
Recommended
Recommended
More Related Content
What's hot
What's hot (20)
Viewers also liked
Viewers also liked (18)
Similar to Question 6
Similar to Question 6 (20)
Recently uploaded
Recently uploaded (20)
Question 6
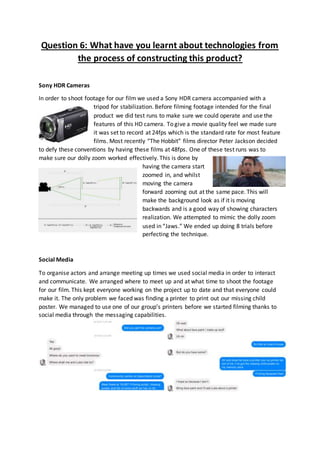
- 1. Question 6: What have you learnt about technologies from the process of constructing this product? Sony HDR Cameras In order to shoot footage for our film we used a Sony HDR camera accompanied with a tripod for stabilization. Before filming footage intended for the final product we did test runs to make sure we could operate and use the features of this HD camera. To give a movie quality feel we made sure it was set to record at 24fps which is the standard rate for most feature films. Most recently “The Hobbit” films director Peter Jackson decided to defy these conventions by having these films at 48fps. One of these test runs was to make sure our dolly zoom worked effectively. This is done by having the camera start zoomed in, and whilst moving the camera forward zooming out at the same pace. This will make the background look as if it is moving backwards and is a good way of showing characters realization. We attempted to mimic the dolly zoom used in “Jaws.” We ended up doing 8 trials before perfecting the technique. Social Media To organise actors and arrange meeting up times we used social media in order to interact and communicate. We arranged where to meet up and at what time to shoot the footage for our film. This kept everyone working on the project up to date and that everyone could make it. The only problem we faced was finding a printer to print out our missing child poster. We managed to use one of our group’s printers before we started filming thanks to social media through the messaging capabilities.
- 2. iMovie To edit the footage I used different hardware and software in order to achieve the final product. I first used an iPad Air to achieve the text and background. On the iMovie app it came equipped with templates for different genres of film. To suit our movie I chose a “Scary” template to fit our supernatural sub-genre. From my “Possible Fonts” research it was suited for “The Haunted Children” as it had a similar colour palette and font to other horror films with similar themes such as “Sinister” and “The Conjuring.” After I had made all the slides I imported them to the iMac where I would do the majority of the editing. I also collected the footage from the cameras by importing these into the iMac as well. I then used the iMovie on the iMac which is more advanced than the iPad version. Editing the footage, I utilized features such as “Stabilization” which reduced wobbles and camera shakes. Trimming was also key to make the clips run smoothly together, with match on action, and to get rid of excess footage which was not needed. After the visuals were finished music was added to add to the tone. The music at the start is high pitched and builds tension. This was acquired of YouTube by extracting the audio through a www.youtube-mp3.org. The music towards the end is scary chase music at the height of the tension. The audio files could then simply be dragged onto iMovie where it was required. After the final copy was done the movie could then be exported to MP4 format where it could be uploaded onto video services such as YouTube.
- 3. Embedding/Uploading To upload video files onto YouTube I used the same account used for my Blogger due to Google merging these services together in order for users to use one account for all. After uploading the video onto YouTube the embedding code is found by going on the options and looking for the share button. The code can then be copied onto the Blogger file. This is similar for other services such as Prezi, Emaze and Mindomo. After the file has been embedded with a document or video I then published it to my Blog so it would be viewed on my page.