
Recommended
More Related Content
Similar to California State University, Fullerton College of Engineerin.docx
Similar to California State University, Fullerton College of Engineerin.docx (20)
More from humphrieskalyn
More from humphrieskalyn (20)
Recently uploaded
Recently uploaded (20)
California State University, Fullerton College of Engineerin.docx
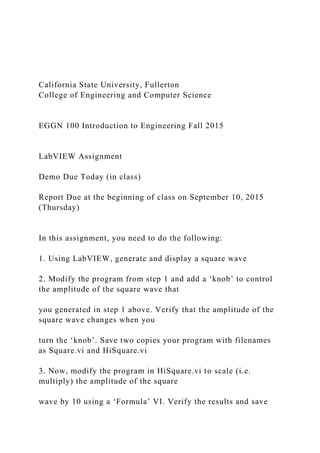
- 1. California State University, Fullerton College of Engineering and Computer Science EGGN 100 Introduction to Engineering Fall 2015 LabVIEW Assignment Demo Due Today (in class) Report Due at the beginning of class on September 10, 2015 (Thursday) In this assignment, you need to do the following: 1. Using LabVIEW, generate and display a square wave 2. Modify the program from step 1 and add a ‘knob’ to control the amplitude of the square wave that you generated in step 1 above. Verify that the amplitude of the square wave changes when you turn the ‘knob’. Save two copies your program with filenames as Square.vi and HiSquare.vi 3. Now, modify the program in HiSquare.vi to scale (i.e. multiply) the amplitude of the square wave by 10 using a ‘Formula’ VI. Verify the results and save
- 2. the program file. (You must complete steps 1, 2 and 3 in 30 minutes) 4. Demonstrate the results corresponding to part 2 (Square.vi ) and part 3 (HiSquare.vi) to the instructor before the end of class today 5. Turn in a 1-page hard-copy report at the beginning of class on September 10, 2015 (Thursday). Use Times New Roman font; size 11; 1.5 line spacing to type your report. Your report should include descriptions for the following: • The goal(s) of the assignment • The procedure that you followed in order to complete the assignment • Challenges/difficulties faced (if any) and how you overcame them • What you were able to accomplish at the end? • Conclusion P.S. Nair EGGN 100: Introduction to Engineering LabVIEW Tutorial
- 3. Dr. Pradeep Nair Associate Professor, Computer Engineering Objectives of the Tutorial: To generate, display and modify a desired signal shape using LabVIEW graphical programming LabVIEW Description: • LabVIEW is the abbreviation for Laboratory Virtual Instrumentation Engineering Workbench • LabVIEW is a product from National Instruments Corporation (NI) • LabVIEW is a system design platform that makes use of Visual Programming/Graphical Programming • In visual programming, we make use of visual programming elements known as Virtual Instruments, or VIs, instead of writing programs/code using traditional text-based instructions P.S. Nair
- 4. • In other words, we can say that a LabVIEW program is a collection of VIs • Visual/Graphical Programming makes the programming task easier because it allows you to drag- and-drop icons that represent programming constructs • Some of the things that LabVIEW can do (it is a powerful design platform!): specifications tput signals) for a set of inputs -related data of the system Components of a LabVIEW Program: • User Interface built by the user (you); this interface is known as the Front Panel • A window that contains the VIs that make up the program, known as the Block Diagram window • The front panel is built using Controls and Indicators P.S. Nair
- 5. • Controls are the various input mechanisms that are available. Examples: Virtual dials, virtual knobs, virtual push-buttons etc. • Indicators are the output mechanisms. Examples are Graphs, Virtual output displays, virtual LEDs etc. LabVIEW Programming Sequence: Buil System/Process- P.S. Nair Using LabVIEW to Generate, Display and Modify Signals 1. Open LabVIEW Template’. After this, select ‘Tutorial (Getting
- 6. Click OK. P.S. Nair 3. This will open up two new windows: Front Panel and Block Diagram. The front panel is where the controls and indicators are placed. In this part of the tutorial, the process required to generate a sine wave has already been added to the block diagram and the required controls and indicators have already been added to the front panel. We will now learn how to run this program and observe the sine wave output. 4. The front panel and the block diagram look like this: P.S. Nair 5. The block diagram is the core of the graphical program. It contains structures and VIs that interact with the front-panel objects. It looks like this:
- 7. 6. Click on the ‘Run’ button in the front panel to run the program. It looks like this: You should now see a sine wave being displayed on the front-panel indicator. When the program is running, the ‘Run’ button changes in appearance and color, like this: 7. Stop the execution of the program by clicking on the control named ‘STOP’ in the front panel: P.S. Nair 8. Next, we will add a ‘Knob’ control (shown below) to the ‘Num Ctrls’. Then click on ‘Knob’ and then, drag the ‘Knob’ control and drop it inside the front panel. 9. Save t panel. Choose the file name as ‘SignalGeneration.vi’. Save in Desktop. 10. Next, we will change the signal display type from Sine wave to a ‘Sawtooth’ wave. For this, first click on the block diagram window. Then double click on the VI block that is named as ‘Simulate Signal’.
- 8. P.S. Nair 11. You will now see that a new window pops up, as shown below. Change the ‘Signal type’ to ‘Sawtooth’. Click OK. 12. If you run the program in the front panel now, you will see the new Sawtooth signal in the front panel 13. Highlight the ‘Simulate Signal’ block by clicking over it once in the block diagram window and keep the cursor over the lower part of the ‘Simulate Signal’ block. A double-sided arrow will appear. Click and pull downwards till you can see an input called ‘Amplitude’ P.S. Nair being displayed. An input is denoted by an arrow feeding into the ‘Simulate Signal’ block and an output is denoted by an arrow feeding leaving the ‘Simulate Signal’ block 14. In the block diagram, move the ‘Knob’ VI to the left of the ‘Simulate Signal’ block. Click on the output of the ‘Knob’ VI and draw out a wire (click and pull till the termination point). Terminate the wire at the input of ‘Amplitude’ in the ‘Simulate Signal’ VI. The amplitude of the Sawtooth wave generated can now be controlled
- 9. from the front panel using the knob. Run the program to verify this and then stop execution using ‘STOP’. 15. Next, we will scale the amplitude of the signal according to a formula. For this, first click on the wire connecting the ‘Simulate Signal’ VI with the ‘Waveform Graph’ P.S. Nair and delete the wire using the Delete button on your keyboard. 16. In the block diagram window, click on ‘Formula’. Drag the ‘Formula’ VI to the block diagram window, as shown below: 17. Double-click on the ‘Formula’ VI and change the label in the first label field (in this example, it is X1) to the name of the output wave generated by the ‘Simulate Signal’ VI (in this example it is ‘Sawtooth’). The display field in the ‘Formula’ VI will now read as ‘Sawtooth’. Replace it by ‘Sawtooth * 2’. Click OK. This VI will P.S. Nair now multiply the incoming sawtooth signal amplitude by 2.
- 10. 18. Connect the ‘Sawtooth’ output of the Simulate Signal’ VI to the ‘Sawtooth’ input of the ‘Formula’ VI using a wire. 19. Connect the ‘Result’ output of the Simulate Signal’ VI to the input of the ‘Waveform Graph’ VI using another wire. 20. Run your program in the front panel and verify that the signal amplitude of the original sawtooth waveform is now scaled by 2. Also verify that the amplitude is still sensitive to the input from the knob.