SlideShare a Scribd company logo
1 of 839
Download to read offline
page 0
A
C + B
C * B
B
T1 ST2 A
⋅
=
T1
T2
T3
T4
ST1
ST2
ST3
FS = first scan
ST1 ST1 T1
+
( ) T2
⋅ FS
+
=
ST2 ST2 T2 T3
+ +
( ) T1 T4
⋅ ⋅
=
ST3 ST3 T4 T1
⋅
+
( ) T3
⋅
=
T2 ST1 B
⋅
=
T3 ST3 C B
⋅
( )
⋅
=
T4 ST2 C B
+
( )
⋅
=
ST2 A
ST1 B
ST3 C B
T1
T2
T3
T4
ST2
C
B
ST1
T2
ST1
T1
first scan
ST2
T1
ST2
T2
T3
ST3
T3
ST3
T4
T4
T1
Automating Manufacturing Systems
with PLCs
(Version 5.0, May 4, 2007)
Hugh Jack
page 0
Copyright (c) 1993-2007 Hugh Jack (jackh@gvsu.edu).
Permission is granted to copy, distribute and/or modify this document under the
terms of the GNU Free Documentation License, Version 1.2 or any later version
published by the Free Software Foundation; with no Invariant Sections, no
Front-Cover Texts, and no Back-Cover Texts. A copy of the license is included
in the section entitled "GNU Free Documentation License".
This document is provided as-is with no warranty, implied or otherwise. There
have been attempts to eliminate errors from this document, but there is no doubt
that errors remain. As a result, the author does not assume any responsibility for
errors and omissions, or damages resulting from the use of the information pro-
vided.
Additional materials and updates for this work will be available at http://clay-
more.engineer.gvsu.edu/~jackh/books.html
www.PAControl.com
page i
1.1 TODO LIST 1.3
2. PROGRAMMABLE LOGIC CONTROLLERS . . . . . . . . . . . . . 2.1
2.1 INTRODUCTION 2.1
2.1.1 Ladder Logic 2.1
2.1.2 Programming 2.6
2.1.3 PLC Connections 2.10
2.1.4 Ladder Logic Inputs 2.11
2.1.5 Ladder Logic Outputs 2.12
2.2 A CASE STUDY 2.13
2.3 SUMMARY 2.14
2.4 PRACTICE PROBLEMS 2.15
2.5 PRACTICE PROBLEM SOLUTIONS 2.15
2.6 ASSIGNMENT PROBLEMS 2.16
3. PLC HARDWARE . . . . . . . . . . . . . . . . . . . . . . . . . . . . . . . . . . . . 3.1
3.1 INTRODUCTION 3.1
3.2 INPUTS AND OUTPUTS 3.2
3.2.1 Inputs 3.3
3.2.2 Output Modules 3.7
3.3 RELAYS 3.13
3.4 A CASE STUDY 3.14
3.5 ELECTRICAL WIRING DIAGRAMS 3.15
3.5.1 JIC Wiring Symbols 3.18
3.6 SUMMARY 3.22
3.7 PRACTICE PROBLEMS 3.22
3.8 PRACTICE PROBLEM SOLUTIONS 3.25
3.9 ASSIGNMENT PROBLEMS 3.28
4. LOGICAL SENSORS . . . . . . . . . . . . . . . . . . . . . . . . . . . . . . . . . . 4.1
4.1 INTRODUCTION 4.1
4.2 SENSOR WIRING 4.1
4.2.1 Switches 4.2
4.2.2 Transistor Transistor Logic (TTL) 4.3
4.2.3 Sinking/Sourcing 4.3
4.2.4 Solid State Relays 4.10
4.3 PRESENCE DETECTION 4.11
4.3.1 Contact Switches 4.11
4.3.2 Reed Switches 4.11
4.3.3 Optical (Photoelectric) Sensors 4.12
4.3.4 Capacitive Sensors 4.19
4.3.5 Inductive Sensors 4.23
4.3.6 Ultrasonic 4.25
4.3.7 Hall Effect 4.25
www.PAControl.com
page ii
4.3.8 Fluid Flow 4.26
4.4 SUMMARY 4.26
4.5 PRACTICE PROBLEMS 4.27
4.6 PRACTICE PROBLEM SOLUTIONS 4.30
4.7 ASSIGNMENT PROBLEMS 4.36
5. LOGICAL ACTUATORS . . . . . . . . . . . . . . . . . . . . . . . . . . . . . . 5.1
5.1 INTRODUCTION 5.1
5.2 SOLENOIDS 5.1
5.3 VALVES 5.2
5.4 CYLINDERS 5.4
5.5 HYDRAULICS 5.6
5.6 PNEUMATICS 5.8
5.7 MOTORS 5.9
5.8 OTHERS 5.10
5.9 SUMMARY 5.10
5.10 PRACTICE PROBLEMS 5.10
5.11 PRACTICE PROBLEM SOLUTIONS 5.11
5.12 ASSIGNMENT PROBLEMS 5.12
6. BOOLEAN LOGIC DESIGN . . . . . . . . . . . . . . . . . . . . . . . . . . . . 6.1
6.1 INTRODUCTION 6.1
6.2 BOOLEAN ALGEBRA 6.1
6.3 LOGIC DESIGN 6.6
6.3.1 Boolean Algebra Techniques 6.13
6.4 COMMON LOGIC FORMS 6.14
6.4.1 Complex Gate Forms 6.14
6.4.2 Multiplexers 6.15
6.5 SIMPLE DESIGN CASES 6.17
6.5.1 Basic Logic Functions 6.17
6.5.2 Car Safety System 6.18
6.5.3 Motor Forward/Reverse 6.18
6.5.4 A Burglar Alarm 6.19
6.6 SUMMARY 6.23
6.7 PRACTICE PROBLEMS 6.24
6.8 PRACTICE PROBLEM SOLUTIONS 6.27
6.9 ASSIGNMENT PROBLEMS 6.37
7. KARNAUGH MAPS . . . . . . . . . . . . . . . . . . . . . . . . . . . . . . . . . . 7.1
7.1 INTRODUCTION 7.1
7.2 SUMMARY 7.4
7.3 PRACTICE PROBLEMS 7.5
7.4 PRACTICE PROBLEM SOLUTIONS 7.11
www.PAControl.com
page iii
7.5 ASSIGNMENT PROBLEMS 7.17
8. PLC OPERATION . . . . . . . . . . . . . . . . . . . . . . . . . . . . . . . . . . . . 8.1
8.1 INTRODUCTION 8.1
8.2 OPERATION SEQUENCE 8.3
8.2.1 The Input and Output Scans 8.4
8.2.2 The Logic Scan 8.4
8.3 PLC STATUS 8.6
8.4 MEMORY TYPES 8.6
8.5 SOFTWARE BASED PLCS 8.7
8.6 SUMMARY 8.7
8.7 PRACTICE PROBLEMS 8.8
8.8 PRACTICE PROBLEM SOLUTIONS 8.8
8.9 ASSIGNMENT PROBLEMS 8.9
9. LATCHES, TIMERS, COUNTERS AND MORE . . . . . . . . . . . . 9.1
9.1 INTRODUCTION 9.1
9.2 LATCHES 9.2
9.3 TIMERS 9.6
9.4 COUNTERS 9.14
9.5 MASTER CONTROL RELAYS (MCRs) 9.17
9.6 INTERNAL BITS 9.19
9.7 DESIGN CASES 9.20
9.7.1 Basic Counters And Timers 9.20
9.7.2 More Timers And Counters 9.21
9.7.3 Deadman Switch 9.22
9.7.4 Conveyor 9.23
9.7.5 Accept/Reject Sorting 9.24
9.7.6 Shear Press 9.26
9.8 SUMMARY 9.27
9.9 PRACTICE PROBLEMS 9.28
9.10 PRACTICE PROBLEM SOLUTIONS 9.32
9.11 ASSIGNMENT PROBLEMS 9.43
10. STRUCTURED LOGIC DESIGN . . . . . . . . . . . . . . . . . . . . . . . 10.1
10.1 INTRODUCTION 10.1
10.2 PROCESS SEQUENCE BITS 10.2
10.3 TIMING DIAGRAMS 10.6
10.4 DESIGN CASES 10.9
10.5 SUMMARY 10.9
10.6 PRACTICE PROBLEMS 10.9
10.7 PRACTICE PROBLEM SOLUTIONS 10.10
10.8 ASSIGNMENT PROBLEMS 10.14
www.PAControl.com
page iv
11. FLOWCHART BASED DESIGN . . . . . . . . . . . . . . . . . . . . . . . 11.1
11.1 INTRODUCTION 11.1
11.2 BLOCK LOGIC 11.4
11.3 SEQUENCE BITS 11.11
11.4 SUMMARY 11.15
11.5 PRACTICE PROBLEMS 11.15
11.6 PRACTICE PROBLEM SOLUTIONS 11.16
11.7 ASSIGNMENT PROBLEMS 11.26
12. STATE BASED DESIGN . . . . . . . . . . . . . . . . . . . . . . . . . . . . . . 12.1
12.1 INTRODUCTION 12.1
12.1.1 State Diagram Example 12.4
12.1.2 Conversion to Ladder Logic 12.7
Block Logic Conversion 12.7
State Equations 12.16
State-Transition Equations 12.24
12.2 SUMMARY 12.29
12.3 PRACTICE PROBLEMS 12.29
12.4 PRACTICE PROBLEM SOLUTIONS 12.34
12.5 ASSIGNMENT PROBLEMS 12.49
13. NUMBERS AND DATA . . . . . . . . . . . . . . . . . . . . . . . . . . . . . . 13.1
13.1 INTRODUCTION 13.1
13.2 NUMERICAL VALUES 13.2
13.2.1 Binary 13.2
Boolean Operations 13.5
Binary Mathematics 13.6
13.2.2 Other Base Number Systems 13.10
13.2.3 BCD (Binary Coded Decimal) 13.11
13.3 DATA CHARACTERIZATION 13.11
13.3.1 ASCII (American Standard Code for Information Interchange)
13.11
13.3.2 Parity 13.14
13.3.3 Checksums 13.15
13.3.4 Gray Code 13.16
13.4 SUMMARY 13.17
13.5 PRACTICE PROBLEMS 13.17
13.6 PRACTICE PROBLEM SOLUTIONS 13.20
13.7 ASSIGNMENT PROBLEMS 13.23
14. PLC MEMORY . . . . . . . . . . . . . . . . . . . . . . . . . . . . . . . . . . . . . . 14.1
14.1 INTRODUCTION 14.1
14.2 PROGRAM VS VARIABLE MEMORY 14.1
www.PAControl.com
page v
14.3 PROGRAMS 14.3
14.4 VARIABLES (TAGS) 14.3
14.4.1 Timer and Counter Memory 14.6
14.4.2 PLC Status Bits 14.8
14.4.3 User Function Control Memory 14.11
14.5 SUMMARY 14.12
14.6 PRACTICE PROBLEMS 14.12
14.7 PRACTICE PROBLEM SOLUTIONS 14.13
14.8 ASSIGNMENT PROBLEMS 14.15
15. LADDER LOGIC FUNCTIONS . . . . . . . . . . . . . . . . . . . . . . . . 15.1
15.1 INTRODUCTION 15.1
15.2 DATA HANDLING 15.3
15.2.1 Move Functions 15.3
15.2.2 Mathematical Functions 15.5
15.2.3 Conversions 15.10
15.2.4 Array Data Functions 15.11
Statistics 15.12
Block Operations 15.13
15.3 LOGICAL FUNCTIONS 15.15
15.3.1 Comparison of Values 15.15
15.3.2 Boolean Functions 15.21
15.4 DESIGN CASES 15.22
15.4.1 Simple Calculation 15.22
15.4.2 For-Next 15.23
15.4.3 Series Calculation 15.24
15.4.4 Flashing Lights 15.25
15.5 SUMMARY 15.25
15.6 PRACTICE PROBLEMS 15.26
15.7 PRACTICE PROBLEM SOLUTIONS 15.28
15.8 ASSIGNMENT PROBLEMS 15.34
16. ADVANCED LADDER LOGIC FUNCTIONS . . . . . . . . . . . . . 16.1
16.1 INTRODUCTION 16.1
16.2 LIST FUNCTIONS 16.1
16.2.1 Shift Registers 16.1
16.2.2 Stacks 16.3
16.2.3 Sequencers 16.6
16.3 PROGRAM CONTROL 16.9
16.3.1 Branching and Looping 16.9
16.3.2 Fault Handling 16.14
16.3.3 Interrupts 16.15
16.4 INPUT AND OUTPUT FUNCTIONS 16.17
16.4.1 Immediate I/O Instructions 16.17
www.PAControl.com
page vi
16.5 DESIGN TECHNIQUES 16.19
16.5.1 State Diagrams 16.19
16.6 DESIGN CASES 16.24
16.6.1 If-Then 16.24
16.6.2 Traffic Light 16.25
16.7 SUMMARY 16.25
16.8 PRACTICE PROBLEMS 16.26
16.9 PRACTICE PROBLEM SOLUTIONS 16.28
16.10 ASSIGNMENT PROBLEMS 16.37
17. OPEN CONTROLLERS . . . . . . . . . . . . . . . . . . . . . . . . . . . . . . . 17.1
17.1 INTRODUCTION 17.1
17.2 IEC 61131 17.2
17.3 OPEN ARCHITECTURE CONTROLLERS 17.3
17.4 SUMMARY 17.4
17.5 PRACTICE PROBLEMS 17.4
17.6 PRACTICE PROBLEM SOLUTIONS 17.4
17.7 ASSIGNMENT PROBLEMS 17.4
18. INSTRUCTION LIST PROGRAMMING . . . . . . . . . . . . . . . . . 18.1
18.1 INTRODUCTION 18.1
18.2 THE IEC 61131 VERSION 18.1
18.3 THE ALLEN-BRADLEY VERSION 18.4
18.4 SUMMARY 18.9
18.5 PRACTICE PROBLEMS 18.10
18.6 PRACTICE PROBLEM SOLUTIONS 18.10
18.7 ASSIGNMENT PROBLEMS 18.10
19. STRUCTURED TEXT PROGRAMMING . . . . . . . . . . . . . . . . 19.1
19.1 INTRODUCTION 19.1
19.2 THE LANGUAGE 19.2
19.2.1 Elements of the Language 19.3
19.2.2 Putting Things Together in a Program 19.9
19.3 AN EXAMPLE 19.14
19.4 SUMMARY 19.16
19.5 PRACTICE PROBLEMS 19.16
19.6 PRACTICE PROBLEM SOLUTIONS 19.16
19.7 ASSIGNMENT PROBLEMS 19.16
20. SEQUENTIAL FUNCTION CHARTS . . . . . . . . . . . . . . . . . . . 20.1
20.1 INTRODUCTION 20.1
20.2 A COMPARISON OF METHODS 20.16
20.3 SUMMARY 20.16
www.PAControl.com
page vii
20.4 PRACTICE PROBLEMS 20.17
20.5 PRACTICE PROBLEM SOLUTIONS 20.18
20.6 ASSIGNMENT PROBLEMS 20.25
21. FUNCTION BLOCK PROGRAMMING . . . . . . . . . . . . . . . . . . 21.1
21.1 INTRODUCTION 21.1
21.2 CREATING FUNCTION BLOCKS 21.3
21.3 DESIGN CASE 21.4
21.4 SUMMARY 21.4
21.5 PRACTICE PROBLEMS 21.5
21.6 PRACTICE PROBLEM SOLUTIONS 21.5
21.7 ASSIGNMENT PROBLEMS 21.5
22. ANALOG INPUTS AND OUTPUTS . . . . . . . . . . . . . . . . . . . . 22.1
22.1 INTRODUCTION 22.1
22.2 ANALOG INPUTS 22.2
22.2.1 Analog Inputs With a PLC-5 22.9
22.3 ANALOG OUTPUTS 22.13
22.3.1 Analog Outputs With A PLC-5 22.16
22.3.2 Pulse Width Modulation (PWM) Outputs 22.18
22.3.3 Shielding 22.20
22.4 DESIGN CASES 22.22
22.4.1 Process Monitor 22.22
22.5 SUMMARY 22.22
22.6 PRACTICE PROBLEMS 22.23
22.7 PRACTICE PROBLEM SOLUTIONS 22.24
22.8 ASSIGNMENT PROBLEMS 22.29
23. CONTINUOUS SENSORS . . . . . . . . . . . . . . . . . . . . . . . . . . . . 23.1
23.1 INTRODUCTION 23.1
23.2 INDUSTRIAL SENSORS 23.2
23.2.1 Angular Displacement 23.3
Potentiometers 23.3
23.2.2 Encoders 23.4
Tachometers 23.8
23.2.3 Linear Position 23.8
Potentiometers 23.8
Linear Variable Differential Transformers (LVDT)23.9
Moire Fringes 23.11
Accelerometers 23.12
23.2.4 Forces and Moments 23.15
Strain Gages 23.15
Piezoelectric 23.18
23.2.5 Liquids and Gases 23.20
www.PAControl.com
page viii
Pressure 23.21
Venturi Valves 23.22
Coriolis Flow Meter 23.23
Magnetic Flow Meter 23.24
Ultrasonic Flow Meter 23.24
Vortex Flow Meter 23.24
Positive Displacement Meters 23.25
Pitot Tubes 23.25
23.2.6 Temperature 23.25
Resistive Temperature Detectors (RTDs) 23.26
Thermocouples 23.26
Thermistors 23.28
Other Sensors 23.30
23.2.7 Light 23.30
Light Dependant Resistors (LDR) 23.30
23.2.8 Chemical 23.31
pH 23.31
Conductivity 23.31
23.2.9 Others 23.32
23.3 INPUT ISSUES 23.32
23.4 SENSOR GLOSSARY 23.35
23.5 SUMMARY 23.36
23.6 REFERENCES 23.37
23.7 PRACTICE PROBLEMS 23.37
23.8 PRACTICE PROBLEM SOLUTIONS 23.38
23.9 ASSIGNMENT PROBLEMS 23.40
24. CONTINUOUS ACTUATORS . . . . . . . . . . . . . . . . . . . . . . . . . 24.1
24.1 INTRODUCTION 24.1
24.2 ELECTRIC MOTORS 24.1
24.2.1 Basic Brushed DC Motors 24.3
24.2.2 AC Motors 24.7
24.2.3 Brushless DC Motors 24.15
24.2.4 Stepper Motors 24.17
24.2.5 Wound Field Motors 24.19
24.3 HYDRAULICS 24.23
24.4 OTHER SYSTEMS 24.24
24.5 SUMMARY 24.25
24.6 PRACTICE PROBLEMS 24.25
24.7 PRACTICE PROBLEM SOLUTIONS 24.26
24.8 ASSIGNMENT PROBLEMS 24.27
25. CONTINUOUS CONTROL . . . . . . . . . . . . . . . . . . . . . . . . . . . . 25.1
25.1 INTRODUCTION 25.1
www.PAControl.com
page ix
25.2 CONTROL OF LOGICAL ACTUATOR SYSTEMS 25.4
25.3 CONTROL OF CONTINUOUS ACTUATOR SYSTEMS 25.5
25.3.1 Block Diagrams 25.5
25.3.2 Feedback Control Systems 25.6
25.3.3 Proportional Controllers 25.8
25.3.4 PID Control Systems 25.12
25.4 DESIGN CASES 25.14
25.4.1 Oven Temperature Control 25.14
25.4.2 Water Tank Level Control 25.17
25.4.3 Position Measurement 25.20
25.5 SUMMARY 25.20
25.6 PRACTICE PROBLEMS 25.21
25.7 PRACTICE PROBLEM SOLUTIONS 25.22
25.8 ASSIGNMENT PROBLEMS 25.26
26. FUZZY LOGIC . . . . . . . . . . . . . . . . . . . . . . . . . . . . . . . . . . . . . . 26.1
26.1 INTRODUCTION 26.1
26.2 COMMERCIAL CONTROLLERS 26.7
26.3 REFERENCES 26.7
26.4 SUMMARY 26.7
26.5 PRACTICE PROBLEMS 26.8
26.6 PRACTICE PROBLEM SOLUTIONS 26.8
26.7 ASSIGNMENT PROBLEMS 26.8
27. SERIAL COMMUNICATION . . . . . . . . . . . . . . . . . . . . . . . . . . 27.1
27.1 INTRODUCTION 27.1
27.2 SERIAL COMMUNICATIONS 27.2
27.2.1 RS-232 27.5
ASCII Functions 27.9
27.3 PARALLEL COMMUNICATIONS 27.13
27.4 DESIGN CASES 27.14
27.4.1 PLC Interface To a Robot 27.14
27.5 SUMMARY 27.15
27.6 PRACTICE PROBLEMS 27.15
27.7 PRACTICE PROBLEM SOLUTIONS 27.16
27.8 ASSIGNMENT PROBLEMS 27.18
28. NETWORKING . . . . . . . . . . . . . . . . . . . . . . . . . . . . . . . . . . . . . 28.1
28.1 INTRODUCTION 28.1
28.1.1 Topology 28.2
28.1.2 OSI Network Model 28.3
28.1.3 Networking Hardware 28.5
28.1.4 Control Network Issues 28.7
28.2 NETWORK STANDARDS 28.8
www.PAControl.com
page x
28.2.1 Devicenet 28.8
28.2.2 CANbus 28.12
28.2.3 Controlnet 28.13
28.2.4 Ethernet 28.14
28.2.5 Profibus 28.15
28.2.6 Sercos 28.15
28.3 PROPRIETARY NETWORKS 28.16
28.3.1 Data Highway 28.16
28.4 NETWORK COMPARISONS 28.20
28.5 DESIGN CASES 28.22
28.5.1 Devicenet 28.22
28.6 SUMMARY 28.23
28.7 PRACTICE PROBLEMS 28.23
28.8 PRACTICE PROBLEM SOLUTIONS 28.24
28.9 ASSIGNMENT PROBLEMS 28.28
29. INTERNET . . . . . . . . . . . . . . . . . . . . . . . . . . . . . . . . . . . . . . . . . 29.1
29.1 INTRODUCTION 29.1
29.1.1 Computer Addresses 29.2
IPV6 29.3
29.1.2 Phone Lines 29.3
29.1.3 Mail Transfer Protocols 29.3
29.1.4 FTP - File Transfer Protocol 29.4
29.1.5 HTTP - Hypertext Transfer Protocol 29.4
29.1.6 Novell 29.4
29.1.7 Security 29.5
Firewall 29.5
IP Masquerading 29.5
29.1.8 HTML - Hyper Text Markup Language 29.5
29.1.9 URLs 29.6
29.1.10 Encryption 29.6
29.1.11 Compression 29.7
29.1.12 Clients and Servers 29.7
29.1.13 Java 29.9
29.1.14 Javascript 29.9
29.1.15 CGI 29.9
29.1.16 ActiveX 29.9
29.1.17 Graphics 29.10
29.2 DESIGN CASES 29.10
29.2.1 Remote Monitoring System 29.10
29.3 SUMMARY 29.11
29.4 PRACTICE PROBLEMS 29.11
29.5 PRACTICE PROBLEM SOLUTIONS 29.11
29.6 ASSIGNMENT PROBLEMS 29.11
www.PAControl.com
page xi
30. HUMAN MACHINE INTERFACES (HMI) . . . . . . . . . . . . . . . 30.1
30.1 INTRODUCTION 30.1
30.2 HMI/MMI DESIGN 30.2
30.3 DESIGN CASES 30.3
30.4 SUMMARY 30.3
30.5 PRACTICE PROBLEMS 30.4
30.6 PRACTICE PROBLEM SOLUTIONS 30.4
30.7 ASSIGNMENT PROBLEMS 30.4
31. ELECTRICAL DESIGN AND CONSTRUCTION . . . . . . . . . . 31.1
31.1 INTRODUCTION 31.1
31.2 ELECTRICAL WIRING DIAGRAMS 31.1
31.2.1 Selecting Voltages 31.8
31.2.2 Grounding 31.9
31.2.3 Wiring 31.12
31.2.4 Suppressors 31.13
31.2.5 PLC Enclosures 31.14
31.2.6 Wire and Cable Grouping 31.16
31.3 FAIL-SAFE DESIGN 31.17
31.4 SAFETY RULES SUMMARY 31.18
31.5 REFERENCES 31.20
31.6 SUMMARY 31.20
31.7 PRACTICE PROBLEMS 31.20
31.8 PRACTICE PROBLEM SOLUTIONS 31.20
31.9 ASSIGNMENT PROBLEMS 31.20
32. SOFTWARE ENGINEERING . . . . . . . . . . . . . . . . . . . . . . . . . . 32.1
32.1 INTRODUCTION 32.1
32.1.1 Fail Safe Design 32.1
32.2 DEBUGGING 32.2
32.2.1 Troubleshooting 32.3
32.2.2 Forcing 32.3
32.3 PROCESS MODELLING 32.3
32.4 PROGRAMMING FOR LARGE SYSTEMS 32.8
32.4.1 Developing a Program Structure 32.8
32.4.2 Program Verification and Simulation 32.11
32.5 DOCUMENTATION 32.12
32.6 COMMISIONING 32.20
32.7 SAFETY 32.20
32.7.1 IEC 61508/61511 safety standards 32.21
32.8 LEAN MANUFACTURING 32.22
32.9 REFERENCES 32.23
32.10 SUMMARY 32.23
www.PAControl.com
page xii
32.11 PRACTICE PROBLEMS 32.23
32.12 PRACTICE PROBLEM SOLUTIONS 32.23
32.13 ASSIGNMENT PROBLEMS 32.23
33. SELECTING A PLC . . . . . . . . . . . . . . . . . . . . . . . . . . . . . . . . . . 33.1
33.1 INTRODUCTION 33.1
33.2 SPECIAL I/O MODULES 33.6
33.3 SUMMARY 33.9
33.4 PRACTICE PROBLEMS 33.10
33.5 PRACTICE PROBLEM SOLUTIONS 33.10
33.6 ASSIGNMENT PROBLEMS 33.10
34. FUNCTION REFERENCE . . . . . . . . . . . . . . . . . . . . . . . . . . . . . 34.1
34.1 FUNCTION DESCRIPTIONS 34.1
34.1.1 General Functions 34.1
34.1.2 Program Control 34.3
34.1.3 Timers and Counters 34.5
34.1.4 Compare 34.10
34.1.5 Calculation and Conversion 34.14
34.1.6 Logical 34.20
34.1.7 Move 34.21
34.1.8 File 34.22
34.1.9 List 34.27
34.1.10 Program Control 34.30
34.1.11 Advanced Input/Output 34.34
34.1.12 String 34.37
34.2 DATA TYPES 34.42
35. COMBINED GLOSSARY OF TERMS . . . . . . . . . . . . . . . . . . . 35.1
35.1 A 35.1
35.2 B 35.2
35.3 C 35.5
35.4 D 35.9
35.5 E 35.11
35.6 F 35.12
35.7 G 35.13
35.8 H 35.14
35.9 I 35.14
35.10 J 35.16
35.11 K 35.16
35.12 L 35.17
35.13 M 35.17
35.14 N 35.19
35.15 O 35.20
www.PAControl.com
page xiii
35.16 P 35.21
35.17 Q 35.23
35.18 R 35.23
35.19 S 35.25
35.20 T 35.27
35.21 U 35.28
35.22 V 35.29
35.23 W 35.29
35.24 X 35.30
35.25 Y 35.30
35.26 Z 35.30
36. PLC REFERENCES . . . . . . . . . . . . . . . . . . . . . . . . . . . . . . . . . . 36.1
36.1 SUPPLIERS 36.1
36.2 PROFESSIONAL INTEREST GROUPS 36.2
36.3 PLC/DISCRETE CONTROL REFERENCES 36.2
37. GNU Free Documentation License . . . . . . . . . . . . . . . . . . . . . . . 37.1
37.1 PREAMBLE 37.1
37.2 APPLICABILITY AND DEFINITIONS 37.1
37.3 VERBATIM COPYING 37.2
37.4 COPYING IN QUANTITY 37.3
37.5 MODIFICATIONS 37.3
37.6 COMBINING DOCUMENTS 37.5
37.7 COLLECTIONS OF DOCUMENTS 37.5
37.8 AGGREGATION WITH INDEPENDENT WORKS 37.6
37.9 TRANSLATION 37.6
37.10 TERMINATION 37.6
37.11 FUTURE REVISIONS OF THIS LICENSE 37.6
37.12 How to use this License for your documents 37.7
www.PAControl.com
plc wiring - 1.1
PREFACE
Designing software for control systems is difficult. Experienced controls engineers
have learned many techniques that allow them to solve problems. This book was written to
present methods for designing controls software using Programmable Logic Controllers
(PLCs). It is my personal hope that by employing the knowledge in the book that you will
be able to quickly write controls programs that work as expected (and avoid having to
learn by costly mistakes.)
This book has been designed for students with some knowledge of technology,
including limited electricity, who wish to learn the discipline of practical control system
design on commonly used hardware. To this end the book will use the Allen Bradley Con-
trolLogix processors to allow depth. Although the chapters will focus on specific hard-
ware, the techniques are portable to other PLCs. Whenever possible the IEC 61131
programming standards will be used to help in the use of other PLCs.
In some cases the material will build upon the content found in a linear controls
course. But, a heavy emphasis is placed on discrete control systems. Figure 1.1 crudely
shows some of the basic categories of control system problems.
Figure 1.1 Control Dichotomy
• Continuous - The values to be controlled change smoothly. e.g. the speed of a car.
• Logical/Discrete - The value to be controlled are easily described as on-off. e.g.
the car motor is on-off. NOTE: all systems are continuous but they can be
treated as logical for simplicity.
e.g. “When I do this, that always happens!” For example, when the power
is turned on, the press closes!
CONTROL
CONTINUOUS DISCRETE
LINEAR NON_LINEAR CONDITIONAL SEQUENTIAL
e.g. PID
e.g. MRAC
e.g. FUZZY LOGIC
BOOLEAN
TEMPORAL
e.g. TIMERS
e.g. COUNTERS
EVENT BASED
EXPERT SYSTEMS
www.PAControl.com
plc wiring - 1.2
• Linear - Can be described with a simple differential equation. This is the pre-
ferred starting point for simplicity, and a common approximation for real world
problems.
e.g. A car can be driving around a track and can pass same the same spot at
a constant velocity. But, the longer the car runs, the mass decreases, and
it travels faster, but requires less gas, etc. Basically, the math gets
tougher, and the problem becomes non-linear.
e.g. We are driving the perfect car with no friction, with no drag, and can
predict how it will work perfectly.
• Non-Linear - Not Linear. This is how the world works and the mathematics
become much more complex.
e.g. As rocket approaches sun, gravity increases, so control must change.
• Sequential - A logical controller that will keep track of time and previous events.
The difference between these control systems can be emphasized by considering a
simple elevator. An elevator is a car that travels between floors, stopping at precise
heights. There are certain logical constraints used for safety and convenience. The points
below emphasize different types of control problems in the elevator.
Logical:
1. The elevator must move towards a floor when a button is pushed.
2. The elevator must open a door when it is at a floor.
3. It must have the door closed before it moves.
etc.
Linear:
1. If the desired position changes to a new value, accelerate quickly
towards the new position.
2. As the elevator approaches the correct position, slow down.
Non-linear:
1 Accelerate slowly to start.
2. Decelerate as you approach the final position.
3. Allow faster motion while moving.
4. Compensate for cable stretch, and changing spring constant, etc.
Logical and sequential control is preferred for system design. These systems are
more stable, and often lower cost. Most continuous systems can be controlled logically.
But, some times we will encounter a system that must be controlled continuously. When
this occurs the control system design becomes more demanding. When improperly con-
trolled, continuous systems may be unstable and become dangerous.
When a system is well behaved we say it is self regulating. These systems don’t
need to be closely monitored, and we use open loop control. An open loop controller will
set a desired position for a system, but no sensors are used to verify the position. When a
www.PAControl.com
plc wiring - 1.3
system must be constantly monitored and the control output adjusted we say it is closed
loop. A cruise control in a car is an excellent example. This will monitor the actual speed
of a car, and adjust the speed to meet a set target speed.
Many control technologies are available for control. Early control systems relied
upon mechanisms and electronics to build controlled. Most modern controllers use a com-
puter to achieve control. The most flexible of these controllers is the PLC (Programmable
Logic Controller).
The book has been set up to aid the reader, as outlined below.
Sections labeled Aside: are for topics that would be of interest to one disci-
pline, such as electrical or mechanical.
Sections labeled Note: are for clarification, to provide hints, or to add
explanation.
Each chapter supports about 1-4 lecture hours depending upon students
background and level in the curriculum.
Topics are organized to allow students to start laboratory work earlier in the
semester.
Sections begin with a topic list to help set thoughts.
Objective given at the beginning of each chapter.
Summary at the end of each chapter to give big picture.
Significant use of figures to emphasize physical implementations.
Worked examples and case studies.
Problems at ends of chapters with solutions.
Glossary.
1.1 TODO LIST
- Finish writing chapters
* - structured text chapter
* - FBD chapter
- fuzzy logic chapter
* - internet chapter
- hmi chapter
- modify chapters
* - add topic hierarchies to this chapter. split into basics, logic design tech-
niques, new stuff, integration, professional design for curriculum design
* - electrical wiring chapter
- fix wiring and other issues in the implementation chapter
- software chapter - improve P&ID section
- appendices - complete list of instruction data types in appendix
- small items
www.PAControl.com
plc wiring - 1.4
- update serial IO slides
- all chapters
* - grammar and spelling check
* - update powerpoint slides
* - add a resources web page with links
- links to software/hardware vendors, iec1131, etc.
- pictures of hardware and controls cabinet
www.PAControl.com
plc wiring - 2.1
2. PROGRAMMABLE LOGIC CONTROLLERS
2.1 INTRODUCTION
Control engineering has evolved over time. In the past humans were the main
method for controlling a system. More recently electricity has been used for control and
early electrical control was based on relays. These relays allow power to be switched on
and off without a mechanical switch. It is common to use relays to make simple logical
control decisions. The development of low cost computer has brought the most recent rev-
olution, the Programmable Logic Controller (PLC). The advent of the PLC began in the
1970s, and has become the most common choice for manufacturing controls.
PLCs have been gaining popularity on the factory floor and will probably remain
predominant for some time to come. Most of this is because of the advantages they offer.
• Cost effective for controlling complex systems.
• Flexible and can be reapplied to control other systems quickly and easily.
• Computational abilities allow more sophisticated control.
• Trouble shooting aids make programming easier and reduce downtime.
• Reliable components make these likely to operate for years before failure.
2.1.1 Ladder Logic
Ladder logic is the main programming method used for PLCs. As mentioned
before, ladder logic has been developed to mimic relay logic. The decision to use the relay
Topics:
Objectives:
• Know general PLC issues
• To be able to write simple ladder logic programs
• Understand the operation of a PLC
• PLC History
• Ladder Logic and Relays
• PLC Programming
• PLC Operation
• An Example
www.PAControl.com
plc wiring - 2.2
logic diagrams was a strategic one. By selecting ladder logic as the main programming
method, the amount of retraining needed for engineers and tradespeople was greatly
reduced.
Modern control systems still include relays, but these are rarely used for logic. A
relay is a simple device that uses a magnetic field to control a switch, as pictured in Figure
2.1. When a voltage is applied to the input coil, the resulting current creates a magnetic
field. The magnetic field pulls a metal switch (or reed) towards it and the contacts touch,
closing the switch. The contact that closes when the coil is energized is called normally
open. The normally closed contacts touch when the input coil is not energized. Relays are
normally drawn in schematic form using a circle to represent the input coil. The output
contacts are shown with two parallel lines. Normally open contacts are shown as two
lines, and will be open (non-conducting) when the input is not energized. Normally closed
contacts are shown with two lines with a diagonal line through them. When the input coil
is not energized the normally closed contacts will be closed (conducting).
www.PAControl.com
plc wiring - 2.3
Figure 2.1 Simple Relay Layouts and Schematics
Relays are used to let one power source close a switch for another (often high cur-
rent) power source, while keeping them isolated. An example of a relay in a simple control
application is shown in Figure 2.2. In this system the first relay on the left is used as nor-
mally closed, and will allow current to flow until a voltage is applied to the input A. The
second relay is normally open and will not allow current to flow until a voltage is applied
to the input B. If current is flowing through the first two relays then current will flow
through the coil in the third relay, and close the switch for output C. This circuit would
normally be drawn in the ladder logic form. This can be read logically as C will be on if A
is off and B is on.
normally
open
normally
closed
input coil
OR
OR
www.PAControl.com
plc wiring - 2.4
Figure 2.2 A Simple Relay Controller
The example in Figure 2.2 does not show the entire control system, but only the
logic. When we consider a PLC there are inputs, outputs, and the logic. Figure 2.3 shows a
more complete representation of the PLC. Here there are two inputs from push buttons.
We can imagine the inputs as activating 24V DC relay coils in the PLC. This in turn drives
an output relay that switches 115V AC, that will turn on a light. Note, in actual PLCs
inputs are never relays, but outputs are often relays. The ladder logic in the PLC is actually
a computer program that the user can enter and change. Notice that both of the input push
buttons are normally open, but the ladder logic inside the PLC has one normally open con-
tact, and one normally closed contact. Do not think that the ladder logic in the PLC needs
to match the inputs or outputs. Many beginners will get caught trying to make the ladder
logic match the input types.
115VAC
wall plug
relay logic
input A
(normally closed)
input B
(normally open)
output C
(normally open)
ladder logic
A B C
www.PAControl.com
plc wiring - 2.5
Figure 2.3 A PLC Illustrated With Relays
Many relays also have multiple outputs (throws) and this allows an output relay to
also be an input simultaneously. The circuit shown in Figure 2.4 is an example of this, it is
called a seal in circuit. In this circuit the current can flow through either branch of the cir-
cuit, through the contacts labelled A or B. The input B will only be on when the output B
is on. If B is off, and A is energized, then B will turn on. If B turns on then the input B will
turn on, and keep output B on even if input A goes off. After B is turned on the output B
will not turn off.
ladder
power
supply
+24V
com.
inputs
outputs
push buttons
logic
PLC
AC power
115Vac
neut.
A B C
light
www.PAControl.com
plc wiring - 2.6
Figure 2.4 A Seal-in Circuit
2.1.2 Programming
The first PLCs were programmed with a technique that was based on relay logic
wiring schematics. This eliminated the need to teach the electricians, technicians and engi-
neers how to program a computer - but, this method has stuck and it is the most common
technique for programming PLCs today. An example of ladder logic can be seen in Figure
2.5. To interpret this diagram imagine that the power is on the vertical line on the left hand
side, we call this the hot rail. On the right hand side is the neutral rail. In the figure there
are two rungs, and on each rung there are combinations of inputs (two vertical lines) and
outputs (circles). If the inputs are opened or closed in the right combination the power can
flow from the hot rail, through the inputs, to power the outputs, and finally to the neutral
rail. An input can come from a sensor, switch, or any other type of sensor. An output will
be some device outside the PLC that is switched on or off, such as lights or motors. In the
top rung the contacts are normally open and normally closed. Which means if input A is on
and input B is off, then power will flow through the output and activate it. Any other com-
bination of input values will result in the output X being off.
Note: When A is pushed, the output B will turn on, and
the input B will also turn on and keep B on perma-
nently - until power is removed.
A
B
B
Note: The line on the right is being left off intentionally
and is implied in these diagrams.
www.PAControl.com
plc wiring - 2.7
Figure 2.5 A Simple Ladder Logic Diagram
The second rung of Figure 2.5 is more complex, there are actually multiple combi-
nations of inputs that will result in the output Y turning on. On the left most part of the
rung, power could flow through the top if C is off and D is on. Power could also (and
simultaneously) flow through the bottom if both E and F are true. This would get power
half way across the rung, and then if G or H is true the power will be delivered to output Y.
In later chapters we will examine how to interpret and construct these diagrams.
There are other methods for programming PLCs. One of the earliest techniques
involved mnemonic instructions. These instructions can be derived directly from the lad-
der logic diagrams and entered into the PLC through a simple programming terminal. An
example of mnemonics is shown in Figure 2.6. In this example the instructions are read
one line at a time from top to bottom. The first line 00000 has the instruction LDN (input
load and not) for input A. This will examine the input to the PLC and if it is off it will
remember a 1 (or true), if it is on it will remember a 0 (or false). The next line uses an LD
(input load) statement to look at the input. If the input is off it remembers a 0, if the input
is on it remembers a 1 (note: this is the reverse of the LD). The AND statement recalls the
last two numbers remembered and if the are both true the result is a 1, otherwise the result
is a 0. This result now replaces the two numbers that were recalled, and there is only one
number remembered. The process is repeated for lines 00003 and 00004, but when these
are done there are now three numbers remembered. The oldest number is from the AND,
the newer numbers are from the two LD instructions. The AND in line 00005 combines the
results from the last LD instructions and now there are two numbers remembered. The OR
instruction takes the two numbers now remaining and if either one is a 1 the result is a 1,
otherwise the result is a 0. This result replaces the two numbers, and there is now a single
HOT NEUTRAL
INPUTS OUTPUTS
A B X
C D
E F
G
H
Y
Note: Power needs to flow through some combination of the inputs
(A,B,C,D,E,F,G,H) to turn on outputs (X,Y).
www.PAControl.com
plc wiring - 2.8
number there. The last instruction is the ST (store output) that will look at the last value
stored and if it is 1, the output will be turned on, if it is 0 the output will be turned off.
Figure 2.6 An Example of a Mnemonic Program and Equivalent Ladder Logic
The ladder logic program in Figure 2.6, is equivalent to the mnemonic program.
Even if you have programmed a PLC with ladder logic, it will be converted to mnemonic
form before being used by the PLC. In the past mnemonic programming was the most
common, but now it is uncommon for users to even see mnemonic programs.
00000
00001
00002
00003
00004
00005
00006
LDN
LD
AND
LD
LD
AND
OR
A
B
C
D
A B
C D
X
END
the mnemonic code is equivalent to
the ladder logic below
ST
00007 X
END
00008
Note: The notation shown above is
not standard Allen-Bradley
notation. The program to the
right would be the A-B equiva-
lent.
SOR
BST
XIC A
XIO B
NXB
XIO C
XIO D
BND
OTE X
EOR
END
www.PAControl.com
plc wiring - 2.9
Sequential Function Charts (SFCs) have been developed to accommodate the pro-
gramming of more advanced systems. These are similar to flowcharts, but much more
powerful. The example seen in Figure 2.7 is doing two different things. To read the chart,
start at the top where is says start. Below this there is the double horizontal line that says
follow both paths. As a result the PLC will start to follow the branch on the left and right
hand sides separately and simultaneously. On the left there are two functions the first one
is the power up function. This function will run until it decides it is done, and the power
down function will come after. On the right hand side is the flash function, this will run
until it is done. These functions look unexplained, but each function, such as power up
will be a small ladder logic program. This method is much different from flowcharts
because it does not have to follow a single path through the flowchart.
Figure 2.7 An Example of a Sequential Function Chart
Structured Text programming has been developed as a more modern programming
language. It is quite similar to languages such as BASIC. A simple example is shown in
Figure 2.8. This example uses a PLC memory location i. This memory location is for an
integer, as will be explained later in the book. The first line of the program sets the value
to 0. The next line begins a loop, and will be where the loop returns to. The next line
recalls the value in location i, adds 1 to it and returns it to the same location. The next line
checks to see if the loop should quit. If i is greater than or equal to 10, then the loop will
quit, otherwise the computer will go back up to the REPEAT statement continue from
there. Each time the program goes through this loop i will increase by 1 until the value
reaches 10.
Start
End
power up
power down
flash
Execution follows
multiple paths
www.PAControl.com
plc wiring - 2.10
Figure 2.8 An Example of a Structured Text Program
2.1.3 PLC Connections
When a process is controlled by a PLC it uses inputs from sensors to make deci-
sions and update outputs to drive actuators, as shown in Figure 2.9. The process is a real
process that will change over time. Actuators will drive the system to new states (or modes
of operation). This means that the controller is limited by the sensors available, if an input
is not available, the controller will have no way to detect a condition.
Figure 2.9 The Separation of Controller and Process
The control loop is a continuous cycle of the PLC reading inputs, solving the lad-
der logic, and then changing the outputs. Like any computer this does not happen
instantly. Figure 2.10 shows the basic operation cycle of a PLC. When power is turned on
initially the PLC does a quick sanity check to ensure that the hardware is working prop-
erly. If there is a problem the PLC will halt and indicate there is an error. For example, if
the PLC power is dropping and about to go off this will result in one type of fault. If the
PLC passes the sanity check it will then scan (read) all the inputs. After the inputs values
are stored in memory the ladder logic will be scanned (solved) using the stored values -
not the current values. This is done to prevent logic problems when inputs change during
the ladder logic scan. When the ladder logic scan is complete the outputs will be scanned
i := 0;
REPEAT
i := i + 1;
UNTIL i >= 10
END_REPEAT;
PROCESS
Feedback from
sensors/switches
PLC
Connections to
actuators
www.PAControl.com
plc wiring - 2.11
(the output values will be changed). After this the system goes back to do a sanity check,
and the loop continues indefinitely. Unlike normal computers, the entire program will be
run every scan. Typical times for each of the stages is in the order of milliseconds.
Figure 2.10 The Scan Cycle of a PLC
2.1.4 Ladder Logic Inputs
PLC inputs are easily represented in ladder logic. In Figure 2.11 there are three
types of inputs shown. The first two are normally open and normally closed inputs, dis-
cussed previously. The IIT (Immediate InpuT) function allows inputs to be read after the
input scan, while the ladder logic is being scanned. This allows ladder logic to examine
input values more often than once every cycle. (Note: This instruction is not available on
the ControlLogix processors, but is still available on older models.)
Read inputs
PLC program changes outputs
by examining inputs Set new outputs
Process changes and PLC pauses
while it checks its own operation
THE
CONTROL
LOOP
Power turned on
www.PAControl.com
plc wiring - 2.12
Figure 2.11 Ladder Logic Inputs
2.1.5 Ladder Logic Outputs
In ladder logic there are multiple types of outputs, but these are not consistently
available on all PLCs. Some of the outputs will be externally connected to devices outside
the PLC, but it is also possible to use internal memory locations in the PLC. Six types of
outputs are shown in Figure 2.12. The first is a normal output, when energized the output
will turn on, and energize an output. The circle with a diagonal line through is a normally
on output. When energized the output will turn off. This type of output is not available on
all PLC types. When initially energized the OSR (One Shot Relay) instruction will turn on
for one scan, but then be off for all scans after, until it is turned off. The L (latch) and U
(unlatch) instructions can be used to lock outputs on. When an L output is energized the
output will turn on indefinitely, even when the output coil is deenergized. The output can
only be turned off using a U output. The last instruction is the IOT (Immediate OutpuT)
that will allow outputs to be updated without having to wait for the ladder logic scan to be
completed.
Normally open, an active input x will close the contact
and allow power to flow.
Normally closed, power flows when the input x is not open.
x
x
immediate inputs will take current values, not those from
the previous input scan. (Note: this instruction is actually
x
IIT
an output that will update the input table with the current
input values. Other input contacts can now be used to
examine the new values.)
www.PAControl.com
plc wiring - 2.13
Figure 2.12 Ladder Logic Outputs
2.2 A CASE STUDY
Problem: Try to develop (without looking at the solution) a relay based controller
that will allow three switches in a room to control a single light.
When power is applied (on) the output x is activated for the left output, but turned
An input transition on will cause the output x to go on for one scan
x x
OSR
x
(this is also known as a one shot relay)
off for the output on the right.
When the L coil is energized, x will be toggled on, it will stay on until the U coil
Some PLCs will allow immediate outputs that do not wait for the program scan to
L
U
IOT
end before setting an output. (Note: This instruction will only update the outputs using
is energized. This is like a flip-flop and stays set even when the PLC is turned off.
x
x
x
the output table, other instruction must change the individual outputs.)
Note: Outputs are also commonly shown using parentheses -( )- instead of
the circle. This is because many of the programming systems are text
based and circles cannot be drawn.
www.PAControl.com
plc wiring - 2.14
2.3 SUMMARY
• Normally open and closed contacts.
• Relays and their relationship to ladder logic.
• PLC outputs can be inputs, as shown by the seal in circuit.
• Programming can be done with ladder logic, mnemonics, SFCs, and structured
text.
• There are multiple ways to write a PLC program.
Solution: There are two possible approaches to this problem. The first assumes that any
one of the switches on will turn on the light, but all three switches must be off for the
light to be off.
switch 1
switch 2
switch 3
light
The second solution assumes that each switch can turn the light on or off, regardless of
the states of the other switches. This method is more complex and involves thinking
through all of the possible combinations of switch positions. You might recognize
this problem as an exclusive or problem.
switch 1
switch 1
switch 1
light
switch 2
switch 2
switch 2
switch 3
switch 3
switch 3
switch 1 switch 2 switch 3
Note: It is important to get a clear understanding of how the controls are expected to
work. In this example two radically different solutions were obtained based upon a
simple difference in the operation.
www.PAControl.com
plc wiring - 2.15
2.4 PRACTICE PROBLEMS
1. Give an example of where a PLC could be used.
2. Why would relays be used in place of PLCs?
3. Give a concise description of a PLC.
4. List the advantages of a PLC over relays.
5. A PLC can effectively replace a number of components. Give examples and discuss some good
and bad applications of PLCs.
6. Explain why ladder logic outputs are coils?
7. In the figure below, will the power for the output on the first rung normally be on or off? Would
the output on the second rung normally be on or off?
8. Write the mnemonic program for the Ladder Logic below.
2.5 PRACTICE PROBLEM SOLUTIONS
1. To control a conveyor system
2. For simple designs
3. A PLC is a computer based controller that uses inputs to monitor a process, and uses outputs to
control a process using a program.
A
B
Y
www.PAControl.com
plc wiring - 2.16
4. Less expensive for complex processes, debugging tools, reliable, flexible, easy to expand, etc.
5. A PLC could replace a few relays. In this case the relays might be easier to install and less
expensive. To control a more complex system the controller might need timing, counting and
other mathematical calculations. In this case a PLC would be a better choice.
6. The ladder logic outputs were modelled on relay logic diagrams. The output in a relay ladder
diagram is a relay coil that switches a set of output contacts.
7. off, on
8. Generic: LD A, LD B, OR, ST Y, END; Allen Bradley: SOR, BST, XIO A, NXB, XIO B,
BND, OTE Y, EOR, END
2.6 ASSIGNMENT PROBLEMS
1. Explain the trade-offs between relays and PLCs for control applications.
2. Develop a simple ladder logic program that will turn on an output X if inputs A and B, or input
C is on.
www.PAControl.com
plc wiring - 3.1
3. PLC HARDWARE
3.1 INTRODUCTION
Many PLC configurations are available, even from a single vendor. But, in each of
these there are common components and concepts. The most essential components are:
Power Supply - This can be built into the PLC or be an external unit. Common
voltage levels required by the PLC (with and without the power supply) are
24Vdc, 120Vac, 220Vac.
CPU (Central Processing Unit) - This is a computer where ladder logic is stored
and processed.
I/O (Input/Output) - A number of input/output terminals must be provided so that
the PLC can monitor the process and initiate actions.
Indicator lights - These indicate the status of the PLC including power on, program
running, and a fault. These are essential when diagnosing problems.
The configuration of the PLC refers to the packaging of the components. Typical
configurations are listed below from largest to smallest as shown in Figure 3.1.
Rack - A rack is often large (up to 18” by 30” by 10”) and can hold multiple cards.
When necessary, multiple racks can be connected together. These tend to be the
highest cost, but also the most flexible and easy to maintain.
Mini - These are smaller than full sized PLC racks, but can have the same IO
capacity.
Micro - These units can be as small as a deck of cards. They tend to have fixed
quantities of I/O and limited abilities, but costs will be the lowest.
Software - A software based PLC requires a computer with an interface card, but
Topics:
Objectives:
• Be able to understand and design basic input and output wiring.
• Be able to produce industrial wiring diagrams.
• PLC hardware configurations
• Input and outputs types
• Electrical wiring for inputs and outputs
• Relays
• Electrical Ladder Diagrams and JIC wiring symbols
www.PAControl.com
plc wiring - 3.2
allows the PLC to be connected to sensors and other PLCs across a network.
Figure 3.1 Typical Configurations for PLC
3.2 INPUTS AND OUTPUTS
Inputs to, and outputs from, a PLC are necessary to monitor and control a process.
Both inputs and outputs can be categorized into two basic types: logical or continuous.
Consider the example of a light bulb. If it can only be turned on or off, it is logical control.
If the light can be dimmed to different levels, it is continuous. Continuous values seem
more intuitive, but logical values are preferred because they allow more certainty, and
simplify control. As a result most controls applications (and PLCs) use logical inputs and
outputs for most applications. Hence, we will discuss logical I/O and leave continuous I/O
for later.
Outputs to actuators allow a PLC to cause something to happen in a process. A
short list of popular actuators is given below in order of relative popularity.
Solenoid Valves - logical outputs that can switch a hydraulic or pneumatic flow.
Lights - logical outputs that can often be powered directly from PLC output
boards.
Motor Starters - motors often draw a large amount of current when started, so they
require motor starters, which are basically large relays.
Servo Motors - a continuous output from the PLC can command a variable speed
or position.
rack
mini
micro
www.PAControl.com
plc wiring - 3.3
Outputs from PLCs are often relays, but they can also be solid state electronics
such as transistors for DC outputs or Triacs for AC outputs. Continuous outputs require
special output cards with digital to analog converters.
Inputs come from sensors that translate physical phenomena into electrical signals.
Typical examples of sensors are listed below in relative order of popularity.
Proximity Switches - use inductance, capacitance or light to detect an object logi-
cally.
Switches - mechanical mechanisms will open or close electrical contacts for a log-
ical signal.
Potentiometer - measures angular positions continuously, using resistance.
LVDT (linear variable differential transformer) - measures linear displacement
continuously using magnetic coupling.
Inputs for a PLC come in a few basic varieties, the simplest are AC and DC inputs.
Sourcing and sinking inputs are also popular. This output method dictates that a device
does not supply any power. Instead, the device only switches current on or off, like a sim-
ple switch.
Sinking - When active the output allows current to flow to a common ground. This
is best selected when different voltages are supplied.
Sourcing - When active, current flows from a supply, through the output device
and to ground. This method is best used when all devices use a single supply
voltage.
This is also referred to as NPN (sinking) and PNP (sourcing). PNP is more popu-
lar. This will be covered in detail in the chapter on sensors.
3.2.1 Inputs
In smaller PLCs the inputs are normally built in and are specified when purchasing
the PLC. For larger PLCs the inputs are purchased as modules, or cards, with 8 or 16
inputs of the same type on each card. For discussion purposes we will discuss all inputs as
if they have been purchased as cards. The list below shows typical ranges for input volt-
ages, and is roughly in order of popularity.
12-24 Vdc
100-120 Vac
10-60 Vdc
12-24 Vac/dc
www.PAControl.com
plc wiring - 3.4
5 Vdc (TTL)
200-240 Vac
48 Vdc
24 Vac
PLC input cards rarely supply power, this means that an external power supply is
needed to supply power for the inputs and sensors. The example in Figure 3.2 shows how
to connect an AC input card.
Figure 3.2 An AC Input Card and Ladder Logic
24 V AC
Power
Supply
normally open push-button
normally open
temperature switch
PLC Input Card
24V AC
it is in rack "bob"
slot 3
00
01
02
03
04
05
06
07
Pushbutton (bob:3:I.Data.1)
Tempsensor (bob:3:I.Data.3)
COM
Note: inputs are normally high impedance. This means that they will
use very little current.
Hot
Neut.
www.PAControl.com
plc wiring - 3.5
In the example there are two inputs, one is a normally open push button, and the
second is a temperature switch, or thermal relay. (NOTE: These symbols are standard and
will be discussed later in this chapter.) Both of the switches are powered by the positive/
hot output of the 24Vac power supply - this is like the positive terminal on a DC supply.
Power is supplied to the left side of both of the switches. When the switches are open there
is no voltage passed to the input card. If either of the switches are closed power will be
supplied to the input card. In this case inputs 1 and 3 are used - notice that the inputs start
at 0. The input card compares these voltages to the common. If the input voltage is within
a given tolerance range the inputs will switch on. Ladder logic is shown in the figure for
the inputs. Here it uses Allen Bradley notation for ControlLogix. At the top is the tag
(variable name) for the rack. The input card (’I’) is in slot 3, so the address for the card is
bob:3.I.Data.x, where ’x’ is the input bit number. These addresses can also be given alias
tags to make the ladder logic less confusing.
Many beginners become confused about where connections are needed in the cir-
cuit above. The key word to remember is circuit, which means that there is a full loop that
the voltage must be able to follow. In Figure 3.2 we can start following the circuit (loop) at
the power supply. The path goes through the switches, through the input card, and back to
the power supply where it flows back through to the start. In a full PLC implementation
there will be many circuits that must each be complete.
A second important concept is the common. Here the neutral on the power supply
is the common, or reference voltage. In effect we have chosen this to be our 0V reference,
and all other voltages are measured relative to it. If we had a second power supply, we
would also need to connect the neutral so that both neutrals would be connected to the
same common. Often common and ground will be confused. The common is a reference,
or datum voltage that is used for 0V, but the ground is used to prevent shocks and damage
to equipment. The ground is connected under a building to a metal pipe or grid in the
ground. This is connected to the electrical system of a building, to the power outlets,
where the metal cases of electrical equipment are connected. When power flows through
the ground it is bad. Unfortunately many engineers, and manufacturers mix up ground and
common. It is very common to find a power supply with the ground and common misla-
beled.
NOTE: The design process will be much easier if the inputs and outputs are planned first,
and the tags are entered before the ladder logic. Then the program is entered using the
much simpler tag names.
www.PAControl.com
plc wiring - 3.6
One final concept that tends to trap beginners is that each input card is isolated.
This means that if you have connected a common to only one card, then the other cards are
not connected. When this happens the other cards will not work properly. You must con-
nect a common for each of the output cards.
There are many trade-offs when deciding which type of input cards to use.
• DC voltages are usually lower, and therefore safer (i.e., 12-24V).
• DC inputs are very fast, AC inputs require a longer on-time. For example, a 60Hz
wave may require up to 1/60sec for reasonable recognition.
• DC voltages can be connected to larger variety of electrical systems.
• AC signals are more immune to noise than DC, so they are suited to long dis-
tances, and noisy (magnetic) environments.
• AC power is easier and less expensive to supply to equipment.
• AC signals are very common in many existing automation devices.
Remember - Don’t mix up the ground and common. Don’t connect them together if the
common of your device is connected to a common on another device.
www.PAControl.com
plc wiring - 3.7
Figure 3.3 Aside: PLC Input Circuits
3.2.2 Output Modules
ASIDE: PLC inputs must convert a variety of logic levels to the 5Vdc logic levels
used on the data bus. This can be done with circuits similar to those shown below.
Basically the circuits condition the input to drive an optocoupler. This electrically
isolates the external electrical circuitry from the internal circuitry. Other circuit
components are used to guard against excess or reversed voltage polarity.
TTL
+5V
optocoupler
TTL
+5V
optocoupler
DC
input
AC
input
+
COM
hot
neut.
WARNING - ALWAYS CHECK RATED VOLTAGES AND CURRENTS FOR PLC’s
AND NEVER EXCEED!
www.PAControl.com
plc wiring - 3.8
As with input modules, output modules rarely supply any power, but instead act as
switches. External power supplies are connected to the output card and the card will
switch the power on or off for each output. Typical output voltages are listed below, and
roughly ordered by popularity.
120 Vac
24 Vdc
12-48 Vac
12-48 Vdc
5Vdc (TTL)
230 Vac
These cards typically have 8 to 16 outputs of the same type and can be purchased
with different current ratings. A common choice when purchasing output cards is relays,
transistors or triacs. Relays are the most flexible output devices. They are capable of
switching both AC and DC outputs. But, they are slower (about 10ms switching is typi-
cal), they are bulkier, they cost more, and they will wear out after millions of cycles. Relay
outputs are often called dry contacts. Transistors are limited to DC outputs, and Triacs are
limited to AC outputs. Transistor and triac outputs are called switched outputs.
Dry contacts - a separate relay is dedicated to each output. This allows mixed volt-
ages (AC or DC and voltage levels up to the maximum), as well as isolated out-
puts to protect other outputs and the PLC. Response times are often greater than
10ms. This method is the least sensitive to voltage variations and spikes.
Switched outputs - a voltage is supplied to the PLC card, and the card switches it to
different outputs using solid state circuitry (transistors, triacs, etc.) Triacs are
well suited to AC devices requiring less than 1A. Transistor outputs use NPN or
PNP transistors up to 1A typically. Their response time is well under 1ms.
www.PAControl.com
plc wiring - 3.9
Figure 3.4 Aside: PLC Output Circuits
Caution is required when building a system with both AC and DC outputs. If AC is
ASIDE: PLC outputs must convert the 5Vdc logic levels on the PLC data bus to exter-
nal voltage levels. This can be done with circuits similar to those shown below.
Basically the circuits use an optocoupler to switch external circuitry. This electri-
cally isolates the external electrical circuitry from the internal circuitry. Other cir-
cuit components are used to guard against excess or reversed voltage polarity.
TTL
+V
optocoupler
Sourcing DC output
TTL
optocoupler
AC
output
TTL
+V
relay
output
AC/DC
Note: Some AC outputs will
also use zero voltage detec-
tion. This allows the output
to be switched on when the
voltage and current are
effectively off, thus prevent-
ing surges.
www.PAControl.com
plc wiring - 3.10
accidentally connected to a DC transistor output it will only be on for the positive half of
the cycle, and appear to be working with a diminished voltage. If DC is connected to an
AC triac output it will turn on and appear to work, but you will not be able to turn it off
without turning off the entire PLC.
A major issue with outputs is mixed power sources. It is good practice to isolate all
power supplies and keep their commons separate, but this is not always feasible. Some
output modules, such as relays, allow each output to have its own common. Other output
cards require that multiple, or all, outputs on each card share the same common. Each out-
put card will be isolated from the rest, so each common will have to be connected. It is
common for beginners to only connect the common to one card, and forget the other cards
- then only one card seems to work!
The output card shown in Figure 3.5 is an example of a 24Vdc output card that has
a shared common. This type of output card would typically use transistors for the outputs.
ASIDE: A transistor is a semiconductor based device that can act as an adjustable valve.
When switched off it will block current flow in both directions. While switched on it
will allow current flow in one direction only. There is normally a loss of a couple of
volts across the transistor. A triac is like two SCRs (or imagine transistors) connected
together so that current can flow in both directions, which is good for AC current.
One major difference for a triac is that if it has been switched on so that current flows,
and then switched off, it will not turn off until the current stops flowing. This is fine
with AC current because the current stops and reverses every 1/2 cycle, but this does
not happen with DC current, and so the triac will remain on.
www.PAControl.com
plc wiring - 3.11
Figure 3.5 An Example of a 24Vdc Output Card (Sinking)
In this example the outputs are connected to a low current light bulb (lamp) and a
relay coil. Consider the circuit through the lamp, starting at the 24Vdc supply. When the
output 07 is on, current can flow in 07 to the COM, thus completing the circuit, and allow-
ing the light to turn on. If the output is off the current cannot flow, and the light will not
turn on. The output 03 for the relay is connected in a similar way. When the output 03 is
on, current will flow through the relay coil to close the contacts and supply 120Vac to the
motor. Ladder logic for the outputs is shown in the bottom right of the figure. The notation
is for an Allen Bradley ControlLogix. The output card (’O’) is in a rack labelled ’sue’ in
slot 2. As indicated for the input card, it is good practice to define and use an alias tag for
an output (e.g. Motor) instead of using the full description (e.g. sue:2.O.Data.3). This card
24 V DC
Output Card
rack "sue"
slot 2
COM
00
01
02
03
04
05
06
07
24 V Lamp
Relay
+24 V DC
Power
120 V AC
Power
Motor
Supply
Supply
Motor (sue:2.O.Data.3)
Lamp (sue:2.O.Data.3)
Neut.
COM
www.PAControl.com
plc wiring - 3.12
could have many different voltages applied from different sources, but all the power sup-
plies would need a single shared common.
The circuits in Figure 3.6 had the sequence of power supply, then device, then PLC
card, then power supply. This requires that the output card have a common. Some output
schemes reverse the device and PLC card, thereby replacing the common with a voltage
input. The example in Figure 3.5 is repeated in Figure 3.6 for a voltage supply card.
Figure 3.6 An Example of a 24Vdc Output Card With a Voltage Input (Sourcing)
In this example the positive terminal of the 24Vdc supply is connected to the out-
put card directly. When an output is on power will be supplied to that output. For example,
if output 07 is on then the supply voltage will be output to the lamp. Current will flow
through the lamp and back to the common on the power supply. The operation is very sim-
ilar for the relay switching the motor. Notice that the ladder logic (shown in the bottom
right of the figure) is identical to that in Figure 3.5. With this type of output card only one
power supply can be used.
We can also use relay outputs to switch the outputs. The example shown in Figure
24 V DC
Output Card
V+
00
01
02
03
04
05
06
07
24 V lamp
Relay
+24 V DC
Power
120 V AC
Power
Motor
Supply
Supply
Neut.
COM
www.PAControl.com
plc wiring - 3.13
3.5 and Figure 3.6 is repeated yet again in Figure 3.7 for relay output.
Figure 3.7 An Example of a Relay Output Card
In this example the 24Vdc supply is connected directly to both relays (note that
this requires 2 connections now, whereas the previous example only required one.) When
an output is activated the output switches on and power is delivered to the output devices.
This layout is more similar to Figure 3.6 with the outputs supplying voltage, but the relays
could also be used to connect outputs to grounds, as in Figure 3.5. When using relay out-
puts it is possible to have each output isolated from the next. A relay output card could
have AC and DC outputs beside each other.
3.3 RELAYS
Although relays are rarely used for control logic, they are still essential for switch-
120 V AC/DC
Output Card
in rack 01
I/O group 2
00
01
02
03
04
05
06
07 24 V lamp
Relay
24 V DC
Power
120 V AC
Power
Motor Supply
Supply
www.PAControl.com
plc wiring - 3.14
ing large power loads. Some important terminology for relays is given below.
Contactor - Special relays for switching large current loads.
Motor Starter - Basically a contactor in series with an overload relay to cut off
when too much current is drawn.
Arc Suppression - when any relay is opened or closed an arc will jump. This
becomes a major problem with large relays. On relays switching AC this prob-
lem can be overcome by opening the relay when the voltage goes to zero (while
crossing between negative and positive). When switching DC loads this prob-
lem can be minimized by blowing pressurized gas across during opening to sup-
press the arc formation.
AC coils - If a normal coil is driven by AC power the contacts will vibrate open
and closed at the frequency of the AC power. This problem is overcome by
relay manufacturers by adding a shading pole to the internal construction of the
relay.
The most important consideration when selecting relays, or relay outputs on a
PLC, is the rated current and voltage. If the rated voltage is exceeded, the contacts will
wear out prematurely, or if the voltage is too high fire is possible. The rated current is the
maximum current that should be used. When this is exceeded the device will become too
hot, and it will fail sooner. The rated values are typically given for both AC and DC,
although DC ratings are lower than AC. If the actual loads used are below the rated values
the relays should work well indefinitely. If the values are exceeded a small amount the life
of the relay will be shortened accordingly. Exceeding the values significantly may lead to
immediate failure and permanent damage. Please note that relays may also include mini-
mum ratings that should also be observed to ensure proper operation and long life.
• Rated Voltage - The suggested operation voltage for the coil. Lower levels can
result in failure to operate, voltages above shorten life.
• Rated Current - The maximum current before contact damage occurs (welding or
melting).
3.4 A CASE STUDY
(Try the following case without looking at the solution in Figure 3.8.) An electrical
layout is needed for a hydraulic press. The press uses a 24Vdc double actuated solenoid
valve to advance and retract the press. This device has a single common and two input
wires. Putting 24Vdc on one wire will cause the press to advance, putting 24Vdc on the
second wire will cause it to retract. The press is driven by a large hydraulic pump that
requires 220Vac rated at 20A, this should be running as long as the press is on. The press
is outfitted with three push buttons, one is a NC stop button, the other is a NO manual
retract button, and the third is a NO start automatic cycle button. There are limit switches
www.PAControl.com
plc wiring - 3.15
at the top and bottom of the press travels that must also be connected.
Figure 3.8 Case Study for Press Wiring
The input and output cards were both selected to be 24Vdc so that they may share
a single 24Vdc power supply. In this case the solenoid valve was wired directly to the out-
put card, while the hydraulic pump was connected indirectly using a relay (only the coil is
shown for simplicity). This decision was primarily made because the hydraulic pump
requires more current than any PLC can handle, but a relay would be relatively easy to
purchase and install for that load. All of the input switches are connected to the same sup-
ply and to the inputs.
3.5 ELECTRICAL WIRING DIAGRAMS
When a controls cabinet is designed and constructed ladder diagrams are used to
document the wiring. A basic wiring diagram is shown in Figure 3.9. In this example the
system would be supplied with AC power (120Vac or 220Vac) on the left and right rails.
24VDC
24VDC
advance
retract
solenoid
V+
24VDC
+
-
O/0
O/1
O/2
I/0
I/1
I/2
I/3
I/4
com
SOLUTION
relay for
hydraulic
output card input card
pump
www.PAControl.com
plc wiring - 3.16
The lines of these diagrams are numbered, and these numbers are typically used to number
wires when building the electrical system. The switch before line 010 is a master discon-
nect for the power to the entire system. A fuse is used after the disconnect to limit the
maximum current drawn by the system. Line 020 of the diagram is used to control power
to the outputs of the system. The stop button is normally closed, while the start button is
normally open. The branch, and output of the rung are CR1, which is a master control
relay. The PLC receives power on line 30 of the diagram.
The inputs to the PLC are all AC, and are shown on lines 040 to 070. Notice that
Input I:0/0 is a set of contacts on the MCR CR1. The three other inputs are a normally
open push button (line 050), a limit switch (060) and a normally closed push button (070).
After line 080 the MCR CR1 can apply power to the outputs. These power the relay out-
puts of the PLC to control a red indicator light (040), a green indicator light (050), a sole-
noid (060), and another relay (080). The relay on line 080 switches a relay that turn on
another device drill station.
www.PAControl.com
plc wiring - 3.17
Figure 3.9 A Ladder Wiring Diagram
L1 N
PLC
L1 N
I:0/0
I:0/1
I:0/2
I:0/3
ac com
O:0/0
O:0/1
O:0/2
O:0/3
stop start
CR1
CR1
CR1
CR1
MCR
PB1
LS1
PB2
CR2
CR2
L1 N
Drill Station
010
020
030
040
050
060
070
080
090
100
110
120
130
R
G
L1
L2
S1
035
050
060
070
090
100
110
120
90-1
100-1
110-1
120-1
90-1
100-1
110-1
120-1
www.PAControl.com
plc wiring - 3.18
In the wiring diagram the choice of a normally close stop button and a normally
open start button are intentional. Consider line 020 in the wiring diagram. If the stop but-
ton is pushed it will open the switch, and power will not be able to flow to the control
relay and output power will shut off. If the stop button is damaged, say by a wire falling
off, the power will also be lost and the system will shut down - safely. If the stop button
used was normally open and this happened the system would continue to operate while the
stop button was unable to shut down the power. Now consider the start button. If the but-
ton was damaged, say a wire was disconnected, it would be unable to start the system, thus
leaving the system unstarted and safe. In summary, all buttons that stop a system should be
normally closed, while all buttons that start a system should be normally open.
3.5.1 JIC Wiring Symbols
To standardize electrical schematics, the Joint International Committee (JIC) sym-
bols were developed, these are shown in Figure 3.10, Figure 3.11 and Figure 3.12.
www.PAControl.com
plc wiring - 3.19
Figure 3.10 JIC Schematic Symbols
disconnect circuit interrupter
breaker (3 phase AC)
normally open
limit switch
normally closed
limit switch
normally open
push-button
normally closed
push-button double pole
push-button
mushroom head
push-button
F
fuse
thermal
motor (3 phase AC)
(3 phase AC) (3 phase AC)
liquid level
normally open
liquid level
normally closed
vacuum pressure
normally open
vacuum pressure
normally closed
overload relay
www.PAControl.com
plc wiring - 3.20
Figure 3.11 JIC Schematic Symbols
temperature
normally open temperature
normally closed
flow
normally open
flow
normally closed
relay contact
normally open
relay contact
normally closed
relay coil
relay time delay on
normally open
relay time delay on
normally closed relay time delay off
normally open
relay time delay off
normally closed
H1 H2
H3 H4
X1 X2
horn buzzer bell
control transformer
2-H
solenoid 2-position
hydraulic solenoid
R
indicator lamp
Female connector
Male connector
normally open
proximity switch
normally closed
proximity switch
www.PAControl.com
plc wiring - 3.21
Figure 3.12 JIC Schematic Symbols
Resistor Tapped Resistor Variable Resistor
(potentiometer)
Rheostat
(potentiometer)
Capacitor Polarized Capacitor
+
Variable Capacitor
Capacitor Battery
+
Crystal Thermocouple Antenna
Shielded Conductor Shielded Grounded
Common
Coil or Inductor
Coil with magnetic core
Tapped Coil Transformer
Transformer magnetic core
www.PAControl.com
plc wiring - 3.22
3.6 SUMMARY
• PLC inputs condition AC or DC inputs to be detected by the logic of the PLC.
• Outputs are transistors (DC), triacs (AC) or relays (AC and DC).
• Input and output addresses are a function of the card location/tag name and input
bit number.
• Electrical system schematics are documented with diagrams that look like ladder
logic.
3.7 PRACTICE PROBLEMS
1. Can a PLC input switch a relay coil to control a motor?
2. How do input and output cards act as an interface between the PLC and external devices?
3. What is the difference between wiring a sourcing and sinking output?
4. What is the difference between a motor starter and a contactor?
5. Is AC or DC easier to interrupt?
6. What can happen if the rated voltage on a device is exceeded?
7. What are the benefits of input/output modules?
8. (for electrical engineers) Explain the operation of AC input and output conditioning circuits.
9. What will happen if a DC output is switched by an AC output.
10. Explain why a stop button must be normally closed and a start button must be normally open.
11. For the circuit shown in the figure below, list the input and output addresses for the PLC. If
switch A controls the light, switch B the motor, and C the solenoid, write a simple ladder logic
www.PAControl.com
plc wiring - 3.23
program.
12. We have a PLC rack with a 24 VDC input card in slot 3, and a 120VAC output card in slot 2.
The inputs are to be connected to 4 push buttons. The outputs are to drive a 120VAC light bulb,
a 240VAC motor, and a 24VDC operated hydraulic valve. Draw the electrical connections for
the inputs and outputs. Show all other power supplies and other equipment/components
required.
13. You are planning a project that will be controlled by a PLC. Before ordering parts you decide
to plan the basic wiring and select appropriate input and output cards. The devices that we will
use for inputs are 2 limit switches, a push button and a thermal switch. The output will be for a
24Vdc solenoid valve, a 110Vac light bulb, and a 220Vac 50HP motor. Sketch the basic wiring
below including PLC cards.
14. Add three push buttons as inputs to the figure below. You must also select a power supply, and
200
201
202
203
204
205
206
207
com
100
101
102
103
104
105
106
107
com
A
B
C
12VDC
+
solenoid
valve
24VDC
+
www.PAControl.com
plc wiring - 3.24
show all necessary wiring.
15. Three 120Vac outputs are to be connected to the output card below. Show the 120Vac source,
and all wiring.
16. Sketch the wiring for PLC outputs that are listed below.
- a double acting hydraulic solenoid valve (with two coils)
- a 24Vdc lamp
- a 120 Vac high current lamp
- a low current 12Vdc motor
1
com
2
com
3
com
4
com
5
com
V
00
01
02
03
04
05
06
07
www.PAControl.com
plc wiring - 3.25
3.8 PRACTICE PROBLEM SOLUTIONS
1. no - a plc OUTPUT can switch a relay
2. input cards are connected to sensors to determine the state of the system. Output cards are con-
nected to actuators that can drive the process.
3. sourcing outputs supply current that will pass through an electrical load to ground. Sinking
inputs allow current to flow from the electrical load, to the common.
4. a motor starter typically has three phases
5. AC is easier, it has a zero crossing
6. it will lead to premature failure
7. by using separate modules, a PLC can be customized for different applications. If a single mod-
ule fails, it can be replaced quickly, without having to replace the entire controller.
8. AC input conditioning circuits will rectify an AC input to a DC waveform with a ripple. This
will be smoothed, and reduced to a reasonable voltage level to drive an optocoupler. An AC
output circuit will switch an AC output with a triac, or a relay.
9. an AC output is a triac. When a triac output is turned off, it will not actually turn off until the
AC voltage goes to 0V. Because DC voltages don’t go to 0V, it will never turn off.
10. If a NC stop button is damaged, the machine will act as if the stop button was pushed and shut
down safely. If a NO start button is damaged the machine will not be able to start.
11.
outputs:
200 - light
202 - motor
204 - solenoid
inputs:
100 - switch A
102 - switch B
104 - switch C
200
202
210
100
102
104
www.PAControl.com
plc wiring - 3.26
12.
13.
0
1
2
3
4
5
6
7
com
24VDC
+
-
0
1
2
3
4
5
6
7
com
0
1
2
3
4
5
6
7
com
24VDC
+
-
0
1
2
3
4
5
6
7
24Vdc
+
-
Note: relays are used to reduce the total
number of output cards
120Vac
hot
neut.
220Vac
hot
neut.
www.PAControl.com
plc wiring - 3.27
14.
15.
1
com
2
com
3
com
4
com
5
com
24Vdc
+
-
V
00
01
02
03
04
05
06
07
120Vac
hot
neut.
Load 1
Load 2
Load 3
www.PAControl.com
plc wiring - 3.28
16.
3.9 ASSIGNMENT PROBLEMS
1. Describe what could happen if a normally closed start button was used on a system, and the
wires to the button were cut.
2. Describe what could happen if a normally open stop button was used on a system and the wires
to the button were cut.
3. a) For the input (’in’) and output (’out’) cards below, add three output lights and three normally
00
01
02
03
relay output card
04
power
supply
24Vdc
+
-
power
supply
120Vac
hot
neut.
power
supply
12Vdc
+
-
www.PAControl.com
plc wiring - 3.29
open push button inputs. b) Redraw the outputs so that it uses a relay output card.
4. Draw an electrical wiring (ladder) diagram for PLC outputs that are listed below.
- a solenoid controlled hydraulic valve
- a 24Vdc lamp
- a 120 Vac high current lamp
- a low current 12Vdc motor
5. Draw an electrical ladder diagram for a PLC that has a PNP and an NPN sensor for inputs. The
outputs are two small indicator lights. You should use proper symbols for all components. You
must also include all safety devices including fuses, disconnects, MCRs, etc...
6. Draw an electrical wiring diagram for a PLC controlling a system with an NPN and PNP input
sensor. The outputs include an indicator light and a relay to control a 20A motor load. Include
ALL safety circuitry.
0
1
2
3
4
5
6
7
com
V
0
1
2
3
4
5
6
7
-
+
-
+
in:0.I.Data.x out:1.O.Data.x
www.PAControl.com
discrete sensors - 4.1
4. LOGICAL SENSORS
4.1 INTRODUCTION
Sensors allow a PLC to detect the state of a process. Logical sensors can only
detect a state that is either true or false. Examples of physical phenomena that are typically
detected are listed below.
• inductive proximity - is a metal object nearby?
• capacitive proximity - is a dielectric object nearby?
• optical presence - is an object breaking a light beam or reflecting light?
• mechanical contact - is an object touching a switch?
Recently, the cost of sensors has dropped and they have become commodity items,
typically between $50 and $100. They are available in many forms from multiple vendors
such as Allen Bradley, Omron, Hyde Park and Turck. In applications sensors are inter-
changeable between PLC vendors, but each sensor will have specific interface require-
ments.
This chapter will begin by examining the various electrical wiring techniques for
sensors, and conclude with an examination of many popular sensor types.
4.2 SENSOR WIRING
When a sensor detects a logical change it must signal that change to the PLC. This
is typically done by switching a voltage or current on or off. In some cases the output of
the sensor is used to switch a load directly, completely eliminating the PLC. Typical out-
Topics:
Objectives:
• Understand the different types of sensor outputs.
• Know the basic sensor types and understand application issues.
• Sensor wiring; switches, TTL, sourcing, sinking
• Proximity detection; contact switches, photo-optics, capacitive, inductive and
ultrasonic
www.PAControl.com
discrete sensors - 4.2
puts from sensors (and inputs to PLCs) are listed below in relative popularity.
Sinking/Sourcing - Switches current on or off.
Plain Switches - Switches voltage on or off.
Solid State Relays - These switch AC outputs.
TTL (Transistor Transistor Logic) - Uses 0V and 5V to indicate logic levels.
4.2.1 Switches
The simplest example of sensor outputs are switches and relays. A simple example
is shown in Figure 4.1.
Figure 4.1 An Example of Switched Sensors
In the figure a NO contact switch is connected to input 01. A sensor with a relay
output is also shown. The sensor must be powered separately, therefore the V+ and V- ter-
minals are connected to the power supply. The output of the sensor will become active
when a phenomenon has been detected. This means the internal switch (probably a relay)
will be closed allowing current to flow and the positive voltage will be applied to input 06.
24 Vdc
Power
Supply
normally open push-button
PLC Input Card
24V DC
00
01
02
03
04
05
06
07
COM
+
-
sensor
V+
V-
relay
output
www.PAControl.com
discrete sensors - 4.3
4.2.2 Transistor Transistor Logic (TTL)
Transistor-Transistor Logic (TTL) is based on two voltage levels, 0V for false and
5V for true. The voltages can actually be slightly larger than 0V, or lower than 5V and still
be detected correctly. This method is very susceptible to electrical noise on the factory
floor, and should only be used when necessary. TTL outputs are common on electronic
devices and computers, and will be necessary sometimes. When connecting to other
devices simple circuits can be used to improve the signal, such as the Schmitt trigger in
Figure 4.2.
Figure 4.2 A Schmitt Trigger
A Schmitt trigger will receive an input voltage between 0-5V and convert it to 0V
or 5V. If the voltage is in an ambiguous range, about 1.5-3.5V it will be ignored.
If a sensor has a TTL output the PLC must use a TTL input card to read the values.
If the TTL sensor is being used for other applications it should be noted that the maximum
current output is normally about 20mA.
4.2.3 Sinking/Sourcing
Sinking sensors allow current to flow into the sensor to the voltage common, while
sourcing sensors allow current to flow out of the sensor from a positive source. For both of
these methods the emphasis is on current flow, not voltage. By using current flow, instead
of voltage, many of the electrical noise problems are reduced.
When discussing sourcing and sinking we are referring to the output of the sensor
that is acting like a switch. In fact the output of the sensor is normally a transistor, that will
act like a switch (with some voltage loss). A PNP transistor is used for the sourcing out-
put, and an NPN transistor is used for the sinking input. When discussing these sensors the
Vi Vo
Vi
Vo
www.PAControl.com
discrete sensors - 4.4
term sourcing is often interchanged with PNP, and sinking with NPN. A simplified exam-
ple of a sinking output sensor is shown in Figure 4.3. The sensor will have some part that
deals with detection, this is on the left. The sensor needs a voltage supply to operate, so a
voltage supply is needed for the sensor. If the sensor has detected some phenomenon then
it will trigger the active line. The active line is directly connected to an NPN transistor.
(Note: for an NPN transistor the arrow always points away from the center.) If the voltage
to the transistor on the active line is 0V, then the transistor will not allow current to flow
into the sensor. If the voltage on the active line becomes larger (say 12V) then the transis-
tor will switch on and allow current to flow into the sensor to the common.
Figure 4.3 A Simplified NPN/Sinking Sensor
Sourcing sensors are the complement to sinking sensors. The sourcing sensors use
a PNP transistor, as shown in Figure 4.4. (Note: PNP transistors are always drawn with the
arrow pointing to the center.) When the sensor is inactive the active line stays at the V+
Sensor
V+
V-
Active
physical
phenomenon
Aside: The sensor responds to a physical phenomenon. If the sensor is inactive (nothing
detected) then the active line is low and the transistor is off, this is like an open
switch. That means the NPN output will have no current in/out. When the sensor is
active, it will make the active line high. This will turn on the transistor, and effec-
tively close the switch. This will allow current to flow into the sensor to ground
(hence sinking). The voltage on the NPN output will be pulled down to V-. Note: the
voltage will always be 1-2V higher because of the transistor. When the sensor is off,
the NPN output will float, and any digital circuitry needs to contain a pull-up resistor.
V+
NPN
V-
sensor
output
and
Detector
Line
current flows in
when switched on
www.PAControl.com
discrete sensors - 4.5
value, and the transistor stays switched off. When the sensor becomes active the active
line will be made 0V, and the transistor will allow current to flow out of the sensor.
Figure 4.4 A Simplified Sourcing/PNP Sensor
Most NPN/PNP sensors are capable of handling currents up to a few amps, and
they can be used to switch loads directly. (Note: always check the documentation for rated
voltages and currents.) An example using sourcing and sinking sensors to control lights is
shown in Figure 4.5. (Note: This example could be for a motion detector that turns on
lights in dark hallways.)
Sensor
V+
V-
Active
physical
phenomenon
Aside: The sensor responds to the physical phenomenon. If the sensor is inactive (nothing
detected) then the active line is high and the transistor is off, this is like an open switch.
That means the PNP output will have no current in/out. When the sensor is active, it
will make the active line high. This will turn on the transistor, and effectively close the
switch. This will allow current to flow from V+ through the sensor to the output (hence
sourcing). The voltage on the PNP output will be pulled up to V+. Note: the voltage
will always be 1-2V lower because of the transistor. When off, the PNP output will
float, if used with digital circuitry a pull-down resistor will be needed.
V+
PNP
V-
sensor
output
and
Detector
Line
current flows out
when switched on
www.PAControl.com
discrete sensors - 4.6
Figure 4.5 Direct Control Using NPN/PNP Sensors
In the sinking system in Figure 4.5 the light has V+ applied to one side. The other
side is connected to the NPN output of the sensor. When the sensor turns on the current
will be able to flow through the light, into the output to V- common. (Note: Yes, the cur-
rent will be allowed to flow into the output for an NPN sensor.) In the sourcing arrange-
ment the light will turn on when the output becomes active, allowing current to flow from
the V+, thought the sensor, the light and to V- (the common).
At this point it is worth stating the obvious - The output of a sensor will be an input
for a PLC. And, as we saw with the NPN sensor, this does not necessarily indicate where
current is flowing. There are two viable approaches for connecting sensors to PLCs. The
first is to always use PNP sensors and normal voltage input cards. The second option is to
purchase input cards specifically designed for sourcing or sinking sensors. An example of
a PLC card for sinking sensors is shown in Figure 4.6.
power
supply
sensor V+
V- (common)
V+
V-
NPN
power
supply
sensor V+
V- (common)
V+
V-
PNP
Note: remember to check the current and voltage ratings for the sensors.
sinking
sourcing
Note: When marking power terminals, there will sometimes be two sets of
markings. The more standard is V+ and COM, but sometimes you will see
devices and power supplies without a COM (common), in this case assume
the V- is the common.
www.PAControl.com
discrete sensors - 4.7
Figure 4.6 A PLC Input Card for Sinking Sensors
The dashed line in the figure represents the circuit, or current flow path when the
sensor is active. This path enters the PLC input card first at a V+ terminal (Note: there is
no common on this card) and flows through an optocoupler. This current will use light to
turn on a phototransistor to tell the computer in the PLC the input current is flowing. The
current then leaves the card at input 00 and passes through the sensor to V-. When the sen-
sor is inactive the current will not flow, and the light in the optocoupler will be off. The
optocoupler is used to help protect the PLC from electrical problems outside the PLC.
The input cards for PNP sensors are similar to the NPN cards, as shown in Figure
4.7.
PLC Input Card for Sinking Sensors
Internal
Card
Electronics
PLC Data Bus External Electrical
NPN
sensor
power
supply
+V
-V
+V
NPN
-V
current flow
+V
00
01 Note: When a PLC input card does not have a
common but it has a V+ instead, it can be
used for NPN sensors. In this case the cur-
rent will flow out of the card (sourcing) and
we must switch it to ground.
ASIDE: This card is shown with 2 optocouplers (one for each output). Inside these
devices the is an LED and a phototransistor, but no electrical connection. These
devices are used to isolate two different electrical systems. In this case they pro-
tect the 5V digital levels of the PLC computer from the various external voltages
and currents.
www.PAControl.com
discrete sensors - 4.8
Figure 4.7 PLC Input Card for Sourcing Sensors
The current flow loop for an active sensor is shown with a dashed line. Following
the path of the current we see that it begins at the V+, passes through the sensor, in the
input 00, through the optocoupler, out the common and to the V-.
Wiring is a major concern with PLC applications, so to reduce the total number of
wires, two wire sensors have become popular. But, by integrating three wires worth of
function into two, we now couple the power supply and sensing functions into one. Two
wire sensors are shown in Figure 4.8.
PLC Input Card for Sourcing Sensors
Internal
Card
Electronics
PNP
sensor
power
supply
+V
-V
+V
PNP
-V
current flow
00
01
com
Note: When we have a PLC input card that has
a common then we can use PNP sensors. In
this case the current will flow into the card
and then out the common to the power sup-
ply.
www.PAControl.com
discrete sensors - 4.9
Figure 4.8 Two Wire Sensors
A two wire sensor can be used as either a sourcing or sinking input. In both of
these arrangements the sensor will require a small amount of current to power the sensor,
but when active it will allow more current to flow. This requires input cards that will allow
a small amount of current to flow (called the leakage current), but also be able to detect
when the current has exceeded a given value.
PLC Input Card two wire
sensor
power
supply
+V
-V
+V
-V
00
01
com
Note: These sensors require a certain leakage
current to power the electronics.
PLC Input Card
two wire
sensor
power
supply
+V
-V
+V
-V
00
01
V+
for Sourcing Sensors
for Sinking Sensors
www.PAControl.com
discrete sensors - 4.10
When purchasing sensors and input cards there are some important considerations.
Most modern sensors have both PNP and NPN outputs, although if the choice is not avail-
able, PNP is the more popular choice. PLC cards can be confusing to buy, as each vendor
refers to the cards differently. To avoid problems, look to see if the card is specifically for
sinking or sourcing sensors, or look for a V+ (sinking) or COM (sourcing). Some vendors
also sell cards that will allow you to have NPN and PNP inputs mixed on the same card.
When drawing wiring diagrams the symbols in Figure 4.9 are used for sinking and
sourcing proximity sensors. Notice that in the sinking sensor when the switch closes
(moves up to the terminal) it contacts the common. Closing the switch in the sourcing sen-
sor connects the output to the V+. On the physical sensor the wires are color coded as indi-
cated in the diagram. The brown wire is positive, the blue wire is negative and the output
is white for sinking and black for sourcing. The outside shape of the sensor may change
for other devices, such as photo sensors which are often shown as round circles.
Figure 4.9 Sourcing and Sinking Schematic Symbols
4.2.4 Solid State Relays
Solid state relays switch AC currents. These are relatively inexpensive and are
available for large loads. Some sensors and devices are available with these as outputs.
NPN (sinking)
PNP (sourcing)
V+
V-
NPN
V-
V+ PNP
black
brown
white
brown
blue
blue
www.PAControl.com
discrete sensors - 4.11
4.3 PRESENCE DETECTION
There are two basic ways to detect object presence; contact and proximity. Contact
implies that there is mechanical contact and a resulting force between the sensor and the
object. Proximity indicates that the object is near, but contact is not required. The follow-
ing sections examine different types of sensors for detecting object presence. These sen-
sors account for a majority of the sensors used in applications.
4.3.1 Contact Switches
Contact switches are available as normally open and normally closed. Their hous-
ings are reinforced so that they can take repeated mechanical forces. These often have roll-
ers and wear pads for the point of contact. Lightweight contact switches can be purchased
for less than a dollar, but heavy duty contact switches will have much higher costs. Exam-
ples of applications include motion limit switches and part present detectors.
4.3.2 Reed Switches
Reed switches are very similar to relays, except a permanent magnet is used
instead of a wire coil. When the magnet is far away the switch is open, but when the mag-
net is brought near the switch is closed as shown in Figure 4.10. These are very inexpen-
sive an can be purchased for a few dollars. They are commonly used for safety screens and
doors because they are harder to trick than other sensors.
Figure 4.10 Reed Switch
Note: With this device the magnet is moved towards the reed switch. As it gets
closer the switch will close. This allows proximity detection without contact, but
requires that a separate magnet be attached to a moving part.
www.PAControl.com
discrete sensors - 4.12
4.3.3 Optical (Photoelectric) Sensors
Light sensors have been used for almost a century - originally photocells were
used for applications such as reading audio tracks on motion pictures. But modern optical
sensors are much more sophisticated.
Optical sensors require both a light source (emitter) and detector. Emitters will
produce light beams in the visible and invisible spectrums using LEDs and laser diodes.
Detectors are typically built with photodiodes or phototransistors. The emitter and detec-
tor are positioned so that an object will block or reflect a beam when present. A basic opti-
cal sensor is shown in Figure 4.11.
Figure 4.11 A Basic Optical Sensor
In the figure the light beam is generated on the left, focused through a lens. At the
detector side the beam is focused on the detector with a second lens. If the beam is broken
the detector will indicate an object is present. The oscillating light wave is used so that the
sensor can filter out normal light in the room. The light from the emitter is turned on and
off at a set frequency. When the detector receives the light it checks to make sure that it is
at the same frequency. If light is being received at the right frequency then the beam is not
broken. The frequency of oscillation is in the KHz range, and too fast to be noticed. A side
effect of the frequency method is that the sensors can be used with lower power at longer
distances.
An emitter can be set up to point directly at a detector, this is known as opposed
mode. When the beam is broken the part will be detected. This sensor needs two separate
oscillator
+V +V
lens lens
square wave
light
LED
phototransistor
amplifier
demodulator
detector and
switching circuits
smaller signal
www.PAControl.com
discrete sensors - 4.13
components, as shown in Figure 4.12. This arrangement works well with opaque and
reflective objects with the emitter and detector separated by distances of up to hundreds of
feet.
Figure 4.12 Opposed Mode Optical Sensor
Having the emitter and detector separate increases maintenance problems, and
alignment is required. A preferred solution is to house the emitter and detector in one unit.
But, this requires that light be reflected back as shown in Figure 4.13. These sensors are
well suited to larger objects up to a few feet away.
Figure 4.13 Retroreflective Optical Sensor
emitter object detector
Note: the reflector is constructed with polarizing screens oriented at 90 deg. angles. If
the light is reflected back directly the light does not pass through the screen in front
of the detector. The reflector is designed to rotate the phase of the light by 90 deg.,
so it will now pass through the screen in front of the detector.
emitter
detector
object
reflector
emitter
detector
reflector
www.PAControl.com
discrete sensors - 4.14
In the figure, the emitter sends out a beam of light. If the light is returned from the
reflector most of the light beam is returned to the detector. When an object interrupts the
beam between the emitter and the reflector the beam is no longer reflected back to the
detector, and the sensor becomes active. A potential problem with this sensor is that
reflective objects could return a good beam. This problem is overcome by polarizing the
light at the emitter (with a filter), and then using a polarized filter at the detector. The
reflector uses small cubic reflectors and when the light is reflected the polarity is rotated
by 90 degrees. If the light is reflected off the object the light will not be rotated by 90
degrees. So the polarizing filters on the emitter and detector are rotated by 90 degrees, as
shown in Figure 4.14. The reflector is very similar to reflectors used on bicycles.
Figure 4.14 Polarized Light in Retroreflective Sensors
For retroreflectors the reflectors are quite easy to align, but this method still
requires two mounted components. A diffuse sensors is a single unit that does not use a
reflector, but uses focused light as shown in Figure 4.15.
object reflector
emitter
detector
have filters for
emitted light
rotated by 90 deg.
reflector
emitter
detector
light reflected with
same polarity
light rotated by 90 deg.
www.PAControl.com
discrete sensors - 4.15
Figure 4.15 Diffuse Optical Sensor
Diffuse sensors use light focused over a given range, and a sensitivity adjustment
is used to select a distance. These sensors are the easiest to set up, but they require well
controlled conditions. For example if it is to pick up light and dark colored objects prob-
lems would result.
When using opposed mode sensors the emitter and detector must be aligned so that
the emitter beam and detector window overlap, as shown in Figure 4.16. Emitter beams
normally have a cone shape with a small angle of divergence (a few degrees of less).
Detectors also have a cone shaped volume of detection. Therefore when aligning opposed
mode sensor care is required not just to point the emitter at the detector, but also the detec-
tor at the emitter. Another factor that must be considered with this and other sensors is that
the light intensity decreases over distance, so the sensors will have a limit to separation
distance.
Note: with diffuse reflection the light is scattered. This reduces the quantity of light
returned. As a result the light needs to be amplified using lenses.
emitter
detector
object
www.PAControl.com
discrete sensors - 4.16
Figure 4.16 Beam Divergence and Alignment
If an object is smaller than the width of the light beam it will not be able to block
the beam entirely when it is in front as shown in Figure 4.17. This will create difficulties
in detection, or possibly stop detection altogether. Solutions to this problem are to use nar-
rower beams, or wider objects. Fiber optic cables may be used with an opposed mode opti-
cal sensor to solve this problem, however the maximum effective distance is reduced to a
couple feet.
Figure 4.17 The Relationship Between Beam Width and Object Size
Separated sensors can detect reflective parts using reflection as shown in Figure
4.18. The emitter and detector are positioned so that when a reflective surface is in posi-
tion the light is returned to the detector. When the surface is not present the light does not
return.
effective
beam angle
emitter
detector
effective
detector
angle
effective beam
alignment
is required
intensity
1
r
2
----
∝
the smaller beam width is good (but harder to align
emitter detector
object
www.PAControl.com
AutomatingManufacturingSystemsWithPLCs.pdf

More Related Content

Similar to AutomatingManufacturingSystemsWithPLCs.pdf

Frank_D_Petruzella_Programmable_Logic_C.pdf
Frank_D_Petruzella_Programmable_Logic_C.pdfFrank_D_Petruzella_Programmable_Logic_C.pdf
Frank_D_Petruzella_Programmable_Logic_C.pdfMahamad Jawhar
 
text book Programmable-Logic-Controllers plc.pdf
text book Programmable-Logic-Controllers plc.pdftext book Programmable-Logic-Controllers plc.pdf
text book Programmable-Logic-Controllers plc.pdfMahamad Jawhar
 
Explorations in Parallel Distributed Processing: A Handbook of Models, Progra...
Explorations in Parallel Distributed Processing: A Handbook of Models, Progra...Explorations in Parallel Distributed Processing: A Handbook of Models, Progra...
Explorations in Parallel Distributed Processing: A Handbook of Models, Progra...mustafa sarac
 
14157565 embedded-programming
14157565 embedded-programming14157565 embedded-programming
14157565 embedded-programmingPRADEEP
 
Automating_Manufacturing_Systems_with_PL.pdf
Automating_Manufacturing_Systems_with_PL.pdfAutomating_Manufacturing_Systems_with_PL.pdf
Automating_Manufacturing_Systems_with_PL.pdfjenifer326780
 
Drive berger lahr
Drive berger lahr Drive berger lahr
Drive berger lahr jguillermo91
 
Cd00004444 understanding-and-minimising-adc-conversion-errors-stmicroelectronics
Cd00004444 understanding-and-minimising-adc-conversion-errors-stmicroelectronicsCd00004444 understanding-and-minimising-adc-conversion-errors-stmicroelectronics
Cd00004444 understanding-and-minimising-adc-conversion-errors-stmicroelectronicsvu CAO
 
Plc and scada report
Plc and scada reportPlc and scada report
Plc and scada reportIndira Kundu
 
On-Line Presentation of Data from PMU Stations
On-Line Presentation of Data from PMU StationsOn-Line Presentation of Data from PMU Stations
On-Line Presentation of Data from PMU StationsPower System Operation
 
Simocode dp = manual de parametrização e operação
Simocode dp = manual de parametrização e operaçãoSimocode dp = manual de parametrização e operação
Simocode dp = manual de parametrização e operaçãoconfidencial
 
Distributed Traffic management framework
Distributed Traffic management frameworkDistributed Traffic management framework
Distributed Traffic management frameworkSaurabh Nambiar
 

Similar to AutomatingManufacturingSystemsWithPLCs.pdf (20)

Frank_D_Petruzella_Programmable_Logic_C.pdf
Frank_D_Petruzella_Programmable_Logic_C.pdfFrank_D_Petruzella_Programmable_Logic_C.pdf
Frank_D_Petruzella_Programmable_Logic_C.pdf
 
text book Programmable-Logic-Controllers plc.pdf
text book Programmable-Logic-Controllers plc.pdftext book Programmable-Logic-Controllers plc.pdf
text book Programmable-Logic-Controllers plc.pdf
 
PLC & SCADA
PLC & SCADA PLC & SCADA
PLC & SCADA
 
OPCDE Crackme Solution
OPCDE Crackme SolutionOPCDE Crackme Solution
OPCDE Crackme Solution
 
report
reportreport
report
 
Explorations in Parallel Distributed Processing: A Handbook of Models, Progra...
Explorations in Parallel Distributed Processing: A Handbook of Models, Progra...Explorations in Parallel Distributed Processing: A Handbook of Models, Progra...
Explorations in Parallel Distributed Processing: A Handbook of Models, Progra...
 
Aviation Control Unit
Aviation Control UnitAviation Control Unit
Aviation Control Unit
 
14157565 embedded-programming
14157565 embedded-programming14157565 embedded-programming
14157565 embedded-programming
 
Automating_Manufacturing_Systems_with_PL.pdf
Automating_Manufacturing_Systems_with_PL.pdfAutomating_Manufacturing_Systems_with_PL.pdf
Automating_Manufacturing_Systems_with_PL.pdf
 
Drive berger lahr
Drive berger lahr Drive berger lahr
Drive berger lahr
 
Cd00004444 understanding-and-minimising-adc-conversion-errors-stmicroelectronics
Cd00004444 understanding-and-minimising-adc-conversion-errors-stmicroelectronicsCd00004444 understanding-and-minimising-adc-conversion-errors-stmicroelectronics
Cd00004444 understanding-and-minimising-adc-conversion-errors-stmicroelectronics
 
Abap tips
Abap tipsAbap tips
Abap tips
 
PLC: Introducción al PLC
PLC: Introducción al PLC PLC: Introducción al PLC
PLC: Introducción al PLC
 
ASIC_Design.pdf
ASIC_Design.pdfASIC_Design.pdf
ASIC_Design.pdf
 
Plc and scada report
Plc and scada reportPlc and scada report
Plc and scada report
 
On-Line Presentation of Data from PMU Stations
On-Line Presentation of Data from PMU StationsOn-Line Presentation of Data from PMU Stations
On-Line Presentation of Data from PMU Stations
 
Simocode dp = manual de parametrização e operação
Simocode dp = manual de parametrização e operaçãoSimocode dp = manual de parametrização e operação
Simocode dp = manual de parametrização e operação
 
Distributed Traffic management framework
Distributed Traffic management frameworkDistributed Traffic management framework
Distributed Traffic management framework
 
MF4-K
MF4-KMF4-K
MF4-K
 
Final Report
Final ReportFinal Report
Final Report
 

More from Mahamad Jawhar (20)

2.pdf
2.pdf2.pdf
2.pdf
 
3.pdf
3.pdf3.pdf
3.pdf
 
1.pdf
1.pdf1.pdf
1.pdf
 
robotic2.docx
robotic2.docxrobotic2.docx
robotic2.docx
 
Power Plant Engineering - (Malestrom) (1).pdf
Power Plant Engineering - (Malestrom) (1).pdfPower Plant Engineering - (Malestrom) (1).pdf
Power Plant Engineering - (Malestrom) (1).pdf
 
ref3.pdf
ref3.pdfref3.pdf
ref3.pdf
 
I-Section-US-1003.pdf
I-Section-US-1003.pdfI-Section-US-1003.pdf
I-Section-US-1003.pdf
 
ref.pdf
ref.pdfref.pdf
ref.pdf
 
lect 01 (1).pdf
lect 01 (1).pdflect 01 (1).pdf
lect 01 (1).pdf
 
plasma cutting.pdf
plasma cutting.pdfplasma cutting.pdf
plasma cutting.pdf
 
Grad. Proj. Poster Templete akam.docx
Grad. Proj. Poster Templete akam.docxGrad. Proj. Poster Templete akam.docx
Grad. Proj. Poster Templete akam.docx
 
project format writting 2.docx
project format writting 2.docxproject format writting 2.docx
project format writting 2.docx
 
PLC4.docx
PLC4.docxPLC4.docx
PLC4.docx
 
PLC 1 (2).docx
PLC 1 (2).docxPLC 1 (2).docx
PLC 1 (2).docx
 
Project Cooling Tower.pptx
Project Cooling Tower.pptxProject Cooling Tower.pptx
Project Cooling Tower.pptx
 
final project.docx
final project.docxfinal project.docx
final project.docx
 
final project1.docx
final project1.docxfinal project1.docx
final project1.docx
 
project cooling tower.docx
project cooling tower.docxproject cooling tower.docx
project cooling tower.docx
 
robotic.docx
robotic.docxrobotic.docx
robotic.docx
 
report project.docx
report project.docxreport project.docx
report project.docx
 

Recently uploaded

2024 WRC Hyundai World Rally Team’s i20 N Rally1 Hybrid
2024 WRC Hyundai World Rally Team’s i20 N Rally1 Hybrid2024 WRC Hyundai World Rally Team’s i20 N Rally1 Hybrid
2024 WRC Hyundai World Rally Team’s i20 N Rally1 HybridHyundai Motor Group
 
2024 TOP 10 most fuel-efficient vehicles according to the US agency
2024 TOP 10 most fuel-efficient vehicles according to the US agency2024 TOP 10 most fuel-efficient vehicles according to the US agency
2024 TOP 10 most fuel-efficient vehicles according to the US agencyHyundai Motor Group
 
UNIT-IV-STEERING, BRAKES AND SUSPENSION SYSTEMS.pptx
UNIT-IV-STEERING, BRAKES AND SUSPENSION SYSTEMS.pptxUNIT-IV-STEERING, BRAKES AND SUSPENSION SYSTEMS.pptx
UNIT-IV-STEERING, BRAKES AND SUSPENSION SYSTEMS.pptxDineshKumar4165
 
꧁ ୨⎯Call Girls In Ashok Vihar, New Delhi **✿❀7042364481❀✿**Escorts ServiCes C...
꧁ ୨⎯Call Girls In Ashok Vihar, New Delhi **✿❀7042364481❀✿**Escorts ServiCes C...꧁ ୨⎯Call Girls In Ashok Vihar, New Delhi **✿❀7042364481❀✿**Escorts ServiCes C...
꧁ ୨⎯Call Girls In Ashok Vihar, New Delhi **✿❀7042364481❀✿**Escorts ServiCes C...Hot Call Girls In Sector 58 (Noida)
 
call girls in G.T.B. Nagar (DELHI) 🔝 >༒9953330565🔝 genuine Escort Service 🔝✔️✔️
call girls in  G.T.B. Nagar (DELHI) 🔝 >༒9953330565🔝 genuine Escort Service 🔝✔️✔️call girls in  G.T.B. Nagar (DELHI) 🔝 >༒9953330565🔝 genuine Escort Service 🔝✔️✔️
call girls in G.T.B. Nagar (DELHI) 🔝 >༒9953330565🔝 genuine Escort Service 🔝✔️✔️9953056974 Low Rate Call Girls In Saket, Delhi NCR
 
Crash Vehicle Emergency Rescue Slideshow.ppt
Crash Vehicle Emergency Rescue Slideshow.pptCrash Vehicle Emergency Rescue Slideshow.ppt
Crash Vehicle Emergency Rescue Slideshow.pptVlademirGebDubouzet1
 
VIP Mumbai Call Girls Thakur village Just Call 9920874524 with A/C Room Cash ...
VIP Mumbai Call Girls Thakur village Just Call 9920874524 with A/C Room Cash ...VIP Mumbai Call Girls Thakur village Just Call 9920874524 with A/C Room Cash ...
VIP Mumbai Call Girls Thakur village Just Call 9920874524 with A/C Room Cash ...Garima Khatri
 
GREEN VEHICLES the kids picture show 2024
GREEN VEHICLES the kids picture show 2024GREEN VEHICLES the kids picture show 2024
GREEN VEHICLES the kids picture show 2024AHOhOops1
 
如何办理(UQ毕业证书)昆士兰大学毕业证毕业证成绩单原版一比一
如何办理(UQ毕业证书)昆士兰大学毕业证毕业证成绩单原版一比一如何办理(UQ毕业证书)昆士兰大学毕业证毕业证成绩单原版一比一
如何办理(UQ毕业证书)昆士兰大学毕业证毕业证成绩单原版一比一hnfusn
 
VIP Kolkata Call Girl Kasba 👉 8250192130 Available With Room
VIP Kolkata Call Girl Kasba 👉 8250192130  Available With RoomVIP Kolkata Call Girl Kasba 👉 8250192130  Available With Room
VIP Kolkata Call Girl Kasba 👉 8250192130 Available With Roomdivyansh0kumar0
 
Call me @ 9892124323 Call Girl in Andheri East With Free Home Delivery
Call me @ 9892124323 Call Girl in Andheri East With Free Home DeliveryCall me @ 9892124323 Call Girl in Andheri East With Free Home Delivery
Call me @ 9892124323 Call Girl in Andheri East With Free Home DeliveryPooja Nehwal
 
UNIT-II-ENGINE AUXILIARY SYSTEMS &TURBOCHARGER
UNIT-II-ENGINE AUXILIARY SYSTEMS &TURBOCHARGERUNIT-II-ENGINE AUXILIARY SYSTEMS &TURBOCHARGER
UNIT-II-ENGINE AUXILIARY SYSTEMS &TURBOCHARGERDineshKumar4165
 
John Deere Tractors 5515 Diagnostic Repair Manual
John Deere Tractors 5515 Diagnostic Repair ManualJohn Deere Tractors 5515 Diagnostic Repair Manual
John Deere Tractors 5515 Diagnostic Repair ManualExcavator
 
Digamma / CertiCon Company Presentation
Digamma / CertiCon Company  PresentationDigamma / CertiCon Company  Presentation
Digamma / CertiCon Company PresentationMihajloManjak
 
Innovating Manufacturing with CNC Technology
Innovating Manufacturing with CNC TechnologyInnovating Manufacturing with CNC Technology
Innovating Manufacturing with CNC Technologyquickpartslimitlessm
 
BLUE VEHICLES the kids picture show 2024
BLUE VEHICLES the kids picture show 2024BLUE VEHICLES the kids picture show 2024
BLUE VEHICLES the kids picture show 2024AHOhOops1
 
Russian Call Girls Delhi Indirapuram {9711199171} Aarvi Gupta ✌️Independent ...
Russian  Call Girls Delhi Indirapuram {9711199171} Aarvi Gupta ✌️Independent ...Russian  Call Girls Delhi Indirapuram {9711199171} Aarvi Gupta ✌️Independent ...
Russian Call Girls Delhi Indirapuram {9711199171} Aarvi Gupta ✌️Independent ...shivangimorya083
 

Recently uploaded (20)

Indian Downtown Call Girls # 00971528903066 # Indian Call Girls In Downtown D...
Indian Downtown Call Girls # 00971528903066 # Indian Call Girls In Downtown D...Indian Downtown Call Girls # 00971528903066 # Indian Call Girls In Downtown D...
Indian Downtown Call Girls # 00971528903066 # Indian Call Girls In Downtown D...
 
(NEHA) Call Girls Pushkar Booking Open 8617697112 Pushkar Escorts
(NEHA) Call Girls Pushkar Booking Open 8617697112 Pushkar Escorts(NEHA) Call Girls Pushkar Booking Open 8617697112 Pushkar Escorts
(NEHA) Call Girls Pushkar Booking Open 8617697112 Pushkar Escorts
 
2024 WRC Hyundai World Rally Team’s i20 N Rally1 Hybrid
2024 WRC Hyundai World Rally Team’s i20 N Rally1 Hybrid2024 WRC Hyundai World Rally Team’s i20 N Rally1 Hybrid
2024 WRC Hyundai World Rally Team’s i20 N Rally1 Hybrid
 
2024 TOP 10 most fuel-efficient vehicles according to the US agency
2024 TOP 10 most fuel-efficient vehicles according to the US agency2024 TOP 10 most fuel-efficient vehicles according to the US agency
2024 TOP 10 most fuel-efficient vehicles according to the US agency
 
UNIT-IV-STEERING, BRAKES AND SUSPENSION SYSTEMS.pptx
UNIT-IV-STEERING, BRAKES AND SUSPENSION SYSTEMS.pptxUNIT-IV-STEERING, BRAKES AND SUSPENSION SYSTEMS.pptx
UNIT-IV-STEERING, BRAKES AND SUSPENSION SYSTEMS.pptx
 
꧁ ୨⎯Call Girls In Ashok Vihar, New Delhi **✿❀7042364481❀✿**Escorts ServiCes C...
꧁ ୨⎯Call Girls In Ashok Vihar, New Delhi **✿❀7042364481❀✿**Escorts ServiCes C...꧁ ୨⎯Call Girls In Ashok Vihar, New Delhi **✿❀7042364481❀✿**Escorts ServiCes C...
꧁ ୨⎯Call Girls In Ashok Vihar, New Delhi **✿❀7042364481❀✿**Escorts ServiCes C...
 
call girls in G.T.B. Nagar (DELHI) 🔝 >༒9953330565🔝 genuine Escort Service 🔝✔️✔️
call girls in  G.T.B. Nagar (DELHI) 🔝 >༒9953330565🔝 genuine Escort Service 🔝✔️✔️call girls in  G.T.B. Nagar (DELHI) 🔝 >༒9953330565🔝 genuine Escort Service 🔝✔️✔️
call girls in G.T.B. Nagar (DELHI) 🔝 >༒9953330565🔝 genuine Escort Service 🔝✔️✔️
 
Crash Vehicle Emergency Rescue Slideshow.ppt
Crash Vehicle Emergency Rescue Slideshow.pptCrash Vehicle Emergency Rescue Slideshow.ppt
Crash Vehicle Emergency Rescue Slideshow.ppt
 
VIP Mumbai Call Girls Thakur village Just Call 9920874524 with A/C Room Cash ...
VIP Mumbai Call Girls Thakur village Just Call 9920874524 with A/C Room Cash ...VIP Mumbai Call Girls Thakur village Just Call 9920874524 with A/C Room Cash ...
VIP Mumbai Call Girls Thakur village Just Call 9920874524 with A/C Room Cash ...
 
GREEN VEHICLES the kids picture show 2024
GREEN VEHICLES the kids picture show 2024GREEN VEHICLES the kids picture show 2024
GREEN VEHICLES the kids picture show 2024
 
如何办理(UQ毕业证书)昆士兰大学毕业证毕业证成绩单原版一比一
如何办理(UQ毕业证书)昆士兰大学毕业证毕业证成绩单原版一比一如何办理(UQ毕业证书)昆士兰大学毕业证毕业证成绩单原版一比一
如何办理(UQ毕业证书)昆士兰大学毕业证毕业证成绩单原版一比一
 
VIP Kolkata Call Girl Kasba 👉 8250192130 Available With Room
VIP Kolkata Call Girl Kasba 👉 8250192130  Available With RoomVIP Kolkata Call Girl Kasba 👉 8250192130  Available With Room
VIP Kolkata Call Girl Kasba 👉 8250192130 Available With Room
 
Call me @ 9892124323 Call Girl in Andheri East With Free Home Delivery
Call me @ 9892124323 Call Girl in Andheri East With Free Home DeliveryCall me @ 9892124323 Call Girl in Andheri East With Free Home Delivery
Call me @ 9892124323 Call Girl in Andheri East With Free Home Delivery
 
UNIT-II-ENGINE AUXILIARY SYSTEMS &TURBOCHARGER
UNIT-II-ENGINE AUXILIARY SYSTEMS &TURBOCHARGERUNIT-II-ENGINE AUXILIARY SYSTEMS &TURBOCHARGER
UNIT-II-ENGINE AUXILIARY SYSTEMS &TURBOCHARGER
 
John Deere Tractors 5515 Diagnostic Repair Manual
John Deere Tractors 5515 Diagnostic Repair ManualJohn Deere Tractors 5515 Diagnostic Repair Manual
John Deere Tractors 5515 Diagnostic Repair Manual
 
Digamma / CertiCon Company Presentation
Digamma / CertiCon Company  PresentationDigamma / CertiCon Company  Presentation
Digamma / CertiCon Company Presentation
 
Innovating Manufacturing with CNC Technology
Innovating Manufacturing with CNC TechnologyInnovating Manufacturing with CNC Technology
Innovating Manufacturing with CNC Technology
 
BLUE VEHICLES the kids picture show 2024
BLUE VEHICLES the kids picture show 2024BLUE VEHICLES the kids picture show 2024
BLUE VEHICLES the kids picture show 2024
 
Russian Call Girls Delhi Indirapuram {9711199171} Aarvi Gupta ✌️Independent ...
Russian  Call Girls Delhi Indirapuram {9711199171} Aarvi Gupta ✌️Independent ...Russian  Call Girls Delhi Indirapuram {9711199171} Aarvi Gupta ✌️Independent ...
Russian Call Girls Delhi Indirapuram {9711199171} Aarvi Gupta ✌️Independent ...
 
Hotel Escorts Sushant Golf City - 9548273370 Call Girls Service in Lucknow, c...
Hotel Escorts Sushant Golf City - 9548273370 Call Girls Service in Lucknow, c...Hotel Escorts Sushant Golf City - 9548273370 Call Girls Service in Lucknow, c...
Hotel Escorts Sushant Golf City - 9548273370 Call Girls Service in Lucknow, c...
 

AutomatingManufacturingSystemsWithPLCs.pdf

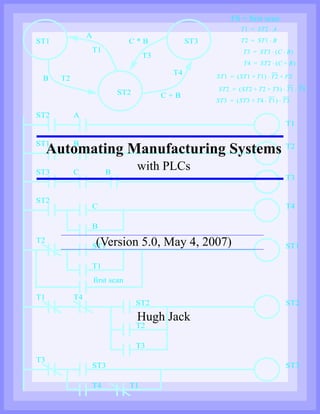
  • 1. page 0 A C + B C * B B T1 ST2 A ⋅ = T1 T2 T3 T4 ST1 ST2 ST3 FS = first scan ST1 ST1 T1 + ( ) T2 ⋅ FS + = ST2 ST2 T2 T3 + + ( ) T1 T4 ⋅ ⋅ = ST3 ST3 T4 T1 ⋅ + ( ) T3 ⋅ = T2 ST1 B ⋅ = T3 ST3 C B ⋅ ( ) ⋅ = T4 ST2 C B + ( ) ⋅ = ST2 A ST1 B ST3 C B T1 T2 T3 T4 ST2 C B ST1 T2 ST1 T1 first scan ST2 T1 ST2 T2 T3 ST3 T3 ST3 T4 T4 T1 Automating Manufacturing Systems with PLCs (Version 5.0, May 4, 2007) Hugh Jack
  • 2. page 0 Copyright (c) 1993-2007 Hugh Jack (jackh@gvsu.edu). Permission is granted to copy, distribute and/or modify this document under the terms of the GNU Free Documentation License, Version 1.2 or any later version published by the Free Software Foundation; with no Invariant Sections, no Front-Cover Texts, and no Back-Cover Texts. A copy of the license is included in the section entitled "GNU Free Documentation License". This document is provided as-is with no warranty, implied or otherwise. There have been attempts to eliminate errors from this document, but there is no doubt that errors remain. As a result, the author does not assume any responsibility for errors and omissions, or damages resulting from the use of the information pro- vided. Additional materials and updates for this work will be available at http://clay- more.engineer.gvsu.edu/~jackh/books.html www.PAControl.com
  • 3. page i 1.1 TODO LIST 1.3 2. PROGRAMMABLE LOGIC CONTROLLERS . . . . . . . . . . . . . 2.1 2.1 INTRODUCTION 2.1 2.1.1 Ladder Logic 2.1 2.1.2 Programming 2.6 2.1.3 PLC Connections 2.10 2.1.4 Ladder Logic Inputs 2.11 2.1.5 Ladder Logic Outputs 2.12 2.2 A CASE STUDY 2.13 2.3 SUMMARY 2.14 2.4 PRACTICE PROBLEMS 2.15 2.5 PRACTICE PROBLEM SOLUTIONS 2.15 2.6 ASSIGNMENT PROBLEMS 2.16 3. PLC HARDWARE . . . . . . . . . . . . . . . . . . . . . . . . . . . . . . . . . . . . 3.1 3.1 INTRODUCTION 3.1 3.2 INPUTS AND OUTPUTS 3.2 3.2.1 Inputs 3.3 3.2.2 Output Modules 3.7 3.3 RELAYS 3.13 3.4 A CASE STUDY 3.14 3.5 ELECTRICAL WIRING DIAGRAMS 3.15 3.5.1 JIC Wiring Symbols 3.18 3.6 SUMMARY 3.22 3.7 PRACTICE PROBLEMS 3.22 3.8 PRACTICE PROBLEM SOLUTIONS 3.25 3.9 ASSIGNMENT PROBLEMS 3.28 4. LOGICAL SENSORS . . . . . . . . . . . . . . . . . . . . . . . . . . . . . . . . . . 4.1 4.1 INTRODUCTION 4.1 4.2 SENSOR WIRING 4.1 4.2.1 Switches 4.2 4.2.2 Transistor Transistor Logic (TTL) 4.3 4.2.3 Sinking/Sourcing 4.3 4.2.4 Solid State Relays 4.10 4.3 PRESENCE DETECTION 4.11 4.3.1 Contact Switches 4.11 4.3.2 Reed Switches 4.11 4.3.3 Optical (Photoelectric) Sensors 4.12 4.3.4 Capacitive Sensors 4.19 4.3.5 Inductive Sensors 4.23 4.3.6 Ultrasonic 4.25 4.3.7 Hall Effect 4.25 www.PAControl.com
  • 4. page ii 4.3.8 Fluid Flow 4.26 4.4 SUMMARY 4.26 4.5 PRACTICE PROBLEMS 4.27 4.6 PRACTICE PROBLEM SOLUTIONS 4.30 4.7 ASSIGNMENT PROBLEMS 4.36 5. LOGICAL ACTUATORS . . . . . . . . . . . . . . . . . . . . . . . . . . . . . . 5.1 5.1 INTRODUCTION 5.1 5.2 SOLENOIDS 5.1 5.3 VALVES 5.2 5.4 CYLINDERS 5.4 5.5 HYDRAULICS 5.6 5.6 PNEUMATICS 5.8 5.7 MOTORS 5.9 5.8 OTHERS 5.10 5.9 SUMMARY 5.10 5.10 PRACTICE PROBLEMS 5.10 5.11 PRACTICE PROBLEM SOLUTIONS 5.11 5.12 ASSIGNMENT PROBLEMS 5.12 6. BOOLEAN LOGIC DESIGN . . . . . . . . . . . . . . . . . . . . . . . . . . . . 6.1 6.1 INTRODUCTION 6.1 6.2 BOOLEAN ALGEBRA 6.1 6.3 LOGIC DESIGN 6.6 6.3.1 Boolean Algebra Techniques 6.13 6.4 COMMON LOGIC FORMS 6.14 6.4.1 Complex Gate Forms 6.14 6.4.2 Multiplexers 6.15 6.5 SIMPLE DESIGN CASES 6.17 6.5.1 Basic Logic Functions 6.17 6.5.2 Car Safety System 6.18 6.5.3 Motor Forward/Reverse 6.18 6.5.4 A Burglar Alarm 6.19 6.6 SUMMARY 6.23 6.7 PRACTICE PROBLEMS 6.24 6.8 PRACTICE PROBLEM SOLUTIONS 6.27 6.9 ASSIGNMENT PROBLEMS 6.37 7. KARNAUGH MAPS . . . . . . . . . . . . . . . . . . . . . . . . . . . . . . . . . . 7.1 7.1 INTRODUCTION 7.1 7.2 SUMMARY 7.4 7.3 PRACTICE PROBLEMS 7.5 7.4 PRACTICE PROBLEM SOLUTIONS 7.11 www.PAControl.com
  • 5. page iii 7.5 ASSIGNMENT PROBLEMS 7.17 8. PLC OPERATION . . . . . . . . . . . . . . . . . . . . . . . . . . . . . . . . . . . . 8.1 8.1 INTRODUCTION 8.1 8.2 OPERATION SEQUENCE 8.3 8.2.1 The Input and Output Scans 8.4 8.2.2 The Logic Scan 8.4 8.3 PLC STATUS 8.6 8.4 MEMORY TYPES 8.6 8.5 SOFTWARE BASED PLCS 8.7 8.6 SUMMARY 8.7 8.7 PRACTICE PROBLEMS 8.8 8.8 PRACTICE PROBLEM SOLUTIONS 8.8 8.9 ASSIGNMENT PROBLEMS 8.9 9. LATCHES, TIMERS, COUNTERS AND MORE . . . . . . . . . . . . 9.1 9.1 INTRODUCTION 9.1 9.2 LATCHES 9.2 9.3 TIMERS 9.6 9.4 COUNTERS 9.14 9.5 MASTER CONTROL RELAYS (MCRs) 9.17 9.6 INTERNAL BITS 9.19 9.7 DESIGN CASES 9.20 9.7.1 Basic Counters And Timers 9.20 9.7.2 More Timers And Counters 9.21 9.7.3 Deadman Switch 9.22 9.7.4 Conveyor 9.23 9.7.5 Accept/Reject Sorting 9.24 9.7.6 Shear Press 9.26 9.8 SUMMARY 9.27 9.9 PRACTICE PROBLEMS 9.28 9.10 PRACTICE PROBLEM SOLUTIONS 9.32 9.11 ASSIGNMENT PROBLEMS 9.43 10. STRUCTURED LOGIC DESIGN . . . . . . . . . . . . . . . . . . . . . . . 10.1 10.1 INTRODUCTION 10.1 10.2 PROCESS SEQUENCE BITS 10.2 10.3 TIMING DIAGRAMS 10.6 10.4 DESIGN CASES 10.9 10.5 SUMMARY 10.9 10.6 PRACTICE PROBLEMS 10.9 10.7 PRACTICE PROBLEM SOLUTIONS 10.10 10.8 ASSIGNMENT PROBLEMS 10.14 www.PAControl.com
  • 6. page iv 11. FLOWCHART BASED DESIGN . . . . . . . . . . . . . . . . . . . . . . . 11.1 11.1 INTRODUCTION 11.1 11.2 BLOCK LOGIC 11.4 11.3 SEQUENCE BITS 11.11 11.4 SUMMARY 11.15 11.5 PRACTICE PROBLEMS 11.15 11.6 PRACTICE PROBLEM SOLUTIONS 11.16 11.7 ASSIGNMENT PROBLEMS 11.26 12. STATE BASED DESIGN . . . . . . . . . . . . . . . . . . . . . . . . . . . . . . 12.1 12.1 INTRODUCTION 12.1 12.1.1 State Diagram Example 12.4 12.1.2 Conversion to Ladder Logic 12.7 Block Logic Conversion 12.7 State Equations 12.16 State-Transition Equations 12.24 12.2 SUMMARY 12.29 12.3 PRACTICE PROBLEMS 12.29 12.4 PRACTICE PROBLEM SOLUTIONS 12.34 12.5 ASSIGNMENT PROBLEMS 12.49 13. NUMBERS AND DATA . . . . . . . . . . . . . . . . . . . . . . . . . . . . . . 13.1 13.1 INTRODUCTION 13.1 13.2 NUMERICAL VALUES 13.2 13.2.1 Binary 13.2 Boolean Operations 13.5 Binary Mathematics 13.6 13.2.2 Other Base Number Systems 13.10 13.2.3 BCD (Binary Coded Decimal) 13.11 13.3 DATA CHARACTERIZATION 13.11 13.3.1 ASCII (American Standard Code for Information Interchange) 13.11 13.3.2 Parity 13.14 13.3.3 Checksums 13.15 13.3.4 Gray Code 13.16 13.4 SUMMARY 13.17 13.5 PRACTICE PROBLEMS 13.17 13.6 PRACTICE PROBLEM SOLUTIONS 13.20 13.7 ASSIGNMENT PROBLEMS 13.23 14. PLC MEMORY . . . . . . . . . . . . . . . . . . . . . . . . . . . . . . . . . . . . . . 14.1 14.1 INTRODUCTION 14.1 14.2 PROGRAM VS VARIABLE MEMORY 14.1 www.PAControl.com
  • 7. page v 14.3 PROGRAMS 14.3 14.4 VARIABLES (TAGS) 14.3 14.4.1 Timer and Counter Memory 14.6 14.4.2 PLC Status Bits 14.8 14.4.3 User Function Control Memory 14.11 14.5 SUMMARY 14.12 14.6 PRACTICE PROBLEMS 14.12 14.7 PRACTICE PROBLEM SOLUTIONS 14.13 14.8 ASSIGNMENT PROBLEMS 14.15 15. LADDER LOGIC FUNCTIONS . . . . . . . . . . . . . . . . . . . . . . . . 15.1 15.1 INTRODUCTION 15.1 15.2 DATA HANDLING 15.3 15.2.1 Move Functions 15.3 15.2.2 Mathematical Functions 15.5 15.2.3 Conversions 15.10 15.2.4 Array Data Functions 15.11 Statistics 15.12 Block Operations 15.13 15.3 LOGICAL FUNCTIONS 15.15 15.3.1 Comparison of Values 15.15 15.3.2 Boolean Functions 15.21 15.4 DESIGN CASES 15.22 15.4.1 Simple Calculation 15.22 15.4.2 For-Next 15.23 15.4.3 Series Calculation 15.24 15.4.4 Flashing Lights 15.25 15.5 SUMMARY 15.25 15.6 PRACTICE PROBLEMS 15.26 15.7 PRACTICE PROBLEM SOLUTIONS 15.28 15.8 ASSIGNMENT PROBLEMS 15.34 16. ADVANCED LADDER LOGIC FUNCTIONS . . . . . . . . . . . . . 16.1 16.1 INTRODUCTION 16.1 16.2 LIST FUNCTIONS 16.1 16.2.1 Shift Registers 16.1 16.2.2 Stacks 16.3 16.2.3 Sequencers 16.6 16.3 PROGRAM CONTROL 16.9 16.3.1 Branching and Looping 16.9 16.3.2 Fault Handling 16.14 16.3.3 Interrupts 16.15 16.4 INPUT AND OUTPUT FUNCTIONS 16.17 16.4.1 Immediate I/O Instructions 16.17 www.PAControl.com
  • 8. page vi 16.5 DESIGN TECHNIQUES 16.19 16.5.1 State Diagrams 16.19 16.6 DESIGN CASES 16.24 16.6.1 If-Then 16.24 16.6.2 Traffic Light 16.25 16.7 SUMMARY 16.25 16.8 PRACTICE PROBLEMS 16.26 16.9 PRACTICE PROBLEM SOLUTIONS 16.28 16.10 ASSIGNMENT PROBLEMS 16.37 17. OPEN CONTROLLERS . . . . . . . . . . . . . . . . . . . . . . . . . . . . . . . 17.1 17.1 INTRODUCTION 17.1 17.2 IEC 61131 17.2 17.3 OPEN ARCHITECTURE CONTROLLERS 17.3 17.4 SUMMARY 17.4 17.5 PRACTICE PROBLEMS 17.4 17.6 PRACTICE PROBLEM SOLUTIONS 17.4 17.7 ASSIGNMENT PROBLEMS 17.4 18. INSTRUCTION LIST PROGRAMMING . . . . . . . . . . . . . . . . . 18.1 18.1 INTRODUCTION 18.1 18.2 THE IEC 61131 VERSION 18.1 18.3 THE ALLEN-BRADLEY VERSION 18.4 18.4 SUMMARY 18.9 18.5 PRACTICE PROBLEMS 18.10 18.6 PRACTICE PROBLEM SOLUTIONS 18.10 18.7 ASSIGNMENT PROBLEMS 18.10 19. STRUCTURED TEXT PROGRAMMING . . . . . . . . . . . . . . . . 19.1 19.1 INTRODUCTION 19.1 19.2 THE LANGUAGE 19.2 19.2.1 Elements of the Language 19.3 19.2.2 Putting Things Together in a Program 19.9 19.3 AN EXAMPLE 19.14 19.4 SUMMARY 19.16 19.5 PRACTICE PROBLEMS 19.16 19.6 PRACTICE PROBLEM SOLUTIONS 19.16 19.7 ASSIGNMENT PROBLEMS 19.16 20. SEQUENTIAL FUNCTION CHARTS . . . . . . . . . . . . . . . . . . . 20.1 20.1 INTRODUCTION 20.1 20.2 A COMPARISON OF METHODS 20.16 20.3 SUMMARY 20.16 www.PAControl.com
  • 9. page vii 20.4 PRACTICE PROBLEMS 20.17 20.5 PRACTICE PROBLEM SOLUTIONS 20.18 20.6 ASSIGNMENT PROBLEMS 20.25 21. FUNCTION BLOCK PROGRAMMING . . . . . . . . . . . . . . . . . . 21.1 21.1 INTRODUCTION 21.1 21.2 CREATING FUNCTION BLOCKS 21.3 21.3 DESIGN CASE 21.4 21.4 SUMMARY 21.4 21.5 PRACTICE PROBLEMS 21.5 21.6 PRACTICE PROBLEM SOLUTIONS 21.5 21.7 ASSIGNMENT PROBLEMS 21.5 22. ANALOG INPUTS AND OUTPUTS . . . . . . . . . . . . . . . . . . . . 22.1 22.1 INTRODUCTION 22.1 22.2 ANALOG INPUTS 22.2 22.2.1 Analog Inputs With a PLC-5 22.9 22.3 ANALOG OUTPUTS 22.13 22.3.1 Analog Outputs With A PLC-5 22.16 22.3.2 Pulse Width Modulation (PWM) Outputs 22.18 22.3.3 Shielding 22.20 22.4 DESIGN CASES 22.22 22.4.1 Process Monitor 22.22 22.5 SUMMARY 22.22 22.6 PRACTICE PROBLEMS 22.23 22.7 PRACTICE PROBLEM SOLUTIONS 22.24 22.8 ASSIGNMENT PROBLEMS 22.29 23. CONTINUOUS SENSORS . . . . . . . . . . . . . . . . . . . . . . . . . . . . 23.1 23.1 INTRODUCTION 23.1 23.2 INDUSTRIAL SENSORS 23.2 23.2.1 Angular Displacement 23.3 Potentiometers 23.3 23.2.2 Encoders 23.4 Tachometers 23.8 23.2.3 Linear Position 23.8 Potentiometers 23.8 Linear Variable Differential Transformers (LVDT)23.9 Moire Fringes 23.11 Accelerometers 23.12 23.2.4 Forces and Moments 23.15 Strain Gages 23.15 Piezoelectric 23.18 23.2.5 Liquids and Gases 23.20 www.PAControl.com
  • 10. page viii Pressure 23.21 Venturi Valves 23.22 Coriolis Flow Meter 23.23 Magnetic Flow Meter 23.24 Ultrasonic Flow Meter 23.24 Vortex Flow Meter 23.24 Positive Displacement Meters 23.25 Pitot Tubes 23.25 23.2.6 Temperature 23.25 Resistive Temperature Detectors (RTDs) 23.26 Thermocouples 23.26 Thermistors 23.28 Other Sensors 23.30 23.2.7 Light 23.30 Light Dependant Resistors (LDR) 23.30 23.2.8 Chemical 23.31 pH 23.31 Conductivity 23.31 23.2.9 Others 23.32 23.3 INPUT ISSUES 23.32 23.4 SENSOR GLOSSARY 23.35 23.5 SUMMARY 23.36 23.6 REFERENCES 23.37 23.7 PRACTICE PROBLEMS 23.37 23.8 PRACTICE PROBLEM SOLUTIONS 23.38 23.9 ASSIGNMENT PROBLEMS 23.40 24. CONTINUOUS ACTUATORS . . . . . . . . . . . . . . . . . . . . . . . . . 24.1 24.1 INTRODUCTION 24.1 24.2 ELECTRIC MOTORS 24.1 24.2.1 Basic Brushed DC Motors 24.3 24.2.2 AC Motors 24.7 24.2.3 Brushless DC Motors 24.15 24.2.4 Stepper Motors 24.17 24.2.5 Wound Field Motors 24.19 24.3 HYDRAULICS 24.23 24.4 OTHER SYSTEMS 24.24 24.5 SUMMARY 24.25 24.6 PRACTICE PROBLEMS 24.25 24.7 PRACTICE PROBLEM SOLUTIONS 24.26 24.8 ASSIGNMENT PROBLEMS 24.27 25. CONTINUOUS CONTROL . . . . . . . . . . . . . . . . . . . . . . . . . . . . 25.1 25.1 INTRODUCTION 25.1 www.PAControl.com
  • 11. page ix 25.2 CONTROL OF LOGICAL ACTUATOR SYSTEMS 25.4 25.3 CONTROL OF CONTINUOUS ACTUATOR SYSTEMS 25.5 25.3.1 Block Diagrams 25.5 25.3.2 Feedback Control Systems 25.6 25.3.3 Proportional Controllers 25.8 25.3.4 PID Control Systems 25.12 25.4 DESIGN CASES 25.14 25.4.1 Oven Temperature Control 25.14 25.4.2 Water Tank Level Control 25.17 25.4.3 Position Measurement 25.20 25.5 SUMMARY 25.20 25.6 PRACTICE PROBLEMS 25.21 25.7 PRACTICE PROBLEM SOLUTIONS 25.22 25.8 ASSIGNMENT PROBLEMS 25.26 26. FUZZY LOGIC . . . . . . . . . . . . . . . . . . . . . . . . . . . . . . . . . . . . . . 26.1 26.1 INTRODUCTION 26.1 26.2 COMMERCIAL CONTROLLERS 26.7 26.3 REFERENCES 26.7 26.4 SUMMARY 26.7 26.5 PRACTICE PROBLEMS 26.8 26.6 PRACTICE PROBLEM SOLUTIONS 26.8 26.7 ASSIGNMENT PROBLEMS 26.8 27. SERIAL COMMUNICATION . . . . . . . . . . . . . . . . . . . . . . . . . . 27.1 27.1 INTRODUCTION 27.1 27.2 SERIAL COMMUNICATIONS 27.2 27.2.1 RS-232 27.5 ASCII Functions 27.9 27.3 PARALLEL COMMUNICATIONS 27.13 27.4 DESIGN CASES 27.14 27.4.1 PLC Interface To a Robot 27.14 27.5 SUMMARY 27.15 27.6 PRACTICE PROBLEMS 27.15 27.7 PRACTICE PROBLEM SOLUTIONS 27.16 27.8 ASSIGNMENT PROBLEMS 27.18 28. NETWORKING . . . . . . . . . . . . . . . . . . . . . . . . . . . . . . . . . . . . . 28.1 28.1 INTRODUCTION 28.1 28.1.1 Topology 28.2 28.1.2 OSI Network Model 28.3 28.1.3 Networking Hardware 28.5 28.1.4 Control Network Issues 28.7 28.2 NETWORK STANDARDS 28.8 www.PAControl.com
  • 12. page x 28.2.1 Devicenet 28.8 28.2.2 CANbus 28.12 28.2.3 Controlnet 28.13 28.2.4 Ethernet 28.14 28.2.5 Profibus 28.15 28.2.6 Sercos 28.15 28.3 PROPRIETARY NETWORKS 28.16 28.3.1 Data Highway 28.16 28.4 NETWORK COMPARISONS 28.20 28.5 DESIGN CASES 28.22 28.5.1 Devicenet 28.22 28.6 SUMMARY 28.23 28.7 PRACTICE PROBLEMS 28.23 28.8 PRACTICE PROBLEM SOLUTIONS 28.24 28.9 ASSIGNMENT PROBLEMS 28.28 29. INTERNET . . . . . . . . . . . . . . . . . . . . . . . . . . . . . . . . . . . . . . . . . 29.1 29.1 INTRODUCTION 29.1 29.1.1 Computer Addresses 29.2 IPV6 29.3 29.1.2 Phone Lines 29.3 29.1.3 Mail Transfer Protocols 29.3 29.1.4 FTP - File Transfer Protocol 29.4 29.1.5 HTTP - Hypertext Transfer Protocol 29.4 29.1.6 Novell 29.4 29.1.7 Security 29.5 Firewall 29.5 IP Masquerading 29.5 29.1.8 HTML - Hyper Text Markup Language 29.5 29.1.9 URLs 29.6 29.1.10 Encryption 29.6 29.1.11 Compression 29.7 29.1.12 Clients and Servers 29.7 29.1.13 Java 29.9 29.1.14 Javascript 29.9 29.1.15 CGI 29.9 29.1.16 ActiveX 29.9 29.1.17 Graphics 29.10 29.2 DESIGN CASES 29.10 29.2.1 Remote Monitoring System 29.10 29.3 SUMMARY 29.11 29.4 PRACTICE PROBLEMS 29.11 29.5 PRACTICE PROBLEM SOLUTIONS 29.11 29.6 ASSIGNMENT PROBLEMS 29.11 www.PAControl.com
  • 13. page xi 30. HUMAN MACHINE INTERFACES (HMI) . . . . . . . . . . . . . . . 30.1 30.1 INTRODUCTION 30.1 30.2 HMI/MMI DESIGN 30.2 30.3 DESIGN CASES 30.3 30.4 SUMMARY 30.3 30.5 PRACTICE PROBLEMS 30.4 30.6 PRACTICE PROBLEM SOLUTIONS 30.4 30.7 ASSIGNMENT PROBLEMS 30.4 31. ELECTRICAL DESIGN AND CONSTRUCTION . . . . . . . . . . 31.1 31.1 INTRODUCTION 31.1 31.2 ELECTRICAL WIRING DIAGRAMS 31.1 31.2.1 Selecting Voltages 31.8 31.2.2 Grounding 31.9 31.2.3 Wiring 31.12 31.2.4 Suppressors 31.13 31.2.5 PLC Enclosures 31.14 31.2.6 Wire and Cable Grouping 31.16 31.3 FAIL-SAFE DESIGN 31.17 31.4 SAFETY RULES SUMMARY 31.18 31.5 REFERENCES 31.20 31.6 SUMMARY 31.20 31.7 PRACTICE PROBLEMS 31.20 31.8 PRACTICE PROBLEM SOLUTIONS 31.20 31.9 ASSIGNMENT PROBLEMS 31.20 32. SOFTWARE ENGINEERING . . . . . . . . . . . . . . . . . . . . . . . . . . 32.1 32.1 INTRODUCTION 32.1 32.1.1 Fail Safe Design 32.1 32.2 DEBUGGING 32.2 32.2.1 Troubleshooting 32.3 32.2.2 Forcing 32.3 32.3 PROCESS MODELLING 32.3 32.4 PROGRAMMING FOR LARGE SYSTEMS 32.8 32.4.1 Developing a Program Structure 32.8 32.4.2 Program Verification and Simulation 32.11 32.5 DOCUMENTATION 32.12 32.6 COMMISIONING 32.20 32.7 SAFETY 32.20 32.7.1 IEC 61508/61511 safety standards 32.21 32.8 LEAN MANUFACTURING 32.22 32.9 REFERENCES 32.23 32.10 SUMMARY 32.23 www.PAControl.com
  • 14. page xii 32.11 PRACTICE PROBLEMS 32.23 32.12 PRACTICE PROBLEM SOLUTIONS 32.23 32.13 ASSIGNMENT PROBLEMS 32.23 33. SELECTING A PLC . . . . . . . . . . . . . . . . . . . . . . . . . . . . . . . . . . 33.1 33.1 INTRODUCTION 33.1 33.2 SPECIAL I/O MODULES 33.6 33.3 SUMMARY 33.9 33.4 PRACTICE PROBLEMS 33.10 33.5 PRACTICE PROBLEM SOLUTIONS 33.10 33.6 ASSIGNMENT PROBLEMS 33.10 34. FUNCTION REFERENCE . . . . . . . . . . . . . . . . . . . . . . . . . . . . . 34.1 34.1 FUNCTION DESCRIPTIONS 34.1 34.1.1 General Functions 34.1 34.1.2 Program Control 34.3 34.1.3 Timers and Counters 34.5 34.1.4 Compare 34.10 34.1.5 Calculation and Conversion 34.14 34.1.6 Logical 34.20 34.1.7 Move 34.21 34.1.8 File 34.22 34.1.9 List 34.27 34.1.10 Program Control 34.30 34.1.11 Advanced Input/Output 34.34 34.1.12 String 34.37 34.2 DATA TYPES 34.42 35. COMBINED GLOSSARY OF TERMS . . . . . . . . . . . . . . . . . . . 35.1 35.1 A 35.1 35.2 B 35.2 35.3 C 35.5 35.4 D 35.9 35.5 E 35.11 35.6 F 35.12 35.7 G 35.13 35.8 H 35.14 35.9 I 35.14 35.10 J 35.16 35.11 K 35.16 35.12 L 35.17 35.13 M 35.17 35.14 N 35.19 35.15 O 35.20 www.PAControl.com
  • 15. page xiii 35.16 P 35.21 35.17 Q 35.23 35.18 R 35.23 35.19 S 35.25 35.20 T 35.27 35.21 U 35.28 35.22 V 35.29 35.23 W 35.29 35.24 X 35.30 35.25 Y 35.30 35.26 Z 35.30 36. PLC REFERENCES . . . . . . . . . . . . . . . . . . . . . . . . . . . . . . . . . . 36.1 36.1 SUPPLIERS 36.1 36.2 PROFESSIONAL INTEREST GROUPS 36.2 36.3 PLC/DISCRETE CONTROL REFERENCES 36.2 37. GNU Free Documentation License . . . . . . . . . . . . . . . . . . . . . . . 37.1 37.1 PREAMBLE 37.1 37.2 APPLICABILITY AND DEFINITIONS 37.1 37.3 VERBATIM COPYING 37.2 37.4 COPYING IN QUANTITY 37.3 37.5 MODIFICATIONS 37.3 37.6 COMBINING DOCUMENTS 37.5 37.7 COLLECTIONS OF DOCUMENTS 37.5 37.8 AGGREGATION WITH INDEPENDENT WORKS 37.6 37.9 TRANSLATION 37.6 37.10 TERMINATION 37.6 37.11 FUTURE REVISIONS OF THIS LICENSE 37.6 37.12 How to use this License for your documents 37.7 www.PAControl.com
  • 16. plc wiring - 1.1 PREFACE Designing software for control systems is difficult. Experienced controls engineers have learned many techniques that allow them to solve problems. This book was written to present methods for designing controls software using Programmable Logic Controllers (PLCs). It is my personal hope that by employing the knowledge in the book that you will be able to quickly write controls programs that work as expected (and avoid having to learn by costly mistakes.) This book has been designed for students with some knowledge of technology, including limited electricity, who wish to learn the discipline of practical control system design on commonly used hardware. To this end the book will use the Allen Bradley Con- trolLogix processors to allow depth. Although the chapters will focus on specific hard- ware, the techniques are portable to other PLCs. Whenever possible the IEC 61131 programming standards will be used to help in the use of other PLCs. In some cases the material will build upon the content found in a linear controls course. But, a heavy emphasis is placed on discrete control systems. Figure 1.1 crudely shows some of the basic categories of control system problems. Figure 1.1 Control Dichotomy • Continuous - The values to be controlled change smoothly. e.g. the speed of a car. • Logical/Discrete - The value to be controlled are easily described as on-off. e.g. the car motor is on-off. NOTE: all systems are continuous but they can be treated as logical for simplicity. e.g. “When I do this, that always happens!” For example, when the power is turned on, the press closes! CONTROL CONTINUOUS DISCRETE LINEAR NON_LINEAR CONDITIONAL SEQUENTIAL e.g. PID e.g. MRAC e.g. FUZZY LOGIC BOOLEAN TEMPORAL e.g. TIMERS e.g. COUNTERS EVENT BASED EXPERT SYSTEMS www.PAControl.com
  • 17. plc wiring - 1.2 • Linear - Can be described with a simple differential equation. This is the pre- ferred starting point for simplicity, and a common approximation for real world problems. e.g. A car can be driving around a track and can pass same the same spot at a constant velocity. But, the longer the car runs, the mass decreases, and it travels faster, but requires less gas, etc. Basically, the math gets tougher, and the problem becomes non-linear. e.g. We are driving the perfect car with no friction, with no drag, and can predict how it will work perfectly. • Non-Linear - Not Linear. This is how the world works and the mathematics become much more complex. e.g. As rocket approaches sun, gravity increases, so control must change. • Sequential - A logical controller that will keep track of time and previous events. The difference between these control systems can be emphasized by considering a simple elevator. An elevator is a car that travels between floors, stopping at precise heights. There are certain logical constraints used for safety and convenience. The points below emphasize different types of control problems in the elevator. Logical: 1. The elevator must move towards a floor when a button is pushed. 2. The elevator must open a door when it is at a floor. 3. It must have the door closed before it moves. etc. Linear: 1. If the desired position changes to a new value, accelerate quickly towards the new position. 2. As the elevator approaches the correct position, slow down. Non-linear: 1 Accelerate slowly to start. 2. Decelerate as you approach the final position. 3. Allow faster motion while moving. 4. Compensate for cable stretch, and changing spring constant, etc. Logical and sequential control is preferred for system design. These systems are more stable, and often lower cost. Most continuous systems can be controlled logically. But, some times we will encounter a system that must be controlled continuously. When this occurs the control system design becomes more demanding. When improperly con- trolled, continuous systems may be unstable and become dangerous. When a system is well behaved we say it is self regulating. These systems don’t need to be closely monitored, and we use open loop control. An open loop controller will set a desired position for a system, but no sensors are used to verify the position. When a www.PAControl.com
  • 18. plc wiring - 1.3 system must be constantly monitored and the control output adjusted we say it is closed loop. A cruise control in a car is an excellent example. This will monitor the actual speed of a car, and adjust the speed to meet a set target speed. Many control technologies are available for control. Early control systems relied upon mechanisms and electronics to build controlled. Most modern controllers use a com- puter to achieve control. The most flexible of these controllers is the PLC (Programmable Logic Controller). The book has been set up to aid the reader, as outlined below. Sections labeled Aside: are for topics that would be of interest to one disci- pline, such as electrical or mechanical. Sections labeled Note: are for clarification, to provide hints, or to add explanation. Each chapter supports about 1-4 lecture hours depending upon students background and level in the curriculum. Topics are organized to allow students to start laboratory work earlier in the semester. Sections begin with a topic list to help set thoughts. Objective given at the beginning of each chapter. Summary at the end of each chapter to give big picture. Significant use of figures to emphasize physical implementations. Worked examples and case studies. Problems at ends of chapters with solutions. Glossary. 1.1 TODO LIST - Finish writing chapters * - structured text chapter * - FBD chapter - fuzzy logic chapter * - internet chapter - hmi chapter - modify chapters * - add topic hierarchies to this chapter. split into basics, logic design tech- niques, new stuff, integration, professional design for curriculum design * - electrical wiring chapter - fix wiring and other issues in the implementation chapter - software chapter - improve P&ID section - appendices - complete list of instruction data types in appendix - small items www.PAControl.com
  • 19. plc wiring - 1.4 - update serial IO slides - all chapters * - grammar and spelling check * - update powerpoint slides * - add a resources web page with links - links to software/hardware vendors, iec1131, etc. - pictures of hardware and controls cabinet www.PAControl.com
  • 20. plc wiring - 2.1 2. PROGRAMMABLE LOGIC CONTROLLERS 2.1 INTRODUCTION Control engineering has evolved over time. In the past humans were the main method for controlling a system. More recently electricity has been used for control and early electrical control was based on relays. These relays allow power to be switched on and off without a mechanical switch. It is common to use relays to make simple logical control decisions. The development of low cost computer has brought the most recent rev- olution, the Programmable Logic Controller (PLC). The advent of the PLC began in the 1970s, and has become the most common choice for manufacturing controls. PLCs have been gaining popularity on the factory floor and will probably remain predominant for some time to come. Most of this is because of the advantages they offer. • Cost effective for controlling complex systems. • Flexible and can be reapplied to control other systems quickly and easily. • Computational abilities allow more sophisticated control. • Trouble shooting aids make programming easier and reduce downtime. • Reliable components make these likely to operate for years before failure. 2.1.1 Ladder Logic Ladder logic is the main programming method used for PLCs. As mentioned before, ladder logic has been developed to mimic relay logic. The decision to use the relay Topics: Objectives: • Know general PLC issues • To be able to write simple ladder logic programs • Understand the operation of a PLC • PLC History • Ladder Logic and Relays • PLC Programming • PLC Operation • An Example www.PAControl.com
  • 21. plc wiring - 2.2 logic diagrams was a strategic one. By selecting ladder logic as the main programming method, the amount of retraining needed for engineers and tradespeople was greatly reduced. Modern control systems still include relays, but these are rarely used for logic. A relay is a simple device that uses a magnetic field to control a switch, as pictured in Figure 2.1. When a voltage is applied to the input coil, the resulting current creates a magnetic field. The magnetic field pulls a metal switch (or reed) towards it and the contacts touch, closing the switch. The contact that closes when the coil is energized is called normally open. The normally closed contacts touch when the input coil is not energized. Relays are normally drawn in schematic form using a circle to represent the input coil. The output contacts are shown with two parallel lines. Normally open contacts are shown as two lines, and will be open (non-conducting) when the input is not energized. Normally closed contacts are shown with two lines with a diagonal line through them. When the input coil is not energized the normally closed contacts will be closed (conducting). www.PAControl.com
  • 22. plc wiring - 2.3 Figure 2.1 Simple Relay Layouts and Schematics Relays are used to let one power source close a switch for another (often high cur- rent) power source, while keeping them isolated. An example of a relay in a simple control application is shown in Figure 2.2. In this system the first relay on the left is used as nor- mally closed, and will allow current to flow until a voltage is applied to the input A. The second relay is normally open and will not allow current to flow until a voltage is applied to the input B. If current is flowing through the first two relays then current will flow through the coil in the third relay, and close the switch for output C. This circuit would normally be drawn in the ladder logic form. This can be read logically as C will be on if A is off and B is on. normally open normally closed input coil OR OR www.PAControl.com
  • 23. plc wiring - 2.4 Figure 2.2 A Simple Relay Controller The example in Figure 2.2 does not show the entire control system, but only the logic. When we consider a PLC there are inputs, outputs, and the logic. Figure 2.3 shows a more complete representation of the PLC. Here there are two inputs from push buttons. We can imagine the inputs as activating 24V DC relay coils in the PLC. This in turn drives an output relay that switches 115V AC, that will turn on a light. Note, in actual PLCs inputs are never relays, but outputs are often relays. The ladder logic in the PLC is actually a computer program that the user can enter and change. Notice that both of the input push buttons are normally open, but the ladder logic inside the PLC has one normally open con- tact, and one normally closed contact. Do not think that the ladder logic in the PLC needs to match the inputs or outputs. Many beginners will get caught trying to make the ladder logic match the input types. 115VAC wall plug relay logic input A (normally closed) input B (normally open) output C (normally open) ladder logic A B C www.PAControl.com
  • 24. plc wiring - 2.5 Figure 2.3 A PLC Illustrated With Relays Many relays also have multiple outputs (throws) and this allows an output relay to also be an input simultaneously. The circuit shown in Figure 2.4 is an example of this, it is called a seal in circuit. In this circuit the current can flow through either branch of the cir- cuit, through the contacts labelled A or B. The input B will only be on when the output B is on. If B is off, and A is energized, then B will turn on. If B turns on then the input B will turn on, and keep output B on even if input A goes off. After B is turned on the output B will not turn off. ladder power supply +24V com. inputs outputs push buttons logic PLC AC power 115Vac neut. A B C light www.PAControl.com
  • 25. plc wiring - 2.6 Figure 2.4 A Seal-in Circuit 2.1.2 Programming The first PLCs were programmed with a technique that was based on relay logic wiring schematics. This eliminated the need to teach the electricians, technicians and engi- neers how to program a computer - but, this method has stuck and it is the most common technique for programming PLCs today. An example of ladder logic can be seen in Figure 2.5. To interpret this diagram imagine that the power is on the vertical line on the left hand side, we call this the hot rail. On the right hand side is the neutral rail. In the figure there are two rungs, and on each rung there are combinations of inputs (two vertical lines) and outputs (circles). If the inputs are opened or closed in the right combination the power can flow from the hot rail, through the inputs, to power the outputs, and finally to the neutral rail. An input can come from a sensor, switch, or any other type of sensor. An output will be some device outside the PLC that is switched on or off, such as lights or motors. In the top rung the contacts are normally open and normally closed. Which means if input A is on and input B is off, then power will flow through the output and activate it. Any other com- bination of input values will result in the output X being off. Note: When A is pushed, the output B will turn on, and the input B will also turn on and keep B on perma- nently - until power is removed. A B B Note: The line on the right is being left off intentionally and is implied in these diagrams. www.PAControl.com
  • 26. plc wiring - 2.7 Figure 2.5 A Simple Ladder Logic Diagram The second rung of Figure 2.5 is more complex, there are actually multiple combi- nations of inputs that will result in the output Y turning on. On the left most part of the rung, power could flow through the top if C is off and D is on. Power could also (and simultaneously) flow through the bottom if both E and F are true. This would get power half way across the rung, and then if G or H is true the power will be delivered to output Y. In later chapters we will examine how to interpret and construct these diagrams. There are other methods for programming PLCs. One of the earliest techniques involved mnemonic instructions. These instructions can be derived directly from the lad- der logic diagrams and entered into the PLC through a simple programming terminal. An example of mnemonics is shown in Figure 2.6. In this example the instructions are read one line at a time from top to bottom. The first line 00000 has the instruction LDN (input load and not) for input A. This will examine the input to the PLC and if it is off it will remember a 1 (or true), if it is on it will remember a 0 (or false). The next line uses an LD (input load) statement to look at the input. If the input is off it remembers a 0, if the input is on it remembers a 1 (note: this is the reverse of the LD). The AND statement recalls the last two numbers remembered and if the are both true the result is a 1, otherwise the result is a 0. This result now replaces the two numbers that were recalled, and there is only one number remembered. The process is repeated for lines 00003 and 00004, but when these are done there are now three numbers remembered. The oldest number is from the AND, the newer numbers are from the two LD instructions. The AND in line 00005 combines the results from the last LD instructions and now there are two numbers remembered. The OR instruction takes the two numbers now remaining and if either one is a 1 the result is a 1, otherwise the result is a 0. This result replaces the two numbers, and there is now a single HOT NEUTRAL INPUTS OUTPUTS A B X C D E F G H Y Note: Power needs to flow through some combination of the inputs (A,B,C,D,E,F,G,H) to turn on outputs (X,Y). www.PAControl.com
  • 27. plc wiring - 2.8 number there. The last instruction is the ST (store output) that will look at the last value stored and if it is 1, the output will be turned on, if it is 0 the output will be turned off. Figure 2.6 An Example of a Mnemonic Program and Equivalent Ladder Logic The ladder logic program in Figure 2.6, is equivalent to the mnemonic program. Even if you have programmed a PLC with ladder logic, it will be converted to mnemonic form before being used by the PLC. In the past mnemonic programming was the most common, but now it is uncommon for users to even see mnemonic programs. 00000 00001 00002 00003 00004 00005 00006 LDN LD AND LD LD AND OR A B C D A B C D X END the mnemonic code is equivalent to the ladder logic below ST 00007 X END 00008 Note: The notation shown above is not standard Allen-Bradley notation. The program to the right would be the A-B equiva- lent. SOR BST XIC A XIO B NXB XIO C XIO D BND OTE X EOR END www.PAControl.com
  • 28. plc wiring - 2.9 Sequential Function Charts (SFCs) have been developed to accommodate the pro- gramming of more advanced systems. These are similar to flowcharts, but much more powerful. The example seen in Figure 2.7 is doing two different things. To read the chart, start at the top where is says start. Below this there is the double horizontal line that says follow both paths. As a result the PLC will start to follow the branch on the left and right hand sides separately and simultaneously. On the left there are two functions the first one is the power up function. This function will run until it decides it is done, and the power down function will come after. On the right hand side is the flash function, this will run until it is done. These functions look unexplained, but each function, such as power up will be a small ladder logic program. This method is much different from flowcharts because it does not have to follow a single path through the flowchart. Figure 2.7 An Example of a Sequential Function Chart Structured Text programming has been developed as a more modern programming language. It is quite similar to languages such as BASIC. A simple example is shown in Figure 2.8. This example uses a PLC memory location i. This memory location is for an integer, as will be explained later in the book. The first line of the program sets the value to 0. The next line begins a loop, and will be where the loop returns to. The next line recalls the value in location i, adds 1 to it and returns it to the same location. The next line checks to see if the loop should quit. If i is greater than or equal to 10, then the loop will quit, otherwise the computer will go back up to the REPEAT statement continue from there. Each time the program goes through this loop i will increase by 1 until the value reaches 10. Start End power up power down flash Execution follows multiple paths www.PAControl.com
  • 29. plc wiring - 2.10 Figure 2.8 An Example of a Structured Text Program 2.1.3 PLC Connections When a process is controlled by a PLC it uses inputs from sensors to make deci- sions and update outputs to drive actuators, as shown in Figure 2.9. The process is a real process that will change over time. Actuators will drive the system to new states (or modes of operation). This means that the controller is limited by the sensors available, if an input is not available, the controller will have no way to detect a condition. Figure 2.9 The Separation of Controller and Process The control loop is a continuous cycle of the PLC reading inputs, solving the lad- der logic, and then changing the outputs. Like any computer this does not happen instantly. Figure 2.10 shows the basic operation cycle of a PLC. When power is turned on initially the PLC does a quick sanity check to ensure that the hardware is working prop- erly. If there is a problem the PLC will halt and indicate there is an error. For example, if the PLC power is dropping and about to go off this will result in one type of fault. If the PLC passes the sanity check it will then scan (read) all the inputs. After the inputs values are stored in memory the ladder logic will be scanned (solved) using the stored values - not the current values. This is done to prevent logic problems when inputs change during the ladder logic scan. When the ladder logic scan is complete the outputs will be scanned i := 0; REPEAT i := i + 1; UNTIL i >= 10 END_REPEAT; PROCESS Feedback from sensors/switches PLC Connections to actuators www.PAControl.com
  • 30. plc wiring - 2.11 (the output values will be changed). After this the system goes back to do a sanity check, and the loop continues indefinitely. Unlike normal computers, the entire program will be run every scan. Typical times for each of the stages is in the order of milliseconds. Figure 2.10 The Scan Cycle of a PLC 2.1.4 Ladder Logic Inputs PLC inputs are easily represented in ladder logic. In Figure 2.11 there are three types of inputs shown. The first two are normally open and normally closed inputs, dis- cussed previously. The IIT (Immediate InpuT) function allows inputs to be read after the input scan, while the ladder logic is being scanned. This allows ladder logic to examine input values more often than once every cycle. (Note: This instruction is not available on the ControlLogix processors, but is still available on older models.) Read inputs PLC program changes outputs by examining inputs Set new outputs Process changes and PLC pauses while it checks its own operation THE CONTROL LOOP Power turned on www.PAControl.com
  • 31. plc wiring - 2.12 Figure 2.11 Ladder Logic Inputs 2.1.5 Ladder Logic Outputs In ladder logic there are multiple types of outputs, but these are not consistently available on all PLCs. Some of the outputs will be externally connected to devices outside the PLC, but it is also possible to use internal memory locations in the PLC. Six types of outputs are shown in Figure 2.12. The first is a normal output, when energized the output will turn on, and energize an output. The circle with a diagonal line through is a normally on output. When energized the output will turn off. This type of output is not available on all PLC types. When initially energized the OSR (One Shot Relay) instruction will turn on for one scan, but then be off for all scans after, until it is turned off. The L (latch) and U (unlatch) instructions can be used to lock outputs on. When an L output is energized the output will turn on indefinitely, even when the output coil is deenergized. The output can only be turned off using a U output. The last instruction is the IOT (Immediate OutpuT) that will allow outputs to be updated without having to wait for the ladder logic scan to be completed. Normally open, an active input x will close the contact and allow power to flow. Normally closed, power flows when the input x is not open. x x immediate inputs will take current values, not those from the previous input scan. (Note: this instruction is actually x IIT an output that will update the input table with the current input values. Other input contacts can now be used to examine the new values.) www.PAControl.com
  • 32. plc wiring - 2.13 Figure 2.12 Ladder Logic Outputs 2.2 A CASE STUDY Problem: Try to develop (without looking at the solution) a relay based controller that will allow three switches in a room to control a single light. When power is applied (on) the output x is activated for the left output, but turned An input transition on will cause the output x to go on for one scan x x OSR x (this is also known as a one shot relay) off for the output on the right. When the L coil is energized, x will be toggled on, it will stay on until the U coil Some PLCs will allow immediate outputs that do not wait for the program scan to L U IOT end before setting an output. (Note: This instruction will only update the outputs using is energized. This is like a flip-flop and stays set even when the PLC is turned off. x x x the output table, other instruction must change the individual outputs.) Note: Outputs are also commonly shown using parentheses -( )- instead of the circle. This is because many of the programming systems are text based and circles cannot be drawn. www.PAControl.com
  • 33. plc wiring - 2.14 2.3 SUMMARY • Normally open and closed contacts. • Relays and their relationship to ladder logic. • PLC outputs can be inputs, as shown by the seal in circuit. • Programming can be done with ladder logic, mnemonics, SFCs, and structured text. • There are multiple ways to write a PLC program. Solution: There are two possible approaches to this problem. The first assumes that any one of the switches on will turn on the light, but all three switches must be off for the light to be off. switch 1 switch 2 switch 3 light The second solution assumes that each switch can turn the light on or off, regardless of the states of the other switches. This method is more complex and involves thinking through all of the possible combinations of switch positions. You might recognize this problem as an exclusive or problem. switch 1 switch 1 switch 1 light switch 2 switch 2 switch 2 switch 3 switch 3 switch 3 switch 1 switch 2 switch 3 Note: It is important to get a clear understanding of how the controls are expected to work. In this example two radically different solutions were obtained based upon a simple difference in the operation. www.PAControl.com
  • 34. plc wiring - 2.15 2.4 PRACTICE PROBLEMS 1. Give an example of where a PLC could be used. 2. Why would relays be used in place of PLCs? 3. Give a concise description of a PLC. 4. List the advantages of a PLC over relays. 5. A PLC can effectively replace a number of components. Give examples and discuss some good and bad applications of PLCs. 6. Explain why ladder logic outputs are coils? 7. In the figure below, will the power for the output on the first rung normally be on or off? Would the output on the second rung normally be on or off? 8. Write the mnemonic program for the Ladder Logic below. 2.5 PRACTICE PROBLEM SOLUTIONS 1. To control a conveyor system 2. For simple designs 3. A PLC is a computer based controller that uses inputs to monitor a process, and uses outputs to control a process using a program. A B Y www.PAControl.com
  • 35. plc wiring - 2.16 4. Less expensive for complex processes, debugging tools, reliable, flexible, easy to expand, etc. 5. A PLC could replace a few relays. In this case the relays might be easier to install and less expensive. To control a more complex system the controller might need timing, counting and other mathematical calculations. In this case a PLC would be a better choice. 6. The ladder logic outputs were modelled on relay logic diagrams. The output in a relay ladder diagram is a relay coil that switches a set of output contacts. 7. off, on 8. Generic: LD A, LD B, OR, ST Y, END; Allen Bradley: SOR, BST, XIO A, NXB, XIO B, BND, OTE Y, EOR, END 2.6 ASSIGNMENT PROBLEMS 1. Explain the trade-offs between relays and PLCs for control applications. 2. Develop a simple ladder logic program that will turn on an output X if inputs A and B, or input C is on. www.PAControl.com
  • 36. plc wiring - 3.1 3. PLC HARDWARE 3.1 INTRODUCTION Many PLC configurations are available, even from a single vendor. But, in each of these there are common components and concepts. The most essential components are: Power Supply - This can be built into the PLC or be an external unit. Common voltage levels required by the PLC (with and without the power supply) are 24Vdc, 120Vac, 220Vac. CPU (Central Processing Unit) - This is a computer where ladder logic is stored and processed. I/O (Input/Output) - A number of input/output terminals must be provided so that the PLC can monitor the process and initiate actions. Indicator lights - These indicate the status of the PLC including power on, program running, and a fault. These are essential when diagnosing problems. The configuration of the PLC refers to the packaging of the components. Typical configurations are listed below from largest to smallest as shown in Figure 3.1. Rack - A rack is often large (up to 18” by 30” by 10”) and can hold multiple cards. When necessary, multiple racks can be connected together. These tend to be the highest cost, but also the most flexible and easy to maintain. Mini - These are smaller than full sized PLC racks, but can have the same IO capacity. Micro - These units can be as small as a deck of cards. They tend to have fixed quantities of I/O and limited abilities, but costs will be the lowest. Software - A software based PLC requires a computer with an interface card, but Topics: Objectives: • Be able to understand and design basic input and output wiring. • Be able to produce industrial wiring diagrams. • PLC hardware configurations • Input and outputs types • Electrical wiring for inputs and outputs • Relays • Electrical Ladder Diagrams and JIC wiring symbols www.PAControl.com
  • 37. plc wiring - 3.2 allows the PLC to be connected to sensors and other PLCs across a network. Figure 3.1 Typical Configurations for PLC 3.2 INPUTS AND OUTPUTS Inputs to, and outputs from, a PLC are necessary to monitor and control a process. Both inputs and outputs can be categorized into two basic types: logical or continuous. Consider the example of a light bulb. If it can only be turned on or off, it is logical control. If the light can be dimmed to different levels, it is continuous. Continuous values seem more intuitive, but logical values are preferred because they allow more certainty, and simplify control. As a result most controls applications (and PLCs) use logical inputs and outputs for most applications. Hence, we will discuss logical I/O and leave continuous I/O for later. Outputs to actuators allow a PLC to cause something to happen in a process. A short list of popular actuators is given below in order of relative popularity. Solenoid Valves - logical outputs that can switch a hydraulic or pneumatic flow. Lights - logical outputs that can often be powered directly from PLC output boards. Motor Starters - motors often draw a large amount of current when started, so they require motor starters, which are basically large relays. Servo Motors - a continuous output from the PLC can command a variable speed or position. rack mini micro www.PAControl.com
  • 38. plc wiring - 3.3 Outputs from PLCs are often relays, but they can also be solid state electronics such as transistors for DC outputs or Triacs for AC outputs. Continuous outputs require special output cards with digital to analog converters. Inputs come from sensors that translate physical phenomena into electrical signals. Typical examples of sensors are listed below in relative order of popularity. Proximity Switches - use inductance, capacitance or light to detect an object logi- cally. Switches - mechanical mechanisms will open or close electrical contacts for a log- ical signal. Potentiometer - measures angular positions continuously, using resistance. LVDT (linear variable differential transformer) - measures linear displacement continuously using magnetic coupling. Inputs for a PLC come in a few basic varieties, the simplest are AC and DC inputs. Sourcing and sinking inputs are also popular. This output method dictates that a device does not supply any power. Instead, the device only switches current on or off, like a sim- ple switch. Sinking - When active the output allows current to flow to a common ground. This is best selected when different voltages are supplied. Sourcing - When active, current flows from a supply, through the output device and to ground. This method is best used when all devices use a single supply voltage. This is also referred to as NPN (sinking) and PNP (sourcing). PNP is more popu- lar. This will be covered in detail in the chapter on sensors. 3.2.1 Inputs In smaller PLCs the inputs are normally built in and are specified when purchasing the PLC. For larger PLCs the inputs are purchased as modules, or cards, with 8 or 16 inputs of the same type on each card. For discussion purposes we will discuss all inputs as if they have been purchased as cards. The list below shows typical ranges for input volt- ages, and is roughly in order of popularity. 12-24 Vdc 100-120 Vac 10-60 Vdc 12-24 Vac/dc www.PAControl.com
  • 39. plc wiring - 3.4 5 Vdc (TTL) 200-240 Vac 48 Vdc 24 Vac PLC input cards rarely supply power, this means that an external power supply is needed to supply power for the inputs and sensors. The example in Figure 3.2 shows how to connect an AC input card. Figure 3.2 An AC Input Card and Ladder Logic 24 V AC Power Supply normally open push-button normally open temperature switch PLC Input Card 24V AC it is in rack "bob" slot 3 00 01 02 03 04 05 06 07 Pushbutton (bob:3:I.Data.1) Tempsensor (bob:3:I.Data.3) COM Note: inputs are normally high impedance. This means that they will use very little current. Hot Neut. www.PAControl.com
  • 40. plc wiring - 3.5 In the example there are two inputs, one is a normally open push button, and the second is a temperature switch, or thermal relay. (NOTE: These symbols are standard and will be discussed later in this chapter.) Both of the switches are powered by the positive/ hot output of the 24Vac power supply - this is like the positive terminal on a DC supply. Power is supplied to the left side of both of the switches. When the switches are open there is no voltage passed to the input card. If either of the switches are closed power will be supplied to the input card. In this case inputs 1 and 3 are used - notice that the inputs start at 0. The input card compares these voltages to the common. If the input voltage is within a given tolerance range the inputs will switch on. Ladder logic is shown in the figure for the inputs. Here it uses Allen Bradley notation for ControlLogix. At the top is the tag (variable name) for the rack. The input card (’I’) is in slot 3, so the address for the card is bob:3.I.Data.x, where ’x’ is the input bit number. These addresses can also be given alias tags to make the ladder logic less confusing. Many beginners become confused about where connections are needed in the cir- cuit above. The key word to remember is circuit, which means that there is a full loop that the voltage must be able to follow. In Figure 3.2 we can start following the circuit (loop) at the power supply. The path goes through the switches, through the input card, and back to the power supply where it flows back through to the start. In a full PLC implementation there will be many circuits that must each be complete. A second important concept is the common. Here the neutral on the power supply is the common, or reference voltage. In effect we have chosen this to be our 0V reference, and all other voltages are measured relative to it. If we had a second power supply, we would also need to connect the neutral so that both neutrals would be connected to the same common. Often common and ground will be confused. The common is a reference, or datum voltage that is used for 0V, but the ground is used to prevent shocks and damage to equipment. The ground is connected under a building to a metal pipe or grid in the ground. This is connected to the electrical system of a building, to the power outlets, where the metal cases of electrical equipment are connected. When power flows through the ground it is bad. Unfortunately many engineers, and manufacturers mix up ground and common. It is very common to find a power supply with the ground and common misla- beled. NOTE: The design process will be much easier if the inputs and outputs are planned first, and the tags are entered before the ladder logic. Then the program is entered using the much simpler tag names. www.PAControl.com
  • 41. plc wiring - 3.6 One final concept that tends to trap beginners is that each input card is isolated. This means that if you have connected a common to only one card, then the other cards are not connected. When this happens the other cards will not work properly. You must con- nect a common for each of the output cards. There are many trade-offs when deciding which type of input cards to use. • DC voltages are usually lower, and therefore safer (i.e., 12-24V). • DC inputs are very fast, AC inputs require a longer on-time. For example, a 60Hz wave may require up to 1/60sec for reasonable recognition. • DC voltages can be connected to larger variety of electrical systems. • AC signals are more immune to noise than DC, so they are suited to long dis- tances, and noisy (magnetic) environments. • AC power is easier and less expensive to supply to equipment. • AC signals are very common in many existing automation devices. Remember - Don’t mix up the ground and common. Don’t connect them together if the common of your device is connected to a common on another device. www.PAControl.com
  • 42. plc wiring - 3.7 Figure 3.3 Aside: PLC Input Circuits 3.2.2 Output Modules ASIDE: PLC inputs must convert a variety of logic levels to the 5Vdc logic levels used on the data bus. This can be done with circuits similar to those shown below. Basically the circuits condition the input to drive an optocoupler. This electrically isolates the external electrical circuitry from the internal circuitry. Other circuit components are used to guard against excess or reversed voltage polarity. TTL +5V optocoupler TTL +5V optocoupler DC input AC input + COM hot neut. WARNING - ALWAYS CHECK RATED VOLTAGES AND CURRENTS FOR PLC’s AND NEVER EXCEED! www.PAControl.com
  • 43. plc wiring - 3.8 As with input modules, output modules rarely supply any power, but instead act as switches. External power supplies are connected to the output card and the card will switch the power on or off for each output. Typical output voltages are listed below, and roughly ordered by popularity. 120 Vac 24 Vdc 12-48 Vac 12-48 Vdc 5Vdc (TTL) 230 Vac These cards typically have 8 to 16 outputs of the same type and can be purchased with different current ratings. A common choice when purchasing output cards is relays, transistors or triacs. Relays are the most flexible output devices. They are capable of switching both AC and DC outputs. But, they are slower (about 10ms switching is typi- cal), they are bulkier, they cost more, and they will wear out after millions of cycles. Relay outputs are often called dry contacts. Transistors are limited to DC outputs, and Triacs are limited to AC outputs. Transistor and triac outputs are called switched outputs. Dry contacts - a separate relay is dedicated to each output. This allows mixed volt- ages (AC or DC and voltage levels up to the maximum), as well as isolated out- puts to protect other outputs and the PLC. Response times are often greater than 10ms. This method is the least sensitive to voltage variations and spikes. Switched outputs - a voltage is supplied to the PLC card, and the card switches it to different outputs using solid state circuitry (transistors, triacs, etc.) Triacs are well suited to AC devices requiring less than 1A. Transistor outputs use NPN or PNP transistors up to 1A typically. Their response time is well under 1ms. www.PAControl.com
  • 44. plc wiring - 3.9 Figure 3.4 Aside: PLC Output Circuits Caution is required when building a system with both AC and DC outputs. If AC is ASIDE: PLC outputs must convert the 5Vdc logic levels on the PLC data bus to exter- nal voltage levels. This can be done with circuits similar to those shown below. Basically the circuits use an optocoupler to switch external circuitry. This electri- cally isolates the external electrical circuitry from the internal circuitry. Other cir- cuit components are used to guard against excess or reversed voltage polarity. TTL +V optocoupler Sourcing DC output TTL optocoupler AC output TTL +V relay output AC/DC Note: Some AC outputs will also use zero voltage detec- tion. This allows the output to be switched on when the voltage and current are effectively off, thus prevent- ing surges. www.PAControl.com
  • 45. plc wiring - 3.10 accidentally connected to a DC transistor output it will only be on for the positive half of the cycle, and appear to be working with a diminished voltage. If DC is connected to an AC triac output it will turn on and appear to work, but you will not be able to turn it off without turning off the entire PLC. A major issue with outputs is mixed power sources. It is good practice to isolate all power supplies and keep their commons separate, but this is not always feasible. Some output modules, such as relays, allow each output to have its own common. Other output cards require that multiple, or all, outputs on each card share the same common. Each out- put card will be isolated from the rest, so each common will have to be connected. It is common for beginners to only connect the common to one card, and forget the other cards - then only one card seems to work! The output card shown in Figure 3.5 is an example of a 24Vdc output card that has a shared common. This type of output card would typically use transistors for the outputs. ASIDE: A transistor is a semiconductor based device that can act as an adjustable valve. When switched off it will block current flow in both directions. While switched on it will allow current flow in one direction only. There is normally a loss of a couple of volts across the transistor. A triac is like two SCRs (or imagine transistors) connected together so that current can flow in both directions, which is good for AC current. One major difference for a triac is that if it has been switched on so that current flows, and then switched off, it will not turn off until the current stops flowing. This is fine with AC current because the current stops and reverses every 1/2 cycle, but this does not happen with DC current, and so the triac will remain on. www.PAControl.com
  • 46. plc wiring - 3.11 Figure 3.5 An Example of a 24Vdc Output Card (Sinking) In this example the outputs are connected to a low current light bulb (lamp) and a relay coil. Consider the circuit through the lamp, starting at the 24Vdc supply. When the output 07 is on, current can flow in 07 to the COM, thus completing the circuit, and allow- ing the light to turn on. If the output is off the current cannot flow, and the light will not turn on. The output 03 for the relay is connected in a similar way. When the output 03 is on, current will flow through the relay coil to close the contacts and supply 120Vac to the motor. Ladder logic for the outputs is shown in the bottom right of the figure. The notation is for an Allen Bradley ControlLogix. The output card (’O’) is in a rack labelled ’sue’ in slot 2. As indicated for the input card, it is good practice to define and use an alias tag for an output (e.g. Motor) instead of using the full description (e.g. sue:2.O.Data.3). This card 24 V DC Output Card rack "sue" slot 2 COM 00 01 02 03 04 05 06 07 24 V Lamp Relay +24 V DC Power 120 V AC Power Motor Supply Supply Motor (sue:2.O.Data.3) Lamp (sue:2.O.Data.3) Neut. COM www.PAControl.com
  • 47. plc wiring - 3.12 could have many different voltages applied from different sources, but all the power sup- plies would need a single shared common. The circuits in Figure 3.6 had the sequence of power supply, then device, then PLC card, then power supply. This requires that the output card have a common. Some output schemes reverse the device and PLC card, thereby replacing the common with a voltage input. The example in Figure 3.5 is repeated in Figure 3.6 for a voltage supply card. Figure 3.6 An Example of a 24Vdc Output Card With a Voltage Input (Sourcing) In this example the positive terminal of the 24Vdc supply is connected to the out- put card directly. When an output is on power will be supplied to that output. For example, if output 07 is on then the supply voltage will be output to the lamp. Current will flow through the lamp and back to the common on the power supply. The operation is very sim- ilar for the relay switching the motor. Notice that the ladder logic (shown in the bottom right of the figure) is identical to that in Figure 3.5. With this type of output card only one power supply can be used. We can also use relay outputs to switch the outputs. The example shown in Figure 24 V DC Output Card V+ 00 01 02 03 04 05 06 07 24 V lamp Relay +24 V DC Power 120 V AC Power Motor Supply Supply Neut. COM www.PAControl.com
  • 48. plc wiring - 3.13 3.5 and Figure 3.6 is repeated yet again in Figure 3.7 for relay output. Figure 3.7 An Example of a Relay Output Card In this example the 24Vdc supply is connected directly to both relays (note that this requires 2 connections now, whereas the previous example only required one.) When an output is activated the output switches on and power is delivered to the output devices. This layout is more similar to Figure 3.6 with the outputs supplying voltage, but the relays could also be used to connect outputs to grounds, as in Figure 3.5. When using relay out- puts it is possible to have each output isolated from the next. A relay output card could have AC and DC outputs beside each other. 3.3 RELAYS Although relays are rarely used for control logic, they are still essential for switch- 120 V AC/DC Output Card in rack 01 I/O group 2 00 01 02 03 04 05 06 07 24 V lamp Relay 24 V DC Power 120 V AC Power Motor Supply Supply www.PAControl.com
  • 49. plc wiring - 3.14 ing large power loads. Some important terminology for relays is given below. Contactor - Special relays for switching large current loads. Motor Starter - Basically a contactor in series with an overload relay to cut off when too much current is drawn. Arc Suppression - when any relay is opened or closed an arc will jump. This becomes a major problem with large relays. On relays switching AC this prob- lem can be overcome by opening the relay when the voltage goes to zero (while crossing between negative and positive). When switching DC loads this prob- lem can be minimized by blowing pressurized gas across during opening to sup- press the arc formation. AC coils - If a normal coil is driven by AC power the contacts will vibrate open and closed at the frequency of the AC power. This problem is overcome by relay manufacturers by adding a shading pole to the internal construction of the relay. The most important consideration when selecting relays, or relay outputs on a PLC, is the rated current and voltage. If the rated voltage is exceeded, the contacts will wear out prematurely, or if the voltage is too high fire is possible. The rated current is the maximum current that should be used. When this is exceeded the device will become too hot, and it will fail sooner. The rated values are typically given for both AC and DC, although DC ratings are lower than AC. If the actual loads used are below the rated values the relays should work well indefinitely. If the values are exceeded a small amount the life of the relay will be shortened accordingly. Exceeding the values significantly may lead to immediate failure and permanent damage. Please note that relays may also include mini- mum ratings that should also be observed to ensure proper operation and long life. • Rated Voltage - The suggested operation voltage for the coil. Lower levels can result in failure to operate, voltages above shorten life. • Rated Current - The maximum current before contact damage occurs (welding or melting). 3.4 A CASE STUDY (Try the following case without looking at the solution in Figure 3.8.) An electrical layout is needed for a hydraulic press. The press uses a 24Vdc double actuated solenoid valve to advance and retract the press. This device has a single common and two input wires. Putting 24Vdc on one wire will cause the press to advance, putting 24Vdc on the second wire will cause it to retract. The press is driven by a large hydraulic pump that requires 220Vac rated at 20A, this should be running as long as the press is on. The press is outfitted with three push buttons, one is a NC stop button, the other is a NO manual retract button, and the third is a NO start automatic cycle button. There are limit switches www.PAControl.com
  • 50. plc wiring - 3.15 at the top and bottom of the press travels that must also be connected. Figure 3.8 Case Study for Press Wiring The input and output cards were both selected to be 24Vdc so that they may share a single 24Vdc power supply. In this case the solenoid valve was wired directly to the out- put card, while the hydraulic pump was connected indirectly using a relay (only the coil is shown for simplicity). This decision was primarily made because the hydraulic pump requires more current than any PLC can handle, but a relay would be relatively easy to purchase and install for that load. All of the input switches are connected to the same sup- ply and to the inputs. 3.5 ELECTRICAL WIRING DIAGRAMS When a controls cabinet is designed and constructed ladder diagrams are used to document the wiring. A basic wiring diagram is shown in Figure 3.9. In this example the system would be supplied with AC power (120Vac or 220Vac) on the left and right rails. 24VDC 24VDC advance retract solenoid V+ 24VDC + - O/0 O/1 O/2 I/0 I/1 I/2 I/3 I/4 com SOLUTION relay for hydraulic output card input card pump www.PAControl.com
  • 51. plc wiring - 3.16 The lines of these diagrams are numbered, and these numbers are typically used to number wires when building the electrical system. The switch before line 010 is a master discon- nect for the power to the entire system. A fuse is used after the disconnect to limit the maximum current drawn by the system. Line 020 of the diagram is used to control power to the outputs of the system. The stop button is normally closed, while the start button is normally open. The branch, and output of the rung are CR1, which is a master control relay. The PLC receives power on line 30 of the diagram. The inputs to the PLC are all AC, and are shown on lines 040 to 070. Notice that Input I:0/0 is a set of contacts on the MCR CR1. The three other inputs are a normally open push button (line 050), a limit switch (060) and a normally closed push button (070). After line 080 the MCR CR1 can apply power to the outputs. These power the relay out- puts of the PLC to control a red indicator light (040), a green indicator light (050), a sole- noid (060), and another relay (080). The relay on line 080 switches a relay that turn on another device drill station. www.PAControl.com
  • 52. plc wiring - 3.17 Figure 3.9 A Ladder Wiring Diagram L1 N PLC L1 N I:0/0 I:0/1 I:0/2 I:0/3 ac com O:0/0 O:0/1 O:0/2 O:0/3 stop start CR1 CR1 CR1 CR1 MCR PB1 LS1 PB2 CR2 CR2 L1 N Drill Station 010 020 030 040 050 060 070 080 090 100 110 120 130 R G L1 L2 S1 035 050 060 070 090 100 110 120 90-1 100-1 110-1 120-1 90-1 100-1 110-1 120-1 www.PAControl.com
  • 53. plc wiring - 3.18 In the wiring diagram the choice of a normally close stop button and a normally open start button are intentional. Consider line 020 in the wiring diagram. If the stop but- ton is pushed it will open the switch, and power will not be able to flow to the control relay and output power will shut off. If the stop button is damaged, say by a wire falling off, the power will also be lost and the system will shut down - safely. If the stop button used was normally open and this happened the system would continue to operate while the stop button was unable to shut down the power. Now consider the start button. If the but- ton was damaged, say a wire was disconnected, it would be unable to start the system, thus leaving the system unstarted and safe. In summary, all buttons that stop a system should be normally closed, while all buttons that start a system should be normally open. 3.5.1 JIC Wiring Symbols To standardize electrical schematics, the Joint International Committee (JIC) sym- bols were developed, these are shown in Figure 3.10, Figure 3.11 and Figure 3.12. www.PAControl.com
  • 54. plc wiring - 3.19 Figure 3.10 JIC Schematic Symbols disconnect circuit interrupter breaker (3 phase AC) normally open limit switch normally closed limit switch normally open push-button normally closed push-button double pole push-button mushroom head push-button F fuse thermal motor (3 phase AC) (3 phase AC) (3 phase AC) liquid level normally open liquid level normally closed vacuum pressure normally open vacuum pressure normally closed overload relay www.PAControl.com
  • 55. plc wiring - 3.20 Figure 3.11 JIC Schematic Symbols temperature normally open temperature normally closed flow normally open flow normally closed relay contact normally open relay contact normally closed relay coil relay time delay on normally open relay time delay on normally closed relay time delay off normally open relay time delay off normally closed H1 H2 H3 H4 X1 X2 horn buzzer bell control transformer 2-H solenoid 2-position hydraulic solenoid R indicator lamp Female connector Male connector normally open proximity switch normally closed proximity switch www.PAControl.com
  • 56. plc wiring - 3.21 Figure 3.12 JIC Schematic Symbols Resistor Tapped Resistor Variable Resistor (potentiometer) Rheostat (potentiometer) Capacitor Polarized Capacitor + Variable Capacitor Capacitor Battery + Crystal Thermocouple Antenna Shielded Conductor Shielded Grounded Common Coil or Inductor Coil with magnetic core Tapped Coil Transformer Transformer magnetic core www.PAControl.com
  • 57. plc wiring - 3.22 3.6 SUMMARY • PLC inputs condition AC or DC inputs to be detected by the logic of the PLC. • Outputs are transistors (DC), triacs (AC) or relays (AC and DC). • Input and output addresses are a function of the card location/tag name and input bit number. • Electrical system schematics are documented with diagrams that look like ladder logic. 3.7 PRACTICE PROBLEMS 1. Can a PLC input switch a relay coil to control a motor? 2. How do input and output cards act as an interface between the PLC and external devices? 3. What is the difference between wiring a sourcing and sinking output? 4. What is the difference between a motor starter and a contactor? 5. Is AC or DC easier to interrupt? 6. What can happen if the rated voltage on a device is exceeded? 7. What are the benefits of input/output modules? 8. (for electrical engineers) Explain the operation of AC input and output conditioning circuits. 9. What will happen if a DC output is switched by an AC output. 10. Explain why a stop button must be normally closed and a start button must be normally open. 11. For the circuit shown in the figure below, list the input and output addresses for the PLC. If switch A controls the light, switch B the motor, and C the solenoid, write a simple ladder logic www.PAControl.com
  • 58. plc wiring - 3.23 program. 12. We have a PLC rack with a 24 VDC input card in slot 3, and a 120VAC output card in slot 2. The inputs are to be connected to 4 push buttons. The outputs are to drive a 120VAC light bulb, a 240VAC motor, and a 24VDC operated hydraulic valve. Draw the electrical connections for the inputs and outputs. Show all other power supplies and other equipment/components required. 13. You are planning a project that will be controlled by a PLC. Before ordering parts you decide to plan the basic wiring and select appropriate input and output cards. The devices that we will use for inputs are 2 limit switches, a push button and a thermal switch. The output will be for a 24Vdc solenoid valve, a 110Vac light bulb, and a 220Vac 50HP motor. Sketch the basic wiring below including PLC cards. 14. Add three push buttons as inputs to the figure below. You must also select a power supply, and 200 201 202 203 204 205 206 207 com 100 101 102 103 104 105 106 107 com A B C 12VDC + solenoid valve 24VDC + www.PAControl.com
  • 59. plc wiring - 3.24 show all necessary wiring. 15. Three 120Vac outputs are to be connected to the output card below. Show the 120Vac source, and all wiring. 16. Sketch the wiring for PLC outputs that are listed below. - a double acting hydraulic solenoid valve (with two coils) - a 24Vdc lamp - a 120 Vac high current lamp - a low current 12Vdc motor 1 com 2 com 3 com 4 com 5 com V 00 01 02 03 04 05 06 07 www.PAControl.com
  • 60. plc wiring - 3.25 3.8 PRACTICE PROBLEM SOLUTIONS 1. no - a plc OUTPUT can switch a relay 2. input cards are connected to sensors to determine the state of the system. Output cards are con- nected to actuators that can drive the process. 3. sourcing outputs supply current that will pass through an electrical load to ground. Sinking inputs allow current to flow from the electrical load, to the common. 4. a motor starter typically has three phases 5. AC is easier, it has a zero crossing 6. it will lead to premature failure 7. by using separate modules, a PLC can be customized for different applications. If a single mod- ule fails, it can be replaced quickly, without having to replace the entire controller. 8. AC input conditioning circuits will rectify an AC input to a DC waveform with a ripple. This will be smoothed, and reduced to a reasonable voltage level to drive an optocoupler. An AC output circuit will switch an AC output with a triac, or a relay. 9. an AC output is a triac. When a triac output is turned off, it will not actually turn off until the AC voltage goes to 0V. Because DC voltages don’t go to 0V, it will never turn off. 10. If a NC stop button is damaged, the machine will act as if the stop button was pushed and shut down safely. If a NO start button is damaged the machine will not be able to start. 11. outputs: 200 - light 202 - motor 204 - solenoid inputs: 100 - switch A 102 - switch B 104 - switch C 200 202 210 100 102 104 www.PAControl.com
  • 61. plc wiring - 3.26 12. 13. 0 1 2 3 4 5 6 7 com 24VDC + - 0 1 2 3 4 5 6 7 com 0 1 2 3 4 5 6 7 com 24VDC + - 0 1 2 3 4 5 6 7 24Vdc + - Note: relays are used to reduce the total number of output cards 120Vac hot neut. 220Vac hot neut. www.PAControl.com
  • 62. plc wiring - 3.27 14. 15. 1 com 2 com 3 com 4 com 5 com 24Vdc + - V 00 01 02 03 04 05 06 07 120Vac hot neut. Load 1 Load 2 Load 3 www.PAControl.com
  • 63. plc wiring - 3.28 16. 3.9 ASSIGNMENT PROBLEMS 1. Describe what could happen if a normally closed start button was used on a system, and the wires to the button were cut. 2. Describe what could happen if a normally open stop button was used on a system and the wires to the button were cut. 3. a) For the input (’in’) and output (’out’) cards below, add three output lights and three normally 00 01 02 03 relay output card 04 power supply 24Vdc + - power supply 120Vac hot neut. power supply 12Vdc + - www.PAControl.com
  • 64. plc wiring - 3.29 open push button inputs. b) Redraw the outputs so that it uses a relay output card. 4. Draw an electrical wiring (ladder) diagram for PLC outputs that are listed below. - a solenoid controlled hydraulic valve - a 24Vdc lamp - a 120 Vac high current lamp - a low current 12Vdc motor 5. Draw an electrical ladder diagram for a PLC that has a PNP and an NPN sensor for inputs. The outputs are two small indicator lights. You should use proper symbols for all components. You must also include all safety devices including fuses, disconnects, MCRs, etc... 6. Draw an electrical wiring diagram for a PLC controlling a system with an NPN and PNP input sensor. The outputs include an indicator light and a relay to control a 20A motor load. Include ALL safety circuitry. 0 1 2 3 4 5 6 7 com V 0 1 2 3 4 5 6 7 - + - + in:0.I.Data.x out:1.O.Data.x www.PAControl.com
  • 65. discrete sensors - 4.1 4. LOGICAL SENSORS 4.1 INTRODUCTION Sensors allow a PLC to detect the state of a process. Logical sensors can only detect a state that is either true or false. Examples of physical phenomena that are typically detected are listed below. • inductive proximity - is a metal object nearby? • capacitive proximity - is a dielectric object nearby? • optical presence - is an object breaking a light beam or reflecting light? • mechanical contact - is an object touching a switch? Recently, the cost of sensors has dropped and they have become commodity items, typically between $50 and $100. They are available in many forms from multiple vendors such as Allen Bradley, Omron, Hyde Park and Turck. In applications sensors are inter- changeable between PLC vendors, but each sensor will have specific interface require- ments. This chapter will begin by examining the various electrical wiring techniques for sensors, and conclude with an examination of many popular sensor types. 4.2 SENSOR WIRING When a sensor detects a logical change it must signal that change to the PLC. This is typically done by switching a voltage or current on or off. In some cases the output of the sensor is used to switch a load directly, completely eliminating the PLC. Typical out- Topics: Objectives: • Understand the different types of sensor outputs. • Know the basic sensor types and understand application issues. • Sensor wiring; switches, TTL, sourcing, sinking • Proximity detection; contact switches, photo-optics, capacitive, inductive and ultrasonic www.PAControl.com
  • 66. discrete sensors - 4.2 puts from sensors (and inputs to PLCs) are listed below in relative popularity. Sinking/Sourcing - Switches current on or off. Plain Switches - Switches voltage on or off. Solid State Relays - These switch AC outputs. TTL (Transistor Transistor Logic) - Uses 0V and 5V to indicate logic levels. 4.2.1 Switches The simplest example of sensor outputs are switches and relays. A simple example is shown in Figure 4.1. Figure 4.1 An Example of Switched Sensors In the figure a NO contact switch is connected to input 01. A sensor with a relay output is also shown. The sensor must be powered separately, therefore the V+ and V- ter- minals are connected to the power supply. The output of the sensor will become active when a phenomenon has been detected. This means the internal switch (probably a relay) will be closed allowing current to flow and the positive voltage will be applied to input 06. 24 Vdc Power Supply normally open push-button PLC Input Card 24V DC 00 01 02 03 04 05 06 07 COM + - sensor V+ V- relay output www.PAControl.com
  • 67. discrete sensors - 4.3 4.2.2 Transistor Transistor Logic (TTL) Transistor-Transistor Logic (TTL) is based on two voltage levels, 0V for false and 5V for true. The voltages can actually be slightly larger than 0V, or lower than 5V and still be detected correctly. This method is very susceptible to electrical noise on the factory floor, and should only be used when necessary. TTL outputs are common on electronic devices and computers, and will be necessary sometimes. When connecting to other devices simple circuits can be used to improve the signal, such as the Schmitt trigger in Figure 4.2. Figure 4.2 A Schmitt Trigger A Schmitt trigger will receive an input voltage between 0-5V and convert it to 0V or 5V. If the voltage is in an ambiguous range, about 1.5-3.5V it will be ignored. If a sensor has a TTL output the PLC must use a TTL input card to read the values. If the TTL sensor is being used for other applications it should be noted that the maximum current output is normally about 20mA. 4.2.3 Sinking/Sourcing Sinking sensors allow current to flow into the sensor to the voltage common, while sourcing sensors allow current to flow out of the sensor from a positive source. For both of these methods the emphasis is on current flow, not voltage. By using current flow, instead of voltage, many of the electrical noise problems are reduced. When discussing sourcing and sinking we are referring to the output of the sensor that is acting like a switch. In fact the output of the sensor is normally a transistor, that will act like a switch (with some voltage loss). A PNP transistor is used for the sourcing out- put, and an NPN transistor is used for the sinking input. When discussing these sensors the Vi Vo Vi Vo www.PAControl.com
  • 68. discrete sensors - 4.4 term sourcing is often interchanged with PNP, and sinking with NPN. A simplified exam- ple of a sinking output sensor is shown in Figure 4.3. The sensor will have some part that deals with detection, this is on the left. The sensor needs a voltage supply to operate, so a voltage supply is needed for the sensor. If the sensor has detected some phenomenon then it will trigger the active line. The active line is directly connected to an NPN transistor. (Note: for an NPN transistor the arrow always points away from the center.) If the voltage to the transistor on the active line is 0V, then the transistor will not allow current to flow into the sensor. If the voltage on the active line becomes larger (say 12V) then the transis- tor will switch on and allow current to flow into the sensor to the common. Figure 4.3 A Simplified NPN/Sinking Sensor Sourcing sensors are the complement to sinking sensors. The sourcing sensors use a PNP transistor, as shown in Figure 4.4. (Note: PNP transistors are always drawn with the arrow pointing to the center.) When the sensor is inactive the active line stays at the V+ Sensor V+ V- Active physical phenomenon Aside: The sensor responds to a physical phenomenon. If the sensor is inactive (nothing detected) then the active line is low and the transistor is off, this is like an open switch. That means the NPN output will have no current in/out. When the sensor is active, it will make the active line high. This will turn on the transistor, and effec- tively close the switch. This will allow current to flow into the sensor to ground (hence sinking). The voltage on the NPN output will be pulled down to V-. Note: the voltage will always be 1-2V higher because of the transistor. When the sensor is off, the NPN output will float, and any digital circuitry needs to contain a pull-up resistor. V+ NPN V- sensor output and Detector Line current flows in when switched on www.PAControl.com
  • 69. discrete sensors - 4.5 value, and the transistor stays switched off. When the sensor becomes active the active line will be made 0V, and the transistor will allow current to flow out of the sensor. Figure 4.4 A Simplified Sourcing/PNP Sensor Most NPN/PNP sensors are capable of handling currents up to a few amps, and they can be used to switch loads directly. (Note: always check the documentation for rated voltages and currents.) An example using sourcing and sinking sensors to control lights is shown in Figure 4.5. (Note: This example could be for a motion detector that turns on lights in dark hallways.) Sensor V+ V- Active physical phenomenon Aside: The sensor responds to the physical phenomenon. If the sensor is inactive (nothing detected) then the active line is high and the transistor is off, this is like an open switch. That means the PNP output will have no current in/out. When the sensor is active, it will make the active line high. This will turn on the transistor, and effectively close the switch. This will allow current to flow from V+ through the sensor to the output (hence sourcing). The voltage on the PNP output will be pulled up to V+. Note: the voltage will always be 1-2V lower because of the transistor. When off, the PNP output will float, if used with digital circuitry a pull-down resistor will be needed. V+ PNP V- sensor output and Detector Line current flows out when switched on www.PAControl.com
  • 70. discrete sensors - 4.6 Figure 4.5 Direct Control Using NPN/PNP Sensors In the sinking system in Figure 4.5 the light has V+ applied to one side. The other side is connected to the NPN output of the sensor. When the sensor turns on the current will be able to flow through the light, into the output to V- common. (Note: Yes, the cur- rent will be allowed to flow into the output for an NPN sensor.) In the sourcing arrange- ment the light will turn on when the output becomes active, allowing current to flow from the V+, thought the sensor, the light and to V- (the common). At this point it is worth stating the obvious - The output of a sensor will be an input for a PLC. And, as we saw with the NPN sensor, this does not necessarily indicate where current is flowing. There are two viable approaches for connecting sensors to PLCs. The first is to always use PNP sensors and normal voltage input cards. The second option is to purchase input cards specifically designed for sourcing or sinking sensors. An example of a PLC card for sinking sensors is shown in Figure 4.6. power supply sensor V+ V- (common) V+ V- NPN power supply sensor V+ V- (common) V+ V- PNP Note: remember to check the current and voltage ratings for the sensors. sinking sourcing Note: When marking power terminals, there will sometimes be two sets of markings. The more standard is V+ and COM, but sometimes you will see devices and power supplies without a COM (common), in this case assume the V- is the common. www.PAControl.com
  • 71. discrete sensors - 4.7 Figure 4.6 A PLC Input Card for Sinking Sensors The dashed line in the figure represents the circuit, or current flow path when the sensor is active. This path enters the PLC input card first at a V+ terminal (Note: there is no common on this card) and flows through an optocoupler. This current will use light to turn on a phototransistor to tell the computer in the PLC the input current is flowing. The current then leaves the card at input 00 and passes through the sensor to V-. When the sen- sor is inactive the current will not flow, and the light in the optocoupler will be off. The optocoupler is used to help protect the PLC from electrical problems outside the PLC. The input cards for PNP sensors are similar to the NPN cards, as shown in Figure 4.7. PLC Input Card for Sinking Sensors Internal Card Electronics PLC Data Bus External Electrical NPN sensor power supply +V -V +V NPN -V current flow +V 00 01 Note: When a PLC input card does not have a common but it has a V+ instead, it can be used for NPN sensors. In this case the cur- rent will flow out of the card (sourcing) and we must switch it to ground. ASIDE: This card is shown with 2 optocouplers (one for each output). Inside these devices the is an LED and a phototransistor, but no electrical connection. These devices are used to isolate two different electrical systems. In this case they pro- tect the 5V digital levels of the PLC computer from the various external voltages and currents. www.PAControl.com
  • 72. discrete sensors - 4.8 Figure 4.7 PLC Input Card for Sourcing Sensors The current flow loop for an active sensor is shown with a dashed line. Following the path of the current we see that it begins at the V+, passes through the sensor, in the input 00, through the optocoupler, out the common and to the V-. Wiring is a major concern with PLC applications, so to reduce the total number of wires, two wire sensors have become popular. But, by integrating three wires worth of function into two, we now couple the power supply and sensing functions into one. Two wire sensors are shown in Figure 4.8. PLC Input Card for Sourcing Sensors Internal Card Electronics PNP sensor power supply +V -V +V PNP -V current flow 00 01 com Note: When we have a PLC input card that has a common then we can use PNP sensors. In this case the current will flow into the card and then out the common to the power sup- ply. www.PAControl.com
  • 73. discrete sensors - 4.9 Figure 4.8 Two Wire Sensors A two wire sensor can be used as either a sourcing or sinking input. In both of these arrangements the sensor will require a small amount of current to power the sensor, but when active it will allow more current to flow. This requires input cards that will allow a small amount of current to flow (called the leakage current), but also be able to detect when the current has exceeded a given value. PLC Input Card two wire sensor power supply +V -V +V -V 00 01 com Note: These sensors require a certain leakage current to power the electronics. PLC Input Card two wire sensor power supply +V -V +V -V 00 01 V+ for Sourcing Sensors for Sinking Sensors www.PAControl.com
  • 74. discrete sensors - 4.10 When purchasing sensors and input cards there are some important considerations. Most modern sensors have both PNP and NPN outputs, although if the choice is not avail- able, PNP is the more popular choice. PLC cards can be confusing to buy, as each vendor refers to the cards differently. To avoid problems, look to see if the card is specifically for sinking or sourcing sensors, or look for a V+ (sinking) or COM (sourcing). Some vendors also sell cards that will allow you to have NPN and PNP inputs mixed on the same card. When drawing wiring diagrams the symbols in Figure 4.9 are used for sinking and sourcing proximity sensors. Notice that in the sinking sensor when the switch closes (moves up to the terminal) it contacts the common. Closing the switch in the sourcing sen- sor connects the output to the V+. On the physical sensor the wires are color coded as indi- cated in the diagram. The brown wire is positive, the blue wire is negative and the output is white for sinking and black for sourcing. The outside shape of the sensor may change for other devices, such as photo sensors which are often shown as round circles. Figure 4.9 Sourcing and Sinking Schematic Symbols 4.2.4 Solid State Relays Solid state relays switch AC currents. These are relatively inexpensive and are available for large loads. Some sensors and devices are available with these as outputs. NPN (sinking) PNP (sourcing) V+ V- NPN V- V+ PNP black brown white brown blue blue www.PAControl.com
  • 75. discrete sensors - 4.11 4.3 PRESENCE DETECTION There are two basic ways to detect object presence; contact and proximity. Contact implies that there is mechanical contact and a resulting force between the sensor and the object. Proximity indicates that the object is near, but contact is not required. The follow- ing sections examine different types of sensors for detecting object presence. These sen- sors account for a majority of the sensors used in applications. 4.3.1 Contact Switches Contact switches are available as normally open and normally closed. Their hous- ings are reinforced so that they can take repeated mechanical forces. These often have roll- ers and wear pads for the point of contact. Lightweight contact switches can be purchased for less than a dollar, but heavy duty contact switches will have much higher costs. Exam- ples of applications include motion limit switches and part present detectors. 4.3.2 Reed Switches Reed switches are very similar to relays, except a permanent magnet is used instead of a wire coil. When the magnet is far away the switch is open, but when the mag- net is brought near the switch is closed as shown in Figure 4.10. These are very inexpen- sive an can be purchased for a few dollars. They are commonly used for safety screens and doors because they are harder to trick than other sensors. Figure 4.10 Reed Switch Note: With this device the magnet is moved towards the reed switch. As it gets closer the switch will close. This allows proximity detection without contact, but requires that a separate magnet be attached to a moving part. www.PAControl.com
  • 76. discrete sensors - 4.12 4.3.3 Optical (Photoelectric) Sensors Light sensors have been used for almost a century - originally photocells were used for applications such as reading audio tracks on motion pictures. But modern optical sensors are much more sophisticated. Optical sensors require both a light source (emitter) and detector. Emitters will produce light beams in the visible and invisible spectrums using LEDs and laser diodes. Detectors are typically built with photodiodes or phototransistors. The emitter and detec- tor are positioned so that an object will block or reflect a beam when present. A basic opti- cal sensor is shown in Figure 4.11. Figure 4.11 A Basic Optical Sensor In the figure the light beam is generated on the left, focused through a lens. At the detector side the beam is focused on the detector with a second lens. If the beam is broken the detector will indicate an object is present. The oscillating light wave is used so that the sensor can filter out normal light in the room. The light from the emitter is turned on and off at a set frequency. When the detector receives the light it checks to make sure that it is at the same frequency. If light is being received at the right frequency then the beam is not broken. The frequency of oscillation is in the KHz range, and too fast to be noticed. A side effect of the frequency method is that the sensors can be used with lower power at longer distances. An emitter can be set up to point directly at a detector, this is known as opposed mode. When the beam is broken the part will be detected. This sensor needs two separate oscillator +V +V lens lens square wave light LED phototransistor amplifier demodulator detector and switching circuits smaller signal www.PAControl.com
  • 77. discrete sensors - 4.13 components, as shown in Figure 4.12. This arrangement works well with opaque and reflective objects with the emitter and detector separated by distances of up to hundreds of feet. Figure 4.12 Opposed Mode Optical Sensor Having the emitter and detector separate increases maintenance problems, and alignment is required. A preferred solution is to house the emitter and detector in one unit. But, this requires that light be reflected back as shown in Figure 4.13. These sensors are well suited to larger objects up to a few feet away. Figure 4.13 Retroreflective Optical Sensor emitter object detector Note: the reflector is constructed with polarizing screens oriented at 90 deg. angles. If the light is reflected back directly the light does not pass through the screen in front of the detector. The reflector is designed to rotate the phase of the light by 90 deg., so it will now pass through the screen in front of the detector. emitter detector object reflector emitter detector reflector www.PAControl.com
  • 78. discrete sensors - 4.14 In the figure, the emitter sends out a beam of light. If the light is returned from the reflector most of the light beam is returned to the detector. When an object interrupts the beam between the emitter and the reflector the beam is no longer reflected back to the detector, and the sensor becomes active. A potential problem with this sensor is that reflective objects could return a good beam. This problem is overcome by polarizing the light at the emitter (with a filter), and then using a polarized filter at the detector. The reflector uses small cubic reflectors and when the light is reflected the polarity is rotated by 90 degrees. If the light is reflected off the object the light will not be rotated by 90 degrees. So the polarizing filters on the emitter and detector are rotated by 90 degrees, as shown in Figure 4.14. The reflector is very similar to reflectors used on bicycles. Figure 4.14 Polarized Light in Retroreflective Sensors For retroreflectors the reflectors are quite easy to align, but this method still requires two mounted components. A diffuse sensors is a single unit that does not use a reflector, but uses focused light as shown in Figure 4.15. object reflector emitter detector have filters for emitted light rotated by 90 deg. reflector emitter detector light reflected with same polarity light rotated by 90 deg. www.PAControl.com
  • 79. discrete sensors - 4.15 Figure 4.15 Diffuse Optical Sensor Diffuse sensors use light focused over a given range, and a sensitivity adjustment is used to select a distance. These sensors are the easiest to set up, but they require well controlled conditions. For example if it is to pick up light and dark colored objects prob- lems would result. When using opposed mode sensors the emitter and detector must be aligned so that the emitter beam and detector window overlap, as shown in Figure 4.16. Emitter beams normally have a cone shape with a small angle of divergence (a few degrees of less). Detectors also have a cone shaped volume of detection. Therefore when aligning opposed mode sensor care is required not just to point the emitter at the detector, but also the detec- tor at the emitter. Another factor that must be considered with this and other sensors is that the light intensity decreases over distance, so the sensors will have a limit to separation distance. Note: with diffuse reflection the light is scattered. This reduces the quantity of light returned. As a result the light needs to be amplified using lenses. emitter detector object www.PAControl.com
  • 80. discrete sensors - 4.16 Figure 4.16 Beam Divergence and Alignment If an object is smaller than the width of the light beam it will not be able to block the beam entirely when it is in front as shown in Figure 4.17. This will create difficulties in detection, or possibly stop detection altogether. Solutions to this problem are to use nar- rower beams, or wider objects. Fiber optic cables may be used with an opposed mode opti- cal sensor to solve this problem, however the maximum effective distance is reduced to a couple feet. Figure 4.17 The Relationship Between Beam Width and Object Size Separated sensors can detect reflective parts using reflection as shown in Figure 4.18. The emitter and detector are positioned so that when a reflective surface is in posi- tion the light is returned to the detector. When the surface is not present the light does not return. effective beam angle emitter detector effective detector angle effective beam alignment is required intensity 1 r 2 ---- ∝ the smaller beam width is good (but harder to align emitter detector object www.PAControl.com