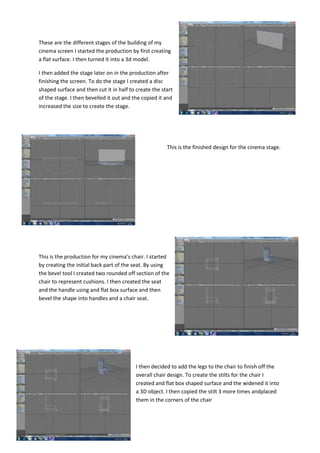
1. These are the different stages of the building of my
cinema screen I started the production by first creating
a flat surface. I then turned it into a 3d model.
I then added the stage later on in the production after
finishing the screen. To do the stage I created a disc
shaped surface and then cut it in half to create the start
of the stage. I then bevelled it out and the copied it and
increased the size to create the stage.
This is the finished design for the cinema stage.
This is the production for my cinema’s chair. I started
by creating the initial back part of the seat. By using
the bevel tool I created two rounded off section of the
chair to represent cushions. I then created the seat
and the handle using and flat box surface and then
bevel the shape into handles and a chair seat.
I then decided to add the legs to the chair to finish off the
overall chair design. To create the stilts for the chair I
created and flat box shaped surface and the widened it into
a 3D object. I then copied the stilt 3 more times andplaced
them in the corners of the chair
2. This is the camera that I created for the sequence. I first
created the camera by creating discs and the bevelling
them out to look like the film roles and then I decided to
create the box for the main part of the projector.
The table I decided to place in later after completing the
camera for something for the camera to be placed on. I
started the creation of the table by first creating the
table top. Then I decide to create the leg and just copy
and paste it so I didn’t have to keep making the legs.