Ultrasonic sensor
•
22 likes•14,465 views

This presentation discuss about the Ultrasonic Sensor long with its working principle and simple test with sample of Arduino program. The ultrasonic Sensor featured in this presentation is HC-SR04.

Recommended
More Related Content
What's hot
What's hot (20)
Similar to Ultrasonic sensor
Similar to Ultrasonic sensor (20)
Recently uploaded
Recently uploaded (20)
Ultrasonic sensor
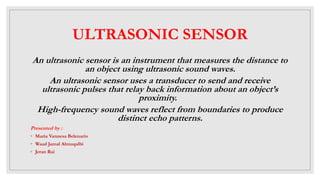
- 1. ULTRASONIC SENSOR An ultrasonic sensor is an instrument that measures the distance to an object using ultrasonic sound waves. An ultrasonic sensor uses a transducer to send and receive ultrasonic pulses that relay back information about an object’s proximity. High-frequency sound waves reflect from boundaries to produce distinct echo patterns. Presented by : ◦ Maria Vannesa Belenario ◦ Waad Jamal Almuqalbi ◦ Jeran Rai
- 2. LAWS OF PHYSICS OF ULTRASONIC WAVES Sound waves are having specific frequencies or number of oscillations per second. Humans can detect sounds in a frequency range from about 20Hz to 20 KHz. However the frequency range normally employed in ultrasonic detection is 100 KHz to 50MHz. The velocity of ultrasound at a particular time and temperature is constant in a medium.
- 3. WORKING PRINCIPLE When an electrical pulse of high voltage is applied to the ultrasonic transducer it vibrates across a specific spectrum of frequencies and generates a burst of sound waves. Whenever any obstacle comes ahead of the ultrasonic sensor the sound waves will reflect back in the form of echo and generates an electric pulse. It calculates the time taken between sending sound waves and receiving echo. The echo patterns will be compared with the patterns of sound waves to determine detected signal’s condition.
- 5. HC-SR04 ULTRASONIC SENSOR As shown in picture, the HC-SR04 Ultrasonic sensor is a 4 pin module, whose pin names are Vcc, Trigger, Echo and Ground respectively. This sensor is a very popular sensor used in many applications where measuring distance or sensing objects are required. The module has two eyes like projects in the front which forms the Ultrasonic transmitter and Receiver.
- 6. HC-SR04 Pin Number Pin Name Description 1 Vcc The Vcc pin powers the sensor, typically with +5V 2 Trigger Trigger pin is an Input pin. This pin has to be kept high for 10µs to initialize measurement by sending Ultrasonic wave. 3 Echo Echo pin is an Output pin. This pin goes high for a period of time which will be equal to the time taken for the Ultrasonic wave to return back to the sensor. 4 Ground This pin is connected to the Ground of the system.
- 7. HC-SR04 CHARACTERISTICS ◦ Supply voltage: 5V (DC). ◦ Supply current: 15mA. ◦ Modulation frequency: 40Hz. ◦ Output: 0 – 5V (Output high when obstacle detected in range). ◦ Beam Angle: Max 15 degree. ◦ Theoretical measuring Distance: 2cm – 400cm. ◦ Accuracy: 0.3cm.
- 8. HC-SR04 OPERATION ◦ The Ultrasonic transmitter transmits an ultrasonic wave, this wave travels in air and when it gets objected by any material it gets reflected back toward the sensor this reflected wave is observed by the Ultrasonic receiver module as shown in the picture below
- 9. HC-SR04 OPERATION Power the Sensor using a regulated +5V through the Vcc ad Ground pins of the sensor. The current consumed by the sensor is less than 15mA and hence can be directly powered by the on board 5V pins (If available). The Trigger and the Echo pins are both I/O pins and hence they can be connected to I/O pins of the microcontroller. To start the measurement, the trigger pin has to be made high for 10uS and then turned off. This action will trigger an ultrasonic wave at frequency of 40Hz from the transmitter and the receiver will wait for the wave to return.
- 10. HC-SR04 OPERATION Once the wave is returned after it getting reflected by any object the Echo pin goes high for a particular amount of time which will be equal to the time taken for the wave to return back to the sensor. The amount of time during which the Echo pin stays high is measured by the MCU/MPU as it gives the information about the time taken for the wave to return back to the Sensor. Using this information the distance is measured as explained in the above head. HC-SR04 is commonly used with both microcontroller and microprocessor platforms like Arduino, ARM, PIC, Raspberry Pie etc
- 11. SIMPLE ARDUINO C PROGRAMMING FOR DISTANCE MEASUREMENT 1. // defines pins numbers 2. const int trigPin = 12; 3. const int echoPin = 11; 4. // defines variables 5. long duration; 6. int distance; 7. void setup() { 8. pinMode(trigPin, OUTPUT); // Sets the trigPin as an Output 9. pinMode(echoPin, INPUT); // Sets the echoPin as an Input 10. Serial.begin(9600); // Starts the serial communication 11. }
- 12. SIMPLE ARDUINO C PROGRAMMING FOR DISTANCE MEASUREMENT 12. void loop() { 13. // Clears the trigPin 14. digitalWrite(trigPin, LOW); 15. delayMicroseconds(2); 16. // Sets the trigPin on HIGH state for 10 micro seconds 17. digitalWrite(trigPin, HIGH); 18. delayMicroseconds(10); 19. digitalWrite(trigPin, LOW); 20. // Reads the echoPin, returns the sound wave travel time in microseconds 21. duration = pulseIn(echoPin, HIGH);
- 13. SIMPLE ARDUINO C PROGRAMMING FOR DISTANCE MEASUREMENT 22. // Calculating the distance 23. distance= (duration*0.034)/2; //Speed of sound in air at standard condition = 0.034cm/µs 24. // Prints the distance on the Serial Monitor 25. Serial.print("Distance: "); 26. Serial.println(distance); Note : In line 23, the numerator is divided by 2 to account for the fact that the ultrasonic wave travels double the distance from transmitter to object and again bounce back to receiver striking object.
- 14. INTERFACING ULTRASONIC SENSOR WITH ARDUINO MARIA&JERAN
- 15. APPLICATION OF ULTRASONIC SENSOR Proximity Detection. Liquid Level Sensing. Obstacle Detection. Ranging/Distance Measurement. Anti Collision system. Contouring or Profiling. Presence Detection. Product Counting and Sorting. Anti Intrusion System. Medical Imaging. ◦
- 16. ADVANTGES OF ULTRASONIC SENSOR Its small size makes it easy to integrate into projects. Ultrasonics can easily integrate with any type of controller. Its high frequency, sensitivity, and power make it easy to detect objects. It have greater accuracy than many other methods at measuring thickness and depth of a parallel surface. Ultrasonics are easy to use and not dangerous during operation. An inexpensive option.
- 17. “Somewhere in me is a curiosity sensor. I want to know what's over the next hill. You know, people can live longer without food than without information. Without information, you'd go crazy.”