Step by step for shiny applications
•
0 likes•240 views

Web Deployment using Shiny -- Steps by Steps tutorial. Another more useful platform is Intuitics, see https://www.intuitics.com/

Recommended
Recommended
More Related Content
Recently uploaded
Recently uploaded (20)
Featured
Featured (20)
Step by step for shiny applications
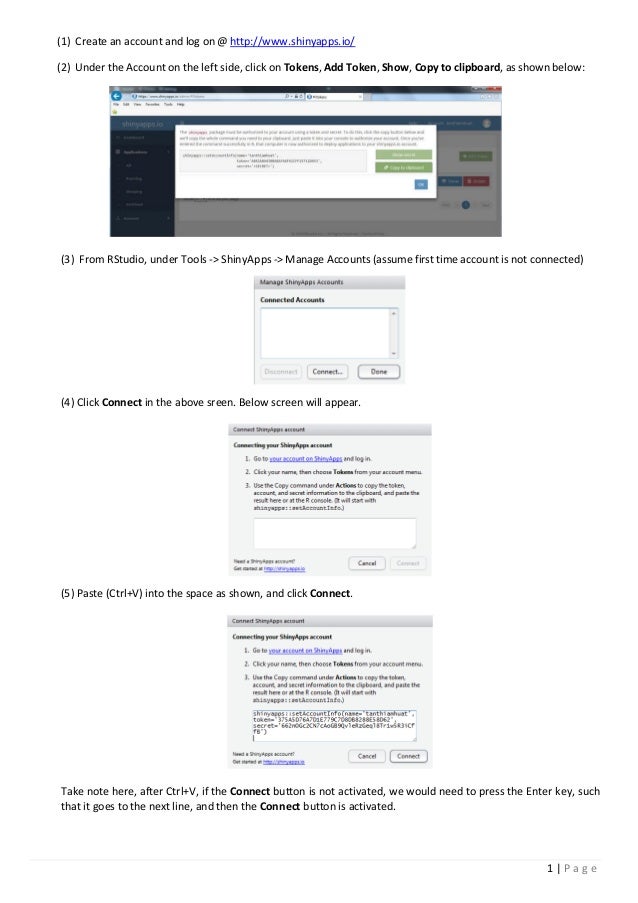
- 1. 1 | P a g e (1) Create an account and log on @ http://www.shinyapps.io/ (2) Under the Account on the left side, click on Tokens, Add Token, Show, Copy to clipboard, as shown below: (3) From RStudio, under Tools -> ShinyApps -> Manage Accounts (assume first time account is not connected) (4) Click Connect in the above sreen. Below screen will appear. (5) Paste (Ctrl+V) into the space as shown, and click Connect. Take note here, after Ctrl+V, if the Connect button is not activated, we would need to press the Enter key, such that it goes to the next line, and then the Connect button is activated.
- 2. 2 | P a g e (6) The account is then shown in the Manage ShinyApps Accounts screen below: (7) Click the Done button. (8) Install shiny package from Tools-> Install Packages (9) Restart RStudio. (10) Open up your server.R and ui.R files. See http://shiny.rstudio.com/tutorial/ for more information. (11) From RStudio, under Tools -> ShinyApps -> Publish App Choose the correct Account and Application and click the Publish button. (12) On the Rstudio Deploy, the below would appear: (13) The final deployment on the browser is as seen below: (14) Recommended book: Web Application Development with R Using Shiny, https://www.packtpub.com/web-development/web-application-development-r-using-shiny