

Recommended
Recommended
More Related Content
What's hot
What's hot (20)
Viewers also liked
Viewers also liked (14)
Similar to Fuji frenic-5000 g11s-p11s-user-manual
Similar to Fuji frenic-5000 g11s-p11s-user-manual (20)
More from Toàn Huỳnh
More from Toàn Huỳnh (20)
Recently uploaded
Recently uploaded (20)
Fuji frenic-5000 g11s-p11s-user-manual
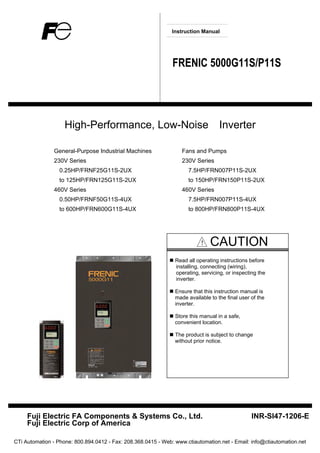
- 1. Instruction Manual FRENIC 5000G11S/P11S High-Performance, Low-Noise Inverter General-Purpose Industrial Machines Fans and Pumps 230V Series 230V Series 0.25HP/FRNF25G11S-2UX 7.5HP/FRN007P11S-2UX to 125HP/FRN125G11S-2UX to 150HP/FRN150P11S-2UX 460V Series 460V Series 0.50HP/FRNF50G11S-4UX 7.5HP/FRN007P11S-4UX to 600HP/FRN600G11S-4UX to 800HP/FRN800P11S-4UX ! CAUTION Read all operating instructions before installing, connecting (wiring), operating, servicing, or inspecting the inverter. Ensure that this instruction manual is made available to the final user of the inverter. Store this manual in a safe, convenient location. The product is subject to change without prior notice. Fuji Electric FA Components & Systems Co., Ltd. INR-SI47-1206-E Fuji Electric Corp of America CTi Automation - Phone: 800.894.0412 - Fax: 208.368.0415 - Web: www.ctiautomation.net - Email: info@ctiautomation.net
- 2. Preface Thank you four purchasing our FRENIC5000G11S or FRENIC5000P11S series inverter. This product is used to drive a 3-phase electric motor at variable speed. As incorrect use of this product may result in personal injury and/or property damage, read all operating instructions before using. As this manual does not cover the use of option cards, etc., refer to relevant manuals for option operations. Safety Instructions Read this manual carefully before installing, connecting (wiring), operating, servicing, or inspecting the inverter. Familiarize yourself with all safety features before using the inverter. In this manual, safety messages are classified as follows: WARNING Improper operation may result in serious personal injury or death. CAUTION Improper operation may result in slight to medium personal injury or property damage. Situations more serious than those covered by CAUTION will depend on prevailing circumstances. Always follow instructions. Instructions on use WARNING • This inverter is designed to drive a 3-phase induction motor and is not suitable for a single-phase motor or others, as fire may result. • This inverter may not be used (as is) as a component of a life-support system or other medical device directly affecting the personal welfare of the user. • This inverter is manufactured under strict quality control standards. However, safety equipment must be installed if the failure of this device may result in personal injury and/or property damage. There is a risk of accident. Instructions on installation WARNING • Mount this inverter on an incombustible material such as metal. There is a risk of fire. • Do not place combustible or flammable material near this inverter, as fire may result. CAUTION • Do not hold or carry this inverter by the surface cover. Inverter may be dropped causing injury. • Ensure that the inverter and heat sink surfaces are kept free of foreign matter (lint, paper dust, small chips of wood or metal, and dust), as fire or accident may result. • Do not install or operate a damaged inverter or an inverter with missing parts, as injury may result. CTi Automation - Phone: 800.894.0412 - Fax: 208.368.0415 - Web: www.ctiautomation.net - Email: info@ctiautomation.net
- 3. Instructions on wiring WARNING • Connect the inverter to power via a line-protection molded-case circuit breaker or Fuse, as fire may result. • Always connect a ground wire, as electric shock or fire may result. • A licensed specialist must perform the wiring works, as electric shock may result. • Turn off the power before starting the wiring work, as electric shock may result. • Wire the inverter after installation is complete, as electric shock or injury may occur. CAUTION • Confirm that the phases and rated voltage of this product match those of the AC power supply, as injury may result. • Do not connect the AC power supply to the output terminals (U,V,and W), as injury may result. • Do not connect a braking resistor directly to the DC terminals (P(+)and N(-)), as fire may result. • Ensure that the noise generated by the inverter, motor, or wiring does not adversely affect peripheral sensors and equipment, as accident may result. Instructions on operation WARNING • Be sure to install the surface cover before turning on the power (closed). Do not remove the cover while power to the inverter is turned on. Electric shock may occur. • Do not operate switches with wet hands, as electric shock may result. • When the retry function is selected, the inverter may restart automatically after tripping. (Design the machine to ensure personal safety in the event of restart) Accident may result. • When the torque limiting function is selected, operating conditions may differ from preset conditions (acceleration/deceleration time or speed). In this case, personal safety must be assured. Accident may result. • As the STOP key is effective only when a function setting has been established, install an emergency switch independently, and when an operation via the external signal terminal is selected, the STOP key on the keypad panel will be disabled. Accident may result. • As operations start suddenly if alarm is reset with a running signal input, confirm that no running signal is input before resetting alarm. Accident may result. • Do not touch inverter terminals when energized even if inverter has stopped. Electric shock may result. CAUTION • Do not start or stop the inverter using the main circuit power. Failure may result. • Do not touch the heat sink or braking resistor because they become very hot. Burns may result. • As the inverter can set high speed operation easily, carefully check the performance of motor or machine before changing speed settings. Injury may result. • Do not use the inverter braking function for mechanical holding. Injury may result. CTi Automation - Phone: 800.894.0412 - Fax: 208.368.0415 - Web: www.ctiautomation.net - Email: info@ctiautomation.net
- 4. Instructions on maintenance, inspection, and replacement WARNING • Wait a minimum of five minutes (30HP or less) or ten minutes (40HP or more) after power has been tumed off (open) before starting inspection. (Also confirm that the charge lamp is off and that DC voltage between terminals P (+) and N (-) do not exceed 25V.) Electrical shock may result. • Only authorized personnel should perform maintenance, inspection, and replacement operations.(Take off metal jewelry such as watches and rings. Use insulated tools.) Electric shock or injury may result. Instructions on disposal CAUTION • Treat as industrial waste when disposing it. Injury may result. Other instructions WARNING • Never modify the product. Electric shock or injury may result. Conformity to Low Voltage Directive in Europe CAUTION • The contact capacity of alarm output for any fault (30A, B, C) and relay signal output (Y5A, Y5C) is 0.5A at 48V DC. • The ground terminal G should be connected to the ground. Use a crimp terminal to connect a cable to the main circuit terminal or inverter ground terminal. • Where RCD (Residual-current protective device) is used for protection in case of direct or indirect contact, only RCD of type B is allowed on the supply side of this EE (Electric equipment). Otherwise another protective measure shall be applied such as separation of the EE from the environment by double or reinforced insulation or isolation of EE and supply system by the transformer. • Use a single cable to connect the G inverter ground terminal. (Do not use two or more inverter ground terminals.) • Use a molded-case circuit breaker (MCCB) and magnetic contactor (MC) that conform to EN or IEC standards. • Use the inverter under over-voltage category III conditions and maintain Pollution degree 2 or better as specified in IEC664. To maintain Pollution degree 2 or more, install the inverter in the control panel (IP54 or higher level) having structure free from water, oil, carbon, dust, etc. • For the input-output wiring of the inverter, use cable (diameter and type) as specified in Appendix C in EN60204. • To ensure safety, install an optional AC reactor, DC reactor, or external braking resistor as follows: 1) Install inside an IP4X cabinet or barrier if electrical parts are exposed. 2) Install inside an IP2X cabinet or barrier if electrical parts are not exposed. • It is necessary to install the inverter in appropriate method using an appropriate RFI filter to conform to the EMC directive. It is customer's responsibility to check whether the equipment, the inverter is installed in, conforms to EMC directive. CTi Automation - Phone: 800.894.0412 - Fax: 208.368.0415 - Web: www.ctiautomation.net - Email: info@ctiautomation.net
- 5. Conformity to Low Voltage Directive in Europe CAUTION Table 1-1 Applicable equipment and wire size for main circuit in Europe Fuse/MCCB current rating [A] Tightening torque [N*m] Recommended wire size [mm 2 ] L1/R, L2/S, L3/T ( G) Voltage Applicationmotor[HP] Inverter type With DCR Without DCR L1/R,L2/S,L3/T U,V,W P1,P(+),DB,N(-) G R0,T0 Control With DCR Without DCR U,V,W R0,T0 P1,P(+) P(+),DB,N(-) Control 1/4 FRNF25G11S-2UX 5 5 1/2 FRNF50G11S-2UX 5 5 1 FRN001G11S-2UX 5 10 1.2 - - 2 FRN002G11S-2UX 10 15 3 FRN003G11S-2UX 10 15 2.5 (2.5) 5 FRN005G11S-2UX 20 30 1.8 2.5 (2.5) 4(4) 2.5 2.5 7.5 FRN007P11S-2UX 30 40 6(6) 10(10) 4 4 7.5 FRN007G11S-2UX 10 FRN010P11S-2UX 40 60 16 6 6 10 FRN010G11S-2UX (16) 15 FRN015P11S-2UX 50 100 3.5 35 10 10 15 FRN015G11S-2UX 10 (10) (16) 20 FRN020P11S-2UX 75 125 25 16 16 20 FRN020G11S-2UX (16) 2.5 25 FRN025P11S-2UX 100 150 3.5 25 FRN025G11S-2UX 30 FRN030P11S-2UX 100 175 25 25 5.5 30 FRN030G11S-2UX 5.8 35 (16) 50 (25) 35 2.5 35 40 FRN040P11S-2UX 150 200 50 25×2 50 16×2 40 FRN040G11S-2UX (25) (25) 50 FRN050P11S-2UX 175 250 13.5 16×2 35×2 25×2 25×2 4 50 FRN050G11S-2UX 70(35) (50) 70 95 60 FRN060P11S-2UX 200 300 95 50×2 25×2 35×2 60 FRN060G11S-2UX (50) (50) 75 FRN075P11S-2UX 250 350 35×2 70×2 35×2 50×2 6 75 FRN075G11S-2UX (35) (70) 100 FRN100P11S-2UX 350 - 27 13.5 50×2 - 50×2 70×2 10 100 FRN100G11S-2UX 185(95) 240 125 FRN125P11S-2UX 400 - 240 - 70×2 95×2 16 125 FRN125G11S-2UX (120) 300 150 FRN150P11S-2UX 500 - 95×2 - 95×2 120×2 3phase230Vsystem 48 27 1.2 0.7 (95) 2.5 to 6 25 0.2 to 0.75 Note: The type of wire is 75℃ (167ºF) 600V Grade heat-resistant polyvinyl chloride insulated wires (PVC). The above-mentioned wire size are the recommended size under the condition of the ambient temperature 50℃ (122ºF) or lower. CTi Automation - Phone: 800.894.0412 - Fax: 208.368.0415 - Web: www.ctiautomation.net - Email: info@ctiautomation.net
- 6. Conformity to Low Voltage Directive in Europe CAUTION Table 1-2 Applicable equipment and wire size for main circuit in Europe Fuse/MCCB current rating [A] Tightening torque [N*m] Recommended wire size [mm 2 ] L1/R, L2/S, L3/T ( G) Voltage Applicationmotor[HP] Inverter type With DCR Without DCR L1/R,L2/S,L3/T U,V,W P1,P(+),DB,N(-) G R0,T0 Control With DCR Without DCR U,V,W R0,T0 P1,P(+) P(+),DB,N(-) Control 1/2 FRNF50G11S-4UX 5 5 1.2 1 FRN001G11S-4UX 5 5 - - 2 FRN002G11S-4UX 5 10 3 FRN003G11S-4UX 10 15 5 FRN005G11S-4UX 10 15 1.8 7.5 FRN007P11S-4UX 15 20 7.5 FRN007G11S-4UX 2.5 (2.5) 10 FRN010P11S-4UX 20 30 6 10 FRN010G11S-4UX 2.5 (2.5) (6) 2.5 2.5 15 FRN015P11S-4UX 30 40 3.5 6 4 4 15 FRN015G11S-4UX (6) 20 FRN020P11S-4UX 40 50 6 6 20 FRN020G11S-4UX 10 (10) 25 FRN025P11S-4UX 40 60 16 10 10 25 FRN025G11S-4UX (16) 30 FRN030P11S-4UX 50 75 25 30 FRN030G11S-4UX 5.8 10 (10) (16) 2.5 2.5 40 FRN040P11S-4UX 75 100 16 35 25 25 40 FRN040G11S-4UX (10) (25) 50 FRN050P11S-4UX 100 125 25 50 25 35 50 FRN050G11S-4UX (16) (25) 60 FRN060P11S-4UX 100 150 35 25×2 35 50 60 FRN060G11S-4UX (25) (25) 75 FRN075P11S-4UX 125 175 50 25×2 50 25×2 2.5 75 FRN075G11S-4UX (25) (25) 100 FRN100P11S-4UX 175 - 13.5 25×2 - 25×2 25×2 100 FRN100G11S-4UX 70(35) 95 95 125 FRN125P11S-4UX 200 - 13.5 95 - 95 50×2 4 125 FRN125G11S-4UX (50) 150 FRN150P11S-4UX 225 - 50×2 - 50×2 70×2 6 150 FRN150G11S-4UX (50) 200 FRN200P11S-4UX 300 - 27 50×2 - 70×2 70×2 200 FRN200G11S-4UX 150 185 240 250 FRN250P11S-4UX 350 - 240 - 240 95×2 10 250 FRN250G11S-4UX (120) 300 FRN300P11S-4UX 400 - 95×2 - 120×2 150×2 16 300 FRN300G11S-4UX 300 350 FRN350P11S-4UX 500 - 120×2 - 120×2 185×2 350 FRN350G11S-4UX (120) 400 FRN400P11S-4UX 600 - 185×2 - 185×2 240×2 25 400 FRN400G11S-4UX (185) 450 FRN450P11S-4UX 700 - 240×2 - 240×2 300×2 450 FRN450G11S-4UX (240) 500 FRN500P11S-4UX 800 - 240×2 - 150×3 185×3 50 500 FRN500G11S-4UX (240) 300×2 600 FRN600P11S-4UX 1,000 - 150×3 - 185×3 240×3 600 FRN600G11S-4UX 300×2 300×2 700 FRN700P11S-4UX 185×3 - 240×3 300×3 3phase460Vsystem 800 FRN800P11S-4UX 1,200 - 48 27 1.2 0.7 240×3 - 240×3 2.5 to 6 300×3 70 0.2 to 0.75 Note: The type of wire is 75℃ (167ºF) 600V Grade heat-resistant polyvinyl chloride insulated wires (PVC). The above-mentioned wire size are the recommended size under the condition of the ambient temperature 50℃ (122ºF) or lower. CTi Automation - Phone: 800.894.0412 - Fax: 208.368.0415 - Web: www.ctiautomation.net - Email: info@ctiautomation.net
- 7. Compliance with UL/cUL standards [Applicable to products with UL/cUL mark] CAUTION Tightening torque and wire range Inverter type Required torque [lb-inch](N.m) Wire range [AWG] (mm2 ) Voltage G11S/P11S Main terminal Auxiliary control- power Control L1/R,L2/S,L3/T U,V,W Auxiliary control- power Control FRNF25G11S-2UX FRNF50G11S-2UX FRN001G11S-2UX 10.6(1.2) ― ― FRN002G11S-2UX 16 (1.3) FRN003G11S-2UX 14 (2.1) FRN005G11S-2UX 15.9(1.8) 10 (5.3) FRN007G11S-2UX FRN007,010P11S-2UX 8 (8.4) 6 (13.3)FRN010G11S-2UX FRN015P11S-2UX 31.0(3.5) FRN015G11S-2UX FRN020P11S-2UX 4 (21.2) FRN020G11S-2UX FRN025P11S-2UX 3 (26.7) FRN025G11S-2UX FRN030P11S-2UX 2 (33.6) FRN030G11S-2UX 51.3(5.8) 1 (42.4) FRN040G11S/P11S-2UX 2X2 (33.6X2)119(13.5) FRN050P11S-2UX FRN050G11S-2UX 1X2(42.4X2) FRN060G11S/P11S-2UX 2/0X2(67.4X2) FRN075G11S/P11S-2UX 3/0X2(85X2) 239(27) FRN100P11S-2UX FRN100G11S-2UX 4/0X2(107.2X2) FRN125G11S/P11S-2UX 250X2(127X2) 3-phase 230V FRN150P11S-2UX 425(48) 10.6(1.2) 6.2(0.7) 350X2(177X2) 16(1.3) 24 (0.2) FRNF50G11S-4UX FRN001G11S-4UX 10.6(1.2) ― ― FRN002G11S-4UX FRN003G11S-4UX 16 (1.3) FRN005G11S-4UX 15.9(1.8) 14 (2.1) FRN007G11S-4UX FRN007,010P11S-4UX 12 (3.3) FRN010G11S-4UX FRN015P11S-4UX FRN015G11S-4UX FRN020P11S-4UX 10 (5.3) FRN020G11S-4UX FRN025P11S-4UX 8 (8.4) FRN025G11S-4UX FRN030P11S-4UX 6 (13.3) FRN030G11S-4UX 31.0(3.5) 4 (21.2) FRN040G11S/P11S-4UX 2 (33.6) FRN050G11S/P11S-4UX 1(42.4) FRN060G11S/P11S-4UX 3X2 (26.7X2) FRN075G11S/P11S-4UX 2X2 (33.6X2) 119(13.5) 2X2 (33.6X2)FRN100P11S-4UX FRN100G11S-4UX 4/0(107.2) FRN125G11S/P11S-4UX 1X2(42.4X2) FRN150G11S/P11S-4UX 2/0X2(67.4X2) 239(27) FRN200P11S-4UX FRN200G11S-4UX 3/0X2(85X2) FRN250G11S/P11S-4UX 4/0X2(107.2X2) FRN300P11S-4UX FRN300G11S-4UX 300X2(152X2) FRN350G11S/P11S-4UX 350X2(177X2) FRN400G11S/P11S-4UX FRN450P11S-4UX 500X2(253X2) FRN450G11S-4UX 300X3(152X3) FRN500G11S/P11S-4UX 400X3(203X3) FRN600G11S/P11S-4UX 500X3(253X3) FRN700P11S-4UX 3-phase 460V FRN800P11S-4UX 425(48) 10.6(1.2) 6.2(0.7) 600X3(304X3) 16(1.3) 24 (0.2) Use the following power supply to the inverter Inverter Model Maximum input voltage Input source current FRNF25G11S-2UX ~ FRN125G11S-2UX AC240V FRN007P11S-2UX ~ FRN150P11S-2UX FRNF50G11S-4UX ~ FRN600G11S-4UX FRN007P11S-4UX ~ FRN800P11S-4UX AC480V Not more than 100,000A CTi Automation - Phone: 800.894.0412 - Fax: 208.368.0415 - Web: www.ctiautomation.net - Email: info@ctiautomation.net
- 8. Compliance with UL/cUL standards [Applicable to products with UL/cUL mark] CAUTION • [CAUTION] Hazard of electrical shock. Disconnect incoming power before working on this control. • [CAUTION] Dangerous voltage exists until charge lights is off. • [WARNING] • More than one live parts inside the inverter. • Type1 “INDOOR USE ONLY” The inverter is approved as a part used inside a panel. Install it inside a panel. • Suitable for use on a circuit capable of delivering not more than 100,000rms symmetrical amperes. • Use 60/75C copper wire only. • A Class2 circuit wired with class1 wire. • Field wiring connection must be made by a UL Listed and CSA Certified closed-loop terminal connector sized for the wire gauge involved. Connector must be fixed using the crimp tool specified by the connector manufacturer. • Connect the power supply to main power supply terminals via the Molded-case circuit breaker (MCCB) or a ground fault circuit interrupter (GFCI) to apply the UL Listing Mark. (See Instruction Manual basic connection diagram Fig.2-3-1). • In case of using auxiliary control-power input (R0, T0), connect it referring to Basic connection diagram Fig.2-3-1. • Solid state motor overload protection is provided in each model. General instructions Although figures in this manual may show the inverter with covers and safety screens removed for explanation purposes, do not operate the device until all such covers and screens have been replaced. CTi Automation - Phone: 800.894.0412 - Fax: 208.368.0415 - Web: www.ctiautomation.net - Email: info@ctiautomation.net
- 9. Contents 1. Before Using This Product ・・・・・・・・・・・・・・・1-1 1-1 Receiving Inspections ・・・・・・・・・・・・・・・・1-1 1-2 Appearance ・・・・・・・・・・・・・・・・・・・・・・・・1-1 1-3 Handling the Product ・・・・・・・・・・・・・・・・・1-2 1-4 Carrying ・・・・・・・・・・・・・・・・・・・・・・・・・・・・1-3 1-5 Storage ・・・・・・・・・・・・・・・・・・・・・・・・・・・・1-3 2. Installation and Connection ・・・・・・・・・・・・・・2-1 2-1 Operating Environment ・・・・・・・・・・・・・・・2-1 2-2 Installation Method ・・・・・・・・・・・・・・・・・・2-1 2-3 Connection ・・・・・・・・・・・・・・・・・・・・・・・・・2-3 2-3-1 Basic connection ・・・・・・・・・・・・・・・・2-3 2-3-2 Connecting the main circuit and ground terminals ・・・・・・・・・・・・・・・・2-8 2-3-3 Connecting the control terminals ・・・2-13 2-3-4 Terminal arrangement・・・・・・・・・・・・2-16 2-3-5 Applicable equipment and wire size for main circuit ・・・・・・・・・・・・・・・・・2-18 3. Operation ・・・・・・・・・・・・・・・・・・・・・・・・・・・・・・3-1 3-1 Inspection and Preparation before Operation・・・・・・・・・・・・・・・・・・・・・3-1 3-2 Operation Method ・・・・・・・・・・・・・・・・・・・3-1 3-3 Trial Run ・・・・・・・・・・・・・・・・・・・・・・・・・・・3-1 4. Keypad Panel ・・・・・・・・・・・・・・・・・・・・・・・・・・4-1 4-1 Appearance of Keypad Panel ・・・・・・・・・4-1 4-2 Keypad Panel Operation System (LCD screen, Level Structure) ・・・・・・・・4-2 4-2-1 Normal operation ・・・・・・・・・・・・・・・・4-2 4-2-2 Alarm occurrence ・・・・・・・・・・・・・・・・4-2 4-3 Operating Keypad Panel ・・・・・・・・・・・・・4-4 4-3-1 Operation Mode ・・・・・・・・・・・・・・・・・4-4 4-3-2 Setting digital frequency ・・・・・・・・・・4-4 4-3-3 Switching the LED monitor ・・・・・・・・4-5 4-3-4 Menu screen ・・・・・・・・・・・・・・・・・・・・4-5 4-3-5 Setting function data ・・・・・・・・・・・・・4-5 4-3-6 Checking function data ・・・・・・・・・・・4-7 4-3-7 Monitoring operating status ・・・・・・・4-7 4-3-8 I/O check ・・・・・・・・・・・・・・・・・・・・・・・4-8 4-3-9 Maintenance information ・・・・・・・・・・4-9 4-3-10 Load rate measurement ・・・・・・・・4-10 4-3-11 Alarm information ・・・・・・・・・・・・・・4-11 4-3-12 Alarm history and factors ・・・・・・・・4-12 4-3-13 Data copy ・・・・・・・・・・・・・・・・・・・・4-13 4-3-14 Alarm mode ・・・・・・・・・・・・・・・・・・・4-15 5. Function Select ・・・・・・・・・・・・・・・・・・・・・・・・ 5-1 5-1 Function select list ・・・・・・・・・・・・・・・・・・・ 5-1 5-2 Function Explanation ・・・・・・・・・・・・・・・・ 5-7 6. Protective Operation ・・・・・・・・・・・・・・・・・・・・ 6-1 6-1 List of Protective Operations ・・・・・・・・・・ 6-1 6-2 Alarm Reset ・・・・・・・・・・・・・・・・・・・・・・・・ 6-2 7. Trouble shooting ・・・・・・・・・・・・・・・・・・・・・・・ 7-1 7-1 Protective function activation ・・・・・・・・・・ 7-1 7-2 Abnormal motor rotation ・・・・・・・・・・・・・・ 7-5 8. Maintenance and Inspection ・・・・・・・・・・・・・ 8-1 8-1 Daily Inspection ・・・・・・・・・・・・・・・・・・・・・ 8-1 8-2 Periodical Inspection ・・・・・・・・・・・・・・・・・ 8-1 8-3 Measurement of Main Circuit Electrical Quantity ・・・・・・・・・・・・・・・・・・・ 8-4 8-4 Insulation Test ・・・・・・・・・・・・・・・・・・・・・・ 8-5 8-5 Parts Replacement ・・・・・・・・・・・・・・・・・・ 8-5 8-6 Inquiries about Products and Product Guarantee ・・・・・・・・・・・・・・・・・・ 8-5 9. Specifications ・・・・・・・・・・・・・・・・・・・・・・・・・・ 9-1 9-1 Standard Specifications ・・・・・・・・・・・・・・ 9-1 9-2 Common Specifications ・・・・・・・・・・・・・・ 9-3 9-3 Outline Dimensions ・・・・・・・・・・・・・・・・・・ 9-4 9-4 RS-485 Modbus RTU Serial Communications ・・・・・・・・・・・・・・・・・・・・ 9-8 9-4-1 Transmission Specification ・・・・・・・・ 9-8 9-4-2 Connection ・・・・・・・・・・・・・・・・・・・・・・ 9-8 9-4-3 Serial Interface Configuration ・・・・・・ 9-8 9-4-4 Modbus RTU Functions ・・・・・・・・・・・ 9-8 9-4-5 Inverter Function Code Access ・・・・・ 9-9 9-4-6 Command and Monitor Data Registers ・・・・・・・・・・・・・・・・・・ 9-9 9-4-7 Data Format Specification ・・・・・・・・9-11 9-4-8 Communication Errors ・・・・・・・・・・・9-15 10. Options ・・・・・・・・・・・・・・・・・・・・・・・・・・・・・10-1 10-1 Built-in Options ・・・・・・・・・・・・・・・・・・・10-1 10-2 Separately Installed Options ・・・・・・・・10-2 11. Electromagnetic compatibility (EMC) ・・・・11-1 11-1 General ・・・・・・・・・・・・・・・・・・・・・・・・・・11-1 11-2 Recommended Installation Instructions ・・・・・・・・・・・・・・・・・・・・・・11-2 11-3 The harmonics restriction in Europe Union (EU) ・・・・・・・・・・・・・11-5 CTi Automation - Phone: 800.894.0412 - Fax: 208.368.0415 - Web: www.ctiautomation.net - Email: info@ctiautomation.net
- 10. 1-1 1. Before Using This Product 1-1 Receiving Inspections Unpack and check the product as explained below. If you have any questions about the product, contact the nearest Fuji sales office or your local distributor where you purchased the unit. ① Check the ratings nameplate to confirm that the delivered product is the ordered one. Ratings nameplate TYPE : Inverter type SOURCE : Power rating OUTPUT : Output rating MASS : Mass (not indicated for products with 30HP or less) SER.No. : Serial number 7 5 A 1 2 3 A 0 0 0 1 Z Production lot serial number Production month:1 to 9: January to September, X: October, Y: November, Z: December Production year: Last digit of year (7 --> 2007) ② Check for damaged and/or missing parts upon delivery. ③ In addition to the inverter unit and this manual, the package contains rubber bushing (for products with 30HP or less) and a terminating resistor (1/2 W, 120Ω). The terminating resistors for products with 30HP or less is packed in a sack. The terminating resistors for products with 40HP or more is connected to the control terminal of the inverter unit. This terminating resistor is required for RS-485 communication. The terminating resistor need not be removed regardless of RS-485 communication status. 1-2 Appearance FRN 030 G11S-4 UX Power supply voltage system :2→ 230V grade、4→460V grade Series name:G11S or P11S Nominal applied motor:030→30HP Product type: FRENIC5000 30HP or less 40HP or more Surface cover Keypad panel Mounting screws of surface cover Intermediate cover Ratings nameplate Mounting screws of surface cover (6 screws total) Keypad panel Surface cover Ratings nameplate Lifting holes (4 holes total) CTi Automation - Phone: 800.894.0412 - Fax: 208.368.0415 - Web: www.ctiautomation.net - Email: info@ctiautomation.net
- 11. 1-2 1-3 Handling the Product (1) Removing the surface cover For the inverter of 30HP or less, loosen the mounting screws of the surface cover, then remove the cover by pulling the top (see Figure 1.3.1). Fig. 1-3-1 Removing the surface cover (for inverter of 30HP or less) For the inverter of 40HP or more, remove the six mounting screws of the surface cover, then remove the surface cover. Fig. 1-3-2 Removing the surface cover (for inverter of 40HP or more) (2) Removing the keypad panel After removing the surface cover as explained in (1), loosen the mounting screws of the keypad panel and remove as shown in Figure 1.3.3. Fig. 1-3-3 Removing the keypad panel Loosen the mounting screws of the keypad panel and remove using the finger holds on the keypad panel case. Fig. 1-3-4 Removing the keypad panel (for inverter of 40HP or more) CTi Automation - Phone: 800.894.0412 - Fax: 208.368.0415 - Web: www.ctiautomation.net - Email: info@ctiautomation.net
- 12. 1-3 Temporary storage Long-term storage 1-4 Carrying Carry the product by the main unit. Do not carry the product while holding the cover or parts other than the main unit. Use a crane or hoist to carry a product equipped with hanging holes. 1-5 Storage Temporary storage of this product must meet those conditions listed in Table 1-5-1. Table 1-5-1 Storage environment Item Specifications Ambient temperature -10℃(14ºF) to +50℃(122ºF) Storage temperature -25℃(-13ºF) to +65℃(149ºF) Relative humidity 5 to 95%Note2 Condensation or freezing must not occur as a result of sudden temperature changes. Atmosphere Pollution degree 2 Air pressure Operation/storage: 86 to 106 kPa Transport : 70 to 106 kPa Note1: The storage temperature applies only to short periods such as transport. Note2: As a large change in temperature within this humidity range may result in condensation or freezing, do not store where such temperature changes may occur. ① Do not place this product directly on a floor. ② To store the product in an extreme environment, pack in vinyl sheet, etc. ③ If the product is stored in a high-humidity environment, insert a drying agent (e.g., silica gel) and pack the product in vinyl sheet. If the product is to be stored for an extended period after purchase, the method of storage depends primarily on storage location. The general long-term storage method is as follows: ① The above conditions for temporary storage must be satisfied. When the storage period exceeds three months, the upper limit of ambient temperature must be reduced to 30℃(86ºF) to prevent the deterioration of the electrolytic capacitors. ② Pack the product thoroughly to eliminate exposure to moisture and include a drying agent to ensure a relative humidity of about 70% or less. ③ If the product is mounted on a unit or control panel and is left unused and exposed to the elements like moisture or dust (particularly on a construction site), remove the product and store in a suitable environment. ④ Electrolytic capacitors not provided with power for an extended period will deteriorate. Do not store electrolytic capacitors for one year or longer without providing power. CTi Automation - Phone: 800.894.0412 - Fax: 208.368.0415 - Web: www.ctiautomation.net - Email: info@ctiautomation.net
- 13. 2-1 2. Installation and Connection 2-1 Operating Environment Install this product in a location that meets those conditions listed in Table 2-1-1 Table 2-1-1 Operating environment Item Specifications Table 2-1-2 Output current reduction rate based on altitude Location Indoor Altitude Output current reduction rate 3300ft (1000m) or lower 1.00 3300-4950ft (1000 to 1500m) 0.97 Ambient temperature -10℃(14ºF) to +50℃(122ºF)(For products of 30HP or less, the ventilating covers must be removed if ambient temperature exceeds +40℃(104ºF)) 4950-6600ft (1500 to 2000m) 0.95 6600-8250ft (2000 to 2500m) 0.91Relative humidity 5 to 95% (No condensation) 8250-9900ft (2500 to 3000m) 0.88 Atmosphere Pollution degree 2 Air pressure 86 to 106 kPa Vibration 3mm:from 2 to less than 9 Hz, 1m/s 2 :from 9 to less than 20 Hz, 1m/s2 :from 20 to less than 55 Hz, 1m/s 2 :from 55 to less than 200 Hz 2-2 Installation Method ① Securely fasten the product in an upright position on a solid structure such that FRENIC5000G11S is facing the front. Do not turn the product upside down or install in a horizontal position. ② As heat is generated during inverter operation, the spaces shown in Fig. 2-2-1 are required to ensure sufficient cooling. As heat radiates upward, do not install the product beneath a device sensitive to heat. ③ As the heat sink may reach a temperature of 90℃(194ºF) during inverter operation, ensure that the material surrounding the product can withstand this temperature. ! WARNING Install this product on nonflammable material such as metal. ④ When installing this product in a control panel, consider ventilation to prevent ambient temperature of the inverter from exceeding the specified value. Do not install the product in an area from which heat cannot be sufficiently released. ⑤ If two or more inverters must be installed in the same device or control panel, arrange the units horizontally to minimize the effect of heat. If two or more inverters must be installed vertically, place an insulated plate between the inverters to minimize the effect of heat. ⑥ When shipped from the factory, inverters are internal cooling type inside panel. An inverter of 30HP or less can be converted to an external cooling type simply by adding an optional mounting adapter. An inverter of 40HP or more can be converted simply by moving mounting adapter. In an external cooling system, a heat sink radiating about 70% of total inverter heat (total loss) can be placed outside the device or control panel. Ensure that heat sink surfaces are kept free of foreign matter (lint, Fig. 2-2-2 External cooling system moist dust particles etc.). ! WARNING ・In case of external cooling system, cover the inverter rear side in order not to touch the main capacitor and braking resistor. Electric shock may result. ・Ensure that the inverter and heat sink surfaces are kept free of foreign matter such as lint, paper dust, small chips of wood or metal, and dust. Fire or accident may result. Right 30HP or less: Gap X can be 0. (side-by-side installation) 40HP or more: Gap X >= 2inch (50mm) 3.9inch(100mm) 3.9inch(100mm) Fig.2-2-1 Fig.2-2-2 CTi Automation - Phone: 800.894.0412 - Fax: 208.368.0415 - Web: www.ctiautomation.net - Email: info@ctiautomation.net
- 14. 2-2 An inverter of 40HP or more can be converted to an external cooling type simply by moving upper and lower mounting brackets as shown in Fig. 2-2-3. Remove the M6 bracket screws, move the brackets, then secure the brackets using the M5 case mounting screws. (The bracket screws are no longer required after changing the bracket mounting position.) Quantity of mounting screw Voltage series Inverter type Bracket screws Case mounting screws FRN040G11S-2UX to FRN100G11S-2UX FRN040P11S-2UX to FRN125P11S-2UX 5 5 230V FRN125G11S-2UX FRN125P11S-2UX 6 6 FRN040G11S-4UX to FRN250G11S-4UX FRN040P11S-4UX to FRN300P11S-4UX 5 5 460V FRN300G11S-4UX to FRN350G11S-4UX FRN350P11S-4UX to FRN400P11S-4UX 6 6 Fig. 2-2-3 ⑦ For inverters of 30HP or less, remove the ventilating covers if ambient temperature exceeds +40℃(104ºF) (1) Removing the ventilating covers One ventilating cover is mounted on top of the inverter and two or three are mounted at the bottom. Remove the surface cover, then remove ventilating covers by popping out the cover inserts as shown in Fig.2-2-4. Fig. 2-2-4 Removing the ventilating cover CTi Automation - Phone: 800.894.0412 - Fax: 208.368.0415 - Web: www.ctiautomation.net - Email: info@ctiautomation.net
- 15. 2-3 2-3 Connection Remove the surface cover before connecting the terminal blocks as follows. 2-3-1 Basic connection ①Always connect power to the L1/R, L2/S, and L3/T main circuit power terminals of the inverter. Connecting power to another terminal will damage the inverter. Check that the power voltage is within the maximum allowable voltage marked on the nameplate, etc. ②Always ground the ground terminal to prevent disasters such as fire or electric shock and to minimize noise. ③Use a reliable crimp terminal for connection between a terminal and a cable. ④After terminating the connection(wiring), confirm the following: a. Confirm that the connection is correct. b. Confirm that all necessary connections have been made. c. Confirm that there is no short-circuit or ground fault between terminals and cables. ⑤Connection modification after power-on The smoothing capacitor in the direct current portion of the main circuit cannot be discharged immediately after the power is turned off. To ensure safety, use a multimeter to check that the voltage of the direct current (DC) is lowered to the safety range (25V DC or less)after the charge lamp goes off. Also, confirm that the voltage is zero before short-circuiting. The residual voltage (electric charge) may causesparks. ! WARNING • Always connect a ground wire. Electric shock or fire may result. • Ensure that a licensed specialist performs all wiring works. • Confirm that the power is turned off (open) before commencing wiring operations. Electrical shock may result. CTi Automation - Phone: 800.894.0412 - Fax: 208.368.0415 - Web: www.ctiautomation.net - Email: info@ctiautomation.net
- 16. 2-4 Basic Connection Diagram (Sink Logic) Ground-fault circuit interrupter (GFCI) RS-485 (CM) (THR) DB) Note: The control circuit common terminals [11], (CM) and <CMY> are isolated (*1) Use a drive with rated voltage matching the power supply voltage. (*2) Use as required. (*3) Use this peripheral device when necessary. (*4) Remove the jumper wire (*4) between P1 and P(+) before connecting a DC REACTOR. (*5) Be sure to use the braking unit (option)(*6) when connecting the external braking resistor (option)(*5) (*6) Connect the braking unit to P(+) ans N(-). The auxiliary terminals [1] and [2] have polarity. Connect them as shown in the figure above. (*7) The drive can be operated without connecting the auxiliary control power supply. (*8) Terminal (X1) to (X9) can be set to 9 (THR) - Braking unit thermal trip input. (*9) If usingV2 or C1, as a reference signal, they must be used exclusively. (*10) It is possible to input voltage signals (0 to +10 VDC or 0 to +5 VDC) to terminals [12] [11] instead of the potentiometer. Fig.2-3-1 G11S:15HP and above P11S:20HP and above G11S:Up to 10HP P11S:Up to 15HP CTi Automation - Phone: 800.894.0412 - Fax: 208.368.0415 - Web: www.ctiautomation.net - Email: info@ctiautomation.net
- 17. 2-5 Basic Connection Diagram to PLC (Sink Logic) Ground-fault circuit interrupter (GFCI) RS-485 Fig.2-3-2 G11S:15HP and above P11S:20HP and above G11S:Up to 10HP P11S:Up to 15HP CTi Automation - Phone: 800.894.0412 - Fax: 208.368.0415 - Web: www.ctiautomation.net - Email: info@ctiautomation.net
- 18. 2-6 Basic Connection Diagram (Source Logic, Typically used in Europe) Ground-fault circuit interrupter (GFCI) RS-485 Note: The control circuit common terminals [11], (CM) and <CMY> are isolated (*1) Use a drive with rated voltage matching the power supply voltage. (*2) Use as required. (*3) Use this peripheral device when necessary. (*4) Remove the jumper wire (*4) between P1 and P(+) before connecting a DC REACTOR. (*5) Be sure to use the braking unit (option)(*6) when connecting the external braking resistor (option)(*5) (*6) Connect the braking unit to P(+) ans N(-). The auxiliary terminals [1] and [2] have polarity. Connect them as shown in the figure above. (*7) The drive can be operated without connecting the auxiliary control power supply. (*8) Terminal (X1) to (X9) can be set to 9 (THR) - Braking unit thermal trip input. (*9) If usingV2 or C1, as a reference signal, they must be used exclusively. (*10) It is possible to input voltage signals (0 to +10 VDC or 0 to +5 VDC) to terminals [12] [11] instead of the potentiometer Fig.2-3-3 G11S:15HP and above P11S:20HP and above G11S:Up to 10HP P11S:Up to 15HP CTi Automation - Phone: 800.894.0412 - Fax: 208.368.0415 - Web: www.ctiautomation.net - Email: info@ctiautomation.net
- 19. 2-7 Basic Connection Diagram to PLC (Source logic, Typically used in Europe) Ground-fault circuit interrupter (GFCI) RS-485 (THR) (P24) Fig.2-3-4 G11S:15HP and above P11S:20HP and above G11S:Up to 10HP P11S:Up to 15HP CTi Automation - Phone: 800.894.0412 - Fax: 208.368.0415 - Web: www.ctiautomation.net - Email: info@ctiautomation.net
- 20. 2-8 2-3-2 Connecting the main circuit and ground terminals Table 2-3-1 Functions of main circuit terminals and ground terminals Symbol Terminal name Description L1/R, L2/S, L3/T Main circuit power terminal Connects a 3-phase power supply. U, V, W Inverter output terminal Connects a 3-phase motor. R0, T0 Auxiliary control-power input terminal Connects a backup AC power supply to the control circuit. (Not supported for inverter of 1HP or less) P1, P (+) DC reactor connecting terminal Connects the optional power-factor correcting DC reactor. P (+), DB External braking resistor connecting terminal Connects the optional external braking resistor. (For inverter of 10HP or less) P (+), N (-) DC link circuit terminal Supplies DC link circuit voltage to the external braking unit (option) or power regeneration unit (option). G Inverter ground terminal Grounds the inverter chassis (case) to the earth. (1) Main circuit power terminals (L1/R, L2/S, L3/T) ① Connect these terminals to the power supply via a molded-case circuit breaker or a ground-fault circuit interrupter for circuit (wiring) protection. Phase-sequence matching is unnecessary. ② To ensure safety, a magnetic contactor should be connected to disconnect the inverter from the power supply when the inverter protective function activates. ③ Use control circuit terminal FWD/REV or the RUN/STOP key on the keypad panel to start or stop the inverter. The main circuit power should be used to start or stop the inverter only if absolutely necessary and then should not be used more than once every hour. ④ If you need to connect these terminals to a single-phase power supply, please contact the factory. (2) Inverter output terminals (U, V, W) ① Connect these terminals to a 3-phase motor in the correct phase sequence. If the direction of motor rotation is incorrect, exchange any two of the U, V, and W phases. ② Do not connect a power factor correction capacitor or surge absorber to the inverter output. ③ If the cable from the inverter to the motor is very long, a high-frequency current may be generated by stray capacitance between the cables and result in an overcurrent trip of the inverter, an increase in leakage current, or a reduction in current indication precision. When a motor is driven by a PWM-type drive, the motor terminals may be subject to surge voltage generated by drive element switching. If the motor cable (with 460V series motors, in particular) is particularly long, surge voltage will deteriorate motor insulation. To prevent this, use the following guidelines: Inverters 7.5 HP and larger Motor Insulation Level 1000V 1300V 1600V 460 VAC Input Voltage 66 ft (20 m) 328 ft (100 m) 1312 ft (400 m) * 230 VAC Input Voltage 1312 ft (400 m) * 1312 ft (400 m) * 1312 ft (400 m) * Inverters 5 HP and smaller Motor Insulation Level 1000V 1300V 1600V 460 VAC Input Voltage 66 ft (20 m) 165 ft (50 m) * 165 ft (50 m) * 230 VAC Input Voltage 328 ft (100 m) * 328 ft (100 m) * 328 ft (100 m) * * For this case the cable length is determined by secondary effects and not voltage spiking. Note: When a motor protective thermal O/L relay is inserted between the inverter and the motor, the thermal O/L relay may malfunction (particularly in the 460V series), even when the cable length is 165 feet (50m) or less. To correct, insert a filter or reduce the carrier frequency. (Use function code “F26 Motor sound”.) CTi Automation - Phone: 800.894.0412 - Fax: 208.368.0415 - Web: www.ctiautomation.net - Email: info@ctiautomation.net
- 21. 2-9 (3) Auxiliary control-power input terminals (R0 and T0) The inverter operates even if power is not provided to these terminals. If a protective circuit operates and the magnetic contactor on the inverter power side is opened (off), the inverter control circuit power, the alarm output (30A, B, and C), and the keypad panel display goes off. To prevent this, the same AC power as the main circuit AC power must be supplied (as auxiliary control power) to the auxiliary control-power input terminals (R0 and T0). ① To ensure effective noise reduction when using a radio noise filter, the output power from the filter must go to the auxiliary control-power input terminals. P1 P(+) L1/R L2/S L3/T Magnetic contactor Noise filter RCDPower supply R0 T0 Inverter + + DC/DC Inverter control power Insulation Transformer Fig. 2-3-5 Connecting the auxiliary control-power input terminals If these terminals are connected to the input side of the filter, the noise reduction effect deteriorates. ② When the RCD (Residual-current Protective Device) is installed (G11S:30HP or less), the terminal R0 and T0 should be connected to the OUTPUT side of the RCD. If they are connected to the input side of the RCD, RCD will be malfunction because the power supply of the inverter is three phase and the terminal R0 and T0 is single phase. When the terminal R0 and T0 are connected to the INPUT side of the RCD, the insulation transformer is required to install as shown on the Fig. 2-3-5. (4) DC reactor connecting terminals (P1 and P (+)) ① Before connecting a power-factor correcting DC reactor (optional) to these terminals, remove the factory-installed jumper. ② If a DC reactor is not used, do not remove the jumper. Note:For inverter of 100HP or more, the DC reactor is provided as a separate standard component and should always be connected to the terminals. Fig. 2-3-6 (5) External braking-resistor connecting terminals (P (+) and DB) (G11S:10HP or less) For the G11S of 10HP or less, a built-in braking resistor is connected to terminals P (+) and DB. If this braking resistor does not provide sufficient thermal capacity (e.g., in highly repetitive operation or heavy inertia load operation), an external braking resistor (option) must be mounted to improve braking performance. ① Remove the built-in braking resistor from terminals P(+) and DB. Insulate the resistor-removed terminals with adhesive insulation tape, etc. ② Connect terminals P(+) and DB of the external braking resistor to terminals P(+) and DB of the inverter. ③ The wiring (cables twisted or otherwise) should not exceed 16ft (5m). (6) DC link circuit terminals (P (+) and N (-)) The G11S inverter of 15HP or more does not contain a drive circuit for the braking resistor. To improve braking P1 P(+) DBR DB N(-) DC reactor (DCR) External braking resistor (DB) P DB 2 1 (THR) (P24) [ x x ] Fig. 2-3-7 Connection (G11S:10HP or less) performance, an external braking unit (option) and an external braking resistor (option) must be installed. ① Connect terminals P(+) and N(-) of the braking unit to terminals P(+) and N(-) of the inverter. The wiring (cables twisted or otherwise) should not exceed 16ft(5m). ② Connect terminals P(+) and DB of the braking resistor to terminals P(+) and DB of the braking unit. The wiring (cables twisted or otherwise) should not exceed 33ft (10m). When terminals P (+) and N (-) of the inverter are not used, leave terminals open. If P (+) is connected to N (-) or the braking resistor is connected directly, the resistor will break. ③ Auxiliary contacts 1 and 2 of the braking unit have polarity. To connect the power regeneration unit, refer to the "Power Regeneration Unit Instruction Manual". DC reactor (DCR) P1 P(+) N(-) External braking resistor (DB) P DB P P N Braking unit (BU) 1 2 1 2 DB (THR) (P24) Fig. 2-3-8 Connection (G11S:15HP or more) CTi Automation - Phone: 800.894.0412 - Fax: 208.368.0415 - Web: www.ctiautomation.net - Email: info@ctiautomation.net
- 22. 2-10 (7) Inverter ground terminal To ensure safety and noise reduction, always ground the inverter ground terminal. Also, metal frames of electrical equipment must be grounded as specified in the Electric Facility Technical Standard. The connection procedure is as follows: ① Ground metal frames to a ground terminal (Ground resistance:10Ω or less). ② Use a suitable cable (short and thick) to connect the inverter system to the ground terminal. (8) Auxiliary power switching connector (CN UX) (for inverter of 40HP or more) When an inverter of 40HP or more requires a main circuit power voltage as listed in Table 2-3-2, disconnect auxiliary power switching connector CN UX from U1 and connect to U2. For the switching method, see Fig. 2-3-11. Table 2-3-2 Main circuit power voltage requiring auxiliary power switching connector switching Frequency [Hz] Power voltage range [VAC] 50 380-398 60 380-430 ! CAUTION • Check that the number of phases and rated voltage of this product match those of the AC power supply. • Do not connect the AC power supply to the output terminals (U, V, W). Injury may result. • Do not connect a braking resistor directly to the DC terminals (P[+] and N[-]). Fire may result. (9) Fan power switching connector (CN RXTX) (for inverter of 40HP or more) G11S without options supports DC power input via DC common connection by connecting the power regeneration converter (RHC series) as shown in Fig. 2-3-10. For details, refer to technical documentation. The inverter of 40HP or more contains an AC-powered component (e.g., AC cooling fan). To use the inverter using DC power input, switch the fan power switching connector (CN RTXT) inside the inverter to the R0-T0 side and provide AC power to the R0 and T0 terminals. (See Fig. 2-3-9.) For the switching method, see Fig. 2-3-11. Note: In the standard state, the fan power switching connector (CN RXTX) is connected to the L1/R-L3/T side. When DC power input is not used, do not switch this connector. The same AC voltage as the main circuit power voltage must be supplied to the auxiliary control-power input terminals (R0 and T0). If not supplied, the fan does not rotate and the inverter will overheat (0H1). CTi Automation - Phone: 800.894.0412 - Fax: 208.368.0415 - Web: www.ctiautomation.net - Email: info@ctiautomation.net
- 23. 2-11 M CN RX TX L1/R L2/S L3/T Magnetic contactor Noise filter MCCB Power supply R0 T0 P1 P(+) Jumper (not supplied for inverter of 75kW or more) Fan U V W N(-) C F Inverter CN RX TX R0 T0 When switched to DC power input mode + 30kW or more Fig. 2-3-9 Fan power switching 30kW or more M P1 P(+) N(-) CN RX TX + C L1/R L2/S L3/T R0 T0 Fan U V W F Inverter Switch CNRXTX to the R0-T0 side. + Power supply R S T P(+) N(-) PWM converter C Fig. 2-3-10A Example of connection by combination with power regeneration converter(40HP or more) Note: To connect the power regeneration converter to an inverter of 30HP or less, do not connect the power supply directly to the auxiliary control-power input terminals (R0 and T0) of the inverter. However, if such a connection is required, insulate these input terminals from the main power of the power regeneration converter with an insulation transformer. The connection example of a power regeneration unit is provided in the "Power Regeneration Unit Instruction Manual". Magnetic contactor Noise filter MCCB or RCD Power supply Insulation Transformer L1/R L2/S L3/T R1 S1 T1 RHC series R0 T0 L1/R L3/T FRN-G11S U V W M Fig. 2-3-10B Example of connection by combination with power regeneration converter (30HP or less) 40HP or more Jumper (not supplied for inverter of 100HP or more) 40HP or more CTi Automation - Phone: 800.894.0412 - Fax: 208.368.0415 - Web: www.ctiautomation.net - Email: info@ctiautomation.net
- 24. 2-12 The switching connectors are mounted on the power PCB above the control PCB as shown on the right. Note: To remove a connector, unlock the connector (using the locking mechanism) and pull. To mount a connector, push the connector until it click locks. FRN040G11S-4UX to FRN150G11S-4UX FRN200G11S-4UX to FRN350G11S-4UX When shipped from the factory, CN UX is connected to the U1 side and CN RXTX is connected to the L1/R-L3/T side. Factory shipment status Connector removal After connector switching. CNUX : U1 CNRXTX : L1/R-L3/T In this figure the power voltage is 380 to 398V AC, 50Hz (or 380 to 430V AC, 60Hz) and the inverter is used in DC power input mode. Fig. 2-3-11 Power switching connectors (only for 40HP or more) <Enlarged view of part A> <Oblique view of part A> CTi Automation - Phone: 800.894.0412 - Fax: 208.368.0415 - Web: www.ctiautomation.net - Email: info@ctiautomation.net
- 25. 2-13 2-3-3 Connecting the control terminals Table 2-3-3 lists the functions of the control circuit terminals. A control circuit terminal should be connected according to the setting of its functions. Table 2-3-3 Terminal Classification symbol Terminal name Function 13 Potentiometer power supply Used for +10V DC power supply for frequency setting POT (variable resistor of 1 to 5kΩ) 12 Voltage input ① Frequency is set according to the analog input voltage supplied from an external circuit. - 0 to +10V DC/0 to 100% - Reversible operation using positive and negative signals:0 to +/- 10V DC/0 to 100% - Reverse operation: +10 to 0V DC/0 to 100% ② The feedback signal for PID control is input. ③ The analog input value from the external circuit is used for torque control. (P11S does not support this function.) * Input resistance: 22kΩ V2 Voltage input Frequency is set according to the analog input voltage supplied from an external circuit - 0 to +10V DC/0 to 100% - Reverse operation:+10 to 0V DC/0 to 100% * It can be used only one terminal "V2" or "C1" alternatively * Input resistance:22kΩ C1 Current input ① Frequency is set according to the analog input current supplied from an external circuit. - 4 to 20mA DC/0 to 100% - Reverse operation:20 to 4mA DC/0 to 100% ② The feedback signal for PID control is input. ③ PTC thermistor input * It can be used only one terminal "V2" or "C1" alternatively. * Input resistance:250Ω Analog input 11 Analog input common Common terminal for analog input signals FWD Forward operation/stop command Used for forward operation (when FWD-CM is on) or deceleration and stop (when FWD-CM is off) REV Reverse operation/stop command Used for reverse operation (when REV-CM is on) or deceleration and stop (when REV-CM is off) X1 Digital input 1 X2 Digital input 2 X3 Digital input 3 X4 Digital input 4 X5 Digital input 5 X6 Digital input 6 X7 Digital input 7 X8 Digital input 8 X9 Digital input 9 The coast-to-stop command, external alarm, alarm reset, multistep frequency selection, and other functions (from an external circuit) can be assigned to terminals X1 to X9. For details, see "Setting the Terminal Functions E01 to E09" in Section 5.2, "Details of Each Function." <Specifications of digital input circuit> * Item min. typ. max. ON level 2V - 2VOperating voltage OFF level 22V 24V 27V Operating current at ON level - 3.2mA 4.5mA Allowable leakage current at OFF level - - 0.5mA CM Common terminal Common terminal for Digital input and FMP terminals P24 Control Unit power Supply +24VDC power supply for control input. Maximum output current 100mA Digital input PLC PLC signal power Used to connect power supply for PLC output signals (rated voltage 24(22 to 27) V DC) at source logic operation. Analog output FMA (11: Common terminal) Analog monitor Outputs monitor signal using analog DC voltage 0 to +10V DC. The meaning of this signal is one of the following: -Output frequency (before slip compensation) -Power consumption -Output frequency (after slip compensation) -PID feedback value -Output current -PG feedback value -Output voltage -DC link circuit voltage -Output torque -Universal AO -Load factor *Connectable impedance:5kΩ minimum CTi Automation - Phone: 800.894.0412 - Fax: 208.368.0415 - Web: www.ctiautomation.net - Email: info@ctiautomation.net
- 26. 2-14 Pulse output FMP (CM: Common terminal) Frequency monitor (pulse waveform output) Outputs a monitor signal using the pulse waveform. This signal has the same function as the FMA signal. Y1 Transistor output1 Y2 Transistor output2 Y3 Transistor output3 Y4 Transistor output4 A running signal, frequency equivalence signal, overload early warning signal, and other signals from the inverter are output (as transistor output) to arbitrary ports, For details, see "Setting the Terminal Functions E20 to E23" in Section 5.2, "Details of Each Function." <Specifications of transistor output circuit> * Item min. typ. max. ON level - 2V 3VOperating voltage OFF level - 24V 27V Maximum load current at ON level - - 50mA Leakage current at OFF level - - 0.1mA Transistor output CME Transistor output common Common terminal for transistor output signals This terminal is insulated from terminals [CM] and [11]. 30A,30B, 30C Alarm output for any fault If the inverter is stopped by an alarm (protective function), the alarm signal is output from the relay contact output terminal (1SPDT). Contact rating: 48V DC, 0.5A An excitation mode (excitation at alarm occurrence or at normal operation) can be selected. Relay output Y5A,Y5C Multipurpose-signal relay output These signals can be output similar to the Y1 to Y4 signals above. The contact rating for any fault is the same as that of the alarm output above. An excitation mode (excitation at alarm occurrence or at normal operation) can be selected. DX+, DX- RS-485 communication input-output Input-output signal terminals for RS-485 communication. UP to 31 inverters can be connected using the daisy chain method. Communication SD Communication-cable shield connection terminal Terminal for connecting the shield of a cable. The terminal is electrically floating. (1)Analog input terminals (13,12,V2,C1,and 11) ①These terminals receive weak analog signals that may be affected by external noise. The cables must be as short as possible (66ft (20m) or less), must be shielded, and must be grounded in principle. If the cables are affected by external induction noise, the shielding effect may be improved by connecting the shield to terminal [11]. ② If contacts must be connected to these circuits, twin (bifurcated type) contacts for handling weak signals must be used. A contact must not be connected to terminal [11]. ③If an external analog signal output device is connected to these terminals, it may malfunction as a result of inverter noise. To prevent malfunction, connect a ferrite core or capacitor to the external analog signal output device. Fig. 2-3-12 Fig. 2-3-13 Example of noise prevention 0k to 5 kΩ CTi Automation - Phone: 800.894.0412 - Fax: 208.368.0415 - Web: www.ctiautomation.net - Email: info@ctiautomation.net
- 27. 2-15 (2) Digital input terminals (FWD, REV, X1 to X9 and CM) ① Digital input terminals (e.g., FWD, REV, X1 to X9) are generally turned on or off by connecting or disconnecting the line to or from the CM terminal. If Digital input terminals are turned on or off by switching the open collector output of PLC using an external power supply, a resulting bypass circuit may cause the inverter to malfunction. To prevent a malfunction, connect the PLC terminal as shown in Fig. 2-3-14. ② When using a contact input, a relay having highly reliable contact must be used. Example: Fuji Electric Control Relay:HH54PW Fig. 2-3-14 Connection for External power supply (3) Transistor output terminals (Y1 to Y4, CME) ① To connect a control relay, connect a surge absorbing diode to both ends of its exciting coil. (4) Others ① To prevent a malfunction as a result of noise, control terminal cables must be placed as far as possible from the main circuit cables. ② The control cables inside the inverter must be secured to prevent direct contact with live section (e.g., main-circuit terminal block) of the main circuit. ! WARNING Control lines generally do not have enhanced insulation. If the insulation of a control line is damaged, the control signals may be exposed to high voltage in the main circuit. The Low Voltage Directive in Europe also restricts the exposure to high voltage. Electric shock may result ! CAUTION The inverter, motor, and cables generate noise. Check that the ambient sensors and devices do not malfunction. Accident may result. (5) Wiring of control circuit (inverter of 40HP or more) ① Pull out the control circuit wiring along the left panel as shown in Fig. 2-3-15. ② Secure the cable to cable binding hole A (on the left wall of the main circuit terminal block) using a cable-tie (e.g., insulock). The cable-tie must not exceed 0.14inch (3.5mm) in width and 0.06inch (1.5mm) in thickness. ③ When the optional PC board is mounted, the signal lines must be secured to cable binding hole B. Fig. 2-3-15 The wiring route of the control circuit Programmable Logic controller Fig. 2-3-16 The securing positions of the control-circuit line of inverter (40HP or more) CTi Automation - Phone: 800.894.0412 - Fax: 208.368.0415 - Web: www.ctiautomation.net - Email: info@ctiautomation.net
- 28. 2-16 2-3-4 Terminal arrangement (1) Main circuit terminals FRNF25 to 001G11S-2UX FRNF50 to 001G11S-4UX Screw size M3.5 FRN100G11S-2UX /FRN125P11S-2UX FRN002 to 005G11S-2UX FRN002 to 005G11S-4UX FRN125G11S-2UX /FRN150P11S-2UX FRN200 to 350G11S-4UX /FRN250 to 450P11S-4UX Screw size M4 FRN007 to 010G11S-2UX /FRN007 to 015P11S-2UX FRN007 to 010G11S-4UX /FRN007 to 015P11S-4UX FRN400, 450 G11S-4UX/FRN500, 600 P11S-4UX FRN015 to 030G11S-2UX /FRN020 to 030P11S-2UX FRN015 to 030G11S-4UX /FRN020 to 030P11S-4UX FRN040G11S-2UX /FRN040 to 050P11S-2UX FRN040 to 075G11S-4UX /FRN040 to 100P11S-4UX FRN500, 600 G11S-4UX/FRN700, 800 P11S-4UX FRN050 to 075G11S-2UX /FRN060 to 100P11S-2UX FRN100 to 150G11S-4UX /FRN125 to 200P11S-4UX L2/SL1/R DBL3/T P(+)P1 UN(-) WV GG T0R0 L2/SL1/R DBL3/T P(+)P1 UN(-) WV G G Screw size M3.5 Screw size M4 T0R0 Screw size G : M10 other terminals : M12 L1/R L2/S L3/T P1 U P(+) V N(-) W GG Screw size M4 Screw size M3.5 N(-)P(+) WVU G G P1L3/TL2/SL1/R R0 T0 Screw size G : M8 other terminals : M10 Screw size M4 L2/SL1/R DBL3/T P(+)P1 UN(-) WV GG T0R0 Screw size M5 Screw size M3.5 G G T0R0 Screw size M6 Screw size M3.5 L2/SL1/R DBL3/T P(+)P1 UN(-) WV N(-)P(+) WVU G G P1L3/TL2/SL1/R R0 T0 Screw size M8 Screw size M4 Screw size G = M10 Other terminals = M12 Screw size M4 L1/R L2/S L3/T U V W GG P1 L1/R L2/S L3/T U V WP1 P(+) N(-) P(+) N(-) T0R0 Screw size R0, T0 = M4 G = M10 Other terminals = M12 GG L1/R L2/S L3/T L1/R L2/S L3/T T0R0 P1 P1 P(+) P(+) N(-) N(-) U U V V W W Screw size G: M10 other terminals : M12 GG Screw size G: M10 other terminals : M12 WVL3/TL2/SL1/R UN(-)P(+)P1 GG T0R0 CTi Automation - Phone: 800.894.0412 - Fax: 208.368.0415 - Web: www.ctiautomation.net - Email: info@ctiautomation.net
- 29. 2-17 (2) Control circuit terminals 30C 30A 30B Y5A Y5C CMY Y4 Y3 Y2 Y1 11 C1 12 FMA 13 FMP V2 PLC CM X1 CM X2 FWD X3 REV X4 P24 X5 P24 X6 DX − X7 DX + X8 SD X9 CTi Automation - Phone: 800.894.0412 - Fax: 208.368.0415 - Web: www.ctiautomation.net - Email: info@ctiautomation.net
- 30. 2-18 2-3-5 Applicable equipment and wire size for main circuit Inverter type MCCB or RCD/GFCI Rated current(A) Required torque [lb-inch](N.m) Wire range [AWG] (mm 2 ) Voltage G11S/P11S W/ DCR W/o DCR Main terminal Auxiliary control-power Control L1/R,L2/S,L3/T U,V,W Auxiliary control-power Control FRNF25G11S-2UX 5 5 FRNF50G11S-2UX 5 5 FRN001G11S-2UX 5 10 10.6(1.2) - - FRN002G11S-2UX 10 15 16 (1.3) FRN003G11S-2UX 10 20 14 (2.1) FRN005G11S-2UX 20 30 15.9(1.8) 10 (5.3) 30 50FRN007G11S-2UX FRN007,010P11S-2UX 30,40 50,75 8 (8.4) 40 75 6 (13.3)FRN010G11S-2UX FRN015P11S-2UX 50 100 31.0(3.5) 50 100FRN015G11S-2UX FRN020P11S-2UX 75 125 4 (21.2) 75 125FRN020G11S-2UX FRN025P11S-2UX 100 150 3 (26.7) 100 150FRN025G11S-2UX FRN030P11S-2UX 100 175 2 (33.6) FRN030G11S-2UX 100 175 51.3(5.8) 1 (42.4) FRN040G11S/P11S-2UX 150 200 2X2 (33.6X2) 119(13.5) FRN050P11S-2UX FRN050G11S-2UX 175 250 1X2(42.4X2) FRN060G11S/P11S-2UX 200 300 2/0X2(67.4X2) FRN075G11S/P11S-2UX 250 350 3/0X2(85X2) 239(27) FRN100P11S-2UX FRN100G11S-2UX 350 - 4/0X2(107.2X2) FRN125G11S/P11S-2UX 400 - 250X2(127X2) 3-phase 230V FRN150P11S-2UX 500 - 425(48) 10.6(1.2) 6.2(0.7) 350X2(177X2) 16(1.3) 24 (0.2) FRNF50G11S-4UX 5 5 FRN001G11S-4UX 5 5 10.6(1.2) - - FRN002G11S-4UX 5 10 FRN003G11S-4UX 5 15 16 (1.3) FRN005G11S-4UX 10 20 15.9(1.8) 14 (2.1) 15 30FRN007G11S-4UX FRN007, 010P11S-4UX 15,20 30,40 12 (3.3) 20 40FRN010G11S-4UX FRN015P11S-4UX 30 50 31.0(3.5) 30 50FRN015G11S-4UX FRN020P11S-4UX 40 60 10 (5.3) 40 60FRN020G11S-4UX FRN025P11S-4UX 40 75 8 (8.4) 40 75FRN025G11S-4UX FRN030P11S-4UX 50 100 6 (13.3) FRN030G11S-4UX 50 100 51.3(5.8) 4 (21.2) FRN040G11S/P11S-4UX 75 125 2 (33.6) FRN050G11S/P11S-4UX 100 125 1(42.4) FRN060G11S/P11S-4UX 100 150 3X2 (26.7X2) FRN075G11S/P11S-4UX 125 200 2X2 (33.6X2) 119(13.5) 2X2 (33.6X2)FRN100P11S-4UX FRN100G11S-4UX 175 - 4/0(107.2) FRN125G11S/P11S-4UX 200 - 1X2(42.4X2) FRN150G11S/P11S-4UX 250 - 2/0X2(67.4X2) 239(27) FRN200P11S-4UX FRN200G11S-4UX 300 - 3/0X2(85X2) FRN250G11S/P11S-4UX 350 - 4/0X2(107.2X2) FRN300P11S-4UX FRN300G11S-4UX 500 - 300X2(152X2) FRN350G11S/P11S-4UX 500 - 350X2(177X2) 600 -FRN400G11S/P11S-4UX FRN450P11S-4UX 700 - 500X2(253X2) FRN450G11S-4UX 700 - 300X3(152X3) FRN500G11S/P11S-4UX 800 - 400X3(203X3) FRN600G11S/P11S-4UX 1,000 - 500X3(253X3) FRN700P11S-4UX 1,000 - 3-phase 460V FRN800P11S-4UX 1,200 - 425(48) 10.6(1.2) 6.2(0.7) 600X3(304X3) 16(1.3) 24 (0.2) Note:The type of wire is 70℃(149ºF) 600V Grade heat-resistant polyvinyl chloride insulated wires (PVC). The above-mentioned wire size are the recommended size under the condition of the ambient temperature 50℃(122ºF) or lower. CTi Automation - Phone: 800.894.0412 - Fax: 208.368.0415 - Web: www.ctiautomation.net - Email: info@ctiautomation.net
- 31. 2-19 CAUTION on Magnetic contactor selection (without DCR) [without DCR] The magnetic contactor should be selected from "Magnetic contactor models" shown in table 2-3-4 to prevent the welding the magnetic contactor when using the auxiliary power input (R0, T0) and the time between the magnetic contactor of the main circuit (L1/R, L2/S, L3/T) is OFF and re-turning on is "T off main circuit re-turning on time" or the less shown in table 2-3-4. [with DCR or other conditions] When the inverter which is NOT described in the table 2-3-4 or using with DCR (power-factor correcting DC reactor), the magnetic contactor is selected from "2-3-5 Applicable equipment and wire size for main circuit" in chapter 2. Table 2-3-4 Re-turning on time and recommended magnetic contactor models Voltage G11S P11S *1 T off Re-turning on time [s] (the time from power OFF to re-turning on) *2 Magnetic contactor models (without DCR) FRN002G11S-2UX 54 FRN003G11S-2UX 76 SC-N1 FRN005G11S-2UX - 108 SC-N2 FRN007G11S-2UX FRN007P11S-2UX 77 FRN010G11S-2UX FRN010P11S-2UX 112 SC-N2S 3-Phase 230V series FRN015G11S-2UX FRN015P11S-2UX 77 SC-N3 FRN002G11S-4UX 27 SC-5-1 FRN003G11S-4UX 38 FRN005G11S-4UX - 54 SC-N1 FRN007G11S-4UX FRN007P11S-4UX 43 FRN010G11S-4UX FRN010P11S-4UX 57 SC-N2 FRN015G11S-4UX FRN015P11S-4UX 77 FRN020G11S-4UX FRN020P11S-4UX 112 FRN025G11S-4UX FRN025P11S-4UX 134 SC-N2S 3-Phase 460V series FRN030G11S-4UX FRN030P11S-4UX 154 SC-N3 Magnetic contactor ON OFF ON Auxiliary power input supplied *1 T off Power supply L1/R R0 L2/S T0 L3/T Inverter *2 Magnetic contactor P1 P(+) without DCR CTi Automation - Phone: 800.894.0412 - Fax: 208.368.0415 - Web: www.ctiautomation.net - Email: info@ctiautomation.net
- 32. 3-1 3. Operation 3-1 Inspection and Preparation before Operation Check the following before operation: ① Check that the connection is correct. In particular, check that the power supply is not connected to any of the U, V, and W output terminals and that the ground terminal is securely grounded. ② Check for short-circuits and ground faults between the terminals and live sections. ③ Check for loose terminals, connectors, or screws. ④ Check that the motor is separated from mechanical equipment. Fig. 3-1-1 Inverter connection ⑤ Turn off switches before turning power to ensure that the inverter will not start or operate abnormally at power-on. ⑥ Check the following after power-on: a. Check that no alarm message is displayed on the keypad panel (see Figure 3-1-2). b. Check that the fan inside the inverter is rotating. (For inverters with 2HP or more) ! WARNING Be sure to put on the surface cover before turning on the power (close). Never remove the cover while the power is applied to the inverter. To ensure safety, do not operate switches with wet hands. Electric shock may result Fig. 3-1-2 Display on keypad panel at power-on 3-2 Operation Method There are various methods of operation. Select a method of operation according to operating purpose and specifications by referring to Section 4-2, "Operating the Keypad Panel," and Chapter 5, "Explanation of Functions." Table 3-2-1 lists general operation methods 3-3 Trial Run Upon confirming that inspection results are normal (see Section 3-1), proceed with a trial run. The initial operation mode (set at factory) is using the keypad panel. Table 3-2-1 General operation methods Operation command Frequency setting Operation command Operation using keypad panel Keys on keypad panel ① Turn power on and confirm that frequency display 0.00Hz is blinking on the LED monitor. ② Set the frequency to about 5Hz using key. ③ To start the run, press key (for forward rotation) or key (for reverse rotation). To stop, press key. ④ Check the following items : a. Is the rotating direction correct? b. Is the rotation smooth? (no buzzing or abnormal vibration) Operation using external signal terminals Freq. Setting POT (VR), analog voltage, analog current Contact input (switch) Terminals FWD-CM and REV-CM c. Is acceleration and deceleration smooth? If no abnormality is detected, increase the frequency and check the above items again. If the results of the trial run are normal, start a formal run. Notes: - If an error is detected in the inverter or motor, immediately stop the operation and attempt to determine the cause of error referring to Chapter 7, "Troubleshooting." - As voltage is still applied to the main circuit terminals (L1/R, L2/S, L3/T) and auxiliary control-power terminals (R0, T0) even when the output from the inverter is terminated, do not touch the terminals. The smoothing capacitor in the inverter is being charged after the power is turned off and it is not discharged immediately. Before touching an electric circuit, confirm that the charge lamp is off or a multimeter is indicating a low voltage at the terminals. FWD REV STOP ∧ ∧ ∨ ∧ ∨ FWD REV STOP CTi Automation - Phone: 800.894.0412 - Fax: 208.368.0415 - Web: www.ctiautomation.net - Email: info@ctiautomation.net
- 33. 4-1 4. Keypad Panel The keypad panel has various functions for specifying operations such as keypad operation (frequency setting, run/stop command), confirming and changing function data, confirming status, and copying. Review the use of each function before commencing running. The keypad panel can also be removed or inserted during running. However, if the keypad panel is removed during a keypad panel operation (e.g., run/stop, frequency setting), the inverter stops and outputs an alarm. 4-1 Appearance of Keypad Panel LED monitor: Four-digit 7-segment display Used to display various items of monitored data such as setting frequency, output frequency and alarm code. Auxiliary information indication for LED monitor: Selected units or multiple of the monitored data (on the LED monitor) are displayed on the top line of the LCD monitor. The symbol indicates selected units or multiple number. The symbol ▲ indicates there is an upper screen not currently displayed. LCD monitor: Used to display such various items of information as operation status and function data. An operation guide message, which can be scrolled, is displayed at the bottom of the LCD monitor. This LCD monitor has a backlight feature which turns on when the control power is applied or any keypad key is pressed, and stays on approximately 5 minutes after the last key stroke. Indication on LCD monitor: Displays one of the following operation status: FWD: Forward operation REV: Reverse operation STOP: Stop Control keys (valid during keypad panel operation): Used for inverter run and stop : Forward operation command : Reverse operation command : Stop command Operation keys: Used for screen switching, data change, frequency setting, etc. Displays the selected operation mode: REM: Terminal block LOC: Keypad panel COMM: Communication terminal JOG: Jogging mode The symbol ▼ indicates there is a lower screen not currently displayed. RUN LED : Indicates that an operation command was input by pressing the or key. Table 4-1-1 Functions of operation keys Operation key Main function Used to switch the current screen to the menu screen or switch to the initial screen in the operation/trip mode. Used to switch the LED monitor or to determine the entered frequency, function code, or data. , Used to change data, move the cursor up or down, or scroll the screen Used to move the cursor horizontally at data change. When this key is pressed with the up or down key, the cursor moves to the next function block. Used to cancel current input data and switch the displayed screen. If an alarm occurs, this key is used to reset the trip status (valid only when the alarm mode initial screen is displayed). + Used to switch normal operation mode to jogging operation mode or vice versa. The selected mode is displayed on the LCD monitor. + Switches operation mode (from keypad panel operation mode to terminal block operation mode or reverse). When these keys are operated, function F01 data is also switched from 0 to 1 or from 1 to 0. The selected mode is displayed on the LCD indicator. FWD REV REV FED STOP FUNC DATA SHIFT >> ∧ ∨ ∧ STOP PRG RESET STOP RESET CTi Automation - Phone: 800.894.0412 - Fax: 208.368.0415 - Web: www.ctiautomation.net - Email: info@ctiautomation.net
- 34. 4-2 4-2 Keypad Panel Operation System (LCD screen, Level Structure) 4-2-1 Normal operation The keypad panel operation system (screen transition, level structure) is structured as follows: 4-2-2 Alarm occurrence If an alarm is activated, operation is changed from normal keypad panel operation to an alarm mode operation. The alarm mode screen appears and alarm information is displayed. The program menu, function screens, and supplementary screens remain unchanged as during normal operation, though the switching method from program menu to alarm mode is limited to . Program menu 60.00 Supplementary screen 60.0060.00 Operation mode 60.00 Screen for each function Program menu Alarm Supplementary screen AlarmAlarm Operation mode Alarm mode 60.00 Alarm Alarm reset processing (including ) Alarm is activated Keypad panel operating system during normal operation Screen for each function RESET RESET RESET FUNC DATA FUNC DATA FUNC DATA PRG PRG PRG RESET RESET RESET FUNC DATA FUNC DATA PRG PRG FUNC DATA CTi Automation - Phone: 800.894.0412 - Fax: 208.368.0415 - Web: www.ctiautomation.net - Email: info@ctiautomation.net
- 35. 4-3 Table 4-2-1 Overview of contents displayed for each level No. Level name Content 1 Operating mode This screen is for normal operation. Frequency setting by keypad panel and the LED monitor switching are possible only when this screen is displayed. Each function of the keypad panel is displayed in menu form and can be selected. Selecting the desired function from the list and pressing displays the screen of the selected function. The following functions are available as keypad panel functions (menus). No. Menu name Outline 1 DATA SET The code and name of the function are displayed. Selecting a function displays a data setting screen for checking, or modifying data. 2 DATA CHECK The code and name of the function are displayed. Select a function to display a screen for checking data. Modifying data is possible as described above by going to the data setting screen. 3 OPR MNTR Can check various data on the operating status. 4 I/O CHECK Can check the status of analog and digital input/output for the inverter and options as an I/O checker. 5 MAINTENANC Can check inverter status, life expectancy , communication error status, and ROM version information as maintenance information. 6 LOAD FCTR Can measure maximum and average current and average breaking force in load rate measurement. 7 ALM INF Can check the operating status and input/output status at the latest alarm occurrence. 8 ALM CAUSE Can check the latest alarm or simultaneously occurred alarms and alarm history. Selecting the alarm and pressing , displays the contents of alarm as troubleshooting. 9 DATA COPY Places the function of one inverter in memory for copying to another inverter. 2 Program menu 3 Screen for each function The function screen selected on the program menu appears, hence completing the function. 4 Supplementary screen Functions not completed (e.g., modifying function data, displaying alarm factors) on individual function screens are displayed on the supplementary screen. FUNC DATA FUNC DATA CTi Automation - Phone: 800.894.0412 - Fax: 208.368.0415 - Web: www.ctiautomation.net - Email: info@ctiautomation.net
- 36. 4-4 4-3 Operating Keypad Panel 4-3-1 Operation Mode The screen for normal inverter operation includes a screen for displaying inverter operating status and an operation guide and a screen for graphically displaying the operating status in the form of a bar graph. Switching between both screens is possible using the E45 function. 1) Operation guide (E45=0) Rotating direction (no operation command, blank, yes: FWD/REV) Operating status (no operation command, STOP, yes: RUN) 2) Bar graph (E45=1) Output frequency (maximum frequency at full-scale) Output current (200% of inverter rating at full-scale) Torque calculation value (200% of motor rating at full-scale) 4-3-2 Setting digital frequency On the operation mode screen, press or to display the set frequency on the LED. Data is initially incremented and decremented in the smallest possible unit. Holding down or increases or decreases the speed of increment or decrement. The digit to change data can be selected using and then data can be set directly. To save the frequency settings, press . Press and to return to the operation mode. If keypad panel settings are not selected, the present frequency setting mode appears on the LCD. When selecting the PID function, PID command can be set with a process value. (Refer to technical documentation for details). 1) Digital (keypad panel) settings (F01=0 or C30=0) 2) Other than digital setting <DIG.SET Hz> LOCAL 50−400 F/D⇒DATA SET 56.89 STORING... RUN PRG ⇒ PRG MENU F/D⇒LED SHIFT 60.0060.00 <DIG.SET Hz> LOCAL 50 −400 F/D⇒DATA SET 60.00 Frequency setting value Screen explanation Hz A % Fout/Iout/TRQ 60.00 Present frequency setting mode Operation guide 60.00 60.00 RUN PRG ⇒ PRG MENU F/D ⇒LED SHIFT 60.00 FWD Frequency setting value Screen explanation Present frequency setting mode Frequency setting range Operations guide When pressed and writing data SHIFT >> STOP PRG ⇒ PRG MENU F/D ⇒LED SHIFT RUN PRG⇒PRG MENU F/D⇒LED SHIFT <REMOTE REF> 12+V1 F/D⇒DATA SET FUNC DATA ∧ ∨ ∧ ∨ RESET PRG ∧ ∨ ∧ ∨ FUNC DATA ∧ ∨ CTi Automation - Phone: 800.894.0412 - Fax: 208.368.0415 - Web: www.ctiautomation.net - Email: info@ctiautomation.net
- 37. 4-5 4-3-3 Switching the LED monitor On the normal operation, press to switch to LED monitor display. When power is turned on, the monitor contents set by the function (E43) are displayed on the LED. When stopping (E44 = 0) (E44 = 1) When running (E44 =0,1) Unit Remarks 0 Setting frequency Output frequency 1 (before slip compensation) 1 Setting frequency Output frequency 2 (after slip compensation) 2 Setting frequency Setting frequency Hz 3 Output current Output current A 4 Output voltage (specified value) Output voltage (specified value) V 5 Synchronous speed setting value Synchronous speed r/min. 6 Line speed setting value Line speed m/min. 7 Load rotation speed setting value Load rotation speed r/min. For 4 digits or more, the last digits are cut, with x10, x100 marked on the indicator. 8 Torque calculation value Torque calculation value % ± indication 9 Power consumption Power consumption kW 10 PID setting value PID setting value − 11 PID remote setting value PID remote setting value − 12 PID feedback value PID feedback value − Displayed only when PID is effective in PID operation selection. 4-3-4 Menu screen The “Program menu” screen is shown below. Only four items can be displayed simultaneously. Move the cursor with or to select an item, then press to display the next screen. 4-3-5 Setting function data On the “program menu” screen, select "1. Data Setting" then the “Function Select” screen appears with function codes and names on it. Select the desired function. Function code Function name Data setting range Data E43 1.DATA SETTING 2.DATA CHECK 3.OPR MNTR 4.I/O CHECK ⇒5.MAINTENANC 6.LOAD FCTR 7.ALM INF 8.ALM CAUSE 9.DATA COPY 4.I/O CHECK ⇒5.MAINTENANC 6.LOAD FCTR 7.ALM INF Display F01FREQ COM 1 0 0 − 11 F00DATA PRTC F01FREQ COM 1 F02OPR METHOD F03MAX Hz-1 RUN PRG⇒PRG MENU F/D⇒LED SHIFT 60.00 ⇒1.DATA SETTING 2.DATA CHECK 3.OPR MNTR 4.I/O CHECK 60.0060.0060.00PRG FUNC DATA FUNC DATA ∧ ∨ FUNC DATA FUNC DATA CTi Automation - Phone: 800.894.0412 - Fax: 208.368.0415 - Web: www.ctiautomation.net - Email: info@ctiautomation.net
- 38. 4-6 The function code consists of alphanumeric characters. Unique alphabetical letters are assigned for each function group. Table 4-3-1 Function code Function Remarks F00 - F42 Fundamental Functions E01 - E47 Extension Terminal Functions C01 - C33 Control Functions of Frequency P01 - P09 Motor Parameters H03 - H39 High Performance Functions A01 - A18 Alternative Motor Parameters U01 - U61 User Functions o01 - o55 Optional Functions Can be selected only with an option connected To scroll “Function Select” screen rapidly , use + or + to move the screen in a unit grouped by alphabet. Select the desired function and press to switch to the “data setting” screen. On the “data setting” screen, the data values on the LCD can be increased or decreased in the smallest possible unit by pressing or Holding down or expands the rate of change, thereby enabling values to be modified more rapidly. Otherwise, select the digit to be modified using , then set data directly. When data is modified, the value before modification will be displayed at the same time for reference purpose. To save the data, press . Pressing cancels the changes made and returns to the “Function Select” screen. The modified data will be effective in inverter operation after the data is saved by . The inverter operation does not change only if data is modified. When data setting is disabled in the case of “Data protected” or “Data setting invalid during inverter running,” make necessary changes. Data cannot be modified for the following reasons : Table 4-3-2 Display Reason for no modification Release method LINK ACTIVE Currently writing from RS-485/link option to Function is being made. Send a cancel command of function writing from RS-485. Stops a “Write” operation from the link. NO SIGNAL(WE) The edit enabling command function is selected using a general-purpose input terminal. Among functions E01 to E09, turn the terminal of data 19 (edit enabling command selection) ON. DATA PRTCTD Data protection is selected for function F00. Change function F00 to 0. INV RUNNING An attempt is made to change a function that cannot be changed during inverter operation. Stop inverter operation. FWD/REV ON An attempt is made to change a function that cannot be changed with the FWD/REV command on. Turn FWD/REV command off. FUNC DATA FUNC DATA ∧ ∨ >> RESET ∧ >> ∨ F00DATA PRTC F01FREQ CMD 1 F02OPR METHOD F03MAX Hz-1 A18SLIP COMP2 F00DATA PRTC F01DATA PRTC F02OPR METHOD F42TRQVECTOR1 E01X1 FUNC E02X2 FUNC E03X3 FUNC F00DATA PRTC F01FREQ CMD 1 F02PPR METHOD F03MAX Hz-1 ++∨ >> ∨ >> ∧ ∨∧ >> FUNC DATA CTi Automation - Phone: 800.894.0412 - Fax: 208.368.0415 - Web: www.ctiautomation.net - Email: info@ctiautomation.net
- 39. 4-7 4-3-6 Checking function data On the "Program menu" screen, select "2. DATA CHECK". The "Function Select" screen then appears with function codes and names. Function code Data changed from initial value Data Select the desired function and press to check the function data. By pressing , the screen switches to the "Data setting" screen, to modify data. 4-3-7 Monitoring operating status On the "Program menu" screen, select "3. OPR MNTR" to display the present operating status of inverter. Use and to switch between the four operation monitor screens. 60.00 FUNC DATA 60.00 F00 DATA PRTC 0 0 - 1 60.0060.00 1.DATA SETTING ⇒2.DATA CHECK 3.OPR MNTR 4.I/O CHECK F00 0 F01 *1 F02 *1 F03 60Hz 60.0060.00 60.00 1.DATA SETTING 2.DATA CHECK ⇒3.OPR MNTR 4.I/O CHECK Fout=xxxx.xHz Iout= x.xxA Vout= xxxV TRQ= xxx% Output frequency Output current Output voltage Torque calculation method 60.00 60.00 Fref=xxxx.xHz xxx xx xx xx 60.00 Synchronous rotation speed (r/min) Load speed (r/min) Line speed (m/min.) Setting frequency Operation status FWD/REV: Rotating direction IL: Current limiting VL: Voltage limiting LU: Under voltage TL: Torque limiting PID setting value PID feedback value Driving torque limiting setting value Braking torque limiting setting ∧ ∨ ∨ ∨ FUNC DATA RUN PRG⇒PRG MENU F/D⇒LED SHIFT RUN PRG⇒PRG MENU F/D⇒LED SHIFT SYN=xxxxxx LOD=xxxxxx LIN=xxxxxx SV=xxxxx PV=xxxxx TLD= xxx% TLB= xxx% FUNC DATAFWD FUNC DATA PRG FWD FUNC DATA PRG ∨ CTi Automation - Phone: 800.894.0412 - Fax: 208.368.0415 - Web: www.ctiautomation.net - Email: info@ctiautomation.net
- 40. 4-8 4-3-8 I/O check On the “Program menu” screen, select "4. I/O Check" to display analog and digital input/output signal status for the inverter and options. Use ∧ and to switch between the eight screens of data. Master-side A/B phase 4x frequency Unused Slave-side A/B phase 4x frequency Unused Terminal 12 input voltage Terminal 22 input voltage (AIO option) Terminal 32 input voltage (AIO option) Terminal V2 input voltage 60.00 60.00 RUN PRG⇒PRG MENU F/D ⇒LED SHIFT 60.00 60.00 □X2 □X6 ■FWD □X3 □X7 □REV □X4 □X8 □X1 □X5 □X9 60.00 60.00 C1= xx.xmA C2= xx.xmA 60.00 Terminal C1 input current Terminal C2 input current (AIO option) 60.0060.00 60.00 Terminal AO output voltage (AIO option) Terminal CS output current (AIO option) Digital input voltage (HEX indication) Digital output voltage (HEX indication) FMA output voltage FMP output voltage FMP output frequency ∨ ∧ ∨ ∨ ∨ ∨ 12=± xx.xV 22= xx.xV 32=± xx.xV V2= xx.xV P1=±xxxxx0p/s Z1= 0p/s P2=±xxxxx0p/s Z2= 0p/s A0 =±xx.xV CS= xx.xmA DI = xxxxH D0= xxH FMA=xx.xV FMP=xx.xV FMP=xxxxp/s □X2 □X6 □FWD □X3 □X7 □REV □X4 □X8 □X1 □X5 □X9 □Y1 □Y5 □Y2 □Y3 □Y4 ∨ 1.DATA SETTING 2.DATA CHECK 3.OPR MNTR ⇒4.I/O CHECK :Signal OFF, :Signal ON FWD FUNC DATAPRG REV :Signal OFF, :Signal ON :Signal OFF, :Signal ON ∨ COMM ∨ Input terminal status (terminals) Output terminal status Input terminal status (via communication) Analog input signal Analog input signal option input status Output for meter PG/SY option input status CTi Automation - Phone: 800.894.0412 - Fax: 208.368.0415 - Web: www.ctiautomation.net - Email: info@ctiautomation.net
- 41. 4-9 4-3-9 Maintenance information On the "Program menu" screen, select "5. Maintenance" to display information necessary for maintenance and inspection. Use and to switch between the five screens of data. 60.0060.00 60.00 1.DATA SETTING 2.DATA CHECK 3.OPR MNTR 4.I/O CHECK TIME=xxxxxh E D C= xxxV TMPI=xxxx℃ TMPF=xxxx℃ Cumulative operating time DC link circuit voltage Maximum temperature inside inverter (Maximum value in hour units) Maximum temperature of heat sink (Maximum value in hour units) 60.00 60.00 Imax=x.xxA CAP=xxx.x% 60.00 Capacitor on PC board accumulation time ( ):Judgment level. Cooling fan operating time ( ):Judgment level. Maximum current(ms) (Maximum value in hour units) Main capacitor capacity No. of communication errors:keypad panel No. of communication errors:RS-485 No. of communication errors:option 60.00 INV=Hxxxx KEYPAD=Kxxxxx OPTION=Pxxxxx ROM version: inverter (40HP or more: H xxxxx 30HP or less:S xxxxx) ROM version: keypad panel ROM version: option ∨ ∧ ∨ ∨ ∨ ∨ ⇒5.MAINTENANC RUN PRG⇒PRG MENU F/D⇒LED SHIFT NRK=xxxxx NRR=xxxxx NRO=xxxxx TCAP=xxxxxh (61000h) TFAN=xxxxxh (25000h) FWD FUNC DATAPRG CTi Automation - Phone: 800.894.0412 - Fax: 208.368.0415 - Web: www.ctiautomation.net - Email: info@ctiautomation.net
- 42. 4-10 4-3-10 Load rate measurement On the "Program menu" screen, select "6. Load Rate Measurement". On the "Load rate measurement" screen, the maximum current, average current, and average breaking power during the set measuring time are measured and displayed. Display returns to initial values. Maximum current Average current Average breaking power (Motor rated output/100%) 60.00 60.00 RUN PRG⇒PRG MENU F/D ⇒LED SHIFT 60.00 60.00 Measuring time 60.00 T=600s Imax=0.00A Iave= 0.00A BPave= 0.0% Change measuring using and and . 60.00 5.MAINTENANC ⇒6.LOAD FCTR T=360s Imax=0.00A Iave=0.00A BPave= 0.0% FUNC DATA 1.DATA SETTING 2.DATA CHECK 3.OPR MNTR 4.I/O CHECK PRG FWD T=3600s Imax=56.4A Iave=23.5A BPave= 10.4% T=150s Imax=0.00A Iave=0.00A BPave= 0.0% Displays the remaining measuring time, when reaches zero, ends the measurement. FUNC DATA Start measuring Set measuring time ∨∧>> CTi Automation - Phone: 800.894.0412 - Fax: 208.368.0415 - Web: www.ctiautomation.net - Email: info@ctiautomation.net
- 43. 4-11 4-3-11 Alarm information On the "Program menu" screen, select "7. Alarm Information". Various operating data when the latest alarm occurred is displayed. Use and to switch between the nine screens of alarm information data. □:Signal OFF, ■:Signal ON Cumulative operating hours at alarm occurrence DC link circuit voltage at alarm occurrence Temperature inside inverter at alarm occurrence Heat sink temperature at alarm occurrence OC1 60.00 60.00 OC1 Code of latest alarm (High speed blinking during alarm alarm mode only) Output frequency at alarm occurrence Output current at alarm occurrence Output voltage at alarm occurrence Torque calculation value at alarm occurrence OC1 Setting frequency at alarm occurrence Operating status at alarm occurrence FWD/REV:Rotating direction IL :Current limiting VL :Voltage limiting LU :Under voltage TL :Torque limiting OC1 5.MAINTENANC 6.LOAD FCTR ⇒7.ALM INF Input terminal status at alarm occurrence (terminals) OC1 No. of communication errors at alarm occurrence:keypad panel No. of communication errors at alarm occurrence:RS-485 No. of communication errors at alarm occurrence:Options OC1 □:Signal OFF, ■:Signal ON Input terminal status at alarm occurrence (communication) OC1 OC1 OC1 Latest alarm No. of occurrences Alarm history No. of occurrences Updated at alarm occurrence If the cause of alarm is the same as the same as the previous one, only the number of occurrences is incremented. Multiple alarms (Simultaneously occurring alarms) Alarm code Previous alarm Before previous alarm Two times before previous Up to four alarm codes can be displayed simultaneously. ∨ ∨ ∨ ∨ ∨ ∨ ∧ RUN PRG⇒PRG MENU F/D ⇒LED SHIFT Fout=xxxx.xHz Iout= x.xxA Vout= xxxV TRQ= xxx% TIME=xxxxxh EDC= xxxV TMPI=xxxx℃ TMPF=xxxx℃ Fref=xxxx.xHz xxx xx xx xx □X2 □X6 □FWD □X3 □X7 □REV □X4 □X8 □X1 □X5 □X9 NRK=xxxxx NRR=xxxxx NRO=xxxxx □X2 □X6 □FWD □X3 □X7 □REV □X4 □X8 □X1 □X5 □X9 0/1=xxx xxx -1=xxx xxx -2=xxx xxx -3=xxx xxx □Y1 □Y5 □Y2 □Y3 □Y4 5=xxx 4=xxx 3=xxx 2=xxx FWD 1.DATA SETTING 2.DATA CHECK 3.OPR MNTR 4.I/O CHECK PRG FUNC DATA ∨ ∨ ∨ REM Output terminal status at alarm occurrence □:Signal OFF, ■:Signal ON COMM CTi Automation - Phone: 800.894.0412 - Fax: 208.368.0415 - Web: www.ctiautomation.net - Email: info@ctiautomation.net
- 44. 4-12 4-3-12 Alarm history and factors On the "Program menu" screen, select "8.Alarm Factors" to display the alarm history. Press to display troubleshooting information for the alarm selected. Latest alarm Alarm history Multiple alarms (simultaneously occurring alarms) Move the cursor using and to select one of the alarm occurred. Alarm code of the selected alarm Alarm occurrence factors of the selected alarm. OC1 60.00 RUN PRG⇒PRG MENU F/D ⇒LED SHIFT 60.00 1.DATA SETTING 2.DATA CHECK 3.OPR MNTR 4.I/O CHECK 60.00 0/1=xxx xxx -1=xxx xxx -2=xxx xxx -3=xxx xxx 60.00 5=xxx 4=xxx 3=xxx 2=xxx 5.MAINTENANC 6.LOAD FCTR 7.ALM INF ⇒8.ALM CAUSE 0/1=xxx xxx -1=xxx xxx -2=xxx xxx -3=xxx xxx FUNC DATA FUNC DATA ∨∧ xxxxxxxxxxxxx xxxxxxxxxxxxx xxxxxxxxxxxxx xxxxxxxxxxxxx FWD FUNC DATAPRG CTi Automation - Phone: 800.894.0412 - Fax: 208.368.0415 - Web: www.ctiautomation.net - Email: info@ctiautomation.net
- 45. 4-13 4-3-13 Data copy On the "Program menu" screen, select "9. Data Copy" to display the data copy read screen. A copy operation is then performed in the following order;reading inverter function data, removing the keypad panel, attaching the keypad panel to another inverter, and writing the data to the inverter. The "verify" feature also makes it possible to compare and check differences in the data stored in the keypad panel and the data stored in the inverter. DATA copy screen Mode (read mode) 60.00 RUN PRG⇒PRG MENU F/D ⇒LED SHIFT 60.00 1.DATA SETTING 2.DATA CHECK 3.OPR MNTR 4.I/O CHECK 5.MAINTENANC 6.LOAD FCTR 7.ALM INF 8.ALM CAUSE ⇒9.DATA COPY Write dataRead data <DATA COPY> ----- READ <DATA COPY> ----- READ Reading <DATA COPY> 040HP-4 READ COMPLETE Remove keypad panel Data of inverter type read by keypad panel Read complete 60.00 RUN PRG⇒PRG MENU F/D ⇒LED SHIFT <DATA COPY> 040HP-4 READ <DATA COPY> 040HP-4 WRITE Mode (write mode) <DATA COPY> 040HP-4 WRITE Attach keypad panel, Turn power ON. Writing <DATA COPY> 040HP-4 WRITE COMPLETE Write complete When WRITE to the type of the inverter (capacity, voltage and series) is same as the inverter type in copy origin, all of the function will be written. When the type of the inverter is different, the function except the following will be written. However, in both cases, F00(Data protection), P02/A11(Motor capacity), P04/A13 (Motor tuning), H03(Data initializing), H31(RS-485 address) and o26/AIO optional adjustment will NOT be written. - The function which will NOT be copied when different inverter type FUNC. NAME FUNC. NAME F03 Max. freq. 1 F26 Motor sound F04 Base freq. 1 E33 OL function (Mode select) F05 Rated voltage 1 E34 OL function (Level) F06 Max. voltage 1 E35 OL function (Timer) F09 Torque boost 1 E37 OL2 function (Level) F10 Electronic thermal 1 (Select) H15 Auto-restart (Holding DC voltage) F11 Electronic thermal 1 (Level) All of "P" code Motor 1 F12 Electronic thermal 1 (Thermal time constant) All of "A" code Motor 2 F13 Electronic thermal overload relay In addition, when WRITE from inverter ROM No. is new one to old one, WRITE except F01(Freq. command 1) without ERROR display. 60.00 1.DATA SETTING 2.DATA CHECK 3.OPR MNTR 4.I/O CHECK 5.MAINTENANC 6.LOAD FCTR 7.ALM INF 8.ALM CAUSE ⇒9.DATA COPY Inverter type of data stored by keypad panel <DATA COPY> 040HP-4 WRITE MEMORY ERROR <DATA COPY> 040HP-4 WRITE MEMORY ERROR WRITE to the inverter with different capacity, voltage and series. FUNC DATA FUNC DATA FUNC DATA FUNC DATA FUNC DATA FUNC DATA PRG ∧ PRG PRG CTi Automation - Phone: 800.894.0412 - Fax: 208.368.0415 - Web: www.ctiautomation.net - Email: info@ctiautomation.net
- 46. 4-14 Inverter type of data stored in the keypad panel 60.00 60.00 1.DATA SETTING 2.DATA CHECK 3.OPR MNTR 4.I/O CHECK 5.MAINTENANC 6.LOAD FCTR 7.ALM INF 8.ALM CAUSE ⇒9.DATA COPY Error processing Data check (verify) <DATA COPY> 040HP-4 READ <DATA COPY> 040HP-4 VERIFY Mode (data check) <DATA COPY> 040HP-4 VERIFY Data check in progress <DATA COPY> 040HP-4 WRITE INV RUNNING RUN PRG⇒PRG MENU F/D ⇒LED SHIFT <DATA COPY> 040HP-4 VERIFY COMPLETE Data check complete <DATA COPY> 040HP-4 WRITE 1) Change disabled during operation If a write operation is attempted during an inverter operation, or vice versa, the error message below will appear. After stopping the inverter and pressing , retry the write operation. 2) Memory error If a write operation is attempted while data has not been saved (i.e., no data) in the keypad panel data memory during the read mode, the following error message will appear: <DATA COPY> WRITE MEMORY ERROR 3) Verify error During a data check (verify) operation, if data stored in the keypad panel differs from data stored in the inverter, the following error message is displayed to indicate the function No. The data check is suspended. To continue the data check and check for other mismatching data, press . To stop the data check and switch to another operation, press . <DATA COPY> 075HP-4 WRITE ERR:F25 4) Data protection When WRITE to the inverter which is protected by "Data protection" function, the following error message will appear. After released the protection, write operation is attempted. <DATA COPY> 040HP-4 WRITE DATA PRTCTD FUNC DATA FUNC DATA FUNC DATA RESET PRG ∧ ∧ RESET CTi Automation - Phone: 800.894.0412 - Fax: 208.368.0415 - Web: www.ctiautomation.net - Email: info@ctiautomation.net
- 47. 4-15 4-3-14 Alarm mode If an alarm occurs, the “Alarm screen” indicating the alarm contents is displayed. Use and to display alarm history and multiple alarms (if more than two alarms occur simultaneously). Alarm detection order Operation method LED display LCD display Description 5. 5 No. 5 alarm 4. 4 No. 4 alarm 3. 3 No. 3 alarm 2. 2 No. 2 alarm 1. 1 No. 1 alarm (more than two alarms occurred) Blank 0 Latest alarm (only one alarm occurred/alarm released) Blank -1 Previous alarm history Blank -2 Alarm history before previous alarm Blank -3 Alarm history two times before previous alarm Alarm code: See Table 6-1-1 Alarm code Alarm detection order No. of consecutive occurrences Alarm name Operation guide 1.OC1 1=xxx xxx xxxxxxxxxxxxx PRG⇒PRG MENU RESET⇒RESET ∨∧ ∨∧ CTi Automation - Phone: 800.894.0412 - Fax: 208.368.0415 - Web: www.ctiautomation.net - Email: info@ctiautomation.net
- 48. 5-1 5. Function select 5-1 Function select list F:Fundamental Functions Factory settingFunc No. NAME LCD Display Setting range Unit Min. Unit -30HP 40HP- Change during op User Set value Remark F00 Data protection F00 DATA PRTC 0, 1 - - 0 NA F01 Frequency command 1 F01 FREQ CMD 1 0 to 11 - - 0 NA F02 Operation method F02 OPR METHOD 0 to 4 - - 0 NA F03 Maximum frequency 1 F03 MAX Hz-1 G11S: 50 to 400Hz Hz 1 60 NA P11S: 50 to 120Hz F04 Base frequency 1 F04 BASE Hz-1 G11S: 25 to 400Hz Hz 1 60 NA P11S: 25 to 120Hz F05 Rated voltage 1 F05 RATED V-1 0V: (Output voltage V 1 230:(230V class) NA (at Base frequency 1) proportinal to sorce voltage) 460:(460V class) 80 to 240V: (230V class) 320 to 480V: (460V class) F06 Maximum voltage 1 F06 MAX V-1 80 to 240V: (230V class) V 1 230:(230V class) NA (at Maximum frequency 1) 320 to 480V: (460V class) 460:(460V class) F07 Acceleration time 1 F07 ACC TIME1 0.01 to 3600s s 0.01 6.0 20.0 A F08 Deceleration time 1 F08 DEC TIME1 F09 Torque boost 1 F09 TRQ BOOST1 0.0, 0.1 to 20.0 - 0.1 G11S:2.0 A P11S:2.0 F10 Electronic (Select) F10 ELCTRN OL1 0, 1, 2 - - 1 A F11 thermal 1 (Level) F11 OL LEVEL1 INV rated current 20 to 135% A 0.01 Motor rated current A F12 (Thermal time constant) F12 TIME CNST1 0.5 to 75.0 min min 0.1 5.0 10.0 A F13 Electronic thermal overload relay F13 DBR OL G11 [Up to 10[HP]] - - (for braking resistor) 0, 1, 2 1 A [15[HP] and above ] 0 0 P11 [Up to 15[HP]] 0, 2 0 [020[HP] and above ] 0 0 F14 Restart mode after F14 RESTART 0 to 5 - - 0 NA momentary power failure F15 Frequency limiter (High) F15 H LIMITER G11S: 0 to 400Hz Hz 1 70 A F16 (Low) F16 L LIMITER P11S: 0 to 120Hz 0 A F17 Gain (for freq. set signal) F17 FREQ GAIN 0.0 to 200.0% % 0.1 100.0 A F18 Bias frequency F18 FREQ BIAS G11S: -400.0 to +400.0Hz Hz 0.1 0.0 A P11S: -120.0 to +120.0Hz F20 DC brake (Starting freq.) F20 DC BRK Hz 0.0 to 60.0Hz Hz 0.1 0.0 A F21 (Braking level) F21 DC BRK LVL G11S: 0 to 100% % 1 0 A P11S: 0 to 80% F22 (Braking time) F22 DC BRK t 0.0s(Inactive) s 0.1 0.0 A 0.1 to 30.0s F23 Starting frequency (Freq.) F23 START Hz 0.1 to 60.0Hz Hz 0.1 0.5 NA F24 (Holding time) F24 HOLDING t 0.0 to 10.0s s 0.1 0.0 NA F25 Stop frequency F25 STOP Hz 0.1 to 60.0Hz Hz 0.1 0.2 NA F26 Motor sound (Carrier freq.) F26 MTR SOUND 0.75 to 15kHz kHz 1 2 A F27 (Sound tone) F27 SOUND TONE 0 to 3 - - 0 A F30 FMA (Voltage adjust) F30 FMA V-ADJ 0 to 200% % 1 100 A F31 (Function) F31 FMA FUNC 0 to 11 - - 0 A F33 FMP (Pulse rate) F33 FMP PULSES 300 to 6000p/s (full scale) p/s 1 1440 A F34 (Voltage adjust) F34 FMP V-ADJ 0%, 1 to 200% % 1 0 A F35 (Function) F35 FMP FUNC 0 to 10 - - 0 A F36 30RY operation mode F36 30RY MODE 0, 1 - - 0 NA F40 Torque limiter 1 (Driving) F40 DRV TRQ 1 G11S: 20 to 200%, 999 % 1 999 A P11S: 20 to 150%, 999 F41 (Braking) F41 BRK TRQ 1 G11S: 0%, 20 to 200%, 999 999 A P11S: 0%, 20 to 150%, 999 F42 Torque vector control 1 F42 TRQVECTOR1 0, 1 - - 0 NA CTi Automation - Phone: 800.894.0412 - Fax: 208.368.0415 - Web: www.ctiautomation.net - Email: info@ctiautomation.net