Use Pediatric Intubation Manikin
•
0 likes•4 views

The Pediatric Intubation Manikin is designed to help medical professionals perfect endotracheal intubation and gastric tube insertion skills through a step-by-step training process. Key steps include preparing the necessary equipment like a laryngoscope and endotracheal tube, inserting the laryngoscope to visualize the airway, inserting the endotracheal tube into the trachea, connecting a resuscitation gasbag, and checking that the tube is correctly placed by observing whether the balloons inflate properly in the lungs or stomach. The manikin allows trainees to practice this important neonatal medical procedure in a way that mimics real clinical scenarios.

Recommended
More Related Content
Similar to Use Pediatric Intubation Manikin
Similar to Use Pediatric Intubation Manikin (20)
Recently uploaded
Recently uploaded (20)
Use Pediatric Intubation Manikin
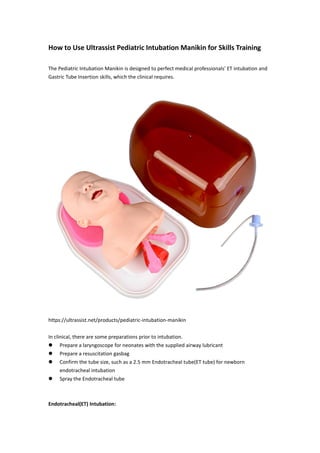
- 1. How to Use Ultrassist Pediatric Intubation Manikin for Skills Training The Pediatric Intubation Manikin is designed to perfect medical professionals' ET intubation and Gastric Tube Insertion skills, which the clinical requires. https://ultrassist.net/products/pediatric-intubation-manikin In clinical, there are some preparations prior to intubation. Prepare a laryngoscope for neonates with the supplied airway lubricant Prepare a resuscitation gasbag Confirm the tube size, such as a 2.5 mm Endotracheal tube(ET tube) for newborn endotracheal intubation Spray the Endotracheal tube Endotracheal(ET) Intubation:
- 2. A laryngoscope device is used to help visualize the airway, and the endotracheal tube is inserted into the trachea through the mouth to the larynx. By inflating the endotracheal tube, observe the two small balloons for adjustment and confirmation to ensure that the tube is correct. Gastric Tube Insertion: Insert the tube into one nostril, passing through the nasopharynx and throat, until it reaches the stomach. Inflate the endotracheal tube and observe the large balloon to adjust and confirm whether the tube is correctly placed in the stomach, avoiding misplacement in the trachea or other locations.
- 3. Pediatric ET Intubation Training Step-by-step Guide Step 1: Check the items Make sure the laryngoscope, Endotracheal tube, gasbag, and neonatal intubation trainer are available for training. Step 2: Let the infant intubation trainer lay down on a table that the height is good for operation. The head of Ultrassist Neonatal Intubation Trainer is set back slightly just like in the real scenarios for intubation operation. So it is not necessary to stabilize the neonate's head in the "nasoaspiratory position" for the best view of the airway. Step 3: Insert the laryngoscope to open the epiglottis and visualize the airway.
- 4. Step 4: Insert the Endotracheal tube Step 5: Remove the laryngoscope
- 5. Step 6: Connect resuscitation gasbag for frontal ventilation Step 7: Check if the intubation is correct Neonatal ET intubation: check if the pink balloons representing both lungs are inflated while the red balloon is not. Neonatal Nasal Intubation: check if the red balloon representing stomach is inflated while the pink balloons are not. Neonatal intubation is a medical procedure where a flexible tube is inserted into an infant's airway, typically through the mouth or nose, to establish an open airway, provide mechanical ventilation, or administer medications. This procedure is necessary in various clinical situations where an infant's respiratory or medical condition requires intervention. Note: In order to complete the intubation training, laryngoscope and gasbag are also necessary except the neonatal intubation trainer and ET tube we supply.