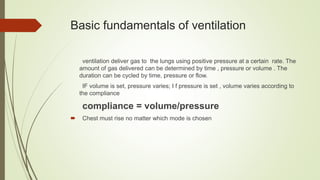
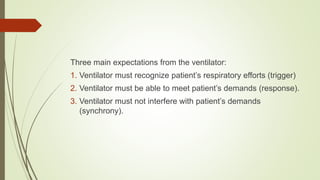
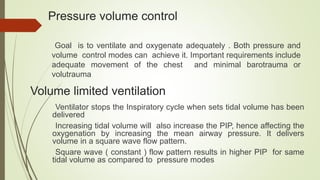
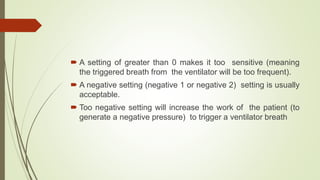
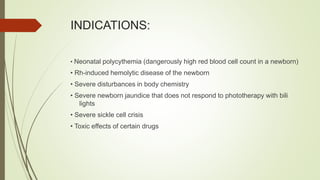
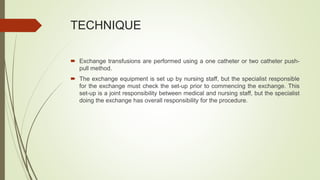
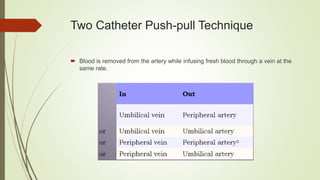
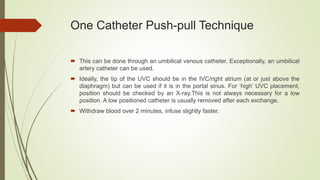
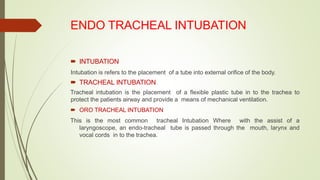
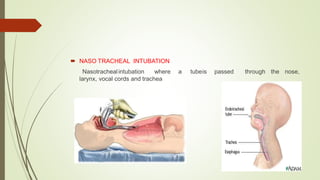
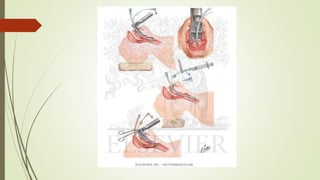
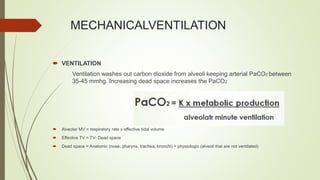
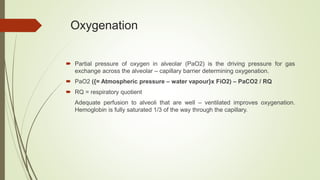
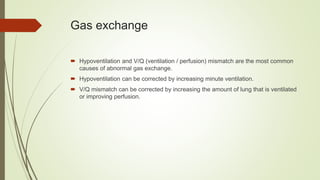
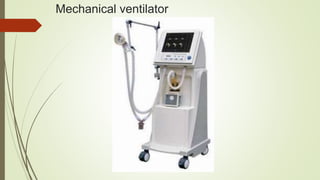
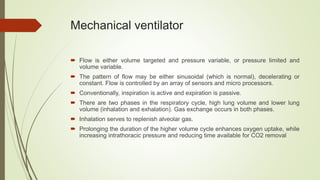
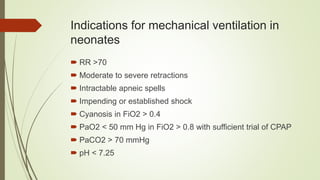
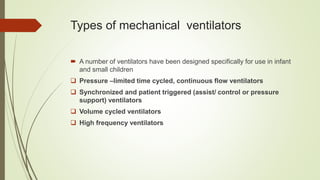
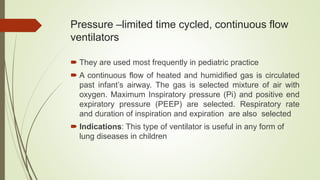
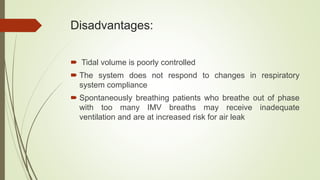
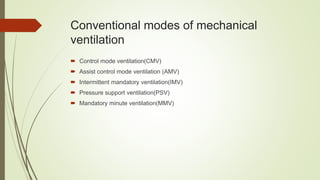
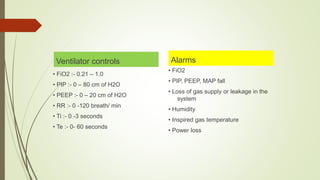
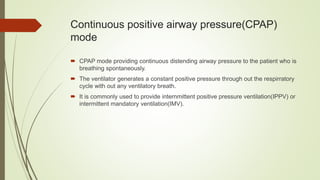
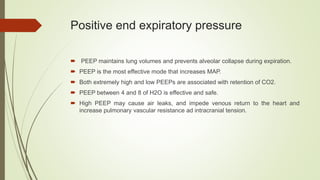
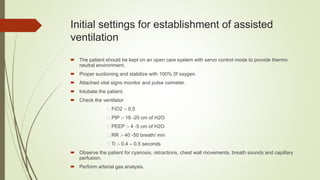
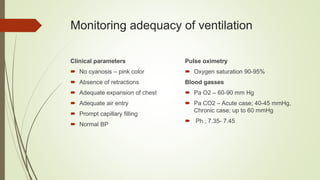
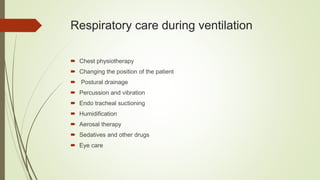
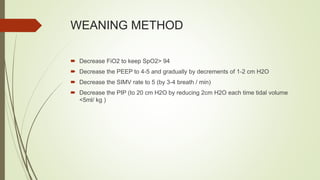
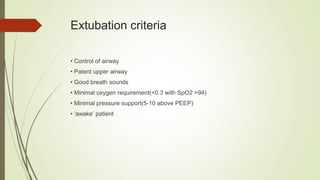
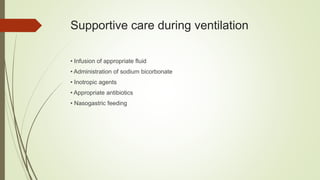
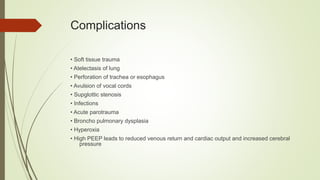
4. ENDO TRACHEAL INTUBATION
INTUBATION
Intubation is refers to the placement of a tube into external orifice of the body.
TRACHEAL INTUBATION
Tracheal intubation is the placement of a flexible plastic tube in to the trachea to
protect the patients airway and provide a means of mechanical ventilation.
ORO TRACHEAL INTUBATION
This is the most common tracheal Intubation Where with the assist of a
laryngoscope, an endo-tracheal tube is passed through the mouth, larynx and
vocal cords in to the trachea.
5. NASO TRACHEAL INTUBATION
Nasotrachealintubation where a tubeis passed through the nose,
larynx, vocal cords and trachea
6. INDICATIONS
In neonatal asphyxia
Nag and mask ventilation fails to improve cardiac status
Apparently still born baby after adequate suctioning of upper airway.
Infants with diaphragmatic hernia.
Thick meconium stained baby.
Babies requiring prolonged positive pressure ventilation
As a pre requisite for artificial ventilation
7. INDICATIONS
Circulatory
Cardio pulmonary arrest
Refractory or unresuscitate shock.
Sepsis
CNS depression
Head injury
Diabetic coma
Barbiturate poisoning etc.
Disease of the peripheral nervous system
Polio mylitis
Tetanus
Organ phosphorus poisoning
Administration of general anesthesia
8. INDICATIONS
Airway support
Diminished mental status
Compromised airway anatomy (eg. Edema)
Diminished airway reflexes( general
anesthesia , drug over dose)
Requirement for sedation in circumstances
(eg.CT, MRI)
Pharyngeal instability (eg. Facial fractures)
Pulmonary diseases
Acute hypoxic respiratory failure
Hypo ventilation
Lung disease
9. RECOGNITION OF A DIFFIUCULT
AIRWAY
History
Difficult intubation
Upper airway obstruction
Anatomic features
Mid face hypoplasia
Gross macrocephaly
Small mouth
Glossoptosis
Severe obesity
Facial trauma
Oro pharyngeal mass
Limited temporo mandibular Joint
mobility
Midline clefts
Micro canthia
Limited neck mobility
13. SELECTION OF TRACHEAL TUBE
Uncuffed tracheal tube for children < 8 years old
Formula for the selection of uncuffed tracheal tube size (mm ID)
Cuffed tube size (mm ID)
Weight/ age ET tube size
in diameter in mm
<1000 gm 2.5
1000 – 2000gm 3.0
2000 – 3000gm 3.5
>3000gm 4.0
1 -5 years 4.0 – 5.0
5 – 12 years 5.0 – 6.5
14. PREPARATION FOR INTUBATION
Assemble all the equipment
Administer oxygen before intubation
Laryngoscope and suction equipment should be checked
15.
16. POSITION OF THE PATIENT
Child more than 2 years – a folded sheet or towel to be placed under the occiput
align the pharyngeal and tracheal axis. So that external ear canal is anterior to
shoulder.
Child < 2 years – a folded sheet to be placed under shoulder to align airway.
The patient is placed in supine position. The operator stands beyond the patients
head. Patient’s neck is slightly extended with the head in midline.
18. TECHNIQUE
Clear the oropharynx with
Gentle suctioning.
Empty the stomach.
Orotracheal intubation is preferred during resuscitation.
Hold laryngoscope handle in left hand and insert the blade in to the mouth in
midline, following the natural contour of the pharynx to the base of the tongue
19.
20. TECHNIQUE
Once the tip of the blade is at the base of the tongue and the epiglottis is seen,
move the proximal end of the blade to the right side of the mouth and then sweep
the tongue toward the middle to achieve control of the tongue to insert the blade
along the right side of the mouth to the base of the tongue.
This movement provides a channel in the right third of the mouth to pass the
tracheal tube while maintaining direct visualization of the laryngeal structures.
21. TECHNIQUE
After the tube is properly positioned , traction is exerted upward in the direction of
the long axis of the handle to displace the base of the tongue and the epiglottis
anteriorly exposing glottis
Insert the tracheal tube from the base laryngoscope blade.
In addition, application of cricoid pressure by an assistant may facilitated
visualization of the glottic opening
The black glottic marker of the tube is placed at the level of the vocal cords.
22. PRECAUTIONS
Risk of laryngeal trauma is increased if the blade is initially inserted in to the
esophagus and then slowly withdrawn to visualize the glottis.
The handle and blade must not be used for prying or levering, nor should the
upper gums or teeth be used as a fulcrum. These practices may damage to the
teeth and reduce the ability to visualize the larynx.
23. CONFIRMATION OF TRACHEAL TUBE
PLACEMENT
Symmetric bilateral chest movement.
Look for water vapor in the tracheal tube during exhalation.
Listen for breath sounds over upper abdomen.
Look for the evidence of exhalation of carbon dioxide by capnography or mass
spectrometer.
Fibroptic identification of tracheal rings via endotracheal tube lumen.
Chest roentgenogram.
24. FIXATION OF THE TUBE
Cut 3 pieces of adhesive plaster approximatly 7cm X 1.5 cm size.
Two of these cut across the middle along the length to resemble pantaloons.
Apply tincture benzoin along the upper lip.
Fix the uncut rectangular piece here.
Fix the pantaloons on both cheeks encircling the tube
25. CHANGING ET TUBE
Tube needs to be changed if its cuff develops leak
A standard NG tube with in it can be used as a guide.
The patient is hyper ventilated.
The guide is passed through a ET tube
Maintaining cricoid pressure, the tube is withdrawn over the guide and another ET
tube is passed over it in to the trachea.
The guide is then withdrawn.
26. ET route for administration of drugs
Epinephrine
Nalaxone
Atropine
Lidocaine
Surfactant in preterm babies
27. COMPLICATIONS
Hypoxia
Bradycardia
Apnea
Pneumothorax
Contusions or laceration of the tongue, gums, pharynx, epiglottis, trachea, vocal
cords or esophagus.
Infections
Post- extubation
28. RAPID SEQUENCE INTUBATION
Rapid sequence in refers to the rapid uninterrupted injection of preselected dosage of an induction
agent and a muscle relaxant
Indication
Head injury
Combativeness
Prolonged seizure activity
Drug over dosage
Respiratory failure
Near drowning
Burns
Sepsis
Pneumonia
30. STEPS OF RSI
1. Brief history and anatomic assessment.
2. Preparation of equipment and
medications.
3. Pre oxygenation.
4. Pre medications with adjunctive agents
(atropine, lignogaine etc).
5. Sedation and induction of
unconsciousness.
6. Cricoid pressure.
7. Muscle relaxation.
8. Intubation.
9. Verification of ET tube placement
10.ET tube is secured, appropriate
mechanical ventilation is begun. Chest
x-ray ordered.
11.Medical record documentation.
32. MECHANICALVENTILATION
VENTILATION
Ventilation washes out carbon dioxide from alveoli keeping arterial PaCO2 between
35-45 mmhg. Increasing dead space increases the PaCO2
Alveolar MV = respiratory rate x effective tidal volume
Effective TV = TV- Dead space
Dead space = Anatomic (nose, pharynx, trachea, bronchi) + physiologic (alveoli that are not ventilated)
33. Oxygenation
Partial pressure of oxygen in alveolar (PaO2) is the driving pressure for gas
exchange across the alveolar – capillary barrier determining oxygenation.
PaO2 ({= Atmospheric pressure – water vapour}x FiO2) – PaCO2 / RQ
RQ = respiratory quotient
Adequate perfusion to alveoli that are well – ventilated improves oxygenation.
Hemoglobin is fully saturated 1/3 of the way through the capillary.
34. Gas exchange
Hypoventilation and V/Q (ventilation / perfusion) mismatch are the most common
causes of abnormal gas exchange.
Hypoventilation can be corrected by increasing minute ventilation.
V/Q mismatch can be corrected by increasing the amount of lung that is ventilated
or improving perfusion.
35. Time consent
Time constant is the time required to fill an alveolar space. It takes three times constants (0.3 –
0.45 sec) to achieve greater than 90% capacity of the alveolar unit filled.
Time constant = Resistance (pressure x time/volume) x Compliance (volume/pressure)
37. Mechanical ventilator
Mechanical ventilator is a machine that generates a controlled flow of gas into a
patient’s airways.
Oxygen and air are received from cylinders or wall outlets, the gas is pressure
reduced and blended according to the prescribed inspired oxygen tension (FiO2),
accumulated in a receptacle within the machine and delivered to the patient using
one of many available modes of ventilation.
The central premise of positive pressure ventilation is that gas flows along a
pressure gradient between the upper airway and the alveoli.
The magnitude, rate and duration of flow are determined by operator.
38. Mechanical ventilator
Flow is either volume targeted and pressure variable, or pressure limited and
volume variable.
The pattern of flow may be either sinusoidal (which is normal), decelerating or
constant. Flow is controlled by an array of sensors and micro processors.
Conventionally, inspiration is active and expiration is passive.
There are two phases in the respiratory cycle, high lung volume and lower lung
volume (inhalation and exhalation). Gas exchange occurs in both phases.
Inhalation serves to replenish alveolar gas.
Prolonging the duration of the higher volume cycle enhances oxygen uptake, while
increasing intrathoracic pressure and reducing time available for CO2 removal
39. Basic fundamentals of ventilation
ventilation deliver gas to the lungs using positive pressure at a certain rate. The
amount of gas delivered can be determined by time , pressure or volume . The
duration can be cycled by time, pressure or flow.
IF volume is set, pressure varies; I f pressure is set , volume varies according to
the compliance
compliance = volume/pressure
Chest must rise no matter which mode is chosen
40. Three main expectations from the ventilator:
1. Ventilator must recognize patient’s respiratory efforts (trigger)
2. Ventilator must be able to meet patient’s demands (response).
3. Ventilator must not interfere with patient’s demands
(synchrony).
41. Pressure volume control
Goal is to ventilate and oxygenate adequately . Both pressure and
volume control modes can achieve it. Important requirements include
adequate movement of the chest and minimal barotrauma or
volutrauma
Volume limited ventilation
Ventilator stops the Inspiratory cycle when sets tidal volume has been
delivered
Increasing tidal volume will also increase the PIP, hence affecting the
oxygenation by increasing the mean airway pressure. It delivers
volume in a square wave flow pattern.
Square wave ( constant ) flow pattern results in higher PIP for same
tidal volume as compared to pressure modes
42. Trigger or sensitivity
Trigger means sensitivity setting of the ventilator
Ventilators have a negative pressure sensor which can be set
at various levels of sensitivity to initiate a breath usually
based on patient effort (negative pressure) or elapsed time
before the next breath in the event of respiration depression
or a chance in flow in the circuit (flow triggering)
43. A setting of greater than 0 makes it too sensitive (meaning
the triggered breath from the ventilator will be too frequent).
A negative setting (negative 1 or negative 2) setting is usually
acceptable.
Too negative setting will increase the work of the patient (to
generate a negative pressure) to trigger a ventilator breath
44. INDICATIONS FOR MECHANICAL
VENTILATION
Following are clinical signs indicating acute respiratory failure:
Air hunger or slow ineffective
ventilation
Cyanosis
Marked bradycardia or tachycardia
Hypotension
Restlessness, irritability or lethargy
Convulsions and unconsciousness
the arterial PCO2 of >60 mmHg
and PO2 of < 60 mmHg while
receiving 100% O2 indicated acute
respiratory failure.
48. Indications for mechanical ventilation in
neonates
RR >70
Moderate to severe retractions
Intractable apneic spells
Impending or established shock
Cyanosis in FiO2 > 0.4
PaO2 < 50 mm Hg in FiO2 > 0.8 with sufficient trial of CPAP
PaCO2 > 70 mmHg
pH < 7.25
49. Types of mechanical ventilators
A number of ventilators have been designed specifically for use in infant
and small children
Pressure –limited time cycled, continuous flow ventilators
Synchronized and patient triggered (assist/ control or pressure
support) ventilators
Volume cycled ventilators
High frequency ventilators
50. Pressure –limited time cycled, continuous flow
ventilators
They are used most frequently in pediatric practice
A continuous flow of heated and humidified gas is circulated
past infant’s airway. The gas is selected mixture of air with
oxygen. Maximum Inspiratory pressure (Pi) and positive end
expiratory pressure (PEEP) are selected. Respiratory rate
and duration of inspiration and expiration are also selected
Indications: This type of ventilator is useful in any form of
lung diseases in children
51. Advantages
The continuous flow of fresh gas allows the patient to make
spontaneous respiratory efforts between ventilator breaths
with intermittent mandatory ventilation (IMV)
Good control is maintained over respiratory pressures.
Inspiratory and expiratory time can be controlled
independently.
The device is relatively simple.
52. Disadvantages:
Tidal volume is poorly controlled
The system does not respond to changes in respiratory
system compliance
Spontaneously breathing patients who breathe out of phase
with too many IMV breaths may receive inadequate
ventilation and are at increased risk for air leak
53. Synchronized and patient triggered (assist/
control or pressure support) ventilators
These ventilators combine the features of pressure limited,
time cycled, continues flow ventilators with an airway
pressure, airflow or respiratory movement sensor.
By measuring inspiratory flow or movement, these ventilators
deliver intermittent positive pressure breaths at a fixed rate in
synchrony with the baby’s inspiratory efforts. It is called
synchronized IMV or SIMV.
54. Indications
SIMV can be used when a conventional pressure limited is indicated.
It is used for infants who are breathing spontaneously while on IMV.
55. Advantages
Synchronizing the delivery of positive pressure breaths with
the infant’s inspiratory effort reduces the phenomenon of
breathing out of phase with IMV breaths.
Pronounced asynchrony ventilator has been associated with
air leak and intra ventricular hemorrhage. Use of SIMV
reduces this complications.
56. Disadvantages
Inappropriate to trigger a breath or fail to trigger because of problems with sensor.
It is more e
xpensive and complicated to use.
57. Volume cycled ventilators
Volume cycled ventilators deliver a preset tidal volume to
the patient. Positive pressure breaths delivered in the IMV
mode are synchronized with the patient’s inspiratory efforts
(SIMV mode) controls are also provided or adjusting
inspiratory pressure pause and for delivering continuous or
decelerating inspiratory flow patterns
58. Advantages
These ventilators capable of many different modes of ventilation.
Asynchrony between spontaneous breath and positive pressure breaths are
discouraged, thus avoids the risk of barotrauma
59. Disadvantages
The absence of continuous flow circuitry requires that patient
must open the inspiratory demand valve during spontaneous
breathing.
It is more expensive
60. High frequency ventilators
This can achieve adequate and it is an important
adjunct to conventional mechanical ventilation
Types
High frequency oscillatory ventilator
High frequency jet ventilator
High frequency flow ventilator
In the newborns. These ventilators apply continuous distending pressure to
maintain an elevated lung volume, small tidal volumes are super imposed at a
rapid rate
61. Advantages
It can be achieve adequate ventilation while avoiding the large swings in lung
volume required by conventional ventilators and associated with lung injury, it is
useful in pulmonary air leak syndrome.
They allow the use o high MAP for alveolar recruitment and improvement in
ventilation perfusion matching.
63. Conventional modes of mechanical
ventilation
Control mode ventilation(CMV)
Assist control mode ventilation (AMV)
Intermittent mandatory ventilation(IMV)
Pressure support ventilation(PSV)
Mandatory minute ventilation(MMV)
64. Ventilator controls
• FiO2 :- 0.21 – 1.0
• PIP :- 0 – 80 cm of H2O
• PEEP :- 0 – 20 cm of H2O
• RR :- 0 -120 breath/ min
• Ti :- 0 -3 seconds
• Te :- 0- 60 seconds
Alarms
• FiO2
• PIP, PEEP, MAP fall
• Loss of gas supply or leakage in the
system
• Humidity
• Inspired gas temperature
• Power loss
65. Continuous positive airway pressure(CPAP)
mode
CPAP mode providing continuous distending airway pressure to the patient who is
breathing spontaneously.
The ventilator generates a constant positive pressure through out the respirratory
cycle with out any ventilatory breath.
It is commonly used to provide internmittent positive pressure ventilation(IPPV) or
intermittent mandatory ventilation(IMV).
66. Positive end expiratory pressure
PEEP maintains lung volumes and prevents alveolar collapse during expiration.
PEEP is the most effective mode that increases MAP.
Both extremely high and low PEEPs are associated with retention of CO2.
PEEP between 4 and 8 of H2O is effective and safe.
High PEEP may cause air leaks, and impede venous return to the heart and
increase pulmonary vascular resistance ad intracranial tension.
67. Initial settings for establishment of assisted
ventilation
The patient should be kept on an open care system with servo control mode to provide thermo
neutral environment.
Proper suctioning and stabilize with 100% 0f oxygen.
Attached vital signs monitor and pulse oximeter.
Intubate the patient.
Check the ventilator
FiO2 :- 0.5
PIP :- 18 -20 cm of H2O
PEEP :- 4 -5 cm of H2O
RR :- 40 -50 breath/ min
Ti :- 0.4 – 0.5 seconds
Observe the patient for cyanosis, retractions, chest wall movements, breath sounds and capillary
perfusion.
Perform arterial gas analysis.
68. Monitoring adequacy of ventilation
Clinical parameters
No cyanosis – pink color
Absence of retractions
Adequate expansion of chest
Adequate air entry
Prompt capillary filling
Normal BP
Pulse oximetry
Oxygen saturation 90-95%
Blood gasses
Pa O2 – 60-90 mm Hg
Pa CO2 – Acute case; 40-45 mmHg,
Chronic case; up to 60 mmHg
Ph ; 7.35- 7.45
69. Respiratory care during ventilation
Chest physiotherapy
Changing the position of the patient
Postural drainage
Percussion and vibration
Endo tracheal suctioning
Humidification
Aerosal therapy
Sedatives and other drugs
Eye care
70. Weaning from mechanical ventilation
Condition for weaning
• Improving general conditions
• Decreasing FiO2 requirement
• Improving breath sounds
• Decreasing endotracheal secretions
• Improving chest x-rays
• Decreased chest tube drainage
• Improved fluid and electrolyte status
• Improving neurological status
71. WEANING METHOD
Decrease FiO2 to keep SpO2> 94
Decrease the PEEP to 4-5 and gradually by decrements of 1-2 cm H2O
Decrease the SIMV rate to 5 (by 3-4 breath / min)
Decrease the PIP (to 20 cm H2O by reducing 2cm H2O each time tidal volume
<5ml/ kg )
72. Extubation criteria
• Control of airway
• Patent upper airway
• Good breath sounds
• Minimal oxygen requirement(<0.3 with SpO2 >94)
• Minimal pressure support(5-10 above PEEP)
• ‘awake’ patient
73. Supportive care during ventilation
• Infusion of appropriate fluid
• Administration of sodium bicorbonate
• Inotropic agents
• Appropriate antibiotics
• Nasogastric feeding
74. Complications
• Soft tissue trauma
• Atelectasis of lung
• Perforation of trachea or esophagus
• Avulsion of vocal cords
• Supglottic stenosis
• Infections
• Acute parotrauma
• Broncho pulmonary dysplasia
• Hyperoxia
• High PEEP leads to reduced venous return and cardiac output and increased cerebral
pressure
76. GASTRIC GAVAGE
Tube feeding or gastric gavage
Gastric gavage is the term applied to the process of feeding the patient by means
of a tube introduced directly in to the stomach by way of either mouth or the nose.
The word “gavage” comes from the french “ gaver” meaning to “ force feeding of
poultry”.
77. INDICATIONS FOR NG TUBE
INSERTION
Diagnostic
Gastric aspirate test for diagnosis of
neonatal septicemia.
Shake test for lung maturity.
Examination of gastric contents.
Assessment of upper GI bleeding.
Measurement of gastric volume.
Determination of gastric acid content.
Drug analysis on stomach content.
Passage of intrinsic factor.
Therapeutic
Paralytic ileus
Acute gastric dilatation
Intestinal obstruction
Gastric haemorrhage
Enteral feeding
Administration of therapeutic substances.
78. Contra indications of tube insertion
Nasal fractures
Head and neck injury
Esophageal stricture
Ingesion of alkali
79. INDICATIONS FOR GASTRIC GAVAGE
• Preterm babies
• Certain sick babies like
• Severe neurological problems
• Severe medical problems
• Unconsciousness
• RDS
• Viral hepatitis
• For at risk babies requiring continuing
care
• Viral encephalitis
• Meningitis
• Babies with palatal paralysis
• Tetanus
• Tube feeding are used to supplement the
breast feed .
80. Contra indications of tube feeding
• Absence of bowel sounds
• Respiratory distress
• Intestinal obstruction
• Convulsions
• Upper gastro intestinal bleeding
• Paralytic ileus
• Nasal fracture
• Head and neck injury
81. TECHNIQUE
Preliminary assessment
• Recognize the patient by his identification
• Check the doctor’s order
• Get the instruction from the senior sister
• Check the consciousness of the child
• See the required feed is ready
• Check the articles available in the ward
• Assess the reaction of the patient to the tube feeding
82. EQUIPEMENT
A clean tray containing
Nasal tube,(catheter no. 7 or 8), funnel, glass connection and tubing.
Levin tube or ryle’s tube
Required amount of fluid in a bowl(bolus feeding- 300 to 500 ml/day, intermittent feeding-
formula is placed in to gravity bag dripped in over 30 – 60 mins, continues feeding administer
via infusion pump usually 50 – 150 ml)
Lubricant such as water soluble jelly
Clean water in a container
Mouth wash
Swab stick
Rag pieces
Kidney basin
Mackintosh and towel
Adhesive tapes and scissors
83. PROCEDURE
1. The head is raised in semi upright position
2. The distance from the nose to ear lobe and from the ear lobe to xiphoid process is
determined to measure the length of the tube is to be passed. The spot is marked
on the tube .
3. The patent nostril is selected and cleaned with swab sticks.
4. The terminal end of the tube is lubricated with lubricant.
5. The tube is passed in to the nostril downward along the floor of the nose.
6. With swallowing of the saliva tube is advanced in to the esophagus and passed up
to the mark as measured.
84. Confirmation of the tube placement
Aspiration of the stomach content
Air is injected in to the tube while the epigastric area is palpated
Placing the tube in a glass of water and escape of air bubbles
Radio opaque tube can be assessed by radiography.
85. 7. The tube is fixed with a tape.
8. Check the bowel sounds prior to each feeding.
9. Elevate the head of the bed before each feeding.
10.Connect the syringe or funnel and pinch the tube and hold the syringe upward and
pour some plain water in to it.
11.Pour the feed before the funnel is empty. After feeding also pour some water to
clear the tube.
12.Make the patient in comfort.
13.Replace the articles.
14.Record the procedure.
86. When are tube feeding stopped?
When they no longer needed; the baby must have ;
Developed a gag reflux
No respiratory problems
Normal vital signs, color and activity
When they are not tolerated;
The baby is so sick
87. Complications of tube feeding
Inability to pass the tube may be due to gagging, uncooperative patient
esophageal stricture, creation of false passage, esophageal atresia etc.
Pulmonary aspiration
Esophageal perforation
Gastric perforation
Nasal necrosis
89. GASTRIC LAVAGE
Gastric lavage also commonly called stomach pumping or gastric irrigation is the
process of cleaning out the contents of the stomach.
90. INDICATIONS
Oral poisons
GI bleeding
Meconium aspiration syndrome
Suspected congenital TB
CONTRA INDICATIONS
Ingestion of corrosive poisons
Ingestion of hydrocorbons
Presence of neurological
symptoms
Tetanus
92. TECHNIQUE
• Measure the distance on the tube
• Keep the child in supine position
• Smear the tube with lubricant
• Pass the tube gently through the nose or mouth in to the stomach
• Confirm the presence of tube in stomach
• Secure the tube
• Remove the gastric contents by gentle suction or syringe or aspirating bulb
• After removing gastric contents, perform gastric lavage by normal saline
• Repeat the introduction and with drawl of fluid until the return is clear for several
passes
95. EXCHANGE TRANSFUSION
INTRODUCTION:
Exchange transfusion is a potentially life-saving procedure that is done to
counteract the effects of serious jaundice or changes in the blood due to diseases
such as sickle cell anemia.
DEFINITION:
Exchange transfusion involves slowly removing the patient's blood and replacing it
with fresh donor blood or plasma.
96. INDICATIONS:
• Neonatal polycythemia (dangerously high red blood cell count in a newborn)
• Rh-induced hemolytic disease of the newborn
• Severe disturbances in body chemistry
• Severe newborn jaundice that does not respond to phototherapy with bili
lights
• Severe sickle cell crisis
• Toxic effects of certain drugs
97. TECHNIQUE
Exchange transfusions are performed using a one catheter or two catheter push-
pull method.
The exchange equipment is set up by nursing staff, but the specialist responsible
for the exchange must check the set-up prior to commencing the exchange. This
set-up is a joint responsibility between medical and nursing staff, but the specialist
doing the exchange has overall responsibility for the procedure.
98. Two Catheter Push-pull Technique
Blood is removed from the artery while infusing fresh blood through a vein at the
same rate.
99. One Catheter Push-pull Technique
This can be done through an umbilical venous catheter. Exceptionally, an umbilical
artery catheter can be used.
Ideally, the tip of the UVC should be in the IVC/right atrium (at or just above the
diaphragm) but can be used if it is in the portal sinus. For ‘high’ UVC placement,
position should be checked by an X-ray.This is not always necessary for a low
position. A low positioned catheter is usually removed after each exchange.
Withdraw blood over 2 minutes, infuse slightly faster.
100. VOLUME
N.B: Blood Volume = 70-90 ml/kg for term and 85- 110 ml/kg for preterm infants
One blood volume removes 65% of baby’s red cells.
Two blood volumes removes 88%
Thereafter the gain is small.
101. PRINCIPLES
1. There must be at least one doctor/ns-anp and one nurse exclusively involved in
the exchange throughout its progress.
2. The doctor/ns-anp must be present throughout the exchange. He/she may leave
the room briefly to get blood results, but if called away, the exchange is stopped
and the lines flushed.
3. It may be necessary for another doctor/ns-anp to cover the rest of the unit during
the exchange.
4. Meticulous care must be taken throughout, especially with volume balance, the
rate of the exchange, the vital signs and any signs of air in the lines.
102. PRINCIPLES
5. All exchanges are to be conducted in nicu level 3.
6. The nurse must be at least a level four nurse, who is trained and up to date with
the procedure, if there are not two nurses who are trained and up to date on shift,
one who is should be called in (placed on call)
7. If there are any doubts about the set-up or the method of doing the exchange
transfusion, they must be immediately referred to senior medical or nursing staff
and the exchange interrupted until they are answered satisfactorily.
103. PROCEDURE
A. If an exchange transfusion is necessary, compatible blood must be ordered. If a
severely affected ( i.e. hydropic) infant with Rh hemolytic disease is anticipated at
birth, it may be necessary to have blood available in the nursery prior to the
delivery. The request should be for O negative packed red blood cells of the
specific volume needed and of the appropriate CMV status.
104. This blood may be utilized in any one of the following ways:
1. The RBC's may be given as a simple transfusion (with or without additional Plasmanate)
while stabilization of the infant is accomplished.
2. The RBC's may be used for a partial exchange transfusion to acutely elevate the
hematocrit without changing the blood volume in a severely anemic baby.
B. When the need for an emergency, complete exchange transfusion is virtually
certain, arrangements can be made in advance for O negative whole blood or O
negative PRBC's resuspended in fresh frozen plasma.
105. III. For double-volume exchange transfusions for hemolytic disease of the newborn or
for hyperbilirubinemia without hemolysis, the blood used will be packed cells (type
O, Rh specific for the infant) resuspended to the desired hematocrit in compatible
fresh frozen plasma.
IV. A partial exchange transfusion is often done for polycythemia (see section on
polycythemia).
II. . Although the standard anticoagulant (CPD) is acidic, the blood need not be
buffered. If the infant is severely acidemic, consult the staff neonatologist.
III. If possible, the infant should be NPO and the stomach contents aspirated prior to
the procedure.
106. IV. The exchange transfusion should be done under a radiant warmer using sterile
technique.
V. The donor blood should be warmed using the blood warmer to a temperature not
exceeding 37oC.
VI. The infants blood pressure, respiratory rate, heart rate and general condition
should be monitored during the exchange transfusion according to standard
nursing protocol.
VII. If the serum bilirubin concentration is at a dangerous level and the blood for
exchange transfusion is not yet ready, consider priming the infant with 1 gram/kg
(4 ml/kg) of a 25% solution of salt-poor albumin to bind additional bilirubin and
keep it in the circulation until the exchange can be accomplished..
107. VIII.The umbilical vein catheter should be inserted until there is free flow of blood
immediately prior to starting the exchange transfusion. See section on placement
of umbilical catheters for technique. The exchange transfusion should not be done
through an umbilical artery line unless the UAC is used only for blood withdrawal
with simultaneous replacement through the umbilical vein or peripheral IV. At the
beginning of the exchange transfusion, the first blood sample withdrawn should be
sent for for ,
1)total and direct bilirubin;
2) hemoglobin and hematocrit;
3) glucose; and
4) calcium.
108. IX. Use the "exchange transfusion kit", which contains catheters, stopcocks, waste
bag, and calcium gluconate
X. Ideally, blood (or colloid in the event of a partial volume exchange) should be
infused through a peripheral vein at a rate equal to blood withdrawal from the
UVC. If the "push-pull" (single catheter) technique is utilized, no more than 5 ml/kg
body weight should be withdrawn at any one time.
XI. The exchange volume is generally twice the infant's blood volume, (generally
estimated to be 80 ml/kg). The total volume exchange should not exceed one
adult unit of blood (450-500 ml). A standard twovolume exchange will remove
approximately 85% of the red cells in circulation before the exchange and reduce
the serum indirect bilirubin level by one-half. The exchange of blood should
require a minimum of 45 minutes
109. XII. The need for giving supplemental calcium is controversial. If used give 0.5 to 1.0 ml of
10% calcium gluconate IV, after each 100 ml of exchange blood. Monitor heart rate for
bradycardia.
XIII.At the end of an exchange transfusion blood should be sent for sodium, glucose,
calcium, total and direct bilirubin, and hemoglobin and Haematocrit
XIV.At the end of an exchange transfusion, the umbilical vein catheter is usually removed.
In the event of a subsequent exchange, a new catheter can be inserted.
XV. Hypoglycemia often occurs in the first or second hour following an exchange
transfusion. It is therefore necessary to monitor blood glucose levels for the first
several hours after exchange
110. XVI.The serum bilirubin concentration rebounds to a value approximately halfway
between the preand post- exchange levels by two hours after completing the
exchange transfusion. Therefore, the serum bilirubin concentration should be
monitored at two to four hours after exchange and subsequently every three to
four hours.
XVII.Feedings may be attempted two to four hours after the exchange transfusion.
111. COMPLICATIONS:
Blood clots
Changes in blood chemistry (high or low potassium, low calcium, low glucose,
change in acid-base balance in the blood )
Heart and lung problems
Infection (very low risk due to careful screening of blood)
Shock due to inadequate replacement of blood
113. UMBILICAL VEIN CATHETERIZATION
INTRODUCTION
Umbilical vein catheters (UVC), are used for exchange transfusions, monitoring of
central venous pressure, and infusion of fluids (when passed through the ductus
venosus and near the right atrium); and for emergency vascular access for
infusions of fluid, blood products or medications.
MEANING
Umbilical vein catheterization should be considered as a potential intravenous
access stein infants up to 2 weeks old. The procedure is indicated for neonates
with shock or cardiopulmonary failure.
114. INDICATIONS:
Emergent access to newborn circulation
Exchange Transfusion
Very ill infants
Very low birth weight (<750g)
EQUIPMENT
5 or 8 French catheter, or a 5 French feeding tube
10-mL syringe
Umbilical cord tape or suture to tie the base of the cord
Flush solution
115. PROCEDURE:
1. Place the infant beneath a radiant warmer and restrain the extremities.
2. Prepare the abdomen and umbilicus with antiseptic solution (surgical prep).
3. Drape the umbilical area in a sterile manner. Expose the infant’s head for
observation.
4. To anchor the line after placement, place a constricting loop of umbilical tape at the
base of the cord. Using a scalpel blade, trim the umbilical cord to1 to 2 cm above
the skin surface
116.
117. 5. Identify the umbilical vessels. The umbilical vein is a single, thin-walled, large-
diameter lumen, usually located at12 o’clock. The arteries are paired and have
thicker walls with a small-diameter lumen
6. Obtain an umbilical vascular catheter(5 Fr). Flush the catheter with heparinized
saline (1 unit per mL) and attach it to a 3-way stopcock.
7. Measure and mark 5 cm from the tip of the catheter.
8. Close the ends of a pair of smooth forceps, then insert the end into the lumen of
the umbilical vein. Dilate the opening by allowing the ends of the forceps to
separate, then insert the catheter into the lumen of the umbilical vein and advance
it gently toward the liver for 4 to 5 cm or until blood return is noted
118. 9. If resistance to advancement of the catheter is encountered, the tip might be in the
portal vein or the ductus venosus. The catheter should be pulled back until blood
can be withdrawn smoothly.
10.Remove the catheter when resuscitations complete and peripheral Vascular
access has been obtained.
119. COMPLICATIONS AND PITFALLS
Central venous catheterization is an invasive form of vascular access, and many
potential complications are associated with this technique. Some of these potential
complications are common to all sites of insertion, while others are site specific.
The complications common to all insertion sites are as follows:
120. Arterial injury:
The most common complication of this technique is accidental puncture and/or
cannulation of the adjacent artery.
In most cases, this results in a minor injury to the artery that can be easily
managed with direct pressure at the insertion site or by application of a pressure
dressing.
Obviously, it is much harder to control significant bleeding of one of the carotid
arteries, but fingertip pressure applied directly to the site might be sufficient.
Use of the vein dilator or a mishap with the scalpel can result in more serious injury
to the artery, necessitating the involvement of a vascular surgeon.
If possible, it is best to avoid injuring the artery.
121. Infection:
Central venous catheters are foreign bodies and can, like any such object, become
colonized by bacteria. Central venous catheter infections can have devastating
consequences, particularly in critically ill children.
Furthermore, the emergence of multiple resistant bacteria in many hospitals
increases the risks substantially. Attention to sterile technique is critical.
When time permits, those involved in the placement should don sterile gowns and
wear masks and hats. Large sterile drapes can prevent inadvertent contamination
of the guide wire and catheter prior to insertion.
122. Thrombosis:
Just as any foreign object can become infected, almost any foreign object can become
a nidus for thrombus formation.
The risk is highest with polyvinylchloride catheters and when the rate of infusion
through the catheter is less than 3 mL/hr.
Flushing the catheter with heparin when it is not in use and using H
Heparinized fluid when the rate of infusion is less than 3 mL/hr might prevent thrombus
formation.
Catheters made of Teflon have surface characteristics that are not conducive to
thrombus formation.
Unfortunately, these catheters are also quite stiff and can injure vascular structures.
Likewise, catheters that are impregnated with heparin are less often associated with
thrombus formation
123. Guide wire misplacement:
In rare instances, the guide wire enters the central venous circulation and must be
retrieved by an angiographer or a surgeon.
This complication can be avoided by ensuring hat one hand remains in firm
contact with the wire at all times.
124. Air embolus:
Allowing a bolus of air to enter the catheter can result in an air embolus when the
end of the needle or catheter is open to the air and the venous pressure is low.
This complication is most likely to occur when the catheter is placed into the
internal jugular vein or the subclavian vein. An air embolus can be avoided by
covering the open end of the catheter with the thumb after the guide wire has been
removed, before connecting the intravenous fluids, and by positioning the patient
with the insertion site slightly dependent.
125. Such positioning has the added benefit of aiding catheter placement because it
dilates the veins.
Aspirating the catheter before flushing will remove air within the catheter.
Older patients can be asked to perform a Valsalva maneuver during internal
jugular and subclavian cannulation to avoid negative pressure within the vein
126. Site-Specific Complications
Umbilical vein catheterization should be used for temporary vascular access only,
and the catheter should be removed once the patient is stable and vascular access
has been secured via other sites. Umbilical vein catheterization can cause hepatic
thrombosis, infection, and hemorrhage due to vessel perforation.
128. PHOTO THERAPY
Phototherapy (light therapy) is a way of treating jaundice. Special lights help break
down the bilirubin in the baby's skin so that it can be removed from his or her
body. This lowers the bilirubin level in baby's blood.
129. TYPES OF PHOTOTHERAPY UNIT
1. Single surface unit.
2. Double surface unit.
3. Triple surface unit.
131. CONTRA INDICATIONS
Photosensitive conditions such as lupus erythematosus and xeroderma
ligmentosum.
History of cutaneous malignancies.
Patient on arsenic or ionizing radiation therapy Patient on photosensitizing drugs .
132. Technique
1. Perform hand wash.
2. Place baby naked in cradle or incubator.
3. Fix eye shades & genital area.
4. Keep baby at least 45 cm from lights, if using closer monitor temperature of baby.
5. Start phototherapy.
6. Frequent extra breast feeding every 2 hourly.
7. Turn baby after each feed.
8. Temperature record 2 to 4 hourly.
9. Weight record- daily.
10.Monitor urine frequency.
11.Monitor bilirubin level
133. Mechanism of phototherapy
Blue-green light in the range of 460-490 nm is most effective for phototherapy. The
absorption of light by the normal bilirubin (4Z,15Z-bilirubin) generates
configuration isomers, structural isomers, and photooxidation products. The 2
principal photoisomers formed in humans are shown. Configurational
isomerization is reversible and much faster than structural isomerization
Structural isomerization is slow and irreversible. Photooxidation occurs more
slowly than both configurational and structural isomerization. Photooxidation
products are excreted mainly in urine.
134. Nursing care of phototherapy
Skin care
Infants in isolettes who are < 1200gm are generally nursed without a nappy on an
absorbent sheet protector. (In cohelp)
Infants in isolettes who are > 1200gm may be nursed with a nappy on if the
bilirubin is not rising rapidly.
If intensive phototherapy is required then the nappy should be removed.
Keep the infant clean and dry.
Clean only with water. Do not apply oils or creams to the exposed skin.
Eucerin has been proven to be safe for use when the infant is receiving
phototherapy.
Infants nursed in nappies where the buttocks are not exposed may have zinc and
castor oil applied to areas of skin excoriation.
135. Observation
All infants in newborn care receiving phototherapy should have vitals
recorded every 4 hrly
If an infant requires continuous cardio- respiratory monitoring for other reasons,
then, this should continue whilst under phototherapy.
Eye care
Eye pads are required for the infants comfort if overhead white or blue fluorescent
lights are used
Size N720 (micro) if < 1500g
Size N721 (small) if 1500 - 2500g
Size N722 (large) if > 2500g
Eye pads should be removed 4 hourly and eye cares attended with normal saline.
There have never been human studies showing that retinal damage occurs from
with phototherapy.
136. Fluid Requirements
All Infants
Accurately document fluid intake (oral or intravenous) and output.
Urinalysis and specific gravity should be checked 8 hourly.
Assess and record stools
Term Infants
Breast fed infants should continue on demand breast feeds.
Bottle fed infants should be fed on demand 4-6th hourly.
Preterm Infants
The daily fluid rate may need to be increased by 10ml-15ml/kg/day to prevent
dehydration
137. When to stop phototherapy
Term babies:
Day 3: Stop at the discretion of the consultant as the jaundice is likely to be
pathological.
Day 4: Stop phototherapy when the SBR is
280 mmol/L for term infants with physiological jaundice.
Premature babies:
Stop at the discretion of the consultant
138. Side effects of phototherapy
Increased insensible water loss.
Loose stools.
Skin rash.
Bronze baby syndrome.
Hyperthermia .
Upsets maternal baby interaction.
May result in hypocalcemia.