SlideShare a Scribd company logo
1 of 2
Download to read offline
Vigilance II Monitor Quick Reference Guide
Set Time/Date
Full/Split
Screen Icon
• STAT Boxes
• Data Relationship
Plot
• Diagnostic Plot
Home Icon
• Return to Home
Configuration
Help Icon
• Access Help
Screens
• Alarm/Alert Help
Setup Icon
• Display Preferences
• Cable Test
• Language Selection
• Serial/Analog Port Setup
Patient
CCO Cable
Connector
SvO2 /ScvO2
Connector
Cable Test
Ports
On/Off
Press to Activate Monitor
CCO
Start/Stop
Bolus Mode
Patient Data
• Cardiac Profile
• Oxygenation Profile
Trend Scroll
Alarm Silence, 2 min
Navigation Knob
Rotate to Navigate,
Push to Select
See Vigilance II monitor operator’s manual for detailed instructions.
For professional use. CAUTION: Federal (United States) law restricts this device to sale by or on the
order of a physician. See instructions for use for full prescribing information, including indications,
contraindications, warnings, precautions and adverse events.
Edwards Lifesciences devices placed on the European market meeting the essential requirements referred to
in Article 3 of the Medical Device Directive 93/42/EEC bear the CE marking of conformity.
Edwards, Edwards Lifesciences, the stylized E logo, Swan-Ganz, Vigilance, and Vigilance II are trademarks of
Edwards Lifesciences Corporation. © 2012 Edwards Lifesciences Corporation. All rights reserved. AR07822
Vigilance II Monitor Quick Reference Guide
Oximetry Setup and Calibration
In-Vitro Calibration
1. Connect the optical module to the SvO2/ScvO2
color-coded connector on the front of the monitor.
Connect catheter to the optical module with the
“Top” side up. Allow 20 minutes for the module
to warm up.
2. Use the navigation knob to highlight the SvO2/
ScvO2 large parameter frame. Press knob to
display calibration menu. Highlight In-Vitro
Calibration. Press knob to select.
3. Highlight HGB. Press knob to select. Enter
hospital lab values by turning the knob. Press
knob to confirm setting.
4. Turn knob to highlight Calibrate. Press to select.
Upon successful completion of calibration,
insert catheter in patient.
5. Highlight Start. Press knob to select.
In-Vivo Calibration
1. Use the navigation knob to highlight the SvO2/
ScvO2 large parameter frame. Press knob to
display calibration menu.
2. Highlight In-Vivo Calibration. Press knob to select.
3. After 25 seconds Draw is highlighted. Press knob
just prior to drawing waste and lab samples.
4. Use knob to enter oximetry and HGB or Hct
values.
5. Highlight Calibrate. Press knob to select.
To Transport
1. The Swan-Ganz catheter should remain
connected to the optical module during transport.
Unplug the optical module cable from the
Vigilance II monitor. Transport the patient.
2. If reconnecting to a different Vigilance II monitor,
press the patient data button, select New Patient,
select Yes, and Yes again.
3. Reconnect the optical module cable to the
Vigilance II monitor.
4. Highlight and select oximetry large parameter
frame. Select Recall OM Data. The calibration
data stored in the optical module will be
displayed.
5. If stored data is less than 24 hours old a Yes or No
option will be displayed. Select Yes to begin
oximetry monitoring. If No is selected, In-Vivo
calibration will be necessary.
Continuous Cardiac Output
1. Connect the patient CCO cable to the color-
coded connector on the front panel.
2. If CEDV is required, connect the ECG interface
cable from the bedside monitor to the ECG
connector on the Vigilance II monitor rear panel.
3. Connect an Edwards advanced technology
Swan-Ganz catheter to the patient cable per
catheter instructions.
4. Press CO Start/Stop button to begin continuous
cardiac output monitoring. If CEDV monitoring
is required:
	 • Highlight one of the large parameter frames.
Press knob to display menu.
	 • Highlight and select Parameter, then EDV.
Highlight Return. Push knob to select.
Activating STAT Boxes
1. Highlight the Full/Split Screen icon.
Press knob to select.
2. Highlight the lower frame of the split screen.
Press knob to select.
3. Highlight STAT Boxes.
Press knob to select.
Signal Quality
Signal Quality May be Compromised by:
	 • Pulsatility
	 • Signal intensity (e.g., kinking of catheter,
blood clot, hemodilution)
	 • Intermittent wall contact by the catheter
Signal Quality May be Improved by:
	 • Try to aspirate distal lumen; if able to aspirate,
flush lumen with extreme caution
	 • Check catheter for kinking and recalibrate;
replace catheter if required and recalibrate
	 • Reposition catheter and if SQI  2, recalibrate
monitor by performing in-vivo calibration
	 • Attempt to distance electrocautery equipment
and cables from the Vigilance monitor
	 • Plug the power cord into separate AC circuits
if possible
	 • Update entered hemoglobin and hematocrit
values when there is a physiologic change of
6% or greater in hematocrits or of 1.8 g/dl
(1.1 mmol/L) or greater in hemoglobin
Edwards Lifesciences
Irvine, USA I Nyon, Switzerland I Tokyo, Japan I Singapore, Singapore I São Paulo, Brazil
edwards.com

More Related Content

Similar to ar07822-vigilance_ii_monitor_sellsheet_6x9alr

RAC-050 Engineer Training V1.0e-202202.ppt
RAC-050 Engineer Training V1.0e-202202.pptRAC-050 Engineer Training V1.0e-202202.ppt
RAC-050 Engineer Training V1.0e-202202.pptArnoldoFelix3
 
AUTOMATIC HYPODERMIC INFUSION REGULATOR
AUTOMATIC HYPODERMIC INFUSION REGULATORAUTOMATIC HYPODERMIC INFUSION REGULATOR
AUTOMATIC HYPODERMIC INFUSION REGULATORIRJET Journal
 
Transcutaneous bilirubin monitoring (bilichek)
Transcutaneous bilirubin monitoring (bilichek)Transcutaneous bilirubin monitoring (bilichek)
Transcutaneous bilirubin monitoring (bilichek)wcmc
 
Santamedical SM-220 Finger Pulse Oximeter
Santamedical SM-220 Finger Pulse OximeterSantamedical SM-220 Finger Pulse Oximeter
Santamedical SM-220 Finger Pulse OximeterGurin Products, LLC
 
Rigel vital-signs-booklet-uk
Rigel vital-signs-booklet-ukRigel vital-signs-booklet-uk
Rigel vital-signs-booklet-ukCao Xuân Trình
 
Check Point new 09.2015 full
Check Point new 09.2015 fullCheck Point new 09.2015 full
Check Point new 09.2015 fullIvailo Dachov
 
ShuntCheck Operating Manual
ShuntCheck Operating ManualShuntCheck Operating Manual
ShuntCheck Operating Manualneurodx
 
Ecat htw nexus pp
Ecat  htw  nexus ppEcat  htw  nexus pp
Ecat htw nexus ppJoe Spencer
 
Heartmate ii system overview
Heartmate ii system overviewHeartmate ii system overview
Heartmate ii system overviewLinda Veldman
 
Hướng dẫn sử dụng Đầu dò nhiệt độ Testo 805i
Hướng dẫn sử dụng Đầu dò nhiệt độ Testo 805i Hướng dẫn sử dụng Đầu dò nhiệt độ Testo 805i
Hướng dẫn sử dụng Đầu dò nhiệt độ Testo 805i Tenmars Việt Nam
 

Similar to ar07822-vigilance_ii_monitor_sellsheet_6x9alr (20)

Md90 user manual
Md90 user manualMd90 user manual
Md90 user manual
 
RAC-050 Engineer Training V1.0e-202202.ppt
RAC-050 Engineer Training V1.0e-202202.pptRAC-050 Engineer Training V1.0e-202202.ppt
RAC-050 Engineer Training V1.0e-202202.ppt
 
ZMPCZM018000.12 User's manual
ZMPCZM018000.12 User's  manualZMPCZM018000.12 User's  manual
ZMPCZM018000.12 User's manual
 
ZMPCZM018000.12 User's manual
ZMPCZM018000.12 User's  manualZMPCZM018000.12 User's  manual
ZMPCZM018000.12 User's manual
 
ZMPCZM018000.12 User's manual
ZMPCZM018000.12 User's  manualZMPCZM018000.12 User's  manual
ZMPCZM018000.12 User's manual
 
Font
FontFont
Font
 
Bionet bm3 manual de servicio
Bionet bm3 manual de servicioBionet bm3 manual de servicio
Bionet bm3 manual de servicio
 
AUTOMATIC HYPODERMIC INFUSION REGULATOR
AUTOMATIC HYPODERMIC INFUSION REGULATORAUTOMATIC HYPODERMIC INFUSION REGULATOR
AUTOMATIC HYPODERMIC INFUSION REGULATOR
 
Transcutaneous bilirubin monitoring (bilichek)
Transcutaneous bilirubin monitoring (bilichek)Transcutaneous bilirubin monitoring (bilichek)
Transcutaneous bilirubin monitoring (bilichek)
 
Santamedical SM-220 Finger Pulse Oximeter
Santamedical SM-220 Finger Pulse OximeterSantamedical SM-220 Finger Pulse Oximeter
Santamedical SM-220 Finger Pulse Oximeter
 
Friability test apparatus
Friability test apparatusFriability test apparatus
Friability test apparatus
 
Rigel vital-signs-booklet-uk
Rigel vital-signs-booklet-ukRigel vital-signs-booklet-uk
Rigel vital-signs-booklet-uk
 
Check Point new 09.2015 full
Check Point new 09.2015 fullCheck Point new 09.2015 full
Check Point new 09.2015 full
 
H@H Brochure En
H@H Brochure EnH@H Brochure En
H@H Brochure En
 
ShuntCheck Operating Manual
ShuntCheck Operating ManualShuntCheck Operating Manual
ShuntCheck Operating Manual
 
ORP Sensor Troubleshooting Guide
ORP Sensor Troubleshooting GuideORP Sensor Troubleshooting Guide
ORP Sensor Troubleshooting Guide
 
Ecat htw nexus pp
Ecat  htw  nexus ppEcat  htw  nexus pp
Ecat htw nexus pp
 
Heartmate ii system overview
Heartmate ii system overviewHeartmate ii system overview
Heartmate ii system overview
 
Hướng dẫn sử dụng Đầu dò nhiệt độ Testo 805i
Hướng dẫn sử dụng Đầu dò nhiệt độ Testo 805i Hướng dẫn sử dụng Đầu dò nhiệt độ Testo 805i
Hướng dẫn sử dụng Đầu dò nhiệt độ Testo 805i
 
MD Inservice
MD InserviceMD Inservice
MD Inservice
 

ar07822-vigilance_ii_monitor_sellsheet_6x9alr

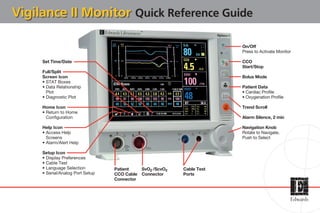
  • 1. Vigilance II Monitor Quick Reference Guide Set Time/Date Full/Split Screen Icon • STAT Boxes • Data Relationship Plot • Diagnostic Plot Home Icon • Return to Home Configuration Help Icon • Access Help Screens • Alarm/Alert Help Setup Icon • Display Preferences • Cable Test • Language Selection • Serial/Analog Port Setup Patient CCO Cable Connector SvO2 /ScvO2 Connector Cable Test Ports On/Off Press to Activate Monitor CCO Start/Stop Bolus Mode Patient Data • Cardiac Profile • Oxygenation Profile Trend Scroll Alarm Silence, 2 min Navigation Knob Rotate to Navigate, Push to Select
  • 2. See Vigilance II monitor operator’s manual for detailed instructions. For professional use. CAUTION: Federal (United States) law restricts this device to sale by or on the order of a physician. See instructions for use for full prescribing information, including indications, contraindications, warnings, precautions and adverse events. Edwards Lifesciences devices placed on the European market meeting the essential requirements referred to in Article 3 of the Medical Device Directive 93/42/EEC bear the CE marking of conformity. Edwards, Edwards Lifesciences, the stylized E logo, Swan-Ganz, Vigilance, and Vigilance II are trademarks of Edwards Lifesciences Corporation. © 2012 Edwards Lifesciences Corporation. All rights reserved. AR07822 Vigilance II Monitor Quick Reference Guide Oximetry Setup and Calibration In-Vitro Calibration 1. Connect the optical module to the SvO2/ScvO2 color-coded connector on the front of the monitor. Connect catheter to the optical module with the “Top” side up. Allow 20 minutes for the module to warm up. 2. Use the navigation knob to highlight the SvO2/ ScvO2 large parameter frame. Press knob to display calibration menu. Highlight In-Vitro Calibration. Press knob to select. 3. Highlight HGB. Press knob to select. Enter hospital lab values by turning the knob. Press knob to confirm setting. 4. Turn knob to highlight Calibrate. Press to select. Upon successful completion of calibration, insert catheter in patient. 5. Highlight Start. Press knob to select. In-Vivo Calibration 1. Use the navigation knob to highlight the SvO2/ ScvO2 large parameter frame. Press knob to display calibration menu. 2. Highlight In-Vivo Calibration. Press knob to select. 3. After 25 seconds Draw is highlighted. Press knob just prior to drawing waste and lab samples. 4. Use knob to enter oximetry and HGB or Hct values. 5. Highlight Calibrate. Press knob to select. To Transport 1. The Swan-Ganz catheter should remain connected to the optical module during transport. Unplug the optical module cable from the Vigilance II monitor. Transport the patient. 2. If reconnecting to a different Vigilance II monitor, press the patient data button, select New Patient, select Yes, and Yes again. 3. Reconnect the optical module cable to the Vigilance II monitor. 4. Highlight and select oximetry large parameter frame. Select Recall OM Data. The calibration data stored in the optical module will be displayed. 5. If stored data is less than 24 hours old a Yes or No option will be displayed. Select Yes to begin oximetry monitoring. If No is selected, In-Vivo calibration will be necessary. Continuous Cardiac Output 1. Connect the patient CCO cable to the color- coded connector on the front panel. 2. If CEDV is required, connect the ECG interface cable from the bedside monitor to the ECG connector on the Vigilance II monitor rear panel. 3. Connect an Edwards advanced technology Swan-Ganz catheter to the patient cable per catheter instructions. 4. Press CO Start/Stop button to begin continuous cardiac output monitoring. If CEDV monitoring is required: • Highlight one of the large parameter frames. Press knob to display menu. • Highlight and select Parameter, then EDV. Highlight Return. Push knob to select. Activating STAT Boxes 1. Highlight the Full/Split Screen icon. Press knob to select. 2. Highlight the lower frame of the split screen. Press knob to select. 3. Highlight STAT Boxes. Press knob to select. Signal Quality Signal Quality May be Compromised by: • Pulsatility • Signal intensity (e.g., kinking of catheter, blood clot, hemodilution) • Intermittent wall contact by the catheter Signal Quality May be Improved by: • Try to aspirate distal lumen; if able to aspirate, flush lumen with extreme caution • Check catheter for kinking and recalibrate; replace catheter if required and recalibrate • Reposition catheter and if SQI 2, recalibrate monitor by performing in-vivo calibration • Attempt to distance electrocautery equipment and cables from the Vigilance monitor • Plug the power cord into separate AC circuits if possible • Update entered hemoglobin and hematocrit values when there is a physiologic change of 6% or greater in hematocrits or of 1.8 g/dl (1.1 mmol/L) or greater in hemoglobin Edwards Lifesciences Irvine, USA I Nyon, Switzerland I Tokyo, Japan I Singapore, Singapore I São Paulo, Brazil edwards.com