SlideShare a Scribd company logo
1 of 49
UNIT-III
AZURE ARCHITECT TECHNOLOGIES
Azure Files -Azure Blob Storage-Azure Resource Manager template (JSON and Bicep)-Virtual
Networking- Azure AD Identity Protection- Azure AD Connect
Azure Files
Azure files are fully managed File shares in the Cloud. When you have a local network, you
can attach a NAS box so that all users in a network can access the files. Inside a cloud service,
unfortunately, this is absent. This need is fulfilled by Azure File Service.
Key features of Azure Files:
1. Replace On Premise file servers or supplement with Azure File sync
2. Lift and shift applications. If you are moving any application to the Cloud, the using
Azure Files, you can move both Application and Data to the Cloud. Or you can
implement Hybrid scenario where application runs On Premise and Data resides in
the Cloud. If you have an app that works with your on-premise file server, moving
it to Azure means rewriting it, or setting up a file server in the cloud. Azure Files is
perfect for that.
3. Shared Application settings. If you are running a Distributed application at multiple
locations, and there is a need for these multiple applications to access common
application settings, these can be on Azure Files
4. A Cloud Application can write logs, metrics, crash dumps on Azure files. Then using
Azure File Sync these will be replicated on local Server periodically.
Azure File Storage Pros and Cons
The primary benefit of Azure Files is its familiarity. Most users are already comfortable
working with traditional file systems and can easily transition to Azure Files.
Below are some additional pros of using Azure Files:
 Fully managed service—management and maintenance tasks are handled for you,
eliminating overhead.
 Shared access—since it is based on SMB it is broadly compatible with most on-
premises applications and services. This means you can easily migrate applications
and share across distributed teams.
 Redundancy—data stored in Azure Files is 99.999999999% durable and is
automatically replicated to prevent loss due to resource failure.
 Easy automation—Azure Files is compatible with most common automation tools
and can be managed through a variety of interfaces, including PowerShell, Azure
CLI, Azure Storage Explorer, and Azure Portal.
 Easy APIs—includes a built-in REST API and client libraries for simplified
interfacing and integration with other services.
While Azure Files can provide numerous benefits, it also has limitations that you should be
aware of. These limitations are most relevant for larger enterprises or those managing large
volumes of data.
Below are some important limitations of Azure Files:
 Security and access—to access files you must share your account key with users.
This means users have access to your entire storage account. Additionally, files can
be accessed externally via a UNC path and your key. You cannot block this access.
 Backup—Azure Files does not include a built-in mechanism for snapshots or
automatic backups. To ensure that data is recoverable in case of accidental deletion
or user error, you need to perform backups manually.
 Performance—throughput is limited to 60MB/s on the standard tier. The premium
tier offers higher limits but may cost significantly more.
 Size limitations—you can only store up to 5TB per standard storage account and up
to 100TB spread across 20 accounts. The premium tier can scale up to 100TB per
account but may cost significantly more.
 File system limitations—individual files are limited to 1TB. You can store up to
200k system objects per account and file names can be up to 255 characters. These
limitations primarily present issues for legacy migrations.
Azure File Sync
Azure File Sync enables centralizing your organization's file shares in Azure Files, while
keeping the flexibility, performance, and compatibility of a Windows file server. While some
users may opt to keep a full copy of their data locally, Azure File Sync can turn Windows
Server into a quick cache of your Azure file shares. You can use any protocol available on
Windows Server to access your data locally, including SMB, NFS, and FTPS. You can have
as many caches as you need across the world.
Common reasons customers use Azure File Sync:
 Centralize file share backups in Azure to optimize cost and manageability
 Free up on-premises storage capacity to avoid buying more storage
 Maintain on-premises file share performance for frequently used files
 Migrate on-premises file shares to Azure Files
 Provide low latency, multi-site access for file shares
Features and Benefits
1. Multiple File Servers at multiple locations. Sync all to single Azure File Storage.
Commonly used files are cached on local server. If local server goes down, quickly
install another Server or VM and sync Azure files to it.
2. The older, rarely accessed files will move to Azure thus freeing your local file
Server.
3. Sync Group helps to manage locations that should be kept in sync with each other.
Every Sync Group has one common Cloud Storage. So, a Sync Group will have one
Azure End point and multiple Server end points. There is a 2-way sync so that
changes to Cloud are replicated on local server within 12 to 24 hours. But changes
on a local server are replicated to all end points within 5 minutes.
4. An agent is installed on the Server end point. There is no need to change or relocate
data on a different volume. Thus it is non-disruptive type of agent.
5. Every Server end point creates an Azure file share in the storage account. End user
experience is unchanged
6. When a particular local file is getting synced , then it is locked. But this is only for
a few seconds.
7. A Disaster Recovery Solution for File Server. If local File Server is destroyed, set
up a VM or physical server , join to the previous sync group and you get “rapid
restore”.
8. When a file is renamed or moved, the meta data is preserved.
9. Its different from One Drive . One Drive is for Personal Document management and
is not a general purpose File Server. One Drive is primarily meant for collaborating
on Office files. Not optimized for very large files , CAD drawings, multimedia
development projects.
10. Azure File Sync works with On Premise AD and not Azure AD.
Use cases for Azure File Sync:
1. Company with multiple offices having a need to share files with all offices.
2. Branch Office backup of files. In real world, the files of branch offices rarely get
backed up.
3. Disaster Recovery Solution in case File Server goes down.
4. New Branch Office setup. You can setup new Server and connect to same Azure
Storage.
5. Move old data automatically to Azure. This is Cloud Tiering. The non-used data
will move to Azure. The files will have greyed icons with an offline O file attribute
to tell user that this file is only on Azure.
Azure blob storage
Azure Blob storage is perhaps one of the most versatile cloud storage solutions out there. If
you wish to make a comparison to other cloud storage solutions, then Blob Storage is like the
popular S3 storage offering from Amazon Web Services. Azure Blob storage is a sub-service
or sub-resource underneath Azure storage accounts. Blob storage is the only object-based
storage solution (data storage architecture for handling large amounts of unstructured data)
among the storage sub-services found inside our storage accounts.
Data stored inside Azure blobs could easily be accessed over HTTP and REST APIs making
it an ideal storage solution for content like image and video files that form the basis for
content streaming services like what you see with Netflix and some of these streaming
services. We can also store things like text files, log files, and even virtual hard disk files
making it a versatile storage solution. We can think of an Azure blob as a bucket, and we can
throw anything we need inside this bucket.
Azure Blob Storage Architecture
 Azure blob storage account: This is our blob service inside of our storage
account, and this is that sub-service that gives us that object-based storage
solution.
 Blob containers: these are the actual instances of the blob service that we
create, where we can store our blobs. We can think of these containers as our
buckets or our storage bins, where we can drop off our actual blobs.
 Blob: They are the data that we're storing inside these containers like the
video files, the text files, the log files, and the virtual hard disks.
Types of Azure Blob Storage
1. Block blobs
 Block Blobs are optimized for sequential accessing of the data
 These are going to store things like images or videos that are best suited for
streaming.
 The process for uploading the file is to break the file into smaller blocks and
then upload the blocks concurrently.
 Once the blocks have been uploaded to the storage account, they are
committed into a single file.
 That “commitment” is basically the creation of the metadata surrounding the
ordering and location of the blocks that belong to this particular file.
2. Append blobs
 Block blobs are used for streaming and storing; append blobs fulfil the same
task with the addition that they are optimized for append operations.
 Updating an append blob can only be done by adding a new block to the end.
 An append blob's field of application consists of logging, in which data has to
be written to the end of the blob.
 These are going to best for append operations like uploading log files.
3. Page blobs
 Page Blobs are optimized so that the data in the blob can be accessed
randomly.
 This is in contrast to reading and writing data sequentially from start to finish
(as is found in Block Blobs)
 There are some limitations on the size of a Page Blob. They can be up to 1 TB
in size, divided up into 512-bytes on each page.
 This category of blobs is going to be best for random access memory for
read/write operations for virtual machine hard disks.
 Odds are pretty good that if you use some of the more advanced Windows
Azure features, you’ll use Page Blobs (that use is indirect)
 For example, the persisted disks that are part of Windows Azure Virtual
Machines use Page Blobs to store both the data and operating system drives.
Blob access control/Container access levels
Once we start storing a lot of blobs inside of the Blob storage service, at some point we are
going to want to implement some level of access control for the actual resources that we have
in the blob service. This is where container access levels come into the picture. We can use
container access levels to determine what kind of access we have to our resources inside of
the blob service. By default, public access to blobs is granted at the storage account level.
If we disable public access to blobs at the storage account level, then in that case regardless
of what we have going on inside our container access levels, we will not be able to access any
of our blob because at the service level of the storage account, it is disabled. But when it is
enabled by default, we can have public access to those blobs, and we can granularly control
the access to the blobs by using container access levels.
We have 3 container access levels:
 Private: In this case, we do not provide anonymous access to any of our blob
resources.
 Blob: This provides anonymous access to all the blobs inside of a container,
but not the container data itself.
 Container access level: This is the most open access level category and
provides anonymous access to a container and all the blobs it contains within
it.
Configuring Azure Blob Storage
Login to the Azure portal and in search bar type in storage accounts. In the storage accounts
page, we’ll select the storage account we created earlier. On the storage account page, under
the data storage section on the left, we have a tab called Containers.
Click on this tab as this is where we will configure blob storage. Here we see a container
named logs already created. This is a system container and is usually created when we
configure something like a static website. We can create static websites inside Azure blob
using static scripts. On this page click on the container button to create a new container.
This will bring up a page where we could specify our container name and container access
level. We’ll simply name our container demo, keep our access level as private and click
on create container.
Once the container has been successfully created it would appear in the containers page as
shown below.
Click on the container name to navigate to the container management page. As expected,
we find the container to be empty at the moment.
Advertisement
We’ll now add a blob (image file) to this container. For doing so click on the upload button.
In the upload page, we’ll just browse and select an image file to upload.
As you can see from the screen, we have several options and we’ll discus them one by one
now.
 Authentication type: This determines the authentication method used to
access the blob being uploaded. This could be either a storage account access
key or Azure AD authentication.
 Blob type: This could be block blob, append blob, or page blob. Since the
blob being uploaded is a image, we’ll select block bob.
 Block size: This determines the block size of the files being uploaded.
 Access tier: The access tier could be hot, cold or archive depending on the
frequency of data access hot being the costliest and archive being the cheapest.
The hot access tier has the lowest latency during data writing and retrieval.
 Upload to folder: We could provide a folder name here to organize the blob
in that folder. But please note that this is not an actual folder in the file system
hierarchy. Object storage comprises a flat file hierarchy. The folder name in
this case will be prefixed with the file name and give the users the appearance
of a file system hierarchy.
 Blob index tags: These are key-value pairs helpful in blob identification.
Once we click upload, the folder (in case we gave a folder name) should appear on the
container page as soon as the file gets uploaded.
Click on the folder name to view its contents.
We find that the file has been uploaded successfully. The uploaded file will be accessible via
HTTP/s via a unique URL. To view the URL for the file, click on the file name to display its
properties.
Advertisement
Let’s copy the URL contents and open the URL in a browser. If you followed the steps
described thus far precisely then you should NOT be able to view the file and instead see
the below message in the browser window.
This is because we set the container access level to private and as a consequence of this, the
file will not be publicly accessible anonymously. To view the file contents directly in a
browser, we’ll need to change the container access level.
As you can see it’s currently set to private. Let’s change this to blob by selecting blob and
then clicking ok. You will be shown a warning, but we can ignore that since this isn’t a
production environment.
Azure Resource Manager template (JSON and Bicep)
ARM stands for Azure Resource Manager, which is Microsoft’s deployment and management
service for Azure. You use the ARM management layer for creating, updating, and deleting
Azure resources. In this article, you will learn more about ARM templates, the core components
of writing a template, and how to deploy that template using PowerShell.
ARM templates are a form of infrastructure as code, a concept where you define the
infrastructure you need to be deployed. You no longer need to click around the portal creating
virtual machines or writing scripts to deploy a storage account. Instead, the template defines
the resources, and the Azure ARM management layer is responsible for creating the
infrastructure.
This concept is called declarative syntax. Declarative syntax is where you state what resources
you want to create without writing the sequence of commands to make it. For example, you
can easily create a script using the Azure CLI or Azure PowerShell to create a virtual machine.
However, you have to include lots of logic and error checking to handle any scenario.
Creating a declarative template defines the environment’s end state, and Azure takes the
template as input and creates the environment for you. The ARM management layer will create
a new resource if it doesn’t exist or modify an existing resource if the template is different.
Microsoft has introduced a new infrastructure as code language called Azure Bicep. Read more
about getting started with Bicep in the article Azure Bicep: Getting Started and How-To Guide.
Benefits of Using ARM Templates
Using ARM templates in managing your Azure environment has many benefits. As already
mentioned, using declarative syntax removes the requirement of writing complicated
deployment scripts to handle multiple deployment scenarios.
ARM templates also provide repeatable results and are idempotent, meaning you can write and
deploy the same template many times to get the same result. You can take the same template
you used for the development infrastructure and use it to deploy the production environment.
Using the same template ensures the resources and settings are the same.
The Azure Resource Manager also takes care of the order of operations for deployment. As a
result, ARM deploys dependent resources in the correct order and, when possible, deploys in
parallel for faster deployments. You can also extend the templates with deployments script
written in PowerShell or Bash for a complete end-to-end environment setup.
Why choose ARM templates?
If you're trying to decide between using ARM templates and one of the other infrastructure as
code services, consider the following advantages of using templates:
 Declarative syntax: ARM templates allow you to create and deploy an entire
Azure infrastructure declaratively. For example, you can deploy not only virtual
machines, but also the network infrastructure, storage systems, and any other
resources you may need.
 Repeatable results: Repeatedly deploy your infrastructure throughout the
development lifecycle and have confidence your resources are deployed in a
consistent manner. Templates are idempotent, which means you can deploy the
same template many times and get the same resource types in the same state. You
can develop one template that represents the desired state, rather than developing
lots of separate templates to represent updates.
 Orchestration: You don't have to worry about the complexities of ordering
operations. Resource Manager orchestrates the deployment of interdependent
resources so they're created in the correct order. When possible, Resource
Manager deploys resources in parallel so your deployments finish faster than
serial deployments. You deploy the template through one command, rather than
through multiple imperative commands.
 Modular files: You can break your templates into smaller, reusable components
and link them together at deployment time. You can also nest one template inside
another template.
 Create any Azure resource: You can immediately use new Azure services and
features in templates. As soon as a resource provider introduces new resources,
you can deploy those resources through templates. You don't have to wait for
tools or modules to be updated before using the new services.
 Extensibility: With deployment scripts, you can add PowerShell or Bash scripts
to your templates. The deployment scripts extend your ability to set up resources
during deployment. A script can be included in the template, or stored in an
external source and referenced in the template. Deployment scripts give you the
ability to complete your end-to-end environment setup in a single ARM template.
 Testing: You can make sure your template follows recommended guidelines by
testing it with the ARM template tool kit (arm-ttk). This test kit is a PowerShell
script that you can download from GitHub. The tool kit makes it easier for you to
develop expertise using the template language.
 Preview changes: You can use the what-if operation to get a preview of changes
before deploying the template. With what-if, you see which resources will be
created, updated, or deleted, and any resource properties that will be changed.
The what-if operation checks the current state of your environment and eliminates
the need to manage state.
 Built-in validation: Your template is deployed only after passing validation.
Resource Manager checks the template before starting the deployment to make
sure the deployment will succeed. Your deployment is less likely to stop in a half-
finished state.
 Tracked deployments: In the Azure portal, you can review the deployment
history and get information about the template deployment. You can see the
template that was deployed, the parameter values passed in, and any output
values. Other infrastructure as code services aren't tracked through the portal.
 Policy as code: Azure Policy is a policy as code framework to automate
governance. If you're using Azure policies, policy remediation is done on non-
compliant resources when deployed through templates.
 Deployment Blueprints: You can take advantage of Blueprints provided by
Microsoft to meet regulatory and compliance standards. These blueprints include
pre-built templates for various architectures.
 CI/CD integration: You can integrate templates into your continuous integration
and continuous deployment (CI/CD) tools, which can automate your release
pipelines for fast and reliable application and infrastructure updates. By using
Azure DevOps and Resource Manager template task, you can use Azure Pipelines
to continuously build and deploy ARM template projects. To learn more, see VS
project with pipelines and Tutorial: Continuous integration of Azure Resource
Manager templates with Azure Pipelines.
 Exportable code: You can get a template for an existing resource group by either
exporting the current state of the resource group, or viewing the template used for
a particular deployment. Viewing the exported template is a helpful way to learn
about the template syntax.
 Authoring tools: You can author templates with Visual Studio Code and the
template tool extension. You get intellisense, syntax highlighting, in-line help,
and many other language functions. In addition to Visual Studio Code, you can
also use Visual Studio.
ARM Template Basics
Now that you have an overview of ARM templates, it is time for you to learn the basics of
writing your first template. Templates use a JavaScript Object Notation (JSON) syntax that
also includes advanced capabilities. Here is a blank ARM template:
{
"$schema":"https://schema.management.azure.com/schemas/2019-04-
01/deploymentTemplate.json#",
"contentVersion": "1.0.0.0",
"parameters": {},
"functions": [],
"variables": {},
"resources": [],
"outputs": {}
}
Parameters
Parameters allow you to pass different values to the ARM template for use during the
deployment. Some common examples include names of resources or which Azure region to
host them. Parameters enable your templates to be more dynamic and used across different
environments.
At a minimum, parameters require a name and a type. Parameter types include strings, arrays,
objects, integers, booleans, or a secure string, like a password. Optionally, the parameter also
contains a description of how to use the parameter. You can include default values, so you
don’t need to provide one at runtime, and you can configure a set of allowed values. Allowed
values limit what a person can use for a parameter value. This configuration is helpful if you
want to limit what SKUs or locations a person can deploy resources.
The following example showcases different parameter implementations.
The VMName parameter allows any string to be used for the virtual machine name.
The VMAdmin parameter also allows any value and has a default value, so the person using
the template doesn’t always have to provide it.
The VMAdminPassword is a secure string, meaning Azure will not store its value in the
deployment history. Finally, VMSize is also a string but only allows specific SKUs for the
virtual machine.
"parameters": {
"VMName": {
"type": "string",
"metadata": {
"description": "The name of the virtual machine."
}
},
"VMAdmin": {
"type": "string",
"metadata": {
"description": "Name of the local virtual machine administrator account."
},
"defaultValue": "local_admin"
},
"VMAdminPassword": {
"type": "securestring",
"metadata": {
"description": "Password for the local virtual machine administrator account."
}
},
"VMSize": {
"type": "string",
"metadata": {
"description": "Virtual Machine SKU Size"
},
"allowedValues": [
"Standard_D2_v4",
"Standard_D4_v4",
"Standard_D8_v4",
"Standard_D16_v4"
]
}
}
To provide parameter values, you can pass values inline when creating a resource deployment.
You’ll see an example of this later in the article.
Another option is creating a parameters file that contains the values. The parameters file also
uses JSON syntax. Parameters files also have advanced capabilities such as connecting to
Azure Key Vault to extract sensitive information, such as passwords, SSH keys, or certificates.
While not required, ARM template parameter files typically follow a naming convention of
including parameters in the template name. For example, if you had an ARM template
called virtualMachine.json, the parameter filename would be virtualMachine.parameters.json.
If you are reusing a template to deploy different environments, include the environment name
in the parameters file. Example file names include virtualMachine.parameters-
dev.json or virtualMachine.parameters-prod.json.
Here is an example file named virtualMachine.parameters.json with values for the parameters
defined earlier in this section. Note that the VMAdmin parameter is technically optional since
it has a default value. If you did not include it in this file, the template uses the defined default
value.
{
"$schema": "https://schema.management.azure.com/schemas/2019-04-
01/deploymentParameters.json#",
"contentVersion": "1.0.0.0",
"parameters": {
"VMName": {
"value": "webapp01"
},
"VMAdmin": {
"value": "svr_admin"
},
"VMAdminPassword": {
"value": "N0t@Rea!P@ss0wrd"
},
"VMSize": {
"value": "Standard_D4_v4"
}
}
}
Functions
The next section in the ARM template is functions. Functions allow you to create complicated
expressions that you don’t want to repeat throughout the template. ARM template functions
are a lot of functions in other programming languages. You call them when you need to run
them, and you can pass information to them and expect a return value.
For example, say you need to create unique names for resources. Instead of copying and pasting
the same code to generate the unique name, you create a function that makes the unique name.
For example, here is a function called uniqueName with a parameter named prefix that returns
a unique name using the resource group ID.
Note the namespace value. This value can be anything you want. Functions require a different
namespace value to avoid naming conflicts with regular template functions.
"functions": [
{
"namespace": "varonis",
"members": {
"uniqueName": {
"parameters": [
{
"name": "prefix",
"type": "string"
}
],
"output": {
"type": "string",
"value": "[concat(toLower(parameters('prefix')), uniqueString(resourceGroup().id))]"
}
}
}
}
]
Here is an example of calling the uniqueName function passing prodwebapp as the value for
the prefix parameter. Instead of passing the string, you can also give a template parameter or
variable value.
"name": "[varonis.uniqueName('prodwebapp')]"
Variables
Variables are not much different in ARM templates than you find in other programming
languages. Variables contain values that are used repeatedly throughout the template. Like
functions, you can use variables to create complicated expressions, so you don’t have to repeat
them in the template.
Like parameters, variables have the same data types, such as strings, objects, and integers. You
define variables using the colon as the assignment operator. For example, instead of passing
the Azure region as a parameter, you can define it as a variable, like this:
"variables": {
"location": "westus2"
}
To reference a variable later, using the variable() function with the variable name, like this:
"location": "[variables('location')]"
Resources
Finally, arguably the essential part of the ARM template: resources. The resources section
defines what Azure resources to deploy with the template. Resources can be anything as small
as a network security group all the way to virtual machines, storage accounts, or Azure
Functions.
Most resources have a set of common properties. Here is a template of a resource definition
with explanations of each part.
"name": “<resource name>”,
"type": "Microsoft.<resource provider>/<resource type>",
"apiVersion": "<api version>",
"tags": {
"key": "value"
},
"location": "<location>",
"dependsOn": [ ],
"properties": { }
 Name: Name for the resource. This value can be set from a parameter, variable, or set
manually.
 Type: The type of resource to deploy. The <resource provider> refers to the high-level
family of resources to deploy. Examples include Microsoft.Compute,
Microsoft.Storage, and Microsoft.Network. The <resource type> maps out more
precisely the resource to deploy. For example, Microsoft.Compute contains resources
related to compute infrastructure such as virtual machines, disks, and availability sets.
The resource provider and resource type are separated by a forward slash ( / ).
 ApiVersion: The API version determines what properties are available to configure on
the resource. As Azure grows, Microsoft often adds new features or settings to
resources. The API version combined with the resource type determines what you can
configure. The API version is formatted as YYYY-MM-DD.
 Tags: You can tag your resources just like when you create them in the Azure portal.
Tags allow organizing resources and are made up of a key-value pair. For example, you
can have a tag showing the resource’s environment, such as development or production.
 Location: Location is the Azure region to deploy the resource. You typically deploy
resources to the same resource group when you create a deployment (you’ll see a demo
of this later). To automatically set the location to the same location as the resource
group, use the resourceGroup() function and the location property, like this:
“location”: "[resourceGroup().location]"
 DependsOn: Unlike other infrastructure as code languages like Terraform, ARM
templates require that you manually create resource dependencies. Dependencies
determine the order Azure should deploy the resources. For example, if an ARM
template is deploying a virtual network and a virtual machine, the virtual network must
exist first before creating the virtual machine.
 Properties: The properties section contains configuration information for the deployed
resource. For example, virtual networks have properties like their address space and
subnets. Storage accounts have their access tier and minimum allowed TLS version.
Outputs
The outputs section defines values and information returned from the deployment. Outputs are
helpful for data that Azure dynamically generates during the deployment, like a public IP
address.
Here is an example of an output section displaying the connection endpoints for a newly created
storage account. The ARM template generates a storage account name in
the stgAccountName variable.
"outputs": {
"endpoints": {
"type": "object",
"value": "[reference(variables('stgAcctName')).primaryEndpoints]"
}
}
Here is the output of the deployment with the primary endpoints listed when deploying the
ARM template using PowerShell
What is Bicep?
Bicep is a domain-specific language (DSL) that uses declarative syntax to deploy Azure
resources. In a Bicep file, you define the infrastructure you want to deploy to Azure, and then
use that file throughout the development lifecycle to repeatedly deploy your infrastructure.
Your resources are deployed in a consistent manner.
Bicep provides concise syntax, reliable type safety, and support for code reuse. Bicep offers a
first-class authoring experience for your infrastructure-as-code solutions in Azure.
Benefits of Bicep
Bicep provides the following advantages:
 Support for all resource types and API versions: Bicep immediately supports
all preview and GA versions for Azure services. As soon as a resource provider
introduces new resources types and API versions, you can use them in your Bicep
file. You don't have to wait for tools to be updated before using the new services.
 Simple syntax: When compared to the equivalent JSON template, Bicep files are
more concise and easier to read. Bicep requires no previous knowledge of
programming languages. Bicep syntax is declarative and specifies which
resources and resource properties you want to deploy.
The following examples show the difference between a Bicep file and the
equivalent JSON template. Both examples deploy a storage account.
Bicep
param location string = resourceGroup().location
param storageAccountName string =
'toylaunch${uniqueString(resourceGroup().id)}'
resource storageAccount 'Microsoft.Storage/storageAccounts@2021-06-01' = {
name: storageAccountName
location: location
sku: {
name: 'Standard_LRS'
}
kind: 'StorageV2'
properties: {
accessTier: 'Hot'
}
}
 Authoring experience: When you use the Bicep Extension for VS Code to create
your Bicep files, you get a first-class authoring experience. The editor provides
rich type-safety, intellisense, and syntax validation.
 Repeatable results: Repeatedly deploy your infrastructure throughout the
development lifecycle and have confidence your resources are deployed in a
consistent manner. Bicep files are idempotent, which means you can deploy the
same file many times and get the same resource types in the same state. You can
develop one file that represents the desired state, rather than developing lots of
separate files to represent updates.
 Orchestration: You don't have to worry about the complexities of ordering
operations. Resource Manager orchestrates the deployment of interdependent
resources so they're created in the correct order. When possible, Resource
Manager deploys resources in parallel so your deployments finish faster than
serial deployments. You deploy the file through one command, rather than
through multiple imperative commands.
 Modularity: You can break your Bicep code into manageable parts by
using modules. The module deploys a set of related resources. Modules enable
you to reuse code and simplify development. Add the module to a Bicep file
anytime you need to deploy those resources.
 Integration with Azure services: Bicep is integrated with Azure services such
as Azure Policy, template specs, and Blueprints.
 Preview changes: You can use the what-if operation to get a preview of changes
before deploying the Bicep file. With what-if, you see which resources will be
created, updated, or deleted, and any resource properties that will be changed.
The what-if operation checks the current state of your environment and eliminates
the need to manage state.
 No state or state files to manage: All state is stored in Azure. Users can
collaborate and have confidence their updates are handled as expected.
 No cost and open source: Bicep is completely free. You don't have to pay for
premium capabilities. It's also supported by Microsoft support.
Comparing JSON and Bicep for templates
Expressions
To author an expression:
Bicep
func()
JSON
"[func()]"
Parameters
To declare a parameter with a default value:
Bicep
param orgName string = 'Contoso'
JSON
"parameters": {
"orgName": {
"type": "string",
"defaultValue": "Contoso"
}
}
To get a parameter value, use the name you defined:
Bicep
name: orgName
JSON
"name": "[parameters('orgName'))]"
Variables
To declare a variable:
Bicep
var description = 'example value'
JSON
"variables": {
"description": "example value"
},
To get a variable value, use the name you defined:
Bicep
workloadSetting: description
JSON
"workloadSetting": "[variables('description'))]"
Strings
To concatenate strings:
Bicep
name: '${namePrefix}-vm'
JSON
"name": "[concat(parameters('namePrefix'), '-vm')]"
Logical operators
To return the logical AND:
Bicep
isMonday && isNovember
JSON
[and(parameter('isMonday'), parameter('isNovember'))]
To conditionally set a value:
Bicep
isMonday ? 'valueIfTrue' : 'valueIfFalse'
JSON
[if(parameters('isMonday'), 'valueIfTrue', 'valueIfFalse')]
Deployment scope
To set the target scope of the deployment:
Bicep
targetScope = 'subscription'
JSON
"$schema": "https://schema.management.azure.com/schemas/2018-05-
01/subscriptionDeploymentTemplate.json#"
Resources
To declare a resource:
Bicep
resource virtualMachine 'Microsoft.Compute/virtualMachines@2020-06-01' = {
...
}
JSON
"resources": [
{
"type": "Microsoft.Compute/virtualMachines",
"apiVersion": "2020-06-01",
...
}
]
To conditionally deploy a resource:
Bicep
resource virtualMachine 'Microsoft.Compute/virtualMachines@2020-06-01' =
if(deployVM) {
...
}
JSON
"resources": [
{
"condition": "[parameters('deployVM')]",
"type": "Microsoft.Compute/virtualMachines",
"apiVersion": "2020-06-01",
...
}
]
To set a resource property:
Bicep
sku: '2016-Datacenter'
JSON
"sku": "2016-Datacenter",
To get the resource ID of a resource in the template:
Bicep
nic1.id
JSON
[resourceId('Microsoft.Network/networkInterfaces', variables('nic1Name'))]
Loops
To iterate over items in an array or count:
Bicep
[for storageName in storageAccountNames: {
...
}]
JSON
"copy": {
"name": "storagecopy",
"count": "[length(parameters('storageAccountNames'))]"
},
...
Resource dependencies
For Bicep, you can set an explicit dependency but this approach isn't recommended. Instead,
rely on implicit dependencies. An implicit dependency is created when one resource
declaration references the identifier of another resource.
The following shows a network interface with an implicit dependency on a network security
group. It references the network security group with netSecurityGroup.id.
Bicep
resource netSecurityGroup 'Microsoft.Network/networkSecurityGroups@2020-06-01' = {
...
}
resource nic1 'Microsoft.Network/networkInterfaces@2020-06-01' = {
name: nic1Name
location: location
properties: {
...
networkSecurityGroup: {
id: netSecurityGroup.id
}
}
}
If you must set an explicit dependence, use:
Bicep
dependsOn: [ storageAccount ]
JSON
"dependsOn": ["[resourceId('Microsoft.Storage/storageAccounts',
'parameters('storageAccountName'))]"]
Reference resources
To get a property from a resource in the template:
Bicep
storageAccount.properties.primaryEndpoints.blob
JSON
[reference(resourceId('Microsoft.Storage/storageAccounts',
variables('storageAccountName'))).primaryEndpoints.blob]
To get a property from an existing resource that isn't deployed in the template:
Bicep
resource storageAccount 'Microsoft.Storage/storageAccounts@2019-06-01' existing = {
name: storageAccountName
}
// use later in template as often as needed
storageAccount.properties.primaryEndpoints.blob
JSON
// required every time the property is needed
"[reference(resourceId('Microsoft.Storage/storageAccounts/',
parameters('storageAccountName')), '2019-06-01').primaryEndpoints.blob]"
In Bicep, use the nested accessor (::) to get a property on a resource nested within a parent
resource:
Bicep
VNet1::Subnet1.properties.addressPrefix
For JSON, use reference function:
JSON
[reference(resourceId('Microsoft.Network/virtualNetworks/subnets',
variables('subnetName'))).properties.addressPrefix]
Outputs
To output a property from a resource in the template:
Bicep
output hostname string = publicIP.properties.dnsSettings.fqdn
JSON
"outputs": {
"hostname": {
"type": "string",
"value": "[reference(resourceId('Microsoft.Network/publicIPAddresses',
variables('publicIPAddressName'))).dnsSettings.fqdn]"
},
}
To conditionally output a value:
Bicep
output hostname string = condition ? publicIP.properties.dnsSettings.fqdn : ''
JSON
"outputs": {
"hostname": {
"condition": "[variables('condition')]",
"type": "string",
"value": "[reference(resourceId('Microsoft.Network/publicIPAddresses',
variables('publicIPAddressName'))).dnsSettings.fqdn]"
}
}
The Bicep ternary operator is the equivalent to the if function in an ARM template JSON, not
the condition property. The ternary syntax has to evaluate to one value or the other. If the
condition is false in the preceding samples, Bicep outputs a hostname with an empty string, but
JSON outputs no values.
Azure AD Identity Protection
Identity Protection uses the learnings Microsoft has acquired from their position in
organizations with Azure Active Directory, the consumer space with Microsoft Accounts, and
in gaming with Xbox to protect your users. Microsoft analyses trillions of signals per day to
identify and protect customers from threats. Identity Protection allows organizations to
accomplish three key tasks:
 Automate the detection and remediation of identity-based risks.
 Investigate risks using data in the portal.
 Export risk detection data to other tools.
The signals generated by and fed to Identity Protection, can be further fed into tools like
Conditional Access to make access decisions, or fed back to a security information and event
management (SIEM) tool for further investigation.
Why is automation important?
In the blog post Cyber Signals: Defending against cyber threats with the latest research,
insights, and trends dated February 3, 2022 we shared a threat intelligence brief including the
following statistics:
 Analyzed ...24 trillion security signals combined with intelligence we track by
monitoring more than 40 nation-state groups and over 140 threat groups...
 ...From January 2021 through December 2021, we’ve blocked more than 25.6
billion Azure AD brute force authentication attacks...
The sheer scale of signals and attacks requires some level of automation to be able to keep up.
Detect risk
Identity Protection detects risks of many types, including:
 Anonymous IP address use
 Atypical travel
 Malware linked IP address
 Unfamiliar sign-in properties
 Leaked credentials
 Password spray
 and more...
The risk signals can trigger remediation efforts such as requiring: perform multifactor
authentication, reset their password using self-service password reset, or block access until an
administrator takes action.
More detail on these and other risks including how or when they're calculated can be found in
the article, What is risk.
Investigate risk
Administrators can review detections and take manual action on them if needed. There are
three key reports that administrators use for investigations in Identity Protection:
 Risky users
 Risky sign-ins
 Risk detections
More information can be found in the article, How To: Investigate risk.
Risk levels
Identity Protection categorizes risk into tiers: low, medium, and high.
Microsoft doesn't provide specific details about how risk is calculated. Each level of risk brings
higher confidence that the user or sign-in is compromised. For example, something like one
instance of unfamiliar sign-in properties for a user might not be as threatening as leaked
credentials for another user.
Make further use of risk information
Data from Identity Protection can be exported to other tools for archive and further
investigation and correlation. The Microsoft Graph based APIs allow organizations to collect
this data for further processing in a tool such as their SIEM. Information about how to access
the Identity Protection API can be found in the article, Get started with Azure Active Directory
Identity Protection and Microsoft Graph
Information about integrating Identity Protection information with Microsoft Sentinel can be
found in the article, Connect data from Azure AD Identity Protection.
Organizations can choose to store data for longer periods by changing diagnostic settings in
Azure AD. They can choose to send data to a Log Analytics workspace, archive data to a
storage account, stream data to Event Hubs, or send data to a partner solution. Detailed
information about how to do so can be found in the article, How To: Export risk data.
Azure Active Directory Identity Protection is a security tool that detects identity-based risks
like compromised identities, mitigates security threats, provides conditional access policies,
and provides information on security events for conducting investigations.
The three Identity protection policies
(i) Multi-factor authentication registration policy
MFA is a self-remediation method that decreases the risk of a malicious person trying to
impersonate a domain user, thereby reducing the volume of helpdesk calls. Organizations can
opt for Azure multi-factor authentication (MFA) for all or specific users. This is possible in
Azure AD Identity Protection by setting up a Conditional Access policy* that requires
registration during sign-in.
*Conditional Access policy
The IT team of an organization can create a custom policy where the users' location,
applications opened, device used etc. can be pre-set as conditions. The risk score is then
calculated, for every deviant behavior other than the one specified in the conditions.
(ii) User risk remediation policy
Every time a user signs in, Azure AD Identity Protection calculates a risk score based on
previous logon behavior by the user. If the risk score is high, administrators can choose to block
the account, or allow sign in with multi-factor authentication.
(iii) Sign-in risk remediation policy
Every time a user signs in, Azure AD Identity Protection calculates a risk score based on the
probability that the logon was not carried out by the user. If the risk score is high, administrators
can choose to block the account, allow sign in, or allow sign in with multi-factor authentication.
The major capabilities of Identity Protection that helps organizations safeguard their users
identities include:
 Detection and mitigation of identity-based risks without human intervention.
 Conducting risk analysis.
 Export information about the security risks to third-party tools for deeper analysis.
Azure AD Identity Protection utilizes machine learning algorithms to detect and generate
reports and alerts to resolve threats.
Azure AD Connect
Azure AD Connect is a Microsoft tool designed to help organizations with hybrid IT
environments. It is included for free with your Azure subscription. It offers multiple features,
including federation integration and health monitoring. However, today we’ll focus on its best-
known capability: synchronization.
Simply put, organizations use Azure AD Connect to automatically synchronize identity data
between their on-premises Active Directory environment and Azure AD. That way, users can
use the same credentials to access both on-premises applications and cloud services such as
Microsoft 365.
How does it work?
You install the application on a domain-joined server in your on-premises data center. The
default installation option is Express Settings, which is used for the most common scenario:
synchronizing data between a single on-premises forest that has one or more domains and a
single Azure AD tenant. If you have multiple forests or multiple Azure AD tenants, check out
the other topologies that Microsoft supports.
By default, the sync is one way: from on-premises AD to Azure AD. However, you can
configure the writeback function to sync changes from Azure AD back to your on-premises
AD. That way, for instance, if a user changes their password using the Azure AD self-service
password management function, the password will be updated in the on-premises AD.
What data can the tool sync?
Azure AD Connect can synchronize the user accounts, groups and credential hashes in your
on-premises AD. Most attributes of the user accounts, such as the User Principal
Name (UPN) and security identifier (SID), are synchronized.
However, the following objects and attributes are NOT synchronized:
 Any objects and attributes you specifically exclude from the sync
 Sid History attributes for users and groups
 Group Policy objects (GPOs)
 The contents of the Sysvol folder
 Computer objects for computers joined to the on-premises AD environment
 Organization unit (OU) structures
How often is data synchronized?
The synchronization is controlled by a scheduler. By default, a sync task runs every 30
minutes.
Using PowerShell, you can:
 Review the scheduler’s configuration and change some of its parameters.
 Force a sync.
 Stop a running sync task or even temporarily disable the scheduler (for example, so that you
can modify the configuration of Azure AD Connect).
Azure Active Directory Connect
AAD Connect is currently in a public preview, but will be the preferred sync engine once it
goes RTM. This is a guide for installing it in a basic setup. (You will notice the option to branch
in different directions along the way, but not all of these will be covered.)
Provided you have the necessary credentials at hand it is a fairly easy installer to follow. For
this guide I assume a clean install of Windows Server 2012 R2 with the current updates applied.
Azure Files, Blob Storage, and File Sync comparison

More Related Content

Similar to Azure Files, Blob Storage, and File Sync comparison

Azure data store with storage and cosmo db
Azure   data store with storage and cosmo dbAzure   data store with storage and cosmo db
Azure data store with storage and cosmo dbBipeen Sinha
 
Dipping Your Toes: Azure Data Lake for DBAs
Dipping Your Toes: Azure Data Lake for DBAsDipping Your Toes: Azure Data Lake for DBAs
Dipping Your Toes: Azure Data Lake for DBAsBob Pusateri
 
Ahmedabad- Global Azure bootcamp- Azure Storage Services- Global Azure Bootca...
Ahmedabad- Global Azure bootcamp- Azure Storage Services- Global Azure Bootca...Ahmedabad- Global Azure bootcamp- Azure Storage Services- Global Azure Bootca...
Ahmedabad- Global Azure bootcamp- Azure Storage Services- Global Azure Bootca...Jalpesh Vadgama
 
A complete guide to azure storage
A complete guide to azure storageA complete guide to azure storage
A complete guide to azure storageHimanshu Sahu
 
High availability solutions bakostech
High availability solutions bakostechHigh availability solutions bakostech
High availability solutions bakostechViktoria Bakos
 
Amazon S3 Integration
Amazon S3 IntegrationAmazon S3 Integration
Amazon S3 IntegrationFileCatalyst
 
Consolidating File Servers into the Cloud
Consolidating File Servers into the CloudConsolidating File Servers into the Cloud
Consolidating File Servers into the CloudBuurst
 
Storage Made Easy Enterprise File Fabric Brochure
Storage Made Easy Enterprise File Fabric Brochure Storage Made Easy Enterprise File Fabric Brochure
Storage Made Easy Enterprise File Fabric Brochure Hybrid Cloud
 
Cloud storage with AWS
Cloud storage with AWSCloud storage with AWS
Cloud storage with AWSAhmad karawash
 
SMB Market : Backup Solution & Service with Azure Cloud and Fujitsu Storage
SMB Market : Backup Solution & Service with Azure Cloud and Fujitsu StorageSMB Market : Backup Solution & Service with Azure Cloud and Fujitsu Storage
SMB Market : Backup Solution & Service with Azure Cloud and Fujitsu StorageAlessandro Guli
 
May 2018 Azure Need to Know Webinar
May 2018 Azure Need to Know WebinarMay 2018 Azure Need to Know Webinar
May 2018 Azure Need to Know WebinarRobert Crane
 
Microsoft Azure Storage Overview | Microsoft Azure Training | Microsoft Azure...
Microsoft Azure Storage Overview | Microsoft Azure Training | Microsoft Azure...Microsoft Azure Storage Overview | Microsoft Azure Training | Microsoft Azure...
Microsoft Azure Storage Overview | Microsoft Azure Training | Microsoft Azure...Edureka!
 
Cloudera ref arch_azure
Cloudera ref arch_azureCloudera ref arch_azure
Cloudera ref arch_azureraivikash
 
Digitally Transform (And Keep) Your On-Premises File Servers
Digitally Transform (And Keep) Your On-Premises File ServersDigitally Transform (And Keep) Your On-Premises File Servers
Digitally Transform (And Keep) Your On-Premises File ServersAidan Finn
 
Deep Dive on the AWS Storage Gateway - April 2017 AWS Online Tech Talks
Deep Dive on the AWS Storage Gateway - April 2017 AWS Online Tech TalksDeep Dive on the AWS Storage Gateway - April 2017 AWS Online Tech Talks
Deep Dive on the AWS Storage Gateway - April 2017 AWS Online Tech TalksAmazon Web Services
 
UK WVD User Group January - Jim Moyle - BC/DR with WVD
UK WVD User Group January - Jim Moyle - BC/DR with WVDUK WVD User Group January - Jim Moyle - BC/DR with WVD
UK WVD User Group January - Jim Moyle - BC/DR with WVDNeil McLoughlin
 
PowerPoint Presentation.pdf
PowerPoint Presentation.pdfPowerPoint Presentation.pdf
PowerPoint Presentation.pdfmarvellPalenewen
 

Similar to Azure Files, Blob Storage, and File Sync comparison (20)

Azure data store with storage and cosmo db
Azure   data store with storage and cosmo dbAzure   data store with storage and cosmo db
Azure data store with storage and cosmo db
 
CC -Unit3.pptx
CC -Unit3.pptxCC -Unit3.pptx
CC -Unit3.pptx
 
Dipping Your Toes: Azure Data Lake for DBAs
Dipping Your Toes: Azure Data Lake for DBAsDipping Your Toes: Azure Data Lake for DBAs
Dipping Your Toes: Azure Data Lake for DBAs
 
Ahmedabad- Global Azure bootcamp- Azure Storage Services- Global Azure Bootca...
Ahmedabad- Global Azure bootcamp- Azure Storage Services- Global Azure Bootca...Ahmedabad- Global Azure bootcamp- Azure Storage Services- Global Azure Bootca...
Ahmedabad- Global Azure bootcamp- Azure Storage Services- Global Azure Bootca...
 
A complete guide to azure storage
A complete guide to azure storageA complete guide to azure storage
A complete guide to azure storage
 
High availability solutions bakostech
High availability solutions bakostechHigh availability solutions bakostech
High availability solutions bakostech
 
Amazon S3 Integration
Amazon S3 IntegrationAmazon S3 Integration
Amazon S3 Integration
 
Consolidating File Servers into the Cloud
Consolidating File Servers into the CloudConsolidating File Servers into the Cloud
Consolidating File Servers into the Cloud
 
04 Azure IAAS 101
04 Azure IAAS 10104 Azure IAAS 101
04 Azure IAAS 101
 
Storage Made Easy Enterprise File Fabric Brochure
Storage Made Easy Enterprise File Fabric Brochure Storage Made Easy Enterprise File Fabric Brochure
Storage Made Easy Enterprise File Fabric Brochure
 
Cloud storage with AWS
Cloud storage with AWSCloud storage with AWS
Cloud storage with AWS
 
SMB Market : Backup Solution & Service with Azure Cloud and Fujitsu Storage
SMB Market : Backup Solution & Service with Azure Cloud and Fujitsu StorageSMB Market : Backup Solution & Service with Azure Cloud and Fujitsu Storage
SMB Market : Backup Solution & Service with Azure Cloud and Fujitsu Storage
 
May 2018 Azure Need to Know Webinar
May 2018 Azure Need to Know WebinarMay 2018 Azure Need to Know Webinar
May 2018 Azure Need to Know Webinar
 
Microsoft Azure Storage Overview | Microsoft Azure Training | Microsoft Azure...
Microsoft Azure Storage Overview | Microsoft Azure Training | Microsoft Azure...Microsoft Azure Storage Overview | Microsoft Azure Training | Microsoft Azure...
Microsoft Azure Storage Overview | Microsoft Azure Training | Microsoft Azure...
 
Cloudera ref arch_azure
Cloudera ref arch_azureCloudera ref arch_azure
Cloudera ref arch_azure
 
Digitally Transform (And Keep) Your On-Premises File Servers
Digitally Transform (And Keep) Your On-Premises File ServersDigitally Transform (And Keep) Your On-Premises File Servers
Digitally Transform (And Keep) Your On-Premises File Servers
 
Deep Dive on the AWS Storage Gateway - April 2017 AWS Online Tech Talks
Deep Dive on the AWS Storage Gateway - April 2017 AWS Online Tech TalksDeep Dive on the AWS Storage Gateway - April 2017 AWS Online Tech Talks
Deep Dive on the AWS Storage Gateway - April 2017 AWS Online Tech Talks
 
Microsoft Azure
Microsoft AzureMicrosoft Azure
Microsoft Azure
 
UK WVD User Group January - Jim Moyle - BC/DR with WVD
UK WVD User Group January - Jim Moyle - BC/DR with WVDUK WVD User Group January - Jim Moyle - BC/DR with WVD
UK WVD User Group January - Jim Moyle - BC/DR with WVD
 
PowerPoint Presentation.pdf
PowerPoint Presentation.pdfPowerPoint Presentation.pdf
PowerPoint Presentation.pdf
 

More from Revathiparamanathan (19)

UNIT 1 NOTES.docx
UNIT 1 NOTES.docxUNIT 1 NOTES.docx
UNIT 1 NOTES.docx
 
Unit 3,4.docx
Unit 3,4.docxUnit 3,4.docx
Unit 3,4.docx
 
UNIT II.docx
UNIT II.docxUNIT II.docx
UNIT II.docx
 
UNIT V.docx
UNIT V.docxUNIT V.docx
UNIT V.docx
 
COMPILER DESIGN.docx
COMPILER DESIGN.docxCOMPILER DESIGN.docx
COMPILER DESIGN.docx
 
UNIT -IV.docx
UNIT -IV.docxUNIT -IV.docx
UNIT -IV.docx
 
UNIT - II.docx
UNIT - II.docxUNIT - II.docx
UNIT - II.docx
 
UNIT -V.docx
UNIT -V.docxUNIT -V.docx
UNIT -V.docx
 
UNIT - I.docx
UNIT - I.docxUNIT - I.docx
UNIT - I.docx
 
CC -Unit4.pptx
CC -Unit4.pptxCC -Unit4.pptx
CC -Unit4.pptx
 
CC.pptx
CC.pptxCC.pptx
CC.pptx
 
Unit 4 notes.pdf
Unit 4 notes.pdfUnit 4 notes.pdf
Unit 4 notes.pdf
 
Unit 3 notes.pdf
Unit 3 notes.pdfUnit 3 notes.pdf
Unit 3 notes.pdf
 
Unit 1 notes.pdf
Unit 1 notes.pdfUnit 1 notes.pdf
Unit 1 notes.pdf
 
Unit 2 notes.pdf
Unit 2 notes.pdfUnit 2 notes.pdf
Unit 2 notes.pdf
 
Unit 5 notes.pdf
Unit 5 notes.pdfUnit 5 notes.pdf
Unit 5 notes.pdf
 
CC.pptx
CC.pptxCC.pptx
CC.pptx
 
Unit-4 Day1.pptx
Unit-4 Day1.pptxUnit-4 Day1.pptx
Unit-4 Day1.pptx
 
Scala Introduction.pptx
Scala Introduction.pptxScala Introduction.pptx
Scala Introduction.pptx
 

Recently uploaded

HARDNESS, FRACTURE TOUGHNESS AND STRENGTH OF CERAMICS
HARDNESS, FRACTURE TOUGHNESS AND STRENGTH OF CERAMICSHARDNESS, FRACTURE TOUGHNESS AND STRENGTH OF CERAMICS
HARDNESS, FRACTURE TOUGHNESS AND STRENGTH OF CERAMICSRajkumarAkumalla
 
Software Development Life Cycle By Team Orange (Dept. of Pharmacy)
Software Development Life Cycle By  Team Orange (Dept. of Pharmacy)Software Development Life Cycle By  Team Orange (Dept. of Pharmacy)
Software Development Life Cycle By Team Orange (Dept. of Pharmacy)Suman Mia
 
High Profile Call Girls Nagpur Isha Call 7001035870 Meet With Nagpur Escorts
High Profile Call Girls Nagpur Isha Call 7001035870 Meet With Nagpur EscortsHigh Profile Call Girls Nagpur Isha Call 7001035870 Meet With Nagpur Escorts
High Profile Call Girls Nagpur Isha Call 7001035870 Meet With Nagpur Escortsranjana rawat
 
the ladakh protest in leh ladakh 2024 sonam wangchuk.pptx
the ladakh protest in leh ladakh 2024 sonam wangchuk.pptxthe ladakh protest in leh ladakh 2024 sonam wangchuk.pptx
the ladakh protest in leh ladakh 2024 sonam wangchuk.pptxhumanexperienceaaa
 
Introduction to IEEE STANDARDS and its different types.pptx
Introduction to IEEE STANDARDS and its different types.pptxIntroduction to IEEE STANDARDS and its different types.pptx
Introduction to IEEE STANDARDS and its different types.pptxupamatechverse
 
Model Call Girl in Narela Delhi reach out to us at 🔝8264348440🔝
Model Call Girl in Narela Delhi reach out to us at 🔝8264348440🔝Model Call Girl in Narela Delhi reach out to us at 🔝8264348440🔝
Model Call Girl in Narela Delhi reach out to us at 🔝8264348440🔝soniya singh
 
VIP Call Girls Service Hitech City Hyderabad Call +91-8250192130
VIP Call Girls Service Hitech City Hyderabad Call +91-8250192130VIP Call Girls Service Hitech City Hyderabad Call +91-8250192130
VIP Call Girls Service Hitech City Hyderabad Call +91-8250192130Suhani Kapoor
 
OSVC_Meta-Data based Simulation Automation to overcome Verification Challenge...
OSVC_Meta-Data based Simulation Automation to overcome Verification Challenge...OSVC_Meta-Data based Simulation Automation to overcome Verification Challenge...
OSVC_Meta-Data based Simulation Automation to overcome Verification Challenge...Soham Mondal
 
Introduction and different types of Ethernet.pptx
Introduction and different types of Ethernet.pptxIntroduction and different types of Ethernet.pptx
Introduction and different types of Ethernet.pptxupamatechverse
 
APPLICATIONS-AC/DC DRIVES-OPERATING CHARACTERISTICS
APPLICATIONS-AC/DC DRIVES-OPERATING CHARACTERISTICSAPPLICATIONS-AC/DC DRIVES-OPERATING CHARACTERISTICS
APPLICATIONS-AC/DC DRIVES-OPERATING CHARACTERISTICSKurinjimalarL3
 
Decoding Kotlin - Your guide to solving the mysterious in Kotlin.pptx
Decoding Kotlin - Your guide to solving the mysterious in Kotlin.pptxDecoding Kotlin - Your guide to solving the mysterious in Kotlin.pptx
Decoding Kotlin - Your guide to solving the mysterious in Kotlin.pptxJoão Esperancinha
 
chaitra-1.pptx fake news detection using machine learning
chaitra-1.pptx  fake news detection using machine learningchaitra-1.pptx  fake news detection using machine learning
chaitra-1.pptx fake news detection using machine learningmisbanausheenparvam
 
College Call Girls Nashik Nehal 7001305949 Independent Escort Service Nashik
College Call Girls Nashik Nehal 7001305949 Independent Escort Service NashikCollege Call Girls Nashik Nehal 7001305949 Independent Escort Service Nashik
College Call Girls Nashik Nehal 7001305949 Independent Escort Service NashikCall Girls in Nagpur High Profile
 
Sheet Pile Wall Design and Construction: A Practical Guide for Civil Engineer...
Sheet Pile Wall Design and Construction: A Practical Guide for Civil Engineer...Sheet Pile Wall Design and Construction: A Practical Guide for Civil Engineer...
Sheet Pile Wall Design and Construction: A Practical Guide for Civil Engineer...Dr.Costas Sachpazis
 
VIP Call Girls Service Kondapur Hyderabad Call +91-8250192130
VIP Call Girls Service Kondapur Hyderabad Call +91-8250192130VIP Call Girls Service Kondapur Hyderabad Call +91-8250192130
VIP Call Girls Service Kondapur Hyderabad Call +91-8250192130Suhani Kapoor
 
Processing & Properties of Floor and Wall Tiles.pptx
Processing & Properties of Floor and Wall Tiles.pptxProcessing & Properties of Floor and Wall Tiles.pptx
Processing & Properties of Floor and Wall Tiles.pptxpranjaldaimarysona
 
Coefficient of Thermal Expansion and their Importance.pptx
Coefficient of Thermal Expansion and their Importance.pptxCoefficient of Thermal Expansion and their Importance.pptx
Coefficient of Thermal Expansion and their Importance.pptxAsutosh Ranjan
 

Recently uploaded (20)

HARDNESS, FRACTURE TOUGHNESS AND STRENGTH OF CERAMICS
HARDNESS, FRACTURE TOUGHNESS AND STRENGTH OF CERAMICSHARDNESS, FRACTURE TOUGHNESS AND STRENGTH OF CERAMICS
HARDNESS, FRACTURE TOUGHNESS AND STRENGTH OF CERAMICS
 
Software Development Life Cycle By Team Orange (Dept. of Pharmacy)
Software Development Life Cycle By  Team Orange (Dept. of Pharmacy)Software Development Life Cycle By  Team Orange (Dept. of Pharmacy)
Software Development Life Cycle By Team Orange (Dept. of Pharmacy)
 
Roadmap to Membership of RICS - Pathways and Routes
Roadmap to Membership of RICS - Pathways and RoutesRoadmap to Membership of RICS - Pathways and Routes
Roadmap to Membership of RICS - Pathways and Routes
 
High Profile Call Girls Nagpur Isha Call 7001035870 Meet With Nagpur Escorts
High Profile Call Girls Nagpur Isha Call 7001035870 Meet With Nagpur EscortsHigh Profile Call Girls Nagpur Isha Call 7001035870 Meet With Nagpur Escorts
High Profile Call Girls Nagpur Isha Call 7001035870 Meet With Nagpur Escorts
 
the ladakh protest in leh ladakh 2024 sonam wangchuk.pptx
the ladakh protest in leh ladakh 2024 sonam wangchuk.pptxthe ladakh protest in leh ladakh 2024 sonam wangchuk.pptx
the ladakh protest in leh ladakh 2024 sonam wangchuk.pptx
 
Introduction to IEEE STANDARDS and its different types.pptx
Introduction to IEEE STANDARDS and its different types.pptxIntroduction to IEEE STANDARDS and its different types.pptx
Introduction to IEEE STANDARDS and its different types.pptx
 
Model Call Girl in Narela Delhi reach out to us at 🔝8264348440🔝
Model Call Girl in Narela Delhi reach out to us at 🔝8264348440🔝Model Call Girl in Narela Delhi reach out to us at 🔝8264348440🔝
Model Call Girl in Narela Delhi reach out to us at 🔝8264348440🔝
 
VIP Call Girls Service Hitech City Hyderabad Call +91-8250192130
VIP Call Girls Service Hitech City Hyderabad Call +91-8250192130VIP Call Girls Service Hitech City Hyderabad Call +91-8250192130
VIP Call Girls Service Hitech City Hyderabad Call +91-8250192130
 
OSVC_Meta-Data based Simulation Automation to overcome Verification Challenge...
OSVC_Meta-Data based Simulation Automation to overcome Verification Challenge...OSVC_Meta-Data based Simulation Automation to overcome Verification Challenge...
OSVC_Meta-Data based Simulation Automation to overcome Verification Challenge...
 
9953056974 Call Girls In South Ex, Escorts (Delhi) NCR.pdf
9953056974 Call Girls In South Ex, Escorts (Delhi) NCR.pdf9953056974 Call Girls In South Ex, Escorts (Delhi) NCR.pdf
9953056974 Call Girls In South Ex, Escorts (Delhi) NCR.pdf
 
Introduction and different types of Ethernet.pptx
Introduction and different types of Ethernet.pptxIntroduction and different types of Ethernet.pptx
Introduction and different types of Ethernet.pptx
 
APPLICATIONS-AC/DC DRIVES-OPERATING CHARACTERISTICS
APPLICATIONS-AC/DC DRIVES-OPERATING CHARACTERISTICSAPPLICATIONS-AC/DC DRIVES-OPERATING CHARACTERISTICS
APPLICATIONS-AC/DC DRIVES-OPERATING CHARACTERISTICS
 
Decoding Kotlin - Your guide to solving the mysterious in Kotlin.pptx
Decoding Kotlin - Your guide to solving the mysterious in Kotlin.pptxDecoding Kotlin - Your guide to solving the mysterious in Kotlin.pptx
Decoding Kotlin - Your guide to solving the mysterious in Kotlin.pptx
 
chaitra-1.pptx fake news detection using machine learning
chaitra-1.pptx  fake news detection using machine learningchaitra-1.pptx  fake news detection using machine learning
chaitra-1.pptx fake news detection using machine learning
 
College Call Girls Nashik Nehal 7001305949 Independent Escort Service Nashik
College Call Girls Nashik Nehal 7001305949 Independent Escort Service NashikCollege Call Girls Nashik Nehal 7001305949 Independent Escort Service Nashik
College Call Girls Nashik Nehal 7001305949 Independent Escort Service Nashik
 
Sheet Pile Wall Design and Construction: A Practical Guide for Civil Engineer...
Sheet Pile Wall Design and Construction: A Practical Guide for Civil Engineer...Sheet Pile Wall Design and Construction: A Practical Guide for Civil Engineer...
Sheet Pile Wall Design and Construction: A Practical Guide for Civil Engineer...
 
VIP Call Girls Service Kondapur Hyderabad Call +91-8250192130
VIP Call Girls Service Kondapur Hyderabad Call +91-8250192130VIP Call Girls Service Kondapur Hyderabad Call +91-8250192130
VIP Call Girls Service Kondapur Hyderabad Call +91-8250192130
 
Processing & Properties of Floor and Wall Tiles.pptx
Processing & Properties of Floor and Wall Tiles.pptxProcessing & Properties of Floor and Wall Tiles.pptx
Processing & Properties of Floor and Wall Tiles.pptx
 
Coefficient of Thermal Expansion and their Importance.pptx
Coefficient of Thermal Expansion and their Importance.pptxCoefficient of Thermal Expansion and their Importance.pptx
Coefficient of Thermal Expansion and their Importance.pptx
 
DJARUM4D - SLOT GACOR ONLINE | SLOT DEMO ONLINE
DJARUM4D - SLOT GACOR ONLINE | SLOT DEMO ONLINEDJARUM4D - SLOT GACOR ONLINE | SLOT DEMO ONLINE
DJARUM4D - SLOT GACOR ONLINE | SLOT DEMO ONLINE
 

Azure Files, Blob Storage, and File Sync comparison

  • 1. UNIT-III AZURE ARCHITECT TECHNOLOGIES Azure Files -Azure Blob Storage-Azure Resource Manager template (JSON and Bicep)-Virtual Networking- Azure AD Identity Protection- Azure AD Connect Azure Files Azure files are fully managed File shares in the Cloud. When you have a local network, you can attach a NAS box so that all users in a network can access the files. Inside a cloud service, unfortunately, this is absent. This need is fulfilled by Azure File Service. Key features of Azure Files: 1. Replace On Premise file servers or supplement with Azure File sync 2. Lift and shift applications. If you are moving any application to the Cloud, the using Azure Files, you can move both Application and Data to the Cloud. Or you can implement Hybrid scenario where application runs On Premise and Data resides in the Cloud. If you have an app that works with your on-premise file server, moving it to Azure means rewriting it, or setting up a file server in the cloud. Azure Files is perfect for that. 3. Shared Application settings. If you are running a Distributed application at multiple locations, and there is a need for these multiple applications to access common application settings, these can be on Azure Files 4. A Cloud Application can write logs, metrics, crash dumps on Azure files. Then using Azure File Sync these will be replicated on local Server periodically.
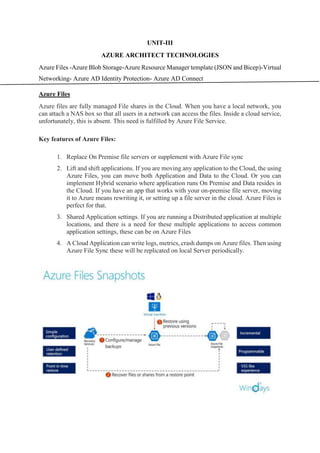
  • 2. Azure File Storage Pros and Cons The primary benefit of Azure Files is its familiarity. Most users are already comfortable working with traditional file systems and can easily transition to Azure Files. Below are some additional pros of using Azure Files:  Fully managed service—management and maintenance tasks are handled for you, eliminating overhead.  Shared access—since it is based on SMB it is broadly compatible with most on- premises applications and services. This means you can easily migrate applications and share across distributed teams.  Redundancy—data stored in Azure Files is 99.999999999% durable and is automatically replicated to prevent loss due to resource failure.  Easy automation—Azure Files is compatible with most common automation tools and can be managed through a variety of interfaces, including PowerShell, Azure CLI, Azure Storage Explorer, and Azure Portal.  Easy APIs—includes a built-in REST API and client libraries for simplified interfacing and integration with other services. While Azure Files can provide numerous benefits, it also has limitations that you should be aware of. These limitations are most relevant for larger enterprises or those managing large volumes of data. Below are some important limitations of Azure Files:  Security and access—to access files you must share your account key with users. This means users have access to your entire storage account. Additionally, files can be accessed externally via a UNC path and your key. You cannot block this access.  Backup—Azure Files does not include a built-in mechanism for snapshots or automatic backups. To ensure that data is recoverable in case of accidental deletion or user error, you need to perform backups manually.  Performance—throughput is limited to 60MB/s on the standard tier. The premium tier offers higher limits but may cost significantly more.
  • 3.  Size limitations—you can only store up to 5TB per standard storage account and up to 100TB spread across 20 accounts. The premium tier can scale up to 100TB per account but may cost significantly more.  File system limitations—individual files are limited to 1TB. You can store up to 200k system objects per account and file names can be up to 255 characters. These limitations primarily present issues for legacy migrations. Azure File Sync Azure File Sync enables centralizing your organization's file shares in Azure Files, while keeping the flexibility, performance, and compatibility of a Windows file server. While some users may opt to keep a full copy of their data locally, Azure File Sync can turn Windows Server into a quick cache of your Azure file shares. You can use any protocol available on Windows Server to access your data locally, including SMB, NFS, and FTPS. You can have as many caches as you need across the world. Common reasons customers use Azure File Sync:  Centralize file share backups in Azure to optimize cost and manageability  Free up on-premises storage capacity to avoid buying more storage  Maintain on-premises file share performance for frequently used files  Migrate on-premises file shares to Azure Files  Provide low latency, multi-site access for file shares
  • 4. Features and Benefits 1. Multiple File Servers at multiple locations. Sync all to single Azure File Storage. Commonly used files are cached on local server. If local server goes down, quickly install another Server or VM and sync Azure files to it. 2. The older, rarely accessed files will move to Azure thus freeing your local file Server. 3. Sync Group helps to manage locations that should be kept in sync with each other. Every Sync Group has one common Cloud Storage. So, a Sync Group will have one Azure End point and multiple Server end points. There is a 2-way sync so that changes to Cloud are replicated on local server within 12 to 24 hours. But changes on a local server are replicated to all end points within 5 minutes. 4. An agent is installed on the Server end point. There is no need to change or relocate data on a different volume. Thus it is non-disruptive type of agent. 5. Every Server end point creates an Azure file share in the storage account. End user experience is unchanged 6. When a particular local file is getting synced , then it is locked. But this is only for a few seconds. 7. A Disaster Recovery Solution for File Server. If local File Server is destroyed, set up a VM or physical server , join to the previous sync group and you get “rapid restore”. 8. When a file is renamed or moved, the meta data is preserved. 9. Its different from One Drive . One Drive is for Personal Document management and is not a general purpose File Server. One Drive is primarily meant for collaborating on Office files. Not optimized for very large files , CAD drawings, multimedia development projects. 10. Azure File Sync works with On Premise AD and not Azure AD. Use cases for Azure File Sync: 1. Company with multiple offices having a need to share files with all offices. 2. Branch Office backup of files. In real world, the files of branch offices rarely get backed up. 3. Disaster Recovery Solution in case File Server goes down. 4. New Branch Office setup. You can setup new Server and connect to same Azure Storage. 5. Move old data automatically to Azure. This is Cloud Tiering. The non-used data will move to Azure. The files will have greyed icons with an offline O file attribute to tell user that this file is only on Azure.
  • 5. Azure blob storage Azure Blob storage is perhaps one of the most versatile cloud storage solutions out there. If you wish to make a comparison to other cloud storage solutions, then Blob Storage is like the popular S3 storage offering from Amazon Web Services. Azure Blob storage is a sub-service or sub-resource underneath Azure storage accounts. Blob storage is the only object-based storage solution (data storage architecture for handling large amounts of unstructured data) among the storage sub-services found inside our storage accounts. Data stored inside Azure blobs could easily be accessed over HTTP and REST APIs making it an ideal storage solution for content like image and video files that form the basis for content streaming services like what you see with Netflix and some of these streaming services. We can also store things like text files, log files, and even virtual hard disk files making it a versatile storage solution. We can think of an Azure blob as a bucket, and we can throw anything we need inside this bucket. Azure Blob Storage Architecture  Azure blob storage account: This is our blob service inside of our storage account, and this is that sub-service that gives us that object-based storage solution.  Blob containers: these are the actual instances of the blob service that we create, where we can store our blobs. We can think of these containers as our buckets or our storage bins, where we can drop off our actual blobs.  Blob: They are the data that we're storing inside these containers like the video files, the text files, the log files, and the virtual hard disks. Types of Azure Blob Storage 1. Block blobs  Block Blobs are optimized for sequential accessing of the data  These are going to store things like images or videos that are best suited for streaming.
  • 6.  The process for uploading the file is to break the file into smaller blocks and then upload the blocks concurrently.  Once the blocks have been uploaded to the storage account, they are committed into a single file.  That “commitment” is basically the creation of the metadata surrounding the ordering and location of the blocks that belong to this particular file. 2. Append blobs  Block blobs are used for streaming and storing; append blobs fulfil the same task with the addition that they are optimized for append operations.  Updating an append blob can only be done by adding a new block to the end.  An append blob's field of application consists of logging, in which data has to be written to the end of the blob.  These are going to best for append operations like uploading log files. 3. Page blobs  Page Blobs are optimized so that the data in the blob can be accessed randomly.  This is in contrast to reading and writing data sequentially from start to finish (as is found in Block Blobs)  There are some limitations on the size of a Page Blob. They can be up to 1 TB in size, divided up into 512-bytes on each page.  This category of blobs is going to be best for random access memory for read/write operations for virtual machine hard disks.  Odds are pretty good that if you use some of the more advanced Windows Azure features, you’ll use Page Blobs (that use is indirect)  For example, the persisted disks that are part of Windows Azure Virtual Machines use Page Blobs to store both the data and operating system drives. Blob access control/Container access levels Once we start storing a lot of blobs inside of the Blob storage service, at some point we are going to want to implement some level of access control for the actual resources that we have in the blob service. This is where container access levels come into the picture. We can use container access levels to determine what kind of access we have to our resources inside of the blob service. By default, public access to blobs is granted at the storage account level. If we disable public access to blobs at the storage account level, then in that case regardless of what we have going on inside our container access levels, we will not be able to access any of our blob because at the service level of the storage account, it is disabled. But when it is enabled by default, we can have public access to those blobs, and we can granularly control the access to the blobs by using container access levels. We have 3 container access levels:  Private: In this case, we do not provide anonymous access to any of our blob resources.
  • 7.  Blob: This provides anonymous access to all the blobs inside of a container, but not the container data itself.  Container access level: This is the most open access level category and provides anonymous access to a container and all the blobs it contains within it. Configuring Azure Blob Storage Login to the Azure portal and in search bar type in storage accounts. In the storage accounts page, we’ll select the storage account we created earlier. On the storage account page, under the data storage section on the left, we have a tab called Containers. Click on this tab as this is where we will configure blob storage. Here we see a container named logs already created. This is a system container and is usually created when we configure something like a static website. We can create static websites inside Azure blob using static scripts. On this page click on the container button to create a new container.
  • 8. This will bring up a page where we could specify our container name and container access level. We’ll simply name our container demo, keep our access level as private and click on create container. Once the container has been successfully created it would appear in the containers page as shown below. Click on the container name to navigate to the container management page. As expected, we find the container to be empty at the moment. Advertisement
  • 9. We’ll now add a blob (image file) to this container. For doing so click on the upload button. In the upload page, we’ll just browse and select an image file to upload.
  • 10. As you can see from the screen, we have several options and we’ll discus them one by one now.  Authentication type: This determines the authentication method used to access the blob being uploaded. This could be either a storage account access key or Azure AD authentication.  Blob type: This could be block blob, append blob, or page blob. Since the blob being uploaded is a image, we’ll select block bob.  Block size: This determines the block size of the files being uploaded.  Access tier: The access tier could be hot, cold or archive depending on the frequency of data access hot being the costliest and archive being the cheapest. The hot access tier has the lowest latency during data writing and retrieval.  Upload to folder: We could provide a folder name here to organize the blob in that folder. But please note that this is not an actual folder in the file system hierarchy. Object storage comprises a flat file hierarchy. The folder name in
  • 11. this case will be prefixed with the file name and give the users the appearance of a file system hierarchy.  Blob index tags: These are key-value pairs helpful in blob identification. Once we click upload, the folder (in case we gave a folder name) should appear on the container page as soon as the file gets uploaded. Click on the folder name to view its contents. We find that the file has been uploaded successfully. The uploaded file will be accessible via HTTP/s via a unique URL. To view the URL for the file, click on the file name to display its properties. Advertisement
  • 12. Let’s copy the URL contents and open the URL in a browser. If you followed the steps described thus far precisely then you should NOT be able to view the file and instead see the below message in the browser window. This is because we set the container access level to private and as a consequence of this, the file will not be publicly accessible anonymously. To view the file contents directly in a browser, we’ll need to change the container access level.
  • 13. As you can see it’s currently set to private. Let’s change this to blob by selecting blob and then clicking ok. You will be shown a warning, but we can ignore that since this isn’t a production environment.
  • 14. Azure Resource Manager template (JSON and Bicep) ARM stands for Azure Resource Manager, which is Microsoft’s deployment and management service for Azure. You use the ARM management layer for creating, updating, and deleting Azure resources. In this article, you will learn more about ARM templates, the core components of writing a template, and how to deploy that template using PowerShell. ARM templates are a form of infrastructure as code, a concept where you define the infrastructure you need to be deployed. You no longer need to click around the portal creating virtual machines or writing scripts to deploy a storage account. Instead, the template defines the resources, and the Azure ARM management layer is responsible for creating the infrastructure. This concept is called declarative syntax. Declarative syntax is where you state what resources you want to create without writing the sequence of commands to make it. For example, you can easily create a script using the Azure CLI or Azure PowerShell to create a virtual machine. However, you have to include lots of logic and error checking to handle any scenario. Creating a declarative template defines the environment’s end state, and Azure takes the template as input and creates the environment for you. The ARM management layer will create a new resource if it doesn’t exist or modify an existing resource if the template is different. Microsoft has introduced a new infrastructure as code language called Azure Bicep. Read more about getting started with Bicep in the article Azure Bicep: Getting Started and How-To Guide. Benefits of Using ARM Templates Using ARM templates in managing your Azure environment has many benefits. As already mentioned, using declarative syntax removes the requirement of writing complicated deployment scripts to handle multiple deployment scenarios. ARM templates also provide repeatable results and are idempotent, meaning you can write and deploy the same template many times to get the same result. You can take the same template you used for the development infrastructure and use it to deploy the production environment. Using the same template ensures the resources and settings are the same. The Azure Resource Manager also takes care of the order of operations for deployment. As a result, ARM deploys dependent resources in the correct order and, when possible, deploys in parallel for faster deployments. You can also extend the templates with deployments script written in PowerShell or Bash for a complete end-to-end environment setup.
  • 15. Why choose ARM templates? If you're trying to decide between using ARM templates and one of the other infrastructure as code services, consider the following advantages of using templates:  Declarative syntax: ARM templates allow you to create and deploy an entire Azure infrastructure declaratively. For example, you can deploy not only virtual machines, but also the network infrastructure, storage systems, and any other resources you may need.  Repeatable results: Repeatedly deploy your infrastructure throughout the development lifecycle and have confidence your resources are deployed in a consistent manner. Templates are idempotent, which means you can deploy the same template many times and get the same resource types in the same state. You can develop one template that represents the desired state, rather than developing lots of separate templates to represent updates.  Orchestration: You don't have to worry about the complexities of ordering operations. Resource Manager orchestrates the deployment of interdependent resources so they're created in the correct order. When possible, Resource Manager deploys resources in parallel so your deployments finish faster than serial deployments. You deploy the template through one command, rather than through multiple imperative commands.  Modular files: You can break your templates into smaller, reusable components and link them together at deployment time. You can also nest one template inside another template.  Create any Azure resource: You can immediately use new Azure services and features in templates. As soon as a resource provider introduces new resources, you can deploy those resources through templates. You don't have to wait for tools or modules to be updated before using the new services.  Extensibility: With deployment scripts, you can add PowerShell or Bash scripts to your templates. The deployment scripts extend your ability to set up resources during deployment. A script can be included in the template, or stored in an external source and referenced in the template. Deployment scripts give you the ability to complete your end-to-end environment setup in a single ARM template.  Testing: You can make sure your template follows recommended guidelines by testing it with the ARM template tool kit (arm-ttk). This test kit is a PowerShell script that you can download from GitHub. The tool kit makes it easier for you to develop expertise using the template language.
  • 16.  Preview changes: You can use the what-if operation to get a preview of changes before deploying the template. With what-if, you see which resources will be created, updated, or deleted, and any resource properties that will be changed. The what-if operation checks the current state of your environment and eliminates the need to manage state.  Built-in validation: Your template is deployed only after passing validation. Resource Manager checks the template before starting the deployment to make sure the deployment will succeed. Your deployment is less likely to stop in a half- finished state.  Tracked deployments: In the Azure portal, you can review the deployment history and get information about the template deployment. You can see the template that was deployed, the parameter values passed in, and any output values. Other infrastructure as code services aren't tracked through the portal.  Policy as code: Azure Policy is a policy as code framework to automate governance. If you're using Azure policies, policy remediation is done on non- compliant resources when deployed through templates.  Deployment Blueprints: You can take advantage of Blueprints provided by Microsoft to meet regulatory and compliance standards. These blueprints include pre-built templates for various architectures.  CI/CD integration: You can integrate templates into your continuous integration and continuous deployment (CI/CD) tools, which can automate your release pipelines for fast and reliable application and infrastructure updates. By using Azure DevOps and Resource Manager template task, you can use Azure Pipelines to continuously build and deploy ARM template projects. To learn more, see VS project with pipelines and Tutorial: Continuous integration of Azure Resource Manager templates with Azure Pipelines.  Exportable code: You can get a template for an existing resource group by either exporting the current state of the resource group, or viewing the template used for a particular deployment. Viewing the exported template is a helpful way to learn about the template syntax.  Authoring tools: You can author templates with Visual Studio Code and the template tool extension. You get intellisense, syntax highlighting, in-line help, and many other language functions. In addition to Visual Studio Code, you can also use Visual Studio.
  • 17. ARM Template Basics Now that you have an overview of ARM templates, it is time for you to learn the basics of writing your first template. Templates use a JavaScript Object Notation (JSON) syntax that also includes advanced capabilities. Here is a blank ARM template: { "$schema":"https://schema.management.azure.com/schemas/2019-04- 01/deploymentTemplate.json#", "contentVersion": "1.0.0.0", "parameters": {}, "functions": [], "variables": {}, "resources": [], "outputs": {} } Parameters Parameters allow you to pass different values to the ARM template for use during the deployment. Some common examples include names of resources or which Azure region to host them. Parameters enable your templates to be more dynamic and used across different environments.
  • 18. At a minimum, parameters require a name and a type. Parameter types include strings, arrays, objects, integers, booleans, or a secure string, like a password. Optionally, the parameter also contains a description of how to use the parameter. You can include default values, so you don’t need to provide one at runtime, and you can configure a set of allowed values. Allowed values limit what a person can use for a parameter value. This configuration is helpful if you want to limit what SKUs or locations a person can deploy resources. The following example showcases different parameter implementations. The VMName parameter allows any string to be used for the virtual machine name. The VMAdmin parameter also allows any value and has a default value, so the person using the template doesn’t always have to provide it. The VMAdminPassword is a secure string, meaning Azure will not store its value in the deployment history. Finally, VMSize is also a string but only allows specific SKUs for the virtual machine. "parameters": { "VMName": { "type": "string", "metadata": { "description": "The name of the virtual machine." } }, "VMAdmin": { "type": "string", "metadata": { "description": "Name of the local virtual machine administrator account." }, "defaultValue": "local_admin" },
  • 19. "VMAdminPassword": { "type": "securestring", "metadata": { "description": "Password for the local virtual machine administrator account." } }, "VMSize": { "type": "string", "metadata": { "description": "Virtual Machine SKU Size" }, "allowedValues": [ "Standard_D2_v4", "Standard_D4_v4", "Standard_D8_v4", "Standard_D16_v4" ] } } To provide parameter values, you can pass values inline when creating a resource deployment. You’ll see an example of this later in the article. Another option is creating a parameters file that contains the values. The parameters file also uses JSON syntax. Parameters files also have advanced capabilities such as connecting to Azure Key Vault to extract sensitive information, such as passwords, SSH keys, or certificates. While not required, ARM template parameter files typically follow a naming convention of including parameters in the template name. For example, if you had an ARM template
  • 20. called virtualMachine.json, the parameter filename would be virtualMachine.parameters.json. If you are reusing a template to deploy different environments, include the environment name in the parameters file. Example file names include virtualMachine.parameters- dev.json or virtualMachine.parameters-prod.json. Here is an example file named virtualMachine.parameters.json with values for the parameters defined earlier in this section. Note that the VMAdmin parameter is technically optional since it has a default value. If you did not include it in this file, the template uses the defined default value. { "$schema": "https://schema.management.azure.com/schemas/2019-04- 01/deploymentParameters.json#", "contentVersion": "1.0.0.0", "parameters": { "VMName": { "value": "webapp01" }, "VMAdmin": { "value": "svr_admin" }, "VMAdminPassword": { "value": "N0t@Rea!P@ss0wrd" }, "VMSize": { "value": "Standard_D4_v4" } } } Functions The next section in the ARM template is functions. Functions allow you to create complicated expressions that you don’t want to repeat throughout the template. ARM template functions
  • 21. are a lot of functions in other programming languages. You call them when you need to run them, and you can pass information to them and expect a return value. For example, say you need to create unique names for resources. Instead of copying and pasting the same code to generate the unique name, you create a function that makes the unique name. For example, here is a function called uniqueName with a parameter named prefix that returns a unique name using the resource group ID. Note the namespace value. This value can be anything you want. Functions require a different namespace value to avoid naming conflicts with regular template functions. "functions": [ { "namespace": "varonis", "members": { "uniqueName": { "parameters": [ { "name": "prefix", "type": "string" } ], "output": { "type": "string", "value": "[concat(toLower(parameters('prefix')), uniqueString(resourceGroup().id))]" } } } } ]
  • 22. Here is an example of calling the uniqueName function passing prodwebapp as the value for the prefix parameter. Instead of passing the string, you can also give a template parameter or variable value. "name": "[varonis.uniqueName('prodwebapp')]" Variables Variables are not much different in ARM templates than you find in other programming languages. Variables contain values that are used repeatedly throughout the template. Like functions, you can use variables to create complicated expressions, so you don’t have to repeat them in the template. Like parameters, variables have the same data types, such as strings, objects, and integers. You define variables using the colon as the assignment operator. For example, instead of passing the Azure region as a parameter, you can define it as a variable, like this: "variables": { "location": "westus2" } To reference a variable later, using the variable() function with the variable name, like this: "location": "[variables('location')]" Resources Finally, arguably the essential part of the ARM template: resources. The resources section defines what Azure resources to deploy with the template. Resources can be anything as small as a network security group all the way to virtual machines, storage accounts, or Azure Functions. Most resources have a set of common properties. Here is a template of a resource definition with explanations of each part. "name": “<resource name>”, "type": "Microsoft.<resource provider>/<resource type>", "apiVersion": "<api version>", "tags": { "key": "value" }, "location": "<location>",
  • 23. "dependsOn": [ ], "properties": { }  Name: Name for the resource. This value can be set from a parameter, variable, or set manually.  Type: The type of resource to deploy. The <resource provider> refers to the high-level family of resources to deploy. Examples include Microsoft.Compute, Microsoft.Storage, and Microsoft.Network. The <resource type> maps out more precisely the resource to deploy. For example, Microsoft.Compute contains resources related to compute infrastructure such as virtual machines, disks, and availability sets. The resource provider and resource type are separated by a forward slash ( / ).  ApiVersion: The API version determines what properties are available to configure on the resource. As Azure grows, Microsoft often adds new features or settings to resources. The API version combined with the resource type determines what you can configure. The API version is formatted as YYYY-MM-DD.  Tags: You can tag your resources just like when you create them in the Azure portal. Tags allow organizing resources and are made up of a key-value pair. For example, you can have a tag showing the resource’s environment, such as development or production.  Location: Location is the Azure region to deploy the resource. You typically deploy resources to the same resource group when you create a deployment (you’ll see a demo of this later). To automatically set the location to the same location as the resource group, use the resourceGroup() function and the location property, like this: “location”: "[resourceGroup().location]"  DependsOn: Unlike other infrastructure as code languages like Terraform, ARM templates require that you manually create resource dependencies. Dependencies
  • 24. determine the order Azure should deploy the resources. For example, if an ARM template is deploying a virtual network and a virtual machine, the virtual network must exist first before creating the virtual machine.  Properties: The properties section contains configuration information for the deployed resource. For example, virtual networks have properties like their address space and subnets. Storage accounts have their access tier and minimum allowed TLS version. Outputs The outputs section defines values and information returned from the deployment. Outputs are helpful for data that Azure dynamically generates during the deployment, like a public IP address. Here is an example of an output section displaying the connection endpoints for a newly created storage account. The ARM template generates a storage account name in the stgAccountName variable. "outputs": { "endpoints": { "type": "object", "value": "[reference(variables('stgAcctName')).primaryEndpoints]" } } Here is the output of the deployment with the primary endpoints listed when deploying the ARM template using PowerShell
  • 25. What is Bicep? Bicep is a domain-specific language (DSL) that uses declarative syntax to deploy Azure resources. In a Bicep file, you define the infrastructure you want to deploy to Azure, and then use that file throughout the development lifecycle to repeatedly deploy your infrastructure. Your resources are deployed in a consistent manner. Bicep provides concise syntax, reliable type safety, and support for code reuse. Bicep offers a first-class authoring experience for your infrastructure-as-code solutions in Azure. Benefits of Bicep Bicep provides the following advantages:  Support for all resource types and API versions: Bicep immediately supports all preview and GA versions for Azure services. As soon as a resource provider introduces new resources types and API versions, you can use them in your Bicep file. You don't have to wait for tools to be updated before using the new services.  Simple syntax: When compared to the equivalent JSON template, Bicep files are more concise and easier to read. Bicep requires no previous knowledge of programming languages. Bicep syntax is declarative and specifies which resources and resource properties you want to deploy. The following examples show the difference between a Bicep file and the equivalent JSON template. Both examples deploy a storage account. Bicep param location string = resourceGroup().location param storageAccountName string = 'toylaunch${uniqueString(resourceGroup().id)}' resource storageAccount 'Microsoft.Storage/storageAccounts@2021-06-01' = { name: storageAccountName location: location sku: { name: 'Standard_LRS' } kind: 'StorageV2' properties: { accessTier: 'Hot' } }  Authoring experience: When you use the Bicep Extension for VS Code to create your Bicep files, you get a first-class authoring experience. The editor provides rich type-safety, intellisense, and syntax validation.  Repeatable results: Repeatedly deploy your infrastructure throughout the development lifecycle and have confidence your resources are deployed in a
  • 26. consistent manner. Bicep files are idempotent, which means you can deploy the same file many times and get the same resource types in the same state. You can develop one file that represents the desired state, rather than developing lots of separate files to represent updates.  Orchestration: You don't have to worry about the complexities of ordering operations. Resource Manager orchestrates the deployment of interdependent resources so they're created in the correct order. When possible, Resource Manager deploys resources in parallel so your deployments finish faster than serial deployments. You deploy the file through one command, rather than through multiple imperative commands.  Modularity: You can break your Bicep code into manageable parts by using modules. The module deploys a set of related resources. Modules enable you to reuse code and simplify development. Add the module to a Bicep file anytime you need to deploy those resources.  Integration with Azure services: Bicep is integrated with Azure services such as Azure Policy, template specs, and Blueprints.  Preview changes: You can use the what-if operation to get a preview of changes before deploying the Bicep file. With what-if, you see which resources will be created, updated, or deleted, and any resource properties that will be changed. The what-if operation checks the current state of your environment and eliminates the need to manage state.  No state or state files to manage: All state is stored in Azure. Users can collaborate and have confidence their updates are handled as expected.  No cost and open source: Bicep is completely free. You don't have to pay for premium capabilities. It's also supported by Microsoft support. Comparing JSON and Bicep for templates Expressions To author an expression: Bicep func() JSON
  • 27. "[func()]" Parameters To declare a parameter with a default value: Bicep param orgName string = 'Contoso' JSON "parameters": { "orgName": { "type": "string", "defaultValue": "Contoso" } } To get a parameter value, use the name you defined: Bicep name: orgName JSON "name": "[parameters('orgName'))]" Variables To declare a variable: Bicep var description = 'example value' JSON "variables": { "description": "example value" }, To get a variable value, use the name you defined: Bicep workloadSetting: description JSON "workloadSetting": "[variables('description'))]" Strings To concatenate strings: Bicep name: '${namePrefix}-vm' JSON "name": "[concat(parameters('namePrefix'), '-vm')]"
  • 28. Logical operators To return the logical AND: Bicep isMonday && isNovember JSON [and(parameter('isMonday'), parameter('isNovember'))] To conditionally set a value: Bicep isMonday ? 'valueIfTrue' : 'valueIfFalse' JSON [if(parameters('isMonday'), 'valueIfTrue', 'valueIfFalse')] Deployment scope To set the target scope of the deployment: Bicep targetScope = 'subscription' JSON "$schema": "https://schema.management.azure.com/schemas/2018-05- 01/subscriptionDeploymentTemplate.json#" Resources To declare a resource: Bicep resource virtualMachine 'Microsoft.Compute/virtualMachines@2020-06-01' = { ... } JSON "resources": [ { "type": "Microsoft.Compute/virtualMachines", "apiVersion": "2020-06-01", ... } ] To conditionally deploy a resource: Bicep resource virtualMachine 'Microsoft.Compute/virtualMachines@2020-06-01' = if(deployVM) { ... }
  • 29. JSON "resources": [ { "condition": "[parameters('deployVM')]", "type": "Microsoft.Compute/virtualMachines", "apiVersion": "2020-06-01", ... } ] To set a resource property: Bicep sku: '2016-Datacenter' JSON "sku": "2016-Datacenter", To get the resource ID of a resource in the template: Bicep nic1.id JSON [resourceId('Microsoft.Network/networkInterfaces', variables('nic1Name'))] Loops To iterate over items in an array or count: Bicep [for storageName in storageAccountNames: { ... }] JSON "copy": { "name": "storagecopy", "count": "[length(parameters('storageAccountNames'))]" }, ... Resource dependencies For Bicep, you can set an explicit dependency but this approach isn't recommended. Instead, rely on implicit dependencies. An implicit dependency is created when one resource declaration references the identifier of another resource. The following shows a network interface with an implicit dependency on a network security group. It references the network security group with netSecurityGroup.id. Bicep resource netSecurityGroup 'Microsoft.Network/networkSecurityGroups@2020-06-01' = {
  • 30. ... } resource nic1 'Microsoft.Network/networkInterfaces@2020-06-01' = { name: nic1Name location: location properties: { ... networkSecurityGroup: { id: netSecurityGroup.id } } } If you must set an explicit dependence, use: Bicep dependsOn: [ storageAccount ] JSON "dependsOn": ["[resourceId('Microsoft.Storage/storageAccounts', 'parameters('storageAccountName'))]"] Reference resources To get a property from a resource in the template: Bicep storageAccount.properties.primaryEndpoints.blob JSON [reference(resourceId('Microsoft.Storage/storageAccounts', variables('storageAccountName'))).primaryEndpoints.blob] To get a property from an existing resource that isn't deployed in the template: Bicep resource storageAccount 'Microsoft.Storage/storageAccounts@2019-06-01' existing = { name: storageAccountName } // use later in template as often as needed storageAccount.properties.primaryEndpoints.blob JSON // required every time the property is needed "[reference(resourceId('Microsoft.Storage/storageAccounts/', parameters('storageAccountName')), '2019-06-01').primaryEndpoints.blob]" In Bicep, use the nested accessor (::) to get a property on a resource nested within a parent resource: Bicep
  • 31. VNet1::Subnet1.properties.addressPrefix For JSON, use reference function: JSON [reference(resourceId('Microsoft.Network/virtualNetworks/subnets', variables('subnetName'))).properties.addressPrefix] Outputs To output a property from a resource in the template: Bicep output hostname string = publicIP.properties.dnsSettings.fqdn JSON "outputs": { "hostname": { "type": "string", "value": "[reference(resourceId('Microsoft.Network/publicIPAddresses', variables('publicIPAddressName'))).dnsSettings.fqdn]" }, } To conditionally output a value: Bicep output hostname string = condition ? publicIP.properties.dnsSettings.fqdn : '' JSON "outputs": { "hostname": { "condition": "[variables('condition')]", "type": "string", "value": "[reference(resourceId('Microsoft.Network/publicIPAddresses', variables('publicIPAddressName'))).dnsSettings.fqdn]" } } The Bicep ternary operator is the equivalent to the if function in an ARM template JSON, not the condition property. The ternary syntax has to evaluate to one value or the other. If the condition is false in the preceding samples, Bicep outputs a hostname with an empty string, but JSON outputs no values. Azure AD Identity Protection Identity Protection uses the learnings Microsoft has acquired from their position in organizations with Azure Active Directory, the consumer space with Microsoft Accounts, and in gaming with Xbox to protect your users. Microsoft analyses trillions of signals per day to identify and protect customers from threats. Identity Protection allows organizations to accomplish three key tasks:
  • 32.  Automate the detection and remediation of identity-based risks.  Investigate risks using data in the portal.  Export risk detection data to other tools. The signals generated by and fed to Identity Protection, can be further fed into tools like Conditional Access to make access decisions, or fed back to a security information and event management (SIEM) tool for further investigation. Why is automation important? In the blog post Cyber Signals: Defending against cyber threats with the latest research, insights, and trends dated February 3, 2022 we shared a threat intelligence brief including the following statistics:  Analyzed ...24 trillion security signals combined with intelligence we track by monitoring more than 40 nation-state groups and over 140 threat groups...  ...From January 2021 through December 2021, we’ve blocked more than 25.6 billion Azure AD brute force authentication attacks... The sheer scale of signals and attacks requires some level of automation to be able to keep up. Detect risk Identity Protection detects risks of many types, including:  Anonymous IP address use  Atypical travel  Malware linked IP address  Unfamiliar sign-in properties  Leaked credentials  Password spray  and more... The risk signals can trigger remediation efforts such as requiring: perform multifactor authentication, reset their password using self-service password reset, or block access until an administrator takes action. More detail on these and other risks including how or when they're calculated can be found in the article, What is risk. Investigate risk Administrators can review detections and take manual action on them if needed. There are three key reports that administrators use for investigations in Identity Protection:  Risky users  Risky sign-ins  Risk detections More information can be found in the article, How To: Investigate risk.
  • 33. Risk levels Identity Protection categorizes risk into tiers: low, medium, and high. Microsoft doesn't provide specific details about how risk is calculated. Each level of risk brings higher confidence that the user or sign-in is compromised. For example, something like one instance of unfamiliar sign-in properties for a user might not be as threatening as leaked credentials for another user. Make further use of risk information Data from Identity Protection can be exported to other tools for archive and further investigation and correlation. The Microsoft Graph based APIs allow organizations to collect this data for further processing in a tool such as their SIEM. Information about how to access the Identity Protection API can be found in the article, Get started with Azure Active Directory Identity Protection and Microsoft Graph Information about integrating Identity Protection information with Microsoft Sentinel can be found in the article, Connect data from Azure AD Identity Protection. Organizations can choose to store data for longer periods by changing diagnostic settings in Azure AD. They can choose to send data to a Log Analytics workspace, archive data to a storage account, stream data to Event Hubs, or send data to a partner solution. Detailed information about how to do so can be found in the article, How To: Export risk data. Azure Active Directory Identity Protection is a security tool that detects identity-based risks like compromised identities, mitigates security threats, provides conditional access policies, and provides information on security events for conducting investigations. The three Identity protection policies
  • 34. (i) Multi-factor authentication registration policy MFA is a self-remediation method that decreases the risk of a malicious person trying to impersonate a domain user, thereby reducing the volume of helpdesk calls. Organizations can opt for Azure multi-factor authentication (MFA) for all or specific users. This is possible in Azure AD Identity Protection by setting up a Conditional Access policy* that requires registration during sign-in. *Conditional Access policy The IT team of an organization can create a custom policy where the users' location, applications opened, device used etc. can be pre-set as conditions. The risk score is then calculated, for every deviant behavior other than the one specified in the conditions. (ii) User risk remediation policy Every time a user signs in, Azure AD Identity Protection calculates a risk score based on previous logon behavior by the user. If the risk score is high, administrators can choose to block the account, or allow sign in with multi-factor authentication. (iii) Sign-in risk remediation policy Every time a user signs in, Azure AD Identity Protection calculates a risk score based on the probability that the logon was not carried out by the user. If the risk score is high, administrators can choose to block the account, allow sign in, or allow sign in with multi-factor authentication.
  • 35. The major capabilities of Identity Protection that helps organizations safeguard their users identities include:  Detection and mitigation of identity-based risks without human intervention.  Conducting risk analysis.  Export information about the security risks to third-party tools for deeper analysis. Azure AD Identity Protection utilizes machine learning algorithms to detect and generate reports and alerts to resolve threats. Azure AD Connect Azure AD Connect is a Microsoft tool designed to help organizations with hybrid IT environments. It is included for free with your Azure subscription. It offers multiple features, including federation integration and health monitoring. However, today we’ll focus on its best- known capability: synchronization. Simply put, organizations use Azure AD Connect to automatically synchronize identity data between their on-premises Active Directory environment and Azure AD. That way, users can use the same credentials to access both on-premises applications and cloud services such as Microsoft 365. How does it work? You install the application on a domain-joined server in your on-premises data center. The default installation option is Express Settings, which is used for the most common scenario: synchronizing data between a single on-premises forest that has one or more domains and a single Azure AD tenant. If you have multiple forests or multiple Azure AD tenants, check out the other topologies that Microsoft supports. By default, the sync is one way: from on-premises AD to Azure AD. However, you can configure the writeback function to sync changes from Azure AD back to your on-premises AD. That way, for instance, if a user changes their password using the Azure AD self-service password management function, the password will be updated in the on-premises AD. What data can the tool sync? Azure AD Connect can synchronize the user accounts, groups and credential hashes in your on-premises AD. Most attributes of the user accounts, such as the User Principal Name (UPN) and security identifier (SID), are synchronized. However, the following objects and attributes are NOT synchronized:  Any objects and attributes you specifically exclude from the sync
  • 36.  Sid History attributes for users and groups  Group Policy objects (GPOs)  The contents of the Sysvol folder  Computer objects for computers joined to the on-premises AD environment  Organization unit (OU) structures How often is data synchronized? The synchronization is controlled by a scheduler. By default, a sync task runs every 30 minutes. Using PowerShell, you can:  Review the scheduler’s configuration and change some of its parameters.  Force a sync.  Stop a running sync task or even temporarily disable the scheduler (for example, so that you can modify the configuration of Azure AD Connect). Azure Active Directory Connect AAD Connect is currently in a public preview, but will be the preferred sync engine once it goes RTM. This is a guide for installing it in a basic setup. (You will notice the option to branch in different directions along the way, but not all of these will be covered.) Provided you have the necessary credentials at hand it is a fairly easy installer to follow. For this guide I assume a clean install of Windows Server 2012 R2 with the current updates applied.