SlideShare a Scribd company logo
1 of 14
Download to read offline
Dell EMC™
ProDeploy set up a
production-ready environment in
less time and fewer steps
Compared to an in-house, entry-level admin, a
Dell Technologies-certified engineer installed
and configured a Dell EMC solution faster and
more efficiently
Adding resources to your data center can help you meet key
business goals quickly. The faster admins can deploy and configure
new hardware, the sooner your critical applications will have access
to resources that could boost revenue streams, expand a customer
base, or promote other positive business outcomes. Choosing
Dell EMC™
ProDeploy to install and configure your new Dell EMC
hardware could allow your organization to feel the impact of new
resources sooner than deploying with in-house, entry-level admins.
In our data center, a Dell Technologies-certified engineer installed
and configured a Dell EMC solution of Dell EMC PowerEdge™
R740
servers, Dell EMC PowerSwitch S4048-ON switches, and a Dell
EMC Unity array in 68 percent less time than our in-house admin
deployed the same solution.
In addition, ProDeploy required little from our in-house
project manager, which allowed them to do other work. A Dell
Technologies-certified engineer deploying Dell EMC hardware in
your data center could mean your IT staff would have more time to
spend on other strategic IT initiatives.
4x
faster
planning and
deployment
82%
less project-
planning time
68%
less
deployment
time
Follows best
practices to
ensure proper
deployment
Dell EMC ProDeploy set up a production-ready environment in less time and fewer steps September 2020
A Principled Technologies report: Hands-on testing. Real-world results.
First things first: Save critical time
by planning deployment with a
Dell Technologies project manager
Project planning can help make even the most complex solution deployment
less frustrating and time consuming. Planning phases give IT teams time to
understand necessary planning processes, read supporting documentation,
and learn toolsets before touching any hardware. Planning a deployment
can (and some might say should) include validating power and connectivity
requirements, determining site readiness, and reviewing best practices.
Without these tasks, organizations could see serious delays and performance
impacts. However, Dell Technologies project managers and engineers from
ProDeploy already know the approaches, tools, and best practices for Dell
EMC solutions.
Before a Dell Technologies engineer did any physical work to deploy the
solution in Figure 1 (for detailed configuration information of the solution, see
the section System configuration information), a Dell Technologies project
manager guided the deployment through the planning phase. They gathered
and documented the project requirements and developed a detailed project
roadmap and implementation plan with our in-house project manager that
highlighted best deployment paths and best practices. Our in-house staff
played a role in only the planning phase of the ProDeploy deployment;
the Dell Technologies-certified engineer handled the hardware unboxing,
racking, and deployment and the Dell Technologies project manager assisted
with planning. Choosing ProDeploy can significantly minimize your IT staff’s
involvement in planning, which allows them to focus on other tasks.
Without ProDeploy, our entry-level admin had to spend time planning the
deployment of the solution in Figure 1. Both deployments (with and without
ProDeploy) needed a project-planning phase, but as Figure 2 shows, the Dell
Technologies project manager saved our IT staff significant time compared to
our entry-level person planning on their own.
Required involvement from entry-level admin
with ProDeploy
without ProDeploy (entry-level admin)
Total time:
8h 1min (4x faster)
Planning:
2h 35min
Total time:
32h 5min
Planning:
14h 45min
Less time is better
Dell EMC PowerConnect 5448 switch
2x Dell EMC PowerSwitch
S4048-ON 10GbE switches
4x Dell EMC PowerEdge
R740 servers
1x Dell EMC Unity 650F
all-flash storage
Figure 1: Illustration of the Dell EMC solution.
Source: Principled Technologies.
Figure 2: Time required of an in-house, entry-level admin with and without Dell
EMC ProDeploy service. Source: Principled Technologies.
Dell EMC ProDeploy set up a production-ready environment in less time and fewer steps September 2020 | 2
A ProDeploy engineer needed less time than our entry-level admin
For the ProDeploy deployment, our entry-level admin spent 2 hours and 35 minutes planning the deployment with
a Dell Technologies project manager before the Dell Technologies-certified engineer arrived at our datacenter.
Those 2 hours and 35 minutes completed our involvement; we did not need to be involved in any further planning
or deployment. Over the course of two business days, the Dell Technologies-certified engineer spent 5 hours
and 26 minutes physically installing and configuring the PowerEdge servers, networking components, Unity array,
and software.
Without ProDeploy, we spent 32 hours and 5 minutes installing and configuring the solution over six business days.
Figure 3 breaks down deployment in business days. Highlights include the following:
• With ProDeploy, unboxing and racking the PowerEdge servers, networking components, and the Unity array
took 83 percent less time and saved 2 hours and 9 minutes compared to the time it took our in-house, entry-
level admin. ProDeploy saved 2 hours and 45 minutes when cabling the solution.
• Setting up the networking components with ProDeploy saved nearly 1 hour and 58 minutes and took 85
percent less time.
• Following deployment best practices took
longer for our entry-level admin because
they required deployment documentation
for guidance.
• With ProDeploy, configuring the Dell EMC
Unity array, upgrading its firmware and
software, and performing a health check on
the array saved 1 hour and 3 minutes and
took 42 percent less time.
• With ProDeploy, installing the OS, updating
the server firmware, setting up VMware
vCenter®
, and updating VMware ESXi™
saved
a sizable chunk of time—almost 4 hours—and
took 60 percent less time.
Table 1 breaks down the deployment times by stage of installation and configuration in hours and minutes.
Table 1: Comparison of time (in hours:minutes) required to complete each stage of the deployment process for an in-house,
entry-level admin and a Dell Technologies-certified engineer. Source: Principled Technologies.
Stage Entry-level admin ProDeploy engineer
ProDeploy
percentage less time
Planning 14:45 2:35 82%
Racking hardware & cabling 5:55 1:01 82%
Configuring networking 2:18 0:20 85%
Configuring OS & firmware 6:38 2:39 60%
Configuring storage 2:29 1:26 42%
Total deployment time without planning stage 17:20 5:26 68%
Total planning and deployment time 32:05 8:01 75%
ProDeploy engineer
Entry-level admin
8h 1min (4x faster)
32h 5min
Mon Tues
Tues Wed Thurs Fri MonMon
Time spent on deployment each day
Less time is better
Figure 3: Comparison of time required to complete server deployment
for a Dell Technologies-certified engineer and an in-house, entry-level
admin. Source: Principled Technologies.
Dell EMC ProDeploy set up a production-ready environment in less time and fewer steps September 2020 | 3
Day-by-day breakdown:
ProDeploy vs. in-house deployment
Table 2 shows how our in-house admin and the Dell Technologies-certified engineer spent their
time on the first day. Without ProDeploy, we spent the first 4 hours confirming implementation
details with our in-house project manager. It took the Dell Technologies-certified engineer 1 hour
and 38 fewer minutes to plan the deployment; unbox, rack, and cable the solution; conduct a health
check; update the server firmware; install the OS; configure the Ethernet switch; set up vCenter; and
update ESXi than it took us to plan this first day and unbox, rack, and cable the PowerEdge servers,
networking components, and Unity array.
Table 2: Comparison between an in-house, entry-level admin and a Dell Technologies-certified engineer for
time (in hours:minutes) required to deploy the solution during day one. Source: Principled Technologies.
Stage Entry-level admin ProDeploy engineer
Planning 4:00 2:35
Unboxing and racking 2:35 0:26
Initial cabling 1:15 0:35
Checking server health 0:25
Updating server firmware 0:28
OS installation 0:12
Ethernet switch config 0:20
vCenter setup 0:21
ESXi updates 0:50
Time spent deploying the Dell EMC solution 7:50 6:12
Table 3 shows how our admin without ProDeploy and the Dell Technologies-certified engineer
spent their time on the second day. In addition to the deployment, our admin had to address
unrelated administrative and routine tasks that needed immediate attention. The Dell
Technologies-certified engineer, however, was able to focus and complete the deployment.
Table 3: Comparison between an in-house, entry-level admin and a Dell Technologies-certified engineer for
time (in hours:minutes) required to deploy the solution during day two. Source: Principled Technologies.
Stage Entry-level admin ProDeploy engineer
Planning 1:15
Initial cabling 2:05
Storage configuration 0:23
Storage firmware/software upgrade 0:38
**Installation of OME and SAE 0:48
Time spent deploying the Dell EMC solution 3:20 1:49
Dell EMC ProDeploy set up a production-ready environment in less time and fewer steps September 2020 | 4
It took our in-house, entry-level admin four more business days to finish planning the installation as
well as to finish installing and configuring the new PowerEdge servers, networking components, and
Unity arrays from Dell EMC. That’s six business days total, compared to the two business days it took
the Dell Technologies-certified engineer. An organization would have had the new PowerEdge servers,
networking components, and Unity array up and running six days earlier (including Saturday and
Sunday) by using ProDeploy. After two days, our admin still had a lot to do, as Table 4 shows.
Table 4: Breakdown of in-house, entry-level admin time (in hours:minutes) on the remaining days.
Source: Principled Technologies.
Stage Entry-level admin ProDeploy engineer
(Day 3) Wednesday
Planning 3:00
Time spent deploying the Dell EMC solution 3:00 0:00
(Day 4) Thursday
Planning 3:45
Health check 0:30
Time spent deploying the Dell EMC solution 4:15 0:00
(Day 5) Friday
Planning 1:15
Configuring storage 0:42
Upgrading storage firmware 1:17
Server firmware update 0:42
OS installation 0:27
Ethernet switch config 0:53
ESXi updates 0:36
Time spent deploying the Dell EMC solution 5:52 0:00
(Day 6) Monday
Planning 1:30
Ethernet switch config 1:25
vCenter setup 0:48
ESXi updates 1:00
Installing OME and SAE 3:05
Time spent deploying the Dell EMC solution 7:48 0:00
Dell EMC ProDeploy set up a production-ready environment in less time and fewer steps September 2020 | 5
Get additional post-deployment care from Dell Technologies
After installing and configuring the solution, our in-house admin and the Dell Technologies-certified engineer
initiated post-deployment services. These were mostly checks to ensure things were running smoothly. However,
the Dell Technologies-certified engineer took some extra time to do things beyond deployment. In addition to
collecting environment configuration across all the platforms, they performed a final health check, validated that
they had implemented all configuration best practices, and completed the remaining documentation.
Conclusion
Choosing ProDeploy to install and configure new Dell EMC hardware means your organization can get new
data center resources to applications more quickly without tying up too much of an admin’s time. In our
data center:
• The Dell Technologies-certified engineer installed and configured the Dell EMC solution in 68 percent less
time, saving 11 hours and 54 minutes and allowing our in-house admin to focus on organizational demands
and other strategic initiatives.
• Installing and configuring the Dell EMC solution with ProDeploy reduced the total planning and
deployment time by 75 percent, 4 times faster than our in-house admin.
• The Dell Technologies-certified engineer needed only 5 hours and 26 minutes over two business days to
deploy the Dell EMC solution.
• Without ProDeploy, it took more than 17 hours over six business days for our in-house, entry-level admin to
install and configure the same solution.
• Familiarity with the solution components allowed the Dell Technologies-certified engineer to complete
tasks, such as configuring the network, faster than our in-house, entry-level admin, who sometimes needed
documentation and guidance from our project manager.
With ProDeploy, your organization can realize a faster, more efficient deployment with minimal impact on your
in-house IT staff.
Compliance with
COVID-19 restrictions
Before the Dell Technologies engineer
visited our data center, we informed
them of our social distancing policy
and face covering requirement to
help reduce the potential spread of
the virus causing coronavirus disease
2019 (COVID-19). The engineer
complied by maintaining a distance
of at least six feet from others and
by wearing a mask that covered their
mouth and nose at all times.
Dell EMC ProDeploy set up a production-ready environment in less time and fewer steps September 2020 | 6
We concluded our hands-on testing on July 7, 2020. During testing, we determined the appropriate hardware
and software configurations and applied updates as they became available. The results in this report reflect
configurations that we finalized on June 23, 2020 or earlier. Unavoidably, these configurations may not represent
the latest versions available when this report appears.
Our results
For our calculations, we found that the Dell EMC ProDeploy time of 8 hours and 1 minute was just under a
quarter of the in-house, entry level time of 32 hours and 5 minutes. Therefore, we assume that a Dell EMC
ProDeploy-certified engineer could do four deployments in the time of one in-house, entry level IT admin-
conducted deployment and thus is four times faster.
Table 5: Times (in hours:minutes) for each stage of deployment.
Task In-house, entry-level IT admin Dell EMC ProDeploy-certified engineer
Planning 14:45 2:35
Unboxing and racking 2:35 0:26
Initial cabling 3:20 0:35
Storage configuration 0:42 0:23
Storage firmware/software upgrade 1:17 0:38
Health check 0:30 0:25
Server firmware update 0:42 0:28
OS installation 0:27 0:12
Ethernet switch config 2:18 0:20
vCenter setup 0:48 0:21
ESXi updates 1:36 0:50
Installation of OME and SAE 3:05 0:48
Total time 32:05 8:01
Dell EMC ProDeploy set up a production-ready environment in less time and fewer steps September 2020 | 7
System configuration information
Table 6: Detailed information for the deployed servers. Source: Principled Technologies.
Server configuration information Dell EMC PowerEdge R740
BIOS name and version 2.6.4
Non-default BIOS settings none
Operating system name and version/build number VMware ESXi™
7.0 15843807
Date of last OS updates/patches applied 6/22/20
Power management policy Balanced
Processor
Number of processors 2
Vendor and model Intel®
Xeon®
Silver 4216
Core count (per processor) 16
Core frequency (GHz) 2.1
Stepping 7
Memory module(s)
Total memory in system (GB) 96
Memory module A Memory module B
Number of memory modules 2 2
Vendor and model Samsung®
M393A2K43BB1-CTD6Q Samsung M393A4K40CB2-CTD7Q
Size (GB) 16 32
Type DDR4 DDR4
Speed (MHz) 2,666 2,666
Speed running in the server (MHz) 2,666 2,666
Storage controller
Vendor and model Dell PERC H740P Mini
Cache size (GB) 4
Firmware version 50.9.4-3025
Driver version 7.712.50.00
Local storage (type A)
Number of drives 2
Drive vendor and model Micron®
MTFDDAK480TDN
Drive size (GB) 480
Drive information (speed, interface, type) 6GB/s, SAS, SSD
Dell EMC ProDeploy set up a production-ready environment in less time and fewer steps September 2020 | 8
Server configuration information Dell EMC PowerEdge R740
Local storage (type B)
Number of drives 1
Drive vendor and model Seagate ST600MM0069
Drive size (GB) 600
Drive information (speed, interface, type) 12GB/s, SAS, HDD
Network adapter (type A)
Vendor and model Broadcom Adv. Dual 10GBASE-T Ethernet
Number and type of ports 4
Driver version 21.60.22.11
Network adapter (type B)
Vendor and model Intel Ethernet Server Adapter X520
Number and type of ports 2
Driver version 1.7.1.26
Cooling fans
Vendor and model Nidec Ultraflo XN44V-A00
Number of cooling fans 6
Power supplies
Vendor and model Dell PWR SPLY, 750W
Number of power supplies 2
Wattage of each (W) 750
Table 7: Detailed information for the deployed storage. Source: Principled Technologies.
Storage configuration information Dell EMC Unity 650F
Software Version 5.0.3.0.5.014
Number of drives 10
Drive vendor and model Samsung MZ-ILT1T9A
Drive size 1.92TB
Protocol SAS
Gb/s 12Gb/s
Dell EMC ProDeploy set up a production-ready environment in less time and fewer steps September 2020 | 9
Table 8: Detailed information for the deployed switches. Source: Principled Technologies.
Switch configuration information Dell EMC PowerConnect 5448
Port type A
Type of ports Gigabit ethernet
Number of ports 48
Port type B
Type of ports Combo gigabit SFP
Number of ports 4
Dell EMC ProDeploy set up a production-ready environment in less time and fewer steps September 2020 | 10
How we tested
Configuring Unity 650F
1.	 Visit https://www.dell.com/support/home/en-us/product-support/product/unity-family/overview, and download the Dell EMC Unity
Connection Utility.
2.	 When the download is finished, click Run.
3.	 At the Select Setup Language screen, Select English, and click OK.
4.	 At the Welcome screen, click Next.
5.	 At the Choose Install Folder, accept defaults, and click Next.
6.	 At the Pre-Installation Summary screen, click Install.
7.	 Check Run Connection Utility, and click Finish.
Connecting to the storage and configuring management IP address
1.	 In the connection utility, select Auto Discover, and click Next.
2.	 Select the System, and click Next.
3.	 Enter the management IP information, and click Next.
4.	 Review the information, and click Next.
5.	 Click Deploy.
Running the initial configuration wizard
1.	 At the introduction screen, click Next.
2.	 Enter the DNS server address, and click Next.
3.	 At the NTP server screen, click Add.
4.	 Enter the NTP server IP, and click Next.
5.	 Apply the Unisphere License, and click Next.
6.	 Until the initial configuration wizard completes, click Next.
7.	 Check Run Connection Utility, and click Finish.
Creating a storage pool
1.	 On left Unisphere pane, under Storage, click Pools.
2.	 Click +.
3.	 Enter a Pool name and description.
4.	 Select Extreme Performance Tier, and click Next.
5.	 Select all available drives, and click Next.
6.	 At the Capability Profile Name screen, click Next.
7.	 At the Summary screen, click Finish.
Creating a NAS server
1.	 Under Storage, select File>NAS Servers.
2.	 Click the add icon.
3.	 Create a server name, and choose the appropriate pool and storage processor.
4.	 Click Next.
5.	 Select the Ethernet port, and set the IP address, subnet mask, and Gateway.
6.	 Click Next.
7.	 Check Enable NFSv3 and NFSv4.
8.	 On DNS, Replication, and Summary, click Next.
9.	 Click Finish.
Dell EMC ProDeploy set up a production-ready environment in less time and fewer steps September 2020 | 11
Creating a file system
1.	 Under Storage, select File>File Systems.
2.	 Click the add icon.
3.	 Create a name and description.
4.	 Click Next.
5.	 On File-level Retention, click Next.
6.	 Select the appropriate pool, set its size, and check Thin.
7.	 On subsequent screens, check Next.
8.	 Click Finish.
Discovering and adding multiple ESXi hosts
1.	 On left Unisphere pane, under Access, click VMware.
2.	 To connect to the vCenter server, click +.
3.	 At the Find ESXi Hosts screen, enter the vCenter credentials, and click Find.
4.	 Select the appropriate ESXi hosts, and click Next.
5.	 At the VSA Provider screen, click Next.
6.	 At the Summary screen, click Finish.
Installing VMware ESXi
1.	 Using the USB, boot to the VMware ESXi installation media.
2.	 To Continue, press Enter.
3.	 To Accept and Continue, press F11 key.
4.	 Under Storage Device, select the installation drive, and press Enter.
5.	 For keyboard layout, select US Default, and press Enter.
6.	 Enter the root password twice, and press Enter.
7.	 At the Confirm Install window, press F11.
8.	 At the Installation Complete window, press Enter.
9.	 To configure the system after rebooting, press F2.
10.	 Log in with root credentials, and press Enter.
11.	 Scroll to Configure Management Network, and press Enter.
12.	 Scroll to IPv4 Configuration, and press Enter.
13.	 Scroll to Static IPv4, and use the spacebar to select it.
14.	 Set the IPv4 address, Subnet Mask, and Default gateway.
15.	 Press Enter.
16.	 Scroll to IPv6 Configuration, and press Enter.
17.	 Scroll to Disable IPv6, and use the spacebar to select it.
18.	 Press Enter.
19.	 Scroll to DNS Configuration, and press Enter.
20.	 Scroll to manually configure DNS, and use the spacebar to select it.
21.	 Add the Primary DNS Server and the Alternate DNS Server, and provide the hostname for the system.
22.	 Scroll to Custom DNS Suffixes, and press Enter.
23.	 Add the suffix that is required for testing, and press Enter.
24.	 To accept the changes, press Esc.
25.	 To confirm changes, press Y. The system will reboot.
26.	 To configure the system after rebooting, press F2.
27.	 Log in with root credentials, and press Enter.
28.	 Scroll to Troubleshooting Options, and press Enter.
29.	 Select Enable ESXi Shell, and press Enter.
30.	 Select Enable SSH, and press Enter.
31.	 Scroll to Restart Management Agents, and press Enter.
32.	 Press F11.
33.	 To exit, press Esc.
34.	 To log out, press Esc.
Dell EMC ProDeploy set up a production-ready environment in less time and fewer steps September 2020 | 12
Deploying VMware vCenter Server®
7.0
1.	 Using a USB drive, on a Windows server or VM, locate the VMware-VCSA installer image using USB.
2.	 Mount the image, navigate to the vcsa-ui-installer folder, and double-click win32.
3.	 Double-click installer.exe.
4.	 Click Install.
5.	 Click Next.
6.	 Accept the terms of the license agreement, and click Next.
7.	 Ensure that the vCenter Server with an Embedded Platform Services Controller is selected, and click Next.
8.	 Enter the FQDN or IP address of the host onto which you are deploying the vCenter Server Appliance.
9.	 Provide the server’s username and password, and click Next.
10.	 To accept the certificate of the host you chose to connect to, click Yes.
11.	 Provide a name and password for the vCenter Appliance, and click Next.
12.	 Set an appropriate appliance size, and click Next.
13.	 Select the appropriate datastore, and click Next.
14.	 At the Configure Network Settings page, configure the network settings as appropriate for your environment, and click Next.
15.	 Review your settings, and click Finish.
16.	 When the deployment completes, click Continue.
17.	 At the Introduction page, click Next.
18.	 At the Appliance configuration page, select the time synchronization mode and SSH access settings, and click Next.
19.	 At the CEIP page, click Next.
20.	 At the Ready to complete page, click Finish.
21.	 At the Warning pop-up, click OK.
22.	 Once Stage 2 completes successfully, click Close.
Adding the servers to vCenter
1.	 Log into vCenter.
2.	 In the left pane, right-click vCenter, and select New Datacenter.
3.	 Enter the name of your datacenter, and press OK.
4.	 Right-click your datacenter, and select Add Host.
5.	 In Name and location, add the IP address of your host, and click Next.
6.	 In Connection settings, to log into your ESXi host, enter the username and password, and click Next.
7.	 In Host summary, verify your host’s information, and click Next.
8.	 In Assign license, choose the appropriate license for your host, and click Next.
9.	 In Lockdown mode, leave the host lockdown as default (Disabled), and click Next.
10.	 In VM location, choose the location where your VMs will be organized, and click Next.
11.	 In Ready to complete, verify your settings, and click Finish.
12.	 Complete steps 4 through 11 for the remaining three servers.
Downloading and installing OpenManage Enterprise
1.	 From the support site, download the openmanage_enterprise_ovf_format.zip file, and extract the file to a location accessible by the
VMware vSphere Client.
2.	 In vSphere Client, select File>Deploy OVF Template.
3.	 On the Local file option, click Upload files, select the OVF and VMDK packages, and click Next.
4.	 Name the VM, select the Datacenter, and click Next.
5.	 Select the host on which you want to deploy the appliance VM, and click Next.
6.	 Review the details, and click Next.
7.	 Accept the License agreements, and click Next.
8.	 Select storage option, choose Thin provision, and click Next.
9.	 Select Networks, and click Next.
10.	 Enter DNS, hostname, Gateway, network address (IPV4), time zone, NTP server address, and click next.
11.	 Review the settings, and click Finish.
Dell EMC ProDeploy set up a production-ready environment in less time and fewer steps September 2020 | 13
Principled Technologies is a registered trademark of Principled Technologies, Inc.
All other product names are the trademarks of their respective owners.
DISCLAIMER OF WARRANTIES; LIMITATION OF LIABILITY:
Principled Technologies, Inc. has made reasonable efforts to ensure the accuracy and validity of its testing, however, Principled Technologies, Inc. specifically disclaims
any warranty, expressed or implied, relating to the test results and analysis, their accuracy, completeness or quality, including any implied warranty of fitness for any
particular purpose. All persons or entities relying on the results of any testing do so at their own risk, and agree that Principled Technologies, Inc., its employees and its
subcontractors shall have no liability whatsoever from any claim of loss or damage on account of any alleged error or defect in any testing procedure or result.
In no event shall Principled Technologies, Inc. be liable for indirect, special, incidental, or consequential damages in connection with its testing, even if advised of the
possibility of such damages. In no event shall Principled Technologies, Inc.’s liability, including for direct damages, exceed the amounts paid in connection with Principled
Technologies, Inc.’s testing. Customer’s sole and exclusive remedies are as set forth herein.
This project was commissioned by Dell Technologies.
Principled
Technologies®
Facts matter.®Principled
Technologies®
Facts matter.®
Configuring OpenManage Enterprise
1.	 In a web browser, navigate to the IP of the OpenManage Enterprise VM, and log in.
2.	 On the Home tab, choose Discover Devices.
3.	 Click Add, and in the Device Type dropdown, choose Server.
4.	 Select Dell iDRAC, and click OK.
5.	 In the IP/Hostname/Range box, enter the IP range of the servers.
6.	 For the servers, enter the login credentials.
7.	 Select Run Now, and click Finish.
8.	 For the virtual machine files, select the datastore, and click Next.
9.	 On the Disk Format page, to pre-allocate physical storage space to VMs, click Thick provision.
10.	 Review the selected options, and click Finish.
Downloading and installing SupportAssist Enterprise
1.	 From the support site, download the OVF file, and extract the file to a location accessible by the VMware vSphere Client.
2.	 In vSphere Client, select File>Deploy OVF Template.
3.	 On the local file option, click Upload files, select the OVF and VMDK packages, and click Next.
4.	 Name the VM, select the Datacenter, and click Next.
5.	 Select the host on which you want to deploy the appliance VM, and click Next.
6.	 Review the details, and click Next.
7.	 Accept the license agreements, and click Next.
8.	 Select storage option, choose Thin provision, and click Next.
9.	 Select the networks, and click Next.
10.	 Enter DNS, hostname, Gateway, network address (IPV4), time zone, NTP server address, and click Next.
11.	 Review the settings, and click Finish.
Configuring SupportAssist Enterprise
1.	 In a web browser, navigate to the IP of the SupportAssist Enterprise VM, and log in.
2.	 On the Devices tab, choose Add.
3.	 In Device Type, select iDRAC, enter the IP address of the host, name the host, and choose create new credentials account.
4.	 Name the credentials, and select the device type, operating system, username, and password. Click Save.
5.	 Select the account credentials you created, and select Next.
6.	 For the additional three servers, complete steps 1 through 5.
Dell EMC ProDeploy set up a production-ready environment in less time and fewer steps September 2020 | 14

More Related Content

What's hot

NeilBrittleton Current CV
NeilBrittleton Current CVNeilBrittleton Current CV
NeilBrittleton Current CVNeil Brittleton
 
Migrating to Windows 7 or 8 with Lenovo's Deployment Optimization Solutions
Migrating to Windows 7 or 8 with Lenovo's Deployment Optimization SolutionsMigrating to Windows 7 or 8 with Lenovo's Deployment Optimization Solutions
Migrating to Windows 7 or 8 with Lenovo's Deployment Optimization SolutionsLenovo Business
 
Rolston Rene _Resume
Rolston Rene _ResumeRolston Rene _Resume
Rolston Rene _ResumeRolston Rene
 
Kapruch steve
Kapruch steveKapruch steve
Kapruch steveNASAPMC
 
Lecture6
Lecture6Lecture6
Lecture6soloeng
 
Terry.cooke davies
Terry.cooke daviesTerry.cooke davies
Terry.cooke daviesNASAPMC
 
Pm610 1103 b-02-schwappach-loren-p2-ip2
Pm610 1103 b-02-schwappach-loren-p2-ip2Pm610 1103 b-02-schwappach-loren-p2-ip2
Pm610 1103 b-02-schwappach-loren-p2-ip2Loren Schwappach
 
01 intro+
01 intro+01 intro+
01 intro+im|s
 
Dell Nycdoe Pcs Presentation
Dell Nycdoe Pcs PresentationDell Nycdoe Pcs Presentation
Dell Nycdoe Pcs Presentationragogli
 
VMWorld 2004 - Justifying the transition from Physical to Virtual
VMWorld 2004 - Justifying the transition from Physical to VirtualVMWorld 2004 - Justifying the transition from Physical to Virtual
VMWorld 2004 - Justifying the transition from Physical to VirtualDavid Kent
 
Windows Server 2003 EOS : l'opportunité de repenser votre IT et mettre en pla...
Windows Server 2003 EOS : l'opportunité de repenser votre IT et mettre en pla...Windows Server 2003 EOS : l'opportunité de repenser votre IT et mettre en pla...
Windows Server 2003 EOS : l'opportunité de repenser votre IT et mettre en pla...Microsoft Décideurs IT
 
Case Study with Spectrum Integrity
Case Study with Spectrum IntegrityCase Study with Spectrum Integrity
Case Study with Spectrum IntegrityAltium
 
How We Built Test Automation within a Manual Testing Organization
How We Built Test Automation within a Manual Testing OrganizationHow We Built Test Automation within a Manual Testing Organization
How We Built Test Automation within a Manual Testing OrganizationAn Doan
 
Your CEO's Teams Calls Keep Dropping... What do you do?
Your CEO's Teams Calls Keep Dropping... What do you do?Your CEO's Teams Calls Keep Dropping... What do you do?
Your CEO's Teams Calls Keep Dropping... What do you do?panagenda
 
Alliance 2017 3891-University of California | Office of The President People...
Alliance 2017  3891-University of California | Office of The President People...Alliance 2017  3891-University of California | Office of The President People...
Alliance 2017 3891-University of California | Office of The President People...Smart ERP Solutions, Inc.
 

What's hot (20)

NeilBrittleton Current CV
NeilBrittleton Current CVNeilBrittleton Current CV
NeilBrittleton Current CV
 
Migrating to Windows 7 or 8 with Lenovo's Deployment Optimization Solutions
Migrating to Windows 7 or 8 with Lenovo's Deployment Optimization SolutionsMigrating to Windows 7 or 8 with Lenovo's Deployment Optimization Solutions
Migrating to Windows 7 or 8 with Lenovo's Deployment Optimization Solutions
 
Rolston Rene _Resume
Rolston Rene _ResumeRolston Rene _Resume
Rolston Rene _Resume
 
Kapruch steve
Kapruch steveKapruch steve
Kapruch steve
 
Lecture6
Lecture6Lecture6
Lecture6
 
Terry.cooke davies
Terry.cooke daviesTerry.cooke davies
Terry.cooke davies
 
EGENindepth_v3_recto
EGENindepth_v3_rectoEGENindepth_v3_recto
EGENindepth_v3_recto
 
Pm610 1103 b-02-schwappach-loren-p2-ip2
Pm610 1103 b-02-schwappach-loren-p2-ip2Pm610 1103 b-02-schwappach-loren-p2-ip2
Pm610 1103 b-02-schwappach-loren-p2-ip2
 
01 intro+
01 intro+01 intro+
01 intro+
 
Dell Nycdoe Pcs Presentation
Dell Nycdoe Pcs PresentationDell Nycdoe Pcs Presentation
Dell Nycdoe Pcs Presentation
 
VMWorld 2004 - Justifying the transition from Physical to Virtual
VMWorld 2004 - Justifying the transition from Physical to VirtualVMWorld 2004 - Justifying the transition from Physical to Virtual
VMWorld 2004 - Justifying the transition from Physical to Virtual
 
Windows Server 2003 EOS : l'opportunité de repenser votre IT et mettre en pla...
Windows Server 2003 EOS : l'opportunité de repenser votre IT et mettre en pla...Windows Server 2003 EOS : l'opportunité de repenser votre IT et mettre en pla...
Windows Server 2003 EOS : l'opportunité de repenser votre IT et mettre en pla...
 
PRAKASH P
PRAKASH PPRAKASH P
PRAKASH P
 
Case Study with Spectrum Integrity
Case Study with Spectrum IntegrityCase Study with Spectrum Integrity
Case Study with Spectrum Integrity
 
Devops
DevopsDevops
Devops
 
Fundamentals of Deploy and Release
Fundamentals of Deploy and ReleaseFundamentals of Deploy and Release
Fundamentals of Deploy and Release
 
Software Lifecycle
Software LifecycleSoftware Lifecycle
Software Lifecycle
 
How We Built Test Automation within a Manual Testing Organization
How We Built Test Automation within a Manual Testing OrganizationHow We Built Test Automation within a Manual Testing Organization
How We Built Test Automation within a Manual Testing Organization
 
Your CEO's Teams Calls Keep Dropping... What do you do?
Your CEO's Teams Calls Keep Dropping... What do you do?Your CEO's Teams Calls Keep Dropping... What do you do?
Your CEO's Teams Calls Keep Dropping... What do you do?
 
Alliance 2017 3891-University of California | Office of The President People...
Alliance 2017  3891-University of California | Office of The President People...Alliance 2017  3891-University of California | Office of The President People...
Alliance 2017 3891-University of California | Office of The President People...
 

Similar to Dell EMC™ ProDeploy set up a production-ready environment in less time and fewer steps

Using Dell ProDeploy Plus for Infrastructure can improve deployment times for...
Using Dell ProDeploy Plus for Infrastructure can improve deployment times for...Using Dell ProDeploy Plus for Infrastructure can improve deployment times for...
Using Dell ProDeploy Plus for Infrastructure can improve deployment times for...Principled Technologies
 
Speed up system deployment with Dell Connected Configuration services
Speed up system deployment with Dell Connected Configuration servicesSpeed up system deployment with Dell Connected Configuration services
Speed up system deployment with Dell Connected Configuration servicesPrincipled Technologies
 
Spend less time, effort, and money by choosing a Dell EMC server with pre-ins...
Spend less time, effort, and money by choosing a Dell EMC server with pre-ins...Spend less time, effort, and money by choosing a Dell EMC server with pre-ins...
Spend less time, effort, and money by choosing a Dell EMC server with pre-ins...Principled Technologies
 
The evolution of Dell EMC PowerEdge server systems management - Infographic
The evolution of Dell EMC PowerEdge server systems management - InfographicThe evolution of Dell EMC PowerEdge server systems management - Infographic
The evolution of Dell EMC PowerEdge server systems management - InfographicPrincipled Technologies
 
Dell PowerEdge VRTX and M-series compute nodes configuration study
Dell PowerEdge VRTX and M-series compute nodes configuration studyDell PowerEdge VRTX and M-series compute nodes configuration study
Dell PowerEdge VRTX and M-series compute nodes configuration studyPrincipled Technologies
 
Faster and easier server installation with Dell ProDeploy Factory Configurati...
Faster and easier server installation with Dell ProDeploy Factory Configurati...Faster and easier server installation with Dell ProDeploy Factory Configurati...
Faster and easier server installation with Dell ProDeploy Factory Configurati...Principled Technologies
 
Remote notebook management: Dell unique vPro extensions and Dell Client Integ...
Remote notebook management: Dell unique vPro extensions and Dell Client Integ...Remote notebook management: Dell unique vPro extensions and Dell Client Integ...
Remote notebook management: Dell unique vPro extensions and Dell Client Integ...Principled Technologies
 
Simplify administrator tasks and improve security and health monitoring with ...
Simplify administrator tasks and improve security and health monitoring with ...Simplify administrator tasks and improve security and health monitoring with ...
Simplify administrator tasks and improve security and health monitoring with ...Principled Technologies
 
Systems management savings with Dell OpenManage on 13G Dell PowerEdge servers
Systems management savings with Dell OpenManage on 13G Dell PowerEdge servers Systems management savings with Dell OpenManage on 13G Dell PowerEdge servers
Systems management savings with Dell OpenManage on 13G Dell PowerEdge servers Principled Technologies
 
Reduce complexity and save money with Dell Engineered Solutions for VMware EV...
Reduce complexity and save money with Dell Engineered Solutions for VMware EV...Reduce complexity and save money with Dell Engineered Solutions for VMware EV...
Reduce complexity and save money with Dell Engineered Solutions for VMware EV...Principled Technologies
 
Microsoft System Center virtual environment comparison: Dell PowerEdge server...
Microsoft System Center virtual environment comparison: Dell PowerEdge server...Microsoft System Center virtual environment comparison: Dell PowerEdge server...
Microsoft System Center virtual environment comparison: Dell PowerEdge server...Principled Technologies
 
Simplifying systems management with Dell OpenManage on 13G Dell PowerEdge ser...
Simplifying systems management with Dell OpenManage on 13G Dell PowerEdge ser...Simplifying systems management with Dell OpenManage on 13G Dell PowerEdge ser...
Simplifying systems management with Dell OpenManage on 13G Dell PowerEdge ser...Principled Technologies
 
Design advantages of Hadoop ETL offload with the Intel processor-powered Dell...
Design advantages of Hadoop ETL offload with the Intel processor-powered Dell...Design advantages of Hadoop ETL offload with the Intel processor-powered Dell...
Design advantages of Hadoop ETL offload with the Intel processor-powered Dell...Principled Technologies
 
Efficient and versatile hardware management with Dell PowerEdge VRTX
Efficient and versatile hardware management with Dell PowerEdge VRTXEfficient and versatile hardware management with Dell PowerEdge VRTX
Efficient and versatile hardware management with Dell PowerEdge VRTXPrincipled Technologies
 
Dell EMC PowerEdge MX streamlined routine tasks including deployment, firmwar...
Dell EMC PowerEdge MX streamlined routine tasks including deployment, firmwar...Dell EMC PowerEdge MX streamlined routine tasks including deployment, firmwar...
Dell EMC PowerEdge MX streamlined routine tasks including deployment, firmwar...Principled Technologies
 
Tips_Tricks_for_Oracle_E-Business Suite_Database_Upgrade.pdf
Tips_Tricks_for_Oracle_E-Business Suite_Database_Upgrade.pdfTips_Tricks_for_Oracle_E-Business Suite_Database_Upgrade.pdf
Tips_Tricks_for_Oracle_E-Business Suite_Database_Upgrade.pdfAkhashRamnath
 
Smarter z/OS Software Delivery using Rational Enterprise Cloud Solutions
Smarter z/OS Software Delivery using Rational Enterprise Cloud SolutionsSmarter z/OS Software Delivery using Rational Enterprise Cloud Solutions
Smarter z/OS Software Delivery using Rational Enterprise Cloud SolutionsJean-Yves Rigolet
 
Reducing deployment time with Dell Chassis Management Controller
Reducing deployment time with Dell Chassis Management ControllerReducing deployment time with Dell Chassis Management Controller
Reducing deployment time with Dell Chassis Management ControllerPrincipled Technologies
 
DellEMC Forum NYC - DevOps and Digital Trans vPublic
DellEMC Forum NYC - DevOps and Digital Trans vPublicDellEMC Forum NYC - DevOps and Digital Trans vPublic
DellEMC Forum NYC - DevOps and Digital Trans vPublicDon Demcsak
 
Performance advantages of Hadoop ETL offload with the Intel processor-powered...
Performance advantages of Hadoop ETL offload with the Intel processor-powered...Performance advantages of Hadoop ETL offload with the Intel processor-powered...
Performance advantages of Hadoop ETL offload with the Intel processor-powered...Principled Technologies
 

Similar to Dell EMC™ ProDeploy set up a production-ready environment in less time and fewer steps (20)

Using Dell ProDeploy Plus for Infrastructure can improve deployment times for...
Using Dell ProDeploy Plus for Infrastructure can improve deployment times for...Using Dell ProDeploy Plus for Infrastructure can improve deployment times for...
Using Dell ProDeploy Plus for Infrastructure can improve deployment times for...
 
Speed up system deployment with Dell Connected Configuration services
Speed up system deployment with Dell Connected Configuration servicesSpeed up system deployment with Dell Connected Configuration services
Speed up system deployment with Dell Connected Configuration services
 
Spend less time, effort, and money by choosing a Dell EMC server with pre-ins...
Spend less time, effort, and money by choosing a Dell EMC server with pre-ins...Spend less time, effort, and money by choosing a Dell EMC server with pre-ins...
Spend less time, effort, and money by choosing a Dell EMC server with pre-ins...
 
The evolution of Dell EMC PowerEdge server systems management - Infographic
The evolution of Dell EMC PowerEdge server systems management - InfographicThe evolution of Dell EMC PowerEdge server systems management - Infographic
The evolution of Dell EMC PowerEdge server systems management - Infographic
 
Dell PowerEdge VRTX and M-series compute nodes configuration study
Dell PowerEdge VRTX and M-series compute nodes configuration studyDell PowerEdge VRTX and M-series compute nodes configuration study
Dell PowerEdge VRTX and M-series compute nodes configuration study
 
Faster and easier server installation with Dell ProDeploy Factory Configurati...
Faster and easier server installation with Dell ProDeploy Factory Configurati...Faster and easier server installation with Dell ProDeploy Factory Configurati...
Faster and easier server installation with Dell ProDeploy Factory Configurati...
 
Remote notebook management: Dell unique vPro extensions and Dell Client Integ...
Remote notebook management: Dell unique vPro extensions and Dell Client Integ...Remote notebook management: Dell unique vPro extensions and Dell Client Integ...
Remote notebook management: Dell unique vPro extensions and Dell Client Integ...
 
Simplify administrator tasks and improve security and health monitoring with ...
Simplify administrator tasks and improve security and health monitoring with ...Simplify administrator tasks and improve security and health monitoring with ...
Simplify administrator tasks and improve security and health monitoring with ...
 
Systems management savings with Dell OpenManage on 13G Dell PowerEdge servers
Systems management savings with Dell OpenManage on 13G Dell PowerEdge servers Systems management savings with Dell OpenManage on 13G Dell PowerEdge servers
Systems management savings with Dell OpenManage on 13G Dell PowerEdge servers
 
Reduce complexity and save money with Dell Engineered Solutions for VMware EV...
Reduce complexity and save money with Dell Engineered Solutions for VMware EV...Reduce complexity and save money with Dell Engineered Solutions for VMware EV...
Reduce complexity and save money with Dell Engineered Solutions for VMware EV...
 
Microsoft System Center virtual environment comparison: Dell PowerEdge server...
Microsoft System Center virtual environment comparison: Dell PowerEdge server...Microsoft System Center virtual environment comparison: Dell PowerEdge server...
Microsoft System Center virtual environment comparison: Dell PowerEdge server...
 
Simplifying systems management with Dell OpenManage on 13G Dell PowerEdge ser...
Simplifying systems management with Dell OpenManage on 13G Dell PowerEdge ser...Simplifying systems management with Dell OpenManage on 13G Dell PowerEdge ser...
Simplifying systems management with Dell OpenManage on 13G Dell PowerEdge ser...
 
Design advantages of Hadoop ETL offload with the Intel processor-powered Dell...
Design advantages of Hadoop ETL offload with the Intel processor-powered Dell...Design advantages of Hadoop ETL offload with the Intel processor-powered Dell...
Design advantages of Hadoop ETL offload with the Intel processor-powered Dell...
 
Efficient and versatile hardware management with Dell PowerEdge VRTX
Efficient and versatile hardware management with Dell PowerEdge VRTXEfficient and versatile hardware management with Dell PowerEdge VRTX
Efficient and versatile hardware management with Dell PowerEdge VRTX
 
Dell EMC PowerEdge MX streamlined routine tasks including deployment, firmwar...
Dell EMC PowerEdge MX streamlined routine tasks including deployment, firmwar...Dell EMC PowerEdge MX streamlined routine tasks including deployment, firmwar...
Dell EMC PowerEdge MX streamlined routine tasks including deployment, firmwar...
 
Tips_Tricks_for_Oracle_E-Business Suite_Database_Upgrade.pdf
Tips_Tricks_for_Oracle_E-Business Suite_Database_Upgrade.pdfTips_Tricks_for_Oracle_E-Business Suite_Database_Upgrade.pdf
Tips_Tricks_for_Oracle_E-Business Suite_Database_Upgrade.pdf
 
Smarter z/OS Software Delivery using Rational Enterprise Cloud Solutions
Smarter z/OS Software Delivery using Rational Enterprise Cloud SolutionsSmarter z/OS Software Delivery using Rational Enterprise Cloud Solutions
Smarter z/OS Software Delivery using Rational Enterprise Cloud Solutions
 
Reducing deployment time with Dell Chassis Management Controller
Reducing deployment time with Dell Chassis Management ControllerReducing deployment time with Dell Chassis Management Controller
Reducing deployment time with Dell Chassis Management Controller
 
DellEMC Forum NYC - DevOps and Digital Trans vPublic
DellEMC Forum NYC - DevOps and Digital Trans vPublicDellEMC Forum NYC - DevOps and Digital Trans vPublic
DellEMC Forum NYC - DevOps and Digital Trans vPublic
 
Performance advantages of Hadoop ETL offload with the Intel processor-powered...
Performance advantages of Hadoop ETL offload with the Intel processor-powered...Performance advantages of Hadoop ETL offload with the Intel processor-powered...
Performance advantages of Hadoop ETL offload with the Intel processor-powered...
 

More from Principled Technologies

Investing in GenAI: Cost‑benefit analysis of Dell on‑premises deployments vs....
Investing in GenAI: Cost‑benefit analysis of Dell on‑premises deployments vs....Investing in GenAI: Cost‑benefit analysis of Dell on‑premises deployments vs....
Investing in GenAI: Cost‑benefit analysis of Dell on‑premises deployments vs....Principled Technologies
 
Dell APEX Cloud Platform for Red Hat OpenShift: An easily deployable and powe...
Dell APEX Cloud Platform for Red Hat OpenShift: An easily deployable and powe...Dell APEX Cloud Platform for Red Hat OpenShift: An easily deployable and powe...
Dell APEX Cloud Platform for Red Hat OpenShift: An easily deployable and powe...Principled Technologies
 
Upgrade your cloud infrastructure with Dell PowerEdge R760 servers and VMware...
Upgrade your cloud infrastructure with Dell PowerEdge R760 servers and VMware...Upgrade your cloud infrastructure with Dell PowerEdge R760 servers and VMware...
Upgrade your cloud infrastructure with Dell PowerEdge R760 servers and VMware...Principled Technologies
 
Realize 2.1X the performance with 20% less power with AMD EPYC processor-back...
Realize 2.1X the performance with 20% less power with AMD EPYC processor-back...Realize 2.1X the performance with 20% less power with AMD EPYC processor-back...
Realize 2.1X the performance with 20% less power with AMD EPYC processor-back...Principled Technologies
 
Improve performance and gain room to grow by easily migrating to a modern Ope...
Improve performance and gain room to grow by easily migrating to a modern Ope...Improve performance and gain room to grow by easily migrating to a modern Ope...
Improve performance and gain room to grow by easily migrating to a modern Ope...Principled Technologies
 
Boost PC performance: How more available memory can improve productivity
Boost PC performance: How more available memory can improve productivityBoost PC performance: How more available memory can improve productivity
Boost PC performance: How more available memory can improve productivityPrincipled Technologies
 
Deploy with confidence: VMware Cloud Foundation 5.1 on next gen Dell PowerEdg...
Deploy with confidence: VMware Cloud Foundation 5.1 on next gen Dell PowerEdg...Deploy with confidence: VMware Cloud Foundation 5.1 on next gen Dell PowerEdg...
Deploy with confidence: VMware Cloud Foundation 5.1 on next gen Dell PowerEdg...Principled Technologies
 
Upgrade your cloud infrastructure with Dell PowerEdge R760 servers and VMware...
Upgrade your cloud infrastructure with Dell PowerEdge R760 servers and VMware...Upgrade your cloud infrastructure with Dell PowerEdge R760 servers and VMware...
Upgrade your cloud infrastructure with Dell PowerEdge R760 servers and VMware...Principled Technologies
 
A comparison of security features in Dell, HP, and Lenovo PC systems
A comparison of security features in Dell, HP, and Lenovo PC systemsA comparison of security features in Dell, HP, and Lenovo PC systems
A comparison of security features in Dell, HP, and Lenovo PC systemsPrincipled Technologies
 
Increase security, sustainability, and efficiency with robust Dell server man...
Increase security, sustainability, and efficiency with robust Dell server man...Increase security, sustainability, and efficiency with robust Dell server man...
Increase security, sustainability, and efficiency with robust Dell server man...Principled Technologies
 
Scale up your storage with higher-performing Dell APEX Block Storage for AWS ...
Scale up your storage with higher-performing Dell APEX Block Storage for AWS ...Scale up your storage with higher-performing Dell APEX Block Storage for AWS ...
Scale up your storage with higher-performing Dell APEX Block Storage for AWS ...Principled Technologies
 
Scale up your storage with higher-performing Dell APEX Block Storage for AWS
Scale up your storage with higher-performing Dell APEX Block Storage for AWSScale up your storage with higher-performing Dell APEX Block Storage for AWS
Scale up your storage with higher-performing Dell APEX Block Storage for AWSPrincipled Technologies
 
Get in and stay in the productivity zone with the HP Z2 G9 Tower Workstation
Get in and stay in the productivity zone with the HP Z2 G9 Tower WorkstationGet in and stay in the productivity zone with the HP Z2 G9 Tower Workstation
Get in and stay in the productivity zone with the HP Z2 G9 Tower WorkstationPrincipled Technologies
 
Open up new possibilities with higher transactional database performance from...
Open up new possibilities with higher transactional database performance from...Open up new possibilities with higher transactional database performance from...
Open up new possibilities with higher transactional database performance from...Principled Technologies
 
Improving database performance and value with an easy migration to Azure Data...
Improving database performance and value with an easy migration to Azure Data...Improving database performance and value with an easy migration to Azure Data...
Improving database performance and value with an easy migration to Azure Data...Principled Technologies
 
Realize better value and performance migrating from Azure Database for Postgr...
Realize better value and performance migrating from Azure Database for Postgr...Realize better value and performance migrating from Azure Database for Postgr...
Realize better value and performance migrating from Azure Database for Postgr...Principled Technologies
 
Set up students and teachers to excel now and in the future with Intel proces...
Set up students and teachers to excel now and in the future with Intel proces...Set up students and teachers to excel now and in the future with Intel proces...
Set up students and teachers to excel now and in the future with Intel proces...Principled Technologies
 

More from Principled Technologies (20)

Investing in GenAI: Cost‑benefit analysis of Dell on‑premises deployments vs....
Investing in GenAI: Cost‑benefit analysis of Dell on‑premises deployments vs....Investing in GenAI: Cost‑benefit analysis of Dell on‑premises deployments vs....
Investing in GenAI: Cost‑benefit analysis of Dell on‑premises deployments vs....
 
Dell APEX Cloud Platform for Red Hat OpenShift: An easily deployable and powe...
Dell APEX Cloud Platform for Red Hat OpenShift: An easily deployable and powe...Dell APEX Cloud Platform for Red Hat OpenShift: An easily deployable and powe...
Dell APEX Cloud Platform for Red Hat OpenShift: An easily deployable and powe...
 
Upgrade your cloud infrastructure with Dell PowerEdge R760 servers and VMware...
Upgrade your cloud infrastructure with Dell PowerEdge R760 servers and VMware...Upgrade your cloud infrastructure with Dell PowerEdge R760 servers and VMware...
Upgrade your cloud infrastructure with Dell PowerEdge R760 servers and VMware...
 
Upgrade your cloud infrastructure with Dell PowerEdge R760 servers and VMware...
Upgrade your cloud infrastructure with Dell PowerEdge R760 servers and VMware...Upgrade your cloud infrastructure with Dell PowerEdge R760 servers and VMware...
Upgrade your cloud infrastructure with Dell PowerEdge R760 servers and VMware...
 
Realize 2.1X the performance with 20% less power with AMD EPYC processor-back...
Realize 2.1X the performance with 20% less power with AMD EPYC processor-back...Realize 2.1X the performance with 20% less power with AMD EPYC processor-back...
Realize 2.1X the performance with 20% less power with AMD EPYC processor-back...
 
Improve performance and gain room to grow by easily migrating to a modern Ope...
Improve performance and gain room to grow by easily migrating to a modern Ope...Improve performance and gain room to grow by easily migrating to a modern Ope...
Improve performance and gain room to grow by easily migrating to a modern Ope...
 
Boost PC performance: How more available memory can improve productivity
Boost PC performance: How more available memory can improve productivityBoost PC performance: How more available memory can improve productivity
Boost PC performance: How more available memory can improve productivity
 
Deploy with confidence: VMware Cloud Foundation 5.1 on next gen Dell PowerEdg...
Deploy with confidence: VMware Cloud Foundation 5.1 on next gen Dell PowerEdg...Deploy with confidence: VMware Cloud Foundation 5.1 on next gen Dell PowerEdg...
Deploy with confidence: VMware Cloud Foundation 5.1 on next gen Dell PowerEdg...
 
Upgrade your cloud infrastructure with Dell PowerEdge R760 servers and VMware...
Upgrade your cloud infrastructure with Dell PowerEdge R760 servers and VMware...Upgrade your cloud infrastructure with Dell PowerEdge R760 servers and VMware...
Upgrade your cloud infrastructure with Dell PowerEdge R760 servers and VMware...
 
A comparison of security features in Dell, HP, and Lenovo PC systems
A comparison of security features in Dell, HP, and Lenovo PC systemsA comparison of security features in Dell, HP, and Lenovo PC systems
A comparison of security features in Dell, HP, and Lenovo PC systems
 
Increase security, sustainability, and efficiency with robust Dell server man...
Increase security, sustainability, and efficiency with robust Dell server man...Increase security, sustainability, and efficiency with robust Dell server man...
Increase security, sustainability, and efficiency with robust Dell server man...
 
Increase security, sustainability, and efficiency with robust Dell server man...
Increase security, sustainability, and efficiency with robust Dell server man...Increase security, sustainability, and efficiency with robust Dell server man...
Increase security, sustainability, and efficiency with robust Dell server man...
 
Scale up your storage with higher-performing Dell APEX Block Storage for AWS ...
Scale up your storage with higher-performing Dell APEX Block Storage for AWS ...Scale up your storage with higher-performing Dell APEX Block Storage for AWS ...
Scale up your storage with higher-performing Dell APEX Block Storage for AWS ...
 
Scale up your storage with higher-performing Dell APEX Block Storage for AWS
Scale up your storage with higher-performing Dell APEX Block Storage for AWSScale up your storage with higher-performing Dell APEX Block Storage for AWS
Scale up your storage with higher-performing Dell APEX Block Storage for AWS
 
Get in and stay in the productivity zone with the HP Z2 G9 Tower Workstation
Get in and stay in the productivity zone with the HP Z2 G9 Tower WorkstationGet in and stay in the productivity zone with the HP Z2 G9 Tower Workstation
Get in and stay in the productivity zone with the HP Z2 G9 Tower Workstation
 
Open up new possibilities with higher transactional database performance from...
Open up new possibilities with higher transactional database performance from...Open up new possibilities with higher transactional database performance from...
Open up new possibilities with higher transactional database performance from...
 
Improving database performance and value with an easy migration to Azure Data...
Improving database performance and value with an easy migration to Azure Data...Improving database performance and value with an easy migration to Azure Data...
Improving database performance and value with an easy migration to Azure Data...
 
Realize better value and performance migrating from Azure Database for Postgr...
Realize better value and performance migrating from Azure Database for Postgr...Realize better value and performance migrating from Azure Database for Postgr...
Realize better value and performance migrating from Azure Database for Postgr...
 
Realize better value and performance migrating from Azure Database for Postgr...
Realize better value and performance migrating from Azure Database for Postgr...Realize better value and performance migrating from Azure Database for Postgr...
Realize better value and performance migrating from Azure Database for Postgr...
 
Set up students and teachers to excel now and in the future with Intel proces...
Set up students and teachers to excel now and in the future with Intel proces...Set up students and teachers to excel now and in the future with Intel proces...
Set up students and teachers to excel now and in the future with Intel proces...
 

Recently uploaded

Elevate Developer Efficiency & build GenAI Application with Amazon Q​
Elevate Developer Efficiency & build GenAI Application with Amazon Q​Elevate Developer Efficiency & build GenAI Application with Amazon Q​
Elevate Developer Efficiency & build GenAI Application with Amazon Q​Bhuvaneswari Subramani
 
Introduction to use of FHIR Documents in ABDM
Introduction to use of FHIR Documents in ABDMIntroduction to use of FHIR Documents in ABDM
Introduction to use of FHIR Documents in ABDMKumar Satyam
 
[BuildWithAI] Introduction to Gemini.pdf
[BuildWithAI] Introduction to Gemini.pdf[BuildWithAI] Introduction to Gemini.pdf
[BuildWithAI] Introduction to Gemini.pdfSandro Moreira
 
TrustArc Webinar - Unified Trust Center for Privacy, Security, Compliance, an...
TrustArc Webinar - Unified Trust Center for Privacy, Security, Compliance, an...TrustArc Webinar - Unified Trust Center for Privacy, Security, Compliance, an...
TrustArc Webinar - Unified Trust Center for Privacy, Security, Compliance, an...TrustArc
 
Decarbonising Commercial Real Estate: The Role of Operational Performance
Decarbonising Commercial Real Estate: The Role of Operational PerformanceDecarbonising Commercial Real Estate: The Role of Operational Performance
Decarbonising Commercial Real Estate: The Role of Operational PerformanceIES VE
 
JavaScript Usage Statistics 2024 - The Ultimate Guide
JavaScript Usage Statistics 2024 - The Ultimate GuideJavaScript Usage Statistics 2024 - The Ultimate Guide
JavaScript Usage Statistics 2024 - The Ultimate GuidePixlogix Infotech
 
"I see eyes in my soup": How Delivery Hero implemented the safety system for ...
"I see eyes in my soup": How Delivery Hero implemented the safety system for ..."I see eyes in my soup": How Delivery Hero implemented the safety system for ...
"I see eyes in my soup": How Delivery Hero implemented the safety system for ...Zilliz
 
ChatGPT and Beyond - Elevating DevOps Productivity
ChatGPT and Beyond - Elevating DevOps ProductivityChatGPT and Beyond - Elevating DevOps Productivity
ChatGPT and Beyond - Elevating DevOps ProductivityVictorSzoltysek
 
Simplifying Mobile A11y Presentation.pptx
Simplifying Mobile A11y Presentation.pptxSimplifying Mobile A11y Presentation.pptx
Simplifying Mobile A11y Presentation.pptxMarkSteadman7
 
Stronger Together: Developing an Organizational Strategy for Accessible Desig...
Stronger Together: Developing an Organizational Strategy for Accessible Desig...Stronger Together: Developing an Organizational Strategy for Accessible Desig...
Stronger Together: Developing an Organizational Strategy for Accessible Desig...caitlingebhard1
 
Polkadot JAM Slides - Token2049 - By Dr. Gavin Wood
Polkadot JAM Slides - Token2049 - By Dr. Gavin WoodPolkadot JAM Slides - Token2049 - By Dr. Gavin Wood
Polkadot JAM Slides - Token2049 - By Dr. Gavin WoodJuan lago vázquez
 
TEST BANK For Principles of Anatomy and Physiology, 16th Edition by Gerard J....
TEST BANK For Principles of Anatomy and Physiology, 16th Edition by Gerard J....TEST BANK For Principles of Anatomy and Physiology, 16th Edition by Gerard J....
TEST BANK For Principles of Anatomy and Physiology, 16th Edition by Gerard J....rightmanforbloodline
 
Navigating the Deluge_ Dubai Floods and the Resilience of Dubai International...
Navigating the Deluge_ Dubai Floods and the Resilience of Dubai International...Navigating the Deluge_ Dubai Floods and the Resilience of Dubai International...
Navigating the Deluge_ Dubai Floods and the Resilience of Dubai International...Orbitshub
 
DEV meet-up UiPath Document Understanding May 7 2024 Amsterdam
DEV meet-up UiPath Document Understanding May 7 2024 AmsterdamDEV meet-up UiPath Document Understanding May 7 2024 Amsterdam
DEV meet-up UiPath Document Understanding May 7 2024 AmsterdamUiPathCommunity
 
Modernizing Legacy Systems Using Ballerina
Modernizing Legacy Systems Using BallerinaModernizing Legacy Systems Using Ballerina
Modernizing Legacy Systems Using BallerinaWSO2
 
API Governance and Monetization - The evolution of API governance
API Governance and Monetization -  The evolution of API governanceAPI Governance and Monetization -  The evolution of API governance
API Governance and Monetization - The evolution of API governanceWSO2
 
Six Myths about Ontologies: The Basics of Formal Ontology
Six Myths about Ontologies: The Basics of Formal OntologySix Myths about Ontologies: The Basics of Formal Ontology
Six Myths about Ontologies: The Basics of Formal Ontologyjohnbeverley2021
 
Corporate and higher education May webinar.pptx
Corporate and higher education May webinar.pptxCorporate and higher education May webinar.pptx
Corporate and higher education May webinar.pptxRustici Software
 
Web Form Automation for Bonterra Impact Management (fka Social Solutions Apri...
Web Form Automation for Bonterra Impact Management (fka Social Solutions Apri...Web Form Automation for Bonterra Impact Management (fka Social Solutions Apri...
Web Form Automation for Bonterra Impact Management (fka Social Solutions Apri...Jeffrey Haguewood
 

Recently uploaded (20)

Understanding the FAA Part 107 License ..
Understanding the FAA Part 107 License ..Understanding the FAA Part 107 License ..
Understanding the FAA Part 107 License ..
 
Elevate Developer Efficiency & build GenAI Application with Amazon Q​
Elevate Developer Efficiency & build GenAI Application with Amazon Q​Elevate Developer Efficiency & build GenAI Application with Amazon Q​
Elevate Developer Efficiency & build GenAI Application with Amazon Q​
 
Introduction to use of FHIR Documents in ABDM
Introduction to use of FHIR Documents in ABDMIntroduction to use of FHIR Documents in ABDM
Introduction to use of FHIR Documents in ABDM
 
[BuildWithAI] Introduction to Gemini.pdf
[BuildWithAI] Introduction to Gemini.pdf[BuildWithAI] Introduction to Gemini.pdf
[BuildWithAI] Introduction to Gemini.pdf
 
TrustArc Webinar - Unified Trust Center for Privacy, Security, Compliance, an...
TrustArc Webinar - Unified Trust Center for Privacy, Security, Compliance, an...TrustArc Webinar - Unified Trust Center for Privacy, Security, Compliance, an...
TrustArc Webinar - Unified Trust Center for Privacy, Security, Compliance, an...
 
Decarbonising Commercial Real Estate: The Role of Operational Performance
Decarbonising Commercial Real Estate: The Role of Operational PerformanceDecarbonising Commercial Real Estate: The Role of Operational Performance
Decarbonising Commercial Real Estate: The Role of Operational Performance
 
JavaScript Usage Statistics 2024 - The Ultimate Guide
JavaScript Usage Statistics 2024 - The Ultimate GuideJavaScript Usage Statistics 2024 - The Ultimate Guide
JavaScript Usage Statistics 2024 - The Ultimate Guide
 
"I see eyes in my soup": How Delivery Hero implemented the safety system for ...
"I see eyes in my soup": How Delivery Hero implemented the safety system for ..."I see eyes in my soup": How Delivery Hero implemented the safety system for ...
"I see eyes in my soup": How Delivery Hero implemented the safety system for ...
 
ChatGPT and Beyond - Elevating DevOps Productivity
ChatGPT and Beyond - Elevating DevOps ProductivityChatGPT and Beyond - Elevating DevOps Productivity
ChatGPT and Beyond - Elevating DevOps Productivity
 
Simplifying Mobile A11y Presentation.pptx
Simplifying Mobile A11y Presentation.pptxSimplifying Mobile A11y Presentation.pptx
Simplifying Mobile A11y Presentation.pptx
 
Stronger Together: Developing an Organizational Strategy for Accessible Desig...
Stronger Together: Developing an Organizational Strategy for Accessible Desig...Stronger Together: Developing an Organizational Strategy for Accessible Desig...
Stronger Together: Developing an Organizational Strategy for Accessible Desig...
 
Polkadot JAM Slides - Token2049 - By Dr. Gavin Wood
Polkadot JAM Slides - Token2049 - By Dr. Gavin WoodPolkadot JAM Slides - Token2049 - By Dr. Gavin Wood
Polkadot JAM Slides - Token2049 - By Dr. Gavin Wood
 
TEST BANK For Principles of Anatomy and Physiology, 16th Edition by Gerard J....
TEST BANK For Principles of Anatomy and Physiology, 16th Edition by Gerard J....TEST BANK For Principles of Anatomy and Physiology, 16th Edition by Gerard J....
TEST BANK For Principles of Anatomy and Physiology, 16th Edition by Gerard J....
 
Navigating the Deluge_ Dubai Floods and the Resilience of Dubai International...
Navigating the Deluge_ Dubai Floods and the Resilience of Dubai International...Navigating the Deluge_ Dubai Floods and the Resilience of Dubai International...
Navigating the Deluge_ Dubai Floods and the Resilience of Dubai International...
 
DEV meet-up UiPath Document Understanding May 7 2024 Amsterdam
DEV meet-up UiPath Document Understanding May 7 2024 AmsterdamDEV meet-up UiPath Document Understanding May 7 2024 Amsterdam
DEV meet-up UiPath Document Understanding May 7 2024 Amsterdam
 
Modernizing Legacy Systems Using Ballerina
Modernizing Legacy Systems Using BallerinaModernizing Legacy Systems Using Ballerina
Modernizing Legacy Systems Using Ballerina
 
API Governance and Monetization - The evolution of API governance
API Governance and Monetization -  The evolution of API governanceAPI Governance and Monetization -  The evolution of API governance
API Governance and Monetization - The evolution of API governance
 
Six Myths about Ontologies: The Basics of Formal Ontology
Six Myths about Ontologies: The Basics of Formal OntologySix Myths about Ontologies: The Basics of Formal Ontology
Six Myths about Ontologies: The Basics of Formal Ontology
 
Corporate and higher education May webinar.pptx
Corporate and higher education May webinar.pptxCorporate and higher education May webinar.pptx
Corporate and higher education May webinar.pptx
 
Web Form Automation for Bonterra Impact Management (fka Social Solutions Apri...
Web Form Automation for Bonterra Impact Management (fka Social Solutions Apri...Web Form Automation for Bonterra Impact Management (fka Social Solutions Apri...
Web Form Automation for Bonterra Impact Management (fka Social Solutions Apri...
 

Dell EMC™ ProDeploy set up a production-ready environment in less time and fewer steps

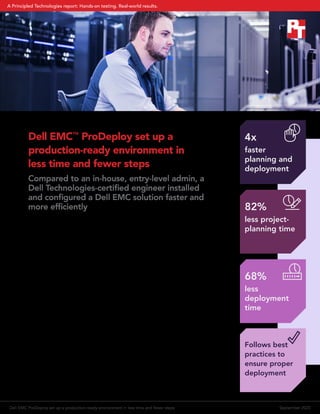
  • 1. Dell EMC™ ProDeploy set up a production-ready environment in less time and fewer steps Compared to an in-house, entry-level admin, a Dell Technologies-certified engineer installed and configured a Dell EMC solution faster and more efficiently Adding resources to your data center can help you meet key business goals quickly. The faster admins can deploy and configure new hardware, the sooner your critical applications will have access to resources that could boost revenue streams, expand a customer base, or promote other positive business outcomes. Choosing Dell EMC™ ProDeploy to install and configure your new Dell EMC hardware could allow your organization to feel the impact of new resources sooner than deploying with in-house, entry-level admins. In our data center, a Dell Technologies-certified engineer installed and configured a Dell EMC solution of Dell EMC PowerEdge™ R740 servers, Dell EMC PowerSwitch S4048-ON switches, and a Dell EMC Unity array in 68 percent less time than our in-house admin deployed the same solution. In addition, ProDeploy required little from our in-house project manager, which allowed them to do other work. A Dell Technologies-certified engineer deploying Dell EMC hardware in your data center could mean your IT staff would have more time to spend on other strategic IT initiatives. 4x faster planning and deployment 82% less project- planning time 68% less deployment time Follows best practices to ensure proper deployment Dell EMC ProDeploy set up a production-ready environment in less time and fewer steps September 2020 A Principled Technologies report: Hands-on testing. Real-world results.
  • 2. First things first: Save critical time by planning deployment with a Dell Technologies project manager Project planning can help make even the most complex solution deployment less frustrating and time consuming. Planning phases give IT teams time to understand necessary planning processes, read supporting documentation, and learn toolsets before touching any hardware. Planning a deployment can (and some might say should) include validating power and connectivity requirements, determining site readiness, and reviewing best practices. Without these tasks, organizations could see serious delays and performance impacts. However, Dell Technologies project managers and engineers from ProDeploy already know the approaches, tools, and best practices for Dell EMC solutions. Before a Dell Technologies engineer did any physical work to deploy the solution in Figure 1 (for detailed configuration information of the solution, see the section System configuration information), a Dell Technologies project manager guided the deployment through the planning phase. They gathered and documented the project requirements and developed a detailed project roadmap and implementation plan with our in-house project manager that highlighted best deployment paths and best practices. Our in-house staff played a role in only the planning phase of the ProDeploy deployment; the Dell Technologies-certified engineer handled the hardware unboxing, racking, and deployment and the Dell Technologies project manager assisted with planning. Choosing ProDeploy can significantly minimize your IT staff’s involvement in planning, which allows them to focus on other tasks. Without ProDeploy, our entry-level admin had to spend time planning the deployment of the solution in Figure 1. Both deployments (with and without ProDeploy) needed a project-planning phase, but as Figure 2 shows, the Dell Technologies project manager saved our IT staff significant time compared to our entry-level person planning on their own. Required involvement from entry-level admin with ProDeploy without ProDeploy (entry-level admin) Total time: 8h 1min (4x faster) Planning: 2h 35min Total time: 32h 5min Planning: 14h 45min Less time is better Dell EMC PowerConnect 5448 switch 2x Dell EMC PowerSwitch S4048-ON 10GbE switches 4x Dell EMC PowerEdge R740 servers 1x Dell EMC Unity 650F all-flash storage Figure 1: Illustration of the Dell EMC solution. Source: Principled Technologies. Figure 2: Time required of an in-house, entry-level admin with and without Dell EMC ProDeploy service. Source: Principled Technologies. Dell EMC ProDeploy set up a production-ready environment in less time and fewer steps September 2020 | 2
  • 3. A ProDeploy engineer needed less time than our entry-level admin For the ProDeploy deployment, our entry-level admin spent 2 hours and 35 minutes planning the deployment with a Dell Technologies project manager before the Dell Technologies-certified engineer arrived at our datacenter. Those 2 hours and 35 minutes completed our involvement; we did not need to be involved in any further planning or deployment. Over the course of two business days, the Dell Technologies-certified engineer spent 5 hours and 26 minutes physically installing and configuring the PowerEdge servers, networking components, Unity array, and software. Without ProDeploy, we spent 32 hours and 5 minutes installing and configuring the solution over six business days. Figure 3 breaks down deployment in business days. Highlights include the following: • With ProDeploy, unboxing and racking the PowerEdge servers, networking components, and the Unity array took 83 percent less time and saved 2 hours and 9 minutes compared to the time it took our in-house, entry- level admin. ProDeploy saved 2 hours and 45 minutes when cabling the solution. • Setting up the networking components with ProDeploy saved nearly 1 hour and 58 minutes and took 85 percent less time. • Following deployment best practices took longer for our entry-level admin because they required deployment documentation for guidance. • With ProDeploy, configuring the Dell EMC Unity array, upgrading its firmware and software, and performing a health check on the array saved 1 hour and 3 minutes and took 42 percent less time. • With ProDeploy, installing the OS, updating the server firmware, setting up VMware vCenter® , and updating VMware ESXi™ saved a sizable chunk of time—almost 4 hours—and took 60 percent less time. Table 1 breaks down the deployment times by stage of installation and configuration in hours and minutes. Table 1: Comparison of time (in hours:minutes) required to complete each stage of the deployment process for an in-house, entry-level admin and a Dell Technologies-certified engineer. Source: Principled Technologies. Stage Entry-level admin ProDeploy engineer ProDeploy percentage less time Planning 14:45 2:35 82% Racking hardware & cabling 5:55 1:01 82% Configuring networking 2:18 0:20 85% Configuring OS & firmware 6:38 2:39 60% Configuring storage 2:29 1:26 42% Total deployment time without planning stage 17:20 5:26 68% Total planning and deployment time 32:05 8:01 75% ProDeploy engineer Entry-level admin 8h 1min (4x faster) 32h 5min Mon Tues Tues Wed Thurs Fri MonMon Time spent on deployment each day Less time is better Figure 3: Comparison of time required to complete server deployment for a Dell Technologies-certified engineer and an in-house, entry-level admin. Source: Principled Technologies. Dell EMC ProDeploy set up a production-ready environment in less time and fewer steps September 2020 | 3
  • 4. Day-by-day breakdown: ProDeploy vs. in-house deployment Table 2 shows how our in-house admin and the Dell Technologies-certified engineer spent their time on the first day. Without ProDeploy, we spent the first 4 hours confirming implementation details with our in-house project manager. It took the Dell Technologies-certified engineer 1 hour and 38 fewer minutes to plan the deployment; unbox, rack, and cable the solution; conduct a health check; update the server firmware; install the OS; configure the Ethernet switch; set up vCenter; and update ESXi than it took us to plan this first day and unbox, rack, and cable the PowerEdge servers, networking components, and Unity array. Table 2: Comparison between an in-house, entry-level admin and a Dell Technologies-certified engineer for time (in hours:minutes) required to deploy the solution during day one. Source: Principled Technologies. Stage Entry-level admin ProDeploy engineer Planning 4:00 2:35 Unboxing and racking 2:35 0:26 Initial cabling 1:15 0:35 Checking server health 0:25 Updating server firmware 0:28 OS installation 0:12 Ethernet switch config 0:20 vCenter setup 0:21 ESXi updates 0:50 Time spent deploying the Dell EMC solution 7:50 6:12 Table 3 shows how our admin without ProDeploy and the Dell Technologies-certified engineer spent their time on the second day. In addition to the deployment, our admin had to address unrelated administrative and routine tasks that needed immediate attention. The Dell Technologies-certified engineer, however, was able to focus and complete the deployment. Table 3: Comparison between an in-house, entry-level admin and a Dell Technologies-certified engineer for time (in hours:minutes) required to deploy the solution during day two. Source: Principled Technologies. Stage Entry-level admin ProDeploy engineer Planning 1:15 Initial cabling 2:05 Storage configuration 0:23 Storage firmware/software upgrade 0:38 **Installation of OME and SAE 0:48 Time spent deploying the Dell EMC solution 3:20 1:49 Dell EMC ProDeploy set up a production-ready environment in less time and fewer steps September 2020 | 4
  • 5. It took our in-house, entry-level admin four more business days to finish planning the installation as well as to finish installing and configuring the new PowerEdge servers, networking components, and Unity arrays from Dell EMC. That’s six business days total, compared to the two business days it took the Dell Technologies-certified engineer. An organization would have had the new PowerEdge servers, networking components, and Unity array up and running six days earlier (including Saturday and Sunday) by using ProDeploy. After two days, our admin still had a lot to do, as Table 4 shows. Table 4: Breakdown of in-house, entry-level admin time (in hours:minutes) on the remaining days. Source: Principled Technologies. Stage Entry-level admin ProDeploy engineer (Day 3) Wednesday Planning 3:00 Time spent deploying the Dell EMC solution 3:00 0:00 (Day 4) Thursday Planning 3:45 Health check 0:30 Time spent deploying the Dell EMC solution 4:15 0:00 (Day 5) Friday Planning 1:15 Configuring storage 0:42 Upgrading storage firmware 1:17 Server firmware update 0:42 OS installation 0:27 Ethernet switch config 0:53 ESXi updates 0:36 Time spent deploying the Dell EMC solution 5:52 0:00 (Day 6) Monday Planning 1:30 Ethernet switch config 1:25 vCenter setup 0:48 ESXi updates 1:00 Installing OME and SAE 3:05 Time spent deploying the Dell EMC solution 7:48 0:00 Dell EMC ProDeploy set up a production-ready environment in less time and fewer steps September 2020 | 5
  • 6. Get additional post-deployment care from Dell Technologies After installing and configuring the solution, our in-house admin and the Dell Technologies-certified engineer initiated post-deployment services. These were mostly checks to ensure things were running smoothly. However, the Dell Technologies-certified engineer took some extra time to do things beyond deployment. In addition to collecting environment configuration across all the platforms, they performed a final health check, validated that they had implemented all configuration best practices, and completed the remaining documentation. Conclusion Choosing ProDeploy to install and configure new Dell EMC hardware means your organization can get new data center resources to applications more quickly without tying up too much of an admin’s time. In our data center: • The Dell Technologies-certified engineer installed and configured the Dell EMC solution in 68 percent less time, saving 11 hours and 54 minutes and allowing our in-house admin to focus on organizational demands and other strategic initiatives. • Installing and configuring the Dell EMC solution with ProDeploy reduced the total planning and deployment time by 75 percent, 4 times faster than our in-house admin. • The Dell Technologies-certified engineer needed only 5 hours and 26 minutes over two business days to deploy the Dell EMC solution. • Without ProDeploy, it took more than 17 hours over six business days for our in-house, entry-level admin to install and configure the same solution. • Familiarity with the solution components allowed the Dell Technologies-certified engineer to complete tasks, such as configuring the network, faster than our in-house, entry-level admin, who sometimes needed documentation and guidance from our project manager. With ProDeploy, your organization can realize a faster, more efficient deployment with minimal impact on your in-house IT staff. Compliance with COVID-19 restrictions Before the Dell Technologies engineer visited our data center, we informed them of our social distancing policy and face covering requirement to help reduce the potential spread of the virus causing coronavirus disease 2019 (COVID-19). The engineer complied by maintaining a distance of at least six feet from others and by wearing a mask that covered their mouth and nose at all times. Dell EMC ProDeploy set up a production-ready environment in less time and fewer steps September 2020 | 6
  • 7. We concluded our hands-on testing on July 7, 2020. During testing, we determined the appropriate hardware and software configurations and applied updates as they became available. The results in this report reflect configurations that we finalized on June 23, 2020 or earlier. Unavoidably, these configurations may not represent the latest versions available when this report appears. Our results For our calculations, we found that the Dell EMC ProDeploy time of 8 hours and 1 minute was just under a quarter of the in-house, entry level time of 32 hours and 5 minutes. Therefore, we assume that a Dell EMC ProDeploy-certified engineer could do four deployments in the time of one in-house, entry level IT admin- conducted deployment and thus is four times faster. Table 5: Times (in hours:minutes) for each stage of deployment. Task In-house, entry-level IT admin Dell EMC ProDeploy-certified engineer Planning 14:45 2:35 Unboxing and racking 2:35 0:26 Initial cabling 3:20 0:35 Storage configuration 0:42 0:23 Storage firmware/software upgrade 1:17 0:38 Health check 0:30 0:25 Server firmware update 0:42 0:28 OS installation 0:27 0:12 Ethernet switch config 2:18 0:20 vCenter setup 0:48 0:21 ESXi updates 1:36 0:50 Installation of OME and SAE 3:05 0:48 Total time 32:05 8:01 Dell EMC ProDeploy set up a production-ready environment in less time and fewer steps September 2020 | 7
  • 8. System configuration information Table 6: Detailed information for the deployed servers. Source: Principled Technologies. Server configuration information Dell EMC PowerEdge R740 BIOS name and version 2.6.4 Non-default BIOS settings none Operating system name and version/build number VMware ESXi™ 7.0 15843807 Date of last OS updates/patches applied 6/22/20 Power management policy Balanced Processor Number of processors 2 Vendor and model Intel® Xeon® Silver 4216 Core count (per processor) 16 Core frequency (GHz) 2.1 Stepping 7 Memory module(s) Total memory in system (GB) 96 Memory module A Memory module B Number of memory modules 2 2 Vendor and model Samsung® M393A2K43BB1-CTD6Q Samsung M393A4K40CB2-CTD7Q Size (GB) 16 32 Type DDR4 DDR4 Speed (MHz) 2,666 2,666 Speed running in the server (MHz) 2,666 2,666 Storage controller Vendor and model Dell PERC H740P Mini Cache size (GB) 4 Firmware version 50.9.4-3025 Driver version 7.712.50.00 Local storage (type A) Number of drives 2 Drive vendor and model Micron® MTFDDAK480TDN Drive size (GB) 480 Drive information (speed, interface, type) 6GB/s, SAS, SSD Dell EMC ProDeploy set up a production-ready environment in less time and fewer steps September 2020 | 8
  • 9. Server configuration information Dell EMC PowerEdge R740 Local storage (type B) Number of drives 1 Drive vendor and model Seagate ST600MM0069 Drive size (GB) 600 Drive information (speed, interface, type) 12GB/s, SAS, HDD Network adapter (type A) Vendor and model Broadcom Adv. Dual 10GBASE-T Ethernet Number and type of ports 4 Driver version 21.60.22.11 Network adapter (type B) Vendor and model Intel Ethernet Server Adapter X520 Number and type of ports 2 Driver version 1.7.1.26 Cooling fans Vendor and model Nidec Ultraflo XN44V-A00 Number of cooling fans 6 Power supplies Vendor and model Dell PWR SPLY, 750W Number of power supplies 2 Wattage of each (W) 750 Table 7: Detailed information for the deployed storage. Source: Principled Technologies. Storage configuration information Dell EMC Unity 650F Software Version 5.0.3.0.5.014 Number of drives 10 Drive vendor and model Samsung MZ-ILT1T9A Drive size 1.92TB Protocol SAS Gb/s 12Gb/s Dell EMC ProDeploy set up a production-ready environment in less time and fewer steps September 2020 | 9
  • 10. Table 8: Detailed information for the deployed switches. Source: Principled Technologies. Switch configuration information Dell EMC PowerConnect 5448 Port type A Type of ports Gigabit ethernet Number of ports 48 Port type B Type of ports Combo gigabit SFP Number of ports 4 Dell EMC ProDeploy set up a production-ready environment in less time and fewer steps September 2020 | 10
  • 11. How we tested Configuring Unity 650F 1. Visit https://www.dell.com/support/home/en-us/product-support/product/unity-family/overview, and download the Dell EMC Unity Connection Utility. 2. When the download is finished, click Run. 3. At the Select Setup Language screen, Select English, and click OK. 4. At the Welcome screen, click Next. 5. At the Choose Install Folder, accept defaults, and click Next. 6. At the Pre-Installation Summary screen, click Install. 7. Check Run Connection Utility, and click Finish. Connecting to the storage and configuring management IP address 1. In the connection utility, select Auto Discover, and click Next. 2. Select the System, and click Next. 3. Enter the management IP information, and click Next. 4. Review the information, and click Next. 5. Click Deploy. Running the initial configuration wizard 1. At the introduction screen, click Next. 2. Enter the DNS server address, and click Next. 3. At the NTP server screen, click Add. 4. Enter the NTP server IP, and click Next. 5. Apply the Unisphere License, and click Next. 6. Until the initial configuration wizard completes, click Next. 7. Check Run Connection Utility, and click Finish. Creating a storage pool 1. On left Unisphere pane, under Storage, click Pools. 2. Click +. 3. Enter a Pool name and description. 4. Select Extreme Performance Tier, and click Next. 5. Select all available drives, and click Next. 6. At the Capability Profile Name screen, click Next. 7. At the Summary screen, click Finish. Creating a NAS server 1. Under Storage, select File>NAS Servers. 2. Click the add icon. 3. Create a server name, and choose the appropriate pool and storage processor. 4. Click Next. 5. Select the Ethernet port, and set the IP address, subnet mask, and Gateway. 6. Click Next. 7. Check Enable NFSv3 and NFSv4. 8. On DNS, Replication, and Summary, click Next. 9. Click Finish. Dell EMC ProDeploy set up a production-ready environment in less time and fewer steps September 2020 | 11
  • 12. Creating a file system 1. Under Storage, select File>File Systems. 2. Click the add icon. 3. Create a name and description. 4. Click Next. 5. On File-level Retention, click Next. 6. Select the appropriate pool, set its size, and check Thin. 7. On subsequent screens, check Next. 8. Click Finish. Discovering and adding multiple ESXi hosts 1. On left Unisphere pane, under Access, click VMware. 2. To connect to the vCenter server, click +. 3. At the Find ESXi Hosts screen, enter the vCenter credentials, and click Find. 4. Select the appropriate ESXi hosts, and click Next. 5. At the VSA Provider screen, click Next. 6. At the Summary screen, click Finish. Installing VMware ESXi 1. Using the USB, boot to the VMware ESXi installation media. 2. To Continue, press Enter. 3. To Accept and Continue, press F11 key. 4. Under Storage Device, select the installation drive, and press Enter. 5. For keyboard layout, select US Default, and press Enter. 6. Enter the root password twice, and press Enter. 7. At the Confirm Install window, press F11. 8. At the Installation Complete window, press Enter. 9. To configure the system after rebooting, press F2. 10. Log in with root credentials, and press Enter. 11. Scroll to Configure Management Network, and press Enter. 12. Scroll to IPv4 Configuration, and press Enter. 13. Scroll to Static IPv4, and use the spacebar to select it. 14. Set the IPv4 address, Subnet Mask, and Default gateway. 15. Press Enter. 16. Scroll to IPv6 Configuration, and press Enter. 17. Scroll to Disable IPv6, and use the spacebar to select it. 18. Press Enter. 19. Scroll to DNS Configuration, and press Enter. 20. Scroll to manually configure DNS, and use the spacebar to select it. 21. Add the Primary DNS Server and the Alternate DNS Server, and provide the hostname for the system. 22. Scroll to Custom DNS Suffixes, and press Enter. 23. Add the suffix that is required for testing, and press Enter. 24. To accept the changes, press Esc. 25. To confirm changes, press Y. The system will reboot. 26. To configure the system after rebooting, press F2. 27. Log in with root credentials, and press Enter. 28. Scroll to Troubleshooting Options, and press Enter. 29. Select Enable ESXi Shell, and press Enter. 30. Select Enable SSH, and press Enter. 31. Scroll to Restart Management Agents, and press Enter. 32. Press F11. 33. To exit, press Esc. 34. To log out, press Esc. Dell EMC ProDeploy set up a production-ready environment in less time and fewer steps September 2020 | 12
  • 13. Deploying VMware vCenter Server® 7.0 1. Using a USB drive, on a Windows server or VM, locate the VMware-VCSA installer image using USB. 2. Mount the image, navigate to the vcsa-ui-installer folder, and double-click win32. 3. Double-click installer.exe. 4. Click Install. 5. Click Next. 6. Accept the terms of the license agreement, and click Next. 7. Ensure that the vCenter Server with an Embedded Platform Services Controller is selected, and click Next. 8. Enter the FQDN or IP address of the host onto which you are deploying the vCenter Server Appliance. 9. Provide the server’s username and password, and click Next. 10. To accept the certificate of the host you chose to connect to, click Yes. 11. Provide a name and password for the vCenter Appliance, and click Next. 12. Set an appropriate appliance size, and click Next. 13. Select the appropriate datastore, and click Next. 14. At the Configure Network Settings page, configure the network settings as appropriate for your environment, and click Next. 15. Review your settings, and click Finish. 16. When the deployment completes, click Continue. 17. At the Introduction page, click Next. 18. At the Appliance configuration page, select the time synchronization mode and SSH access settings, and click Next. 19. At the CEIP page, click Next. 20. At the Ready to complete page, click Finish. 21. At the Warning pop-up, click OK. 22. Once Stage 2 completes successfully, click Close. Adding the servers to vCenter 1. Log into vCenter. 2. In the left pane, right-click vCenter, and select New Datacenter. 3. Enter the name of your datacenter, and press OK. 4. Right-click your datacenter, and select Add Host. 5. In Name and location, add the IP address of your host, and click Next. 6. In Connection settings, to log into your ESXi host, enter the username and password, and click Next. 7. In Host summary, verify your host’s information, and click Next. 8. In Assign license, choose the appropriate license for your host, and click Next. 9. In Lockdown mode, leave the host lockdown as default (Disabled), and click Next. 10. In VM location, choose the location where your VMs will be organized, and click Next. 11. In Ready to complete, verify your settings, and click Finish. 12. Complete steps 4 through 11 for the remaining three servers. Downloading and installing OpenManage Enterprise 1. From the support site, download the openmanage_enterprise_ovf_format.zip file, and extract the file to a location accessible by the VMware vSphere Client. 2. In vSphere Client, select File>Deploy OVF Template. 3. On the Local file option, click Upload files, select the OVF and VMDK packages, and click Next. 4. Name the VM, select the Datacenter, and click Next. 5. Select the host on which you want to deploy the appliance VM, and click Next. 6. Review the details, and click Next. 7. Accept the License agreements, and click Next. 8. Select storage option, choose Thin provision, and click Next. 9. Select Networks, and click Next. 10. Enter DNS, hostname, Gateway, network address (IPV4), time zone, NTP server address, and click next. 11. Review the settings, and click Finish. Dell EMC ProDeploy set up a production-ready environment in less time and fewer steps September 2020 | 13
  • 14. Principled Technologies is a registered trademark of Principled Technologies, Inc. All other product names are the trademarks of their respective owners. DISCLAIMER OF WARRANTIES; LIMITATION OF LIABILITY: Principled Technologies, Inc. has made reasonable efforts to ensure the accuracy and validity of its testing, however, Principled Technologies, Inc. specifically disclaims any warranty, expressed or implied, relating to the test results and analysis, their accuracy, completeness or quality, including any implied warranty of fitness for any particular purpose. All persons or entities relying on the results of any testing do so at their own risk, and agree that Principled Technologies, Inc., its employees and its subcontractors shall have no liability whatsoever from any claim of loss or damage on account of any alleged error or defect in any testing procedure or result. In no event shall Principled Technologies, Inc. be liable for indirect, special, incidental, or consequential damages in connection with its testing, even if advised of the possibility of such damages. In no event shall Principled Technologies, Inc.’s liability, including for direct damages, exceed the amounts paid in connection with Principled Technologies, Inc.’s testing. Customer’s sole and exclusive remedies are as set forth herein. This project was commissioned by Dell Technologies. Principled Technologies® Facts matter.®Principled Technologies® Facts matter.® Configuring OpenManage Enterprise 1. In a web browser, navigate to the IP of the OpenManage Enterprise VM, and log in. 2. On the Home tab, choose Discover Devices. 3. Click Add, and in the Device Type dropdown, choose Server. 4. Select Dell iDRAC, and click OK. 5. In the IP/Hostname/Range box, enter the IP range of the servers. 6. For the servers, enter the login credentials. 7. Select Run Now, and click Finish. 8. For the virtual machine files, select the datastore, and click Next. 9. On the Disk Format page, to pre-allocate physical storage space to VMs, click Thick provision. 10. Review the selected options, and click Finish. Downloading and installing SupportAssist Enterprise 1. From the support site, download the OVF file, and extract the file to a location accessible by the VMware vSphere Client. 2. In vSphere Client, select File>Deploy OVF Template. 3. On the local file option, click Upload files, select the OVF and VMDK packages, and click Next. 4. Name the VM, select the Datacenter, and click Next. 5. Select the host on which you want to deploy the appliance VM, and click Next. 6. Review the details, and click Next. 7. Accept the license agreements, and click Next. 8. Select storage option, choose Thin provision, and click Next. 9. Select the networks, and click Next. 10. Enter DNS, hostname, Gateway, network address (IPV4), time zone, NTP server address, and click Next. 11. Review the settings, and click Finish. Configuring SupportAssist Enterprise 1. In a web browser, navigate to the IP of the SupportAssist Enterprise VM, and log in. 2. On the Devices tab, choose Add. 3. In Device Type, select iDRAC, enter the IP address of the host, name the host, and choose create new credentials account. 4. Name the credentials, and select the device type, operating system, username, and password. Click Save. 5. Select the account credentials you created, and select Next. 6. For the additional three servers, complete steps 1 through 5. Dell EMC ProDeploy set up a production-ready environment in less time and fewer steps September 2020 | 14