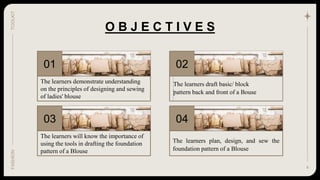
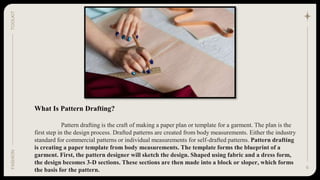
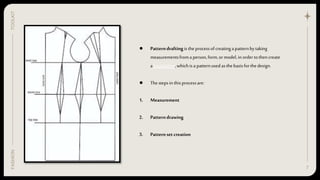
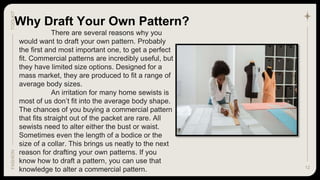
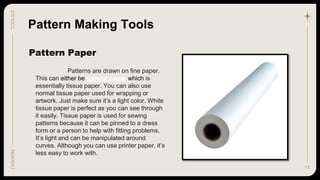
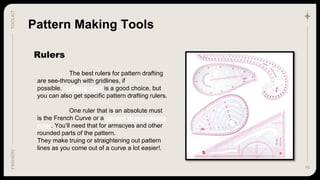
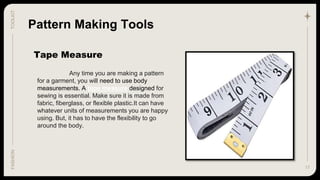
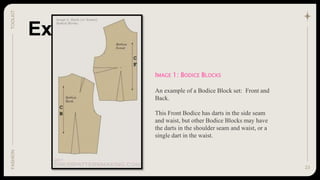
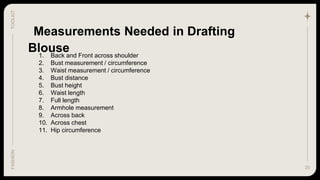
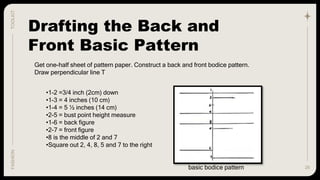
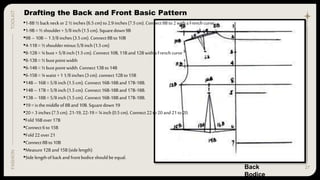
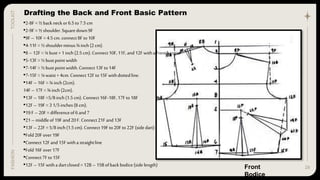
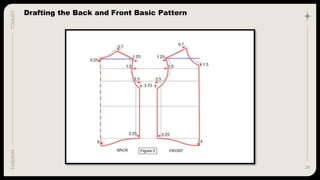
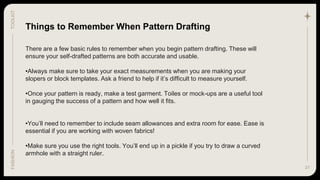
DRAFTING THE
FOUNDATION
PATTERN
(Back and Front BLOUSE)
1
TOOLKIT
FASHION
2
TOOLKIT
FASHION
GOOD AFTERNOON
3
TOOLKIT
FASHION
Dear Lord, we thank you for the gift of life today.
You allow us to have another day to praise You and
see Your glory.
Thank you for the love and protection especially this
time of pandemic.
Bless us Father with Your wisdom as we begin our
class.
Help us focus our hearts and minds on what we are
about to learn.
Guide us by Your eternal light as we discover more
about the world around us.
Lord, we thank you, and let Your will be done in our
lives.
We ask all this in the mighty Name of JESUS, AMEN.
02
.
04
The learners plan, design, and sew the
foundation pattern of a Blouse
4
01
The learners demonstrate understanding
on the principles of designing and sewing
of ladies' blouse
03
The learners will know the importance of
using the tools in drafting the foundation
pattern of a Blouse
O B J E C T I V E S
TOOLKIT
FASHION
The learners draft basic/ block
pattern back and front of a Bouse
5
TOOLKIT
FASHION
1 2
3 4
What Is Pattern Drafting?
Pattern drafting is the craft of making a paper plan or template for a garment. The plan is the
first step in the design process. Drafted patterns are created from body measurements. Either the industry
standard for commercial patterns or individual measurements for self-drafted patterns. Pattern drafting
is creating a paper template from body measurements. The template forms the blueprint of a
garment. First, the pattern designer will sketch the design. Shaped using fabric and a dress form,
the design becomes 3-D sections. These sections are then made into a block or sloper, which forms
the basis for the pattern. 6
TOOLKIT
FASHION
7
● Patterndraftingistheprocessofcreatingapatternbytaking
measurementsfroma person,form,ormodel, inordertothencreate
afoundation,whichisa patternusedasthebasisforthedesign.
● Thestepsin thisprocessare:
1. Measurement
2. Patterndrawing
3. Patternsetcreation
TOOLKIT
FASHION
8
TOOLKIT
FASHION
The measurements are taken based upon a model, which is either a human being
or an approximation of one, and depending upon the type of garment to be made, the
measurements differ depending upon which parts of the body the garment seeks to cover, the
type of garment it is, the gender of the person, and if they're female, the type of body shape
they have.
When taking measurements, there are some which are shared in common between
men and women as body proportion and size remains the same. However, there are other
measurements which are completely unused for men for obvious reasons, such as the bust, the
rib-cage and so on; these are used specifically to cater to the female physique.
Measurements needed depend upon the garment that is being produced, because
the more elaborate or large a garment is, the more pattern pieces are required to create it.
The collection of pattern pieces together, which are used to create a garment are called
the pattern set.
MEASUREMENT
9
When taking measurements..
Itis always a good idea to use something likea spreadsheet to
list the measurements in the order theywere takenas the
"base" measurements, and thenagain when the
measurementsbegin to become split into eighths or quarters
whenthe pattern is drawn.
TOOLKIT
FASHION
10
TOOLKIT
FASHION
Once the measurements have been taken, the foundation
or basic pattern is created. This starts off with a wire frame which
generally outlines the length and width of the pattern piece, and then
is gradually developed into one of the pieces of the pattern set.
This process can be done either by the use of manual or
electronic pattern making tools. When performed manually, the
pattern is transcribed onto pattern paper, and then at the last, pinned
to fabric. When performed using electronic means, such as by
Fashion Computer Aided Design (Fashion CAD), the pattern set is
designed and then printed onto paper, cut and pinned onto fabric.
PATTERN DRAWING
11
TOOLKIT
FASHION
With manual pattern making, the pattern set is usually not developed in a
"block" method; individual parts are drawn onto pattern paper one at a time, and
then assembled onto the material from which the patterns are being cut. Using
electronic means usually begins from the dimensions of the material which is being
cut as the size of the CAD document being developed.
In a non-industrial setting, the pattern would still be developed within
CAD and printed to paper, but it would be manually set onto material, pinned, and
then cut.
In industrial settings, individual layers of fabric are not cut with scissors, but rather,
several hundred layers are laid on top of each-other and made rigid, and then a
computer-aided cutter follows the pattern preset via CAD and precedes to cut out
shapes from the material without the requirement of printed patterns.
PATTERN SET CREATION
12
Why Draft Your Own Pattern?
TOOLKIT
FASHION
There are several reasons why you
would want to draft your own pattern. Probably
the first and most important one, to get a perfect
fit. Commercial patterns are incredibly useful, but
they have limited size options. Designed for a
mass market, they are produced to fit a range of
average body sizes.
An irritation for many home sewists is
most of us don’t fit into the average body shape.
The chances of you buying a commercial pattern
that fits straight out of the packet are rare. All
sewists need to alter either the bust or waist.
Sometimes even the length of a bodice or the
size of a collar. This brings us neatly to the next
reason for drafting your own patterns. If you
know how to draft a pattern, you can use that
knowledge to alter a commercial pattern.
13
TOOLKIT
FASHION
Understanding how a sewing pattern works will alter the design,
so it fits your measurements a lot easier. You’ll even be able to add extra
features like pockets.
You might find you need a particular style or design that can’t be
found. Commercial patterns follow fashion trends and are released per
season. If you’re itching to make a swimsuit in the middle of winter, the
pattern you need might not be available.
This is where the skill of pattern drafting can be worth its weight
in gold. Not restricted by the current clothing fads or time of year, you can
design and produce your own swimsuit. Or any other garment. On your
timeframe. You can even add your own design touches to make a truly
unique garment to match your individuality and style.
Why Draft Your Own Pattern?
14
TOOLKIT
FASHION
Some of the tools needed for pattern drafting are probably already in
your sewing box or at least close at hand. The basic requirements are
pens, pencils, paper, tape measure, and rulers.
Pattern Making Tools
You can use any pens and
pencils for drafting patterns. They don’t have
to be specific to pattern designing. Pencils
should be hard enough to leave a line you can
see on your paper, but not too sharp they’ll
punch a hole in it. Pens need to be in at least 3
different colors. One color to outline your pencil
sketch, another for alterations. The third, for
final tweaking.
15
TOOLKIT
FASHION
Pattern Paper
Pattern Making Tools
Patterns are drawn on fine paper.
This can either be pattern paper which is
essentially tissue paper. You can also use
normal tissue paper used for wrapping or
artwork. Just make sure it’s a light color. White
tissue paper is perfect as you can see through
it easily. Tissue paper is used for sewing
patterns because it can be pinned to a dress
form or a person to help with fitting problems.
It’s light and can be manipulated around
curves. Although you can use printer paper, it’s
less easy to work with.
16
TOOLKIT
FASHION
Rulers
Pattern Making Tools
The best rulers for pattern drafting
are see-through with gridlines, if
possible. Quilting ruler is a good choice, but
you can also get specific pattern drafting rulers.
One ruler that is an absolute must
is the French Curve or a curved dressmaking
ruler. You’ll need that for armscyes and other
rounded parts of the pattern.
They make truing or straightening out pattern
lines as you come out of a curve a lot easier!.
17
TOOLKIT
FASHION
Tape Measure
Pattern Making Tools
Any time you are making a pattern
for a garment, you will need to use body
measurements. A tape measure designed for
sewing is essential. Make sure it is made from
fabric, fiberglass, or flexible plastic.It can have
whatever units of measurements you are happy
using. But, it has to have the flexibility to go
around the body.
18
TOOLKIT
FASHION
Scissors
Pattern Making Tools
A decent pair of paper scissors for
cutting out the drafted pattern will help you
keep your lines neat and true to the
design.Similarly, fabric scissors for your
muslin or toile fabric are also invaluable for
ensuring accuracy.
19
TOOLKIT
FASHION
Dress Form
Pattern Making Tools
This is the tailor’s dummy or
mannequin used by sewist for fitting garments.
If you are looking at pattern draping, a dress
form is a useful gadget to have. Otherwise,
you’ll have to pin and drape your fabric to your
own body. That can be a tricky thing to do. It
can also be a little painful. Dress forms also
help with toiles or mock-ups as they allow you
to see areas of a garment in need of altering to
get a better fit.
20
TOOLKIT
FASHION
How to Draft a Sewing
Pattern
The first thing you should do when drafting your pattern is to make slopers or blocks
based on your measurements. Blocks and slopers can be used as permanent templates to form
the foundation of any garment. For instance, a bodice sloper can be put under tracing paper and
used as the foundation for a new pattern piece. By changing design elements on every tracing
you make, you can create any design of bodice. Keeping your sloper intact allows you to use it
again and again.
To make an accurate sloper, you’ll need to make sure you take your measurements
carefully. Once you have them, draw them onto paper to form the shape of the garment you want
to make.
For a bodice, you’ll have measurements for your shoulder, neck, armhole, and distance from the
neck down to wherever you want the bodice to end. This can be either the waist or hips,
depending on your preferred style.
When designing a pattern from scratch, remember to include your seam allowances
and pattern ease. The ease allows extra space for getting the garment on and off. You may find
this measurement is easier to calculate once you’ve made a test or mock-up item.
21
TOOLKIT
FASHION
Block (or Sloper)
A simple master pattern that is used to make more detailed patterns.
Blocks generally have no design features other than what is required for fitting. A
Block is usually made from a thin cardboard, not paper, so that the patternmaker
can trace around it to create patterns. The term Block is more commonly used in
Australia and the UK, while the term Sloper is used in the United States.
The Basic Block or Sloper Set consists of seven pieces: Bodice Front,
Bodice Back, Sleeve, Skirt Front, Skirt Back, Pants Front and Pants Back. See the
images below an example of each of these.
22
TOOLKIT
FASHION
Examples:
IMAGE 2: SLEEVE BLOCK
An Example of a Sleeve Block.
This is a Fitted Sleeve Block as it has a dart in
the elbow. Other Sleeve Block options include
the two-piece Sleeve Block, which has a
seamline under the arm, and the basic Sleeve
Block with no dart/curve at the elbow.
23
TOOLKIT
FASHION
Examples:
IMAGE 1: BODICE BLOCKS
An example of a Bodice Block set: Front and
Back.
This Front Bodice has darts in the side seam
and waist, but other Bodice Blocks may have
the darts in the shoulder seam and waist, or a
single dart in the waist.
24
TOOLKIT
FASHION
25
TOOLKIT
FASHION
Measurements Needed in Drafting
Blouse
1. Back and Front across shoulder
2. Bust measurement / circumference
3. Waist measurement / circumference
4. Bust distance
5. Bust height
6. Waist length
7. Full length
8. Armhole measurement
9. Across back
10. Across chest
11. Hip circumference
26
TOOLKIT
FASHION
Drafting the Back and
Front Basic Pattern
Get one-half sheet of pattern paper. Construct a back and front bodice pattern.
Draw perpendicular line T
•1-2 =3/4 inch (2cm) down
•1-3 = 4 inches (10 cm)
•1-4 = 5 ½ inches (14 cm)
•2-5 = bust point height measure
•1-6 = back figure
•2-7 = front figure
•8 is the middle of 2 and 7
•Square out 2, 4, 8, 5 and 7 to the right
basic bodice pattern
27
TOOLKIT
FASHION Drafting the Back and Front Basic Pattern
•1-8B ½backneck or2½ inches(6.5cm) to2.9inches(7.5cm).Connect8Bto2withaFrenchcurve
•1-9B =½ shoulder+5/8inch(1.5cm).Squaredown9B
•9B – 10B– 13/8inches(3.5cm).Connect8B to10B
•4-11B= ½shoulderminus5/8inch (1.5cm)
•8-12B= ¼bust+ 5/8inch (1.5cm).Connect10B,11Band12B withaFrenchcurve
•8-13B= ½bustpointwidth
•6-14B= ½bustpointwidth.Connect13B to14B
•6-15B= ¼waist+11/8inches(3cm).connect12B to15B
•14B– 16B =5/8inch (1.5cm).Connect16B-18Band 17B-18B.
•14B– 17B =5/8inch (1.5cm).Connect16B-18Band 17B-18B.
•13B– 18B =5/8inch (1.5cm).Connect16B-18Band 17B-18B.
•19= isthemiddleof8Band10B.Squaredown19
•20= 3inches (7.5cm).21-19, 22-19= ¼inch (0.5cm).Connect22to20and21to20.
•Fold16Bover17B
•Connect6to15B
•Fold22over 21
•Connect8Bto10B
•Measure12B and15B(sidelength)
•Sidelengthofback andfrontbodiceshould beequal.
Back
Bodice
28
TOOLKIT
FASHION Drafting the Back and Front Basic Pattern
•2-8F= ½back neck or6.5to7.5cm
•2-9F= ½shoulder.Squaredown9F
•9F– 10F= 4.5cm. connect8Fto10F
•4-11F= ½shoulderminus¾inch (2 cm).
•8 – 12F=¼ bust+1inch (2.5cm).Connect10F,11F, and12F withaFrenchcurve
•5-13F= ½bustpointwidth
•7-14F= ½bustpointwidth.Connect13Fto14F
•7-15F= ¼waist+ 4cm. Connect12Fto15Fwithdottedline.
•14F– 16F= ¾inch (2cm).
14F– 17F= ¾inch (2cm).
•13F– 18F=5/8inch (1.5cm).Connect16F-18F,17Fto18F
•12F–19F= 31/5inches(8cm).
•19F – 20F= differenceof6and7
•21– middleof19Fand20F.Connect21F and13F
•13F– 22F= 5/8inch (1.5cm).Connect19Fto20Fto22F(sidedart)
•Fold20Fover19F
•Connect12Fand15Fwitha straightline
•Fold16Fover17F
•Connect7Fto15F
•12F– 15Fwitha dartclosed= 12B – 15B ofback bodice(sidelength) Front
Bodice
29
TOOLKIT
FASHION Drafting the Back and Front Basic Pattern
30
TOOLKIT
FASHION
Pattern Drafting is an important part of fashion designing and requires tremendous skills and
practice. Pattern drafting is where pattern pieces are drawn on paper according to body
measurement which becomes the base for designers to create garments. There are various
techniques that professionals use, some of them are:
Tracing:
This is one of the easiest technique that is used. In this method a garment (similar
to what a designer wishes to create) is placed flat on a paper and the pattern is traced. Some
space is left to add-on seam of the garment. The tracing technique works best for garments
with minimum shapes and is considered to be one of the best technique for beginners.
Creating a Sloper:
This is a slightly complex method in pattern drafting. Slopers, also named to as
‘block patterns’ or ‘fitting shells’, are extremely close-fitting garments with no ease movement.
A sloper is the building block from which a designer can make any number of patterns. There
are two ways to achieve a sloper: one is to find ample free sloper patterns online or can be
created from scratch. Creating a sloper from the scratch requires a good knowledge for
geometry as well as maths.
31
TOOLKIT
FASHION
Things to Remember When Pattern Drafting
There are a few basic rules to remember when you begin pattern drafting. These will
ensure your self-drafted patterns are both accurate and usable.
•Always make sure to take your exact measurements when you are making your
slopers or block templates. Ask a friend to help if it’s difficult to measure yourself.
•Once your pattern is ready, make a test garment. Toiles or mock-ups are a useful tool
in gauging the success of a pattern and how well it fits.
•You’ll need to remember to include seam allowances and extra room for ease. Ease is
essential if you are working with woven fabrics!
•Make sure you use the right tools. You’ll end up in a pickle if you try to draw a curved
armhole with a straight ruler.
CREDITS: This presentation template was created by
Slidesgo, including icons by Flaticon, and
infographics & images by Freepik
32
THANK
YOU FOR
LISTENING
Please keep this slide for attribution
TOOLKIT
FASHION
33
RESOURCES
PHOTOS
● Portrait man posing with flowers
● Portrait man with flowers
● Portrait of fashionable boy with lemon
● Beautiful woman portrait in autumn setting
● Close up transgender model posing
● Man and woman posing together
● Woman with bouquet of flowers
● Medium shot model posing
● Portrait of elegant older woman posing and
being happy
● Women posing together close up
● Portrait of stylish woman posing in a
fashionable outfit
● Medium shot smiley woman sitting on chair
● Medium shot man holding book
● Man with trench coat holding flowers
● Asian model covering male face with
transparent fabric
● Portrait of elegant female model posing in
shirt new feminity concept
VECTORS
● Hand drawn sparkling star collection
Did you like the resources on this template? Get them for free at our other websites:
TOOLKIT
FASHION

PatternDrafting_PPT.pptx

  • 1.
    DRAFTING THE FOUNDATION PATTERN (Back andFront BLOUSE) 1 TOOLKIT FASHION
  • 2.
  • 3.
    3 TOOLKIT FASHION Dear Lord, wethank you for the gift of life today. You allow us to have another day to praise You and see Your glory. Thank you for the love and protection especially this time of pandemic. Bless us Father with Your wisdom as we begin our class. Help us focus our hearts and minds on what we are about to learn. Guide us by Your eternal light as we discover more about the world around us. Lord, we thank you, and let Your will be done in our lives. We ask all this in the mighty Name of JESUS, AMEN.
  • 4.
    02 . 04 The learners plan,design, and sew the foundation pattern of a Blouse 4 01 The learners demonstrate understanding on the principles of designing and sewing of ladies' blouse 03 The learners will know the importance of using the tools in drafting the foundation pattern of a Blouse O B J E C T I V E S TOOLKIT FASHION The learners draft basic/ block pattern back and front of a Bouse
  • 5.
  • 6.
    What Is PatternDrafting? Pattern drafting is the craft of making a paper plan or template for a garment. The plan is the first step in the design process. Drafted patterns are created from body measurements. Either the industry standard for commercial patterns or individual measurements for self-drafted patterns. Pattern drafting is creating a paper template from body measurements. The template forms the blueprint of a garment. First, the pattern designer will sketch the design. Shaped using fabric and a dress form, the design becomes 3-D sections. These sections are then made into a block or sloper, which forms the basis for the pattern. 6 TOOLKIT FASHION
  • 7.
    7 ● Patterndraftingistheprocessofcreatingapatternbytaking measurementsfroma person,form,ormodel,inordertothencreate afoundation,whichisa patternusedasthebasisforthedesign. ● Thestepsin thisprocessare: 1. Measurement 2. Patterndrawing 3. Patternsetcreation TOOLKIT FASHION
  • 8.
    8 TOOLKIT FASHION The measurements aretaken based upon a model, which is either a human being or an approximation of one, and depending upon the type of garment to be made, the measurements differ depending upon which parts of the body the garment seeks to cover, the type of garment it is, the gender of the person, and if they're female, the type of body shape they have. When taking measurements, there are some which are shared in common between men and women as body proportion and size remains the same. However, there are other measurements which are completely unused for men for obvious reasons, such as the bust, the rib-cage and so on; these are used specifically to cater to the female physique. Measurements needed depend upon the garment that is being produced, because the more elaborate or large a garment is, the more pattern pieces are required to create it. The collection of pattern pieces together, which are used to create a garment are called the pattern set. MEASUREMENT
  • 9.
    9 When taking measurements.. Itisalways a good idea to use something likea spreadsheet to list the measurements in the order theywere takenas the "base" measurements, and thenagain when the measurementsbegin to become split into eighths or quarters whenthe pattern is drawn. TOOLKIT FASHION
  • 10.
    10 TOOLKIT FASHION Once the measurementshave been taken, the foundation or basic pattern is created. This starts off with a wire frame which generally outlines the length and width of the pattern piece, and then is gradually developed into one of the pieces of the pattern set. This process can be done either by the use of manual or electronic pattern making tools. When performed manually, the pattern is transcribed onto pattern paper, and then at the last, pinned to fabric. When performed using electronic means, such as by Fashion Computer Aided Design (Fashion CAD), the pattern set is designed and then printed onto paper, cut and pinned onto fabric. PATTERN DRAWING
  • 11.
    11 TOOLKIT FASHION With manual patternmaking, the pattern set is usually not developed in a "block" method; individual parts are drawn onto pattern paper one at a time, and then assembled onto the material from which the patterns are being cut. Using electronic means usually begins from the dimensions of the material which is being cut as the size of the CAD document being developed. In a non-industrial setting, the pattern would still be developed within CAD and printed to paper, but it would be manually set onto material, pinned, and then cut. In industrial settings, individual layers of fabric are not cut with scissors, but rather, several hundred layers are laid on top of each-other and made rigid, and then a computer-aided cutter follows the pattern preset via CAD and precedes to cut out shapes from the material without the requirement of printed patterns. PATTERN SET CREATION
  • 12.
    12 Why Draft YourOwn Pattern? TOOLKIT FASHION There are several reasons why you would want to draft your own pattern. Probably the first and most important one, to get a perfect fit. Commercial patterns are incredibly useful, but they have limited size options. Designed for a mass market, they are produced to fit a range of average body sizes. An irritation for many home sewists is most of us don’t fit into the average body shape. The chances of you buying a commercial pattern that fits straight out of the packet are rare. All sewists need to alter either the bust or waist. Sometimes even the length of a bodice or the size of a collar. This brings us neatly to the next reason for drafting your own patterns. If you know how to draft a pattern, you can use that knowledge to alter a commercial pattern.
  • 13.
    13 TOOLKIT FASHION Understanding how asewing pattern works will alter the design, so it fits your measurements a lot easier. You’ll even be able to add extra features like pockets. You might find you need a particular style or design that can’t be found. Commercial patterns follow fashion trends and are released per season. If you’re itching to make a swimsuit in the middle of winter, the pattern you need might not be available. This is where the skill of pattern drafting can be worth its weight in gold. Not restricted by the current clothing fads or time of year, you can design and produce your own swimsuit. Or any other garment. On your timeframe. You can even add your own design touches to make a truly unique garment to match your individuality and style. Why Draft Your Own Pattern?
  • 14.
    14 TOOLKIT FASHION Some of thetools needed for pattern drafting are probably already in your sewing box or at least close at hand. The basic requirements are pens, pencils, paper, tape measure, and rulers. Pattern Making Tools You can use any pens and pencils for drafting patterns. They don’t have to be specific to pattern designing. Pencils should be hard enough to leave a line you can see on your paper, but not too sharp they’ll punch a hole in it. Pens need to be in at least 3 different colors. One color to outline your pencil sketch, another for alterations. The third, for final tweaking.
  • 15.
    15 TOOLKIT FASHION Pattern Paper Pattern MakingTools Patterns are drawn on fine paper. This can either be pattern paper which is essentially tissue paper. You can also use normal tissue paper used for wrapping or artwork. Just make sure it’s a light color. White tissue paper is perfect as you can see through it easily. Tissue paper is used for sewing patterns because it can be pinned to a dress form or a person to help with fitting problems. It’s light and can be manipulated around curves. Although you can use printer paper, it’s less easy to work with.
  • 16.
    16 TOOLKIT FASHION Rulers Pattern Making Tools Thebest rulers for pattern drafting are see-through with gridlines, if possible. Quilting ruler is a good choice, but you can also get specific pattern drafting rulers. One ruler that is an absolute must is the French Curve or a curved dressmaking ruler. You’ll need that for armscyes and other rounded parts of the pattern. They make truing or straightening out pattern lines as you come out of a curve a lot easier!.
  • 17.
    17 TOOLKIT FASHION Tape Measure Pattern MakingTools Any time you are making a pattern for a garment, you will need to use body measurements. A tape measure designed for sewing is essential. Make sure it is made from fabric, fiberglass, or flexible plastic.It can have whatever units of measurements you are happy using. But, it has to have the flexibility to go around the body.
  • 18.
    18 TOOLKIT FASHION Scissors Pattern Making Tools Adecent pair of paper scissors for cutting out the drafted pattern will help you keep your lines neat and true to the design.Similarly, fabric scissors for your muslin or toile fabric are also invaluable for ensuring accuracy.
  • 19.
    19 TOOLKIT FASHION Dress Form Pattern MakingTools This is the tailor’s dummy or mannequin used by sewist for fitting garments. If you are looking at pattern draping, a dress form is a useful gadget to have. Otherwise, you’ll have to pin and drape your fabric to your own body. That can be a tricky thing to do. It can also be a little painful. Dress forms also help with toiles or mock-ups as they allow you to see areas of a garment in need of altering to get a better fit.
  • 20.
    20 TOOLKIT FASHION How to Drafta Sewing Pattern The first thing you should do when drafting your pattern is to make slopers or blocks based on your measurements. Blocks and slopers can be used as permanent templates to form the foundation of any garment. For instance, a bodice sloper can be put under tracing paper and used as the foundation for a new pattern piece. By changing design elements on every tracing you make, you can create any design of bodice. Keeping your sloper intact allows you to use it again and again. To make an accurate sloper, you’ll need to make sure you take your measurements carefully. Once you have them, draw them onto paper to form the shape of the garment you want to make. For a bodice, you’ll have measurements for your shoulder, neck, armhole, and distance from the neck down to wherever you want the bodice to end. This can be either the waist or hips, depending on your preferred style. When designing a pattern from scratch, remember to include your seam allowances and pattern ease. The ease allows extra space for getting the garment on and off. You may find this measurement is easier to calculate once you’ve made a test or mock-up item.
  • 21.
    21 TOOLKIT FASHION Block (or Sloper) Asimple master pattern that is used to make more detailed patterns. Blocks generally have no design features other than what is required for fitting. A Block is usually made from a thin cardboard, not paper, so that the patternmaker can trace around it to create patterns. The term Block is more commonly used in Australia and the UK, while the term Sloper is used in the United States. The Basic Block or Sloper Set consists of seven pieces: Bodice Front, Bodice Back, Sleeve, Skirt Front, Skirt Back, Pants Front and Pants Back. See the images below an example of each of these.
  • 22.
    22 TOOLKIT FASHION Examples: IMAGE 2: SLEEVEBLOCK An Example of a Sleeve Block. This is a Fitted Sleeve Block as it has a dart in the elbow. Other Sleeve Block options include the two-piece Sleeve Block, which has a seamline under the arm, and the basic Sleeve Block with no dart/curve at the elbow.
  • 23.
    23 TOOLKIT FASHION Examples: IMAGE 1: BODICEBLOCKS An example of a Bodice Block set: Front and Back. This Front Bodice has darts in the side seam and waist, but other Bodice Blocks may have the darts in the shoulder seam and waist, or a single dart in the waist.
  • 24.
  • 25.
    25 TOOLKIT FASHION Measurements Needed inDrafting Blouse 1. Back and Front across shoulder 2. Bust measurement / circumference 3. Waist measurement / circumference 4. Bust distance 5. Bust height 6. Waist length 7. Full length 8. Armhole measurement 9. Across back 10. Across chest 11. Hip circumference
  • 26.
    26 TOOLKIT FASHION Drafting the Backand Front Basic Pattern Get one-half sheet of pattern paper. Construct a back and front bodice pattern. Draw perpendicular line T •1-2 =3/4 inch (2cm) down •1-3 = 4 inches (10 cm) •1-4 = 5 ½ inches (14 cm) •2-5 = bust point height measure •1-6 = back figure •2-7 = front figure •8 is the middle of 2 and 7 •Square out 2, 4, 8, 5 and 7 to the right basic bodice pattern
  • 27.
    27 TOOLKIT FASHION Drafting theBack and Front Basic Pattern •1-8B ½backneck or2½ inches(6.5cm) to2.9inches(7.5cm).Connect8Bto2withaFrenchcurve •1-9B =½ shoulder+5/8inch(1.5cm).Squaredown9B •9B – 10B– 13/8inches(3.5cm).Connect8B to10B •4-11B= ½shoulderminus5/8inch (1.5cm) •8-12B= ¼bust+ 5/8inch (1.5cm).Connect10B,11Band12B withaFrenchcurve •8-13B= ½bustpointwidth •6-14B= ½bustpointwidth.Connect13B to14B •6-15B= ¼waist+11/8inches(3cm).connect12B to15B •14B– 16B =5/8inch (1.5cm).Connect16B-18Band 17B-18B. •14B– 17B =5/8inch (1.5cm).Connect16B-18Band 17B-18B. •13B– 18B =5/8inch (1.5cm).Connect16B-18Band 17B-18B. •19= isthemiddleof8Band10B.Squaredown19 •20= 3inches (7.5cm).21-19, 22-19= ¼inch (0.5cm).Connect22to20and21to20. •Fold16Bover17B •Connect6to15B •Fold22over 21 •Connect8Bto10B •Measure12B and15B(sidelength) •Sidelengthofback andfrontbodiceshould beequal. Back Bodice
  • 28.
    28 TOOLKIT FASHION Drafting theBack and Front Basic Pattern •2-8F= ½back neck or6.5to7.5cm •2-9F= ½shoulder.Squaredown9F •9F– 10F= 4.5cm. connect8Fto10F •4-11F= ½shoulderminus¾inch (2 cm). •8 – 12F=¼ bust+1inch (2.5cm).Connect10F,11F, and12F withaFrenchcurve •5-13F= ½bustpointwidth •7-14F= ½bustpointwidth.Connect13Fto14F •7-15F= ¼waist+ 4cm. Connect12Fto15Fwithdottedline. •14F– 16F= ¾inch (2cm). 14F– 17F= ¾inch (2cm). •13F– 18F=5/8inch (1.5cm).Connect16F-18F,17Fto18F •12F–19F= 31/5inches(8cm). •19F – 20F= differenceof6and7 •21– middleof19Fand20F.Connect21F and13F •13F– 22F= 5/8inch (1.5cm).Connect19Fto20Fto22F(sidedart) •Fold20Fover19F •Connect12Fand15Fwitha straightline •Fold16Fover17F •Connect7Fto15F •12F– 15Fwitha dartclosed= 12B – 15B ofback bodice(sidelength) Front Bodice
  • 29.
    29 TOOLKIT FASHION Drafting theBack and Front Basic Pattern
  • 30.
    30 TOOLKIT FASHION Pattern Drafting isan important part of fashion designing and requires tremendous skills and practice. Pattern drafting is where pattern pieces are drawn on paper according to body measurement which becomes the base for designers to create garments. There are various techniques that professionals use, some of them are: Tracing: This is one of the easiest technique that is used. In this method a garment (similar to what a designer wishes to create) is placed flat on a paper and the pattern is traced. Some space is left to add-on seam of the garment. The tracing technique works best for garments with minimum shapes and is considered to be one of the best technique for beginners. Creating a Sloper: This is a slightly complex method in pattern drafting. Slopers, also named to as ‘block patterns’ or ‘fitting shells’, are extremely close-fitting garments with no ease movement. A sloper is the building block from which a designer can make any number of patterns. There are two ways to achieve a sloper: one is to find ample free sloper patterns online or can be created from scratch. Creating a sloper from the scratch requires a good knowledge for geometry as well as maths.
  • 31.
    31 TOOLKIT FASHION Things to RememberWhen Pattern Drafting There are a few basic rules to remember when you begin pattern drafting. These will ensure your self-drafted patterns are both accurate and usable. •Always make sure to take your exact measurements when you are making your slopers or block templates. Ask a friend to help if it’s difficult to measure yourself. •Once your pattern is ready, make a test garment. Toiles or mock-ups are a useful tool in gauging the success of a pattern and how well it fits. •You’ll need to remember to include seam allowances and extra room for ease. Ease is essential if you are working with woven fabrics! •Make sure you use the right tools. You’ll end up in a pickle if you try to draw a curved armhole with a straight ruler.
  • 32.
    CREDITS: This presentationtemplate was created by Slidesgo, including icons by Flaticon, and infographics & images by Freepik 32 THANK YOU FOR LISTENING Please keep this slide for attribution TOOLKIT FASHION
  • 33.
    33 RESOURCES PHOTOS ● Portrait manposing with flowers ● Portrait man with flowers ● Portrait of fashionable boy with lemon ● Beautiful woman portrait in autumn setting ● Close up transgender model posing ● Man and woman posing together ● Woman with bouquet of flowers ● Medium shot model posing ● Portrait of elegant older woman posing and being happy ● Women posing together close up ● Portrait of stylish woman posing in a fashionable outfit ● Medium shot smiley woman sitting on chair ● Medium shot man holding book ● Man with trench coat holding flowers ● Asian model covering male face with transparent fabric ● Portrait of elegant female model posing in shirt new feminity concept VECTORS ● Hand drawn sparkling star collection Did you like the resources on this template? Get them for free at our other websites: TOOLKIT FASHION

Editor's Notes

  • #7 Blueprint - A design plan or other technical drawing