Siemens catalog hmi-protool lite configuration software manual
•
1 like•274 views

Tự Động Hóa Siemens, Catalog Thiết Bị Điện Tự Động Hóa Siemens, Catalog Phụ Kiện Tự Động Hóa Siemens, Catalog Tự Động Hóa Siemens, http://dienhathe.com, Chi tiết các sản phẩm khác của Tự Động Hóa Siemens tại https://dienhathe.com Xem thêm các Catalog khác của Tự Động Hóa Siemens tại https://dienhathe.info Để nhận báo giá sản phẩm Tự Động Hóa Siemens vui lòng gọi: 0907.764.966

Recommended
More Related Content
Similar to Siemens catalog hmi-protool lite configuration software manual
Similar to Siemens catalog hmi-protool lite configuration software manual (20)
More from Dien Ha The
More from Dien Ha The (20)
Recently uploaded
Recently uploaded (20)
Siemens catalog hmi-protool lite configuration software manual
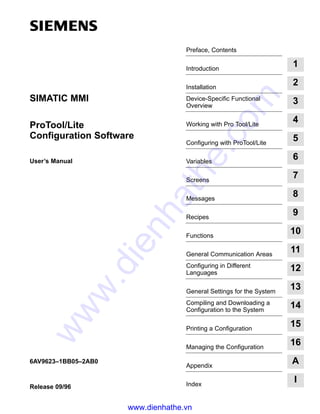
- 1. Preface, Contents Introduction 1 Installation 2 Device-Specific Functional Overview 3 Working with Pro Tool/Lite 4 Configuring with ProTool/Lite 5 Variables 6 Screens 7 Messages 8 Recipes 9 Functions 10 General Communication Areas 11 Configuring in Different Languages 12 General Settings for the System 13 Compiling and Downloading a Configuration to the System 14 Printing a Configuration 15 Managing the Configuration 16 Appendix A Index I Release 09/96 6AV9623–1BB05–2AB0 ProTool/Lite Configuration Software User’s Manual SIMATIC MMI www.dienhathe.vn www.dienhathe.com
- 2. ii SIMATICR is a registered trademark of SIEMENS AG. Be aware that other designations in this catalog may be registered trademarks, the use of which might infringe the rights of others. We have checked the contents of this manual for agreement with the hardware andsoftwaredescribed.Sincedeviationscannotbeprecluded entirely, we cannot guarantee full agreement. However, the data in this manualarereviewedregularlyandanynecessarycorrectionsincludedin subsequent editions. Suggestions for improvement are welcomed. Technical data subject to change. E Siemens AG 1996 Disclaimer of LiabilityCopyright E Siemens AG 1994 All rights reserved The reproduction, transmission or use of this document or its contents is notpermittedwithoutexpresswrittenauthority.Offenderswillbeliablefor damages.Allrights,includingrightscreatedbypatentgrantorregistration of a utility model or design, are reserved. Siemens AG Automation Group Industrial Automation Systems Postfach 4848,ăDĆ90327 Nürnberg Siemens Aktiengesellschaft Order No. 6AV9623–1BB05–2AB0 Trademarks www.dienhathe.vn www.dienhathe.com
- 3. i ProTool/Lite User’s Manual Release 09/96 Preface ProTool/Lite is used to configure Operator Panels (OPs) having text based displays for specific systems. The ProTool/Lite User’s Manual explains how you run the configuring tool ProTool/Lite and what configuration means. The manual is valid for configuring the following devices: – OP3 – OP5 – OP7 – OP15 – OP17 – C7-623 – C7-624 The manual is part of the SIMATIC MMI documentation. It includes the ma- nuals for the configuring tool, the Operator Panels and communication bet- ween the PLC and the OP. Below, you will find an overview diagram and a description of when you require the different manuals. PC OP PLC Configuration CommuniĆ cation Graphics Equipment ProTool/LiteProTool User's Installation Operation Connection Other PLCs Online Help Manual User's Manual displays Manual Text based Equipment displays Manual User's Manual Purpose How it fits in www.dienhathe.vn www.dienhathe.com
- 4. ii ProTool/Lite User’s Manual Release 09/96 Document Type Target Group Contents Getting Started Product Brief Beginners This document guides you step by step through the configuration of S a screen containing static text S a screen containing an input/output field and a bar graph S changing from one screen to another S a message A document is available for each of the fol- lowing: – OP3, OP5, OP15 – OP7, OP17 – OP25, OP35, OP45 ProTool User’s Manual Configurer Provides information for working with the ProTool configuring tool. It contains S basic rules for configuration S a detailed description of objects and functions that you can configure S examples of configuring objects This document is valid for OPs having graphics displays. ProTool/Lite User’s Manual Configurer Same contents as the ProTool User’s Manual. This document is valid for OPs having text based displays. ProTool Online Help Configurer Provides information on your computer (PU or PC) screen for working with the ProTool configuring tool. The online Help is context- sensitive and contains S a general description of the editors to be found in ProTool S a detailed description of the different fields in the dialog boxes S a comprehensive description of the func- tions Preface www.dienhathe.vn www.dienhathe.com
- 5. iii ProTool/Lite User’s Manual Release 09/96 Document Type ContentsTarget Group Example Application Commissioning Instruc- tions Beginners Example configurations are supplied with Pro- Tool together with the associated PLC pro- grams. This document describes S how you load the examples onto the OP and the PLC S how you can run the example S how you can upgrade the connection for your application OP37 Equipment Manual OP25, OP35, OP45 Equipment Manual OP7, OP17 Equipment Manual OP5, OP15 Equipment Manual Commissioning engi- neers, users Describes the OP hardware and general opera- tion. It contains S installation and commissioning S a description of the OP device S electrical installation with connection of the PLC, printer and configuration computer S OP modes S OP operation S description of the standard screens supplied with the software and their usage S how to install options S maintemance and replacement of spare parts OP3 Equipment Manual Commissioning engi- neers, users, programmers Describes the OP hardware, generaloperation and the connection to a SIMATIC S7. Preface www.dienhathe.vn www.dienhathe.com
- 6. iv ProTool/Lite User’s Manual Release 09/96 Document Type ContentsTarget Group Communication User’s Manual Programmers Provides information on connecting OPs to the following PLCs: S SIMATIC S5 S SIMATIC S7 S SIMATIC 500/505 S block drivers for other PLCs This document describes S the configuration and parameters required to connect the OP to the PLC and to the network S the user data areas used for exchanging data between the OP and the PLC Other PLCs Online Help Programmers Provides information for connecting OPs to PLCs such as S Mitsubishi S Allen Bradley S Telemecanique The drivers for connections to these PLCs are located on separate floppy disks and are re- ferred to as NATIVE drivers. Installation of a driver also installs the associated online Help. Preface www.dienhathe.vn www.dienhathe.com
- 7. v ProTool/Lite User’s Manual Release 09/96 This manual comprises four parts: Chapters 1–4 contain information of a general nature. This is information about what ProTool/Lite does, what functions ProTool/Lite supports, and how ProTool/Lite is installed and run under Windows. Chapter 5 describes the basic approach to configuration. You should study this chapter before you embark on configuration. Chapters 6–10 contain detailed information on how to configure different objects. Instructions are given on a step-by-step basis. Chapters 11–16 provide instructions on doing any of the following – create a configuration in different languages – print your configuration – transfer your configuration to the OP – copy or archive your configuration The following conventions are used in this manual: VAR_23 Typewriting identifies inputs or outputs as shown on the screen. They may be commands, filenames, entries in dia- log boxes or system messages. F1 Names of keys are shown in a different type for identifica- tion purposes. File → Menu items are shown in this form. The whole path is Print always specified, showing how the menu item is accessed. Variable Dialog boxes as well as fields and buttons in dialog boxes are shown in italic type. The different issues of the User’s Manual apply to the following ProTool/Lite versions: Issue 06/95 Valid for ProTool/Lite versions up to and including 1.01 Issue 12/95 Extensions and revisions. Valid for ProTool/Lite version 2.0 or later and for ProTool version 2.0 or later Issue 09/96 Extensions for the OP7 and the OP17 Valid for ProTool/Lite version 2.5 or later and for ProTool version 2.5 or later How the manual is organized Conventions Applicability Preface www.dienhathe.vn www.dienhathe.com
- 8. vi ProTool/Lite User’s Manual Release 09/96 The following firmware releases are required for the Operator Panels: – OP3 V1.00 or later – OP5 V1.20 or later – OP15 V2.20 or later – OP7 V1.0 or later – OP17 V1.0 or later In the event of technical queries, please get into touch with your point of con- tact at the Siemens agency or branch which takes care of your affairs. You will find the addresses in Appendix D Siemens Worldwide. In addition, you can call our hotline on +49 (911) 895-7000 (Fax 7001). The abbreviations used in the ProTool/Lite User’s Guide have the following meanings: AG Automatisierungsgerät (German for ”PLC”) AM Alarm Message ANSI American National Standards Institute AS 511 Driver of PU interface to the SIMATIC S5 ASCII American Standard Code for Information Interchange DB Data Block (on PLC) DW Data Word (on PLC) EM Event Message EM Equipment Manual FW Flag Word (on PLC) LED Light-Emitting Diode MPI Multipoint Interface (SIMATIC S7) OLE Object Linking and Embedding OP Operator Panel PC Personal Computer PLC Programmable Logic Controller PPI Point-to-Point Interface (SIMATIC S7) PU Programming Unit RAM Random Access Memory (working memory) UM User’s Manual Software and hardware versions Obtaining product support Abbreviations Preface www.dienhathe.vn www.dienhathe.com
- 9. vii ProTool/Lite User’s Manual Release 09/96 Contents 1 Introduction 1-1. . . . . . . . . . . . . . . . . . . . . . . . . . . . . . . . . . . . . . . . . . . . . . . . . . . . . . . . . . . . . 2 Installation 2-1. . . . . . . . . . . . . . . . . . . . . . . . . . . . . . . . . . . . . . . . . . . . . . . . . . . . . . . . . . . . . . 3 Device-Specific Functional Overview 3-1. . . . . . . . . . . . . . . . . . . . . . . . . . . . . . . . . . . . . 4 Working with Pro Tool/Lite 4-1. . . . . . . . . . . . . . . . . . . . . . . . . . . . . . . . . . . . . . . . . . . . . . . 4.1 General Remarks 4-1. . . . . . . . . . . . . . . . . . . . . . . . . . . . . . . . . . . . . . . . . . . . . . . . 4.1.1 Opening Several Configurations and Editors 4-2. . . . . . . . . . . . . . . . . . . . . . . . . 4.1.2 Using Online Help 4-3. . . . . . . . . . . . . . . . . . . . . . . . . . . . . . . . . . . . . . . . . . . . . . . . 4.1.3 Status Bar in Pro Tool/Lite 4-5. . . . . . . . . . . . . . . . . . . . . . . . . . . . . . . . . . . . . . . . . 4.1.4 All Menus 4-5. . . . . . . . . . . . . . . . . . . . . . . . . . . . . . . . . . . . . . . . . . . . . . . . . . . . . . . 4.2 Tool Bar 4-7. . . . . . . . . . . . . . . . . . . . . . . . . . . . . . . . . . . . . . . . . . . . . . . . . . . . . . . . 4.3 General Settings 4-8. . . . . . . . . . . . . . . . . . . . . . . . . . . . . . . . . . . . . . . . . . . . . . . . . 4.4 Information Functions 4-9. . . . . . . . . . . . . . . . . . . . . . . . . . . . . . . . . . . . . . . . . . . . . 4.5 Dialog Boxes 4-10. . . . . . . . . . . . . . . . . . . . . . . . . . . . . . . . . . . . . . . . . . . . . . . . . . . . 5 Configuring with ProTool/Lite 5-1. . . . . . . . . . . . . . . . . . . . . . . . . . . . . . . . . . . . . . . . . . . . 5.1 Procedure for Configuration 5-2. . . . . . . . . . . . . . . . . . . . . . . . . . . . . . . . . . . . . . . 5.2 Special Features of STEP 7 Integration 5-5. . . . . . . . . . . . . . . . . . . . . . . . . . . . . 5.3 The Most Important Objects and Their Settings 5-10. . . . . . . . . . . . . . . . . . . . . . 5.4 Editors for Different Object Types 5-12. . . . . . . . . . . . . . . . . . . . . . . . . . . . . . . . . . 5.5 Copying to and from the Clipboard 5-18. . . . . . . . . . . . . . . . . . . . . . . . . . . . . . . . . 5.6 Assigning Function Keys 5-19. . . . . . . . . . . . . . . . . . . . . . . . . . . . . . . . . . . . . . . . . . 6 Variables 6-1. . . . . . . . . . . . . . . . . . . . . . . . . . . . . . . . . . . . . . . . . . . . . . . . . . . . . . . . . . . . . . . . 6.1 Configuring a Variable 6-2. . . . . . . . . . . . . . . . . . . . . . . . . . . . . . . . . . . . . . . . . . . . 6.2 Setting Limit Values of a Variable 6-4. . . . . . . . . . . . . . . . . . . . . . . . . . . . . . . . . . . 6.3 Using the STEP 7 Symbol Table 6-5. . . . . . . . . . . . . . . . . . . . . . . . . . . . . . . . . . . 7 Screens 7-1. . . . . . . . . . . . . . . . . . . . . . . . . . . . . . . . . . . . . . . . . . . . . . . . . . . . . . . . . . . . . . . . . 7.1 Configuring Fields 7-2. . . . . . . . . . . . . . . . . . . . . . . . . . . . . . . . . . . . . . . . . . . . . . . . 7.2 Integrating Screen with the Operating Process 7-5. . . . . . . . . . . . . . . . . . . . . . . 7.3 Example of Configuring a Screen Entry 7-6. . . . . . . . . . . . . . . . . . . . . . . . . . . . . 7.4 Assigning Soft Keys 7-9. . . . . . . . . . . . . . . . . . . . . . . . . . . . . . . . . . . . . . . . . . . . . . 7.5 Using Standard Screens 7-12. . . . . . . . . . . . . . . . . . . . . . . . . . . . . . . . . . . . . . . . . . 7.6 Detecting a Called Screen on the PLC 7-13. . . . . . . . . . . . . . . . . . . . . . . . . . . . . . www.dienhathe.vn www.dienhathe.com
- 10. viii ProTool/Lite User’s Manual Release 09/96 8 Messages 8-1. . . . . . . . . . . . . . . . . . . . . . . . . . . . . . . . . . . . . . . . . . . . . . . . . . . . . . . . . . . . . . . 8.1 Configuring Output Fields 8-6. . . . . . . . . . . . . . . . . . . . . . . . . . . . . . . . . . . . . . . . . 8.2 Event Messages 8-9. . . . . . . . . . . . . . . . . . . . . . . . . . . . . . . . . . . . . . . . . . . . . . . . . 8.3 Alarm Messages 8-12. . . . . . . . . . . . . . . . . . . . . . . . . . . . . . . . . . . . . . . . . . . . . . . . . 8.4 Options for Displaying Messages 8-14. . . . . . . . . . . . . . . . . . . . . . . . . . . . . . . . . . . 9 Recipes 9-1. . . . . . . . . . . . . . . . . . . . . . . . . . . . . . . . . . . . . . . . . . . . . . . . . . . . . . . . . . . . . . . . . 9.1 Configuring Input Fields 9-4. . . . . . . . . . . . . . . . . . . . . . . . . . . . . . . . . . . . . . . . . . . 9.2 Creating and Transferring Data Records 9-7. . . . . . . . . . . . . . . . . . . . . . . . . . . . 9.3 Example of Recipes and Data Records for SIMATIC S5 9-8. . . . . . . . . . . . . . . 10 Functions 10-1. . . . . . . . . . . . . . . . . . . . . . . . . . . . . . . . . . . . . . . . . . . . . . . . . . . . . . . . . . . . . . . 11 General Communication Areas 11-1. . . . . . . . . . . . . . . . . . . . . . . . . . . . . . . . . . . . . . . . . . . 11.1 Interface Area for Non-SIMATIC PLCs 11-1. . . . . . . . . . . . . . . . . . . . . . . . . . . . . . 11.1.1 Control and Acknowledgement Bits 11-3. . . . . . . . . . . . . . . . . . . . . . . . . . . . . . . . . 11.1.2 Data Areas in the Interface Area 11-6. . . . . . . . . . . . . . . . . . . . . . . . . . . . . . . . . . . 11.2 OP Keyboard and LED Assignments 11-8. . . . . . . . . . . . . . . . . . . . . . . . . . . . . . . 11.2.1 System Keyboard Assignment 11-9. . . . . . . . . . . . . . . . . . . . . . . . . . . . . . . . . . . . . 11.2.2 Function Keyboard Assignment 11-10. . . . . . . . . . . . . . . . . . . . . . . . . . . . . . . . . . . . 11.2.3 LED Assignment 11-11. . . . . . . . . . . . . . . . . . . . . . . . . . . . . . . . . . . . . . . . . . . . . . . . . 11.2.4 Hints on Optimization 11-13. . . . . . . . . . . . . . . . . . . . . . . . . . . . . . . . . . . . . . . . . . . . . 12 Configuring in Different Languages 12-1. . . . . . . . . . . . . . . . . . . . . . . . . . . . . . . . . . . . . . . 13 General Settings for the System 13-1. . . . . . . . . . . . . . . . . . . . . . . . . . . . . . . . . . . . . . . . . . 14 Compiling and Downloading a Configuration to the System 14-1. . . . . . . . . . . . . . . . 14.1 Downloading the Configuration to the OP 14-2. . . . . . . . . . . . . . . . . . . . . . . . . . . 14.2 Downloading Serial 14-2. . . . . . . . . . . . . . . . . . . . . . . . . . . . . . . . . . . . . . . . . . . . . . . 14.3 Downloading with MPI 14-3. . . . . . . . . . . . . . . . . . . . . . . . . . . . . . . . . . . . . . . . . . . . 14.4 Troubleshooting Configuration Download Problems 14-4. . . . . . . . . . . . . . . . . . . 15 Printing a Configuration 15-1. . . . . . . . . . . . . . . . . . . . . . . . . . . . . . . . . . . . . . . . . . . . . . . . . 16 Managing the Configuration 16-1. . . . . . . . . . . . . . . . . . . . . . . . . . . . . . . . . . . . . . . . . . . . . . 16.1 File Structure 16-1. . . . . . . . . . . . . . . . . . . . . . . . . . . . . . . . . . . . . . . . . . . . . . . . . . . . 16.2 Project Manager 16-5. . . . . . . . . . . . . . . . . . . . . . . . . . . . . . . . . . . . . . . . . . . . . . . . . A Description of Functions A-1. . . . . . . . . . . . . . . . . . . . . . . . . . . . . . . . . . . . . . . . . . . . . . . . . A.1 Description of functions A-5. . . . . . . . . . . . . . . . . . . . . . . . . . . . . . . . . . . . . . . . . . . B Code Tables B-1. . . . . . . . . . . . . . . . . . . . . . . . . . . . . . . . . . . . . . . . . . . . . . . . . . . . . . . . . . . . . C PLC Jobs C-1. . . . . . . . . . . . . . . . . . . . . . . . . . . . . . . . . . . . . . . . . . . . . . . . . . . . . . . . . . . . . . . C.1 Special Situations – PLC Jobs C-9. . . . . . . . . . . . . . . . . . . . . . . . . . . . . . . . . . . . . C.2 Key Codes C-10. . . . . . . . . . . . . . . . . . . . . . . . . . . . . . . . . . . . . . . . . . . . . . . . . . . . . . D Siemens Worldwide D-1. . . . . . . . . . . . . . . . . . . . . . . . . . . . . . . . . . . . . . . . . . . . . . . . . . . . . Contents www.dienhathe.vn www.dienhathe.com
- 11. 1-1 ProTool/Lite User’s Manual Release 09/96 Introduction ProTool/Lite is an easy-to-use configuration tool for Operator Panels (OPs). It can run under Microsoft® Windows™. You can use a mouse or the key- board to execute most actions that have to be performed in ProTool/Lite. Configuration consists in creating screens and messages and linking them to the PLC program. This means that the processes in the PLC can be visualized and manipulated. Screens are used to create an image of the process with text and variables so that the operator can quickly grasp the relationships and intervene in the pro- cess, should this be necessary. Text explains individual elements on the screen. Variables are directly linked to the PLC and are used to display cur- rent values. By using variables, the operator can also write values to the PLC. Messages draw the operator’s attention to certain operating states, or they display malfunctions in process execution. Screens have to be called. Messages are displayed automatically. They are initiated by the PLC. Operator Panels have a system keypad and a function keypad. The system keypad contains the keys for operating the Operator Panel, such as cursor control and inputs. Functions can be assigned to the function keys during configuration. In this way the actual control sequence is implemented. Configuration is performed on a PC or a programming unit (PU). The configuration then has to be compiled under ProTool/Lite and down- loaded to the OP. If there is link to the PLC, the OP displays the current val- ues of variables. Figure 1-1 shows the different phases in which work is per- formed on configuration data. ProTool/Lite Configuration Screens and Messages Keys Configuration data 1 www.dienhathe.vn www.dienhathe.com
- 12. 1-2 ProTool/Lite User’s Manual Release 09/96 L y o o t a os o t Link fcL fL fU ProTool/Lite ef abSfcDm f ct c o t Configuration data Configuration data Figure 1-1 Configuration Phase, Download Phase and Process Control Phase A configuration consists of different components, including: – specification of the PLC and type of link – general settings for the Operator Panel – objects such as variables, screens and messages. In ProTool/Lite, there is a separate editor for every type of object such as messages or variables. Different objects, which are given a symbolic name, are created under an object type. You have to specify this symbolic name when you edit, reference or delete the object. Part or all of the configuration can be printed under ProTool/Lite. Part means that all the objects of a single object type, such as messages or variables, are printed. Components of a configuration Object types Printing a configuration Introduction www.dienhathe.vn www.dienhathe.com
- 13. 2-1 ProTool/Lite User’s Manual Release 09/96 Installation Table 2-1 shows the system requirements for running. Table 2-1 System Requirements for ProTool/Lite Device Required CPU 80486 SX/33 MHz Main memory 8 MB Free space on hard disk 2 MB in Windows directory 10 MB for ProTool/Lite Graphics card VGA Floppy disk drive 3.5 ” Microsoft Windows MS-Windows 3.1 MS-Windows for Workgroups 3.11 MS-Windows95 The system requirements depend on the operating system being used. To improve performance, and thus speed, we recommend that you create virtual memory for Windows. Virtual memory should be of the Permanent type and at least 15 MB. Information is written temporarily from main memory to a file on your hard disk. This file is a hidden file which reserves storage space on your hard disk. When you require the information again, Windows loads it back into main memory. You have to install ProTool/Lite under Windows. You can install it either from the floppy disks supplied to you or – for example, for networks – from your hard disk. System requirements Virtual memory Methods of installation 2 www.dienhathe.vn www.dienhathe.com
- 14. 2-2 ProTool/Lite User’s Manual Release 09/96 If STEP 7 version 2.0 programming software is available on your computer, you can install ProTool/Lite integrated in STEP 7. The advantages of doing this are as follows: S You manage ProTool/Lite projects with the SIMATIC Manager, the same tool as you use for managing your STEP 7 projects. S You can select STEP 7 symbols and data blocks from a text or graphic list as variables. The data type and the address are entered automatically. S ProTool/Lite lists all the PLCs in your STEP 7 project and determines the address parameters once a PLC has been selected. Before installation proper begins, the system asks you what language and options you wish to use. Installation begins in the same language in which you installed Windows or in English. After you have selected the language in which you want to have ProTool/Lite installed, installation is resumed in the language you specified. You cannot change the ProTool/Lite language in On- line mode. If you wish to be able to use the ProTool/Lite user interface in a different language, you have to re-install ProTool/Lite. To install ProTool/Lite, proceed as follows: Step for Windows 3.0 or later for Windows95 1 Start Windows 2 Insert the first floppy disk into the drive. 3 Select in the File Manager the drive in which the floppy disk is inserted and double-click on the setup.exe program Select in the Explorer the drive in which the floppy disk is inserted and double-click on the setup.exe pro- gram 4 A dialog box appears in which you can click, under Options, the software packages you wish to have installed. Perform modifications here only if you have ordered optional software packages. 5 Under STEP 7 , select whether Pro- Tool/Lite should be installed as Inte- grated or Standalone. 6 Follow the setup instructions on the screen. STEP 7 integration Selecting a language Installing from floppy disk Installation www.dienhathe.vn www.dienhathe.com
- 15. 2-3 ProTool/Lite User’s Manual Release 09/96 Installation may be varied in its detail by installation options. With the op- tions featured, the following components are installed: ProTool/Lite is the program for creating configurations. Optional PLC are drivers and examples for ”non-SIMATIC” PLCs drivers and have to be ordered separately. To install ProTool/Lite from your hard disk, you must first copy the floppy disks to hard disk. In doing so, you must observe certain conventions. ProTool/Lite consists of two components, which are also labeled differently. These components are: S ProTool/Lite Software Labeled on floppy disk as ProTool/Lite S Optional PLC drivers Labeled on floppy disk as Driver Create a separate directory for all the different components and floppy disks, containing the name of the component and the number of the floppy disk. The directories have to be created in accordance with the labels on the floppy disks. This means that you create for the ProTool/Lite software the directories PROLITEDISKn where n is the number of the floppy disk. For floppy disk 1, you therefore create a directory called PROLITEDISK1; for floppy disk 2 you create a directory called PROLITEDISK2, and so on. For the Optional PLC Drivers, create a directory called DRIVERDISK1. ProTool/Lite is installed in a program group of its own. When installation has been completed, you will see the following icons in the program group: Double-clicking this icon launches ProTool/Lite. For late breaking information about ProTool/Lite double- click this icon. To call online Help, double-click on this icon. Online Help can also be called in ProTool/Lite by pressing key F1. To modify Setup, double-click on this icon. You can modify Setup to install an option. Options Installing from hard disk Icons in the program group in Windows 3.11 Installation www.dienhathe.vn www.dienhathe.com
- 16. 2-4 ProTool/Lite User’s Manual Release 09/96 With Windows95, you call ProTool/Lite by means of the taskbar. The icons described under Windows 3.x will be found here as entries on the taskbar. If you have installed ProTool/Lite to be Standalone, you will find it in the Programs folder. If you have installed ProTool/Lite to be Integrated, you will find it in the Simatic folder. Note Before you start work on a configuration, you should first read about the file structure created for ProTool/Lite and the significance of the standard screens supplied to you by consulting section 7.5. The taskbar with Windows95 Installation www.dienhathe.vn www.dienhathe.com
- 17. 3-1 ProTool/Lite User’s Manual Release 09/96 Device-Specific Functional Overview The following tables present an overview of the S objects (Table 3-1), S general functions (Table 3-2) that can be configured for the different devices. Table 3-1 Configurable Objects Objects OP3 OP5 C7-623 OP7 OP15 C7-624 OP17 Screens Screen entries Soft keys Information text x – x x x x x x x x Input fields Variable Scheduler x – x – x x x – x x Output fields Variable Date Time x x x x x x x x x x x x x x x Input/output fields Variable x x x x x Character format Flashing Upper case x – x – x – x x1 x x Attributes Number Directory Start screen Return to Title Information text x x x x2 x – x x x x x x x x x x x x x x x x x x x x x x x x Event messages Standby message Date Time x x x x x x x x x x Output fields Variable Date Time x x x x x x x x x x x x x x x Attributes Priority Print x – x x x x x x x x Information text – x x x x Character format Flashing Upper case x – x – x – x x1 x x 1 With OP15C and C7-624 having 8*40 characters only 2 The only return possible is BACK. In this chapter 3 www.dienhathe.vn www.dienhathe.com
- 18. 3-2 ProTool/Lite User’s Manual Release 09/96 Table 3-1 Configurable Objects Objects OP17OP15 C7-624 OP7OP5 C7-623 OP3 Alarm messages Output fields Variable Date Time – – – x x x x x x x x x x x x Attributes Priority Acknowledge Print – – – x x x x x x x x x x x x Information text – x x x x Character format Flashing Upper case1 – – x – x – x x1 x x Recipes Recipe entries Information text – x x x x Input fields Variable – x x x x Character format Flashing Upper case – – x – x – x x1 x x Attributes Number Directory Return to Title Information text – – – – – x x x x x x x x x x x x x x x x x x x x Headers/ footers Message log EM chronological EM together AM chronological AM together Overflow Screen printout Recipe – – – – – – – – x x x x x x x x x x x x x x x x x x x x x x x x x x x x x x x x Output fields Date Time Page number – – – x x x x x x x x x x x x Character format Underlined Italics – – x x x x x x x x Scheduler Type Scheduler time Bit Function – – – – – – – – – – – – x x x x x x x x 1 With OP15C and C7-624 having 8*40 characters only Device-Specific Functional Overview www.dienhathe.vn www.dienhathe.com
- 19. 3-3 ProTool/Lite User’s Manual Release 09/96 Table 3-1 Configurable Objects Objects OP17OP15 C7-624 OP7OP5 C7-623 OP3 Output fields Usage Variable Date Time Page number x x x – x x x x x x x x x x x x x x x x Display Decimal Hexadecimal Binary String Decimal,decimal Text symbol x x x x x x x x x x x x x x x x x x x x x x x x x x x x x x Field length i bl x x x x xg Variable x x x x x Input fields Usage Variable Date Time Scheduler x x x – x x x – x x x – x x x x x x x x Display Decimal Hexadecimal Binary String Decimal,decimal Text symbol x x x x x x x x x x x x x x x x x x x x x x x x x x x x x x Field length x x x x xg Variable P d l l x x x x x Password level Information text x x x x x x x x xInformation text – x x x x Variables Format x x x x x Length P lli i x x x x x Polling time Decimals x x x x x x x x x xDecimals Address x x x x x x x x x xAddress PLC x x x x x x x x x xPLC Limit values x x x x x x x x x xLimit values Variable x – x – x x x – x x Functions x – x – x Soft keys Password level x x x x xy Bit in variable F i x x x x x Functions x x x x x Function keys Password level Function Shift + Function Set bit in LED assignment Set bit in keyboard assignment – – – – – x x x – x x x x x x x x x x x x x x x x Device-Specific Functional Overview www.dienhathe.vn www.dienhathe.com
- 20. 3-4 ProTool/Lite User’s Manual Release 09/96 Table 3-2 Configurable General Settings General Settings OP3 OP5 C7-623 OP7 OP15 C7-624 OP17 PLC Standard clock pulse x x x x x Drivers SIMATIC S5 – AS511 SIMATIC S5 – FAP SIMATIC S5 – SINEC L2–DP SIMATIC S7 – 300/400 SIMATIC S7 – 200 FREE SERIAL SIMATIC 500/505 – – – x x – – x1 x1 x1 x x1 x1 x1 x x x x x x x x1 x1 x1 x x1 x1 x1 x x x x x x x Parameters Depend on PLC x x x x x Area pointer Interface area User version x x x x x x x x xUser version Screen number – x x x x x x x x xScreen number Event messages Al x x x x x x x x x x Alarm messages PLC acknowledge – – x x x x x x x xPLC acknowledge OP acknowledge – – x x 1 x x x x 1 x xg Recipe number Data mailbox – x1 x1 x x x1 x1 x xData mailbox Recipe mailbox – – x1 x1 x x x1 x1 x xRecipe mailbox Successive recipe ilb – x x x x x x x x mailbox System keyboard x x x x xSystem keyboard Function keyboard LED i x – x x x x x x x x LED assignment – – x x x Parameters Messages Printout Alarm messages: – First/Last – Separate/Together Language-dependent charac- ters for: – Messages in buffer – Information text Warn on buffer overflow – – – – – – x x x x x x x x x x x x x x x x x x x x x x x x Firmware Device and firmware release x x x x x Miscellaneous User version Time/date format Superuser password Contrast Flashing input field Display system messages – x x – x x x x x x x x x x x x x x x x x x x x x x x x x x 1 Not with C7-623 and C7-624 Device-Specific Functional Overview www.dienhathe.vn www.dienhathe.com
- 21. 3-5 ProTool/Lite User’s Manual Release 09/96 General Settings OP17OP15 C7-624 OP7OP5 C7-623 OP3 Printer Interface Type Data bits Parity Stop bits Baud rate – – – – – x x x x x x x x x x x x x x x x x x x x Settings Select printer Parameters – – x x x x x x x x Languages Configuration possible in: German English French Italian Spanish Russian x x x x x – x x x x x – x x x x x x x x x x x x1 x x x x x x Languages loaded simultaneously on the OP 3 configuration languages x x x x x Download using Serial interface MPI x x x2 x3 x – x2 x3 x x 1 Not possible with OP15A 2 Not possible with C7-623 or C7-624 3 Possible with C7-623 and C7-624 only Device-Specific Functional Overview www.dienhathe.vn www.dienhathe.com
- 22. 3-6 ProTool/Lite User’s Manual Release 09/96 Device-Specific Functional Overview www.dienhathe.vn www.dienhathe.com
- 23. 4-1 ProTool/Lite User’s Manual Release 09/96 Working with Pro Tool/Lite This chapter contains a general description of how to run Pro Tool/Lite. This description is not a substitute for the general Windows documentation. 4.1 General Remarks Pro Tool/Lite is primarily designed to be run with a mouse. The different edi- tors are provided with special tool bars that have editor-specific buttons. These tool bars are shortcuts to frequently used functions. You can also configure ProTool/Lite using the keyboard. The following sections tell you how to handle mice and keyboards. Under Pro Tool/Lite, you always use the left mouse button to operate the mouse. In the Pro Tool/Lite documentation, the following terms are used for working with a mouse: Click The mouse button is pressed and released. Drag The mouse button is pressed and held down, the cursor is moved to its new position, and the mouse button is released. Double-click The mouse button is pressed twice in rapid succession. If you work without a mouse, the same key conventions apply in ProTool/ Lite as in Windows. The key combinations valid for ProTool/Lite have the following functions in the message, screen and recipe editors: SHIFT + left Select one character on left SHIFT + right Select one character on right Strg + Arrow Next configured message Working with a Mouse Working without a Mouse 4 www.dienhathe.vn www.dienhathe.com
- 24. 4-2 ProTool/Lite User’s Manual Release 09/96 On some menus, the menu items are followed by details of keys and key combinations. If you press this key or key combination, the menu item is ini- tiated. You must not choose the menu in advance. If menu items, symbols or buttons are displayed in gray, you cannot execute these functions. 4.1.1 Opening Several Configurations and Editors Under Pro Tool/Lite, you can open several configurations and editors simul- taneously. You can copy data to and from a configuration via the Clipboard. This facilitates work since you do not have to re-configure all the data. The same applies to editors, for you can also open several editors simulta- neously. You can also open an editor several times over, thus being able to work at different points in the editor. A window is opened every time you select a configuration or an editor. You can always edit the active window. You can recognize an active window by the color of its title bar, which is different from that of the other windows (Figure 4-1). Figure 4-1 Pro Tool/Lite Screen with Several Open Windows Opening several configurations Opening several editors Active window Working with Pro Tool/Lite www.dienhathe.vn www.dienhathe.com
- 25. 4-3 ProTool/Lite User’s Manual Release 09/96 4.1.2 Using Online Help Online Help is a complete reference tool which you can choose at any time while you are configuring. By using online Help, you obtain information in dialog boxes about menus, ranges of values etc. You can call online Help in several different ways: F1 You can always press F1 in Pro Tool/Lite to consult on line Help. Online Help is automatically called for the editor in which you happen to be working or for the dia- log box you selected. Context-sensitive Clicking the Help button (↑?) on the tool bar transforms the cursor into an arrow with a question mark. Clicking this cursor in Pro Tool/Lite on an item about which you would like to obtain more information calls online Help, and the corresponding position in online Help is displayed. The items you click may be dialog boxes, menu items or buttons on the menu bar. If you are not working with a mouse, you can activate context-sensitive Help by pressing SHIFT + F1. Help menu You can call online Help by choosing the Help → Con- tents menu. The first page of online Help is then dis- played. Figure 4-2 shows an example taken from Online Help: Figure 4-2 Online-Help Purpose Calling online Help Online Help window Working with Pro Tool/Lite www.dienhathe.vn www.dienhathe.com
- 26. 4-4 ProTool/Lite User’s Manual Release 09/96 A green, underlined topic identifies a button which references another topic. If you click this button, the new topic is displayed in a different window. A green, dotted underlined topic denotes a button which references a brief explanation. Clicking the cursor on this button displays a window containing the information. The window is hidden by clicking anywhere on its surface. Furthermore, online Help frequently displays screen dumps of Pro Tool/Lite, i.e. editors, dialog boxes, etc. There are buttons under many of these screen dumps. If you press these buttons, you jump to other topics or call a superim- posed window, where you can obtain further information. If you click in online Help on a button or menu item in a screen dump which causes the Pro Tool/Lite software to branch to a dialog box, online Help also branches to the associated topic. If you click in online Help on a field in which an entry has to be made in the Pro Tool/Lite software, a window con- taining a description is superimposed. To make the buttons in screen dumps visible, press the following key com- binations: CTRL + TAB All invisible buttons are displayed while you hold down CTRL + TAB. ESC + TAB The first invisible button is displayed. Every time you press ESC + TAB, the next button is displayed. Pressing RE- TURN pushes the button. Green text Jump in screen dumps Displaying jumps Working with Pro Tool/Lite www.dienhathe.vn www.dienhathe.com
- 27. 4-5 ProTool/Lite User’s Manual Release 09/96 4.1.3 Status Bar in Pro Tool/Lite The status bar is the bar at the bottom of the screen. In Pro Tool/Lite, the sta- tus bar displays general information and editor-specific details. The general information includes such items as the OP that you have selected or how you can call online Help. Editor-specific details, on the other hand, might be the language and the assignment of a message in the area pointer. Fig. 4-3 shows the status bar with messages. Figure 4-3 Status Bar with Messages In the status bar you can also display information about the functions of but- tons or of menu items. To do so, click the item you require and press and hold down the mouse button. During this time the corresponding information will be displayed in the status bar. If you do not want to initiate the function, continue to hold down the mouse button and drag the mouse away from the selected item. 4.1.4 All Menus There are various editing levels in the configuration. They are represented by main menu items. Figure 4-4 Menu Bar All the editing actions of an editing level are arranged under one main menu item. The main menu items are specifically: File All editing actions concerning the entire configuration are concentrated here. At this point you can, for example, open and save files, compile files and transfer them to the OP etc. Edit All editing actions concerning selected or highlighted sec- tions of the configuration are concentrated under this main menu item. At this point you can, for example, cut, copy, insert etc. fields or text. Purpose Displaying information Menu bar Main menu bar Working with Pro Tool/Lite www.dienhathe.vn www.dienhathe.com
- 28. 4-6 ProTool/Lite User’s Manual Release 09/96 Editors! All the editors used for configuring the OP are concentrated here. At this point you can select the editor you want to work with – for example, for screens, event messages etc. System General settings for the OP are listed under this main menu item. At this point you perform settings for the link to the PLC program and PLC-specific settings, and you set area pointers etc. Options At this point you will find default settings and cross-refer- ences. Window All the editing actions for arranging the windows of Pro- Tool/Lite are located here. You can select – for example – the window you want to have in the foreground, or you can arrange all open windows on the screen, etc. Help By choosing Help, you go to online Help. You can find in- formation by searching for Help topics (Contents). Editor-dependent menu items appear only when the corresponding editor is called. All the editing actions specific to that editor appear under these menu items. The following menu items are involved: Screen At this point you can, for example, select screen attributes, create fields, define character formats, etc. Messages Under Messages, you can, for example, edit variables or information text, open additional windows, etc. Headers/Footers Headers and footers can be edited for the printout on the OP. Recipe This menu item allows you, for example, to create fields, edit information text, recipe attributes and character for- mats, etc. Editor-dependent menu items Working with Pro Tool/Lite www.dienhathe.vn www.dienhathe.com
- 29. 4-7 ProTool/Lite User’s Manual Release 09/96 4.2 Tool Bar Some functions can be accessed not only on menus but also directly on the tool bar at the top border of the screen. The buttons are self-explanatory and represent shortcuts. Figure 4-5 Tool Bar in Screen Editor Below, a description is given of all the buttons on tool bars: New Open a project with the default settings. Open Open an existing project. The File Open dialog box is opened. You choose the project you require from the dialog box. Save Save a project under its name. If it is a new, unnamed proj- ect, the Save As dialog box is opened. Cut Cut highlighted fields or text from the project and store them on the Clipboard. Copy Copy highlighted fields or text in the project and store them on the Clipboard. Paste Paste fields or text in the project from the Clipboard. Context- Show a special cursor. Click the cursor on the item about sensitive help which you require information. Online Help is chosen. Character format You assign a character format to highlighted text: under- lined, flashing, italic, upper case. With upper case, the let- ters are two lines high (this attribute can be selected only for the OP15C having 8x40 characters). WYSIWYG Toggle display of fields between symbolic name and actual mode length. Purpose Summary of functions Working with Pro Tool/Lite www.dienhathe.vn www.dienhathe.com
- 30. 4-8 ProTool/Lite User’s Manual Release 09/96 Information text The same editor can be used to configure information text for messages, screen and recipe entries. You use this key to toggle between edit mode and information text. Insert field With messages, screen and recipe entries, and headers and footers, you can also use fields. This button is used to insert a field. 4.3 General Settings You can customize Pro Tool/Lite while you are configuring. To do this, the following menu items are available to you: At this point you can modify the default settings of names and settings. Select Reference Text and, for the active screen, the screen is displayed in the reference language. When you press the Apply Text button on the refe- rence screen, all text strings on the reference screen are applied to the active screen. This menu item is used to display and hide the attribute window. In this win- dow, you set different options which apply to just one message. This is its priority, for instance. This menu item is used to display and hide the reference text window. Mes- sage text is displayed in the reference language in this window. This menu item is used to display and hide the reference text window. Recipe text is displayed in the reference language in this window. This menu item is used to display and hide the reference text window. Hea- der and footer text is displayed in the reference language in this window. Window Under this menu item, you will find settings for customizing your screen. This includes displaying more than one window on your screen simulta- neously, for instance. Menu items Options → Default Setting Screen → Reference Text Messages → Attribute Window Messages → Reference Text Recipe → Reference Text Headers and Footers → Reference Text Working with Pro Tool/Lite www.dienhathe.vn www.dienhathe.com
- 31. 4-9 ProTool/Lite User’s Manual Release 09/96 4.4 Information Functions Pro Tool/Lite contains functions that provide information about the entire configuration. These items are listed below: Here you will find general details relating to the project: Device, date crea ted, author etc. Following compilation or download of a configuration, the storage space re quired for that configuration on the OP is displayed. If there is a link to the OP, the current firmware release of the OP is dis played. The objects that refer to each other are displayed. If, for example, you wish to delete a variable which is being used in a field, you find the associated field by means of Cross-Reference. Double-click on the specified field to have ProTool/Lite jump directly to the field. Summary File → Project Information System → Memory Requirements System → Parameters → Firmware Options → Cross–reference Working with Pro Tool/Lite www.dienhathe.vn www.dienhathe.com
- 32. 4-10 ProTool/Lite User’s Manual Release 09/96 4.5 Dialog Boxes When you open a dialog box, only the essential settings are visible initially. Optional settings may be accessed by clicking a button. Clicking a button opens yet another dialog box, which may contain more buttons. An example of the structure of a dialog box is shown in Fig. 4-6. Figure 4-6 Function Key Dialog Box A description is given below of all the points that you have to remember when you are using dialog boxes. If there is an ellipsis (...) behind a name on a button – for example, in Fig. 4-6 Function... – ProTool/Lite branches to another dialog box when you press the button. If there is a check box in front of the name of the button, you branch by pres- sing the button to an optional setting – for example, in Fig. 4-6 Function.... You can tell from the check box whether a configuration is available in the dialog box: if there is a check mark in the check box, a configuration is avai- lable; if the check box is not checked, no configuration is available. Dialog boxes contain either OK and Cancel buttons or a Close button. In the first case, you have two options for closing a dialog box – you can close with or without saving. To close a dialog box and to save any changes you may have made at the same time, you have to exit from the dialog box by pressing the OK button. Settings Branching to other dialog boxes Closing a dialog box Working with Pro Tool/Lite www.dienhathe.vn www.dienhathe.com
- 33. 4-11 ProTool/Lite User’s Manual Release 09/96 If you exit from the dialog box by pressing the Cancel button, any changes you may have made are lost. In the second case, the Close button is used to close the dialog box. In this type of dialog box, any changes you may have made take immediate effect. In other words, changes do not have to be explicitly saved. Working with Pro Tool/Lite www.dienhathe.vn www.dienhathe.com
- 34. 4-12 ProTool/Lite User’s Manual Release 09/96 Working with Pro Tool/Lite www.dienhathe.vn www.dienhathe.com
- 35. 5-1 ProTool/Lite User’s Manual Release 09/96 Configuring with ProTool/Lite You configure the different OPs in basically the same manner. Before you can start work on your configuration, you have to set the device type – for example, OP5. You are now offered only the functions that are available with this device type. You cannot modify the device type for this configuration once it has been set. With the menu item File → Convert, you can convert configurations as fol- lows: S from an OP5 to an OP7 and S from an OP15C to an OP17. Note Re-conversion is no longer possible. The items that you configure are individual objects. We distinguish between different types of object, such as messages, screens, variables, etc. A separate editor is available for every type of object. The link to the PLC is established by means of variables. Variables are used on screens and in recipes and messages to read values from the PLC and to display them on the OP. Similarly, variables may be used to write values to the PLC. Information text can be configured to provide the OP operator with additional information about individual objects. General settings for the system and the communication areas in the PLC have to be performed centrally. Upon completion, the configuration has to be downloaded to the OP. In this procedure the configuration is first compiled. Compile means that an OP- readable version is created. Device type Object types Variables Information text General settings Compiling, downloading 5 www.dienhathe.vn www.dienhathe.com
- 36. 5-2 ProTool/Lite User’s Manual Release 09/96 5.1 Procedure for Configuration A configuration has to be created step by step. Certain steps are mandatory, others are optional. An explanation is provided in the following of the different configuration steps in the order in which they have to be performed. This is followed by a list of the settings required for configuring different functions. Figure 5-1 shows the basic details that have to be provided in respect of the Operator Panel and the Controller in a configuration. They in clude – OP type, – display resolution, – type of PLC to which the OP will be connected, – protocol which the PLC and OP will use to communicate with each other, – communcation areas. OP type PLC Communication Display resolution Objects Communication data areas Addresses Hardware and driver General settings Process visualization Configuration: OP-specific components PLC-specific components Figure 5-1 Basic Structure of a Configuration The visualization of the process is performed by using objects, such as screens and messages. These objects are supplied with current values by the PLC. The values are set by means of addresses. Introduction Required details Objects Configuring with ProTool/Lite www.dienhathe.vn www.dienhathe.com
- 37. 5-3 ProTool/Lite User’s Manual Release 09/96 You create your configuration on a PC or PU and then download it to the OP. The procedure for configuration is specifically as follows: 1. Set device type. After a new configuration has been opened, the dialog box for selecting the device is opened. At this point you set the type of OP. The other items displayed by ProTool/Lite thereafter are device-specific. For the OP15C, you set the display resolution – the number of lines and the number of characters per line – at this point. 2. Set PLC and communication protocol. You must specify in the configuration the PLC to which the OP will be connected and the protocol which the OP and the PLC will use to commu- nicate with each other. This is done by choosing System → PLC from the menu. The PLC dialog box is displayed. All settings performed at this point are saved under a symbolic PLC name. If you use a variable in an object, you specify this symbolic name for the link to the PLC. 3. Enter communication areas (area pointers). For the OP and the PLC to be able to communicate with each other, you must define commonly used data areas. These data areas are termed com- munication areas. They are entered by choosing System → Area Pointers from the menu. The communication areas you enter depend on the types of object that are being configured. Table 13-1 shows the dependencies. It is vital that you create the interface area for the SIMATIC S5 PLC un- der Area Pointers. You will find a detailed description in theCommunica- tion User’s Manual. 4. Configure objects. Now, configure the messages, screens and recipes required by your pro- cess. You will find a detailed description of how to configure screens, messages and recipes in Chapters 7, 8 and 9. You can create variables, which make the link to the PLC possible, either directly by using the variables editor or you can leave them until such time as you configure individual objects. If, for example, you create an input field on a screen, you can call the dialog box for creating variables by pressing the Edit button. 5. Compile configuration. For the configuration to run on the OP, it must first be compiled. To do this, choose in ProTool/Lite File → Compile from the menu. During compilation, a check is made for inconsistencies in the configura- tion. One inconsistency might be, for example, that a particular type of object has been configured without the corresponding communication area having been created. Procedure Configuring with ProTool/Lite www.dienhathe.vn www.dienhathe.com
- 38. 5-4 ProTool/Lite User’s Manual Release 09/96 6. Download configuration to OP. You download the configuration to the OP by choosing File → Download from the menu. Should there be a current, compiled version already, it is downloaded. If a compiled version does not exist, the configuration is first compiled and then downloaded. To create a configuration for an OP5, proceed as follows: 1. Call the standard configuration for the OP5, c:prolitestan- dards_05.pdb, and rename it by calling File → Save As... from the menu and save the standard configuration by giving it the project name quickmix.pdb. 2. Choose System → PLC from the menu to set the PLC. 3. Press the Edit button. The Driver dialog box now appears. We want to establish the connection is over AS511. 4. Press the Parameters button. The SIMATIC S5-AS511 dialog box is now displayed. 5. Select in the SIMATIC S5-AS511 dialog box, for example, CPU Type: S5 115 CPU944 if you wish to connect the OP5 to that PLC. 6. If you close the dialog box by clicking OK, the settings are applied. Do exactly the same in all the other dialog boxes which you may have opened in the meantime. Exit from the PLC dialog box by clicking the Close button in order to apply all the settings. 7. Choose System → Area Pointers from the menu to configure the interface area, DB-TDOP. 8. In the Type field, you will see that Interface Area has already been se- lected. Press the Add key. A dialog box having the title Interface Area is opened. 9. Enter the following values in the Interface Area dialog box: DB: 51, Length: 255. This means that DB51 is the Interface Area. 10. Exit from the Interface Area and Area Pointers dialog boxes by choosing OK to save the settings. 11. Configure a screen (refer to chapter 12) 12. Choose File → Save from the menu to save the file. 13. Choose File → Compile from the menu to compile the configuration. 14. Connect the OP to your PC or PU. Choose File → Download from the menu to download the configuration to the OP. Example for SIMATIC S5 Configuring with ProTool/Lite www.dienhathe.vn www.dienhathe.com
- 39. 5-5 ProTool/Lite User’s Manual Release 09/96 5.2 Special Features of STEP 7 Integration If you have installed ProTool/Lite as being integrated, you can access the same database with ProTool/Lite as with the engineering tools of STEP 7. You assign your symbolism only once and use it everywhere. This saves you repeated inputs. The communication parameters of the PLC are applied directly to your confi- guration. When you are configuring variables and area pointers, you access the STEP 7 text or graphic list. You call ProTool/Lite as follows: 1. Start the SIMATIC Manager. 2. Select an S7 project or create a new one. 3. Choose Insert → Hardware → COROS OP from the menu. The ProTool/ Lite project OP1 is created. 4. Double-click on OP1 to start ProTool/Lite. You can copy, move and delete the ProTool/Lite project in the SIMATIC Manager. Note The project name and the object name in STEP 7 must be different or else an error message points out to you that the object cannot be saved. When you are configuring variables, the STEP 7 symbol table is displayed for you. When you click on a symbolic name, the name and the complete address are applied automatically to the configuration.This is illustrated in Figure 5-2. STEP 7 integration Calling ProTool/ Liteite Using the symbol table Configuring with ProTool/Lite www.dienhathe.vn www.dienhathe.com
- 40. 5-6 ProTool/Lite User’s Manual Release 09/96 Figure 5-2 Variable Dialog Box with Embedded STEP 7 Symbol Table Select the PLC in the way you normally would. For the parameters, the SIMATIC S7 – 300/400 dialog box (refer to Figure 5-3) displays all the net- works, CPUs and FMs available in the STEP 7 project. Once you have selec- ted the network and the CPU by means of symbolic names, the parameters and addresses are entered for you automatically. You can select the CPU symbolically only if you have placed it in an S7 sta- tion using the SIMATIC Manager, assigned parameters to it and networked it. Figure 5-3 SIMATIC S7 – 300/400 Dialog Box If you have not yet created the configuration, you can type in the parameters. To type in the parameters, select No Symbol. Selecting the PLC Configuring with ProTool/Lite www.dienhathe.vn www.dienhathe.com
- 41. 5-7 ProTool/Lite User’s Manual Release 09/96 The text or graphic lists and the address parameters are continuously updated via the symbolic link. STEP 7 modifications are applied immediately. Choose menu items File → New, File → Open and File → Save As... in Pro- Tool/Lite to open STEP 7 dialog boxes. By way of an example, Figure 5-4 shows the Open dialog box. Figure 5-4 Open Dialog Box In this dialog box, you can open ProTool/Lite projects. You can recognize ProTool/Lite projects by the icons preceding them . The dialog boxes for New and Save As... look alike, but they have different functions. When opening a ProTool/Lite project, specify in the Object Name entry field an existing ProTool/Lite project. When creating a new ProTool/Lite project, you can enter a new name having a length not exceeding 24 characters at this point. You cannot call projects under the SIMATIC Manager that have been created as stand-alone projects. For these projects to be linked to a STEP 7 project, they have to be integrated. To integrate these projects, choose in ProTool/Lite File → Integrate from the menu. Give the ProTool/Lite project a different name in the STEP 7 configuration from that in the original project. ProTool/Lite can still be started as a stand-alone program if you call ProTool/ Lite setup and choose Standalone. If you wish to modify this setting in Setup, ProTool/Lite is not re-installed, only the link to STEP 7 is canceled. Updating Menu File Integrating projects ProTool/Lite Standalone Configuring with ProTool/Lite www.dienhathe.vn www.dienhathe.com
- 42. 5-8 ProTool/Lite User’s Manual Release 09/96 In this example, you will create a ProTool/Lite project, including all the pre- liminary work for connecting the OP to the S7 PLC. 1. Create a new STEP 7 project called PROLITE in the SIMATIC Manager. 2. Select the PROLITE project. Then, choose Insert → Hardware → SIMA- TIC 300 Station from the menu. The SIMATIC 300 Station1 icon appears in the SIMATIC Manager. 3. If, when you are creating the PROLITE STEP 7 project, the icon for an MPI network does not appear, choose Insert → Subnet → MPI Network. 4. Select the SIMATIC 300 Station1 icon and choose Edit → Open Object from the menu. The Hardware Configuration dialog box appears. 5. Open the hardware catalog by choosing View → Catalog from the menu. 6. In the hardware catalog, click the + sign preceding SIMATIC 300 and then the + sign preceding RACK 300. Then, select Mounting Rail and drag it into the empty, blue bar of the Hardware Configuration dialog box. The first line (expansion slot 0) of the configuration table appears; the rail is entered on it. 7. Click on the + sign preceding expansion slot 0 to open the configuration table completely. 8. Click in the hardware catalog on the + sign preceding CPU-300. Select CPU314 and drag it to expansion slot 2 of the configuration table. CPU314 is entered in expansion slot 2, and the line remains selected. 9. Choose Edit → Object Properties. The Properties – CPU 314 dialog box appears. 10. Click the MPI button on the Properties card. The Properties – MPI Node dialog box is opened. 11. Enable the Networked list box by clicking it. Select the MPI Network 1 entry beneath it. 12. Then, close all the dialog boxes by clicking OK or by saving. In this way you have created and networked the PLC to the extent required for Pro- Tool/Lite. The STEP 7 symbol table has been created automatically. 13. To open it, click first on the + sign preceding the PROLITE project, on the + sign preceding SIMATIC 300 Station1, on the + sign preceding CPU314 and on the + sign preceding S7 Programm1. Select SY and then choose Edit → Open Object. The symbol table is opened. 14. Make the following entries: Symbol: Mixer1 Address: I0.1 The BOOL data type is entered automatically. 15. Save and then close the symbol table. You can use the Mixer1 symbol later to configure a variable. 16. Open the ProTool project containing the standard configurations which were supplied to you. Copy object OP15C 8*40 to your PROLITE pro- ject. Example: Creating a ProTool/Lite project Configuring with ProTool/Lite www.dienhathe.vn www.dienhathe.com
- 43. 5-9 ProTool/Lite User’s Manual Release 09/96 17. Double-click the Copy OP15C 8*40 icon. ProTool/Lite is started and the standard configuration for the OP15C is opened. 18. Choose System → PLC from the menu. The PLC dialog box is opened. By default, the SIMATIC S7-300/400 PLC is entered at this point in the case of STEP 7 integration. 19. Now, first click the Edit button and then the Parameters button. The SIMATIC S7 300/400 dialog box appears. 20. Select the entry MPI Network1 in the Connect OP to Network list box. This entry now appears in the Select Communicating Peer list box. 21. Click in the Select Communicating Peer list box on the + sign preceding the MPI Network1 entry. The entry CPU314 (S7 Program1) appears. 22. Select the CPU314 (S7 Program1) entry and close all the dialog boxes dealing with the PLC by clicking OK or Close. The connection between the OP and the PLC is thus established. 23. Double-click in the editor window on Variable. The Variable dialog box appears. 24. In the PLC selection box, choose PLC_1. In the Symbol list box, you will now see the Mixer1 symbol from the STEP 7 symbol table. Double-click this symbol. The following values are applied to the dialog box: Mixer 1 in the Name entry field BOOL in the Type list box I in the Area list box 0 in the E entry field 1 in the Bit entry field Configuring with ProTool/Lite www.dienhathe.vn www.dienhathe.com
- 44. 5-10 ProTool/Lite User’s Manual Release 09/96 5.3 The Most Important Objects and Their Settings When a particular type of object – for example, messages – is configured, it is not sufficient merely to edit the messages. Other inputs, concerning com- munication, method of presentation on the OP and printout, have to be made. Table 5-1 lists the most important types of object and the settings required for them. Table 5-1 Objects Used and the Necessary Settings Objects Used Associated Settings Menu Item or Dialog Box PLC PLC type, protocol Interface data block (SIMATIC S5 only) System → PLC System → Area Pointers Event messages Event message area System → Area Pointers Message display System → Parameters → Messages Message printout Messages → Attributes window System → Parameters → Messages Message buffer System → Parameters → Messages – Text – Output – Symbolic output Edit text Variable Variable and text list Messages → Edit/Insert Field Messages → Edit/Insert Field Alarm messages Alarm message area System → Area Pointers Acknowledgment area System → Area Pointers Message display System → Parameters → Messages Message printout Messages → Attributes window System → Parameters → Messages Message buffer System → Parameters → Messages – Text – Output – Symbolic output Edit text Variable Variable and text list Messages → Edit/Insert Field Messages → Edit/Insert Field Details of object type Configuring with ProTool/Lite www.dienhathe.vn www.dienhathe.com
- 45. 5-11 ProTool/Lite User’s Manual Release 09/96 Table 5-1 Objects Used and the Necessary Settings Menu Item or Dialog BoxAssociated SettingsObjects Used Screens – Text – Input/Output – Symbolic Input/Output – Functions Edit text Variable Variable and text list Soft key Screen → Edit/Insert Field Screen → Edit/Insert Field Fx button in screen entry Call screen using function keys or soft key or Scheduler System → Screen/Keys Select Screen function Select Screen function Scheduler Select Screen function Recipes Data mailbox Recipe number mailbox Recipe mailbox Successive recipe mailbox System → Area Pointers System → Area Pointers System → Area Pointers System → Area Pointers – Text – Input – Symbolic input Edit text Variable Variable and text list Recipe → Edit/Insert Field Recipe → Edit/Insert Field Call recipe using function keys or soft key System → Screen/Keys Select Data Record function Select Data Record function Configuring with ProTool/Lite www.dienhathe.vn www.dienhathe.com
- 46. 5-12 ProTool/Lite User’s Manual Release 09/96 5.4 Editors for Different Object Types A configuration consists of different objects. We distinguish between differ- ent types of objects, such as event messages, alarm messages and screens. ProTool/Lite makes a separate editor available for every type of object. There are editors for – screens, – event messages, – alarm messages, – variables, – recipes, – scheduler, – symbol lists, – headers and footers. Figure 5-5 shows the box from which you can choose the editors. Figure 5-5 The Editors of ProTool/Lite Objects such as screens, variables and text or graphic lists are saved under a symbolic name. The symbolic name is valid only for that configuration. You have to specify this symbolic name whenever you create, delete and edit ob- jects or reference objects from within other objects. Symbolic object names are displayed under Objects in the Editors box. Symbolic object names may have default settings and may be numbered au- tomatically. The default settings may be entered by choosing Options → Default Setting from the menu. Default settings were performed before Pro- Tool/ Lite was shipped. Editors in ProTool Symbolic name Configuring with ProTool/Lite www.dienhathe.vn www.dienhathe.com
- 47. 5-13 ProTool/Lite User’s Manual Release 09/96 Variables and symbol lists can also be configured directly for messages and screens. If you wish to configure variables or symbol lists separately, select the corresponding dialog boxes from the editors. The user interface of the different editors is adapted to the specific configura- tion of the various types of objects. A detailed description will be found else where in this document. A brief summary is presented below. A screen consists of several entries. Soft keys are assigned to every screen entry and can be assigned with different functions for specific entries. Soft keys are arranged directly beneath an entry. This means that the assignment of screen entry and soft key is unambiguous. Values are always based on variables which define the link to the PLC. The OP reads a value from the PLC and displays it in its configured form. In the case of inputs, a value is sent to the PLC. Fig. 5-6 shows a configured screen with fields and assigned soft keys. Variables Figure 5-6 Configured Screen in Screen Editor (Example) Event messages and alarm messages are used to display operating states and malfunctions in the process. Values, too, can be output in event messages and alarm messages. Variables and symbol lists Object types Screens Event and alarm messages Configuring with ProTool/Lite www.dienhathe.vn www.dienhathe.com
- 48. 5-14 ProTool/Lite User’s Manual Release 09/96 Figure 5-7 Configured Alarm Messages Variables form the link to the PLC. They contain the address in the memory area of the PLC. From these addresses, the OP reads values or it writes values to them. The Variable dialog box is PLC-specific. Depending on the PLC that you set, the appropriate data types and addresses are presented to you. An example of a variable configured for the SIMATIC S5 is shown in figure 5-8. Figure 5-8 Variable Configured for the SIMATIC S5 Recipes are groups of technologically associated PLC setpoints for a specific application. Data are assigned to the configured data structure on the OP. Fi- gure 5-9 shows a configured recipe. Variables Recipes Configuring with ProTool/Lite www.dienhathe.vn www.dienhathe.com
- 49. 5-15 ProTool/Lite User’s Manual Release 09/96 Figure 5-9 Configured Recipe A scheduler defines a regularly recurring point in time at which a specific function is required to be executed. The following types of scheduler times are available: S hourly, S daily, S weekly or S annually. Table 5-2 shows the time entries that are required for the different types of scheduler. Table 5-2 Time Entries Required for Different Types of Scheduler Scheduler Type Essential Time Entries Hourly Minute Daily Hour, minute Weekly Day of week, hour, minute Annually Month, day, hour, minute Should you subsequently wish to modify or de-activate the scheduler time, you can insert it in a screen entry. When a scheduler time has elapsed, the corresponding scheduler bit is set on the PLC (in the interface area) and the configured function is executed. Scheduler Configuring with ProTool/Lite www.dienhathe.vn www.dienhathe.com
- 50. 5-16 ProTool/Lite User’s Manual Release 09/96 The functions available are: S Print event buffer S Print alarm buffer S Select screen S Print screen S Print recipe. A function does not necessarily have to be configured. If no function is confi- gured, only the scheduler bit is set when the scheduler elapses. Figure 5-10 shows a configured scheduler time. Figure 5-10Configured Scheduler Time Symbol lists are required for symbolic input/output. In this instance text is assigned to the value of a variable. The text appears on the OP. Headers and footers can be edited on the OP for printout. Two lines contain- ing 80 characters are available in both cases. You can use both text and fields. Symbol lists Headers and footers Configuring with ProTool/Lite www.dienhathe.vn www.dienhathe.com
- 51. 5-17 ProTool/Lite User’s Manual Release 09/96 You can initiate different printouts on the OP. These printouts are for: Message log Every message that arrives, departs or is acknowledged is output to the printer. For this, the Print attribute has to be checked for the message. EM Chronological The event buffer is printed in the chronological order of the messages. EM Together The event buffer is printed in message number order. AM Chronological The alarm buffer is printed in the chronological order of the messages. AM Together The alarm buffer is printed in message number order. Overflow Messages are deleted automatically when a buffer overflows. Depending on the system setting, such messages are then output to the printer. Print screen A selected screen is printed. Print recipe A selected recipe is printed. Configuring with ProTool/Lite www.dienhathe.vn www.dienhathe.com
- 52. 5-18 ProTool/Lite User’s Manual Release 09/96 5.5 Copying to and from the Clipboard Sections of configurations can be copied to the Clipboard for pasting within an editor or for pasting into other editors. You can even copy from one proj- ect to another. This affects message text and screen entry text, as well as soft key assignments. Variables cannot be copied between projects. If you select text in a message, a screen entry or a recipe entry, you can copy, cut and paste it in the same way as with other Windows applications. If you select the whole message or the whole screen entry by clicking the number area, attributes and information text are copied as well. Selected parts can be moved and copied using drag and drop editing. Move the mouse to the highlighted text and click the left mouse button. S To move the text, proceed as follows: Hold down the mouse button and drag the mouse pointer to the new loca- tion. S To copy text, proceed as follows: Hold down the mouse button, press the CTRL key at the same time and drag the mouse pointer to the new location. Variables may be assigned to fields on screens or in messages. If you copy a field from one configuration to another, the symbolic name of the variable is retained. The values of variables are lost, however. Let us assume that you are copying variable_XX from Configuration_1 to Configuration_2. S If there still is not a variable with this symbolic name in Configuration_2, variable_XX is created with the default values of Configuration_2. S If there is a variable with this symbolic name already, then that variable is used. Scope Cutting, copying, pasting Example of copying with variables Configuring with ProTool/Lite www.dienhathe.vn www.dienhathe.com
- 53. 5-19 ProTool/Lite User’s Manual Release 09/96 5.6 Assigning Function Keys You can assign functions to function keys in your configuration. Click the function key displayed on the screen. The Function Key - Fx dialog box is opened. With the Function button, select the function call you require for key assignment from the list of functions. You can assign two types of function key: global and local. Local assign- ments have priority over global ones. Global signifies that the assignment applies to the whole configura- tion. Local signifies that the assignment applies only to individual screens. Function key assignments may vary from one screen entry to another. In this way you can have functions initiated in keeping with the situation. A function key, whose assignment may vary depending on the screen entry, is referred to as a soft key. Always place functions that must always be at hand on function keys, never on soft keys. Soft keys are the keys that are directly located under the screen entry. You can assign the following keys as soft keys on the different OPs: OP3 Keys F1 to F5 of the function keyboard. OP5 Keys F2 to F5 of the function keyboard. OP7 Keys F1 to F4 and K1 to K4 beneath the display. OP15 Keys F1 to F8 beneath the display. OP17 Keys F1 to F8 and K1 to K8 beneath the display. You assign soft keys in the editor. You can assign an icon to a soft key that is labeled with text or a graphic. Global function keys are assigned only by choosing System → Screen/Keys from the menu. The following keys can be assigned as function keys for the different operator panels: OP5 Function keys F1 to F6 . OP7 Function keys F1 to F4 and K1 to K4. OP15 Function keys K1 to K16 . Assigning Soft keys Function keys Configuring with ProTool/Lite www.dienhathe.vn www.dienhathe.com
- 54. 5-20 ProTool/Lite User’s Manual Release 09/96 OP17 Function keys F1 to F8 and K1 to K16. Function keys may have two assignments: – for single key operation – for SHIFT + key operation. You can note the functions you have assigned to keys on labeling strips. The F and K keys of Operator Panels OP7 and OP17 can be configured as DP direct keys. DP direct keys means that set bits are passed directly (unpacked) over the L2-DP bus to the PLC. The response time in type mode is about < 100 ms. DP direct keys are configured by means of STEP 7. In order to be able to use the F and K keys as DP direct keys, set CPU type SIMATIC S7-300/400 by choosing System → PLC → Edit from the menu. Select communication type DP by choosing Parameters and then Profile. Note To use the DP direct keys, the OP7 or OP17 must have been configured as an active DP slave in the L2-DP network. You will find details of the assignment of PLC parameters for the connection via L2-DP in the Communication User’s Manual. DP direct keys Configuring with ProTool/Lite www.dienhathe.vn www.dienhathe.com
- 55. 6-1 ProTool/Lite User’s Manual Release 09/96 Variables Variables represent the lowest level in a configuration. You specify the ad- dress on the PLC in variables. This means that variables are used to establish the link to the PLC. Values are written to variables. This may be done from the PLC or by means of an operator input. Variables are used to display process values. They can be configured on screens and in messages or recipes. To do this, you must insert a field to de- fine how the variable is to be used. The variable itself defines only the ad- dress on the PLC. The field defines how the variable is to be used – for input or for output. The setting for transferring the values of variables between the OP and the PLC is as follows: Polling time > 0 If a value greater than 0 is entered for the polling time of a variable, the value of the variable is transferred within the specified time. Polling time is a multiple of the standard clock pulse in se- conds. By default, the standard clock pulse is set to 200 ms. If, for example, you enter a polling time of 0.8 s, it is four times the value of the standard clock pulse. If you raise the standard clock pulse to 400 ms by choosing System → PLC from the menu, the specified polling time is increased to 1.6 s. By raising the standard clock pulse, you can globally in- crease the polling times of all the variables in a project. Polling time = 0 If the polling time is entered as 0, the variable is read only when a screen, message or recipe is called. It is then not updated after that. Definition Usage Updating 6 www.dienhathe.vn www.dienhathe.com
- 56. 6-2 ProTool/Lite User’s Manual Release 09/96 6.1 Configuring a Variable To configure a variable, select the Variables editor in the Editors dialog box. In the Variable dialog box, enter the address from which the value you wish to display will be read or to which it will be written. When defining a field, you can use a variable that is already configured on a screen, in a message or in a recipe. However, you can also configure the va- riable when you define a field (see chapter 7, 8 or 9). Apart from the address, you also have to set the PLC. Define the PLC under a symbolic name by choosing System → PLC from the menu. You specify this name in the Variable dialog box. The complete address setting depends on the PLC you are using. To configure a variable, proceed as follows: 1. Select the Variables editor in the Editors dialog box. The Variables dialog box is opened. Figure 6-1 Dialog Box 2. The Name field displays the symbolic name together with the next free number. If you have still not configured any variables in this project, Var_1 is displayed in this field. Setting an address Setting the PLC Example for SIMATIC S5 Variables www.dienhathe.vn www.dienhathe.com
- 57. 6-3 ProTool/Lite User’s Manual Release 09/96 3. Enter the following values in the Variable dialog box: DB: 10 DW: 2 Format: KF PLC: PLC_1 4. Exit from the Variable dialog box by clicking OK. 5. The entry VAR_1 appears under Objects in the right column of the Edi- tors dialog box. Variables www.dienhathe.vn www.dienhathe.com
- 58. 6-4 ProTool/Lite User’s Manual Release 09/96 6.2 Setting Limit Values of a Variable For every variable, you can configure an upper limit value and a lower limit value. If you enter a value outside the configured limit values, the input is not accepted. Upper and lower limit values are set in the Limit Values dialog box. Figure 6-2 shows the dialog box. Configured limit values are possible only in input and input/output fields. Figure 6-2 Limit Values Dialog Box Under Upper/Lower Limit Values, you can choose whether there is to be an upper limit value and/or a lower limit value for the variable that you config- ured. By default, the setting is disabled. You can define whether the specified limit value is determined by a constant or a variable (OP3, OP7 and OP17 only). If you specify a limit value variable, it must have the same format as the corresponding variable. Limit values for variables are entered without a decimal point. Depending on whether digits behind the decimal points are specified for the variable, the constant for the limit value is interpreted in different ways. The same number of digits behind the decimal points as specified is taken to be the number of digits behind the decimal points for the limit value as well. Configured Digits behind Decimal Points Limit Value Input Interpretation by ProTool 0 2222 2222 1 2222 222.2 2 2222 22.22 Upper and lower limit values Interpretation of digits behind the decimal points Variables www.dienhathe.vn www.dienhathe.com
- 59. 6-5 ProTool/Lite User’s Manual Release 09/96 6.3 Using the STEP 7 Symbol Table In STEP 7, you can assign informative symbolic names, called symbols, for addresses. Symbols are stored together with the data type, address and com- ments in a symbol table. You can use a symbol contained in the symbol table in ProTool/Lite for configuring a variable. A symbol contained in the symbol table may also be a structured data block, which you can open by double-clicking. The requirements for using the symbol table are as follows: 1. You have installed ProTool/Lite integrated into STEP 7 under Win- dows95. 2. You have assigned parameters to an S7 PLC connection in ProTool/Lite and selected an S7 CPU at that point (refer to section 5.2). This means that the corresponding STEP 7 symbol table has been set. 3. Symbols have already been created in the STEP 7 symbol table. To apply symbols from the STEP 7 symbol table, open the Variable dialog box. The symbols contained in the symbol table are now listed in the Symbol box. The following entries are applied to the dialog box as soon as you select one of the symbols: S the symbol name, as the name of the variable S the address and S the data type. You can modify the name of the variable later without the link to the symbol table being lost. Modifications to the symbol table in STEP 7 are applied to ProTool/Lite after the STEP 7 symbol table has been saved. Figure 6-3 shows the Variable dialog box with the STEP 7 symbol table. Definition Requirements Applying symbols for setting varia- bles Variables www.dienhathe.vn www.dienhathe.com
- 60. 6-6 ProTool/Lite User’s Manual Release 09/96 Figure 6-3 Variable Dialog Box with Embedded STEP 7 Symbol Table Variables www.dienhathe.vn www.dienhathe.com
- 61. 7-1 ProTool/Lite User’s Manual Release 09/96 Screens Screens represent a summary of process values for displaying process execu- tion and specifying values for a process. Process values can be randomly sorted according to subject matter. With screens, entered values are immedi- ately transferred to the PLC. A typical screen might be: Figure 7-1 Configured Screen in ProTool/Lite Screens are created with their own editor. Every screen is stored under a sym- bolic name. The name is entered by choosing Screen → Attributes from the menu. You must specify this name whenever you wish to edit, reference or delete the screen. In addition, the screen is automatically given a number which can be modified. You can configure one or more screen entries on a screen. A screen is the same size as the display. The entry numbers are shown in the left margin of the Screens editor (refer to Figure 7-1). The maximum number of screen en- tries on a screen depends on the OP you are using. An entry consists of static text and/or fields. Fields may contain variables, the date, time or a scheduler. Text such as variables can be freely configured. The link to the PLC is established by means of variables. Definition Screen editor Components of a screen 7 www.dienhathe.vn www.dienhathe.com
- 62. 7-2 ProTool/Lite User’s Manual Release 09/96 7.1 Configuring Fields When configuring a screen entry, you can use the following field types: Input fields With input fields, the operator enters a value on the OP which is transferred to the PLC. The value can also be en- tered in symbolic form as text. Output fields With output fields, values are read from the PLC and dis- played on the OP. The value can also be output in symbolic form as text. Fields for date and time are special fields which are not linked to the PLC. In these fields, the OP date and time is displayed. Input/ With input/output fields, values are read from the PLC. output fields Simultaneous inputs are possible in this type of field on the OP. Symbolic inputs and outputs are possible here too. The objects that can be entered in the different field types are shown in Table 7-1. Table 7-1 Field Types Possible for the Different Objects Field Type Used for Display Output Variable Value, symbol Date Value Time Value Input Variable Value, symbol Scheduler Value Input/output Variable Value, symbol Field types Screens www.dienhathe.vn www.dienhathe.com
- 63. 7-3 ProTool/Lite User’s Manual Release 09/96 To configure fields, choose Screen → Edit/Insert Field from the menu. The Input/Output dialog box appears (refer to Figure 7-2). Figure 7-2 Input/Output Dialog Box In this dialog box, you set how a field is displayed on the OP. To do this, you have to specify the following three items: Usage Here you set whether a link to the PLC exists by using a variable or the field is used to display the date, time or a scheduler. Field type Here you set whether a field is an input field, an output field or an input/output field. Display Here you set how the contents of a field will be displayed – as a value or a symbol. When values are set, you can choose between different formats – for example, decimal, hexade- cimal or string. If you select the entry Text Symbol for Display, you can assign a symbolic display to a field. In symbolic fields, text is displayed instead of values. Text is assigned to the values of a variable in the configuration. For example, to switch a motor on and off, the values of the variable are not self-explanatory. Text is easier for the operator to understand. The assignment of values and text might be as follows: 0 OFF 1 SLOW 2 FAST The OP does not display a value 0 but the corresponding word – OFF. Configuring fields Configuring fields with symbolic dis- play Screens www.dienhathe.vn www.dienhathe.com
- 64. 7-4 ProTool/Lite User’s Manual Release 09/96 Symbolic inputs and outputs are entered by means of symbol lists. The dialog box changes in the case of a symbolic field as shown in Figure 7-3. Figure 7-3 Text Symbol Setting for Symbolic Display To edit the symbol list, choose List and click the Edit button. The Symbol List – Text dialog box is opened, and you can edit text in the dialog box. Figure 7-4 shows the dialog box in which the previous example was configured. Figure 7-4 Symbol List – Text Dialog Box Editing the symbol list Screens www.dienhathe.vn www.dienhathe.com
- 65. 7-5 ProTool/Lite User’s Manual Release 09/96 7.2 Integrating Screen with the Operating Process For it to be possible to call a screen on the OP, it has to be integrated with the operating process of the OP. There are two ways in which this can be done: 1. You assign the Select Screen function to a function key or soft key. Spec- ify the name of the screen that you wish to call as the parameter. In doing so, ensure that the configured function is valid only for the screen entry concerned in the case of soft keys. With function keys, it applies to the whole project. 2. The screen is included in the screen directory. To do this, call Screen → Attributes on the menu. Check the Screen to Directory field. You can now select the screen on the OP under the standard screen Screens → Edit. When you choose the Title button, you can give the screen a name, which will then appear in the screen directory. One of the screens has to be declared as the start screen. This is the screen which is called when you branch on the OP from message level to screen level. To do this, call Screen → Attributes on the menu. Check the Start Screen field. Methods of selecting screens Start screen Screens www.dienhathe.vn www.dienhathe.com
- 66. 7-6 ProTool/Lite User’s Manual Release 09/96 7.3 Example of Configuring a Screen Entry In this example you will configure a screen having a screen entry. This screen will be the start screen. 1. Call the Screens editor. 2. Position the cursor on the first entry. 3. Edit the following text: Speed, mixer:. 4. To insert an input field, choose Screen → Edit/Insert Field from the menu. The Input/Output dialog box appears. Figure 7-5 Input/Output Dialog Box 5. Under Usage:, select Variable. 6. Under Field Type:, select Input. 7. Under Display:, select Decimal. 8. In the variables field, enter the symbolic name Var_1. Click the Edit but ton to edit a variable. The Variable dialog box appears. Example for SIMATIC S5 Screens www.dienhathe.vn www.dienhathe.com
- 67. 7-7 ProTool/Lite User’s Manual Release 09/96 Figure 7-6 Variable Dialog Box 9. In the Variable dialog box, enter the following values: DB: 10 DW: 4 Format: KF PLC: PLC_1 10. Exit from the Variable and Input/Output dialog boxes by clicking OK. 11. The screen entry now looks as follows: 12. Press RETURN and enter blanks until the cursor is located under VAR_1. 13. Now configure the output field. To insert an output field, choose Screen → Edit/Insert Field from the menu. The box Input/Output dialog box ap- pears. 14. Under Field Type:, select Output. 15. Under Usage:, select Variable. 16. Under Display:, select Decimal. 17. Enter the symbolic name Var_2 in the Variables field. Click the Edit but- ton to edit a variable. The Variable dialog box appears. 18. Enter the following values in theVariable dialog box: DB: 10 DW: 5 Format: KF PLC: PLC_1 19. Exit from the Variable and Input/Output dialog boxes by clicking OK. 20. The screen entry now looks as follows: Screens www.dienhathe.vn www.dienhathe.com
- 68. 7-8 ProTool/Lite User’s Manual Release 09/96 21. Choose Screen → Attributes from the menu. Select the Start Screen check box. This makes this screen the start screen. Figure 7-7 Screen Attributes Dialog Box Screens www.dienhathe.vn www.dienhathe.com
- 69. 7-9 ProTool/Lite User’s Manual Release 09/96 7.4 Assigning Soft Keys You can assign soft keys for each screen entry. That means that you as sign a function to a soft key. Soft keys can be used to call another function, for ex- ample, to jump to a screen entry within a screen or to call the message buffer. The soft keys are shown directly beneath a screen entry. Next to the func tion key there is a check box. If you have already configured the function key, the check box is checked. Figure 7-8 shows that in entry 2 function key F1 has been configured. Soft key F1 is configured Figure 7-8 Identification of Soft-Key Assignment To assign a soft key in a screen entry, click one of the Fx keys beneath the screen entry. The Function Keys dialog box appears (refer to 7-9). You can assign a bit in a variable and/or a function to a soft key. Figure 7-9 Function Keys Dialog Box Usage Assigning Screens www.dienhathe.vn www.dienhathe.com
- 70. 7-10 ProTool/Lite User’s Manual Release 09/96 If you assign a bit to a soft key, the bit is set in the variable when you press the key. The bit is reset by releasing the key. If the address of the variable refers to a data word or a data byte, several keys can be assigned to a vari- able. These keys can then be pressed simultaneously on the OP. Click the Function... button in the Function key dialog box. The Functions dialog box shown in figure 7-10 appears. In the dialog box, select a function. A brief explanation of the function and its parameters is shown in the De- scription field. Figure 7-10 Example of Soft-Key Assignment By way of an example, select the Select Screen function. With the Select Screen function you can branch from one screen to another, thus establishing your process-specific screen hierarchy. If you click on the key having the double-headed arrow, the function is transferred to the display field on the right. Click on the Parameters button and enter PIC_3, for example, as the parameter. This screen must exist already; if it does not, you cannot select it. If the operator has to be able immediately to recognize which function has been assigned to the soft key, the description of the soft key is shown on the display. There are several ways of doing this, for example. S In the screen entry, text is arranged immediately above the key – for ex- ample, ON, OFF. S In the screen entry, a line denotes the key to which the lettering refers. S The description of the soft keys is contained in information text associated with the screen entry. In any case, make sure that lettering and keys are clearly assigned. Figure 7-11 shows two ways in which you can describe soft keys. Bit in variable Functions Description of soft key Screens www.dienhathe.vn www.dienhathe.com
- 71. 7-11 ProTool/Lite User’s Manual Release 09/96 Figure 7-11 Examples of Naming Soft Keys for OP15 On Operator Panels OP7 and OP17 there are two rows of soft keys. You can use the superimposed keys to switch a drive on and off, for instance (Figure 7-12). Figure 7-12Examples of Naming Soft Keys for OP7 Screens www.dienhathe.vn www.dienhathe.com
- 72. 7-12 ProTool/Lite User’s Manual Release 09/96 7.5 Using Standard Screens When ProTool/Lite is installed, one of the items installed is a configuration with ”standard screens”. You require this configuration if you wish to use standard functions on the OP. The standard screens are listed in Chapter 16. Note If you do not build on top of the standard configuration, you have to config- ure system function calls yourself. If you wish to use one or more of the standard screens in your configuration, you must proceed from the standard configuration for the OP concerned. Since screens cannot be copied from one screen to another, copy your stan- dard configuration. Use this copy for your work. You copy a configuration by saving it under a different name in ProTool/Lite. Standard screens are arranged hierarchically. You branch to all other standard screens from the Z_SYSTEM_MEN standard screen. It thus suffices to assign this Z_SYSTEM_MEN to a function key. You can then select all other stan- dard screens on the OP. In the standard configuration supplied to you, the standard screen known as Z_SYSTEM_MEN is configured as the start screen. When you edit your pro- cess-specific configuration, you will most certainly wish to create your own start screen. If you wish to use the standard screens, you have to integrate them in the configuration first. It is sufficient to call the standard screen known as Z_SYSTEM_MEN by means of a soft key or a function key. Select the ”Select Screen” function and specify Z_System_men as the parameter. Why standard screens? Standard screen hierarchy Screens www.dienhathe.vn www.dienhathe.com
- 73. 7-13 ProTool/Lite User’s Manual Release 09/96 7.6 Detecting a Called Screen on the PLC To be able to detect on the PLC the screen that has just been called on the OP, you have to create a Screen Number area on the PLC. The OP stores in- formation in the screen number area about the screen called on the OP. In this way it is possible to transfer information about the current display contents of the OP to the PLC and to initiate specific reactions on the PLC – for example, calling another screen or selecting an LED. If you wish to use the screen number area, you have to specify it during configuration as Area Pointer – Type Screen Number. It can be created only on one PLC – and once only. The screen number area is transferred spontaneously to the PLC, i.e. a transfer takes place whenever a change is registered on the OP. There is therefore no need to configure a polling time. The screen number area is a data area having a fixed length of five data words. The structure of the screen number area is displayed below. Current screen type Current entry No. Current input field No. Current screen No.1st word 2nd word Entry Assignment Current screen type 1: Screen 2: Recipe 3: Function screen Current screen/recipe number 1 to 99 Current entry number 1 to 99 Current input field number 0 to 8 (0: entry field number) At message level, at menu level and when a directory is being displayed, all the bytes of the screen number area are assigned with FFH. With function screens, the screen number area is assigned as follows: 3 Function screen No. FFH Current input field No. 1st word 2nd word Application Condition Structure Screens www.dienhathe.vn www.dienhathe.com
- 74. 7-14 ProTool/Lite User’s Manual Release 09/96 Screens www.dienhathe.vn www.dienhathe.com
- 75. 8-1 ProTool/Lite User’s Manual Release 09/96 Messages The user defines which messages are event messages and which are alarm messages. Alarm messages have priority. Event messages and alarm messa- ges are initiated by the PLC. They contain information about events and sta- tes in the control process. Alarm messages have to be acknowledged on the OP. After being issued, event messages and alarm messages are stored on the OP in separate message buffers. Stored messages can be displayed on the OP and output to an attached printer. Event messages have a special feature – event message No. 0 is the standby message. Typical event messages and alarm messages might look as follows: Figure 8-1 Configured Event Message in ProTool/Lite Figure 8-2 Configured Alarm Message in ProTool/Lite Separate editors are available for creating event messages and alarm messa- ges. You can set the priority of a message or whether it should be acknowled- ged or whether it should be printed in a separate Attributes dialog box. A message consists of static text and/or variables. Text and variables can be freely configured. Variables are used for the link to the PLC. Before you can use variables in a message, you must first insert a field. Only output fields can be used in messages. Definition Message editors Components of a message 8 www.dienhathe.vn www.dienhathe.com
- 76. 8-2 ProTool/Lite User’s Manual Release 09/96 For event messages, an event message area must be defined in the configu- ration, as must also an alarm message area for alarm messages. You set the message area by choosing System → Area Pointers from the menu. An event message or an alarm message can be configured for every bit in the configured message area. When you create the address area for the message area, the number of messages that can be created for it is displayed. Every message area can be divided into several address areas. Table 8-1 shows the number of message areas for event messages and alarm messages, the number of alarm message acknowledgment areas as well as the total length of all the areas for the different OPs. Table 8-1 OP Message Areas Device Event Message Area Alarm Message Area and Alarm Message Acknowledgment Area Number Length (Words) Total per Type Overall Length per Type(Words) OP3 4 32 – – OP5 4 63 4 63 OP7 4 63 4 63 OP15 4 63 4 63 OP17 4 63 4 63 C7-623 4 63 4 63 C7-624 4 63 4 63 In the message editor, message numbers are listed in the left margin. A bit number is assigned to every message number. Thus you can see immediately the bit in the event or alarm message area to which a configured message belongs. In addition, the address with which the message is associated is dis- played on the status bar. Message area Message numbers Messages www.dienhathe.vn www.dienhathe.com