
Recommended
More Related Content
What's hot
What's hot (20)
Similar to Border Molding.ppt
Similar to Border Molding.ppt (20)
More from KanmaniAthi
More from KanmaniAthi (7)
Recently uploaded
Recently uploaded (20)
Border Molding.ppt
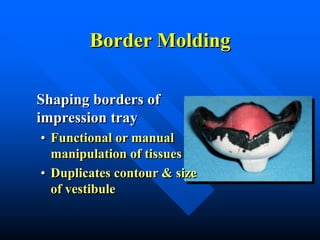
- 1. Border Molding Shaping borders of impression tray • Functional or manual manipulation of tissues • Duplicates contour & size of vestibule
- 2. Border Molding • Performed with – Thermoplastic modeling compound – Waxes – Impression materials
- 3. Tray Wax Spacer • Remains in place during border molding procedures
- 4. Custom Tray • Comfortable • 2-3 mm from vestibule • Dry periphery of tray (Compound will not stick to tray otherwise)
- 5. Heating Compound • Use Bunsen Burner not Hanau Torch • Warm until it starts to droop • Do not overheat – if catches fire or boils, it will not mold properly
- 6. Compound Application • Apply over periphery of tray, in a thickness just slightly narrower than the compound stick
- 7. Re-soften After Application • Flame with a hand torch until all seams or sharp contours have disappeared • Do not melt wax spacer inside tray
- 8. Preventing Slumping • Hold the tray upside down so that compound droops toward the depth of the vestibule
- 9. Tempering Compound • Temper in a water bath (135-140°F) for several seconds – Prevent burning – Hot water bath will keep compound soft for an extended period
- 10. Wax Spacer • Keep out of hot water bath to prevent melting – Difficult to replace tray intraorally in the same position – Results in uneven border molding
- 11. Prepare Patient • Patient seated, head against headrest, mouth open & relaxed • If patient “opens wide”, commisures constrict, limiting access
- 12. Inserting the Custom Tray • Place intraorally by rotating into place – Mold by pulling on the cheeks, lips – Have patient make functional movements
- 13. After Removal • Chill in cold water • Trim excess over wax spacer or external material that is thicker than 4-5 mm – Clean debris from tray
- 14. Assessing Peripheral Role • Proper thickness • No overlap
- 15. Burnthrough • Difficult to see (opaque) • Relieve tray
- 16. After Trimming • If border is sharp or has seams, re-flame, temper and readapt intraorally • Repeat until periphery is completed
- 17. Border Molding • Don’t reduce border molding prior to final impression if: – Modern low viscosity materials are used – Sufficient relief (spacer + holes)
- 18. Maxilla - Seating the Tray • Seat tray firmly in mid-palatal area during border molding procedures
- 19. Maxilla - Contouring • Mold posterior buccal by pulling cheek down & forward with slight circular movement
- 20. Functional Movements • Patient moves mandible side to side & opens wide – Molds the retrozygomal area – Allows for movement of coronoid process – Prevents impingement of pterygomandibular raphe
- 21. Maxilla - Labial Frenum • Pull lip outward & downward – Do not pull to one side
- 22. Maxilla - Labial Frenum • Labial frenum should be narrow • Buccal frena usually broader, “V-shaped”
- 23. Maxilla - Posterior Border • Add compound across the top of the tray (not at the edge)
- 24. Maxilla - Posterior Border • Terminates at vibrating line and hamular notches • Mark with an indelible stick – Insert tray & check visually
- 25. Evaluating Border Molding • Relatively symmetrical
- 26. Evaluating Maxillary Border Molding • Retentive
- 27. Mandible • More difficult • Changing position of the floor of the mouth
- 28. Posterior Buccal Areas • Pull cheek upward while holding tray in place • Have patient suck cheeks inward while holding tray in place
- 29. Retromolar Pad • Should be covered (at least partially) to provide a seal and comfort to the patient
- 30. External Oblique Ridge • Don’t extend past EOR • Palpate cheek at angle of the mandible – Smooth transition between mandible & border - not palpable
- 31. Buccal Extension • Look for fold in vestibule
- 32. Masseter Muscle • Distal buccal extension • Patient closes against force • Activates the masseter, which will displace the compound
- 33. Mandibular Frenal Attachments • Labial frenum is narrow – pull lip straight up, – not as exaggerated as maxilla • Buccal frena broad & “V-shaped”
- 34. Posterior Lingual Areas • Have patient touch their tongue to the corners of the mouth, to the palate and stick their tongue out of their mouth
- 35. Posterior Lingual Areas • An “S” shaped lingual flange commonly results in posterior lingual area
- 36. Retromylohyoid Space • Distolingual border can extend – Straight down from the retromolar pads – Anteriorly to varying degrees – Almost never angles posteriorly from retromolar pads
- 37. Posterior Lingual Areas • Lower border at or slightly below mylohyoid ridge but not deeply into the undercut below the ridge, • Minimizes, abrasion and discomfort Buccal Attachments To Hyoid Mylohyoid Ridge X-section through Mandibular ridge in 2nd Molar region
- 38. Posterior Lingual Areas • Denture should not lift with normal tongue movements
- 39. Anterior Lingual • Patient lifts tongue to palate, to corners of mouth and sticks tongue out • Hold tray in place – denture should not lift with normal tongue movement