
Recommended
More Related Content
What's hot
What's hot (19)
Viewers also liked
Viewers also liked (17)
Similar to BW Magazine Cover Design with Contrasting Colors
Similar to BW Magazine Cover Design with Contrasting Colors (20)
BW Magazine Cover Design with Contrasting Colors
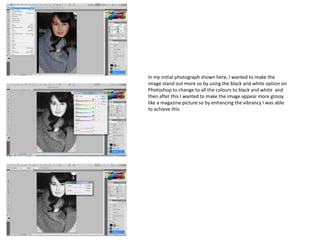
- 1. In my initial photograph shown here, I wanted to make the image stand out more so by using the black and white option on Photoshop to change to all the colours to black and white and then after this I wanted to make the image appear more glossy like a magazine picture so by enhancing the vibrancy I was able to achieve this
- 2. Once I enhance the vibrancy I then went on to adding my masthead, usually a magazine front cover masthead is behind the models head but I thought that it looked better over the forehead. As you can see this looks quite different and stands out more than other magazine mastheads. Because my cover image was in black and white this meant that I couldn’t have the masthead in black or white because it was be to boring so after a while I decided to make the masthead bright yellow which I’m very pleased with as you can see it contrasts with the black and white and also yellow has connotations of happiness which is relevant in my magazine contents. After this I then started to add cover lines, I wanted the masthead to still stand out against the texture of Alexa Wood’s scarf and the black and white so I decided to make them white and this works well I think because all the colours blend together and contrast with one another.
- 3. After I made the first few cover lines I began deciding where to place them on the cover, I decided in the end to put them on the right hand corner which goes against the conventions of magazine making but the reason behind this is that I thought they looked better on the right side against the black of Alexa Woods hair. After putting the right side cover lines in place I added a date and price on the side of ‘HAZE’ this is a convention of magazine making as the date and price are always somewhere on the page, I them flipped the date and price vertically and put it against the masthead because it looked better that way and was clear enough for the audience to see clearly.
- 4. After I was done with cover lines and date/issue I started to put the main cover line on, I chose to put the text in bold black font because it stands out more against the texture of the scarf and is clear enough for the audience to see, underneath the main cover line is ‘Manchester’s finest’ I chose to write this because the distribution of my magazine will be in the North of England and my target audience would like to read articles that involve people who have become successful who are part of the same region. At the bottom of the cover I wanted to put something covering it, so I decided to put a black bar there and then put white font in it saying about the Reading and Leeds festival line ups, my target audience usually go to these festivals because the music they are into is played there.
- 5. I put the white font in the bottom black bar. After doing this I realised that I didn’t have a barcode on the cover, so I imported an image of one into the page and placed it on the left hand bottom corner of the page as this is a convention of magazine making having a barcode somewhere on the corner of a cover, I also added above the barcode the issue of the magazine which is another convention of magazines . Once I was done with this I then began work on the left hand corner of the cover, sticking with the colour scheme I put the text in white but I put yellow lines above to pull them apart so it would be clearer for the audience to see and kept repeating the same process six times as seen on the next few slides...
- 8. Once I was finished with the left hand corner I was very pleased as the colours blend well together and by just putting the names of bands the audience are able to see right away what type of genre my magazine is and also by just putting the names the audience will be intrigued as to why these bands are in the magazine and will thus buy it to find out
- 9. In the final process of the magazine I wanted to make a point that its the first issue, so I used the rectangle tool on Photoshop and created a circle just under the masthead and changed the colour to bight red, this is the only red on the cover so it stands out and contrasts with the black and white and yellow. Then I put text in the circle by using the text tool and put the text in capitals in bold black font so it stands out in the red circle as this is the only colour that I found to work and once this was done my front cover was finally complete.