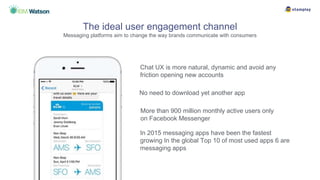
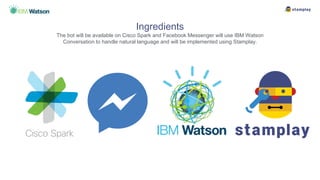
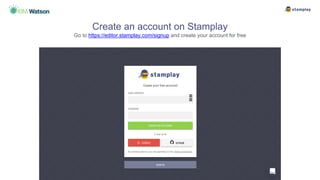
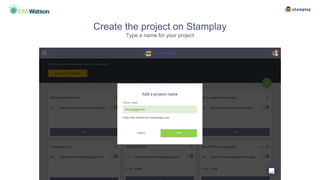
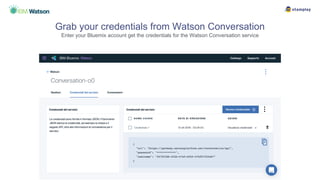
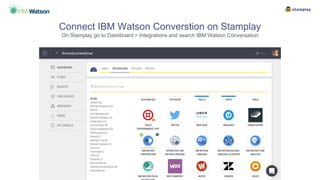
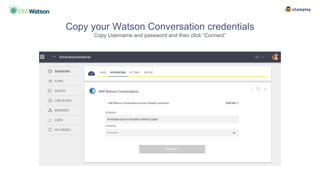
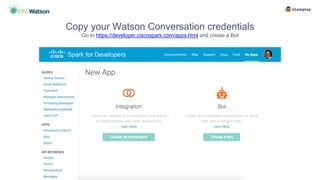
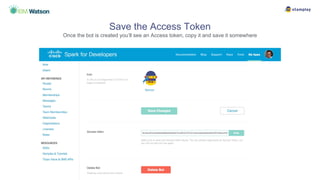
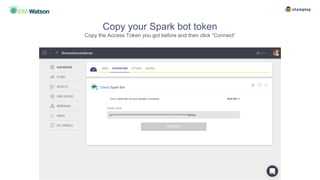
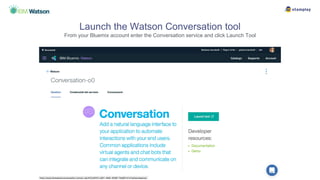
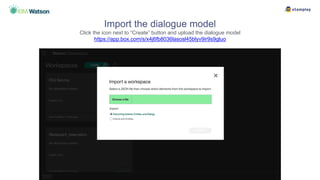
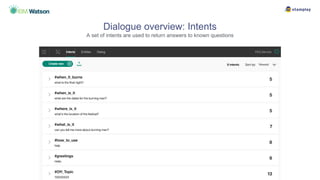
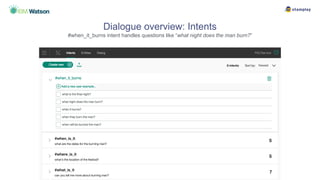
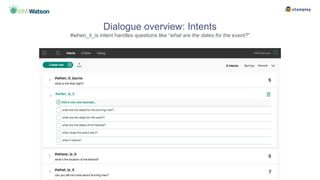
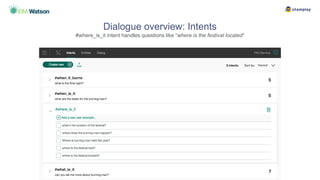
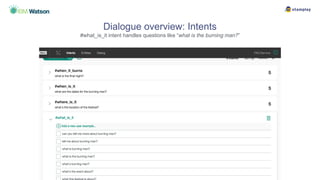
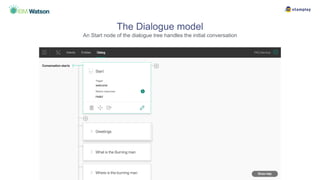
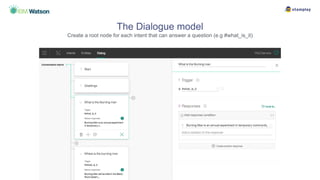
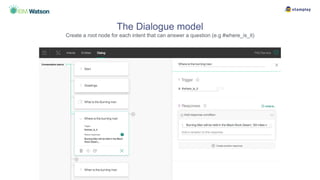
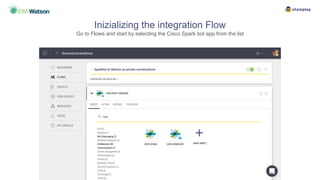
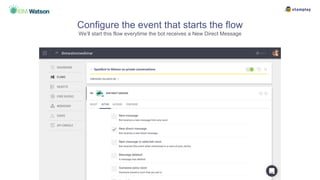
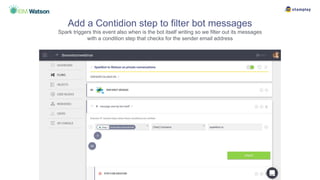
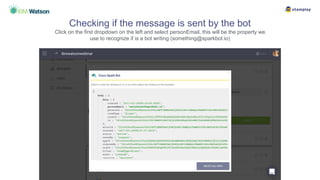
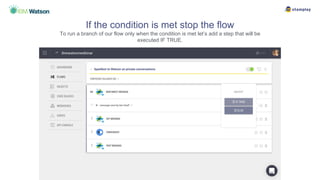
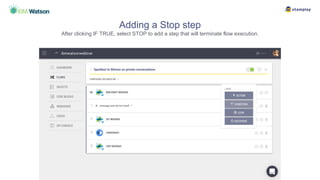
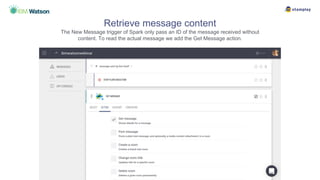
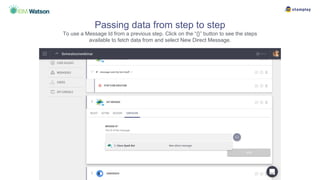
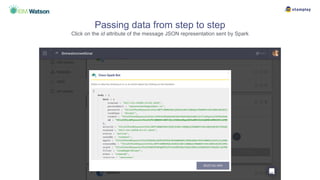
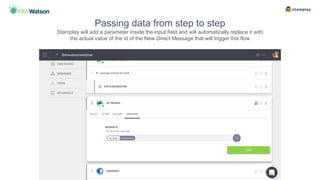
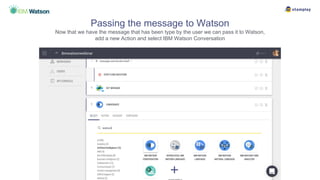
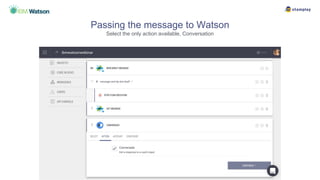
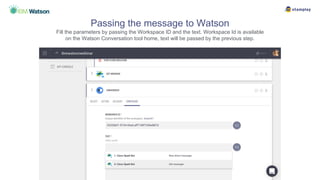
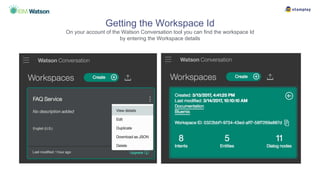
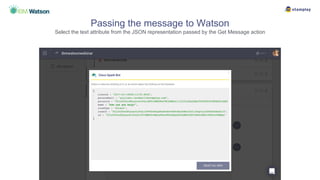
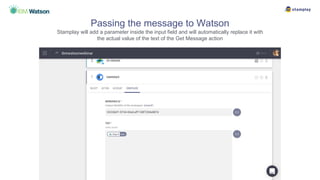
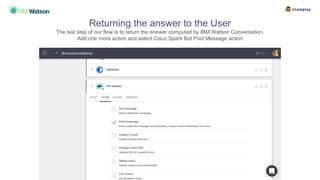
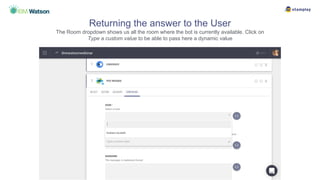
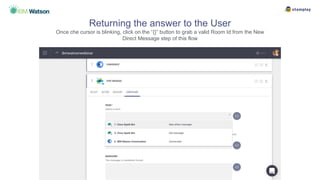
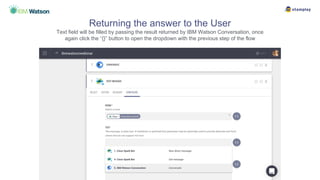
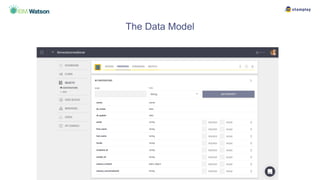
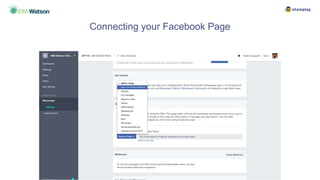
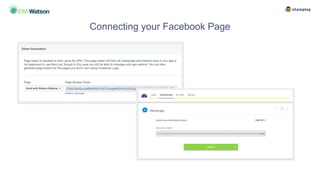
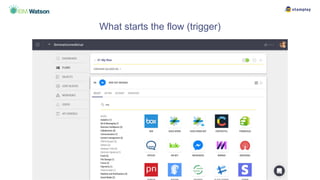
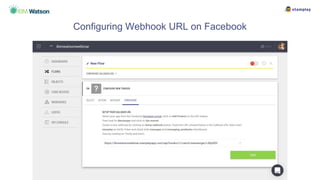
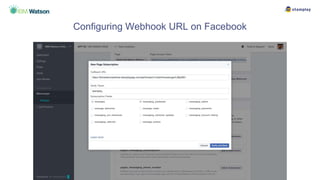
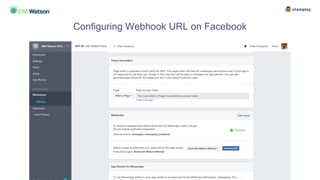
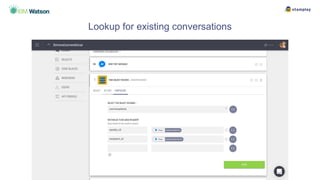
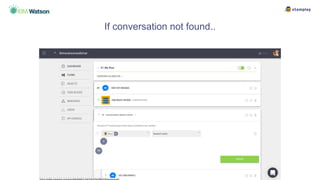
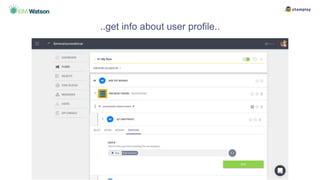
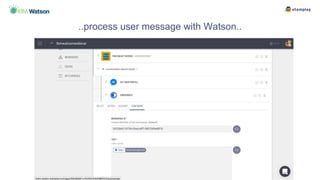
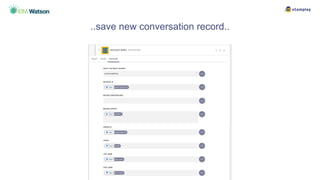
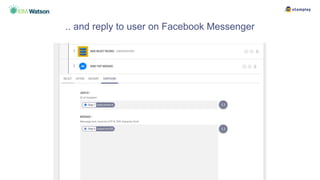
Giuliano Iacobelli, Co-founder /
CEO
g@stamplay.com
Easily Deploy your Chat Bot
to Multiple Channels with
Stamplay
Cooking time: 30 mins
Chat UX is more natural, dynamic and avoid any
friction opening new accounts
The ideal user engagement channel
Messaging platforms aim to change the way brands communicate with consumers
More than 900 million monthly active users only
on Facebook Messenger
In 2015 messaging apps have been the fastest
growing In the global Top 10 of most used apps 6 are
messaging apps
No need to download yet another app
Ingredients
The bot will be available on Cisco Spark and Facebook Messenger will use IBM Watson
Conversation to handle natural language and will be implemented using Stamplay.
Create an account on Stamplay
Go to https://editor.stamplay.com/signup and create your account for free
Create the project on Stamplay
Once inside, click on the green “+” button in the upper right corner and select Start from Scratch
Create the project on Stamplay
Type a name for your project
Grab your credentials from Watson Conversation
Enter your Bluemix account get the credentials for the Watson Conversation service
Connect IBM Watson Converstion on Stamplay
On Stamplay go to Dashboard > Integrations and search IBM Watson Conversation
Copy your Watson Conversation credentials
Copy Username and password and then click “Connect”
Copy your Watson Conversation credentials
Go to https://developer.ciscospark.com/apps.html and create a Bot
Fill basic info for your bot
Icon URL https://dl.dropboxusercontent.com/u/397182/logo_white_512x512.png
Save the Access Token
Once the bot is created you’ll see an Access token, copy it and save it somewhere
Connect Cisco Spark Bot on Stamplay
On Stamplay go to Dashboard > Integrations and search Cisco Spark bot
Copy your Spark bot token
Copy the Access Token you got before and then click “Connect”
Launch the Watson Conversation tool
From your Bluemix account enter the Conversation service and click Launch Tool
Import the dialogue model
Click the icon next to “Create” button and upload the dialogue model
https://app.box.com/s/x4j6fb8036lasosl45blyv9ir9s9gluo
Dialogue overview: Intents
A set of intents are used to return answers to known questions
Dialogue overview: Intents
#when_it_burns intent handles questions like “what night does the man burn?”
Dialogue overview: Intents
#when_it_is intent handles questions like “what are the dates for the event?”
Dialogue overview: Intents
#where_is_it intent handles questions like “where is the festival located”
Dialogue overview: Intents
#what_is_it intent handles questions like “what is the burning man?”
The Dialogue model
An Start node of the dialogue tree handles the initial conversation
The Dialogue model
Create a root node for each intent that can answer a question (e.g #what_is_it)
The Dialogue model
Create a root node for each intent that can answer a question (e.g #where_is_it)
Inizializing the integration Flow
Go to Flows and start by selecting the Cisco Spark bot app from the list
Configure the event that starts the flow
We’ll start this flow everytime the bot receives a New Direct Message
Select the event that starts the flow
Click on continue when you get to the Account tab, we’ve connected this before
Adding a steps to your flow
After each step of your workflow you can define the following action by moving your
mouse hover the + icon
Add a Contidion step to filter bot messages
Spark triggers this event also when is the bot itself writing so we filter out its messages
with a condition step that checks for the sender email address
Checking if the message is sent by the bot
Click on the first dropdown on the left and select personEmail, this will be the property we
use to recognize if is a bot writing (something@sparkbot.io)
If the condition is met stop the flow
To run a branch of our flow only when the condition is met let’s add a step that will be
executed IF TRUE.
Adding a Stop step
After clicking IF TRUE, select STOP to add a step that will terminate flow execution.
Saving the Stop step
Save the new step without any additional configuration and you’re good to go
Retrieve message content
The New Message trigger of Spark only pass an ID of the message received without
content. To read the actual message we add the Get Message action.
Passing data from step to step
To use a Message Id from a previous step. Click on the “{}” button to see the steps
available to fetch data from and select New Direct Message.
Passing data from step to step
Click on the id attribute of the message JSON representation sent by Spark
Passing data from step to step
Stamplay will add a parameter inside the input field and will automatically replace it with
the actual value of the id of the New Direct Message that will trigger this flow
Passing the message to Watson
Now that we have the message that has been type by the user we can pass it to Watson,
add a new Action and select IBM Watson Conversation
Passing the message to Watson
Select the only action available, Conversation
Passing the message to Watson
Fill the parameters by passing the Workspace ID and the text. Workspace Id is available
on the Watson Conversation tool home, text will be passed by the previous step.
Getting the Workspace Id
On your account of the Watson Conversation tool you can find the workspace Id
by entering the Workspace details
Passing the message to Watson
Select the text attribute from the JSON representation passed by the Get Message action
Passing the message to Watson
Stamplay will add a parameter inside the input field and will automatically replace it with
the actual value of the text of the Get Message action
Returning the answer to the User
The last step of our flow is to return the answer computed by IBM Watson Conversation.
Add one more action and select Cisco Spark Bot Post Message action
Returning the answer to the User
The Room dropdown shows us all the room where the bot is currently available. Click on
Type a custom value to be able to pass here a dynamic value
Returning the answer to the User
Once che cursor is blinking, click on the “{}” button to grab a valid Room Id from the New
Direct Message step of this flow
Returning the answer to the User
Select the roomId attribute from the JSON representation
Returning the answer to the User
Text field will be filled by passing the result returned by IBM Watson Conversation, once
again click the “{}” button to open the dropdown with the previous step of the flow
Returning the answer to the User
After selecting IBM Watson Conversation select the text attribute nested under output
You’re all set
The final flow should look like this, make sure it’s on by checking the switch
The Data Model
Connecting your Facebook Page
Creating the integration Flow
What starts the flow (trigger)
Configuring Webhook URL on Facebook
Lookup for existing conversations
If conversation not found..
..get info about user profile..
..process user message with Watson..
..save new conversation record..
.. and reply to user on Facebook Messenger
Giuliano Iacobelli
g@stamplay.com
Thanks!

Easily Deploy your Chat Bot to Multiple Channels with Stamplay

  • 1.
    Giuliano Iacobelli, Co-founder/ CEO g@stamplay.com Easily Deploy your Chat Bot to Multiple Channels with Stamplay Cooking time: 30 mins
  • 2.
    Chat UX ismore natural, dynamic and avoid any friction opening new accounts The ideal user engagement channel Messaging platforms aim to change the way brands communicate with consumers More than 900 million monthly active users only on Facebook Messenger In 2015 messaging apps have been the fastest growing In the global Top 10 of most used apps 6 are messaging apps No need to download yet another app
  • 3.
    Ingredients The bot willbe available on Cisco Spark and Facebook Messenger will use IBM Watson Conversation to handle natural language and will be implemented using Stamplay.
  • 5.
    Create an accounton Stamplay Go to https://editor.stamplay.com/signup and create your account for free
  • 6.
    Create the projecton Stamplay Once inside, click on the green “+” button in the upper right corner and select Start from Scratch
  • 7.
    Create the projecton Stamplay Type a name for your project
  • 8.
    Grab your credentialsfrom Watson Conversation Enter your Bluemix account get the credentials for the Watson Conversation service
  • 9.
    Connect IBM WatsonConverstion on Stamplay On Stamplay go to Dashboard > Integrations and search IBM Watson Conversation
  • 10.
    Copy your WatsonConversation credentials Copy Username and password and then click “Connect”
  • 11.
    Copy your WatsonConversation credentials Go to https://developer.ciscospark.com/apps.html and create a Bot
  • 12.
    Fill basic infofor your bot Icon URL https://dl.dropboxusercontent.com/u/397182/logo_white_512x512.png
  • 13.
    Save the AccessToken Once the bot is created you’ll see an Access token, copy it and save it somewhere
  • 14.
    Connect Cisco SparkBot on Stamplay On Stamplay go to Dashboard > Integrations and search Cisco Spark bot
  • 15.
    Copy your Sparkbot token Copy the Access Token you got before and then click “Connect”
  • 17.
    Launch the WatsonConversation tool From your Bluemix account enter the Conversation service and click Launch Tool
  • 18.
    Import the dialoguemodel Click the icon next to “Create” button and upload the dialogue model https://app.box.com/s/x4j6fb8036lasosl45blyv9ir9s9gluo
  • 19.
    Dialogue overview: Intents Aset of intents are used to return answers to known questions
  • 20.
    Dialogue overview: Intents #when_it_burnsintent handles questions like “what night does the man burn?”
  • 21.
    Dialogue overview: Intents #when_it_isintent handles questions like “what are the dates for the event?”
  • 22.
    Dialogue overview: Intents #where_is_itintent handles questions like “where is the festival located”
  • 23.
    Dialogue overview: Intents #what_is_itintent handles questions like “what is the burning man?”
  • 24.
    The Dialogue model AnStart node of the dialogue tree handles the initial conversation
  • 25.
    The Dialogue model Createa root node for each intent that can answer a question (e.g #what_is_it)
  • 26.
    The Dialogue model Createa root node for each intent that can answer a question (e.g #where_is_it)
  • 28.
    Inizializing the integrationFlow Go to Flows and start by selecting the Cisco Spark bot app from the list
  • 29.
    Configure the eventthat starts the flow We’ll start this flow everytime the bot receives a New Direct Message
  • 30.
    Select the eventthat starts the flow Click on continue when you get to the Account tab, we’ve connected this before
  • 31.
    Adding a stepsto your flow After each step of your workflow you can define the following action by moving your mouse hover the + icon
  • 32.
    Add a Contidionstep to filter bot messages Spark triggers this event also when is the bot itself writing so we filter out its messages with a condition step that checks for the sender email address
  • 33.
    Checking if themessage is sent by the bot Click on the first dropdown on the left and select personEmail, this will be the property we use to recognize if is a bot writing (something@sparkbot.io)
  • 34.
    If the conditionis met stop the flow To run a branch of our flow only when the condition is met let’s add a step that will be executed IF TRUE.
  • 35.
    Adding a Stopstep After clicking IF TRUE, select STOP to add a step that will terminate flow execution.
  • 36.
    Saving the Stopstep Save the new step without any additional configuration and you’re good to go
  • 37.
    Retrieve message content TheNew Message trigger of Spark only pass an ID of the message received without content. To read the actual message we add the Get Message action.
  • 38.
    Passing data fromstep to step To use a Message Id from a previous step. Click on the “{}” button to see the steps available to fetch data from and select New Direct Message.
  • 39.
    Passing data fromstep to step Click on the id attribute of the message JSON representation sent by Spark
  • 40.
    Passing data fromstep to step Stamplay will add a parameter inside the input field and will automatically replace it with the actual value of the id of the New Direct Message that will trigger this flow
  • 41.
    Passing the messageto Watson Now that we have the message that has been type by the user we can pass it to Watson, add a new Action and select IBM Watson Conversation
  • 42.
    Passing the messageto Watson Select the only action available, Conversation
  • 43.
    Passing the messageto Watson Fill the parameters by passing the Workspace ID and the text. Workspace Id is available on the Watson Conversation tool home, text will be passed by the previous step.
  • 44.
    Getting the WorkspaceId On your account of the Watson Conversation tool you can find the workspace Id by entering the Workspace details
  • 45.
    Passing the messageto Watson Select the text attribute from the JSON representation passed by the Get Message action
  • 46.
    Passing the messageto Watson Stamplay will add a parameter inside the input field and will automatically replace it with the actual value of the text of the Get Message action
  • 47.
    Returning the answerto the User The last step of our flow is to return the answer computed by IBM Watson Conversation. Add one more action and select Cisco Spark Bot Post Message action
  • 48.
    Returning the answerto the User The Room dropdown shows us all the room where the bot is currently available. Click on Type a custom value to be able to pass here a dynamic value
  • 49.
    Returning the answerto the User Once che cursor is blinking, click on the “{}” button to grab a valid Room Id from the New Direct Message step of this flow
  • 50.
    Returning the answerto the User Select the roomId attribute from the JSON representation
  • 51.
    Returning the answerto the User Text field will be filled by passing the result returned by IBM Watson Conversation, once again click the “{}” button to open the dropdown with the previous step of the flow
  • 52.
    Returning the answerto the User After selecting IBM Watson Conversation select the text attribute nested under output
  • 53.
    You’re all set Thefinal flow should look like this, make sure it’s on by checking the switch
  • 55.
  • 56.
  • 57.
  • 58.
  • 59.
    What starts theflow (trigger)
  • 60.
  • 61.
  • 62.
  • 63.
    Lookup for existingconversations
  • 64.
  • 65.
    ..get info aboutuser profile..
  • 66.
  • 67.
  • 68.
    .. and replyto user on Facebook Messenger
  • 69.

Editor's Notes

  • #2 I’m Giuliano, CEO Co-founder of Stamplay, I’m happy to be here speaking at IBM Watson dev conf and today we’re talk about how Watson APIs are enabling the chatbot craze..
  • #3 A few months back we’ve witnessed a very important event in regards of user behavior. Messaging has taken over and the monthly active users messaging apps are more than those of the social networks. Now we’re seeing the rise of applications that no longer have a graphical user interface. They’ve actually been around for a while, but they’ve only recently started spreading into the mainstream. More natural Less friction More convenient (Messages are asynchronous Tremendous audience
  • #4 Messenger: Messenger is where you receive messages and route them to an appropriate handler. The point of Messenger is provide a layer of abstraction on top of bot APIs. It’s basically the place where every interaction begins, and usually ends. APIs: Messenger, Kik, Telegram, WeChat but also SMS. Our bot can be available only on one of those platform or more than one.
  • #5 What do all those pieces have in common?
  • #17 What do all those pieces have in common?
  • #28 What do all those pieces have in common?
  • #55 What do all those pieces have in common?
  • #70 Thanks