SlideShare a Scribd company logo
1 of 18
Download to read offline
CHAPTER 4
Working with
Fields
Each table consists of one or more fields. In this chapter, you learn
about field properties and how to set properties such as the field size,
caption, format, and default value. You also learn how to create input
masks and validation rules to help reduce data-entry errors.
Understanding Field Properties .  .  .  .  .  .  .  .  .  .  .  .  .  .  64
Understanding Field Sizes  .  .  .  .  .  .  .  .  .  .  .  .  .  .  .  .  65
Change a Field Size .  .  .  .  .  .  .  .  .  .  .  .  .  .  .  .  .  .  .  . 66
Set a Field Caption  .  .  .  .  .  .  .  .  .  .  .  .  .  .  .  .  .  .  .  . 67
Set a Field’s Format  .  .  .  .  .  .  .  .  .  .  .  .  .  .  .  .  .  .  .  68
Set a Default Value .  .  .  .  .  .  .  .  .  .  .  .  .  .  .  .  .  .  .  . 70
Make a Field Required .  .  .  .  .  .  .  .  .  .  .  .  .  .  .  .  .  .  71
Index a Field .  .  .  .  .  .  .  .  .  .  .  .  .  .  .  .  .  .  .  .  .  .  . 72
Align Data within a Field  .  .  .  .  .  .  .  .  .  .  .  .  .  .  .  .  . 73
Create an Input Mask .  .  .  .  .  .  .  .  .  .  .  .  .  .  .  .  .  .  . 74
Create a Validation Rule .  .  .  .  .  .  .  .  .  .  .  .  .  .  .  .  .  76
Create a Record-Level Validation Rule .  .  .  .  .  .  .  .  .  .  . 78
64
When you create a table, you define each field with data such as the field name, data type, and
an optional description. These are examples of the field’s properties, which are a collection
of data that defines the field and controls how it works. Each field has several other properties,
including its size, the caption that appears as the field’s datasheet heading, and the format that
the field uses to display its data. Other properties define rules for making entries, such as specifying
whether an entry is required or restricting an entry to certain values.
Understanding Field Properties
A	Properties pane
When a field is selected
in the Design view, its
properties appear in the
lower pane.
B	General tab
The General tab contains
most of the properties
that you will work with.
C	Lookup tab
The Lookup tab is
primarily for setting up
lookup lists.
D	Drop-down lists
Some properties have
drop-down lists from
which you can make a selection;
click to open the list. Other
fields have builder buttons ( ),
which open a dialog box that
guides you through the process
of building an entry.
E	Property information
When the insertion point is in a
property’s box, information about
that property appears here.
F	Yes/No properties
Some properties represent yes/no
questions; these are typically
already filled in with default
values.
65
CHAPTER
4
Each field has a size that limits the amount of data you can store in it. There are different ways of
expressing the field size depending on the type of field.
The following table lists the specifications for the data types for which Field Size is a configurable
setting. Many field types do not allow you to set a field size. For a numeric field, the advantage of
choosing a field size that takes up fewer bytes is that it results in a smaller database file. The file
size difference becomes more apparent the more records the table contains.
Understanding Field Sizes
Field Type Default Size Notes
Text 255 characters You can specify any number of characters from 0 to 255. Each
character occupies 1 byte of disk space.
Number Long Integer The choice of number format determines the number of bytes used
to store it:
Byte: Integers from 0 to 255 (1 byte).
Integer: Integers from -32,767 to +32,767 (2 bytes).
Long Integer: Integers from -2,147,483,648 to +2,147,483,647
(4 bytes).
Single: Integers from -3.4 x 1038
to +3.4 x 1038
and up to
7 significant digits (4 bytes).
Double: Floating-point numbers from -1.797 x 10308
to
+1.797 x 10308
and up to 15 significant digits (8 bytes).
Replication ID: A globally unique identifier (GUID), such as a
randomly generated ID number (16 bytes).
Decimal: Integers with a defined decimal precision with values
between -1028
and +1028
. The default precision is zero, and the
default number of decimal places displayed is 18.
AutoNumber Long Integer The same as Number, except there are only two choices: Long
Integer or Replication ID.
66
For the Text Data Type
1	In the Design view, click in the
field that you want to change.
	 The properties for that field
appear.
2	Click in the Field Size row on
the General tab.
3	Type a new field size.
Note: The field size for a text field
is expressed as a number of
characters.
	 Access changes the field size.
For the Number Data Type
1	In the Design view, click in the
field that you want to change.
	 The properties for that field
appear.
2	Click in the Field Size row.
3	Click the Field Size and
then click the field size that
you want.
Note: For a numeric field, size is
expressed as a number type. See the
section “Understanding Field
Properties” for details.
	 Access changes the field size.
Change a Field Size
If you are working with a field that offers a configurable field size, it is best to set the field’s size
to as small a value as possible, while still being large enough to accommodate all possible entries.
This is the most efficient course because it keeps the database file size to a minimum.
If your table will contain just a few entries, its field sizes will not make that much difference.
However, the difference in file size becomes more pronounced as more records are stored in the table.
Change a Field Size
67
CHAPTER
4
A	When you display the table’s
datasheet, the field’s caption
appears as its column
heading.
Note: To check the caption in a
datasheet, click the Save button
( ) to save it and then switch
to the Datasheet view.
1	In the Design view, click in
the field for which you want
to set a caption.
	 The properties for that field
appear.
2	Click here and type a
caption.
Note: The caption can include
spaces and symbols and can have
up to 255 characters.
Set a Field Caption
Afield’s caption is the text that appears as the field’s heading in the Datasheet view, and
the default caption is the field name. For example, if you name a field OrderDate, the text
“OrderDate” appears as the field’s datasheet heading. You can specify captions for fields that are
different from their actual names.
For example, if you have a field called LastName, you can set up its caption to appear as “Last Name”
with a space between the words, which is easier to read. Captions appear not only in datasheet
headings, but also on labels in forms and reports.
Set a Field Caption
68
B	For Date/Time data types,
the choices appear as date/
time formats.
1	In the Design view, click in the
field that you want to change.
	 The properties for that field
appear.
2	Click the Format and then
click the format that you want
to apply to the field.
A	For a Number or AutoNumber
field, the choices represent
different number types, such
as General, Currency, and
Percent.
Set a Field’s Format
Afield’s format determines how Access displays the field’s data. In a field that contains dates, for
example, you could display the dates using the format 12/25/2013, 25-Dec-13, or Wednesday,
December 25, 2013. You can change a field’s format to update its appearance in datasheets, forms,
and reports.
The field format is most significant for fields that store data numerically, such as Number, Currency,
and Yes/No. For example, if you have a field that contains sales tax values, you might prefer to
display those numbers as percentages, such as 5%, rather than decimal values, such as 0.05.
Set a Field’s Format
69
CHAPTER
4Working with Fields
TIP
Why is the Format list blank for some fields?
Many of the Access data types have no preset formats, so the Format list for those fields is blank. Data
types that show a blank Format list are Short Text, Long Text, and Hyperlink. Other data types have no data
format at all, so those fields do not even display the Format list. Data types that do not display the Format
list are OLE Object and Attachment.
D	For a Calculated field, all the
choices from all the other field
types are available because
Access cannot automatically
determine what type of data it
will hold.
C	For Yes/No fields, the choices
appear as ways of expressing
yes or no.
70
A	When you display the table’s
datasheet, the default value
appears in new records.
Note: The default value does not
automatically populate existing
records.
1	In the Design view, click in
the field for which you want
to set a default value.
	 The properties for that field
appear.
2	Click here and type a default
value.
Note: When you move away
from the text box, Access
automatically adds quotation
marks around what you typed
if the field type is Text.
Set a Default Value
You can speed up data entry for fields that usually contain the same value by making that value
the default. For example, suppose that you have a table that includes a PaymentType field, which
can take values such as Cash, Check, and Credit Card. If most of your clients pay by credit card, you
can make Credit Card the default value in the PaymentType field.
When you have specified a default value for a field, each time you start a new record, Access
automatically fills in the field with that value.
Set a Default Value
71
CHAPTER
4
	 When you enter a new record
in the table, a warning
appears if you do not enter
a value in that field.
A	Click OK to clear the error
and then type a value in the
required field.
1	In the Design view, click in
the field that you want to
make required.
	 The properties for that field
appear.
2	Click the Required and
then click Yes.
Make a Field Required
In many tables, one or more fields must be filled in for each record. For example, in a Customers
table, the CompanyName field should be filled in for each record. To ensure that a particular field
is always filled in with data, you can configure the table to make the field required. When a field is
required, Access does not enable users to skip it during data entry.
The primary key field is always required for each record in a database, but you can also make other
fields required without changing the primary key setting.
Make a Field Required
72
1	In the Design view, click in the
field that you want to index.
	 The properties for that field
appear.
2	Click the Indexed and then
click Yes (Duplicates OK).
	 This sets the field to be indexed
without forcing entries in it to
be unique.
A	You can choose Yes (No
Duplicates) if you prefer that
records have unique entries for
that field.
	 If you chose Yes (No Duplicates)
and you then try to enter an
identical value for two records, an
error message appears.
B	Click OK to clear the message
and then correct the error.
Index a Field
When you perform searches on a database that contains many records, a delay can occur as
Access searches. To minimize searching delays, you can set a field to be automatically indexed,
which means that Access gathers extra data about the field that enables it to locate data in the field
extremely fast. Searches based on that field will take place more quickly.
The two types of indexing are Yes (Duplicates OK) and Yes (No Duplicates). The latter has the side
effect of forcing each record to have a unique value for that field, as with the primary key field.
Index a Field
73
CHAPTER
4
A	The next time that you
display the datasheet,
Access applies the selected
alignment to the field.
1	In the Design view, click in
the field whose data you
want to align.
	 The properties for that field
appear.
2	Click the Text Align and
then click the alignment that
you want.
Align Data within a Field
You can make your tables easier to read by aligning text and numbers within a field. By default,
Access uses the General alignment, which means that it aligns numbers with the right side of
the field and text with the left side of the field. For any field, you can choose the Left or Right
alignment, or you can choose Center, which aligns data with the center of the field.
Excel also offers a Distribute alignment, which adds space between each character so that the field
data is aligned with both the left and right side of the field.
Align Data within a Field
74
	 The Input Mask Wizard opens.
4	Click the type of input mask
that you want.
A	To try the mask, you can click
in the Try It box and then type
a sample entry.
5	Click Next to customize the
mask.
B	If you do not want to
customize the mask, click
Finish.
1	Click in the field for which you
want to create an input mask.
	 The properties for that field
appear.
2	Click in the Input Mask row.
3	Click the Build icon ( ).
Create an Input Mask
Amajor database problem is data entered inconsistently, such as phone numbers entered as
(123)555-6783 and 123-555-6783. You can help prevent such inconsistencies by applying an
input mask to the field. An input mask is a kind of template that shows users how to enter the data
and prevents them from entering incorrect characters, such as a letter where a number is required.
For example, here is an input mask for a phone number: (___)___-____. Each underscore (_) acts as
a placeholder for (in this case) a digit, and the parentheses and dash appear automatically as the
user enters the number.
Create an Input Mask
75
CHAPTER
4Working with Fields
TIP
What do the input mask characters mean?
Input masks use characters to represent the types of data that they will accept. The following table shows
the most commonly used characters. For more characters, look up “Input Mask Character Reference” in
Access Help.
Character Use Character Use
0 Single digit, required A Single letter or number, required
9 Single digit, optional a Single letter or number, optional
# A digit, space, plus sign, or
minus sign
& Any character or a space, required
L Single letter, required C Any character or a space, optional
? Single letter, optional
9	Click how you want the data to be stored
( changes to ):
	 With the symbols in the mask: The extra
symbols (such as the parentheses and dash
in a phone number mask) are stored along
with the data.
	 Without the symbols in the mask: The
extra symbols are not stored with the data.
0	Click Finish.
	 The input mask code appears in the Input
Mask row in the field’s properties.
6	Modify the input mask’s code if you
want to.
7	Click the Placeholder character to
select a different placeholder character
if necessary.
C	To try the mask, you can click in the Try
It box and then type a sample entry.
8	Click Next.
76
	 The Expression Builder dialog
box opens.
4	Enter the expression that
represents the criteria you
want to specify.
5	Click OK.
Note: You could have simply
typed the validation rule into the
row and skipped steps 3 to 5, but
the Expression Builder’s tools can
be useful for complex expressions.
Create the Rule
1	In the Design view, click in
the field for which you want
to create a validation rule.
	 The properties for that field
appear.
2	Click in the Validation
Rule row.
3	Click .
Create a Validation Rule
Although an input mask helps a user enter data into a field using the proper number and type
of characters, it cannot restrict the field to certain entries based on logic. A better solution
for preventing data-entry errors is the data validation feature. With data validation, you create
validation rules that specify exactly what kind of data can be entered in a field and in what range
that data can fall. You can also specify an error message that appears when a user enters data that
does not satisfy a validation rule.
Create a Validation Rule
77
CHAPTER
4Working with Fields
TIP
How do I use the Expression Builder?
The Expression Builder can guide you in determining the correct
syntax for an expression. There are many types of expression
content available, including functions, constants, and operators.
For example, to enter the expression from the steps in this section
(>0) ,you would do the following:
1	Click Operators.
2	Click Comparison.
3	Double-click >.
A	The > character appears in the expression at the top of the
dialog box.
4	Type 0.
5	Click OK.
Test the Rule
B	When the rule is violated,
a custom error message
appears, containing the text
that you specified in the
Validation Text row.
1	Click OK and then retype the
field entry.
A	The validation rule appears
in the Validation Rule row.
6	Type the text for the error
message in the Validation
Text row.
78
1	In the Design view, click the
Design tab.
2	Click Property Sheet.
	 The Property Sheet for the
entire table appears.
3	Click in the Validation Rule
box and type the expression.
4	Click here and type the error
message text.
5	Click Test Validation Rules.
	 If the table contains data
already, a warning appears that
the data must be checked.
6	Click Yes.
Create a Record-Level Validation Rule
Although most validation rules involve a single field in the table, you can create rules that involve
two or more fields. For example, a rule might compare the value of one field with another. This is
called a record-level validation rule because it involves multiple fields in each record.
For example, in an Orders table, you could set up a record-level validation rule that checks to make
sure that the Order date is before (or the same as) the Shipped date because an order cannot be
shipped before it is placed.
Create a Record-Level Validation Rule
79
CHAPTER
4Working with Fields
TIPS
How do I construct a validation rule that contains field names?
You can either use the Expression Builder or type field names
directly into the expression. To use the Expression Builder, click in
the Validation Rule box and click to open the Expression
Builder. Click the table name in the Expression Elements list.
Double-click each field to which you want to add to the expression
in the Expression Categories list. Click OK. To enter field names
directly into the Validation Rule box, enclose each one in square
brackets: [OrderDate].
What happens to existing data
that violates the validation rule?
Nothing happens to it; it is allowed
to continue to exist. However, new
records will not be permitted to
violate the rule, and if you ever edit
the record that violates the rule, you
will not be able to save changes to
it until you fix the violation.
	 If existing data violates the new
rule, another warning appears.
You can either keep the new rule
or change it if this happens.
8	Click Yes to keep the new rule,
even if some existing data
violates it.
A	You can also click No to go back
to the previous rule (if any).
	 A confirmation dialog box opens.
9	Click OK.
	 The check is complete.
	 If the table has not been saved,
a prompt appears to save it.
7	Click Yes.

More Related Content

What's hot

Datatypes, Field Properties, Validation and Masking
Datatypes, Field Properties, Validation and MaskingDatatypes, Field Properties, Validation and Masking
Datatypes, Field Properties, Validation and Maskingstarsmileygirl34
 
Ms Access ppt
Ms Access pptMs Access ppt
Ms Access pptanuj
 
Lesson Six Entering And Editing Data In Tables
Lesson Six   Entering And Editing Data In TablesLesson Six   Entering And Editing Data In Tables
Lesson Six Entering And Editing Data In Tablesguevarra_2000
 
Ms access notes
Ms access notesMs access notes
Ms access notesIKIARA
 
Using List Views
Using List ViewsUsing List Views
Using List ViewsEMAINT
 
Access lesson 01 Microsoft Access Basics
Access lesson 01 Microsoft Access BasicsAccess lesson 01 Microsoft Access Basics
Access lesson 01 Microsoft Access BasicsAram SE
 
Access lesson 02 Creating a Database
Access lesson 02 Creating a DatabaseAccess lesson 02 Creating a Database
Access lesson 02 Creating a DatabaseAram SE
 
Access lesson 03 Creating Queries
Access lesson 03 Creating QueriesAccess lesson 03 Creating Queries
Access lesson 03 Creating QueriesAram SE
 
Access lesson 04 Creating and Modifying Forms
Access lesson 04 Creating and Modifying FormsAccess lesson 04 Creating and Modifying Forms
Access lesson 04 Creating and Modifying FormsAram SE
 
Access lesson05
Access lesson05Access lesson05
Access lesson05Aram SE
 
Basic introduction to ms access
Basic introduction to ms accessBasic introduction to ms access
Basic introduction to ms accessjigeno
 
Microsoft Office Excel 2003 Sorting And Filtering
Microsoft Office Excel 2003 Sorting And FilteringMicrosoft Office Excel 2003 Sorting And Filtering
Microsoft Office Excel 2003 Sorting And FilteringMarc Morgenstern
 
PPT On MS-Access 2007 | Full Concepts |
PPT On MS-Access 2007 | Full Concepts |PPT On MS-Access 2007 | Full Concepts |
PPT On MS-Access 2007 | Full Concepts |Umesh Kumar
 

What's hot (20)

MS Access 2010 tutorial 3
MS Access 2010 tutorial 3MS Access 2010 tutorial 3
MS Access 2010 tutorial 3
 
Datatypes, Field Properties, Validation and Masking
Datatypes, Field Properties, Validation and MaskingDatatypes, Field Properties, Validation and Masking
Datatypes, Field Properties, Validation and Masking
 
Ms Access ppt
Ms Access pptMs Access ppt
Ms Access ppt
 
Access 2007 lecture notes students
Access 2007 lecture notes studentsAccess 2007 lecture notes students
Access 2007 lecture notes students
 
Lesson Six Entering And Editing Data In Tables
Lesson Six   Entering And Editing Data In TablesLesson Six   Entering And Editing Data In Tables
Lesson Six Entering And Editing Data In Tables
 
Excel 2007 Unit C
Excel 2007 Unit CExcel 2007 Unit C
Excel 2007 Unit C
 
Ms access notes
Ms access notesMs access notes
Ms access notes
 
Using List Views
Using List ViewsUsing List Views
Using List Views
 
Access lesson 01 Microsoft Access Basics
Access lesson 01 Microsoft Access BasicsAccess lesson 01 Microsoft Access Basics
Access lesson 01 Microsoft Access Basics
 
01 Microsoft Access
01 Microsoft Access01 Microsoft Access
01 Microsoft Access
 
Access lesson 02 Creating a Database
Access lesson 02 Creating a DatabaseAccess lesson 02 Creating a Database
Access lesson 02 Creating a Database
 
Exp31sp1 at a-glance-en
Exp31sp1 at a-glance-enExp31sp1 at a-glance-en
Exp31sp1 at a-glance-en
 
Access lesson 03 Creating Queries
Access lesson 03 Creating QueriesAccess lesson 03 Creating Queries
Access lesson 03 Creating Queries
 
Access 2007
Access 2007Access 2007
Access 2007
 
Access lesson 04 Creating and Modifying Forms
Access lesson 04 Creating and Modifying FormsAccess lesson 04 Creating and Modifying Forms
Access lesson 04 Creating and Modifying Forms
 
Excel chapter-4
Excel chapter-4Excel chapter-4
Excel chapter-4
 
Access lesson05
Access lesson05Access lesson05
Access lesson05
 
Basic introduction to ms access
Basic introduction to ms accessBasic introduction to ms access
Basic introduction to ms access
 
Microsoft Office Excel 2003 Sorting And Filtering
Microsoft Office Excel 2003 Sorting And FilteringMicrosoft Office Excel 2003 Sorting And Filtering
Microsoft Office Excel 2003 Sorting And Filtering
 
PPT On MS-Access 2007 | Full Concepts |
PPT On MS-Access 2007 | Full Concepts |PPT On MS-Access 2007 | Full Concepts |
PPT On MS-Access 2007 | Full Concepts |
 

Similar to Set Up and Manage Database Fields

OPERATE DATABASE APPLICATION
OPERATE DATABASE APPLICATIONOPERATE DATABASE APPLICATION
OPERATE DATABASE APPLICATIONYoomiLaataBekele
 
Operate Spreadsheet applications ppt.pptx
Operate Spreadsheet applications ppt.pptxOperate Spreadsheet applications ppt.pptx
Operate Spreadsheet applications ppt.pptxEsubalew21
 
NetSuite Tip: Creating Custom Fields In NetSuite
NetSuite Tip: Creating Custom Fields In NetSuiteNetSuite Tip: Creating Custom Fields In NetSuite
NetSuite Tip: Creating Custom Fields In NetSuiteProtelo, Inc.
 
Module 08 Access & Use Database Application.pptx
Module 08 Access & Use Database Application.pptxModule 08 Access & Use Database Application.pptx
Module 08 Access & Use Database Application.pptxEsubalew21
 
4.2 Specifying Criteria in a Query
4.2 Specifying Criteria in a Query4.2 Specifying Criteria in a Query
4.2 Specifying Criteria in a QueryPyi Soe
 
Adding A New Field
Adding A New FieldAdding A New Field
Adding A New FieldEMAINT
 
Access lesson 02 Creating a Database
Access lesson 02 Creating a DatabaseAccess lesson 02 Creating a Database
Access lesson 02 Creating a DatabaseAram SE
 
CLASS 10 IT PRACTICAL FILE.pdf
CLASS 10 IT PRACTICAL FILE.pdfCLASS 10 IT PRACTICAL FILE.pdf
CLASS 10 IT PRACTICAL FILE.pdfVandanaGoyal21
 
DATABASES NOTES FOR STUDENTS TAKING MICROSOFT PACKAGES
DATABASES NOTES FOR STUDENTS TAKING MICROSOFT PACKAGESDATABASES NOTES FOR STUDENTS TAKING MICROSOFT PACKAGES
DATABASES NOTES FOR STUDENTS TAKING MICROSOFT PACKAGESWesleyWenceslaus
 
Revision booklet 6957 2016
Revision booklet 6957 2016Revision booklet 6957 2016
Revision booklet 6957 2016jom1987
 
Acccesss notes
Acccesss notesAcccesss notes
Acccesss notesart02
 
Sas visual analytics Training
Sas visual analytics Training Sas visual analytics Training
Sas visual analytics Training bidwhm
 
Gl13 m6-c3-presentation
Gl13 m6-c3-presentationGl13 m6-c3-presentation
Gl13 m6-c3-presentationTracie King
 
Tge how-to-add-quotes-and-offers-to-jira-issues
Tge how-to-add-quotes-and-offers-to-jira-issuesTge how-to-add-quotes-and-offers-to-jira-issues
Tge how-to-add-quotes-and-offers-to-jira-issuesFrancis Martens
 
Create a basic performance point dashboard epc
Create a basic performance point dashboard   epcCreate a basic performance point dashboard   epc
Create a basic performance point dashboard epcEPC Group
 
access1.ppt
access1.pptaccess1.ppt
access1.pptmayada34
 
4 creating and modifying objects in access
4 creating and modifying objects in access4 creating and modifying objects in access
4 creating and modifying objects in accessCJ Quijano
 

Similar to Set Up and Manage Database Fields (20)

OPERATE DATABASE APPLICATION
OPERATE DATABASE APPLICATIONOPERATE DATABASE APPLICATION
OPERATE DATABASE APPLICATION
 
Operate Spreadsheet applications ppt.pptx
Operate Spreadsheet applications ppt.pptxOperate Spreadsheet applications ppt.pptx
Operate Spreadsheet applications ppt.pptx
 
NetSuite Tip: Creating Custom Fields In NetSuite
NetSuite Tip: Creating Custom Fields In NetSuiteNetSuite Tip: Creating Custom Fields In NetSuite
NetSuite Tip: Creating Custom Fields In NetSuite
 
Module 08 Access & Use Database Application.pptx
Module 08 Access & Use Database Application.pptxModule 08 Access & Use Database Application.pptx
Module 08 Access & Use Database Application.pptx
 
4.2 Specifying Criteria in a Query
4.2 Specifying Criteria in a Query4.2 Specifying Criteria in a Query
4.2 Specifying Criteria in a Query
 
Adding A New Field
Adding A New FieldAdding A New Field
Adding A New Field
 
Ayush presentation
Ayush presentationAyush presentation
Ayush presentation
 
Access lesson 02 Creating a Database
Access lesson 02 Creating a DatabaseAccess lesson 02 Creating a Database
Access lesson 02 Creating a Database
 
CLASS 10 IT PRACTICAL FILE.pdf
CLASS 10 IT PRACTICAL FILE.pdfCLASS 10 IT PRACTICAL FILE.pdf
CLASS 10 IT PRACTICAL FILE.pdf
 
DATABASES NOTES FOR STUDENTS TAKING MICROSOFT PACKAGES
DATABASES NOTES FOR STUDENTS TAKING MICROSOFT PACKAGESDATABASES NOTES FOR STUDENTS TAKING MICROSOFT PACKAGES
DATABASES NOTES FOR STUDENTS TAKING MICROSOFT PACKAGES
 
Excel tips-tricks
Excel tips-tricksExcel tips-tricks
Excel tips-tricks
 
Revision booklet 6957 2016
Revision booklet 6957 2016Revision booklet 6957 2016
Revision booklet 6957 2016
 
Ms Access
Ms AccessMs Access
Ms Access
 
Acccesss notes
Acccesss notesAcccesss notes
Acccesss notes
 
Sas visual analytics Training
Sas visual analytics Training Sas visual analytics Training
Sas visual analytics Training
 
Gl13 m6-c3-presentation
Gl13 m6-c3-presentationGl13 m6-c3-presentation
Gl13 m6-c3-presentation
 
Tge how-to-add-quotes-and-offers-to-jira-issues
Tge how-to-add-quotes-and-offers-to-jira-issuesTge how-to-add-quotes-and-offers-to-jira-issues
Tge how-to-add-quotes-and-offers-to-jira-issues
 
Create a basic performance point dashboard epc
Create a basic performance point dashboard   epcCreate a basic performance point dashboard   epc
Create a basic performance point dashboard epc
 
access1.ppt
access1.pptaccess1.ppt
access1.ppt
 
4 creating and modifying objects in access
4 creating and modifying objects in access4 creating and modifying objects in access
4 creating and modifying objects in access
 

More from FaHaD .H. NooR

FAHAD HASSAN NOOR || UCP Business School Data Analytics Head Recommended | MB...
FAHAD HASSAN NOOR || UCP Business School Data Analytics Head Recommended | MB...FAHAD HASSAN NOOR || UCP Business School Data Analytics Head Recommended | MB...
FAHAD HASSAN NOOR || UCP Business School Data Analytics Head Recommended | MB...FaHaD .H. NooR
 
FAHAD HASSAN NOOR || UCP Business School
FAHAD HASSAN NOOR || UCP Business SchoolFAHAD HASSAN NOOR || UCP Business School
FAHAD HASSAN NOOR || UCP Business SchoolFaHaD .H. NooR
 
Drop Shipping in the Q-Commerce Era, A case study of Daraz. pk | Project by F...
Drop Shipping in the Q-Commerce Era, A case study of Daraz. pk | Project by F...Drop Shipping in the Q-Commerce Era, A case study of Daraz. pk | Project by F...
Drop Shipping in the Q-Commerce Era, A case study of Daraz. pk | Project by F...FaHaD .H. NooR
 
Operations Management A-Z: Business Processes and Systems | Fahad Hassan Noor
Operations Management A-Z: Business Processes and Systems | Fahad Hassan NoorOperations Management A-Z: Business Processes and Systems | Fahad Hassan Noor
Operations Management A-Z: Business Processes and Systems | Fahad Hassan NoorFaHaD .H. NooR
 
Supply Chain Management A-Z: Operations & Logistics Basics | Fahad Hassan Noor
Supply Chain Management A-Z: Operations & Logistics Basics | Fahad Hassan NoorSupply Chain Management A-Z: Operations & Logistics Basics | Fahad Hassan Noor
Supply Chain Management A-Z: Operations & Logistics Basics | Fahad Hassan NoorFaHaD .H. NooR
 
Inventory Management A-Z: Supply Chain & Business Operations | Fahad Hassan N...
Inventory Management A-Z: Supply Chain & Business Operations | Fahad Hassan N...Inventory Management A-Z: Supply Chain & Business Operations | Fahad Hassan N...
Inventory Management A-Z: Supply Chain & Business Operations | Fahad Hassan N...FaHaD .H. NooR
 
Supply Chain Management A-Z: Operations & Logistics Certified - Udemy - Fahad...
Supply Chain Management A-Z: Operations & Logistics Certified - Udemy - Fahad...Supply Chain Management A-Z: Operations & Logistics Certified - Udemy - Fahad...
Supply Chain Management A-Z: Operations & Logistics Certified - Udemy - Fahad...FaHaD .H. NooR
 
Facebook Ads & Facebook Marketing MASTERY | Coursenvy ® - Fahad Hassan Noor -...
Facebook Ads & Facebook Marketing MASTERY | Coursenvy ® - Fahad Hassan Noor -...Facebook Ads & Facebook Marketing MASTERY | Coursenvy ® - Fahad Hassan Noor -...
Facebook Ads & Facebook Marketing MASTERY | Coursenvy ® - Fahad Hassan Noor -...FaHaD .H. NooR
 
Training for Zendesk Administrators MasterClass - Fahad Hassan Noor
Training for Zendesk Administrators MasterClass - Fahad Hassan NoorTraining for Zendesk Administrators MasterClass - Fahad Hassan Noor
Training for Zendesk Administrators MasterClass - Fahad Hassan NoorFaHaD .H. NooR
 
TikTok Marketing: Grow Your Account & Master TikTok Ads - Fahad Hassan Noor
TikTok Marketing: Grow Your Account & Master TikTok Ads - Fahad Hassan NoorTikTok Marketing: Grow Your Account & Master TikTok Ads - Fahad Hassan Noor
TikTok Marketing: Grow Your Account & Master TikTok Ads - Fahad Hassan NoorFaHaD .H. NooR
 
Amazon FBA Private Label Course for Beginners | Amazon 2022 - Fahad Hassan Noor
Amazon FBA Private Label Course for Beginners | Amazon 2022 - Fahad Hassan NoorAmazon FBA Private Label Course for Beginners | Amazon 2022 - Fahad Hassan Noor
Amazon FBA Private Label Course for Beginners | Amazon 2022 - Fahad Hassan NoorFaHaD .H. NooR
 
Complete Video Production, Video Marketing, & YouTube Course - Fahad Hassan Noor
Complete Video Production, Video Marketing, & YouTube Course - Fahad Hassan NoorComplete Video Production, Video Marketing, & YouTube Course - Fahad Hassan Noor
Complete Video Production, Video Marketing, & YouTube Course - Fahad Hassan NoorFaHaD .H. NooR
 
Fahad Hassan Noor | Zendesk Customer Support Portal Certified | Udemy Premium...
Fahad Hassan Noor | Zendesk Customer Support Portal Certified | Udemy Premium...Fahad Hassan Noor | Zendesk Customer Support Portal Certified | Udemy Premium...
Fahad Hassan Noor | Zendesk Customer Support Portal Certified | Udemy Premium...FaHaD .H. NooR
 
Supply Chain Management
Supply Chain ManagementSupply Chain Management
Supply Chain ManagementFaHaD .H. NooR
 
Creating and Managing Supplier Relationships
Creating and Managing Supplier RelationshipsCreating and Managing Supplier Relationships
Creating and Managing Supplier RelationshipsFaHaD .H. NooR
 
ETHICAL AND SUSTAINABLE SOURCING
ETHICAL AND SUSTAINABLE SOURCINGETHICAL AND SUSTAINABLE SOURCING
ETHICAL AND SUSTAINABLE SOURCINGFaHaD .H. NooR
 
Purchasing mangement - Puchasing Process - Make Or Buy Decisions - Supplier S...
Purchasing mangement - Puchasing Process - Make Or Buy Decisions - Supplier S...Purchasing mangement - Puchasing Process - Make Or Buy Decisions - Supplier S...
Purchasing mangement - Puchasing Process - Make Or Buy Decisions - Supplier S...FaHaD .H. NooR
 
MCB Islamic Bank Internship Report - UCP - 2019
MCB Islamic Bank Internship Report - UCP - 2019MCB Islamic Bank Internship Report - UCP - 2019
MCB Islamic Bank Internship Report - UCP - 2019FaHaD .H. NooR
 
Transportation Fundamentals | Transportation stake holders | Transport Capabi...
Transportation	Fundamentals | Transportation stake holders | Transport Capabi...Transportation	Fundamentals | Transportation stake holders | Transport Capabi...
Transportation Fundamentals | Transportation stake holders | Transport Capabi...FaHaD .H. NooR
 

More from FaHaD .H. NooR (20)

FAHAD HASSAN NOOR || UCP Business School Data Analytics Head Recommended | MB...
FAHAD HASSAN NOOR || UCP Business School Data Analytics Head Recommended | MB...FAHAD HASSAN NOOR || UCP Business School Data Analytics Head Recommended | MB...
FAHAD HASSAN NOOR || UCP Business School Data Analytics Head Recommended | MB...
 
FAHAD HASSAN NOOR || UCP Business School
FAHAD HASSAN NOOR || UCP Business SchoolFAHAD HASSAN NOOR || UCP Business School
FAHAD HASSAN NOOR || UCP Business School
 
Drop Shipping in the Q-Commerce Era, A case study of Daraz. pk | Project by F...
Drop Shipping in the Q-Commerce Era, A case study of Daraz. pk | Project by F...Drop Shipping in the Q-Commerce Era, A case study of Daraz. pk | Project by F...
Drop Shipping in the Q-Commerce Era, A case study of Daraz. pk | Project by F...
 
Operations Management A-Z: Business Processes and Systems | Fahad Hassan Noor
Operations Management A-Z: Business Processes and Systems | Fahad Hassan NoorOperations Management A-Z: Business Processes and Systems | Fahad Hassan Noor
Operations Management A-Z: Business Processes and Systems | Fahad Hassan Noor
 
Supply Chain Management A-Z: Operations & Logistics Basics | Fahad Hassan Noor
Supply Chain Management A-Z: Operations & Logistics Basics | Fahad Hassan NoorSupply Chain Management A-Z: Operations & Logistics Basics | Fahad Hassan Noor
Supply Chain Management A-Z: Operations & Logistics Basics | Fahad Hassan Noor
 
Inventory Management A-Z: Supply Chain & Business Operations | Fahad Hassan N...
Inventory Management A-Z: Supply Chain & Business Operations | Fahad Hassan N...Inventory Management A-Z: Supply Chain & Business Operations | Fahad Hassan N...
Inventory Management A-Z: Supply Chain & Business Operations | Fahad Hassan N...
 
Supply Chain Management A-Z: Operations & Logistics Certified - Udemy - Fahad...
Supply Chain Management A-Z: Operations & Logistics Certified - Udemy - Fahad...Supply Chain Management A-Z: Operations & Logistics Certified - Udemy - Fahad...
Supply Chain Management A-Z: Operations & Logistics Certified - Udemy - Fahad...
 
Facebook Ads & Facebook Marketing MASTERY | Coursenvy ® - Fahad Hassan Noor -...
Facebook Ads & Facebook Marketing MASTERY | Coursenvy ® - Fahad Hassan Noor -...Facebook Ads & Facebook Marketing MASTERY | Coursenvy ® - Fahad Hassan Noor -...
Facebook Ads & Facebook Marketing MASTERY | Coursenvy ® - Fahad Hassan Noor -...
 
Training for Zendesk Administrators MasterClass - Fahad Hassan Noor
Training for Zendesk Administrators MasterClass - Fahad Hassan NoorTraining for Zendesk Administrators MasterClass - Fahad Hassan Noor
Training for Zendesk Administrators MasterClass - Fahad Hassan Noor
 
TikTok Marketing: Grow Your Account & Master TikTok Ads - Fahad Hassan Noor
TikTok Marketing: Grow Your Account & Master TikTok Ads - Fahad Hassan NoorTikTok Marketing: Grow Your Account & Master TikTok Ads - Fahad Hassan Noor
TikTok Marketing: Grow Your Account & Master TikTok Ads - Fahad Hassan Noor
 
Amazon FBA Private Label Course for Beginners | Amazon 2022 - Fahad Hassan Noor
Amazon FBA Private Label Course for Beginners | Amazon 2022 - Fahad Hassan NoorAmazon FBA Private Label Course for Beginners | Amazon 2022 - Fahad Hassan Noor
Amazon FBA Private Label Course for Beginners | Amazon 2022 - Fahad Hassan Noor
 
Complete Video Production, Video Marketing, & YouTube Course - Fahad Hassan Noor
Complete Video Production, Video Marketing, & YouTube Course - Fahad Hassan NoorComplete Video Production, Video Marketing, & YouTube Course - Fahad Hassan Noor
Complete Video Production, Video Marketing, & YouTube Course - Fahad Hassan Noor
 
Fahad Hassan Noor | Zendesk Customer Support Portal Certified | Udemy Premium...
Fahad Hassan Noor | Zendesk Customer Support Portal Certified | Udemy Premium...Fahad Hassan Noor | Zendesk Customer Support Portal Certified | Udemy Premium...
Fahad Hassan Noor | Zendesk Customer Support Portal Certified | Udemy Premium...
 
Fahad Hassan Noor | Zendesk Customer Support Portal Certified | Udemy Premium...
Fahad Hassan Noor | Zendesk Customer Support Portal Certified | Udemy Premium...Fahad Hassan Noor | Zendesk Customer Support Portal Certified | Udemy Premium...
Fahad Hassan Noor | Zendesk Customer Support Portal Certified | Udemy Premium...
 
Supply Chain Management
Supply Chain ManagementSupply Chain Management
Supply Chain Management
 
Creating and Managing Supplier Relationships
Creating and Managing Supplier RelationshipsCreating and Managing Supplier Relationships
Creating and Managing Supplier Relationships
 
ETHICAL AND SUSTAINABLE SOURCING
ETHICAL AND SUSTAINABLE SOURCINGETHICAL AND SUSTAINABLE SOURCING
ETHICAL AND SUSTAINABLE SOURCING
 
Purchasing mangement - Puchasing Process - Make Or Buy Decisions - Supplier S...
Purchasing mangement - Puchasing Process - Make Or Buy Decisions - Supplier S...Purchasing mangement - Puchasing Process - Make Or Buy Decisions - Supplier S...
Purchasing mangement - Puchasing Process - Make Or Buy Decisions - Supplier S...
 
MCB Islamic Bank Internship Report - UCP - 2019
MCB Islamic Bank Internship Report - UCP - 2019MCB Islamic Bank Internship Report - UCP - 2019
MCB Islamic Bank Internship Report - UCP - 2019
 
Transportation Fundamentals | Transportation stake holders | Transport Capabi...
Transportation	Fundamentals | Transportation stake holders | Transport Capabi...Transportation	Fundamentals | Transportation stake holders | Transport Capabi...
Transportation Fundamentals | Transportation stake holders | Transport Capabi...
 

Recently uploaded

why an Opensea Clone Script might be your perfect match.pdf
why an Opensea Clone Script might be your perfect match.pdfwhy an Opensea Clone Script might be your perfect match.pdf
why an Opensea Clone Script might be your perfect match.pdfjoe51371421
 
Cloud Management Software Platforms: OpenStack
Cloud Management Software Platforms: OpenStackCloud Management Software Platforms: OpenStack
Cloud Management Software Platforms: OpenStackVICTOR MAESTRE RAMIREZ
 
cybersecurity notes for mca students for learning
cybersecurity notes for mca students for learningcybersecurity notes for mca students for learning
cybersecurity notes for mca students for learningVitsRangannavar
 
buds n tech IT solutions
buds n  tech IT                solutionsbuds n  tech IT                solutions
buds n tech IT solutionsmonugehlot87
 
What are the features of Vehicle Tracking System?
What are the features of Vehicle Tracking System?What are the features of Vehicle Tracking System?
What are the features of Vehicle Tracking System?Watsoo Telematics
 
Try MyIntelliAccount Cloud Accounting Software As A Service Solution Risk Fre...
Try MyIntelliAccount Cloud Accounting Software As A Service Solution Risk Fre...Try MyIntelliAccount Cloud Accounting Software As A Service Solution Risk Fre...
Try MyIntelliAccount Cloud Accounting Software As A Service Solution Risk Fre...MyIntelliSource, Inc.
 
KnowAPIs-UnknownPerf-jaxMainz-2024 (1).pptx
KnowAPIs-UnknownPerf-jaxMainz-2024 (1).pptxKnowAPIs-UnknownPerf-jaxMainz-2024 (1).pptx
KnowAPIs-UnknownPerf-jaxMainz-2024 (1).pptxTier1 app
 
Steps To Getting Up And Running Quickly With MyTimeClock Employee Scheduling ...
Steps To Getting Up And Running Quickly With MyTimeClock Employee Scheduling ...Steps To Getting Up And Running Quickly With MyTimeClock Employee Scheduling ...
Steps To Getting Up And Running Quickly With MyTimeClock Employee Scheduling ...MyIntelliSource, Inc.
 
BATTLEFIELD ORM: TIPS, TACTICS AND STRATEGIES FOR CONQUERING YOUR DATABASE
BATTLEFIELD ORM: TIPS, TACTICS AND STRATEGIES FOR CONQUERING YOUR DATABASEBATTLEFIELD ORM: TIPS, TACTICS AND STRATEGIES FOR CONQUERING YOUR DATABASE
BATTLEFIELD ORM: TIPS, TACTICS AND STRATEGIES FOR CONQUERING YOUR DATABASEOrtus Solutions, Corp
 
Asset Management Software - Infographic
Asset Management Software - InfographicAsset Management Software - Infographic
Asset Management Software - InfographicHr365.us smith
 
办理学位证(UQ文凭证书)昆士兰大学毕业证成绩单原版一模一样
办理学位证(UQ文凭证书)昆士兰大学毕业证成绩单原版一模一样办理学位证(UQ文凭证书)昆士兰大学毕业证成绩单原版一模一样
办理学位证(UQ文凭证书)昆士兰大学毕业证成绩单原版一模一样umasea
 
Adobe Marketo Engage Deep Dives: Using Webhooks to Transfer Data
Adobe Marketo Engage Deep Dives: Using Webhooks to Transfer DataAdobe Marketo Engage Deep Dives: Using Webhooks to Transfer Data
Adobe Marketo Engage Deep Dives: Using Webhooks to Transfer DataBradBedford3
 
ODSC - Batch to Stream workshop - integration of Apache Spark, Cassandra, Pos...
ODSC - Batch to Stream workshop - integration of Apache Spark, Cassandra, Pos...ODSC - Batch to Stream workshop - integration of Apache Spark, Cassandra, Pos...
ODSC - Batch to Stream workshop - integration of Apache Spark, Cassandra, Pos...Christina Lin
 
Advancing Engineering with AI through the Next Generation of Strategic Projec...
Advancing Engineering with AI through the Next Generation of Strategic Projec...Advancing Engineering with AI through the Next Generation of Strategic Projec...
Advancing Engineering with AI through the Next Generation of Strategic Projec...OnePlan Solutions
 
Implementing Zero Trust strategy with Azure
Implementing Zero Trust strategy with AzureImplementing Zero Trust strategy with Azure
Implementing Zero Trust strategy with AzureDinusha Kumarasiri
 
Salesforce Certified Field Service Consultant
Salesforce Certified Field Service ConsultantSalesforce Certified Field Service Consultant
Salesforce Certified Field Service ConsultantAxelRicardoTrocheRiq
 
Call Girls in Naraina Delhi 💯Call Us 🔝8264348440🔝
Call Girls in Naraina Delhi 💯Call Us 🔝8264348440🔝Call Girls in Naraina Delhi 💯Call Us 🔝8264348440🔝
Call Girls in Naraina Delhi 💯Call Us 🔝8264348440🔝soniya singh
 
What is Fashion PLM and Why Do You Need It
What is Fashion PLM and Why Do You Need ItWhat is Fashion PLM and Why Do You Need It
What is Fashion PLM and Why Do You Need ItWave PLM
 
The Essentials of Digital Experience Monitoring_ A Comprehensive Guide.pdf
The Essentials of Digital Experience Monitoring_ A Comprehensive Guide.pdfThe Essentials of Digital Experience Monitoring_ A Comprehensive Guide.pdf
The Essentials of Digital Experience Monitoring_ A Comprehensive Guide.pdfkalichargn70th171
 

Recently uploaded (20)

why an Opensea Clone Script might be your perfect match.pdf
why an Opensea Clone Script might be your perfect match.pdfwhy an Opensea Clone Script might be your perfect match.pdf
why an Opensea Clone Script might be your perfect match.pdf
 
Cloud Management Software Platforms: OpenStack
Cloud Management Software Platforms: OpenStackCloud Management Software Platforms: OpenStack
Cloud Management Software Platforms: OpenStack
 
cybersecurity notes for mca students for learning
cybersecurity notes for mca students for learningcybersecurity notes for mca students for learning
cybersecurity notes for mca students for learning
 
buds n tech IT solutions
buds n  tech IT                solutionsbuds n  tech IT                solutions
buds n tech IT solutions
 
What are the features of Vehicle Tracking System?
What are the features of Vehicle Tracking System?What are the features of Vehicle Tracking System?
What are the features of Vehicle Tracking System?
 
Try MyIntelliAccount Cloud Accounting Software As A Service Solution Risk Fre...
Try MyIntelliAccount Cloud Accounting Software As A Service Solution Risk Fre...Try MyIntelliAccount Cloud Accounting Software As A Service Solution Risk Fre...
Try MyIntelliAccount Cloud Accounting Software As A Service Solution Risk Fre...
 
KnowAPIs-UnknownPerf-jaxMainz-2024 (1).pptx
KnowAPIs-UnknownPerf-jaxMainz-2024 (1).pptxKnowAPIs-UnknownPerf-jaxMainz-2024 (1).pptx
KnowAPIs-UnknownPerf-jaxMainz-2024 (1).pptx
 
Steps To Getting Up And Running Quickly With MyTimeClock Employee Scheduling ...
Steps To Getting Up And Running Quickly With MyTimeClock Employee Scheduling ...Steps To Getting Up And Running Quickly With MyTimeClock Employee Scheduling ...
Steps To Getting Up And Running Quickly With MyTimeClock Employee Scheduling ...
 
Call Girls In Mukherjee Nagar 📱 9999965857 🤩 Delhi 🫦 HOT AND SEXY VVIP 🍎 SE...
Call Girls In Mukherjee Nagar 📱  9999965857  🤩 Delhi 🫦 HOT AND SEXY VVIP 🍎 SE...Call Girls In Mukherjee Nagar 📱  9999965857  🤩 Delhi 🫦 HOT AND SEXY VVIP 🍎 SE...
Call Girls In Mukherjee Nagar 📱 9999965857 🤩 Delhi 🫦 HOT AND SEXY VVIP 🍎 SE...
 
BATTLEFIELD ORM: TIPS, TACTICS AND STRATEGIES FOR CONQUERING YOUR DATABASE
BATTLEFIELD ORM: TIPS, TACTICS AND STRATEGIES FOR CONQUERING YOUR DATABASEBATTLEFIELD ORM: TIPS, TACTICS AND STRATEGIES FOR CONQUERING YOUR DATABASE
BATTLEFIELD ORM: TIPS, TACTICS AND STRATEGIES FOR CONQUERING YOUR DATABASE
 
Asset Management Software - Infographic
Asset Management Software - InfographicAsset Management Software - Infographic
Asset Management Software - Infographic
 
办理学位证(UQ文凭证书)昆士兰大学毕业证成绩单原版一模一样
办理学位证(UQ文凭证书)昆士兰大学毕业证成绩单原版一模一样办理学位证(UQ文凭证书)昆士兰大学毕业证成绩单原版一模一样
办理学位证(UQ文凭证书)昆士兰大学毕业证成绩单原版一模一样
 
Adobe Marketo Engage Deep Dives: Using Webhooks to Transfer Data
Adobe Marketo Engage Deep Dives: Using Webhooks to Transfer DataAdobe Marketo Engage Deep Dives: Using Webhooks to Transfer Data
Adobe Marketo Engage Deep Dives: Using Webhooks to Transfer Data
 
ODSC - Batch to Stream workshop - integration of Apache Spark, Cassandra, Pos...
ODSC - Batch to Stream workshop - integration of Apache Spark, Cassandra, Pos...ODSC - Batch to Stream workshop - integration of Apache Spark, Cassandra, Pos...
ODSC - Batch to Stream workshop - integration of Apache Spark, Cassandra, Pos...
 
Advancing Engineering with AI through the Next Generation of Strategic Projec...
Advancing Engineering with AI through the Next Generation of Strategic Projec...Advancing Engineering with AI through the Next Generation of Strategic Projec...
Advancing Engineering with AI through the Next Generation of Strategic Projec...
 
Implementing Zero Trust strategy with Azure
Implementing Zero Trust strategy with AzureImplementing Zero Trust strategy with Azure
Implementing Zero Trust strategy with Azure
 
Salesforce Certified Field Service Consultant
Salesforce Certified Field Service ConsultantSalesforce Certified Field Service Consultant
Salesforce Certified Field Service Consultant
 
Call Girls in Naraina Delhi 💯Call Us 🔝8264348440🔝
Call Girls in Naraina Delhi 💯Call Us 🔝8264348440🔝Call Girls in Naraina Delhi 💯Call Us 🔝8264348440🔝
Call Girls in Naraina Delhi 💯Call Us 🔝8264348440🔝
 
What is Fashion PLM and Why Do You Need It
What is Fashion PLM and Why Do You Need ItWhat is Fashion PLM and Why Do You Need It
What is Fashion PLM and Why Do You Need It
 
The Essentials of Digital Experience Monitoring_ A Comprehensive Guide.pdf
The Essentials of Digital Experience Monitoring_ A Comprehensive Guide.pdfThe Essentials of Digital Experience Monitoring_ A Comprehensive Guide.pdf
The Essentials of Digital Experience Monitoring_ A Comprehensive Guide.pdf
 

Set Up and Manage Database Fields

  • 1. CHAPTER 4 Working with Fields Each table consists of one or more fields. In this chapter, you learn about field properties and how to set properties such as the field size, caption, format, and default value. You also learn how to create input masks and validation rules to help reduce data-entry errors.
  • 2. Understanding Field Properties . . . . . . . . . . . . . . 64 Understanding Field Sizes . . . . . . . . . . . . . . . . 65 Change a Field Size . . . . . . . . . . . . . . . . . . . . 66 Set a Field Caption . . . . . . . . . . . . . . . . . . . . 67 Set a Field’s Format . . . . . . . . . . . . . . . . . . . 68 Set a Default Value . . . . . . . . . . . . . . . . . . . . 70 Make a Field Required . . . . . . . . . . . . . . . . . . 71 Index a Field . . . . . . . . . . . . . . . . . . . . . . . 72 Align Data within a Field . . . . . . . . . . . . . . . . . 73 Create an Input Mask . . . . . . . . . . . . . . . . . . . 74 Create a Validation Rule . . . . . . . . . . . . . . . . . 76 Create a Record-Level Validation Rule . . . . . . . . . . . 78
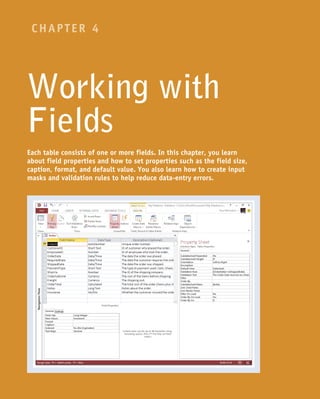
  • 3. 64 When you create a table, you define each field with data such as the field name, data type, and an optional description. These are examples of the field’s properties, which are a collection of data that defines the field and controls how it works. Each field has several other properties, including its size, the caption that appears as the field’s datasheet heading, and the format that the field uses to display its data. Other properties define rules for making entries, such as specifying whether an entry is required or restricting an entry to certain values. Understanding Field Properties A Properties pane When a field is selected in the Design view, its properties appear in the lower pane. B General tab The General tab contains most of the properties that you will work with. C Lookup tab The Lookup tab is primarily for setting up lookup lists. D Drop-down lists Some properties have drop-down lists from which you can make a selection; click to open the list. Other fields have builder buttons ( ), which open a dialog box that guides you through the process of building an entry. E Property information When the insertion point is in a property’s box, information about that property appears here. F Yes/No properties Some properties represent yes/no questions; these are typically already filled in with default values.
  • 4. 65 CHAPTER 4 Each field has a size that limits the amount of data you can store in it. There are different ways of expressing the field size depending on the type of field. The following table lists the specifications for the data types for which Field Size is a configurable setting. Many field types do not allow you to set a field size. For a numeric field, the advantage of choosing a field size that takes up fewer bytes is that it results in a smaller database file. The file size difference becomes more apparent the more records the table contains. Understanding Field Sizes Field Type Default Size Notes Text 255 characters You can specify any number of characters from 0 to 255. Each character occupies 1 byte of disk space. Number Long Integer The choice of number format determines the number of bytes used to store it: Byte: Integers from 0 to 255 (1 byte). Integer: Integers from -32,767 to +32,767 (2 bytes). Long Integer: Integers from -2,147,483,648 to +2,147,483,647 (4 bytes). Single: Integers from -3.4 x 1038 to +3.4 x 1038 and up to 7 significant digits (4 bytes). Double: Floating-point numbers from -1.797 x 10308 to +1.797 x 10308 and up to 15 significant digits (8 bytes). Replication ID: A globally unique identifier (GUID), such as a randomly generated ID number (16 bytes). Decimal: Integers with a defined decimal precision with values between -1028 and +1028 . The default precision is zero, and the default number of decimal places displayed is 18. AutoNumber Long Integer The same as Number, except there are only two choices: Long Integer or Replication ID.
  • 5. 66 For the Text Data Type 1 In the Design view, click in the field that you want to change. The properties for that field appear. 2 Click in the Field Size row on the General tab. 3 Type a new field size. Note: The field size for a text field is expressed as a number of characters. Access changes the field size. For the Number Data Type 1 In the Design view, click in the field that you want to change. The properties for that field appear. 2 Click in the Field Size row. 3 Click the Field Size and then click the field size that you want. Note: For a numeric field, size is expressed as a number type. See the section “Understanding Field Properties” for details. Access changes the field size. Change a Field Size If you are working with a field that offers a configurable field size, it is best to set the field’s size to as small a value as possible, while still being large enough to accommodate all possible entries. This is the most efficient course because it keeps the database file size to a minimum. If your table will contain just a few entries, its field sizes will not make that much difference. However, the difference in file size becomes more pronounced as more records are stored in the table. Change a Field Size
  • 6. 67 CHAPTER 4 A When you display the table’s datasheet, the field’s caption appears as its column heading. Note: To check the caption in a datasheet, click the Save button ( ) to save it and then switch to the Datasheet view. 1 In the Design view, click in the field for which you want to set a caption. The properties for that field appear. 2 Click here and type a caption. Note: The caption can include spaces and symbols and can have up to 255 characters. Set a Field Caption Afield’s caption is the text that appears as the field’s heading in the Datasheet view, and the default caption is the field name. For example, if you name a field OrderDate, the text “OrderDate” appears as the field’s datasheet heading. You can specify captions for fields that are different from their actual names. For example, if you have a field called LastName, you can set up its caption to appear as “Last Name” with a space between the words, which is easier to read. Captions appear not only in datasheet headings, but also on labels in forms and reports. Set a Field Caption
  • 7. 68 B For Date/Time data types, the choices appear as date/ time formats. 1 In the Design view, click in the field that you want to change. The properties for that field appear. 2 Click the Format and then click the format that you want to apply to the field. A For a Number or AutoNumber field, the choices represent different number types, such as General, Currency, and Percent. Set a Field’s Format Afield’s format determines how Access displays the field’s data. In a field that contains dates, for example, you could display the dates using the format 12/25/2013, 25-Dec-13, or Wednesday, December 25, 2013. You can change a field’s format to update its appearance in datasheets, forms, and reports. The field format is most significant for fields that store data numerically, such as Number, Currency, and Yes/No. For example, if you have a field that contains sales tax values, you might prefer to display those numbers as percentages, such as 5%, rather than decimal values, such as 0.05. Set a Field’s Format
  • 8. 69 CHAPTER 4Working with Fields TIP Why is the Format list blank for some fields? Many of the Access data types have no preset formats, so the Format list for those fields is blank. Data types that show a blank Format list are Short Text, Long Text, and Hyperlink. Other data types have no data format at all, so those fields do not even display the Format list. Data types that do not display the Format list are OLE Object and Attachment. D For a Calculated field, all the choices from all the other field types are available because Access cannot automatically determine what type of data it will hold. C For Yes/No fields, the choices appear as ways of expressing yes or no.
  • 9. 70 A When you display the table’s datasheet, the default value appears in new records. Note: The default value does not automatically populate existing records. 1 In the Design view, click in the field for which you want to set a default value. The properties for that field appear. 2 Click here and type a default value. Note: When you move away from the text box, Access automatically adds quotation marks around what you typed if the field type is Text. Set a Default Value You can speed up data entry for fields that usually contain the same value by making that value the default. For example, suppose that you have a table that includes a PaymentType field, which can take values such as Cash, Check, and Credit Card. If most of your clients pay by credit card, you can make Credit Card the default value in the PaymentType field. When you have specified a default value for a field, each time you start a new record, Access automatically fills in the field with that value. Set a Default Value
  • 10. 71 CHAPTER 4 When you enter a new record in the table, a warning appears if you do not enter a value in that field. A Click OK to clear the error and then type a value in the required field. 1 In the Design view, click in the field that you want to make required. The properties for that field appear. 2 Click the Required and then click Yes. Make a Field Required In many tables, one or more fields must be filled in for each record. For example, in a Customers table, the CompanyName field should be filled in for each record. To ensure that a particular field is always filled in with data, you can configure the table to make the field required. When a field is required, Access does not enable users to skip it during data entry. The primary key field is always required for each record in a database, but you can also make other fields required without changing the primary key setting. Make a Field Required
  • 11. 72 1 In the Design view, click in the field that you want to index. The properties for that field appear. 2 Click the Indexed and then click Yes (Duplicates OK). This sets the field to be indexed without forcing entries in it to be unique. A You can choose Yes (No Duplicates) if you prefer that records have unique entries for that field. If you chose Yes (No Duplicates) and you then try to enter an identical value for two records, an error message appears. B Click OK to clear the message and then correct the error. Index a Field When you perform searches on a database that contains many records, a delay can occur as Access searches. To minimize searching delays, you can set a field to be automatically indexed, which means that Access gathers extra data about the field that enables it to locate data in the field extremely fast. Searches based on that field will take place more quickly. The two types of indexing are Yes (Duplicates OK) and Yes (No Duplicates). The latter has the side effect of forcing each record to have a unique value for that field, as with the primary key field. Index a Field
  • 12. 73 CHAPTER 4 A The next time that you display the datasheet, Access applies the selected alignment to the field. 1 In the Design view, click in the field whose data you want to align. The properties for that field appear. 2 Click the Text Align and then click the alignment that you want. Align Data within a Field You can make your tables easier to read by aligning text and numbers within a field. By default, Access uses the General alignment, which means that it aligns numbers with the right side of the field and text with the left side of the field. For any field, you can choose the Left or Right alignment, or you can choose Center, which aligns data with the center of the field. Excel also offers a Distribute alignment, which adds space between each character so that the field data is aligned with both the left and right side of the field. Align Data within a Field
  • 13. 74 The Input Mask Wizard opens. 4 Click the type of input mask that you want. A To try the mask, you can click in the Try It box and then type a sample entry. 5 Click Next to customize the mask. B If you do not want to customize the mask, click Finish. 1 Click in the field for which you want to create an input mask. The properties for that field appear. 2 Click in the Input Mask row. 3 Click the Build icon ( ). Create an Input Mask Amajor database problem is data entered inconsistently, such as phone numbers entered as (123)555-6783 and 123-555-6783. You can help prevent such inconsistencies by applying an input mask to the field. An input mask is a kind of template that shows users how to enter the data and prevents them from entering incorrect characters, such as a letter where a number is required. For example, here is an input mask for a phone number: (___)___-____. Each underscore (_) acts as a placeholder for (in this case) a digit, and the parentheses and dash appear automatically as the user enters the number. Create an Input Mask
  • 14. 75 CHAPTER 4Working with Fields TIP What do the input mask characters mean? Input masks use characters to represent the types of data that they will accept. The following table shows the most commonly used characters. For more characters, look up “Input Mask Character Reference” in Access Help. Character Use Character Use 0 Single digit, required A Single letter or number, required 9 Single digit, optional a Single letter or number, optional # A digit, space, plus sign, or minus sign & Any character or a space, required L Single letter, required C Any character or a space, optional ? Single letter, optional 9 Click how you want the data to be stored ( changes to ): With the symbols in the mask: The extra symbols (such as the parentheses and dash in a phone number mask) are stored along with the data. Without the symbols in the mask: The extra symbols are not stored with the data. 0 Click Finish. The input mask code appears in the Input Mask row in the field’s properties. 6 Modify the input mask’s code if you want to. 7 Click the Placeholder character to select a different placeholder character if necessary. C To try the mask, you can click in the Try It box and then type a sample entry. 8 Click Next.
  • 15. 76 The Expression Builder dialog box opens. 4 Enter the expression that represents the criteria you want to specify. 5 Click OK. Note: You could have simply typed the validation rule into the row and skipped steps 3 to 5, but the Expression Builder’s tools can be useful for complex expressions. Create the Rule 1 In the Design view, click in the field for which you want to create a validation rule. The properties for that field appear. 2 Click in the Validation Rule row. 3 Click . Create a Validation Rule Although an input mask helps a user enter data into a field using the proper number and type of characters, it cannot restrict the field to certain entries based on logic. A better solution for preventing data-entry errors is the data validation feature. With data validation, you create validation rules that specify exactly what kind of data can be entered in a field and in what range that data can fall. You can also specify an error message that appears when a user enters data that does not satisfy a validation rule. Create a Validation Rule
  • 16. 77 CHAPTER 4Working with Fields TIP How do I use the Expression Builder? The Expression Builder can guide you in determining the correct syntax for an expression. There are many types of expression content available, including functions, constants, and operators. For example, to enter the expression from the steps in this section (>0) ,you would do the following: 1 Click Operators. 2 Click Comparison. 3 Double-click >. A The > character appears in the expression at the top of the dialog box. 4 Type 0. 5 Click OK. Test the Rule B When the rule is violated, a custom error message appears, containing the text that you specified in the Validation Text row. 1 Click OK and then retype the field entry. A The validation rule appears in the Validation Rule row. 6 Type the text for the error message in the Validation Text row.
  • 17. 78 1 In the Design view, click the Design tab. 2 Click Property Sheet. The Property Sheet for the entire table appears. 3 Click in the Validation Rule box and type the expression. 4 Click here and type the error message text. 5 Click Test Validation Rules. If the table contains data already, a warning appears that the data must be checked. 6 Click Yes. Create a Record-Level Validation Rule Although most validation rules involve a single field in the table, you can create rules that involve two or more fields. For example, a rule might compare the value of one field with another. This is called a record-level validation rule because it involves multiple fields in each record. For example, in an Orders table, you could set up a record-level validation rule that checks to make sure that the Order date is before (or the same as) the Shipped date because an order cannot be shipped before it is placed. Create a Record-Level Validation Rule
  • 18. 79 CHAPTER 4Working with Fields TIPS How do I construct a validation rule that contains field names? You can either use the Expression Builder or type field names directly into the expression. To use the Expression Builder, click in the Validation Rule box and click to open the Expression Builder. Click the table name in the Expression Elements list. Double-click each field to which you want to add to the expression in the Expression Categories list. Click OK. To enter field names directly into the Validation Rule box, enclose each one in square brackets: [OrderDate]. What happens to existing data that violates the validation rule? Nothing happens to it; it is allowed to continue to exist. However, new records will not be permitted to violate the rule, and if you ever edit the record that violates the rule, you will not be able to save changes to it until you fix the violation. If existing data violates the new rule, another warning appears. You can either keep the new rule or change it if this happens. 8 Click Yes to keep the new rule, even if some existing data violates it. A You can also click No to go back to the previous rule (if any). A confirmation dialog box opens. 9 Click OK. The check is complete. If the table has not been saved, a prompt appears to save it. 7 Click Yes.