1. WindowsRemote Assistance Step-by-StepbyChandlerMorgan
Thisstep-by-stepwill give youwritteninstructionsaswell asvisual
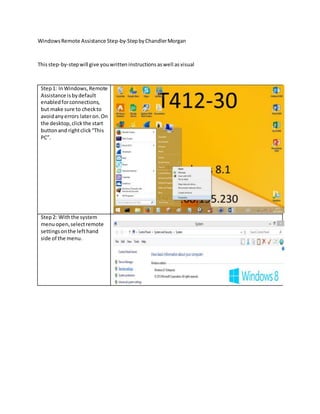
Step1: InWindows,Remote
Assistance isbydefault
enabledforconnections,
but make sure to checkto
avoidanyerrors lateron.On
the desktop,clickthe start
buttonand rightclick“This
PC”.
Step2: Withthe system
menuopen,selectremote
settingsonthe lefthand
side of the menu.
2. Step3: Inthissystem
propertiesmenu,inthe
remote tab,youwill see two
differentboxes.One for
remote assistance,andone
for remote desktop.The
remote assistance box
shouldbe checkedalready,
but if itis not,go aheadand
enable itnowandapply.
Step4: Once those settings
are verifiedandapplied,
returnto the desktop and
openthe start menuonce
more.Type inthe searchbar
“MSRA.EXE” which isthe
executable forMicrosoft’s
Remote Assistance.
3. Step5: WiththisWindows
Remote Assistance window
nowopen,youcan now
eitherinvite someoneto
connectto youor connect
to someone else.First,we
will gooverhowto invite
someone tohelpyou.
Select“Invite someone you
trust to helpyou”.
Step6: Once youhave
selectedinvite,youhave
several options.Youcan
save the file,email the file,
or use easyconnect.For this
step-by-step,we will save
thisinvitationasa file.
4. Step7: Once youhave
selectedtosave the file,you
will selectalocationtosave
it.For thisstep-by-step,we
will save ittoour desktopso
we can findit easily.
Step8: Once it issaved,the
file will be savedwhere ever
youselected.A windowwill
alsopop upwithyour
invitationpassword.Leave
thiswindowopenandkeep
the passwordhandy,as the
personconnectingwill need
it to accessyour computer.
In orderfor the personto
connect,theywill needthe
file thatyousaved.Youcan
transferthisusingemail,a
flashdrive,orany othersort
of file transferringmethod.
Step9: Once the invitation
file iscreated,itistime to
accept the invitationand
connectthroughthe
computerthat isassisting.
Openthe file thatwassent
to you,and itwill prompt
youfor a password.Have
the personwhocreatedthe
invitationtotell youthe
password.
5. Step10: Once the password
has beenentered,the
computerthat isbeing
connectedtowill be
promptedtoallowyouto
connectto see the desktop.
Selectyes.
Step11: Once the
connectionisaccepted,the
personhelpingyouwillhave
a viewof your desktop.This
may be as far as you are
tryingto get,but the person
helpingyoucannotcontrol
your desktopyet.Toallow
the helpertocontrol your
desktopyouwill wantto
selectrequestcontrol on
the Remote Assistance
clientof the personthatis
helpingyou.
6. Step12: Afterrequesting
control of the clients
computer,they will be
promptedforpermissionfor
the helpertoshare control
overthe desktop.Selectyes
if you wishforthemto have
control.
Step13: Once the helper
has gainedcontrol of the
computer,the Remote
Assistance clientwill letyou
knowat the bottom that
theyare sharingcontrol.
Once theyhave control,
theycan use the computer
as if it were theirownand
helpassistyouwithyour
needs.
Thishas beena step-by-steponhowtosuccessfullyuse WindowsRemote Assistance toconnectto
anothercomputer.If all stepsare followedcorrectly,the clientshouldhave noproblemconnectingto
you!