Authentic No 1 Amil Baba In Pakistan Authentic No 1 Amil Baba In Karachi No 1...
Evaluationhomeless
1. Is your advertising campaign fit for purpose and why?
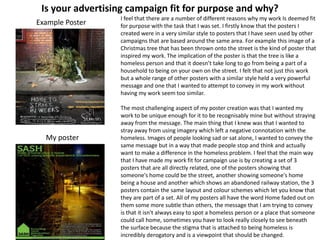
Example Poster
My poster
I feel that there are a number of different reasons why my work Is deemed fit
for purpose with the task that I was set. I firstly know that the posters I
created were in a very similar style to posters that I have seen used by other
campaigns that are based around the same area. For example this image of a
Christmas tree that has been thrown onto the street is the kind of poster that
inspired my work. The implication of the poster is that the tree is like a
homeless person and that it doesn’t take long to go from being a part of a
household to being on your own on the street. I felt that not just this work
but a whole range of other posters with a similar style held a very powerful
message and one that I wanted to attempt to convey in my work without
having my work seem too similar.
The most challenging aspect of my poster creation was that I wanted my
work to be unique enough for it to be recognisably mine but without straying
away from the message. The main thing that I knew was that I wanted to
stray away from using imagery which left a negative connotation with the
homeless. Images of people looking sad or sat alone, I wanted to convey the
same message but in a way that made people stop and think and actually
want to make a difference in the homeless problem. I feel that the main way
that I have made my work fit for campaign use is by creating a set of 3
posters that are all directly related, one of the posters showing that
someone's home could be the street, another showing someone's home
being a house and another which shows an abandoned railway station, the 3
posters contain the same layout and colour schemes which let you know that
they are part of a set. All of my posters all have the word Home faded out on
them some more subtle than others, the message that I am trying to convey
is that it isn't always easy to spot a homeless person or a place that someone
could call home, sometimes you have to look really closely to see beneath
the surface because the stigma that is attached to being homeless is
incredibly derogatory and is a viewpoint that should be changed.
2. At the top of this page you will see that the three posters that I created all follow a very similar theme, this was definitely
the idea that I wanted to portray. I wanted to create posters that applied to both of my target audiences (16 – 24 and 25+)
my original intention was to have the poster of the street be aimed at those who are 16 – 24 and that the poster with the
house on would be aimed at those who are 25+ due to the implication that those people over 25 would have the homes for
those who are homeless to stay in.
After looking at the finished products I actually feel that it would be the other way around and that the house poster would
be motivation for the 16 – 24 year olds it would make them realise that there may be a nice place to stay and that they
should get in touch. The poster of the street will hopefully make people with homes realise how good they have it and
possibly make them want to help out homeless charities and get in contact.
I feel that my poster set definitely communicates the message that I was trying to convey. Upon first glance the poster still
has a very clear message when read, there is a fact about homelessness and countless contact details on how to contact a
homeless charity. This should clarify the message enough, however, for anyone willing to take a closer look they will see the
word home faded into all the posters and will understand the deeper meaning of the posters. I think that is what I like best
about my posters the fact that the message can be interpreted in a number of different ways dependant on the person who
sees it however as far as I can understand there are no negative connotations to be found.
3. In the top left of this page you will see the flat plan for what was the original idea that I
wanted to use for my set of posters. When you compare the original flat plan to one of
the finished products ( shown below flat plan ) you will notice that whilst being shown
in this manner they may look very differently but if I were to fill the blanks where the
boxes are the final posters would actually look very similar.
When I started to create the first poster I very much used this template but upon
finishing everything the way that I had laid out the poster all seemed very cluttered and
unorganised. That is what made me want to move the layout of it around a little bit, I
shifter the title, tagline and statistic over to the top left of the poster, my main reason
for this was to keep it neat but the secondary reason was to allow for more space for
the image which would allow the poster to be more eye-catching.
The large image was originally only intended to cover around 2/3rd of the poster but
upon moving my title and tagline to the top left I felt that perhaps I could spread the
picture to cover the entirety of the space that I had, after a little bit of searching to find
the correct image which I felt conveyed a powerful enough message and was of a high
enough aspect ratio to allow me to stretch it without blurring. I felt that this allowed my
work to be more eye-catching and would do the job that it was intended to do which is
drag people in to look at the poster.
Originally I left a really big section in the bottom right as my intention was to leave a
large paragraph that was based around the information from the charity. This idea also
changed and what I decided to do was to give a small section in the bottom right. I still
included a decent amount of information based around the charity but opted to use a
smaller font which was still readable but didn’t take up a sizeable amount of the page.
The only thing that was exactly the same was the logo placement. I felt that this was
definitely in the right place, however I did slightly raise it and put it a little higher than
was originally intended, this was too allow a footer which had the information on how
to contact the charity such as a phone number and an email address.
4. I had originally planned to only create 2 posters but due to me
finishing those ahead of schedule I decided to try and create
some extra pieces of work that could help me improve my
grade.
The first thing that I created was the leaflet, shown to the
left, using very simple shapes I feel that I have managed to
create a leaflet that very easily spreads the awareness and
message of what SASH are trying to do without bombarding a
person with massive amounts of text or leaving too little
information for them to understand.
The colour scheme remained the same green that SASH
currently use and I opted for white text as it shows up well and
reinforces the colour scheme that I had been using throughout
the work.
Using screenshots from the SASH website I was able to create a
leaflet that was entirely factually correct and allowed people to
understand what SASH do, some of the key aspects of the
charity and how they can help get involved and help to raise
awareness and funds for the cause.
5. The final piece of work that I created is arguably my least favourite of the work that I produced, not because I feel that it
isn't a good piece of work or that it doesn’t get the message across but simply because I much prefer to work with posters
as I have a lot more space to work with and can allow my creative ideas to come to life.
This piece of work I actually found very difficult, due to the dimensions of the piece I struggled to come up with an idea that
would allow me to subtly spread the word like I had in my previous posters. I decided to go down a different route and
attempt to make it like an advertisement. As much as I hate adverts that have corny testimonials this style of advert was my
inspiration for this. I wanted to try and create a persona for a boy and a man as if the boy were homeless and SASH helped
him find somewhere to go and a man who had found SASH and decided to become a volunteer.
Using what I define as keywords for each participant I wanted to try and relate to the people who are in the same situation
as homeless people. Using words like Alone, Nowhere to go, and then positive reinforcement of the success that he
managed to find somewhere to go, I feel like I managed to create a testimonial that will allow people to know that there is a
chance for them and they can still find a place to stay and get on with their life.
For the volunteer I tried to make it very apparent that helping someone out who is in a worse situation than yourself is a
very rewarding thing. I hoped that this would make people think about what their life would be like if they didn’t have a
place to go or if they already had children and they had no where to stay. In the hopes that this would encourage people to
call up and find out more information about the charity.
I kept the colour scheme relatively similar working with the green background and white text again, however this time I
added long black rectangles for a number of different reasons, the first of which being that it made the text very clear and
easy to read. The other reason was to differentiate between
Which of the two people were talking. The top box showing
The speech of the young homeless boy and the bottom box
Showing the speech of the male volunteer.
I left the logo in the same place as it is in the posters as I feel
That it is appropriate and that people will be able to easily see it
6. The techniques I used for the posters in the majority were actually very basic, however I do not feel that it takes away
from the overall product and quality of my work. I will break down most of the techniques that I used into small segments
as to clearly explain what I did.
The first bit of technique that I used and used frequently throughout the rest of the work were the blending options to
add a drop shadow and a stroke to the text as seen here
the drop shadow allowed me to raise the text
from the background making it stand out more. This also
shows the use of the stroke, the stroke allowed
me to add a black line around the text which would also help the words to stand out.
I used a number of different techniques to make the word home seem nearly invisible on the ground of my first poster.
The first of these techniques was the layer editing option “Multiply” as seen in the menu here From my understanding, the multiply effect is applied to layers in a photoshop document. This
will cause the selected layer in this case the “Home” text and will try to blend the layer with the
background image. An example of multiply in action can be seen here
Without multiply
With multiply
As you can see without multiply the layer is a gradient of
black to white, on a blue background but with multiply on
the black square remains the same, the grey square turns
slightly blue and the white square entirely merges with the
background. This allowed me to make the word fade into
the concrete.
To make the word stand out more clearly and not completely fade into the background I again used the stroke effect to
add a thicker outline to the word so that it subtly sinks into the background.
7. Another technique that I used was to make the 1st poster look like it was a little frayed and
that it had been on the street and was a little tattered. To do this I found a large wall
texture and put it above my main layer. I then went to “Select” then picked the “Colour
range” selection which I knew would allow me to create a frayed style of image.
This brought up a menu which allowed me to select a colour range and then gave me a small
preview window of what the effect would look like when applied to my work. I knew that I only
really wanted the corners of the poster to appear frayed not the entire thing, this made my job at
selecting a colour range a lot more difficult but after a fair bit of experimenting I managed to find it
a colour range that I was happy with, which I have shown as a picture to the right.
Upon picking the correct colour range I then applied it to my work. After I had applied it I had
to hide the texture layer which transferred the selection I had made onto the image layer. I
then had to hit backspace and it deleted the sections of the image which I had selected leaving
faint white marks everywhere as if the image had been on the street.
One of the other techniques that I decided to incorporate was the use of the perspective tool. I used this so that I could
blend the word home into some of my other posters and make it look as if it were laying flat against the ground or a wall
and not just standing randomly in the street.
An example of the perspective tool can be seen in my 1st poster and in my 3rd poster used to change the way
that the word flowed and blends into the wall/road. I have changed the stroke on the image just to make it
stand out more for the sake of the photo -
8. I think that my series of informational posters and banners will have a positive impact on the public. The posters and
leaflets that I have created are very effective I feel. They get the message across appropriately using inviting colour
schemes. The colour green is symbolic of togetherness, courage and money. These are all things that the charity represents
and needs to work. I feel that the work that I have created is very similar in some ways to the SASH work that is already out
there. Below is an example of a leaflet that SASH already has in circulation with a comparison next to the work that I have
done.
I feel that the two pieces of work are relatively similar, both have used white background with green font. There are
some differences such as the use of bold green font at the top of the SASH leaflet in comparison to the drop
shadow, stroke text that I have used. The work that I created appears to use more visuals to get the message across
rather than a lot of text. My text also seems to be a lot bolder and larger than there is. I feel that the works are very
similar which reinforces what I said about it having a positive impact on the public. If the charity themselves are
releasing work that is similar to mine then I must be on the right tracks.