Driving Behavioral Change for Information Management through Data-Driven Gree...
Copy of word 2010 lesson 1 introduction
1. 1
www.gcflearnfree.org ccc/itec27/1_12-13
Lesson 1: Introduction
Introduction
Word 2010 is a word processor that allows you to create various types of documents
such as letters, papers, flyers, faxes and more. In this lesson, you will be introduced to the
Ribbon and the new Backstage view, and you'll learn how to create new documents and open
existing ones.
Getting to Know Word 2010
Word 2010 is a bit different from earlier versions, so even if you've used Word before,
you should take some time to familiarize yourself with the interface. The toolbars are similar to
those in Word 2007, and they include the Ribbon and the Quick Access Toolbar. Unlike Word
2007, commands such as Open and Print are housed in Backstage view, which replaces the
Microsoft Office Button.
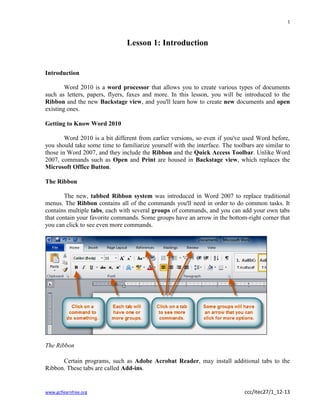
The Ribbon
The new, tabbed Ribbon system was introduced in Word 2007 to replace traditional
menus. The Ribbon contains all of the commands you'll need in order to do common tasks. It
contains multiple tabs, each with several groups of commands, and you can add your own tabs
that contain your favorite commands. Some groups have an arrow in the bottom-right corner that
you can click to see even more commands.
The Ribbon
Certain programs, such as Adobe Acrobat Reader, may install additional tabs to the
Ribbon. These tabs are called Add-ins.
2. 2
www.gcflearnfree.org ccc/itec27/1_12-13
To Minimize and Maximize the Ribbon:
The Ribbon is designed to be responsive to your current task and easy to use; however, you
can choose to minimize it if it's taking up too much screen space.
1. Click the arrow in the upper-right corner of the Ribbon to minimize it.
Minimizing the Ribbon
2. To maximize the Ribbon, click the arrow again.
When the Ribbon is minimized, you can make it reappear by clicking on a tab.
However, the Ribbon will disappear again when you're not using it.
To Customize the Ribbon:
You can customize the Ribbon by creating your own tabs with whichever commands you
want. Commands are always housed within a group, and you can create as many groups as you
want in order to keep your tab organized. If you want, you can even add commands to any of the
default tabs, as long as you create a custom group in the tab.
1. Right-click the Ribbon and select Customize the Ribbon. A dialog box will appear.
3. 3
www.gcflearnfree.org ccc/itec27/1_12-13
Right-clicking the Ribbon to customize it
2. Click New Tab. A new tab will be created with a new group inside it.
3. Make sure the new group is selected.
4. Select a command from the list on the left, then click Add. You can also drag commands
directly into a group.
5. When you are done adding commands, click OK.
4. 4
www.gcflearnfree.org ccc/itec27/1_12-13
The dialog box where you can customize the Ribbon
If you don't see the command you want, click on the Choose commands from:
drop-down box and select All Commands.
Displaying All Commands
Backstage View
Backstage view gives you various options for saving, opening a file, printing, or sharing
your document. It is similar to the Office Button Menu from Word 2007 or the File Menu from
earlier versions of Word. However, instead of just a menu, it is a full-page view which makes it
easier to work with.
To Get to Backstage View:
1. Click the File tab.
5. 5
www.gcflearnfree.org ccc/itec27/1_12-13
Backstage view
2. You can choose an option on the left side of the page.
3. To get back to your document, just click any tab on the Ribbon.
Use the interactive below to learn about the different things you can do in Backstage
view.
The Quick Access Toolbar
The Quick Access Toolbar is located above the ribbon, and it lets you access common
commands no matter which tab you're on. By default, it shows the Save, Undo, and Repeat
commands. You can add other commands to make it more convenient for you.
To Add Commands to the Quick Access Toolbar:
1. Click the drop-down arrow to the right of the Quick Access Toolbar.
2. Select the command you wish to add from the drop-down menu. It will appear in the
Quick Access toolbar.
6. 6
www.gcflearnfree.org ccc/itec27/1_12-13
Adding a command to the Quick Access Toolbar
The Ruler
The Ruler is located at the top and to the left of your document. It makes it easier to
adjust your document with precision. If you want, you can hide the Ruler to free up more screen
space.
The Ruler
To Hide or View the Ruler:
1. Click the View Ruler icon over the scrollbar to hide the ruler.
2. To show the ruler, click the View Ruler icon again.
7. 7
www.gcflearnfree.org ccc/itec27/1_12-13
Hiding and viewing the Ruler
Creating and Opening Documents
Create a New, Blank Document:
1. Click the File tab. This takes you to Backstage view.
2. Select New.
3. Select Blank document under Available Templates. It will be highlighted by default.
Creating a new document
4. Click Create. A new, blank document appears in the Word window.
To save time, you can create your document from a template, which you can select from
the New Document pane. We'll talk about templates in a later lesson.
8. 8
www.gcflearnfree.org ccc/itec27/1_12-13
To Open an Existing Document:
1. Click the File tab. This takes you to Backstage view.
2. Select Open. The Open dialog box appears.
Opening a document
3. Select your document and then click Open.
If you've opened a file recently, you can also access it from the Recent Documents list.
Just click on the File tab and select Recent.
9. 9
www.gcflearnfree.org ccc/itec27/1_12-13
Opening a recent document
Challenge!
1. Open Word 2010 on your computer. A new blank document will
appear on the screen.
2. Make sure the ribbon is maximized.
3. Display the Ruler.
4. Add any commands you wish to the Quick Access Toolbar.
5. Close Word without saving the document
.