1. SQL Server Reporting Services (SSRS) –
Part 1- Basics on how to create a report
Introduction
SQL Server Reporting services are very good feature provided in SQL to build a report of
user choice and deploy it to make use of it anywhere as per the requirement. In this article we
are going to see on how to create a simple report then build and execute the report. Reports
can be exported to multiple formats including delimited text, XML format, pdf format and
Microsoft Excel as well.
Let s jump into the process and see the step by step process on how to create and execute an
SSRS report.
Steps:
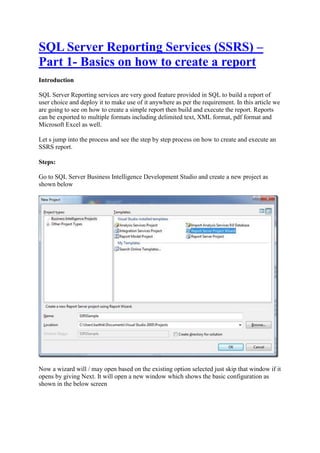
Go to SQL Server Business Intelligence Development Studio and create a new project as
shown below
Now a wizard will / may open based on the existing option selected just skip that window if it
opens by giving Next. It will open a new window which shows the basic configuration as
shown in the below screen
2. Next window will show an option to build a query based on which the result set will be
displayed as a report. We can write our own query to fetch the output as shown in the below
screen.
3. Clicking on Next will open a window which have the option to select on how the result
should display as shown in the below screen
Clicking on Next will open the below window, if you can see the option here to group the
data and show as per our requirement
4. Clicking on the Next button will open a window which gives option to design the report
based on the templates available as shown in the below screen
Now clicking on the button the interesting thing comes over, which is nothing but where to
deploy the report. We can give as per our requirement
5. Clicking on Next will open a window as shown in the below screen. Here we can give our
customized report name
Clicking on Finish will open a window as shown in the below screen, which shows the
structure of the report as shown below
6. Now press F5 to build and execute the process. It will show the result as shown in the below
figure
Conclusion
So in this article we have seen on how to create, build and execute a basic report using SQL
reporting services.
7. SQL Server Reporting Services (SSRS) –
Part 2- Deploying a Report
I NTRODUCTION
In this article we are going to see on how to deploy a report which is created and executed
using SSRS. Once the report design is completed now we can follow the below steps to
deploy the report and use it online. Check for my previous article on how to create a basic
report.
S TEPS
Once the report is created now we need to do some basic configuration as shown in the below
steps
Right click on the project name in the Solution Explorer and then select the Properties from
the popup menu. You will see the window as shown in the below screen
In the options available OverwriteDataSources make it always false since if there is already
an available data source it will get override and close the existing data source.
Once we are done with this configuration and checking the options now we are in the process
of deploying the application. For this go to the Solution Explorer and right click on the same.
There is an option given as Deploy, click on deploy as shown in the below screen
8. Clicking on the deploy button will deploy the report and shows the output in the Output
window at the bottom as shown in the below output.
Deploying to http://localhost/reportserver
Deploying data source '/Data Sources/AdventureWorksLT'.
Warning : Cannot deploy data source AdventureWorksLT to
the server because it already exists and OverwriteDataSources
is not specified.
Deploying report '/SSRS Sample/ReportDesignerExample'.
Deploy complete -- 0 errors, 1 warnings
== Build: 1 succeeded or up-to-date, 0 failed, 0 skipped ==
== Deploy: 1 succeeded, 0 failed, 0 skipped ==
After successful deployment of the REPORT we can see the output in the browser window as
shown in the below screen
9. Note – this is a sample image, since IIS is not deployed in my system I couldn’t able to take a
screen shot of the report.
So we can navigate to the uri http://localhost/reportserver and check the report online
C ONCLUSION
So in this article we have seen on how to deploy the report and how to configure the
deployment process. Hope this was useful; do let me know your comment on this article.
10. SQL Server Reporting Services (SSRS) –
Part 3 – Create Report without Wizard
Introduction
In this article we are going to see on how to create a report without using the wizard which
we used in our first article. The idea behind this article is we will have full control over the
creation of report and we can customize it at any level as per our requirement.
Steps
Let’s open BIDS and create a project under Report Server Project as shown in the below
image
Now right click on the Report on the right hand side and select Add New item à Report as
shown in the below screen
11. Now you will see the report designer window as shown in the below screen.
Here we have 3 tabs as Data, Layout and Preview. Data tab is used to select which data
should we need to show in the report. Clicking on the Datasetà New Dataset as shown in the
below screen will help us to select the data source
12. Now we can write out own query in order to fetch the details which we can show in the
reports as shown in the below screen
13. Now we can shift to the next tab which is LAYOUT tab, where we are going to design the
report based on our requirement. Drag and drop the table control from the tool box to the
layout screen then your screen should look similar to the one below
Now go back to the Dataset tool pane, and select the columns which should appear in which
part of the report as shown in the below screen
14. We can change the properties of the table report structure by pressing F4 will open the
properties tab. You can see the below screen for the different options available to format or
customize your report.
Now press F5 to run the application. It will ask for the Login credentials as shown below.
Once we give the credentials it will fetch the report
15. Without running the project itself we can check the result by clicking on the 3rd tab in the
project which is nothing but the Preview tab as shown in the below screen
Conclusion
In this article we have seen on how to create a report in BIDS without using the Wizard and
how to customize the report based on our requirement.