
Recommended
More Related Content
What's hot
What's hot (19)
Similar to RSS Tutorial
Similar to RSS Tutorial (20)
More from PuttiApps
More from PuttiApps (18)
Recently uploaded
Recently uploaded (20)
RSS Tutorial
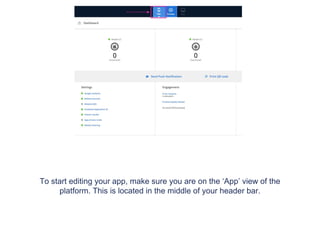
- 1. To start editing your app, make sure you are on the ‘App’ view of the platform. This is located in the middle of your header bar.
- 2. Go to the ‘features’ tab on the navigation panel to start customising out your content.
- 3. Once the ‘Features’ tab has been selected the app panel will appear with a list of the features that are already applied to your app. On the top right of the panel there is a ‘Manage’ button, click this to access the features menu where you can pick and choose which features you would like on your app.
- 4. Select the ‘RSS’ feature. ‘Add’ the feature and then move it to where you would like it to be placed on your app panel. Press ’Close' once you’ve finished.
- 5. Select the ‘RSS’ tab now located on your app panel.
- 6. For a detailed description of what the ‘RSS’ feature does hover over the question mark button
- 7. Click the customise button to change the name or the icon of your RSS feature.
- 8. To chose an icon or to upload your own custom icon press the ‘Browse’ button.
- 9. Choose an icon from the list provided, or to upload your own icon press the ‘Upload custom icon’ tab.
- 10. To upload your custom icon drag and drop your 60 x 60 pixel image into the blue area, or press browse to find your icon manually. Press set when you have chosen your icon.
- 11. Press ‘Save’ once you have finished customising your features name and icon.
- 12. Click on ‘Add’ to enter in you RSS links
- 13. Fill in the caption and the URL of the website you would like your RSS feed to link to
- 14. Choose an icon, you can use the default, select from the preset list or upload your own icon. If you select to upload an icon choose an PNG/JPG 48x48 pixels
- 15. Click ‘Save’ once you’ve finished filling in your content
- 16. Press ‘Add’ if you would like to add more links and repeat the previous steps
- 17. Each entry will have an ‘Edit’ and ‘Delete’ button on the right, so you can make changes to each link or delete them when no longer required
- 18. Preview App To view your new app feature download the Putti Preview App and navigate to your RSS tab.
- 19. Once you are in the RSS you will be able to see all the feeds you have linked
- 20. Tap the arrow on the right of each article to go into the detailed page
- 21. The arrow on the top, will allow you access to filter the articles by categories