1. Making Your Own Passport Photos - Tutorials
You are not logged in. (log in or register)
Home Challenges Community Photos Equipment Learn DPCPrints Help
This Tutorial Tutorials :: Making Your Own Passport Photos
Tutorial Viewed: 32768 times
Discussion: Click Here
Rate This Tutorial!
2.500 Log in to rate this!
q Tutorials Home
0 = Not Helpful up to 3 = Very Helpful. NR = No Rating.
Questions? Feedback? Join the Discussion on this
Tutorial
Making Your Own Passport Photos
by Trinch
This tutorial will show you how to take, format, and prepare your own passport photos. Rather than repeating what is already provided, please see the
guidelines provided by the US Department of State. These will provide you with information regarding proper lighting, exposure, composition, and size. If
you live in another country, please check for guidelines at your passport issuing authority as they will likely differ. For example, in Canada the final size
can be as large as 70mm by 50mm, however, it appears as though they require a photo from a professional although that is not absolutely clear. Enough
of this, let's get one with the process as it pertains to US requirements.
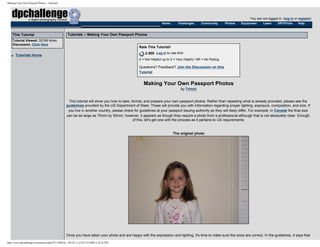
The original photo
Once you have taken your photo and are happy with the expression and lighting, it's time to make sure the sizes are correct. In the guidelines, it says that
http://www.dpchallenge.com/tutorial.php?TUTORIAL_ID=22 (1 of 8)7/23/2006 3:24:22 PM
2. Making Your Own Passport Photos - Tutorials
the trimmed photo must measure 2 inches by 2 inches and the distance from the chin to the top of the hair must be between 1 inch and 1 3/8 inch. So the
first thing to do is to measure the distance between the chin and the top of the head. This is done with the measuring tool.
Select the Measure Tool
We're going to use Photoshop's Measure Tool to measure the distance of interest. The measure tool is hidden under the eye dropper. Click-and-hold on
the eye dropper to reveal a pop-out menu and select the ruler at the bottom. Or, press Shift+I on your keyboard to cycle through the icons until the
measure icon ruler appears.
Measure the distance from the chin to the top of the head
http://www.dpchallenge.com/tutorial.php?TUTORIAL_ID=22 (2 of 8)7/23/2006 3:24:22 PM
3. Making Your Own Passport Photos - Tutorials
Using the Measure Tool, draw a line from the chin to the top of the head. (HINT: Holding the shift key while dragging the line will force it to either vertical
or horizontal) In the title bar, you will notice three values. The angle "A", the vertical distance "D1", and the horizontal distance "D2". We are interested in
the vertical distance which, in this case, is 582 pixels. Now it's time for some math. The distance should be between 1 and 1-3/8 inch, I will use 1.1
inches. Now divide the 582 pixels by 1.1 inches to determine you DPI. In this case, we get 529 DPI (I'll use 530 for simplicity). Since the final photo will be
2"x2", the size of the image will be 1060 pixels by 1060 pixels. (TIP: Many commercial printers will actually increase the size of you picture slightly so that
the image bleeds to the edge of the print. If you set the distance to 1-3/8 inch you risk going over the allowed size when printing.)
Cropping to the right size
http://www.dpchallenge.com/tutorial.php?TUTORIAL_ID=22 (3 of 8)7/23/2006 3:24:22 PM
4. Making Your Own Passport Photos - Tutorials
Choose the marquee select tool from the toolbar. Once the tool is selected, you will see a drop down menu in the title bar allowing you to select a style.
Select the Fixed Size option and set the width and height options to 1060 pixels by 1060 pixels (use the values you calculated in the previous step). Then
position the box so that the subject's nose is in the center. This will ensure that the eyes are within 1-1/8 to 1-3/8 inches from the bottom. Once the
square is positioned, hit CTRL-C to copy the image.
Creating a 4x6 template
http://www.dpchallenge.com/tutorial.php?TUTORIAL_ID=22 (4 of 8)7/23/2006 3:24:22 PM
5. Making Your Own Passport Photos - Tutorials
In the File menu, select New and set the Preset Size to 4x6 and the Resolution to 530 DPI (use your value), then click OK. This will open a new
document with the correct aspect ratio to print a 4x6 and the correct resolution to ensure the photos will be the correct size.
Paste your passport photos to the template
http://www.dpchallenge.com/tutorial.php?TUTORIAL_ID=22 (5 of 8)7/23/2006 3:24:22 PM
6. Making Your Own Passport Photos - Tutorials
Hit CTRL-V (or select paste from the top menu) to place the photo onto the template. Move the photo to the top. Repeat for the second photo and move it
to the bottom. As I mentioned before, commercial printing services may slightly resize your image so make sure the images are not on the edge. You
may loose part of it. You are now ready to save the file and sent it to the printer.
The final product
http://www.dpchallenge.com/tutorial.php?TUTORIAL_ID=22 (6 of 8)7/23/2006 3:24:22 PM
7. Making Your Own Passport Photos - Tutorials
Once you get the photo printed use a trimmer to cut the images to 2"x2" and submit them with your passport application. I printed mine on a Kodak
Instant print machine, but if you have a good enough photo printer at home, you could probably use that. Check the State Department website for digital
printing information.
Good luck and happy travels
Rate This Tutorial!
2.500 Log in to rate this!
0 = Not Helpful up to 3 = Very Helpful. NR = No Rating.
Questions? Feedback? Join the Discussion on this
Tutorial
http://www.dpchallenge.com/tutorial.php?TUTORIAL_ID=22 (7 of 8)7/23/2006 3:24:22 PM