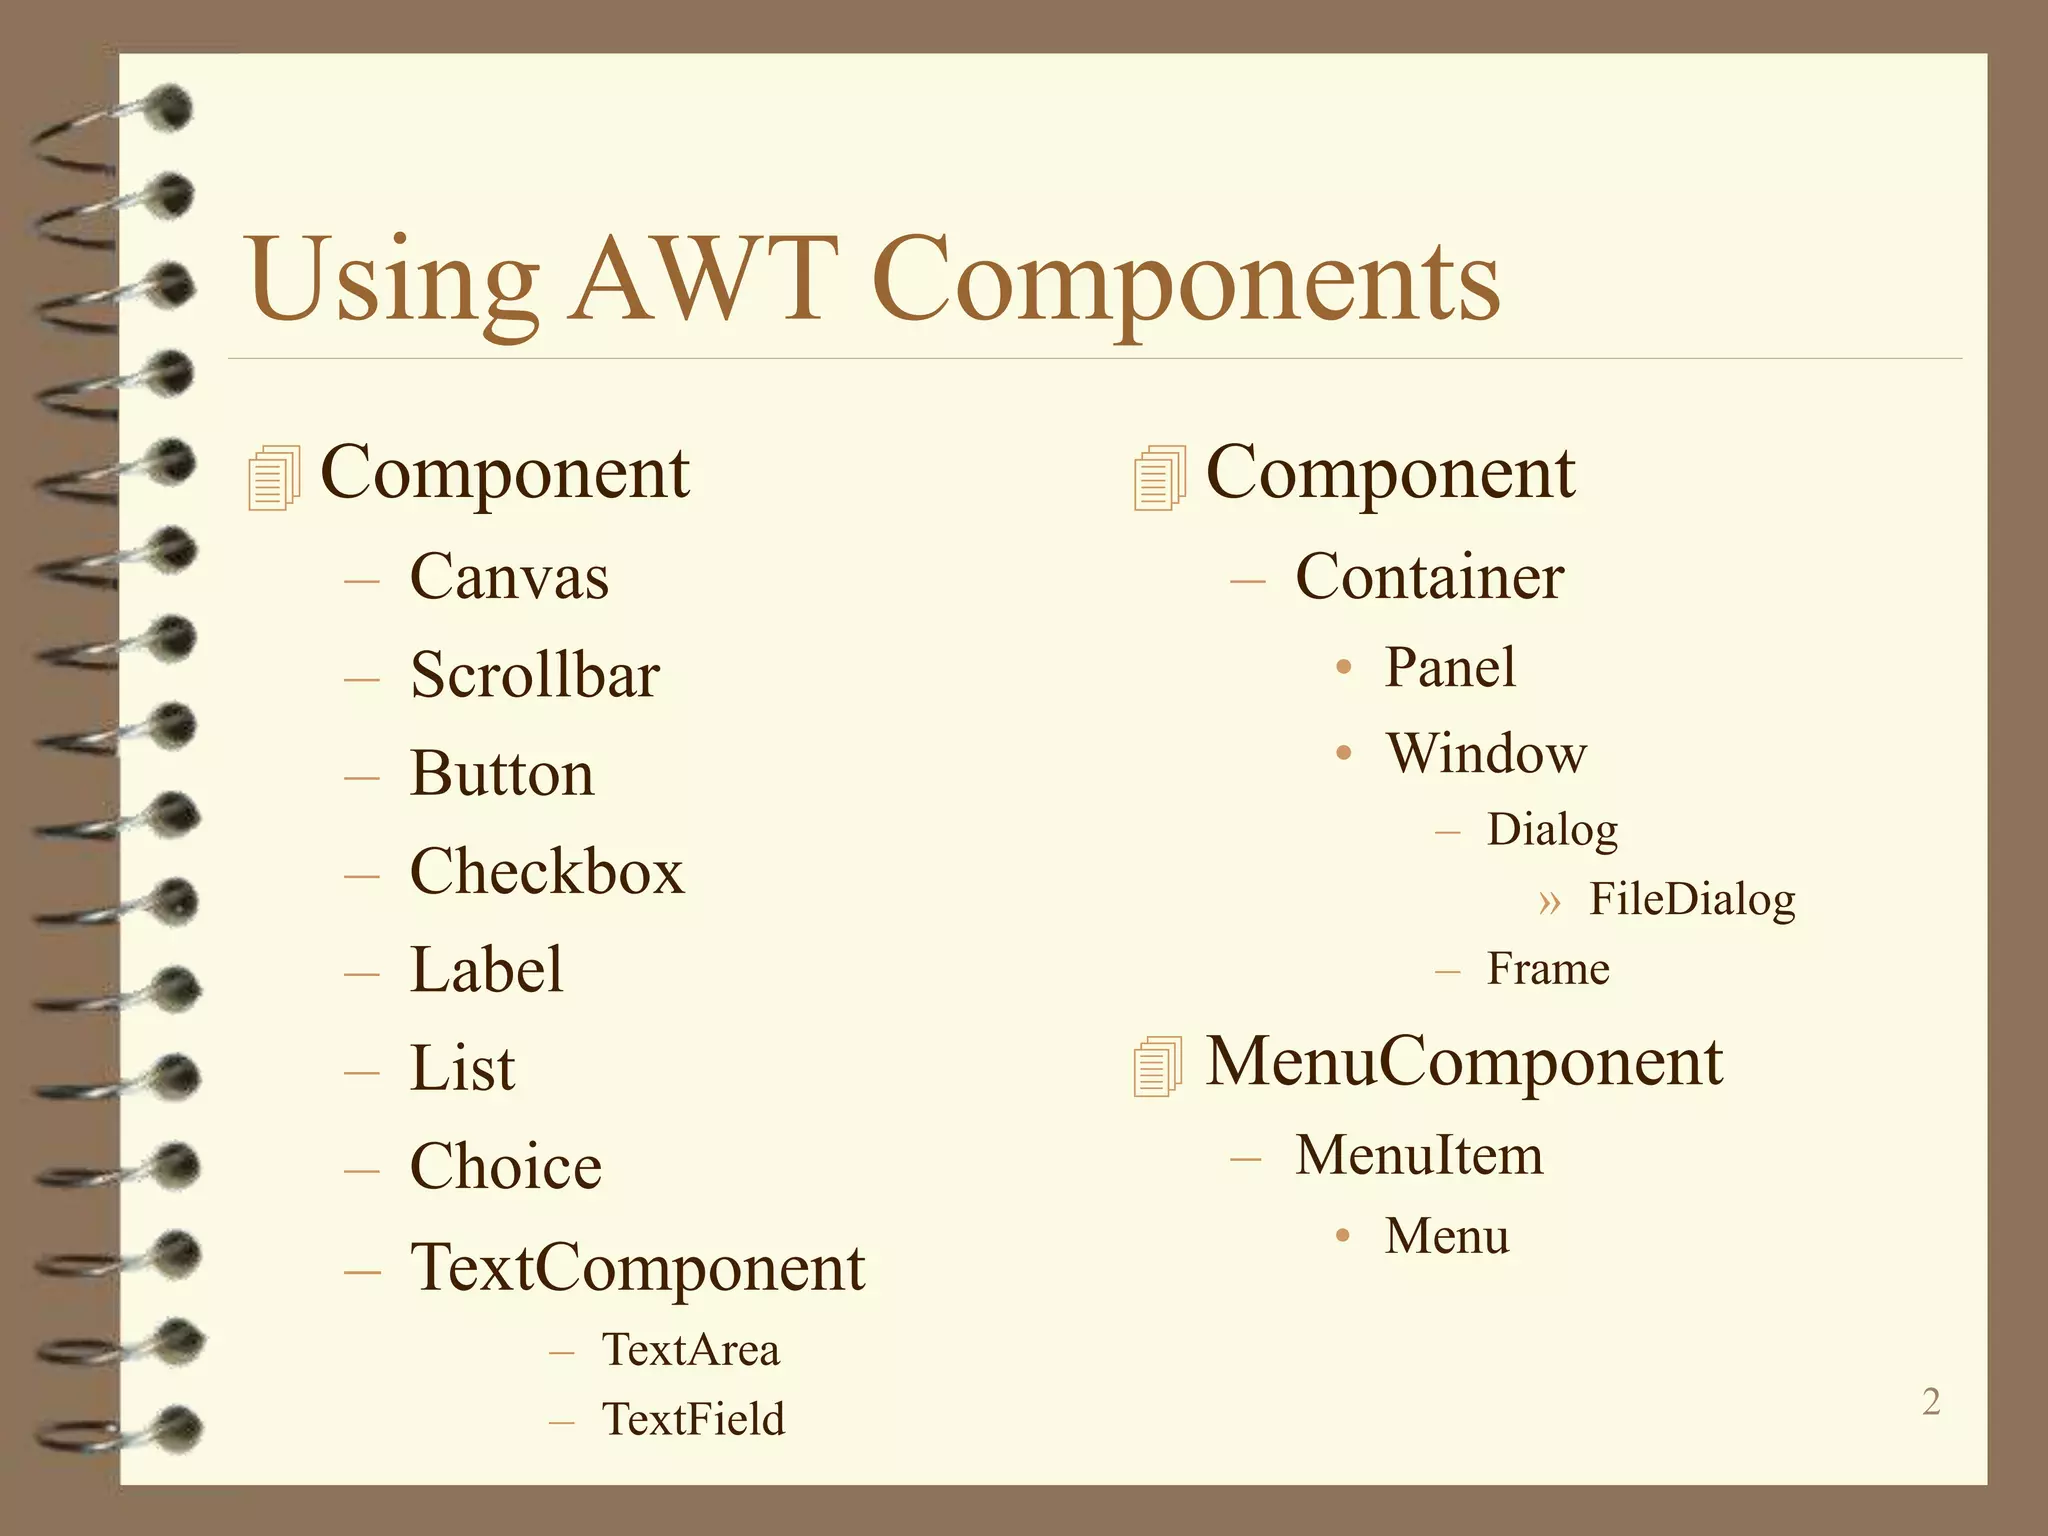
AWT Components
2
Using AWT Components
 Component
– Canvas
– Scrollbar
– Button
– Checkbox
– Label
– List
– Choice
– TextComponent
– TextArea
– TextField
 Component
– Container
• Panel
• Window
– Dialog
» FileDialog
– Frame
 MenuComponent
– MenuItem
• Menu
Frame
import java.awt.*;
public class TestFrame extends Frame {
public TestFrame(String title){
super(title);
}
public static void main(String[] args){
Frame f = new TestFrame("TestFrame");
f.setSize(400,400);
f.setLocation(100,100);
f.show();
}
}
5
How to Use Buttons?
public class TestButton extends Frame {
public TestButton(String title){
super(title);
Button hw = new Button("Hello World!");
add(hw);
}
….
}
How to Use Labels?
public class TestLabel extends Frame {
public TestLabel(String title){
super(title);
Label label1 = new Label();
label1.setText("Label1");
Label label2 = new Label("Label2");
label2.setAlignment(Label.CENTER);
Label label3 = new Label("Label3");
add(label1,"North");
add(label2,"Center");
add(label3,"South");
}
}
7
How to Use Checkboxes?
public class TestCheckbox extends Frame {
public TestCheckbox(String title){
super(title);
CheckboxGroup cbg = new CheckboxGroup();
Checkbox cb1 = new Checkbox("American Express",cbg,false);
Checkbox cb2 = new Checkbox("Visa",cbg,false);
Checkbox cb3 = new Checkbox("Mastercard",cbg,true);
add(cb1,"North");
add(cb2,"Center");
add(cb3,"South");
}
…
}
8
How to Use Choices?
public class TestChoice extends Frame {
public TestChoice(String title){
super(title);
Choice choice = new Choice();
choice.add("ichi");
choice.add("ni");
choice.add("san");
add(choice);
}
How to Use TextField &
TextArea
public class TestText extends Frame {
public TestText(String title){
super(title);
TextField textField = new TextField(20);
TextArea textArea = new TextArea(5, 20);
textArea.setEditable(false);
textField.setText("TextField");
textArea.setText("TextArea Line1 n TextArea Line2");
add(textField,"North");
add(textArea,"South");
}
…
}
10
How to Use Lists?
public class TestList extends Frame {
public TestList(String title){
super(title);
List l = new List(2, true); //prefer 2 items visible
l.add("zero");
l.add("uno");
l.add("dos");
l.add("tres");
l.add("cuatro");
l.add("cinco");
l.add("seis");
l.add("siete");
l.add("ocho");
l.add("nueve");
add(l);
}
11
How to Use Menus?
public class TestMenu extends Frame {
public TestMenu(String title){
super(title);
MenuBar mb = new MenuBar();
setMenuBar(mb);
Menu m1 = new Menu("Menu 1"); mb.add(m1);
MenuItem mi1_1 = new MenuItem("Menu Item 1_1"); m1.add(mi1_1);
m1.addSeparator();
MenuItem mi1_2 = new MenuItem("Menu Item 1_2"); m1.add(mi1_2);
Menu m2 = new Menu("Menu 2"); // mb.add(m2);
m1.add(m2);
MenuItem mi2_1 = new CheckboxMenuItem("Menu Item 2_1");
m2.add(mi2_1);
}
…
12
How to Use Canvases and
Graphics Primitives?
For drawing geometric shapes, texts, and
images
An abstract class
– the extended class must override paint()
Oval
Rectangle
Arc
Line
RoundRectangle
Polygon
13
drawLine(x1,y1,x2,y2)
class MyCanvas extends Canvas {
public void paint(Graphics g){
g.setColor(Color.blue);
int x1 = 161,
y1 = 186,
x2 = 181,
y2 = 206;
g.drawLine(x1,y1,x2,y2);
}
(x1,y1)
(x2,y2)
14
fillOval(x,y,w,h)
drawOval(x,y,w,h)
g.setColor(Color.blue);
{
int x = 239,
y = 186,
w = 48,
h = 32;
g.fillOval(x,y,w,h);
}
fillPolygon(int[] xs, int[] ys)
drawPolygon(int[] xs, int[] ys)
g.setColor(Color.green);
{
int xs[] = {161,161,185,209,185,161};
int ys[] = {310,334,358,334,310,310};
g.fillPolygon(xs,ys,6);
}
fillRect(x,y,w,h)
drawRect(x,y,w,h)
g.setColor(Color.pink);
{
int x = 239,
y = 248,
w = 48,
h = 32;
g.fillRect(x,y,w,h);
}
fillRoundRect(x,y,w,h,rw,rh)
drawRoundRect(x,y,w,h,rw,rh)
g.setColor(Color.yellow);
{
int x = 161,
y = 248,
w = 48,
h = 32,
roundW = 25,
roundH = 25;
g.fillRoundRect(x,y,w,h,roundW,roundH);
}
fillArc(x,y,w,h,sa,a)
drawArc(x,y,w,h,sa,a)
g.setColor(Color.orange);
{
int x = 239,
y = 310,
w = 48,
h = 48,
startAngle = 20,
angle = 90;
g.fillArc(x,y,w,h,startAngle,angle);
}
drawString(s,x,y)
FontMetrics
(x,y)
drawString, Font, & FontMetrics
class MyCanvas extends Canvas {
public void paint(Graphics g){
g.setFont(new Font("Dialog",0,20));
FontMetrics fm = g.getFontMetrics();
int x = 100;
int y = 100;
g.drawString("Hello",x,y);
y = y+fm.getHeight();
g.drawString("World",x,y);
}
}
drawImage(image,x,y,w,h,ob)
Image im = Toolkit.getDefaultToolkit().getImage(name);
g.drawImage(im, x, y, w, h, observer);
drawImage
public class TestImage extends Frame {
Image im;
public TestImage(String title){
super(title);
im = Toolkit.getDefaultToolkit().getImage("jp2.jpg");
if (im==null){
System.out.println("No image");
System.exit(0);
}
}
public void paint(Graphics g){
g.drawImage(im,0,0,im.getHeight(this),im.getWidth(this),this);
}
…
}
Layout of Components
 BorderLayout
– north, south, west, east
& center
 FlowLayout
– left to right & top
down
 CardLayout
– stack of panels
 GridLayout
– tabular form (rows &
columns)
 GridBagLayout
– tabular form(variable
row heights and
column widths)
Use Layout Managers
Default layout managers
– Windows (Frames & Dialogs)
• BorderLayout
– Panels (Applets)
• FlowLayout
setLayout(new BorderLayout());
setLayout(new CardLayout(());
setLayout(new FlowLayout());
setLayout(new GridLayout(rows,columns,xgap,ygap));
How to Use BorderLayout?
import java.awt.*;
public class TestBorderLayout {
public static void main(String[] args){
Frame f = new Frame("TestBorderLayout");
f.setSize(200,200);
f.add("North", new Button("North"));
f.add("South", new Button("South"));
f.add("East", new Button("East"));
f.add("West", new Button("West"));
f.add("Center", new Button("Center"));
f.setVisible(true);
}
How to Use FlowLayout?
import java.awt.*;
public class TestFlowLayout {
public static void main(String[] args){
Frame f = new Frame("TestFlowLayout");
f.setSize(200,200);
f.setLayout(new FlowLayout());
f.add(new Button("Button 1"));
f.add(new Button("Button 2"));
f.add(new Button("Button 3"));
f.add(new Button("Button 4"));
f.add(new Button("Button 5"));
f.setVisible(true);
How to Use CardLayout?
import java.awt.*;
public class TestCardLayout {
public static void main(String[] args){
Frame f = new Frame("TestCard Layout");
f.setSize(200,200);
f.setLayout(new CardLayout());
f.add("GraphicsPanel",new GraphicsPanel());
f.add("LabelPanel",new LabelPanel());
f.add("ButtonPanel",new ButtonPanel());
f.setVisible(true);
}
}
How to Use GridLayout?
import java.awt.*;
public class TestGridLayout {
public static void main(String[] args){
Frame f = new Frame("TestGridLayout");
f.setSize(200,200);
f.setLayout(new GridLayout(2,3));
f.add(new Button("Button 1"));
f.add(new Button("Button 2"));
f.add(new Button("Button 3"));
f.add(new Button("Button 4"));
f.add(new Button("Button 5"));
f.setVisible(true);
}

Awt components

  • 1.
  • 2.
    2 Using AWT Components Component – Canvas – Scrollbar – Button – Checkbox – Label – List – Choice – TextComponent – TextArea – TextField  Component – Container • Panel • Window – Dialog » FileDialog – Frame  MenuComponent – MenuItem • Menu
  • 4.
    Frame import java.awt.*; public classTestFrame extends Frame { public TestFrame(String title){ super(title); } public static void main(String[] args){ Frame f = new TestFrame("TestFrame"); f.setSize(400,400); f.setLocation(100,100); f.show(); } }
  • 5.
    5 How to UseButtons? public class TestButton extends Frame { public TestButton(String title){ super(title); Button hw = new Button("Hello World!"); add(hw); } …. }
  • 6.
    How to UseLabels? public class TestLabel extends Frame { public TestLabel(String title){ super(title); Label label1 = new Label(); label1.setText("Label1"); Label label2 = new Label("Label2"); label2.setAlignment(Label.CENTER); Label label3 = new Label("Label3"); add(label1,"North"); add(label2,"Center"); add(label3,"South"); } }
  • 7.
    7 How to UseCheckboxes? public class TestCheckbox extends Frame { public TestCheckbox(String title){ super(title); CheckboxGroup cbg = new CheckboxGroup(); Checkbox cb1 = new Checkbox("American Express",cbg,false); Checkbox cb2 = new Checkbox("Visa",cbg,false); Checkbox cb3 = new Checkbox("Mastercard",cbg,true); add(cb1,"North"); add(cb2,"Center"); add(cb3,"South"); } … }
  • 8.
    8 How to UseChoices? public class TestChoice extends Frame { public TestChoice(String title){ super(title); Choice choice = new Choice(); choice.add("ichi"); choice.add("ni"); choice.add("san"); add(choice); }
  • 9.
    How to UseTextField & TextArea public class TestText extends Frame { public TestText(String title){ super(title); TextField textField = new TextField(20); TextArea textArea = new TextArea(5, 20); textArea.setEditable(false); textField.setText("TextField"); textArea.setText("TextArea Line1 n TextArea Line2"); add(textField,"North"); add(textArea,"South"); } … }
  • 10.
    10 How to UseLists? public class TestList extends Frame { public TestList(String title){ super(title); List l = new List(2, true); //prefer 2 items visible l.add("zero"); l.add("uno"); l.add("dos"); l.add("tres"); l.add("cuatro"); l.add("cinco"); l.add("seis"); l.add("siete"); l.add("ocho"); l.add("nueve"); add(l); }
  • 11.
    11 How to UseMenus? public class TestMenu extends Frame { public TestMenu(String title){ super(title); MenuBar mb = new MenuBar(); setMenuBar(mb); Menu m1 = new Menu("Menu 1"); mb.add(m1); MenuItem mi1_1 = new MenuItem("Menu Item 1_1"); m1.add(mi1_1); m1.addSeparator(); MenuItem mi1_2 = new MenuItem("Menu Item 1_2"); m1.add(mi1_2); Menu m2 = new Menu("Menu 2"); // mb.add(m2); m1.add(m2); MenuItem mi2_1 = new CheckboxMenuItem("Menu Item 2_1"); m2.add(mi2_1); } …
  • 12.
    12 How to UseCanvases and Graphics Primitives? For drawing geometric shapes, texts, and images An abstract class – the extended class must override paint() Oval Rectangle Arc Line RoundRectangle Polygon
  • 13.
    13 drawLine(x1,y1,x2,y2) class MyCanvas extendsCanvas { public void paint(Graphics g){ g.setColor(Color.blue); int x1 = 161, y1 = 186, x2 = 181, y2 = 206; g.drawLine(x1,y1,x2,y2); } (x1,y1) (x2,y2)
  • 14.
    14 fillOval(x,y,w,h) drawOval(x,y,w,h) g.setColor(Color.blue); { int x =239, y = 186, w = 48, h = 32; g.fillOval(x,y,w,h); }
  • 15.
    fillPolygon(int[] xs, int[]ys) drawPolygon(int[] xs, int[] ys) g.setColor(Color.green); { int xs[] = {161,161,185,209,185,161}; int ys[] = {310,334,358,334,310,310}; g.fillPolygon(xs,ys,6); }
  • 16.
    fillRect(x,y,w,h) drawRect(x,y,w,h) g.setColor(Color.pink); { int x =239, y = 248, w = 48, h = 32; g.fillRect(x,y,w,h); }
  • 17.
    fillRoundRect(x,y,w,h,rw,rh) drawRoundRect(x,y,w,h,rw,rh) g.setColor(Color.yellow); { int x =161, y = 248, w = 48, h = 32, roundW = 25, roundH = 25; g.fillRoundRect(x,y,w,h,roundW,roundH); }
  • 18.
    fillArc(x,y,w,h,sa,a) drawArc(x,y,w,h,sa,a) g.setColor(Color.orange); { int x =239, y = 310, w = 48, h = 48, startAngle = 20, angle = 90; g.fillArc(x,y,w,h,startAngle,angle); }
  • 19.
  • 20.
    drawString, Font, &FontMetrics class MyCanvas extends Canvas { public void paint(Graphics g){ g.setFont(new Font("Dialog",0,20)); FontMetrics fm = g.getFontMetrics(); int x = 100; int y = 100; g.drawString("Hello",x,y); y = y+fm.getHeight(); g.drawString("World",x,y); } }
  • 21.
    drawImage(image,x,y,w,h,ob) Image im =Toolkit.getDefaultToolkit().getImage(name); g.drawImage(im, x, y, w, h, observer);
  • 22.
    drawImage public class TestImageextends Frame { Image im; public TestImage(String title){ super(title); im = Toolkit.getDefaultToolkit().getImage("jp2.jpg"); if (im==null){ System.out.println("No image"); System.exit(0); } } public void paint(Graphics g){ g.drawImage(im,0,0,im.getHeight(this),im.getWidth(this),this); } … }
  • 23.
    Layout of Components BorderLayout – north, south, west, east & center  FlowLayout – left to right & top down  CardLayout – stack of panels  GridLayout – tabular form (rows & columns)  GridBagLayout – tabular form(variable row heights and column widths)
  • 24.
    Use Layout Managers Defaultlayout managers – Windows (Frames & Dialogs) • BorderLayout – Panels (Applets) • FlowLayout setLayout(new BorderLayout()); setLayout(new CardLayout(()); setLayout(new FlowLayout()); setLayout(new GridLayout(rows,columns,xgap,ygap));
  • 25.
    How to UseBorderLayout? import java.awt.*; public class TestBorderLayout { public static void main(String[] args){ Frame f = new Frame("TestBorderLayout"); f.setSize(200,200); f.add("North", new Button("North")); f.add("South", new Button("South")); f.add("East", new Button("East")); f.add("West", new Button("West")); f.add("Center", new Button("Center")); f.setVisible(true); }
  • 26.
    How to UseFlowLayout? import java.awt.*; public class TestFlowLayout { public static void main(String[] args){ Frame f = new Frame("TestFlowLayout"); f.setSize(200,200); f.setLayout(new FlowLayout()); f.add(new Button("Button 1")); f.add(new Button("Button 2")); f.add(new Button("Button 3")); f.add(new Button("Button 4")); f.add(new Button("Button 5")); f.setVisible(true);
  • 27.
    How to UseCardLayout? import java.awt.*; public class TestCardLayout { public static void main(String[] args){ Frame f = new Frame("TestCard Layout"); f.setSize(200,200); f.setLayout(new CardLayout()); f.add("GraphicsPanel",new GraphicsPanel()); f.add("LabelPanel",new LabelPanel()); f.add("ButtonPanel",new ButtonPanel()); f.setVisible(true); } }
  • 28.
    How to UseGridLayout? import java.awt.*; public class TestGridLayout { public static void main(String[] args){ Frame f = new Frame("TestGridLayout"); f.setSize(200,200); f.setLayout(new GridLayout(2,3)); f.add(new Button("Button 1")); f.add(new Button("Button 2")); f.add(new Button("Button 3")); f.add(new Button("Button 4")); f.add(new Button("Button 5")); f.setVisible(true); }