Jointing & Pointing
•Download as DOC, PDF•
1 like•2,691 views

Introduction to jointing and pointing for Construction students, building technology students , bricklaying

Recommended
More Related Content
What's hot
What's hot (20)
Similar to Jointing & Pointing
Similar to Jointing & Pointing (20)
More from Steve Jarvis
More from Steve Jarvis (16)
Recently uploaded
Recently uploaded (20)
Jointing & Pointing
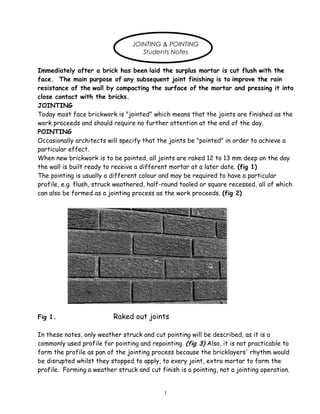
- 1. JOINTING & POINTING Students Notes Immediately after a brick has been laid the surplus mortar is cut flush with the face. The main purpose of any subsequent joint finishing is to improve the rain resistance of the wall by compacting the surface of the mortar and pressing it into close contact with the bricks. JOINTING Today most face brickwork is "jointed" which means that the joints are finished as the work proceeds and should require no further attention at the end of the day. POINTING Occasionally architects will specify that the joints be "pointed" in order to achieve a particular effect. When new brickwork is to be pointed, all joints are raked 12 to 13 mm deep on the day the wall is built ready to receive a different mortar at a later date. (fig 1) The pointing is usually a different colour and may be required to have a particular profile, e.g. flush, struck weathered, half-round tooled or square recessed, all of which can also be formed as a jointing process as the work proceeds. (fig 2) Fig 1. Raked out joints In these notes, only weather struck and cut pointing will be described, as it is a commonly used profile for pointing and repointing. (fig 3) Also, it is not practicable to form the profile as pan of the jointing process because the bricklayers' rhythm would be disrupted whilst they stopped to apply, to every joint, extra mortar to form the profile. Forming a weather struck and cut finish is a pointing, not a jointing operation. 1
- 2. Fig 3. Weather struck and cut pointing Fig 2. Typical joint profiles TOOLS Pointing trowels with blades 50, 75, 1 00 and 150 mm long are used with a hand held hawk. The shortest trowel is known as a "dotter". (fig 4) Fig 4. 50,75,100 & 150mm trowels 2
- 3. THE PROCESS Pointing is seldom popular with bricklayers, for being a static operation and requiring patience, care and attention it can be a cold job during the winter. Specialist pointing gangs are usually engaged for large areas of walling. Careless pointing can spoil good brickwork and conversely, good pointing can considerably improve "questionable" facework. Before pointing begins, loose debris should be removed from the joints with a dry brush and the work "wetted down" to a damp condition. Wetting down reduces the amount of water sucked from the pointing mortar by the existing brickwork which if too great would prevent complete hydration resulting in a weak crumbly mortar. Fig 5. Cross Joint CROSS JOINTS Cross joints are filled first. The pointing mortar should be firmly pressed home and compacted with the inset on the left-hand side and the "cut" on the right-hand side so that every joint looks the same width (fig 5) Both left and right-handed bricklayers must inset on the left and cut on the right to prevent the completed wall face having a patchy appearance. (fig 6) The inset and cut projection must not be exaggerated. in both cases 1mm is enough. When the cross joints are completed over about 1 m² of wall surface, the top and bottom "tails" of mortar should be pressed away. Fig 6. Cutting a cross joint Fig 7 Filling a bed joint 3
- 4. BED JOINTS A trowel with a longer blade is used to apply the mortar to bed joints. Press the pointing mortar firmly into the joints, insetting just 1 mm at the top and "cut projecting" the lower edge by the same amount. Sloping or "weathered" surfaces, by shedding rainwater more readily, are considered to provide better rain resistance than recessed or even flush joints. (fig 8) Bed joints are cut using a pointing rule. It is important to cut the mortar bed joints so that they all appear to be the same width. Fig 8. A pointing rule and trowel in use TIMING Neither cross joints nor bed joints should be cut until the mortar has stiffened a little. This will ensure a clean cut. The absorption of the bricks and weather conditions will determine the timing. Bricks with a high absorption will allow cutting to be carried out sooner than bricks of low absorption. Similarly, cutting can be carried out sooner in warm drying weather than in cold damp weather. Pointing should not be carried out if frost is likely or after a long period of frost if the bricks are still frozen. EXTERNAL ANGLES Bed joints should be neatly formed at corners and reveals (fig 9 ) External angles at Corners and reveals Fig 9 4
- 5. BRUSHING At the end of the day a light bristle brush may be used to remove any crumbs of excess mortar left after cutting the joints. Great care should be taken to avoid making brush marks in the soft mortar. it may be advisable to leave brushing the pointing which has been completed late in the day, until the following morning. (fig 10) Fig 10 The result of brushing joints too soon. REPOINTING Before old brickwork is repainted the cause of the deterioration should have been established. It is usually the result of slow erosion over many years but if it is due to, say, sulphate attack on the mortar the cause should be remedied first. The sequence of operations for repointing old brickwork is virtually the same as for new walling, except that the joints which may be heavily weathered or perished must be cut out first using a hammer, bolster and "timber dog" with care in order to cause minimal damage to the bricks. It is essential that the recess so formed be left square. The brick edges should be absolutely free of old mortar so that the new mortar (fig 11) can bond effectively with the bricks. The recess should be no less than 10 mm and no more than 15mm deep. if it is too shallow the mortar may not have a sufficient bond with the bricks and if it is too deep it may be difficult to force the mortar in for the full depth. At the same time lichen and moss should be removed by careful brushing so as not to damage the bricks. The brickwork should then be dampened, not soaked, and work should proceed as described for pointing new brickwork. 5
- 6. MORTAR MIXES Pointing mortars should be "fatty" and cling to the trowel. This can be achieved by the addition of lime which improves the cohesiveness of mortar, its bond with the bricks and the rain resistance of the brickwork. Under normal conditions of exposure a 1:1:6 cement:lime:sand will be specified as appropriate. With calcium silicate bricks a 1:2:9 mix may be required. With very dense bricks only and in situations of extreme exposure the mortar may be 1:1/4:3. In general the mortar should be no stronger than that used in the construction of the wall Fig 11. Recessing joints for pointing MORTAR BATCHNG whether the cement, lime and sand are all mixed on site or cement is added to premixed lime:sand, careful measurement for every batch is essential if mortar colour variations and patchy brickwork are to be avoided. It is virtually impossible to achieve satisfactory results if measurement or gauging is done by the shovelful. Consistent results are also difficult if pigments are added on site. The use of premixed lime:sand for mortars is the only practicable way of producing coloured mortars. 6
- 7. Key Points: The main purpose of any joint finishing is to improve the wall’s resistance to rain or to the ingress of water through the joint as well as to enhance the appearance of the wall. • Today most brickwork is ‘jointed’ which means that the joints are finished as the work proceeds and should require no further attention. • ‘Pointing’ is a term used to describe the process of finishing off joints that were raked out on the day that the brickwork was built. It is carried out after the brickwork is complete. • Jointing-up brickwork is a critical part of building facework and it should not be hurried. • One of the most important aspects of jointing up brickwork is to avoid smudging or staining the surface of the bricks. • Timing is probably the most important aspect of jointing up. • The shape of brickwork joints is often done to match existing brickwork and very often the client or the architect will specify that the joints be finished in a particular way in order to achieve a particular effect of the finished brickwork. • There are four common shapes of brickwork joints: flush, raked, half-round and weathered. • Care should be taken when finishing mortar joints, otherwise the finished brickwork will look untidy. • When finishing joints on internal angles, the joints must be formed in such a way as to emphasise the bonding or tie bricks. • When filling in the joints, the cross joints are filled in first. • A bed joint is a horizontal joint within a wall. • ‘Struck’ refers to mortar in pointing work being pressed inwards with the edge of a trowel. • ‘Weathering’ refers to a slightly sloping surface arranged to throw off rain water. • Careless or bad pointing can spoil good brickwork and good pointing can improve poor brickwork. • The absorption of water from the mortar into the surrounding brickwork, plus the weather conditions, will determine when the joints should be cut. • No bed joints or cross joints should be cut until the mortar has slightly stiffened. This ensures that a clean cut can be made. • At the end of the day, or at the completion of the pointing, the surface of the brickwork can be lightly brushed with a light bristle brush to remove excess mortar or any crumbs that may be left after cutting the joints. • Repointing refers to pointing old or established brickwork that has deteriorated. 7
- 8. STUDENT ACTIVITY Student …………………………………………. Identify the following joint finishes. 8 NAME NAME NAME NAME
- 9. Identify the following tools associated with jointing and pointing: 9 METHODS OF JOINTING AND POINTING 1. ………………………………………………… 2. ……………………………………………………. 3. ………………………………………………… 4. …………………………………………………….
- 10. 1. Explain the difference between pointing and jointing when applied to new build. 1. State THREE reasons for re-pointing an old house. a) b) c) 3. Explain the benefit of finishing brickwork with a weather joint as against a recessed joint. 10 METHODS OF JOINTING AND POINTING