Year 8 Lesson 1 HTML Introduction GCSE OCR Computer science
1.
Tuesday 1 April2025
UNIT
7.5
Year 8
Computing
Page
1
7.5 -
Coding in
7.5 - Coding in
HTML Weeks 1
2.
Tuesday 1 April2025
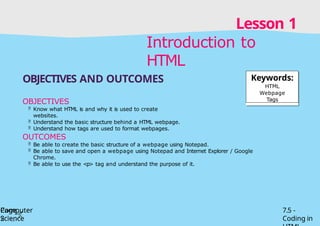
Lesson 1
Introduction to
HTML
Page
2
Computer
Science
7.5 -
Coding in
OBJECTIVES AND OUTCOMES
OBJECTIVES
Know what HTML is and why it is used to create
websites.
Understand the basic structure behind a HTML webpage.
Understand how tags are used to format webpages.
OUTCOMES
Be able to create the basic structure of a webpage using Notepad.
Be able to save and open a webpage using Notepad and Internet Explorer / Google
Chrome.
Be able to use the <p> tag and understand the purpose of it.
Keywords:
HTML
Webpage
Tags
3.
Tuesday 1 April2025
Starter
Research these definitions and write
them down on your whiteboard
• HTML
• Tags
• Elements
• Attributes
• Headings (h1, h2, h3, etc.)
• Links (a tag)
4.
Tuesday 1 April2025
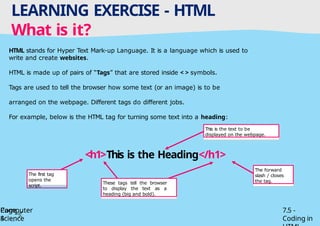
LEARNING EXERCISE - HTML
What is it?
Page
4
Computer
Science
7.5 -
Coding in
HTML stands for Hyper Text Mark-up Language. It is a language which is used to
write and create websites.
HTML is made up of pairs of “Tags” that are stored inside < > symbols.
Tags are used to tell the browser how some text (or an image) is to be
arranged on the webpage. Different tags do different jobs.
For example, below is the HTML tag for turning some text into a heading:
<h1>This is the Heading</h1>
The forward
slash / closes
the tag.
This is the text to be
displayed on the webpage.
These tags tell the browser
to display the text as a
heading (big and bold).
The first tag
opens the
script.
5.
Tuesday 1 April2025
COMPUTER TASK - Your first webpage
Task 1 - Open Notepad
Page
5
Computer
Science
7.5 -
Coding in
You can create a HTML website using many different software packages. We are going to use Notepad to create
our websites this term.
So, first of all, let’s open Notepad.
Select the Start button,
then click All
Programs
1
Select the Accessories
folder, at the top.
2 3
Finally, select Notepad.
An empty file will
open.
4
This is
Notepad.
6.
Tuesday 1 April2025
COMPUTER TASK - Your first webpage
Task 2 - Create the basic structure
Page
6
Computer
Science
7.5 -
Coding in
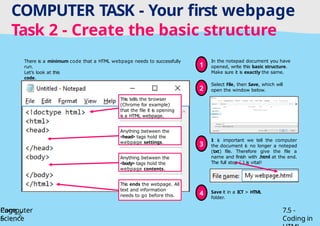
There is a minimum code that a HTML webpage needs to successfully
run.
Let’s look at this
code.
This tells the browser
(Chrome for example)
that the file it is opening
is a HTML webpage.
Anything between the
<head> tags hold the
webpage settings.
Anything between the
<body> tags hold the
webpage contents.
This ends the webpage. All
text and information
needs to go before this.
In the notepad document you have
opened, write this basic structure.
Make sure it is exactly the same.
1
Select File, then Save, which will
open the window below.
2
I
t i
s important we tell the computer
the document i
s no longer a notepad
(txt) file. Therefore give the file a
name and finish with .html at the end.
The full stop (.) is vital!
3
Save it in a ICT > HTML
folder.
4
7.
Tuesday 1 April2025
COMPUTER TASK - Your first webpage
Task 3 - Open the Webpage
You have now created the first part of your webpage by creating the basic structure. By saving it as a .html file, the
computer now knows to open it as a webpage.
7.5 -
Coding in
+
Don’t worry, this should be
empty as you haven’t yet
put anything inside the
<body> tags.
Another way is to use the
Windows key and the arrow keys.
Watch your teacher who
will
demonstrate this.
8.
Tuesday 1 April2025
COMPUTER TASK - Your first webpage
Task 4 - Oops, I’ve closed down the
code
Page
8
7.5 -
Coding in
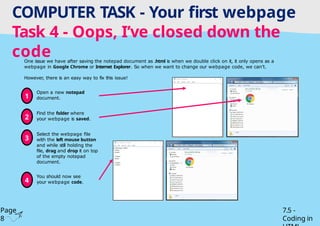
One issue we have after saving the notepad document as .html is when we double click on it, it only opens as a
webpage in Google Chrome or Internet Explorer. So when we want to change our webpage code, we can’t.
However, there is an easy way to fix this issue!
Open a new notepad
document.
1
Find the folder where
your webpage is saved.
2
Select the webpage file
with the left mouse button
and while still holding the
file, drag and drop it on top
of the empty notepad
document.
3
You should now see
your webpage code.
4
9.
Tuesday 1 April2025
COMPUTER TASK - Your first webpage
Task 5 - Time to use the <body>
7.5 -
Coding in
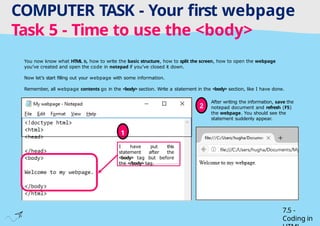
You now know what HTML is, how to write the basic structure, how to split the screen, how to open the webpage
you’ve created and open the code in notepad if you’ve closed it down.
Now let’s start filling out your webpage with some information.
Remember, all webpage contents go in the <body> section. Write a statement in the <body> section, like I have done.
I have put this
statement after the
<body> tag but before
the </body> tag.
1
After writing the information, save the
notepad document and refresh (F5)
the webpage. You should see the
statement suddenly appear.
2
10.
Tuesday 1 April2025
COMPUTER TASK - Your first webpage
Task 6 - Adding more to the <body>
7.5 -
Coding in
Let’s add a second line to the webpage. Remember to put it inside the <body> like we did for Task
5.
Save the notepad file (Ctrl + S) and refresh the webpage (F5).
Something strange has happened.
I created a new line in notepad for my second piece of information, but on the webpage, it is still on the first
line. This is because we need to use a HTML tag to tell the webpage to create a new line.
Two lines.
One long line.
11.
Tuesday 1 April2025
COMPUTER TASK - Your first webpage
Task 7 - Using the <p> tag
Page
11
Computer
Science
7.5 -
Coding in
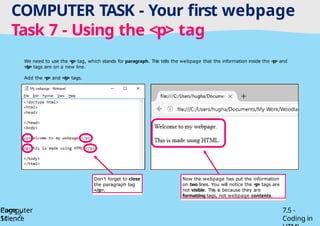
We need to use the <p> tag, which stands for paragraph. This tells the webpage that the information inside the <p> and
</p> tags are on a new line.
Add the <p> and </p> tags.
Don’t forget to close
the paragraph tag
</p>.
Now the webpage has put the information
on two lines. You will notice the <p> tags are
not visible. This is because they are
formatting tags, not webpage contents.
12.
Tuesday 1 April2025
COMPUTER TASK - Formatting the
webpage Task 8 - <h1>, <h2>, <h3> etc
Tags
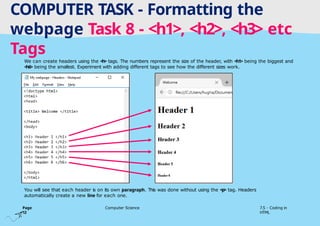
We can create headers using the <h> tags. The numbers represent the size of the header, with <h1> being the biggest and
<h6> being the smallest. Experiment with adding different tags to see how the different sizes work.
You will see that each header is on its own paragraph. This was done without using the <p> tag. Headers
automatically create a new line for each one.
Page
12
Computer Science 7.5 - Coding in
HTML
13.
Tuesday 1 April2025
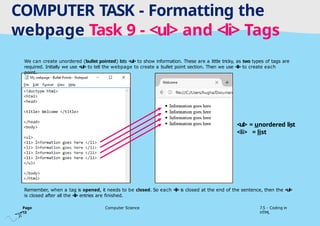
We can create unordered (bullet pointed) lists <ul> to show information. These are a little tricky, as two types of tags are
required. Initially we use <ul> to tell the webpage to create a bullet point section. Then we use <li> to create each
point.
Remember, when a tag is opened, it needs to be closed. So each <li> is closed at the end of the sentence, then the <ul>
is closed after all the <li> entries are finished.
COMPUTER TASK - Formatting the
webpage Task 9 - <ul> and <li> Tags
<ul> = unordered list
<li> = list
Page
13
Computer Science 7.5 - Coding in
HTML
14.
Tuesday 1 April2025
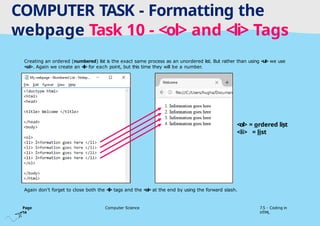
Creating an ordered (numbered) list is the exact same process as an unordered list. But rather than using <ul> we use
<ol>. Again we create an <li> for each point, but this time they will be a number.
Again don’t forget to close both the <li> tags and the <ol> at the end by using the forward slash.
COMPUTER TASK - Formatting the
webpage Task 10 - <ol> and <li> Tags
<ol> = ordered list
<li> = list
Page
14
Computer Science 7.5 - Coding in
HTML
15.
Tuesday 1 April2025
COMPUTER TASK - Formatting the
webpage Task 11 - <title> Tag
Page
15
Computer Science 7.5 - Coding in
HTML
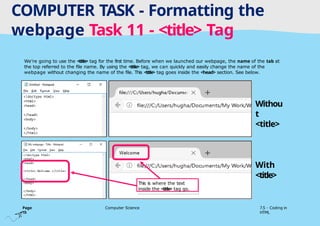
We’re going to use the <title> tag for the first time. Before when we launched our webpage, the name of the tab at
the top referred to the file name. By using the <title> tag, we can quickly and easily change the name of the
webpage without changing the name of the file. This <title> tag goes inside the <head> section. See below.
This is where the text
inside the <title> tag go.
Withou
t
<title>
With
<title>