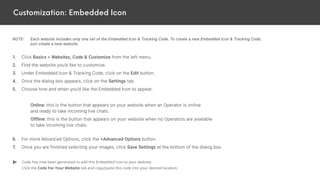
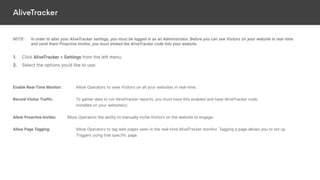
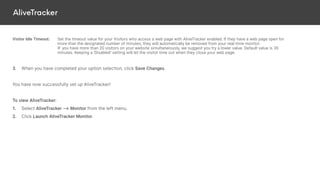
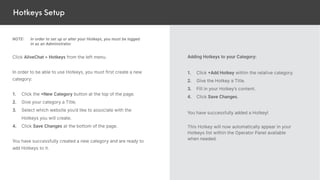
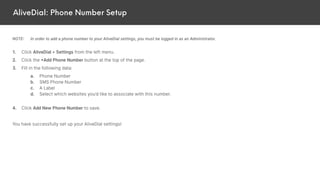
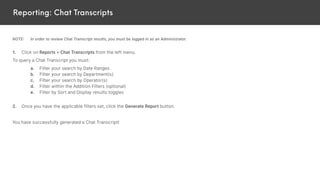
This document provides instructions for general setup and customization of a WebsiteAlive account. It includes steps for logging in as an administrator or operator, setting up operators and departments, customizing websites by adding logos and call-to-action buttons, setting up AliveTracker and AliveDial, and generating chat transcripts reports. The guide offers details on basic account configuration and optimization.
Learn more about AliveChat's software by using this Operator Panel How-To reference guide. Learn about the various types of logins, engaging in live chats and operator tools that will help your success using WebsiteAlive's AliveChat software.
This document will highlight the steps you need to get started with AliveSocial, so you can start
sending links to chat to any of your social networks. AliveSocial only works with
Hootsuite (www.hootsuite.com), the world’s #1 social media management platform.
This assumes you already have a Hootsuite account set up. If you do not have a Hootsuite
account, it’s free to sign up at www.hootsuite.com.
How to get and set a PrestaShop Facebook Addon on your website?Knowband Store
Social login is a great feature to have on your sore. Out of which PrestaShop Facebook plugin would be great start to accept social registrations on your PrestaShop site. Let's see how to setup PrestaShop Facebook login.
In the Facebook App, the comments & the posts of the users within the post of the company or individual post of the visitors will be converted into tickets and automatically forwarded to the ticket system of the company.
SEO-Search engine optimization by om sir's student TanujaOM Maurya
complete guidance of seo & types of seo ,on page seo ,off page seo ,creating sitemap ,creating rss ,favicon, optimizing website according facebook open graph protocol, twitter summary card
This presentation will explain you in detail what are the important strategies for digital marketing like seo,on page seo,off page seo,smo,smm, how to create essential files that are required.
How to integrate a subscription form with WordPress using a free plugin?GeniusContacts
This plugin connects WordPress with your GeniusContacts Account and allows you quickly and easily add a signup form for your GeniusContacts list and to embed a subscription form on your site with various options for how the form is displayed and submitted.
Start using GeniusContacts Signup Form in less than 2 minutes via the WordPress Setting GUI!
This presentation will help you understand, how a web application can automate operations for a wholesaler / distributor, reduce his effort, and enhance productivity.
Net4’s EasySite Builder Step By Step Guide to Create Business WebsiteNet4 India Ltd.
To start creating a website with Builder, you first need to select your website topic, specify website name, and select a language. Please note that the language is selected for your website, not for the Builder editor's interface. The Builder editor's interface language can be changed only through Net4’s EasySite. Learn all the steps before you start with your website. Trust me Net4’s Easysite Builder Tool is very Easy Tool to create Professional Website in Minutes.
Net4’s EasySite Builder Step by Step GuidePallavi Vyas
To start creating a website with Builder, you first need to select your website topic, specify
website name, and select a language. Please note that the language is selected for your
website, not for the Builder editor's interface. The Builder editor's interface language can be
changed only through Net4’s EasySite.
The Wordpress Beginner presentation was presented by Bruce and Tiffany Marler at NamesCon 2015 to help Domain Name investors learn more about deploying engaging websites on their online properties to engage more customers.
FindNerd : A Social Network with Project And Task Management FeaturesFindNerd
FindNerd is a collaborative platform for tech professionals which provide a hassle free online social community to all TECH NERDS where they can easily collaborate with each other for multiple activities including "Freelancing, Project Management and Enhancing Tech Skills” .
App builders have revolutionized the way we create software applications. They enable people with little to no programming experience to develop custom applications quickly and easily. App builders have become increasingly popular in recent years because they allow organizations to save time and money by avoiding the need to hire developers to create custom software.
One of the key factors that make app builders so attractive is their ease of use. They provide drag-and-drop interfaces that allow users to create custom applications with minimal effort. However, to make these tools even more accessible, it is important to develop admin-friendly components. Such components are designed with the non-technical user in mind and should be easy to understand and use.
Recently Dean Infotech hosted a webinar on the topic developing admin friendly components for app builders. The insightful webinar was all about building scalable solutions that are both powerful and user friendly. Following are the key topics that were covered in the webinar.
1. What is Lightning App Builder?
2. What are the uses of App Builder?
3. How to create App Builder?
4. Types of data loaders with their advantages and disadvantages.
SOP Library is a collection of various SOPs (also known as Standing Operating Procedures) that make carrying out digital marketing tasks easier by providing clear instructions.
SOP Library will assist you in executing business procedures consistently and efficiently every time, regardless of who is doing them.
With an SOP library, you may delegate the work to anyone on your team, saving you from having to handle everything yourself. A well-documented SOP library acts as a guide map, guiding you to where you want to go.
The Clickminded SOP library is off-the-street ready, which means anyone with a basic understanding of computers can follow the steps and complete the task.
The Clickminded SOP library details each step you need to follow to complete the activities at hand without any difficulties. To use this SOP or execute any of the activities in this SOP library, you do not need any technical skills. If you have new team members, provide them the SOP library so you can save time onboarding them.
The Clickminded SOP library includes:
SOP Recipes
Analytics & Tracking SOPs
Content Marketing SOPs
Sales Funnel SOPs
Email Marketing SOPs
Operations SOPs
Paid Acquisition SOPs
SEO SOPs
Social Media SOPs
We cover in-depth every digital platform activity you need to perform. Our SOPs also come with professional templates and tools to make everything sorted out for you.
We don't stop there; if you require a new SOP for a similar subject, simply fill out the form on our SOP library page and tell us what SOP you'd like to have added to the library. We'll create the SOP you proposed to us.
We update our SOP library with every update on the platforms you are working on so that you don’t get stuck at any point whatsoever.
SOP library has made our work so much easier. We hope this SOP Library makes things easier and more accessible for you too.
Advance shop by brand extension allows magento 2 store admin to add manufacturer logo & details for displaying it in frontend so customers can buy preferred brand products. To Know More About Product : https://www.appjetty.com/magento2-advance-shop-by-brand.htm
Social Login User Manual by CedCommerceCedCommerce
CedCommerce Social Login extension is very useful extension for the Magento ecommerce platform. It provides your store the feature to login / Register on Magento without filling all the details about yourself. It provides four very popular social networking site login feature.
Language Translator Magento 2 ExtensionBiztech Store
Magento 2 Language Translator helps you translate product attributes, CMS pages along with CMS blocks, meta title & description, product reviews, tags and many more parts of store content. With Language translator, mass language translation of store content is possible as well. See More Details: https://store.biztechconsultancy.com/magento2-language-translator-extension.htm
Connector Corner: Automate dynamic content and events by pushing a buttonDianaGray10
Here is something new! In our next Connector Corner webinar, we will demonstrate how you can use a single workflow to:
Create a campaign using Mailchimp with merge tags/fields
Send an interactive Slack channel message (using buttons)
Have the message received by managers and peers along with a test email for review
But there’s more:
In a second workflow supporting the same use case, you’ll see:
Your campaign sent to target colleagues for approval
If the “Approve” button is clicked, a Jira/Zendesk ticket is created for the marketing design team
But—if the “Reject” button is pushed, colleagues will be alerted via Slack message
Join us to learn more about this new, human-in-the-loop capability, brought to you by Integration Service connectors.
And...
Speakers:
Akshay Agnihotri, Product Manager
Charlie Greenberg, Host
UiPath Test Automation using UiPath Test Suite series, part 3DianaGray10
Welcome to UiPath Test Automation using UiPath Test Suite series part 3. In this session, we will cover desktop automation along with UI automation.
Topics covered:
UI automation Introduction,
UI automation Sample
Desktop automation flow
Pradeep Chinnala, Senior Consultant Automation Developer @WonderBotz and UiPath MVP
Deepak Rai, Automation Practice Lead, Boundaryless Group and UiPath MVP
Let's dive deeper into the world of ODC! Ricardo Alves (OutSystems) will join us to tell all about the new Data Fabric. After that, Sezen de Bruijn (OutSystems) will get into the details on how to best design a sturdy architecture within ODC.
DevOps and Testing slides at DASA ConnectKari Kakkonen
My and Rik Marselis slides at 30.5.2024 DASA Connect conference. We discuss about what is testing, then what is agile testing and finally what is Testing in DevOps. Finally we had lovely workshop with the participants trying to find out different ways to think about quality and testing in different parts of the DevOps infinity loop.
GDG Cloud Southlake #33: Boule & Rebala: Effective AppSec in SDLC using Deplo...James Anderson
Effective Application Security in Software Delivery lifecycle using Deployment Firewall and DBOM
The modern software delivery process (or the CI/CD process) includes many tools, distributed teams, open-source code, and cloud platforms. Constant focus on speed to release software to market, along with the traditional slow and manual security checks has caused gaps in continuous security as an important piece in the software supply chain. Today organizations feel more susceptible to external and internal cyber threats due to the vast attack surface in their applications supply chain and the lack of end-to-end governance and risk management.
The software team must secure its software delivery process to avoid vulnerability and security breaches. This needs to be achieved with existing tool chains and without extensive rework of the delivery processes. This talk will present strategies and techniques for providing visibility into the true risk of the existing vulnerabilities, preventing the introduction of security issues in the software, resolving vulnerabilities in production environments quickly, and capturing the deployment bill of materials (DBOM).
Speakers:
Bob Boule
Robert Boule is a technology enthusiast with PASSION for technology and making things work along with a knack for helping others understand how things work. He comes with around 20 years of solution engineering experience in application security, software continuous delivery, and SaaS platforms. He is known for his dynamic presentations in CI/CD and application security integrated in software delivery lifecycle.
Gopinath Rebala
Gopinath Rebala is the CTO of OpsMx, where he has overall responsibility for the machine learning and data processing architectures for Secure Software Delivery. Gopi also has a strong connection with our customers, leading design and architecture for strategic implementations. Gopi is a frequent speaker and well-known leader in continuous delivery and integrating security into software delivery.
PHP Frameworks: I want to break free (IPC Berlin 2024)Ralf Eggert
In this presentation, we examine the challenges and limitations of relying too heavily on PHP frameworks in web development. We discuss the history of PHP and its frameworks to understand how this dependence has evolved. The focus will be on providing concrete tips and strategies to reduce reliance on these frameworks, based on real-world examples and practical considerations. The goal is to equip developers with the skills and knowledge to create more flexible and future-proof web applications. We'll explore the importance of maintaining autonomy in a rapidly changing tech landscape and how to make informed decisions in PHP development.
This talk is aimed at encouraging a more independent approach to using PHP frameworks, moving towards a more flexible and future-proof approach to PHP development.
Software Delivery At the Speed of AI: Inflectra Invests In AI-Powered QualityInflectra
In this insightful webinar, Inflectra explores how artificial intelligence (AI) is transforming software development and testing. Discover how AI-powered tools are revolutionizing every stage of the software development lifecycle (SDLC), from design and prototyping to testing, deployment, and monitoring.
Learn about:
• The Future of Testing: How AI is shifting testing towards verification, analysis, and higher-level skills, while reducing repetitive tasks.
• Test Automation: How AI-powered test case generation, optimization, and self-healing tests are making testing more efficient and effective.
• Visual Testing: Explore the emerging capabilities of AI in visual testing and how it's set to revolutionize UI verification.
• Inflectra's AI Solutions: See demonstrations of Inflectra's cutting-edge AI tools like the ChatGPT plugin and Azure Open AI platform, designed to streamline your testing process.
Whether you're a developer, tester, or QA professional, this webinar will give you valuable insights into how AI is shaping the future of software delivery.
Kubernetes & AI - Beauty and the Beast !?! @KCD Istanbul 2024Tobias Schneck
As AI technology is pushing into IT I was wondering myself, as an “infrastructure container kubernetes guy”, how get this fancy AI technology get managed from an infrastructure operational view? Is it possible to apply our lovely cloud native principals as well? What benefit’s both technologies could bring to each other?
Let me take this questions and provide you a short journey through existing deployment models and use cases for AI software. On practical examples, we discuss what cloud/on-premise strategy we may need for applying it to our own infrastructure to get it to work from an enterprise perspective. I want to give an overview about infrastructure requirements and technologies, what could be beneficial or limiting your AI use cases in an enterprise environment. An interactive Demo will give you some insides, what approaches I got already working for real.
2. General Setup Guide
A WebsiteAlive How-To Guide
If you need further assistance, help or support, please feel free to visit us at
www.websitealive.com for more information.
If you do not have a WebsiteAlive account, please feel free to give it a try for FREE for 30 days.
Please visit www.websitealive.com to learn more and sign up.
3. Table of Contents
Logging In:
Administrator
Operator
via Apps & Extensions
via Mobile Apps
Setting Up Operators
Setting Up Departments
Customization:
Adding a Website
User-Interface & Logo
Call-to-Action Buttons
Short URL / Text Links
Embedded Icon
AliveTracker
Hotkeys Setup
AliveDial: Phone Number Setup
Reporting: Chat Transcripts
4
5
6
7
8
9
10
11
12
14
15
16
18
19
20
4. Logging In as an Administrator
1. Go to www.websitealive.com
2. Click on Log In in the top right corner of the main menu.
3. Once the form appears, please fill in your login information.
4. When prompted, select Admin from the 2 options.
You now successfully logged in as an Administrator!
5. Logging In as an Operator
NOTE: In order to review Chat Transcript results, you must be logged in as an Administrator.
1. Go to www.websitealive.com
2. Click on Log In in the top right corner of the main menu.
3. Once the form appears, please fill in your login information
4. When prompted, select Operator from the 2 available options.
You should now be successfully logged in as an Operator!
6. Loggin In via Apps & Extensions
Google Chrome Extension:
Download our Google Chrome Extension to log in without having to go to www.websitealive.com.
Please click the link below to download the extension. This link also appears next to the login on our website for easy access.
https://chrome.google.com/webstore/detail/alivechat/lfkhejbklkddgfmandfilejdinegdpik
Windows and Mac Desktop Apps:
Download our Windows Desktop App and use WebsiteAlive’s solutions on your PC without the need for a web browser.
1. Visit our website at www.websitealive.com
2. Click Log In
3. From the dropdown, select the app that matches your operating system.
7. Logging In via Mobile Apps
NOTE: In order to install WebsiteAlive apps on your device, you will need access to your Administrator account.
iPhone & iPad App:
1. Click on Basics > Apps & Add-Ons
2. Click Download in App Store next to the iPhone image.
3. Once the download is complete, install on your iPhone via iTunes and run the app.
You have successfully installed the iPhone/iPad app!
Android:
Visit this address on your Android device:
http://go.websitealive.com/phone/
Nothing more to it. Success!
8. Setting Up Operators
NOTE: In order to setup an Operator, you must be logged in as an Administrator.
1. Click Basics > Operators from the left menu.
2. Click on the +New Operator button in the top right corner of the screen.
3. Provide a Username and Password then click Create New Operator.
You have now successfully created a new Operator!
9. Setting Up Departments
NOTE: In order to setup Departments or Sub-Departments, you must be logged in as an Administrator.
1. Click Basics > Departments from the left menu.
2. Click on the +New Department button in the top right corner of the screen.
3. Setting up the department:
a. Give your Department a name
b. Select if it is a Sub-Department of another existing Department
c. Enable/Disable the Dummy Department features and enter a Dummy Message, if applicable.
d. Assign applicable Operators to the Department
e. Once all forms are satisfactory, click Create Department.
You have now successfully created a new Department!
10. Customization: Adding a Website
NOTE: In order to set up or add a website, you must be logged in as an Administrator.
WebsiteAlive allows you to create separate “Window” designs for different websites. If you have multiple brands and websites, you can
create unlimited designs with this feature.
1. Click Basics > Websites, Code & Customize from the left menu.
2. Click the +Add Website button at the top right.
a. Give your website a name.
b. Enable the apps you’ll use for this particular website.
c. Assign an internal icon for quick identification of this website (optional).
d. Add a description.
e. Select the Departments you’d like to associate with this particular website.
You have now successfully added a new Website!
11. Customization: User-Interface Window & Company Logo
NOTE: In order to set up or alter the customization of your user interface, you must be logged in as an Administrator.
1. Click Basics > Websites, Code & Customize from the left menu.
2. Find the website you’d like to customize and then click the Customize tab from the available tab options.
3. Under Global Settings, select Logo from the available tab options.
4. Click Upload.
5. Once the Upload dialog box has appeared, you have 2 options available to you:
a. Select Choose File and select a new file from your hard drive, then click the Upload Image button.
b. Select an existing uploaded image from your Image Gallery.
Note: Logos can have their padding adjusted, giving you complete control of your gutters.
You also have the option to add a hot link to you logo; if left blank, the logo will have no hot link functionality.
6. Click Save Changes.
You have now successfully added a logo to your window!
12. Customization: Call-to-Action Button
NOTE: In order to set up or alter call-to-action buttons, you must be logged in as an Administrator.
1. Click Basics > Websites, Code & Customize from the left menu.
2. Find the website you’d like to customize.
3. Under Buttons, select +New button.
4. Once the dialog box appears, select the Appearance and connecting Department you’d like.
5. Upload / Choose the Online and Offline buttons you like to use.
Online: this is the button that appears on your website when an Operator is online
and ready to take incoming live chats.
Offline: this is the button that appears on your website when no Operators are available
to take incoming live chats.
Continued on next page...
13. Customization: Call-to-Action Button
6. For more Advanced Options, click the +Advanced Options button.
7. Once you are finished selecting your images, click Save Settings at the bottom of the page.
You have now successfully added custom Online and Offline call-to-action buttons!
Note: WebsiteAlive furnishes all new accounts with default buttons if you do not have a custom button of your own.
Code has now been generated to add your call-to-action button to your web page.
14. Customization: Short URL / Text Links
NOTE: In order to set up a text link, you must be logged in as an Administrator.
1. Click Basics > Websites, Code & Customize from the left menu.
2. Find the website you’d like to customize.
3. Under Links, select the +New button.
4. Add the link text you’d like to use. (Example: “Connect With Us!”)
5. Select which Department you’d like the text link to connect to.
6. For more Advanced Options, click the +Advanced Options button.
7. Once you are finished, click Save Settings at the bottom of the page and generate your text link code to add to a webpage.
You have now successfully created a text link!
Code has now been generated to add short URLs & Text Links to your web page,
Twitter or Facebook posts, emails or anywhere you like!
15. Customization: Embedded Icon
NOTE: Each website includes only one set of the Embedded Icon & Tracking Code. To create a new Embedded Icon & Tracking Code,
just create a new website.
1. Click Basics > Websites, Code & Customize from the left menu.
2. Find the website you’d like to customize.
3. Under Embedded Icon & Tracking Code, click on the Edit button.
4. Once the dialog box appears, click on the Settings tab.
5. Choose how and when you’d like the Embedded Icon to appear.
Online: this is the button that appears on your website when an Operator is online
and ready to take incoming live chats.
Offline: this is the button that appears on your website when no Operators are available
to take incoming live chats.
6. For more Advanced Options, click the +Advanced Options button.
7. Once you are finished selecting your images, click Save Settings at the bottom of the dialog box.
Code has now been generated to add this Embedded Icon to your website.
Click the Code For Your Website tab and copy/paste this code into your desired location.
16. AliveTracker
NOTE: In order to alter your AliveTracker settings, you must be logged in as an Administrator. Before you can see Visitors on your website in real-time
and send them Proactive Invites, you must embed the AliveTracker code into your website.
1. Click AliveTracker > Settings from the left menu.
2. Select the options you’d like to use:
Enable Real-Time Monitor: Allow Operators to view Visitors on all your websites in real-time.
Record Visitor Traffic: To gather data to run AliveTracker reports, you must have this enabled and have AliveTracker code
installed on your website(s).
Allow Proactive Invites: Allow Operators the ability to manually invite Visitors on the website to engage.
Allow Page Tagging: Allow Operators to tag web pages seen in the real-time AliveTracker monitor. Tagging a page allows you to set up
Triggers using that specific page.
17. AliveTracker
Visitor Idle Timeout: Set the timeout value for your Visitors who access a web page with AliveTracker enabled. If they have a web page open for
more than the designated number of minutes, they will automatically be removed from your real-time monitor.
IF you have more than 20 visitors on your website simultaneiously, we suggest you try a lower value. Default value is 30
minutes. Keeping a ‘Disabled’ setting will let the visitor time out when they close your web page.
3. When you have completed your option selection, click Save Changes.
You have now successfully set up AliveTracker!
To view AliveTracker:
1. Select AliveTracker ⟶ Monitor from the left menu.
2. Click Launch AliveTracker Monitor.
18. Hotkeys Setup
NOTE: In order to set up or alter your Hotkeys, you must be logged
in as an Administrator.
Click AliveChat > Hotkeys from the left menu.
In order to be able to use Hotkeys, you must first create a new
category:
1. Click the +New Category button at the top of the page.
2. Give your category a Title.
3. Select which website you’d like to associate with the
Hotkeys you will create.
4. Click Save Changes at the bottom of the page.
You have successfully created a new category and are ready to
add Hotkeys to it.
Adding Hotkeys to your Category:
1. Click +Add Hotkey within the relative category.
2. Give the Hotkey a Title.
3. Fill in your Hotkey’s content.
4. Click Save Changes.
You have successfully added a Hotkey!
This Hotkey will now automatically appear in your
Hotkeys list within the Operator Panel available
when needed.
19. AliveDial: Phone Number Setup
NOTE: In order to add a phone number to your AliveDial settings, you must be logged in as an Administrator.
1. Click AliveDial > Settings from the left menu.
2. Click the +Add Phone Number button at the top of the page.
3. Fill in the following data:
a. Phone Number
b. SMS Phone Number
c. A Label
d. Select which websites you’d like to associate with this number.
4. Click Add New Phone Number to save.
You have successfully set up your AliveDial settings!
20. NOTE: In order to review Chat Transcript results, you must be logged in as an Administrator.
1. Click on Reports > Chat Transcripts from the left menu.
To query a Chat Transcript you must:
a. Filter your search by Date Ranges
b. Filter your search by Department(s)
c. Filter your search by Operator(s)
d. Filter within the Addition Filters (optional)
e. Filter by Sort and Display results toggles
2. Once you have the applicable filters set, click the Generate Report button.
You have successfully generated a Chat Transcript!
Reporting: Chat Transcripts