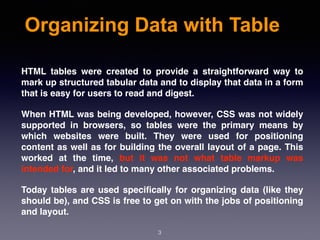
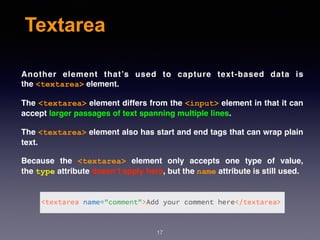
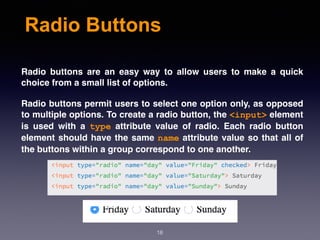
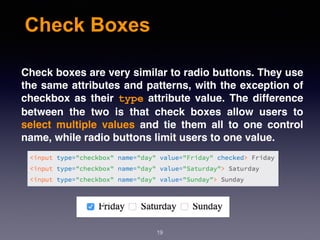
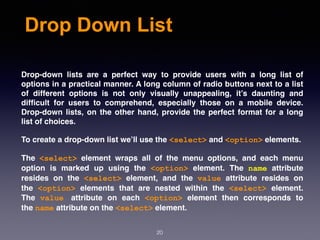
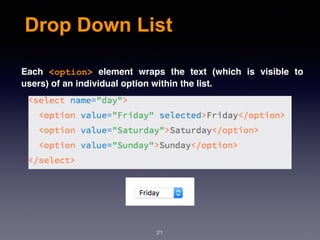
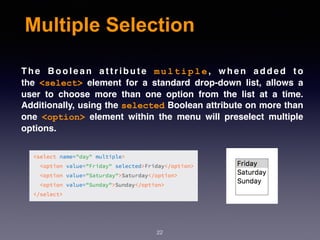
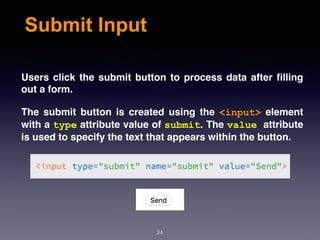
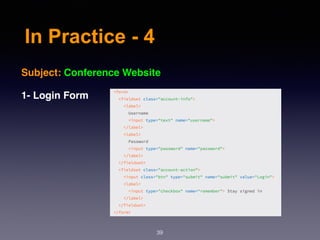
This document provides an overview of web design and development topics including tables, forms, JavaScript, and the DOM. It discusses how to organize data with tables using various table elements like <table>, <tr>, <td>, and <th>. It also covers how to build forms using elements like <form>, <input>, <textarea>, <select>, and <option> as well as attributes. The document then gives an introduction to JavaScript and the DOM before discussing specific JavaScript concepts in more detail.
3. Organizing Data with Table
HTML tables were created to provide a straightforward way to
mark up structured tabular data and to display that data in a form
that is easy for users to read and digest.
When HTML was being developed, however, CSS was not widely
supported in browsers, so tables were the primary means by
which websites were built. They were used for positioning
content as well as for building the overall layout of a page. This
worked at the time, but it was not what table markup was
intended for, and it led to many other associated problems.
Today tables are used specifically for organizing data (like they
should be), and CSS is free to get on with the jobs of positioning
and layout.
3
4. Creating a Table
Tables are made up of data that is contained within columns and
rows, and HTML supplies several different elements for defining
and structuring these items. At a minimum a table must consist
of <table>, <tr> (table row), and <td> (table data) elements.
For greater structure and additional semantic value, tables may
include the <th> (table header) element and a few other
elements as well.
When all of these elements are working together, they produce a
solid table.
4
5. Table
We use the <table> element to initialize a table on
a page.
Using the <table> element signifies that the
information within this element will be tabular data
displayed in the necessary columns and rows.
5
6. Table Row
Once a table has been defined in HTML, table rows may be added
using the <tr> element. A table can have numerous table rows,
or <tr> elements.
Depending on the amount of information there is to display, the
number of table rows may be substantial.
6
7. Table Data
Once a table is defined and rows within that table have been set
up, data cells may be added to the table via the table data,
or <td>, element.
Listing multiple <td> elements one after the other will create
columns within a table row.
7
8. Table Header
To designate a heading for a column or row of cells, the table
header element, <th>, should be used. The <th> element works
just like the <td> element in that it creates a cell for data.
The value to using the <th> element over the <td> element is
that the table header element provides semantic value by
signifying that the data within the cell is a heading, while
the <td> element only represents a generic piece of data.
Additionally, depending on the browser, table headers may
receive some default styling, usually bold and centered.
8
9. Table Caption
The <caption> element provides a caption or title for a
table. A caption will help users identify what the table
pertains to and what data they can expect to find within it.
The <caption> element must come immediately after the
opening <table> tag, and it is positioned at the top of a
table by default.
9
10. Table Head, Body, & Foot
The content within tables can be broken up into multiple groups, including
a head, a body, and a foot. The <thead> (table head), <tbody> (table body),
and <tfoot> (table foot) elements help to structurally organize tables.
The table head element, <thead>, wraps the heading row or rows of a table
to denote the head. The table head should be placed at the top of a table,
after any <caption> element and before any <tbody> element.
After the table head may come either the <tbody> or <tfoot> elements.
Originally the <tfoot> element had to come immediately after
the <thead> element, but HTML5 has provided leeway here. These
elements may now occur in any order so long as they are never parent
elements of one another. The <tbody> element should contain the primary
data within a table, while the <tfoot> element contains data that outlines
the contents of a table.
10
11. Combining Multi Cells
Often, two or more cells need to be combined into one without
breaking the overall row and column layout. Perhaps two cells
next to each other contain the same data, there’s an empty
cell, or the cells should be combined for styling purposes. In
these cases we can use the colspan and rowspan attributes.
T h e s e t w o a t t r i b u t e s w o r k o n e i t h e r
the <td> or <th> elements.
The colspan attribute is used to span a single cell across
multiple columns within a table, while the rowspan attribute is
used to span a single cell across multiple rows. Each attribute
accepts an integer value that indicates the number of cells to
span across, with 1 being the default value.
11
12. Building Forms
Forms are an essential part of the Internet, as they
provide a way for websites to capture information from
users and to process requests, and they offer controls
for nearly every imaginable use of an application.
Through controls or fields, forms can request a small
amount of information—often a search query or a
username and password—or a large amount of
information—perhaps shipping and billing information
or an entire job application.
12
13. Building Forms
We need to know how to build forms in order to
acquire user input. In this part we’ll discuss how to use
HTML to mark up a form, which elements to use to
capture different types of data, and how to style forms
with CSS.
We won’t get too deep into how information from a
form is processed and handled on the back end of a
website now. Form processing is a deeper topic; for
now we’ll stick to the creation and styling of forms.
13
14. Initializing a Form
To add a form to a page, we’ll use the <form> element.
The <form> element identifies where on the page control elements will
appear. Additionally, the <form> element will wrap all of the elements
included within the form, much like a <div> element.
A handful of different attributes can be applied to the <form> element, the
most common of which are action and method. The action attribute
contains the URL to which information included within the form will be
sent for processing by the server. The method attribute is the HTTP
method browsers should use to submit the form data. Both of
these <form> attributes pertain to submitting and processing data.
14
15. Text Fields
One of the primary elements used to obtain text from users is
the <input> element.
The <input> element uses the type attribute to define what type of
information is to be captured within the control. The most
popular type attribute value is text, which denotes a single line of text
input.
Along with setting a type attribute, it is best practice to give
an <input> element a name attribute as well. The name attribute value is
used as the name of the control and is submitted along with the input data
to the server.
15
16. Text Fields
The <input> element is self-contained, meaning it uses
only one tag and it does not wrap any other content. The
value of the element is provided by its attributes and their
corresponding values.
Originally, the only two text-based type attribute values
were text and password (for password inputs); however,
HTML5 brought along a handful of new type attribute
values.
16
17. Textarea
Another element that’s used to capture text-based data is
the <textarea> element.
The <textarea> element differs from the <input> element in that it can
accept larger passages of text spanning multiple lines.
The <textarea> element also has start and end tags that can wrap plain
text.
Because the <textarea> element only accepts one type of value,
the type attribute doesn’t apply here, but the name attribute is still used.
17
18. Radio Buttons
Radio buttons are an easy way to allow users to make a quick
choice from a small list of options.
Radio buttons permit users to select one option only, as opposed
to multiple options. To create a radio button, the <input> element
is used with a type attribute value of radio. Each radio button
element should have the same name attribute value so that all of
the buttons within a group correspond to one another.
18
19. Check Boxes
Check boxes are very similar to radio buttons. They use
the same attributes and patterns, with the exception of
checkbox as their type attribute value. The difference
between the two is that check boxes allow users to
select multiple values and tie them all to one control
name, while radio buttons limit users to one value.
19
20. Drop Down List
Drop-down lists are a perfect way to provide users with a long list of
options in a practical manner. A long column of radio buttons next to a list
of different options is not only visually unappealing, it’s daunting and
difficult for users to comprehend, especially those on a mobile device.
Drop-down lists, on the other hand, provide the perfect format for a long
list of choices.
To create a drop-down list we’ll use the <select> and <option> elements.
The <select> element wraps all of the menu options, and each menu
option is marked up using the <option> element. The name attribute
resides on the <select> element, and the value attribute resides on
the <option> elements that are nested within the <select> element.
The value attribute on each <option> element then corresponds to
the name attribute on the <select> element.
20
21. Drop Down List
Each <option> element wraps the text (which is visible to
users) of an individual option within the list.
21
22. Multiple Selection
T h e B o o l e a n a t t r i b u t e m u l t i p l e , w h e n a d d e d t o
the <select> element for a standard drop-down list, allows a
user to choose more than one option from the list at a time.
Additionally, using the selected Boolean attribute on more than
one <option> element within the menu will preselect multiple
options.
22
23. Form Buttons
After a user inputs the requested information,
buttons allow the user to put that information into
action.
Most commonly, a submit input or submit button
is used to process the data.
23
24. Submit Input
Users click the submit button to process data after filling
out a form.
The submit button is created using the <input> element
with a type attribute value of submit. The value attribute
is used to specify the text that appears within the button.
24
25. Submit Button
As an <input> element, the submit button is self-contained and cannot
wrap any other content. If more control over the structure and design of the
input is desired—along with the ability to wrap other elements—
the <button> element may be used.
The <button> element performs the same way as the <input> element
with the type attribute value of submit; however, it includes opening and
closing tags, which may wrap other elements.
25
26. Hidden Input
Hidden inputs provide a way to pass data to the server
without displaying it to users. Hidden inputs are
typically used for tracking codes, keys, or other
information that is not pertinent to the user but is
helpful when processing the form. This information is
not displayed on the page; however, it can be found by
viewing the source code of a page. It should therefore
not be used for sensitive or secure information.
26
27. File Input
To allow users to add a file to a form, much like
attaching a file to an email, use the file value for
the type attribute.
27
28. Organizing Form Element
Knowing how to capture data with inputs is half the
battle. Organizing form elements and controls in a
usable manner is the other half. When interacting with
forms, users need to understand what is being asked
of them and how to provide the requested information.
By using labels, fieldsets, and legends, we can better
organize forms and guide users to properly complete
them.
28
29. Label
Labels provide captions or headings for form
controls, unambiguously tying them together and
creating an accessible form for all users and
assistive technologies.
Created using the <label> element, labels
should include text that describes the inputs or
controls they pertain to.
29
30. Label
Labels may include a for attribute. The value of
the for attribute should be the same as the value of
the id attribute on the form control the label corresponds
to. Matching up the for and id attribute values ties the two
elements together, allowing users to click on
the <label> element to bring focus to the proper form
control.
30
31. Fieldset
Fieldsets group form controls and labels into
organized sections. Much like a <section> or
other structural element, the <fieldset> is a
block-level element that wraps related elements,
specifically within a <form> element, for better
organization. Fieldsets, by default, also include a
border outline, which can be modified using CSS.
31
33. Legend
A legend provides a caption, or heading, for
the <fieldset> element.
The <legend> element wraps text describing the form
controls that fall within the fieldset. The markup should
include the <legend> element directly after the
opening <fieldset> tag.
On the page, the legend will appear within the top left
part of the fieldset border.
33
35. Form and Input Attributes
To accommodate all of the different form, input, and
control elements, there are a number of attributes and
corresponding values.
These attributes and values serve a handful of different
functions, such as disabling controls and adding form
validation.
Described next are some of the more frequently used
and helpful attributes.
35
36. Disabled
The disabled Boolean attribute turns off an element or control so
that it is not available for interaction or input.
Elements that are disabled will not send any value to the server for
form processing.
Applying the disabled Boolean attribute to a <fieldset> element
will disable all of the form controls within the fieldset.
36
37. Placeholder
The placeholder HTML5 attribute provides a hint or tip within the
form control of an <input> or <textarea> element that disappears
once the control is clicked in or gains focus.
This is used to give users further information on how the form input
should be filled in, for example, the email address format to use.
37
38. Required
The required HTML5 Boolean attribute enforces that an element or form
control must contain a value upon being submitted to the server. Should an
element or form control not have a value, an error message will be displayed
requesting that the user complete the required field. Currently, error message
styles are controlled by the browser and cannot be styled with CSS.
Validation also occurs specific to a control’s type. For example,
an <input> element with a type attribute value of email will require not only
that a value exist within the control, but also that it is a valid email address.
38
41. What is JavaScript?
JavaScript brings a dynamic functionality to your websites.
Every time you see something pop up when you mouse
over an item in the browser, or see new text, colors, or
images appear on the page in front of your eyes, or grab an
object on the page and drag it to a new location—all those
things are done through JavaScript.
It offers effects that are not otherwise possible, because it
runs inside the browser and has direct access to all the
elements in a web document.
41
42. What is JavaScript?
JavaScript first appeared in the Netscape
Navigator browser in 1995, coinciding with the
addition of support for Java technology in the
browser. Because of the initial incorrect
impression that JavaScript was a spin-off of Java,
there has been some longterm confusion over their
relationship.
However, the naming was just a marketing ploy to
help the new scripting language benefit from the
popularity of the Java programming language.
42
43. What is JavaScript?
Several months later, Microsoft released JScript with
Internet Explorer 3. It was a mostly-compatible JavaScript
work-alike. Several months after that, Netscape submitted
JavaScript to Ecma International, a European standards
organization, which resulted in the first edition of
the ECMAScript standard that year. The standard received a
significant update as ECMAScript edition 3 in 1999, and it
has stayed pretty much stable ever since. The fourth edition
was abandoned, due to political differences concerning
language complexity. Many parts of the fourth edition
formed the basis for ECMAScript edition 5, published in
December of 2009, and for the 6th major edition of the
standard, published in June of 2015.
43
44. What is JavaScript?
Because it is more familiar, we will refer to ECMAScript as
"JavaScript" from this point on.
JavaScript gained new power when the HTML elements of
the web page got a more formal, structured definition in
what is called the Document Object Model, or DOM. The
DOM makes it relatively easy to add a new paragraph or
focus on a piece of text and change it.
Because both JavaScript and PHP support much of the
structured programming syntax used by the C
programming language, they look very similar to each
other.
44
45. The HTML DOM
When a web page is loaded, the browser creates
a Document Object Model of the page.
The DOM is a W3C (World Wide Web Consortium)
standard.
The HTML DOM model is constructed as a tree
of Objects:
45
48. The HTML DOM
The W3C Document Object Model (DOM) is a platform and language-neutral
interface that allows programs and scripts to dynamically access and update
the content, structure, and style of a document.
• JavaScript can change all the HTML elements in the page
• JavaScript can change all the HTML attributes in the page
• JavaScript can change all the CSS styles in the page
• JavaScript can remove existing HTML elements and attributes
• JavaScript can add new HTML elements and attributes
• JavaScript can react to all existing HTML events in the page
• JavaScript can create new HTML events in the page
48
49. JavaScript and HTML Text
JavaScript is a client-side scripting language that
runs entirely inside the web browser. To call it up,
you place it between opening HTML tags.
49
50. JavaScript and HTML Text
You may also have noticed that, there is no trailing
semicolon (;). This is because a newline serves the
same purpose as a semicolon in JavaScript.
How ever, if you wish to have more than one
statement on a single line, you do need to place a
semicolon after each command except the last one.
Of course, if you wish, you can add a semicolon to
the end of every statement, and your JavaScript will
work fine.
50
51. JavaScript and HTML Text
The other thing to note in this example is the
<noscript> and </noscript> pair of tags. These
are used when you wish to offer alternative HTML
to users whose browser does not support
JavaScript or who have it disabled.
Using these tags is up to you, as they are not
required, but you really ought to use them because
it’s usually not that difficult to provide static HTML
alternatives to the operations you provide using
JavaScript.
51
52. Using Scripts Within a
Document Head
In addition to placing a script within the body of a
document, you can put it in the <head> section,
which is the ideal place if you wish to execute a
script when a page loads.
52
53. Including JavaScript Files
In addition to writing JavaScript code directly in HTML
documents, you can include files of JavaScript code either from
your website or from anywhere. The syntax for this is as follows:
It is possible to leave out the type="text/javascript" parameters;
all modern browsers default to assuming that the script contains
JavaScript.
53
54. Comments
Because of their shared inheritance from the C
programming language, PHP and JavaScript have
many similarities, one of which is commenting.
54
55. Variables
• A variable may include only the letters a-z, A-Z, 0-9, the $
symbol, and the underscore (_).
• No other characters, such as spaces or punctuation, are
allowed in a variable name.
• The first character of a variable name can be only a-z, A-
Z, $, or _ (no numbers).
• Names are case-sensitive. Count, count, and COUNT are
all different variables.
• There is no set limit on variable name lengths.
55
57. String Variables
You may include a single quote within a double-
quoted string or a double quote within a single-
quoted string. But you must escape a quote of
the same type by using the backslash character,
like this:
57
58. Numeric Variables
Creating a numeric variable is as simple as
assigning a value.
Like strings, numeric variables can be read from
and used in expressions and functions.
58