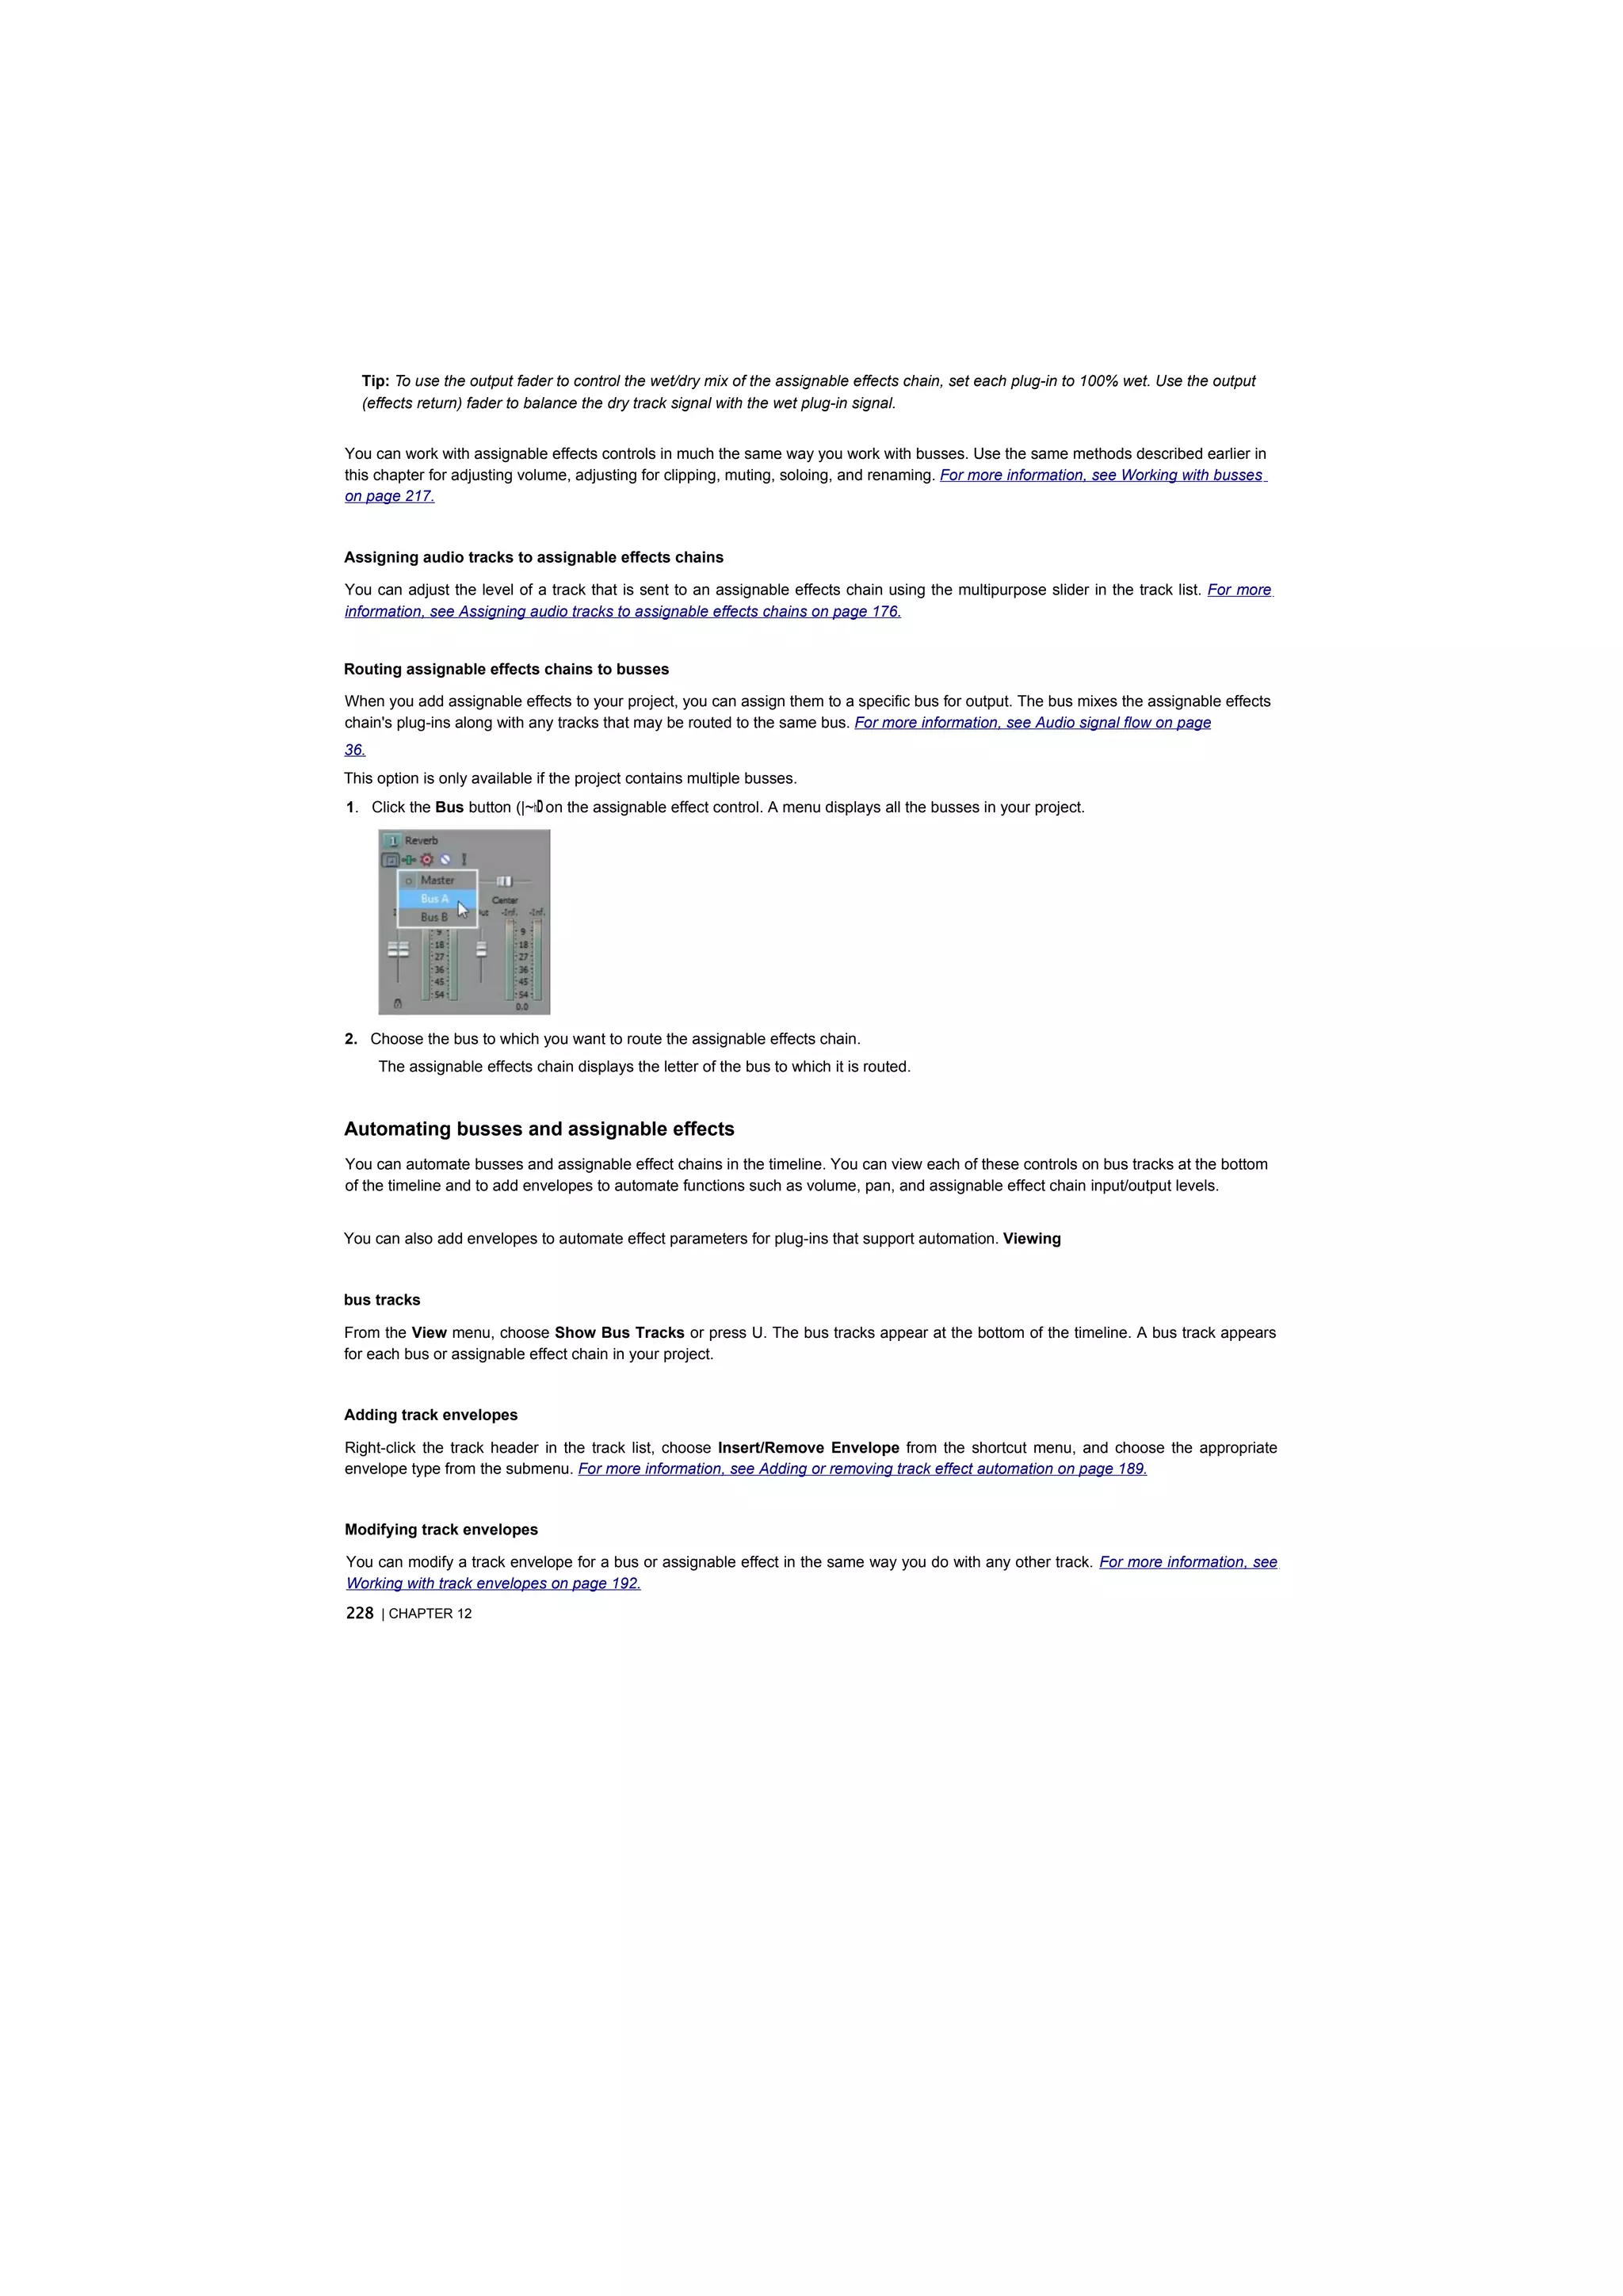
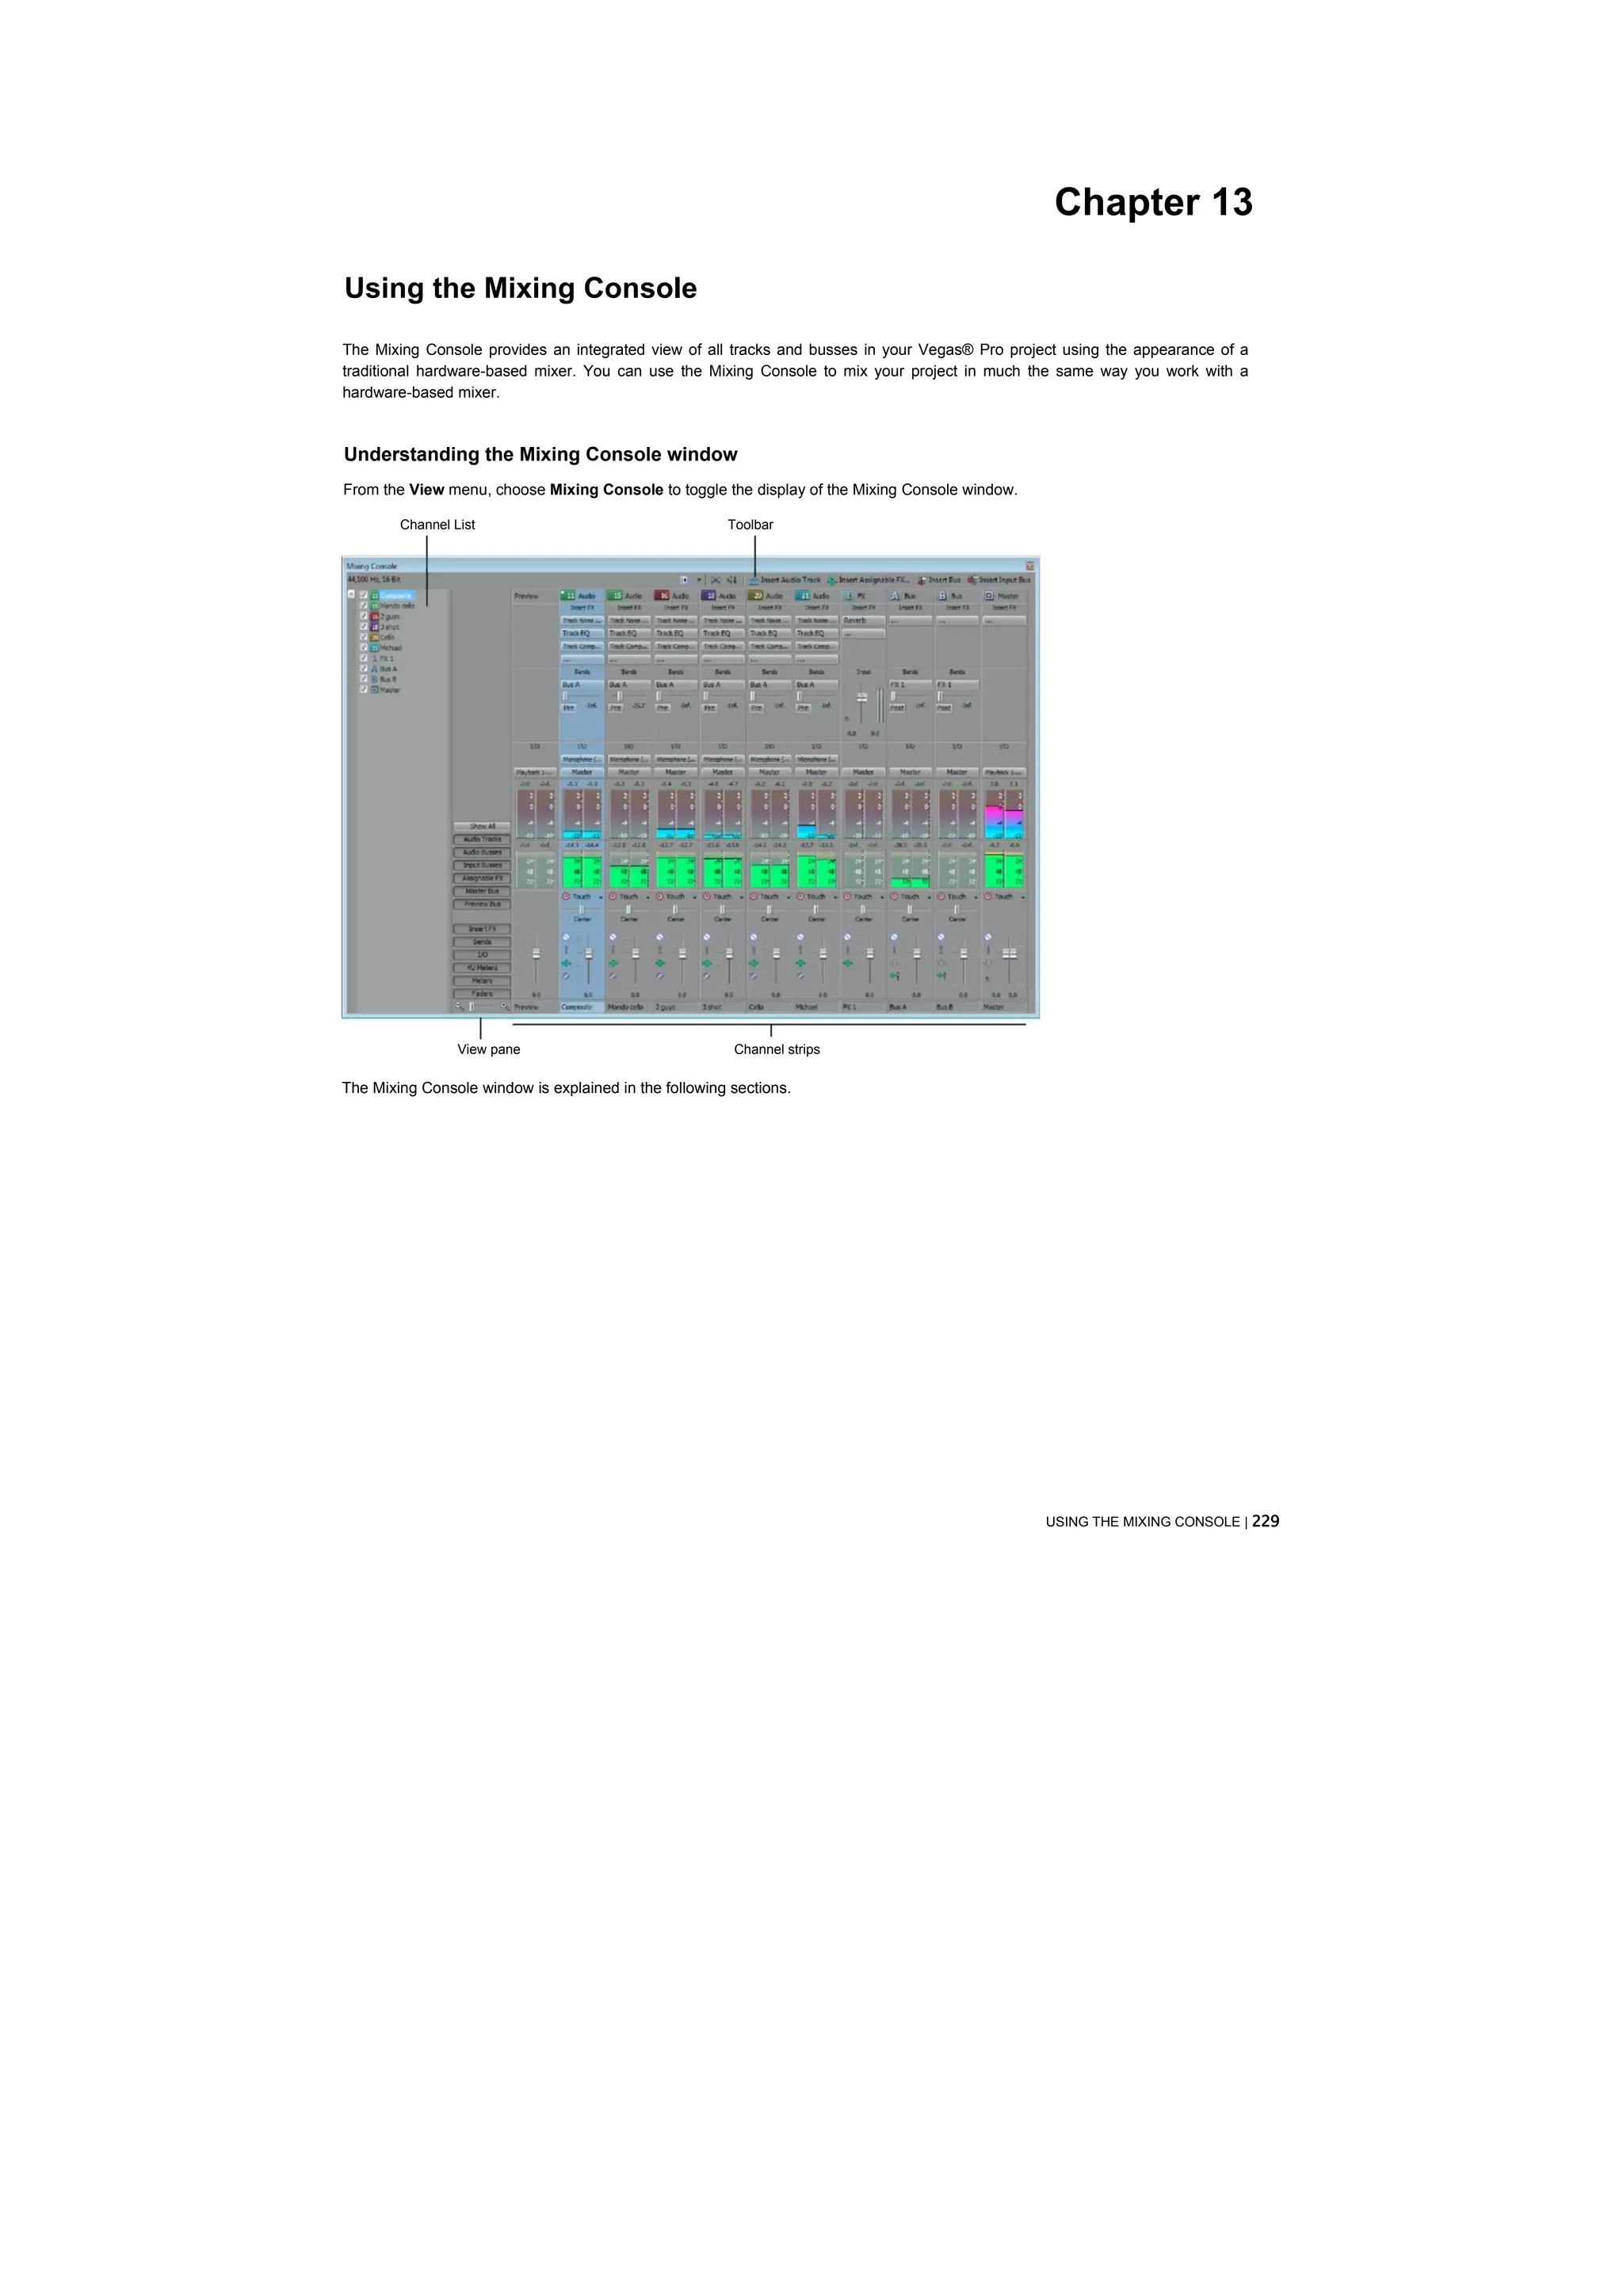
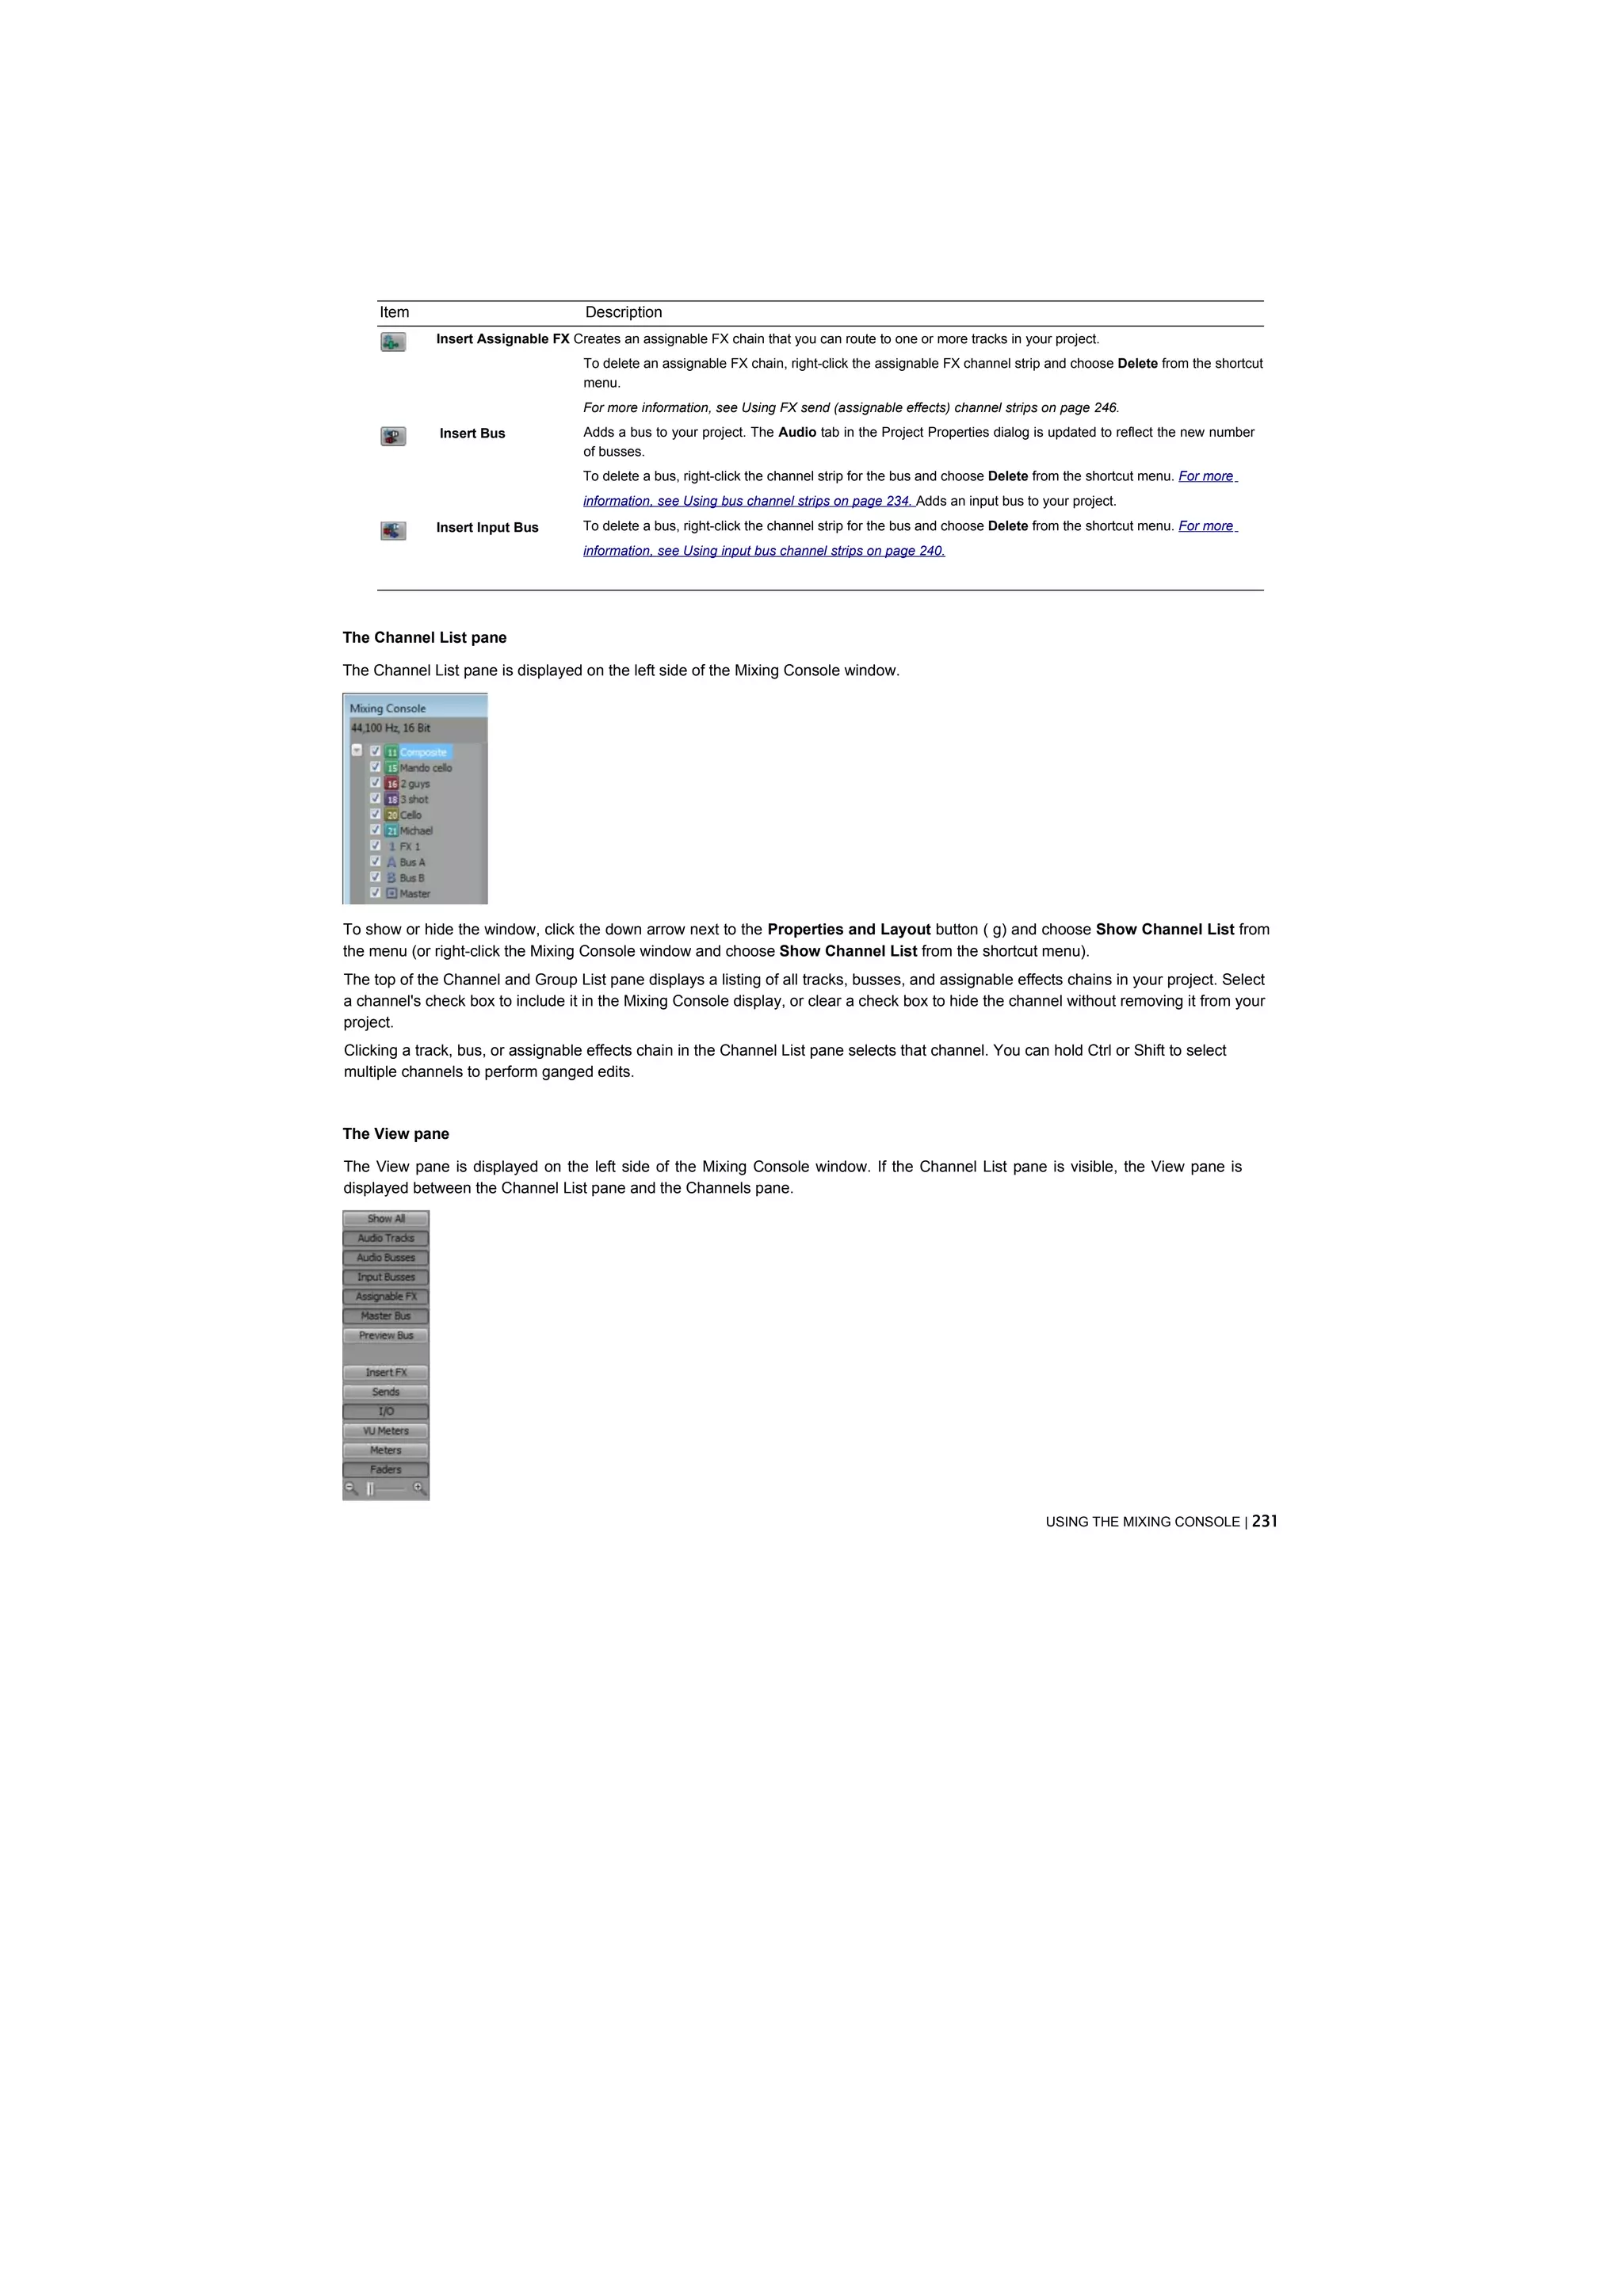
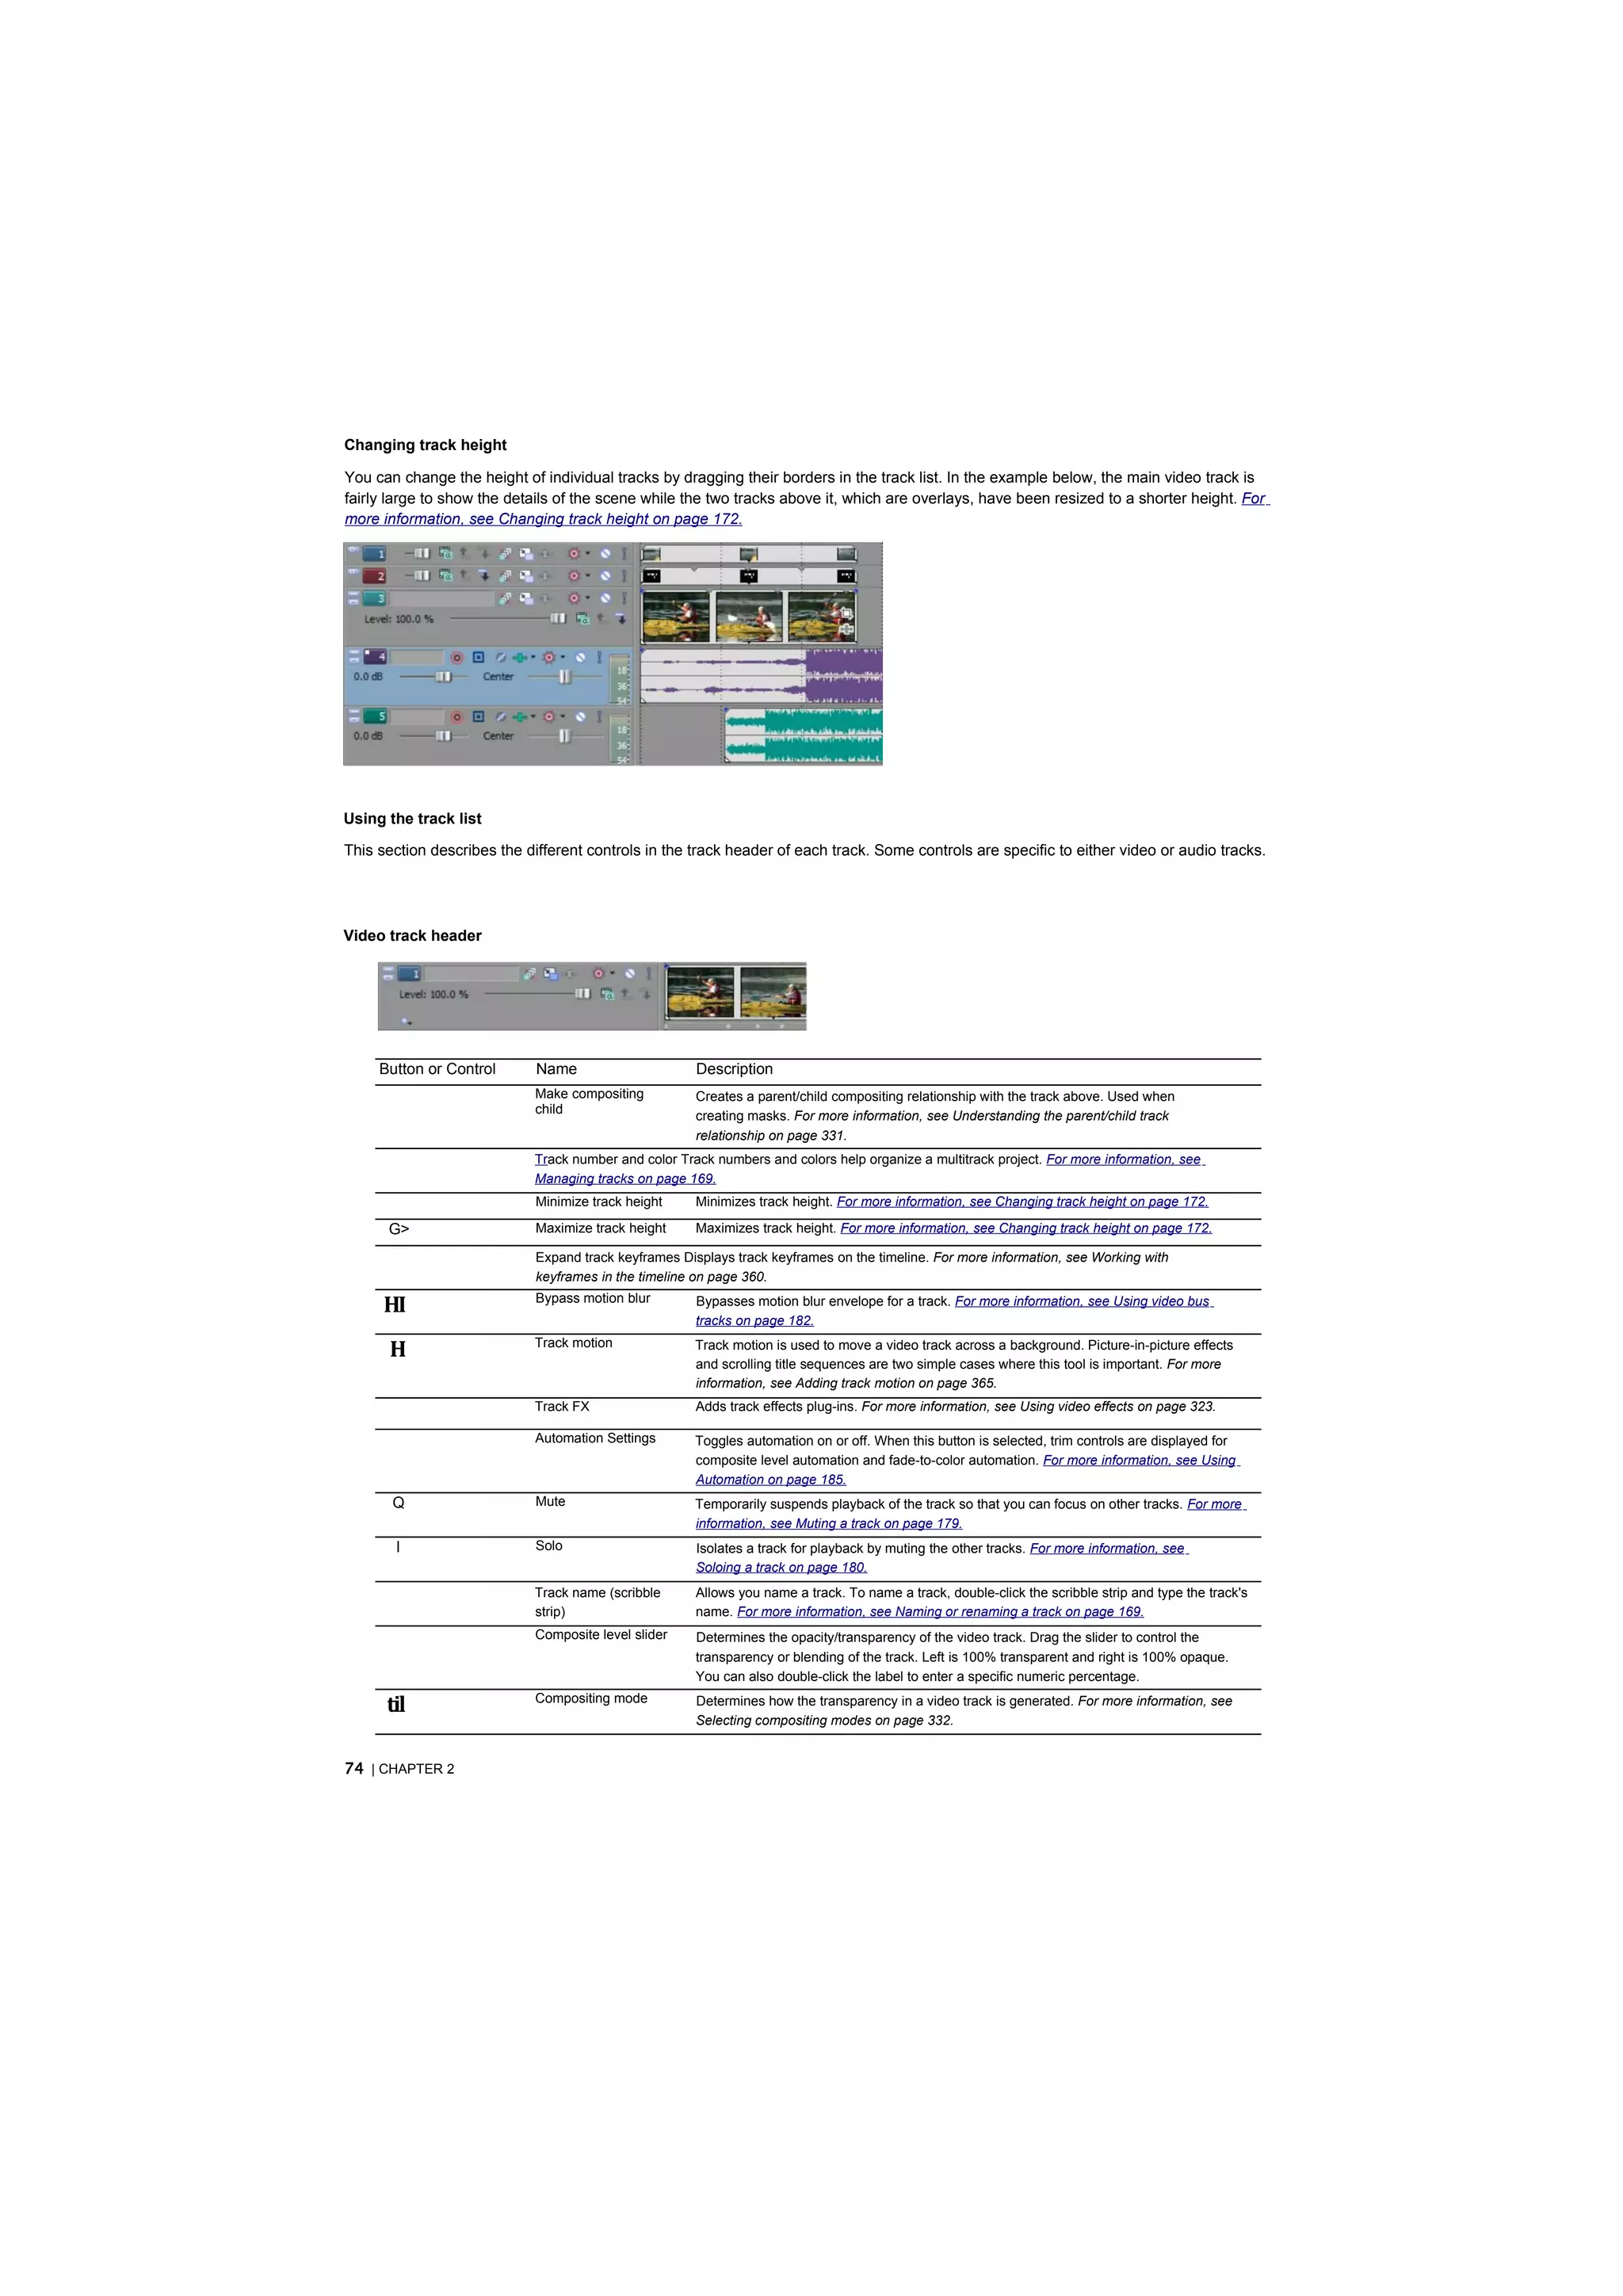
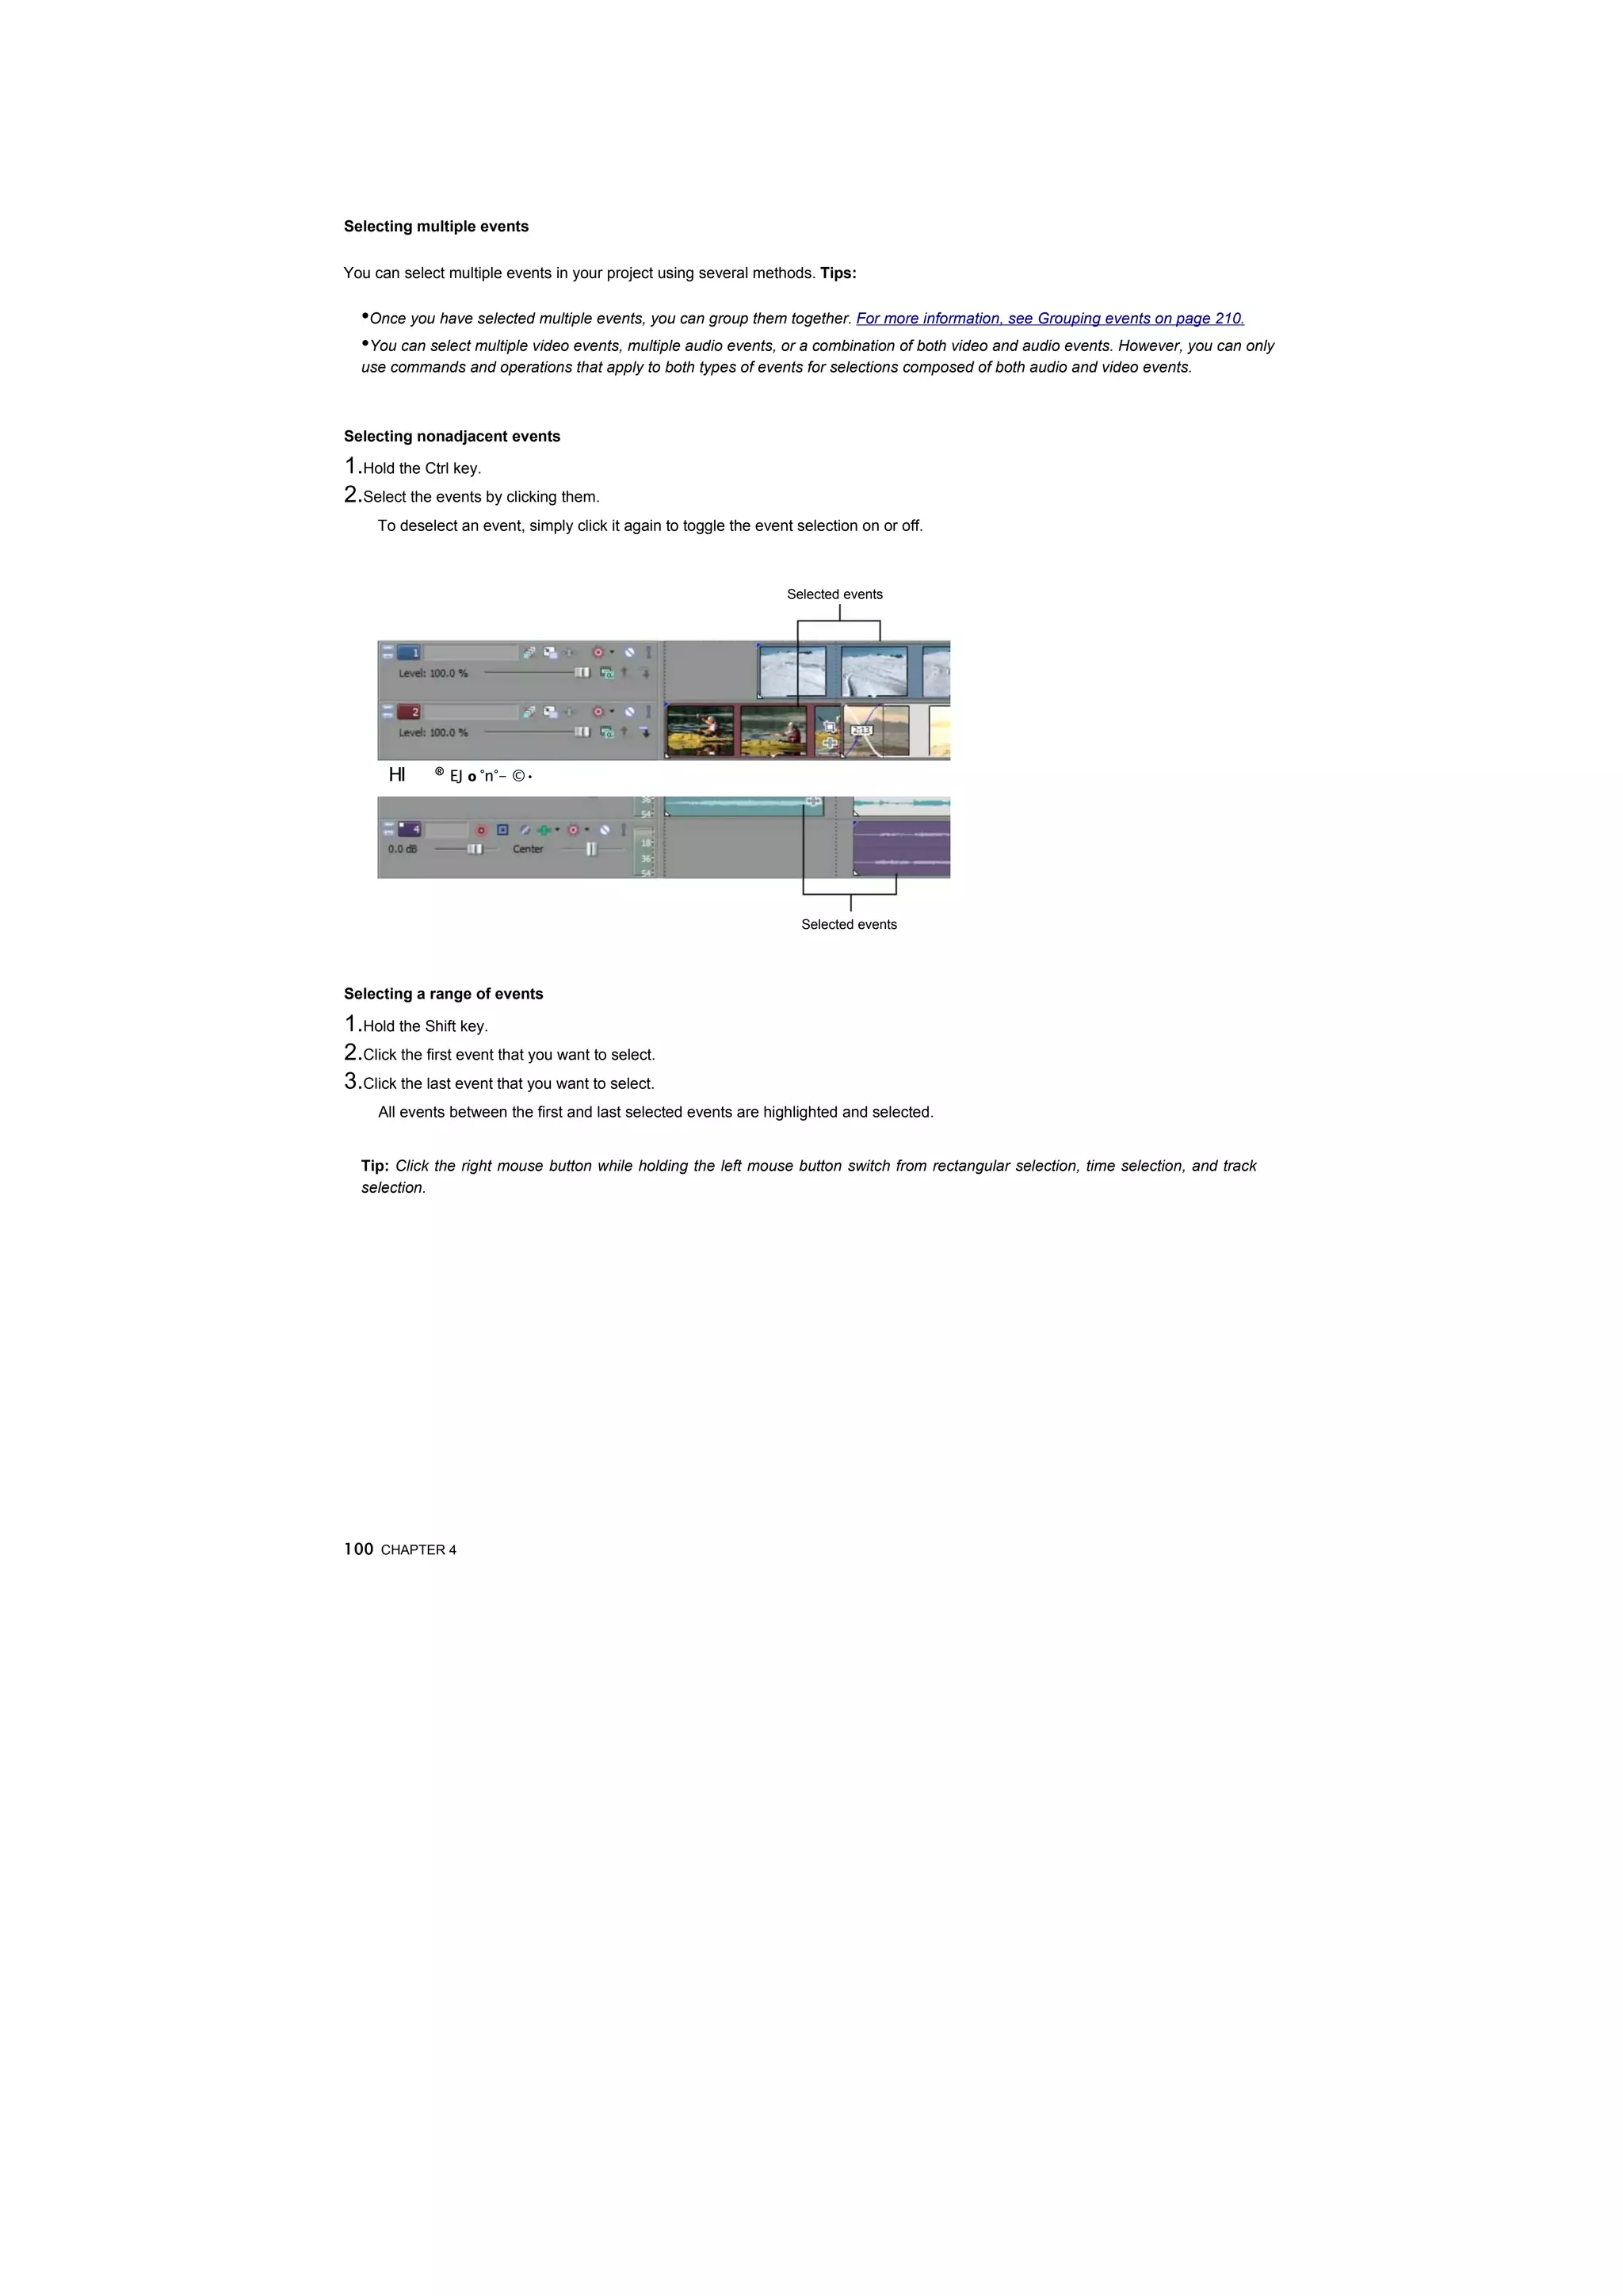
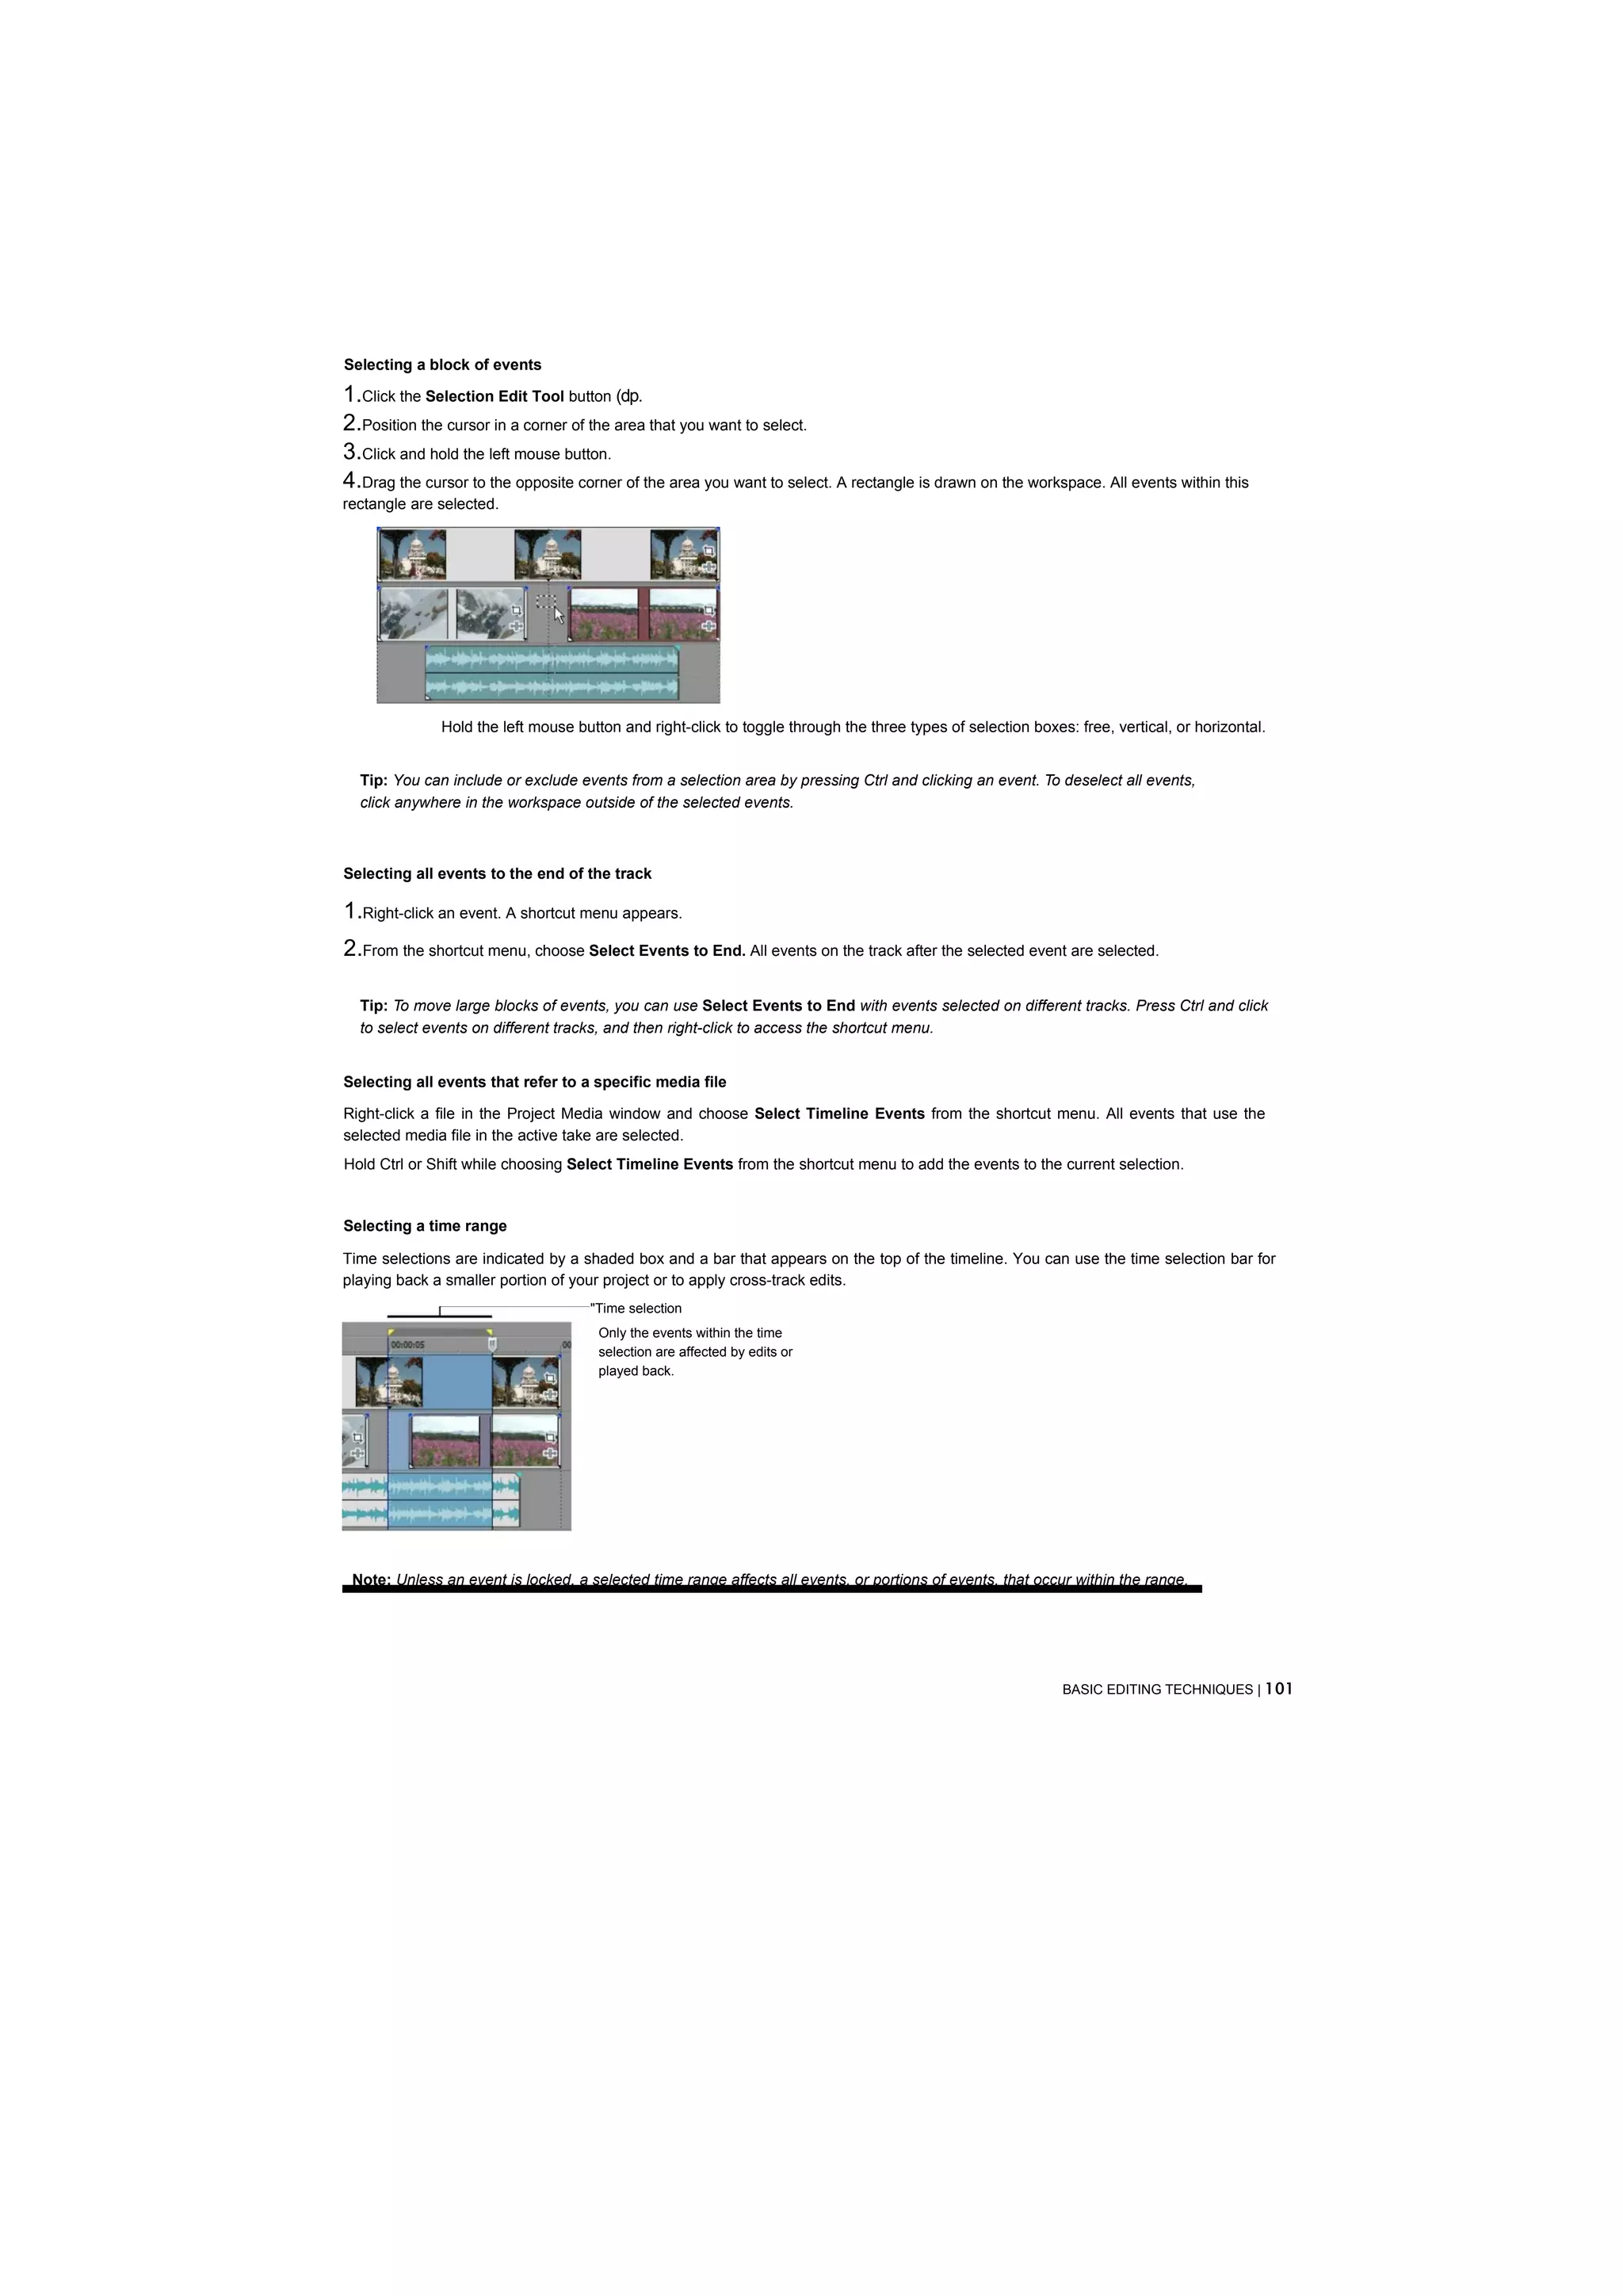
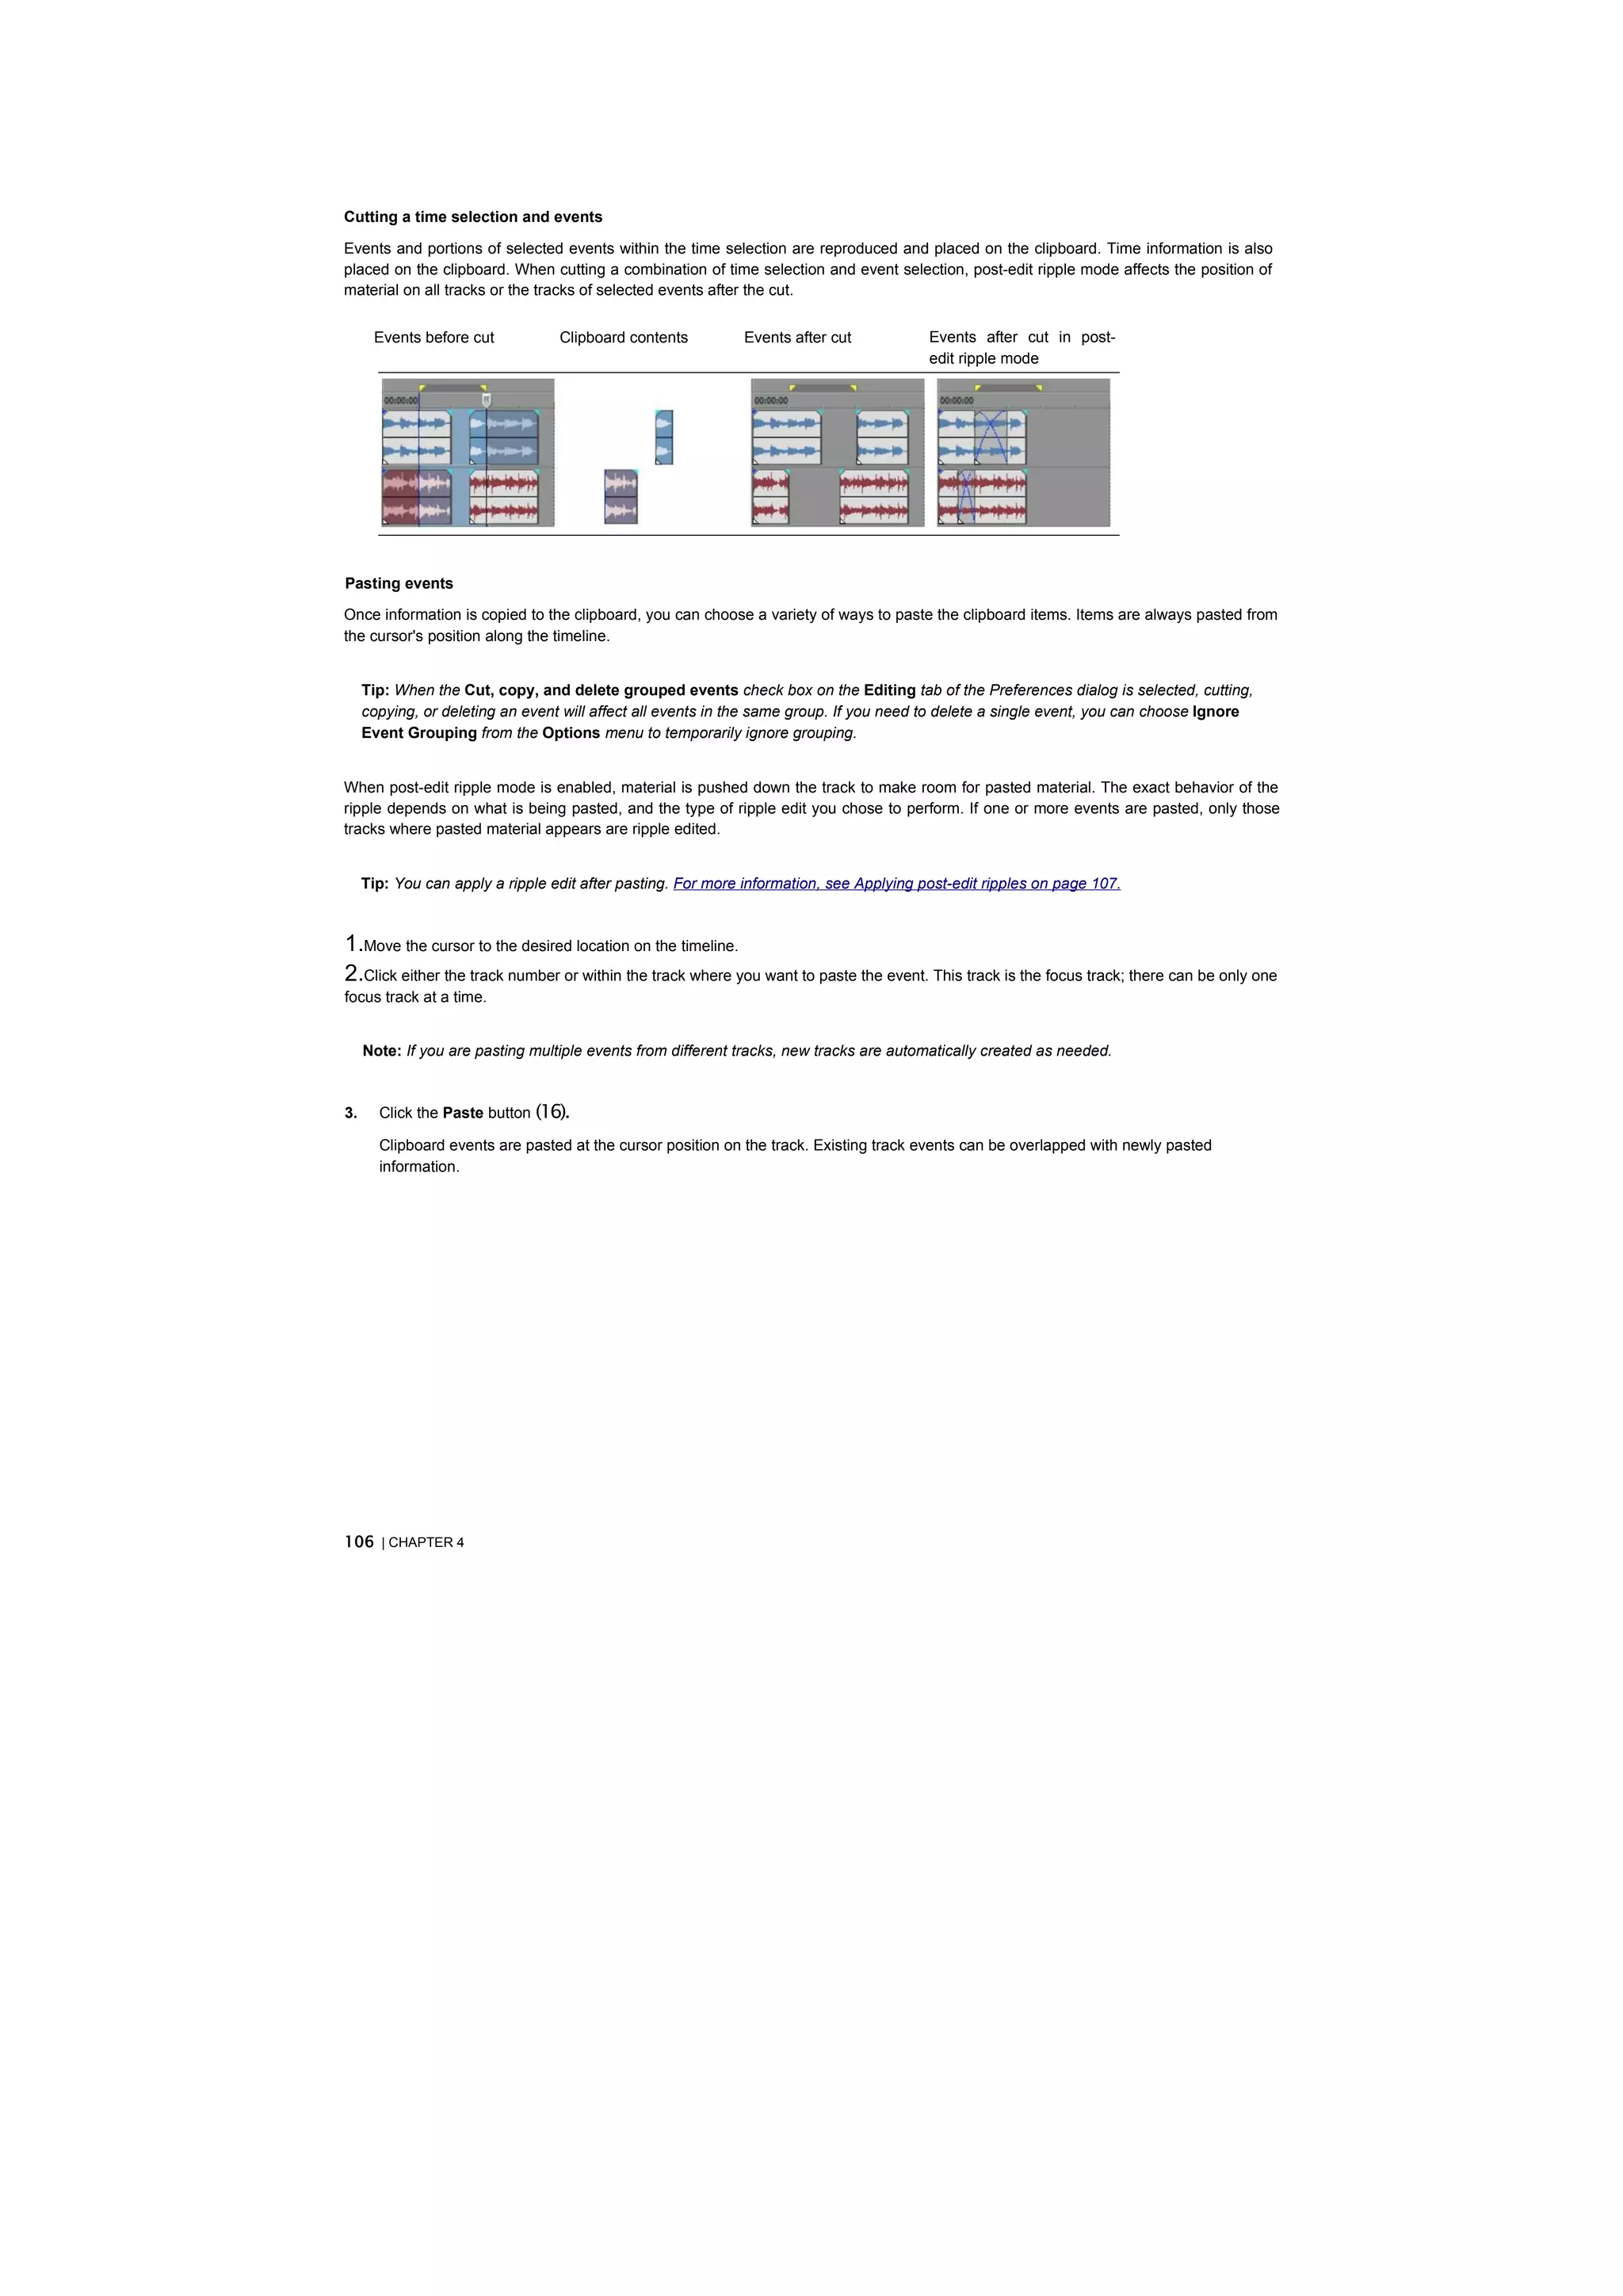
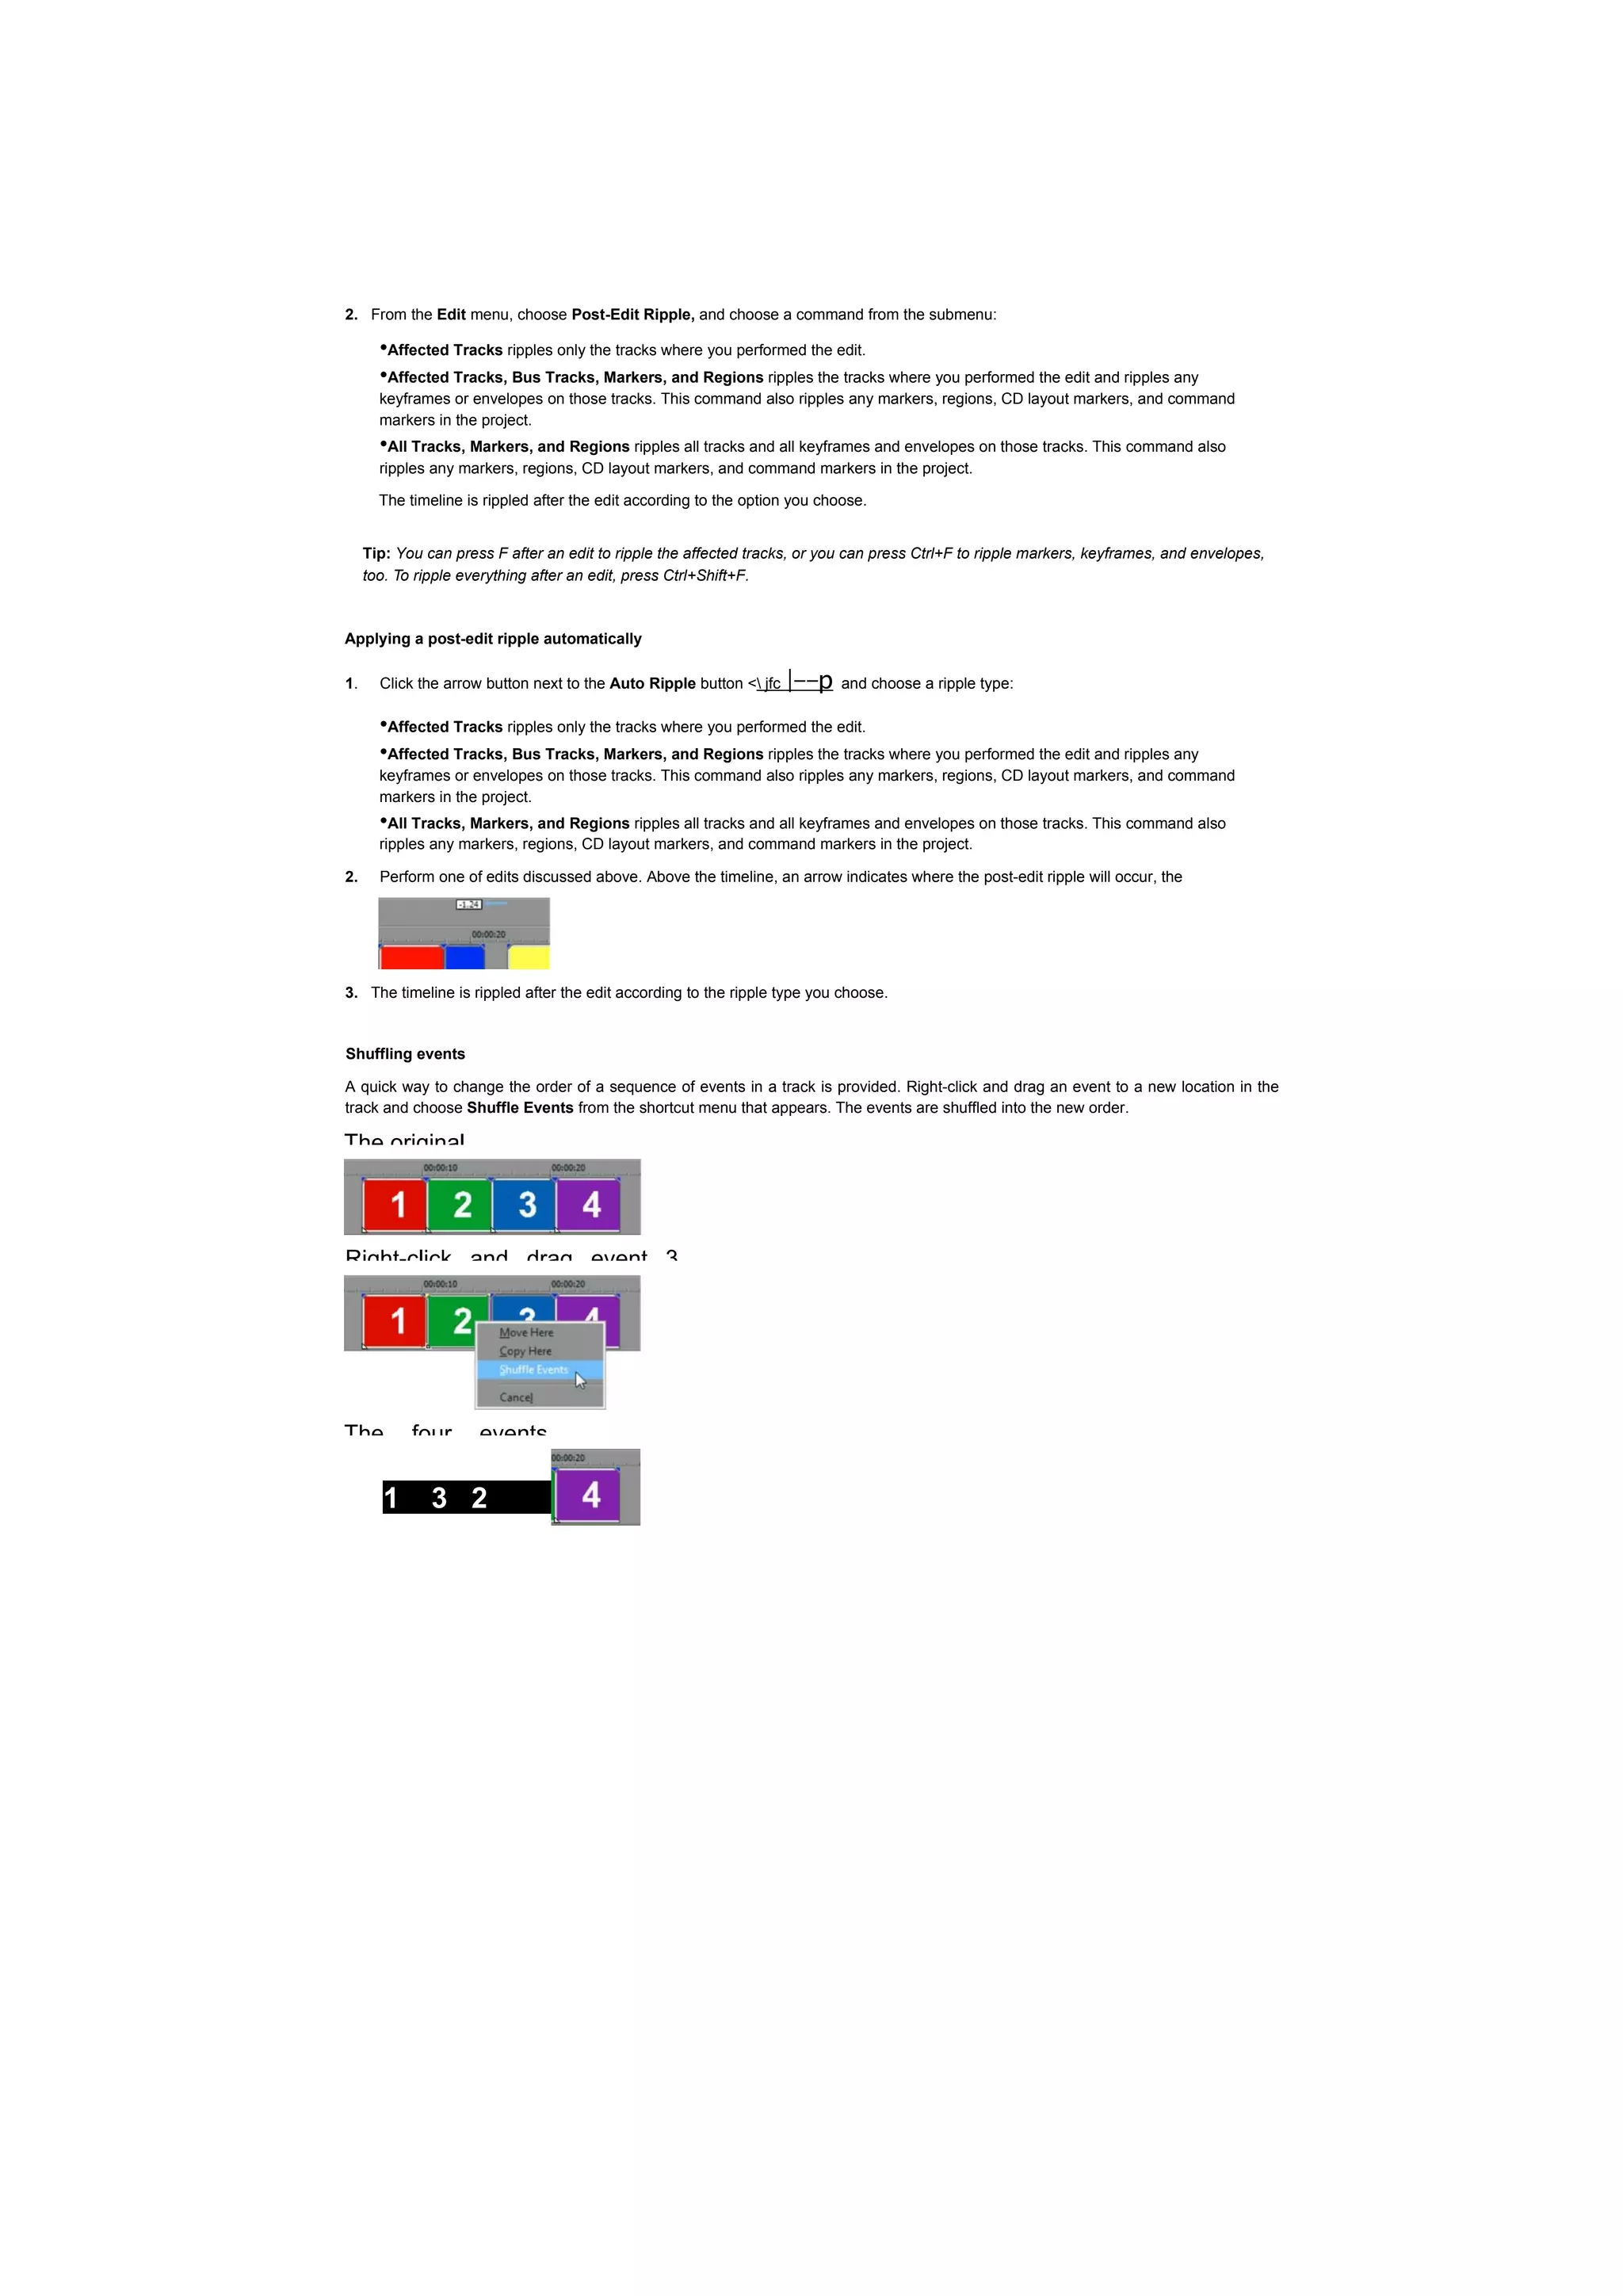
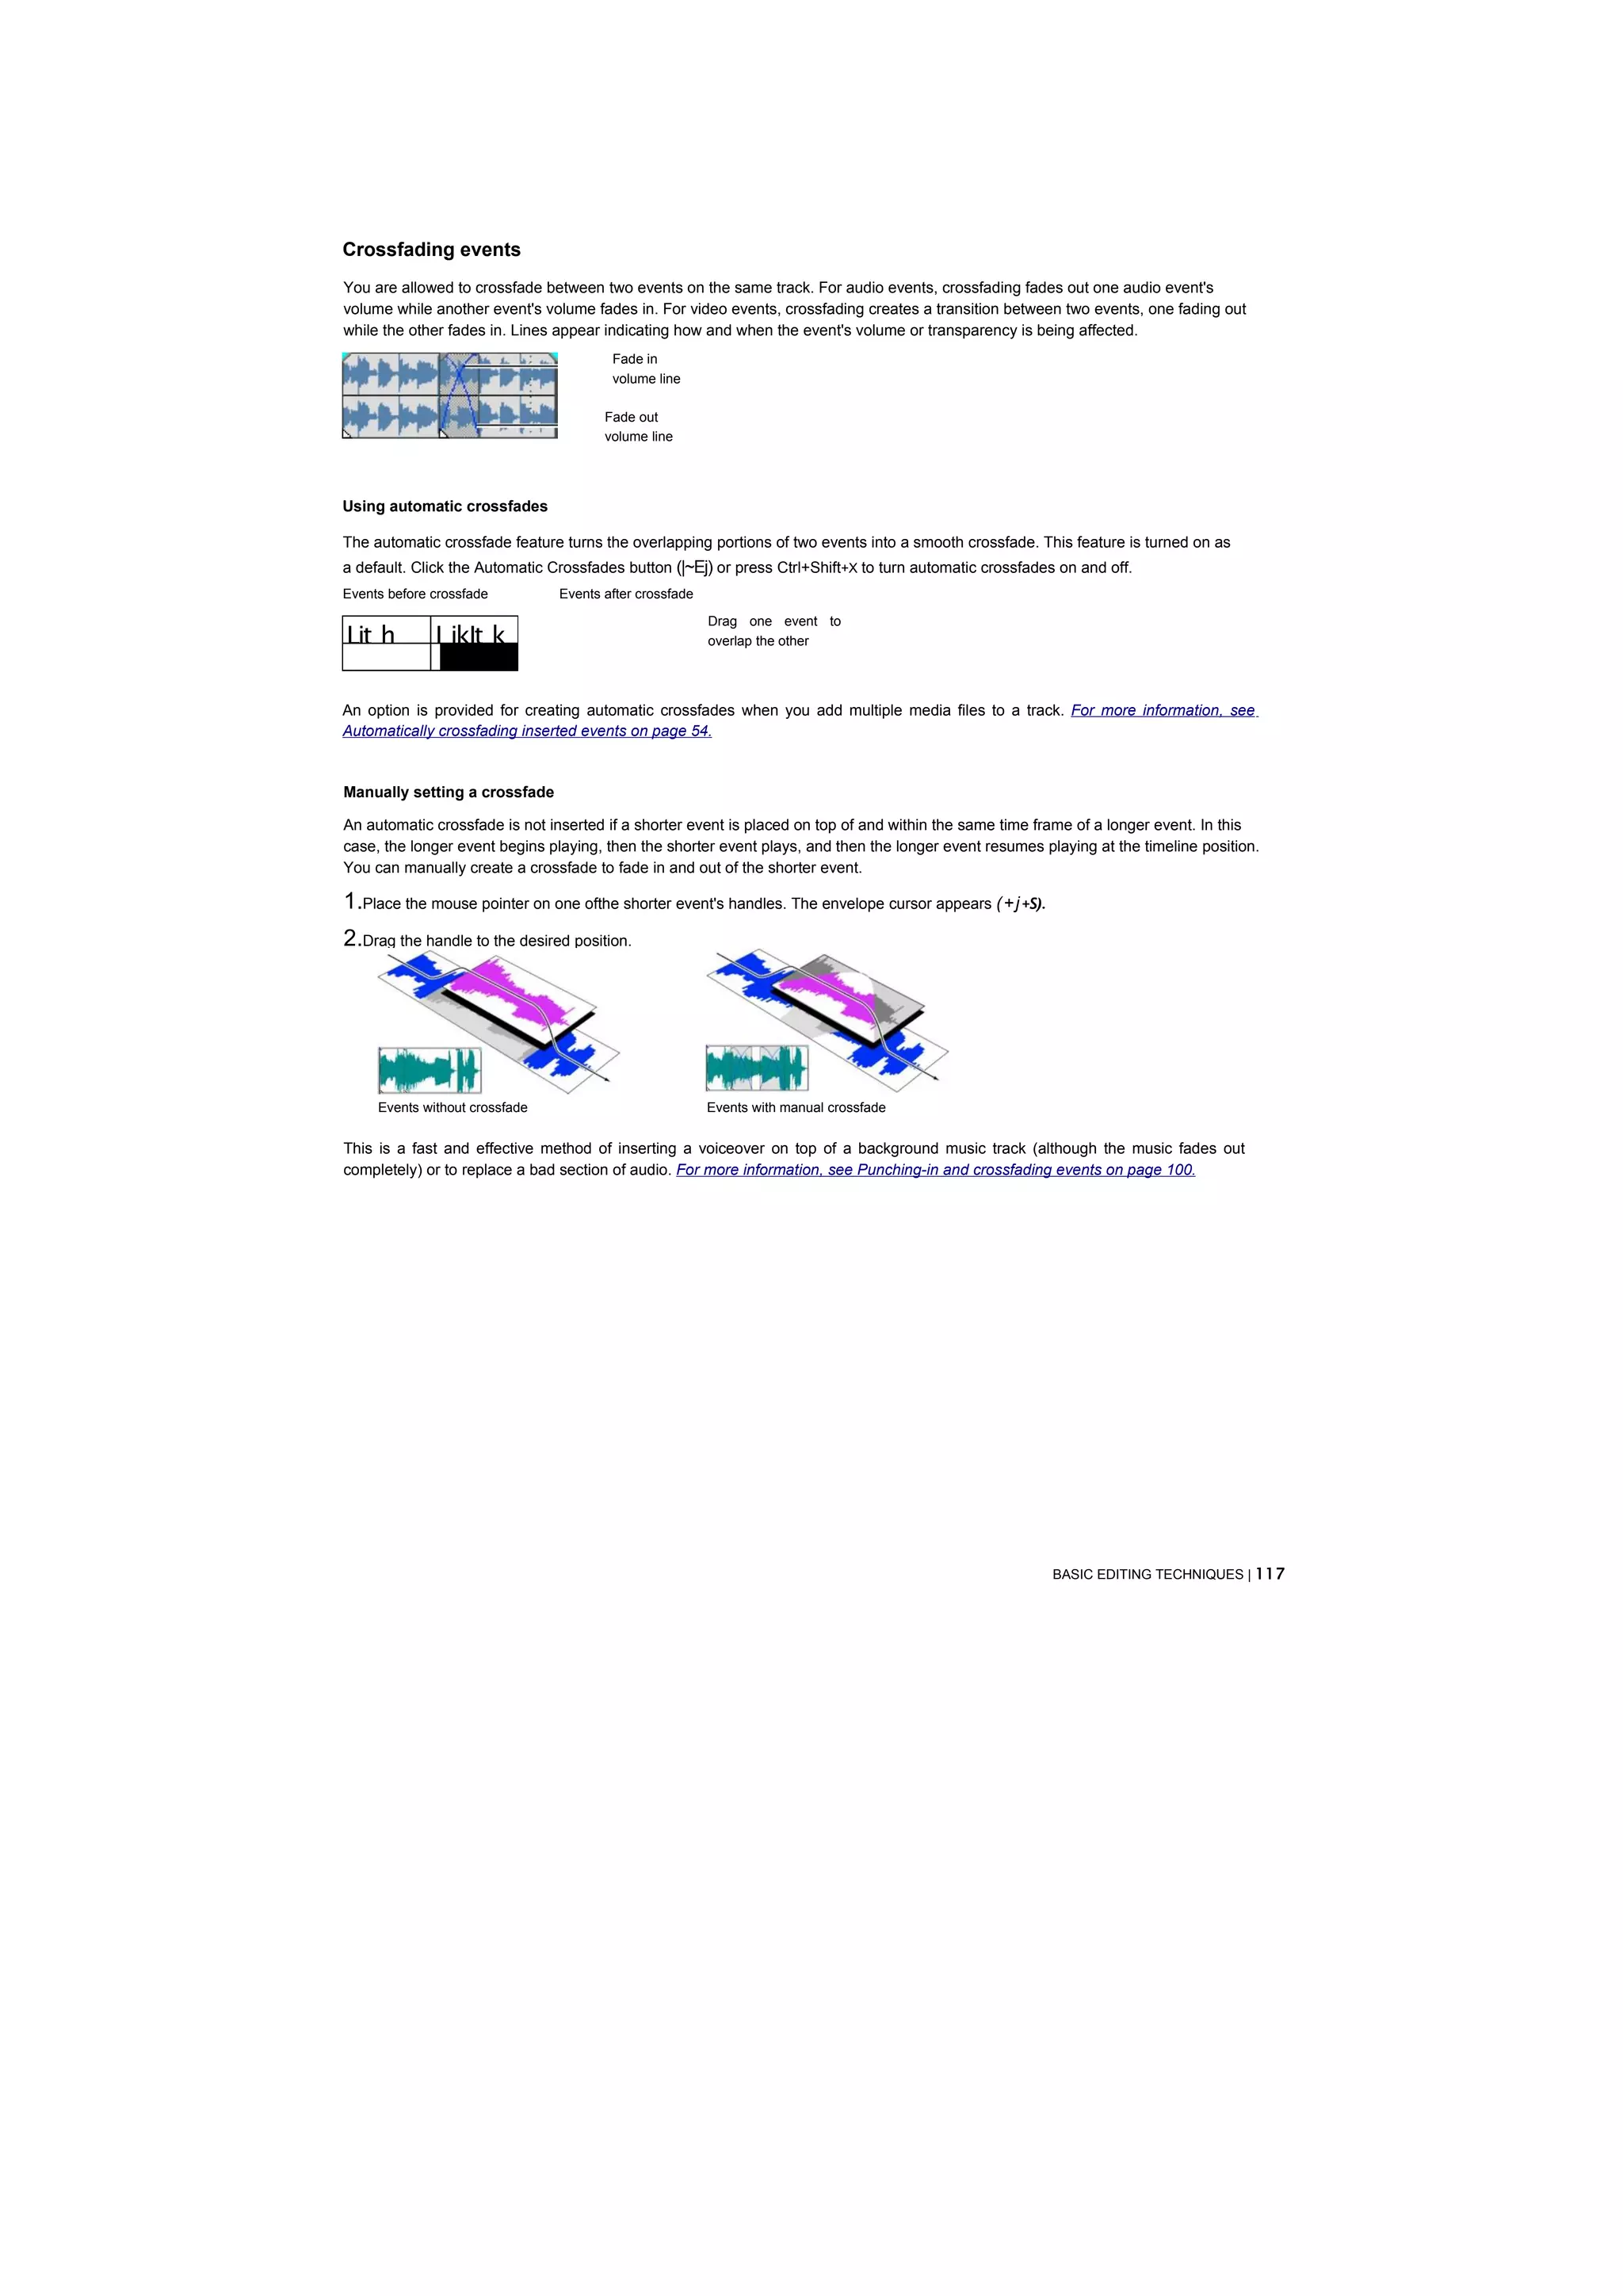
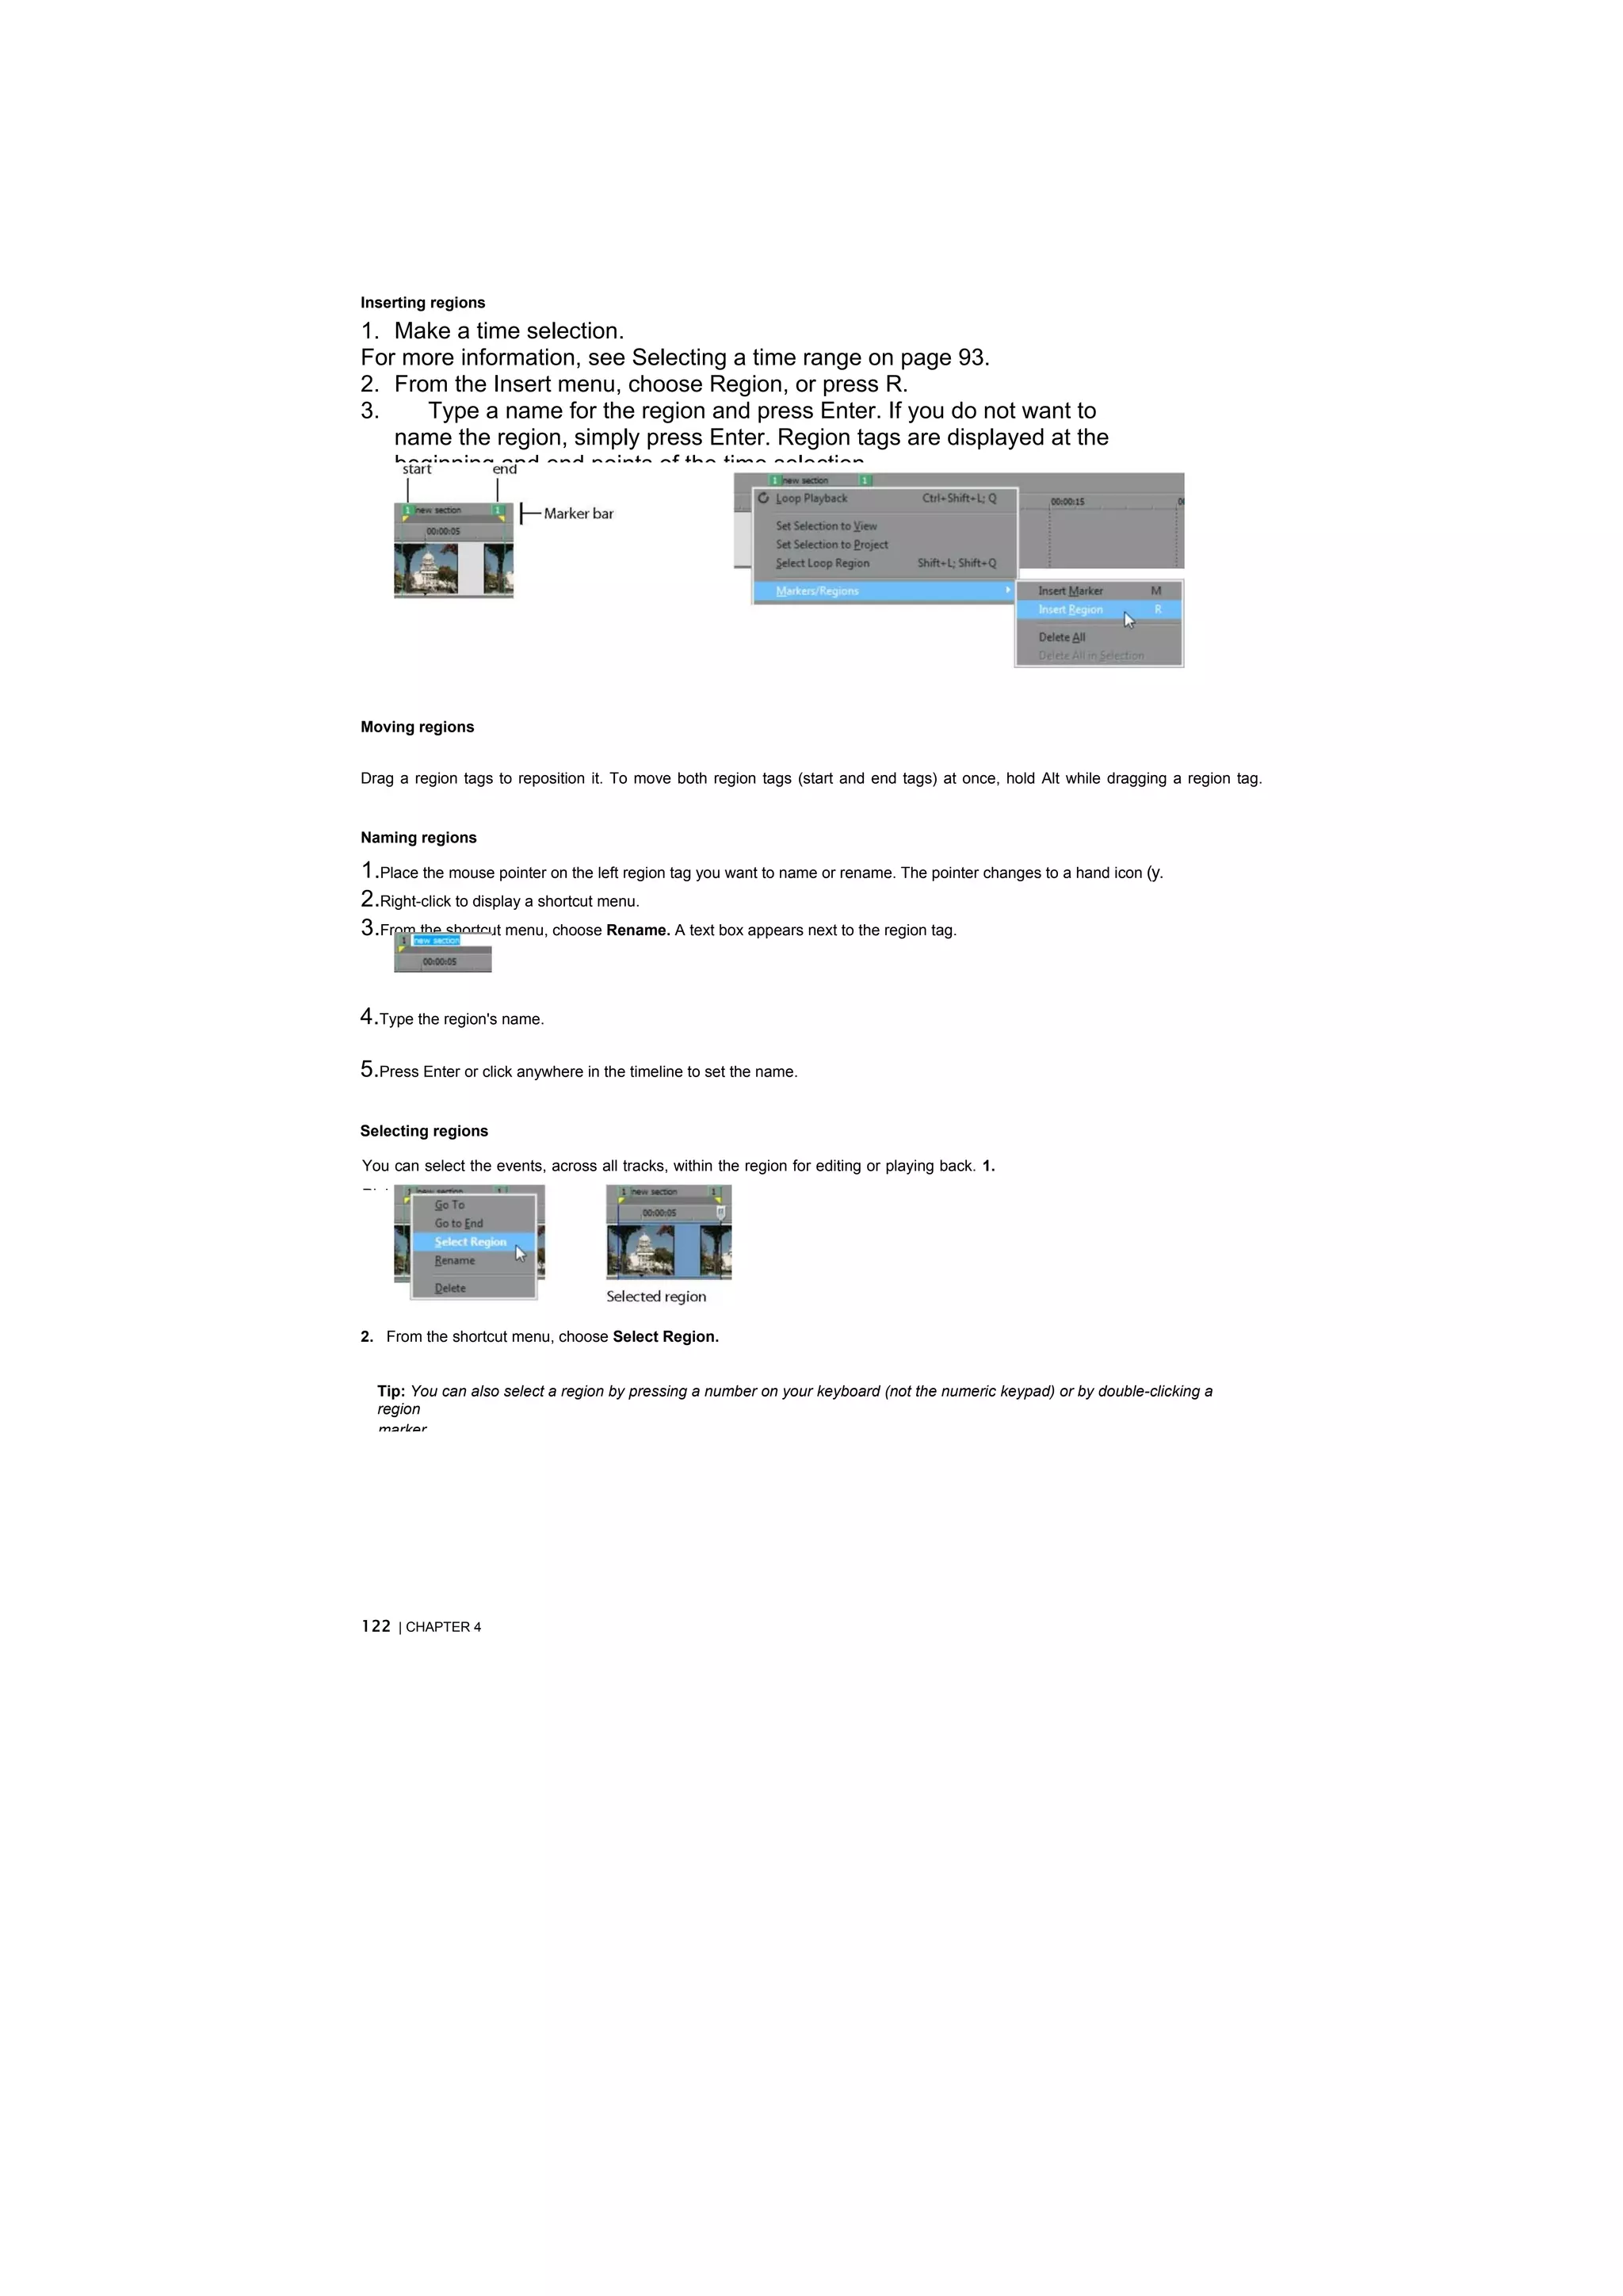
This document provides an overview of the main workflow features in Vegas Pro software. It introduces the main window components like the timeline, track list, transport controls. It describes how to create projects, import and work with media files, capture video, use the device explorer, work with events and tracks. It also covers nesting projects and playing back/previewing projects.


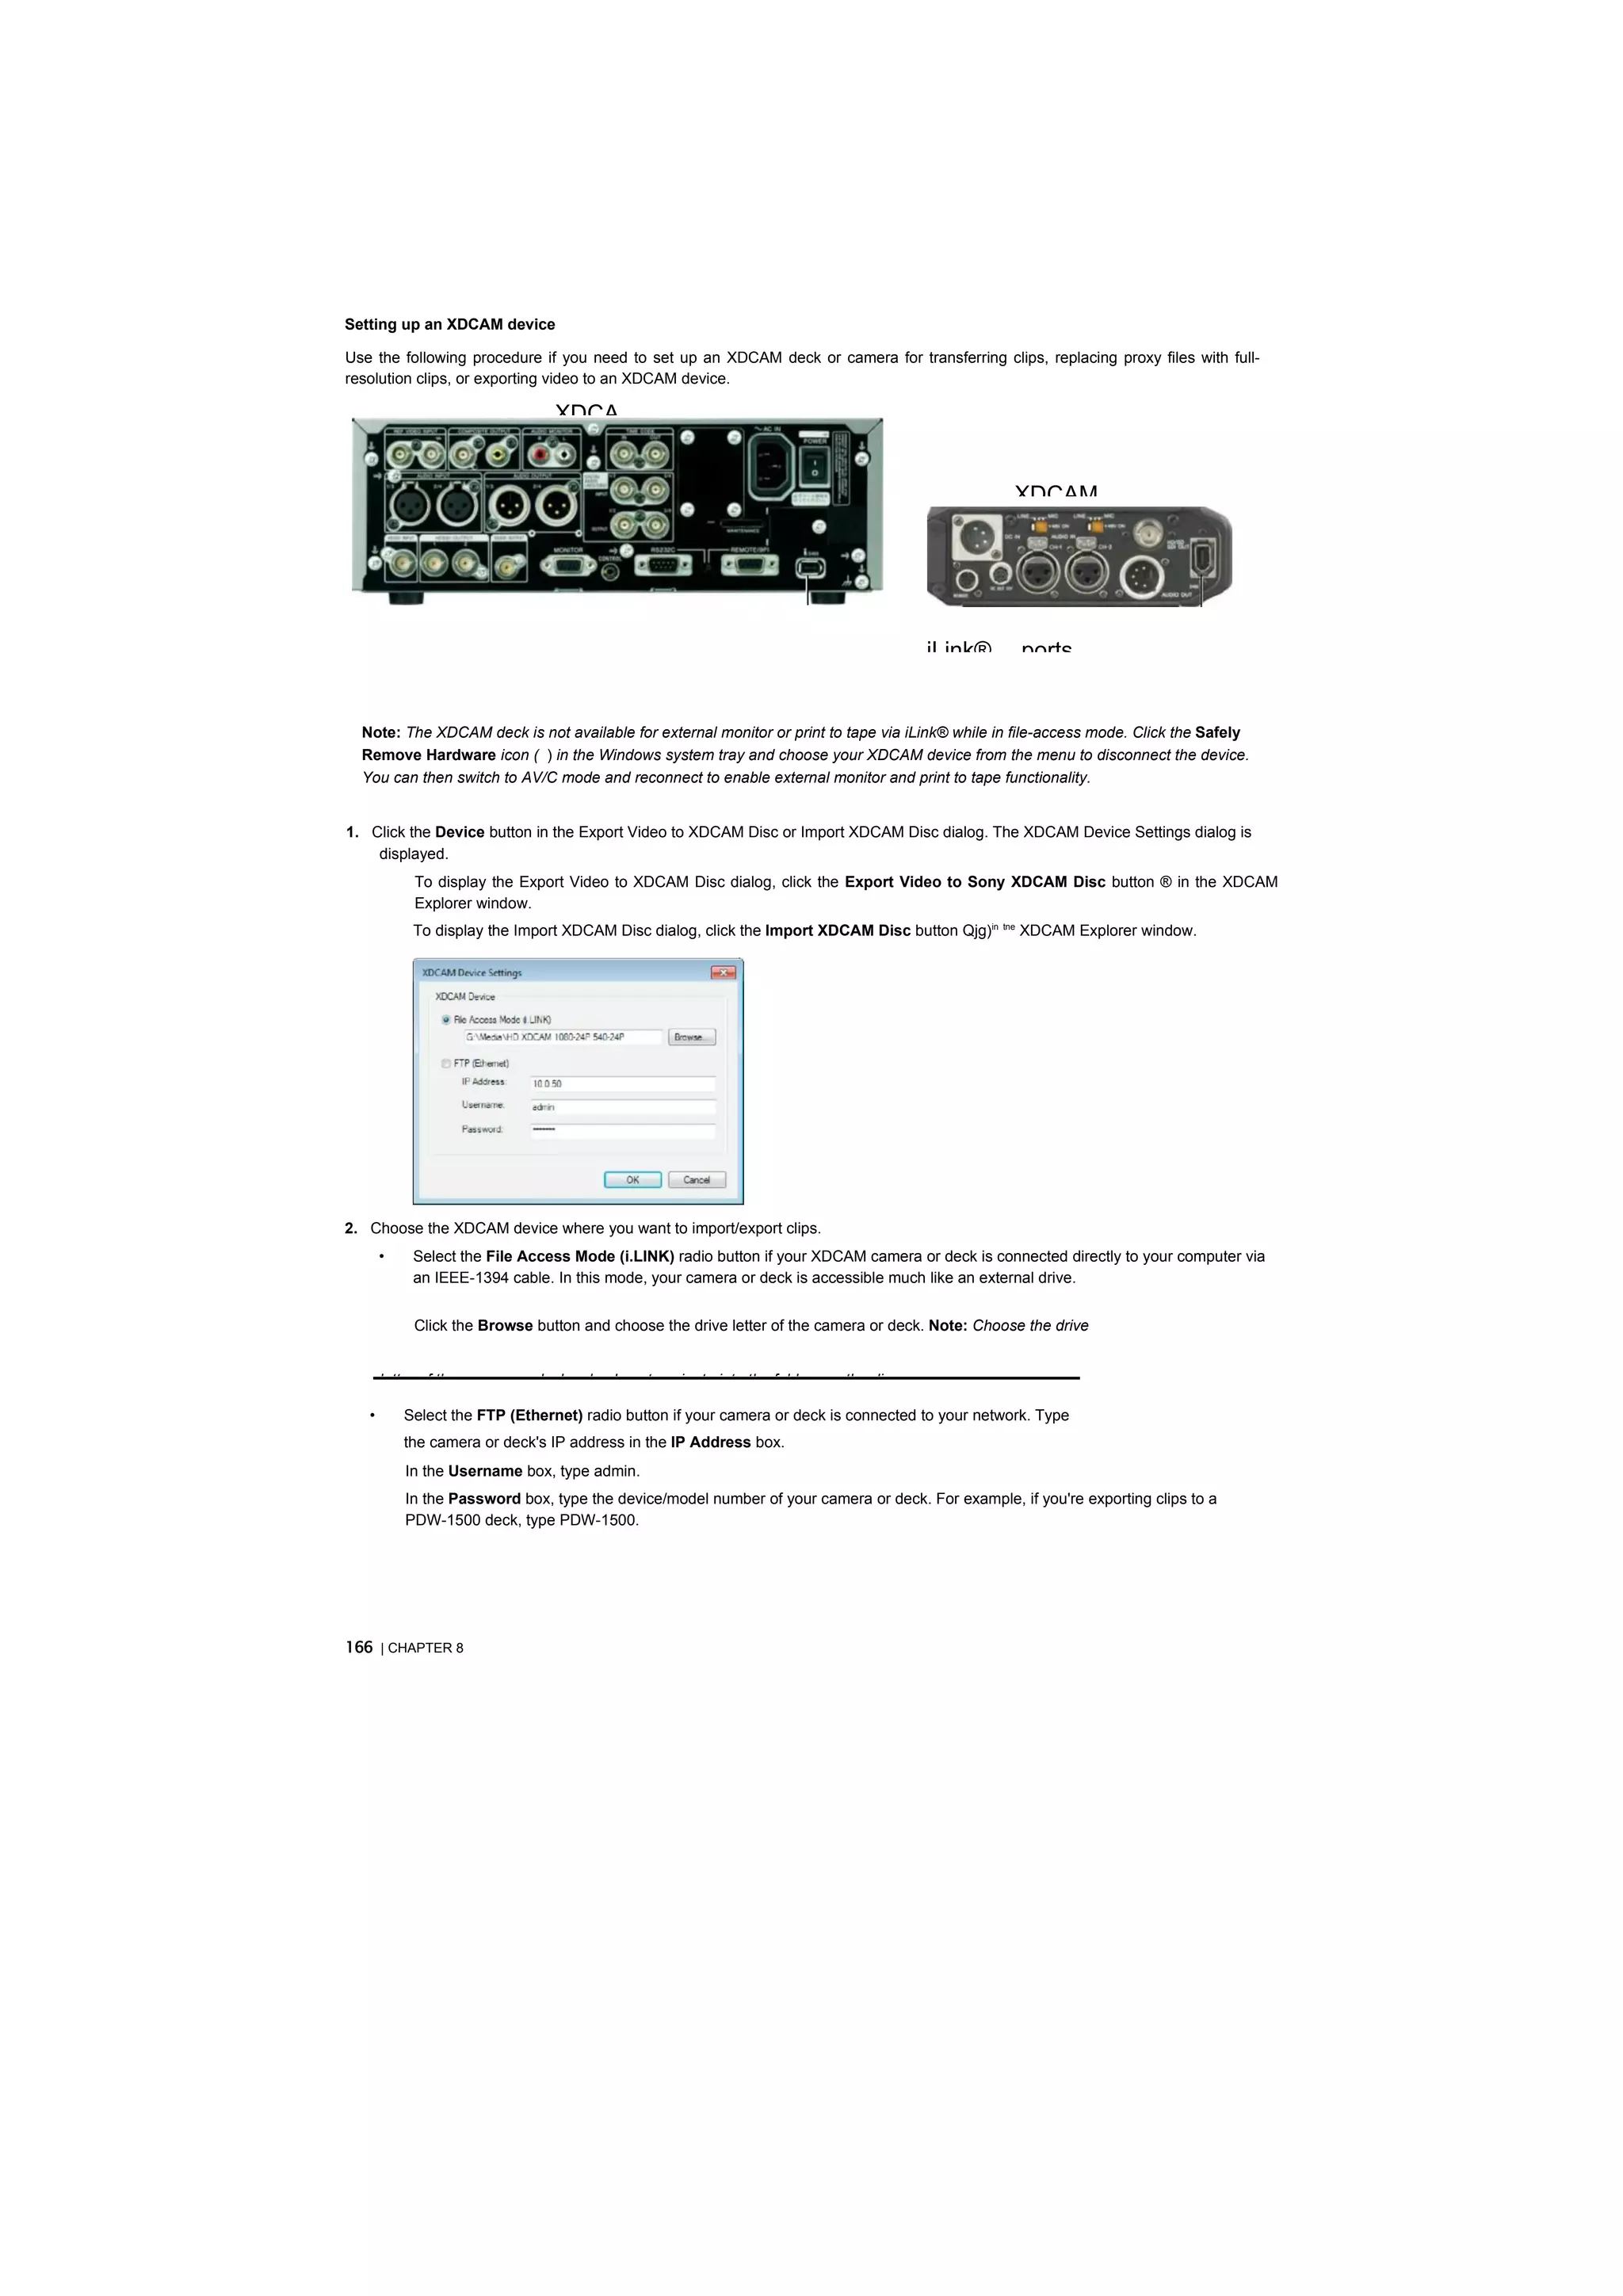
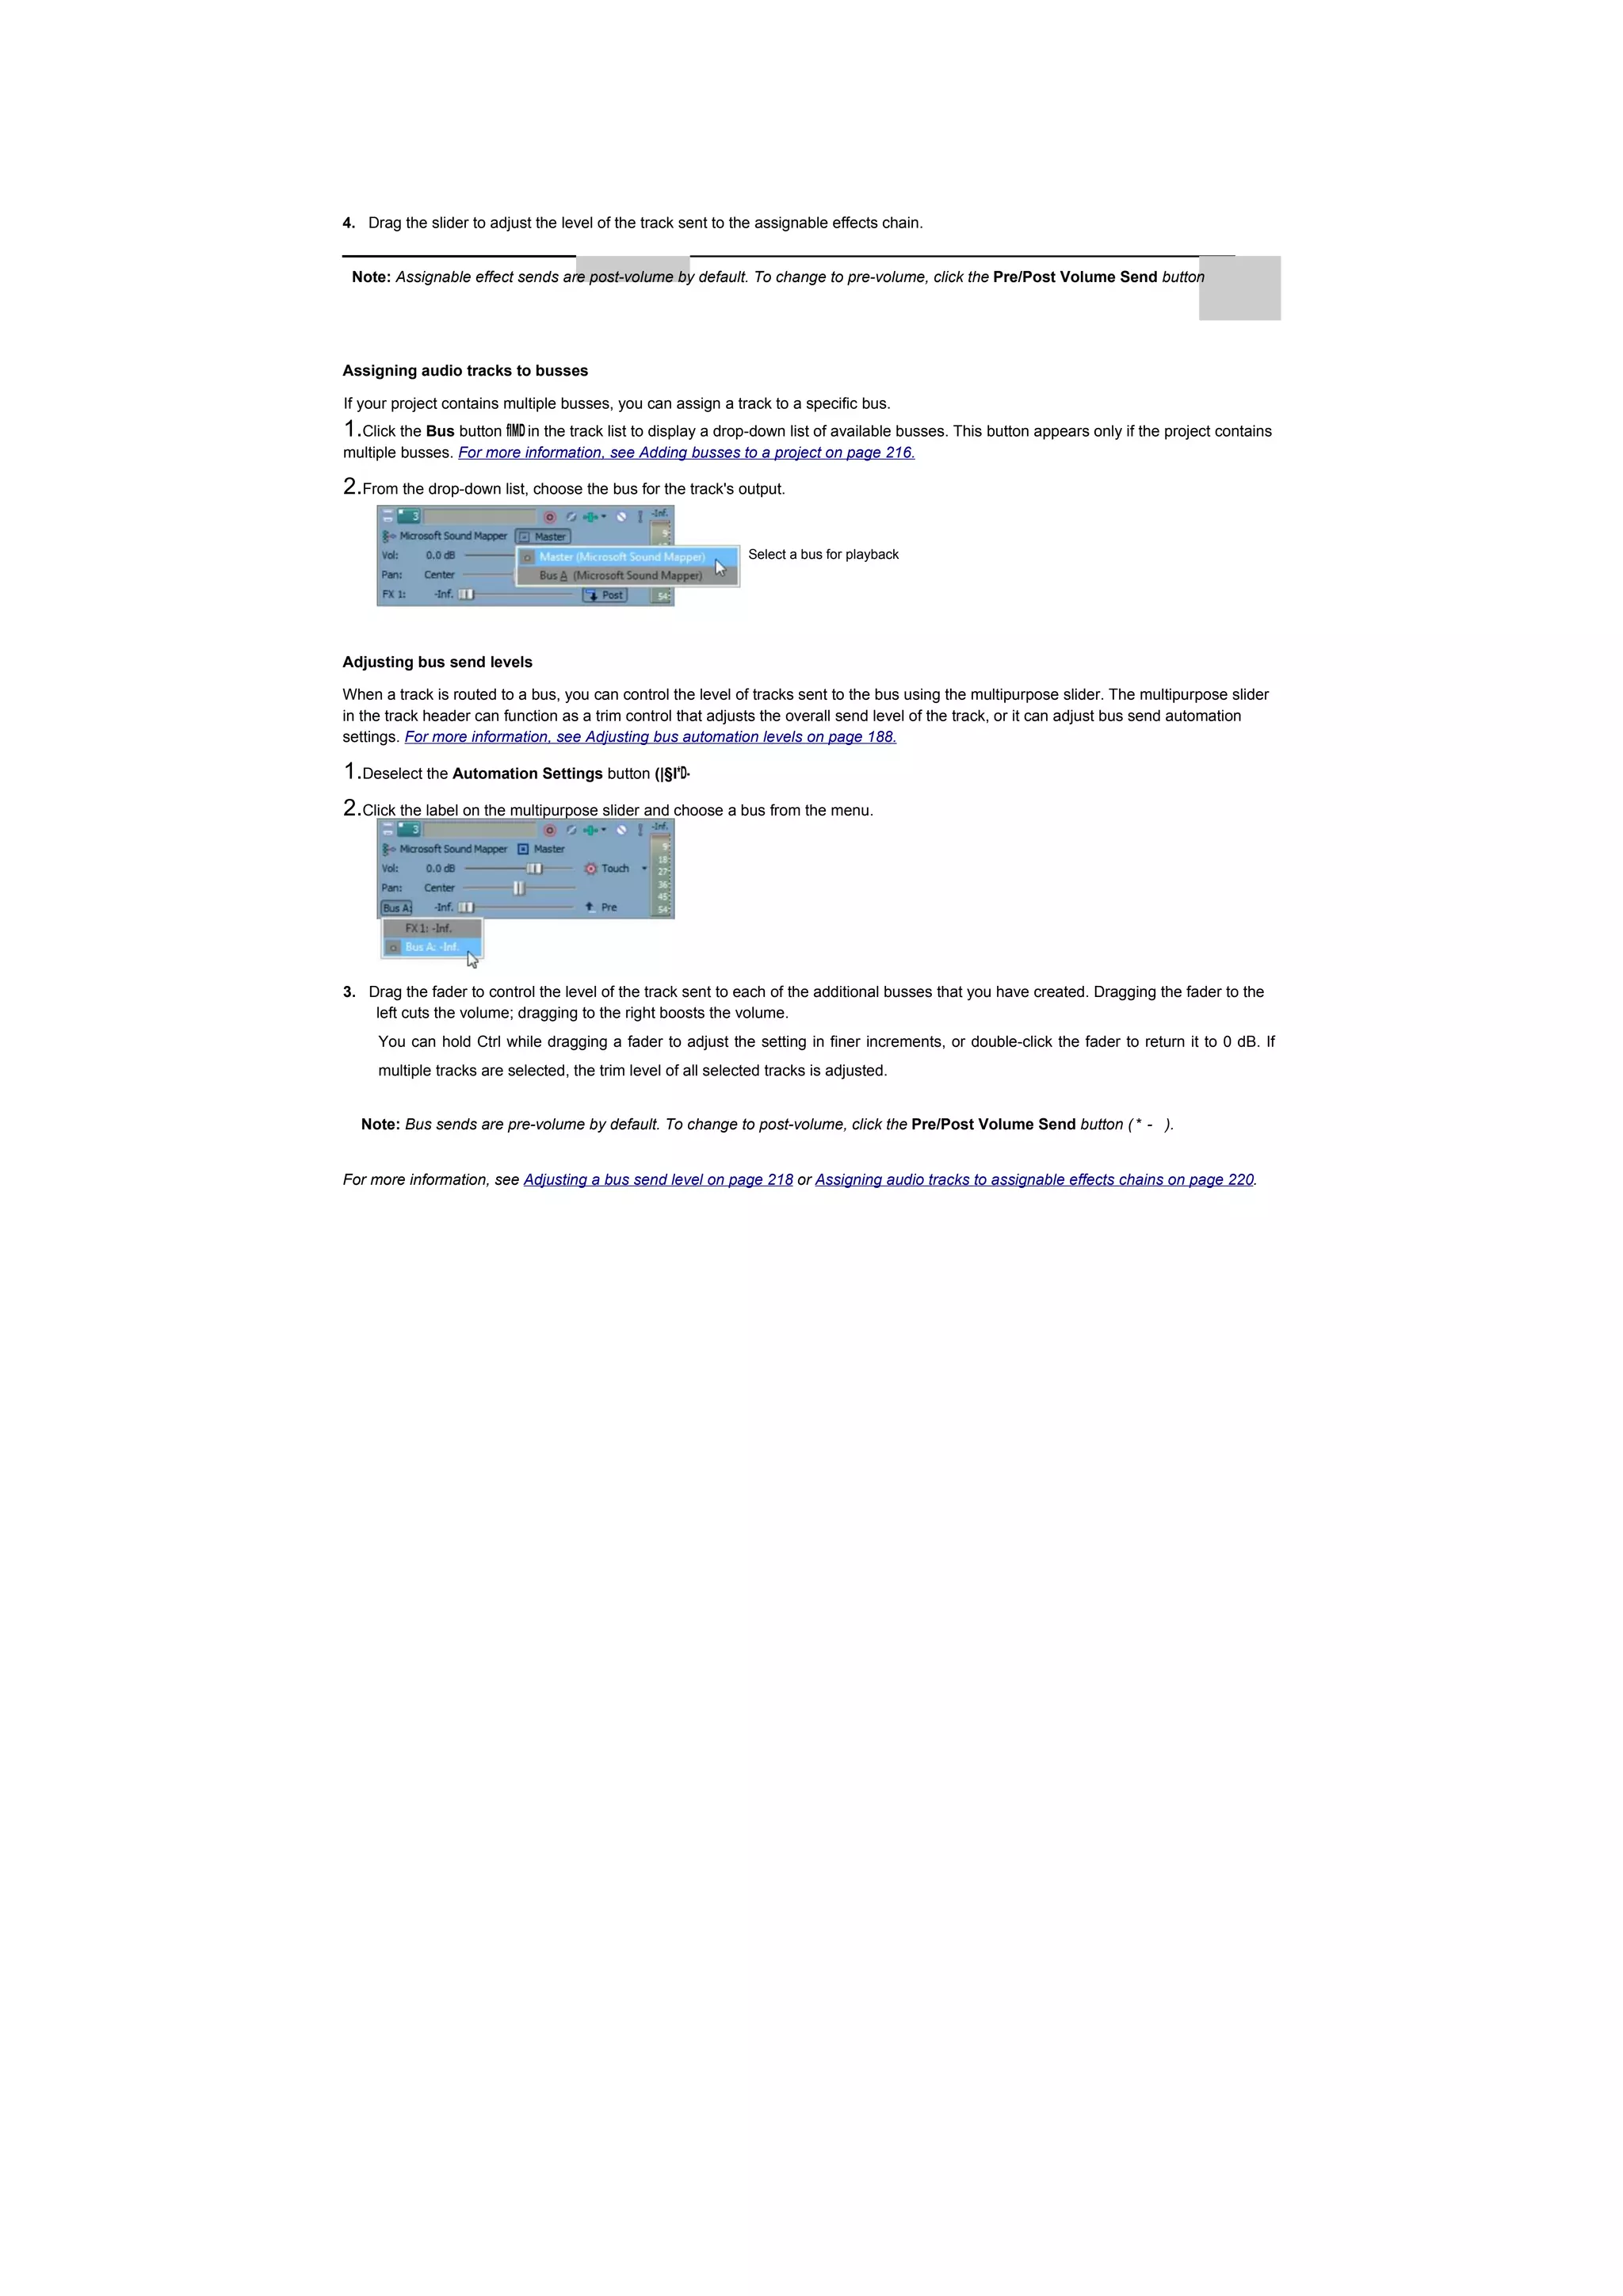
![Getting help
You can access two varieties of help within Vegas Pro:
•Online help
•Interactive tutorials
Online help
To access online help, choose Contents and Index from the Help menu or press F1.
The online help window has four tabs that you can use to find the information that you need.
Toolbar -
Tabs —
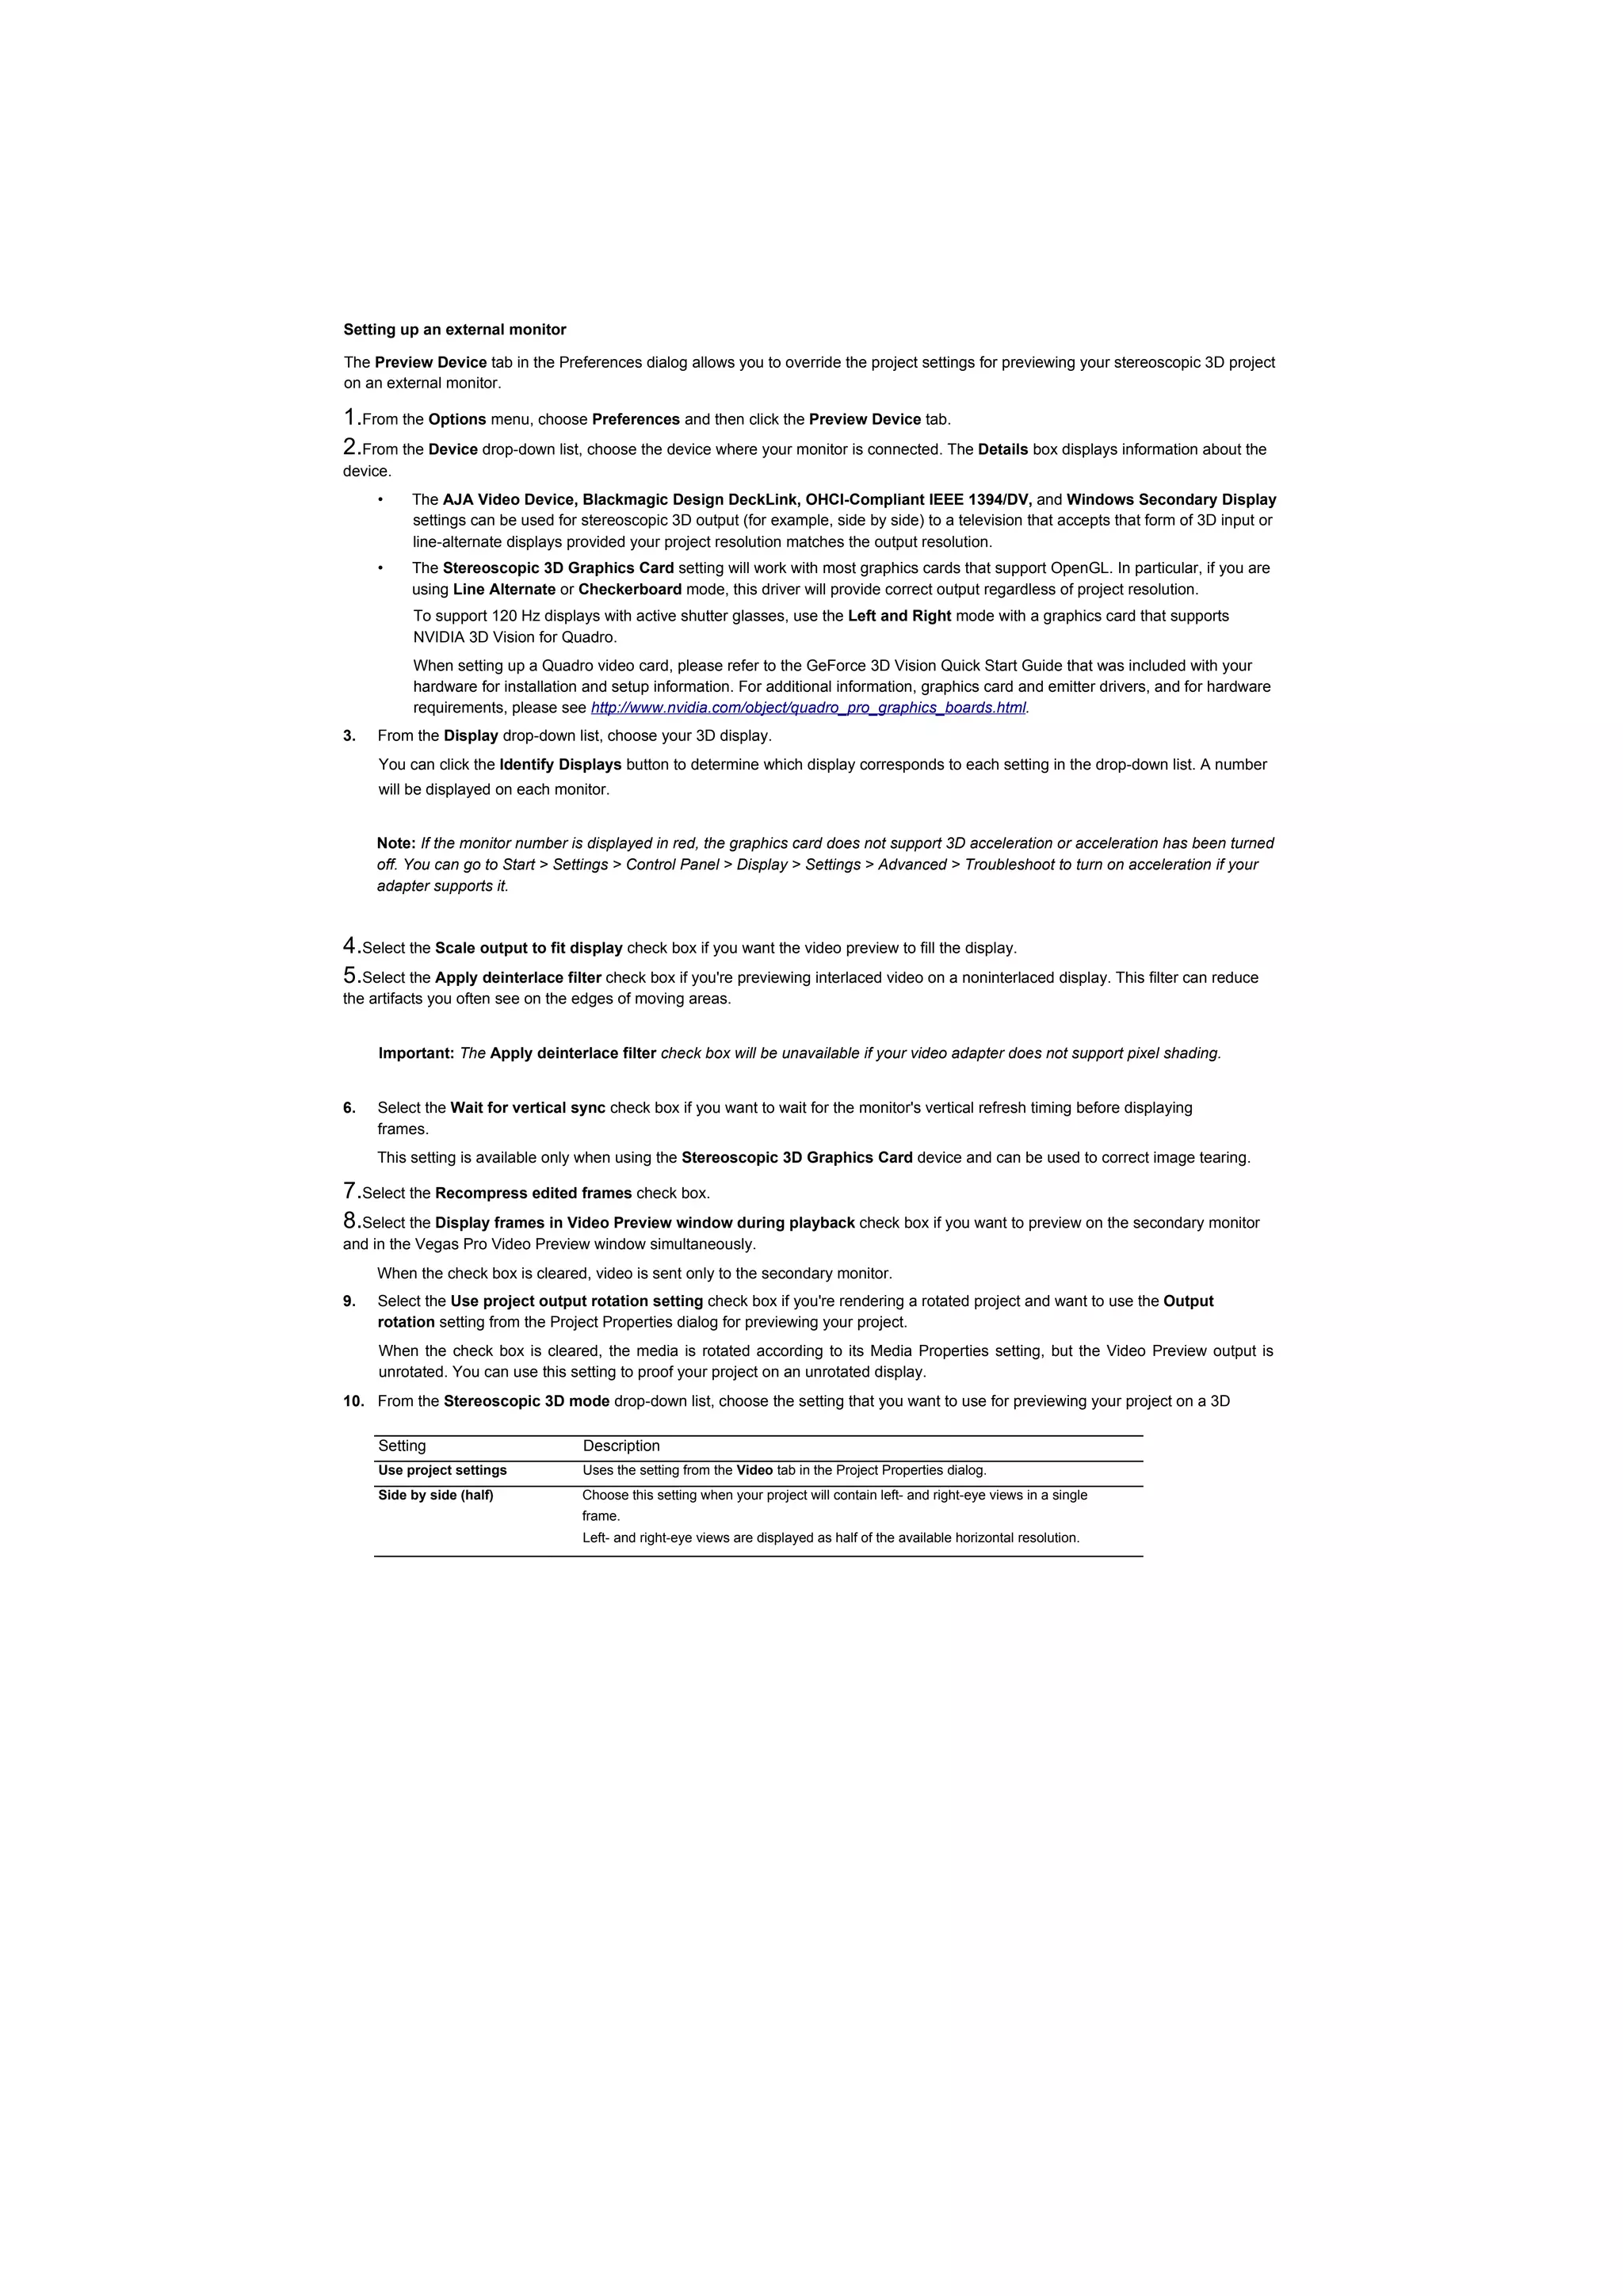
Information
pane
Tab Description
Contents Provides a list of available help topics. Click a closed book ^ to open the pages, and
then click on a topic page [?].
Index Provides a complete listing of the help topics available. Scroll through the list of
available topics or type a word in the Type in the keyword to find box to quickly
locate topics related to that word. Select the topic and click the Display button.
Search Allows you to type a keyword and display all of the topics in the online help that
contain the keyword you have entered. Type a keyword in the Type in the word(s) to
search for box and click the List Topics button. Select the topic from the list and click
the Display button.
Favorites Allows you to keep topics that you revisit often in a separate folder. To add a topic to
your favorites, click the Add button on the Favorites tab.
Interactive tutorials
You can learn more about many of the features in Vegas Pro by using the interactive tutorials installed with the software.
By default, the tutorials display upon startup of the application. However, you can access them at any time from the Help menu by
choosing Interactive Tutorials.
Tip: To turn off automatic display of the tutorials, clear the Show at Startup check box at the bottom of the tutorial window.
Help on the Web
Additional help and information is available on the Sony Creative Software Inc. Web site. From the Help menu, choose Sony on the Web
to view a listing of Web pages pertaining to Vegas Pro software and Sony Creative Software Inc. The software starts your system's Web
browser and attempts to connect to the appropriate page on the Sony Creative Software Inc. site.
30 | CHAPTER 1](https://image.slidesharecdn.com/vegaltk11-110216154309-phpapp02/75/Vegal-tk11-30-2048.jpg)


![Getting media files
You can add media from a variety of sources to your project. You can add audio and video files, record audio into a track, capture video
from a video camera, or extract music from your own CD. You can also create media such as text overlays, backgrounds, and credit rolls
from within the software. For more information, see Using generated media on page 329.
Vegas Pro software supports a wide range of media file types. There are multiple ways to locate and add files to your Vegas Pro project,
as discussed in the following sections.
Notes:
•To have pulldown fields automatically removed when opening 24 fps progressive-scan DV video files, select the Allow pulldown
removal when opening 24p DV check box on the General tab of the Preferences dialog. To open your 24p DV video files as 29.97 fps
interlaced video (60i), clear this check box.
•When you add an ACID loop to the timeline, it is automatically stretched to match the project tempo as specified on the Ruler tab of
the Project Properties dialog. If you want to ignore tempo information, clear the Import audio at project tempo check box on the Audio
tab of the Preferences dialog. For more information on project properties, see Working with project properties on page 436. For more
information on preferences, see Setting preferences on page 442.
•When you add a multichannel audio file (.wav/.wav64, .avi, .mxf, ATRAC, and BWF) to your project, the audio is added across
tracks. For example, if you import a four-channel WAV file, the audio will be added to four adjacent tracks. For control over which
channels are used by each event, right-click a multichannel audio event, choose Channels from the shortcut menu, and choose a
command from the submenu. For more information, see Adjusting audio channels on page 204.
•When you add a multistream audio file to your project, you can choose which stream you want to use by right-clicking the event,
choosing Stream from the shortcut menu, and then choosing a stream from the submenu.
•5.1-channel audio from DVD camcorders will be downmixed to stereo when importing into a stereo project. When importing into a
5.1 surround project, audio will be added to separate tracks for the center, front, rear, and LFE channels.
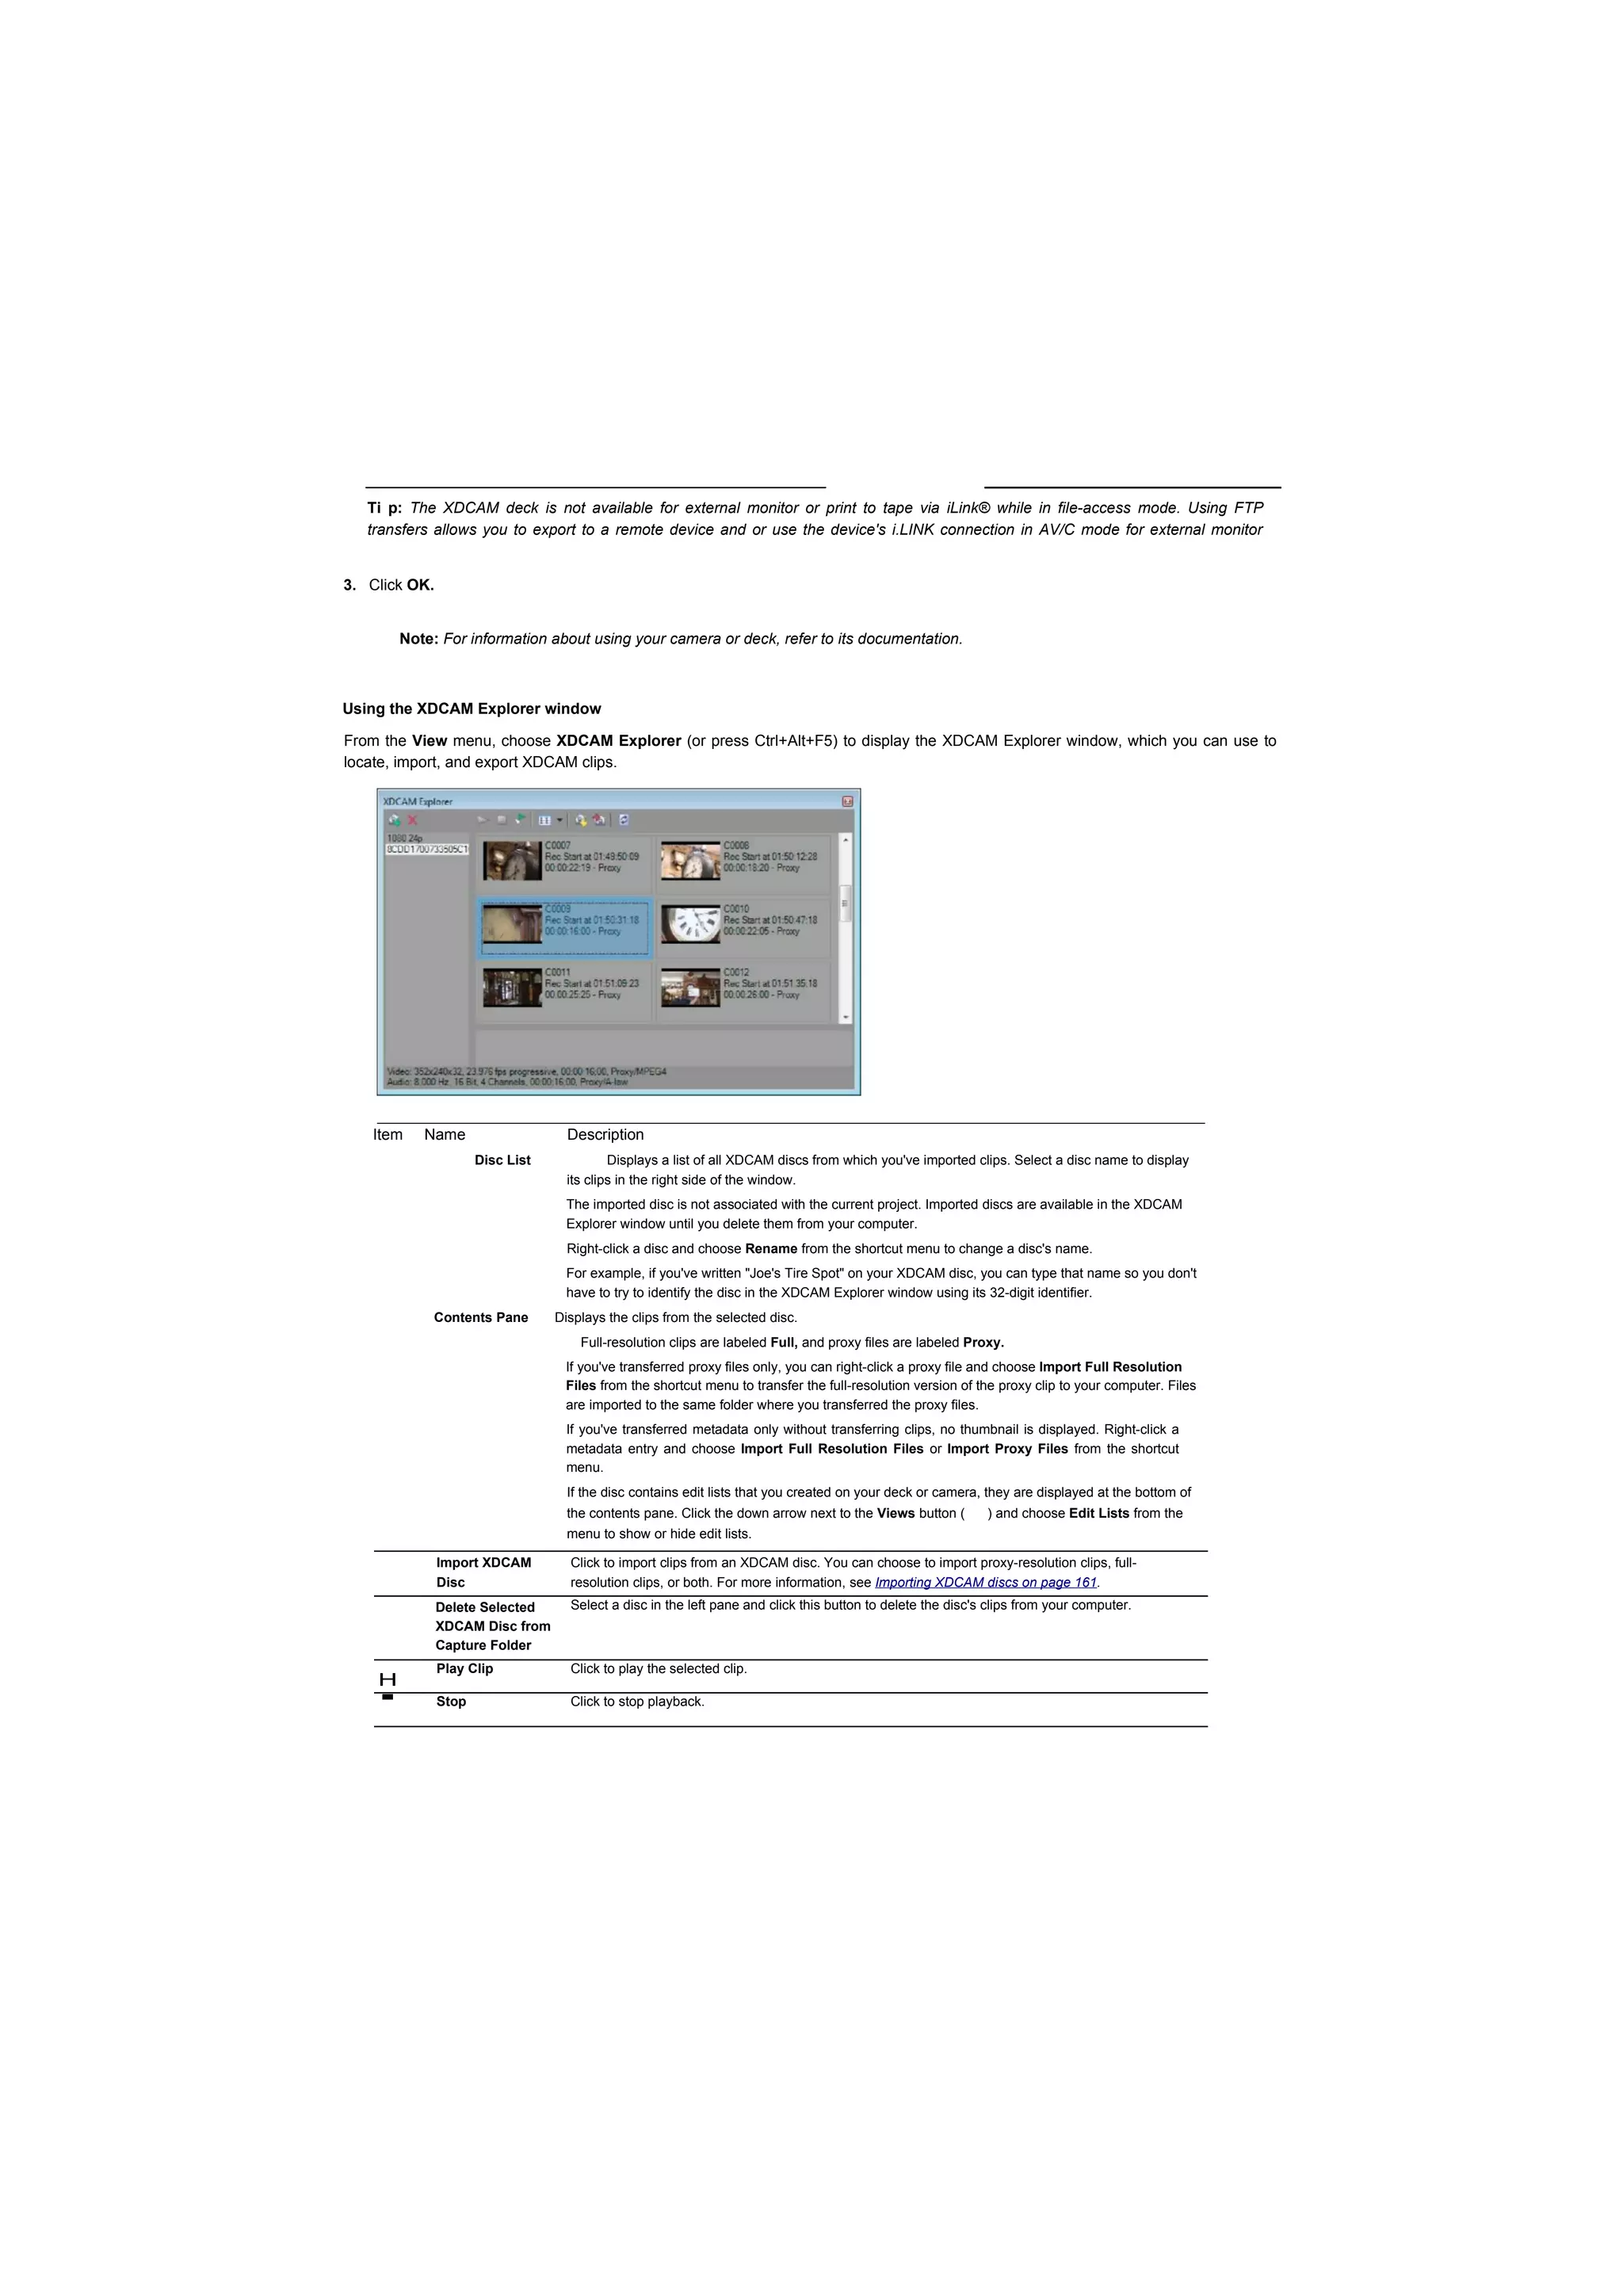
Previewing a media file
You can preview files before placing them in your project. The Explorer window has a mini-transport bar with Play (|^), Stop fl~ap, and
Auto Preview (§]) buttons. When you preview a file, its stream is sent to the Mixer window's preview bus (for audio files) or to the Video
Preview window (for video files).
Tip: You can use the same mini-transport bar buttons in the Project Media window to preview files in the Project Media list.
1.Select a file in the Explorer window.
2.Click the Play button (g) to listen to the file.
3.Click the Stop button (fa) or select a different file to stop previewing the file.
Tip: To automatically preview selected files, click the Auto Preview button ( ) on the Explorer window's transport bar.
Note: Video is previewed in the Trimmer window. If you want to preview video in the Video Preview window, right-click the Trimmer
window and clear the Show Video Monitor command.
GETTING STARTED | 51](https://image.slidesharecdn.com/vegaltk11-110216154309-phpapp02/75/Vegal-tk11-51-2048.jpg)
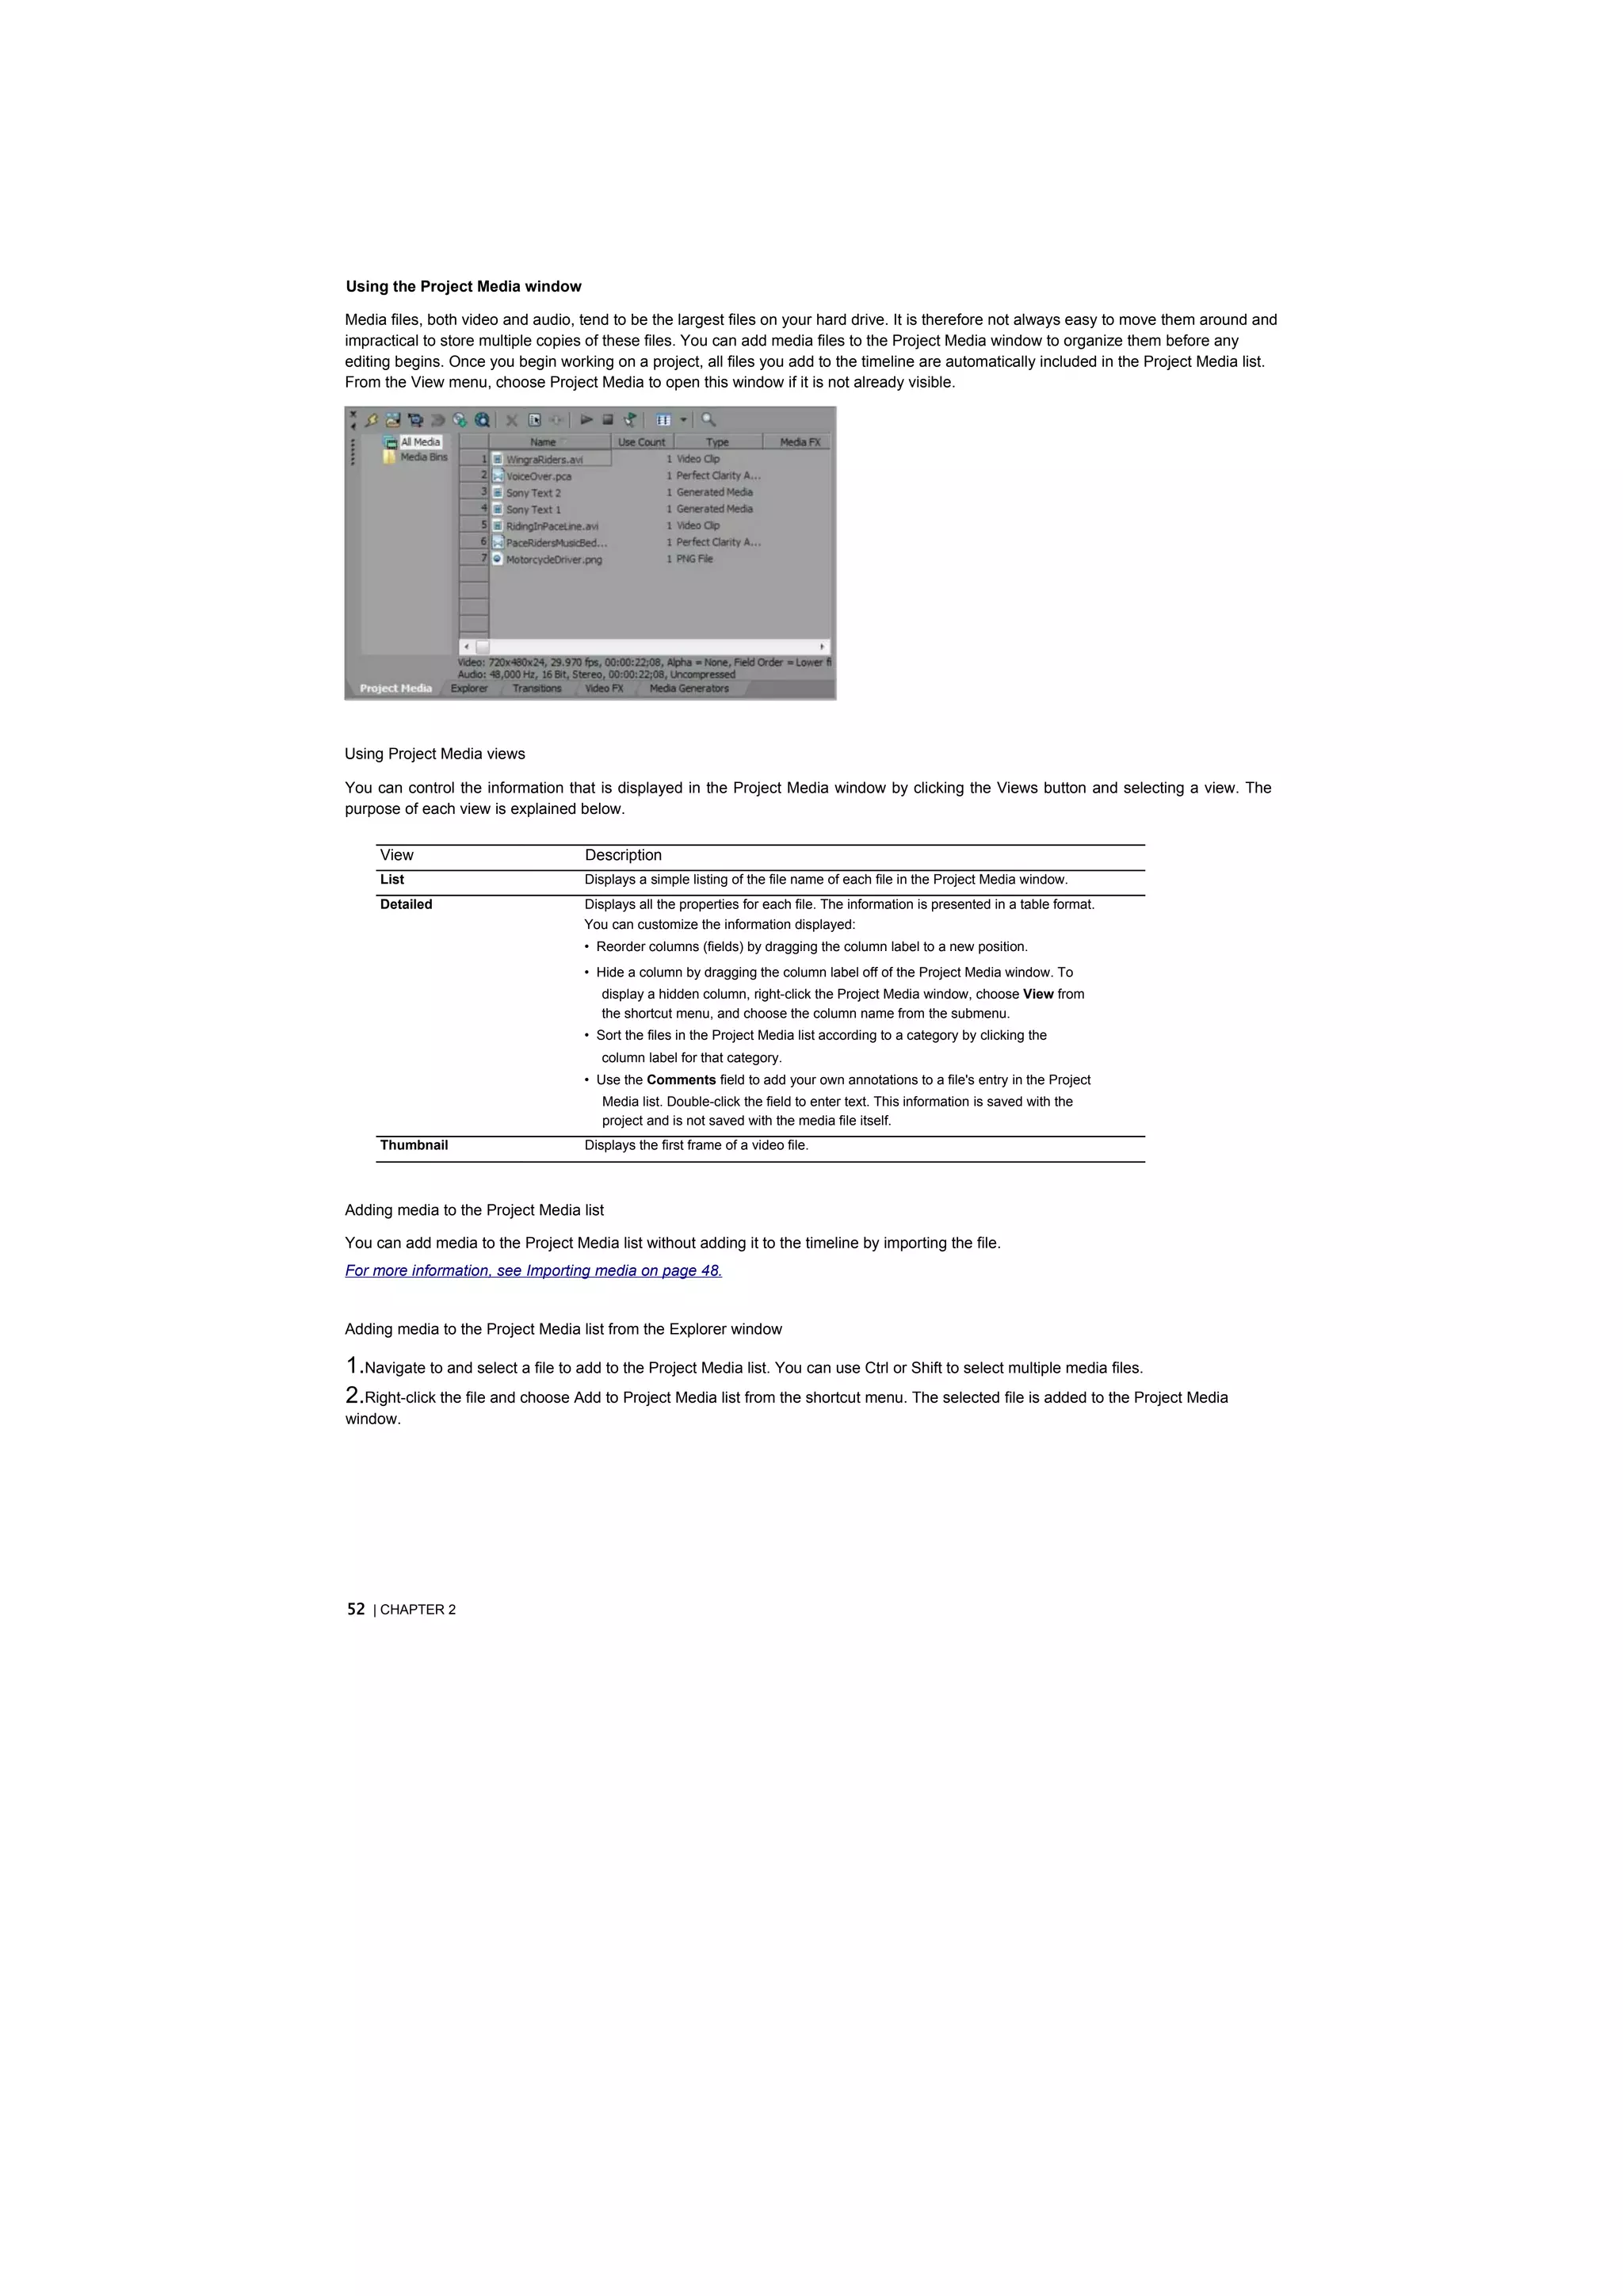
![Replacing media in the Project Media window
You can replace a file in the Project Media window with a different file. When changing the media file that an event contains, every
occurrence of the event on the timeline is updated with the new media file contents.
1.Right-click a file in the Project Media window.
2.Choose Replace from the shortcut menu.
3.In the Replace Media File dialog, browse for and select the file that you want to replace the current file.
4.Click Open. The selected file replaces the old file in the Project Media list, and any events in the timeline containing the old file are
updated to contain the new media file.
Getting images
You can bring images directly into the software from your scanner. The images are added to the Project Media list as JPEG image
files.
Note: In order to getpictures from a scanner, you might need to install a driver for your device. Refer to the software that was
1.Make sure your device is on and connected to your computer.
2.In the Project Media window, click the Get Photo button (|a|). The software is started for the device.
3.Use the device software to get an image and send it to Vegas Pro software. Once the image has been sent, the Scanned Files dialog
appears.
•Click Rename to give the new image a more meaningful name.
•Click Delete to cancel the process of adding the image.
4. Click Done. The new JPEG file is added to the Project Media window.
Extracting audio from a CD
You can extract tracks from a CD and add them to the Project Media window as .wav files.
Important: Vegas Pro software is not intended for, and should not be used for, illegal or infringing purposes, such as the illegal
copying or sharing of copyrighted materials. Using Vegas Pro software for such purposes is, among other things, against United
States and international copyright laws and contrary to the terms and conditions of the End User License Agreement. Such activity
may be punishable by law and may also subject you to the breach remedies set forth in the End User License Agreement.
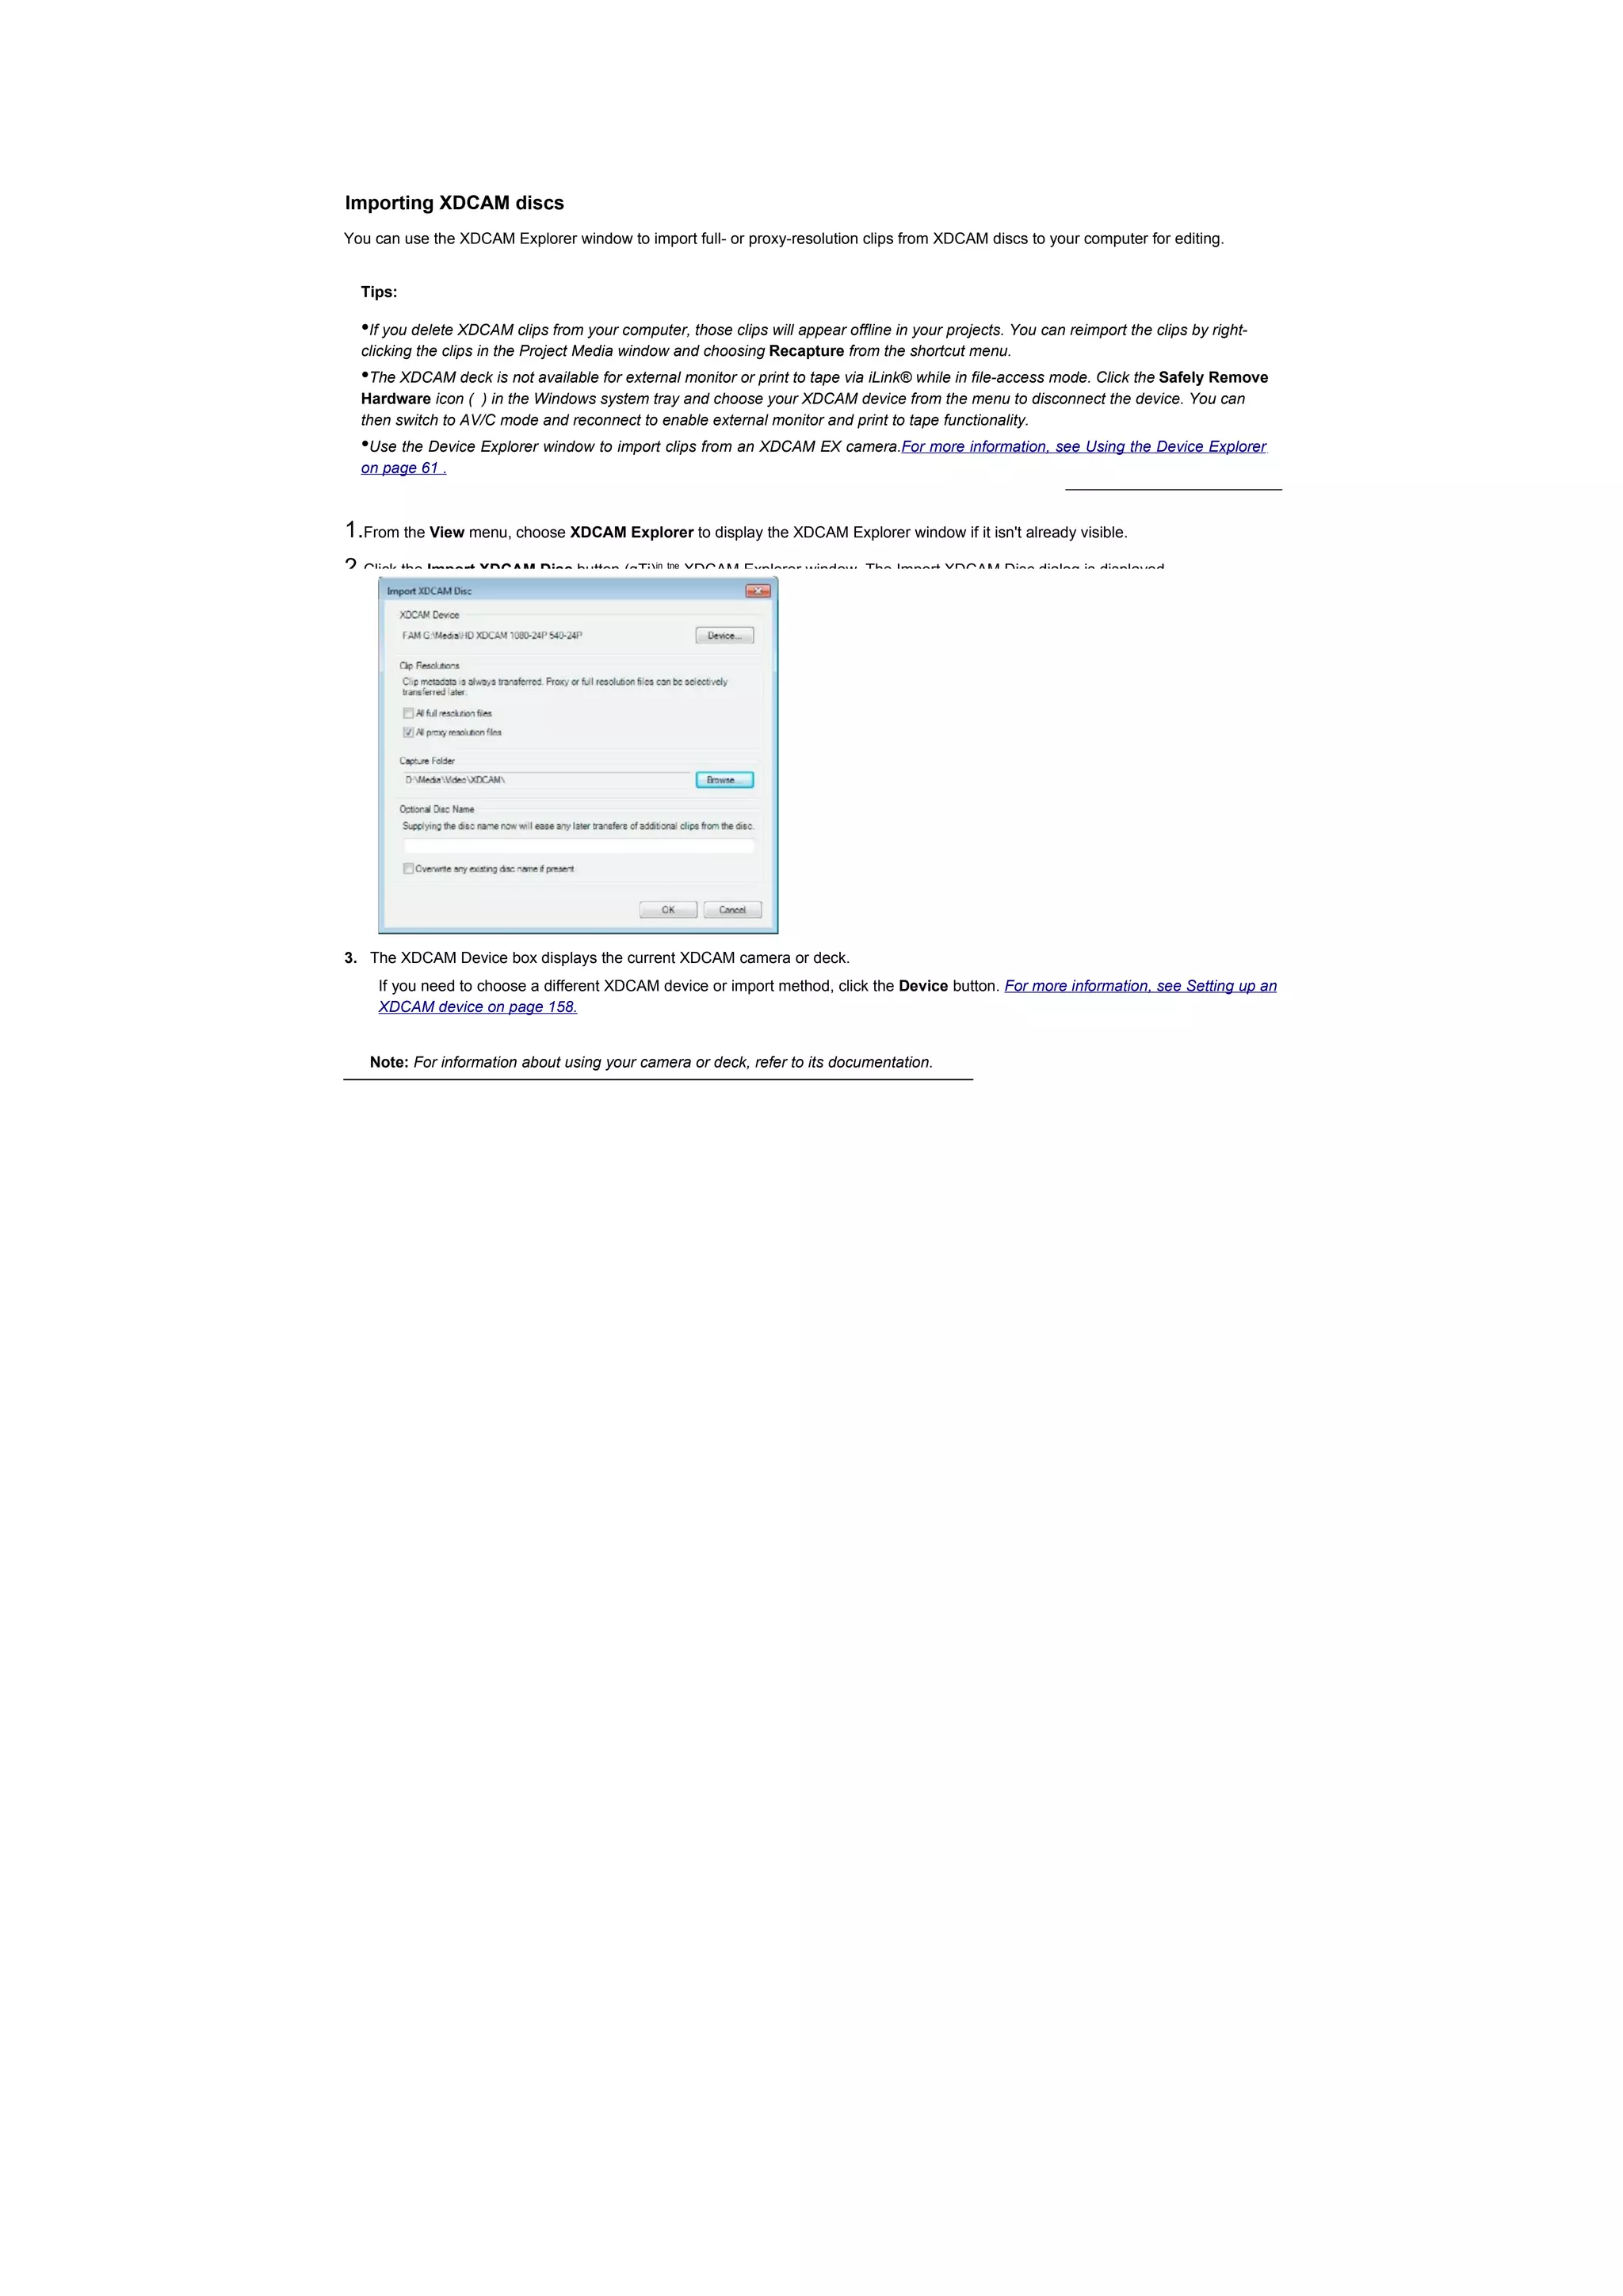
Extract Audio from CD I t? Il^^l
Action: | Read by track
I OK |
Tracks to extract: Cancel
Track Type Start End Leng
101 Shine
Audio 00:02.00 03:34.70 03:32. Refresh
02 Play Audio 03:34.70 07:05.27 7
03:30.:
Play
03 One of These Days Audio 07:05.27 11:50.17 04:44.
04 White Audio 11:50.17 15:32.58 E
03:42. E
4
05 Synergy Audio 15:32.58 18:25.26 03:52. MusicID
4
Drive: 06| [E:] SONY DVD RW DW-Q120A FYS3
100 Unnamed Audio 19:25.26 23:30.21 04:04.
Things Audio 23:30.21 27:54.15 04:23. | CD Info... |
Speed: I ^1
07 Man of Stars and
City IConfigure...Jf Eject E
Light GETTING STARTED | 53
Selected length: 03:32.70
08 Postcards
OS Nora
Audio
Audio
27:54.15
31:44.27
31:44.27
36:07.16
03:50.
1
04:22.
E
-
y |~~ rn ^](https://image.slidesharecdn.com/vegaltk11-110216154309-phpapp02/75/Vegal-tk11-53-2048.jpg)


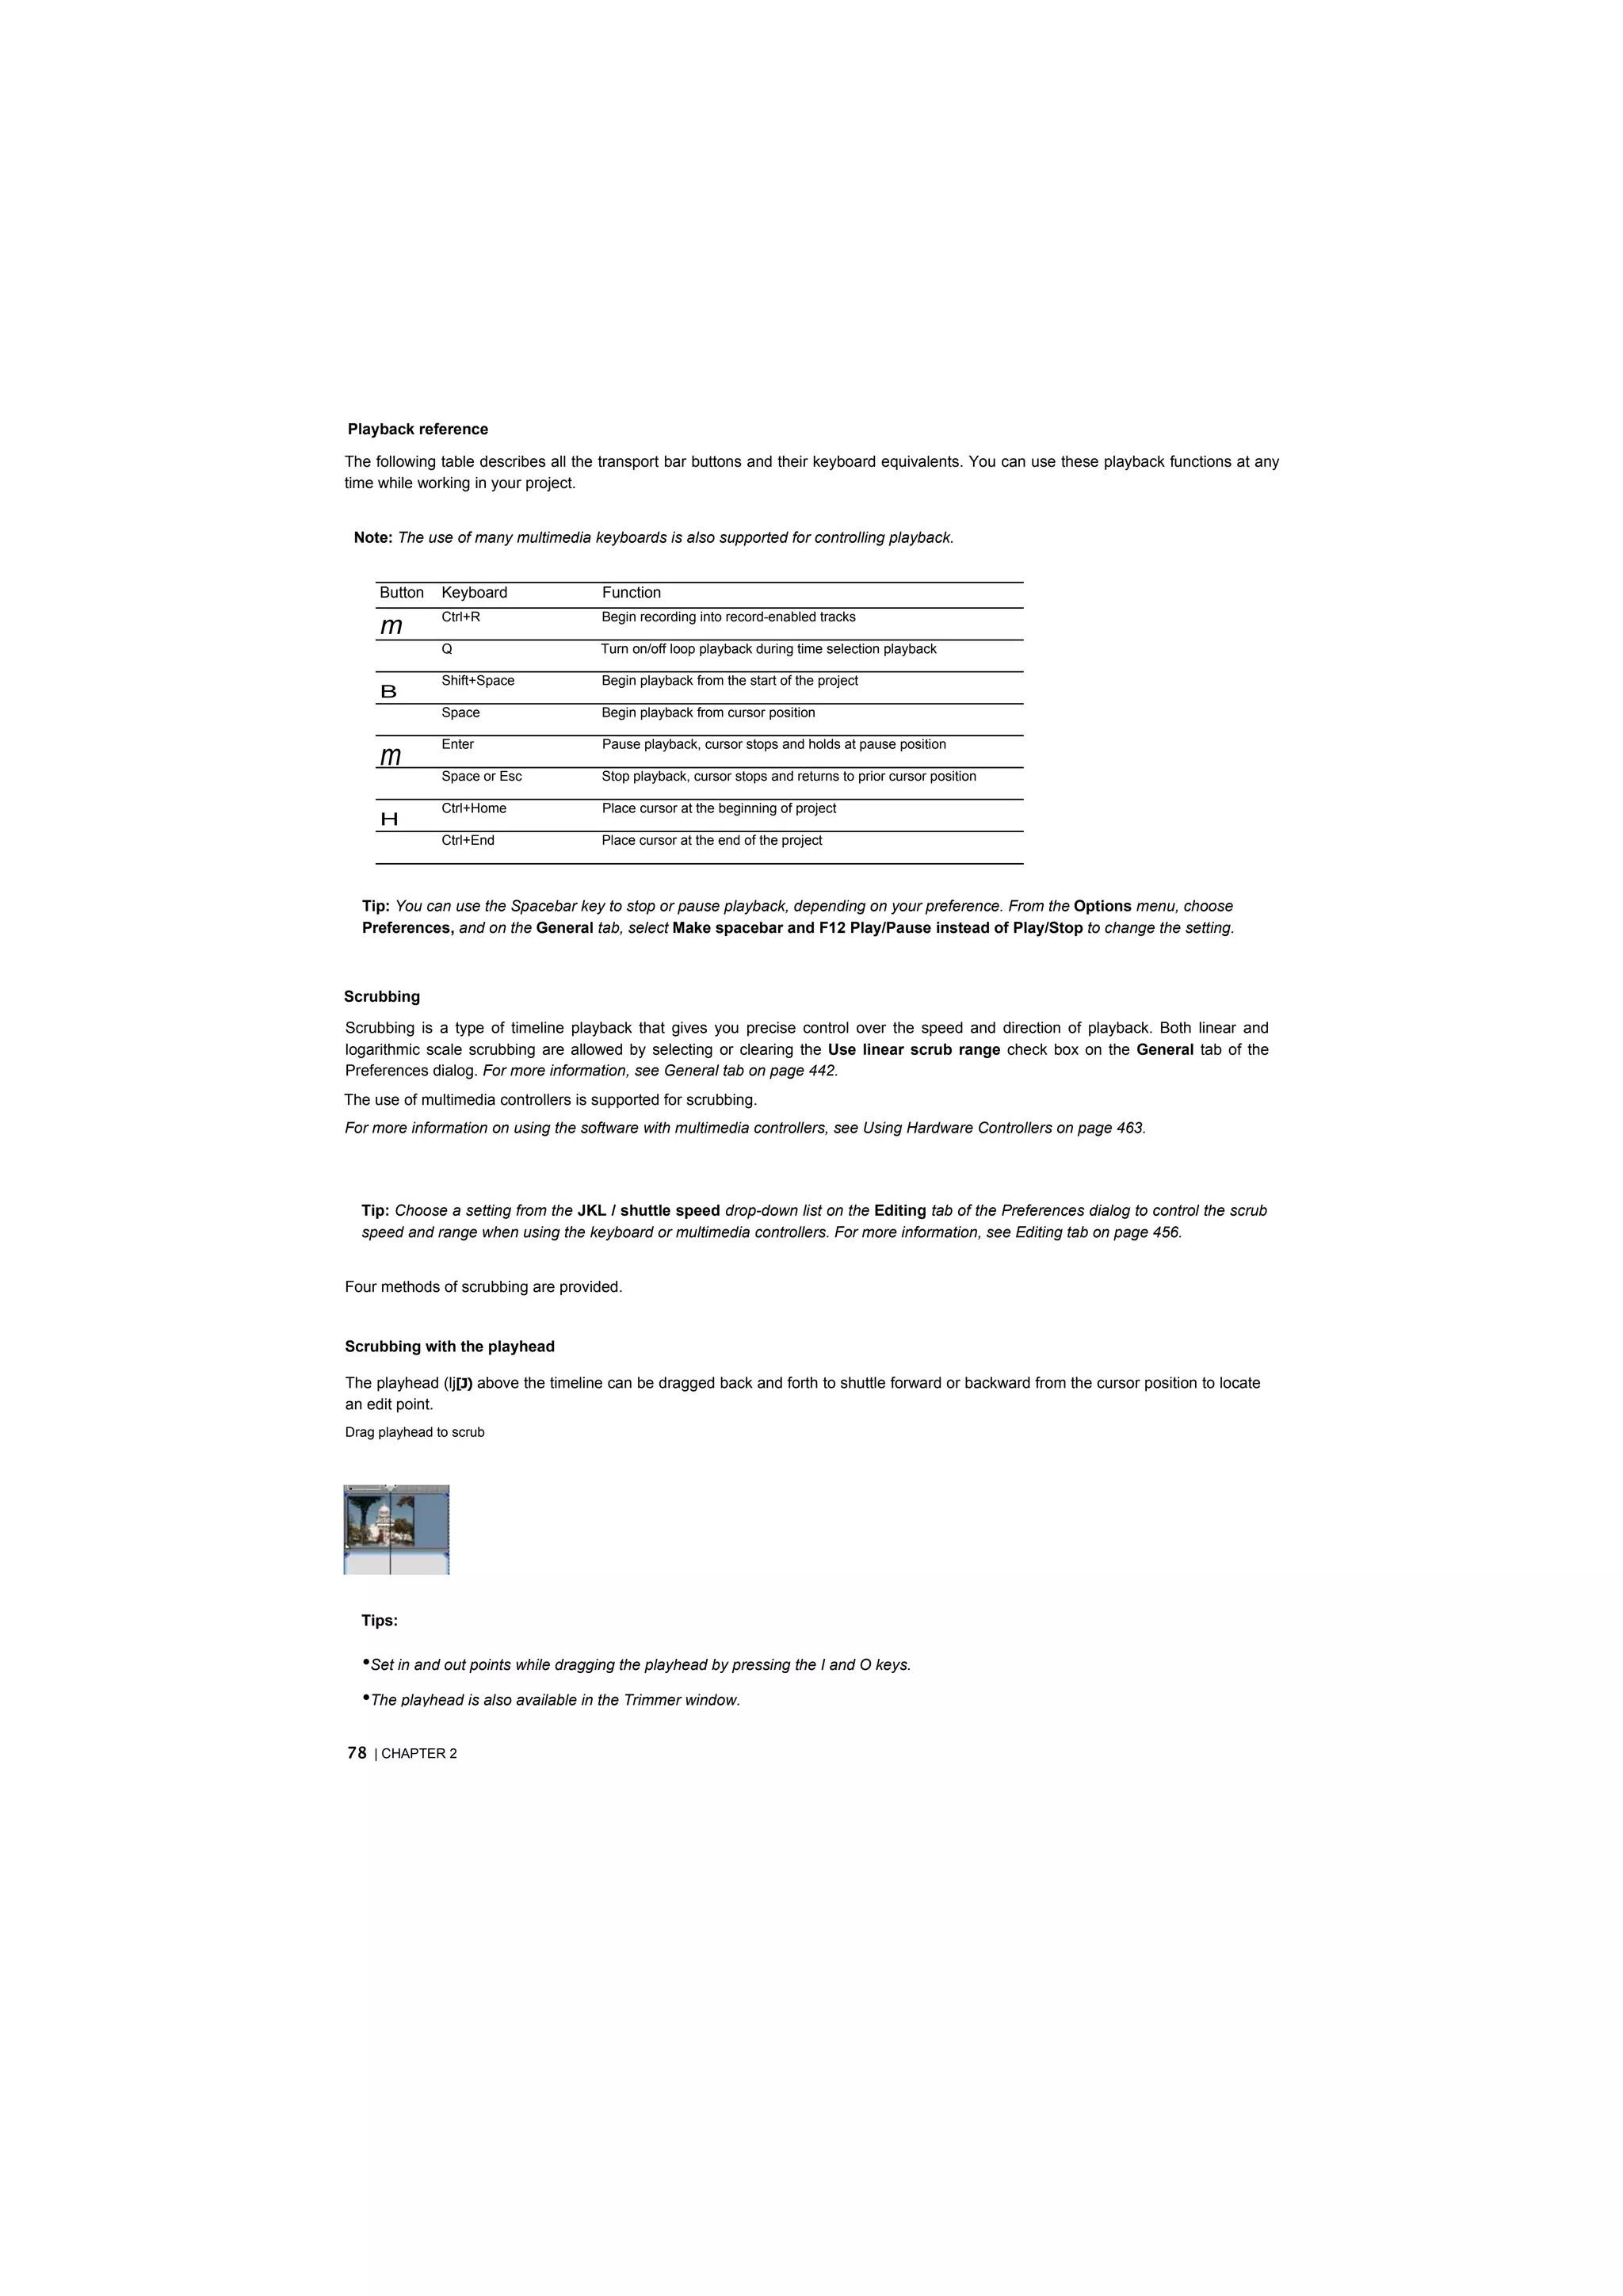
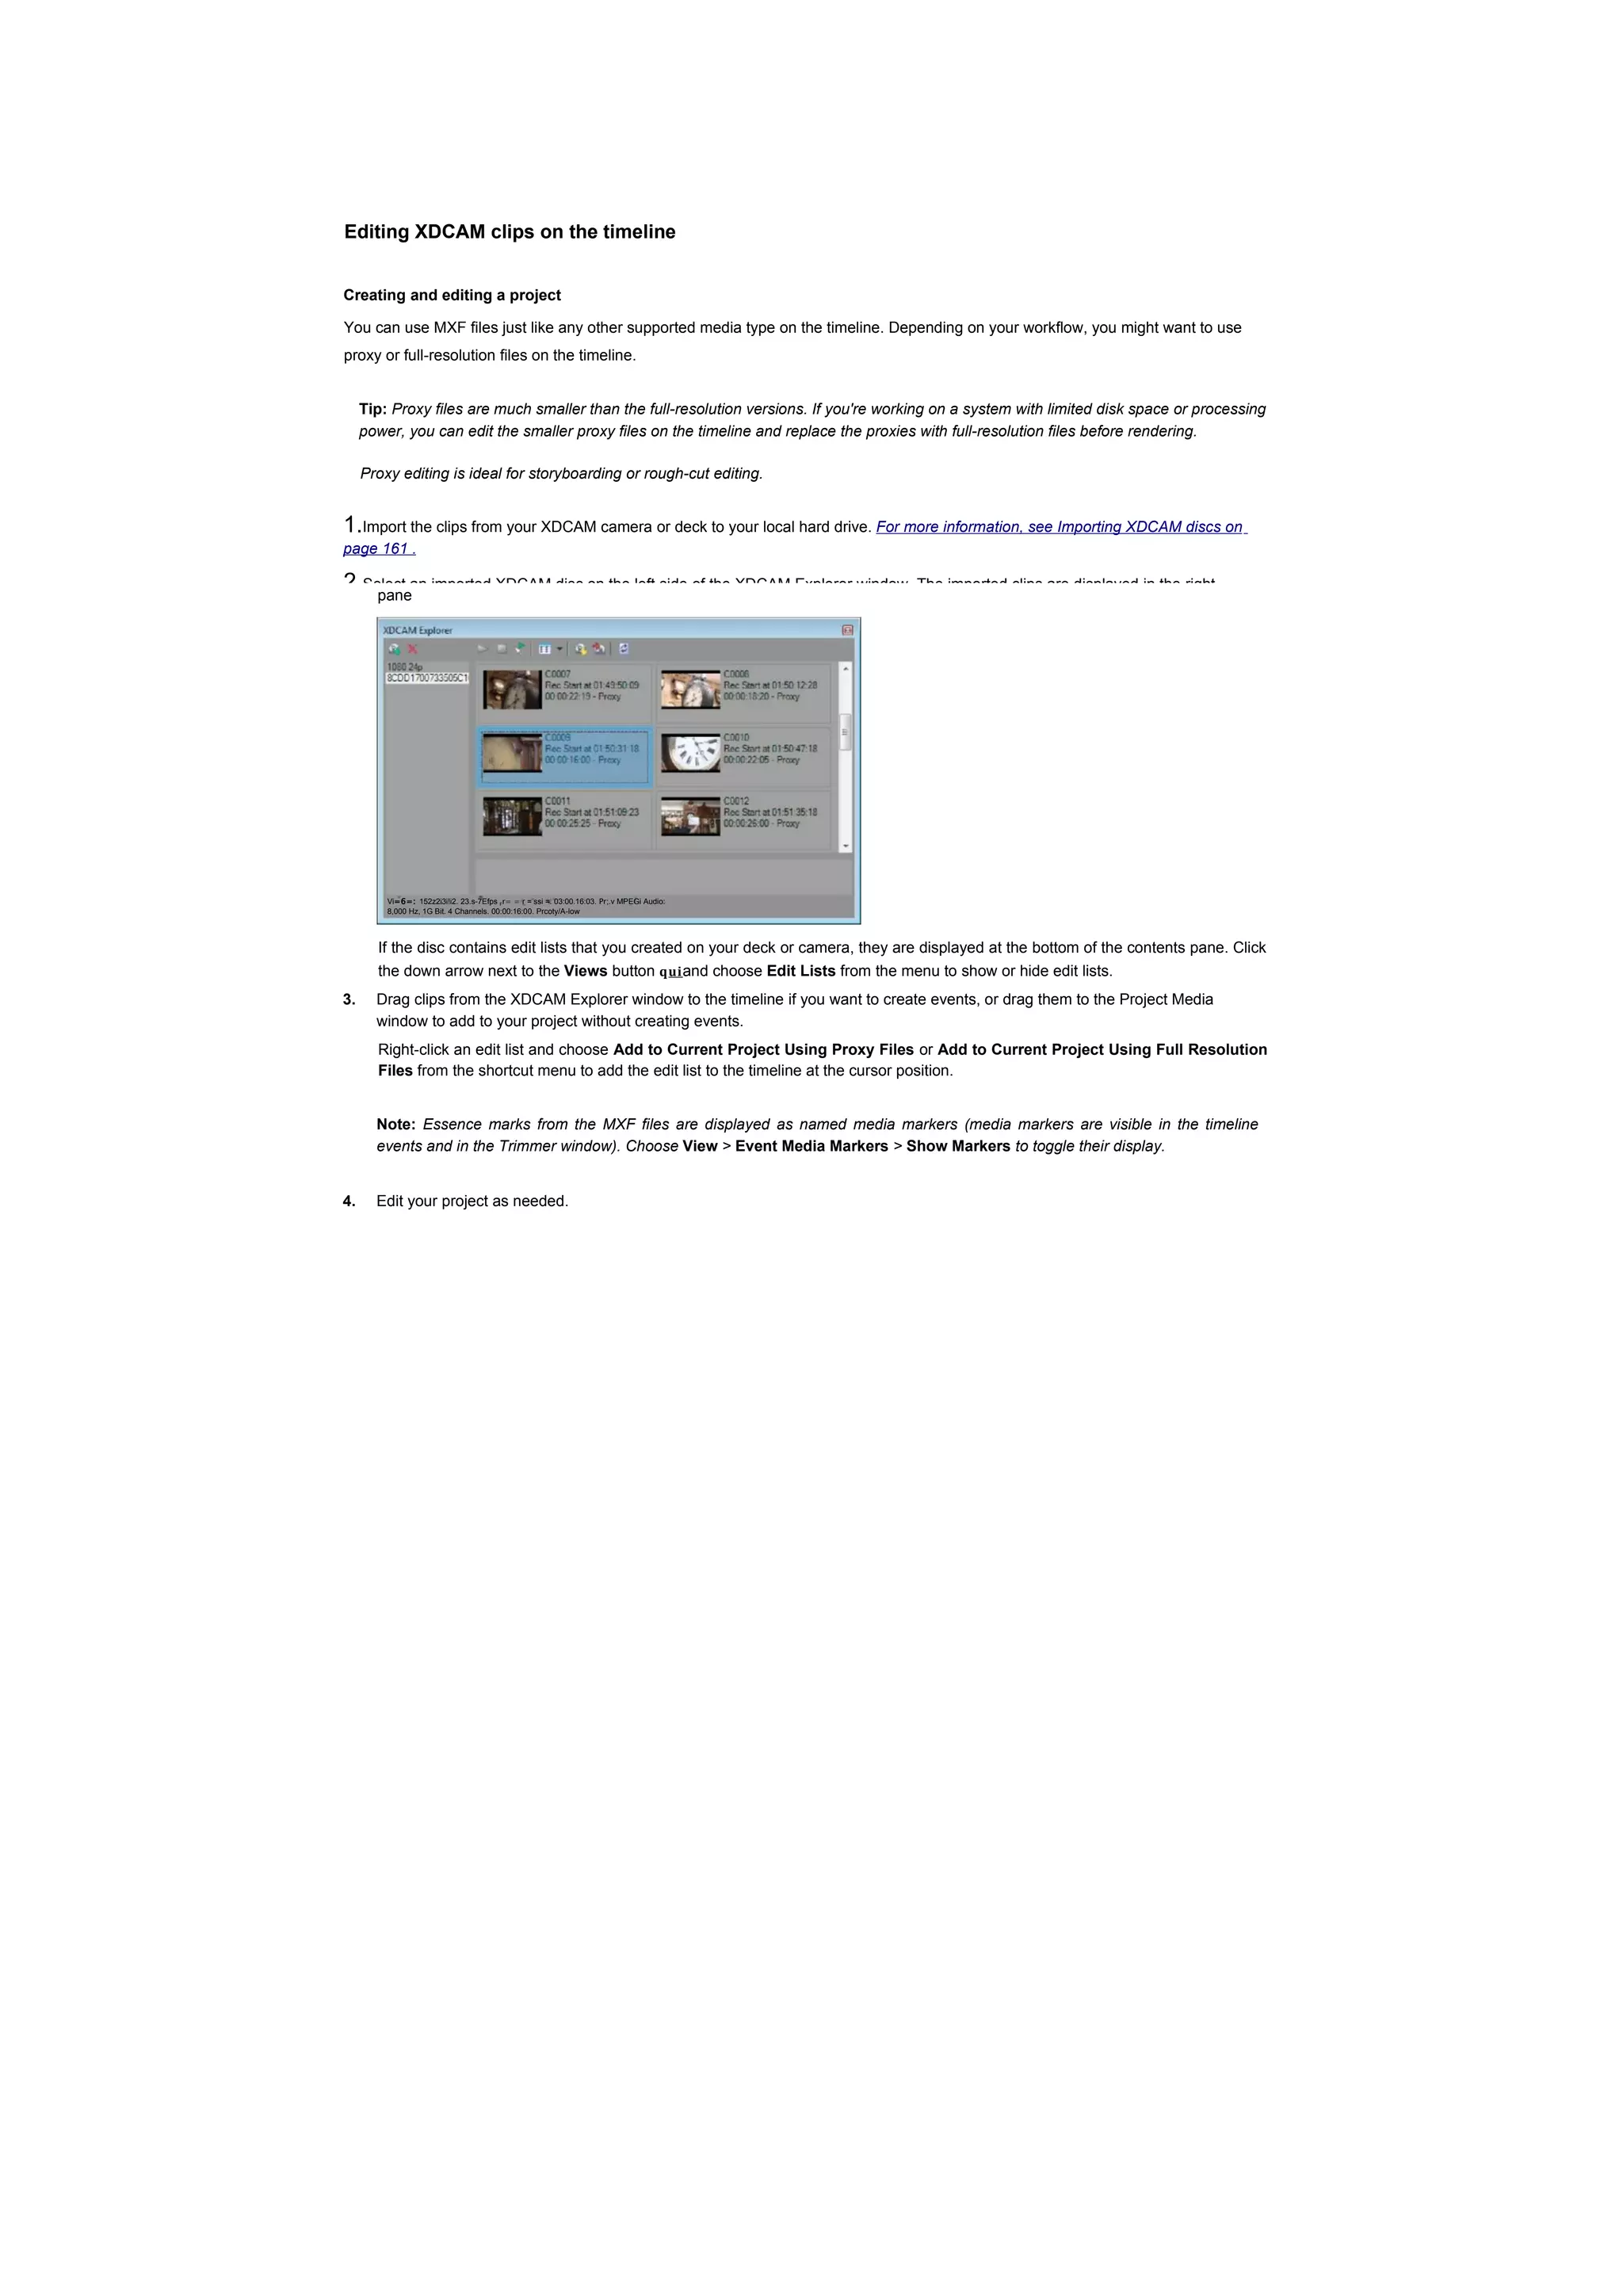
![Playing back and previewing
You can play back your project in two ways: directly from the timeline from within the software or by mixing the entire project to a
preview file.
Playing your project
The transport bar allows you to play back your entire project or portions of your project based on a time selection or the current cursor
position. For more information, see Transport bar controls on page 26.
If your project includes video, make sure the Video Preview window is displayed for playback: from the View menu, choose Video
Preview or press Alt+6.
Playing an entire project
1.Click the Play From Start button (p^j) to begin playback at the beginning of the project.
2.Click the Stop button (| ■[) to stop playback.
Most of the time, you will only want to preview a small portion of the project to perfect a section. You can do this by creating a time
selection.
Playing a time selection
1.Place the mouse pointer above the ruler on the marker bar. The mouse pointer changes to include a left/right arrow cursor
2.Drag to select the time region. To increase or decrease the time selection, drag its start and end points. The time selection is
highlighted and the loop bar appears above the ruler on the timeline.
Loop bar
3.Click the Play button (|H) to begin playback. Only the non-muted tracks and events within the time selection play back.
4.Click the Loop Playback button flop to continually play back the events within the time selection. Click the button again to toggle
this feature off.
5.Click the Stop button (I'M]) to stop playback.
By looping the playback, you can repeatedly watch the same section of the project over and over as you make changes to filters and
effects in real time. You can define selection areas automatically, depending on what you would like to preview.
For more information, see Selecting a time range on page 93 and Cursor placement, loop region, and time selection commands on
page 513.
GETTING STARTED | 77](https://image.slidesharecdn.com/vegaltk11-110216154309-phpapp02/75/Vegal-tk11-77-2048.jpg)


![Adding media files to a library
Before you can search or organize your media files, you'll need to add them to a media library.
If you have the Sound Series Loops & Samples™ reference library loaded when you search your computer for media, media from
existing Sony Loops and Samples or Loops for ACID™ collections will inherit tags and custom properties from the reference library. Use
the Reference Library drop-down list in the Media Manager Options dialog to determine which library is opened when you click the
Switch to Reference Library button fljUJ). For more information on Media Manager options, see Setting Media Manager options on page
88.
Notes:
•The Sound Series Loops & Samples reference library is not installed by default, but you can install it from the Vegas Pro application
disc or download it from the Sony Creative Software Inc. Web site (http://www.sonycreativesoftware.com/utilities).
•If the Save media-usage relationships in active media library check box is selected on the General tab of the Vegas Pro
Preferences dialog, you can add individual files to a library by previewing the files in the Vegas Pro Explorer window.
1.Click the Add Files to Media Library button ( J). The Add Files to Media Library dialog appears.
2.Choose the folders that will be searched for media:
a. If it isn't displayed automatically, click the Add Folder button ([ft]) to display the Browse for Folder dialog.
b. Select the folder you want to search.
c. Click OK.
Tips:
•If you want to change an item in the folder list, select it and click the Browse button in the Folders column.
•If you want to remove a folder from the list, select it and click the Remove Folder button (K_).
3.Repeat step 2 for each folder you want to search.
4.Select the Include subfolders check box if you want to search folders within the selected folders.
5.Select the Audio, Video, Images, or MIDI check boxes to indicate the types of media you want to add. Clear a check box to exclude
that type of media file.
Files that contain audio and video streams will be added if either or both of the Audio or Video check boxes are selected.
6. Specify whether you want to search for new files or all files:
•Select the New files only radio button if you want to search only for new media files. Files that already exist in the media library
will be skipped.
•Select the All files radio button if you want to search for all media files in the specified folder. New media files will be added, and
files that already exist in the media library will be searched to determine whether their properties have changed.
7.Select the Add tags and custom properties from files check box if you want to add tags and custom columns saved in the media
files to your library. For more information about tagging media, see Tagging media files on page 75. For information about adding
custom columns to the Search Results pane, see Adding custom columns on page 86.
8.Select the Use file and folder names to apply tags automatically check box if you want to automatically tag files based on the file
path.
For example, when this check box is selected, a loop saved in the d:loopsdrumshi-hats folder would have the tags Drums and Hi-
Hats applied when it is added to the library. Some synonyms (and variant spellings) will be resolved using a tag thesaurus. If you
need to modify the thesaurus, you can edit the TagThesaurus.xml file, which is created in your My DocumentsSony Media Libraries
folder the first time the application starts.
Note: Changing the selection of the Add tags and custom properties from files and Use file and folder names to apply tags
automatically check boxes also changes the settings in the Media Manager Options dialog.
9. Click the Search button to start adding files to the library.
82 | CHAPTER 3](https://image.slidesharecdn.com/vegaltk11-110216154309-phpapp02/75/Vegal-tk11-82-2048.jpg)
![10. Click the Close button when you're finished.
A tag is automatically added to the Tag tree when you search. The tag name will include the date and time of the search, and all
files that were added or updated in the library are marked with this tag.
Removing media files from a library
You can remove a reference to a media file from a library without affecting the media file itself.
1. Select files in the Search Results pane to choose the files you want to delete:
•To select a single file, click the file.
•To select multiple consecutive files, click the first file, hold the Shift key, and then click the last item.
•To select multiple files that are not consecutive, hold the Ctrl key and click each file.
2.Right-click a selected file and choose Remove from Library from the shortcut menu (or press the Delete key on your keyboard).
A confirmation dialog is displayed.
3.Click OK to remove the selected files from the library.
Tagging media files
Tagging helps you classify your media files. For example, if you wanted to keep track of loops played by a specific instrument, you could
create a tag with the name of the instrument and apply it to the appropriate loops. Similarly, you could create tags for genres, moods,
seasons, client names, locations, scenes, performer names, and so on.
When you create a new library, a default tag tree is displayed in the Tags pane. You can create your own tags to customize the tags for
your needs. Tags are the fastest way to search a media library, and they require very little disk space.
Tags are saved in your media library. If a media file exists in multiple libraries, tagging the media file in one library has no effect on the
other libraries unless you save the tags to the files and use the Add Files to Media Library dialog to update tags and custom properties
for all files.
Tip: If you want to see which tags are associated with a file as you're adding or removing tags, drag the Tags column in the Search
Results pane to the left so you can see the Name and Tags columns at the same time.
Creating a tag
Adding tags creates new tags in the current library only.
1. Click the New Tag button ([ffi]) to add a new tag to the tree.
If a tag is selected, the new tag will be added below the selected tag. If no tag is selected, the new tag will be added to the bottom
of the tag tree.
2.Type a name for the tag.
3.Press Enter.
4.If you want to change the icon used to display the tag, right-click it and choose Edit from the shortcut menu to display the Tag Editor
dialog.
5.If you want to change the tag's location, drag it to a new location in the tag tree.
USING THE MEDIA MANAGER | 83](https://image.slidesharecdn.com/vegaltk11-110216154309-phpapp02/75/Vegal-tk11-83-2048.jpg)
![Applying a tag to a media file
You tag media by dragging a tag from the tag tree to a media file in the Search Results pane (or by dragging a media file to a tag) when
the Apply Tag Mode button ([?]) is selected.
Notes:
•If you want to see which tags are associated with a file as you're adding or removing tags, use the Properties pane in the Search
Results pane (or drag the Tags column in the Search Results pane to the left so you can see the Name and Tags columns at the
same time). For more information, see Using the Properties pane on page 87.
•Tags are saved in your media library. If a media file exists in multiple libraries, tagging the media file in one library has no effect on
the other libraries unless you save the tags to the files and use the Add Files to Media Library dialog to update tags and custom
properties for all files.
1. Select media files to tag in the Search Results pane:
•To select a single file, click the file.
•To select multiple consecutive files, click the first file, hold the Shift key, and then click the last item.
•To select multiple files that are not consecutive, hold the Ctrl key and click each file.
2.Click the Apply Tag Mode button ([?) in the Search pane.
3.Drag a tag from the tag tree to the selected file(s).
Name Rating
|10~ PB Electric Slide A Ol.wav
02
ITT PB Electric Slide A
112
.wav
PB Electric Slide A 113.wa7T"
13PBEIectricSlideA04.wav ^[+] Electric Gutar
Tip: You can also right-click a selection in the Search Results pane and choose Apply Tag from the shortcut menu to add a tag to
all selected media. The Tag Chooser dialog will be displayed. Select the tag you want to add, and then click the OK button.
When you add a subtag to a media file, the tag's hierarchical position in the tag tree is applied implicitly.
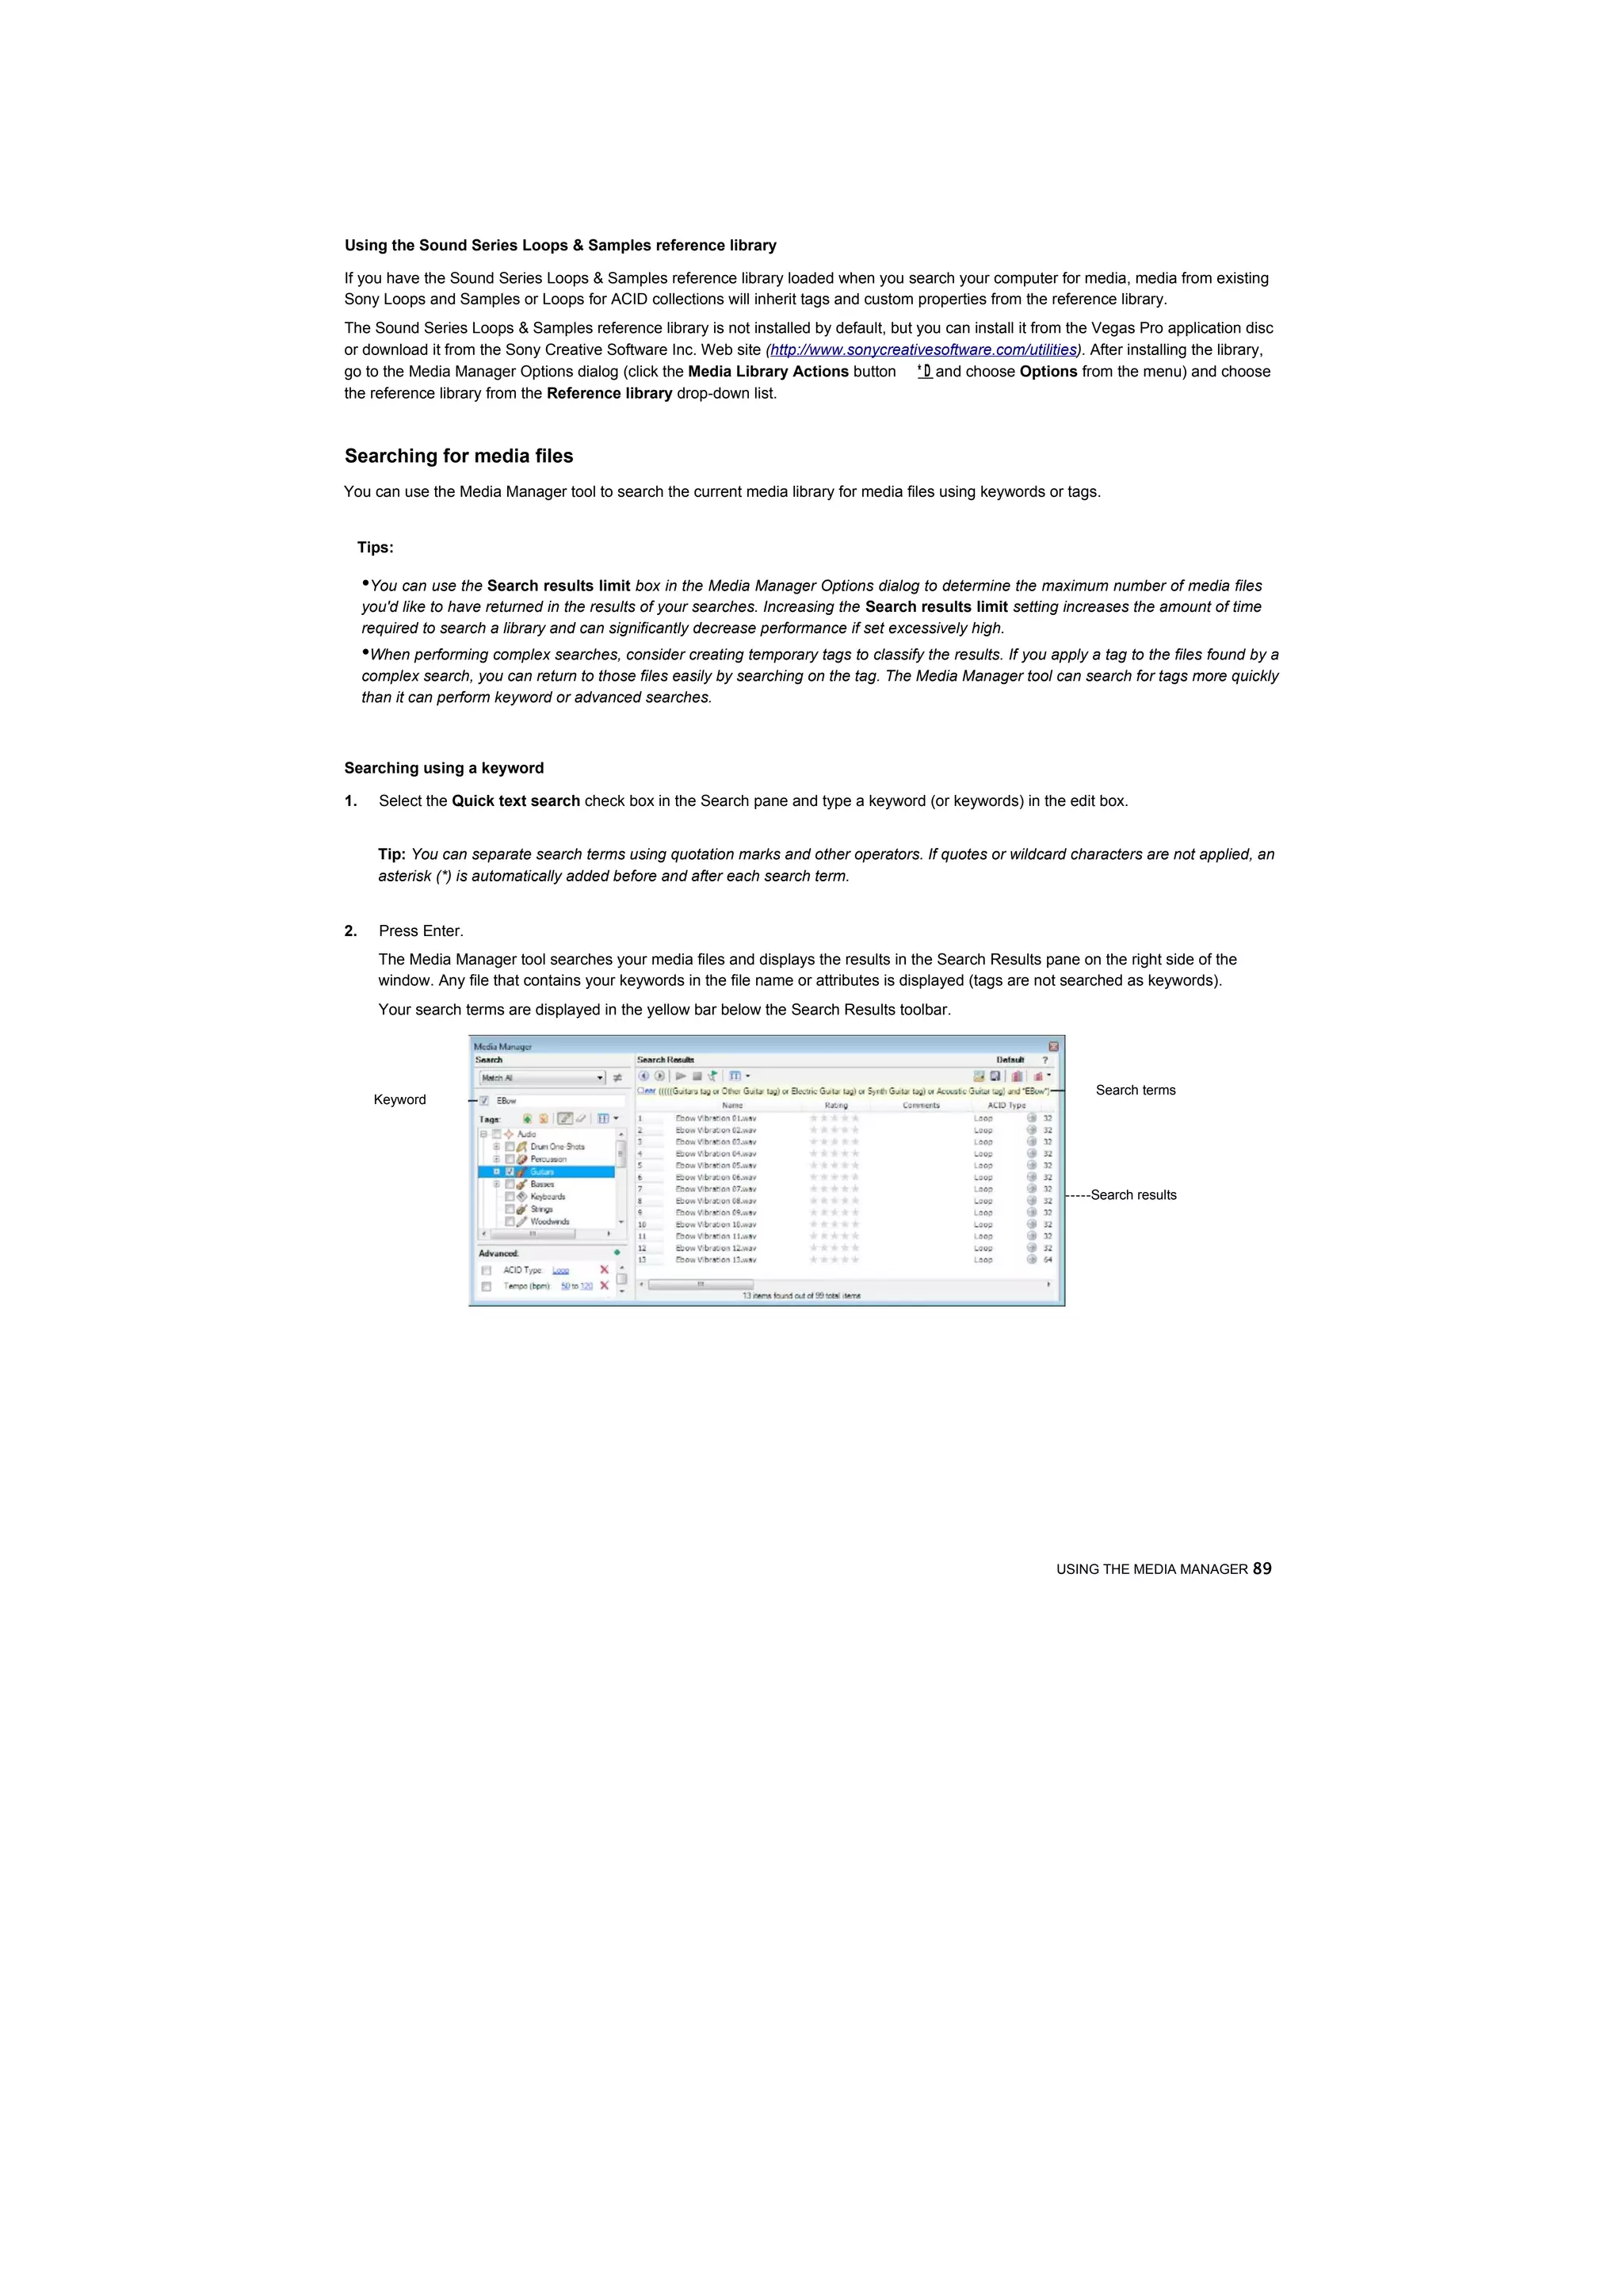
Search
| Match All -|*
O Quick text search
Tags: 1*1 f2 I fZ]
B -n-o- Audio
! fi-D^J Drum One-Shots [=]
1 H Snare
■■■■□0 High Tom jfl
■■■■□0 MidTom
■■■■□Q Floor Tom
■■■■□0 Cymbals
■■■■□0 High Hat
<i rrr ►
Advanced:
□ACID Type: Loop X
In this example, adding the "Snare" tag to a media file would mean that a search for "Audio," "Drum One-Shots," or "Snare" would find
your tagged media. If the user rearranged the tag tree so that the "Snare" tag did not appear below the "Audio" and "Drum One-Shots"
tags, searching for "Audio" or "Drum One-Shots" would not find your tagged media.
If you add all three tags to your media file, a search for "Audio," "Drum One-Shots," or "Snare" would find your tagged media even if the
tag tree had been rearranged, though this behavior is not always desirable.
84 | CHAPTER 3](https://image.slidesharecdn.com/vegaltk11-110216154309-phpapp02/75/Vegal-tk11-84-2048.jpg)
![Removing a tag from a media file
You remove tags from media by dragging a tag from the tag list to a media file in the Search Results pane (or by dragging a media file
to a tag) when the Remove Tag Mode button O^D is selected.
Tip: If you want to see which tags are associated with a file as you're adding or removing tags, use the Properties pane in the Search
Results pane (or drag the Tags column in the Search Results pane to the left so you can see the Name and Tags columns at the
same time).
1. Select media files in the Search Results pane:
•To select a single file, click the file.
•To select multiple consecutive files, click the first file, hold the Shift key, and then click the last item.
•To select multiple files that are not consecutive, hold the Ctrl key and click each file.
2.Click the Remove Tag Mode button (@) in the Search pane.
3.Drag a tag from the tag tree to the selected file(s). The tag is removed from the file(s).
Deleting a tag from a library
Deleting the selected tag(s) affects the current library only.
1. In the Search pane, select the tag(s) to be removed:
•To select a single tag, click the tag.
•To select multiple consecutive tags, click the first tag, hold the Shift key, and then click the last tag.
•To select multiple tags that are not consecutive, hold the Ctrl key and click each tag.
2.Click the Delete Selected Tag button (Q2]) to delete the tag from the current library. A confirmation dialog is displayed.
3.Click OK to remove the selected tags from the library.
The tag is removed from the library and from all media files in the library. However, if the tag had been saved to the media file, it will
be added to the library again the next time the file is added to the library if the Add tags and custom properties from files check
box is selected in the Add Files to Media Library dialog.
Merging subtags
Merging tags combines a selected tag with its subtags and removes the subtags from your library permanently.
To merge a tag with its subtags, right-click the tag and choose Merge Subtags into Selected Tag from the shortcut menu.
All subtags are combined with the main tag, and the subtags are removed from the library. All media formerly associated with the
subtags is associated with the main tag.
Arranging tags in the tag tree
Tags are displayed in a tree view in the Media Manager window. You can organize tags hierarchically: click the Expand button ((+)) in
the Search pane to expand a list, or click the Collapse button (□) in the Search pane to hide an expanded list.
You can drag, copy, and paste tags within the list to arrange them and create parent and child tags.
You can also display tags in a palette view by clicking the Change Tags View button (HQ-
Editing tag names or images
1.Double-click a tag (or right-click a tag and choose Edit from the shortcut menu) to display the Tag Editor dialog.
2.In the Tag name box, type the name you want to display for the tag.
3.Select a thumbnail image to choose the icon that will be displayed for the tag in the Search pane and in the Search Results pane
when the tag is added to a media file.
USING THE MEDIA MANAGER | 85](https://image.slidesharecdn.com/vegaltk11-110216154309-phpapp02/75/Vegal-tk11-85-2048.jpg)


![5. Save the tags to your media files:
a. Delete the Scan [date / time] tags from the tag tree.
b. If you've searched the collection, click Clear to remove all search criteria and ensure all media files are displayed in the
Search Results pane.
c. Select all files in the Search Results pane.
d. Click the Save Tags and Properties to Files button ((H).
Tip: You can also right-click a selected file and choose Save Tags and Properties to Files from the shortcut menu.
6. Distribute your media files. You can optionally include the .medialib file.
Backing up your media libraries
Media Manager software automatically saves your library as you make changes, so you don't need to tell the application explicitly to
save your library as you're working.
However, you can create a backup of the current library as a restore point or as a template to create new libraries.
Note: When you back up your library, the Media Manager automatically performs database management that can reclaim free space
and improve performance.
1.Click the Media Library Actions button (|rjj * D and choose Back Up Media Library from the menu. The Back Up Media Library
dialog is displayed.
2.Choose a drive and folder from the Save in drop-down list, or use the browse window to locate the folder where you want to save
your backup.
3.In the File name box, type the name you want to use to identify the library.
4.Click the Save button.
To restore the backup at a later time, open the backup file.
Opening a reference library
A reference library contains information about media from an outside source or vendor.
If you have the Sony Loops and Samples reference library loaded when you search your computer for media, media from existing Sony
Loops and Samples or Loops for ACID collections will inherit tags and custom properties from the reference library.
You can also use a reference library to search media files that you aren't part of your collection. For example, if you're unable to find the
perfect loop for a Vegas Pro project in your own collection, you could use the Sound Series Loops & Samples reference library to search
the entire Sound Series Loops & Samples catalog and purchase a new loop library.
You can use the Media Reference Library drop-down list in the Media Manager Options dialog to determine which library is opened
when you click the Switch to Reference Library button ([jj]).
1. Click the Switch to Reference Library button ([jj]). The reference library specified in the Media Manager Options dialog is
opened. Media in a reference library is displayed in gray text to indicate that the files are not available on your computer.
Tip: To view the Media Manager Options dialog, click the Media Library Actions button ( - ) and choose Options from the
menu.
2.Find the media you're looking for with a standard or advanced search.
3.Tag media from the reference library as needed. For more information on tagging, see Tagging media files on page 75.
4.When you select a file in a reference library, the Product Information pane displays information about the selected file and a link you
can use to purchase the media.
88 CHAPTER 3](https://image.slidesharecdn.com/vegaltk11-110216154309-phpapp02/75/Vegal-tk11-88-2048.jpg)


![Customizing the Media Manager window
Much of what you see in the Media Manager window can be customized to suit your preferences. Resizing
columns
You can resize the columns in the Search Results pane by dragging the splitter between columns to the desired size. To resize a
column automatically, double-click a splitter.
Moving columns
To move a column in the Search Results pane to a different location, drag the column header to the desired location. A red indicator
shows where the column will be dropped.
Showing or hiding columns
1.Right-click the column headings and choose Column Chooser from the shortcut menu.
2.Drag the columns you want to see from the Column Chooser dialog to the Search Results pane.
3.To hide a column, right-click a column heading and choose Remove this Column from the shortcut menu.
Adding custom columns
You can add custom columns to the Search Results pane to store additional information about media files. When you add custom
columns, they are added to the current library only.
For example, if you wanted to keep track of which removable hard drive contained a media file, you could create a custom Drive
Number column to assign any numeric rating to a media file. You could then use the Advanced section of the Search pane to search
using the Drive Number value.
When adding media to a library, you can choose to add this information by selecting the Add tags and custom columns from files
check box in the Add Files to Media Library dialog.
1.Right-click the column headings and choose Custom Columns from the shortcut menu. The Custom Columns dialog appears.
2.Click the Add New Column button ((+]) to add a custom column. A new entry is added to the list.
3.In the Name box, type the name you'd like to display as a column heading.
4.Select the Type box and choose Text or Integer from the drop-down list to indicate whether you'll store text or numeric data in the
column.
5.If you want to remove a custom column, select an entry in the list and click the Delete Selected Columns button The column and
all data stored in the column is removed from the library.
6.Click the OK button. The column is added to the media library, and the Search Results pane is scrolled to the right to display your new
column.
Editing a column's contents
Some columns in the Search Results pane can be edited. When an entry in the Search Results pane is selected, click a box to make it
editable. You can then type new information in the box.
Changing a column's contents affects only the entry in the current media library. Click the Save Tags and Properties to Files button OHD
to save the properties with the media file.
94 | CHAPTER 3](https://image.slidesharecdn.com/vegaltk11-110216154309-phpapp02/75/Vegal-tk11-94-2048.jpg)


![Dragging to select a time range
1.Position the mouse pointer above the ruler (on the marker bar). The mouse pointer changes to a left/right arrow cursor (IV,).
2.Drag to select a region. All events, or portions of events within the region are highlighted.
3.Drag the yellow handles on either end of the time selection to increase or decrease your time range selection.
Tip: You can move the entire selection range by dragging the time selection bar.
Selecting a time range during playback
1.Click the Play ([►} or the Play From Start ((jg) button to begin playback.
2.Press I where you want the time selection to begin.
3.Press O where you want the time selection to end.
4.Click the Stop button (I'M]) to stop playback.
Using shortcuts for time selections
These shortcuts can speed up the process of making precise time selections.
Description Shortcut
Set time selection duration equal to an Double-click the event
event's duration
Extend selection to the end of the currently Ctrl+Shift+Alt+Right Arrow
selected event edge
Extend selection to the beginning of the Ctrl+Shift+Alt+Left Arrow
currently selected event edge
Drag a time selection on an event without Ctrl+Shift+drag on the event
selecting/deselecting the event
Tip: Press Backspace to recall the last five time selection
areas. Looping playback
If you want to play back the time range, click Play () to play only the events within the time range. Click the Loop Playback button
(foD or press Q to toggle loop playback on and off. Vegas Pro software continually plays back the portion of the timeline within
the time selection when loop playback is toggled on.
102 | CHAPTER 4](https://image.slidesharecdn.com/vegaltk11-110216154309-phpapp02/75/Vegal-tk11-102-2048.jpg)


![Trimming a time selection
Trimming events removes all media outside the time selection. The removed information is not placed on the clipboard. Trimming is
different from cutting in that the events within the time selection are preserved.
1.Select a time range. For more information, see Selecting a time range on page 93.
2.Press Ctrl+T or, from the Edit menu, choose Trim.
The material outside the time selection (across all tracks) is removed from the project. However, the time information (space)
between events is not removed.
Events before trim Clipboard contents Events after trim
Trimming a time and event selection
1.Select the events to be trimmed.
2.Select a time range. For more information, see Selecting events and a time range on page 95.
3.Press Ctrl+T or, from the Edit menu, choose Trim.
Only the portion of selected events outside the time selection is trimmed. Unselected events remain. The time information (space)
between events is not removed.
Events before trim Clipboard contents Events after trim
Edge trimming events using the keyboard
With this method, you can quickly jump through your project and adjust cuts until they're perfectly synchronized. If you have an external
multimedia controller, it's even easier.
1.If you want downstream events to ripple as you trim, click the Auto Ripple button QJE1ZD to turn on Auto Ripple mode.
2.Select the event you want to trim.
3.Press 7 or 9 on the numeric keypad to move the cursor to the event edge you want to trim. 7 selects the beginning of an event or
moves to the previous event edge. 9 selects the end of the event or moves to the next event edge. A red bracket is displayed to indicate
which event edge will be trimmed.
Note: You can also perform this step using the bracket ([or]) keys.
110 | CHAPTER 4](https://image.slidesharecdn.com/vegaltk11-110216154309-phpapp02/75/Vegal-tk11-110-2048.jpg)


![Undoing a series of edits
You can undo a series of edits by using the drop-down list on the Undo button.
1.
Click the arrow to the right of the Undo button (1 ft* |--p.
2.
From the drop-down list, choose the edit that you want to undo. Items above it (subsequent edits) are selected automatically. Your
project is restored to the state prior to those edits.
Use the mouse to
select a series of
edits.
When you undo an edit or a series of edits, they are added to the redo history. This feature allows you to restore your project to a
previous state.
Tip: From the Edit menu, choose Undo All to undo all edits in the history. All edits are undone and added to the redo history.
Using redo
Pressing Ctrl+Shift+Z or clicking the Redo button Qjs]H) redoes the last undo performed. Repeatedly using the keyboard command or
toolbar button continues redoing undos in reverse order, from most recent to oldest. In addition, you can redo the last edit by choosing it
from the Edit menu.
Redoing a series of edits
You can view the redo history by clicking the arrow on the right side of the Redo button (| ra|--p.The top item in the list that appears is the
most recent undo edit. If you redo a specific edit that appears farther down the list, all subsequent edits above it are redone as well.
When you redo an edit or a series of edits, they are added to the undo history again. The redo history is cleared when a new edit is
performed.
Clearing the edit history
You can clear both undo and redo histories without closing your project or exiting the software. Once the histories have been cleared, a
new edit history is created as you continue working on the project. While clearing the edit history is not usually necessary, it can free up
disk space. To clear the edit history, choose Clear Edit History from the Edit menu.](https://image.slidesharecdn.com/vegaltk11-110216154309-phpapp02/75/Vegal-tk11-119-2048.jpg)


![Using the Trimmer window
The Trimmer allows you to work with and edit one media file at a time. The entire file is opened into the Trimmer, in contrast to events
on the timeline that might only contain a portion of the actual source file.
The main function of the Trimmer window is to allow you to trim a media file and place portions of it on a track. You can also add
regions and markers to a file, preview the media file, or open it in an external audio editing program.
Trimmer history
Media file
Splitter
Marker
Loop region or
Playhead
Selection area
Zoom controls
Notes:
•The ruler, scrollbar, and zoom controls may not be visible if there is not enough space to display them. Drag the horizontal splitter
between the video monitor and the Trimmer timeline to adjust the height of the timeline.
•When the scrollbar is hidden, you cannot zoom in or out on the waveform.
•When the Trimmer window is too narrow to display all buttons on the toolbar, the hidden buttons can be found in the More
Buttons drop-down list.
Sort Trimmer History Next Frame
m E
Clear Trimmer History Enable Timeline Overwrite
Remove Current Media from Trimmer
IS
Add Media from Cursor
History
K Trimmer on External Monitor Add Media up to Cursor
o [U
Loop Playback Fit to Fill
LH
Play from Start Create Subclip
B H
Play m Set In Point
ii Pause m Set Out Point
- Stop P Insert Marker
Go to Start Insert Region
LE
M Go to End [HP] Save Markers/Regions
a
Previous Frame
136 | CHAPTER 5](https://image.slidesharecdn.com/vegaltk11-110216154309-phpapp02/75/Vegal-tk11-136-2048.jpg)

![Choosing multichannel/multistream options
When you're working with multichannel or multistream audio in the Trimmer, you can choose whether you want to add
multichannel/multistream audio to the timeline when creating events.
Right-click the audio waveform in the Trimmer and select Use All Streams and Channels to allow Vegas Pro to determine which audio
streams and channels to use:
•Multichannel audio from MXF files will be added to the timeline if the Import MXF as multichannel check box on the General tab of
the Preferences dialog is selected. When the check box is cleared, audio from MXF files will be imported as stereo, but you can access
the other channels by right-clicking the event and choosing Channels from the shortcut menu.
•When using surround AC3 or Windows Media, the stereo downmix stream will be used when adding media to a stereo project. When
adding media to a 5.1 surround project, the stereo stream will be used.
•In other cases, all streams and all channels will be added to the timeline.
When Use All Streams and Channels is not selected, only the stream and channels displayed in the Trimmer will be added to the
timeline.
Moving frame by frame in the Trimmer window
As you navigate through a video file in the Trimmer, the exact frame that the cursor is over in time is displayed as in a thumbnail image
under the cursor. When using the left and right arrow keys, this allows you to edit with frame accuracy.
You can also click the Previous Frame and Next Frame (fin»D buttons to navigate frames in the Trimmer window. Tip:
Click and hold the Previous Frame and Next Frame buttons to move the cursor multiple frames.
Making selections in the Trimmer
After you have opened a media file in the Trimmer, you can select a segment of it and place it in your project. Make a time selection to
select a segment in the Trimmer in the same way you do in the project timeline. For more information, see Selecting a time range on
page 93.
You can make a selection during playback by using the keyboard. Press I or [ to mark the start of the selection, and press O or ] to mark
the end.
If you know the exact timecode of the point where you want to begin and end a time selection, you can type it into the boxes at the lower
right corner of the Trimmer window.
Double-click to type a value.
Selection Start Selection End Selection Length
Tip: Press Backspace to recall the last five time selection areas in the Trimmer.
Adding selections to the timeline
You can use the Trimmer window to do traditional two-point, three-point and four-point editing. These editing techniques allow you to
add smaller sections of files to the timeline.
Post-edit ripple mode affects how a selection is added to the timeline from the Trimmer. When the Auto Ripple button Q jfc |--D is
selected, adding a selection from the Trimmer selection affects the position of later events on the track. When not in post-edit ripple
mode, adding a selection from the Trimmer has no effect on the position of other events. For more information, see Editing events on
page 96.
138 | CHAPTER 5](https://image.slidesharecdn.com/vegaltk11-110216154309-phpapp02/75/Vegal-tk11-138-2048.jpg)
![Adding selections at the cursor (three-point editing)
1.Open a media file in the Trimmer.
2.Make a time selection in the Trimmer.
3.Select the track in the timeline where the selection will be added.
Tip: You can also select two points in the timeline and a single point in the Trimmer to perform three-point editing. In this mode,
ripple editing is not applied. For more information, see Applying post-edit ripples on page 107.
4.Position the cursor in the timeline at either the start or end point where you want to add the selection.
5.Add the selection to the timeline in one of the following ways:
Click the Add Media from Cursor button (fg) or press A to insert the event after the cursor. • Click the
Add Media up to Cursor button ( • ) or press Shift+A to insert the event before the cursor.
Alternately, you can drag the selection from the Trimmer to the timeline. Drag
from the Trimmer to a project track.
Using a Trimmer selection to fill a timeline selection (four-point editing)
1.Open a media file in the Trimmer.
2.Select the portion of the file that you want to use.
3.Select the portion of the timeline where you want to use the Trimmer selection.
4.Click the Fit to Fill button (TBI). The Trimmer selection is time-compressed or stretched to fill the timeline selection.
Overwriting timeline events with the Trimmer selection
The standard behavior of the Trimmer is to perform punch-in edits on the timeline: when you add media to the timeline, the events
created by the Trimmer are laid over existing events on the timeline. You can delete or move the events you create with the Trimmer
without changing the underlying events.
If you want to replace the contents of the timeline when creating events from the Trimmer, select the Enable Timeline Overwrite button
flu^l). When Enable Timeline Overwrite is selected, ripple editing is not available. For more information, see Applying post-edit ripples
on page 107.
Using the Trimmer History list
The drop-down list at the top of the Trimmer lists files and events that have been opened in the Trimmer.
Cable car turnaround in San Francisco.mp4 [E:^lediaVideo Clips] $X|O
ADVANCED EDITING TECHNIQUES | 139
To open a recently used file, choose its file name from the Trimmer History drop-down list.
To sort the list, click the Sort Trimmer History button flSp.The files in the drop-down list are sorted in alphabetical order. To sort in
reverse alphabetical order, hold the Ctrl key while clicking on the Sort Trimmer History button.
Ti p: By default, the Trimmer History list displays file name followed by file path. You can choose to display file path first by clearing
the Show trimmer history with file name first, then folder check box on the General tab of the Preferences dialog. For more
information, see General tab on page 442.](https://image.slidesharecdn.com/vegaltk11-110216154309-phpapp02/75/Vegal-tk11-139-2048.jpg)


![Column Description Edit function
File Path Displays the path of the event's media Enter a new media file reference path for the event to use.
file.
Tape Name Displays the name of the source media Change the tape name here or in the properties dialog for the media file.
tape name. For more information, see Modifying media file properties on page 307.
Select Displays whether the event is selected in Toggle the event's selection by clicking the check box. A check mark in the
the project. box indicates that the event is selected. For more information, see Making
selections on page 91.
Mute Displays whether the event is muted. Toggle the event's mute switch by clicking the check box. A check mark
in the box indicates that the event is muted. For more information, see
Mute on page 201.
Loop Displays whether the event is looped for Toggle the event's loop switch by clicking the check box. A check playback.
mark in the box indicates that the event is looped for playback. For
more information, see Loop on page 201.
Lock Displays whether the event is locked. Toggle the event's lock switch by clicking the check box. A check mark
in the box indicates that the event is locked. For more information, see
Lock on page 201.
Normalize Displays whether the event is Toggle the event's normalize switch by clicking the check box. A check
normalized. mark in the box indicates that the event is normalized. For more
information, see Normalize (audio only) on page 202.
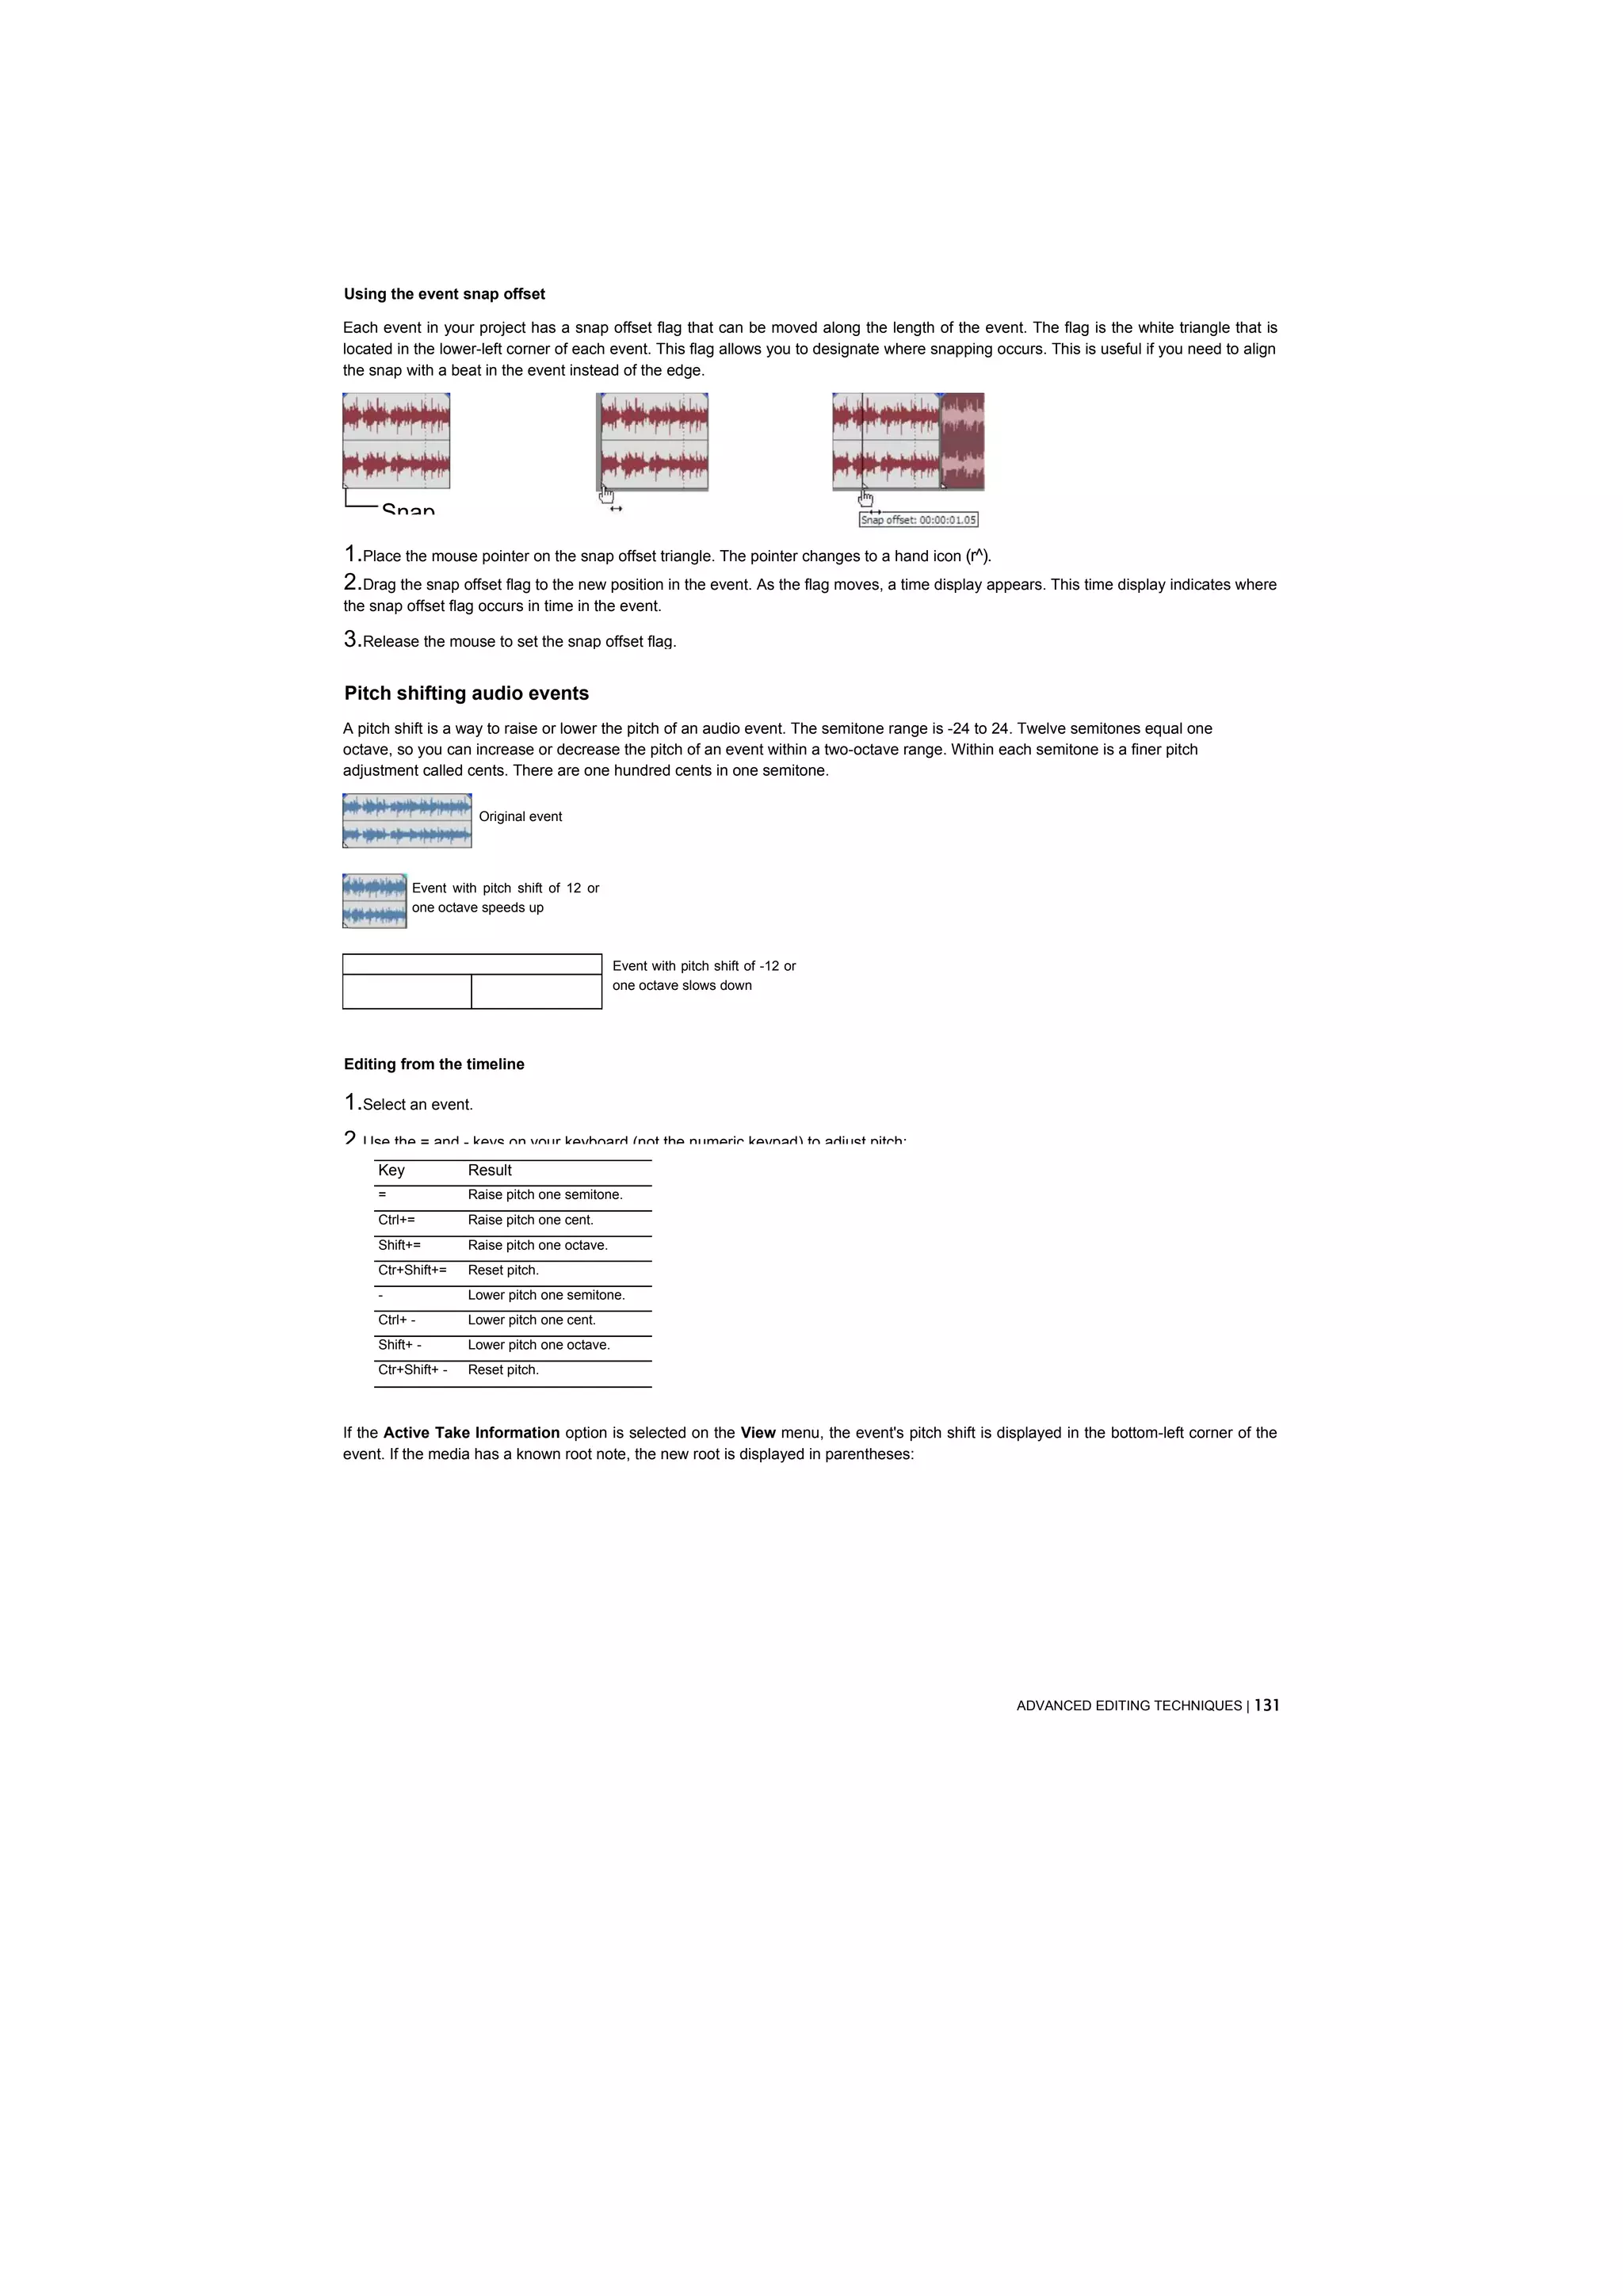
Snap Offset Displays when in the event the snap Enter a different value to change the snap offset position in the event. For
offset is positioned. more information, see Using the event snap offset on page 123.
Markers
The Markers category displays information about markers on the project's timeline. This category displays two columns: the
marker's position on the timeline and the marker's name.
Regions
The Regions category displays information about regions on the project's timeline. This category displays four columns: the region's
start position, end position, length, and name.
Selected Events
The Selected Events category is visually identical to the Events category except that the Edit Details window only displays
information about events that are selected in your project.
Customizing the Edit Details window
You can arrange and delete columns from each category and save the changes to a personal template. One template is available from
which you can create your own display options.
1.From the Show drop-down list, choose the category that you want to customize.
2.Drag a column's header to the new position. The cursor changes to a column icon (^|) as you move the column. If you want to remove
the column from the display, drag the icon off the Edit Details window. Release the mouse to drop the column in its new position.
3.The Template drop-down name changes to "Untitled." Type a new name in the Template drop-down.
Edit Details
Show: | Events ^^^^^y^uBtom^ispJav
4. Click the Save button fly]) on the Edit Details window to save the custom display.
Tip: You can delete a custom display by selecting it from the template drop-down list and clicking the Delete button (]"x]>.
144 | CHAPTER 5](https://image.slidesharecdn.com/vegaltk11-110216154309-phpapp02/75/Vegal-tk11-144-2048.jpg)


![Item Description
Crop When the Automatic Crop check box is cleared, you can drag this slider to adjust
image cropping.
Tips:
•3D depth adjustment is a complex process and is out of the scope of this document. For more information, please review a reference
such as 3D Movie Making: Stereoscopic Digital Cinema from Script to Screen by Bernard Mendiburu.
•When you're working with a stereoscopic 3D project, a separate check box is displayed in the Video FX window for the left- and right-
eye wdeo.-fW stereoscopic 3D Adjust ], By limiting an effect to the left or right eye only, you can use multiple instances of a plug-in with
different settings for each eye.
Rendering a stereoscopic 3D project
When you render your project, the Stereoscopic 3D mode setting from the Video tab in the Project Properties dialog is used by default.
If you want to use a different rendering format (to deliver separate left- and right-eye masters, for example, or to create multiple versions
of your project), you can change the rendering mode.
Supported 3D rendering formats:
•CineForm Neo3D (requires CineForm NeoHD, Neo4k, or Neo3D 5.1 or later). You can create a custom QuickTime or AVI render
template that uses CineForm as your video format. Rendering with this template will create a Neo3D file that can be used by any
application that supports the CineForm stereoscopic 3D format.
•Two separate files. You can create two custom templates and use the Project tab in the Custom Settings dialog to set the
Stereoscopic 3D mode for one template to Left Only and the other to Right Only. You can then render the files separately or use
Tools > Scripting > Batch Render to render the left- and right-eye files.
1.From the File menu, choose Render As to display the Render As dialog.
2.Choose a drive and folder from the Save in drop-down list, or use the browse window to locate the folder where you want to save
your file.
3.Type a name in the File name box, or select a file in the browse window to replace an existing file.
4.Choose a file type from the Save as Type drop-down list.
5.Click the Custom button to create a new template.
6.In the Custom Settings dialog, click the Project tab.
7.From the Stereoscopic 3D mode drop-down list, choose the setting that you want to use for rendering your project.
Choose Use project settings if you want to use the setting from the Video tab in the Project Properties dialog, or choose
another mode if you want to override the project setting when rendering.](https://image.slidesharecdn.com/vegaltk11-110216154309-phpapp02/75/Vegal-tk11-160-2048.jpg)


![4. In the Clip Resolutions box, select check boxes to indicate which clips you want to import:
dip Resolutions
Clip metadata is always transferred. Proxy or full resolution files can be selectively
transferred later.
□ All full resolution files
FT] All proxy resolution
files
Ti p: Proxy files are much smaller than the full-resolution versions. If you're working on a system with limited disk space or
processing power, you can edit the smaller proxy files on the timeline and replace the proxies with full-resolution files before
rendering.
Proxy editing is ideal for storyboarding or rough-cut editing.
• Clear both check boxes if you want to import clip information (metadata) only without importing clips.
You can import clips later by right-clicking a clip in the XDCAM Explorer and choosing Import Full Resolution Files or Import
Proxy Files from the shortcut menu.
•Select the All full resolution files check box to import full-resolution clips.
•Select the All proxy resolution files check box to import low-resolution clips for quick timeline editing and preview.
If you're working on a system with limited disk space or processing power, you can edit the smaller proxy files on the
timeline and replace the proxies with full-resolution files before rendering.
5. The Capture Folder box displays the path to the folder where clips will be imported. Click the Browse button to choose a
folder.
Capture Folder
D:MediaVideoXDCAM Browse...
I
Tip: You can also copy XDCAM discs to the capture folder manually. Simply copy the files and folders to the specified capture
folder (preserving the XDCAM disc folder folder/file structure). The next time you start Vegas Pro, the disc will be available in the
XDCAM Explorer window.
6. Type a name in the Optional Disc Name box if you want to assign a friendly name to the disc.
I I Overwrite any existing disc name if present
For example, if you've written "Joe's Tire Spot" on your XDCAM disc, you can type that name so you don't have to try to identify the
disc in the XDCAM Explorer window using its 32-digit identifier.
7.Click the OK button to start importing clips. The disc label is added to the left pane in the XDCAM Explorer window, and the clips are
displayed in the right pane. For more information, see Using the XDCAM Explorer window on page 159.
8.You're ready to start editing your XDCAM clips on the timeline.
Notes:
•Select the Import MXF as multichannel check box on the General tab of the Preferences dialog if you want to import MXF files
from XDCAM cameras and decks with multichannel audio. When the check box is cleared, audio from MXF files will be imported as
stereo, but you can access the other channels by right-clicking the event and choosing Channels from the shortcut menu.
•The imported disc is not associated with the current project. Imported discs are available in the XDCAM Explorer window until you
delete them from your computer.
•Imported clips are not added to the Project Media window. Drag a clip to the timeline to add it to your project or right-click a clip and
choose Add to Project Media List from the shortcut menu.](https://image.slidesharecdn.com/vegaltk11-110216154309-phpapp02/75/Vegal-tk11-170-2048.jpg)
![5. If you're working with proxy-resolution clips, replace them with full-resolution clips before rendering your project or exporting
it to an XDCAM disc:
a. Click the Conform XDCAM Media in Current Project button @ in the XDCAM Explorer window.
b. If the full-resolution clips are not available on your computer, the Conform XDCAM Media in Current Project dialog is
displayed.
c. Insert the specified disc.
If the events on the timeline have been trimmed, you can select the Trim clips to used regions when possible check box
(available only in file-access mode) to import only the portions of the media files required for the events.
If you need to choose a different XDCAM device or transfer method, click the Device button. For more information, see Setting
up an XDCAM device on page 158.
d. Select the Trim clips to used regions when possible check box (available only in file-access mode) if you want to trim full-
resolution clips to import only the portions used in your project.
Note: Some XDCAM decks might require updated firmware to support trimming clips when connecting via Ethernet (FTP).
e. Click Continue to import the full-resolution clips.
f. Repeat steps 5c and 5d as needed.
Clips are imported to your computer if necessary, and the events on the timeline are updated to use the full-resolution
files.
6. You can now render your project or export it to an XDCAM deck or camera.
Setting up your project for multichannel audio
If you imported your XDCAM clips with the Import MXF as multichannel check box selected on the General tab of the Preferences
dialog, your MXF files will be imported with multichannel audio. When you add the clip to the timeline, the audio channels will be added
across tracks.
The example below shows an MXF clip with six-channel audio. To take advantage of multichannel mapping in Vegas Pro, set up your
project to map each audio channel to a separate bus.
BSH F °o° © - I
Level. 100.0 % ----------------.11 ♦ *
■ © H O ■D" i --------
O.OdB —.1] Center 1;
HI- © H o -0" !
O.OdB --------TjJ— Center
H © H O ■D" © ' I
O.OdB —.1] Center 1;
B © H O ■D" I
0.0 dB —. 1 J Center 1;
■r ©H O ©' i
0.0 dB —. 1 J Center 1;
■
O.OdB
©
--------.1]
H O ■D"
Center 1;
Ir --
1. From the Insert menu, choose Audio Bus (or click the Insert Bus button |) in the Mixer window) to create a bus in the Mixer
window. Because we're working with six-channel audio, we'll add three stereo busses.](https://image.slidesharecdn.com/vegaltk11-110216154309-phpapp02/75/Vegal-tk11-172-2048.jpg)
![2. Now click the bus button ([a]) on each track to assign the channels to busses.
We'll assign channels one and two to Bus A, channels three and four to Bus B, and channels five and six to Bus C.
■r ir-o . ©- i
Level: 100.0% --------------------------------.11 ♦ ♦
□ ~®A O *' ©' I
0.0 dB —IJ Center I1
U~ ® A O
~~1
©' I
0.0 dB -------------- [jj— Center ■ 1
iKHlliitti j
H
'.,>,„...........,.,,,1
~®B O *' ©' Ir
0.0 dB --------------.1 J Center 1
Alternatively, you could create one bus per channel.
We'll1
■ use this channel mapping when you render your video or export it to an XDCAM camera or deck.
~ ® B O ■D" © ' I
0.0 dB —.11 Center 1; ,......................*|*
For more information, see Exporting video to an XDCAM disc on page 166.
Replacing proxy-resolution clips with full-resolution media (conforming media)
If you're working with proxy-resolution clips, replace them with full-resolution clips before rendering your project or exporting it to an
XDCAM disc:
1.Click the Conform XDCAM Media in Current Project button (HJ in the XDCAM Explorer window.
■1 ® C o -o- © • I
2.If the dB — 1 J Center are; not available on your computer, the Conform XDCAM Media in Current Project dialog is displayed.
0.0 full-resolution clips 1
Conform XDCAM Media in Current Project Ij^l XDCAM Device
FAM G:MediaSD Test Disc 1 DVCAM | Device... |
■r ~ ®C O ■!>' © ' I r ...................i
O.OdB —.1]
Remaining DiscsCenter 1; Insert Disc 1
BCD
D1700733505C1OOE30S004G02C
—4
Insert any one of the remaining discs in the device.
OTrim clips to used regions when possible.
| Continue | Stop](https://image.slidesharecdn.com/vegaltk11-110216154309-phpapp02/75/Vegal-tk11-173-2048.jpg)

![4. Choose render settings:
a. Select the Render format radio button.
b. In the File path box, type the path to the file you want to render, or click the Browse button to browse to the folder you
want to use and then type a file name.
This path is used to render an MXF file to your hard drive before transferring to your XDCAM device. You can delete the file
after the transfer is complete.
c. Select the Enable multichannel mapping check box if you want to map render multiple channels of audio.
You can click the Channels button if you want to map the busses in your project to channels in the rendered file. If you don't
specify a channel mapping, Vegas Pro will not render a multichannel file.
[ CHANNEL MAPPING |—E3—|
USE THE FOLLOWING BUSES FOR MULTICHANNEL
BUS CHANNELS
1
1 1 MASTER
1 1 MASTER [MONO DOWNMIX) ,2
_7 BUS A
1 I BUS A [MONO DOWNMI*)
_7
3, 4
1 I BUS B {MONO DOWNMIX)
BUSB
_7]
5, 6
1 1 C [MONO DOWNMIX)
BUS BUSC
OK | CANCEL |
In the Channel Mapping dialog, select the check box for each bus you want to include in the rendered file. Each stereo bus will
be saved to two channels in the rendered file. If you want to save a bus to a single channel, select the (Mono downmix) check
box for that bus.
If you want to change order of the busses in the channel mapping, select the bus and click the Move Up or Move Down
button.
Click OK to close the Channel Mapping dialog and return to the Export Video to XDCAM Disc dialog. For more information,
see Setting up your project for multichannel audio on page 164.
d. From the Template drop-down list, choose the setting that matches your destination disc.
Information about the selected rendering template is displayed in the Description box.
If you choose Default Template, the number of channels will match the number of channels specified in the Channel Mapping
dialog.
e. Select the Render loop region only check box if you want to export only the portion of your project that you selected in
step 1.
f. Select the Delete file after print check box if you want to delete the rendered file from your hard drive after exporting it to
disc. If the export fails, the rendered file remains on disk so you can adjust your XDCAM device settings and export again
without having to render again.
g. Select the Use project output rotation setting check box if you're rendering a rotated project and want to use the Output
rotation setting from the Project Properties dialog for your rendered file.
When the check box is cleared, the media is rotated according to its Media Properties setting, but the project itself is unrotated
—you can use this setting to proof your project on an unrotated display.
5. Click OK. Your project is rendered and transferred to your camera or deck.
WORKING WITH XDCAM VIDEO | 175](https://image.slidesharecdn.com/vegaltk11-110216154309-phpapp02/75/Vegal-tk11-175-2048.jpg)


![Soloing a track
The Solo button ((T]) in the track list isolates a track's events for playback. This allows you to focus on a track's contents without the
distraction of other tracks. You can solo more than one track at a time.
To solo a track, click the Solo button on that track. To solo several tracks, select the tracks and click the Solo button on any of the
selected tracks. Click the Solo button again to restore the track(s) for playback.
Tip: Press Ctrl and dick the Solo button ( IJ to solo only the selected track (and restore any other soloed tracks). If the selected track
is already soloed, press Ctrl and click the Solo button to restore all tracks.
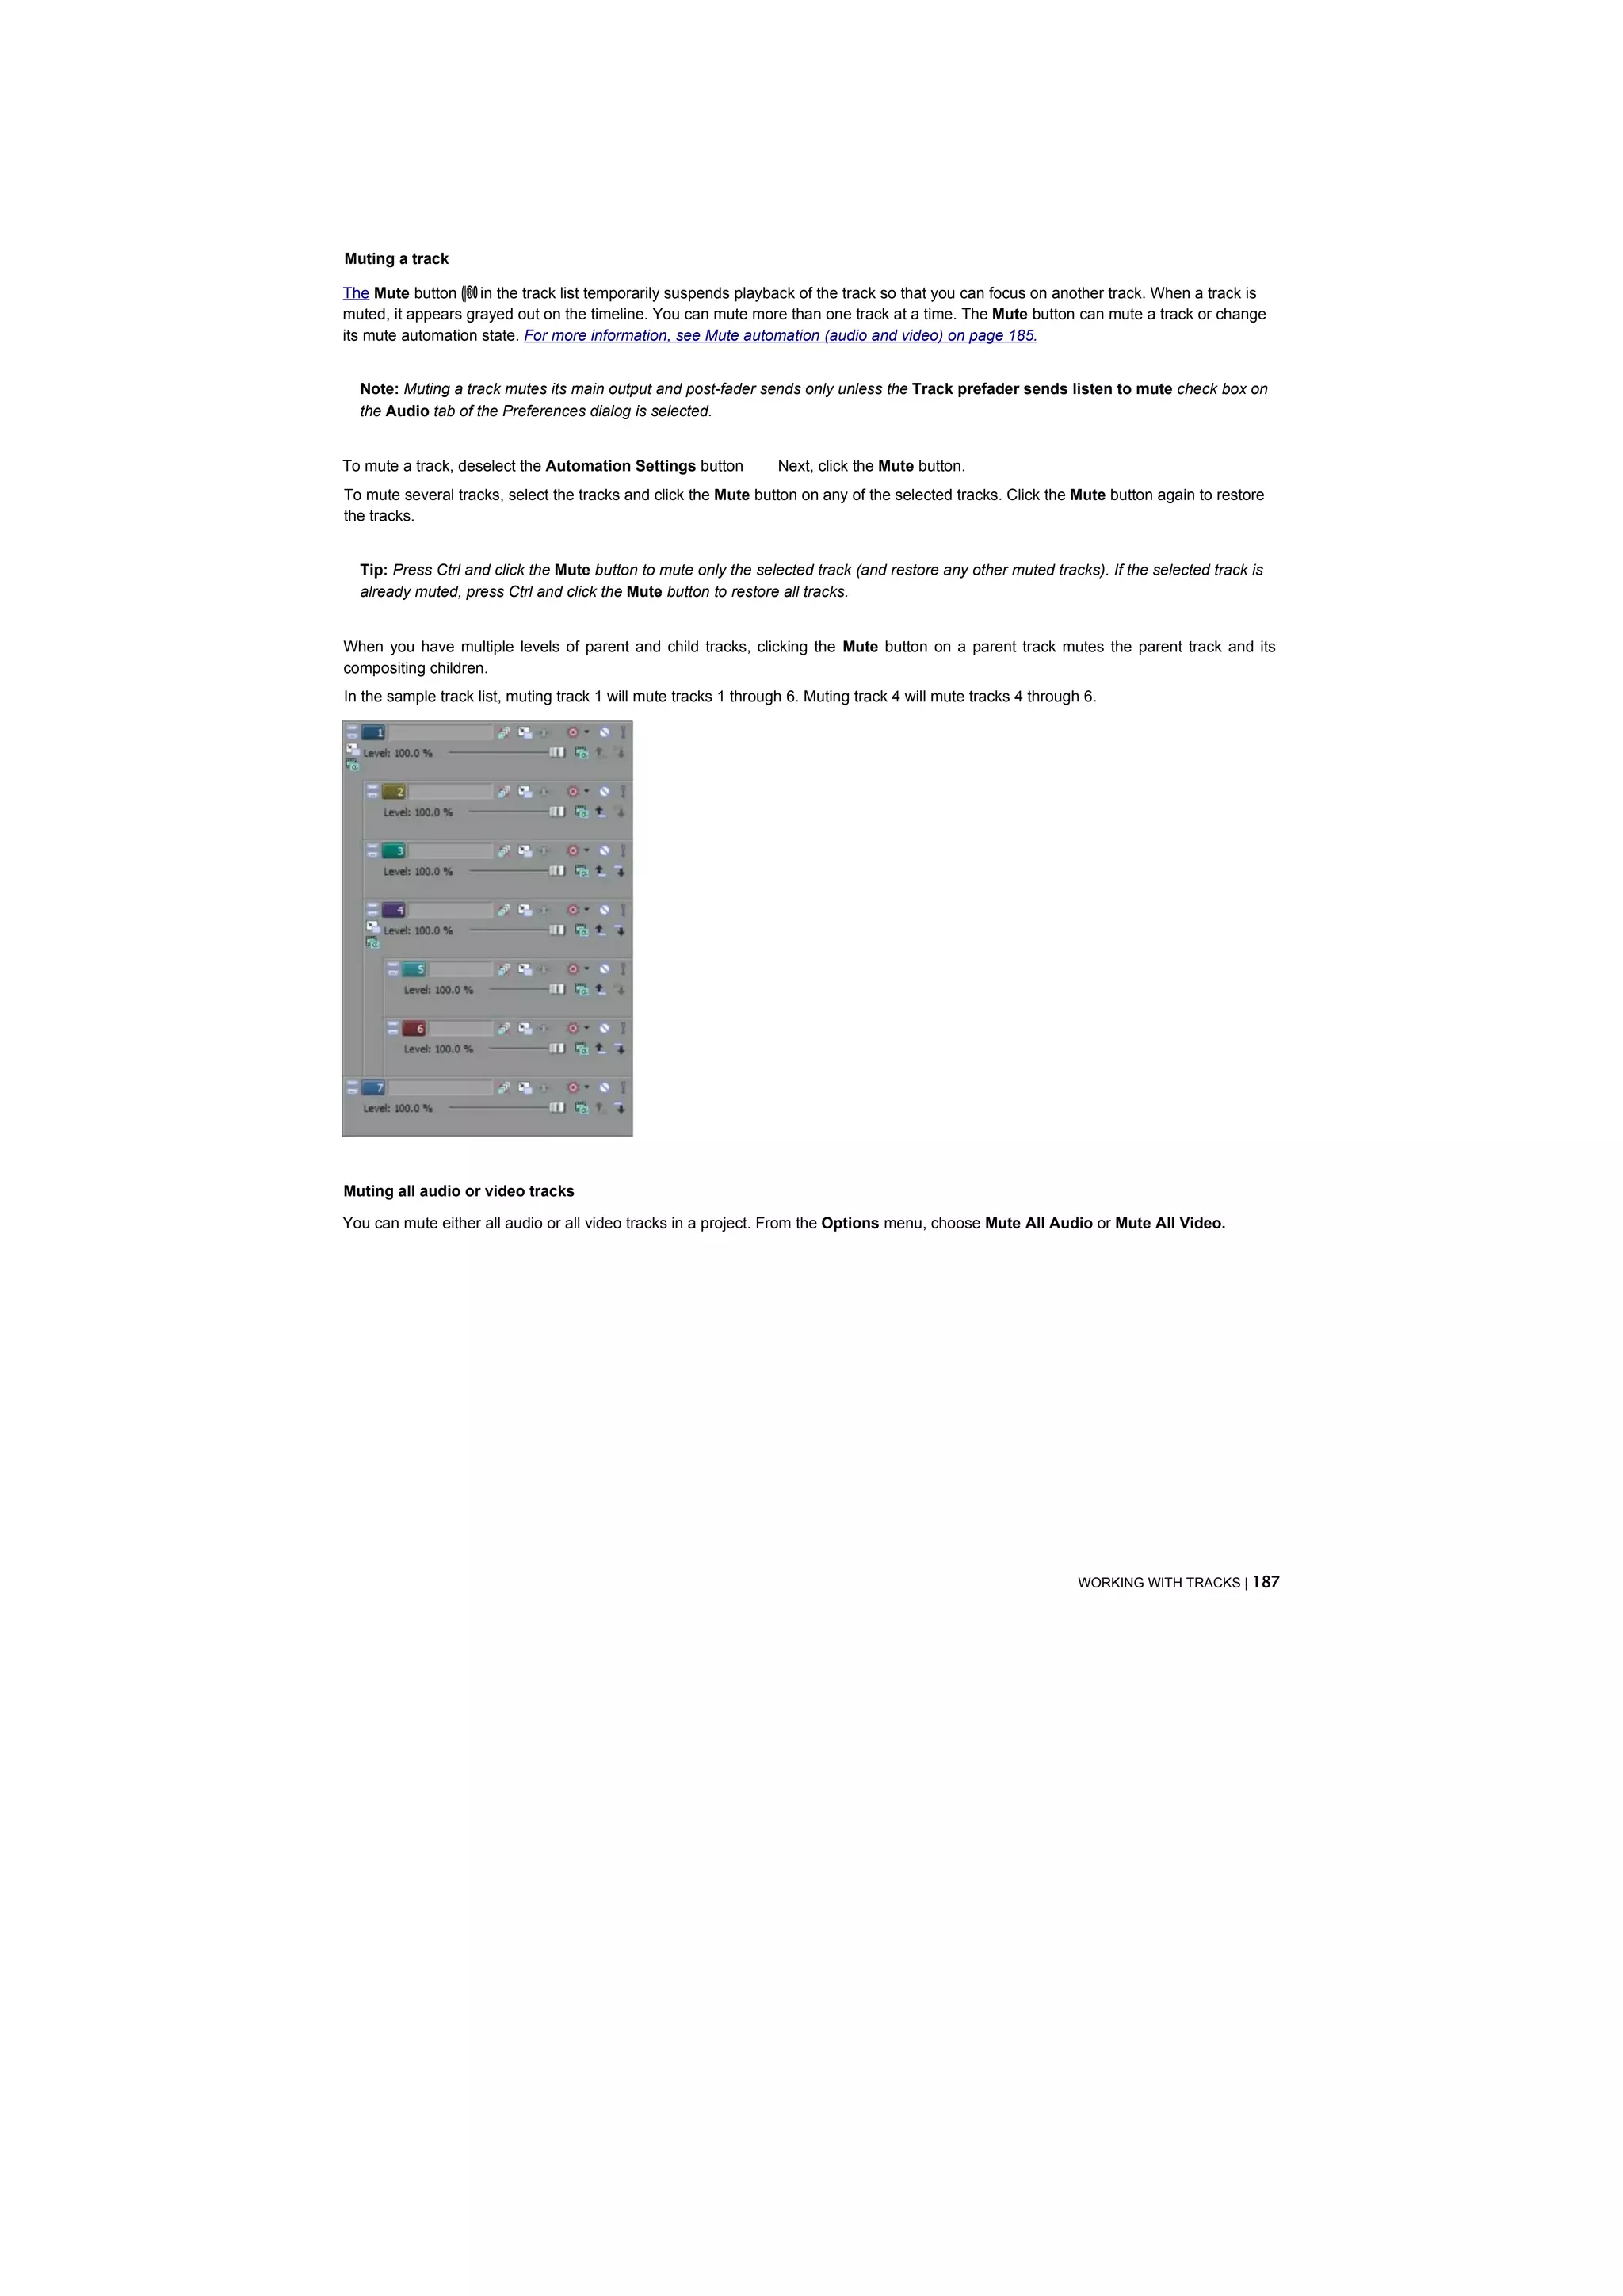
When you have multiple levels of parent and child tracks, clicking the Solo button on a parent track solos the parent track and its
compositing children. Other nonsoloed tracks at the same compositing level are bypassed.
In the sample track list, soloing track 1 will solo tracks 1 through 6. Soloing track 4 will solo tracks 4 through 6. Tracks 2 and 3 are
bypassed, and tracks 1 and 7 play normally.
188 | CHAPTER 9](https://image.slidesharecdn.com/vegaltk11-110216154309-phpapp02/75/Vegal-tk11-188-2048.jpg)


![Adjusting volume or pan automation settings
1.If you want to change volume or pan settings by recording automation, select the Automation Settings button ((gg).The fader/slider
handle is displayed with an automation icon ([a]) in automation mode.
2.Drag the Vol fader to control how loud a track is in the mix or drag the Pan slider to control the position of the track in the stereo field.
The fader and the slider behave differently depending on the track automation recording mode:
•When the track automation mode is set to Off, the fader adjusts the volume of the entire track and the slider pans the entire track.
In this mode, the automation control acts as a second trim control.
•When the track has a volume envelope and the track automation mode is set to Read, the fader/slider will follow the envelope
during playback but cannot be adjusted.
•When the track automation mode is set to Touch or Latch, the fader/slider edits the envelope setting at the cursor position. If the
track does not have a volume/pan envelope, an envelope will be added when you adjust the fader/slider.
If multiple tracks are selected, all selected tracks are adjusted.
If you adjust the fader/slider during playback, the behavior varies depending on the selected automation recording mode. For more
information, see Automation recording modes on page 197.
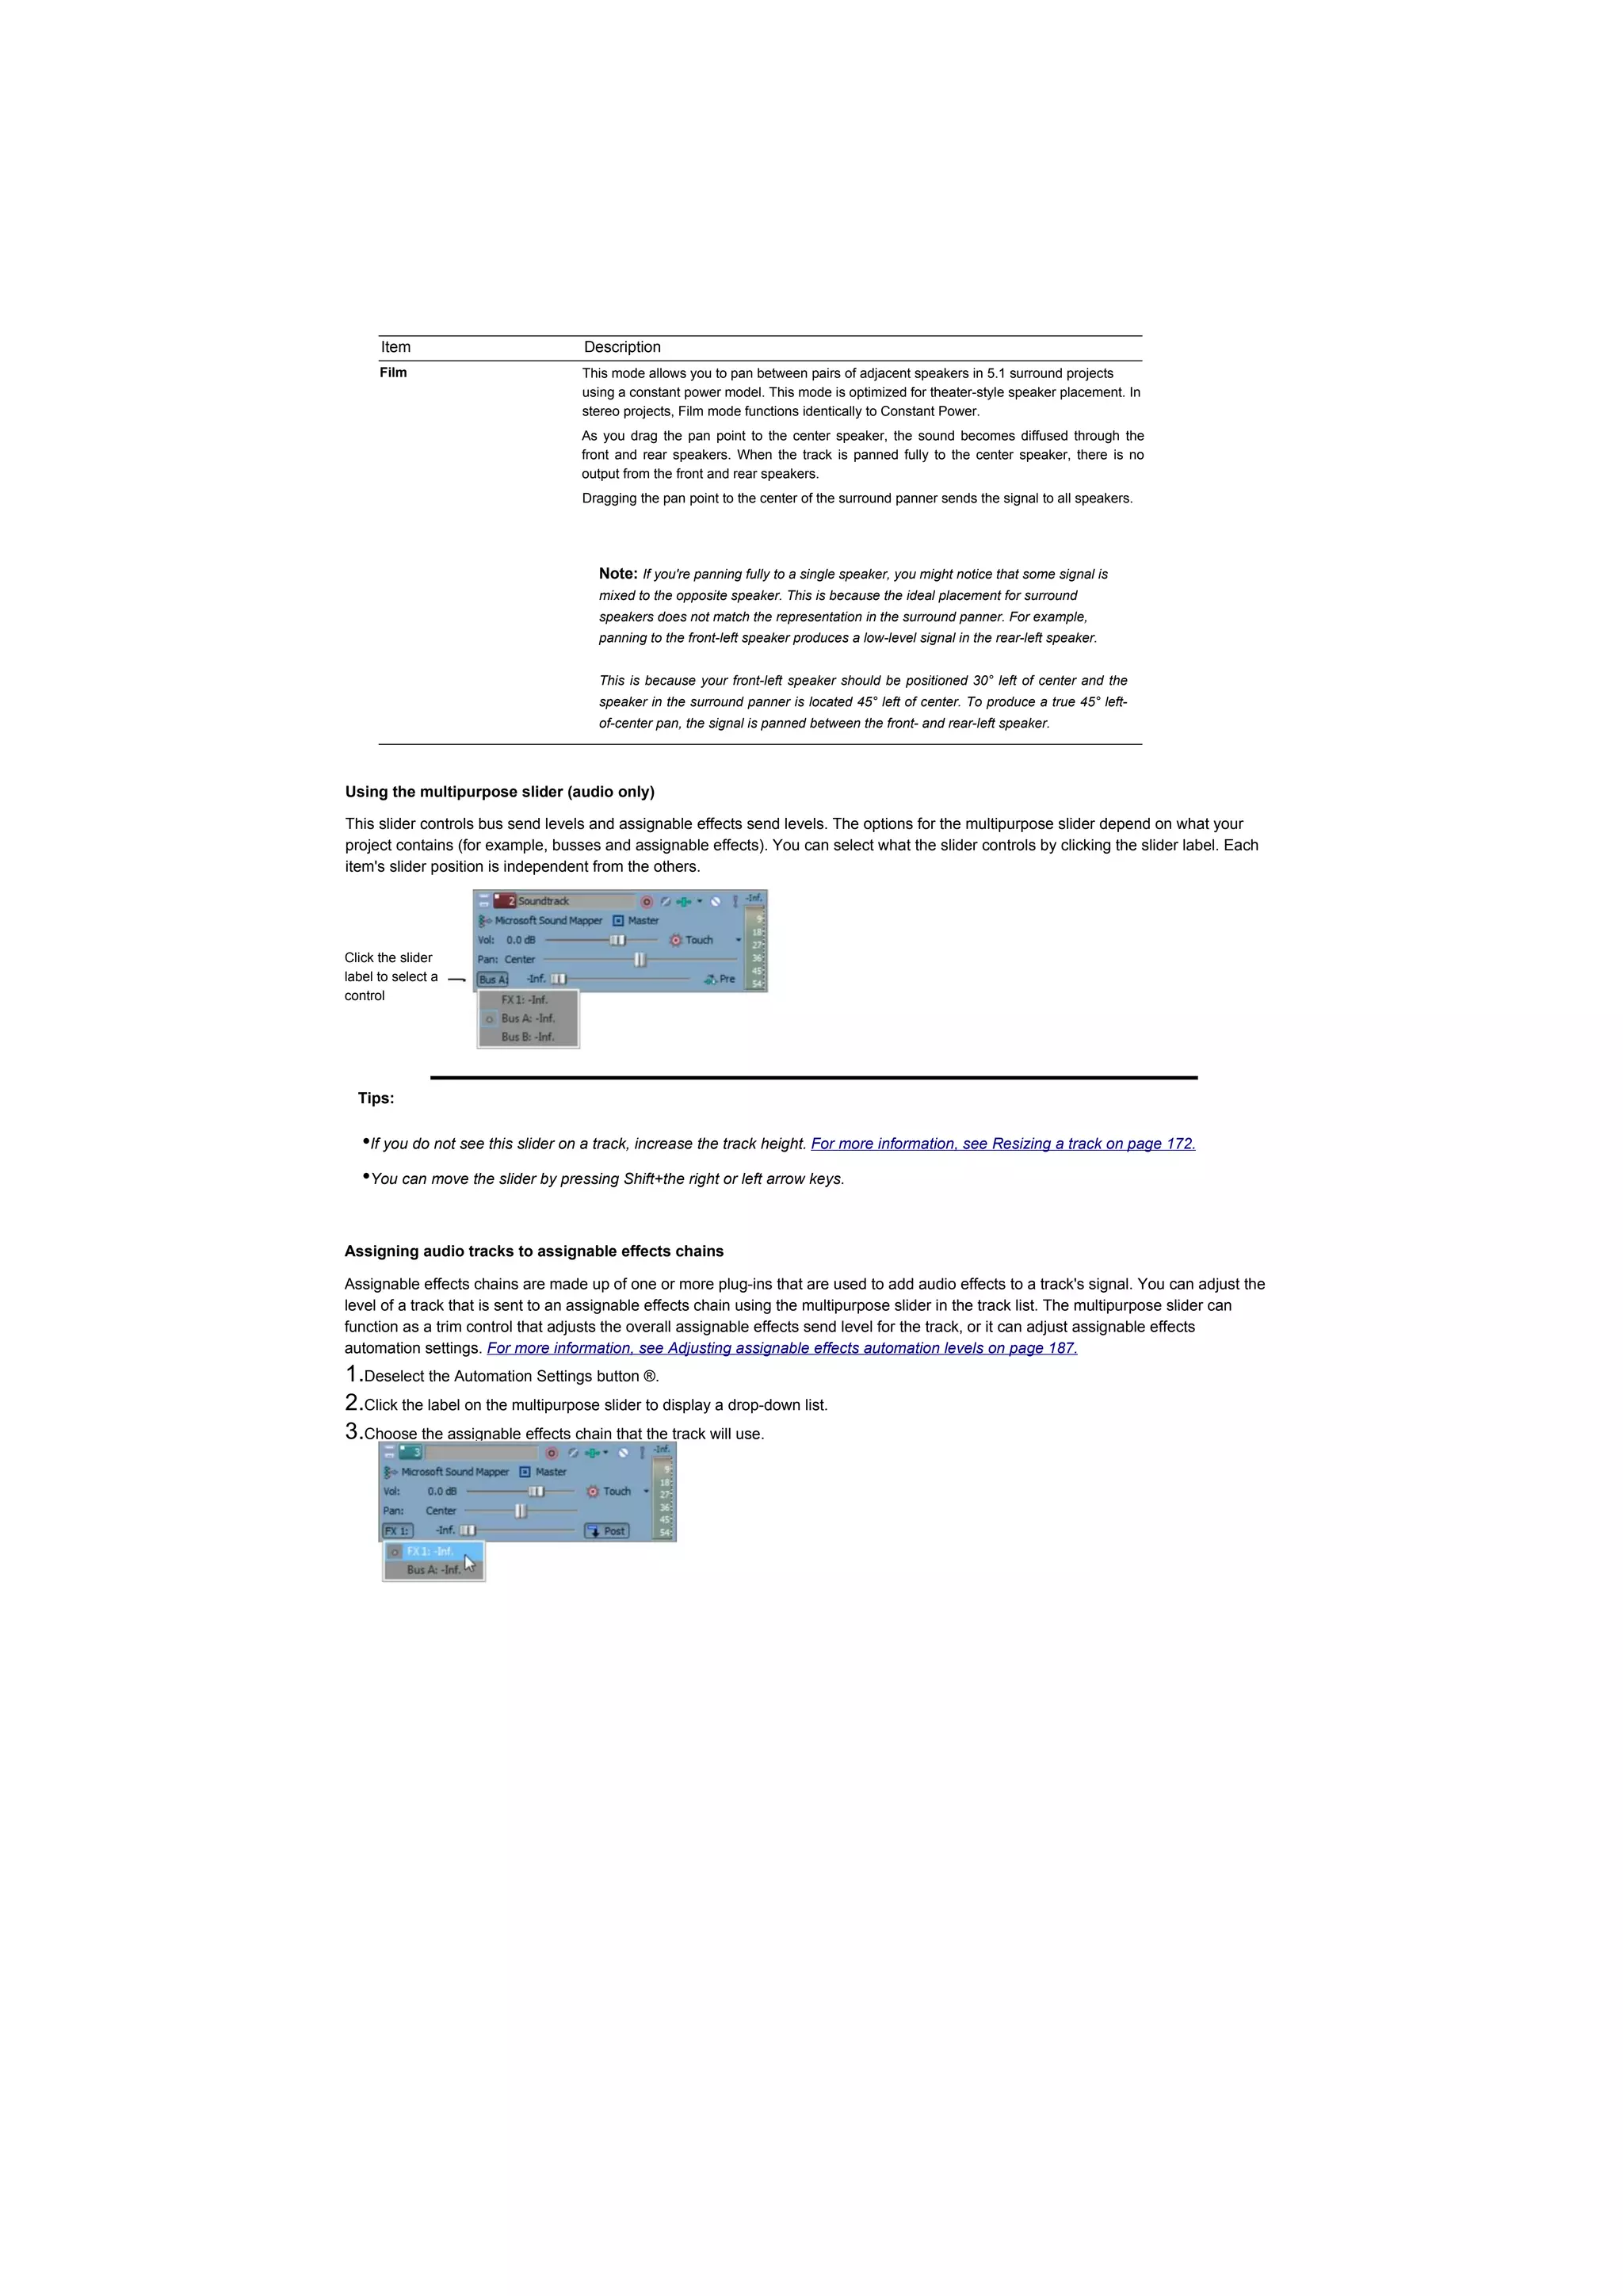
Assignable effects automation (audio only)
You can use assignable effects automation to vary the level of a track sent to an assignable effects chain.
Adding or removing assignable effects automation
Before you can add an assignable effects envelope, you'll need to add an assignable effects chain to your project. For more
information, see Creating an assignable effects plug-in chain on page 256.
1.Select an audio track.
2.From the Insert menu, choose Audio Envelopes, or right-click in the track list and choose Insert/Remove Envelope from the
shortcut menu.
3.From the submenu, choose the effects chain where you want to send the selected track. A check mark is displayed for each
assignable effects chain that is automated for the selected track.
Adjusting assignable effects automation levels
1. Select the Automation Settings button ([&■). The fader handle is displayed with an automation icon (rg)) in automation mode. Click
2. the label on the multipurpose slider and choose an assignable effects chain from the menu.
3. Drag the FX fader to control the level of the track sent to each of the assignable FX chains that you have created. The
fader behaves differently depending on the track automation recording mode:
•When the track has an assignable effects envelope and the track automation mode is set to Off, the fader adjusts the send level of
the entire track. In this mode, the automation control acts as a second trim control.
•When the track has an assignable effects envelope and the track automation mode is set to Read, the fader will follow the
envelope during playback but cannot be adjusted.
•When the track has an assignable effects envelope and the track automation mode is set to Touch or Latch, the fader edits the
envelope setting at the cursor position. If the track does not have an envelope, one will be created when you adjust the fader.
If multiple tracks are selected, all selected tracks are adjusted.
USING AUTOMATION | 195](https://image.slidesharecdn.com/vegaltk11-110216154309-phpapp02/75/Vegal-tk11-195-2048.jpg)


![Adding fade-to-color envelopes
The fade color is chosen by moving the envelope towards the top or bottom of the track. You can add points to automate the fade.
1.Select a video track.
2.From the Insert menu, choose Video Envelopes, or right-click in the track list and choose Insert/Remove Envelope from the
shortcut menu.
3.Choose Track Fade to Color from the submenu or shortcut menu.
If the track already contains a fade-to-color envelope, it will be removed. If the track does not contain a fade-to-color envelope, it will
be added with a setting of No Color (0%) for the duration of the track.
4.If you want to change the fade-to-color setting throughout the track, edit the envelope in the timeline.
5.If you want to change the fade-to-color envelope by recording automation, select the Automation Settings button (|§M) in the track
header to display automation controls. The Fade slider is available only in automation mode.
6.Drag the Fade slider.
The slider behaves differently when you change the track automation recording mode:
•When the track automation mode is set to Off, the slider adjusts the fade level of the entire track.
•When the track automation mode is set to Read, the slider will follow the envelope during playback but cannot be adjusted.
•When the track automation mode is set to Touch or Latch, the slider edits the envelope setting at the cursor position.
For more information about track automation recording modes, see Automation recording modes on page 197.
Setting fade colors
The default fade colors are determined by the Track fade top and Track fade bottom controls on the Video tab of the Preferences
dialog. For more information, see Video tab on page 445.
1.To change the top or bottom color for a track, right-click the track header and choose Fade Colors from the shortcut menu.
2.Choose Top or Bottom from the submenu. A color picker is displayed.
3.Use the color picker to specify the new color.
4.Click OK.
Adding a motion blur envelope
Motion blur can help you make computer-generated animation look more realistic. For example, if you use track motion or event pan/crop
to move a clip across the frame, each frame is displayed clearly when no motion blur is applied. Turning on motion blur adds a motion-
dependent blur to each frame to create the appearance of smooth motion in the same way a fast-moving subject is blurred when you
take a photograph with a slow shutter speed.
Note: Motion blur significantly increases your rendering time. Adjust the envelope to apply motion blur only where necessary.
1.Right-click the video bus track, choose Insert/Remove Envelope from the shortcut menu, and then choose Motion Blur
Amount from the submenu.
2.Add and adjust envelope points as necessary to set the time interval that will be used for blurring. Increasing the value emphasizes
the blur effect. For example, setting the envelope to 0 means no blurring will occur; setting the envelope to 1 second means that each
frame will be blurred for one-half second before and after the frame.
3.The motion blur envelope affects all tracks. To bypass motion blur for a track, select the Bypass Motion Blur button ([§5]) in the
track header.
4.To change blur type, choose a setting from the Motion blur type drop-down list on the Video tab in the Project Properties dialog. This
setting determines the shape of the blur and the opacity of the frames.
USING AUTOMATION 199](https://image.slidesharecdn.com/vegaltk11-110216154309-phpapp02/75/Vegal-tk11-199-2048.jpg)

![Moving envelope points
Once you have added envelope points, you can raise and lower them to different levels along the timeline, or you can adjust the
envelope's location along the timeline by dragging it right or left. You can move one point at a time, even during playback and check
the results in real time. If snapping is enabled, the envelope point snaps to time divisions as you drag. Hold Shift while dragging to
override snapping.
Tip: You can move multiple envelope points at once using the Envelope Edit tool. For more information, see Using the Envelope
Edit tool on page 195.
1.Place the mouse pointer on an envelope point. The pointer changes to a hand icon (rO^).
2.Drag the point to the desired position. As you move an envelope point, a ToolTip displays both the point's location on the timeline
and its decibel level/percent pan.
3. Click the Play ((►]) or Play From Start (|lH) button to play the project and check the timing of the envelope. Tip: You can also
set the value of the point by right-clicking an envelope point and choosing a setting from the shortcut menu.
Changing envelope fade curves
You can set the type of fade curve used after each envelope point: linear, fast, slow, smooth, or sharp. You can select either a point or a
portion of the envelope to set the fade curve. If you select a portion of the envelope, the fade curve is applied to that envelope segment.
If you select a point, the fade curve is applied to the segment of the envelope after the selected point.
1.Right-click a point or a portion of the envelope to display a shortcut menu.
2.From the shortcut menu, choose the curve type.
Tip: If you use the same fade curve frequently, you can set it as a default all new audio or video envelopes. For more information, see
Editing tab on page 456.
Applying envelope fades within a time selection
When you drag an envelope within a time selection, all envelope points within the selection are adjusted, and a fade can be applied to
the beginning and end of the selection to smooth the transition.
1.Create a time selection.
2.Drag an envelope point or segment within the selection. All envelope points within the selection are adjusted as you drag, and fades
are applied to the beginning and end of the selection. Additional envelope points are created as necessary.
Selected envelopes Fades are applied to the beginning and
end of the selection. Additional envelope points
are created as necessary.
By default, fades are centered on the beginning and end of the time selection. You can modify or turn off this setting on the Editing tab
in the Preferences window.
[V] Time selection envelope fades (ms): 50 1 frames at 25.570 fps
/alignment: [Centered 1
Clear the Time selection envelope fades (ms) check box if you want to edit envelope points individually.
Type a value in the edit box (or use the spin control) to specify the length of the fades that will be created.
202 | CHAPTER 10](https://image.slidesharecdn.com/vegaltk11-110216154309-phpapp02/75/Vegal-tk11-202-2048.jpg)

![Cutting, copying, and pasting envelope points
1.Select the Envelope Edit Tool button (T^p,
2.Select the envelope points you want to cut or copy:
a. Create a time selection that contains the envelope points you want to cut or copy.
b. Click the envelope you want to cut or copy.
Tip: If the envelope isn't displayed, you can right-click the track, choose Show Envelopes from the shortcut menu, and then
choose an envelope from the submenu.
3.From the Edit menu, choose Cut or Copy.
4.Select the envelope where you want to paste the envelope points:
a. Click within a track to select it.
b. Insert an audio or video envelope if needed.
c. Click to select the envelope where you want to paste the selected points.
d. Click to position the cursor where you want the envelope to start.
5. From the Edit menu, choose Paste. The envelope points are pasted on the track.
Copying an envelope to another track
1.Select the Envelope Edit Tool button flT^]),
2.Select the envelope you want to copy:
a. Double-click above the time ruler to create a selection that matches the length of your project.
b. Click the envelope you want to copy.
Tip: If the envelope isn't displayed, you can right-click the track, choose Show Envelopes from the shortcut menu, and then
choose an envelope from the submenu.
3.From the Edit menu, choose Copy.
4.Select the envelope where you want to paste the envelope points:
a. Click within a track to select it.
b. Insert an audio or video envelope if needed.
c. Click to select the envelope where you want to paste the selected points.
d. Click the Go to Start button fl"J4p if you want the envelope to appear exactly as it was in the original track, or click to
position the cursor where you want the envelope to start. From the
5. Edit menu, choose Paste. The envelope is pasted on the track.
The original
envelope...
...and the newly
pasted copy.
204 | CHAPTER 10](https://image.slidesharecdn.com/vegaltk11-110216154309-phpapp02/75/Vegal-tk11-204-2048.jpg)
![Track envelopes extend for the length of a track and are independent of the events on the track. This means that the envelope remains
in place when you move the events in the track. However, track envelopes can be set to move with the underlying events, thus
preserving the timing of envelope points in relation to events.
To lock all of the envelopes in a project to the events in which they occur, click the Lock Envelopes to Events button (§]) or, from the
Options menu, choose Lock Envelopes to Events. You can turn this feature off by clicking the button again.
The original event
Moving the event with
Lock Envelopes to Events
turned on
Moving the event with
Lock Envelopes to Events
turned off
Automating 5.1 surround projects
In a 5.1 surround project, you can automate the center channel's volume and surround panning using keyframes. For
more information, see Working with 5.1 Surround on page 273.
Automation recording modes
Automation recording allows you to edit envelope and keyframe settings by using the controls in the Vegas Pro interface. When
combined with a control surface, you can create fades and adjust control parameters with a level of control that only a tangible control
can provide.
Automation recording is available for the following settings:
•Audio track envelopes (using the controls in the track header).
•Audio track effect parameters for automatable effects (using the controls in Audio Plug-In window).
•Surround panning keyframes.
•Video track envelopes (using the controls in the track header).
•Video track effect parameters (using the controls in Video Track FX window).
•Parent track overlay mode plug-in settings (using the controls in Parent Track Overlay window).
•Track-level mask generator plug-in settings (using the controls in Video Mask FX window).
Note: If you want to thin envelope points after recording automation, you can select the Smooth and thin automation data after
recording check box on the External Control & Automation tab of the Preferences dialog or right-click the envelope and choose
Thin Points from the shortcut menu.
Recording automation settings
1. Add an envelope or automatable/keyframeable effect to a track.
For automatable audio track effects, you must add and effect automation envelope for each parameter you want to automate.
2. Select the Automation Settings button (|§I*D in the track header.](https://image.slidesharecdn.com/vegaltk11-110216154309-phpapp02/75/Vegal-tk11-205-2048.jpg)
![3. Click the down arrow next to the Automation Settings button and choose Automation Write (Touch) or Automation Write
(Latch) from the menu.
Automation Recording Mode Track Icon Description
»■
Automation Write (Touch) Envelope points or keyframes are created only while a control is being adjusted.
When you stop adjusting the control, automation recording stops and the existing
envelope points/keyframes are unaffected.
Automation Write (Latch) ©- Envelope points or keyframes are created when you change a control setting, and
recording continues until you stop playback. When you stop adjusting the control, the
control's current setting overwrites the existing envelope points/ keyframes.
4.Click to position the cursor in the timeline, and click the Play button flVD to start playback.
5.Adjust the control that corresponds to the envelope point or keyframe you want to adjust.
During playback, adjusting a control will create envelope points or keyframes at the cursor position. As long as you're adjusting the
control, new envelope points/keyframes will be created for each change of the play cursor's position.
6. Click the Stop button (I'M]) to end playback and stop recording automation.
Editing sections of your recorded settings in Touch mode
In Touch recording mode, envelope points or keyframes are created only while a control is being adjusted. When you stop adjusting the
control, automation recording stops and the existing envelope points/keyframes are unaffected.
Use Touch mode for touching up sections of your recorded automation settings.
1.Select the Automation Settings button (___) in the track header.
2.Click the down arrow next to the Automation Settings buttonand choose Automation Write (Touch) from the menu. The icon in the
track header is displayed with an automation icon
3.Click to position the cursor in the timeline, and click the Play button fl"^ to start playback.
4.When you're ready to start editing, adjust the control that corresponds to the envelope
point or keyframe you want to adjust.
Envelope points/keyframes are updated at the cursor position, and when you stop adjusting the control, the original settings are
preserved.
5. Click the Stop button (| ■[) to end playback and stop recording automation.
Overwriting recorded settings in Latch mode
In Latch mode, envelope points or keyframes are created when you change a control setting, and recording continues until you stop
playback. When you stop adjusting the control, the control's current setting overwrites the existing envelope points/ keyframes.
Use Latch mode to overwrite automation settings with new values.
1.Select the Automation Settings button <___) in the track header.
2.Click the down arrow next to the Automation Settings button and choose Automation Write (Latch) from the menu. The icon in the
track header is displayed with an automation icon (|Hl*D-
3.Click to position the cursor in the timeline, and click the Play button Qg) t0 start
playback.
4.When you're ready to start editing, adjust the control that corresponds to the envelope point or keyframe you want to adjust.
Envelope points/keyframes are updated at the cursor position until you stop playback.
5.Click the Stop button (| ■[) to end playback and stop recording automation.
Editing individual envelope points or keyframes
Editing individual envelope points or keyframes gives you fine control over your recorded settings.
1.Select the Automation Settings button (|© •) on the track you want to edit.
2.Click the down arrow next to the Automation Settings button and choose Automation Write (Touch) or Automation Write](https://image.slidesharecdn.com/vegaltk11-110216154309-phpapp02/75/Vegal-tk11-206-2048.jpg)
![3. Select the parameter you want to edit:
For a track envelope, select the Envelope Edit tool ([J^p and click the envelope point you want to edit. You can right-click a
point and choose Properties from the shortcut menu to display an effect's property page.
For a keyframe, click the Expand/Collapse Track Keyframes button (@) to expand track keyframe rows, and then doubleclick
a keyframe to open its property page. For more information, see Using video effects on page 323.
4. Adjust the control that corresponds to the envelope point or keyframe you want to adjust. The selected envelope point/
keyframe is edited, and all others are unaffected.
For track envelopes, you can also edit the envelope directly in the timeline.
Setting the automation recording mode for a track
1.Select the Automation Settings button ((§Ј]) in the track header.
2.Click the down arrow next to the Automation Settings button and choose a command from the menu to choose the automation
mode.
ModeTrack IconDescriptionOff©-Automated parameters are ignored during
playback.
When you switch to Off mode, the control setting from the cursor position
is used as a static setting, and the envelope/keyframe is dimmed to
indicate that it is unavailable.Read©-The envelope/keyframe value is
applied during playback, and the control reflects the envelope/keyframe
settings at the cursor position.
Adjustments to the control are not recorded.Automation Write
(Touch)©8The envelope/keyframe value is applied during playback, and
the control follows the envelope/keyframe settings during playback and
when you position the cursor.
Envelope points or keyframes are created only while a control is being
adjusted. When you stop adjusting the control, automation recording stops
and the existing envelope points/keyframes are unaffected.Automation
position the cursor.
Envelope points or keyframes are created when
you change a control setting, and recording
continues until you stop playback. When you
USING AUTOMATION | 207](https://image.slidesharecdn.com/vegaltk11-110216154309-phpapp02/75/Vegal-tk11-207-2048.jpg)

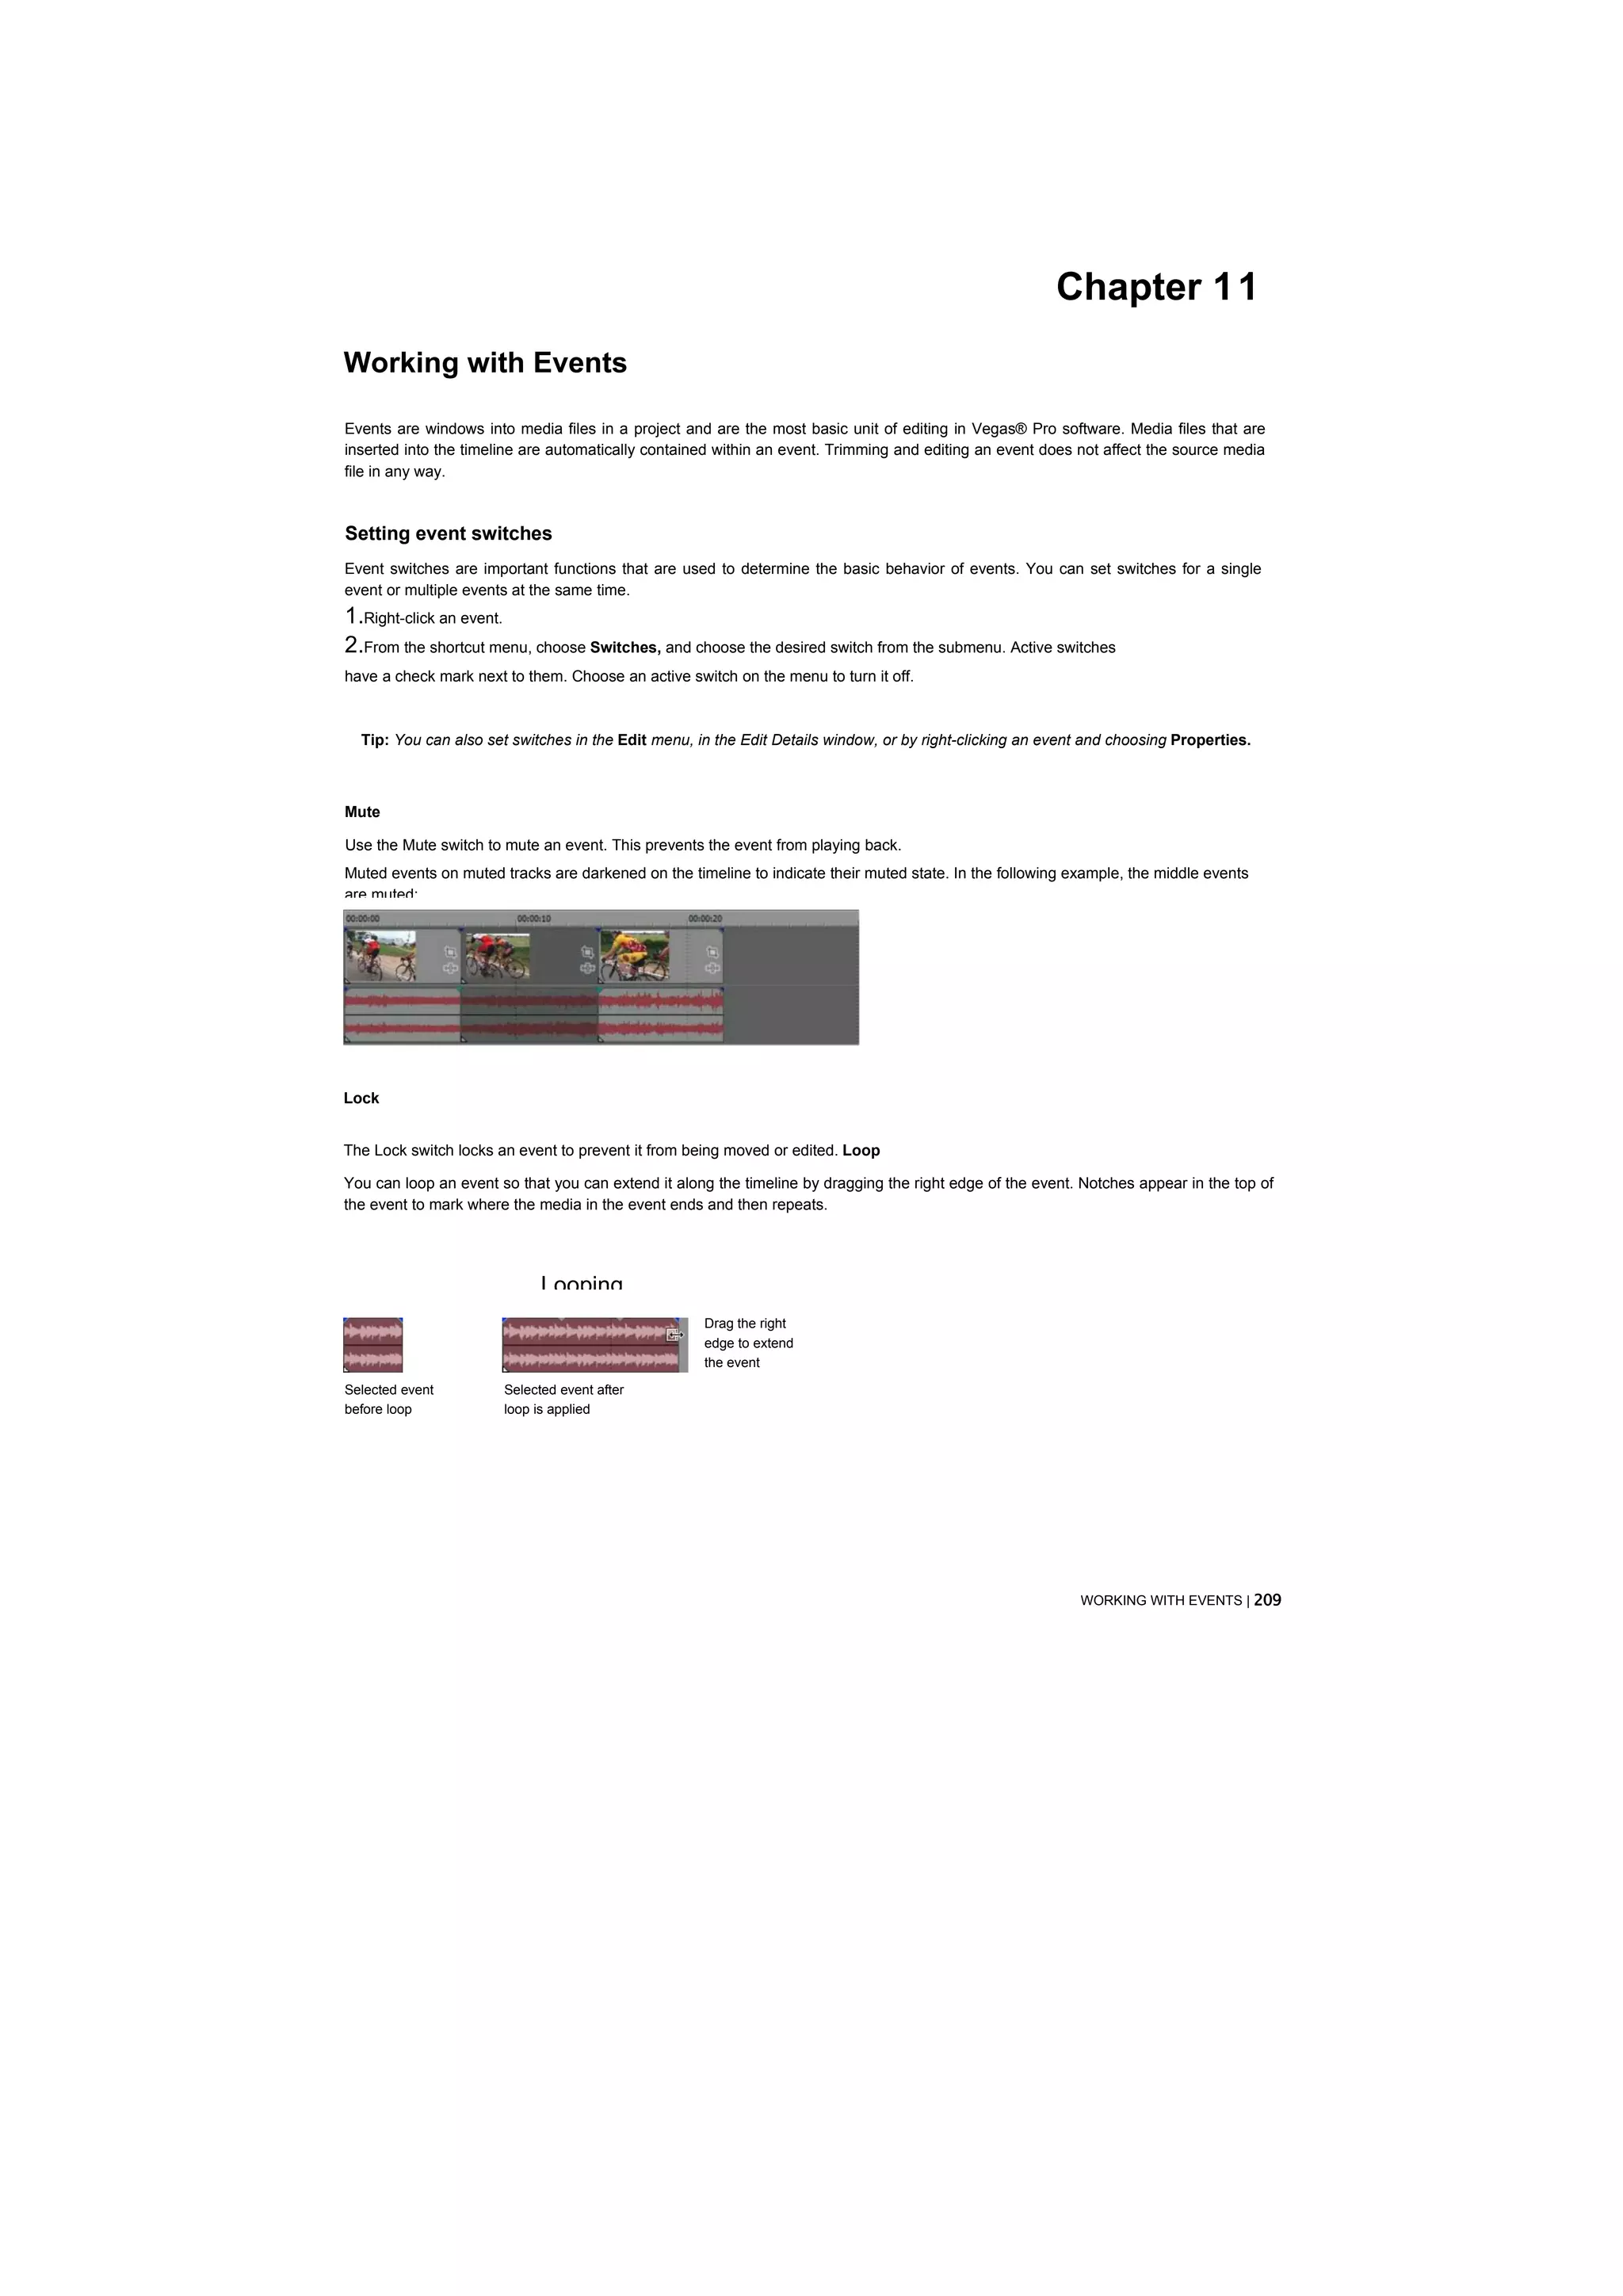


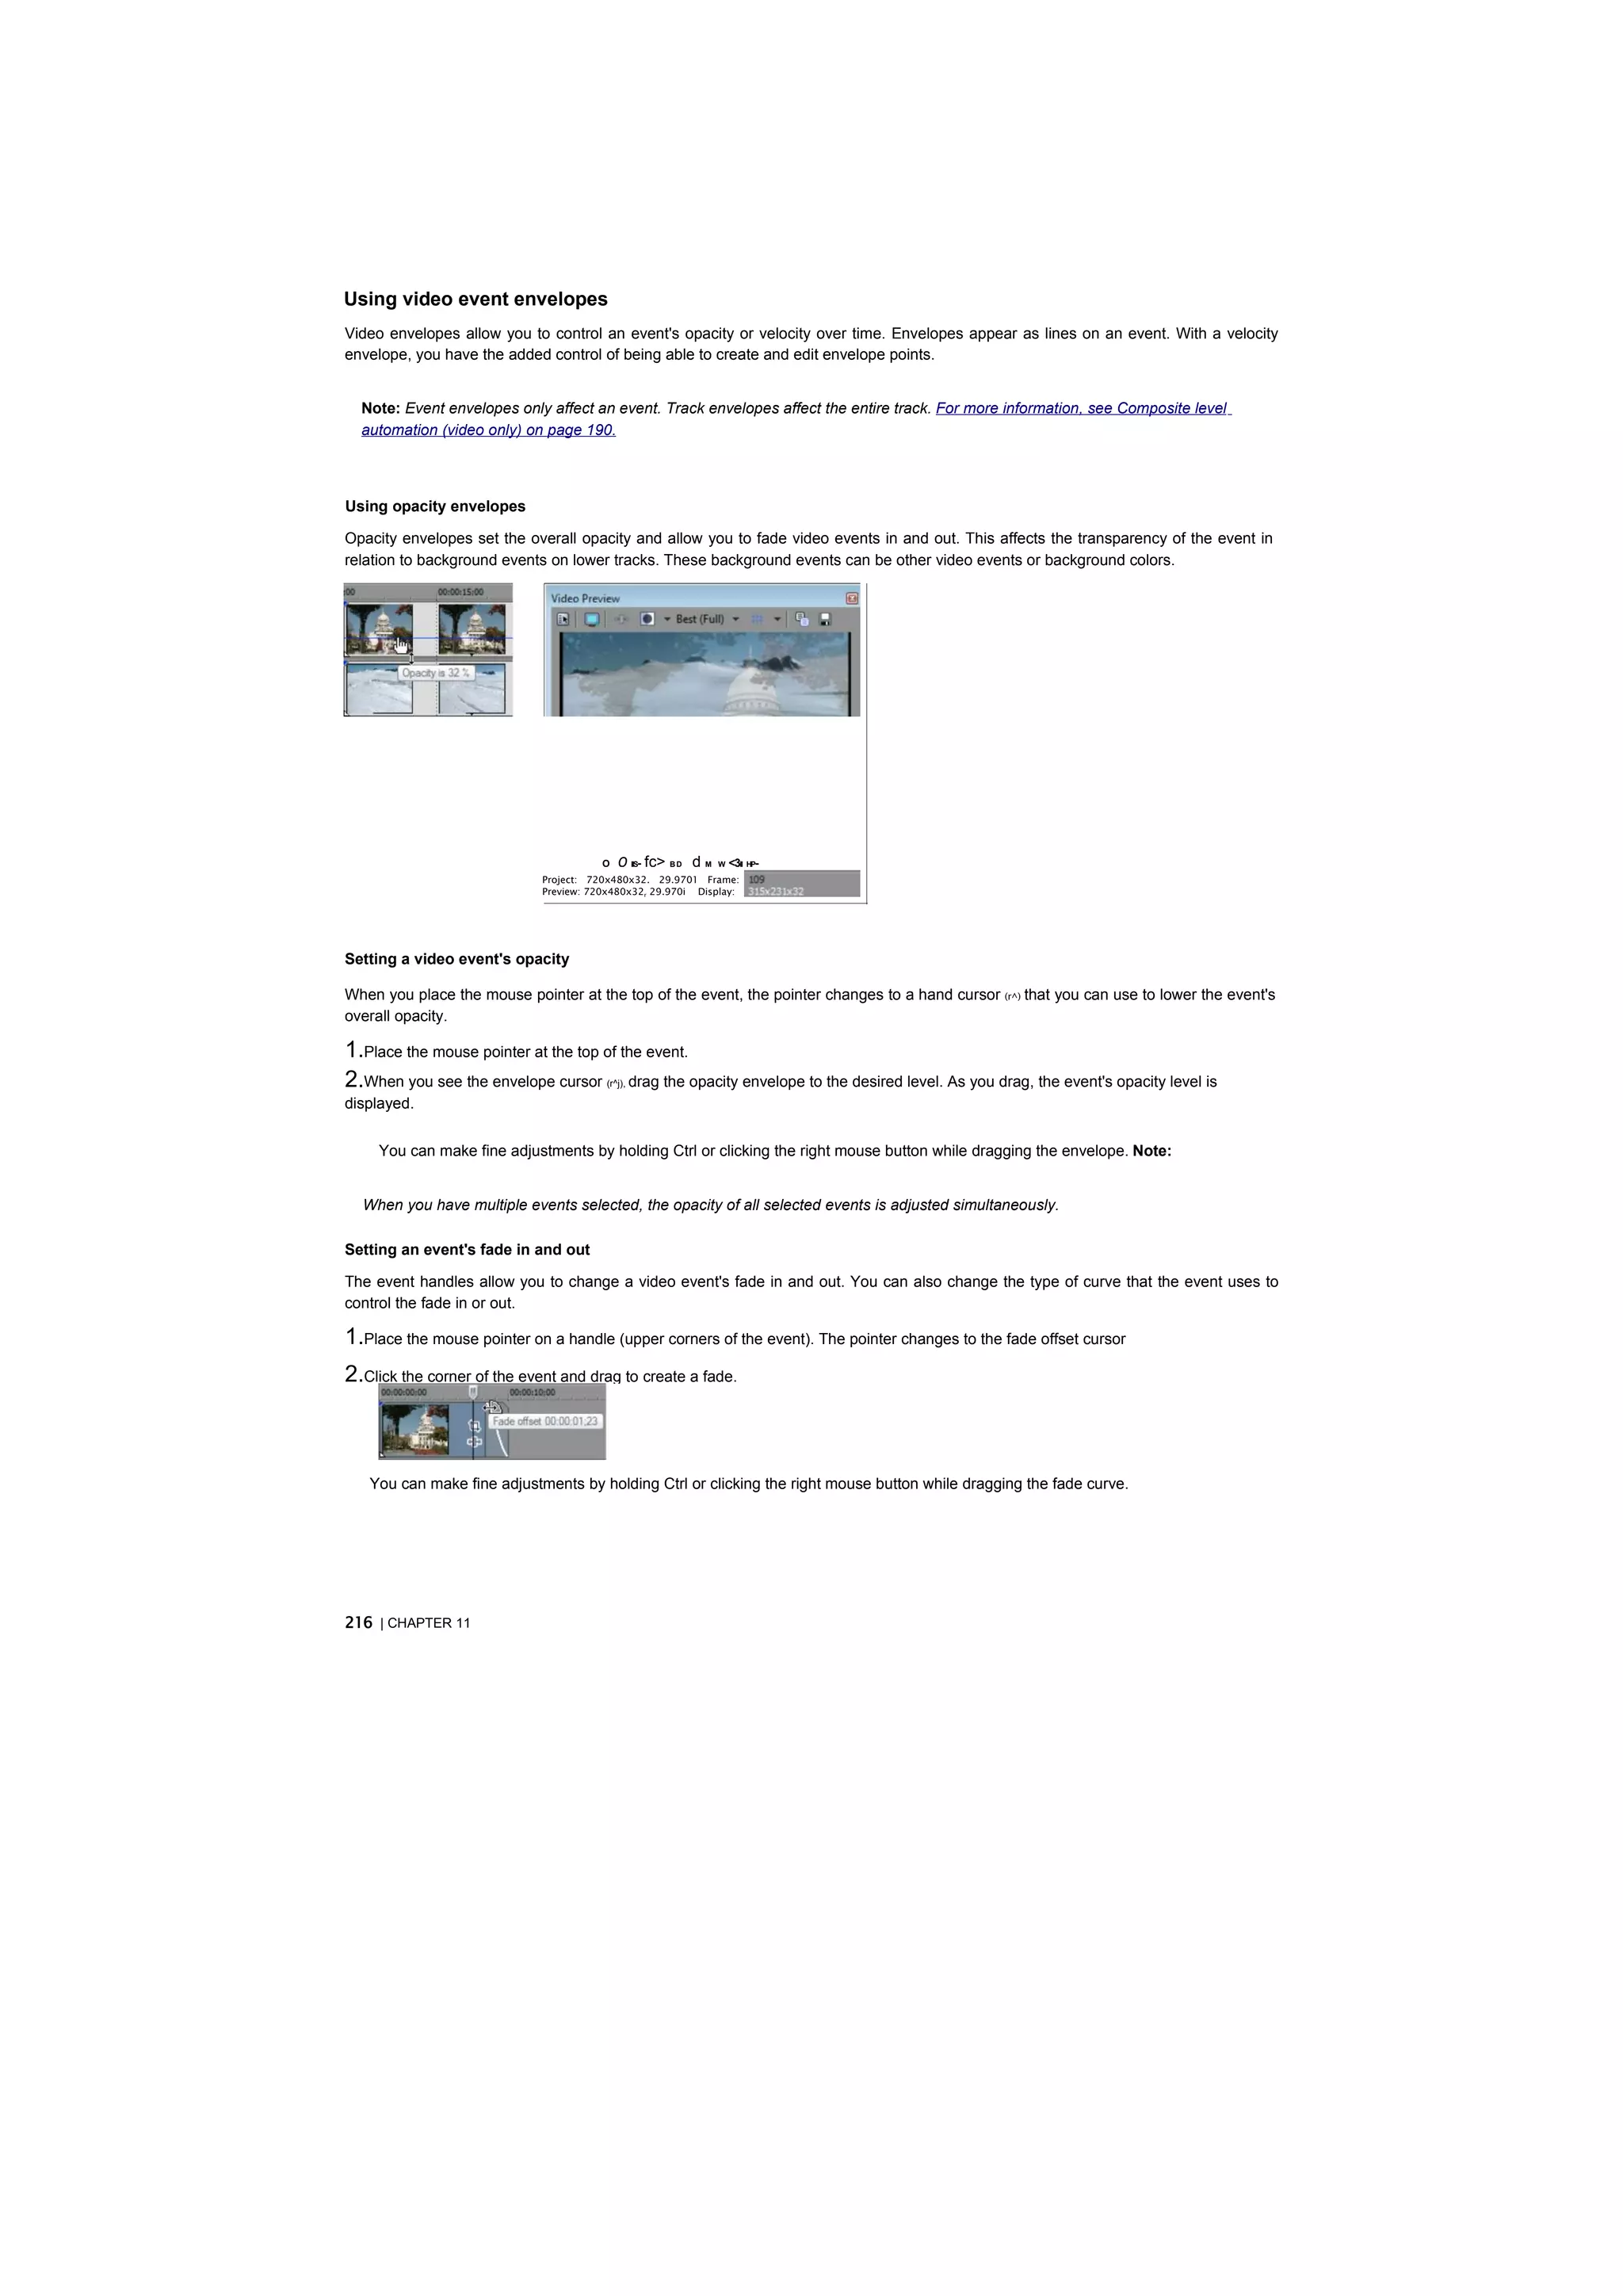
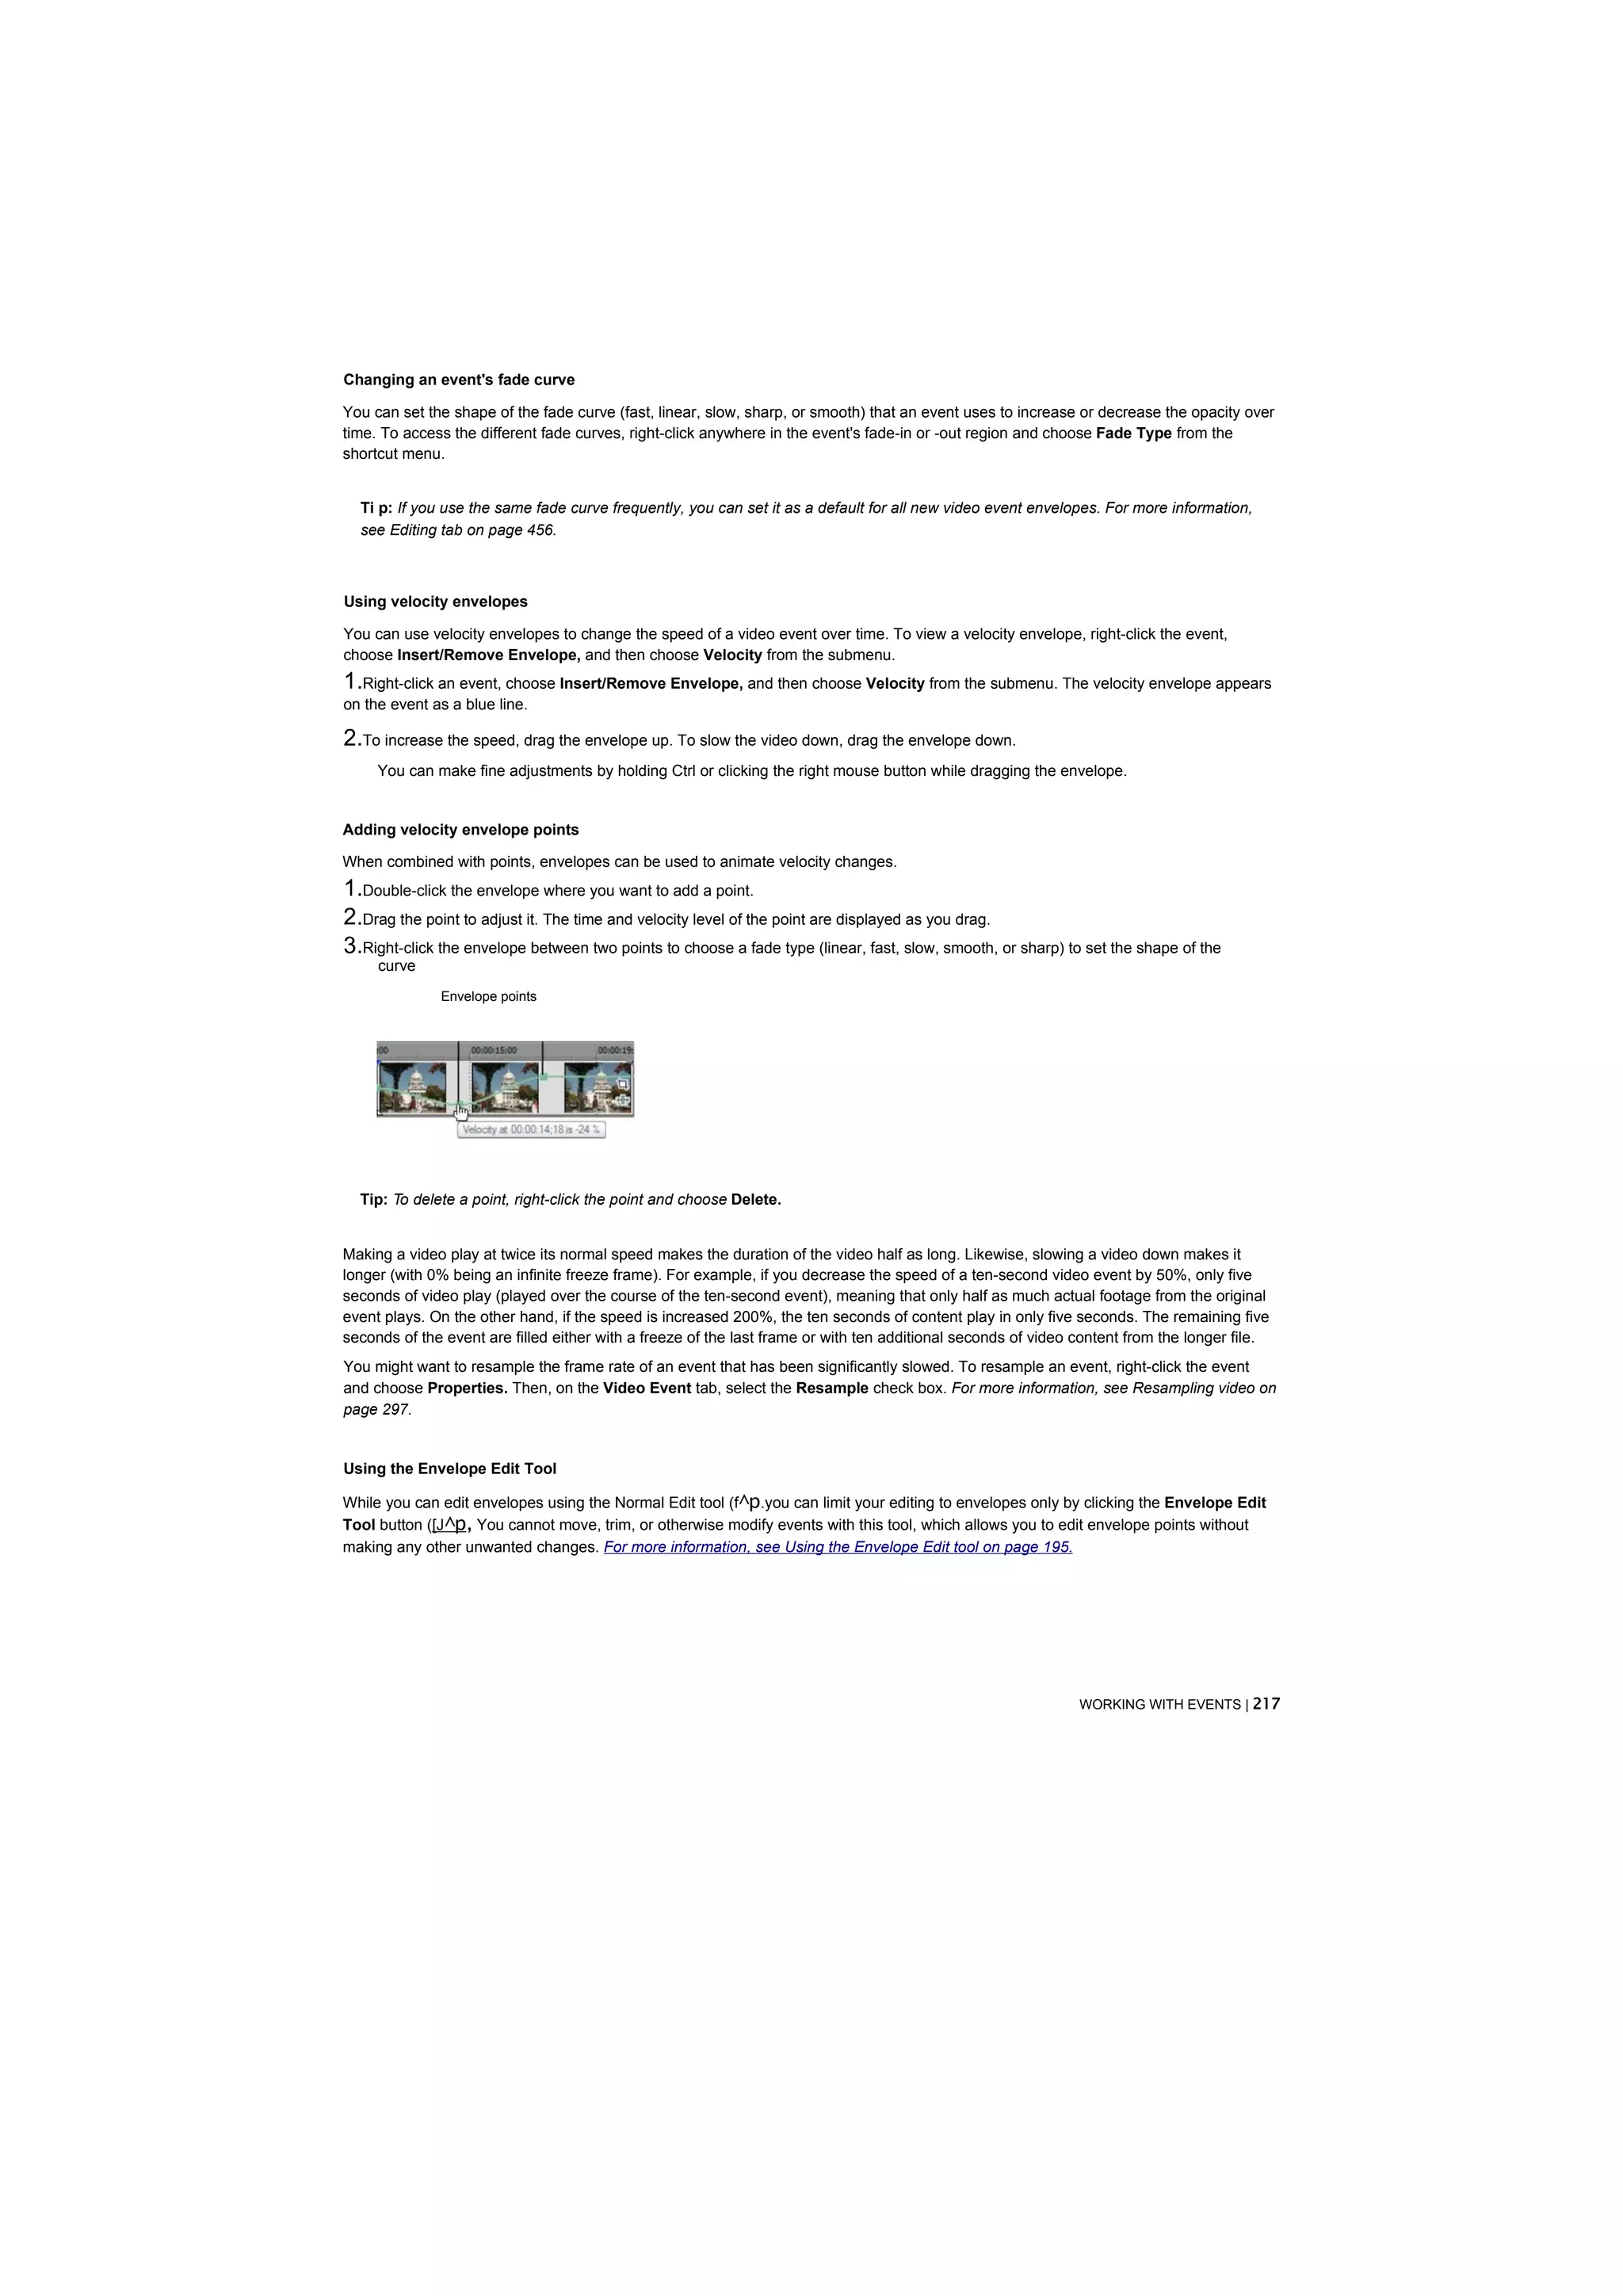


![Chapter 12
Using the Mixer
The Mixer window is where you control the project's busses and assignable effects chains.
Using the Mixer window
The Mixer is a dockable window where you can control audio busses and assignable effects chains within your project and adjust the
outgoing signal's volume and routing.
Viewing the Mixer window
The Mixer window appears in the window docking area by default when you first start Vegas® Pro software. However, you can drag the
Mixer within the workspace at any time to float it.
To hide/view the Mixer window, choose Mixer from the View menu or press Alt+3.
Previe
w (display Bus Assignable
Float handle
Using the Mixer toolbar
The Mixer's toolbar allows you to access project properties, add busses, and add assignable effects chains to the Mixer.
Button Description
i-l The Project Audio Properties button accesses the Audio tab of the Project
Properties dialog. For more information, see Audio tab on page 436.
r,,f The Downmix Output button downmixes your audio from 5.1 surround to stereo or
from stereo to mono so you can ensure your mix will sound the way you intended it, even
when your audience's hardware has fewer channels than the original mix. The button
represents the current playback mode:
•5.1 surround output (| K |)
•Stereo output (|H |)
•Mono output (fT~])
( The Dim Output button attenuates the volume of all busses that are routed to
hardware outputs by 20 dB. Click again to restore original volume.
The Insert Assignable FX button adds an assignable effects chain to your project. You can
route tracks to the assignable effects chain. For more information, see Assigning audio
tracks to assignable effects chains on page 220.
USING THE MIXER | 221](https://image.slidesharecdn.com/vegaltk11-110216154309-phpapp02/75/Vegal-tk11-221-2048.jpg)

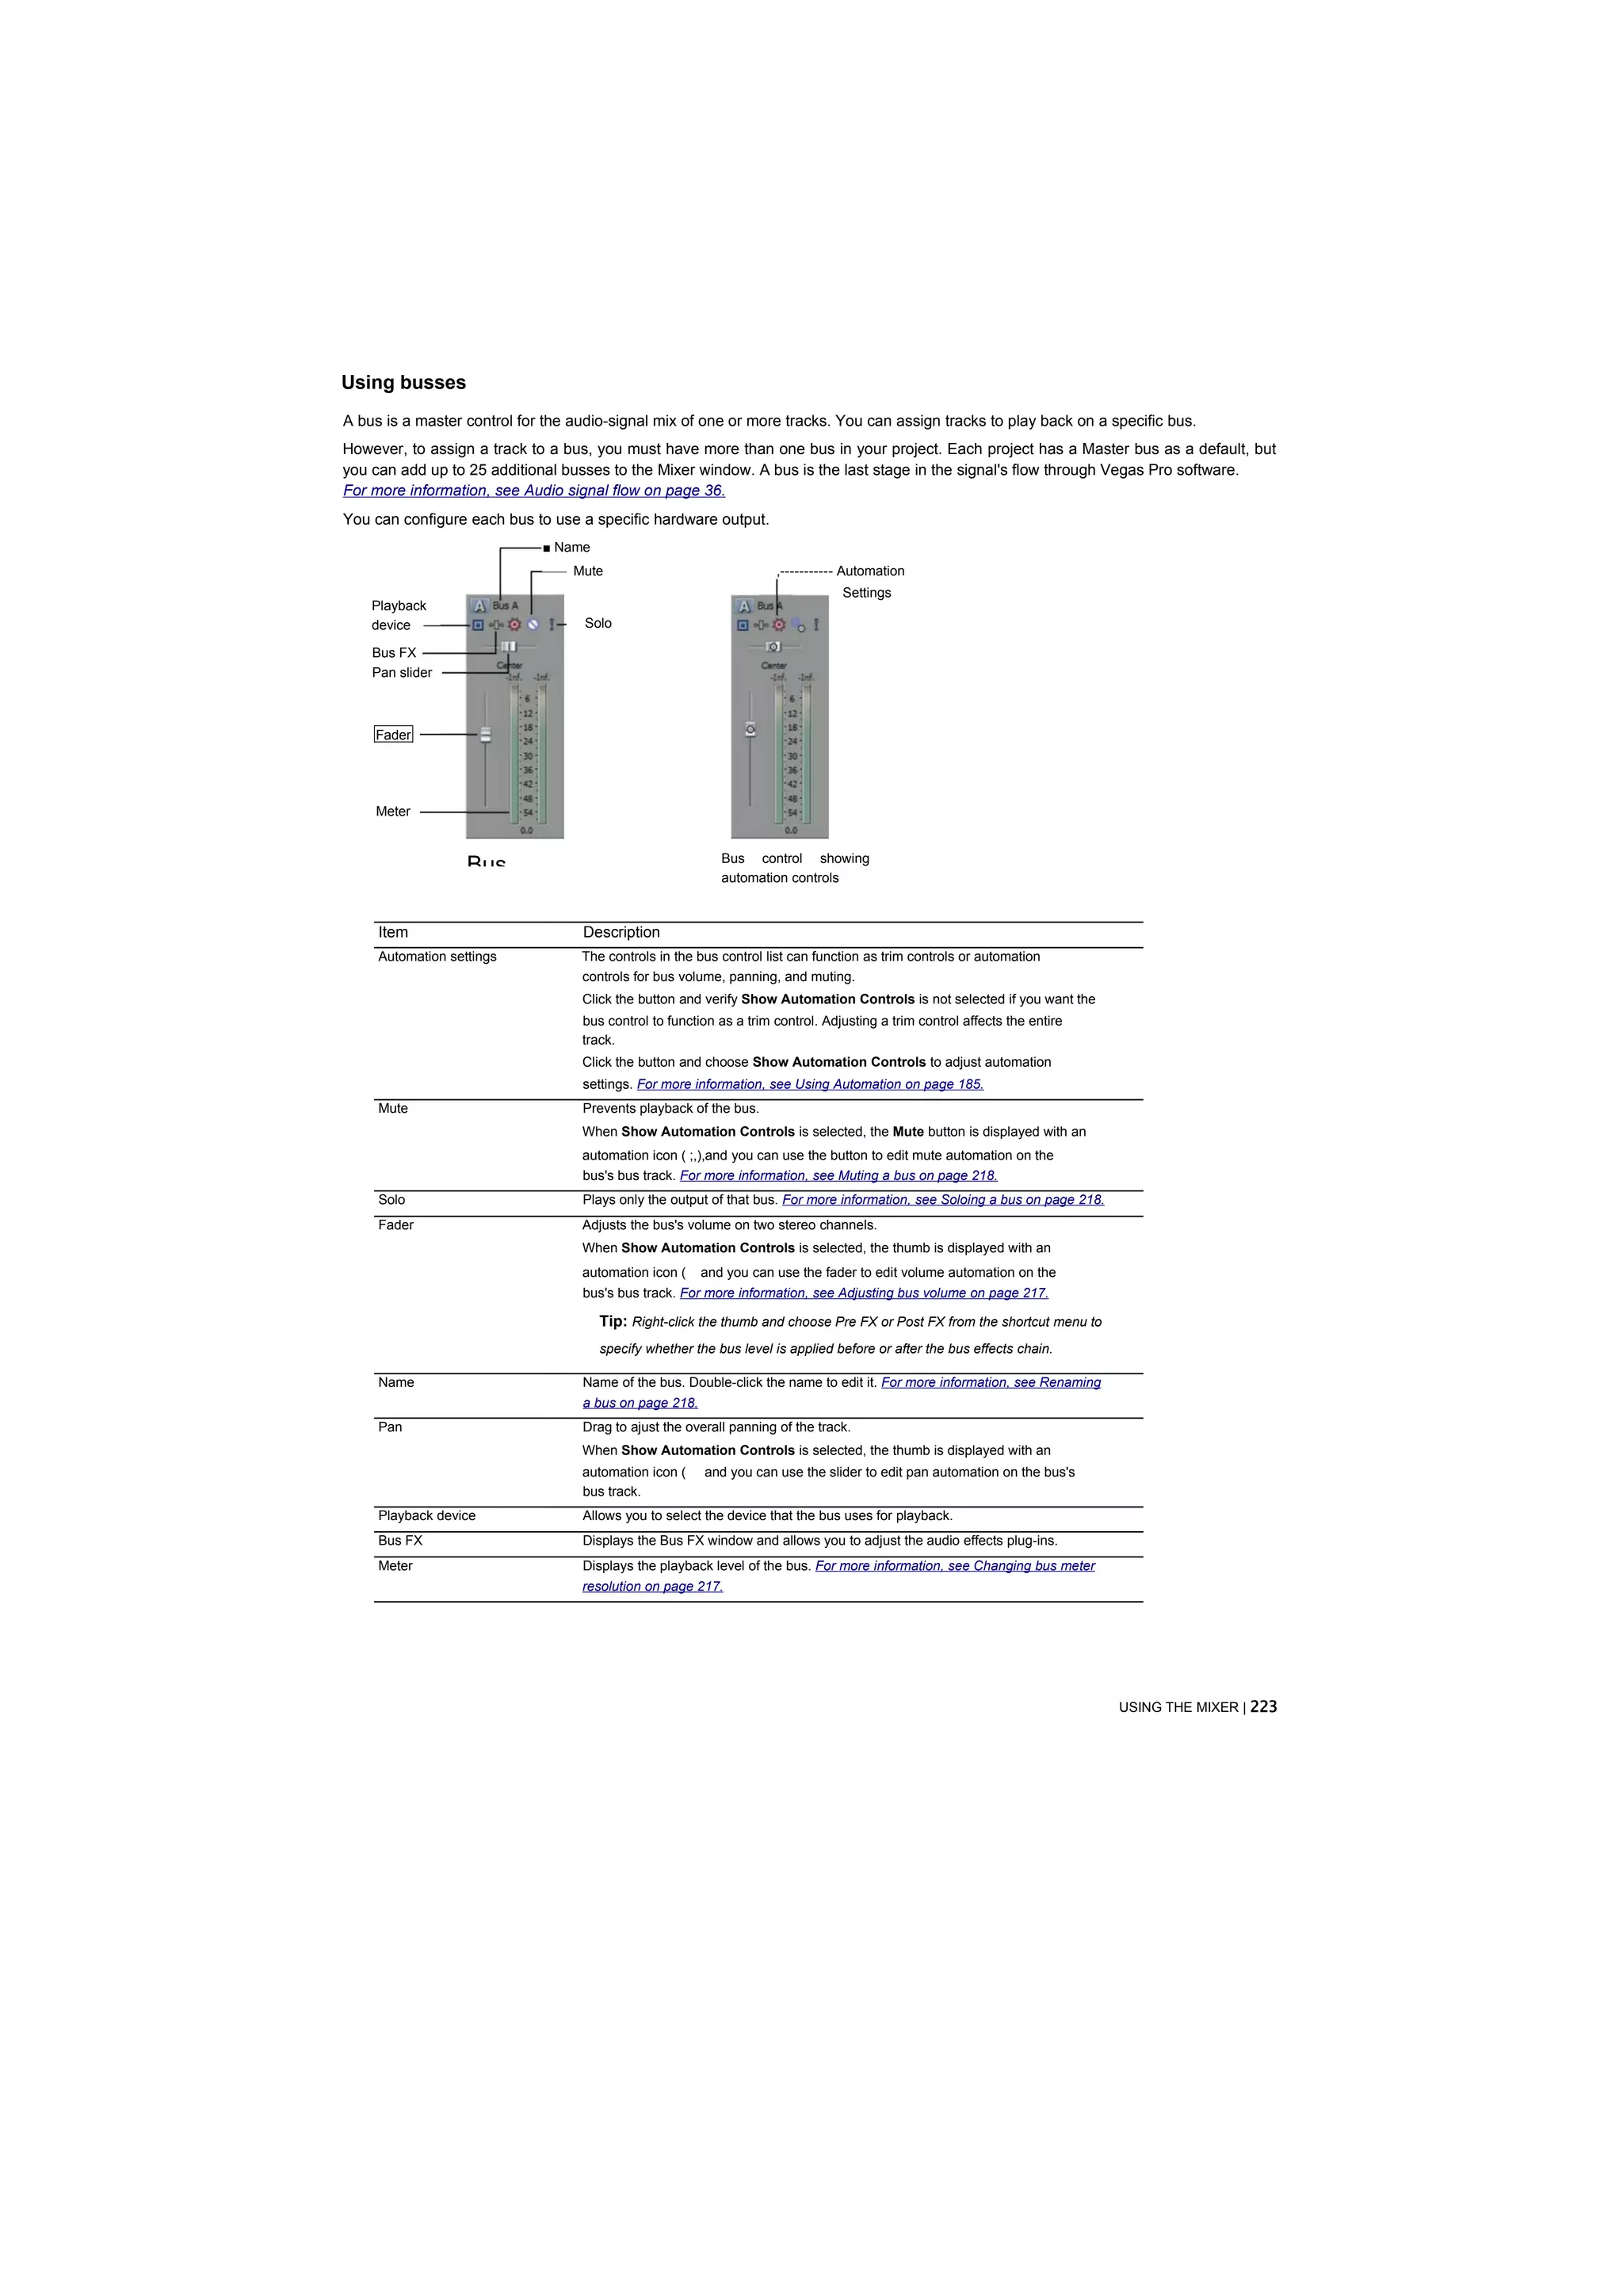
![Adding busses to a project
You can add up to 25 busses at any time during the development of your project.
Adding a bus
Click the Insert Bus button (ISP I) on the Mixer window.
Adding multiple busses
1.Click the Project Audio Properties button ((jD on the Mixer window. The Project Properties window is displayed with the Audio
tab selected.
2.In the Number of stereo busses box, enter the desired number of busses (up to 25) to appear in the Mixer window.
Enter the number of
busses.
3. Click OK to add the specified number of busses and close the Project Properties window. The
new busses appear in the Mixer window.
Deleting busses from a project
You can remove busses from your project at any time. When you remove a bus from a project, any tracks assigned to it are
reassigned to the Master bus.
Deleting a bus
Right-click the bus to be deleted in the Mixer window and choose Delete from the shortcut menu.
Deleting multiple busses
1.Click the Project Audio Properties button ((jD on the Mixer window. The Project Properties window is displayed with the Audio
tab selected.
2.In the Number of stereo busses box, enter the desired number of busses to appear in the Mixer window.
3.Click OK. All tracks assigned to a deleted bus are reassigned to the Master bus in the Mixer window.
Routing a bus to another bus
If you have multiple busses, you can use bus-to-bus routing to create subgroups.
1.Add busses to your project.
2.In the Mixer window, click the Playback Device Selector button on the bus you want to route and choose a bus from the menu.
The button is displayed as a (Ml when a bus is routed to the master bus.
The bus letter is displayed ([A], __, and so on) when a bus is routed to another bus.
The button is displayed as a H§I when a bus is routed to a hardware output.
224 | CHAPTER 12](https://image.slidesharecdn.com/vegaltk11-110216154309-phpapp02/75/Vegal-tk11-224-2048.jpg)
![Routing busses to hardware
You can assign busses to use specific hardware for output. When you installed the software, it automatically detected the hardware
available for output on your computer. For more information, see Audio tab on page 452.
1.From the Options menu, choose Preferences and click the Audio Device tab.
2.From the Audio device type drop-down list, choose Windows Classic Wave Driver or an ASIO™ driver.
Note: If you select Microsoft Sound Mapper in the Audio device type drop-down list on the Audio Device tab, you will not be
able to assign the bus to a different device.
3.Click OK to close the Preferences window.
4.In the Mixer window, click the Playback Device Selector button on the bus you want to route.
5.Choose a hardware device from the menu.
The button is displayed as a IS] when a bus is routed to the master bus.
The bus letter is displayed ([a], [b], and so on) when a bus is routed to another bus.
The button is displayed as a p|| when a bus is routed to a hardware output.
Note: You can map multiple busses to a single sound card.
Working with busses
Busses in the Mixer window are fully independent and can be adjusted separately. You can adjust the bus volume, change the bus
meter resolution, and adjust the bus fader to eliminate clipping.
Adjusting bus volume
You can adjust a bus's volume during project playback by dragging the fader. The fader on a stereo bus is split so that you can adjust the
levels of the two stereo channels independently.
The fader can function as a trim control that adjusts the overall level of the bus, or it can adjust volume automation settings on the bus
track. Click the Automation Settings button ((§]) and verify Show Automation Controls is not selected if you want the fader to function
as a trim control.
The faders are locked (ganged) so that the left and right channels of stereo files move together. Click the Lock/Unlock Fader Channels
button ([rf]) to unlock or lock the faders. You can also press Shift while dragging a fader to temporarily override a fader's locked or
unlocked state.
Tip: Double-click a fader to reset it to 0.0 dB. If you have set each channel independently, double-click either the left or right fader to
have the other fader match the other's volume setting.
If you wantto adjust volume automation settings on the bus's bus track, click the Automation Settings button ((gD and select Show
Automation Controls. The fader handle is displayed with an automation icon (|o|) in automation mode. For more information, see
Adjusting volume or pan automation settings on page 187.
You can adjust the volume of several busses simultaneously by selecting the busses and adjusting any of their faders. If you select an
assignable effect along with the busses, the output fader of the assignable effect moves along with the bus volume faders.
Changing bus meter resolution
You can select a meter resolution at which a bus displays the signal levels that are being mixed. When you change the meter
resolution on this control, the other meters (assignable effects and preview) automatically change to match.
To change bus meter resolution, right-click a meter and choose a meter resolution from the shortcut menu.
USING THE MIXER | 225](https://image.slidesharecdn.com/vegaltk11-110216154309-phpapp02/75/Vegal-tk11-225-2048.jpg)
![Adjusting a bus for clipping
If the volume level is set too high, it can cause clipping. The clipping displays in red at the top of the meter with the clipping value
displayed in decibels (dB). Adjust the fader and click the red clipping value to reset the meter. Continue to adjust the fader and reset the
meter until you eliminate the clipping.
You can set the meter to remember and display the highest and lowest levels by right-clicking and selecting Hold Peaks and Hold
Valleys.
Muting a bus
Muting allows you to temporarily suspend playback of the bus. When a bus is muted, the word Muted appears at the bottom of the
meter. You can mute more than one bus at a time.
The Mute button can mute the bus, or it can adjust mute automation on the bus's bus track. To mute the bus, click the Automation
Settings button ((§]) and verify Show Automation Controls is not selected. Click the Mute button ( ) to mute the bus, and click it again
to restore playback.
To adjust mute automation, click the Automation Settings button ((§]) and select Show Automation Controls. The Mute button is
displayed with an automation icon fl^D in automation mode. Clicktoturn mute automation on, or click it again to turn mute automation off.
For more information, see Adding or removing mute automation on page 186.
Soloing a bus
Soloing isolates a bus's playback so that you can focus on a specific output. You can solo more than one bus at a time. To solo the bus,
click the Solo button ([T}. Click the button again to turn off soloing.
Renaming a bus
Every bus in the Mixer window has an editable name. 1.
Double-click the bus name.
2.Type a new name.
3.Press Enter to save the name.
Panning a bus
Like volume, the pan slider in the track header can function as a trim control that adjusts the overall panning of the track, or it can adjust
track panning automation settings. For more information, see Adding or removing volume or pan automation on page 186.
Assigning audio tracks to busses
If your project contains multiple busses, you can assign a track to a specific bus. For more information, see Assigning audio tracks to
busses on page 177.
Adjusting a bus send level
You can adjust the level of a track sent to a bus by using the multipurpose slider in the track list. For more information, see Adjusting
bus send levels on page 177.
226 | CHAPTER 12](https://image.slidesharecdn.com/vegaltk11-110216154309-phpapp02/75/Vegal-tk11-226-2048.jpg)