SlideShare a Scribd company logo
1 of 46
Download to read offline
TX16Wx User Manual
V2.4 Page 1 ©CWITEC 2014
TX16Wx ©CWITEC 2014
Software Sampler
Version 2.4
TX16Wx User Manual
V2.4 Page 2 ©CWITEC 2014
Contents
1 About TX16Wx................................................................................................................................. 5
2 Sound Architecture.......................................................................................................................... 6
2.1 Bank......................................................................................................................................... 6
2.2 Performance............................................................................................................................ 6
2.3 Channel slots ........................................................................................................................... 6
2.4 Program................................................................................................................................... 6
2.5 Group....................................................................................................................................... 6
2.6 Split.......................................................................................................................................... 6
2.7 Wave........................................................................................................................................ 6
3 The UI .............................................................................................................................................. 7
3.1 Selectors.................................................................................................................................. 7
3.2 Numerical dials........................................................................................................................ 8
3.3 Menu selectors........................................................................................................................ 8
3.4 Popup menus........................................................................................................................... 8
3.5 Drag & drop............................................................................................................................. 9
3.6 Zooming and scrolling views ................................................................................................... 9
3.7 Undo........................................................................................................................................ 9
3.8 Tooltips.................................................................................................................................... 9
3.9 MIDI Select .............................................................................................................................. 9
4 Performance view ......................................................................................................................... 10
4.1 Selecting performance .......................................................................................................... 10
4.1.1 Performance menu........................................................................................................ 10
4.1.2 Reordering performances and programs...................................................................... 10
4.2 Working with program slots.................................................................................................. 11
4.2.1 Adding and removing slots............................................................................................ 11
4.2.2 Selecting programs........................................................................................................ 11
4.2.3 Outputs.......................................................................................................................... 12
4.2.4 Extended slot controls................................................................................................... 12
4.2.5 Automation.................................................................................................................... 12
4.2.6 Active slot...................................................................................................................... 13
5 File browser................................................................................................................................... 13
5.1 Playing waves ........................................................................................................................ 13
5.2 Preview mode........................................................................................................................ 14
TX16Wx User Manual
V2.4 Page 3 ©CWITEC 2014
6 Editing Programs ........................................................................................................................... 14
6.1 Keyboard Mapping Editor ..................................................................................................... 14
6.1.1 Program attributes ........................................................................................................ 15
6.1.2 Program icons................................................................................................................ 15
6.1.3 Group List ...................................................................................................................... 16
6.1.4 Splits .............................................................................................................................. 18
6.1.5 Creating new groups ..................................................................................................... 19
6.1.6 Token-based sample mapping....................................................................................... 21
6.1.7 Copying groups between programs .............................................................................. 22
6.1.8 Slices.............................................................................................................................. 22
6.1.9 Choke groups................................................................................................................. 22
6.2 Group switching .................................................................................................................... 23
6.3 Sample interpolation / sound quality.................................................................................... 23
6.4 Group Sound Settings............................................................................................................ 24
6.4.1 Output, Pan, Velocity and Glide .................................................................................... 24
6.4.2 AEG ................................................................................................................................ 24
6.4.3 Wave Start..................................................................................................................... 25
6.4.4 Delay.............................................................................................................................. 25
6.4.5 Filter............................................................................................................................... 25
6.4.6 FX / Sends ...................................................................................................................... 25
6.4.7 LFO................................................................................................................................. 25
6.4.8 Modulation Envelopes................................................................................................... 26
6.4.9 Step Sequencer.............................................................................................................. 26
6.4.10 Modulation Table .......................................................................................................... 27
6.5 Group cross-fading ................................................................................................................ 29
7 Wave Editor................................................................................................................................... 29
7.1 Wave List ............................................................................................................................... 30
7.2 Playing waves ........................................................................................................................ 31
7.3 Editing start / end.................................................................................................................. 31
7.4 Editing loops and slices.......................................................................................................... 31
7.4.1 Editing loops.................................................................................................................. 31
7.4.2 Editing slices .................................................................................................................. 32
7.5 Wave Edit Menu.................................................................................................................... 32
7.5.1 The Wave Editor Toolbar............................................................................................... 33
TX16Wx User Manual
V2.4 Page 4 ©CWITEC 2014
7.6 Sampling content................................................................................................................... 35
8 Wave matrix .................................................................................................................................. 36
8.1 Wave matrices edit panel...................................................................................................... 36
8.1.1 Wave matrix edit menu................................................................................................. 37
8.2 Wave matrix edit area........................................................................................................... 38
9 FX section ...................................................................................................................................... 39
10 Setup.......................................................................................................................................... 40
10.1 Settings.................................................................................................................................. 40
10.2 Places..................................................................................................................................... 42
10.3 MIDI / External controllers.................................................................................................... 42
10.4 Automation............................................................................................................................ 43
10.5 Outputs.................................................................................................................................. 43
11 TX16Wx Professional................................................................................................................. 43
12 Working in your DAW................................................................................................................ 44
13 Saving sound data ..................................................................................................................... 44
13.1 Banks / Performance / Program............................................................................................ 44
13.2 Waves.................................................................................................................................... 44
14 File formats................................................................................................................................ 44
14.1 Bank / Performance / Program ............................................................................................. 44
14.2 Supported sample formats.................................................................................................... 44
14.3 Importing sound data............................................................................................................ 45
14.3.1 Sound font 2 .................................................................................................................. 45
14.3.2 SFZ Files ......................................................................................................................... 45
14.3.3 EXS Files......................................................................................................................... 45
14.3.4 AKP Files ........................................................................................................................ 45
15 Skins........................................................................................................................................... 45
16 Credits and Acknowledgements................................................................................................ 45
TX16Wx User Manual
V2.4 Page 5 ©CWITEC 2014
1 About TX16Wx
The TX16Wx Software Sampler is a simple, yet powerful sampling instrument inspired by various
classic hardware samplers from the 80s and 90s, but mainly the excellent Yamaha TX16W sampler as
used with the Typhoon operating system.
Many software samplers sport a multitude of features aimed mainly at disk-streaming gigabyte sized
preset libraries. The TX16Wx instead aims to bring back some of the joy of working with the classic
hardware instruments, using sampling not for playing back pre-built libraries, but instead creating
your own new sounds in creative way.
Perhaps the biggest reason this software was created though, is that I have yet to find a software
sampler, free or otherwise, with both workstation features, and a clear cut, well-documented file
format that does not lock the user in to a product forever. The TX16Wx file format is simple XML files
and can be translated even by hand in a simple text editor.
TX16Wx User Manual
V2.4 Page 6 ©CWITEC 2014
2 Sound Architecture
Sounds in TX16Wx are organized in a hierarchical structure of bank, performances, programs, groups,
splits and waves. These components are normally stored to disk as individual files and loosely
referenced by file name. See the file format section.
2.1 Bank
The bank is the complete sampler state, including
settings for External Controllers, outputs and all the
performances, programs and samples.
2.2 Performance
A performance is a complete active multitimbral
setup, with assignment of programs to Midi
channels and audio outputs. Performances are the
top level items exposed to the containing DAW.
2.3 Channel slots
Each channel slot contains a single program and
maps this to a Midi channel and an output.
2.4 Program
A program is a complete instrument (or preset). It
contains one or more groups of samples.
2.5 Group
A group consists of one or more samples organized
into splits. All splits in a group share the same sound
settings and modulation mappings. A group may
also override the channel slots output settings to
send individual groups to specific outputs (for
example when building a drum kit).
2.6 Split
A split maps a single wave to a range on the
keyboard. It also allows you to choose specific loops
for sustain/release
2.7 Wave
A wave is an individual sample loaded from disk. A wave can be shared between any number of
groups splits. A wave also contains such information as root key, tuning and loop points.
Split Spl
it
Split
Bank
Performance
Slot 1
Split Split
Slot 2 Slot ...
Program
Group Group Group
Wave
TX16Wx User Manual
V2.4 Page 7 ©CWITEC 2014
3 The UI
3.1 Selectors
Selecting performances and programs can be done by either clicking the left side up/down arrows or
left-clicking combo box button to open a list of loaded content. Click the text area of the combo box
to edit the name of the current item.
Up/down arrows
Selector combo box - left click to open
Performance
selector
Program slot
View tabs
Group sound
controls
TX16Wx UI
MIDI Select
Group list and key mapper
TX16Wx User Manual
V2.4 Page 8 ©CWITEC 2014
3.2 Numerical dials
Most numerical parameters can be manipulated by either click-dragging the display to slide the
values up/down, or double clicking to enter the value by typing.
Most dials can be switched to a more or less sensitive mode by holding the Shift key while dragging.
Use this to switch between coarse and fine adjustments.
By clicking Ctrl-left, a dial will reset to its default value.
3.3 Menu selectors
Discreet parameters, such as filter/LFO type, outputs, midi channels etc. are selected by clicking the
display and choosing the value from the popup menu.
3.4 Popup menus
Most areas of the UI have context-sensitive popup menus available on right-clicking.
Also, look for the ”wrench” icon in the various toolbars in the UI. Left clicking this will bring up the
current editors action menu.
Increase
Decrease
Drag up/down to modifyClick dial Double-click to type new value
TX16Wx User Manual
V2.4 Page 9 ©CWITEC 2014
3.5 Drag & drop
Any loadable sound item, such as banks, performances, programs and samples can be dragged and
dropped into the UI to load them. Certain areas, such as the programs slots and the key mapper
editor will treat some files special when you drag them there, i.e. dragging program content into a
slot will replace the current program with the newly loaded one, and dragging sound files into the
key mapper will layout the samples in a group.
3.6 Zooming and scrolling views
Editor views in TX16Wx can be zoomed and scrolled to help focusing the edited items/area. Zooming
and scrolling can be done using the scrollbar controls or by using the mouse wheel. Using the mouse
wheel will zoom in the horizontal direction and by holding the shift key you can zoom vertically
(when available). Scrolled areas can also be moved by using the middle mouse button and will
respond to drag gestures.
3.7 Undo
TX16Wx has built in support for undo & redo of edit actions as well as loading and deleting sound
data. The undo and redo buttons are located in the performance view toolbar at the top of the UI.
Maximum undo queue size can be modified in the setup view under settings.
3.8 Tooltips
TX16Wx has context sensitive tooltip support, provding help and hints for most aspects of the UI.
Hover the mouse pointer over a control to display the context sensitive help.
3.9 MIDI Select
In the lower right corner of the edit area (right pane of the UI) is the MIDI Select toggle button. When
active, incoming MIDI notes will cycle through the sound elements triggered by the note. Use this to
quickly find the sound elements you are looking for.
Undo/redo buttons
TX16Wx User Manual
V2.4 Page 10 ©CWITEC 2014
4 Performance view
The performance allows you to select the active performance as well as do edit operations on the top
level items in the sound hierarchy. Here you select, add, delete, load and save performances,
programs and whole bank state.
4.1 Selecting performance
The performance selector in the top of the performance view allows you to switch between the
currently loaded performances. By clicking the name field you may edit the name of the current
performance.
4.1.1 Performance menu
Right clicking the performance selector area or clicking the edit menu (wrench icon) to bring up the
performance edit menu.
 Load bank - loads a txbank file, completely replacing the content of the Samplers memory.
All currently loaded items will be discarded.
 Save bank / Save bank as - saves the full state of the sampler, along with any loaded sound
data. You may be prompted to provide names for individual files being saved.
 Clear bank - empties the sampler memory. All currently loaded items will be discarded.
 Load performance - loads a performance along with its associated programs and waves into
the current bank. Note that you can also drag & drop performances (or soundfonts) from
windows explorer onto the performance field to load them.
 Save performance / Save performance as - saves the currently active performance to disk
along with the programs and waves used. You may be prompted to provide names for
individual files being saved.
 Duplicate performance - creates a shallow copy of the current performance. The new
performance will reference the same programs and samples as the original performance.
 New performance - creates a new, empty performance.
 New perf + slot + program - creates a new performance with a
single slot and a new program assigned.
 Re-order performances / programs – opens the re-order dialog.
 Delete performance - deletes the currently active performance.
Note that this does not delete any programs or waves.
4.1.2 Reordering performances and programs
TX16Wx does not use fixed performance/program number assignments,
however sometimes, for example when using MIDI program change to
switch active sound items, or just to tidy up a bank, it can be helpful to
re-order the sound data lists.
The re-order dialog window lets you change the display order of the
sound items, as well as delete and rename individual items.
TX16Wx User Manual
V2.4 Page 11 ©CWITEC 2014
Items can be shifted up/down using the arrow button, or simply dragged to the desired index.
Double click an item to rename it. Operations within the dialog can be undone, and the edited lists
and items are not committed until you click “Ok” to close the dialog.
4.2 Working with program slots
A performance consists of one or more Program slots. These are
accessed through the program slot list, the first tab of the left pane in
the main UI.
Each program slot in the list maps a Program to a MIDI channel and
output, with settings for volume and pan.
4.2.1 Adding and removing slots
Use the program slot toolbar, located in the top of the program slot tab to add, duplicate or delete
program slots.
Slots can also be created, deleted and duplicated from the Program edit menu.
4.2.2 Selecting programs
Use the program selector to choose a program for the active slot. Right-clicking on a slot, or clicking
the edit icon, brings up the slot program edit menu:
 Load Program - brings up a file selector and allows you to browse for existing programs on
disk. You can also drag & drop program files here to load them.
o The program file selector can also be accessed by clicking the ‘load’ icon next to the
selector field
 Save Program / Save Program As - Saves the active program to disk along with any used
waves. You may be prompted to provide names for individual files being saved.
 Duplicate Program - creates a shallow copy of the current program. The new program will
reference the same samples as the original program.
 New Program - creates a new, empty program.
 Delete Program - deletes the currently active program. Note that this does not delete any
waves. See Delete Unused in the performance editor menu.
Tip: The Load Program file selector has a checkbox to enable/disable "preview" of the programs you
browse. When this mode is active, any program file you click in the selector will be temporarily loaded
into the current program slot and will respond to midi input. This is a great way to quickly preview
how the currently playing song will sound with the new program loaded.
Program Selector
Input/Output Controls
TX16Wx User Manual
V2.4 Page 12 ©CWITEC 2014
4.2.3 Outputs
The lower area of the Program Slot shows the Input / Output Controls: Volume, Pan, Output channel,
Midi channel and solo / mute.
 Volume and Pan - Note that these are combined (multiplied) with the individual volume and
pan settings in the programs respective groups.
 Output - assigns the default output channel for sound from the group played on this slot.
However, individual groups may override this setting, i.e. while the program is set to one
output, one or more groups in it may actually play on another output.
 Midi channel - the program will respond to incoming midi messages on the assigned channel.
If you select Omni, any midi message will activate the program.
 Mute / Solo - turns off output from this/all other slots.
4.2.4 Extended slot controls
By clicking the right corner of the slot view, the extend slot controls are opened.
 Transpose – transposes incoming notes on the assigned channel
 Detune – fine adjustment to pitch of all mapped groups
 Interpolation – sample interpolation quality
 Poly limit – sets the maximum polyphony for this program. If active voice count for the slot
exceeds this number, the oldest playing voice will be stolen and re-used.
 Velocity curve – selectable velocity mapping curve override for this slot, affects how MIDI
note-on velocity is mapped to playing voice velocity.
 FX / Output send 1 – 3 – sets destination, level and pre- or post-fader send for the entire
program mapping. (TX16Wx Professional only)
4.2.5 Automation
By right-clicking the dial/control for some program slot parameters you can assign automation to
control the values. When automated, any changes you make to the parameter will be sent to the
DAW host, and any parameter change from the host will modify the parameter.
TX16Wx User Manual
V2.4 Page 13 ©CWITEC 2014
4.2.6 Active slot
When you click a program slot it becomes the Active Slot. This makes the assigned program active for
edit in the Key mapper editor.
5 File browser
The second tab in the left pane of the UI is the integrated file browser. Here you can access sound
content on disk, and quickly jump between your favorite locations, a.k.a. places.
The top level of the browser lists your designated favorite locations, as well as system drives. By
double-clicking either you can browser for sound items in your sample libraries.
The top field of the browser shows the current location in your computer, and also lets you quickly
jump to another drive or favorite location. To the right you find the up folder button, used to go up in
the file hierarchy.
The leftmost icon in the top bar is the favorite indicator. It lights up
when you are in a designated favorite path. Click it to toggle the
current path on/off as a favorite.
The bottommost selector lets you filter what file content will be
shown. By default it will show any file that TX16Wx is capable of
reading. You can switch between different content filters using the
combo box.
You can drag and drop items from the file browser into TX16Wx, or
simply double click them to load the content into the sampler.
Some content can be opened in the file browser (i.e. sound font files),
and the contained sound data can be browsed and loaded individually as if individual files.
5.1 Playing waves
The lower right corner contains, from left to right, the Play button and
the Auto Play toggle. When a sample is selected, you can preview the
sound by pressing Play. If Auto Play is turned on, selecting a wave file
will automatically play it from start to end. The volume control in the lower right corner sets preview
volume for both the file browser; file dialogs and also previewing in the sample editor.
TX16Wx User Manual
V2.4 Page 14 ©CWITEC 2014
5.2 Preview mode
The rightmost button In the file browser toolbar is the preview toggle. When active, selecting files in
the file browser will temporarily load them into the last selected applicable sound object.
Sound objects that can be previewed are waves, wave matrices and program files. Waves and
matrices can be loaded into splits, waves into matrix cells and programs into program slots.
To work with preview, select the sound item you want to modify, for example a split. Activate
preview and pick a wave file in the browser. The file will be loaded and temporarily replace the
currently mapped sound. Re-selecting the split, selecting another split or editing any range
parameter will reset the split into its original state.
If you are satisfied with the previewed sound, double click the sound file to load it permanently. The
split will be re-mapped with the new sample.
The same workflow applies to matrix cells and program slots.
6 Editing Programs
A Program is edited by adding, deleting and modifying the groups it consists of. This is done in the
Keyboard Mapping editor and with the Group Sound Controls at the bottom of the interface.
6.1 Keyboard Mapping Editor
The Keyboard Mapping Editor gives you a graphical view of the programs group layout and allows
easy and intuitive modification of groups and split attributes.
Groups can be modified by clicking and dragging edges or the whole group to modify low / high key
and velocity, i.e. keyboard range.
Program key rangeGroups Zoom controls
Group controlsGroup list
Program and slot selector
MIDI Select
TX16Wx User Manual
V2.4 Page 15 ©CWITEC 2014
You can also manipulate split positions and change the mapped samples root key by dragging the
highlighted key marker in the key mapper keyboard.
Double clicking inside a split in the keyboard mapper will open a file dialog to load a new sample
from disk.
The key mapper will highlight incoming MIDI messages on the keyboard as well as triggered splits in
the program groups. If you press a key on the mapper keyboard, it will play the corresponding MIDI
note on the selected slots MIDI channel.
Tip: You can vary the MIDI velocity of the note played through the mapper keyboard by holding down
Ctrl (lower), Shift (higher) or Ctrl+Shift (highest velocity).
Tip: Select all groups on or overlapping a specific MIDI key by Control-right-clicking in the mapper
keyboard.
6.1.1 Program attributes
The top row of the keyboard mapper contains the slot and program and attributes.
 Key Mapper Edit Menu – opens up the group menu for the currently selected groups/split.
 Slot –change the active program slot. Useful when the program slot view is hidden.
 Program – change or rename the selected program.
 Bounds - sets the keyboard range, low and high key and velocity, for the entire Program. A
Program will only respond to midi messages that are within the programs active key range.
6.1.2 Program icons
You can assign icons to programs to serve as a visual cue to their contents. Either select from the
built-in icons, or load your own image file.
To select a program icon, click the icon display in an assigned program slot to open the icon menu.
Program icons are saved with the program contents if copy content is enabled in the program save
file dialog. Icons are also stored inside DAW save data.
TX16Wx User Manual
V2.4 Page 16 ©CWITEC 2014
6.1.3 Group List
The lower area of the Keyboard mapper contains the Group List. Here all groups in the currently
active program are listed. This allows you to quickly select a group and split for editing, but also
create, delete and import groups.
To view the splits in a group, click the expand icon (+ sign) at the left of a group item. This will expand
a sub list of the contained splits.
You can select any number of groups and modify their parameters simultaneously.
6.1.3.1 Group parameters
Each group in the list has the following parameters available:
 Name – the displayed name for the group
 Group Key Range- sets the keyboard range, low and high key and velocity, for the group.
Determines the bounds where the group will trigger.
 Group Key Shift - shifts the pitch of the group by semitones.
 Group Fine Tune - shifts the pitch of the group by cents.
 Poly Mode - determines the playing mode of the group.
o Poly - (default). Each pressed key triggers a new played voice.
o Mono - Only one voice can play at a single time for the group. Simulates the behavior
of monophonic instruments.
o Legato - group plays polyphonically, but if a key is triggered while another is held, the
last voice previously triggered will be reused similar to Mono mode.
Tip: Mono and legato mode will not retrigger waveform, envelopes and LFOs when reusing a note,
but continue playing like if the note was actually “bent” to the new note. To force a retrigger behavior
you can set the group(s) to a choke group, which will force retriggering of modulators and wave but
in all other ways still play like Mono/legato.
 Note Priority – when using Mono or Legato mode, this switch determines which held key will
take priority. Default is the last pressed (youngest) key, but you can also set it to Lowest (only
note-on of a lower key than currently playing voice will trigger) or Highest. Use this to change
the behavior of “trilling” moments when playing.
 Trigger mode - determines how the group is triggered by Midi note-on messages
o Normal - (default). Group will trigger on Note-On messages and play the full AEG
envelope.
o Oneshot - group triggers on Note-On, but the AEG envelope will transition to Release
stage without any Sustain period, i.e. holding the key will having no effect. Typically
you would use this for drum sounds. Note that the AEG will still shape the sound,
thus to hear anything you will have to turn up decay/release parameters.
o Release - group is triggered on Note-Off (key release)
o Toggle – group is triggered and silenced by alternating Note-Ons. I.e. hitting a MIDI
key once will start playback, and hitting it again will stop it.
TX16Wx User Manual
V2.4 Page 17 ©CWITEC 2014
Root Key marker
 Keyboard Scale - sets the transposition scale for the group. This determines how the groups
pitch changes by input Midi key.
o Inv * 4 - inverse key scaling where semitones are multiplied by four in pitch
o Inv * 2 - inverse key scaling where semitones are doubled in pitch
o Inv - inverse key scaling.
o Inv / 2 - inverse key scaling where semitones are halved in pitch
o Inv / 4 - inverse key scaling where semitones are divided by four in pitch
o Fixed - fixed key scaling. All keys are given the same pitch. Use this for drum kits.
o 1/4 - normal key scaling where semitones are divided by four in pitch
o 1/2 - normal key scaling where semitones are halved in pitch
o Normal - default
o * 2 - normal key scaling where semitones are doubled in pitch
o * 4 - normal key scaling where semitones are multiplied by four in pitch
 Choke group – assigns a choke group to the selected group(s).
 Group Output - assigns an Individual Output for the group. This setting overrides the
Program Slot output setting.
6.1.3.2 Split parameters
A group contains one or more splits, each mapping a single sample to a key range. The split list items
contain these actions/attributes:
 Delete Split – deletes the split
 Duplicate Split – creates a new copy split, directly after the selected
 Split Key - low key of the Split.
 Wave – the mapped sample
 Split Root Key - displays/edits the used Root Key of the split.
This is initially set to the natural root key as defined in the
assigned wave, but can be changed for only this split, a.k.a.
Overriding Root Key. The root key is also displayed on the reference keyboard. By
clicking and dragging this you can easily change the root override. When the root key/fine
tuning is changed the override indicator shows a “*” next to the root key fields.
NOTE: This does not modify the Wave root key, i.e. this will only affect the selected split. The
overriding root can be “baked” into the wave file by clicking the “*” indicator, to affect all
groups/splits to which the wave is assigned.
NOTE: The root key can also be overridden for an assigned wave matrix, in which case the
root will affect all samples in the matrix.
NOTE: In older versions of TX16Wx the behavior of the split root key was to directly modify
the assigned wave file.
 Split Fine Tune - modifies the split root key override fine tuning.
 Loop / Sustain – selects the Sustain Loop. This is the loop that will play while a Midi key is
held.
TX16Wx User Manual
V2.4 Page 18 ©CWITEC 2014
 Loop / Release – selects the Release Loop. This is the loop that will play after the Midi key is
released but the voice still plays the AEG release.
6.1.3.3 Group menu
By right-clicking on a group (or the empty area) you bring up the Group Menu:
 New Group - adds a new, empty Group
 Duplicate Group(s) - duplicates the currently selected group(s).
 Select All – selects all groups in the program
 Clear Selection – unselects all groups in the program
 Separate – split the group in two at the currently selected split key
 Splits to groups – convert all splits into individual groups
 Load Wave - opens up a file selector and lets you browse for a new wave on disk.
NOTE:
The Wave file selector allows you to preview samples in several ways. You can enable Auto
Play, which will play any sample selected in the browser through the main stereo output
automatically. If not enabled, you can select a wave and press the
Play button to listen to the sample one. When browsing from the
Keyboard Mapping view you can also enable Preview which will
temporarily place the selected sample in the currently active Split.
This is a great way to preview how a new sample fits a playing
tune.
 Edit wave – open the split wave in the Sample Editor
6.1.3.4 Muting Groups
Individual Groups can be muted. A muted group will not produce any sound and will not be shown in
the Keyboard Mapping editor. This is useful for tuning individual groups in multilayered programs,
and also to reduce cluttering when laying out keyboard maps.
6.1.4 Splits
Each group is divided into one or more Splits. A split assigns a Split Point and a Wave to a part of the
group keyboard range. The assigned waves share the same group settings and sound parameters but
can have individual Sustain and Release Loops as well as overriding root key settings.
You can select a Split by clicking on the part of the Group the split occupies. By clicking and dragging
the Split Key Marker line you can modify the Splits start.
Split key marker
TX16Wx User Manual
V2.4 Page 19 ©CWITEC 2014
TIP: ALT + left click inside a group to quickly insert a new split.
Right-click the split area to brings up the group menu, with some added options:
 Add Split - inserts a new Split starting at the key you clicked.
 Delete Split - removes the active split
 Sustain Loop - selects the Sustain Loop. This is the loop that will play while a Midi key is held.
 Release Loop - selects the Release Loop. This is the loop that will play after the Midi key is
released but the voice still plays the AEG release.
6.1.5 Creating new groups
New groups can be created in various ways. You can use the group menu to add a new, empty group,
or duplicate an existing one.
You can also drag and drop wave files into the keyboard mapping editor to either create a new
group, or add splits to an existing one. In this case, TX16Wx will do automatic layout of the new
waves.
6.1.5.1 Dragging into existing groups
If you drag and drop samples into an area of the key mapper already occupied by a group, the new
waves will be placed into splits starting at the key at which you dropped them and ending at end of
the same split range.
Note that if all the dropped samples cannot fit into the range of the split where they were dropped,
the overflowing ones will still be loaded, but not mapped.
6.1.5.2 Dragging into a new group
If you drag and drop samples into either an empty area of the key mapper, or into the mappers
keyboard area (lower part), the dropped samples will create a new group. The group will start at the
key you dropped the samples at, and end depending on the highest root key or the end of the
keyboard.
TX16Wx User Manual
V2.4 Page 20 ©CWITEC 2014
You can also explicitly determine where the new group will begin and end by first moving the mouse
to the desired low key, then while holding the SHIFT key pressed, move the mouse pointer to the
desired high key and release. The new group will then have its bounds set to this range.
6.1.5.3 Automatic key mapping
When dropping samples into the keyboard mapper, TX16Wx will try to place them as well as
possible, based on the area you drop them and the root information in the dropped keys. When
dropping samples with root key information, the new mapping will be laid out with the samples in
ascending root key order, split appropriately, ending a half octave above the highest root key.
When samples without root key information are dropped, TX16Wx will assume that you are building
a drum kit or a similar non-pitched layout, and map the samples in the order they are dropped, at
even intervals, determined by the keyboard range for mapping non-pitched sounds option (default 1).
You can force fixed key mapping by enabling the fixed key mapping toggle button in the toolbar, or
by holding the ALT key while dropping the samples into the keyboard mapper.
You can completely disable tonal based key mapping by turning on force fixed keyboard mapping in
the settings page.
To manually set the resulting groups keyboard range, first drag the cursor to the desired low key on
the key mapper keyboard, then while holding SHIFT, move the cursor to the desired high key and
release.
6.1.5.4 Velocity mapping
By enabling the velocity mapping toggle button in the toolbar or by holding CTRL when dropping the
samples, you can map dropped samples as velocity layers – i.e. separate groups placed by velocity.
Toggles low to high / high to low velocity mapping
Enables / disables velocity mapping
Toggles root key based / fixed key mapping
TX16Wx User Manual
V2.4 Page 21 ©CWITEC 2014
By default, dropped samples will be partitioned according to root key information and velocity layers
will be created based on these sets. You can disable this to force all layers onto the same key by
toggling the force fixed button (CTRL modifier)
This can also be disabled globally in the settings page.
6.1.6 Token-based sample mapping
(TX16Wx professional only)
The token-based mapping tool can be used to create a sample mapping when a set of samples are
missing embedded roots, or when additional information, such as key or velocity range etc. is
embedded in the file name.
To use the auto-mapper, first drop the samples you wish to map into the keyboard mapper layout.
Then select the resulting group(s) and the “auto-remap” entry in the mapping command menu. A
dialog showing the detected name tokens will open. Choose what token should affect what mapping
parameter. When you are satisfied, press ok, and a new mapping layout will be created.
Token usage settings can be saved as presets and recalled when mapping similarly named sample
files the next time.
Keys can be written as symbolic MIDI names, i.e. C#3, or MIDI note numbers, i.e. 0-127.
 Token commands
o Ignore – ignores the token
TX16Wx User Manual
V2.4 Page 22 ©CWITEC 2014
o Set root key – sets the split root to the parsed key value
o Set single key – sets the root + low + high key to the parsed key value
o Set low key – sets the low key bounds for the sample
o Set high key – sets the high key bounds for the sample
o Set low velocity – sets the low velocity bounds for the sample
o Set high velocity – sets the high velocity bounds for the sample
o Set group name – sets the name of the samples group
 Use wave root when available - use the embedded root key of the mapped wave if none has
already been set by token.
 Merge groups to splits when possible – join the resulting mappings into merged groups
when contiguous.
6.1.7 Copying groups between programs
To copy groups between programs, select the source groups in the group list and drag them into the
destination program (in another program slot).
6.1.8 Slices
If a group contains mapped slices, you can drag and drop the group into your DAW or file systems to
export a standard MIDI file for playing the layout parts in order.
6.1.9 Choke groups
A choke groups is essentially a monophonic relationship between groups, where all groups sharing
choke group will use at most one voice, i.e. cut each other off when played. A typical use for this is
setting up hi-hats, where each sample should cut off any other playing. Choke groups can also be
used with the Poly mode setting to achieve certain effects, such as multi-group monophonic
instruments.
Poly Mode No Choke Group Choke Group
Poly Notes play polyphonically, AEG
resets on note-on
Notes play monophonically within choke
group, AEG resets on note-on
Mono Notes play monophonically within
group. No AEG reset on voice
stealing.
Notes play monophonically within choke
group. No AEG reset on voice stealing.
TX16Wx User Manual
V2.4 Page 23 ©CWITEC 2014
Legato Notes play polyphonically, except
when note within group is held while
triggering another, in which case
behaves like mono.
Notes play polyphonically, except when
note within choke group is held while
triggering another, in which case behaves
like mono.
6.2 Group switching
(TX16Wx Professional only)
You can add advanced switching parameters to groups, allowing note trigger to happen only when
certain conditions are fulfilled.
The following conditions can be set or combined
 Modulation / external controller – source / range. The group will
trigger when the external or modulator source is within the
specified range. Note that the range is converted into a 0-127
range, similar to thresholds in the matrix switcher.
 Random – each note-on message will trigger a random value. The
group will play if the generated value is within the specified range.
 BPM – the group will play if the host tempo is within the specified
range
 Sequence / position – sets a sequence length for the group. Each
group will have a unique note-on counter, or you can select a
counter source (see below), resetting when it reaches the sequence length. If the counter
value is equal to position, the group will trigger.
 Key down / up / last – group will trigger if the key is within the bounds specified by the key
lo/hi range, and is currently down / up / was the last key depressed
 Key previous - group will trigger if the previous note depressed was equal to key
 Round robin counter – selects the counter used for this switch node. Available selections are
o Group (default)
o Program (shared between all groups in a program)
o MIDI key (unique counter per key on this channel)
Group switching can be temporarily enabled / disabled and the switching node can be completely
removed by using the bottom row buttons.
6.3 Sample interpolation / sound quality
TX16Wx allows you to control the transposition quality of the played samples by switching between
interpolation modes. The overall quality settings are available in the setup page and are considered
“default” for the instrument. You can also set an overriding interpolation mode for non-real-time
rendering, i.e. offline mix down of a song in you DAW (the DAW must support notifying the
instrument of this).
In TX16Wx Professional, you can set interpolation for individual groups, programs, program slots and
in the saved bank file.
Available interpolation modes:
TX16Wx User Manual
V2.4 Page 24 ©CWITEC 2014
 Default - Use parent setting. If the target is a sound item, such as a group, the parent items
setting will be used. If no setting is available, the setup page setting is used. If no setting is
found, “draft” mode is selected.
 Draft (linear interpolation) - lowest CPU usage, but least quality.
 Hermite interpolation - good compromise between CPU and quality.
 Sinc 32/64/128 - sinc interpolation – best quality, but high CPU usage. Not suitable for live
performance.
6.4 Group Sound Settings
The lower area of the Sampler interface contains the sound controls for the currently active groups.
Here you modify the sound shaping parameters for one or more groups.
6.4.1 Output, Pan, Velocity and Glide
 Volume - sets the Program relative volume.
 Pan - set the Program relative pan.
 Velocity - sets the velocity sensitivity of the group. This determines how keyboard velocity
affects the played volume of the group.
 Velocity Offset - sets the lowest velocity at which the group responds. For example if this is
set to 63, the group will never play at a lower volume than a key velocity of 63 would
produce.
6.4.2 AEG
The Amplitude Envelope Generator modifies the volume of the group over time. It is an extended
version of the standard ADSR envelope with some additional parameters.
Attack Decay1 Decay2 Release
Level1
Sustain
Time
Volume
TX16Wx User Manual
V2.4 Page 25 ©CWITEC 2014
6.4.3 Wave Start
Offsets the played wave(s) start point in the group. You can modulate this value in the Modulation
Table view. For example, by modulating this with keyboard velocity you can skip a sharp transient in
a wave when playing at low velocities.
6.4.4 Delay
Delays playing of the group by a specific time from MIDI note on. You can modulate this value in the
Modulation Table view.
6.4.5 Filter
TX16Wx has a single resonant filter per group, switchable between 6dB and 24dB response slope.
Filter Parameters:
 Type
o Off - Filter off
o Lowpass - frequencies below the cutoff frequency are suppressed.
o Highpass - frequencies above the cutoff frequency are suppressed.
o Bandpass - frequencies below and above the cutoff frequency are suppressed.
o Notch - frequencies around the cutoff frequency are suppressed. The resonance
parameter will regulate the width of the filter.
o LowShelf
o HighShelf - increases or reduces frequencies below the shelf frequency. The gain is
controlled by the drive parameter.
o Peak - makes a peak or a dip in the frequency response. The resonance parameter
controls the width of the filter and the drive parameter the gain.
o AllPass - passes through all frequencies unchanged, but changes the phase of the
signal (controlled by resonance and drive)
 Frequency - the cutoff frequency of the filter
 Resonance - causes frequencies near the cutoff to become amplified.
 Drive - boosts or dampens the signal through the filter.
Note: Only the lowpass filter works in 6dB mode. Other filters will silently operate at 12dB slope.
6.4.6 FX / Sends
(TX16Wx professional only)
Each group can have three assigned sends that go to either a FX bus or a separate output. Sends can
be done either pre- or post-fader/pan.
Each group can also have a single insert assigned. The insert is applied before fader and sends, and
the two first parameters can be modulated like a normal group parameter through the modulation
destinations “insert p1/p2”.
6.4.7 LFO
Two Low Frequency Oscillator generators are available per group.
LFO Parameters:
TX16Wx User Manual
V2.4 Page 26 ©CWITEC 2014
 Rate - LFO frequency in Hz, ranging from ~0.01 - 1500Hz
 Amplitude - Strength of the generated modulation pulse
 Fade in - Time before the LFO reaches its maximum amplitude. Use this to achieve a "fade-
in" effect in the modulation.
 Position - Wave cycle start of the LFO. A setting of 0.5 effectively reverses the phase of the
generated wave.
 Type - Generated wave type
o Triangle
o Sinus
o Sawtooth
o Square
o Exponent
 Sync
o None – LFO will start at a phase determined by the rate and sample position of the
playing son, i.e. free running.
o Key – The LFO cycle starts at each note-on.
o Group - If any voice is active playing this group, the LFO phase will be synced to this.
o Voice - If any voice is active playing any group in this voice, the LFO phase will be
synced to this. Note that the LFO will be synced to the first group found playing, so
this parameter is best used on all the groups in a program.
 Mode
o Normal – rate is expressed in hertz.
o Tempo – rate is expressed as a beat designator with the actual rate determined by
the song tempo. For example settings the rate to 1/4 will cause the LFO to complete
one period per every quarter note.
6.4.8 Modulation Envelopes
TX16Wx has two simple three-stage modulation envelopes per
group. These can be used to modulate other sound shaping
aspects of the group.
 Amp - determines the strength of the modulation
output
 L0 - start level
 T1-3 - envelope times
 L1-3 - envelope levels
Note that the T2-L2 stage will be held as long as the MIDI key is pressed, and begin transition to the
T3-L3 stage on MIDI note-off.
6.4.9 Step Sequencer
Similar to the LFO, and shares most of its parameters, but instead of pre-determined waveforms,
allows the user to draw a step sequence of modulation values which will then be played at the
determined rate.
TX16Wx User Manual
V2.4 Page 27 ©CWITEC 2014
 Steps –sets the number of sequence steps between 8 and
128 steps.
 Type – assigns a LFO style waveform to the sequencer, or
fills it with a random pattern.
 Smooth /Stepped – determines if the modulation value
will interpolate smoothly between the sequence values, or
run in a ‘stepped’ mode. The former creates a soft, LFO-
like sound, while the second will produce a more
pronounced ‘jumping’ effect, useful to create electronic
pulsating sounds.
 Cycle/Step sync - when tempo sync is active, setting this parameter to “step” will make each
step period the assigned sync duration, where as “cycle” will play the whole sequence.
6.4.10 Modulation Table
Each group can have up to 16 active modulation mappings,
from either the sound shaping generators or external Midi
input. The Modulation Mapping View lets you edit and manage
these.
 Source - selects the modulation data source
o ENV1 / ENV2 - the Modulation Envelopes.
o LFO1 / LFO2 - Low Frequency Oscilators
o SEQ1 / SEQ2 / SEQ3 –
o Pitchbend
o Modulation Wheel
o Channel Pressure
o Aftertouch
o Key - maps depending on the played Midi key, where C0 represents no, and G10
(highest Midi key) represents full modulation.
o Key/R - like Key, but maps the modulation into the groups Key Range.
o Vel - maps depending on the played Midi velocity, from 0 to 127.
o Vel/R - like Vel, but maps the modulation into the groups Velocity Range.
o BPM/R – host/wave relative tempo.
o Random – generates a random value between -1 to 1. This source is like MIDI
key/vel, a note-on value only.
o External Controller 1 - 16 - Takes the modulation value from system-defined External
Midi Controllers.
o MIDI Continous Controller – Any MIDI CC
o Automation Parameters – DAW host automation parameters.
 Destination - sets the destination parameter for the modulation
o Amp – before-filter-and-shaper amplitude. (+/- 1). This is the amplitude of the
generated sound before it is treated by any of the other sound shaping aspects, such
as filter and inserts.
TX16Wx User Manual
V2.4 Page 28 ©CWITEC 2014
o AEG Attack - the attack parameter of the AEG. (+/- 1)
o AEG Time - the overall speed (time between stages) of the AEG. (+/- 200%)
o ENV1 / ENV2 Amplitude - (+/- 1)
o LFO1 / LFO1 Amplitude - (+/- 1)
o LFO2 / LFO2 Rate - (+/- 200Hz)
o SEQ1 /SEQ2/ SEQ 3 Amplitude - (+/- 1)
o SEQ1 /SEQ2/ SEQ 3 Rate - (+/- 200Hz)
o Filter Frequency - (+/- 20000Hz)
o Filter Resonance - (+/- 1)
o Pitch/Pitch (raw) - (+/- 127 semitones). Affects the resulting pitch of the played
notes. The first scaled by the groups key scale parameter, the latter is raw pitch
cents.
o Volume - (+/- 1) – The post-sound-shaping output volume of the group (i.e. fader
volume).
o Pan - (+/- 1)
o Loop start (time)
o Loop end(time)
o Loop Direction
o Wave Start (time)
o Glide (Note: only evaluated on note-on)
 Amount - how much the modulation will affect the destination parameter. This field scale is
dependent on the destination.
 Via – Optionally selectable modulation source used to dynamically affect the depth of the
modulation. If enabled, the modulation generated will scale between “Amount” and “Via
amount” dependent on the value of this source.
 Via Amount – Strength of the modulation when the “Via” parameter is a full value.
 Enabled – Enables/disables this modulation slot
 Frozen - if set to true, the modulation will only be evaluated once on Note-On. This will
effectively use a snapshot value of the modulation source at the time of note trigger.
Note: Modulation destinations are additive in nature, thus to have the modulation work as expected
you should in some cases set the original parameter to zero and drive it completely with modulation.
Any destination can have any number of sources whose inputs are summed together.
Note: The BPM/R modulation source is only active when the assigned wave has a tempo defined.
6.4.10.1 Modulation Presets
The lower right corner of the modulation editor contains the preset selector, where you can add,
copy, delete and select modulation matrix presets.
Modulation Presets are a quick way to keep your favorite modulation settings handy.
6.4.10.2 Quick modulation assignment
You can right-click any modulator such as a LFO or ENV to bring up a
context menu where you can add a routing from the modulator to
the available destinations.
TX16Wx User Manual
V2.4 Page 29 ©CWITEC 2014
6.5 Group cross-fading
(TX16Wx professional only)
In TX16Wx Professional, groups can have fade-in/out ranges that define a key and/or velocity range
where the sound produced shifts from silent to full volume.
To create a fade region, Ctrl-click the group edge and drag towards the group center. The fade can
also be edited by Ctrl-clicking the fade region bounds.
Fade regions can be used to create both velocity and keyboard cross fades by fading out the previous
group as the next one is faded in.
To remove all fade regions from a group or groups, use the “Reset fade regions” command in the
keyboard mapping command menu.
7 Wave Editor
The Sample Editor lets you load, save and manipulate waves as well as sample new content from
your DAWs audio input.
Tip: You can quickly zoom in/out in the sample view using the mouse wheel. Drag using the middle
mouse button to scroll the view. The view also responds to drag gestures when scrolling.
TX16Wx User Manual
V2.4 Page 30 ©CWITEC 2014
7.1 Wave List
The lower part of the wave editor is the group list. Here you can view and edit the attributes of
loaded waves, as well as copy, delete and drag them into the keyboard mapper.
Each group item has the following attributes:
 Name – the wave name. Changing this will also change the desired file name of the wave.
 Root Key - the root key (pitch) of the sampled wave.
 Fine Tune - +/-50ct pitch adjustment
 Wave start - sets the start point of the wave. Use this to trim the played range of a wave.
 Wave end
 Tempo - when applicable, such as when working with sliced loops, the wave’s detected
tempo will be presented and can be edited here.
A wave can have several defined loops. Each loop is visible as a sub item in the list:
 Name – name of the loop.
 Loop mode - type of loop
o None - no loop.
o Forward - when reaching end market, playback of the loop will jump back to the start
marker.
o Backward - when reaching the end marker, the playback will reverse and play until
the start marker is again reached, at which point the playback skips back to the end
marker and continues playback backwards.
o Bidirectional - the loop will switch direction every time it crosses the loop markers,
i.e. when it reaches the end marker, playback reverses and plays until the start
marker is reached. Here the playback returns to normal and continues until the end
marker, at which points the process, yes, loops.
TX16Wx User Manual
V2.4 Page 31 ©CWITEC 2014
o Slice - The region is not repeated, but rather, if mapped into a split, will cause only
the loop region to play for this particular mapping.
o Pinned Slice - Like a slice, but the slice will be preserved if you use the beat detect or
slice evenly or delete slice commands. Useful for iteratively building a sliced loop.
 Loop start - start point of active loop
 Loop end - end point of active loop
Loops can be copied or moved between samples by drag & drop. By dragging a loop onto another
you can either swap the loop settings or copy them (ALT-drag for copying). By dragging a loop onto
another wave you either copy (ALT-drag) or move it to the other wave.
You can quickly move the sample views focus to any of the wave/loop start/end points by pressing the
“go to” button next to the respective values. By double clicking the button you can quickly switch
between a fully zoomed out/in view.
Switching between zoom modes can also be done by double clicking anywhere in the sample view
area.
7.2 Playing waves
You can play the currently active wave by clicking and holding the left mouse button inside the
sample view area. The active wave will be played at its root pitch from the point you clicked. Use this
to locate appropriate start / end points for the wave or loops.
By holding the ALT key when clicking you engage looped mode, which will use the currently selected
loop when playing back the wave.
You can also press and hold the play or loop button for a sample in the sample list. This will play the
sample from the start.
7.3 Editing start / end
You can click-drag the Start / End dials to modify the waves start and end
points. By double- clicking you can also enter these manually. By clicking the
Up / Down arrows on either side of the dials the value is incremented by
searching for the closest next / previous Zero-Crossing point in the
Sample Data.
You can also click-drag the Start / End Markers in the sample view to modify this directly.
7.4 Editing loops and slices
The wave editor gives you a graphical view of the loops and slices in the currently selected wave file.
Here you can intuitively edit and fine tune the loop definitions.
7.4.1 Editing loops
Loop points are edited in the same way as Wave Start / End. As with these, the Up / Down Arrows of
the numerical dials lets you search Zero-Crossing points in the sample data. This is an effective way to
find good loop points.
TX16Wx User Manual
V2.4 Page 32 ©CWITEC 2014
7.4.2 Editing slices
Slices, like loops can be edited by dragging their start/end locators in the wave editor. Unlike loops
though, slices are expected to be contiguous, i.e. where one slice ends, another one starts. Thus,
when you move a slice point you are in fact adjusting two regions end and start points respectively.
Insert new slice points by using ALT + double click at the point you want to insert the new slice. To
combine two slices into one, ALT + double click the slice point to remove the cut.
7.5 Wave Edit Menu
As other editor views, either clicking the top-
left edit icon or right-clicking on the Wave
Edit View Area will bring up an Edit menu.
 Goto - centers the sample viewer on
the selected point.
 Set - sets the value of the point to the
time clicked in the sample viewer
o TIP: You can also set the wave
or loop start/end locations by using:
o Ctrl – left click – set wave start
o Ctrl – right click – set wave end
o Shift – left click – set loop start
o Shift – right click – set loop end
 Load Wave - opens up a file browser for loading wave data from disk
 Save Wave / Save Wave As - saves the currently active wave to disk
 Duplicate Wave - creates a copy of the active wave in memory
 Delete Wave - removes the active wave from sampler memory. If the wave is currently
assigned to any groups, these will be modified to be silent
 Load Replacement Wave – opens a file browser for loading new wave(s) to replace the
selected wave(s). All existing mappings will be rewritten to the new wave(s) and you are
given the option to unload the existing sample.
 Replace mappings – replaces one or more wave mappings with the last selected wave. Select
the wave(s) you want to modify and then last the wave you want to replace them with.
Tip: You can also replace wave mappings by dragging files directly from the file browser onto a
loaded wave in the list or double click the wave in the list to open a file selector.
 Add Loop - adds a loop to the wave
 Delete Loop - deletes the currently active loop
 Assign Loop – assigns the selected loop to all active mappings, for both sustain and release.
 Copy Loops – copies the loops from the last selected wave.
 Replace Loops – replaces the loops in the selected waves with those from the last selected
wave.
 Layout Slices – if the sample has slices, this creates a new group with the slices to keys
mapped in ascending order. If the sample is already slice mapped, the mapping will be
updated.
TX16Wx User Manual
V2.4 Page 33 ©CWITEC 2014
 Slices to waves – converts all slices into new waves
 Delete all slices – deletes any slices from the sample
 Detect Pitch - attempts to determine the root pitch of the sample data
 Detect Tempo – attempts to extract the tempo from rhythmic content (loops)
 Normalize - maximizes the volume of the sample data
 Cross fade loop - cross fades the edge parts of the currently active loop to create a smoother
transition.
 DC Remove – removes any DC components from the wave data
 Trim - removes any data outside the Start / End Markers
 Duplicate Range - creates a new wave in memory from the sample data inside the Start / End
Markers (or current loop/slice selection)
 Reverse / Reverse Range – reverses the wave data, making the sound data play backwards
 Mono<->Stereo - converts a mono wave to stereo and vice versa
 Switch L<->R - switches stereo channels
7.5.1 The Wave Editor Toolbar
The toolbar at the top of the Wave Editor allows access to some more advanced features
7.5.1.1 Slice into parts
Slices a waveform into equidistant parts, independent of content
 Slicer / # - sets the number of slices to create
 Slice button – activates slicer
o Once activated, you can slide the slicer/# parameter up/down to adjust the number
of slices created.
o Turn of the slice button to finalize the result
When manipulating slices, either using the slice/# or beat slicer tools as well as manual slice
definition, any active mappings will automatically update their layouts to match the new set of slices.
Use Pinned Slices to keep slices you are satisfied with while modifying the slice parameters to refine
further results. This prevents the pinned slices from being replaced.
7.5.1.2 Beat Slicer
Uses transient detection to slice waveform data into parts based on rhythmic content – also known
as loop slicing. This is typically used to cut a drum loop into parts of a single hit, which can then be
mapped to keys and replayed through MIDI.
 Threshold – sets the beat detection threshold, determining how prominent a transient must
be to warrant slicing
 Cutoff – sets the cutoff frequency for transient detection, limiting the analysis to frequencies
below this value.
 Slice button – activates slicer
o Once activated, you can adjust the threshold and cutoff parameters to tune the
slicing until you get the desired result.
TX16Wx User Manual
V2.4 Page 34 ©CWITEC 2014
o Turn of the slice button to finalize the result
7.5.1.3 Loop crossfade
By crossfading a loop, the sample content from a range before the loop start is mixed in (crossfaded)
with the content at the end of the loop. This can help smooth out the transition between the loop
end and start.
 X-fade – enables the crossfade markers
o Adjust the crossfade range by either the numerical dial or by dragging the markers in
the sample editor
 Do Crossfade button – performs the crossfade operation
7.5.1.4 Loop overlay
By using loop overlay you can see the opposing loop point overlaid the normal sample data. This
allows you to more easily match and find good loop points. Use this with the go-to and zoom buttons
to quickly switch between points and adjust them.
TX16Wx User Manual
V2.4 Page 35 ©CWITEC 2014
7.5.1.5 Boost / dampen
Increases or decreases the volume of the selected sample by decibels.
7.6 Sampling content
Just like a hardware sampler, the TX16Wx makes it easy to create your own sounds from scratch by
recording the sound input from your host as new waves.
The Sampler controls are located in the sampler view in the top right corner.
 Mono / Stereo – toggles Mono or Stereo recording
 Listen – when active VU meters will indicate any active sound input.
 Trigger on threshold exceeded – when active, sampling will start when the
input signal exceeds the set threshold level
 Trigger on transport – when activated, the recording will begin once the
host transport enters playing mode
 Record – toggles recording on/off
 Auto map new samples – map new samples into the current program inside
the set keyboard bounds
 Auto pitch detect new samples – finds the pitch of sampled content
When recording finishes, the result will be in a new sample, ready for editing and mapping.
TX16Wx User Manual
V2.4 Page 36 ©CWITEC 2014
8 Wave matrix
(TX16Wx Professional only)
The Wave matrix editor lets you load and manipulate Wave matrix definitions. These are two-
dimensional grids of up to 127 x 127 samples that can be mapped into splits just like a regular wave.
However, the wave matrix allows you to select a single sample to be triggered from within the grid
based on the value of either external MIDI controls or any modulation source in the triggered voice.
A typical use case for the wave matrix would be a percussive sound with the Y-axis being velocity and
samples mapped by velocity, then mapping variations on the respective sounds in the X-axis and
select from this bases on controller, stepping or random values.
8.1 Wave matrices edit panel
Use the wave matrix toolbar, located in the top of the left hand editor panel to
add, save, delete or duplicate wave matrices.
Wave matrices can also be created, deleted and duplicated from the Wave
matrix edit menu.
Directly below the toolbar is the wave matrix list, which shows all currently
loaded wave matrix definitions. From this list you can select a matrix for
editing or drag it into the keyboard mapper just like you would a wave file.
Each wave matrix has settings for the trigger condition source of the X- and Y-
axis. These are the same sources as are used for sound modulation.
If the axis trigger source is left blank, the row/column will cycle through in a
round-robin fashion. The round robin counter source can be selected, similarly
TX16Wx User Manual
V2.4 Page 37 ©CWITEC 2014
to the Group Switcher. Available sources are:
 Default - this matrix
 Group - shared between all elements in the group, including group switches
 Program – shared between all sound elements in the program
 MIDI key – unique counter for the triggered MIDI note on the assigned channel
Note : The BPM/R modulation source cannot be used in the wave matrix, since its output is dependent
on the assigned wave.
The invert button on the right hand of the trigger selection fields will effectively invert the trigger
source, i.e. triggering will happen in reverse order.
The currently selected matrix cell’s attributes can be inspected and modified in the panel below. The
two topmost fields display the exact trigger threshold values for the cell.
Each cell contains its own sample selection with sustain and release loop, similar to a group split.
The left/right/up/down buttons can be used to shift the selected matrix cell’s contents. The matrix
edit area will also respond to ALT-up/down/left/right arrows to do the same.
Some DAW programs will not allow ALT-arrow key combinations through to the plug in. Use ALT-
GRAPH in this case.
8.1.1 Wave matrix edit menu
Right-clicking in the editor area, or clicking the edit icon, brings up the wave matrix edit menu:
 Load Wave Matrix - brings up a file selector and allows you to browse for existing matrix files
on disk. You can also drag & drop matrix files here to load them.
o The matrix file selector can also be accessed by clicking the ‘load’ icon in the
toolbar
 Save Wave Matrix / Save Wave Matrix As - Saves the active wave matrix to disk along with
any used waves. You may be prompted to provide names for individual files being saved.
 Duplicate Wave Matrix - creates a shallow copy of the current matrix. The new matrix will
reference the same samples as the original item.
 New Wave Matrix - creates a new, empty matrix.
 Delete Wave Matrix - deletes the currently active matrix. Note that this does not delete any
waves. See Delete Unused in the performance editor menu.
 Delete row/column – deletes the rows/columns of the currently selected matrix cells.
 Reverse row/column – flips the rows/columns of the currently selected matrix cells along
the X/Y axis.
 Swap row/column – swaps the contents of selected rows/columns with each other
 Rotate row/column – rotates selected rows/columns across respective axis.
 Distribute row/column – sets the rows/columns to equal distance from each other.
 Load Wave – opens a file selector to load a new wave into the currently selected cell
 Edit Wave – opens the wave of the currently selected cell in the Wave editor.
TX16Wx User Manual
V2.4 Page 38 ©CWITEC 2014
8.2 Wave matrix edit area
The edit area lets you create and edit matrix definitions graphically. Each matrix starts out as a 1x1
sized grid. By ALT-clicking inside the editor you can insert new rows and columns.
ALT-click inside the grid to split the matrix rows and columns at the selected point.
ALT-click in the row or column scale area to split just the row or column.
The matrix rows and columns can be moved by clicking and dragging.
Drag and drop wave files from the file browser or explorer into a cell to replace the assigned wave.
TX16Wx User Manual
V2.4 Page 39 ©CWITEC 2014
By dragging several files into the row/column scale area you can map all the files into the
row/column. The matrix will be resized to accommodate all the dropped files if needed.
Double-click a matrix cell to open a file selector to replace the assigned wave. Loading a wave like
this also lets you preview the new assignment while selecting.
Cell contents can also be swapped between cells by drag and drop. Use ALT-drop to copy content
rather than swapping it.
9 FX section
(TX16Wx professional only)
TX16Wx has 6 FX busses, each of which can be assigned an effect. Effects are controlled and saved
per performance. An effect can be sent to any of the outputs, and its level and wet/dry mix can be
controlled.
 Mute – disable the FX and the send – no sound is produced
 Bypass – disable the FX and send the incoming signal (group/program slot sends) through to
the output
 Level – output level of the effect
 Mix – wet/dry mix. 100% wet means only effect result is sent through (default)
TX16Wx User Manual
V2.4 Page 40 ©CWITEC 2014
Most FX parameter can be automated similar to program slot parameters. By right-clicking the FX
parameter you can assign an automation control.
10 Setup
The Setup tab contains various settings and options that are either global and/or stored in the bank.
10.1 Settings
Global options for the sampler:
 Use TX16Wx Pro features – turns on features available exclusively to the non-free TX16Wx
Professional Edition. You can enable this mode to evaluate the Pro features, but you may
only do so for 30 days. After that, this mode requires you to purchase a license from the
TX16Wx website, http://www.tx16wx.com/.
 Save all waves in FXB/project - toggles whether TX16Wx should force storing all actual wave
data when storing the sampler state in the VST host project or when writing the bank as FXB
(VST/AU plug-in chunk data). Leaving this option set to true makes your project files self-
contained in such that TX16Wx does not have to locate wave files from disk when the project
is reloaded. However, if you have a large sample set in memory this can cause your project
files to become quite large, which causes issues with certain hosts.
 Save waves in project - if this option is active and the host supplies the project file location,
TX16Wx will store all sample data that must be written as separate files instead of writing
the data into the project file itself. The samples will be written as <project
dir>TX16Wx<project name><wave name>. When combined with 'Save all waves in
FXB/project' all data will be stored into the project directory.
 Preview programs in file dialog– should loading programs using a file selector temporarily
load the selected program file for preview
 Preview waves in file dialog– should loading waves into Splits using a file selector
temporarily load the wave into the Split for preview
 Auto play waves in file dialog – should waves selected in file selectors auto play
 Auto play waves in file browser – should waves selected in the file browser auto play
 Copy content on bank save
 Copy content on performance save
 Copy content on program save
o Should contained sound items be copied and saved into the save file structure when
saving the parent sound item. This can also be toggled in the file selector.
 Use 'Places' when saving files - should paths be written as relative to Places (if possible)
when storing sound data to disk. If set to off, any referenced sound files not present in the
directory saved to (or subdirectory) will be written as absolute paths.
 Sample folder naming – determines where sample content will be placed when saving
programs to disk with “copy content” active
 Load output configuration from bank – sets if output configuration is read when loading a
new bank / host project file. “Never” will disallow output configuration from any bank,
“Project Only” will load outputs from DAW host bank, but not from txbank files. “Projects and
files” will load output configuration from both.
TX16Wx User Manual
V2.4 Page 41 ©CWITEC 2014
 Auto create sound items on new / clear – should clearing bank or creating a new
performance automatically create stub content in the sampler, equivalent to “New perf +
slot + prog”
 Keyboard range for mapping non-pitched sounds – key range per sample when creating
groups containing fixed key mappings (not based on root key info)
 Force fixed key mapping – turns off root key based keyboard mapping for dropped samples
 Enable key range / velocity partitioning when doing velocity layer mapping – globally
enables/disables root key partitioning when mapping velocity layers
 Default sampler auto mapping low/high key – sets the default keyboard bounds for the
sample auto mapping feature of the sampler section. These values also affect the slice layout
function.
 New samples format – sets data format for new samples.
 MIDI octave display offset – adjusts octave naming in the UI. Note that saved sound data will
still use canonical MIDI octave names.
 MIDI notes display as numbers – Shows MIDI notes as MIDI note numbers (0-127) instead of
symbolic names (C2, C#2 etc.)
 MIDI velocity curve mapping – determines how incoming MIDI note-on velocity values are
mapped to voice velocity. Default is a linear mapping.
 Show program / performance numbers – when active, program and performance selectors
will display the respective index numbers of the item displayed.
 Report MIDI note names to host – when active, TX16Wx will report mapped samples as MIDI
note names to the host application
 Load existing performances
 Load existing programs
 Load existing waves
o Can be set to yes/no/ask. When loading sound data already loaded, this determines
if a new copy of the data should be added to the bank. In general it is a bad idea to
load duplicate copies of sound data, especially waves, since saving the data will be
ambiguous.
 Replace wave when dragging into sample list – should samples and mappings be
automatically replaced when dragging a new sample file into the wave list.
 Copy loops when replacing wave – should loop definitions be automatically copied into the
replacing wave if no previous loops were defined.
 Place wave peaks file in alternate cache path – should reapeaks files be placed in a separate
folder instead of side-by-side with the originating wave file
 Alternate wave peak cache path – folder for peak files.
 UI Size – select UI resolution. The plug-in will attempt to resize on the fly. Depending on your
host this might require you to close and reopen the UI.
Note that the actual size of the UI will depend on this as well as the chosen skin, since the
plugin will resize to accommodate this.
 UI Skin – select the active skin defining the graphical look of the plug-in.
 Enable tooltips – turn tooltip help on/off
 Knob mode – switch between host determined, circular or linear knob mode
TX16Wx User Manual
V2.4 Page 42 ©CWITEC 2014
 Max undo queue size – determines the maximum number of Undo steps kept. You should
keep this value reasonably low to avoid a high memory footprint.
 MIDI edit of key / velocity fields – sets how and when TX16Wx will respond to MIDI input to
set values in note and velocity text input fields.
 Default sample interpolation mode – sound quality setting, see sample interpolation.
 Offline rendering sample interpolation mode – sets overriding interpolation mode for non-
real-time rendering (mix down)
10.2 Places
"Places" are file system search paths where TX16Wx will look to resolve referenced file names when
loading sound data. Inversely, when saving files and Use Places is active in the settings tab, the
relative file paths used to reference between bank, performances, programs and waves will be
written relatively to these paths.
This definition of search paths allows you to create a complex archive of sound files without having
absolute paths in the referencing filenames, thus making the sound data relocateable.
You can also assign names to places. The file browser will then display these labels instead of the
actual file path when browsing.
10.3 MIDI / External controllers
TX16Wx can have up to 16 external Midi controllers as well as settings for MIDI response defined.
These are stored with the bank data on disk or in DAW memory, but can also be stored as system
defaults. Midi controllers can be selected either from the list, or, if you for example have a controller
area with mapped sliders, you can enable Midi Learn for the controller slot and move the slider to
map it automatically.
Each controller can be given an offset, which then acts as the center point for the controller. Midi
controllers range are normally <0 - 127>, but setting offset to 63, would instead cause the range to
become <-63 - 64>, i.e. bipolar.
Program change mode determines how TX16Wx responds to MIDI program change messages. By
default, MIDI program change will switch between performances, thus selecting different complete
TX16Wx User Manual
V2.4 Page 43 ©CWITEC 2014
multitimbral setups. By changing the setting to “Program”, TX16Wx will instead switch program
assignments on individual program slots in the current performance.
The bottom buttons lets you can either load the system default mappings and settings or save the
current set as defaults.
10.4 Automation
Like external controllers, the VST/AU automation parameters can be mapped to be bipolar instead of
unipolar. In bipolar mode, the effective range of the parameter is <-1 – 1> instead of <0 – 1>. Note
that the offset only applies when the automation parameter is used as a modulation source.
The bottom buttons lets you can either load the system default mappings or save the current set as
defaults.
Automation parameter settings are saved with the TX bank or in the DAW fxb data.
10.5 Outputs
TX16Wx normally has 4 pairs of stereo and 8 mono output busses. In the
TX16Wx Professional edition the 8 mono busses can also be switched into 4
extra stereo pairs. The configuration can be saved in settings as defaults and will
also be saved along with bank data on either file or in the DAW host project.
Whether or not these output settings are re-read on bank load is controlled by
the Load output configuration from bank setting.
Note: After you change the output configuration you will have to
rebuild/reconnect the output busses in your host application. Some hosts may
have problems with modifying outputs in a running plug-in. In these cases you
will have to reload the plug-in.
Note: Previous versions of TX16Wx had the option to disable output busses in the
plug-in. This setting had no effect beyond refusing to render audio output to the bus in question. This
option has been removed since it added no real user benefit. If you don’t need one or more outputs,
simply disconnect them in the host sequencer and avoid assigning sound generators to them in the
plug-in.
Note: The AU plug-in will suggest the output configuration you make here to the host, but the host
may choose to ignore this and configure the actual busses in a different manner.
11 TX16Wx Professional
TX16Wx is free, but is also available in a commercial, professional version. This edition adds several
advanced features and capabilities to the instrument.
You can enable TX16Wx professional features in the settings page to evaluate them. If you decide to
purchase a license you can install it easily by just drag and dropping it into the TX16Wx main UI. The
file will be copied into the application data directory.
TX16Wx User Manual
V2.4 Page 44 ©CWITEC 2014
12 Working in your DAW
Normally a DAW host application will ask the active plug-ins to store their session data in the project
file(s) when closing a project. This is how the state of a VST/AU instrument is restored when
resuming a project.
Since TX16Wx is a sampler instrument, its internal state is dependent on waves loaded from disk,
typically many megabytes in size. Storing this whole state into the project can cause problems, as
some hosts cannot handle very large state data chunks. TX16Wx will by default not store wave data
that has not been modified in this memory, but instead just keep a reference to the file on disk.
While this greatly reduces the size of stored data in most cases, it will leave your project vulnerable if
you for some reason delete or change those original files.
For safety, you should probably store your entire bank state to disk inside your project structure,
with 'copy content' on.
The Save all waves in FXB/project setting controls will cause TX16Wx to store all wave data in the
host project file.
13 Saving sound data
13.1 Banks / Performance / Program
When storing sound program data from TX16Wx, you may tick the option Copy Content on/off in the
file selector window opened (Save As). When Copy Content is on, all contained sound data will be
copied into the same directory as you are saving to, and the resulting sound files will reference the
copied material. Inversely, if Copy Content is off, the saved data will reference the original files
(potentially resolved through places).
13.2 Waves
TX16Wx stores its sound data as Microsoft Wave files on disk, however if a bank references sound
data that has not been modified, the original wave files will be referenced. Once wave data is
modified in memory however, TX16Wx will store a new version of the sound data in Wav format in a
directory named Samples next to the stored program file.
14 File formats
14.1 Bank / Performance / Program
TX16Wx stores its sound definitions in unicode (16-bit) XML data files. The XSD definitions for the
txbank, txperf and txprog file formats are included in the TX16Wx installer.
14.2 Supported sample formats
 WAV - reads and writes PCM and floating point Wav files, including instrument and sampler
definitions.
 AIFF - reads PCM and floating point Audio Exchange Format Files.
 AIFC - reads ulaw, alaw and Typhoon DWVW Compressed AIFF files.
 OGG – reads ogg vorbis encoded compress audio files
TX16Wx User Manual
V2.4 Page 45 ©CWITEC 2014
 FLAC – reads flac loss-less compression files
 W?? – reads Yamaha wave files
14.3 Importing sound data
14.3.1 Sound font 2
TX16Wx has limited support for import of Sound Font 2 files. Sound font container content can be
browsed in the file browser, where individual presets and samples can be loaded. A sound font can
also be loaded in full by drag and drop into the plug-in windows, or by using the Load Performance
file selector. TX16Wx will translate wave data as well as create program representations of the SF2
bank voices.
Note: If you load a sound font into memory when working on a project, and "Save all waves in
FXB/project" is not turned on, TX16Wx will attempt to reference the wave data in the sound font.
Thus the project will be dependent on the imported sound font bank. To avoid this, save the bank in
TX format before closing the project.
14.3.2 SFZ Files
TX16Wx has limited support for the SFZ format. You can load a single SFZ into a program slot or
simply drag and drop them into the sampler.
14.3.3 EXS Files
TX16Wx has limited support for the Logic EXS program format. You can load a single EXS into a
program slot or simply drag and drop them into the sampler. The importer handles sample mapping,
filters, envelopes and modulators (to a certain degree).
14.3.4 AKP Files
TX16Wx has limited support for the Akai S-5000 AKP program format. You can load a single AKP into
a program slot or simply drag and drop them into the sampler. The importer handles sample
mapping, filters, envelopes and modulators (to a certain degree).
15 Skins
TX16Wx supports user defined skins which can be used to alter the graphical appearance of the
plugin. Skins are loaded from the “skins” folder in either or the shared program folder or from the
user settings folder. Skins are created by a CSS-like style sheet definition along with graphical
elements. Please refer to the skinning information on the TX16Wx website for more information.
16 Credits and Acknowledgements
TX16Wx uses the following third-party software:
 Libogg & Libvorbis
 Libflac
 Laurent de Soras FFT library
The plugin is based on the CWPlug library with the GUI built using CWUi, a derivative of VSTGUI. The
VST plugin uses the definitions of the Steinberg VST SDK.
TX16Wx User Manual
V2.4 Page 46 ©CWITEC 2014
The GUI was created mainly using the excellent Knobman tool by Kuso: http://www.g200kg.com/
Some icons are courtesy of http://icons8.com/
None of the DSP parts in this software would have been possible without the great resources at
http://www.musicdsp.org/
The sound architecture is based on the wonderful Typhoon OS, created by NuEdge Development for
the original TX16W hardware sampler. http://nuedge.net/typhoon2000/

More Related Content

What's hot

Fonética y fonología
Fonética y fonologíaFonética y fonología
Fonética y fonologíaPablo Martinez
 
Conceptos basicos lengua
Conceptos basicos lenguaConceptos basicos lengua
Conceptos basicos lenguaDolors Monné
 
La Lengua y su organización: fonemas monemas
La Lengua y su organización: fonemas  monemasLa Lengua y su organización: fonemas  monemas
La Lengua y su organización: fonemas monemasEducation-MEC-DGA
 
Fonética y fonologia
Fonética y fonologiaFonética y fonologia
Fonética y fonologiaLuis Gil Gil
 
El verbo II: Formas no-personales del verbo (Verboides)
El verbo II: Formas no-personales del verbo (Verboides)El verbo II: Formas no-personales del verbo (Verboides)
El verbo II: Formas no-personales del verbo (Verboides)Carlos Alberto Estrada García
 
Aspectos segmentales
Aspectos segmentalesAspectos segmentales
Aspectos segmentalesPaola Caro
 
Rasgos distintivos
Rasgos distintivosRasgos distintivos
Rasgos distintivosFermín
 
Sintaxis Oración coordinada
Sintaxis Oración coordinadaSintaxis Oración coordinada
Sintaxis Oración coordinadaJaime González
 
Preparacion del discurso
Preparacion del discursoPreparacion del discurso
Preparacion del discursomarthaguilar
 
El acento y la entonación
El acento y la entonaciónEl acento y la entonación
El acento y la entonaciónPaola Caro
 
Segmentos y suprasegmentos
Segmentos y suprasegmentos Segmentos y suprasegmentos
Segmentos y suprasegmentos Paola Caro
 
Silabificacion
SilabificacionSilabificacion
SilabificacionEvan Smith
 
5 ejercicios para mejorar el tono de voz
5 ejercicios para mejorar el tono de voz5 ejercicios para mejorar el tono de voz
5 ejercicios para mejorar el tono de vozDruida Oscuro
 
Fonética y Fonología
Fonética y Fonología Fonética y Fonología
Fonética y Fonología pgutier1010
 
Produccion de la voz
Produccion de la vozProduccion de la voz
Produccion de la vozViana Prato
 
Los fonemas del español
Los fonemas del españolLos fonemas del español
Los fonemas del españolEvan Smith
 

What's hot (20)

Lenguaje paraverbal
Lenguaje paraverbalLenguaje paraverbal
Lenguaje paraverbal
 
Fonética y fonología
Fonética y fonologíaFonética y fonología
Fonética y fonología
 
Conceptos basicos lengua
Conceptos basicos lenguaConceptos basicos lengua
Conceptos basicos lengua
 
La Lengua y su organización: fonemas monemas
La Lengua y su organización: fonemas  monemasLa Lengua y su organización: fonemas  monemas
La Lengua y su organización: fonemas monemas
 
Fonética y fonologia
Fonética y fonologiaFonética y fonologia
Fonética y fonologia
 
Fonética y fonología
Fonética y fonologíaFonética y fonología
Fonética y fonología
 
El verbo II: Formas no-personales del verbo (Verboides)
El verbo II: Formas no-personales del verbo (Verboides)El verbo II: Formas no-personales del verbo (Verboides)
El verbo II: Formas no-personales del verbo (Verboides)
 
Evolución fonética
Evolución fonéticaEvolución fonética
Evolución fonética
 
Aspectos segmentales
Aspectos segmentalesAspectos segmentales
Aspectos segmentales
 
Rasgos distintivos
Rasgos distintivosRasgos distintivos
Rasgos distintivos
 
Sintaxis Oración coordinada
Sintaxis Oración coordinadaSintaxis Oración coordinada
Sintaxis Oración coordinada
 
Preparacion del discurso
Preparacion del discursoPreparacion del discurso
Preparacion del discurso
 
El acento y la entonación
El acento y la entonaciónEl acento y la entonación
El acento y la entonación
 
Segmentos y suprasegmentos
Segmentos y suprasegmentos Segmentos y suprasegmentos
Segmentos y suprasegmentos
 
Silabificacion
SilabificacionSilabificacion
Silabificacion
 
5 ejercicios para mejorar el tono de voz
5 ejercicios para mejorar el tono de voz5 ejercicios para mejorar el tono de voz
5 ejercicios para mejorar el tono de voz
 
Fonética y Fonología
Fonética y Fonología Fonética y Fonología
Fonética y Fonología
 
Fonología y fonetica
Fonología y  foneticaFonología y  fonetica
Fonología y fonetica
 
Produccion de la voz
Produccion de la vozProduccion de la voz
Produccion de la voz
 
Los fonemas del español
Los fonemas del españolLos fonemas del español
Los fonemas del español
 

Similar to Tx16 wx user manual

Specification of the Linked Media Layer
Specification of the Linked Media LayerSpecification of the Linked Media Layer
Specification of the Linked Media LayerLinkedTV
 
Pengenalan kepada Pentaho
Pengenalan kepada PentahoPengenalan kepada Pentaho
Pengenalan kepada PentahoHisyammudin
 
Wireshark user's guide
Wireshark user's guideWireshark user's guide
Wireshark user's guideGió Lào
 
Spring Reference
Spring ReferenceSpring Reference
Spring Referenceasas
 
Manual tutorial-spring-java
Manual tutorial-spring-javaManual tutorial-spring-java
Manual tutorial-spring-javasagicar
 
Instructor.demo c84a92d0 c1dc-42eb-ab82-0f4888823ae9
Instructor.demo c84a92d0 c1dc-42eb-ab82-0f4888823ae9Instructor.demo c84a92d0 c1dc-42eb-ab82-0f4888823ae9
Instructor.demo c84a92d0 c1dc-42eb-ab82-0f4888823ae9suku dim
 
BizTalk Practical Course Preview
BizTalk Practical Course PreviewBizTalk Practical Course Preview
BizTalk Practical Course PreviewMoustafaRefaat
 
Tap watch 22 user manual-03253d
Tap watch 22 user manual-03253dTap watch 22 user manual-03253d
Tap watch 22 user manual-03253dczimet
 
First7124911 visual-cpp-and-mfc-programming
First7124911 visual-cpp-and-mfc-programmingFirst7124911 visual-cpp-and-mfc-programming
First7124911 visual-cpp-and-mfc-programmingxmeszeus
 
Oracle forms and resports
Oracle forms and resportsOracle forms and resports
Oracle forms and resportspawansharma1986
 
Spring Reference
Spring ReferenceSpring Reference
Spring ReferenceSyed Shahul
 
software-eng.pdf
software-eng.pdfsoftware-eng.pdf
software-eng.pdffellahi1
 
WebHost Manager User Manual
WebHost Manager User ManualWebHost Manager User Manual
WebHost Manager User Manualwebhostingguy
 
WebHost Manager User Manual
WebHost Manager User ManualWebHost Manager User Manual
WebHost Manager User Manualwebhostingguy
 
Report-Bilong&Jing-final
Report-Bilong&Jing-finalReport-Bilong&Jing-final
Report-Bilong&Jing-finalJing KE
 

Similar to Tx16 wx user manual (20)

Specification of the Linked Media Layer
Specification of the Linked Media LayerSpecification of the Linked Media Layer
Specification of the Linked Media Layer
 
Icp
IcpIcp
Icp
 
Tortoise svn 1.7-en
Tortoise svn 1.7-enTortoise svn 1.7-en
Tortoise svn 1.7-en
 
Pengenalan kepada Pentaho
Pengenalan kepada PentahoPengenalan kepada Pentaho
Pengenalan kepada Pentaho
 
Wireshark user's guide
Wireshark user's guideWireshark user's guide
Wireshark user's guide
 
Novell login documentation and troubleshooting
Novell login documentation and troubleshootingNovell login documentation and troubleshooting
Novell login documentation and troubleshooting
 
Spring Reference
Spring ReferenceSpring Reference
Spring Reference
 
Manual tutorial-spring-java
Manual tutorial-spring-javaManual tutorial-spring-java
Manual tutorial-spring-java
 
Instructor.demo c84a92d0 c1dc-42eb-ab82-0f4888823ae9
Instructor.demo c84a92d0 c1dc-42eb-ab82-0f4888823ae9Instructor.demo c84a92d0 c1dc-42eb-ab82-0f4888823ae9
Instructor.demo c84a92d0 c1dc-42eb-ab82-0f4888823ae9
 
BizTalk Practical Course Preview
BizTalk Practical Course PreviewBizTalk Practical Course Preview
BizTalk Practical Course Preview
 
Tap watch 22 user manual-03253d
Tap watch 22 user manual-03253dTap watch 22 user manual-03253d
Tap watch 22 user manual-03253d
 
First7124911 visual-cpp-and-mfc-programming
First7124911 visual-cpp-and-mfc-programmingFirst7124911 visual-cpp-and-mfc-programming
First7124911 visual-cpp-and-mfc-programming
 
Oracle forms and resports
Oracle forms and resportsOracle forms and resports
Oracle forms and resports
 
Spring Reference
Spring ReferenceSpring Reference
Spring Reference
 
Morph xit
Morph xitMorph xit
Morph xit
 
software-eng.pdf
software-eng.pdfsoftware-eng.pdf
software-eng.pdf
 
End note
End noteEnd note
End note
 
WebHost Manager User Manual
WebHost Manager User ManualWebHost Manager User Manual
WebHost Manager User Manual
 
WebHost Manager User Manual
WebHost Manager User ManualWebHost Manager User Manual
WebHost Manager User Manual
 
Report-Bilong&Jing-final
Report-Bilong&Jing-finalReport-Bilong&Jing-final
Report-Bilong&Jing-final
 

Recently uploaded

WSO2CON 2024 Slides - Open Source to SaaS
WSO2CON 2024 Slides - Open Source to SaaSWSO2CON 2024 Slides - Open Source to SaaS
WSO2CON 2024 Slides - Open Source to SaaSWSO2
 
Crypto Cloud Review - How To Earn Up To $500 Per DAY Of Bitcoin 100% On AutoP...
Crypto Cloud Review - How To Earn Up To $500 Per DAY Of Bitcoin 100% On AutoP...Crypto Cloud Review - How To Earn Up To $500 Per DAY Of Bitcoin 100% On AutoP...
Crypto Cloud Review - How To Earn Up To $500 Per DAY Of Bitcoin 100% On AutoP...SelfMade bd
 
WSO2CON 2024 - Building the API First Enterprise – Running an API Program, fr...
WSO2CON 2024 - Building the API First Enterprise – Running an API Program, fr...WSO2CON 2024 - Building the API First Enterprise – Running an API Program, fr...
WSO2CON 2024 - Building the API First Enterprise – Running an API Program, fr...WSO2
 
WSO2Con2024 - From Blueprint to Brilliance: WSO2's Guide to API-First Enginee...
WSO2Con2024 - From Blueprint to Brilliance: WSO2's Guide to API-First Enginee...WSO2Con2024 - From Blueprint to Brilliance: WSO2's Guide to API-First Enginee...
WSO2Con2024 - From Blueprint to Brilliance: WSO2's Guide to API-First Enginee...WSO2
 
WSO2CON 2024 - Building a Digital Government in Uganda
WSO2CON 2024 - Building a Digital Government in UgandaWSO2CON 2024 - Building a Digital Government in Uganda
WSO2CON 2024 - Building a Digital Government in UgandaWSO2
 
WSO2CON 2024 - Designing Event-Driven Enterprises: Stories of Transformation
WSO2CON 2024 - Designing Event-Driven Enterprises: Stories of TransformationWSO2CON 2024 - Designing Event-Driven Enterprises: Stories of Transformation
WSO2CON 2024 - Designing Event-Driven Enterprises: Stories of TransformationWSO2
 
Announcing Codolex 2.0 from GDK Software
Announcing Codolex 2.0 from GDK SoftwareAnnouncing Codolex 2.0 from GDK Software
Announcing Codolex 2.0 from GDK SoftwareJim McKeeth
 
Devoxx UK 2024 - Going serverless with Quarkus, GraalVM native images and AWS...
Devoxx UK 2024 - Going serverless with Quarkus, GraalVM native images and AWS...Devoxx UK 2024 - Going serverless with Quarkus, GraalVM native images and AWS...
Devoxx UK 2024 - Going serverless with Quarkus, GraalVM native images and AWS...Bert Jan Schrijver
 
Direct Style Effect Systems - The Print[A] Example - A Comprehension Aid
Direct Style Effect Systems -The Print[A] Example- A Comprehension AidDirect Style Effect Systems -The Print[A] Example- A Comprehension Aid
Direct Style Effect Systems - The Print[A] Example - A Comprehension AidPhilip Schwarz
 
WSO2Con2024 - GitOps in Action: Navigating Application Deployment in the Plat...
WSO2Con2024 - GitOps in Action: Navigating Application Deployment in the Plat...WSO2Con2024 - GitOps in Action: Navigating Application Deployment in the Plat...
WSO2Con2024 - GitOps in Action: Navigating Application Deployment in the Plat...WSO2
 
AzureNativeQumulo_HPC_Cloud_Native_Benchmarks.pdf
AzureNativeQumulo_HPC_Cloud_Native_Benchmarks.pdfAzureNativeQumulo_HPC_Cloud_Native_Benchmarks.pdf
AzureNativeQumulo_HPC_Cloud_Native_Benchmarks.pdfryanfarris8
 
WSO2CON 2024 - Freedom First—Unleashing Developer Potential with Open Source
WSO2CON 2024 - Freedom First—Unleashing Developer Potential with Open SourceWSO2CON 2024 - Freedom First—Unleashing Developer Potential with Open Source
WSO2CON 2024 - Freedom First—Unleashing Developer Potential with Open SourceWSO2
 
WSO2CON2024 - It's time to go Platformless
WSO2CON2024 - It's time to go PlatformlessWSO2CON2024 - It's time to go Platformless
WSO2CON2024 - It's time to go PlatformlessWSO2
 
AI & Machine Learning Presentation Template
AI & Machine Learning Presentation TemplateAI & Machine Learning Presentation Template
AI & Machine Learning Presentation TemplatePresentation.STUDIO
 
WSO2Con2024 - WSO2's IAM Vision: Identity-Led Digital Transformation
WSO2Con2024 - WSO2's IAM Vision: Identity-Led Digital TransformationWSO2Con2024 - WSO2's IAM Vision: Identity-Led Digital Transformation
WSO2Con2024 - WSO2's IAM Vision: Identity-Led Digital TransformationWSO2
 
WSO2Con2024 - Facilitating Broadband Switching Services for UK Telecoms Provi...
WSO2Con2024 - Facilitating Broadband Switching Services for UK Telecoms Provi...WSO2Con2024 - Facilitating Broadband Switching Services for UK Telecoms Provi...
WSO2Con2024 - Facilitating Broadband Switching Services for UK Telecoms Provi...WSO2
 
WSO2CON 2024 - How CSI Piemonte Is Apifying the Public Administration
WSO2CON 2024 - How CSI Piemonte Is Apifying the Public AdministrationWSO2CON 2024 - How CSI Piemonte Is Apifying the Public Administration
WSO2CON 2024 - How CSI Piemonte Is Apifying the Public AdministrationWSO2
 
WSO2Con2024 - Low-Code Integration Tooling
WSO2Con2024 - Low-Code Integration ToolingWSO2Con2024 - Low-Code Integration Tooling
WSO2Con2024 - Low-Code Integration ToolingWSO2
 
%in Stilfontein+277-882-255-28 abortion pills for sale in Stilfontein
%in Stilfontein+277-882-255-28 abortion pills for sale in Stilfontein%in Stilfontein+277-882-255-28 abortion pills for sale in Stilfontein
%in Stilfontein+277-882-255-28 abortion pills for sale in Stilfonteinmasabamasaba
 
WSO2CON 2024 - How CSI Piemonte Is Apifying the Public Administration
WSO2CON 2024 - How CSI Piemonte Is Apifying the Public AdministrationWSO2CON 2024 - How CSI Piemonte Is Apifying the Public Administration
WSO2CON 2024 - How CSI Piemonte Is Apifying the Public AdministrationWSO2
 

Recently uploaded (20)

WSO2CON 2024 Slides - Open Source to SaaS
WSO2CON 2024 Slides - Open Source to SaaSWSO2CON 2024 Slides - Open Source to SaaS
WSO2CON 2024 Slides - Open Source to SaaS
 
Crypto Cloud Review - How To Earn Up To $500 Per DAY Of Bitcoin 100% On AutoP...
Crypto Cloud Review - How To Earn Up To $500 Per DAY Of Bitcoin 100% On AutoP...Crypto Cloud Review - How To Earn Up To $500 Per DAY Of Bitcoin 100% On AutoP...
Crypto Cloud Review - How To Earn Up To $500 Per DAY Of Bitcoin 100% On AutoP...
 
WSO2CON 2024 - Building the API First Enterprise – Running an API Program, fr...
WSO2CON 2024 - Building the API First Enterprise – Running an API Program, fr...WSO2CON 2024 - Building the API First Enterprise – Running an API Program, fr...
WSO2CON 2024 - Building the API First Enterprise – Running an API Program, fr...
 
WSO2Con2024 - From Blueprint to Brilliance: WSO2's Guide to API-First Enginee...
WSO2Con2024 - From Blueprint to Brilliance: WSO2's Guide to API-First Enginee...WSO2Con2024 - From Blueprint to Brilliance: WSO2's Guide to API-First Enginee...
WSO2Con2024 - From Blueprint to Brilliance: WSO2's Guide to API-First Enginee...
 
WSO2CON 2024 - Building a Digital Government in Uganda
WSO2CON 2024 - Building a Digital Government in UgandaWSO2CON 2024 - Building a Digital Government in Uganda
WSO2CON 2024 - Building a Digital Government in Uganda
 
WSO2CON 2024 - Designing Event-Driven Enterprises: Stories of Transformation
WSO2CON 2024 - Designing Event-Driven Enterprises: Stories of TransformationWSO2CON 2024 - Designing Event-Driven Enterprises: Stories of Transformation
WSO2CON 2024 - Designing Event-Driven Enterprises: Stories of Transformation
 
Announcing Codolex 2.0 from GDK Software
Announcing Codolex 2.0 from GDK SoftwareAnnouncing Codolex 2.0 from GDK Software
Announcing Codolex 2.0 from GDK Software
 
Devoxx UK 2024 - Going serverless with Quarkus, GraalVM native images and AWS...
Devoxx UK 2024 - Going serverless with Quarkus, GraalVM native images and AWS...Devoxx UK 2024 - Going serverless with Quarkus, GraalVM native images and AWS...
Devoxx UK 2024 - Going serverless with Quarkus, GraalVM native images and AWS...
 
Direct Style Effect Systems - The Print[A] Example - A Comprehension Aid
Direct Style Effect Systems -The Print[A] Example- A Comprehension AidDirect Style Effect Systems -The Print[A] Example- A Comprehension Aid
Direct Style Effect Systems - The Print[A] Example - A Comprehension Aid
 
WSO2Con2024 - GitOps in Action: Navigating Application Deployment in the Plat...
WSO2Con2024 - GitOps in Action: Navigating Application Deployment in the Plat...WSO2Con2024 - GitOps in Action: Navigating Application Deployment in the Plat...
WSO2Con2024 - GitOps in Action: Navigating Application Deployment in the Plat...
 
AzureNativeQumulo_HPC_Cloud_Native_Benchmarks.pdf
AzureNativeQumulo_HPC_Cloud_Native_Benchmarks.pdfAzureNativeQumulo_HPC_Cloud_Native_Benchmarks.pdf
AzureNativeQumulo_HPC_Cloud_Native_Benchmarks.pdf
 
WSO2CON 2024 - Freedom First—Unleashing Developer Potential with Open Source
WSO2CON 2024 - Freedom First—Unleashing Developer Potential with Open SourceWSO2CON 2024 - Freedom First—Unleashing Developer Potential with Open Source
WSO2CON 2024 - Freedom First—Unleashing Developer Potential with Open Source
 
WSO2CON2024 - It's time to go Platformless
WSO2CON2024 - It's time to go PlatformlessWSO2CON2024 - It's time to go Platformless
WSO2CON2024 - It's time to go Platformless
 
AI & Machine Learning Presentation Template
AI & Machine Learning Presentation TemplateAI & Machine Learning Presentation Template
AI & Machine Learning Presentation Template
 
WSO2Con2024 - WSO2's IAM Vision: Identity-Led Digital Transformation
WSO2Con2024 - WSO2's IAM Vision: Identity-Led Digital TransformationWSO2Con2024 - WSO2's IAM Vision: Identity-Led Digital Transformation
WSO2Con2024 - WSO2's IAM Vision: Identity-Led Digital Transformation
 
WSO2Con2024 - Facilitating Broadband Switching Services for UK Telecoms Provi...
WSO2Con2024 - Facilitating Broadband Switching Services for UK Telecoms Provi...WSO2Con2024 - Facilitating Broadband Switching Services for UK Telecoms Provi...
WSO2Con2024 - Facilitating Broadband Switching Services for UK Telecoms Provi...
 
WSO2CON 2024 - How CSI Piemonte Is Apifying the Public Administration
WSO2CON 2024 - How CSI Piemonte Is Apifying the Public AdministrationWSO2CON 2024 - How CSI Piemonte Is Apifying the Public Administration
WSO2CON 2024 - How CSI Piemonte Is Apifying the Public Administration
 
WSO2Con2024 - Low-Code Integration Tooling
WSO2Con2024 - Low-Code Integration ToolingWSO2Con2024 - Low-Code Integration Tooling
WSO2Con2024 - Low-Code Integration Tooling
 
%in Stilfontein+277-882-255-28 abortion pills for sale in Stilfontein
%in Stilfontein+277-882-255-28 abortion pills for sale in Stilfontein%in Stilfontein+277-882-255-28 abortion pills for sale in Stilfontein
%in Stilfontein+277-882-255-28 abortion pills for sale in Stilfontein
 
WSO2CON 2024 - How CSI Piemonte Is Apifying the Public Administration
WSO2CON 2024 - How CSI Piemonte Is Apifying the Public AdministrationWSO2CON 2024 - How CSI Piemonte Is Apifying the Public Administration
WSO2CON 2024 - How CSI Piemonte Is Apifying the Public Administration
 

Tx16 wx user manual

  • 1. TX16Wx User Manual V2.4 Page 1 ©CWITEC 2014 TX16Wx ©CWITEC 2014 Software Sampler Version 2.4
  • 2. TX16Wx User Manual V2.4 Page 2 ©CWITEC 2014 Contents 1 About TX16Wx................................................................................................................................. 5 2 Sound Architecture.......................................................................................................................... 6 2.1 Bank......................................................................................................................................... 6 2.2 Performance............................................................................................................................ 6 2.3 Channel slots ........................................................................................................................... 6 2.4 Program................................................................................................................................... 6 2.5 Group....................................................................................................................................... 6 2.6 Split.......................................................................................................................................... 6 2.7 Wave........................................................................................................................................ 6 3 The UI .............................................................................................................................................. 7 3.1 Selectors.................................................................................................................................. 7 3.2 Numerical dials........................................................................................................................ 8 3.3 Menu selectors........................................................................................................................ 8 3.4 Popup menus........................................................................................................................... 8 3.5 Drag & drop............................................................................................................................. 9 3.6 Zooming and scrolling views ................................................................................................... 9 3.7 Undo........................................................................................................................................ 9 3.8 Tooltips.................................................................................................................................... 9 3.9 MIDI Select .............................................................................................................................. 9 4 Performance view ......................................................................................................................... 10 4.1 Selecting performance .......................................................................................................... 10 4.1.1 Performance menu........................................................................................................ 10 4.1.2 Reordering performances and programs...................................................................... 10 4.2 Working with program slots.................................................................................................. 11 4.2.1 Adding and removing slots............................................................................................ 11 4.2.2 Selecting programs........................................................................................................ 11 4.2.3 Outputs.......................................................................................................................... 12 4.2.4 Extended slot controls................................................................................................... 12 4.2.5 Automation.................................................................................................................... 12 4.2.6 Active slot...................................................................................................................... 13 5 File browser................................................................................................................................... 13 5.1 Playing waves ........................................................................................................................ 13 5.2 Preview mode........................................................................................................................ 14
  • 3. TX16Wx User Manual V2.4 Page 3 ©CWITEC 2014 6 Editing Programs ........................................................................................................................... 14 6.1 Keyboard Mapping Editor ..................................................................................................... 14 6.1.1 Program attributes ........................................................................................................ 15 6.1.2 Program icons................................................................................................................ 15 6.1.3 Group List ...................................................................................................................... 16 6.1.4 Splits .............................................................................................................................. 18 6.1.5 Creating new groups ..................................................................................................... 19 6.1.6 Token-based sample mapping....................................................................................... 21 6.1.7 Copying groups between programs .............................................................................. 22 6.1.8 Slices.............................................................................................................................. 22 6.1.9 Choke groups................................................................................................................. 22 6.2 Group switching .................................................................................................................... 23 6.3 Sample interpolation / sound quality.................................................................................... 23 6.4 Group Sound Settings............................................................................................................ 24 6.4.1 Output, Pan, Velocity and Glide .................................................................................... 24 6.4.2 AEG ................................................................................................................................ 24 6.4.3 Wave Start..................................................................................................................... 25 6.4.4 Delay.............................................................................................................................. 25 6.4.5 Filter............................................................................................................................... 25 6.4.6 FX / Sends ...................................................................................................................... 25 6.4.7 LFO................................................................................................................................. 25 6.4.8 Modulation Envelopes................................................................................................... 26 6.4.9 Step Sequencer.............................................................................................................. 26 6.4.10 Modulation Table .......................................................................................................... 27 6.5 Group cross-fading ................................................................................................................ 29 7 Wave Editor................................................................................................................................... 29 7.1 Wave List ............................................................................................................................... 30 7.2 Playing waves ........................................................................................................................ 31 7.3 Editing start / end.................................................................................................................. 31 7.4 Editing loops and slices.......................................................................................................... 31 7.4.1 Editing loops.................................................................................................................. 31 7.4.2 Editing slices .................................................................................................................. 32 7.5 Wave Edit Menu.................................................................................................................... 32 7.5.1 The Wave Editor Toolbar............................................................................................... 33
  • 4. TX16Wx User Manual V2.4 Page 4 ©CWITEC 2014 7.6 Sampling content................................................................................................................... 35 8 Wave matrix .................................................................................................................................. 36 8.1 Wave matrices edit panel...................................................................................................... 36 8.1.1 Wave matrix edit menu................................................................................................. 37 8.2 Wave matrix edit area........................................................................................................... 38 9 FX section ...................................................................................................................................... 39 10 Setup.......................................................................................................................................... 40 10.1 Settings.................................................................................................................................. 40 10.2 Places..................................................................................................................................... 42 10.3 MIDI / External controllers.................................................................................................... 42 10.4 Automation............................................................................................................................ 43 10.5 Outputs.................................................................................................................................. 43 11 TX16Wx Professional................................................................................................................. 43 12 Working in your DAW................................................................................................................ 44 13 Saving sound data ..................................................................................................................... 44 13.1 Banks / Performance / Program............................................................................................ 44 13.2 Waves.................................................................................................................................... 44 14 File formats................................................................................................................................ 44 14.1 Bank / Performance / Program ............................................................................................. 44 14.2 Supported sample formats.................................................................................................... 44 14.3 Importing sound data............................................................................................................ 45 14.3.1 Sound font 2 .................................................................................................................. 45 14.3.2 SFZ Files ......................................................................................................................... 45 14.3.3 EXS Files......................................................................................................................... 45 14.3.4 AKP Files ........................................................................................................................ 45 15 Skins........................................................................................................................................... 45 16 Credits and Acknowledgements................................................................................................ 45
  • 5. TX16Wx User Manual V2.4 Page 5 ©CWITEC 2014 1 About TX16Wx The TX16Wx Software Sampler is a simple, yet powerful sampling instrument inspired by various classic hardware samplers from the 80s and 90s, but mainly the excellent Yamaha TX16W sampler as used with the Typhoon operating system. Many software samplers sport a multitude of features aimed mainly at disk-streaming gigabyte sized preset libraries. The TX16Wx instead aims to bring back some of the joy of working with the classic hardware instruments, using sampling not for playing back pre-built libraries, but instead creating your own new sounds in creative way. Perhaps the biggest reason this software was created though, is that I have yet to find a software sampler, free or otherwise, with both workstation features, and a clear cut, well-documented file format that does not lock the user in to a product forever. The TX16Wx file format is simple XML files and can be translated even by hand in a simple text editor.
  • 6. TX16Wx User Manual V2.4 Page 6 ©CWITEC 2014 2 Sound Architecture Sounds in TX16Wx are organized in a hierarchical structure of bank, performances, programs, groups, splits and waves. These components are normally stored to disk as individual files and loosely referenced by file name. See the file format section. 2.1 Bank The bank is the complete sampler state, including settings for External Controllers, outputs and all the performances, programs and samples. 2.2 Performance A performance is a complete active multitimbral setup, with assignment of programs to Midi channels and audio outputs. Performances are the top level items exposed to the containing DAW. 2.3 Channel slots Each channel slot contains a single program and maps this to a Midi channel and an output. 2.4 Program A program is a complete instrument (or preset). It contains one or more groups of samples. 2.5 Group A group consists of one or more samples organized into splits. All splits in a group share the same sound settings and modulation mappings. A group may also override the channel slots output settings to send individual groups to specific outputs (for example when building a drum kit). 2.6 Split A split maps a single wave to a range on the keyboard. It also allows you to choose specific loops for sustain/release 2.7 Wave A wave is an individual sample loaded from disk. A wave can be shared between any number of groups splits. A wave also contains such information as root key, tuning and loop points. Split Spl it Split Bank Performance Slot 1 Split Split Slot 2 Slot ... Program Group Group Group Wave
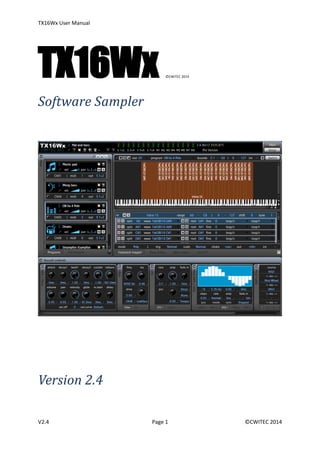
  • 7. TX16Wx User Manual V2.4 Page 7 ©CWITEC 2014 3 The UI 3.1 Selectors Selecting performances and programs can be done by either clicking the left side up/down arrows or left-clicking combo box button to open a list of loaded content. Click the text area of the combo box to edit the name of the current item. Up/down arrows Selector combo box - left click to open Performance selector Program slot View tabs Group sound controls TX16Wx UI MIDI Select Group list and key mapper
  • 8. TX16Wx User Manual V2.4 Page 8 ©CWITEC 2014 3.2 Numerical dials Most numerical parameters can be manipulated by either click-dragging the display to slide the values up/down, or double clicking to enter the value by typing. Most dials can be switched to a more or less sensitive mode by holding the Shift key while dragging. Use this to switch between coarse and fine adjustments. By clicking Ctrl-left, a dial will reset to its default value. 3.3 Menu selectors Discreet parameters, such as filter/LFO type, outputs, midi channels etc. are selected by clicking the display and choosing the value from the popup menu. 3.4 Popup menus Most areas of the UI have context-sensitive popup menus available on right-clicking. Also, look for the ”wrench” icon in the various toolbars in the UI. Left clicking this will bring up the current editors action menu. Increase Decrease Drag up/down to modifyClick dial Double-click to type new value
  • 9. TX16Wx User Manual V2.4 Page 9 ©CWITEC 2014 3.5 Drag & drop Any loadable sound item, such as banks, performances, programs and samples can be dragged and dropped into the UI to load them. Certain areas, such as the programs slots and the key mapper editor will treat some files special when you drag them there, i.e. dragging program content into a slot will replace the current program with the newly loaded one, and dragging sound files into the key mapper will layout the samples in a group. 3.6 Zooming and scrolling views Editor views in TX16Wx can be zoomed and scrolled to help focusing the edited items/area. Zooming and scrolling can be done using the scrollbar controls or by using the mouse wheel. Using the mouse wheel will zoom in the horizontal direction and by holding the shift key you can zoom vertically (when available). Scrolled areas can also be moved by using the middle mouse button and will respond to drag gestures. 3.7 Undo TX16Wx has built in support for undo & redo of edit actions as well as loading and deleting sound data. The undo and redo buttons are located in the performance view toolbar at the top of the UI. Maximum undo queue size can be modified in the setup view under settings. 3.8 Tooltips TX16Wx has context sensitive tooltip support, provding help and hints for most aspects of the UI. Hover the mouse pointer over a control to display the context sensitive help. 3.9 MIDI Select In the lower right corner of the edit area (right pane of the UI) is the MIDI Select toggle button. When active, incoming MIDI notes will cycle through the sound elements triggered by the note. Use this to quickly find the sound elements you are looking for. Undo/redo buttons
  • 10. TX16Wx User Manual V2.4 Page 10 ©CWITEC 2014 4 Performance view The performance allows you to select the active performance as well as do edit operations on the top level items in the sound hierarchy. Here you select, add, delete, load and save performances, programs and whole bank state. 4.1 Selecting performance The performance selector in the top of the performance view allows you to switch between the currently loaded performances. By clicking the name field you may edit the name of the current performance. 4.1.1 Performance menu Right clicking the performance selector area or clicking the edit menu (wrench icon) to bring up the performance edit menu.  Load bank - loads a txbank file, completely replacing the content of the Samplers memory. All currently loaded items will be discarded.  Save bank / Save bank as - saves the full state of the sampler, along with any loaded sound data. You may be prompted to provide names for individual files being saved.  Clear bank - empties the sampler memory. All currently loaded items will be discarded.  Load performance - loads a performance along with its associated programs and waves into the current bank. Note that you can also drag & drop performances (or soundfonts) from windows explorer onto the performance field to load them.  Save performance / Save performance as - saves the currently active performance to disk along with the programs and waves used. You may be prompted to provide names for individual files being saved.  Duplicate performance - creates a shallow copy of the current performance. The new performance will reference the same programs and samples as the original performance.  New performance - creates a new, empty performance.  New perf + slot + program - creates a new performance with a single slot and a new program assigned.  Re-order performances / programs – opens the re-order dialog.  Delete performance - deletes the currently active performance. Note that this does not delete any programs or waves. 4.1.2 Reordering performances and programs TX16Wx does not use fixed performance/program number assignments, however sometimes, for example when using MIDI program change to switch active sound items, or just to tidy up a bank, it can be helpful to re-order the sound data lists. The re-order dialog window lets you change the display order of the sound items, as well as delete and rename individual items.
  • 11. TX16Wx User Manual V2.4 Page 11 ©CWITEC 2014 Items can be shifted up/down using the arrow button, or simply dragged to the desired index. Double click an item to rename it. Operations within the dialog can be undone, and the edited lists and items are not committed until you click “Ok” to close the dialog. 4.2 Working with program slots A performance consists of one or more Program slots. These are accessed through the program slot list, the first tab of the left pane in the main UI. Each program slot in the list maps a Program to a MIDI channel and output, with settings for volume and pan. 4.2.1 Adding and removing slots Use the program slot toolbar, located in the top of the program slot tab to add, duplicate or delete program slots. Slots can also be created, deleted and duplicated from the Program edit menu. 4.2.2 Selecting programs Use the program selector to choose a program for the active slot. Right-clicking on a slot, or clicking the edit icon, brings up the slot program edit menu:  Load Program - brings up a file selector and allows you to browse for existing programs on disk. You can also drag & drop program files here to load them. o The program file selector can also be accessed by clicking the ‘load’ icon next to the selector field  Save Program / Save Program As - Saves the active program to disk along with any used waves. You may be prompted to provide names for individual files being saved.  Duplicate Program - creates a shallow copy of the current program. The new program will reference the same samples as the original program.  New Program - creates a new, empty program.  Delete Program - deletes the currently active program. Note that this does not delete any waves. See Delete Unused in the performance editor menu. Tip: The Load Program file selector has a checkbox to enable/disable "preview" of the programs you browse. When this mode is active, any program file you click in the selector will be temporarily loaded into the current program slot and will respond to midi input. This is a great way to quickly preview how the currently playing song will sound with the new program loaded. Program Selector Input/Output Controls
  • 12. TX16Wx User Manual V2.4 Page 12 ©CWITEC 2014 4.2.3 Outputs The lower area of the Program Slot shows the Input / Output Controls: Volume, Pan, Output channel, Midi channel and solo / mute.  Volume and Pan - Note that these are combined (multiplied) with the individual volume and pan settings in the programs respective groups.  Output - assigns the default output channel for sound from the group played on this slot. However, individual groups may override this setting, i.e. while the program is set to one output, one or more groups in it may actually play on another output.  Midi channel - the program will respond to incoming midi messages on the assigned channel. If you select Omni, any midi message will activate the program.  Mute / Solo - turns off output from this/all other slots. 4.2.4 Extended slot controls By clicking the right corner of the slot view, the extend slot controls are opened.  Transpose – transposes incoming notes on the assigned channel  Detune – fine adjustment to pitch of all mapped groups  Interpolation – sample interpolation quality  Poly limit – sets the maximum polyphony for this program. If active voice count for the slot exceeds this number, the oldest playing voice will be stolen and re-used.  Velocity curve – selectable velocity mapping curve override for this slot, affects how MIDI note-on velocity is mapped to playing voice velocity.  FX / Output send 1 – 3 – sets destination, level and pre- or post-fader send for the entire program mapping. (TX16Wx Professional only) 4.2.5 Automation By right-clicking the dial/control for some program slot parameters you can assign automation to control the values. When automated, any changes you make to the parameter will be sent to the DAW host, and any parameter change from the host will modify the parameter.
  • 13. TX16Wx User Manual V2.4 Page 13 ©CWITEC 2014 4.2.6 Active slot When you click a program slot it becomes the Active Slot. This makes the assigned program active for edit in the Key mapper editor. 5 File browser The second tab in the left pane of the UI is the integrated file browser. Here you can access sound content on disk, and quickly jump between your favorite locations, a.k.a. places. The top level of the browser lists your designated favorite locations, as well as system drives. By double-clicking either you can browser for sound items in your sample libraries. The top field of the browser shows the current location in your computer, and also lets you quickly jump to another drive or favorite location. To the right you find the up folder button, used to go up in the file hierarchy. The leftmost icon in the top bar is the favorite indicator. It lights up when you are in a designated favorite path. Click it to toggle the current path on/off as a favorite. The bottommost selector lets you filter what file content will be shown. By default it will show any file that TX16Wx is capable of reading. You can switch between different content filters using the combo box. You can drag and drop items from the file browser into TX16Wx, or simply double click them to load the content into the sampler. Some content can be opened in the file browser (i.e. sound font files), and the contained sound data can be browsed and loaded individually as if individual files. 5.1 Playing waves The lower right corner contains, from left to right, the Play button and the Auto Play toggle. When a sample is selected, you can preview the sound by pressing Play. If Auto Play is turned on, selecting a wave file will automatically play it from start to end. The volume control in the lower right corner sets preview volume for both the file browser; file dialogs and also previewing in the sample editor.
  • 14. TX16Wx User Manual V2.4 Page 14 ©CWITEC 2014 5.2 Preview mode The rightmost button In the file browser toolbar is the preview toggle. When active, selecting files in the file browser will temporarily load them into the last selected applicable sound object. Sound objects that can be previewed are waves, wave matrices and program files. Waves and matrices can be loaded into splits, waves into matrix cells and programs into program slots. To work with preview, select the sound item you want to modify, for example a split. Activate preview and pick a wave file in the browser. The file will be loaded and temporarily replace the currently mapped sound. Re-selecting the split, selecting another split or editing any range parameter will reset the split into its original state. If you are satisfied with the previewed sound, double click the sound file to load it permanently. The split will be re-mapped with the new sample. The same workflow applies to matrix cells and program slots. 6 Editing Programs A Program is edited by adding, deleting and modifying the groups it consists of. This is done in the Keyboard Mapping editor and with the Group Sound Controls at the bottom of the interface. 6.1 Keyboard Mapping Editor The Keyboard Mapping Editor gives you a graphical view of the programs group layout and allows easy and intuitive modification of groups and split attributes. Groups can be modified by clicking and dragging edges or the whole group to modify low / high key and velocity, i.e. keyboard range. Program key rangeGroups Zoom controls Group controlsGroup list Program and slot selector MIDI Select
  • 15. TX16Wx User Manual V2.4 Page 15 ©CWITEC 2014 You can also manipulate split positions and change the mapped samples root key by dragging the highlighted key marker in the key mapper keyboard. Double clicking inside a split in the keyboard mapper will open a file dialog to load a new sample from disk. The key mapper will highlight incoming MIDI messages on the keyboard as well as triggered splits in the program groups. If you press a key on the mapper keyboard, it will play the corresponding MIDI note on the selected slots MIDI channel. Tip: You can vary the MIDI velocity of the note played through the mapper keyboard by holding down Ctrl (lower), Shift (higher) or Ctrl+Shift (highest velocity). Tip: Select all groups on or overlapping a specific MIDI key by Control-right-clicking in the mapper keyboard. 6.1.1 Program attributes The top row of the keyboard mapper contains the slot and program and attributes.  Key Mapper Edit Menu – opens up the group menu for the currently selected groups/split.  Slot –change the active program slot. Useful when the program slot view is hidden.  Program – change or rename the selected program.  Bounds - sets the keyboard range, low and high key and velocity, for the entire Program. A Program will only respond to midi messages that are within the programs active key range. 6.1.2 Program icons You can assign icons to programs to serve as a visual cue to their contents. Either select from the built-in icons, or load your own image file. To select a program icon, click the icon display in an assigned program slot to open the icon menu. Program icons are saved with the program contents if copy content is enabled in the program save file dialog. Icons are also stored inside DAW save data.
  • 16. TX16Wx User Manual V2.4 Page 16 ©CWITEC 2014 6.1.3 Group List The lower area of the Keyboard mapper contains the Group List. Here all groups in the currently active program are listed. This allows you to quickly select a group and split for editing, but also create, delete and import groups. To view the splits in a group, click the expand icon (+ sign) at the left of a group item. This will expand a sub list of the contained splits. You can select any number of groups and modify their parameters simultaneously. 6.1.3.1 Group parameters Each group in the list has the following parameters available:  Name – the displayed name for the group  Group Key Range- sets the keyboard range, low and high key and velocity, for the group. Determines the bounds where the group will trigger.  Group Key Shift - shifts the pitch of the group by semitones.  Group Fine Tune - shifts the pitch of the group by cents.  Poly Mode - determines the playing mode of the group. o Poly - (default). Each pressed key triggers a new played voice. o Mono - Only one voice can play at a single time for the group. Simulates the behavior of monophonic instruments. o Legato - group plays polyphonically, but if a key is triggered while another is held, the last voice previously triggered will be reused similar to Mono mode. Tip: Mono and legato mode will not retrigger waveform, envelopes and LFOs when reusing a note, but continue playing like if the note was actually “bent” to the new note. To force a retrigger behavior you can set the group(s) to a choke group, which will force retriggering of modulators and wave but in all other ways still play like Mono/legato.  Note Priority – when using Mono or Legato mode, this switch determines which held key will take priority. Default is the last pressed (youngest) key, but you can also set it to Lowest (only note-on of a lower key than currently playing voice will trigger) or Highest. Use this to change the behavior of “trilling” moments when playing.  Trigger mode - determines how the group is triggered by Midi note-on messages o Normal - (default). Group will trigger on Note-On messages and play the full AEG envelope. o Oneshot - group triggers on Note-On, but the AEG envelope will transition to Release stage without any Sustain period, i.e. holding the key will having no effect. Typically you would use this for drum sounds. Note that the AEG will still shape the sound, thus to hear anything you will have to turn up decay/release parameters. o Release - group is triggered on Note-Off (key release) o Toggle – group is triggered and silenced by alternating Note-Ons. I.e. hitting a MIDI key once will start playback, and hitting it again will stop it.
  • 17. TX16Wx User Manual V2.4 Page 17 ©CWITEC 2014 Root Key marker  Keyboard Scale - sets the transposition scale for the group. This determines how the groups pitch changes by input Midi key. o Inv * 4 - inverse key scaling where semitones are multiplied by four in pitch o Inv * 2 - inverse key scaling where semitones are doubled in pitch o Inv - inverse key scaling. o Inv / 2 - inverse key scaling where semitones are halved in pitch o Inv / 4 - inverse key scaling where semitones are divided by four in pitch o Fixed - fixed key scaling. All keys are given the same pitch. Use this for drum kits. o 1/4 - normal key scaling where semitones are divided by four in pitch o 1/2 - normal key scaling where semitones are halved in pitch o Normal - default o * 2 - normal key scaling where semitones are doubled in pitch o * 4 - normal key scaling where semitones are multiplied by four in pitch  Choke group – assigns a choke group to the selected group(s).  Group Output - assigns an Individual Output for the group. This setting overrides the Program Slot output setting. 6.1.3.2 Split parameters A group contains one or more splits, each mapping a single sample to a key range. The split list items contain these actions/attributes:  Delete Split – deletes the split  Duplicate Split – creates a new copy split, directly after the selected  Split Key - low key of the Split.  Wave – the mapped sample  Split Root Key - displays/edits the used Root Key of the split. This is initially set to the natural root key as defined in the assigned wave, but can be changed for only this split, a.k.a. Overriding Root Key. The root key is also displayed on the reference keyboard. By clicking and dragging this you can easily change the root override. When the root key/fine tuning is changed the override indicator shows a “*” next to the root key fields. NOTE: This does not modify the Wave root key, i.e. this will only affect the selected split. The overriding root can be “baked” into the wave file by clicking the “*” indicator, to affect all groups/splits to which the wave is assigned. NOTE: The root key can also be overridden for an assigned wave matrix, in which case the root will affect all samples in the matrix. NOTE: In older versions of TX16Wx the behavior of the split root key was to directly modify the assigned wave file.  Split Fine Tune - modifies the split root key override fine tuning.  Loop / Sustain – selects the Sustain Loop. This is the loop that will play while a Midi key is held.
  • 18. TX16Wx User Manual V2.4 Page 18 ©CWITEC 2014  Loop / Release – selects the Release Loop. This is the loop that will play after the Midi key is released but the voice still plays the AEG release. 6.1.3.3 Group menu By right-clicking on a group (or the empty area) you bring up the Group Menu:  New Group - adds a new, empty Group  Duplicate Group(s) - duplicates the currently selected group(s).  Select All – selects all groups in the program  Clear Selection – unselects all groups in the program  Separate – split the group in two at the currently selected split key  Splits to groups – convert all splits into individual groups  Load Wave - opens up a file selector and lets you browse for a new wave on disk. NOTE: The Wave file selector allows you to preview samples in several ways. You can enable Auto Play, which will play any sample selected in the browser through the main stereo output automatically. If not enabled, you can select a wave and press the Play button to listen to the sample one. When browsing from the Keyboard Mapping view you can also enable Preview which will temporarily place the selected sample in the currently active Split. This is a great way to preview how a new sample fits a playing tune.  Edit wave – open the split wave in the Sample Editor 6.1.3.4 Muting Groups Individual Groups can be muted. A muted group will not produce any sound and will not be shown in the Keyboard Mapping editor. This is useful for tuning individual groups in multilayered programs, and also to reduce cluttering when laying out keyboard maps. 6.1.4 Splits Each group is divided into one or more Splits. A split assigns a Split Point and a Wave to a part of the group keyboard range. The assigned waves share the same group settings and sound parameters but can have individual Sustain and Release Loops as well as overriding root key settings. You can select a Split by clicking on the part of the Group the split occupies. By clicking and dragging the Split Key Marker line you can modify the Splits start. Split key marker
  • 19. TX16Wx User Manual V2.4 Page 19 ©CWITEC 2014 TIP: ALT + left click inside a group to quickly insert a new split. Right-click the split area to brings up the group menu, with some added options:  Add Split - inserts a new Split starting at the key you clicked.  Delete Split - removes the active split  Sustain Loop - selects the Sustain Loop. This is the loop that will play while a Midi key is held.  Release Loop - selects the Release Loop. This is the loop that will play after the Midi key is released but the voice still plays the AEG release. 6.1.5 Creating new groups New groups can be created in various ways. You can use the group menu to add a new, empty group, or duplicate an existing one. You can also drag and drop wave files into the keyboard mapping editor to either create a new group, or add splits to an existing one. In this case, TX16Wx will do automatic layout of the new waves. 6.1.5.1 Dragging into existing groups If you drag and drop samples into an area of the key mapper already occupied by a group, the new waves will be placed into splits starting at the key at which you dropped them and ending at end of the same split range. Note that if all the dropped samples cannot fit into the range of the split where they were dropped, the overflowing ones will still be loaded, but not mapped. 6.1.5.2 Dragging into a new group If you drag and drop samples into either an empty area of the key mapper, or into the mappers keyboard area (lower part), the dropped samples will create a new group. The group will start at the key you dropped the samples at, and end depending on the highest root key or the end of the keyboard.
  • 20. TX16Wx User Manual V2.4 Page 20 ©CWITEC 2014 You can also explicitly determine where the new group will begin and end by first moving the mouse to the desired low key, then while holding the SHIFT key pressed, move the mouse pointer to the desired high key and release. The new group will then have its bounds set to this range. 6.1.5.3 Automatic key mapping When dropping samples into the keyboard mapper, TX16Wx will try to place them as well as possible, based on the area you drop them and the root information in the dropped keys. When dropping samples with root key information, the new mapping will be laid out with the samples in ascending root key order, split appropriately, ending a half octave above the highest root key. When samples without root key information are dropped, TX16Wx will assume that you are building a drum kit or a similar non-pitched layout, and map the samples in the order they are dropped, at even intervals, determined by the keyboard range for mapping non-pitched sounds option (default 1). You can force fixed key mapping by enabling the fixed key mapping toggle button in the toolbar, or by holding the ALT key while dropping the samples into the keyboard mapper. You can completely disable tonal based key mapping by turning on force fixed keyboard mapping in the settings page. To manually set the resulting groups keyboard range, first drag the cursor to the desired low key on the key mapper keyboard, then while holding SHIFT, move the cursor to the desired high key and release. 6.1.5.4 Velocity mapping By enabling the velocity mapping toggle button in the toolbar or by holding CTRL when dropping the samples, you can map dropped samples as velocity layers – i.e. separate groups placed by velocity. Toggles low to high / high to low velocity mapping Enables / disables velocity mapping Toggles root key based / fixed key mapping
  • 21. TX16Wx User Manual V2.4 Page 21 ©CWITEC 2014 By default, dropped samples will be partitioned according to root key information and velocity layers will be created based on these sets. You can disable this to force all layers onto the same key by toggling the force fixed button (CTRL modifier) This can also be disabled globally in the settings page. 6.1.6 Token-based sample mapping (TX16Wx professional only) The token-based mapping tool can be used to create a sample mapping when a set of samples are missing embedded roots, or when additional information, such as key or velocity range etc. is embedded in the file name. To use the auto-mapper, first drop the samples you wish to map into the keyboard mapper layout. Then select the resulting group(s) and the “auto-remap” entry in the mapping command menu. A dialog showing the detected name tokens will open. Choose what token should affect what mapping parameter. When you are satisfied, press ok, and a new mapping layout will be created. Token usage settings can be saved as presets and recalled when mapping similarly named sample files the next time. Keys can be written as symbolic MIDI names, i.e. C#3, or MIDI note numbers, i.e. 0-127.  Token commands o Ignore – ignores the token
  • 22. TX16Wx User Manual V2.4 Page 22 ©CWITEC 2014 o Set root key – sets the split root to the parsed key value o Set single key – sets the root + low + high key to the parsed key value o Set low key – sets the low key bounds for the sample o Set high key – sets the high key bounds for the sample o Set low velocity – sets the low velocity bounds for the sample o Set high velocity – sets the high velocity bounds for the sample o Set group name – sets the name of the samples group  Use wave root when available - use the embedded root key of the mapped wave if none has already been set by token.  Merge groups to splits when possible – join the resulting mappings into merged groups when contiguous. 6.1.7 Copying groups between programs To copy groups between programs, select the source groups in the group list and drag them into the destination program (in another program slot). 6.1.8 Slices If a group contains mapped slices, you can drag and drop the group into your DAW or file systems to export a standard MIDI file for playing the layout parts in order. 6.1.9 Choke groups A choke groups is essentially a monophonic relationship between groups, where all groups sharing choke group will use at most one voice, i.e. cut each other off when played. A typical use for this is setting up hi-hats, where each sample should cut off any other playing. Choke groups can also be used with the Poly mode setting to achieve certain effects, such as multi-group monophonic instruments. Poly Mode No Choke Group Choke Group Poly Notes play polyphonically, AEG resets on note-on Notes play monophonically within choke group, AEG resets on note-on Mono Notes play monophonically within group. No AEG reset on voice stealing. Notes play monophonically within choke group. No AEG reset on voice stealing.
  • 23. TX16Wx User Manual V2.4 Page 23 ©CWITEC 2014 Legato Notes play polyphonically, except when note within group is held while triggering another, in which case behaves like mono. Notes play polyphonically, except when note within choke group is held while triggering another, in which case behaves like mono. 6.2 Group switching (TX16Wx Professional only) You can add advanced switching parameters to groups, allowing note trigger to happen only when certain conditions are fulfilled. The following conditions can be set or combined  Modulation / external controller – source / range. The group will trigger when the external or modulator source is within the specified range. Note that the range is converted into a 0-127 range, similar to thresholds in the matrix switcher.  Random – each note-on message will trigger a random value. The group will play if the generated value is within the specified range.  BPM – the group will play if the host tempo is within the specified range  Sequence / position – sets a sequence length for the group. Each group will have a unique note-on counter, or you can select a counter source (see below), resetting when it reaches the sequence length. If the counter value is equal to position, the group will trigger.  Key down / up / last – group will trigger if the key is within the bounds specified by the key lo/hi range, and is currently down / up / was the last key depressed  Key previous - group will trigger if the previous note depressed was equal to key  Round robin counter – selects the counter used for this switch node. Available selections are o Group (default) o Program (shared between all groups in a program) o MIDI key (unique counter per key on this channel) Group switching can be temporarily enabled / disabled and the switching node can be completely removed by using the bottom row buttons. 6.3 Sample interpolation / sound quality TX16Wx allows you to control the transposition quality of the played samples by switching between interpolation modes. The overall quality settings are available in the setup page and are considered “default” for the instrument. You can also set an overriding interpolation mode for non-real-time rendering, i.e. offline mix down of a song in you DAW (the DAW must support notifying the instrument of this). In TX16Wx Professional, you can set interpolation for individual groups, programs, program slots and in the saved bank file. Available interpolation modes:
  • 24. TX16Wx User Manual V2.4 Page 24 ©CWITEC 2014  Default - Use parent setting. If the target is a sound item, such as a group, the parent items setting will be used. If no setting is available, the setup page setting is used. If no setting is found, “draft” mode is selected.  Draft (linear interpolation) - lowest CPU usage, but least quality.  Hermite interpolation - good compromise between CPU and quality.  Sinc 32/64/128 - sinc interpolation – best quality, but high CPU usage. Not suitable for live performance. 6.4 Group Sound Settings The lower area of the Sampler interface contains the sound controls for the currently active groups. Here you modify the sound shaping parameters for one or more groups. 6.4.1 Output, Pan, Velocity and Glide  Volume - sets the Program relative volume.  Pan - set the Program relative pan.  Velocity - sets the velocity sensitivity of the group. This determines how keyboard velocity affects the played volume of the group.  Velocity Offset - sets the lowest velocity at which the group responds. For example if this is set to 63, the group will never play at a lower volume than a key velocity of 63 would produce. 6.4.2 AEG The Amplitude Envelope Generator modifies the volume of the group over time. It is an extended version of the standard ADSR envelope with some additional parameters. Attack Decay1 Decay2 Release Level1 Sustain Time Volume
  • 25. TX16Wx User Manual V2.4 Page 25 ©CWITEC 2014 6.4.3 Wave Start Offsets the played wave(s) start point in the group. You can modulate this value in the Modulation Table view. For example, by modulating this with keyboard velocity you can skip a sharp transient in a wave when playing at low velocities. 6.4.4 Delay Delays playing of the group by a specific time from MIDI note on. You can modulate this value in the Modulation Table view. 6.4.5 Filter TX16Wx has a single resonant filter per group, switchable between 6dB and 24dB response slope. Filter Parameters:  Type o Off - Filter off o Lowpass - frequencies below the cutoff frequency are suppressed. o Highpass - frequencies above the cutoff frequency are suppressed. o Bandpass - frequencies below and above the cutoff frequency are suppressed. o Notch - frequencies around the cutoff frequency are suppressed. The resonance parameter will regulate the width of the filter. o LowShelf o HighShelf - increases or reduces frequencies below the shelf frequency. The gain is controlled by the drive parameter. o Peak - makes a peak or a dip in the frequency response. The resonance parameter controls the width of the filter and the drive parameter the gain. o AllPass - passes through all frequencies unchanged, but changes the phase of the signal (controlled by resonance and drive)  Frequency - the cutoff frequency of the filter  Resonance - causes frequencies near the cutoff to become amplified.  Drive - boosts or dampens the signal through the filter. Note: Only the lowpass filter works in 6dB mode. Other filters will silently operate at 12dB slope. 6.4.6 FX / Sends (TX16Wx professional only) Each group can have three assigned sends that go to either a FX bus or a separate output. Sends can be done either pre- or post-fader/pan. Each group can also have a single insert assigned. The insert is applied before fader and sends, and the two first parameters can be modulated like a normal group parameter through the modulation destinations “insert p1/p2”. 6.4.7 LFO Two Low Frequency Oscillator generators are available per group. LFO Parameters:
  • 26. TX16Wx User Manual V2.4 Page 26 ©CWITEC 2014  Rate - LFO frequency in Hz, ranging from ~0.01 - 1500Hz  Amplitude - Strength of the generated modulation pulse  Fade in - Time before the LFO reaches its maximum amplitude. Use this to achieve a "fade- in" effect in the modulation.  Position - Wave cycle start of the LFO. A setting of 0.5 effectively reverses the phase of the generated wave.  Type - Generated wave type o Triangle o Sinus o Sawtooth o Square o Exponent  Sync o None – LFO will start at a phase determined by the rate and sample position of the playing son, i.e. free running. o Key – The LFO cycle starts at each note-on. o Group - If any voice is active playing this group, the LFO phase will be synced to this. o Voice - If any voice is active playing any group in this voice, the LFO phase will be synced to this. Note that the LFO will be synced to the first group found playing, so this parameter is best used on all the groups in a program.  Mode o Normal – rate is expressed in hertz. o Tempo – rate is expressed as a beat designator with the actual rate determined by the song tempo. For example settings the rate to 1/4 will cause the LFO to complete one period per every quarter note. 6.4.8 Modulation Envelopes TX16Wx has two simple three-stage modulation envelopes per group. These can be used to modulate other sound shaping aspects of the group.  Amp - determines the strength of the modulation output  L0 - start level  T1-3 - envelope times  L1-3 - envelope levels Note that the T2-L2 stage will be held as long as the MIDI key is pressed, and begin transition to the T3-L3 stage on MIDI note-off. 6.4.9 Step Sequencer Similar to the LFO, and shares most of its parameters, but instead of pre-determined waveforms, allows the user to draw a step sequence of modulation values which will then be played at the determined rate.
  • 27. TX16Wx User Manual V2.4 Page 27 ©CWITEC 2014  Steps –sets the number of sequence steps between 8 and 128 steps.  Type – assigns a LFO style waveform to the sequencer, or fills it with a random pattern.  Smooth /Stepped – determines if the modulation value will interpolate smoothly between the sequence values, or run in a ‘stepped’ mode. The former creates a soft, LFO- like sound, while the second will produce a more pronounced ‘jumping’ effect, useful to create electronic pulsating sounds.  Cycle/Step sync - when tempo sync is active, setting this parameter to “step” will make each step period the assigned sync duration, where as “cycle” will play the whole sequence. 6.4.10 Modulation Table Each group can have up to 16 active modulation mappings, from either the sound shaping generators or external Midi input. The Modulation Mapping View lets you edit and manage these.  Source - selects the modulation data source o ENV1 / ENV2 - the Modulation Envelopes. o LFO1 / LFO2 - Low Frequency Oscilators o SEQ1 / SEQ2 / SEQ3 – o Pitchbend o Modulation Wheel o Channel Pressure o Aftertouch o Key - maps depending on the played Midi key, where C0 represents no, and G10 (highest Midi key) represents full modulation. o Key/R - like Key, but maps the modulation into the groups Key Range. o Vel - maps depending on the played Midi velocity, from 0 to 127. o Vel/R - like Vel, but maps the modulation into the groups Velocity Range. o BPM/R – host/wave relative tempo. o Random – generates a random value between -1 to 1. This source is like MIDI key/vel, a note-on value only. o External Controller 1 - 16 - Takes the modulation value from system-defined External Midi Controllers. o MIDI Continous Controller – Any MIDI CC o Automation Parameters – DAW host automation parameters.  Destination - sets the destination parameter for the modulation o Amp – before-filter-and-shaper amplitude. (+/- 1). This is the amplitude of the generated sound before it is treated by any of the other sound shaping aspects, such as filter and inserts.
  • 28. TX16Wx User Manual V2.4 Page 28 ©CWITEC 2014 o AEG Attack - the attack parameter of the AEG. (+/- 1) o AEG Time - the overall speed (time between stages) of the AEG. (+/- 200%) o ENV1 / ENV2 Amplitude - (+/- 1) o LFO1 / LFO1 Amplitude - (+/- 1) o LFO2 / LFO2 Rate - (+/- 200Hz) o SEQ1 /SEQ2/ SEQ 3 Amplitude - (+/- 1) o SEQ1 /SEQ2/ SEQ 3 Rate - (+/- 200Hz) o Filter Frequency - (+/- 20000Hz) o Filter Resonance - (+/- 1) o Pitch/Pitch (raw) - (+/- 127 semitones). Affects the resulting pitch of the played notes. The first scaled by the groups key scale parameter, the latter is raw pitch cents. o Volume - (+/- 1) – The post-sound-shaping output volume of the group (i.e. fader volume). o Pan - (+/- 1) o Loop start (time) o Loop end(time) o Loop Direction o Wave Start (time) o Glide (Note: only evaluated on note-on)  Amount - how much the modulation will affect the destination parameter. This field scale is dependent on the destination.  Via – Optionally selectable modulation source used to dynamically affect the depth of the modulation. If enabled, the modulation generated will scale between “Amount” and “Via amount” dependent on the value of this source.  Via Amount – Strength of the modulation when the “Via” parameter is a full value.  Enabled – Enables/disables this modulation slot  Frozen - if set to true, the modulation will only be evaluated once on Note-On. This will effectively use a snapshot value of the modulation source at the time of note trigger. Note: Modulation destinations are additive in nature, thus to have the modulation work as expected you should in some cases set the original parameter to zero and drive it completely with modulation. Any destination can have any number of sources whose inputs are summed together. Note: The BPM/R modulation source is only active when the assigned wave has a tempo defined. 6.4.10.1 Modulation Presets The lower right corner of the modulation editor contains the preset selector, where you can add, copy, delete and select modulation matrix presets. Modulation Presets are a quick way to keep your favorite modulation settings handy. 6.4.10.2 Quick modulation assignment You can right-click any modulator such as a LFO or ENV to bring up a context menu where you can add a routing from the modulator to the available destinations.
  • 29. TX16Wx User Manual V2.4 Page 29 ©CWITEC 2014 6.5 Group cross-fading (TX16Wx professional only) In TX16Wx Professional, groups can have fade-in/out ranges that define a key and/or velocity range where the sound produced shifts from silent to full volume. To create a fade region, Ctrl-click the group edge and drag towards the group center. The fade can also be edited by Ctrl-clicking the fade region bounds. Fade regions can be used to create both velocity and keyboard cross fades by fading out the previous group as the next one is faded in. To remove all fade regions from a group or groups, use the “Reset fade regions” command in the keyboard mapping command menu. 7 Wave Editor The Sample Editor lets you load, save and manipulate waves as well as sample new content from your DAWs audio input. Tip: You can quickly zoom in/out in the sample view using the mouse wheel. Drag using the middle mouse button to scroll the view. The view also responds to drag gestures when scrolling.
  • 30. TX16Wx User Manual V2.4 Page 30 ©CWITEC 2014 7.1 Wave List The lower part of the wave editor is the group list. Here you can view and edit the attributes of loaded waves, as well as copy, delete and drag them into the keyboard mapper. Each group item has the following attributes:  Name – the wave name. Changing this will also change the desired file name of the wave.  Root Key - the root key (pitch) of the sampled wave.  Fine Tune - +/-50ct pitch adjustment  Wave start - sets the start point of the wave. Use this to trim the played range of a wave.  Wave end  Tempo - when applicable, such as when working with sliced loops, the wave’s detected tempo will be presented and can be edited here. A wave can have several defined loops. Each loop is visible as a sub item in the list:  Name – name of the loop.  Loop mode - type of loop o None - no loop. o Forward - when reaching end market, playback of the loop will jump back to the start marker. o Backward - when reaching the end marker, the playback will reverse and play until the start marker is again reached, at which point the playback skips back to the end marker and continues playback backwards. o Bidirectional - the loop will switch direction every time it crosses the loop markers, i.e. when it reaches the end marker, playback reverses and plays until the start marker is reached. Here the playback returns to normal and continues until the end marker, at which points the process, yes, loops.
  • 31. TX16Wx User Manual V2.4 Page 31 ©CWITEC 2014 o Slice - The region is not repeated, but rather, if mapped into a split, will cause only the loop region to play for this particular mapping. o Pinned Slice - Like a slice, but the slice will be preserved if you use the beat detect or slice evenly or delete slice commands. Useful for iteratively building a sliced loop.  Loop start - start point of active loop  Loop end - end point of active loop Loops can be copied or moved between samples by drag & drop. By dragging a loop onto another you can either swap the loop settings or copy them (ALT-drag for copying). By dragging a loop onto another wave you either copy (ALT-drag) or move it to the other wave. You can quickly move the sample views focus to any of the wave/loop start/end points by pressing the “go to” button next to the respective values. By double clicking the button you can quickly switch between a fully zoomed out/in view. Switching between zoom modes can also be done by double clicking anywhere in the sample view area. 7.2 Playing waves You can play the currently active wave by clicking and holding the left mouse button inside the sample view area. The active wave will be played at its root pitch from the point you clicked. Use this to locate appropriate start / end points for the wave or loops. By holding the ALT key when clicking you engage looped mode, which will use the currently selected loop when playing back the wave. You can also press and hold the play or loop button for a sample in the sample list. This will play the sample from the start. 7.3 Editing start / end You can click-drag the Start / End dials to modify the waves start and end points. By double- clicking you can also enter these manually. By clicking the Up / Down arrows on either side of the dials the value is incremented by searching for the closest next / previous Zero-Crossing point in the Sample Data. You can also click-drag the Start / End Markers in the sample view to modify this directly. 7.4 Editing loops and slices The wave editor gives you a graphical view of the loops and slices in the currently selected wave file. Here you can intuitively edit and fine tune the loop definitions. 7.4.1 Editing loops Loop points are edited in the same way as Wave Start / End. As with these, the Up / Down Arrows of the numerical dials lets you search Zero-Crossing points in the sample data. This is an effective way to find good loop points.
  • 32. TX16Wx User Manual V2.4 Page 32 ©CWITEC 2014 7.4.2 Editing slices Slices, like loops can be edited by dragging their start/end locators in the wave editor. Unlike loops though, slices are expected to be contiguous, i.e. where one slice ends, another one starts. Thus, when you move a slice point you are in fact adjusting two regions end and start points respectively. Insert new slice points by using ALT + double click at the point you want to insert the new slice. To combine two slices into one, ALT + double click the slice point to remove the cut. 7.5 Wave Edit Menu As other editor views, either clicking the top- left edit icon or right-clicking on the Wave Edit View Area will bring up an Edit menu.  Goto - centers the sample viewer on the selected point.  Set - sets the value of the point to the time clicked in the sample viewer o TIP: You can also set the wave or loop start/end locations by using: o Ctrl – left click – set wave start o Ctrl – right click – set wave end o Shift – left click – set loop start o Shift – right click – set loop end  Load Wave - opens up a file browser for loading wave data from disk  Save Wave / Save Wave As - saves the currently active wave to disk  Duplicate Wave - creates a copy of the active wave in memory  Delete Wave - removes the active wave from sampler memory. If the wave is currently assigned to any groups, these will be modified to be silent  Load Replacement Wave – opens a file browser for loading new wave(s) to replace the selected wave(s). All existing mappings will be rewritten to the new wave(s) and you are given the option to unload the existing sample.  Replace mappings – replaces one or more wave mappings with the last selected wave. Select the wave(s) you want to modify and then last the wave you want to replace them with. Tip: You can also replace wave mappings by dragging files directly from the file browser onto a loaded wave in the list or double click the wave in the list to open a file selector.  Add Loop - adds a loop to the wave  Delete Loop - deletes the currently active loop  Assign Loop – assigns the selected loop to all active mappings, for both sustain and release.  Copy Loops – copies the loops from the last selected wave.  Replace Loops – replaces the loops in the selected waves with those from the last selected wave.  Layout Slices – if the sample has slices, this creates a new group with the slices to keys mapped in ascending order. If the sample is already slice mapped, the mapping will be updated.
  • 33. TX16Wx User Manual V2.4 Page 33 ©CWITEC 2014  Slices to waves – converts all slices into new waves  Delete all slices – deletes any slices from the sample  Detect Pitch - attempts to determine the root pitch of the sample data  Detect Tempo – attempts to extract the tempo from rhythmic content (loops)  Normalize - maximizes the volume of the sample data  Cross fade loop - cross fades the edge parts of the currently active loop to create a smoother transition.  DC Remove – removes any DC components from the wave data  Trim - removes any data outside the Start / End Markers  Duplicate Range - creates a new wave in memory from the sample data inside the Start / End Markers (or current loop/slice selection)  Reverse / Reverse Range – reverses the wave data, making the sound data play backwards  Mono<->Stereo - converts a mono wave to stereo and vice versa  Switch L<->R - switches stereo channels 7.5.1 The Wave Editor Toolbar The toolbar at the top of the Wave Editor allows access to some more advanced features 7.5.1.1 Slice into parts Slices a waveform into equidistant parts, independent of content  Slicer / # - sets the number of slices to create  Slice button – activates slicer o Once activated, you can slide the slicer/# parameter up/down to adjust the number of slices created. o Turn of the slice button to finalize the result When manipulating slices, either using the slice/# or beat slicer tools as well as manual slice definition, any active mappings will automatically update their layouts to match the new set of slices. Use Pinned Slices to keep slices you are satisfied with while modifying the slice parameters to refine further results. This prevents the pinned slices from being replaced. 7.5.1.2 Beat Slicer Uses transient detection to slice waveform data into parts based on rhythmic content – also known as loop slicing. This is typically used to cut a drum loop into parts of a single hit, which can then be mapped to keys and replayed through MIDI.  Threshold – sets the beat detection threshold, determining how prominent a transient must be to warrant slicing  Cutoff – sets the cutoff frequency for transient detection, limiting the analysis to frequencies below this value.  Slice button – activates slicer o Once activated, you can adjust the threshold and cutoff parameters to tune the slicing until you get the desired result.
  • 34. TX16Wx User Manual V2.4 Page 34 ©CWITEC 2014 o Turn of the slice button to finalize the result 7.5.1.3 Loop crossfade By crossfading a loop, the sample content from a range before the loop start is mixed in (crossfaded) with the content at the end of the loop. This can help smooth out the transition between the loop end and start.  X-fade – enables the crossfade markers o Adjust the crossfade range by either the numerical dial or by dragging the markers in the sample editor  Do Crossfade button – performs the crossfade operation 7.5.1.4 Loop overlay By using loop overlay you can see the opposing loop point overlaid the normal sample data. This allows you to more easily match and find good loop points. Use this with the go-to and zoom buttons to quickly switch between points and adjust them.
  • 35. TX16Wx User Manual V2.4 Page 35 ©CWITEC 2014 7.5.1.5 Boost / dampen Increases or decreases the volume of the selected sample by decibels. 7.6 Sampling content Just like a hardware sampler, the TX16Wx makes it easy to create your own sounds from scratch by recording the sound input from your host as new waves. The Sampler controls are located in the sampler view in the top right corner.  Mono / Stereo – toggles Mono or Stereo recording  Listen – when active VU meters will indicate any active sound input.  Trigger on threshold exceeded – when active, sampling will start when the input signal exceeds the set threshold level  Trigger on transport – when activated, the recording will begin once the host transport enters playing mode  Record – toggles recording on/off  Auto map new samples – map new samples into the current program inside the set keyboard bounds  Auto pitch detect new samples – finds the pitch of sampled content When recording finishes, the result will be in a new sample, ready for editing and mapping.
  • 36. TX16Wx User Manual V2.4 Page 36 ©CWITEC 2014 8 Wave matrix (TX16Wx Professional only) The Wave matrix editor lets you load and manipulate Wave matrix definitions. These are two- dimensional grids of up to 127 x 127 samples that can be mapped into splits just like a regular wave. However, the wave matrix allows you to select a single sample to be triggered from within the grid based on the value of either external MIDI controls or any modulation source in the triggered voice. A typical use case for the wave matrix would be a percussive sound with the Y-axis being velocity and samples mapped by velocity, then mapping variations on the respective sounds in the X-axis and select from this bases on controller, stepping or random values. 8.1 Wave matrices edit panel Use the wave matrix toolbar, located in the top of the left hand editor panel to add, save, delete or duplicate wave matrices. Wave matrices can also be created, deleted and duplicated from the Wave matrix edit menu. Directly below the toolbar is the wave matrix list, which shows all currently loaded wave matrix definitions. From this list you can select a matrix for editing or drag it into the keyboard mapper just like you would a wave file. Each wave matrix has settings for the trigger condition source of the X- and Y- axis. These are the same sources as are used for sound modulation. If the axis trigger source is left blank, the row/column will cycle through in a round-robin fashion. The round robin counter source can be selected, similarly
  • 37. TX16Wx User Manual V2.4 Page 37 ©CWITEC 2014 to the Group Switcher. Available sources are:  Default - this matrix  Group - shared between all elements in the group, including group switches  Program – shared between all sound elements in the program  MIDI key – unique counter for the triggered MIDI note on the assigned channel Note : The BPM/R modulation source cannot be used in the wave matrix, since its output is dependent on the assigned wave. The invert button on the right hand of the trigger selection fields will effectively invert the trigger source, i.e. triggering will happen in reverse order. The currently selected matrix cell’s attributes can be inspected and modified in the panel below. The two topmost fields display the exact trigger threshold values for the cell. Each cell contains its own sample selection with sustain and release loop, similar to a group split. The left/right/up/down buttons can be used to shift the selected matrix cell’s contents. The matrix edit area will also respond to ALT-up/down/left/right arrows to do the same. Some DAW programs will not allow ALT-arrow key combinations through to the plug in. Use ALT- GRAPH in this case. 8.1.1 Wave matrix edit menu Right-clicking in the editor area, or clicking the edit icon, brings up the wave matrix edit menu:  Load Wave Matrix - brings up a file selector and allows you to browse for existing matrix files on disk. You can also drag & drop matrix files here to load them. o The matrix file selector can also be accessed by clicking the ‘load’ icon in the toolbar  Save Wave Matrix / Save Wave Matrix As - Saves the active wave matrix to disk along with any used waves. You may be prompted to provide names for individual files being saved.  Duplicate Wave Matrix - creates a shallow copy of the current matrix. The new matrix will reference the same samples as the original item.  New Wave Matrix - creates a new, empty matrix.  Delete Wave Matrix - deletes the currently active matrix. Note that this does not delete any waves. See Delete Unused in the performance editor menu.  Delete row/column – deletes the rows/columns of the currently selected matrix cells.  Reverse row/column – flips the rows/columns of the currently selected matrix cells along the X/Y axis.  Swap row/column – swaps the contents of selected rows/columns with each other  Rotate row/column – rotates selected rows/columns across respective axis.  Distribute row/column – sets the rows/columns to equal distance from each other.  Load Wave – opens a file selector to load a new wave into the currently selected cell  Edit Wave – opens the wave of the currently selected cell in the Wave editor.
  • 38. TX16Wx User Manual V2.4 Page 38 ©CWITEC 2014 8.2 Wave matrix edit area The edit area lets you create and edit matrix definitions graphically. Each matrix starts out as a 1x1 sized grid. By ALT-clicking inside the editor you can insert new rows and columns. ALT-click inside the grid to split the matrix rows and columns at the selected point. ALT-click in the row or column scale area to split just the row or column. The matrix rows and columns can be moved by clicking and dragging. Drag and drop wave files from the file browser or explorer into a cell to replace the assigned wave.
  • 39. TX16Wx User Manual V2.4 Page 39 ©CWITEC 2014 By dragging several files into the row/column scale area you can map all the files into the row/column. The matrix will be resized to accommodate all the dropped files if needed. Double-click a matrix cell to open a file selector to replace the assigned wave. Loading a wave like this also lets you preview the new assignment while selecting. Cell contents can also be swapped between cells by drag and drop. Use ALT-drop to copy content rather than swapping it. 9 FX section (TX16Wx professional only) TX16Wx has 6 FX busses, each of which can be assigned an effect. Effects are controlled and saved per performance. An effect can be sent to any of the outputs, and its level and wet/dry mix can be controlled.  Mute – disable the FX and the send – no sound is produced  Bypass – disable the FX and send the incoming signal (group/program slot sends) through to the output  Level – output level of the effect  Mix – wet/dry mix. 100% wet means only effect result is sent through (default)
  • 40. TX16Wx User Manual V2.4 Page 40 ©CWITEC 2014 Most FX parameter can be automated similar to program slot parameters. By right-clicking the FX parameter you can assign an automation control. 10 Setup The Setup tab contains various settings and options that are either global and/or stored in the bank. 10.1 Settings Global options for the sampler:  Use TX16Wx Pro features – turns on features available exclusively to the non-free TX16Wx Professional Edition. You can enable this mode to evaluate the Pro features, but you may only do so for 30 days. After that, this mode requires you to purchase a license from the TX16Wx website, http://www.tx16wx.com/.  Save all waves in FXB/project - toggles whether TX16Wx should force storing all actual wave data when storing the sampler state in the VST host project or when writing the bank as FXB (VST/AU plug-in chunk data). Leaving this option set to true makes your project files self- contained in such that TX16Wx does not have to locate wave files from disk when the project is reloaded. However, if you have a large sample set in memory this can cause your project files to become quite large, which causes issues with certain hosts.  Save waves in project - if this option is active and the host supplies the project file location, TX16Wx will store all sample data that must be written as separate files instead of writing the data into the project file itself. The samples will be written as <project dir>TX16Wx<project name><wave name>. When combined with 'Save all waves in FXB/project' all data will be stored into the project directory.  Preview programs in file dialog– should loading programs using a file selector temporarily load the selected program file for preview  Preview waves in file dialog– should loading waves into Splits using a file selector temporarily load the wave into the Split for preview  Auto play waves in file dialog – should waves selected in file selectors auto play  Auto play waves in file browser – should waves selected in the file browser auto play  Copy content on bank save  Copy content on performance save  Copy content on program save o Should contained sound items be copied and saved into the save file structure when saving the parent sound item. This can also be toggled in the file selector.  Use 'Places' when saving files - should paths be written as relative to Places (if possible) when storing sound data to disk. If set to off, any referenced sound files not present in the directory saved to (or subdirectory) will be written as absolute paths.  Sample folder naming – determines where sample content will be placed when saving programs to disk with “copy content” active  Load output configuration from bank – sets if output configuration is read when loading a new bank / host project file. “Never” will disallow output configuration from any bank, “Project Only” will load outputs from DAW host bank, but not from txbank files. “Projects and files” will load output configuration from both.
  • 41. TX16Wx User Manual V2.4 Page 41 ©CWITEC 2014  Auto create sound items on new / clear – should clearing bank or creating a new performance automatically create stub content in the sampler, equivalent to “New perf + slot + prog”  Keyboard range for mapping non-pitched sounds – key range per sample when creating groups containing fixed key mappings (not based on root key info)  Force fixed key mapping – turns off root key based keyboard mapping for dropped samples  Enable key range / velocity partitioning when doing velocity layer mapping – globally enables/disables root key partitioning when mapping velocity layers  Default sampler auto mapping low/high key – sets the default keyboard bounds for the sample auto mapping feature of the sampler section. These values also affect the slice layout function.  New samples format – sets data format for new samples.  MIDI octave display offset – adjusts octave naming in the UI. Note that saved sound data will still use canonical MIDI octave names.  MIDI notes display as numbers – Shows MIDI notes as MIDI note numbers (0-127) instead of symbolic names (C2, C#2 etc.)  MIDI velocity curve mapping – determines how incoming MIDI note-on velocity values are mapped to voice velocity. Default is a linear mapping.  Show program / performance numbers – when active, program and performance selectors will display the respective index numbers of the item displayed.  Report MIDI note names to host – when active, TX16Wx will report mapped samples as MIDI note names to the host application  Load existing performances  Load existing programs  Load existing waves o Can be set to yes/no/ask. When loading sound data already loaded, this determines if a new copy of the data should be added to the bank. In general it is a bad idea to load duplicate copies of sound data, especially waves, since saving the data will be ambiguous.  Replace wave when dragging into sample list – should samples and mappings be automatically replaced when dragging a new sample file into the wave list.  Copy loops when replacing wave – should loop definitions be automatically copied into the replacing wave if no previous loops were defined.  Place wave peaks file in alternate cache path – should reapeaks files be placed in a separate folder instead of side-by-side with the originating wave file  Alternate wave peak cache path – folder for peak files.  UI Size – select UI resolution. The plug-in will attempt to resize on the fly. Depending on your host this might require you to close and reopen the UI. Note that the actual size of the UI will depend on this as well as the chosen skin, since the plugin will resize to accommodate this.  UI Skin – select the active skin defining the graphical look of the plug-in.  Enable tooltips – turn tooltip help on/off  Knob mode – switch between host determined, circular or linear knob mode
  • 42. TX16Wx User Manual V2.4 Page 42 ©CWITEC 2014  Max undo queue size – determines the maximum number of Undo steps kept. You should keep this value reasonably low to avoid a high memory footprint.  MIDI edit of key / velocity fields – sets how and when TX16Wx will respond to MIDI input to set values in note and velocity text input fields.  Default sample interpolation mode – sound quality setting, see sample interpolation.  Offline rendering sample interpolation mode – sets overriding interpolation mode for non- real-time rendering (mix down) 10.2 Places "Places" are file system search paths where TX16Wx will look to resolve referenced file names when loading sound data. Inversely, when saving files and Use Places is active in the settings tab, the relative file paths used to reference between bank, performances, programs and waves will be written relatively to these paths. This definition of search paths allows you to create a complex archive of sound files without having absolute paths in the referencing filenames, thus making the sound data relocateable. You can also assign names to places. The file browser will then display these labels instead of the actual file path when browsing. 10.3 MIDI / External controllers TX16Wx can have up to 16 external Midi controllers as well as settings for MIDI response defined. These are stored with the bank data on disk or in DAW memory, but can also be stored as system defaults. Midi controllers can be selected either from the list, or, if you for example have a controller area with mapped sliders, you can enable Midi Learn for the controller slot and move the slider to map it automatically. Each controller can be given an offset, which then acts as the center point for the controller. Midi controllers range are normally <0 - 127>, but setting offset to 63, would instead cause the range to become <-63 - 64>, i.e. bipolar. Program change mode determines how TX16Wx responds to MIDI program change messages. By default, MIDI program change will switch between performances, thus selecting different complete
  • 43. TX16Wx User Manual V2.4 Page 43 ©CWITEC 2014 multitimbral setups. By changing the setting to “Program”, TX16Wx will instead switch program assignments on individual program slots in the current performance. The bottom buttons lets you can either load the system default mappings and settings or save the current set as defaults. 10.4 Automation Like external controllers, the VST/AU automation parameters can be mapped to be bipolar instead of unipolar. In bipolar mode, the effective range of the parameter is <-1 – 1> instead of <0 – 1>. Note that the offset only applies when the automation parameter is used as a modulation source. The bottom buttons lets you can either load the system default mappings or save the current set as defaults. Automation parameter settings are saved with the TX bank or in the DAW fxb data. 10.5 Outputs TX16Wx normally has 4 pairs of stereo and 8 mono output busses. In the TX16Wx Professional edition the 8 mono busses can also be switched into 4 extra stereo pairs. The configuration can be saved in settings as defaults and will also be saved along with bank data on either file or in the DAW host project. Whether or not these output settings are re-read on bank load is controlled by the Load output configuration from bank setting. Note: After you change the output configuration you will have to rebuild/reconnect the output busses in your host application. Some hosts may have problems with modifying outputs in a running plug-in. In these cases you will have to reload the plug-in. Note: Previous versions of TX16Wx had the option to disable output busses in the plug-in. This setting had no effect beyond refusing to render audio output to the bus in question. This option has been removed since it added no real user benefit. If you don’t need one or more outputs, simply disconnect them in the host sequencer and avoid assigning sound generators to them in the plug-in. Note: The AU plug-in will suggest the output configuration you make here to the host, but the host may choose to ignore this and configure the actual busses in a different manner. 11 TX16Wx Professional TX16Wx is free, but is also available in a commercial, professional version. This edition adds several advanced features and capabilities to the instrument. You can enable TX16Wx professional features in the settings page to evaluate them. If you decide to purchase a license you can install it easily by just drag and dropping it into the TX16Wx main UI. The file will be copied into the application data directory.
  • 44. TX16Wx User Manual V2.4 Page 44 ©CWITEC 2014 12 Working in your DAW Normally a DAW host application will ask the active plug-ins to store their session data in the project file(s) when closing a project. This is how the state of a VST/AU instrument is restored when resuming a project. Since TX16Wx is a sampler instrument, its internal state is dependent on waves loaded from disk, typically many megabytes in size. Storing this whole state into the project can cause problems, as some hosts cannot handle very large state data chunks. TX16Wx will by default not store wave data that has not been modified in this memory, but instead just keep a reference to the file on disk. While this greatly reduces the size of stored data in most cases, it will leave your project vulnerable if you for some reason delete or change those original files. For safety, you should probably store your entire bank state to disk inside your project structure, with 'copy content' on. The Save all waves in FXB/project setting controls will cause TX16Wx to store all wave data in the host project file. 13 Saving sound data 13.1 Banks / Performance / Program When storing sound program data from TX16Wx, you may tick the option Copy Content on/off in the file selector window opened (Save As). When Copy Content is on, all contained sound data will be copied into the same directory as you are saving to, and the resulting sound files will reference the copied material. Inversely, if Copy Content is off, the saved data will reference the original files (potentially resolved through places). 13.2 Waves TX16Wx stores its sound data as Microsoft Wave files on disk, however if a bank references sound data that has not been modified, the original wave files will be referenced. Once wave data is modified in memory however, TX16Wx will store a new version of the sound data in Wav format in a directory named Samples next to the stored program file. 14 File formats 14.1 Bank / Performance / Program TX16Wx stores its sound definitions in unicode (16-bit) XML data files. The XSD definitions for the txbank, txperf and txprog file formats are included in the TX16Wx installer. 14.2 Supported sample formats  WAV - reads and writes PCM and floating point Wav files, including instrument and sampler definitions.  AIFF - reads PCM and floating point Audio Exchange Format Files.  AIFC - reads ulaw, alaw and Typhoon DWVW Compressed AIFF files.  OGG – reads ogg vorbis encoded compress audio files
  • 45. TX16Wx User Manual V2.4 Page 45 ©CWITEC 2014  FLAC – reads flac loss-less compression files  W?? – reads Yamaha wave files 14.3 Importing sound data 14.3.1 Sound font 2 TX16Wx has limited support for import of Sound Font 2 files. Sound font container content can be browsed in the file browser, where individual presets and samples can be loaded. A sound font can also be loaded in full by drag and drop into the plug-in windows, or by using the Load Performance file selector. TX16Wx will translate wave data as well as create program representations of the SF2 bank voices. Note: If you load a sound font into memory when working on a project, and "Save all waves in FXB/project" is not turned on, TX16Wx will attempt to reference the wave data in the sound font. Thus the project will be dependent on the imported sound font bank. To avoid this, save the bank in TX format before closing the project. 14.3.2 SFZ Files TX16Wx has limited support for the SFZ format. You can load a single SFZ into a program slot or simply drag and drop them into the sampler. 14.3.3 EXS Files TX16Wx has limited support for the Logic EXS program format. You can load a single EXS into a program slot or simply drag and drop them into the sampler. The importer handles sample mapping, filters, envelopes and modulators (to a certain degree). 14.3.4 AKP Files TX16Wx has limited support for the Akai S-5000 AKP program format. You can load a single AKP into a program slot or simply drag and drop them into the sampler. The importer handles sample mapping, filters, envelopes and modulators (to a certain degree). 15 Skins TX16Wx supports user defined skins which can be used to alter the graphical appearance of the plugin. Skins are loaded from the “skins” folder in either or the shared program folder or from the user settings folder. Skins are created by a CSS-like style sheet definition along with graphical elements. Please refer to the skinning information on the TX16Wx website for more information. 16 Credits and Acknowledgements TX16Wx uses the following third-party software:  Libogg & Libvorbis  Libflac  Laurent de Soras FFT library The plugin is based on the CWPlug library with the GUI built using CWUi, a derivative of VSTGUI. The VST plugin uses the definitions of the Steinberg VST SDK.
  • 46. TX16Wx User Manual V2.4 Page 46 ©CWITEC 2014 The GUI was created mainly using the excellent Knobman tool by Kuso: http://www.g200kg.com/ Some icons are courtesy of http://icons8.com/ None of the DSP parts in this software would have been possible without the great resources at http://www.musicdsp.org/ The sound architecture is based on the wonderful Typhoon OS, created by NuEdge Development for the original TX16W hardware sampler. http://nuedge.net/typhoon2000/