
Recommended
More Related Content
What's hot
Similar to Unit 14 Evidence of my photoshoot
Similar to Unit 14 Evidence of my photoshoot (20)
More from saxonjude
More from saxonjude (20)
Recently uploaded
Recently uploaded (20)
Unit 14 Evidence of my photoshoot
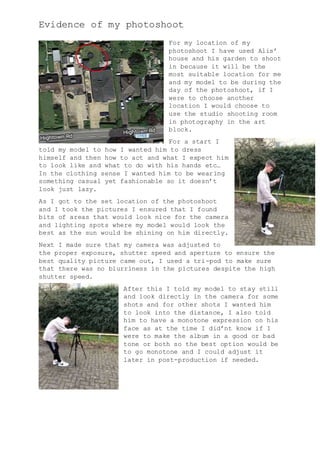
- 1. Evidence of my photoshoot For my location of my photoshoot I have used Alis’ house and his garden to shoot in because it will be the most suitable location for me and my model to be during the day of the photoshoot, if I were to choose another location I would choose to use the studio shooting room in photography in the art block. For a start I told my model to how I wanted him to dress himself and then how to act and what I expect him to look like and what to do with his hands etc… In the clothing sense I wanted him to be wearing something casual yet fashionable so it doesn’t look just lazy. As I got to the set location of the photoshoot and I took the pictures I ensured that I found bits of areas that would look nice for the camera and lighting spots where my model would look the best as the sun would be shining on him directly. Next I made sure that my camera was adjusted to the proper exposure, shutter speed and aperture to ensure the best quality picture came out, I used a tri-pod to make sure that there was no blurriness in the pictures despite the high shutter speed. After this I told my model to stay still and look directly in the camera for some shots and for other shots I wanted him to look into the distance, I also told him to have a monotone expression on his face as at the time I did’nt know if I were to make the album in a good or bad tone or both so the best option would be to go monotone and I could adjust it later in post-production if needed.
- 2. Evidence of my photoshoot I started taking a few images to see if I liked the outcome of them and adjusted my model to how I wanted him to stand and pose. This image was ok but I wanted to try out a few more angles to see if I could get more detail out so that it would be easier when I go to draw over it. In this image I told my model to look off in the distance but I thought that this images exposure was way too dark to use and wanted to brighten it so that I could see every detail in his skin. As we can see in this image I’ve come a little bit closer again to get as much detail in the skin and the hair as possible so that it’s easier for me to draw on as I can see individual strands as the camera quality is really good. I didn’t use this image because it was way too bright so I turn down the exposure on this for the next picture. This is a full body picture of my model because I wanted to do something with the body instead of just the upper side as it would be awkward implementing just the top side whereas the whole body would fit better.