Download to read offline


![Reference Information 4-1
Chapter 4
Reference Information
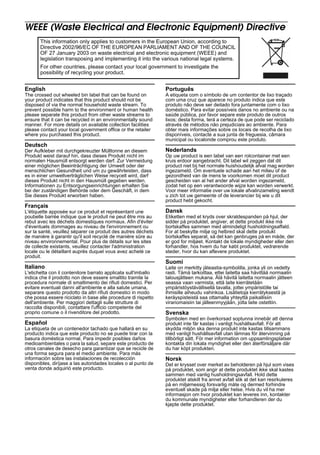
Printing Specifications
[cpi: characters per 25.4 mm (characters per inch)]
Note:
When printing exceeds the allowable print duty cycle, the printer automatically
stops printing. In this case, the printing speed described above is not
guaranteed.
Printing Method: Serial impact dot-matrix
Head wire
configuration:
9-pin serial configuration
Printing Direction: Bi-directional, logic-seeking
Characters/line
(default):
See table on page 4-2.
Character spacing
(default)
Fonts A and B:
See table on page 4-2.
Printing speed: Approx. 3.5 lines/second (40 columns,
16 cpi)
Approx. 6.4 lines/second (16 columns,
16 cpi)
(excluding data transmission time and
processing time)](https://image.slidesharecdn.com/u325uen71-150817192732-lva1-app6892/85/U325u-en-7-1-35-320.jpg)
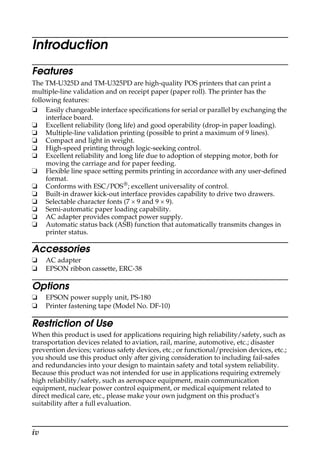
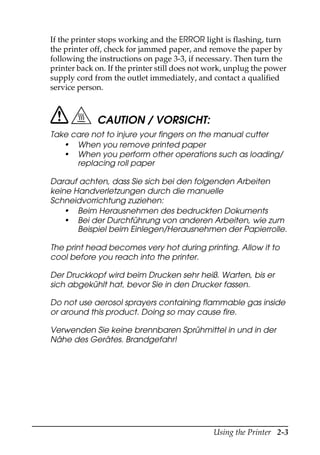
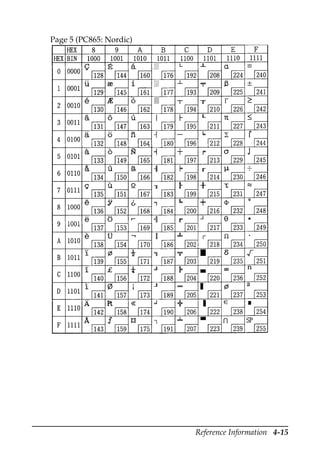
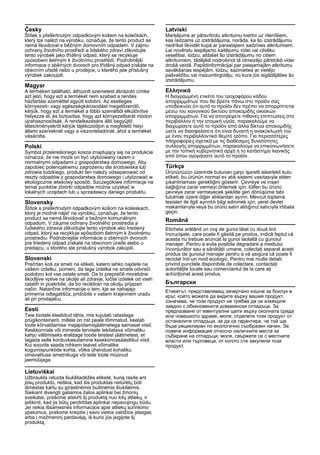
![4-2 Reference Information
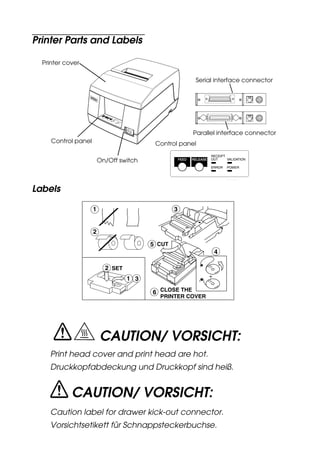
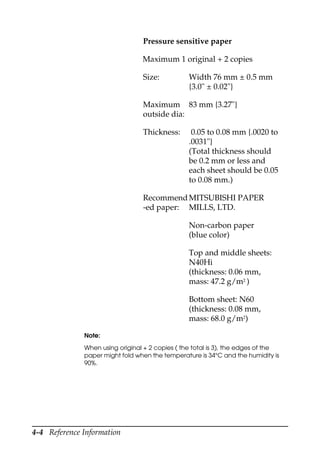
Character Specifications
[cpl: characters per line]
[cpi: characters per 25.4 mm (characters per inch)]
Notes:
• The default is 7 x 9.
• 2-dot spacing in half dot units and 3-dot spacing in half dot units depend on
the DIP switch setting.
Number of
characters
Alphanumeric characters: 95
Extended graphics: 128 × 8 pages,
International characters: 32
Character structure: 7 × 9 (the total number of dots for each
horizontal line: 400 in half dot units)
9 × 9 (the total number of dots for each
horizontal line: 400 in half dot units)
Character size: See table below.
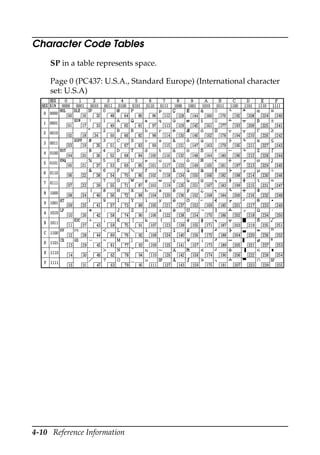
Character Sizes, Character Spacing, Character Columns
Character structure
Character size
W x H (mm)
Character
spacing
Dot space
CPL CPI
W x H
(mm)
Character
7 x 9
ANK 1.2 x 3.1 3 half dots 40 16
Graphics 1.7 x 3.1 0 40 16
9 x 9
ANK 1.6 x 3.1 3 half dots 33 13.3
Graphics 2.0 x 3.1 0 33 13.3
7 x 9
ANK 1.2 x 3.1 2 half dots 42 17.8
Graphics 1.6 x 3.1 0 42 17.8
9 x 9
ANK 1.6 x 3.1 2 half dots 35 14.5
Graphics 1.9 x 3.1 0 35 14.5](https://image.slidesharecdn.com/u325uen71-150817192732-lva1-app6892/85/U325u-en-7-1-36-320.jpg)

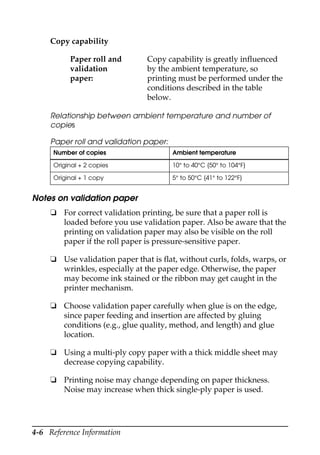
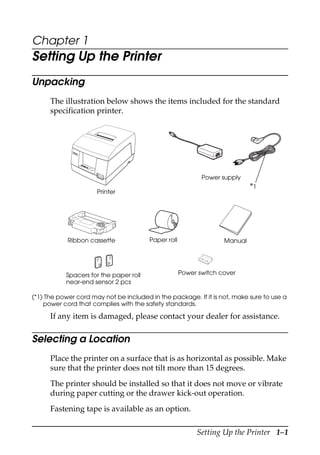
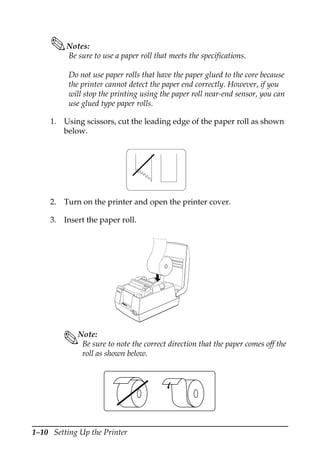
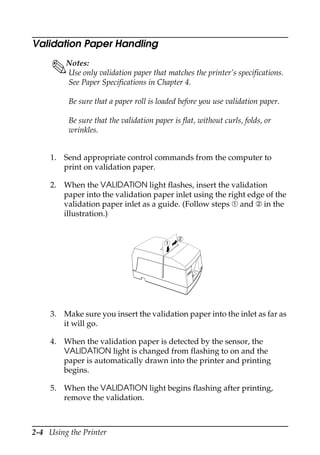
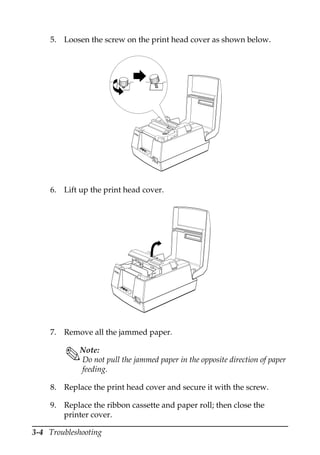
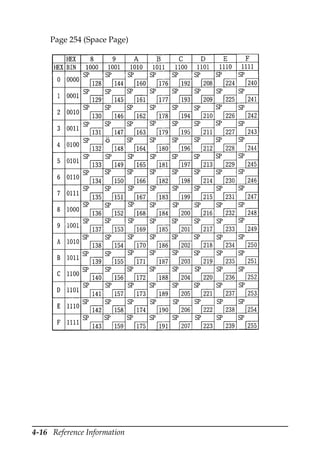
![Reference Information 4-9
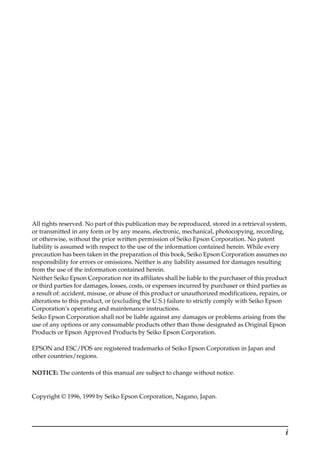
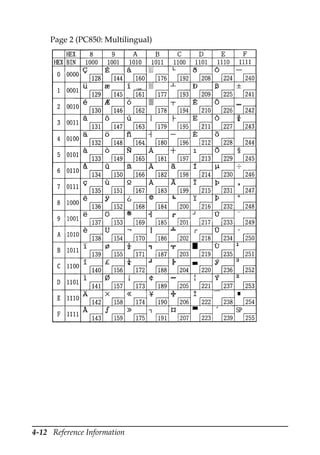
Environmental Conditions
Temperature
Operating
Storage
0 to 50°C {32 to 122°F}
(when the temperature is 30°C or more,
there is a limitation for the humidity.
Refer to the figure below.)
–10 to 50° C {14 to 122° F}
(except for paper, and a ribbon)
Humidity
Operating
Storage
10 to 90% RH
10 to 90% RH
(except for paper and a ribbon)
0
10
20
40
60
80
90
0 2010 30 40 50
34 °C, 90%
40 °C, 65%
50 °C, 35%
Relativehumidity
Environment temperature [ °C]
Operating environment range](https://image.slidesharecdn.com/u325uen71-150817192732-lva1-app6892/85/U325u-en-7-1-43-320.jpg)

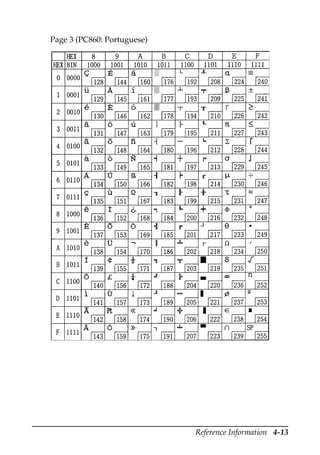
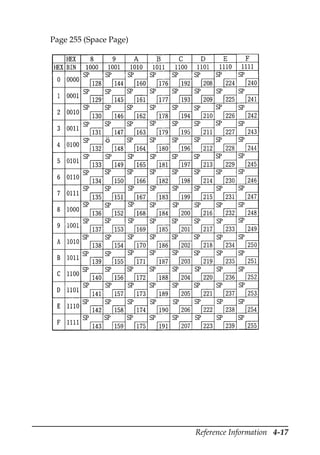
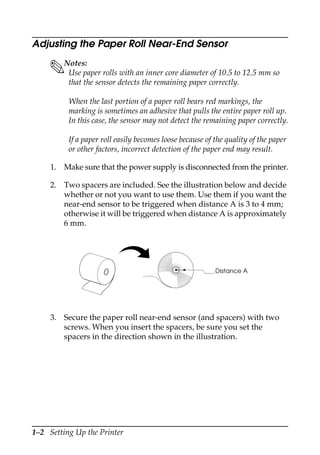
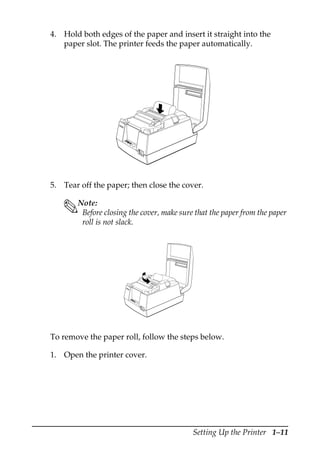
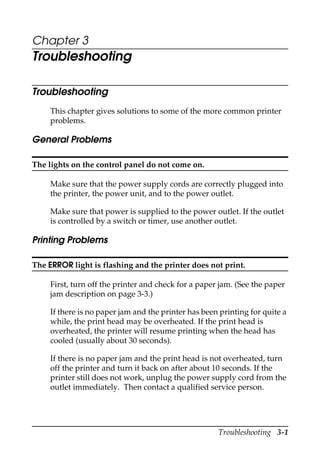
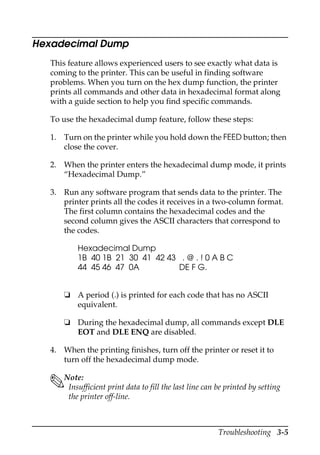
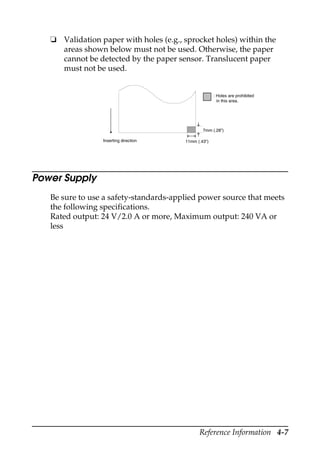
![4-18 Reference Information
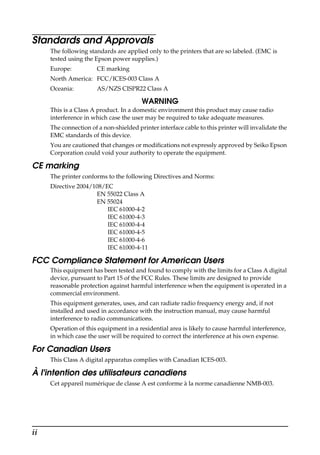
International character set
Country
ASCII code (hexadecimal)
Hex 23 24 40 5B 5C 5D 5E 60 7B 7C 7D 7E
Dec 35 36 64 91 92 93 94 96 123 124 125 126
U.S.A. # $ @ [ ] ^ ` { ¦ } ~
France # $ à ° ç § ^ ` é ù è ¨
Germany # $ § Ä Ö Ü ^ ` ä ö ü ß
U.K. £ $ @ [ ] ^ ` { ¦ } ~
Denmark I # $ @ Æ Ø Å ^ ` æ ø å ~
Sweden # ¤ É Ä Ö Å Ü é ä ö å ü
Italy # $ @ ° é ^ ù à ò è ì
Spain Pt $ @ ¡ Ñ ¿ ^ ` ¨ ñ } ~
Japan # $ @ [ ¥ ] ^ ` { ¦ } ~
Norway # ¤ É Æ Ø Å Ü é æ ø å ü
Denmark II # $ É Æ Ø Å Ü é æ ø å ü](https://image.slidesharecdn.com/u325uen71-150817192732-lva1-app6892/85/U325u-en-7-1-52-320.jpg)


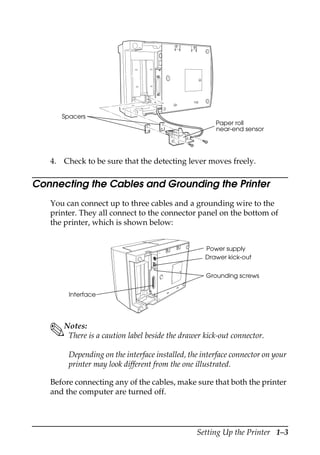
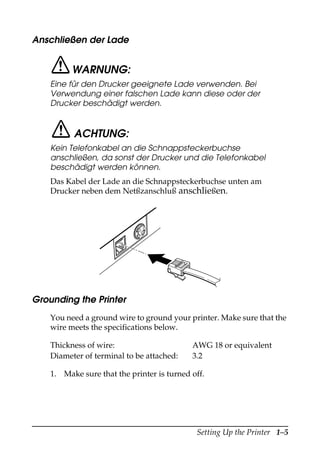
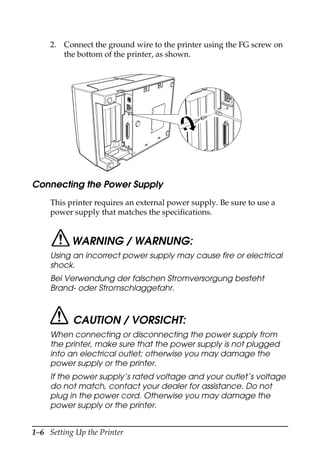
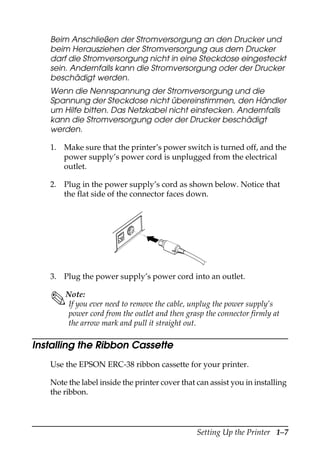
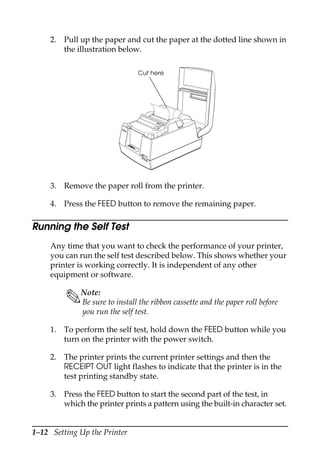
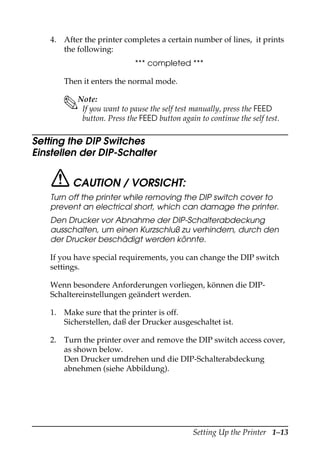
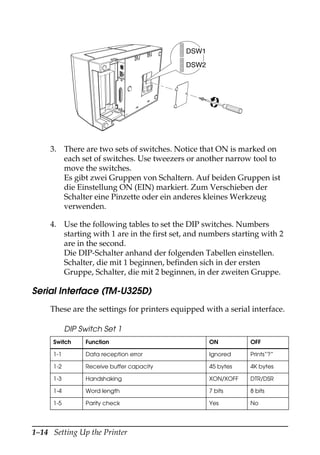
1. The document provides instructions for setting up the TM-U325D/U325PD printer, including unpacking, selecting a location, adjusting the paper roll near-end sensor, connecting cables and grounding the printer, installing the ribbon cassette, and installing the paper roll. 2. Setup instructions cover connecting the computer, drawer, and power supply to the appropriate connectors on the bottom of the printer. The document also provides warnings and cautions about using the correct power supply and cables. 3. Adjusting the paper roll near-end sensor involves deciding whether to use included spacers to trigger the sensor at different remaining paper levels, and securing the sensor in place.


