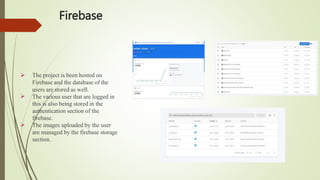
The document outlines a Twitter clone project by Durga Sankar Puhan and Kanta Anurag Sahoo, detailing features such as user authentication, tweet management, profile settings, and image uploading. It discusses the user interface components and functionality, including home page navigation, tweeting capabilities, and Firebase integration for data storage and hosting. The project employs React, CSS, and HTML5, and emphasizes the structured organization of the code.


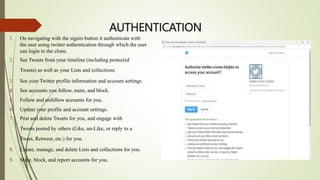
![Project-Code
import {Avatar, Button } from '@material-ui/core';
import React, { useState } from 'react';
import './Tweetinput.css';
import PhotoLibraryIcon from '@material-ui/icons/PhotoLibrary';
import firebase from 'firebase';
import db,{storage} from '../../Firebase/Firebase';
import { connect } from 'react-redux';
const Tweetinput = (props) => {
const [tweetContent,settweetContent] = useState(""); const
[uploadImages,setuploadImages] = useState(null); const [tweeting,setTweeting]
= useState(false);
const [uploadedAmount,setuploadedAmount] = useState(0); const
[uploadedNumber,setuploadedNumber] = useState(0);
const tweetTWEET = (e) =>{ e.preventDefault();
setTweeting(true);
const data = {
displayName: props.user.displayName, userName:
props.user.userName, profileUrl: props.user.photoURL,
verified: props.user.verified,
timeStamp: firebase.firestore.FieldValue.serverTimestamp(), tweetText:
tweetContent,
images: []
}
const uploadedImages = [];
}
const imageSourceChangeHandler = (e)=>{ e.preventDefault();
if(e.target.files[0]){ setuploadImages([e.target.files[0],e.target.files[1]]);
}else{
setuploadImages(null)
}
}
return (
<div className="selftweet">
<div className="selftweet body">
<Avatar className="selftweet body avatar" src={props.user.photoURL} alt="avatar"
>{props.user.displayName[0]}</Avatar>
<textarea value={tweetContent}
onChange={(e)=>{if(tweetContent.length<300 || e.target.value.length<300){settweetContent(e.target.value)}}}
placeholder="What's Happening......?"/>
</div>
<div className="selftweet tweet">
<div className="selftweet tweet details">
<label className="image uploader"><PhotoLibraryIcon id="image uploader label"/> <input type="file"
multiple max={2} onChange={(e)=>{imageSourceChangeHandler(e)}} /></label>
<p style={{color: uploadImages?uploadImages.length===2?"red":"grey":"grey"}}>{uploadImages?
uploadImages.length:0}/2 Images</p>
<p style={{color: tweetContent.length>250?"red":"grey"}}>{tweetContent.length}/300 Words</p>
<p style={{display: tweeting?"initial":"none",color: "green",fontWeight: 900}}>Uploading Image: {uploadedAmount}
% {uploadedNumber}/{uploadImages?uploadImages.length:0}</p>
</div>
<Button disabled={tweeting || tweetContent.trim()==="" } onClick={(e)=>{tweetTWEET(e);}}
className="selftweet button">Tweet</Button>
</div>
</div>
)
};
const mapStateToProps = (state) =>{
return{
user: state.auth.user
}
}
export default connect(mapStateToProps)(Tweetinput);](https://image.slidesharecdn.com/twitterppt-240421141340-906d52fe/85/twitter-ppt-pptx-11-320.jpg)

![TWITTER_PROJECT[a social media app].pptx](https://cdn.slidesharecdn.com/ss_thumbnails/twitterproject1-240626135533-99d0e390-thumbnail.jpg?width=640&height=640&fit=bounds)


![ML PROJECT FINAL[1].pptx](https://cdn.slidesharecdn.com/ss_thumbnails/mlprojectfinal1-230504044433-4418a95d-thumbnail.jpg?width=640&height=640&fit=bounds)


![DBMS[1].pptx](https://cdn.slidesharecdn.com/ss_thumbnails/dbms1-230410082711-c24f9c2b-thumbnail.jpg?width=640&height=640&fit=bounds)


![SecurityBoat_Service_Pitch_Deck[24158].pdf](https://cdn.slidesharecdn.com/ss_thumbnails/securityboatservicepitchdeck24158-260121113056-452683e3-thumbnail.jpg?width=640&height=640&fit=bounds)
