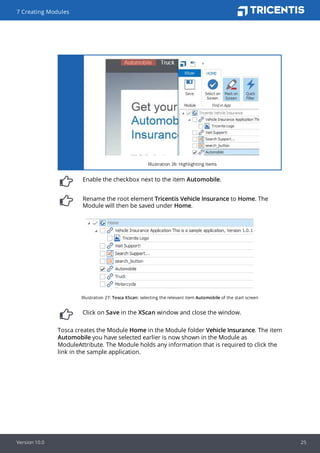
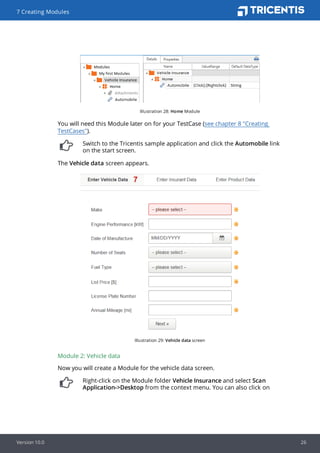
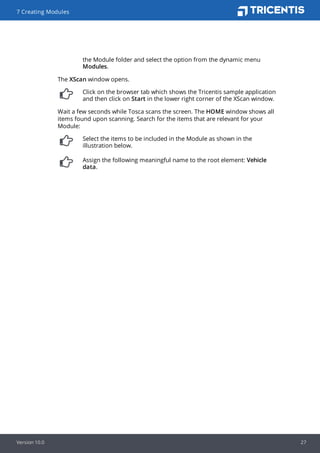
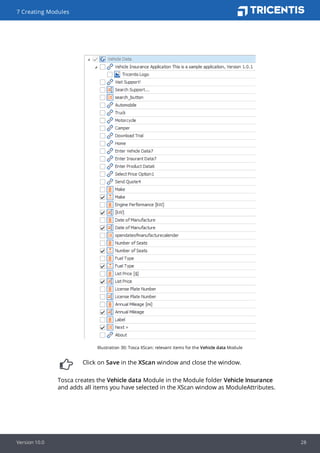
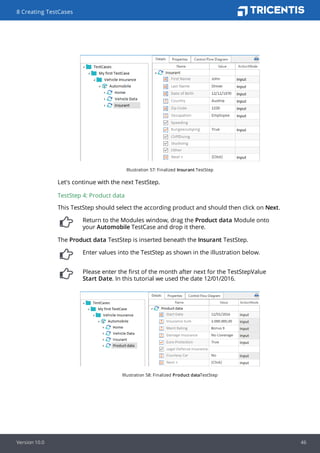
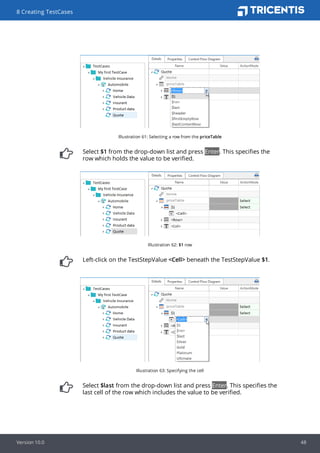
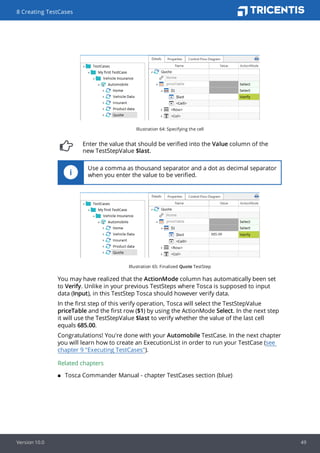
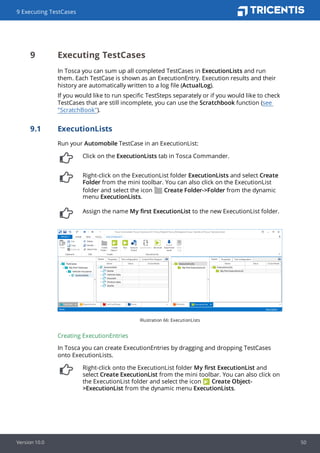
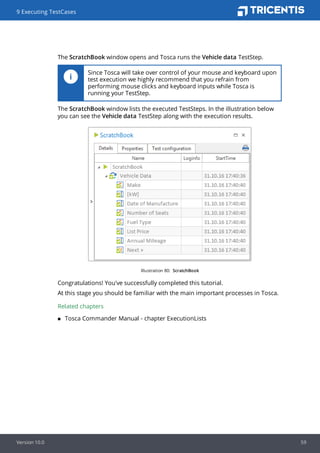
SlideShare a Scribd company logo
Tutorial
Tricentis Tosca Testsuite
Table of Contents
Table of Contents
1 Survey 4
1.1 Tosca Commander™ Tutorial 4
1.2 Legal notice 4
2 Tosca Tutorial 5
3 Preconditions for working through the Tutorial 6
4 Definition of Terms for the Tosca Commander™ Objects 7
5 Starting Tosca Commander 8
6 The Tricentis Sample Application 19
7 Creating Modules 21
8 Creating TestCases 42
9 Executing TestCases 50
9.1 ExecutionLists 50
9.2 ScratchBook 57
Version 10.0 3
1 Survey
Version 10.0 4
1 Survey
Tosca Tutorial, version: 03.11.2016
1.1 Tosca Commander™ Tutorial
The Tosca Commander™ Tutorial is a guide to become acquainted with the
elementary processes in Tosca. It is primarily aimed at beginners, who want to
learn how to use the basic functions of Tosca in self-study.
1.2 Legal notice
Tricentis GmbH
Leonard-Bernstein-Straße 10
1220 Vienna
Austria
Tel.: +43 (1) 263 24 09
Fax: +43 (1) 263 24 09-15
E-Mail: support@tricentis.com
Information in this document is subject to change without notice. No part of this document may be
reproduced or transmitted in any form or by any means, electronic or mechanical, for any purpose without
the express written permission of Tricentis GmbH.
This product contains 3rd party software. For further information, please contact Tricentis Support.
© by Tricentis GmbH
2 Tosca Tutorial
The purpose of this tutorial is to become acquainted with the basic functions in
Tosca Commander™. You will create a test case for the Tricentis Vehicle
Insurance Application (http://sampleapp.tricentis.com) and you will then execute
this test case.
Chapter overview
We recommend that you go through this tutorial chapter by chapter in the given
order since the contents are explained step by step:
n In chapter 3 "Preconditions for working through the Tutorial" you will find
software requirements and browser settings that need to be specified.
n Chapter "Definition of Terms for the Tosca Commander™ Objects" provides
you with basic terms in Tosca and shows you how to build test cases.
n In chapter 5 "Starting Tosca Commander" you will learn how to start Tosca
Commander, how to open the tutorial, how Tosca workspaces look like and
how to work with Tosca Commander.
n In chapter 6 "The Tricentis Sample Application" we will explain the Tosca
sample application to you.
n Chapter "Creating Modules" illustrates why you need modules, and you will
also create your own modules for your test case.
n In chapter 8 "Creating TestCases" we will explain how to build and manage test
cases in Tosca, and you will create your first test case and add test steps.
n Chapter "Executing TestCases" provides you with a detailed description of
execution lists and the Scratchbook. Here you will create an execution list for
your test case.
Help
If you would like to open the Tosca Manuals online, simply press the F1 key in
Tosca Commander. In our Support Portal you can either browse through the
Online Help or you can download the Tosca Manuals as PDF versions.
Useful links that may be of interest to you
n Webinars
n Online Training
2 Tosca Tutorial
Version 10.0 5
3 Preconditions for working through the Tutorial
In order to go through this tutorial you need:
n A complete default installation of Tricentis Tosca Testsuite along with a valid
license
n Microsoft® Internet Explorer 9 or later and zoom settings set to 100% (see also
the System Requirements for Tricentis Tosca Testsuite).
n A stable internet connection to be able to view all the contents that are related
to this tutorial.
Paths
All specified paths refer to a default installation on drive C: with the default
paths recommended by Tosca.
n Tosca program files %TRICENTIS_HOME%: C:Program FilesTRICENTISTosca
Testsuite, or C:Program Files (x86)TRICENTISTosca Testsuite
n Tosca Commander™ project files %TRICENTIS_PROJECTS%: C:Tosca_
PROJECTS
3 Preconditions for working through the Tutorial
Version 10.0 6
4 Definition of Terms for the Tosca Commander™
Objects
This chapter provides you with definitions of the basic terms in Tosca and it
outlines how TestCases are structured in Tosca.
In this tutorial you will create Modules and a TestCase with TestSteps, and finally
you will run your TestCase.
A TestCase consists of several TestSteps which determine the test process. Each
TestStep maps one page of the Tricentis sample application (also known as "the
test object"). TestSteps are processed in sequential order (see chapter 8 "Creating
TestCases").
You specify your test data in the TestStepValues of the TestSteps. Test data are
data which are used in the application upon test execution. This is for instance
the case when a specific text is written to an input field, or when a button is
clicked.
Automated TestSteps are based on Modules. Modules contain technical
information which is used to identify and steer screen items. These items can for
instance be buttons or input fields. Tosca creates a ModuleAttribute for each
item and saves this to the Module (see chapter 7 "Creating Modules").
In Tosca, test data are separated from technical steering information. This allows
Modules to be used repeatedly to create various TestSteps for any number of
TestCases in order to test a variety of data.
ExecutionLists enable you to run your TestCases and to log the results of the test
execution (see chapter 9 "Executing TestCases").
Icon Object Description
Modules Represent the technical steering information
TestCases Determine the test sequence and contain test
data
ExecutionLists Serve to plan and manage the test execution
Table 1: Objects in Tosca Commander™
Object hierarchy
All objects in Tosca Commander are arranged in a strict hierarchical structure.
This object hierarchy must be kept when objects are either copied or moved
around. This means for instance that TestCase folders cannot be copied to
TestStep folders or Module folders (see chapter "Drag and drop").
Related chapters
n Tosca Commander Manual - chapter Managing workspaces (Object hierarchy).
4 Definition of Terms for the Tosca Commander™ Objects
Version 10.0 7
5 Starting Tosca Commander
TestCases are created, executed and organized in Tosca Commander™.
Start Tosca Commander™ via the Windows Start menu: Start->All
Programs->Tricentis->Tosca Testsuite->Tosca Commander.
As soon as Tosca Commander is open, the start screen will be shown.
Illustration 1: Tosca Commander start screen
Creating workspaces
You need to create a workspace where you will manage your objects.
Select Project->New from the Tosca Commander™ menu to open the
Tosca Commander: Create new workspace window.
Enter the name of your workspace into the Select name for new
workspace field, e.g. Tosca_Tutorial_en.
5 Starting Tosca Commander
Version 10.0 8
Illustration 2: Creating a new workspace
Click on OK to create the workspace.
In the next window, click on Close.
The workspace opens.
Illustration 3: Workspace
Tosca Commander™ is inspired by Microsoft Windows Explorer®, which means
that all items are mapped in a tree structure. You can open any number of
windows and display a freely definable section of this tree structure.
If you select an item in the tree view, Tosca will show the item details in the
details view.
5 Starting Tosca Commander
Version 10.0 9
If the German user interface in Tosca Commander™ is active, you
can change the language via the following menu entry: Project-
>Options->Ansicht->Sprache. Set option Sprache to English. Tosca
Commander must be restarted so that the changes take effect.
Title bar
The title bar in Tosca Commander shows the name of the currently open
workspace.
The title bar also includes the quick access toolbar which provides you with
options such as Save, Undo, etc.
Menu (Ribbon)
The menu is designed in the form of ribbons and consists of several tabs which
allow you to access the corresponding Tosca Commander functions. These
functions are either enabled or disabled, depending on the context you are
working in.
If you switch between the windows of the various sections (see chapter "Windows
and tabs") or if you select objects within the sections, Tosca will open up an
additional tab for this section that includes a dynamic menu. The dynamic menu
shows relevant options for the selected section or object.
A dynamic menu is available for the following sections in Tosca Commander:
TestCases, Modules, Requirements, TestCaseDesign, Execution and Reporting.
Within the Execution section, a dynamic menu is available for the subsections
ExecutionLists and Exploratory Testing.
Status bar
The status bar shows the action that is currently performed by Tosca
Commander.
Windows and tabs
Each object type (e.g. TestCases, Modules, etc.) of the Tosca Commander
workspace has its own window. At the bottom of each window you can see a tab
for each window. Please feel free to arrange the windows according to your
needs.
Go to the Home menu and click on Section->Modules to open a new
Modules window.
Left-click onto the title bar of the Modules window and drag the
window onto the icon in the right section of the window as shown in
the picture below.
5 Starting Tosca Commander
Version 10.0 10
Illustration 4: Arranging windows in the workspace
In this example we will insert the Modules window right next to the TestCases
window:
Illustration 5: Two windows
In Tosca you can modify the tabs order at the bottom of the window and you can
drag tabs to other windows, as you like.
Click on the Execution tab in the left window.
Right-click onto the ExecutionLists folder and select the option Open in
new window.
5 Starting Tosca Commander
Version 10.0 11
Illustration 6: Open in new window option
The ExecutionLists window opens.
Drag the ExecutionLists window onto the Modules window and drop it
there.
Illustration 7: Moving the ExecutionLists window
You can also use the tabs to rearrange your workspace windows:
simply click on the tab you would like to move and drag this to the
position of your choice.
Click on the x sign to close tabs you don't need.
5 Starting Tosca Commander
Version 10.0 12
Close both the Modules and the Execution tab in the left window.
The windows and tabs in your workspace should now look like in the picture
shown below since this is the view we will be working with in this tutorial.
Illustration 8: Recommended view
Perspectives
In Tosca you can arrange any open windows as you like and you can save your
customized view as Perspective. So, if you accidentally change your window
arrangements you can easily restore your preferred view.
Go to the View menu and select Manage->Save... from the Perspectives section
to save your current perspective. The option Manage->Select enables you to
select either the default perspective or one of your saved perpectives if you
created some.
Tree view
In Tosca you can hide the tree view if necessary. Simply click on the vertical line
between the two window sections.
If you click once again onto the vertical divider line, the tree view will be shown
again.
5 Starting Tosca Commander
Version 10.0 13
Illustration 9: Tree view is visible
Illustration 10: Hidden tree view
You can resize you workspace windows if required: left-click onto the divider line,
hold the mouse button down and move the vertical divider line to you preferred
position.
Project window
The project window provides you with an overview of your entire project (Home-
>Project). This shows all workspace objects in a tree view starting from the
project root element which is named Tosca_Tutorial_en in this tutorial.
Context menu and mini toolbar
In Tosca you are able to process workspace objects via the context menu or the
dynamic menu. The context menu provides you with the options that are relevant
5 Starting Tosca Commander
Version 10.0 14
for the respective object.
Open the context menu by right-clicking on any object in the workspace.
The upper part of the context menu includes a mini toolbar. This is part of the
context menu and it contains options that are frequently used, such as Delete ,
Rename and options for creating new objects. Hover over the icons in the mini
toolbar to view the option name in the tooltip.
Go to the TestCases section. Right-click on the TestCase folder
TestCases and select the option Create Folder from the mini toolbar.
Illustration 11: Creating a new folder
Rename the new TestCase folder to My first TestCase.
Right-click on the TestCase folder My first TestCase and select the
option Create Folder from the mini toolbar.
Rename the new TestCase folder to Vehicle Insurance.
Illustration 12: New TestCase folder Vehicle Insurance
TestCase folders can be renamed at any point in time. Simply select
the option Rename from the context menu.
Create a copy of the TestCase folder Vehicle Insurance beneath the TestCase
folder.
Right-click on the Vehicle Insurance folder and select the option Copy
from the context menu.
The copy must be created within the TestCase folder My first TestCase so that
this is located on the same level like the TestCase folder Vehicle Insurance.
5 Starting Tosca Commander
Version 10.0 15
Select the option Paste from the context menu of the TestCase folder
My first TestCase.
Tosca automatically assigns the name Vehicle Insurance_1 to the newly created
copy.
Illustration 13: Vehicle Insurance_1 folder
Drag and drop
In Tosca Commander you can perform various operations by using drag and
drop.
Left click on the TestCase folder Vehicle Insurance_1 and keep the
mouse button pressed. Without releasing the mouse button, drag the
TestCase folder Vehicle Insurance_1 over the TestCase folder Vehicle
Insurance. Release the mouse button as soon as the cursor is located
on the TestCase folder Vehicle Insurance.
Illustration 14: Moving TestCase folders by using drag and drop
As you can see, TestCase folder Vehicle Insurance_1 is now located beneath the
TestCase folder Vehicle Insurance:
Illustration 15: TestCase folder Vehicle Insurance_1 as a subfolder
Since you don't need TestCase folder Vehicle Insurance_1 any longer you can
delete this as follows:
Right-click onto the TestCase folder Vehicle Insurance_1 and select the
option Delete from the mini toolbar.
5 Starting Tosca Commander
Version 10.0 16
In the next step, try to move the TestCase folder Vehicle Insurance to the
Modules folder Modules.
Drag the TestCase folder Vehicle Insurance onto the Modules folder
Modules.
Tosca will prevent this operation since TestCase folders may only be
positioned hierarchically beneath TestCase folders (see also chapter "Object
hierarchy").
Editing columns
In the details view you can add columns, move or remove them, as required.
Use drag and drop to move the DataType column to the right of the
Workstate column. Two arrows mark the position where the column
will be inserted.
Illustration 16: Moving a column
Right-click onto the header of a column, and select the option Column
Chooser from the context menu. A window opens containing a list of
available columns.
Illustration 17: Opening the Column Chooser
Use drag and drop to move the entry Description to the required
column position. Two arrows mark the position where the new column
will be inserted.
5 Starting Tosca Commander
Version 10.0 17
Illustration 18: Adding a column
Left-click onto the header of the Description column, keep the mouse
button pressed and drag this column down until the cursor's shape
turns into an X, then release the mouse button. The column is now
removed from this view.
Illustration 19: Removing a column
Related chapters
n Tosca Commander Manual - chapter Working with Tosca
n Tosca Commander Manual - chapter Creating and Managing Workspaces
n Tosca Commander Manual - chapter Managing workspaces (Object hierarchy)
5 Starting Tosca Commander
Version 10.0 18
6 The Tricentis Sample Application
In this tutorial, the Tricentis sample application will serve as object to be tested,
and you will use this application to create a TestCase.
The Tricentis sample application is a fictitious vehicle insurance premium
calculator and can be used to create quotes for various vehicle types.
Open the Tricentis sample application at
http://sampleapp.tricentis.com. Please make sure that you use
Microsoft® Internet Explorer (see chapter 3 "Preconditions for working
through the Tutorial").
Illustration 20: Tricentis Sample Application: start screen
Click on the Automobile link in the navigation bar.
Now you can see the start screen of the vehicle insurance premium calculator
which allows you to enter vehicle data. Mandatory fields are marked with an
asterisk *.
6 The Tricentis Sample Application
Version 10.0 19
Illustration 21: Vehicle insurance premium calculator: entering vehicle data
Feel free to get yourself acquainted with the Tricentis sample application: enter
some data into the input fields and click Next.
Click on Home in the submenu of the navigation bar to return to the
start screen of the Tricentis sample application.
6 The Tricentis Sample Application
Version 10.0 20
7 Creating Modules
If you would like to create an automated TestCase for the Tricentis sample
application you need to create Modules which contain the required steering
information (see chapter 4 "Definition of Terms for the Tosca Commander™
Objects").
Your task in this tutorial is to build an automated TestCase which contains data
for an automobile, and to create a quote for a vehicle insurance with these data.
To gather all this information you need to create Modules for each screen of the
Tricentis sample application (see chapter 6 "The Tricentis Sample Application").
In Tosca we refer to the creation of Modules as Scanning. Tosca analyzes the
screen contents and searches for steerable items. You can then select the items
you need and create a Module in Tosca. The Module contains all information
required for steering the relevant items.
Right-click on the Module folder Modules and select the option Create
Folder from the mini toolbar. You can also click on the Module folder
and select the icon Create Folder->Folder from the dynamic menu
Modules.
Assign the name My first Modules to the new Module folder.
Select the option Create Folder from the context menu of the Module
folder My first Modules. You can also click on the Module folder and
select the icon Create Folder->Folder from the dynamic menu
Modules.
Assign the name Vehicle Insurance to the new Module folder.
Illustration 22: Module folder Vehicle Insurance
Module 1: Start screen (Home)
The first page of the Tricentis sample application is the start screen. Please make
sure that the start screen is open in your browser since Tosca always scans the
screen that is currently available.
Click on Home in the navigation bar of the sample application to open
the start screen.
7 Creating Modules
Version 10.0 21
Illustration 23: Tricentis sample application: start screen
Now you're ready to scan this screen.
Return to Tosca Commander, go to the Modules window and right-click
on the Module folder Vehicle Insurance you created earlier. Select the
option Scan Application->Desktop from the context menu. You can
also click on the Module folder and select the option from the dynamic
menu Modules.
The XScan window opens:
7 Creating Modules
Version 10.0 22
Illustration 24: XScan window
Tosca XScan loads all applications that are currently open.
Click on the window which shows the Tricentis sample application and
then click on Start in the lower right corner of the XScan window.
Wait a few seconds while Tosca scans the screen.
7 Creating Modules
Version 10.0 23
Illustration 25: Tosca XScan: Home screen
The HOME window now displays all items which were found during the scan
process. Although a large amount of items and functions will be shown in the
XScan window, most of them are not relevant for this example.
Search for the items that you need for your Module: The relevant item on the
start screen is the Automobile link located in the navigation bar.
Enable the checkbox in front of an item to select this.
If you would like Tosca to help you identify the items in the XScan
window and the browser, you can use the Mark on Screen function.
Enable this option in the upper part of the XScan window and select
an item from the tree. Tosca will then highlight this in red in the
browser window.
7 Creating Modules
Version 10.0 24
Illustration 26: Highlighting items
Enable the checkbox next to the item Automobile.
Rename the root element Tricentis Vehicle Insurance to Home. The
Module will then be saved under Home.
Illustration 27: Tosca XScan: selecting the relevant item Automobile of the start screen
Click on Save in the XScan window and close the window.
Tosca creates the Module Home in the Module folder Vehicle Insurance. The item
Automobile you have selected earlier is now shown in the Module as
ModuleAttribute. The Module holds any information that is required to click the
link in the sample application.
7 Creating Modules
Version 10.0 25
Illustration 28: Home Module
You will need this Module later on for your TestCase (see chapter 8 "Creating
TestCases").
Switch to the Tricentis sample application and click the Automobile link
on the start screen.
The Vehicle data screen appears.
Illustration 29: Vehicle data screen
Module 2: Vehicle data
Now you will create a Module for the vehicle data screen.
Right-click on the Module folder Vehicle Insurance and select Scan
Application->Desktop from the context menu. You can also click on
7 Creating Modules
Version 10.0 26
the Module folder and select the option from the dynamic menu
Modules.
The XScan window opens.
Click on the browser tab which shows the Tricentis sample application
and then click on Start in the lower right corner of the XScan window.
Wait a few seconds while Tosca scans the screen. The HOME window shows all
items found upon scanning. Search for the items that are relevant for your
Module:
Select the items to be included in the Module as shown in the
illustration below.
Assign the following meaningful name to the root element: Vehicle
data.
7 Creating Modules
Version 10.0 27
Illustration 30: Tosca XScan: relevant items for the Vehicle data Module
Click on Save in the XScan window and close the window.
Tosca creates the Vehicle data Module in the Module folder Vehicle Insurance
and adds all items you have selected in the XScan window as ModuleAttributes.
7 Creating Modules
Version 10.0 28
Switch to the Tricentis sample application, enter the data as shown in
the illustration below and click on Next.
Illustration 31: Entering vehicle data
The Insurant screen appears.
7 Creating Modules
Version 10.0 29
Illustration 32: Insurant data screen (partial view)
Module 3: Insurant
Now you will create a Module for the Insurant screen.
Right-click on the Module folder Vehicle Insurance and select Scan
Application->Desktop from the context menu. You can also click on
the Module folder and select the option from the dynamic menu
Modules.
The XScan window opens.
Click on the browser tab which shows the Tricentis sample application
and then click on Start in the lower right corner of the XScan window.
Wait a few seconds while Tosca scans the screen.
Enable the option Select on Screen in Tosca XScan. This will help you
select the correct items with ease.
7 Creating Modules
Version 10.0 30
Illustration 33: Tosca XScan: Select on Screen
The Select your controls on the screen window opens:
Illustration 34: Tosca XScan: Select your controls on the screen window
Click onto an item in the Tricentis sample application. Tosca will
highlight the corresponding item in blue in the application and will
automatically add this to the Select your controls on the screen
window.
7 Creating Modules
Version 10.0 31
Illustration 35: Tosca XScan: Select your controls on the screen window: First Name is selected
To remove an item from this list, simply click on this item again.
Select the items to be included in your Module as shown in the
illustration below.
Illustration 36: Tosca XScan: Insurant data are selected, part 1
Click on as soon as you're finished. The focus will return to the
Tosca XScan window.
You can open the Select your controls on the screen window again
at any time via the Tosca XScan menu to add further items to your
Module.
Switch to the Tricentis sample application and scroll down on the
current page to display the items as shown in the illustration below.
7 Creating Modules
Version 10.0 32
Illustration 37: Tricentis sample application: Insurant details
Enable the Select on Screen option in Tosca XScan and select the items
that are still missing as shown in the illustration below.
Illustration 38: Tosca XScan: Insurant data are selected, part 2
Rename the project root element to Insurant.
7 Creating Modules
Version 10.0 33
Illustration 39: Tosca XScan: relevant screen items for the Insurant Module
If you are wondering why the Prev button is not enabled in the list
above, it’s just because it is not needed in this TestCase.
Click on Save in the XScan window and close the window.
Tosca creates the Module Insurant in the Module folder Vehicle Insurance and
adds all items you have selected in the XScan window as ModuleAttributes.
Switch to the Tricentis sample application, enter the insurant data as
shown in the illustration below and click on Next.
7 Creating Modules
Version 10.0 34
Illustration 40: Entering insurant data
The Product data screen appears:
7 Creating Modules
Version 10.0 35
Illustration 41: Product data screen
Module 4: Product data
Now you will create a Module for the product data screen.
Right-click on the Module folder Vehicle Insurance and select Scan
Application->Desktop. You can also click on the Module folder and
select the option from the dynamic menu Modules.
The XScan window opens.
Click on the browser tab which shows the Tricentis sample application
and then click on Start in the lower right corner of the XScan window.
Wait a few seconds while Tosca scans the screen.
Select the items to be included in the Module as shown in the
illustration below.
7 Creating Modules
Version 10.0 36
Illustration 42: Tosca XScan: relevant items for the Product data Module
Rename the two Yes items to Euro Protection and Legal Defense
Insurance accordingly:
To do so, enable the Mark on Screen option in Tosca XScan and select
the Yes items in the tree view. This allows you to easily identify and
distinguish these two items from each other.
Illustration 43: Tosca XScan: identifying items by using Mark on Screen
Assign the following meaningful name to the root element: Product
data.
7 Creating Modules
Version 10.0 37
Illustration 44: Tosca XScan: relevant items for the Product data Module
Click on Save in the XScan window and close the window.
Tosca creates the Module Product data in the Module folder Vehicle Insurance
and adds all items you have selected in the XScan window as ModuleAttributes.
Switch to the Tricentis sample application, enter the data as shown in
the illustration below and click on Next.
Indicate the first of the month after next for the Start Date. In our tutorial here,
we use 12/01/2016.
Illustration 45: Entering product data
7 Creating Modules
Version 10.0 38
The Price option screen appears. Please note that the amounts in your sample
application may differ from the ones shown in the illustration below.
Illustration 46: Price option screen
Module 5: Quote
On this page you can choose from various packages and price options. Later on
you will create a TestCase using data of this screen to verify whether the Price per
Year ($) equals a certain value for the corresponding package. This means that
you need to scan a new Module right now:
Right-click on the Module folder Vehicle Insurance and select Scan
Application->Desktop. You can also click on the Module folder and
select the option from the dynamic menu Modules.
The XScan window opens.
Click on the browser tab which shows the Tricentis sample application
and then click on Start in the lower right corner of the XScan window.
Wait a few seconds while Tosca scans the screen.
The insurance calculator shows the calculated quote in the form of a table.
Please note that the amounts in your sample application may differ from the
ones shown in the illustration below.
Illustration 47: Selecting the appropriate package
Use the Mark on Screen option in the XScan window to identify the
table accordingly. The table name in XScan is priceTable.
Select the items to be included in the Module as shown in the
illustration below.
7 Creating Modules
Version 10.0 39
Assign the following meaningful name to the root element: Quote.
Illustration 48: XScan: relevant items for the Quote Module
Click on Save in the XScan window and close the window.
Tosca creates the Module Quote in the Module folder Vehicle Insurance and
adds all items you have selected in the XScan window as ModuleAttributes.
At this stage you have created all the Modules you need for your TestCase.
7 Creating Modules
Version 10.0 40
Illustration 49: Modules required for the Automobile TestCase
Related chapters
n Tosca Commander Manual - chapter Modules section (orange)
7 Creating Modules
Version 10.0 41
8 Creating TestCases
In this chapter you will create a TestCase with TestSteps which maps the vehicle
insurance quote for an automobile. This requires that you specify the automobile
data in the TestSteps in order to create the quote. Finally you should verify a
specific value of your quote.
In the previous chapter "Creating Modules" you have already scanned all the
required Modules, and in this chapter you will create a TestCase with TestSteps
which include the test data required for running this TestCase in the end.
Creating a TestCase
Create the TestCase Automobile in your TestCase folder Vehicle Insurance. You
have already created this folder in chapter "Context menu and mini toolbar".
Right-click on the TestCase folder Vehicle Insurance and select Create
TestCase from the mini toolbar. You can also click on the TestCase
folder and select the icon Create Object->TestCase from the
dynamic menu TestCases.
Assign the name Automobile to the new TestCase.
Illustration 50: Automobile TestCase
The TestCase starts off with the start screen of the Tricentis sample application.
8 Creating TestCases
Version 10.0 42
Illustration 51: Tricentis sample application: start screen
TestStep 1: Start screen (Home)
Your first TestStep should instruct Tosca to click on the Automobile link in the
Tricentis sample application to start the vehicle insurance calculator.
Illustration 52: Navigation bar
You have already created the Module Home earlier (see also "Module 1: Start
screen (Home)"), and you will be using this Module now for your first TestStep.
Switch to the Modules window, drag the Home Module onto your
Automobile TestCase and drop it there.
8 Creating TestCases
Version 10.0 43
Illustration 53: Creating the Home TestStep
Tosca creates the TestStep Home and automatically assigns the name of the
corresponding Module to this. All the TestStepValues that can be steered are
located beneath this TestStep - in our case, the Automobile link of the start
screen Home. The TestStepValue icons are grayed out until you define actions for
these values.
TestStepValues which are grayed out due to lacking values can either
be hidden from view or shown via the F9 key.
Open the drop-down menu in the Value column for the TestStepValue
Automobile, select {Click} and press Enter to confirm your selection.
Illustration 54: Defining actions for the Home screen
The ActionMode column is automatically set to Input since you have defined an
input action.
Illustration 55: Finalized Home TestStep
8 Creating TestCases
Version 10.0 44
You've just created your first TestStep!
TestStep 2: Vehicle data
This TestStep should enter vehicle data and should then click on Next.
Return to the Modules window, drag the Vehicle data Module onto
your Automobile TestCase and drop it there.
The Vehicle data TestStep is inserted beneath the Home TestStep.
Enter the data into the TestStep as shown in the illustration below.
TestStepValues provide values that are stored in the ValueRange
column of the corresponding ModuleAttribute in a drop-down list. If
your required value is not available in this list, you can also enter
this manually.
Illustration 56: Finalized Vehicle data TestStep
The ActionMode column of the TestSteps is automatically set to Input again since
you have defined input actions.
TestStep 3: Insurant
This TestStep should enter insurant data and should then click on Next.
Return to the Modules window, drag the Insurant Module onto your
Automobile TestCase and drop it there.
The Insurant TestStep is inserted beneath the Vehicle data TestStep.
Enter data into the TestStep as shown in the illustration below.
8 Creating TestCases
Version 10.0 45
Illustration 57: Finalized Insurant TestStep
Let's continue with the next TestStep.
TestStep 4: Product data
This TestStep should select the according product and should then click on Next.
Return to the Modules window, drag the Product data Module onto
your Automobile TestCase and drop it there.
The Product data TestStep is inserted beneath the Insurant TestStep.
Enter values into the TestStep as shown in the illustration below.
Please enter the first of the month after next for the TestStepValue
Start Date. In this tutorial we used the date 12/01/2016.
Illustration 58: Finalized Product dataTestStep
8 Creating TestCases
Version 10.0 46
TestStep 5: Quote
This is the final TestStep in your TestCase. Here Tosca should verify whether the
Price per Year ($) for the Ultimate package equals a specific value.
The vehicle insurance calculator shows the calculated values along with various
options in a table. Please note that your Price per Year ($) value may differ from
the one in this tutorial (685,00). You may use the value Tosca calculated for you in
your sample application.
Illustration 59: Quote data
Return to the Modules window, drag the Quote Module onto your
Automobile TestCase and drop it there.
The Quote TestStep is inserted beneath the Product data TestStep.
Illustration 60: Quote TestStep
Define the cell which includes the value to be verified in the TestStepValue
PriceTable. The amount is shown in the first row of the last column.
Expand the view for the TestStepValue priceTable and open the drop-
down menu of the TestStepValue <Row>.
8 Creating TestCases
Version 10.0 47
Illustration 61: Selecting a row from the priceTable
Select $1 from the drop-down list and press Enter. This specifies the
row which holds the value to be verified.
Illustration 62: $1 row
Left-click on the TestStepValue <Cell> beneath the TestStepValue $1.
Illustration 63: Specifying the cell
Select $last from the drop-down list and press Enter. This specifies the
last cell of the row which includes the value to be verified.
8 Creating TestCases
Version 10.0 48
Illustration 64: Specifying the cell
Enter the value that should be verified into the Value column of the
new TestStepValue $last.
Use a comma as thousand separator and a dot as decimal separator
when you enter the value to be verified.
Illustration 65: Finalized Quote TestStep
You may have realized that the ActionMode column has automatically been set
to Verify. Unlike in your previous TestSteps where Tosca is supposed to input
data (Input), in this TestStep Tosca should however verify data.
In the first step of this verify operation, Tosca will select the TestStepValue
priceTable and the first row ($1) by using the ActionMode Select. In the next step
it will use the TestStepValue $last to verify whether the value of the last cell
equals 685.00.
Congratulations! You're done with your Automobile TestCase. In the next chapter
you will learn how to create an ExecutionList in order to run your TestCase (see
chapter 9 "Executing TestCases").
Related chapters
n Tosca Commander Manual - chapter TestCases section (blue)
8 Creating TestCases
Version 10.0 49
9 Executing TestCases
In Tosca you can sum up all completed TestCases in ExecutionLists and run
them. Each TestCase is shown as an ExecutionEntry. Execution results and their
history are automatically written to a log file (ActualLog).
If you would like to run specific TestSteps separately or if you would like to check
TestCases that are still incomplete, you can use the Scratchbook function (see
"ScratchBook").
9.1 ExecutionLists
Run your Automobile TestCase in an ExecutionList:
Click on the ExecutionLists tab in Tosca Commander.
Right-click on the ExecutionList folder ExecutionLists and select Create
Folder from the mini toolbar. You can also click on the ExecutionList
folder and select the icon Create Folder->Folder from the dynamic
menu ExecutionLists.
Assign the name My first ExecutionList to the new ExecutionList folder.
Illustration 66: ExecutionLists
Creating ExecutionEntries
In Tosca you can create ExecutionEntries by dragging and dropping TestCases
onto ExecutionLists.
Right-click onto the ExecutionList folder My first ExecutionList and
select Create ExecutionList from the mini toolbar. You can also click on
the ExecutionList folder and select the icon Create Object-
>ExecutionList from the dynamic menu ExecutionLists.
9 Executing TestCases
Version 10.0 50
Assign the name Vehicle Insurance to the new ExecutionList.
Drag your Automobile TestCase onto your Vehicle Insurance
ExecutionList and drop it there.
The ExecutionEntry Automobile is automatically created and linked to the
corresponding TestCase.
Illustration 67: ExecutionEntry Automobile
If you would like to see which TestCase is linked to which
ExecutionEntry, simply right-click onto an ExecutionEntry and select
the option Jump to TestCase. You can also click on the
ExecutionEntry and select the icon Jump to TestCase from the
dynamic menu ExecutionLists.
Select the option Jump to Module from the context menu of a
TestStep to see which TestStep is linked to which Module. You can
also click on the TestStep and select the icon Jump to Module
from the dynamic menu TestCases.
Running ExecutionLists
Open the Tricentis sample application in Microsoft® Internet Explorer
(see also chapter 6 "The Tricentis Sample Application").
The sample application must show the start screen so that the TestCase can be
successfully executed.
Switch back to Tosca Commander, go to the ExecutionLists window and
select the option Run from the context menu of the Vehicle Insurance
ExecutionList. You can also click on the ExecutionList and select the
icon Run from the dynamic menu ExecutionLists.
9 Executing TestCases
Version 10.0 51
Illustration 68: Running ExecutionLists
Tosca starts executing the TestCase.
Since Tosca will take over control of your mouse and keyboard upon
test execution we highly recommend that you refrain from
performing mouse clicks and keyboard inputs while Tosca is
running your TestCase.
You should now be able to observe Tosca clicking the links and filling out all the
forms in the insurance calculator. The execution will finally stop on the last page
of the Tricentis sample application where you can view the quotes that have been
created for the respective packages.
Execution information
The Loginfo column shows the execution state:
n Green: Passed
n Red: Failed
n White: No Result (i.e. this ExecutionEntry has not yet been executed)
n Gray: the TestCase does no longer exist in this workspace
If your TestCase was successfully executed without any errors, Tosca will indicate
this with a green bar. Since your current TestCase only consists of one single
ExecutionEntry, the green bar includes the figure 1.
Illustration 69: Execution result Automobile
9 Executing TestCases
Version 10.0 52
To get an idea of how various execution information is shown in Tosca you will
now create an ExecutionList containing 5 ExecutionEntries:
Switch to the TestCases window and create the TestCase folder Quotes
beneath the TestCase folder My first TestCase.
Copy the TestCase Automobile to the Quotes TestCase folder and
rename this to Automobile_01.
Switch to the Modules window, drag the Quote Module onto your
Automobile_01 TestCase and drop it there.
Tosca will automatically create the TestStep Quote_1.
Select the option {Click} from the drop-down list of the TestStepValue
Home.
Illustration 70: TestStep Quote_1
Tosca will return to the start screen of the Tricentis sample application after it
has created the quote. This allows you to run several TestCases in a row since
each TestCase starts on the start screen of the sample application.
Make 4 copies of your Automobile_01 TestCase and paste them into
the Quotes folder. The TestCases are numbered consecutively.
Illustration 71: TestCases from Automobile_01 to Automobile_05
9 Executing TestCases
Version 10.0 53
Drag your Quotes TestCase folder onto your Vehicle Insurance
ExecutionList and drop it there.
Tosca automatically creates new ExecutionEntries and adapts the ExecutionList
statistics accordingly: Since your newly created ExecutionEntries have not yet
been executed, they receive the status No Result and are shown with a white bar
in the Loginfo column.
Illustration 72: White bar showing that 5 ExecutionEntries have not yet been executed
Set the test results manually to see all execution states that are available in
Tosca:
Right-click on the Automobile_01 ExecutionEntry and select Set result-
>Failed from the context menu. You can also click on the
ExecutionEntry and select the icon Set result->Failed from the
dynamic menu ExecutionLists.
Give reasons for your decision by entering Reason 01 into the
appearing popup window.
Set the ExecutionEntries for Automobile_02 and Automobile_03 also to
Failed (Set result->Failed). You don't need to give reasons here, simply
click on OK.
Right-click on the Automobile_04 ExecutionEntry and select Set result-
>Passed from the context menu. You can also click on the
ExecutionEntry and select the icon Set result->Passed from the
dynamic menu ExecutionLists. Confirm your selection with a click on
OK in the appearing popup window.
Switch to the TestCases window and remove TestStep Automobile_02
from your TestCase folder Quotes.
Confirm the appearing warning message with a click on OK.
9 Executing TestCases
Version 10.0 54
Illustration 73: Warning
Switch to the ExecutionLists window and left-click on your Quotes
ExecutionList.
The Loginfo column shows various execution states:
One TestCase is marked as passed (green), one has not yet been executed (white),
and one TestCase does no longer exist in the workspace (gray). Two TestCases are
marked as failed (red).
Illustration 74: Execution states
History
To become acquainted with ExecutionList histories, you will now modify a
TestCase and trigger an error. Specify a wrong verification value:
Switch to the TestCases window, go to your Automobile_04 TestCase
(TestCase folder Quotes) and set the value to be verified to 12345 in the
Quote TestStep.
9 Executing TestCases
Version 10.0 55
Illustration 75: The value to be verified is wrong
Open the Tricentis sample application in Microsoft® Internet Explorer
(see also chapter 6 "The Tricentis Sample Application").
The sample application must show the start screen so that your TestCase can be
successfully executed.
Run your Quotes ExecutionList.
Disable the option Show only last ActualLog under View-
>ExecutionLists, and enable the following entries: Show multiline Logs,
Show Statistics only on visible ExecutionLists, and Show Statistics.
Illustration 76: ExecutionLists view - settings
Right-click on the ExecutionEntry Automobile_04 in the details view.
Choose (Expand all) in the mini toolbar to view all TestStepValue
9 Executing TestCases
Version 10.0 56
details.
The log history is shown in chronological order in Tosca. The most recent results
are always located on top.
The ExecutionEntry Automobile_04 provides a description of the error occurred,
along with further details on which TestStep caused the error.
Illustration 77: ExecutionList: history
9.2 ScratchBook
The ScratchBook in Tosca Commander is used for running individual TestSteps
upon TestCase creation.
You can combine various TestCases, TestSteps and TestCase folders and run
them in the ScratchBook.
In contrast to ExecutionLists, the ScratchBook does neither save how TestCases
are combined for test execution nor the test results. We recommend using the
ScratchBook solely upon test case creation.
Run the Vehicle data TestStep in your Automobile TestCase in the ScratchBook.
Since this TestStep contains vehicle data you have to make sure that the
corresponding page of the sample application is open so that Tosca can enter the
data accordingly.
Open the Tricentis sample application in Microsoft® Internet Explorer
(see "The Tricentis Sample Application") and go to the Vehicle data
page.
9 Executing TestCases
Version 10.0 57
Illustration 78: Vehicle data screen
Return to Tosca Commander. Right-click on your Vehicle data TestStep
(beneath the Automobile TestCase) and select the option Run in
ScratchBook from the context menu. You can also click on the TestStep
and select the icon Run in ScratchBook from the dynamic menu
TestCases.
Illustration 79: Running the TestStep in Scratchbook
9 Executing TestCases
Version 10.0 58
The ScratchBook window opens and Tosca runs the Vehicle data TestStep.
Since Tosca will take over control of your mouse and keyboard upon
test execution we highly recommend that you refrain from
performing mouse clicks and keyboard inputs while Tosca is
running your TestStep.
The ScratchBook window lists the executed TestSteps. In the illustration below
you can see the Vehicle data TestStep along with the execution results.
Illustration 80: ScratchBook
Congratulations! You've successfully completed this tutorial.
At this stage you should be familiar with the main important processes in Tosca.
Related chapters
n Tosca Commander Manual - chapter ExecutionLists
9 Executing TestCases
Version 10.0 59

More Related Content

Similar to Tutorial_Tricentis_Tosca_Testsuite.pdf

Tutorials v10
Tutorials v10Tutorials v10
Tutorials v10
Walquer huacani calsin
 
VT University Live Session 3
VT University Live Session 3VT University Live Session 3
VT University Live Session 3
VisibleThread
 
50 essential excel tips
50 essential excel tips50 essential excel tips
50 essential excel tips
mahmoodali550
 
Adv excel® 2013
Adv excel® 2013Adv excel® 2013
Adv excel® 2013
Raghu nath
 
Excel® 2013
Excel® 2013Excel® 2013
Excel® 2013
Raghu nath
 
P3.docx
P3.docxP3.docx
P3.docx
IsaacMwangi25
 
BLCN532 Lab 1Set up your development environmentV2.0.docx
BLCN532 Lab 1Set up your development environmentV2.0.docxBLCN532 Lab 1Set up your development environmentV2.0.docx
BLCN532 Lab 1Set up your development environmentV2.0.docx
moirarandell
 
Lab1
Lab1Lab1
PythonNotes1.pdf
PythonNotes1.pdfPythonNotes1.pdf
PythonNotes1.pdf
Shaikfiza5
 
Excel 2013
Excel 2013Excel 2013
Excel 2013
Raghu nath
 
Generic Repository Pattern in MVC3 Application with Entity Framework
Generic Repository Pattern in MVC3 Application with Entity FrameworkGeneric Repository Pattern in MVC3 Application with Entity Framework
Generic Repository Pattern in MVC3 Application with Entity Framework
Akhil Mittal
 
Pl lab solution
Pl lab solutionPl lab solution
Pl lab solution
Ashwin Kumar
 
( 13 ) Office 2007 Coding With Excel And Excel Services
( 13 ) Office 2007   Coding With Excel And Excel Services( 13 ) Office 2007   Coding With Excel And Excel Services
( 13 ) Office 2007 Coding With Excel And Excel Services
LiquidHub
 
(150324) Everything you ever wanted to know about Studio!
(150324) Everything you ever wanted to know about Studio!(150324) Everything you ever wanted to know about Studio!
(150324) Everything you ever wanted to know about Studio!
Paul Filkin
 
Getting started with_testcomplete
Getting started with_testcompleteGetting started with_testcomplete
Getting started with_testcomplete
ankit.das
 
( 13 ) Office 2007 Coding With Excel And Excel Services
( 13 ) Office 2007   Coding With Excel And Excel Services( 13 ) Office 2007   Coding With Excel And Excel Services
( 13 ) Office 2007 Coding With Excel And Excel Services
LiquidHub
 
Laporan Praktikum Keamanan Siber - Tugas 3 - Kelas C - Kelompok 3.pdf
Laporan Praktikum Keamanan Siber - Tugas 3 - Kelas C - Kelompok 3.pdfLaporan Praktikum Keamanan Siber - Tugas 3 - Kelas C - Kelompok 3.pdf
Laporan Praktikum Keamanan Siber - Tugas 3 - Kelas C - Kelompok 3.pdf
IGedeArieYogantaraSu
 
Advexcellp
AdvexcellpAdvexcellp
ContentsCOSC 2436 – LAB4TITLE .............................docx
ContentsCOSC 2436 – LAB4TITLE .............................docxContentsCOSC 2436 – LAB4TITLE .............................docx
ContentsCOSC 2436 – LAB4TITLE .............................docx
dickonsondorris
 
Advanced Computer ForensicsWindows EnCase Forensics LabDue d.docx
Advanced Computer ForensicsWindows EnCase Forensics LabDue d.docxAdvanced Computer ForensicsWindows EnCase Forensics LabDue d.docx
Advanced Computer ForensicsWindows EnCase Forensics LabDue d.docx
galerussel59292
 

Similar to Tutorial_Tricentis_Tosca_Testsuite.pdf (20)

Tutorials v10
Tutorials v10Tutorials v10
Tutorials v10
 
VT University Live Session 3
VT University Live Session 3VT University Live Session 3
VT University Live Session 3
 
50 essential excel tips
50 essential excel tips50 essential excel tips
50 essential excel tips
 
Adv excel® 2013
Adv excel® 2013Adv excel® 2013
Adv excel® 2013
 
Excel® 2013
Excel® 2013Excel® 2013
Excel® 2013
 
P3.docx
P3.docxP3.docx
P3.docx
 
BLCN532 Lab 1Set up your development environmentV2.0.docx
BLCN532 Lab 1Set up your development environmentV2.0.docxBLCN532 Lab 1Set up your development environmentV2.0.docx
BLCN532 Lab 1Set up your development environmentV2.0.docx
 
Lab1
Lab1Lab1
Lab1
 
PythonNotes1.pdf
PythonNotes1.pdfPythonNotes1.pdf
PythonNotes1.pdf
 
Excel 2013
Excel 2013Excel 2013
Excel 2013
 
Generic Repository Pattern in MVC3 Application with Entity Framework
Generic Repository Pattern in MVC3 Application with Entity FrameworkGeneric Repository Pattern in MVC3 Application with Entity Framework
Generic Repository Pattern in MVC3 Application with Entity Framework
 
Pl lab solution
Pl lab solutionPl lab solution
Pl lab solution
 
( 13 ) Office 2007 Coding With Excel And Excel Services
( 13 ) Office 2007   Coding With Excel And Excel Services( 13 ) Office 2007   Coding With Excel And Excel Services
( 13 ) Office 2007 Coding With Excel And Excel Services
 
(150324) Everything you ever wanted to know about Studio!
(150324) Everything you ever wanted to know about Studio!(150324) Everything you ever wanted to know about Studio!
(150324) Everything you ever wanted to know about Studio!
 
Getting started with_testcomplete
Getting started with_testcompleteGetting started with_testcomplete
Getting started with_testcomplete
 
( 13 ) Office 2007 Coding With Excel And Excel Services
( 13 ) Office 2007   Coding With Excel And Excel Services( 13 ) Office 2007   Coding With Excel And Excel Services
( 13 ) Office 2007 Coding With Excel And Excel Services
 
Laporan Praktikum Keamanan Siber - Tugas 3 - Kelas C - Kelompok 3.pdf
Laporan Praktikum Keamanan Siber - Tugas 3 - Kelas C - Kelompok 3.pdfLaporan Praktikum Keamanan Siber - Tugas 3 - Kelas C - Kelompok 3.pdf
Laporan Praktikum Keamanan Siber - Tugas 3 - Kelas C - Kelompok 3.pdf
 
Advexcellp
AdvexcellpAdvexcellp
Advexcellp
 
ContentsCOSC 2436 – LAB4TITLE .............................docx
ContentsCOSC 2436 – LAB4TITLE .............................docxContentsCOSC 2436 – LAB4TITLE .............................docx
ContentsCOSC 2436 – LAB4TITLE .............................docx
 
Advanced Computer ForensicsWindows EnCase Forensics LabDue d.docx
Advanced Computer ForensicsWindows EnCase Forensics LabDue d.docxAdvanced Computer ForensicsWindows EnCase Forensics LabDue d.docx
Advanced Computer ForensicsWindows EnCase Forensics LabDue d.docx
 

Recently uploaded

Oliver Asks for More by Charles Dickens (9)
Oliver Asks for More by Charles Dickens (9)Oliver Asks for More by Charles Dickens (9)
Oliver Asks for More by Charles Dickens (9)
nitinpv4ai
 
220711130082 Srabanti Bag Internet Resources For Natural Science
220711130082 Srabanti Bag Internet Resources For Natural Science220711130082 Srabanti Bag Internet Resources For Natural Science
220711130082 Srabanti Bag Internet Resources For Natural Science
Kalna College
 
A Free 200-Page eBook ~ Brain and Mind Exercise.pptx
A Free 200-Page eBook ~ Brain and Mind Exercise.pptxA Free 200-Page eBook ~ Brain and Mind Exercise.pptx
A Free 200-Page eBook ~ Brain and Mind Exercise.pptx
OH TEIK BIN
 
BPSC-105 important questions for june term end exam
BPSC-105 important questions for june term end examBPSC-105 important questions for june term end exam
BPSC-105 important questions for june term end exam
sonukumargpnirsadhan
 
How to Manage Reception Report in Odoo 17
How to Manage Reception Report in Odoo 17How to Manage Reception Report in Odoo 17
How to Manage Reception Report in Odoo 17
Celine George
 
220711130088 Sumi Basak Virtual University EPC 3.pptx
220711130088 Sumi Basak Virtual University EPC 3.pptx220711130088 Sumi Basak Virtual University EPC 3.pptx
220711130088 Sumi Basak Virtual University EPC 3.pptx
Kalna College
 
adjectives.ppt for class 1 to 6, grammar
adjectives.ppt for class 1 to 6, grammaradjectives.ppt for class 1 to 6, grammar
adjectives.ppt for class 1 to 6, grammar
7DFarhanaMohammed
 
Accounting for Restricted Grants When and How To Record Properly
Accounting for Restricted Grants  When and How To Record ProperlyAccounting for Restricted Grants  When and How To Record Properly
Accounting for Restricted Grants When and How To Record Properly
TechSoup
 
Skimbleshanks-The-Railway-Cat by T S Eliot
Skimbleshanks-The-Railway-Cat by T S EliotSkimbleshanks-The-Railway-Cat by T S Eliot
Skimbleshanks-The-Railway-Cat by T S Eliot
nitinpv4ai
 
skeleton System.pdf (skeleton system wow)
skeleton System.pdf (skeleton system wow)skeleton System.pdf (skeleton system wow)
skeleton System.pdf (skeleton system wow)
Mohammad Al-Dhahabi
 
欧洲杯下注-欧洲杯下注押注官网-欧洲杯下注押注网站|【​网址​🎉ac44.net🎉​】
欧洲杯下注-欧洲杯下注押注官网-欧洲杯下注押注网站|【​网址​🎉ac44.net🎉​】欧洲杯下注-欧洲杯下注押注官网-欧洲杯下注押注网站|【​网址​🎉ac44.net🎉​】
欧洲杯下注-欧洲杯下注押注官网-欧洲杯下注押注网站|【​网址​🎉ac44.net🎉​】
andagarcia212
 
A Visual Guide to 1 Samuel | A Tale of Two Hearts
A Visual Guide to 1 Samuel | A Tale of Two HeartsA Visual Guide to 1 Samuel | A Tale of Two Hearts
A Visual Guide to 1 Samuel | A Tale of Two Hearts
Steve Thomason
 
Educational Technology in the Health Sciences
Educational Technology in the Health SciencesEducational Technology in the Health Sciences
Educational Technology in the Health Sciences
Iris Thiele Isip-Tan
 
Geography as a Discipline Chapter 1 __ Class 11 Geography NCERT _ Class Notes...
Geography as a Discipline Chapter 1 __ Class 11 Geography NCERT _ Class Notes...Geography as a Discipline Chapter 1 __ Class 11 Geography NCERT _ Class Notes...
Geography as a Discipline Chapter 1 __ Class 11 Geography NCERT _ Class Notes...
ImMuslim
 
مصحف القراءات العشر أعد أحرف الخلاف سمير بسيوني.pdf
مصحف القراءات العشر   أعد أحرف الخلاف سمير بسيوني.pdfمصحف القراءات العشر   أعد أحرف الخلاف سمير بسيوني.pdf
مصحف القراءات العشر أعد أحرف الخلاف سمير بسيوني.pdf
سمير بسيوني
 
Information and Communication Technology in Education
Information and Communication Technology in EducationInformation and Communication Technology in Education
Information and Communication Technology in Education
MJDuyan
 
Ch-4 Forest Society and colonialism 2.pdf
Ch-4 Forest Society and colonialism 2.pdfCh-4 Forest Society and colonialism 2.pdf
Ch-4 Forest Society and colonialism 2.pdf
lakshayrojroj
 
220711130097 Tulip Samanta Concept of Information and Communication Technology
220711130097 Tulip Samanta Concept of Information and Communication Technology220711130097 Tulip Samanta Concept of Information and Communication Technology
220711130097 Tulip Samanta Concept of Information and Communication Technology
Kalna College
 
HYPERTENSION - SLIDE SHARE PRESENTATION.
HYPERTENSION - SLIDE SHARE PRESENTATION.HYPERTENSION - SLIDE SHARE PRESENTATION.
HYPERTENSION - SLIDE SHARE PRESENTATION.
deepaannamalai16
 
Bonku-Babus-Friend by Sathyajith Ray (9)
Bonku-Babus-Friend by Sathyajith Ray  (9)Bonku-Babus-Friend by Sathyajith Ray  (9)
Bonku-Babus-Friend by Sathyajith Ray (9)
nitinpv4ai
 

Recently uploaded (20)

Oliver Asks for More by Charles Dickens (9)
Oliver Asks for More by Charles Dickens (9)Oliver Asks for More by Charles Dickens (9)
Oliver Asks for More by Charles Dickens (9)
 
220711130082 Srabanti Bag Internet Resources For Natural Science
220711130082 Srabanti Bag Internet Resources For Natural Science220711130082 Srabanti Bag Internet Resources For Natural Science
220711130082 Srabanti Bag Internet Resources For Natural Science
 
A Free 200-Page eBook ~ Brain and Mind Exercise.pptx
A Free 200-Page eBook ~ Brain and Mind Exercise.pptxA Free 200-Page eBook ~ Brain and Mind Exercise.pptx
A Free 200-Page eBook ~ Brain and Mind Exercise.pptx
 
BPSC-105 important questions for june term end exam
BPSC-105 important questions for june term end examBPSC-105 important questions for june term end exam
BPSC-105 important questions for june term end exam
 
How to Manage Reception Report in Odoo 17
How to Manage Reception Report in Odoo 17How to Manage Reception Report in Odoo 17
How to Manage Reception Report in Odoo 17
 
220711130088 Sumi Basak Virtual University EPC 3.pptx
220711130088 Sumi Basak Virtual University EPC 3.pptx220711130088 Sumi Basak Virtual University EPC 3.pptx
220711130088 Sumi Basak Virtual University EPC 3.pptx
 
adjectives.ppt for class 1 to 6, grammar
adjectives.ppt for class 1 to 6, grammaradjectives.ppt for class 1 to 6, grammar
adjectives.ppt for class 1 to 6, grammar
 
Accounting for Restricted Grants When and How To Record Properly
Accounting for Restricted Grants  When and How To Record ProperlyAccounting for Restricted Grants  When and How To Record Properly
Accounting for Restricted Grants When and How To Record Properly
 
Skimbleshanks-The-Railway-Cat by T S Eliot
Skimbleshanks-The-Railway-Cat by T S EliotSkimbleshanks-The-Railway-Cat by T S Eliot
Skimbleshanks-The-Railway-Cat by T S Eliot
 
skeleton System.pdf (skeleton system wow)
skeleton System.pdf (skeleton system wow)skeleton System.pdf (skeleton system wow)
skeleton System.pdf (skeleton system wow)
 
欧洲杯下注-欧洲杯下注押注官网-欧洲杯下注押注网站|【​网址​🎉ac44.net🎉​】
欧洲杯下注-欧洲杯下注押注官网-欧洲杯下注押注网站|【​网址​🎉ac44.net🎉​】欧洲杯下注-欧洲杯下注押注官网-欧洲杯下注押注网站|【​网址​🎉ac44.net🎉​】
欧洲杯下注-欧洲杯下注押注官网-欧洲杯下注押注网站|【​网址​🎉ac44.net🎉​】
 
A Visual Guide to 1 Samuel | A Tale of Two Hearts
A Visual Guide to 1 Samuel | A Tale of Two HeartsA Visual Guide to 1 Samuel | A Tale of Two Hearts
A Visual Guide to 1 Samuel | A Tale of Two Hearts
 
Educational Technology in the Health Sciences
Educational Technology in the Health SciencesEducational Technology in the Health Sciences
Educational Technology in the Health Sciences
 
Geography as a Discipline Chapter 1 __ Class 11 Geography NCERT _ Class Notes...
Geography as a Discipline Chapter 1 __ Class 11 Geography NCERT _ Class Notes...Geography as a Discipline Chapter 1 __ Class 11 Geography NCERT _ Class Notes...
Geography as a Discipline Chapter 1 __ Class 11 Geography NCERT _ Class Notes...
 
مصحف القراءات العشر أعد أحرف الخلاف سمير بسيوني.pdf
مصحف القراءات العشر   أعد أحرف الخلاف سمير بسيوني.pdfمصحف القراءات العشر   أعد أحرف الخلاف سمير بسيوني.pdf
مصحف القراءات العشر أعد أحرف الخلاف سمير بسيوني.pdf
 
Information and Communication Technology in Education
Information and Communication Technology in EducationInformation and Communication Technology in Education
Information and Communication Technology in Education
 
Ch-4 Forest Society and colonialism 2.pdf
Ch-4 Forest Society and colonialism 2.pdfCh-4 Forest Society and colonialism 2.pdf
Ch-4 Forest Society and colonialism 2.pdf
 
220711130097 Tulip Samanta Concept of Information and Communication Technology
220711130097 Tulip Samanta Concept of Information and Communication Technology220711130097 Tulip Samanta Concept of Information and Communication Technology
220711130097 Tulip Samanta Concept of Information and Communication Technology
 
HYPERTENSION - SLIDE SHARE PRESENTATION.
HYPERTENSION - SLIDE SHARE PRESENTATION.HYPERTENSION - SLIDE SHARE PRESENTATION.
HYPERTENSION - SLIDE SHARE PRESENTATION.
 
Bonku-Babus-Friend by Sathyajith Ray (9)
Bonku-Babus-Friend by Sathyajith Ray  (9)Bonku-Babus-Friend by Sathyajith Ray  (9)
Bonku-Babus-Friend by Sathyajith Ray (9)
 

Tutorial_Tricentis_Tosca_Testsuite.pdf

  • 2.
  • 3. Table of Contents Table of Contents 1 Survey 4 1.1 Tosca Commander™ Tutorial 4 1.2 Legal notice 4 2 Tosca Tutorial 5 3 Preconditions for working through the Tutorial 6 4 Definition of Terms for the Tosca Commander™ Objects 7 5 Starting Tosca Commander 8 6 The Tricentis Sample Application 19 7 Creating Modules 21 8 Creating TestCases 42 9 Executing TestCases 50 9.1 ExecutionLists 50 9.2 ScratchBook 57 Version 10.0 3
  • 4. 1 Survey Version 10.0 4 1 Survey Tosca Tutorial, version: 03.11.2016 1.1 Tosca Commander™ Tutorial The Tosca Commander™ Tutorial is a guide to become acquainted with the elementary processes in Tosca. It is primarily aimed at beginners, who want to learn how to use the basic functions of Tosca in self-study. 1.2 Legal notice Tricentis GmbH Leonard-Bernstein-Straße 10 1220 Vienna Austria Tel.: +43 (1) 263 24 09 Fax: +43 (1) 263 24 09-15 E-Mail: support@tricentis.com Information in this document is subject to change without notice. No part of this document may be reproduced or transmitted in any form or by any means, electronic or mechanical, for any purpose without the express written permission of Tricentis GmbH. This product contains 3rd party software. For further information, please contact Tricentis Support. © by Tricentis GmbH
  • 5. 2 Tosca Tutorial The purpose of this tutorial is to become acquainted with the basic functions in Tosca Commander™. You will create a test case for the Tricentis Vehicle Insurance Application (http://sampleapp.tricentis.com) and you will then execute this test case. Chapter overview We recommend that you go through this tutorial chapter by chapter in the given order since the contents are explained step by step: n In chapter 3 "Preconditions for working through the Tutorial" you will find software requirements and browser settings that need to be specified. n Chapter "Definition of Terms for the Tosca Commander™ Objects" provides you with basic terms in Tosca and shows you how to build test cases. n In chapter 5 "Starting Tosca Commander" you will learn how to start Tosca Commander, how to open the tutorial, how Tosca workspaces look like and how to work with Tosca Commander. n In chapter 6 "The Tricentis Sample Application" we will explain the Tosca sample application to you. n Chapter "Creating Modules" illustrates why you need modules, and you will also create your own modules for your test case. n In chapter 8 "Creating TestCases" we will explain how to build and manage test cases in Tosca, and you will create your first test case and add test steps. n Chapter "Executing TestCases" provides you with a detailed description of execution lists and the Scratchbook. Here you will create an execution list for your test case. Help If you would like to open the Tosca Manuals online, simply press the F1 key in Tosca Commander. In our Support Portal you can either browse through the Online Help or you can download the Tosca Manuals as PDF versions. Useful links that may be of interest to you n Webinars n Online Training 2 Tosca Tutorial Version 10.0 5
  • 6. 3 Preconditions for working through the Tutorial In order to go through this tutorial you need: n A complete default installation of Tricentis Tosca Testsuite along with a valid license n Microsoft® Internet Explorer 9 or later and zoom settings set to 100% (see also the System Requirements for Tricentis Tosca Testsuite). n A stable internet connection to be able to view all the contents that are related to this tutorial. Paths All specified paths refer to a default installation on drive C: with the default paths recommended by Tosca. n Tosca program files %TRICENTIS_HOME%: C:Program FilesTRICENTISTosca Testsuite, or C:Program Files (x86)TRICENTISTosca Testsuite n Tosca Commander™ project files %TRICENTIS_PROJECTS%: C:Tosca_ PROJECTS 3 Preconditions for working through the Tutorial Version 10.0 6
  • 7. 4 Definition of Terms for the Tosca Commander™ Objects This chapter provides you with definitions of the basic terms in Tosca and it outlines how TestCases are structured in Tosca. In this tutorial you will create Modules and a TestCase with TestSteps, and finally you will run your TestCase. A TestCase consists of several TestSteps which determine the test process. Each TestStep maps one page of the Tricentis sample application (also known as "the test object"). TestSteps are processed in sequential order (see chapter 8 "Creating TestCases"). You specify your test data in the TestStepValues of the TestSteps. Test data are data which are used in the application upon test execution. This is for instance the case when a specific text is written to an input field, or when a button is clicked. Automated TestSteps are based on Modules. Modules contain technical information which is used to identify and steer screen items. These items can for instance be buttons or input fields. Tosca creates a ModuleAttribute for each item and saves this to the Module (see chapter 7 "Creating Modules"). In Tosca, test data are separated from technical steering information. This allows Modules to be used repeatedly to create various TestSteps for any number of TestCases in order to test a variety of data. ExecutionLists enable you to run your TestCases and to log the results of the test execution (see chapter 9 "Executing TestCases"). Icon Object Description Modules Represent the technical steering information TestCases Determine the test sequence and contain test data ExecutionLists Serve to plan and manage the test execution Table 1: Objects in Tosca Commander™ Object hierarchy All objects in Tosca Commander are arranged in a strict hierarchical structure. This object hierarchy must be kept when objects are either copied or moved around. This means for instance that TestCase folders cannot be copied to TestStep folders or Module folders (see chapter "Drag and drop"). Related chapters n Tosca Commander Manual - chapter Managing workspaces (Object hierarchy). 4 Definition of Terms for the Tosca Commander™ Objects Version 10.0 7
  • 8. 5 Starting Tosca Commander TestCases are created, executed and organized in Tosca Commander™. Start Tosca Commander™ via the Windows Start menu: Start->All Programs->Tricentis->Tosca Testsuite->Tosca Commander. As soon as Tosca Commander is open, the start screen will be shown. Illustration 1: Tosca Commander start screen Creating workspaces You need to create a workspace where you will manage your objects. Select Project->New from the Tosca Commander™ menu to open the Tosca Commander: Create new workspace window. Enter the name of your workspace into the Select name for new workspace field, e.g. Tosca_Tutorial_en. 5 Starting Tosca Commander Version 10.0 8
  • 9. Illustration 2: Creating a new workspace Click on OK to create the workspace. In the next window, click on Close. The workspace opens. Illustration 3: Workspace Tosca Commander™ is inspired by Microsoft Windows Explorer®, which means that all items are mapped in a tree structure. You can open any number of windows and display a freely definable section of this tree structure. If you select an item in the tree view, Tosca will show the item details in the details view. 5 Starting Tosca Commander Version 10.0 9
  • 10. If the German user interface in Tosca Commander™ is active, you can change the language via the following menu entry: Project- >Options->Ansicht->Sprache. Set option Sprache to English. Tosca Commander must be restarted so that the changes take effect. Title bar The title bar in Tosca Commander shows the name of the currently open workspace. The title bar also includes the quick access toolbar which provides you with options such as Save, Undo, etc. Menu (Ribbon) The menu is designed in the form of ribbons and consists of several tabs which allow you to access the corresponding Tosca Commander functions. These functions are either enabled or disabled, depending on the context you are working in. If you switch between the windows of the various sections (see chapter "Windows and tabs") or if you select objects within the sections, Tosca will open up an additional tab for this section that includes a dynamic menu. The dynamic menu shows relevant options for the selected section or object. A dynamic menu is available for the following sections in Tosca Commander: TestCases, Modules, Requirements, TestCaseDesign, Execution and Reporting. Within the Execution section, a dynamic menu is available for the subsections ExecutionLists and Exploratory Testing. Status bar The status bar shows the action that is currently performed by Tosca Commander. Windows and tabs Each object type (e.g. TestCases, Modules, etc.) of the Tosca Commander workspace has its own window. At the bottom of each window you can see a tab for each window. Please feel free to arrange the windows according to your needs. Go to the Home menu and click on Section->Modules to open a new Modules window. Left-click onto the title bar of the Modules window and drag the window onto the icon in the right section of the window as shown in the picture below. 5 Starting Tosca Commander Version 10.0 10
  • 11. Illustration 4: Arranging windows in the workspace In this example we will insert the Modules window right next to the TestCases window: Illustration 5: Two windows In Tosca you can modify the tabs order at the bottom of the window and you can drag tabs to other windows, as you like. Click on the Execution tab in the left window. Right-click onto the ExecutionLists folder and select the option Open in new window. 5 Starting Tosca Commander Version 10.0 11
  • 12. Illustration 6: Open in new window option The ExecutionLists window opens. Drag the ExecutionLists window onto the Modules window and drop it there. Illustration 7: Moving the ExecutionLists window You can also use the tabs to rearrange your workspace windows: simply click on the tab you would like to move and drag this to the position of your choice. Click on the x sign to close tabs you don't need. 5 Starting Tosca Commander Version 10.0 12
  • 13. Close both the Modules and the Execution tab in the left window. The windows and tabs in your workspace should now look like in the picture shown below since this is the view we will be working with in this tutorial. Illustration 8: Recommended view Perspectives In Tosca you can arrange any open windows as you like and you can save your customized view as Perspective. So, if you accidentally change your window arrangements you can easily restore your preferred view. Go to the View menu and select Manage->Save... from the Perspectives section to save your current perspective. The option Manage->Select enables you to select either the default perspective or one of your saved perpectives if you created some. Tree view In Tosca you can hide the tree view if necessary. Simply click on the vertical line between the two window sections. If you click once again onto the vertical divider line, the tree view will be shown again. 5 Starting Tosca Commander Version 10.0 13
  • 14. Illustration 9: Tree view is visible Illustration 10: Hidden tree view You can resize you workspace windows if required: left-click onto the divider line, hold the mouse button down and move the vertical divider line to you preferred position. Project window The project window provides you with an overview of your entire project (Home- >Project). This shows all workspace objects in a tree view starting from the project root element which is named Tosca_Tutorial_en in this tutorial. Context menu and mini toolbar In Tosca you are able to process workspace objects via the context menu or the dynamic menu. The context menu provides you with the options that are relevant 5 Starting Tosca Commander Version 10.0 14
  • 15. for the respective object. Open the context menu by right-clicking on any object in the workspace. The upper part of the context menu includes a mini toolbar. This is part of the context menu and it contains options that are frequently used, such as Delete , Rename and options for creating new objects. Hover over the icons in the mini toolbar to view the option name in the tooltip. Go to the TestCases section. Right-click on the TestCase folder TestCases and select the option Create Folder from the mini toolbar. Illustration 11: Creating a new folder Rename the new TestCase folder to My first TestCase. Right-click on the TestCase folder My first TestCase and select the option Create Folder from the mini toolbar. Rename the new TestCase folder to Vehicle Insurance. Illustration 12: New TestCase folder Vehicle Insurance TestCase folders can be renamed at any point in time. Simply select the option Rename from the context menu. Create a copy of the TestCase folder Vehicle Insurance beneath the TestCase folder. Right-click on the Vehicle Insurance folder and select the option Copy from the context menu. The copy must be created within the TestCase folder My first TestCase so that this is located on the same level like the TestCase folder Vehicle Insurance. 5 Starting Tosca Commander Version 10.0 15
  • 16. Select the option Paste from the context menu of the TestCase folder My first TestCase. Tosca automatically assigns the name Vehicle Insurance_1 to the newly created copy. Illustration 13: Vehicle Insurance_1 folder Drag and drop In Tosca Commander you can perform various operations by using drag and drop. Left click on the TestCase folder Vehicle Insurance_1 and keep the mouse button pressed. Without releasing the mouse button, drag the TestCase folder Vehicle Insurance_1 over the TestCase folder Vehicle Insurance. Release the mouse button as soon as the cursor is located on the TestCase folder Vehicle Insurance. Illustration 14: Moving TestCase folders by using drag and drop As you can see, TestCase folder Vehicle Insurance_1 is now located beneath the TestCase folder Vehicle Insurance: Illustration 15: TestCase folder Vehicle Insurance_1 as a subfolder Since you don't need TestCase folder Vehicle Insurance_1 any longer you can delete this as follows: Right-click onto the TestCase folder Vehicle Insurance_1 and select the option Delete from the mini toolbar. 5 Starting Tosca Commander Version 10.0 16
  • 17. In the next step, try to move the TestCase folder Vehicle Insurance to the Modules folder Modules. Drag the TestCase folder Vehicle Insurance onto the Modules folder Modules. Tosca will prevent this operation since TestCase folders may only be positioned hierarchically beneath TestCase folders (see also chapter "Object hierarchy"). Editing columns In the details view you can add columns, move or remove them, as required. Use drag and drop to move the DataType column to the right of the Workstate column. Two arrows mark the position where the column will be inserted. Illustration 16: Moving a column Right-click onto the header of a column, and select the option Column Chooser from the context menu. A window opens containing a list of available columns. Illustration 17: Opening the Column Chooser Use drag and drop to move the entry Description to the required column position. Two arrows mark the position where the new column will be inserted. 5 Starting Tosca Commander Version 10.0 17
  • 18. Illustration 18: Adding a column Left-click onto the header of the Description column, keep the mouse button pressed and drag this column down until the cursor's shape turns into an X, then release the mouse button. The column is now removed from this view. Illustration 19: Removing a column Related chapters n Tosca Commander Manual - chapter Working with Tosca n Tosca Commander Manual - chapter Creating and Managing Workspaces n Tosca Commander Manual - chapter Managing workspaces (Object hierarchy) 5 Starting Tosca Commander Version 10.0 18
  • 19. 6 The Tricentis Sample Application In this tutorial, the Tricentis sample application will serve as object to be tested, and you will use this application to create a TestCase. The Tricentis sample application is a fictitious vehicle insurance premium calculator and can be used to create quotes for various vehicle types. Open the Tricentis sample application at http://sampleapp.tricentis.com. Please make sure that you use Microsoft® Internet Explorer (see chapter 3 "Preconditions for working through the Tutorial"). Illustration 20: Tricentis Sample Application: start screen Click on the Automobile link in the navigation bar. Now you can see the start screen of the vehicle insurance premium calculator which allows you to enter vehicle data. Mandatory fields are marked with an asterisk *. 6 The Tricentis Sample Application Version 10.0 19
  • 20. Illustration 21: Vehicle insurance premium calculator: entering vehicle data Feel free to get yourself acquainted with the Tricentis sample application: enter some data into the input fields and click Next. Click on Home in the submenu of the navigation bar to return to the start screen of the Tricentis sample application. 6 The Tricentis Sample Application Version 10.0 20
  • 21. 7 Creating Modules If you would like to create an automated TestCase for the Tricentis sample application you need to create Modules which contain the required steering information (see chapter 4 "Definition of Terms for the Tosca Commander™ Objects"). Your task in this tutorial is to build an automated TestCase which contains data for an automobile, and to create a quote for a vehicle insurance with these data. To gather all this information you need to create Modules for each screen of the Tricentis sample application (see chapter 6 "The Tricentis Sample Application"). In Tosca we refer to the creation of Modules as Scanning. Tosca analyzes the screen contents and searches for steerable items. You can then select the items you need and create a Module in Tosca. The Module contains all information required for steering the relevant items. Right-click on the Module folder Modules and select the option Create Folder from the mini toolbar. You can also click on the Module folder and select the icon Create Folder->Folder from the dynamic menu Modules. Assign the name My first Modules to the new Module folder. Select the option Create Folder from the context menu of the Module folder My first Modules. You can also click on the Module folder and select the icon Create Folder->Folder from the dynamic menu Modules. Assign the name Vehicle Insurance to the new Module folder. Illustration 22: Module folder Vehicle Insurance Module 1: Start screen (Home) The first page of the Tricentis sample application is the start screen. Please make sure that the start screen is open in your browser since Tosca always scans the screen that is currently available. Click on Home in the navigation bar of the sample application to open the start screen. 7 Creating Modules Version 10.0 21
  • 22. Illustration 23: Tricentis sample application: start screen Now you're ready to scan this screen. Return to Tosca Commander, go to the Modules window and right-click on the Module folder Vehicle Insurance you created earlier. Select the option Scan Application->Desktop from the context menu. You can also click on the Module folder and select the option from the dynamic menu Modules. The XScan window opens: 7 Creating Modules Version 10.0 22
  • 23. Illustration 24: XScan window Tosca XScan loads all applications that are currently open. Click on the window which shows the Tricentis sample application and then click on Start in the lower right corner of the XScan window. Wait a few seconds while Tosca scans the screen. 7 Creating Modules Version 10.0 23
  • 24. Illustration 25: Tosca XScan: Home screen The HOME window now displays all items which were found during the scan process. Although a large amount of items and functions will be shown in the XScan window, most of them are not relevant for this example. Search for the items that you need for your Module: The relevant item on the start screen is the Automobile link located in the navigation bar. Enable the checkbox in front of an item to select this. If you would like Tosca to help you identify the items in the XScan window and the browser, you can use the Mark on Screen function. Enable this option in the upper part of the XScan window and select an item from the tree. Tosca will then highlight this in red in the browser window. 7 Creating Modules Version 10.0 24
  • 25. Illustration 26: Highlighting items Enable the checkbox next to the item Automobile. Rename the root element Tricentis Vehicle Insurance to Home. The Module will then be saved under Home. Illustration 27: Tosca XScan: selecting the relevant item Automobile of the start screen Click on Save in the XScan window and close the window. Tosca creates the Module Home in the Module folder Vehicle Insurance. The item Automobile you have selected earlier is now shown in the Module as ModuleAttribute. The Module holds any information that is required to click the link in the sample application. 7 Creating Modules Version 10.0 25
  • 26. Illustration 28: Home Module You will need this Module later on for your TestCase (see chapter 8 "Creating TestCases"). Switch to the Tricentis sample application and click the Automobile link on the start screen. The Vehicle data screen appears. Illustration 29: Vehicle data screen Module 2: Vehicle data Now you will create a Module for the vehicle data screen. Right-click on the Module folder Vehicle Insurance and select Scan Application->Desktop from the context menu. You can also click on 7 Creating Modules Version 10.0 26
  • 27. the Module folder and select the option from the dynamic menu Modules. The XScan window opens. Click on the browser tab which shows the Tricentis sample application and then click on Start in the lower right corner of the XScan window. Wait a few seconds while Tosca scans the screen. The HOME window shows all items found upon scanning. Search for the items that are relevant for your Module: Select the items to be included in the Module as shown in the illustration below. Assign the following meaningful name to the root element: Vehicle data. 7 Creating Modules Version 10.0 27
  • 28. Illustration 30: Tosca XScan: relevant items for the Vehicle data Module Click on Save in the XScan window and close the window. Tosca creates the Vehicle data Module in the Module folder Vehicle Insurance and adds all items you have selected in the XScan window as ModuleAttributes. 7 Creating Modules Version 10.0 28
  • 29. Switch to the Tricentis sample application, enter the data as shown in the illustration below and click on Next. Illustration 31: Entering vehicle data The Insurant screen appears. 7 Creating Modules Version 10.0 29
  • 30. Illustration 32: Insurant data screen (partial view) Module 3: Insurant Now you will create a Module for the Insurant screen. Right-click on the Module folder Vehicle Insurance and select Scan Application->Desktop from the context menu. You can also click on the Module folder and select the option from the dynamic menu Modules. The XScan window opens. Click on the browser tab which shows the Tricentis sample application and then click on Start in the lower right corner of the XScan window. Wait a few seconds while Tosca scans the screen. Enable the option Select on Screen in Tosca XScan. This will help you select the correct items with ease. 7 Creating Modules Version 10.0 30
  • 31. Illustration 33: Tosca XScan: Select on Screen The Select your controls on the screen window opens: Illustration 34: Tosca XScan: Select your controls on the screen window Click onto an item in the Tricentis sample application. Tosca will highlight the corresponding item in blue in the application and will automatically add this to the Select your controls on the screen window. 7 Creating Modules Version 10.0 31
  • 32. Illustration 35: Tosca XScan: Select your controls on the screen window: First Name is selected To remove an item from this list, simply click on this item again. Select the items to be included in your Module as shown in the illustration below. Illustration 36: Tosca XScan: Insurant data are selected, part 1 Click on as soon as you're finished. The focus will return to the Tosca XScan window. You can open the Select your controls on the screen window again at any time via the Tosca XScan menu to add further items to your Module. Switch to the Tricentis sample application and scroll down on the current page to display the items as shown in the illustration below. 7 Creating Modules Version 10.0 32
  • 33. Illustration 37: Tricentis sample application: Insurant details Enable the Select on Screen option in Tosca XScan and select the items that are still missing as shown in the illustration below. Illustration 38: Tosca XScan: Insurant data are selected, part 2 Rename the project root element to Insurant. 7 Creating Modules Version 10.0 33
  • 34. Illustration 39: Tosca XScan: relevant screen items for the Insurant Module If you are wondering why the Prev button is not enabled in the list above, it’s just because it is not needed in this TestCase. Click on Save in the XScan window and close the window. Tosca creates the Module Insurant in the Module folder Vehicle Insurance and adds all items you have selected in the XScan window as ModuleAttributes. Switch to the Tricentis sample application, enter the insurant data as shown in the illustration below and click on Next. 7 Creating Modules Version 10.0 34
  • 35. Illustration 40: Entering insurant data The Product data screen appears: 7 Creating Modules Version 10.0 35
  • 36. Illustration 41: Product data screen Module 4: Product data Now you will create a Module for the product data screen. Right-click on the Module folder Vehicle Insurance and select Scan Application->Desktop. You can also click on the Module folder and select the option from the dynamic menu Modules. The XScan window opens. Click on the browser tab which shows the Tricentis sample application and then click on Start in the lower right corner of the XScan window. Wait a few seconds while Tosca scans the screen. Select the items to be included in the Module as shown in the illustration below. 7 Creating Modules Version 10.0 36
  • 37. Illustration 42: Tosca XScan: relevant items for the Product data Module Rename the two Yes items to Euro Protection and Legal Defense Insurance accordingly: To do so, enable the Mark on Screen option in Tosca XScan and select the Yes items in the tree view. This allows you to easily identify and distinguish these two items from each other. Illustration 43: Tosca XScan: identifying items by using Mark on Screen Assign the following meaningful name to the root element: Product data. 7 Creating Modules Version 10.0 37
  • 38. Illustration 44: Tosca XScan: relevant items for the Product data Module Click on Save in the XScan window and close the window. Tosca creates the Module Product data in the Module folder Vehicle Insurance and adds all items you have selected in the XScan window as ModuleAttributes. Switch to the Tricentis sample application, enter the data as shown in the illustration below and click on Next. Indicate the first of the month after next for the Start Date. In our tutorial here, we use 12/01/2016. Illustration 45: Entering product data 7 Creating Modules Version 10.0 38
  • 39. The Price option screen appears. Please note that the amounts in your sample application may differ from the ones shown in the illustration below. Illustration 46: Price option screen Module 5: Quote On this page you can choose from various packages and price options. Later on you will create a TestCase using data of this screen to verify whether the Price per Year ($) equals a certain value for the corresponding package. This means that you need to scan a new Module right now: Right-click on the Module folder Vehicle Insurance and select Scan Application->Desktop. You can also click on the Module folder and select the option from the dynamic menu Modules. The XScan window opens. Click on the browser tab which shows the Tricentis sample application and then click on Start in the lower right corner of the XScan window. Wait a few seconds while Tosca scans the screen. The insurance calculator shows the calculated quote in the form of a table. Please note that the amounts in your sample application may differ from the ones shown in the illustration below. Illustration 47: Selecting the appropriate package Use the Mark on Screen option in the XScan window to identify the table accordingly. The table name in XScan is priceTable. Select the items to be included in the Module as shown in the illustration below. 7 Creating Modules Version 10.0 39
  • 40. Assign the following meaningful name to the root element: Quote. Illustration 48: XScan: relevant items for the Quote Module Click on Save in the XScan window and close the window. Tosca creates the Module Quote in the Module folder Vehicle Insurance and adds all items you have selected in the XScan window as ModuleAttributes. At this stage you have created all the Modules you need for your TestCase. 7 Creating Modules Version 10.0 40
  • 41. Illustration 49: Modules required for the Automobile TestCase Related chapters n Tosca Commander Manual - chapter Modules section (orange) 7 Creating Modules Version 10.0 41
  • 42. 8 Creating TestCases In this chapter you will create a TestCase with TestSteps which maps the vehicle insurance quote for an automobile. This requires that you specify the automobile data in the TestSteps in order to create the quote. Finally you should verify a specific value of your quote. In the previous chapter "Creating Modules" you have already scanned all the required Modules, and in this chapter you will create a TestCase with TestSteps which include the test data required for running this TestCase in the end. Creating a TestCase Create the TestCase Automobile in your TestCase folder Vehicle Insurance. You have already created this folder in chapter "Context menu and mini toolbar". Right-click on the TestCase folder Vehicle Insurance and select Create TestCase from the mini toolbar. You can also click on the TestCase folder and select the icon Create Object->TestCase from the dynamic menu TestCases. Assign the name Automobile to the new TestCase. Illustration 50: Automobile TestCase The TestCase starts off with the start screen of the Tricentis sample application. 8 Creating TestCases Version 10.0 42
  • 43. Illustration 51: Tricentis sample application: start screen TestStep 1: Start screen (Home) Your first TestStep should instruct Tosca to click on the Automobile link in the Tricentis sample application to start the vehicle insurance calculator. Illustration 52: Navigation bar You have already created the Module Home earlier (see also "Module 1: Start screen (Home)"), and you will be using this Module now for your first TestStep. Switch to the Modules window, drag the Home Module onto your Automobile TestCase and drop it there. 8 Creating TestCases Version 10.0 43
  • 44. Illustration 53: Creating the Home TestStep Tosca creates the TestStep Home and automatically assigns the name of the corresponding Module to this. All the TestStepValues that can be steered are located beneath this TestStep - in our case, the Automobile link of the start screen Home. The TestStepValue icons are grayed out until you define actions for these values. TestStepValues which are grayed out due to lacking values can either be hidden from view or shown via the F9 key. Open the drop-down menu in the Value column for the TestStepValue Automobile, select {Click} and press Enter to confirm your selection. Illustration 54: Defining actions for the Home screen The ActionMode column is automatically set to Input since you have defined an input action. Illustration 55: Finalized Home TestStep 8 Creating TestCases Version 10.0 44
  • 45. You've just created your first TestStep! TestStep 2: Vehicle data This TestStep should enter vehicle data and should then click on Next. Return to the Modules window, drag the Vehicle data Module onto your Automobile TestCase and drop it there. The Vehicle data TestStep is inserted beneath the Home TestStep. Enter the data into the TestStep as shown in the illustration below. TestStepValues provide values that are stored in the ValueRange column of the corresponding ModuleAttribute in a drop-down list. If your required value is not available in this list, you can also enter this manually. Illustration 56: Finalized Vehicle data TestStep The ActionMode column of the TestSteps is automatically set to Input again since you have defined input actions. TestStep 3: Insurant This TestStep should enter insurant data and should then click on Next. Return to the Modules window, drag the Insurant Module onto your Automobile TestCase and drop it there. The Insurant TestStep is inserted beneath the Vehicle data TestStep. Enter data into the TestStep as shown in the illustration below. 8 Creating TestCases Version 10.0 45
  • 46. Illustration 57: Finalized Insurant TestStep Let's continue with the next TestStep. TestStep 4: Product data This TestStep should select the according product and should then click on Next. Return to the Modules window, drag the Product data Module onto your Automobile TestCase and drop it there. The Product data TestStep is inserted beneath the Insurant TestStep. Enter values into the TestStep as shown in the illustration below. Please enter the first of the month after next for the TestStepValue Start Date. In this tutorial we used the date 12/01/2016. Illustration 58: Finalized Product dataTestStep 8 Creating TestCases Version 10.0 46
  • 47. TestStep 5: Quote This is the final TestStep in your TestCase. Here Tosca should verify whether the Price per Year ($) for the Ultimate package equals a specific value. The vehicle insurance calculator shows the calculated values along with various options in a table. Please note that your Price per Year ($) value may differ from the one in this tutorial (685,00). You may use the value Tosca calculated for you in your sample application. Illustration 59: Quote data Return to the Modules window, drag the Quote Module onto your Automobile TestCase and drop it there. The Quote TestStep is inserted beneath the Product data TestStep. Illustration 60: Quote TestStep Define the cell which includes the value to be verified in the TestStepValue PriceTable. The amount is shown in the first row of the last column. Expand the view for the TestStepValue priceTable and open the drop- down menu of the TestStepValue <Row>. 8 Creating TestCases Version 10.0 47
  • 48. Illustration 61: Selecting a row from the priceTable Select $1 from the drop-down list and press Enter. This specifies the row which holds the value to be verified. Illustration 62: $1 row Left-click on the TestStepValue <Cell> beneath the TestStepValue $1. Illustration 63: Specifying the cell Select $last from the drop-down list and press Enter. This specifies the last cell of the row which includes the value to be verified. 8 Creating TestCases Version 10.0 48
  • 49. Illustration 64: Specifying the cell Enter the value that should be verified into the Value column of the new TestStepValue $last. Use a comma as thousand separator and a dot as decimal separator when you enter the value to be verified. Illustration 65: Finalized Quote TestStep You may have realized that the ActionMode column has automatically been set to Verify. Unlike in your previous TestSteps where Tosca is supposed to input data (Input), in this TestStep Tosca should however verify data. In the first step of this verify operation, Tosca will select the TestStepValue priceTable and the first row ($1) by using the ActionMode Select. In the next step it will use the TestStepValue $last to verify whether the value of the last cell equals 685.00. Congratulations! You're done with your Automobile TestCase. In the next chapter you will learn how to create an ExecutionList in order to run your TestCase (see chapter 9 "Executing TestCases"). Related chapters n Tosca Commander Manual - chapter TestCases section (blue) 8 Creating TestCases Version 10.0 49
  • 50. 9 Executing TestCases In Tosca you can sum up all completed TestCases in ExecutionLists and run them. Each TestCase is shown as an ExecutionEntry. Execution results and their history are automatically written to a log file (ActualLog). If you would like to run specific TestSteps separately or if you would like to check TestCases that are still incomplete, you can use the Scratchbook function (see "ScratchBook"). 9.1 ExecutionLists Run your Automobile TestCase in an ExecutionList: Click on the ExecutionLists tab in Tosca Commander. Right-click on the ExecutionList folder ExecutionLists and select Create Folder from the mini toolbar. You can also click on the ExecutionList folder and select the icon Create Folder->Folder from the dynamic menu ExecutionLists. Assign the name My first ExecutionList to the new ExecutionList folder. Illustration 66: ExecutionLists Creating ExecutionEntries In Tosca you can create ExecutionEntries by dragging and dropping TestCases onto ExecutionLists. Right-click onto the ExecutionList folder My first ExecutionList and select Create ExecutionList from the mini toolbar. You can also click on the ExecutionList folder and select the icon Create Object- >ExecutionList from the dynamic menu ExecutionLists. 9 Executing TestCases Version 10.0 50
  • 51. Assign the name Vehicle Insurance to the new ExecutionList. Drag your Automobile TestCase onto your Vehicle Insurance ExecutionList and drop it there. The ExecutionEntry Automobile is automatically created and linked to the corresponding TestCase. Illustration 67: ExecutionEntry Automobile If you would like to see which TestCase is linked to which ExecutionEntry, simply right-click onto an ExecutionEntry and select the option Jump to TestCase. You can also click on the ExecutionEntry and select the icon Jump to TestCase from the dynamic menu ExecutionLists. Select the option Jump to Module from the context menu of a TestStep to see which TestStep is linked to which Module. You can also click on the TestStep and select the icon Jump to Module from the dynamic menu TestCases. Running ExecutionLists Open the Tricentis sample application in Microsoft® Internet Explorer (see also chapter 6 "The Tricentis Sample Application"). The sample application must show the start screen so that the TestCase can be successfully executed. Switch back to Tosca Commander, go to the ExecutionLists window and select the option Run from the context menu of the Vehicle Insurance ExecutionList. You can also click on the ExecutionList and select the icon Run from the dynamic menu ExecutionLists. 9 Executing TestCases Version 10.0 51
  • 52. Illustration 68: Running ExecutionLists Tosca starts executing the TestCase. Since Tosca will take over control of your mouse and keyboard upon test execution we highly recommend that you refrain from performing mouse clicks and keyboard inputs while Tosca is running your TestCase. You should now be able to observe Tosca clicking the links and filling out all the forms in the insurance calculator. The execution will finally stop on the last page of the Tricentis sample application where you can view the quotes that have been created for the respective packages. Execution information The Loginfo column shows the execution state: n Green: Passed n Red: Failed n White: No Result (i.e. this ExecutionEntry has not yet been executed) n Gray: the TestCase does no longer exist in this workspace If your TestCase was successfully executed without any errors, Tosca will indicate this with a green bar. Since your current TestCase only consists of one single ExecutionEntry, the green bar includes the figure 1. Illustration 69: Execution result Automobile 9 Executing TestCases Version 10.0 52
  • 53. To get an idea of how various execution information is shown in Tosca you will now create an ExecutionList containing 5 ExecutionEntries: Switch to the TestCases window and create the TestCase folder Quotes beneath the TestCase folder My first TestCase. Copy the TestCase Automobile to the Quotes TestCase folder and rename this to Automobile_01. Switch to the Modules window, drag the Quote Module onto your Automobile_01 TestCase and drop it there. Tosca will automatically create the TestStep Quote_1. Select the option {Click} from the drop-down list of the TestStepValue Home. Illustration 70: TestStep Quote_1 Tosca will return to the start screen of the Tricentis sample application after it has created the quote. This allows you to run several TestCases in a row since each TestCase starts on the start screen of the sample application. Make 4 copies of your Automobile_01 TestCase and paste them into the Quotes folder. The TestCases are numbered consecutively. Illustration 71: TestCases from Automobile_01 to Automobile_05 9 Executing TestCases Version 10.0 53
  • 54. Drag your Quotes TestCase folder onto your Vehicle Insurance ExecutionList and drop it there. Tosca automatically creates new ExecutionEntries and adapts the ExecutionList statistics accordingly: Since your newly created ExecutionEntries have not yet been executed, they receive the status No Result and are shown with a white bar in the Loginfo column. Illustration 72: White bar showing that 5 ExecutionEntries have not yet been executed Set the test results manually to see all execution states that are available in Tosca: Right-click on the Automobile_01 ExecutionEntry and select Set result- >Failed from the context menu. You can also click on the ExecutionEntry and select the icon Set result->Failed from the dynamic menu ExecutionLists. Give reasons for your decision by entering Reason 01 into the appearing popup window. Set the ExecutionEntries for Automobile_02 and Automobile_03 also to Failed (Set result->Failed). You don't need to give reasons here, simply click on OK. Right-click on the Automobile_04 ExecutionEntry and select Set result- >Passed from the context menu. You can also click on the ExecutionEntry and select the icon Set result->Passed from the dynamic menu ExecutionLists. Confirm your selection with a click on OK in the appearing popup window. Switch to the TestCases window and remove TestStep Automobile_02 from your TestCase folder Quotes. Confirm the appearing warning message with a click on OK. 9 Executing TestCases Version 10.0 54
  • 55. Illustration 73: Warning Switch to the ExecutionLists window and left-click on your Quotes ExecutionList. The Loginfo column shows various execution states: One TestCase is marked as passed (green), one has not yet been executed (white), and one TestCase does no longer exist in the workspace (gray). Two TestCases are marked as failed (red). Illustration 74: Execution states History To become acquainted with ExecutionList histories, you will now modify a TestCase and trigger an error. Specify a wrong verification value: Switch to the TestCases window, go to your Automobile_04 TestCase (TestCase folder Quotes) and set the value to be verified to 12345 in the Quote TestStep. 9 Executing TestCases Version 10.0 55
  • 56. Illustration 75: The value to be verified is wrong Open the Tricentis sample application in Microsoft® Internet Explorer (see also chapter 6 "The Tricentis Sample Application"). The sample application must show the start screen so that your TestCase can be successfully executed. Run your Quotes ExecutionList. Disable the option Show only last ActualLog under View- >ExecutionLists, and enable the following entries: Show multiline Logs, Show Statistics only on visible ExecutionLists, and Show Statistics. Illustration 76: ExecutionLists view - settings Right-click on the ExecutionEntry Automobile_04 in the details view. Choose (Expand all) in the mini toolbar to view all TestStepValue 9 Executing TestCases Version 10.0 56
  • 57. details. The log history is shown in chronological order in Tosca. The most recent results are always located on top. The ExecutionEntry Automobile_04 provides a description of the error occurred, along with further details on which TestStep caused the error. Illustration 77: ExecutionList: history 9.2 ScratchBook The ScratchBook in Tosca Commander is used for running individual TestSteps upon TestCase creation. You can combine various TestCases, TestSteps and TestCase folders and run them in the ScratchBook. In contrast to ExecutionLists, the ScratchBook does neither save how TestCases are combined for test execution nor the test results. We recommend using the ScratchBook solely upon test case creation. Run the Vehicle data TestStep in your Automobile TestCase in the ScratchBook. Since this TestStep contains vehicle data you have to make sure that the corresponding page of the sample application is open so that Tosca can enter the data accordingly. Open the Tricentis sample application in Microsoft® Internet Explorer (see "The Tricentis Sample Application") and go to the Vehicle data page. 9 Executing TestCases Version 10.0 57
  • 58. Illustration 78: Vehicle data screen Return to Tosca Commander. Right-click on your Vehicle data TestStep (beneath the Automobile TestCase) and select the option Run in ScratchBook from the context menu. You can also click on the TestStep and select the icon Run in ScratchBook from the dynamic menu TestCases. Illustration 79: Running the TestStep in Scratchbook 9 Executing TestCases Version 10.0 58
  • 59. The ScratchBook window opens and Tosca runs the Vehicle data TestStep. Since Tosca will take over control of your mouse and keyboard upon test execution we highly recommend that you refrain from performing mouse clicks and keyboard inputs while Tosca is running your TestStep. The ScratchBook window lists the executed TestSteps. In the illustration below you can see the Vehicle data TestStep along with the execution results. Illustration 80: ScratchBook Congratulations! You've successfully completed this tutorial. At this stage you should be familiar with the main important processes in Tosca. Related chapters n Tosca Commander Manual - chapter ExecutionLists 9 Executing TestCases Version 10.0 59