The Ultimate Tradeshow Checklist User's Guide
•
5 likes•1,755 views

The Ultimate Tradeshow Checklist & Dashboard User's Guide. This document is a guide to help you get started with your template and get the most out of it while planning your next trade show. Responsible for a million different tasks at your upcoming trade show? That’s no reason you should be unprepared! Our Trade Show Checklist Template will make sure you maximize the return on the investment you have made for your upcoming event. The list will make sure you are as prepared as possible for what’s to come. With over 100 items from the most basic tasks that are easily overlooked to the ‘deal-breakers’ – the things you simply cannot go without – The Ultimate Trade Show Checklist has it all.

Recommended
More Related Content
What's hot
What's hot (13)
Viewers also liked
Viewers also liked (20)
Similar to The Ultimate Tradeshow Checklist User's Guide
Similar to The Ultimate Tradeshow Checklist User's Guide (20)
Recently uploaded
Recently uploaded (20)
The Ultimate Tradeshow Checklist User's Guide
- 1. TRADESHOW CHECKLIST & DASHBOARD USERS GUIDE
- 2. Thank You!Thank you for purchasing this template. This document is a guide to help you get started with your template and get the most out of it while planning your next trade show. If you have any questions that are beyond the scope of this document, please feel free to email via our website contact form (http://plexkits.com/contact-us/) or send us a Tweet (https://twitter.com/PLEXKITS)!
- 3. Tradeshow Checklist & Dashboard Guide Table of Contents DETAILS TAB OVERVIEW – p4 First Things First – p5 Main Details – p6 Other Details – p7 Checklist Tab Overview – p8 Overview – p9 Columns Explained – p10 Reminders** - p19 Dashboard Overview – p20 Overview – p21 Budget Tracking – p22 Step-by-Step – p23 PLEXKITS Social Links – p27
- 5. Tradeshow Checklist & Dashboard Guide Make sure you follow Steps 1-‐3 before changing anything on the Checklist Tab! * Go to the Details tab 1. First Things First! Fill in the Show Name & the Show Start Date. 2.
- 6. Tradeshow Checklist & Dashboard Guide While sAll on the Details Tab -‐ Fill out the Name & Email Address Columns, but leave the Task Count Column the way it is. T h e s e c e l l s w i l l u p d a t e automaAcally as you assign tasks on the checklist tab 3. ✓ ✓ ✖ When Adding new Employees to the list, it should automaAcally expand the table, but if it doesn’t, simply drag the boKom corner to include or remove entries. *
- 7. Tradeshow Checklist & Dashboard Guide The rest of the Details Tab is opAonal and can be filled out at any Ame. Some are linked to other items, but leaving them blank won’t cause any problems. SHOW DETAILS 1. Event Budget -‐ Enter your predetermined Budget for the event here. This number is needed for the budget chart on the Dashboard tab 2. Actual Cost – This number is automa;cally calculated from the costs entered in the checklist VENUE DETAILS 3. Venue Name -‐ Enter the name of the venue where the show is taking place 4. Venue Address -‐ This will be used to generate the map link 5. Map to Venue – A link to Google Maps will be auto generated here EQUIPMENT SHIPPING DETAILS (Op5onal) 6. Name -‐ Enter the name of the loca;on where equipment is being shipped 7. Shipping Address -‐ This will be used to generate the map link 8. Map to Venue – A link to a Google Map will be auto generated here 9. Shipment Deadline – This value will be inserted on the checklist HOTEL DETAILS (Op5onal) 10. Hotel Name -‐ Enter the name of the hotel where your staff is styaing 11. Hotel Address -‐ Enter the address hotel to generate a map 12. Map to Hotel – Another auto-‐generated Google Maps link to the hotel 13. # of Rooms Reserved -‐ Enter the number of rooms you have booked 14. Length of Stay -‐ Enter the number of days you have each room for 15. Cost per Room -‐ Enter the cost per room per night 16. Total Cost of Hotels – This cell calculates the total costs of the hotel accommoda;ons and enters it into the appropriate checklist cell. *If you don’t have all the details and just the total cost, you can overwrite this cell with the total value 4. 1 2 3 4 6 5 7 8 9 10 11 13 12 14 15 16 # These Cells Auto-Update **Venue Details, Equipment Shipping and Hotel Details were added in Version 2.7
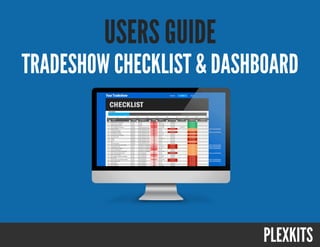
- 9. A B C D E F G H I J K L Go to the Checklist tab. Now that you have entered the beginning details, your checklist should look like the image below. If it doesn’t you should check to make sure you entered all the details correctly from steps 1-‐4. A. Event Title – Title of the event from the details tab B. Progress Bar –The percentage of tasks already completed C. ID # -‐ This is a task ID number D. Task – This is the name of a specific task E. Stage – Which Stage of the process does this task belong to F. Category – What type of task is this G. Effort – Amount of effort required to complete this task H. Owner – Person responsible for compleAon of specific task I. Due Date – Specific Tasks Due Date J. Cost – Actual Cost of specific Item K. Status – Current compleAon status of task L. Notes – A space for personal notes or comments about task
- 10. Tradeshow Checklist & Dashboard Guide The ID column contains a simple ascending count of the tasks when you begin. This column does not use any formulas and the numbers are staAc. This is for sorAng purposes so that if you decide to sort by any of the other columns, you can sAll bring it back to this original order. The ID column must contain a UNIQUE number in order for the “NEXT TASKS” items on the dashboard to properly register. C. Columns Explained – ID If you add in a new column, you’ll noAce that it does not automaAcally receive and ID number. If you don’t want to have to renumber all the other cells in order to insert it at a specific spot, you can get a unique number that fits the order by using decimals. For instance if you insert a line between 10 and 11, instead of renumbering all the tasks from 11 to the end, you could just give the new item a number of 10.1 *
- 11. Tradeshow Checklist & Dashboard Guide The TASK column simple contains the name or brief descripAon of a specific task. The list begins with a huge task list to get you started, but this column is completely editable and completely up to you. You should remove any rows that contain tasks aren’t applicable to your show. Every show is different so make sure you add any addiAonal tasks that may be missing from the original list. D. Columns Explained – Task
- 12. Tradeshow Checklist & Dashboard Guide The Stage & Category columns are completely customizable columns used for the purpose of sorAng. You can come up with as many stages or categories as you would like to help organize your tasks. E&F. Columns Explained – Stage/Category Use column filtering and sorAng to help keep track of tasks and create the perfect view of the progress. *
- 13. Tradeshow Checklist & Dashboard Guide The Effort column is the amount of work involved in compleAng that specific task. This task uses a dropdown box to select your choice from the predetermined list. Select LOW if it involves only a small amount of work. MED is for tasks with an average amount of work and HIGH are tasks with the most work. There is also and N/A category for tasks which effort level does not apply. G. Columns Explained – Effort Each tasks value is weighted based on effort level so that you can accurately gauge your progress so far for the event. For example compleAng a High effort task would increase your overall percent compleAon than compleAng low effort tasks. *
- 14. Tradeshow Checklist & Dashboard Guide The Owner column is where you select the member of your team that is responsible for that specific task. The value must be chosen from a dropdown box that consists of all the names listed on the Details tab. If you remove someone from the Details tab aler they have been assigned a task, the owner column will become greyed out to let you know it needs to be assigned to a new person. A blank cell is remains greyed out unAl it has a proper name selected. H. Columns Explained – Owner The name Ron is no longer on the Details Tab so it becomes greyed out
- 15. Tradeshow Checklist & Dashboard Guide The Due Date column is the date on which that specific task is due. The date column works together with the Status column. If a task due date has past AND the task has not been marked as “Complete” the date will highlight in Red. If a task has been completed, it will not turn red even aler the date has past. The Due Dates that you begin with are are esAmaAon based on the date you entered on the Details tab. I. Columns Explained – Due Date Most of the start dates are created with formulas that look like this =StartDate-60 to adjust a formula for your show you can either adjust the number in the formula or enter an exact date. To adjust the formula just change the number to how many days before the Show Start Date you would like the task to be completed. If the due date should be a week before the show just change the formula to =StartDate-7 *
- 16. Tradeshow Checklist & Dashboard Guide The Cost column is where you can keep track of all the actual costs of specific items throughout the enAre process. Do not enter your budgeted costs in this column, as the sum of this column will be compared to your original budget value you entered on the details tab. The comparison of Actual to Budgeted spend is displayed on the Dashboard tab. J. Columns Explained – Cost A few of the cost cells will be automaAcally populated with data you entered on the details tab (if applicable) *
- 17. Tradeshow Checklist & Dashboard Guide The Status column is where you indicate the current status of a task. You can select either Not Started, In Progress or Completed for the various stages of compleAon. If you do have a task that you need to mark as blank, selecAng N/A in the Effort Column will remove the Status of that specific task. Marking a task as complete or in progress will further your progression towards 100% compleAon. K. Columns Explained – Status
- 18. Tradeshow Checklist & Dashboard Guide The Notes column is just that, a place to enter any notes or comments that you would like to remember for later. There isn’t much to this column, it’s only for convenience and is not connected to any formulas or other cells. L. Columns Explained – Notes
- 19. Tradeshow Checklist & Dashboard Guide The Reminder Email feature was removed from our feature list as it is no longer supported by most email clients, though we lel it in just in case. If you are using most Outlook on a Windows machine most versions will sAll work correctly. EssenAally if a task is past due and not yet marked as complete a link will appear that when you click it will generate an email to the task owner than menAons which task is sAll past due, all you have to do is hit send. If you are using a Mail Client that doesn’t support this feature, feel free to delete or clear the cells to remove the feature completely. ** Columns Explained – Reminders**
- 21. A B C D E F G H I J Go to the Dashboard tab. No cells on this tab need to be edited, they will automaAcally update as you progress through the planning process. A. Event Title – Title of the event from the details tab B. Percent Complete –The percentage of tasks already completed C. Budget Graph – A comparison of actual spend & budget D. Tasks By Owner – A breakdown of number of tasks per person E. Days Un5l Event – Days lel unAl the event begins F. Tasks to Complete – Number of tasks lel to complete G. Tasks Past Due – Number of tasks that are past their due date H. Percent of Budget – Actual Spend as a percentage of Budget I. Next Task List – A list of the next tasks to complete based on date J. Tasks by Status – A breakdown of Tasks by compleAon status
- 23. Tradeshow Checklist & Dashboard Guide Go to the Details tab 1. Make sure you have entered your budget in the Event Budget Cell 2.
- 24. Tradeshow Checklist & Dashboard Guide Go to the Checklist tab 3. Enter any costs from the event in the Cost Column of the applicable task. Ex. The $2500 listed here, is related to the submit full payment item. Even if the item is not marked as complete, you are s;ll able to enter any known costs. 4.
- 25. Tradeshow Checklist & Dashboard Guide If you take a look at the Details tab now, you will see the Actual Cost cell has been updated with the costs entered so far. * Go to the Dashboard tab 5. The graph here will show your current costs compared to the budget you set for the event iniAally. The number to the right will give you a quick percentage showing you if you are on track with your budget. The Green dot means you are sAll under budget.
- 26. Tradeshow Checklist & Dashboard Guide If your Actual Cost is higher than your Event Budget, you will see this reflected in both the graph and on the Details Tab. The Dot on the Dashboard tab will turn from green to red once you are no longer within your budget. *
- 27. Thank You! Have any questions? Stay in touch! www.plexkits.com https://twitter.com/PLEXKITS https://plus.google.com/+Plexkits http://ca.linkedin.com/in/rickbannerman/