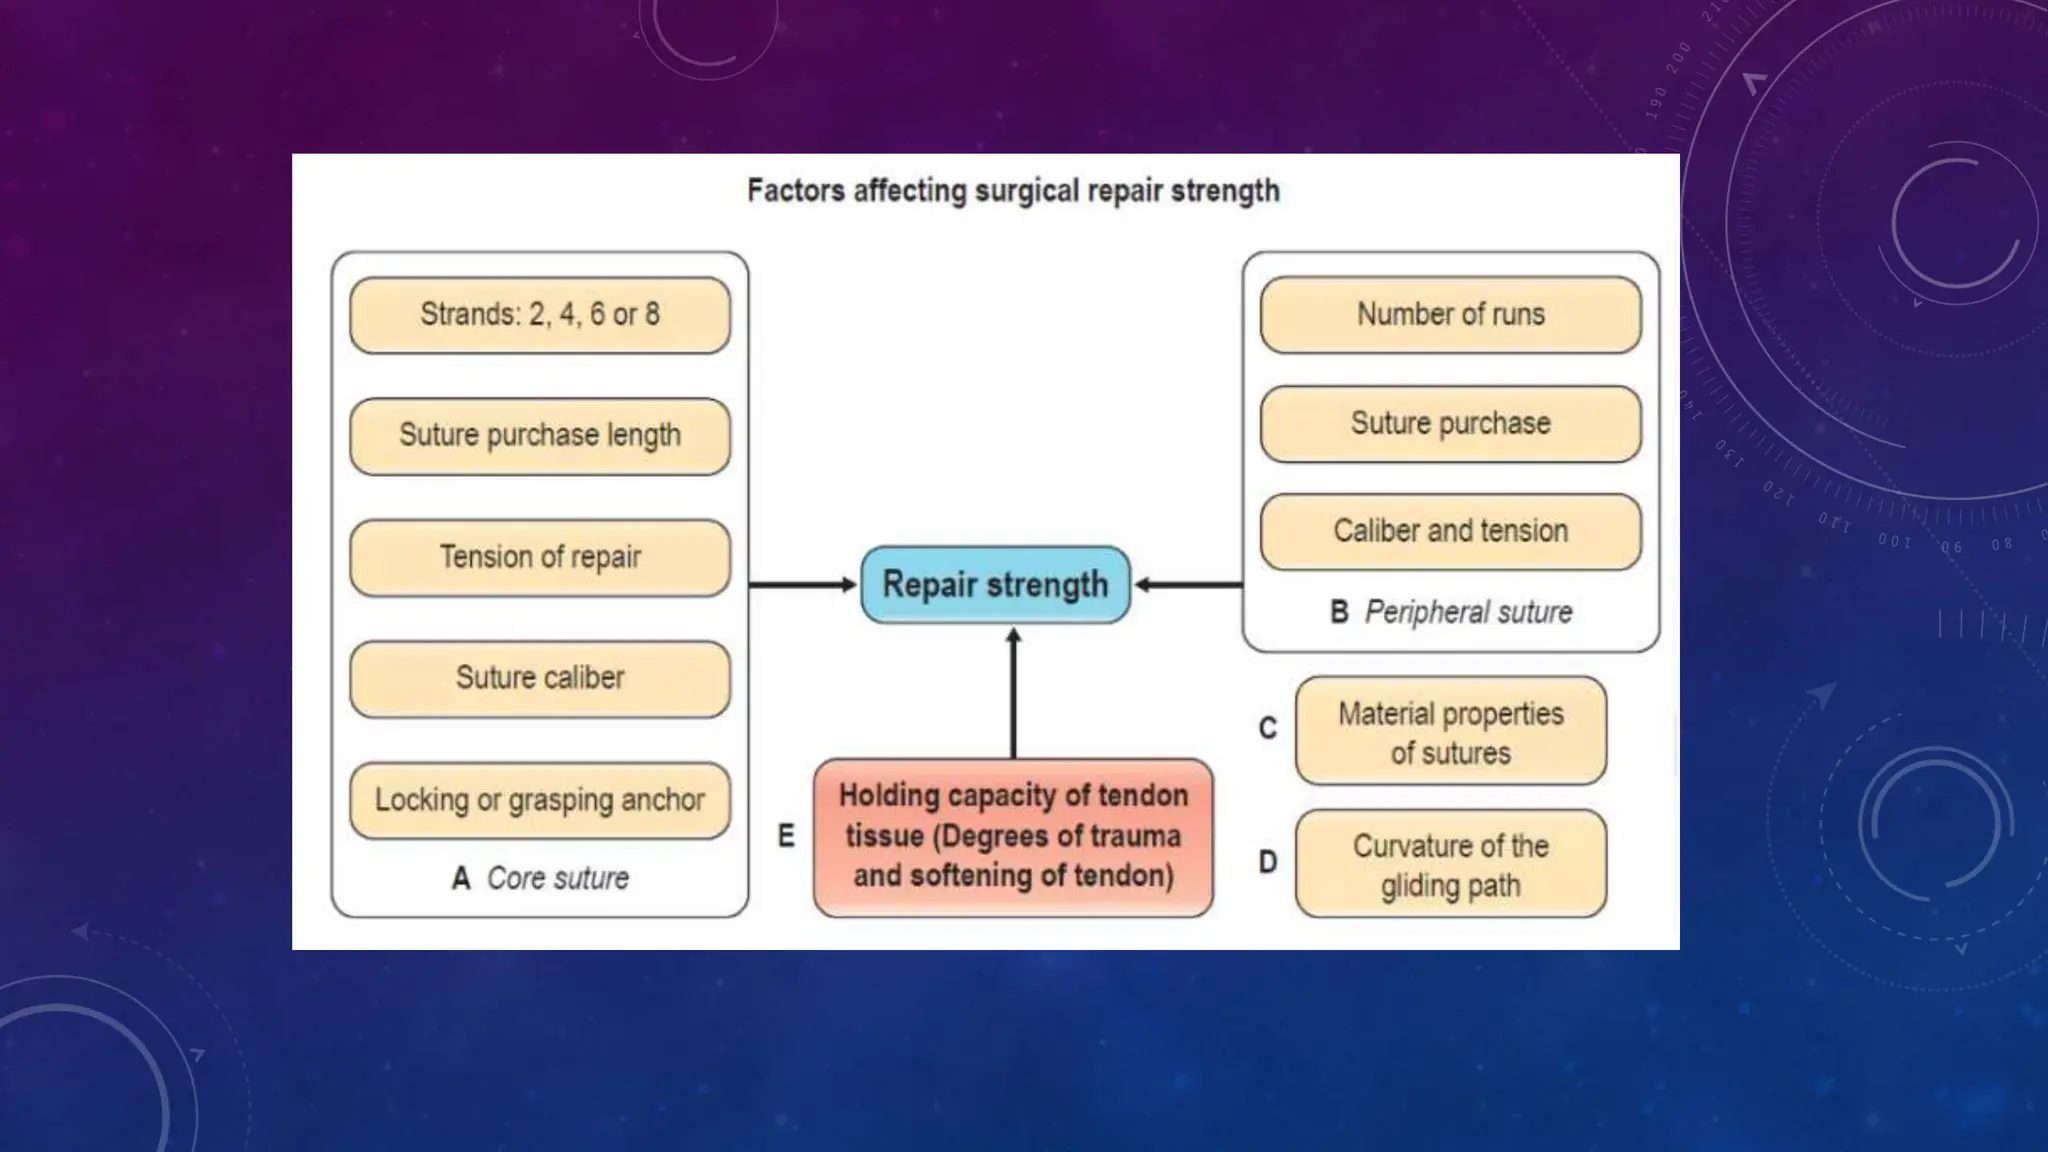
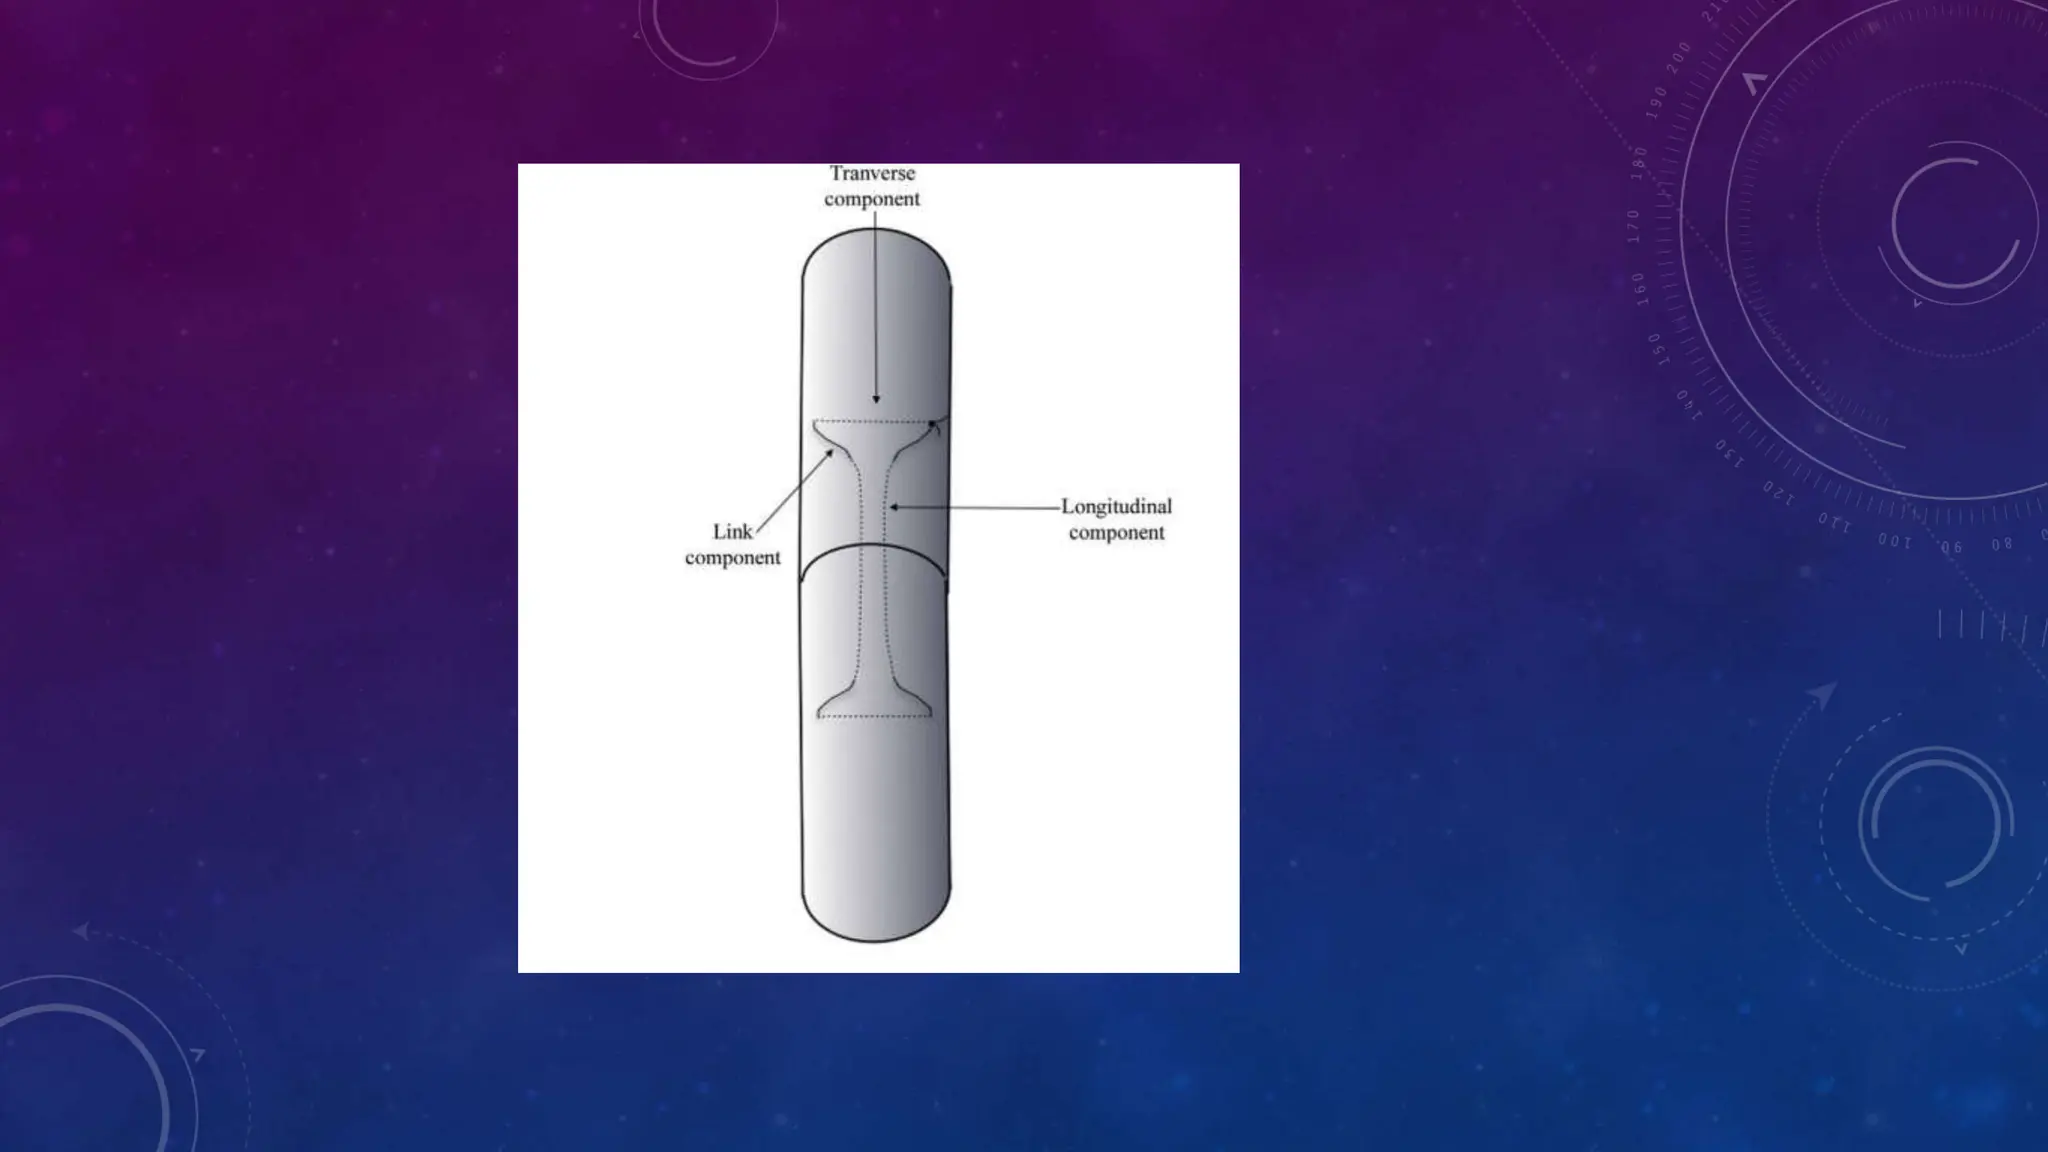
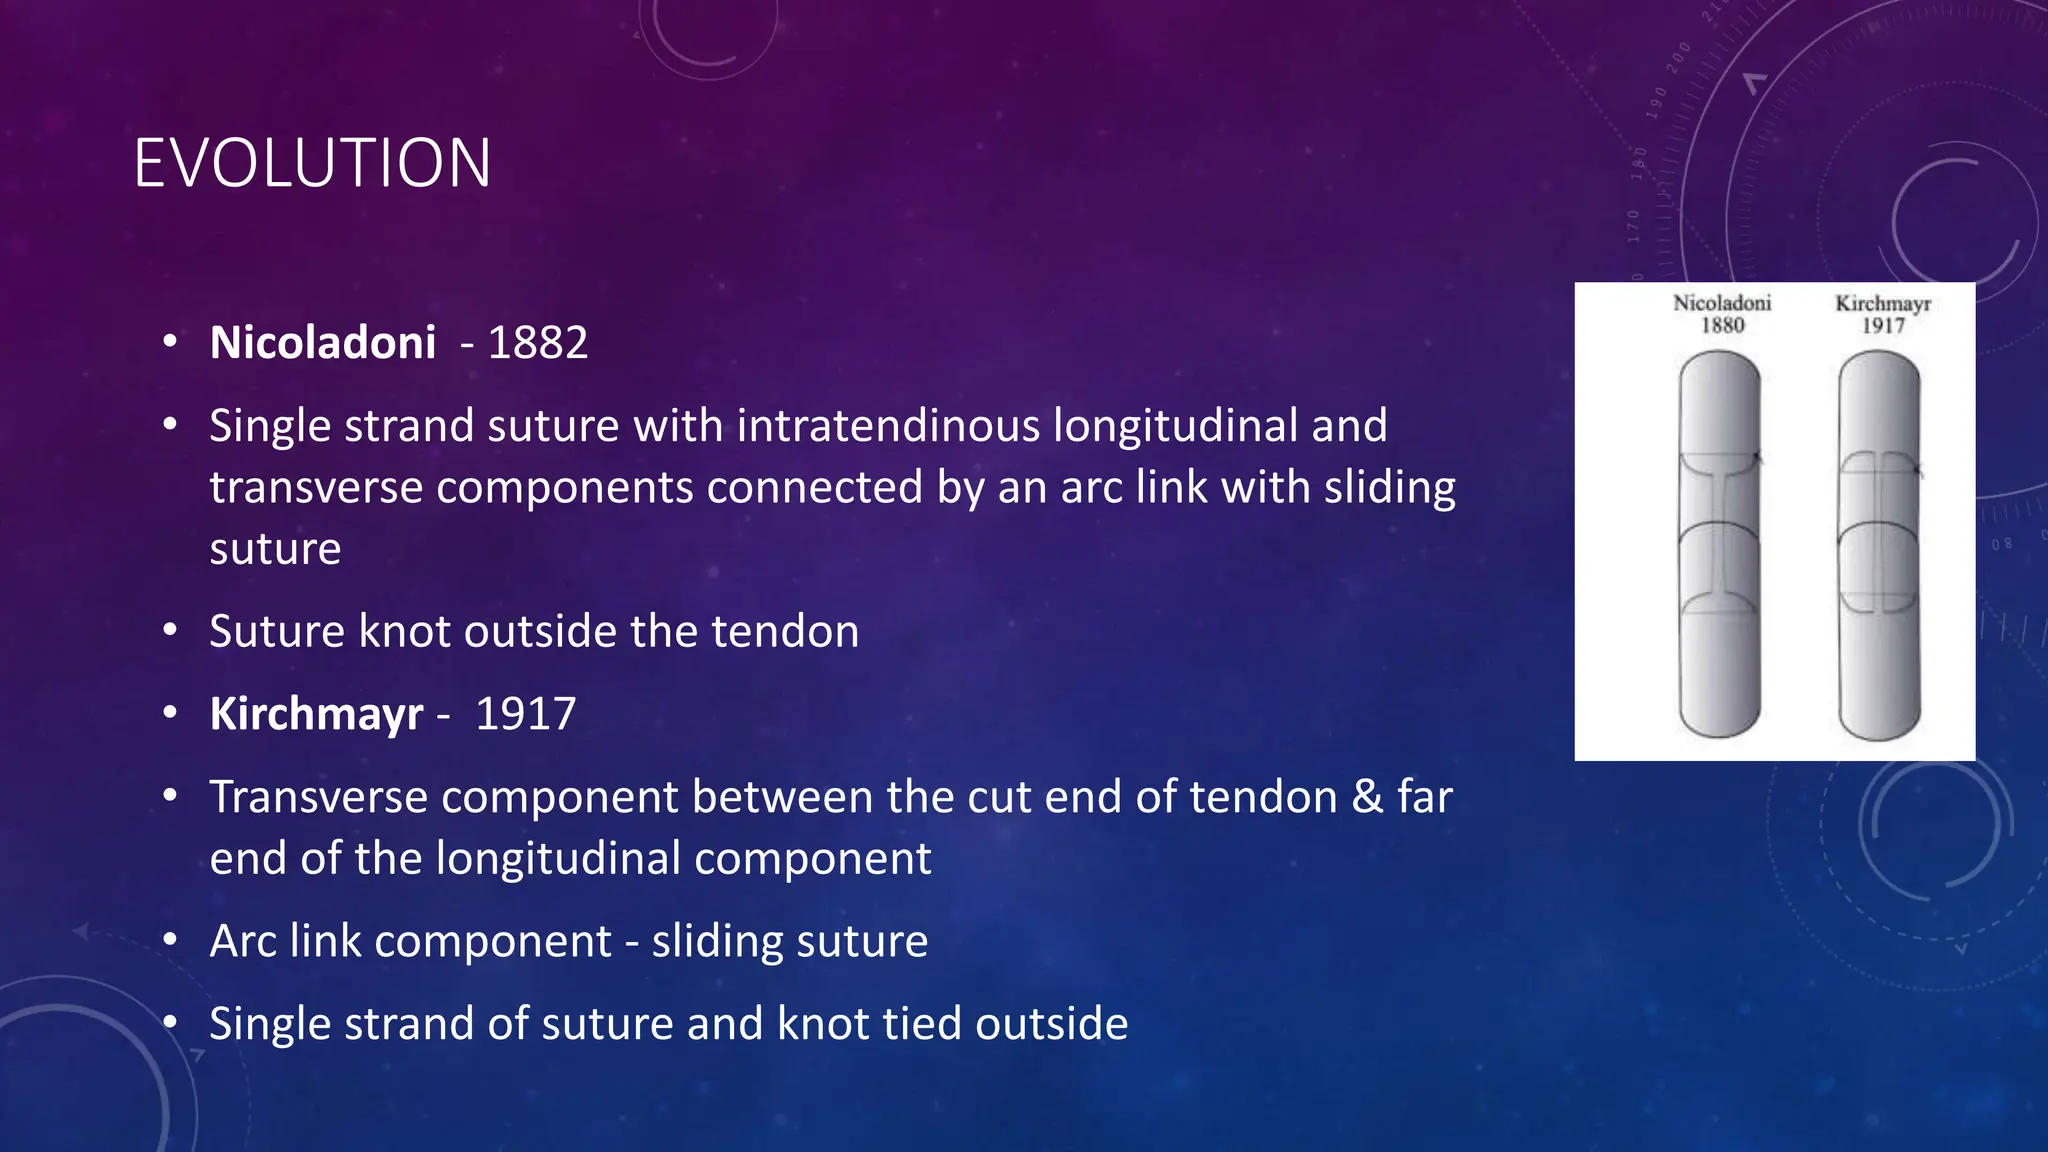
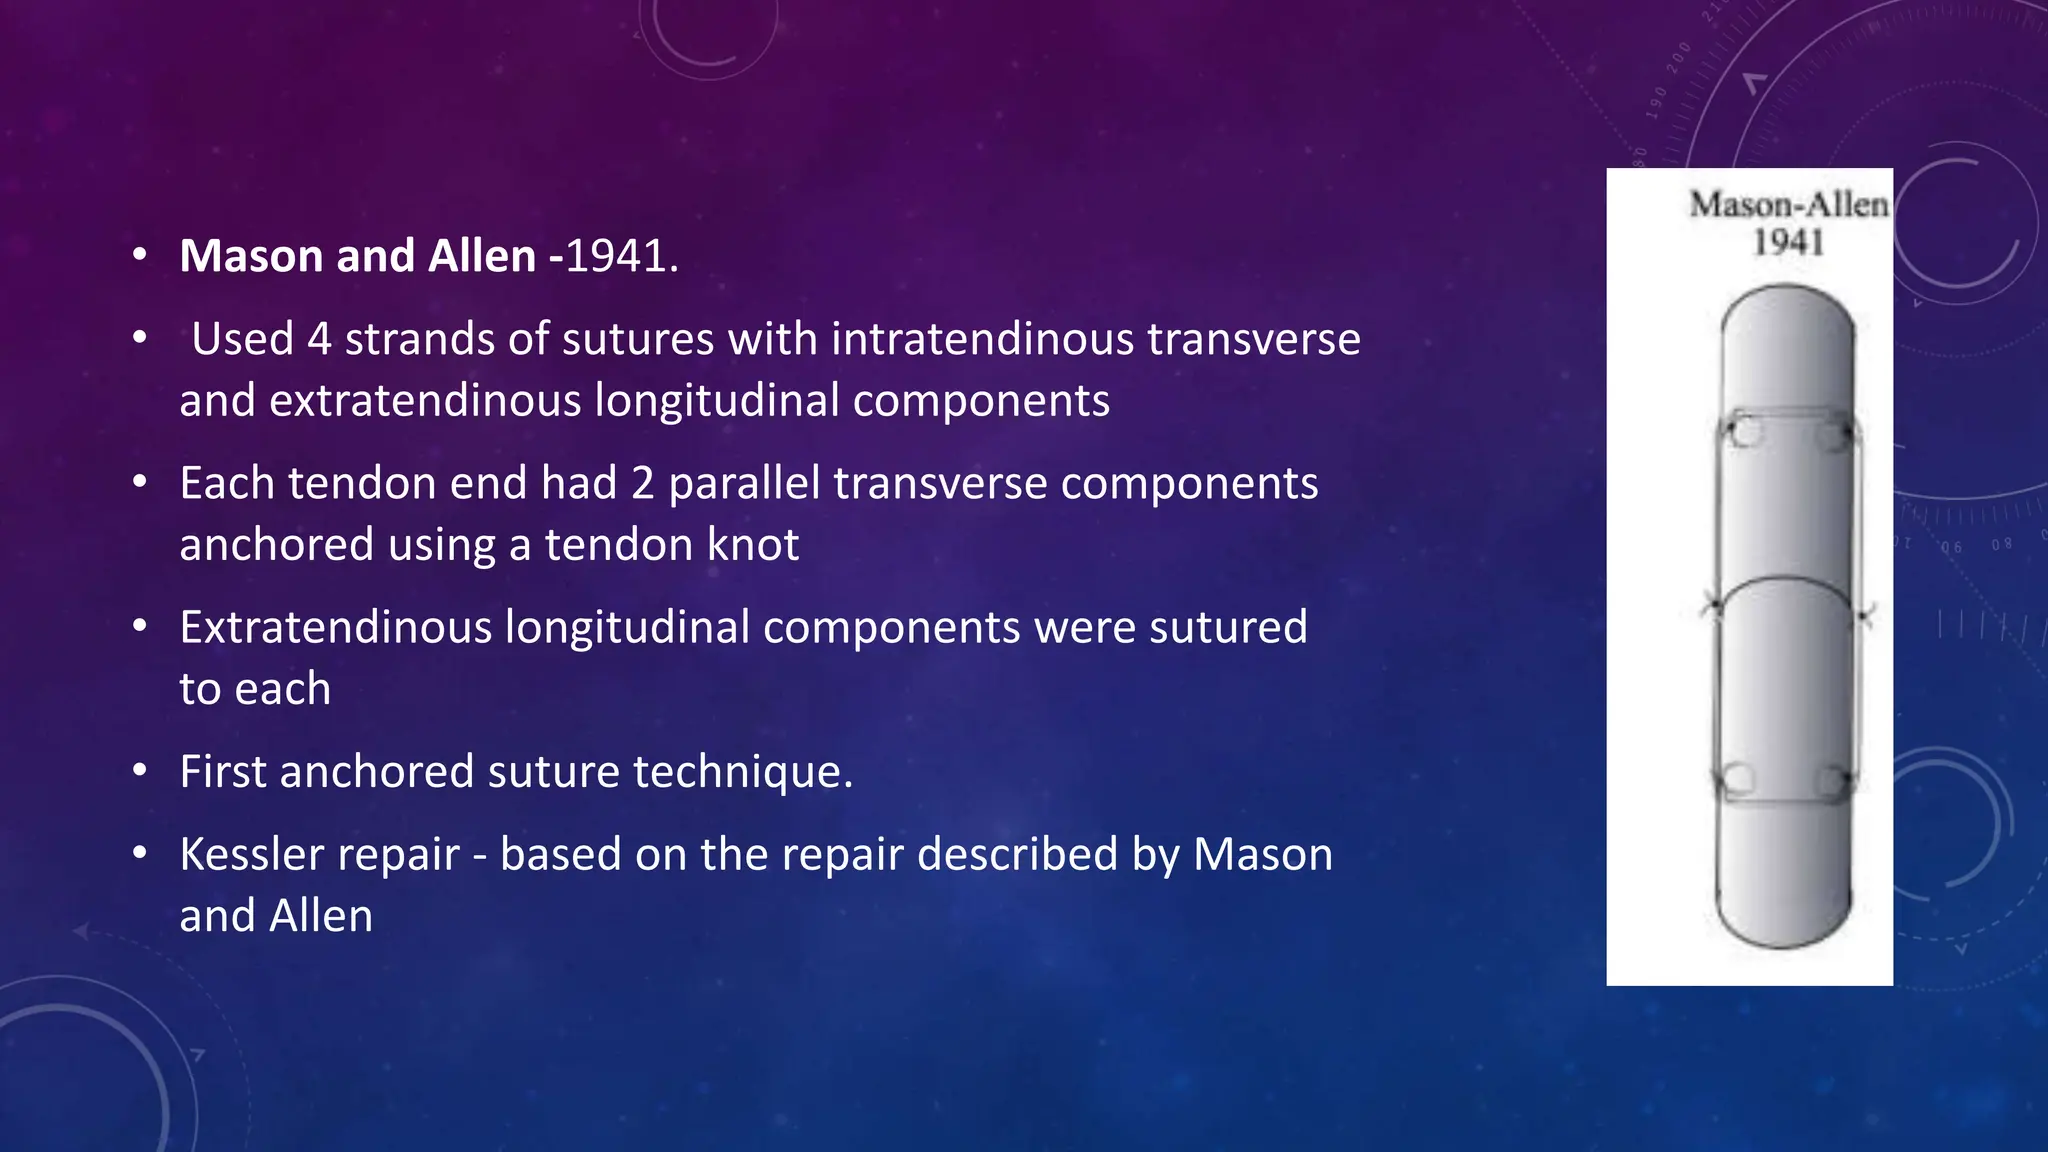
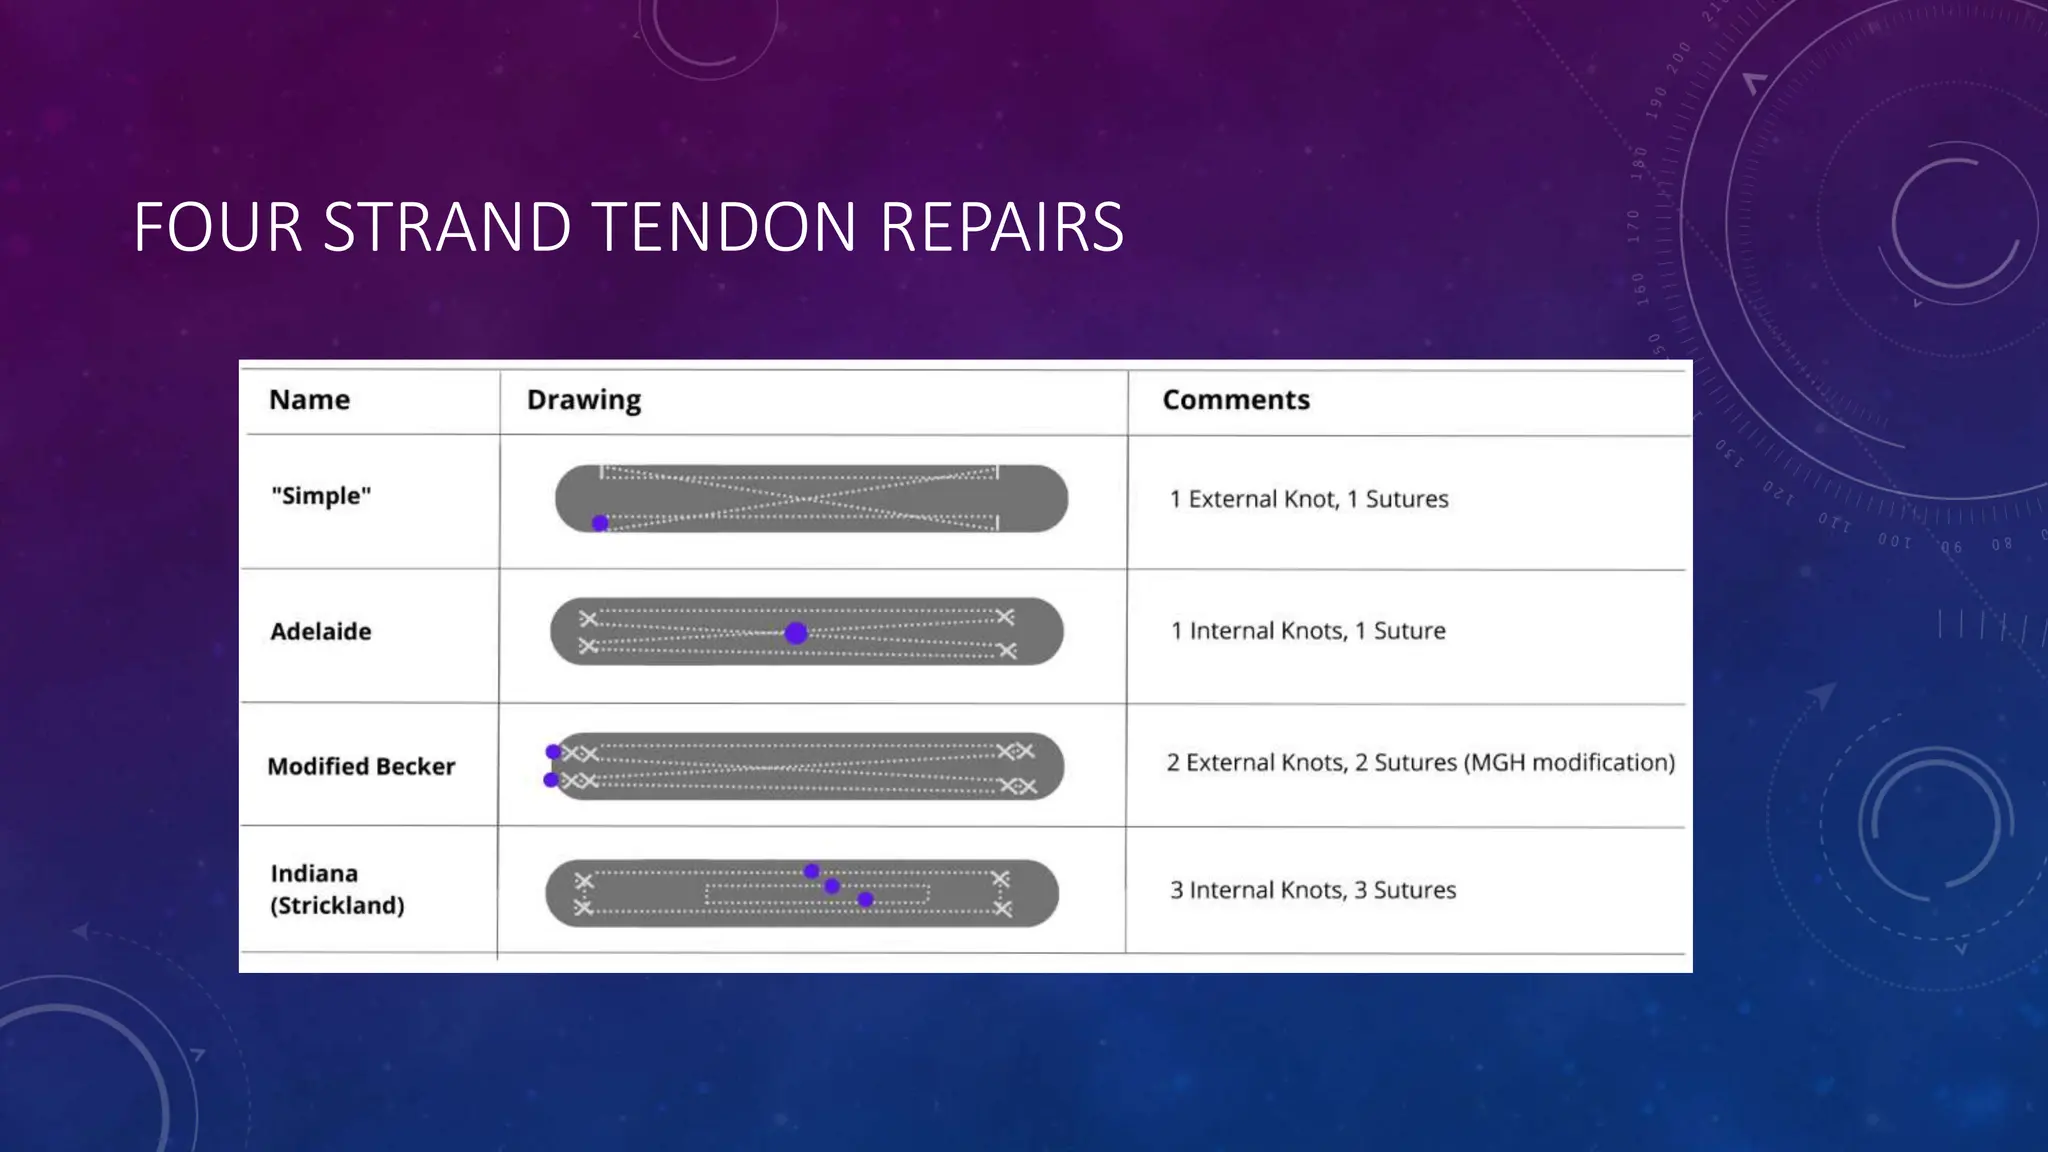
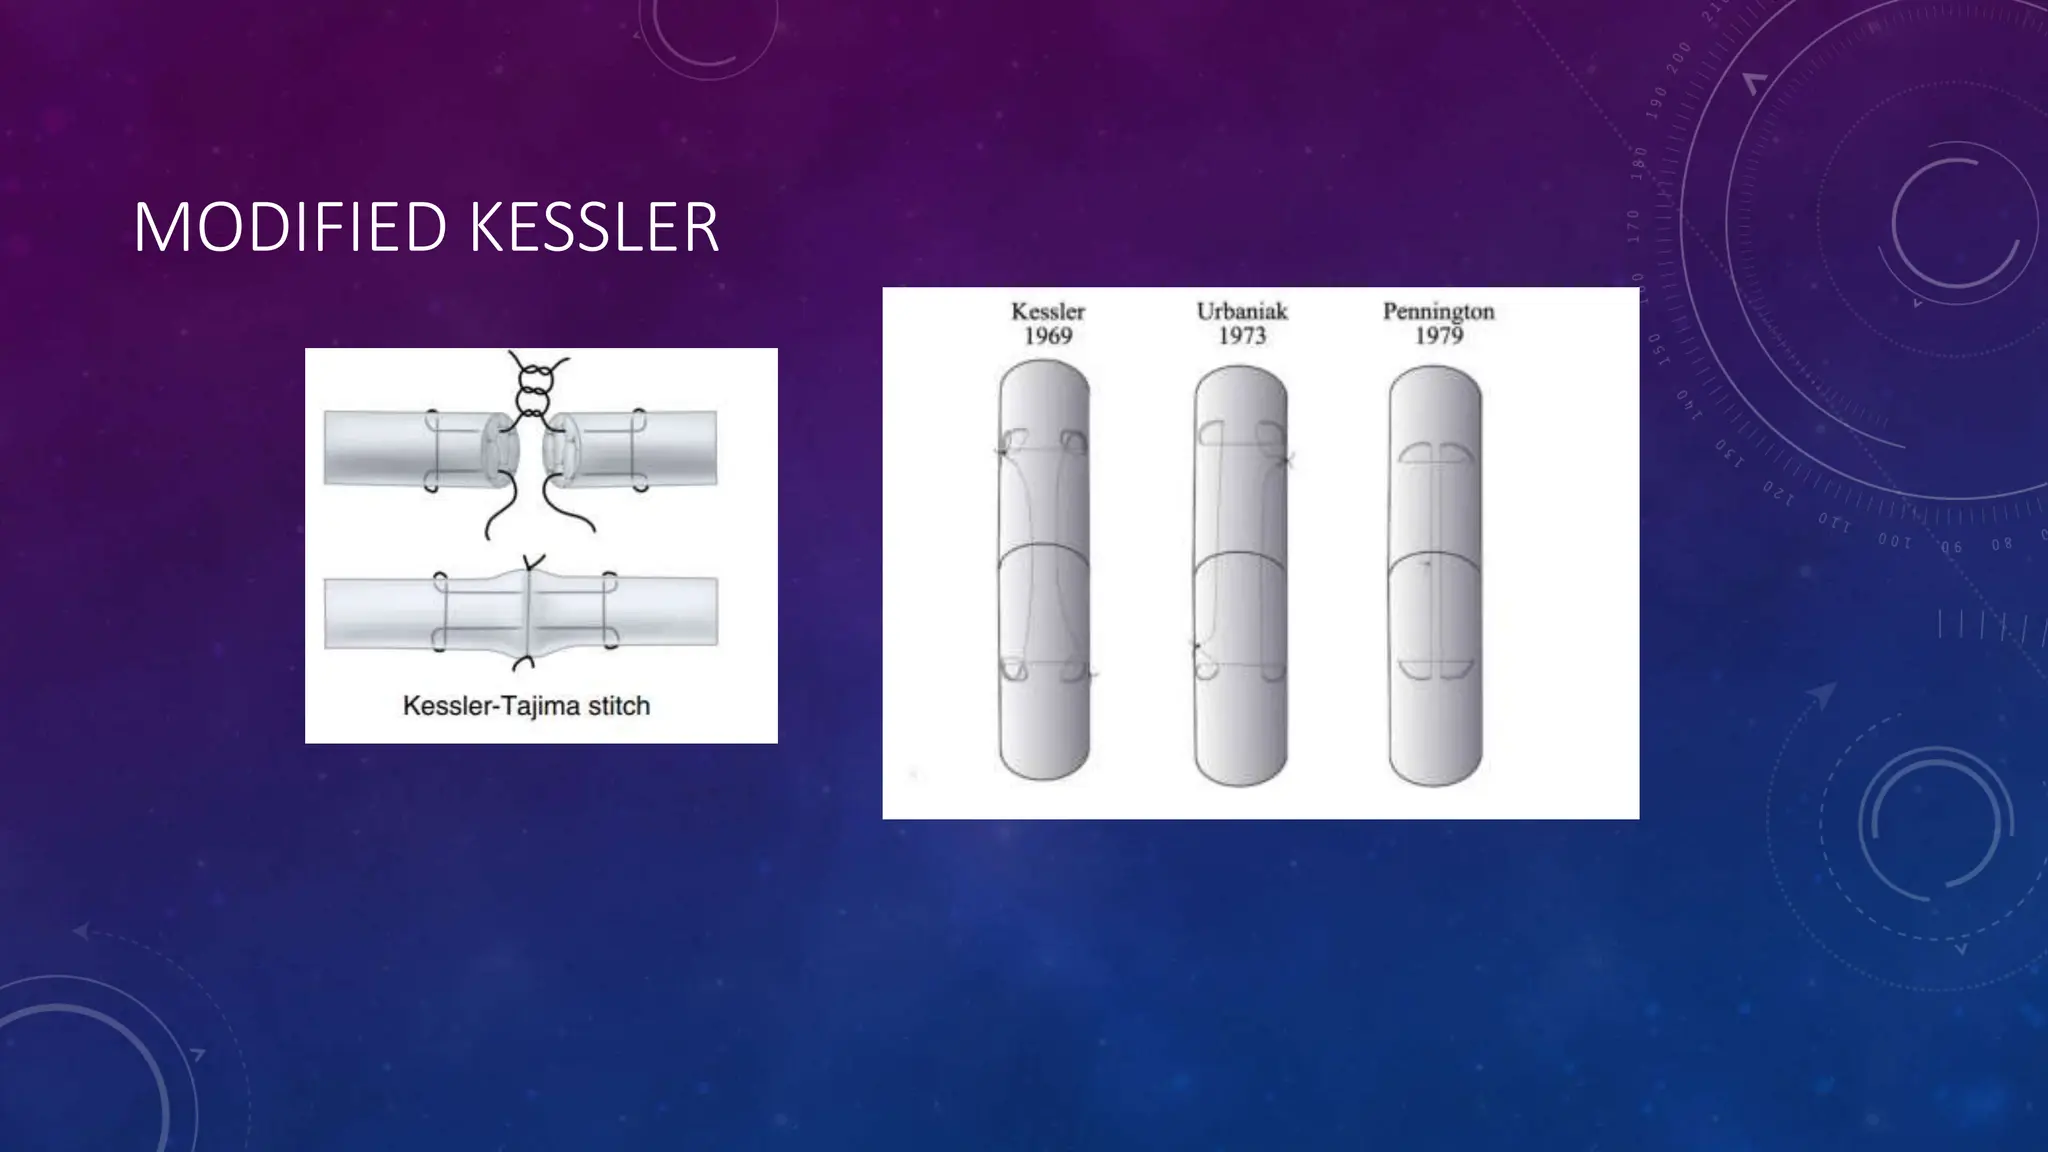
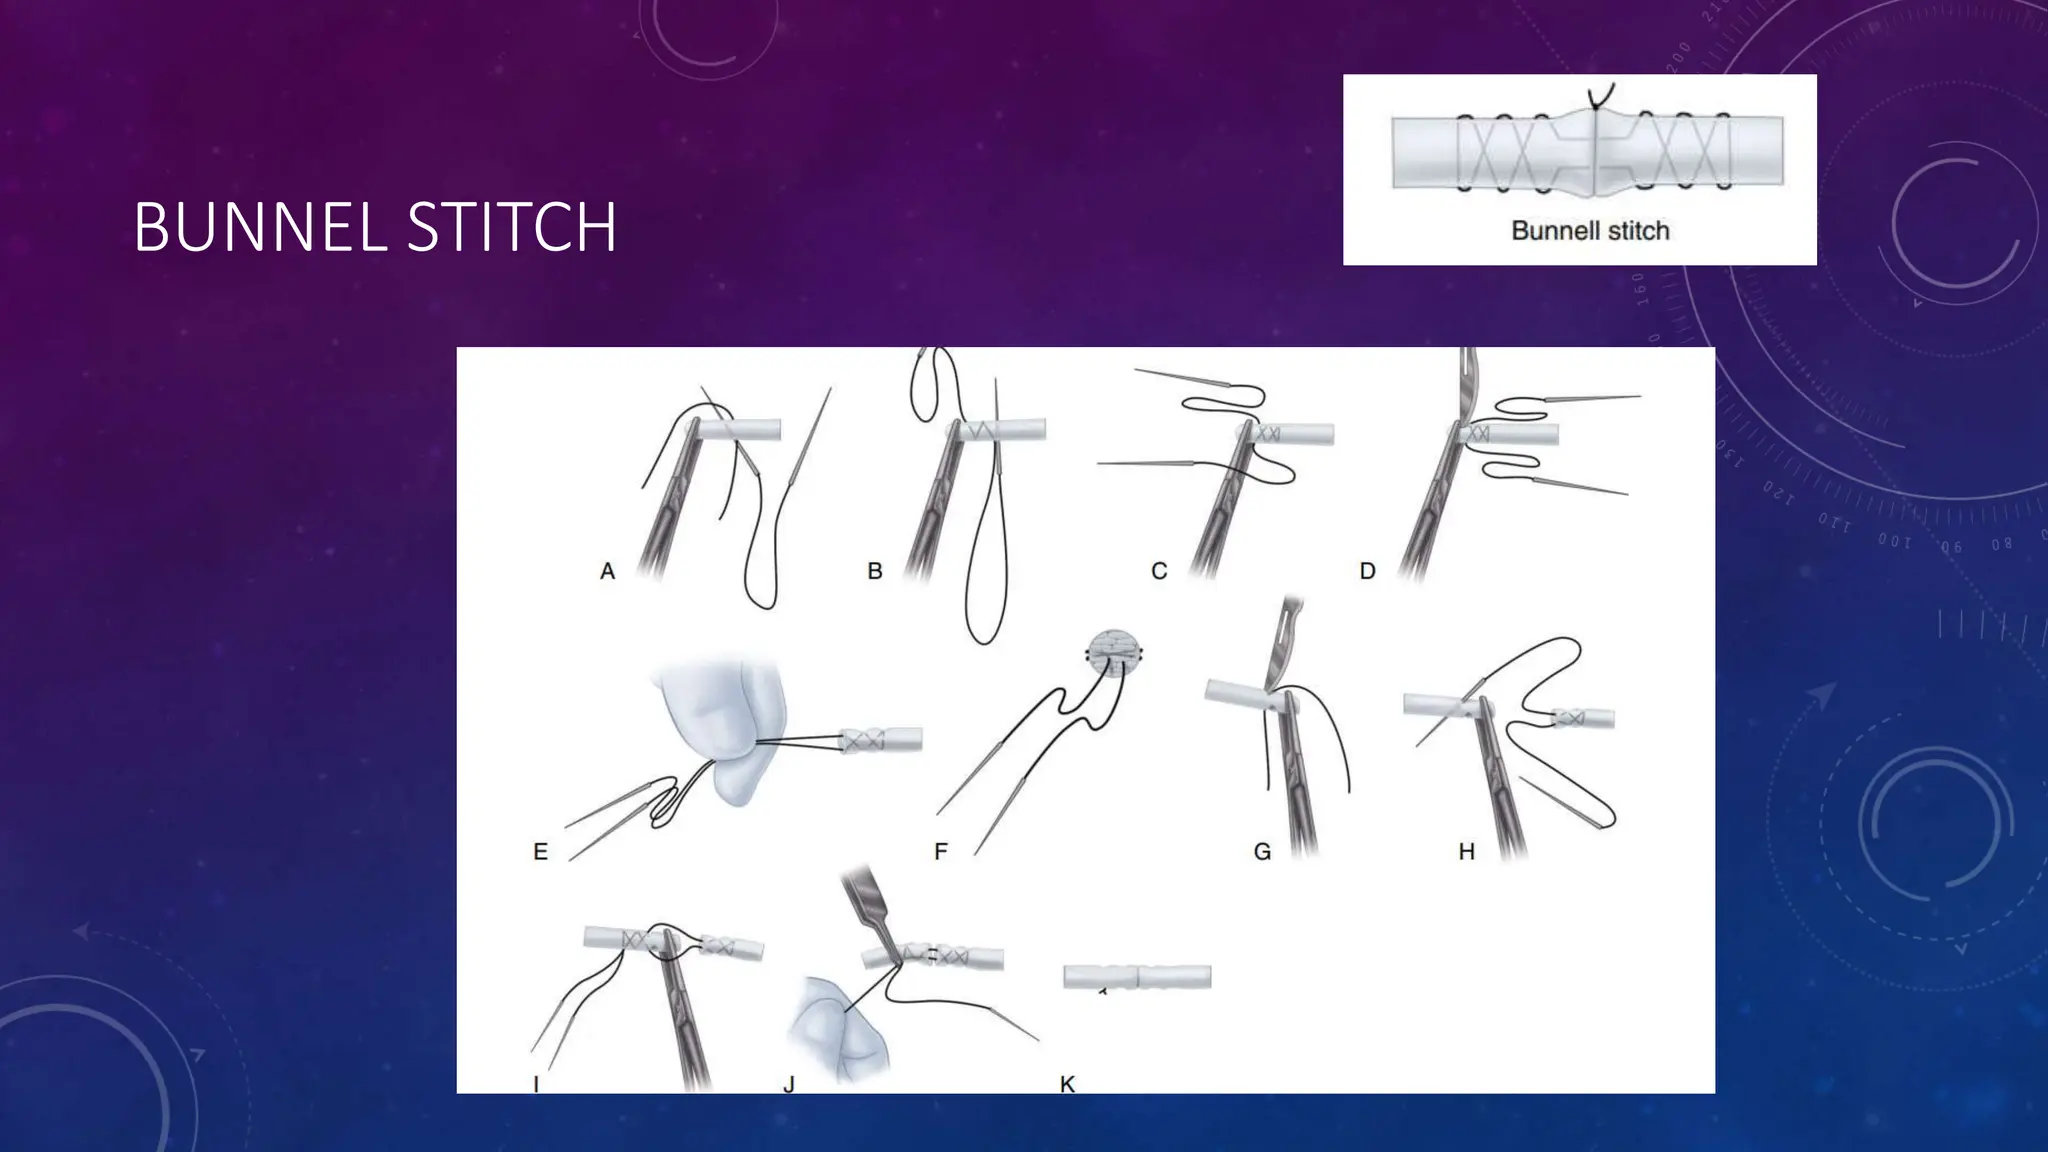
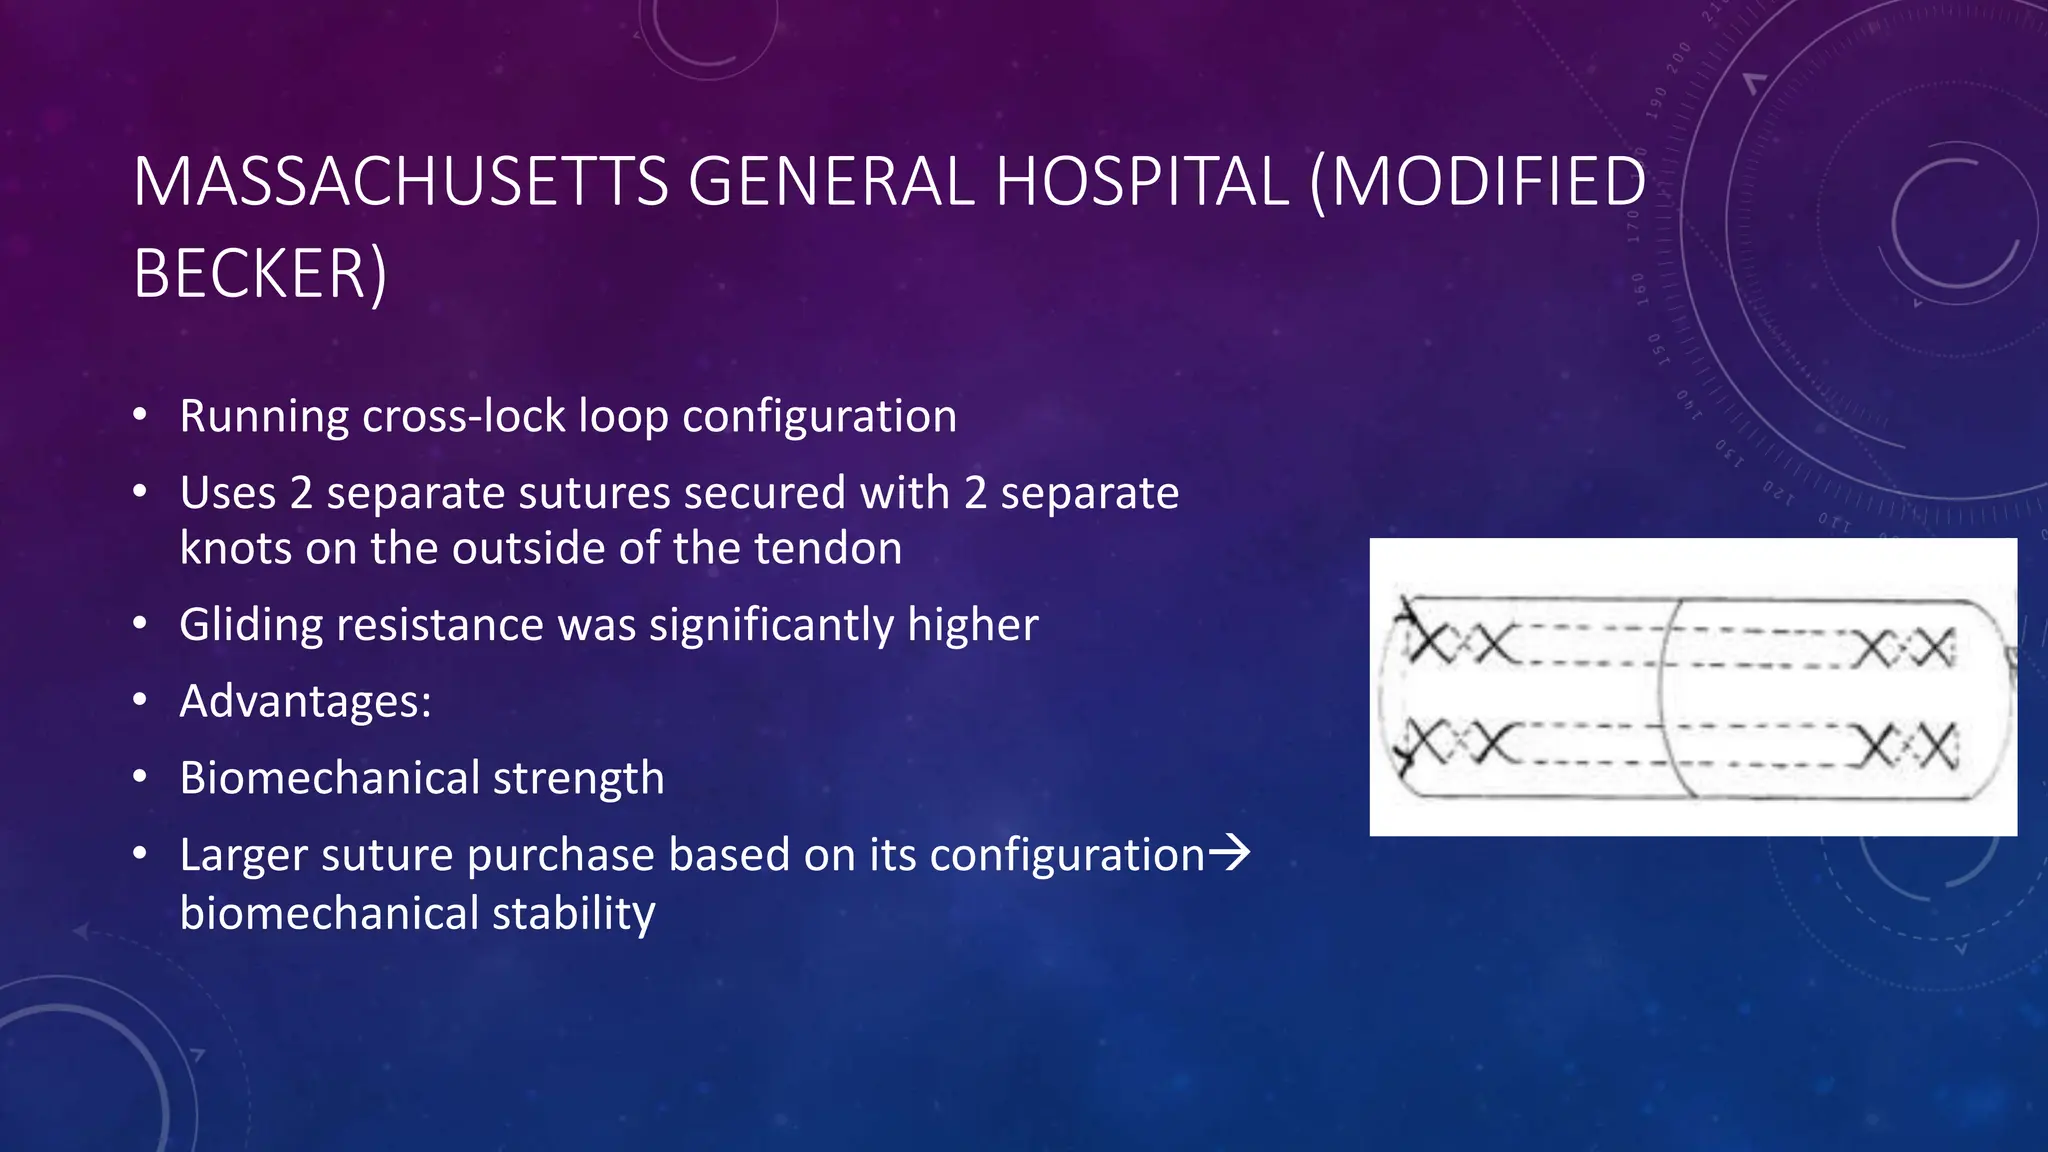
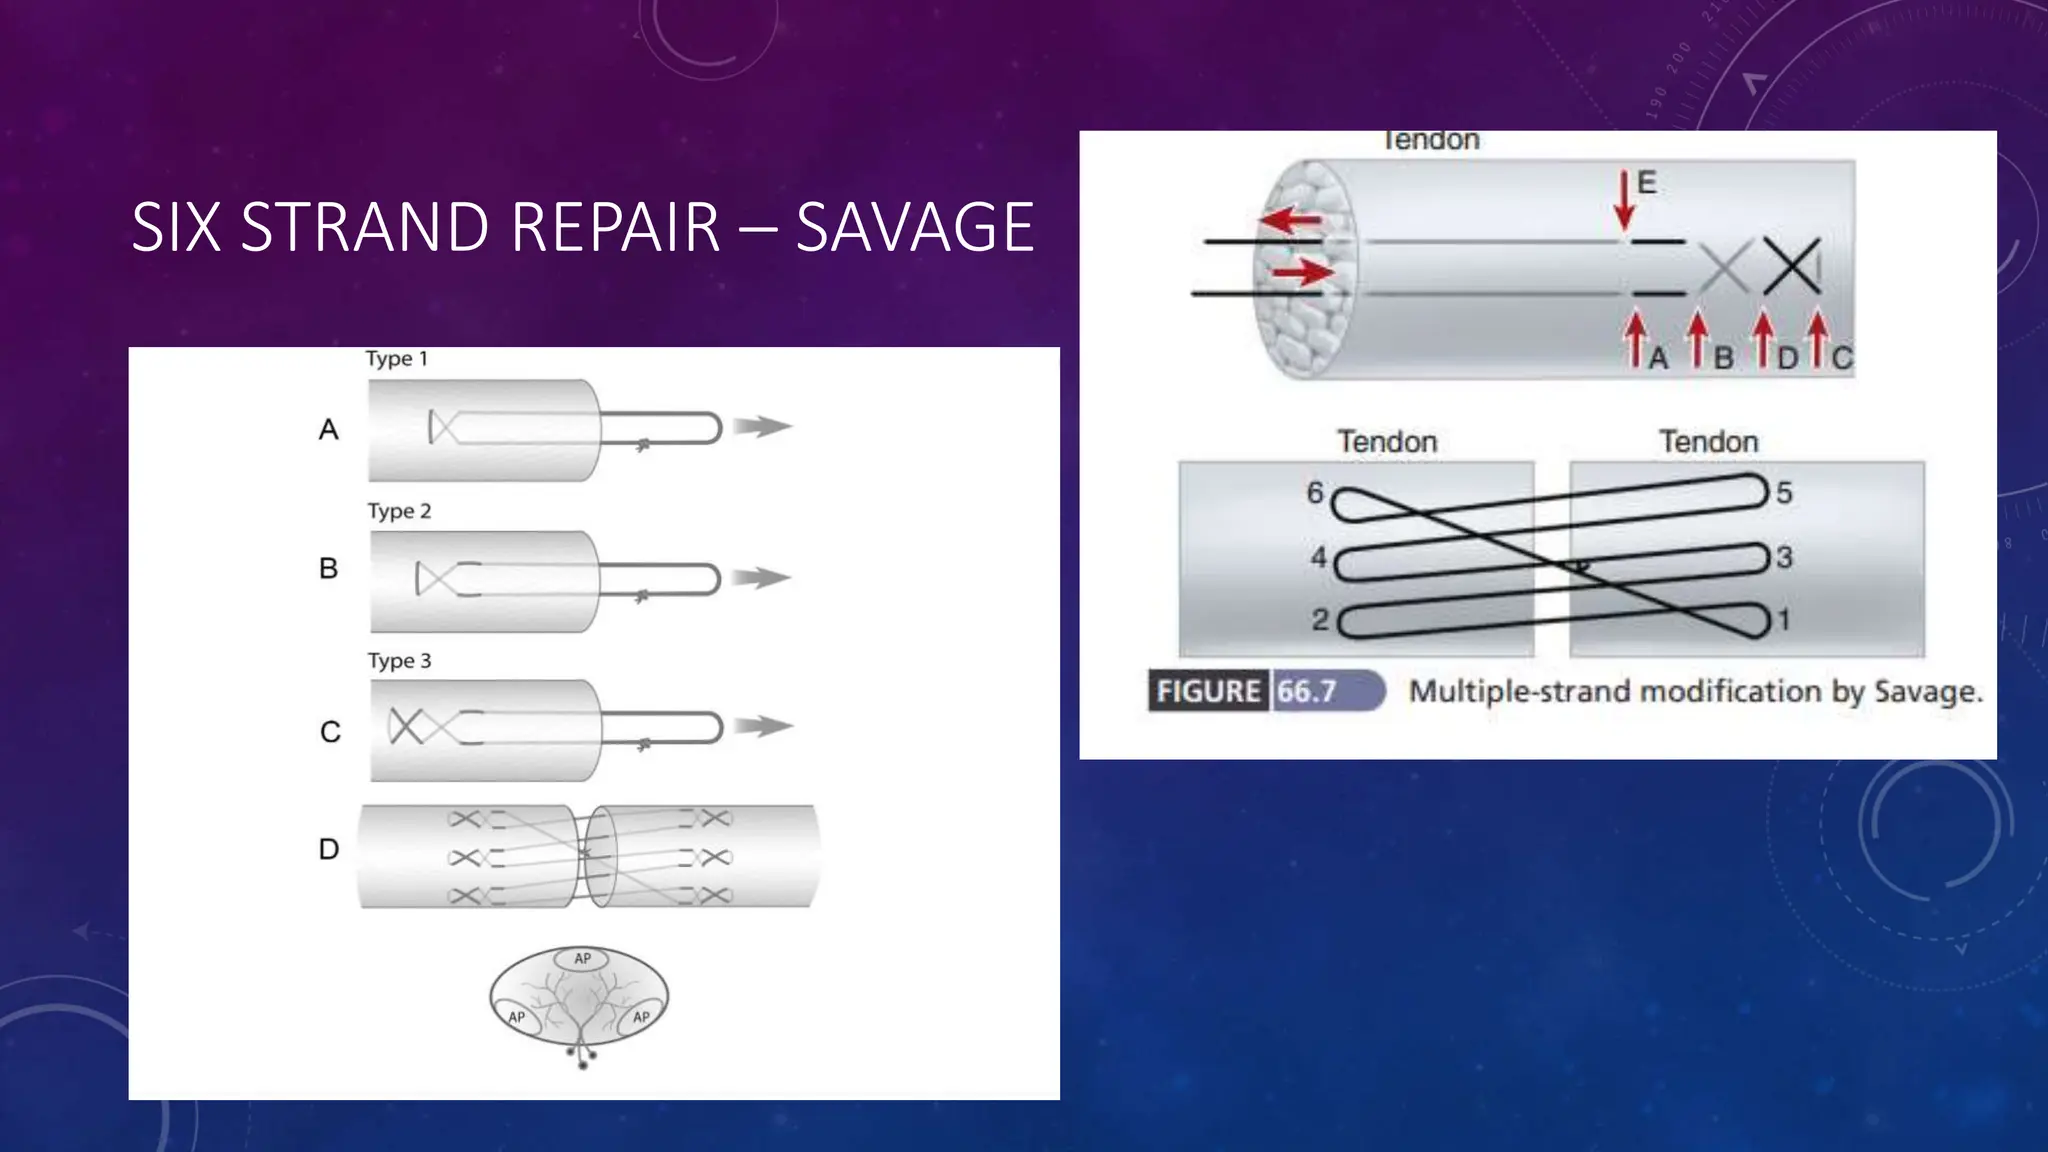
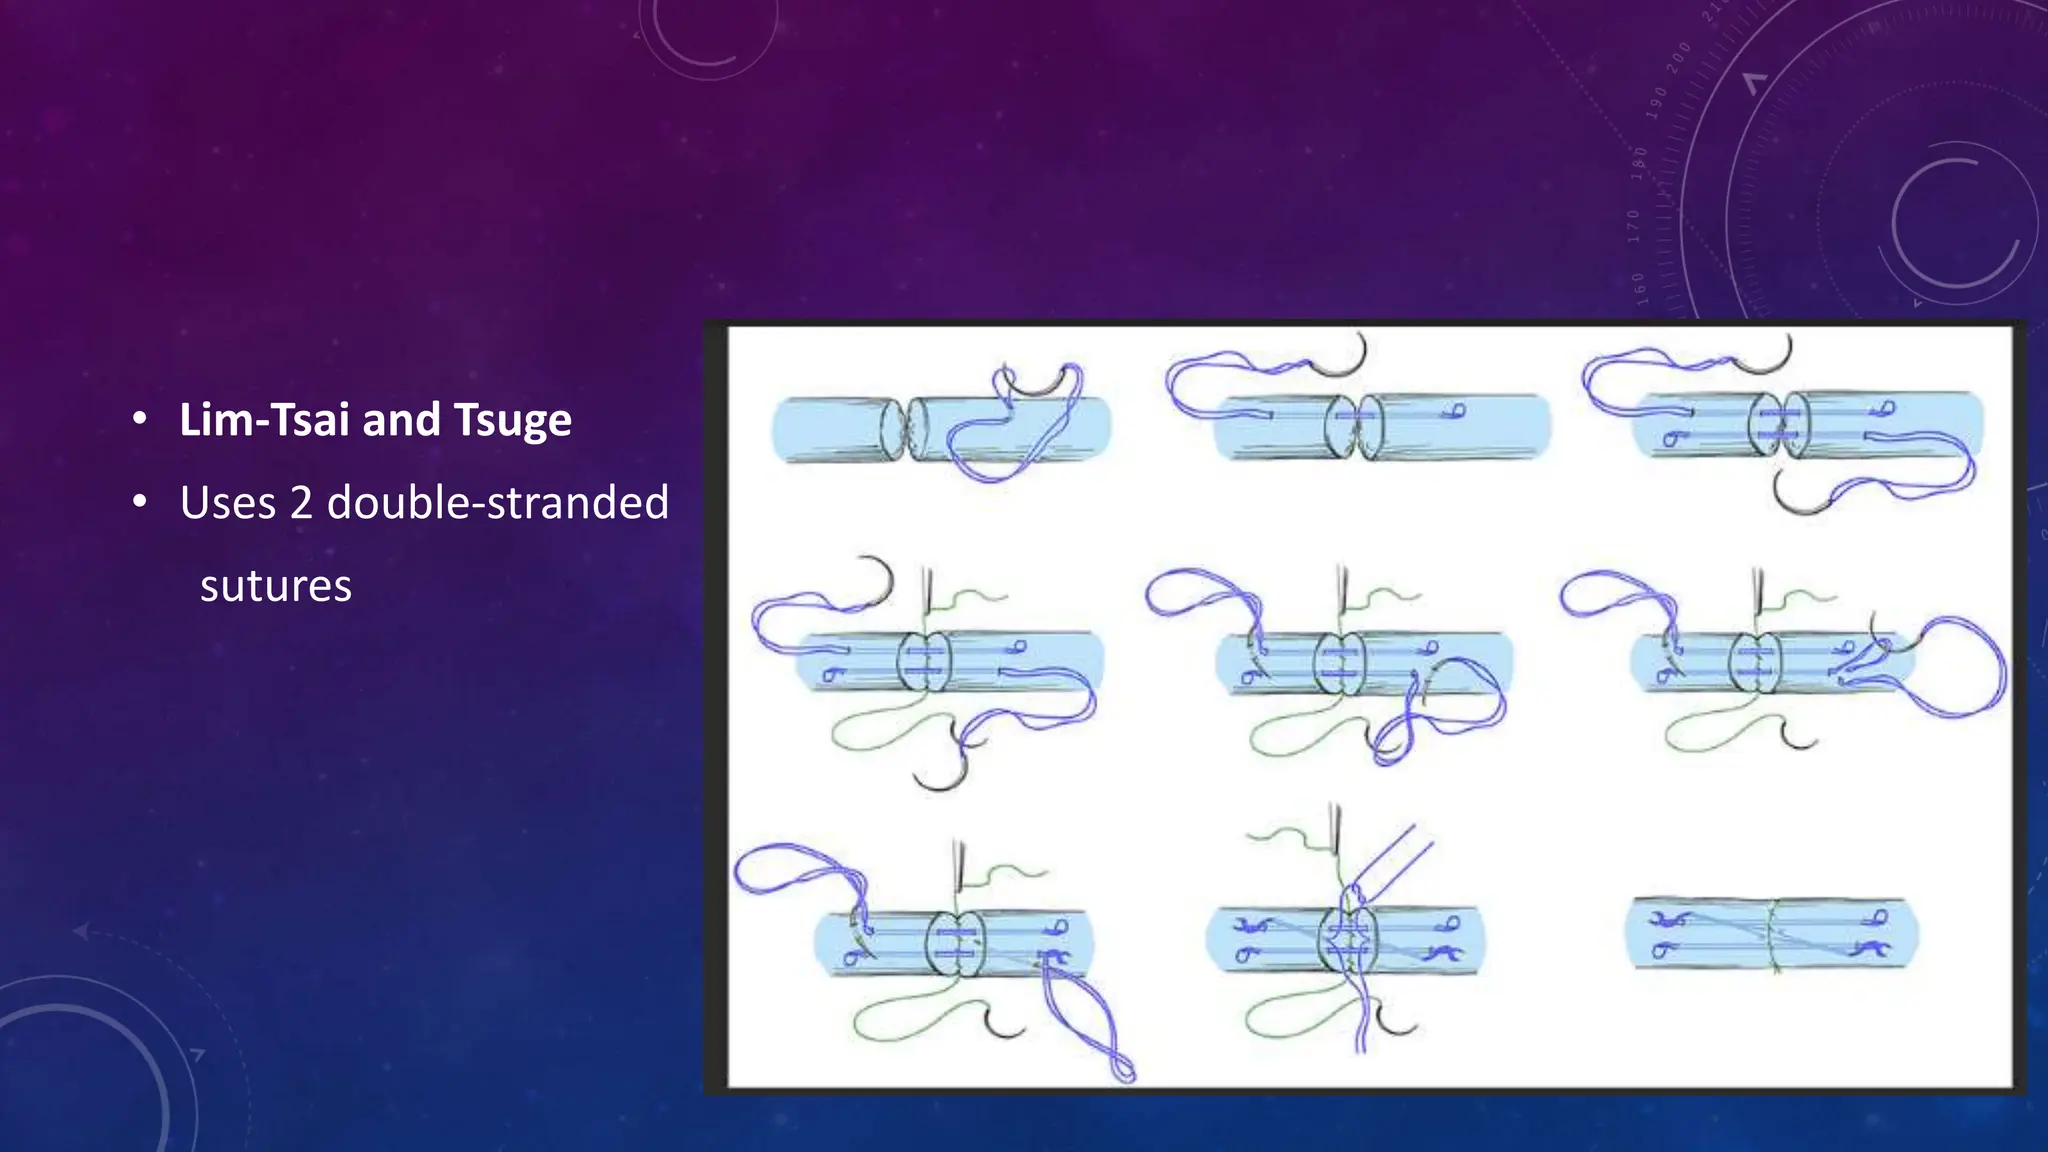
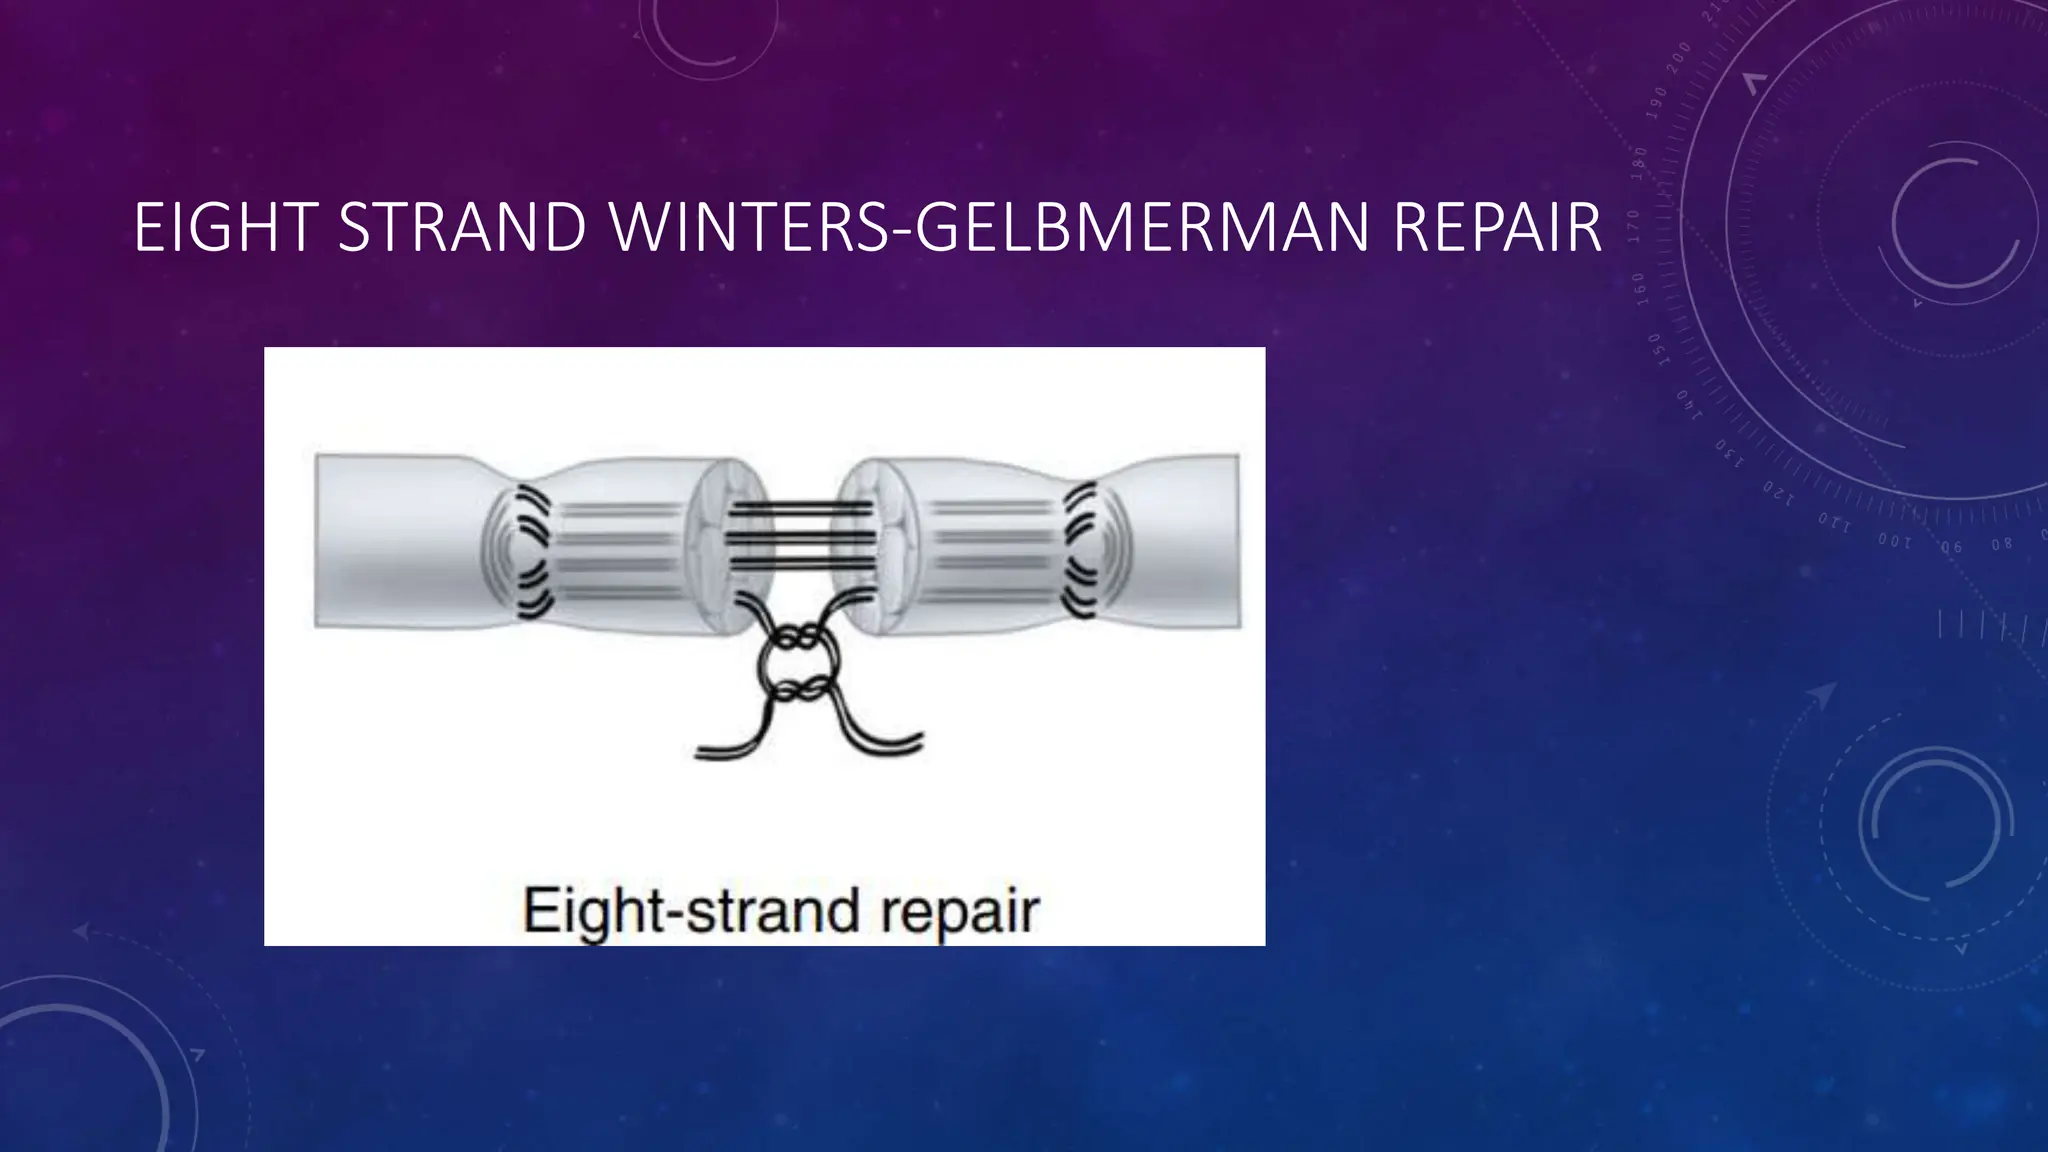
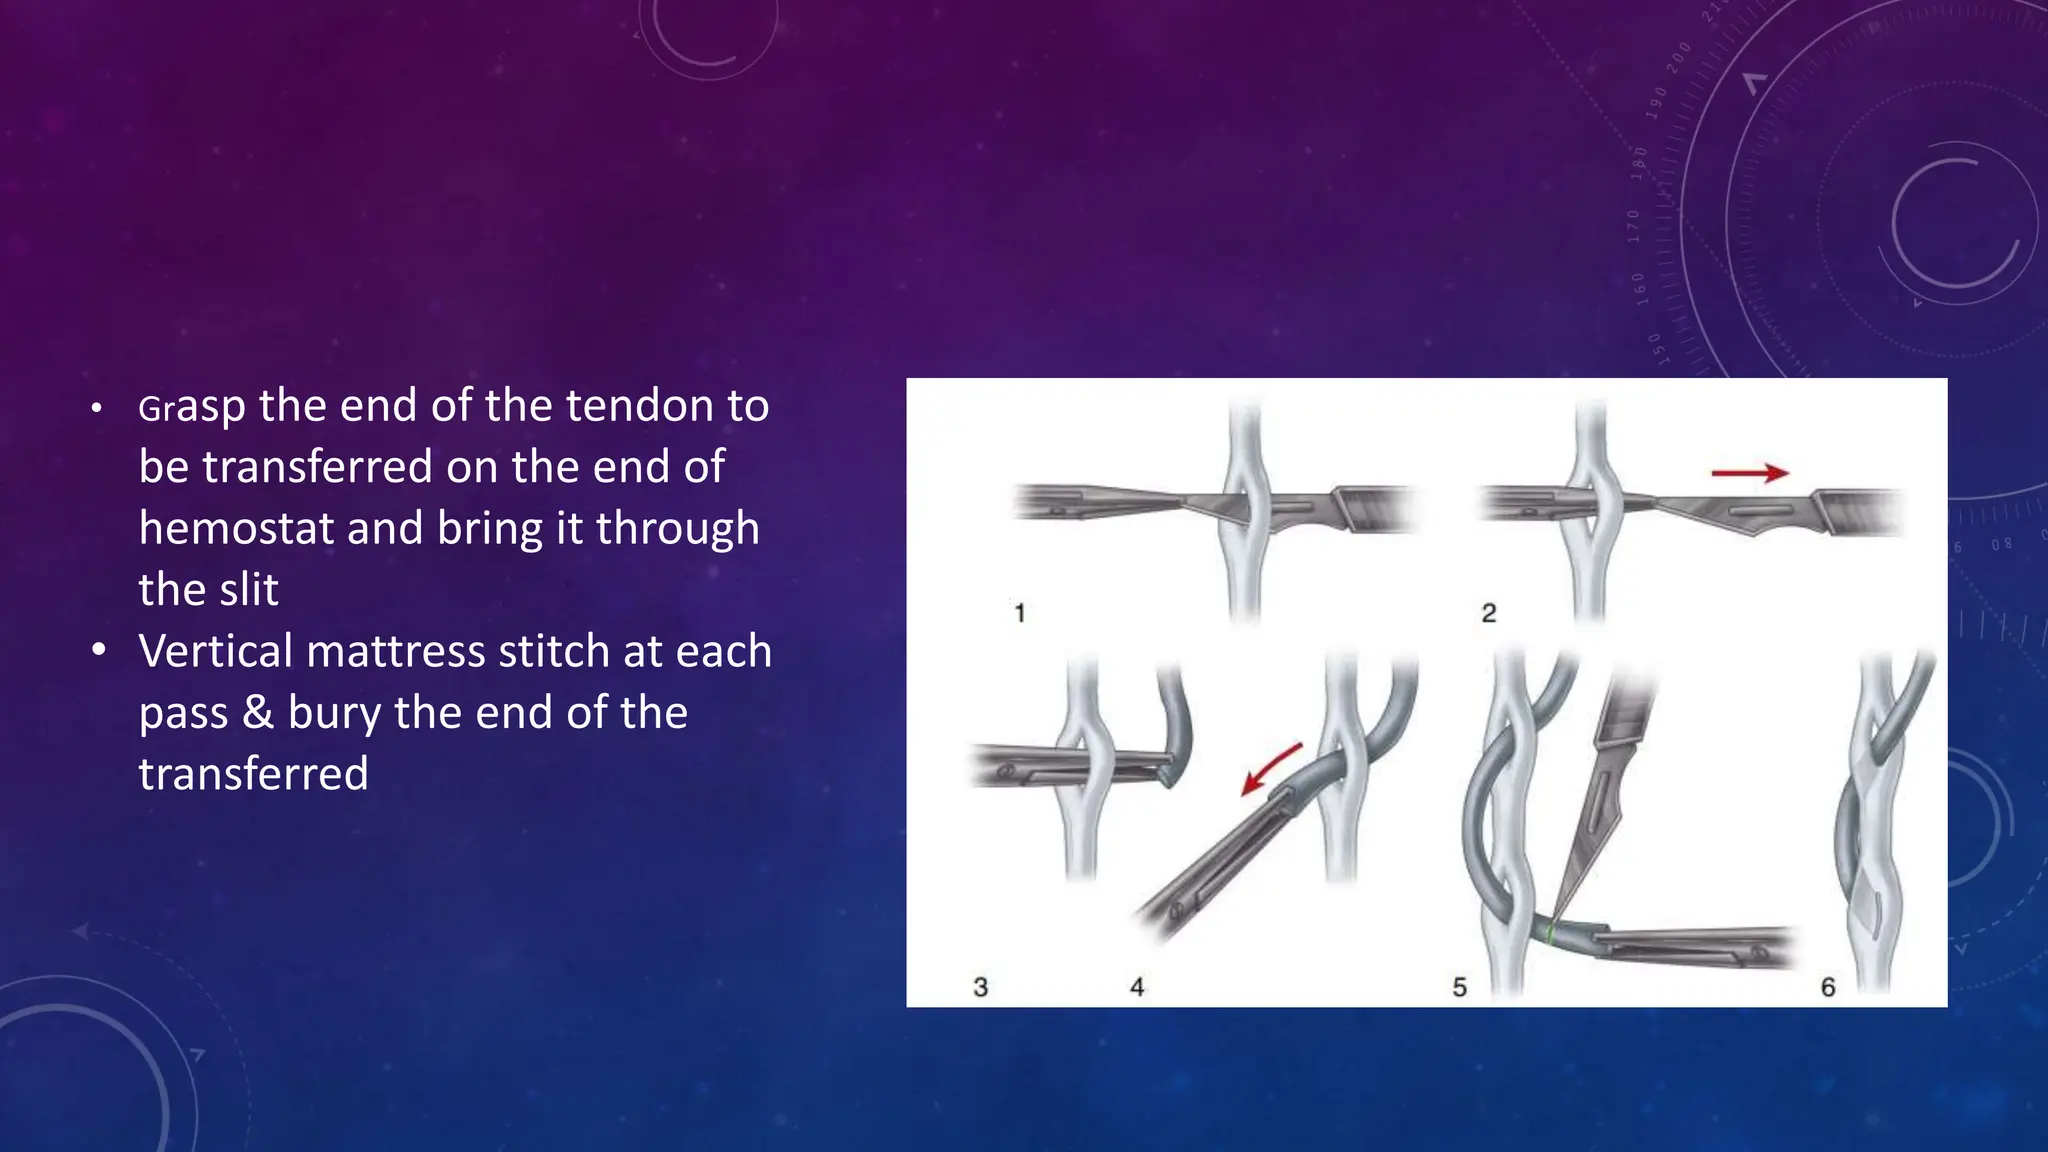
TENDON REPAIR TECHNIQUES
DR GEENA GEORGE
AIM
• Approximate the ends of tendon or end of tendon to adjoining tendon or to
bone
• To retain this during the process of healing
• Early active mobilisation
IDEAL TENDON REPAIR -STRICKLAND
• Easy placement of sutures in tendon
• Secure suture knots
• Smooth juncture of tendon ends
• Minimal or no gapping at repair site
• Minimal interference with tendon vascularity
• Sufficient strength throughout healing to allow early
motion stress to the tendon
• Multiple core suture strands (≥ 4)  stronger repair  able to tolerate
early postoperative active motion rehabilitation
• Repair strength further increased by using higher suture caliber and
stiffer suture materials
• Addition of an epitendinous stitch  improves biomechanical strength,
minimizes gapping, reduces cross-sectional area decreases gliding
friction.
• Knots weakest component of the repair
• Pruitt et al - in vivo canine study - internal knots inferior to outside knot
-overall biomechanical strength at day 0
• 6 weeks post operatively , same biomechanical strength
• In terms of gliding friction from external knot placement, Momose et al -
2 lateral sided knots had more friction than 1 volar-sided or 1 lateral-
sided knot
SUTURE MATERIAL
• Highest tensile strength – Stainless steel  difficult to handle, pulls through
the tendon , large knot
• Can be used in forearm, not in hand
• Absorbable - Catgut, vicryl – absorbed early before strength
• Synthetic – Nylon, Caprolactam – maintain resistance to disrupting forces
more than Prolene & Polyester
• PDS, Maxon
• Monofilament – earlier gap formation
• In biomechanical study , Braided --most suited
• Sufficient resistance, easy handling , good knot (polyester)
• 4-0 suture 66% stronger than 5-0
• 3-0 52% stronger than 4-0
• 3-0  forearm, palm, larger digits
• 4-0  smaller digits
• 5-0 or 6-0 monofilament for epitendinous
SUTURE CONFIGURATION
• Strongest to allow early active & passive mobilization
• 4/6/8 strand core sutures – strongest
• Reduce gap formation, permit more early active motion
• Tang et al – global survey – multistrand 3-0 or 4-0 core suture with 6-0
epitendinous
COMPONENTS OF CORE SUTURE
• 3 components- longitudinal, transverse & link component
• Link component  junction between a longitudinal and a transverse
component or between 2 longitudinal components
• All techniques have the longitudinal and link components and may have the
transverse component
• Longitudinal and transverse components usually placed within the tendon
substance
• Link component lie outside the tendon
• The transverse & link components convert the longitudinal pull of the suture
to a transverse compressive force  prevent the longitudinal component
from pulling out
• Longitudinal component allows placement of the transverse and/or link
components away from the divided end of the tendon
• Orientation of components can vary
• Transverse component may be placed distal or proximal to the far end of the
longitudinal component
• Transverse component may be placed superior, inferior, or between the
longitudinal
• Link component may be constructed as an arc, a loop, or a knot
• Arc  when the 2 suture components forming the link component do not
cross each other (a grasping loop)
• Arc component does not encircle any tendon fibrils
• Loop link  when the suture components cross each other and form a full
circle (a locking loop).
• Holds the tendon fibrils within the loop
• Knot link component Loop is secured with a knot
• Variations in link component - result in a sliding or an anchored suture on
each half of the divided tendon
• Sliding suture allows the suture to slide within the tendon substance when
tension is applied to one of the longitudinal components
• Anchored suture does not allow the suture to move independent of the
tendon
• Arc link component  in sliding suture
• Knot link component  anchored suture
• Loop link component  sliding or an anchored suture, depending on the
complexity of the loop
• Sliding sutures  tension is equally distributed among the different
longitudinal strands
• Anchored suture - longitudinal strands are fixed –any slack in the suture 
uneven distribution of tension and gapping at tendon ends
• Also associated with less bunching of the tendon ends when the suture knot
is tied
EVOLUTION
• Nicoladoni - 1882
• Single strand suture with intratendinous longitudinal and
transverse components connected by an arc link with sliding
suture
• Suture knot outside the tendon
• Kirchmayr - 1917
• Transverse component between the cut end of tendon & far
end of the longitudinal component
• Arc link component - sliding suture
• Single strand of suture and knot tied outside
• Bunnell - 1928
• Intratendinous longitudinal & multiple transverse components connected by
arc link components  sliding suture
• Oblique placement of the longitudinal component to form a figure-of-8
pattern that, combined with the transverse components  required grasp of
the tendon
• single strand of suture with 2 needles & knot was placed outside
• Mason and Allen -1941.
• Used 4 strands of sutures with intratendinous transverse
and extratendinous longitudinal components
• Each tendon end had 2 parallel transverse components
anchored using a tendon knot
• Extratendinous longitudinal components were sutured
to each
• First anchored suture technique.
• Kessler repair - based on the repair described by Mason
and Allen
END TO END SUTURE TECHNIQUES
• Bunnel technique
• Tsuge
• Bevel
• Tajima Kessler
• Kessler
• Indiana 4 strand repair
TWO STRAND TENDON REPAIRS
FOUR STRAND TENDON REPAIRS
SIX STRAND REPAIR
• Savage (with Modifications)
• Lim-Tsai
• Tsuge (Tang Modification)
EIGHT STRAND REPAIR
• Winters Gelberman
• Knotless Barbed sutures
KESSLER -1969
• Suture is anchored to the tendon at all 4 corners with a knot
• This knot prevents the suture from moving within the tendon substance
• Urbaniak et al – compared tensile strengths of 5 different end-to-end tendon-
suturing techniques
• Circumferential interrupted suture , techniques described by Nicoladoni,
Mason and Allen, Bunnell, and Kessler
• The strongest end-to-end suture technique - Mason–Allen technique - tensile
strength of 4,030 g
• Kessler grasping technique - tensile strength of 3,970 g
• Strengths of the Bunnell technique and the Kessler grasping technique
compared during healing
• On day 5, Kessler’s technique was 3 times stronger than the Bunnell suture
MODIFIED KESSLER
BUNNEL STITCH
FOUR OR SIX STRAND MODIFIED TSUGE REPAIR-
CRUCIATE REPAIR
• One of the most commonly performed repairs in flexor tendon surgery
• Original cruciate repair  McLarney et al - nonlocking repair technique
• Locking configurations - biomechanically superior to nonlocking
configurations
• Croog et al compared the biomechanics of different locking cruciate
configurations: simple lock, circlelock, and cross-lock cruciate repairs
• Cross-lock - most superior with and without an epitendinous stitch
• Smaller increase in work of flexion and a higher ultimate load to failure than
the Strickland repair
• Advantages :
• Biomechanical strength compared with other 4-strand repairs
• Single suture to complete the repair
• Overall the cruciate configuration is easier to place than other repairs
• Disadvantages :
• Exposed suture on the surface of the tendon
• Increased tissue handling from placing the cross-locks
• Need to make sure tendon ends are well approximated when the cross-locks
are placed
MASSACHUSETTS GENERAL HOSPITAL (MODIFIED
BECKER)
• Running cross-lock loop configuration
• Uses 2 separate sutures secured with 2 separate
knots on the outside of the tendon
• Gliding resistance was significantly higher
• Advantages:
• Biomechanical strength
• Larger suture purchase based on its configuration
biomechanical stability
• Disadvantages:
• Exposed suture on the surface & cross-lock configuration  increased work
of flexion due to friction and potential for increased adhesions
• Potential weaknesses with the placement of 2 knots
• Increased tissue handling of the injured tendon
STRICKLAND
• Also known as the Indiana Hand method
• 4-core nonlocking (grasping) repair
• Supplemented by a running-locking epitendinous stitch
• Advantages:
• Biomechanical strength compared to 2-core repairs
• Ability to be used for early motion exercises
• Disadvantages
• Poor biomechanical strength compared to other 4 core repairs
• Increased number of knots points of weaknesses in the construct
SIX STRAND REPAIR – SAVAGE
• Lim-Tsai and Tsuge
• Uses 2 double-stranded
sutures
• Advantage:
• Superior biomechanical strength compared to other 2- and 4-core stranded
repairs
• Disadvantage:
• 2 separate sutures increases tissue handling
EIGHT STRAND WINTERS-GELBMERMAN REPAIR
• Advantage :
• Stout biomechanical strength compared to 4-core and 6-core repairs
• Most useful in larger tendons able to withstand 8-strands
• Disadvantages:
• Potentially increased bulk
• Increased tissue handling with increased suture passes
• Technical difficulty
FISH-MOUTH END-TO-END SUTURE (PULVERTAFT)
• Tendon of small diameter can
be sutured to large diameter
tendon
• Used to suture tendons of
unequal size
ROLL STITCH
• For suturing extensor tendons over or near the MCP joints
• 4-0 monofilament wire or nylon
• Tendon sutured through skin
END TO SIDE TECHNIQUES
• Used in tendon transfers when one motor
must activate several tendons
• Pierce the recipient tendon through the
center with blade  grasp blade end with
a straight hemostat
• Withdraw the blade  carrying the
hemostat inside
• Grasp the end of the tendon to
be transferred on the end of
hemostat and bring it through
the slit
• Vertical mattress stitch at each
pass & bury the end of the
transferred
CIRCUMFERENTIAL SUTURES
• Lindsay et al,Pruitt and colleagues, Silfverskiod”ld - gapping at the repair site
becomes the weakest part of the tendon unfavorably alters tendon
mechanics adhesions  decreased tendon excursion
• Peripheral circumferential suture at the completion of a tendon repair  Diao
et al,203 Silfverskio¨ld and colleagues
• Provide a 10% to 50% increase in flexor tendon repair strength and a
significant reduction in gapping between the tendon ends
• The running lock loop stitch  Lin et al
• Horizontal mattress intrafiber method  Mashadi and Amis
• Halsted continuous horizontal mattress suture
• Cross-stitch technique by Silfverskio¨ld
TENDON-TO-BONE ATTACHMENT
• Requires a pull-out technique
• Tendon-to-tendon repair of grafts
preferable in children - avoid physeal
injury
• Core suture techniques - Kessler and
modified Bunnell crisscross suture
SUTURE ANCHOR TENDON ATTACHMENT
• Avoids complications with
the fingernail
• Two suture anchors placed in
the distal phalanx
• From distal-volar to proximal-
dorsal
• Gains purchase in the
thickest portion of the distal
phalanx  greatest pull-out
strength
Key factors determining the strength of tendon core repair:
Number of suture strands crossing the repair site
caliber of the suture
Tensile strength of the suture material
Hold of the core suture on the tendon fibers (sliding vs anchored)
Other factors
Number of knots
Location of the knots (intratendinous vs
extratendinous)
Addition of a peripheral repair
TENDON REPAIR – PRINCIPLES ^0 TYPES-1.pptx

TENDON REPAIR – PRINCIPLES ^0 TYPES-1.pptx

  • 1.
  • 2.
    AIM • Approximate theends of tendon or end of tendon to adjoining tendon or to bone • To retain this during the process of healing • Early active mobilisation
  • 3.
    IDEAL TENDON REPAIR-STRICKLAND • Easy placement of sutures in tendon • Secure suture knots • Smooth juncture of tendon ends • Minimal or no gapping at repair site • Minimal interference with tendon vascularity • Sufficient strength throughout healing to allow early motion stress to the tendon
  • 5.
    • Multiple coresuture strands (≥ 4)  stronger repair  able to tolerate early postoperative active motion rehabilitation • Repair strength further increased by using higher suture caliber and stiffer suture materials • Addition of an epitendinous stitch  improves biomechanical strength, minimizes gapping, reduces cross-sectional area decreases gliding friction.
  • 6.
    • Knots weakestcomponent of the repair • Pruitt et al - in vivo canine study - internal knots inferior to outside knot -overall biomechanical strength at day 0 • 6 weeks post operatively , same biomechanical strength • In terms of gliding friction from external knot placement, Momose et al - 2 lateral sided knots had more friction than 1 volar-sided or 1 lateral- sided knot
  • 7.
    SUTURE MATERIAL • Highesttensile strength – Stainless steel  difficult to handle, pulls through the tendon , large knot • Can be used in forearm, not in hand • Absorbable - Catgut, vicryl – absorbed early before strength • Synthetic – Nylon, Caprolactam – maintain resistance to disrupting forces more than Prolene & Polyester • PDS, Maxon
  • 8.
    • Monofilament –earlier gap formation • In biomechanical study , Braided --most suited • Sufficient resistance, easy handling , good knot (polyester) • 4-0 suture 66% stronger than 5-0 • 3-0 52% stronger than 4-0
  • 9.
    • 3-0 forearm, palm, larger digits • 4-0  smaller digits • 5-0 or 6-0 monofilament for epitendinous
  • 10.
    SUTURE CONFIGURATION • Strongestto allow early active & passive mobilization • 4/6/8 strand core sutures – strongest • Reduce gap formation, permit more early active motion • Tang et al – global survey – multistrand 3-0 or 4-0 core suture with 6-0 epitendinous
  • 11.
    COMPONENTS OF CORESUTURE • 3 components- longitudinal, transverse & link component • Link component  junction between a longitudinal and a transverse component or between 2 longitudinal components • All techniques have the longitudinal and link components and may have the transverse component • Longitudinal and transverse components usually placed within the tendon substance • Link component lie outside the tendon
  • 13.
    • The transverse& link components convert the longitudinal pull of the suture to a transverse compressive force  prevent the longitudinal component from pulling out • Longitudinal component allows placement of the transverse and/or link components away from the divided end of the tendon
  • 14.
    • Orientation ofcomponents can vary • Transverse component may be placed distal or proximal to the far end of the longitudinal component • Transverse component may be placed superior, inferior, or between the longitudinal • Link component may be constructed as an arc, a loop, or a knot
  • 15.
    • Arc when the 2 suture components forming the link component do not cross each other (a grasping loop) • Arc component does not encircle any tendon fibrils • Loop link  when the suture components cross each other and form a full circle (a locking loop). • Holds the tendon fibrils within the loop • Knot link component Loop is secured with a knot
  • 16.
    • Variations inlink component - result in a sliding or an anchored suture on each half of the divided tendon • Sliding suture allows the suture to slide within the tendon substance when tension is applied to one of the longitudinal components • Anchored suture does not allow the suture to move independent of the tendon • Arc link component  in sliding suture • Knot link component  anchored suture • Loop link component  sliding or an anchored suture, depending on the complexity of the loop
  • 17.
    • Sliding sutures tension is equally distributed among the different longitudinal strands • Anchored suture - longitudinal strands are fixed –any slack in the suture  uneven distribution of tension and gapping at tendon ends • Also associated with less bunching of the tendon ends when the suture knot is tied
  • 18.
    EVOLUTION • Nicoladoni -1882 • Single strand suture with intratendinous longitudinal and transverse components connected by an arc link with sliding suture • Suture knot outside the tendon • Kirchmayr - 1917 • Transverse component between the cut end of tendon & far end of the longitudinal component • Arc link component - sliding suture • Single strand of suture and knot tied outside
  • 19.
    • Bunnell -1928 • Intratendinous longitudinal & multiple transverse components connected by arc link components  sliding suture • Oblique placement of the longitudinal component to form a figure-of-8 pattern that, combined with the transverse components  required grasp of the tendon • single strand of suture with 2 needles & knot was placed outside
  • 20.
    • Mason andAllen -1941. • Used 4 strands of sutures with intratendinous transverse and extratendinous longitudinal components • Each tendon end had 2 parallel transverse components anchored using a tendon knot • Extratendinous longitudinal components were sutured to each • First anchored suture technique. • Kessler repair - based on the repair described by Mason and Allen
  • 22.
    END TO ENDSUTURE TECHNIQUES • Bunnel technique • Tsuge • Bevel • Tajima Kessler • Kessler • Indiana 4 strand repair
  • 23.
  • 24.
  • 25.
    SIX STRAND REPAIR •Savage (with Modifications) • Lim-Tsai • Tsuge (Tang Modification)
  • 26.
    EIGHT STRAND REPAIR •Winters Gelberman • Knotless Barbed sutures
  • 27.
  • 28.
    • Suture isanchored to the tendon at all 4 corners with a knot • This knot prevents the suture from moving within the tendon substance • Urbaniak et al – compared tensile strengths of 5 different end-to-end tendon- suturing techniques • Circumferential interrupted suture , techniques described by Nicoladoni, Mason and Allen, Bunnell, and Kessler
  • 29.
    • The strongestend-to-end suture technique - Mason–Allen technique - tensile strength of 4,030 g • Kessler grasping technique - tensile strength of 3,970 g • Strengths of the Bunnell technique and the Kessler grasping technique compared during healing • On day 5, Kessler’s technique was 3 times stronger than the Bunnell suture
  • 30.
  • 31.
  • 33.
    FOUR OR SIXSTRAND MODIFIED TSUGE REPAIR-
  • 34.
    CRUCIATE REPAIR • Oneof the most commonly performed repairs in flexor tendon surgery • Original cruciate repair  McLarney et al - nonlocking repair technique • Locking configurations - biomechanically superior to nonlocking configurations • Croog et al compared the biomechanics of different locking cruciate configurations: simple lock, circlelock, and cross-lock cruciate repairs • Cross-lock - most superior with and without an epitendinous stitch • Smaller increase in work of flexion and a higher ultimate load to failure than the Strickland repair
  • 36.
    • Advantages : •Biomechanical strength compared with other 4-strand repairs • Single suture to complete the repair • Overall the cruciate configuration is easier to place than other repairs • Disadvantages : • Exposed suture on the surface of the tendon • Increased tissue handling from placing the cross-locks • Need to make sure tendon ends are well approximated when the cross-locks are placed
  • 37.
    MASSACHUSETTS GENERAL HOSPITAL(MODIFIED BECKER) • Running cross-lock loop configuration • Uses 2 separate sutures secured with 2 separate knots on the outside of the tendon • Gliding resistance was significantly higher • Advantages: • Biomechanical strength • Larger suture purchase based on its configuration biomechanical stability
  • 38.
    • Disadvantages: • Exposedsuture on the surface & cross-lock configuration  increased work of flexion due to friction and potential for increased adhesions • Potential weaknesses with the placement of 2 knots • Increased tissue handling of the injured tendon
  • 39.
    STRICKLAND • Also knownas the Indiana Hand method • 4-core nonlocking (grasping) repair • Supplemented by a running-locking epitendinous stitch • Advantages: • Biomechanical strength compared to 2-core repairs • Ability to be used for early motion exercises • Disadvantages • Poor biomechanical strength compared to other 4 core repairs • Increased number of knots points of weaknesses in the construct
  • 40.
  • 41.
    • Lim-Tsai andTsuge • Uses 2 double-stranded sutures
  • 42.
    • Advantage: • Superiorbiomechanical strength compared to other 2- and 4-core stranded repairs • Disadvantage: • 2 separate sutures increases tissue handling
  • 43.
  • 44.
    • Advantage : •Stout biomechanical strength compared to 4-core and 6-core repairs • Most useful in larger tendons able to withstand 8-strands • Disadvantages: • Potentially increased bulk • Increased tissue handling with increased suture passes • Technical difficulty
  • 46.
    FISH-MOUTH END-TO-END SUTURE(PULVERTAFT) • Tendon of small diameter can be sutured to large diameter tendon • Used to suture tendons of unequal size
  • 47.
    ROLL STITCH • Forsuturing extensor tendons over or near the MCP joints • 4-0 monofilament wire or nylon • Tendon sutured through skin
  • 48.
    END TO SIDETECHNIQUES • Used in tendon transfers when one motor must activate several tendons • Pierce the recipient tendon through the center with blade  grasp blade end with a straight hemostat • Withdraw the blade  carrying the hemostat inside
  • 49.
    • Grasp theend of the tendon to be transferred on the end of hemostat and bring it through the slit • Vertical mattress stitch at each pass & bury the end of the transferred
  • 50.
    CIRCUMFERENTIAL SUTURES • Lindsayet al,Pruitt and colleagues, Silfverskiod”ld - gapping at the repair site becomes the weakest part of the tendon unfavorably alters tendon mechanics adhesions  decreased tendon excursion • Peripheral circumferential suture at the completion of a tendon repair  Diao et al,203 Silfverskio¨ld and colleagues • Provide a 10% to 50% increase in flexor tendon repair strength and a significant reduction in gapping between the tendon ends
  • 51.
    • The runninglock loop stitch  Lin et al • Horizontal mattress intrafiber method  Mashadi and Amis • Halsted continuous horizontal mattress suture • Cross-stitch technique by Silfverskio¨ld
  • 53.
    TENDON-TO-BONE ATTACHMENT • Requiresa pull-out technique • Tendon-to-tendon repair of grafts preferable in children - avoid physeal injury • Core suture techniques - Kessler and modified Bunnell crisscross suture
  • 56.
    SUTURE ANCHOR TENDONATTACHMENT • Avoids complications with the fingernail • Two suture anchors placed in the distal phalanx • From distal-volar to proximal- dorsal • Gains purchase in the thickest portion of the distal phalanx  greatest pull-out strength
  • 57.
    Key factors determiningthe strength of tendon core repair: Number of suture strands crossing the repair site caliber of the suture Tensile strength of the suture material Hold of the core suture on the tendon fibers (sliding vs anchored) Other factors Number of knots Location of the knots (intratendinous vs extratendinous) Addition of a peripheral repair

Editor's Notes

  • #3 Gentle, delicate handling – to reduce scar & reaction  Adhesions
  • #44 At approximately 1 cm from the repair site, a superficial locking stitch is placed to cinch the suture down to the tendon. A core stitch is placed through to the opposite side, where a cross-lock stitch is placed. Then the suture is brought back through to the center of the repair. Another identical suture configuration also is placed with a double-stranded suture starting on the opposite side. After this is completed, a knot is tied in the center of the repair, completing the 6-core repair. The Tsuge repair is a 6-core repair that also uses a double-stranded suture. By itself it is a 2-core stitch, but this repair can be augmented by placing multiple core stitches to increase repair strength and is commonly referred to as the Tang modification of the Tsuge repair. The repair is started by using a double stranded suture that is cinched onto itself to secure the
  • #46 Insert the needle into the tendon at the repair site and extend it through the posterolateral quadrant, exiting 1 cm from the cut tendon edge. n Working counterclockwise, insert the needle just distal to its previous exit point to anchor the tendon transversely. n Complete the first posterolateral rectangle by paralleling the first suture pass with the tendon edge. n Carry out the procedure in the same way in the opposite tendon stump, completing a dorsal rectangle. n Advance the needle into the palmar half of the tendon and duplicate the previous steps, with the needle finally exiting the repair site opposite and palmar to the initial entry site. n Place tension on the double-stranded suture to allow apposition of the tendon. n Tie a four-throw surgeon’s knot at the repair site (see Fig. 66.5). n Use a 6-0 nylon epitendinous running suture to invaginate the free ends of the tendon
  • #50 Pass the suture through the skin just medial or lateral to the divided tendon and through the proximal segment of the tendon near its margin from superficial to deep and then through the deep surface of the distal segment, to emerge on its superficial surface. n Pass it proximally and through the opposite margin of the proximal segment and bring it out through the skin on the opposite side of the tendon from which it was introduced At about 4 weeks, the suture can be removed by pulling on one of its ends.
  • #56 Bring the needle out through the cut end of the tendon and pass it through the tunnel in the bone and out the opposite side of the bone and the skin. n Pass the needle through felt and a button and tie it over the button. n Pass the pull-out wire retrograde out through the skin with a needle. n At 3 to 4 weeks, to remove the wire, cut the button from the wire suture and pull the pull-out wire retrograde (proximally) to remove it. The crisscross intratendinous suture may bind and is sometimes difficult to remove; another disadvantage is the retrograde traction on the tendon, which has been attached to bone. This can increase the risk of separation of the tendon