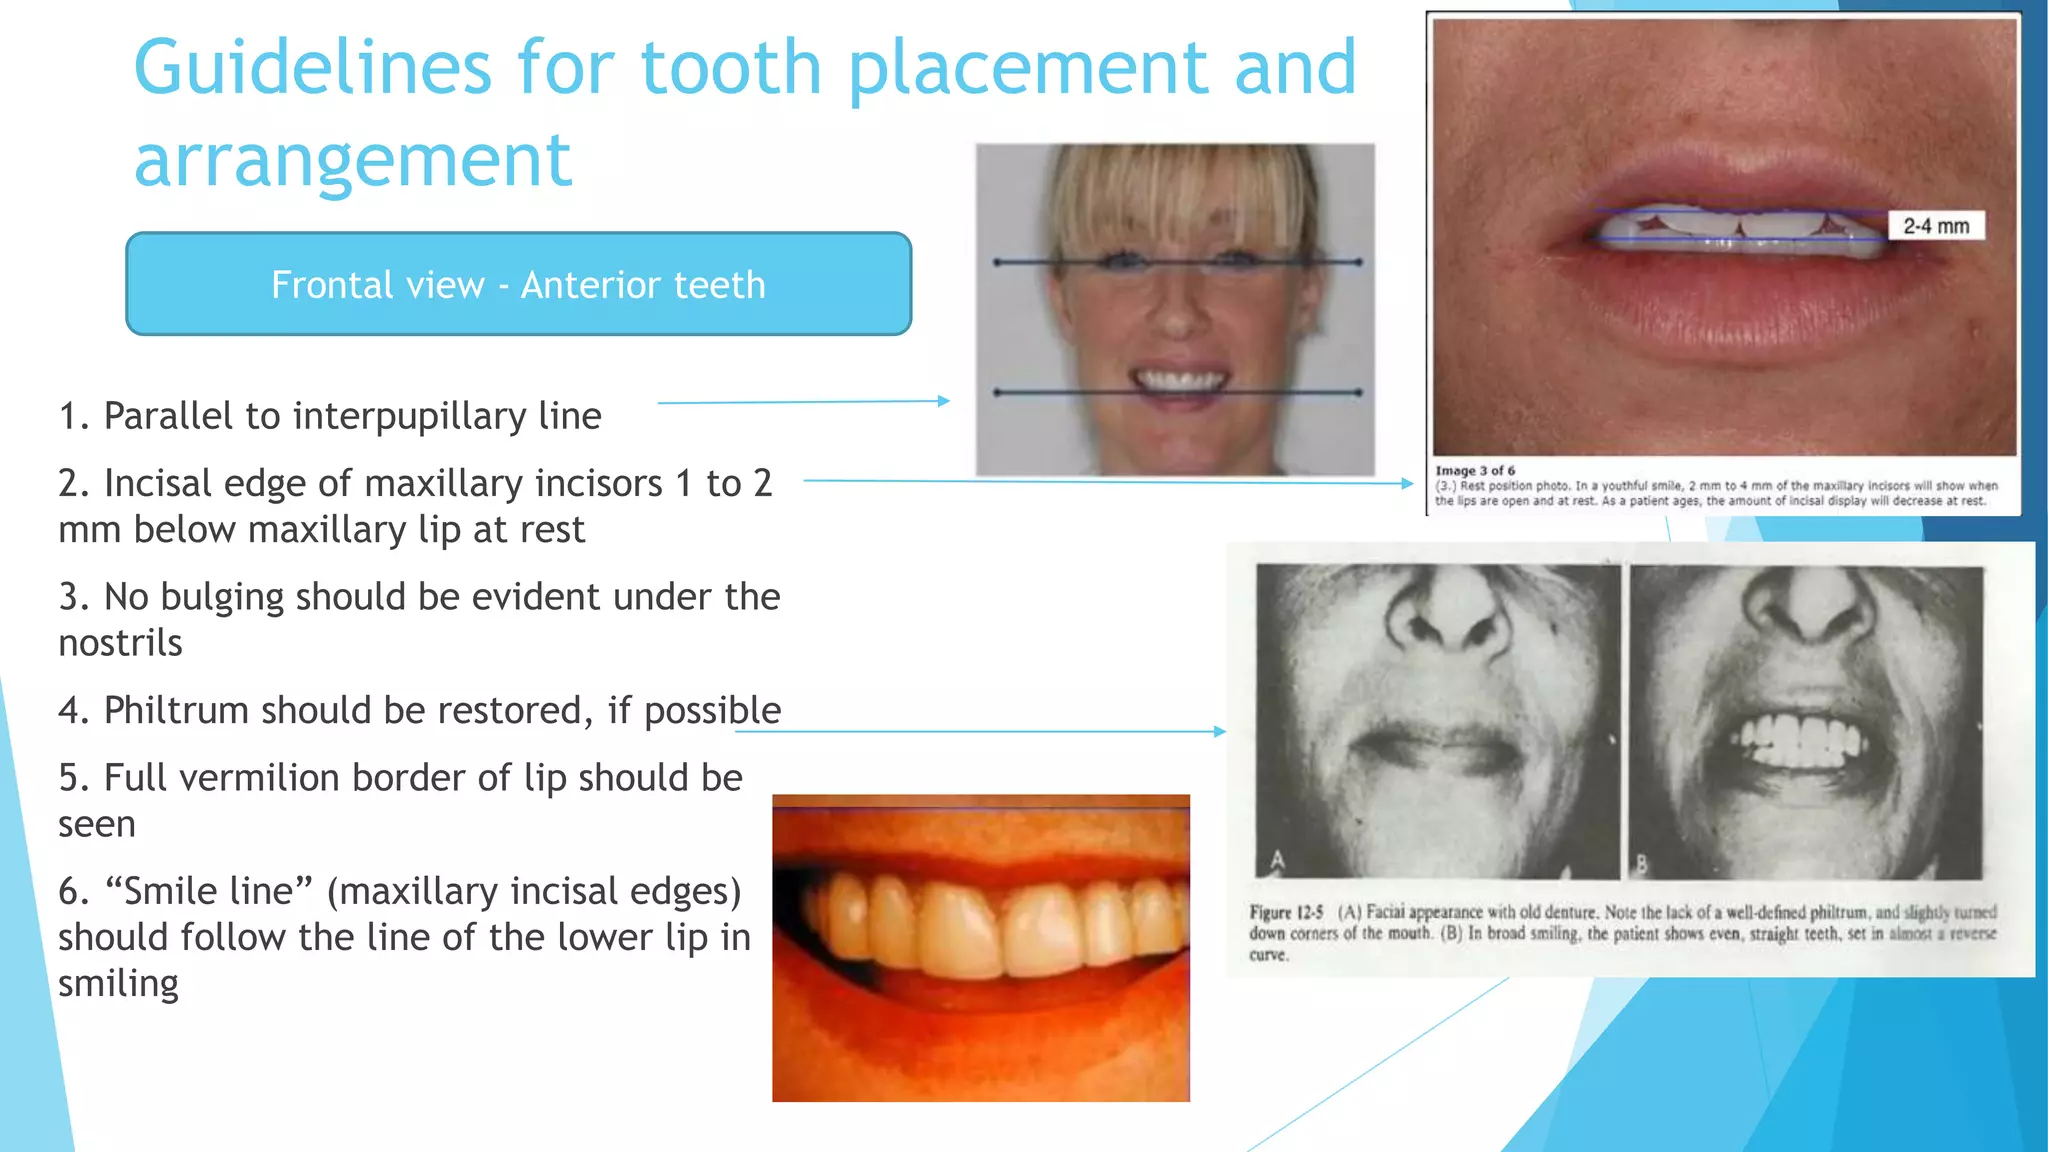
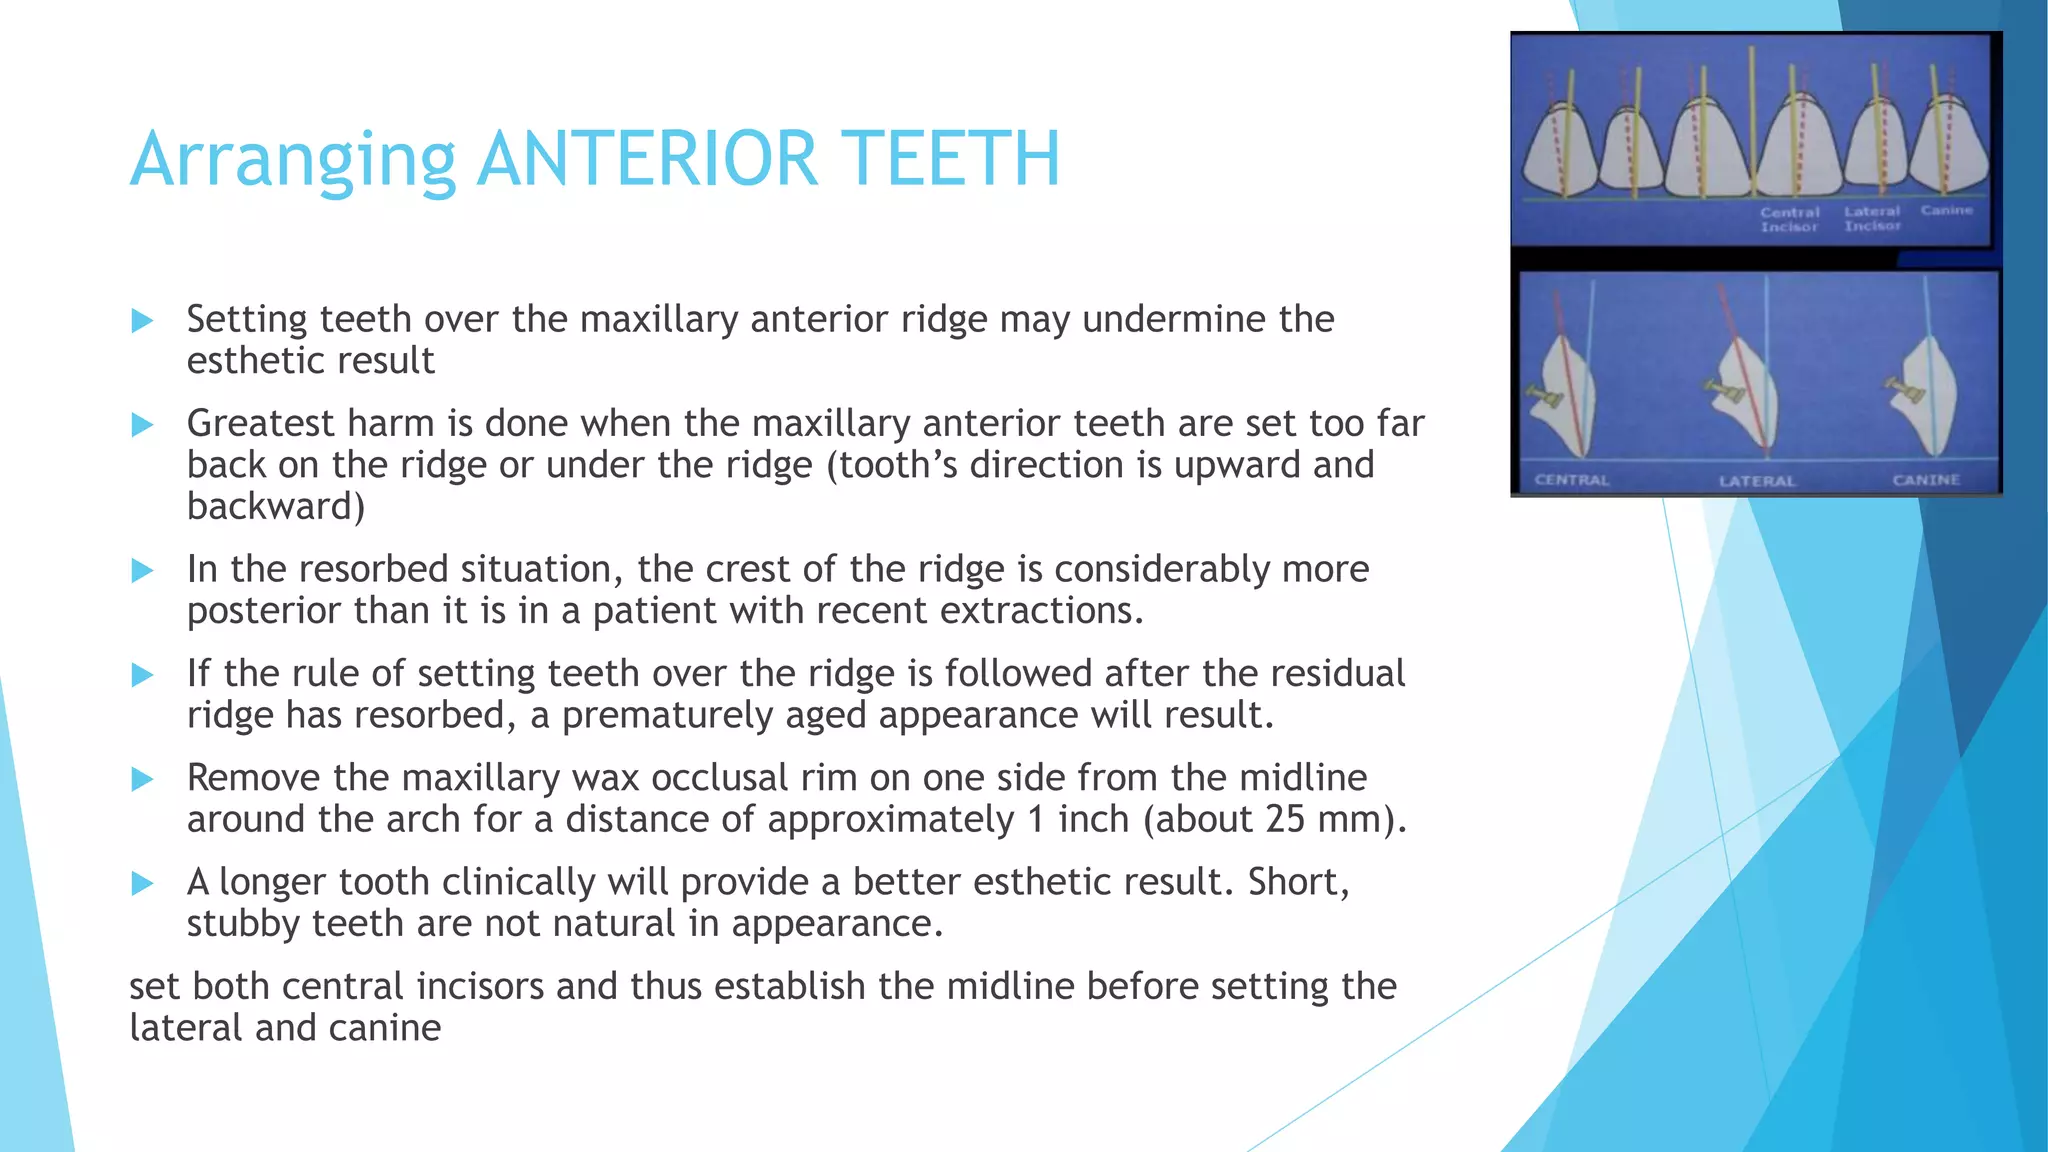
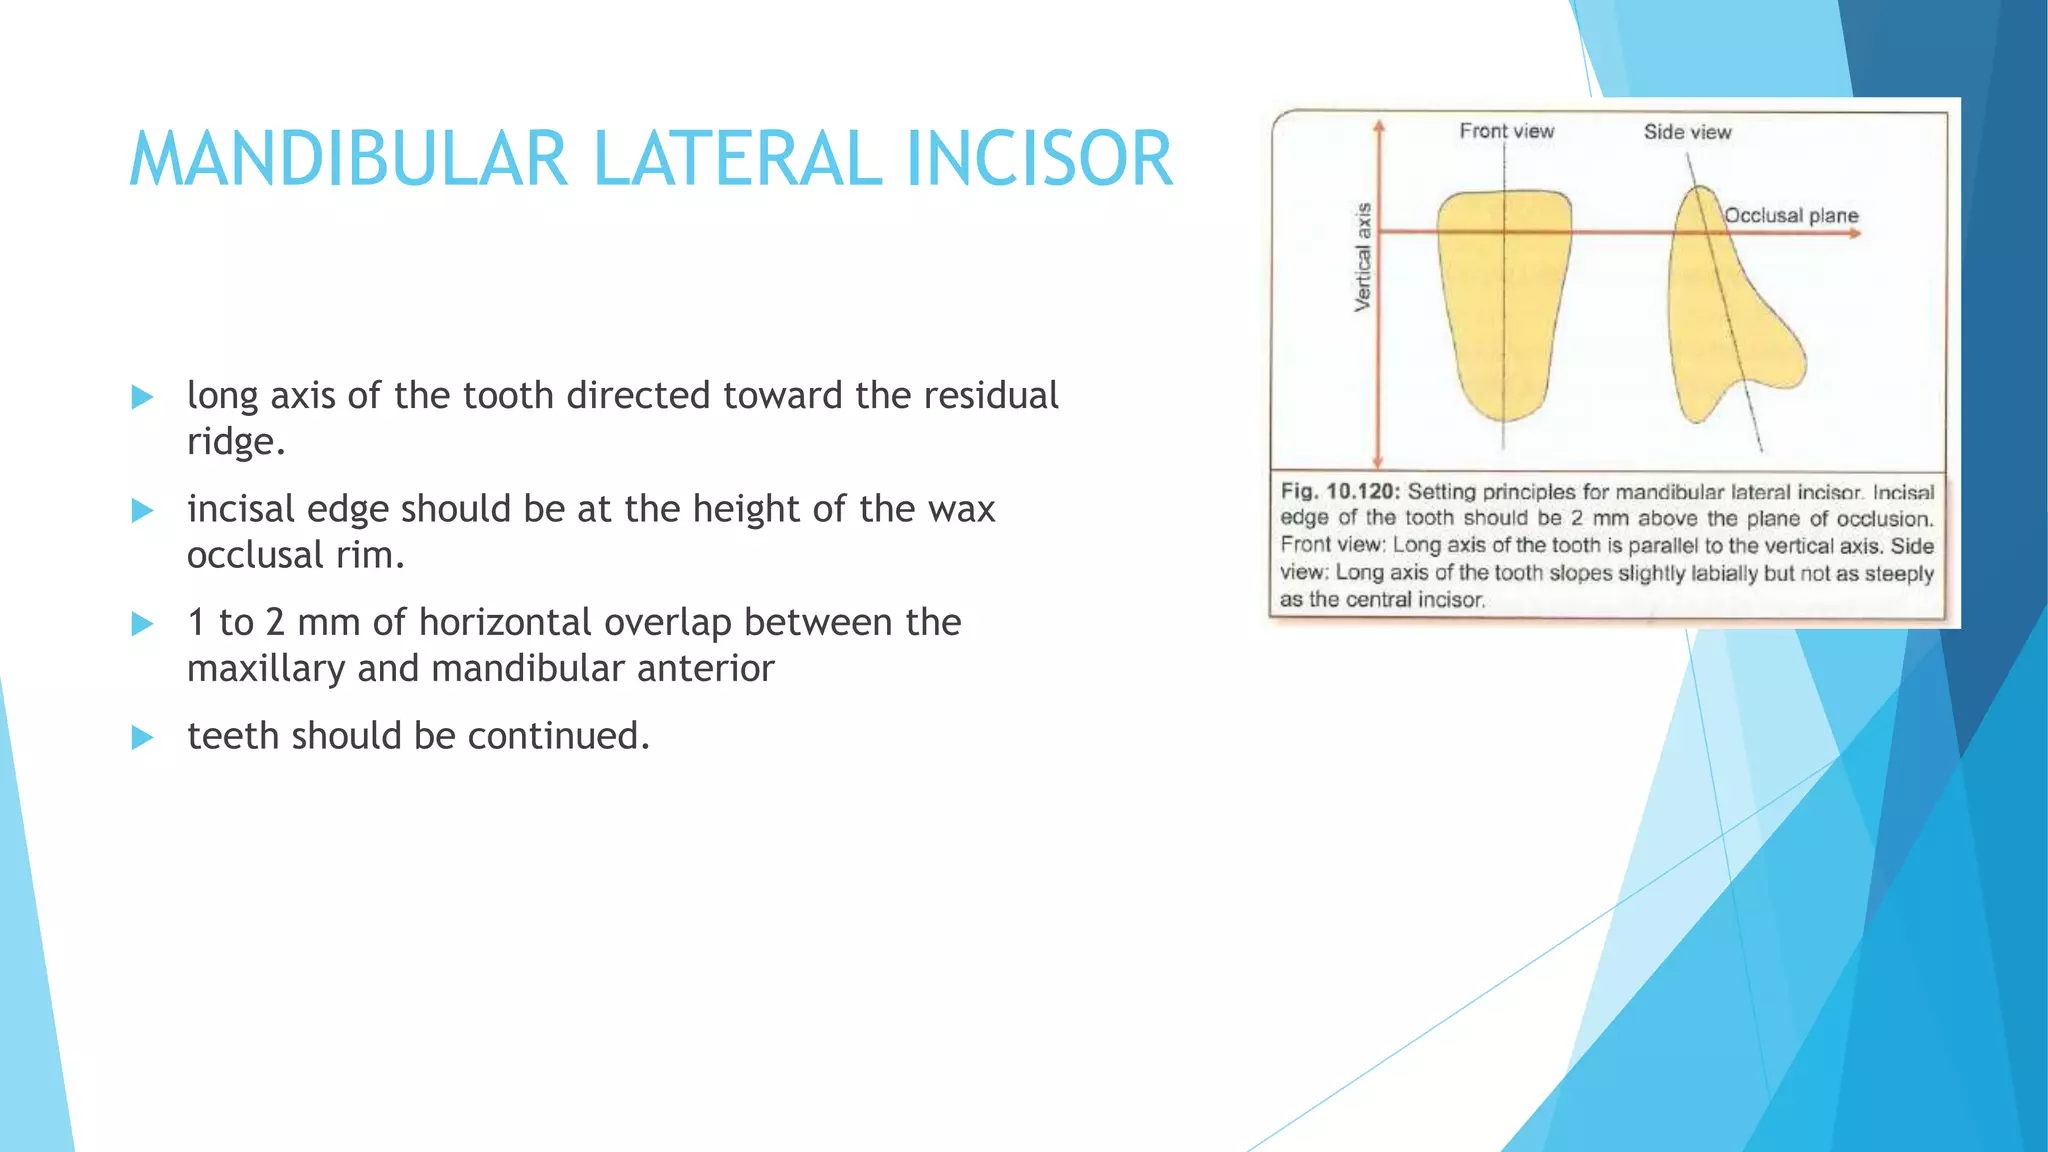
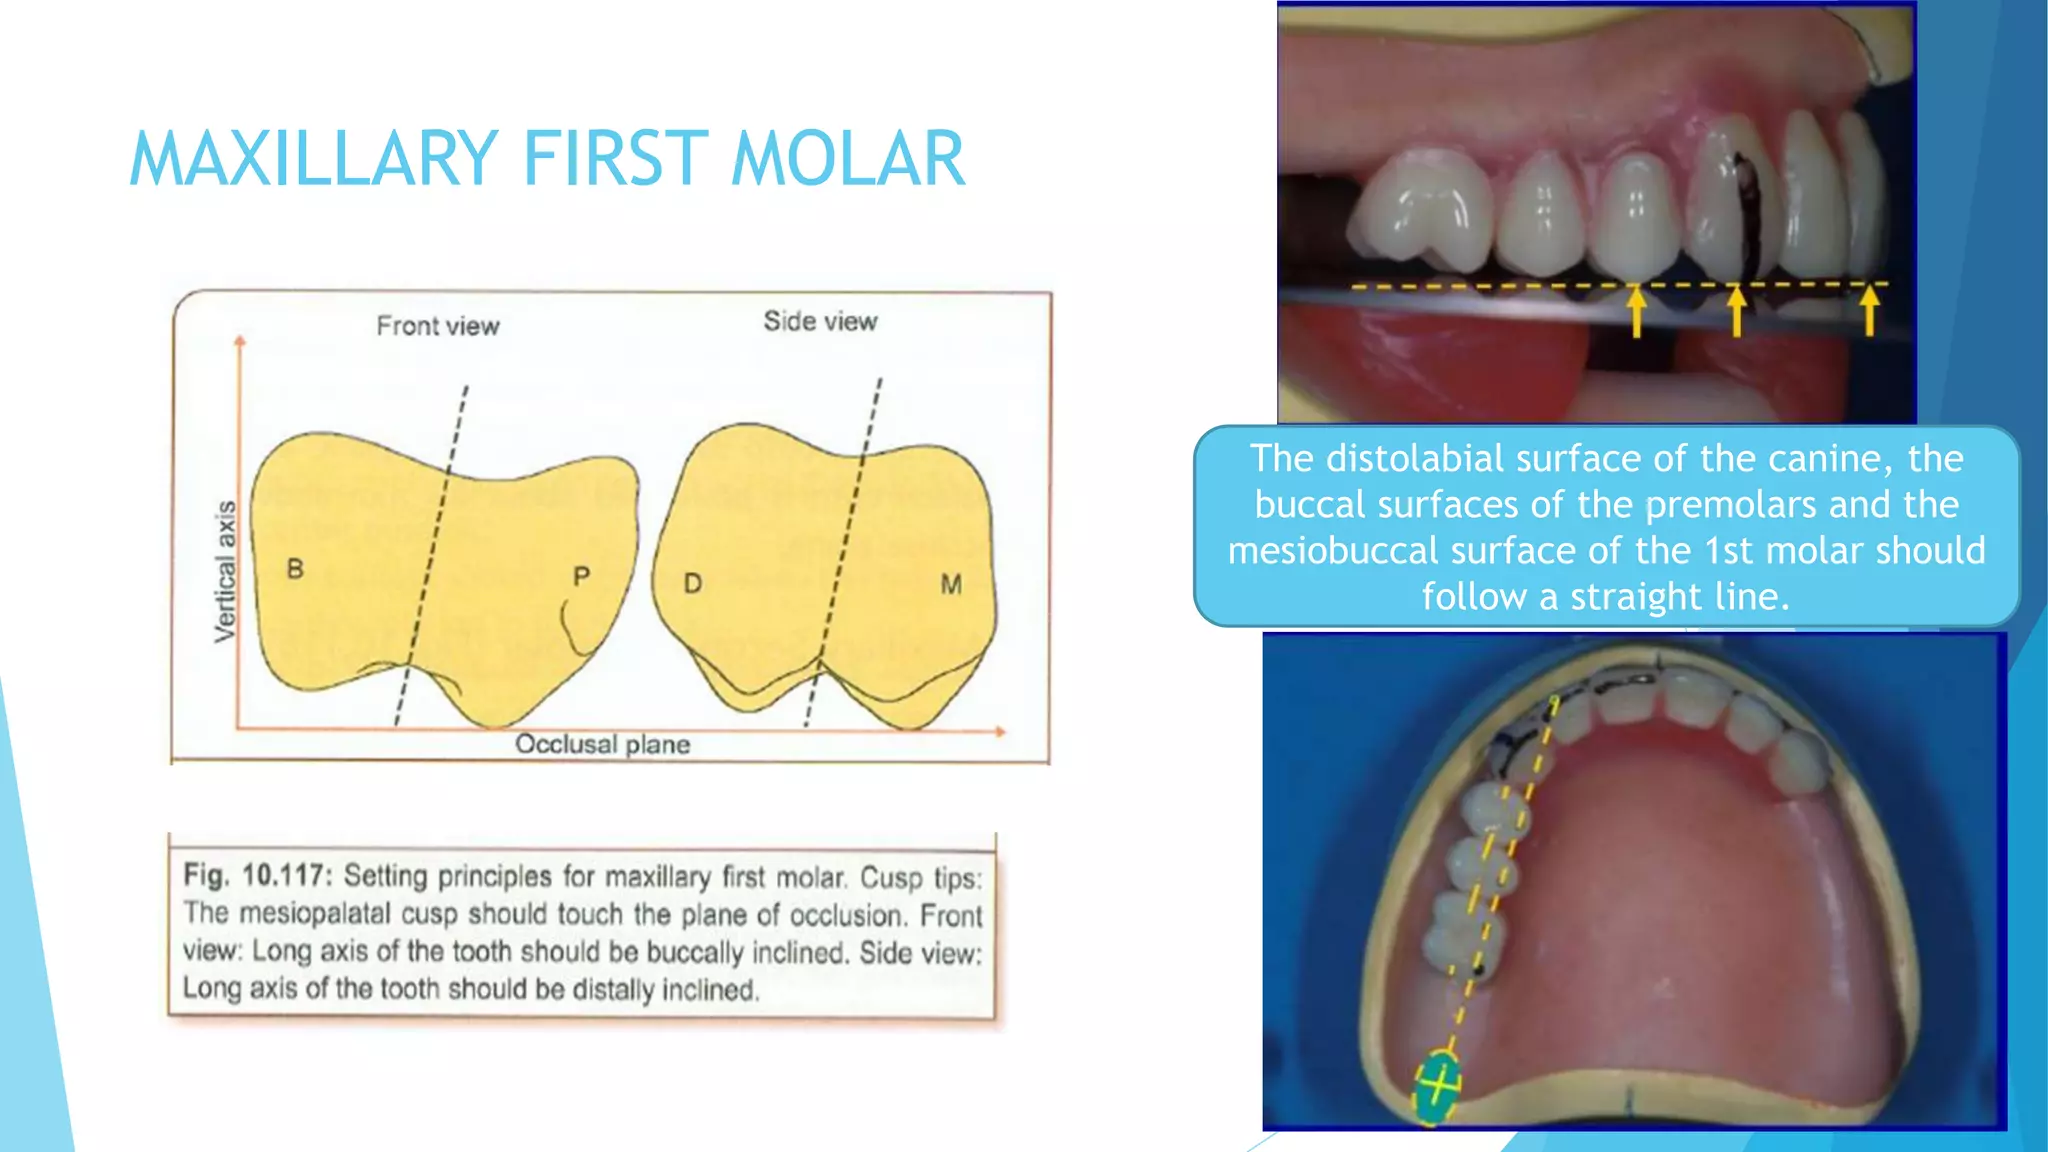
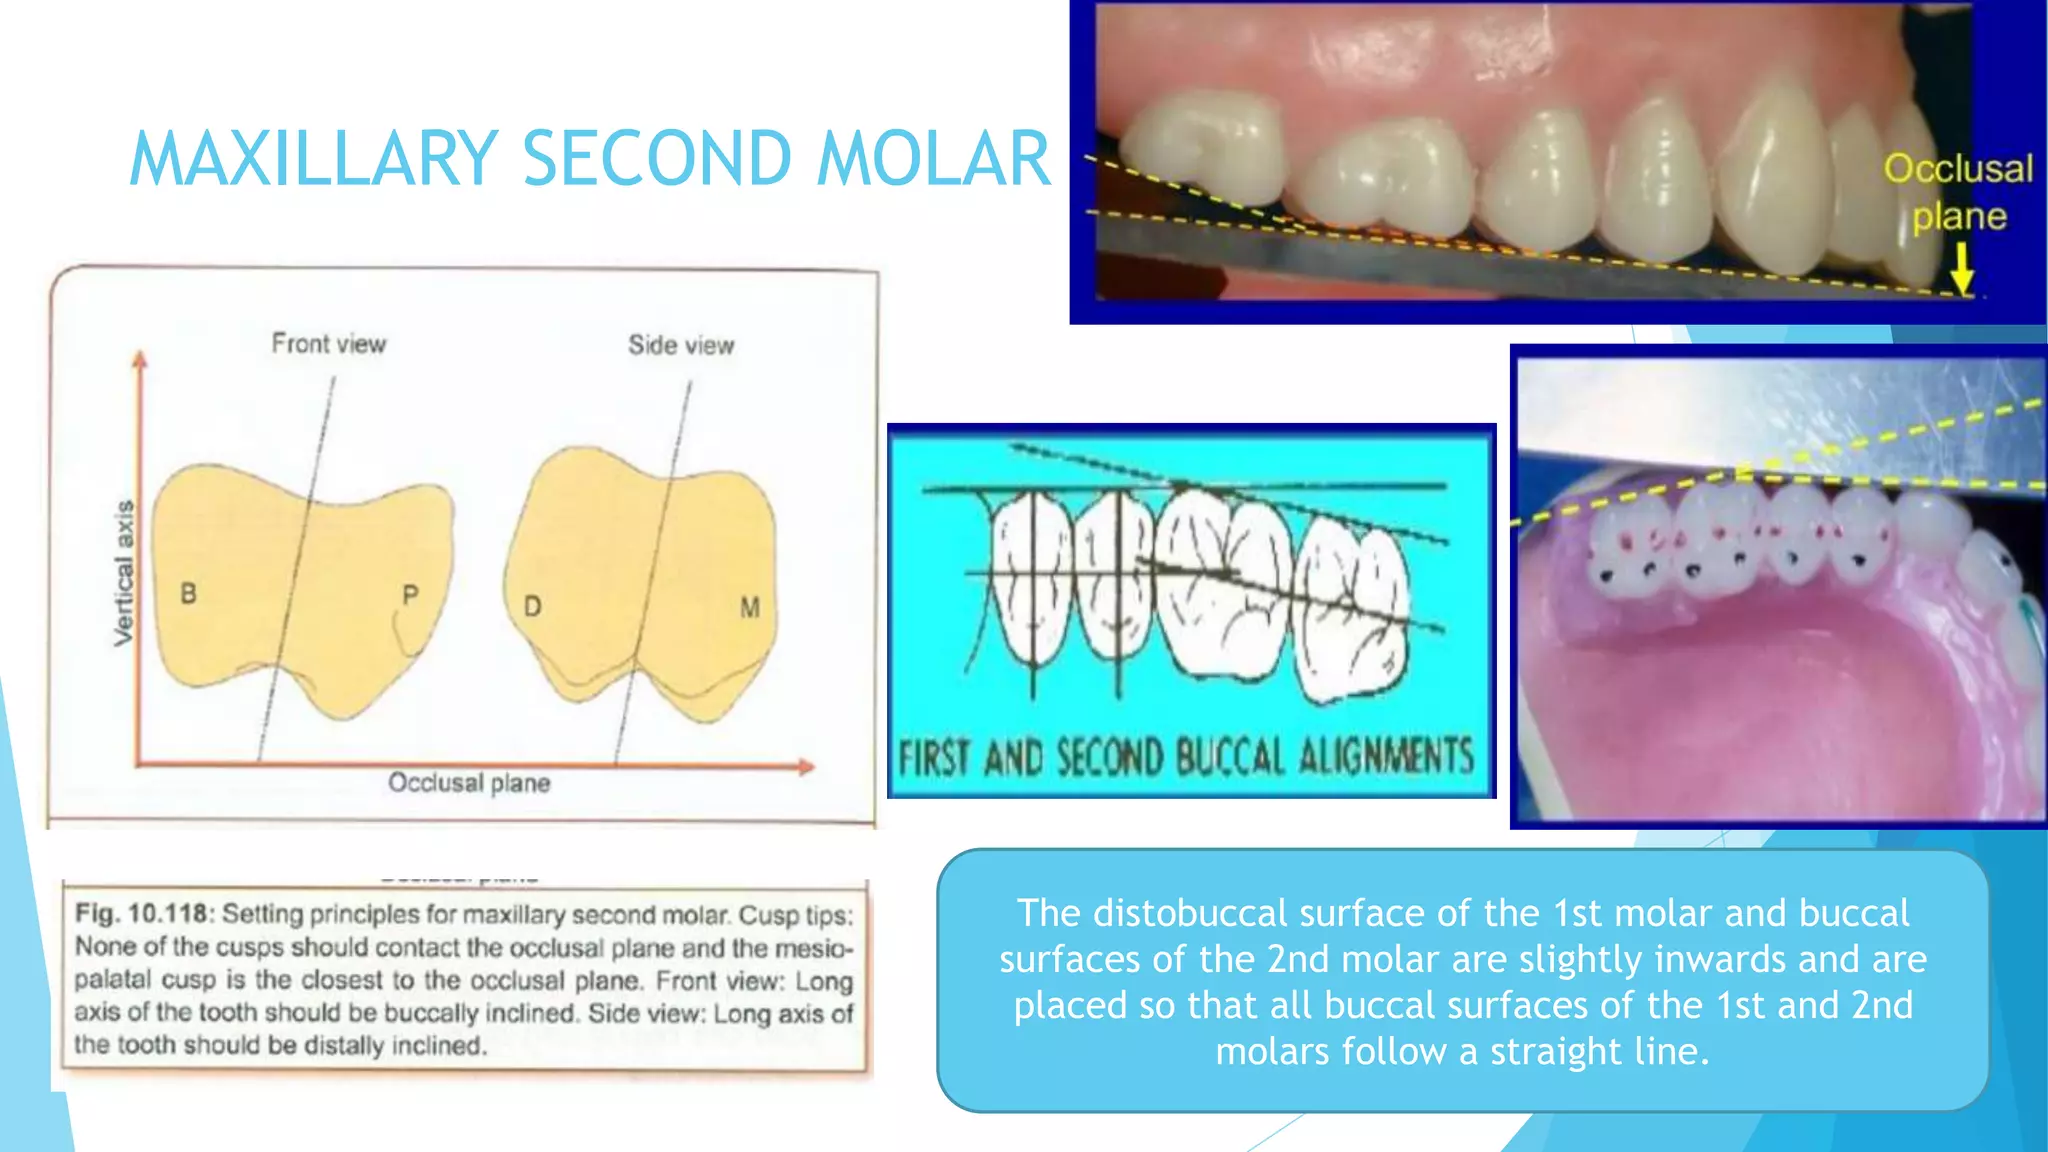
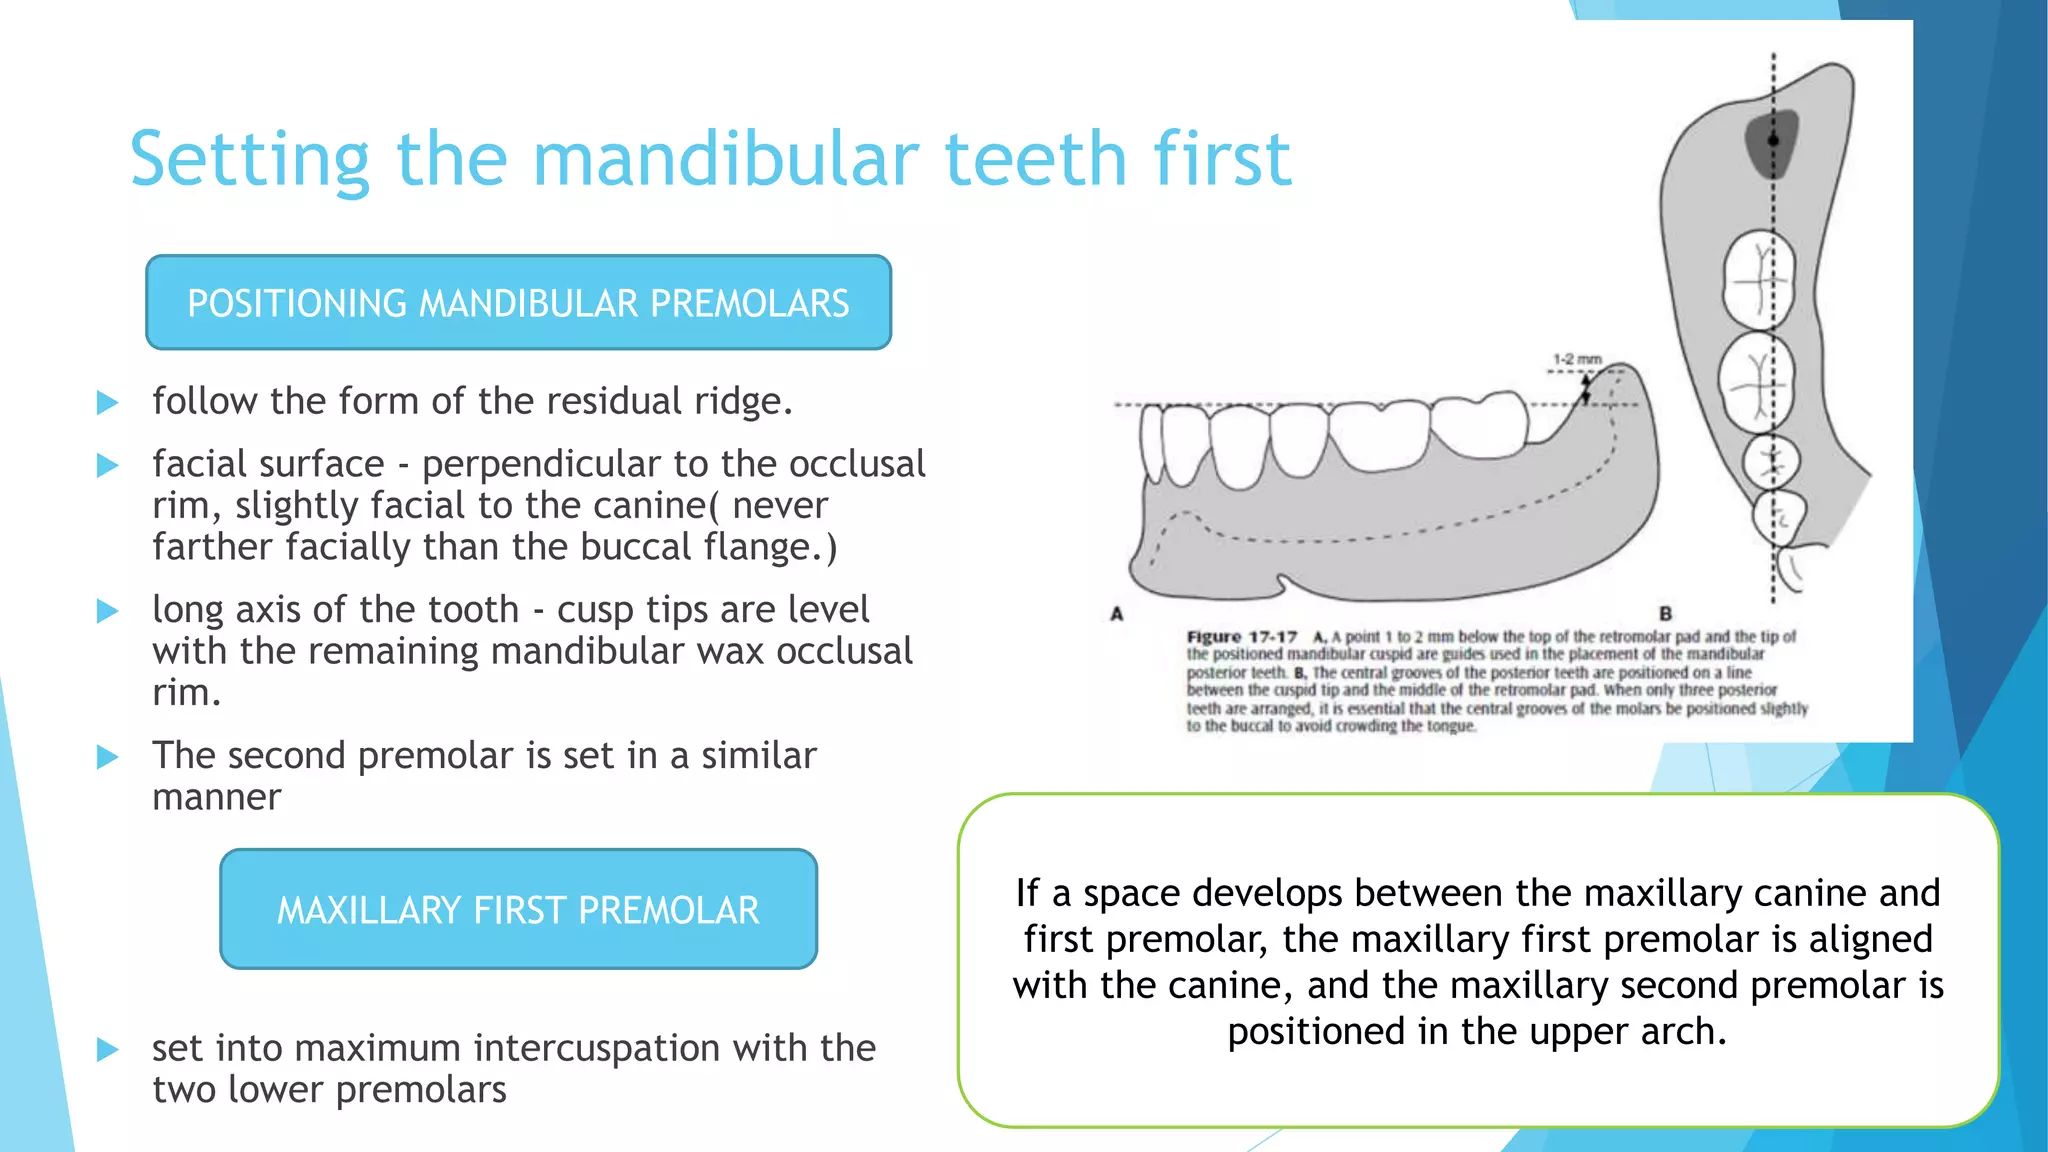
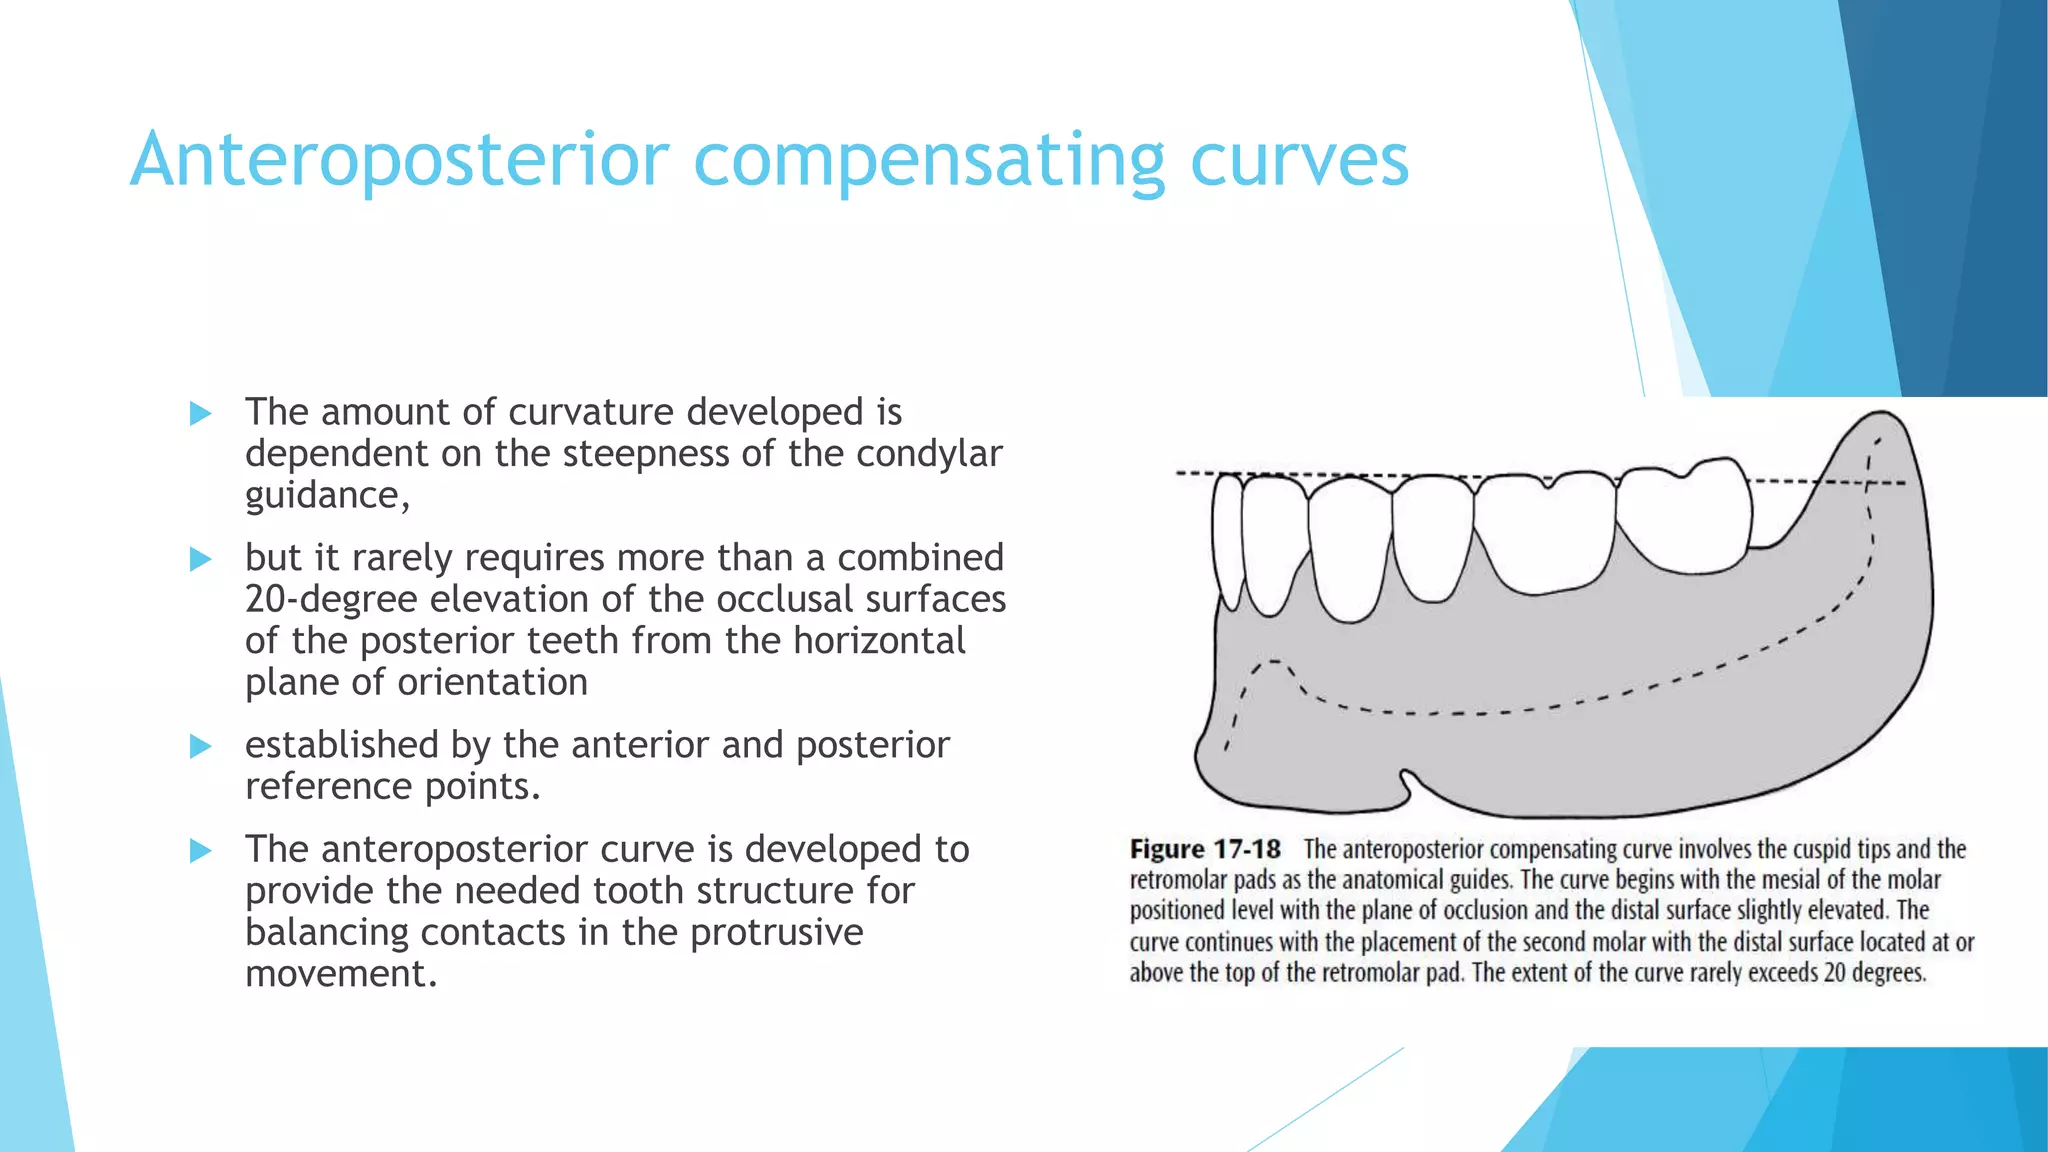
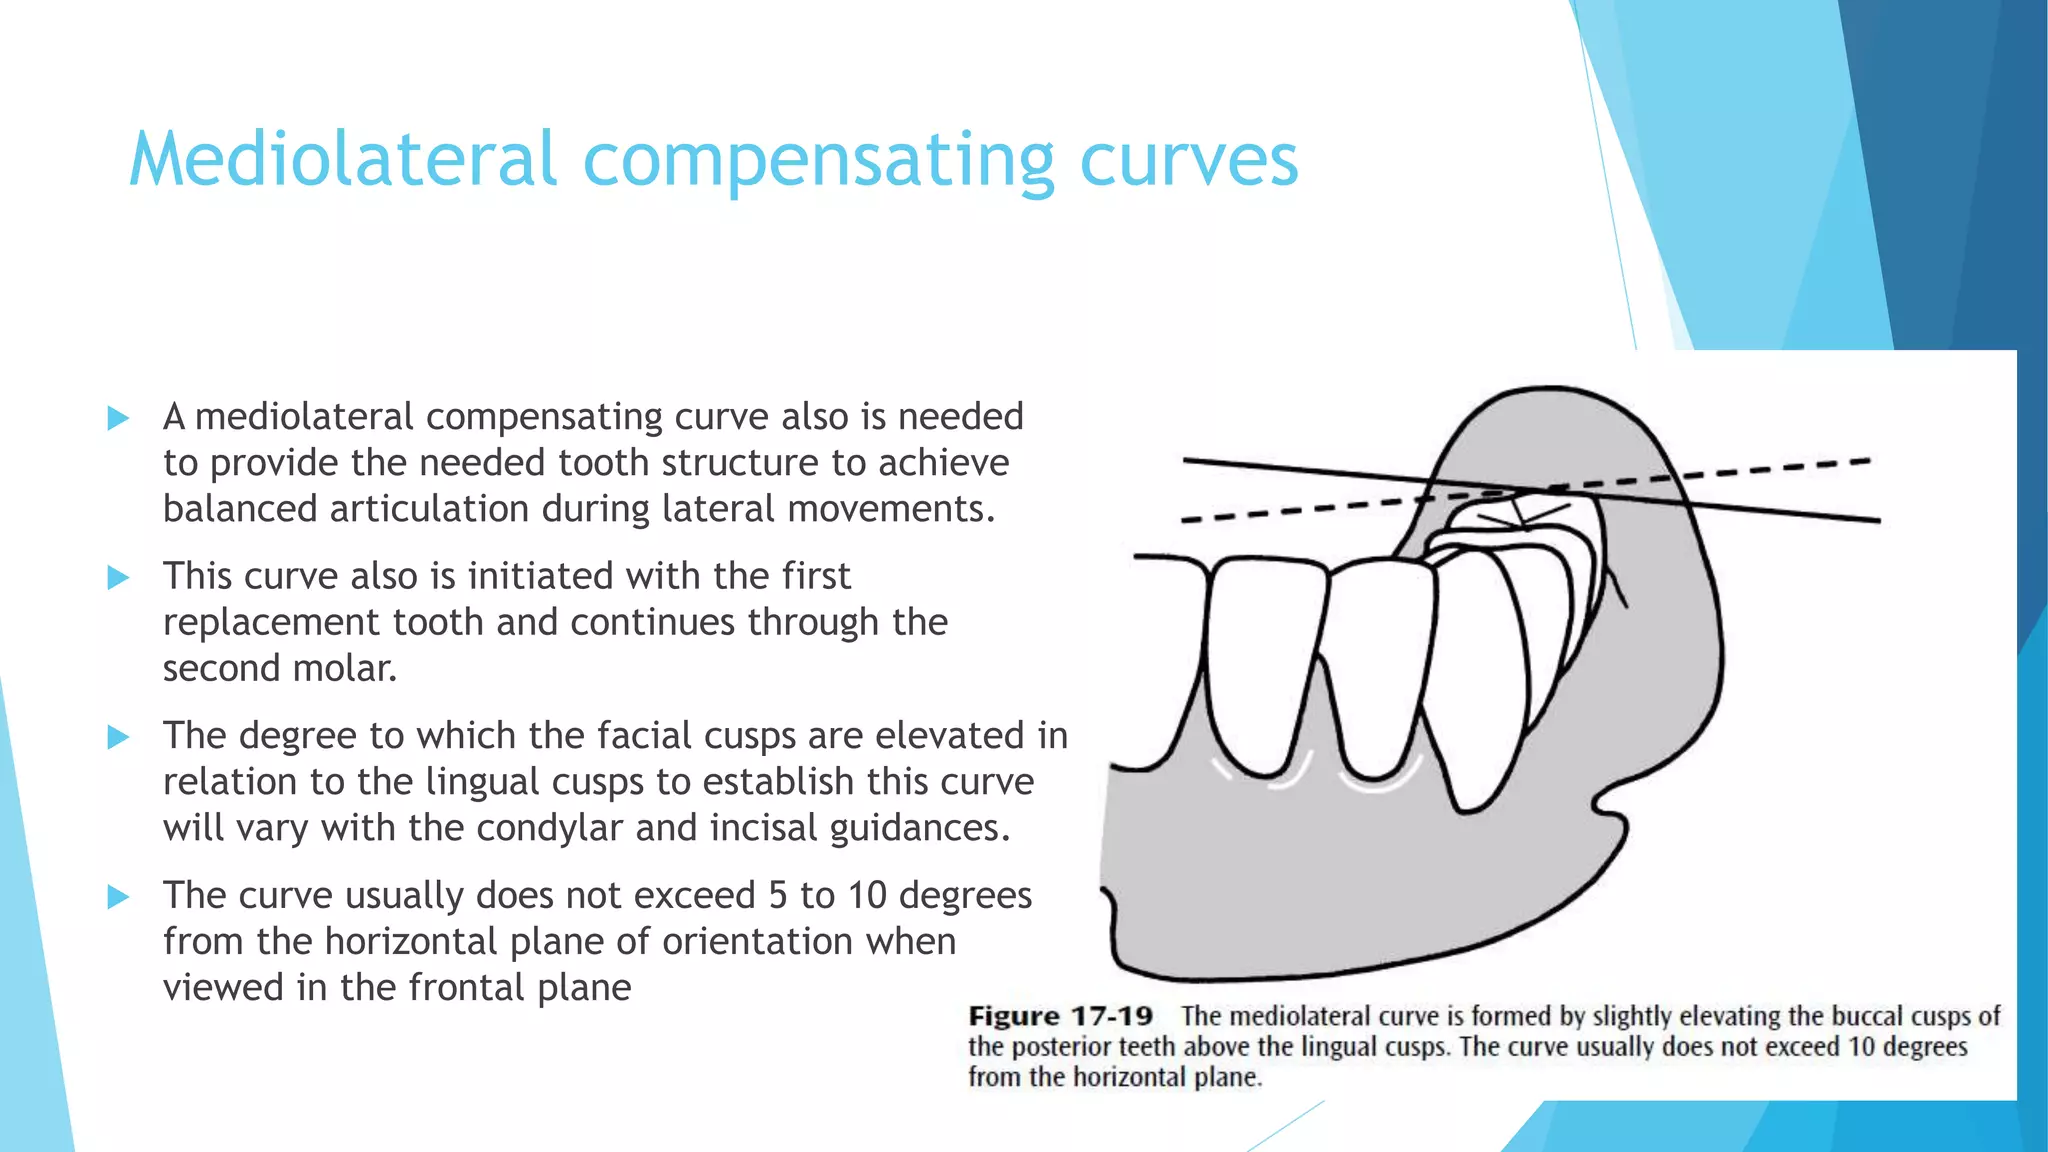
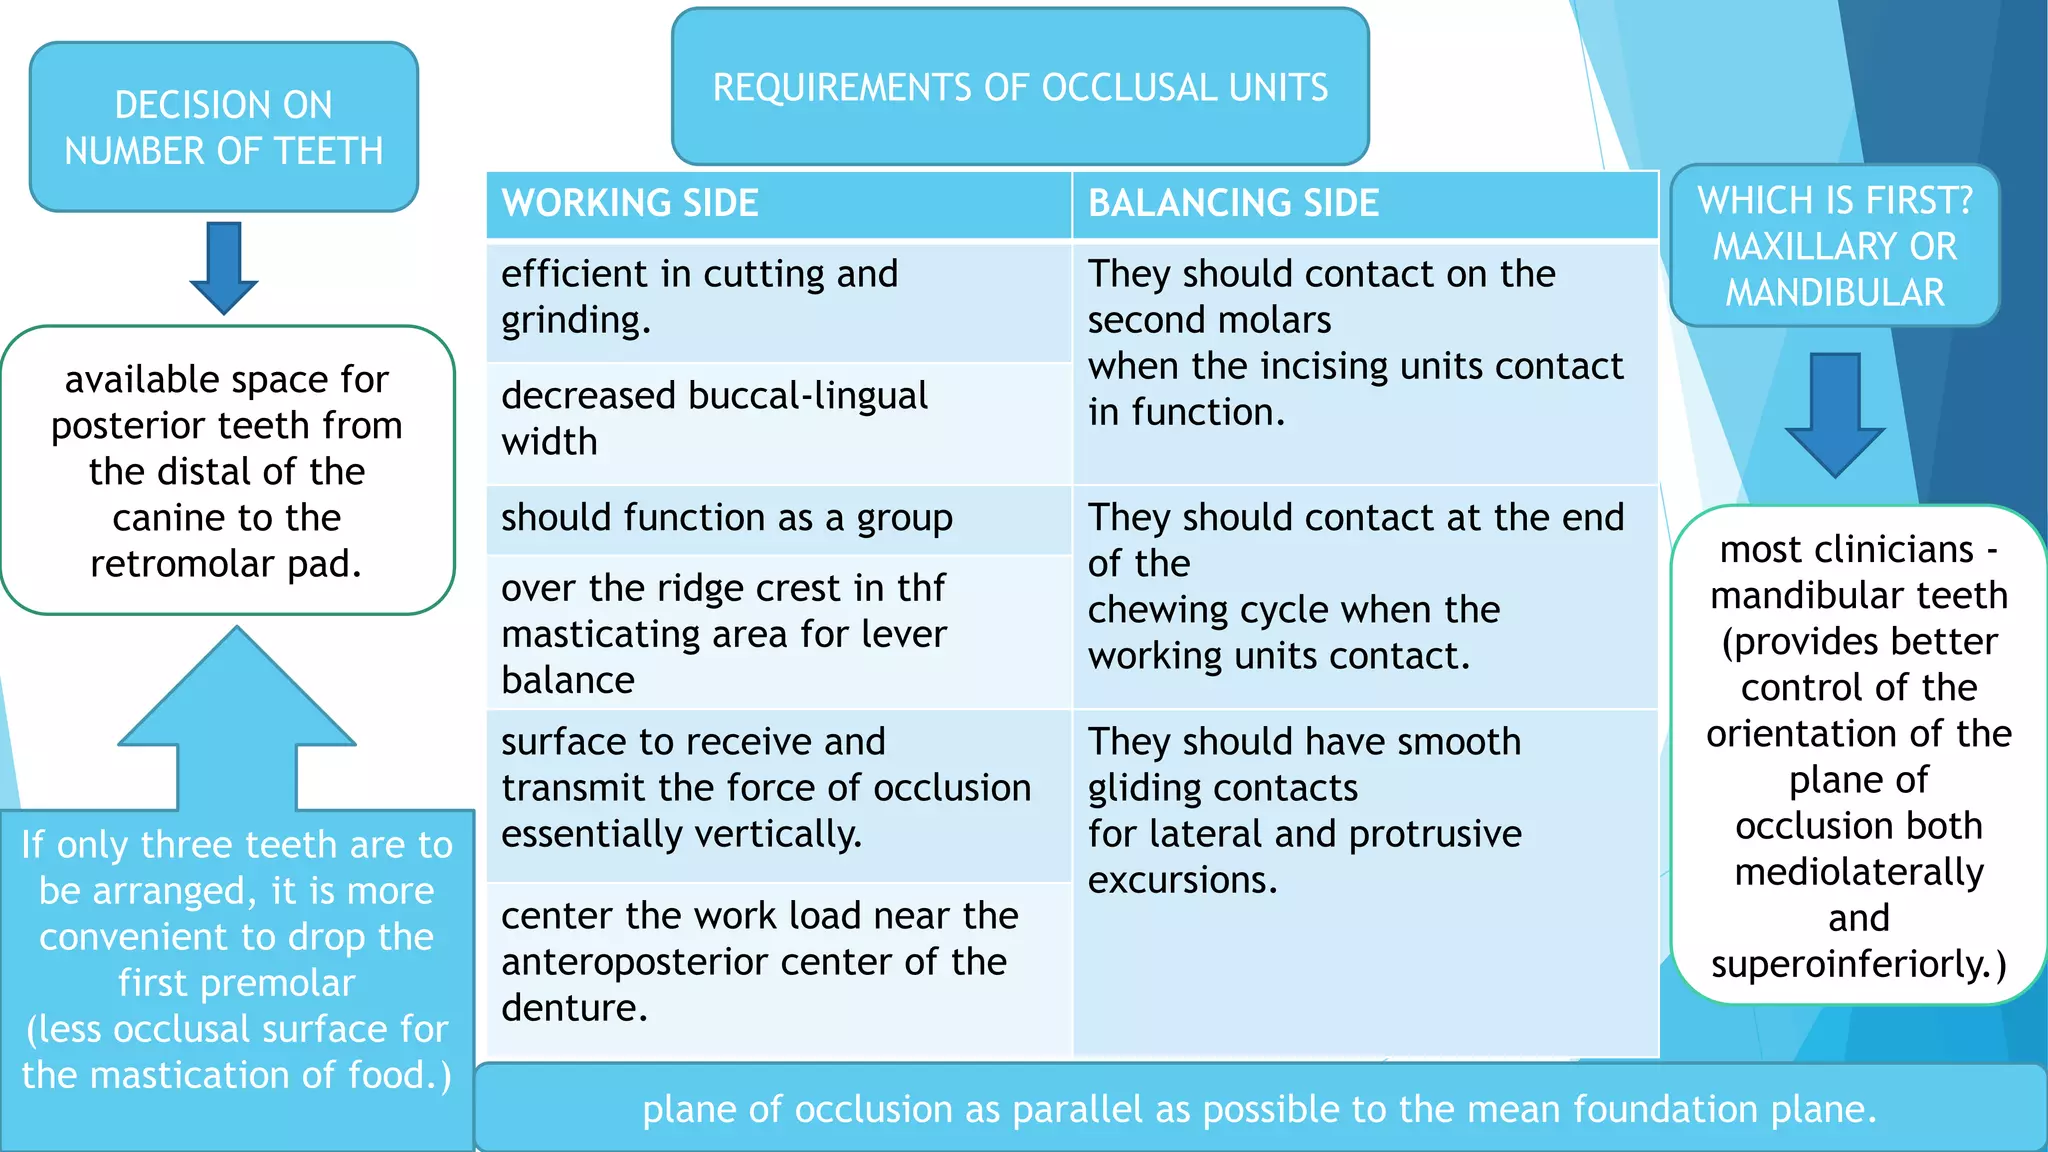
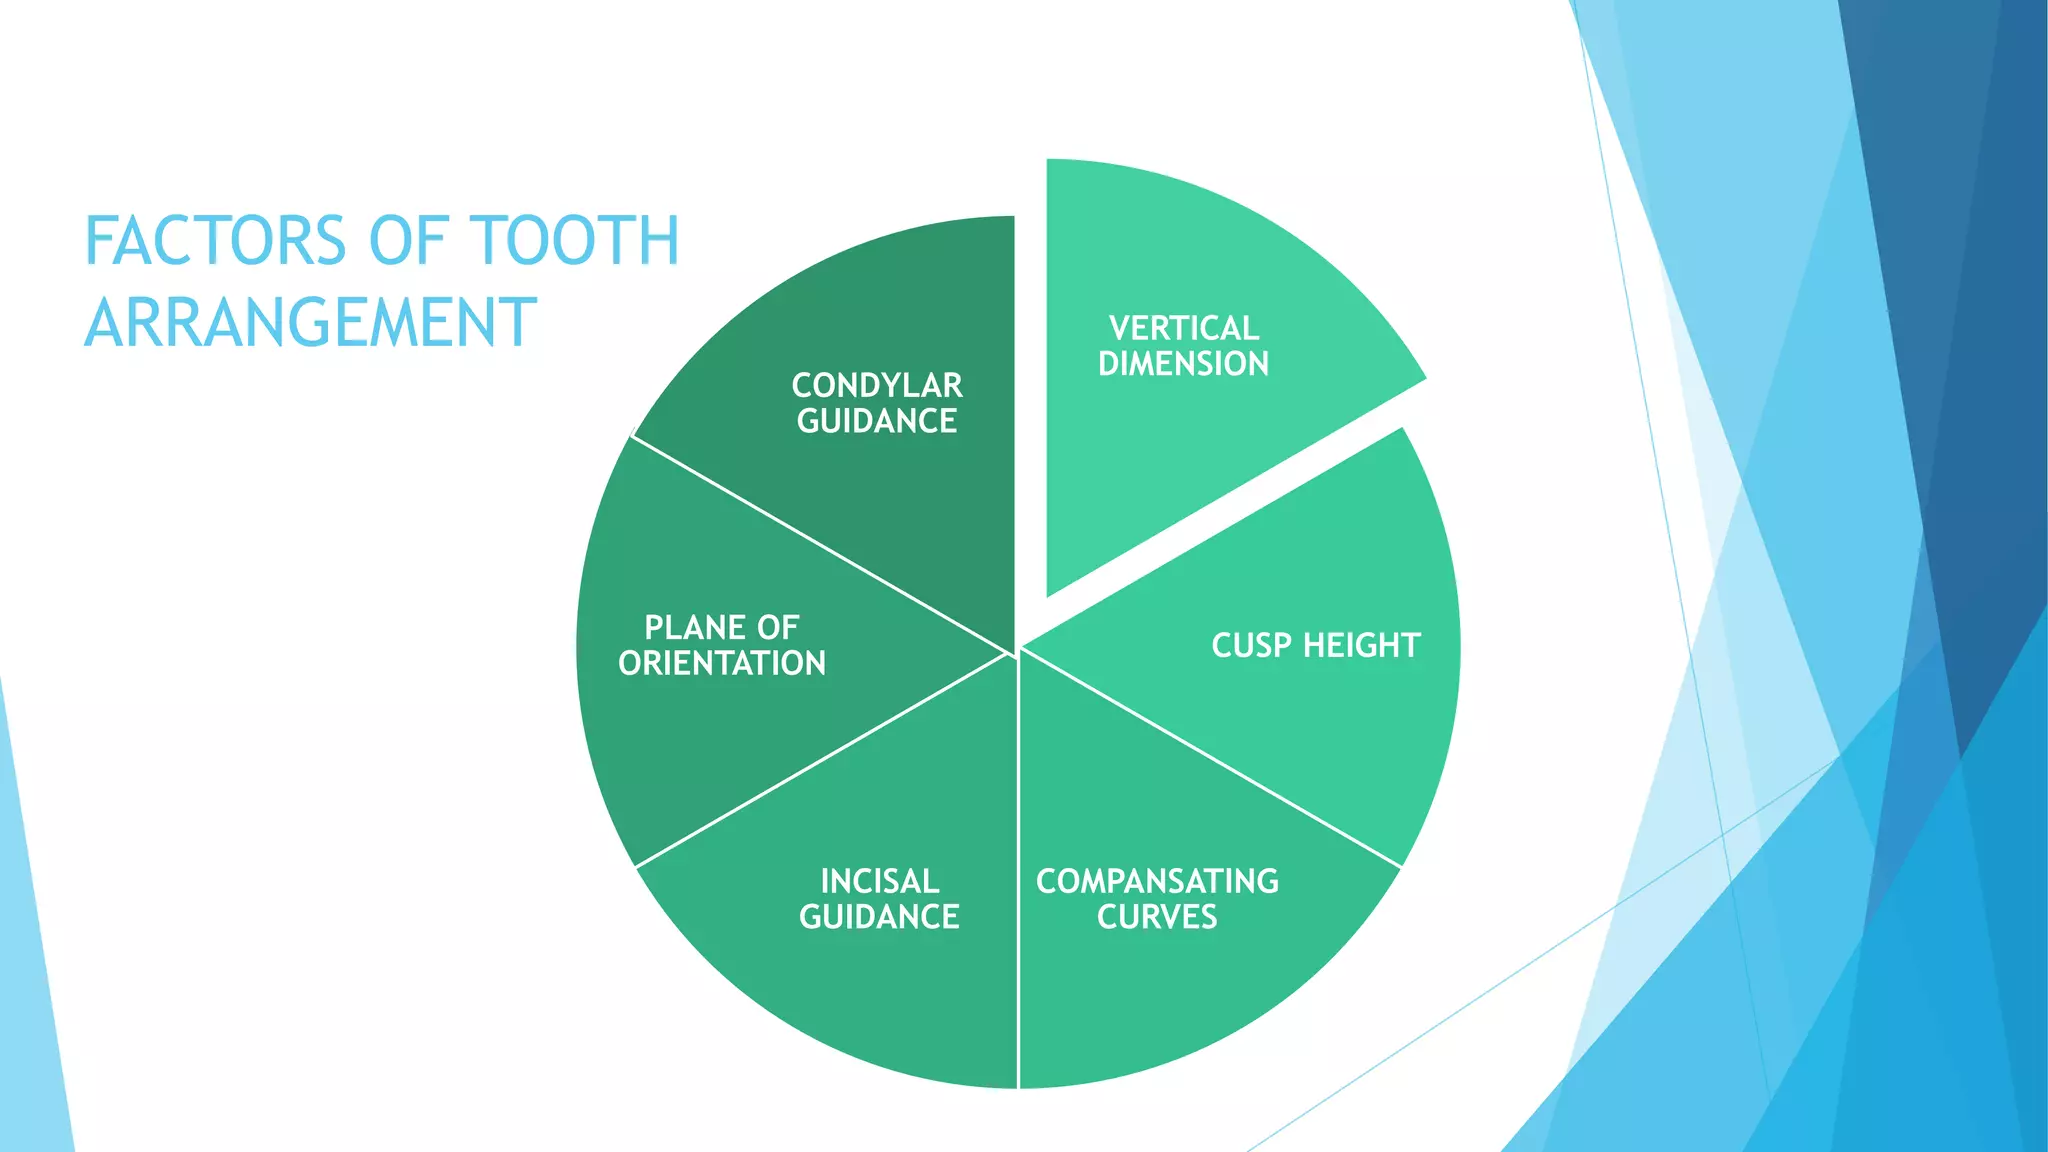
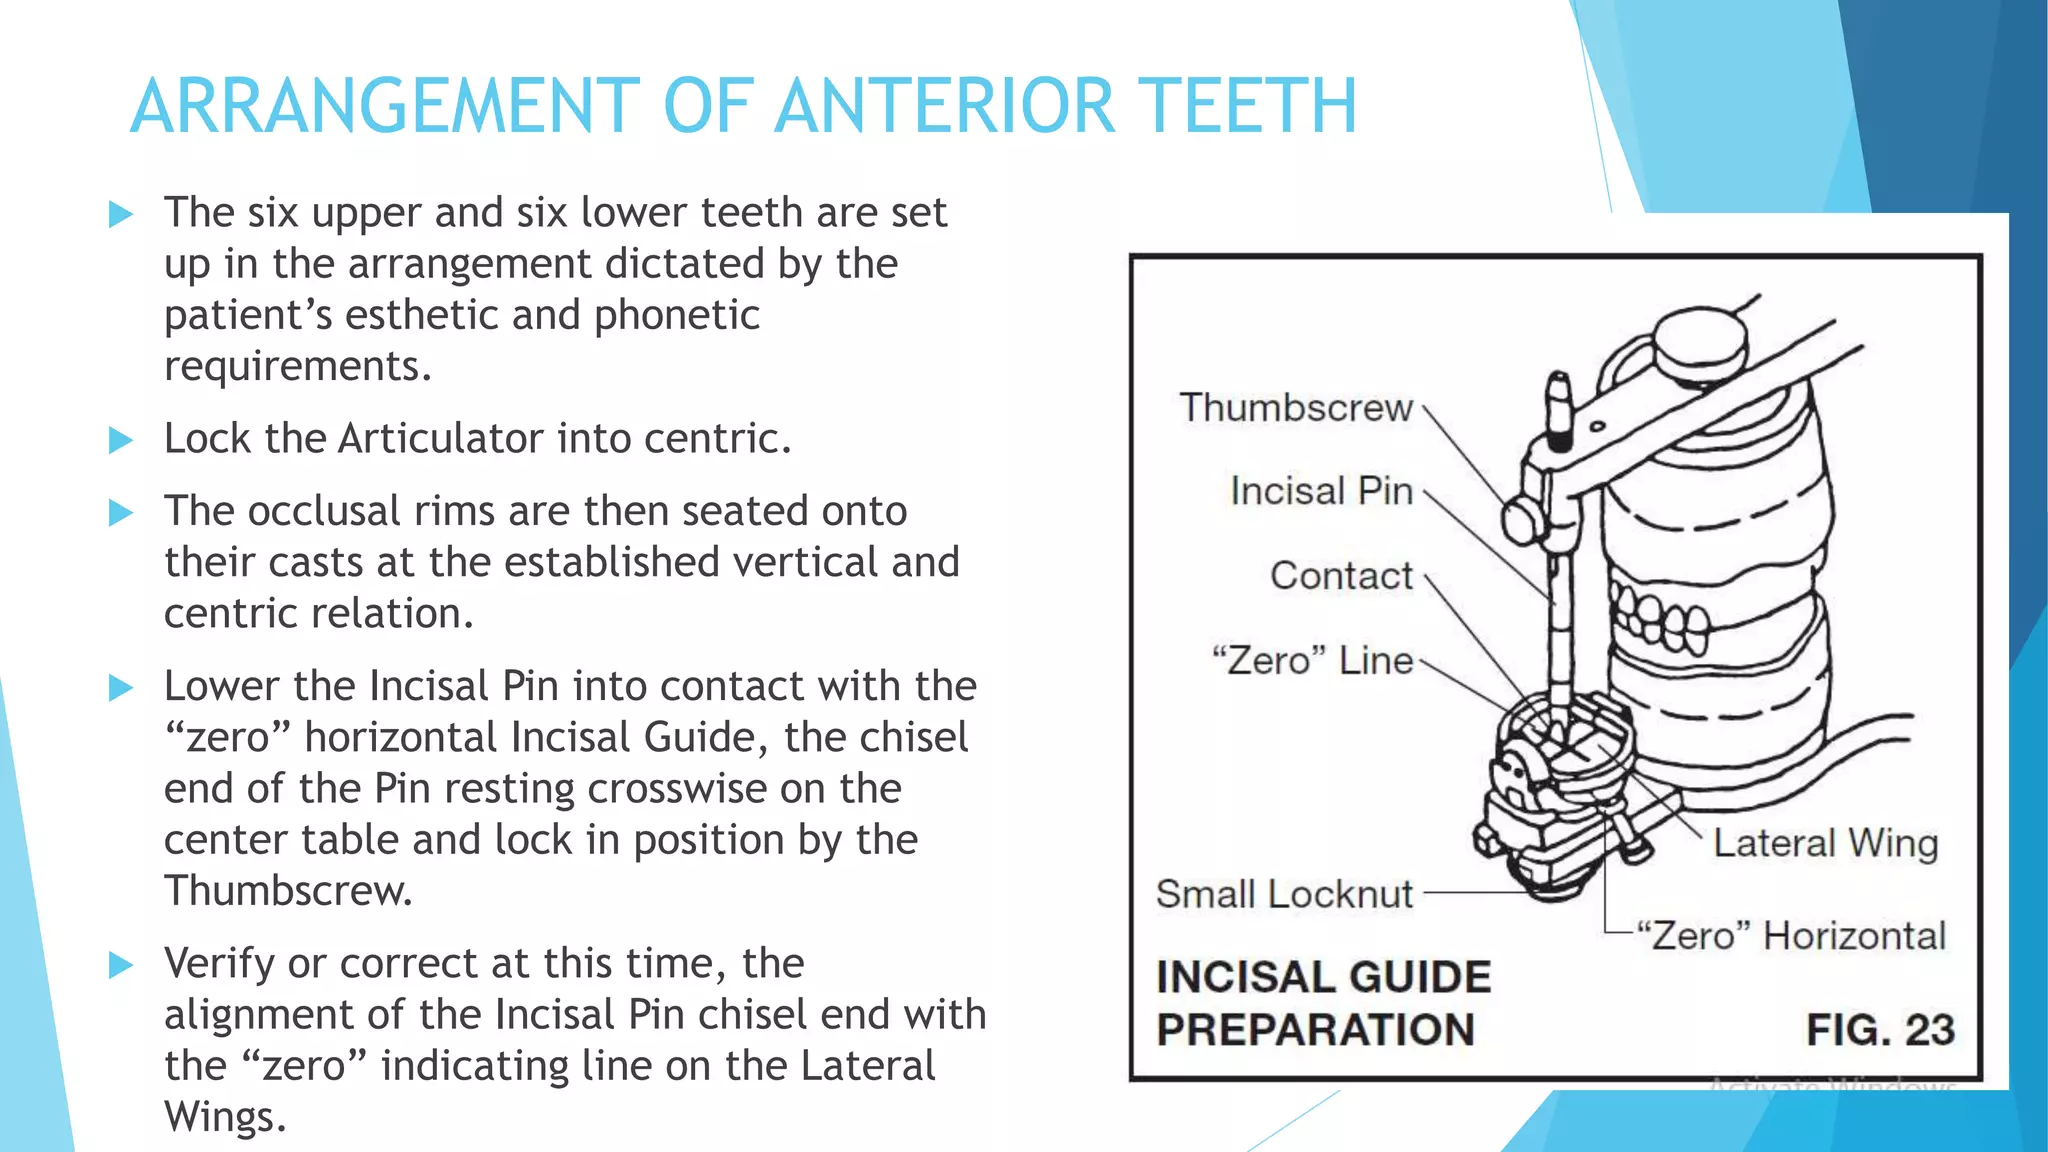
teeth arrangement in balanced occusion describing arrangement of each tooth and in two methods,arrangement of maxillary posteriors first and mandibular posteriors first
2. Guidelines for tooth placement and
arrangement
1. Parallel to interpupillary line
2. Incisal edge of maxillary incisors 1 to 2
mm below maxillary lip at rest
3. No bulging should be evident under the
nostrils
4. Philtrum should be restored, if possible
5. Full vermilion border of lip should be
seen
6. “Smile line” (maxillary incisal edges)
should follow the line of the lower lip in
smiling
Frontal view - Anterior teeth
3. FRONTAL VIEW POSTERIOR TEETH
1. Maxillary posteriors (premolars) should be placed buccally
enough so as to avoid too large a dark buccal corridor upon smiling,
but not to eliminate it
2. The occlusogingival length of the maxillary first premolar tooth
should be long enough so that denture base material is not obvious
on smiling
3. The occlusal surface of the mandibular first bicuspid should never
be superior to the corner of the mouth when the mouth is open only
sufficiently to receive food
4. Posterior plane of occlusion should not “drop down” posteriorly,
or maxillary posterior teeth will show too much during smiling
5. The incisive papilla -
valuable guide to
anterior
tooth placement
A line
marking the
center of
the incisive
papilla on
the wax rim
can be
extended
forward
onto the
landing area
of the cast
6. relationship to the
reflection of soft
tissues under the lip
or as recorded in the
maxillary
impression
The anteroposterior position of the
dental arch should be governed
chiefly by consideration of the
orbicularis oris muscle and its
attaching muscles and by the tone of
the skin of the lips.
The labial surfaces and incisal
edges of the teeth are
anterior to the tissues at the
reflection, where the denture
borders would be placed
position and expression of the lips
7. Arranging ANTERIOR TEETH
Setting teeth over the maxillary anterior ridge may undermine the
esthetic result
Greatest harm is done when the maxillary anterior teeth are set too far
back on the ridge or under the ridge (tooth’s direction is upward and
backward)
In the resorbed situation, the crest of the ridge is considerably more
posterior than it is in a patient with recent extractions.
If the rule of setting teeth over the ridge is followed after the residual
ridge has resorbed, a prematurely aged appearance will result.
Remove the maxillary wax occlusal rim on one side from the midline
around the arch for a distance of approximately 1 inch (about 25 mm).
A longer tooth clinically will provide a better esthetic result. Short,
stubby teeth are not natural in appearance.
set both central incisors and thus establish the midline before setting the
lateral and canine
8. MAXILLARY CENTRAL INCISOR
Make certain that the long axis of the tooth is
perpendicular to the horizontal, with the incisal
edge 0.5 mm below the wax occlusal rim.
it establishes the midline and the esthetic
support of the patient’s lip.
The proper arrangement of the maxillary and
mandibular anterior and posterior teeth relies
on the setting of the maxillary central incisors.
9. MAXILLARY LATERAL INCISOR
neck slightly depressed
incisal edge
symmetry with the central incisor and with the remaining
anterior occlusal rim. (even with the remaining maxillary
wax occlusal rim)
slightly elevated from the central incisor.
parallel with the mandibular wax occlusal rim.
10. MAXILLARY CANINE
anterior one half of the incisal edge is in symmetry with
the lateral and central incisors as it
curves around the labial contour of the wax occlusal rim.
Neck of the tooth must be prominent and the tooth tilted
slightly to the distal.
incisal tip of the canine must be 0.5 mm below the
maxillary wax occlusal rim.
11. Mandibular Central Incisor
Position the central incisor next to
the midline and tip it slightly to the
labial.
Direct the long axis of the tooth
toward the residual ridge.
Necks of the teeth are depressed so
that they are in from the edge of
the record base.
Incisal edges of these teeth must be
at the height of the mandibular wax
occlusal rim.
12. MANDIBULAR LATERAL INCISOR
long axis of the tooth directed toward the residual
ridge.
incisal edge should be at the height of the wax
occlusal rim.
1 to 2 mm of horizontal overlap between the
maxillary and mandibular anterior
teeth should be continued.
13. MANDIBULAR CANINE
Place the mandibular canine with the
anterior one half of the incisal edge in
symmetry with the lateral and central
incisors.
Place the incisal tip at the same level as the
lateral and central incisors.
neck of the tooth is slightly prominent and
tilted to the distal.
14. Arrangement of posterior teeth and
posterior arch form
Anteriorly by the position of the canine
Posteriorly by the shape of the basal seat and the location of
the retromolar pads.
The curvature of the arch of anterior teeth should flow
pleasingly toward the posterior teeth.
The posterior teeth are positioned in such a way that they
are properly related to the bone that supports them and to
the soft tissues that contact their facial and lingual surfaces.
15. Setting maxillary teeth first
In arranging the maxillary posterior teeth first, start
with the maxillary first premolar and continue the
arrangement of the teeth through to the second molar.
During the positioning of these teeth, the maxillary
lingual cusps are aligned with the reference line that
has been scribed on the mandibular wax occlusal rim
from the mandibular canine tip to the middle of the
retromolar pad.
Positioning the maxillary teeth with a slight opening of
the contact points between these teeth allows the
mandibular teeth to better assume their correct
mesiodistal position as they are interdigitated with the
maxillary posterior teeth.
The mandibular cusps tips are designed
to engage the embrasures of the
opposing maxillary teeth.
18. MAXILLARY FIRST MOLAR
The distolabial surface of the canine, the
buccal surfaces of the premolars and the
mesiobuccal surface of the 1st molar should
follow a straight line.
19. MAXILLARY SECOND MOLAR
The distobuccal surface of the 1st molar and buccal
surfaces of the 2nd molar are slightly inwards and are
placed so that all buccal surfaces of the 1st and 2nd
molars follow a straight line.
20. MANDIBULAR FIRST MOLAR
When the mandibular first molar is placed in
position without adjoining teeth, it is possible
to determine its correct anteroposterior
position more easily.
intercuspation is very exacting, it is best
done by placing the mandibular first molar in
position first.
21. MANDIBULAR SECOND MOLAR
Mandibular 2nd molar is placed with the
mesiobuccal cusp should engage between the
maxillary 1st and 2nd molars and contact with
their marginal ridges.
The second mandibular molar is placed after the
positioning of the first molar, thereby assuring its antero
posterior correctness.
22. MANDIBULAR SECOND PREMOLAR
The long axis of the tooth slopes slightly lingually when viewed from the
front.
The long axis of the tooth is parallel to the vertical axis when viewed from
the side.
Both the cusps are 2 mm above the level of the occlusal plane
The buccal cusp of the 2nd premolar should occlude with
the adjacent marginal ridges of the maxillary 1st and 2nd
premolars.
The mandibular second premolar is next placed, after another block
of wax has been cut away from the occlusal rim.
23. MANDIBULAR FIRST PREMOLAR
The Mandibular 2nd Molar The mandibular 2nd molar is
placed with the mesiobuccal cusp should engage
between the maxillary 1st and 2nd molars and contact
with their marginal ridges.
If the mandibular first premolar is
positioned first, the inconstant
vertical overlap might crowd the
tooth into difficult intercuspation
with the maxillary teeth, and this
would be continued throughout all
the mandibular posterior teeth.
placement of the mandibular first premolar is left until last to
take up all the variation in vertical and horizontal overlap of the
anterior teeth.
The first premolar is then ground to fit the remaining space
24. Setting the mandibular teeth first
follow the form of the residual ridge.
facial surface - perpendicular to the occlusal
rim, slightly facial to the canine( never
farther facially than the buccal flange.)
long axis of the tooth - cusp tips are level
with the remaining mandibular wax occlusal
rim.
The second premolar is set in a similar
manner
set into maximum intercuspation with the
two lower premolars
POSITIONING MANDIBULAR PREMOLARS
MAXILLARY FIRST PREMOLAR If a space develops between the maxillary canine and
first premolar, the maxillary first premolar is aligned
with the canine, and the maxillary second premolar is
positioned in the upper arch.
25. Positioning of mandibular and maxillary
first molar
central groove is placed on the canine to retromolar pad reference
line.
vertical height of the tooth is adjusted by positioning the cusp tips
on the occlusal plane.
Articulated with the mandibular first molar.
Articulator is closed so that the mandibular tooth will assist in
seating the maxillary tooth into maximum intercuspation.
This will develop the desired lingual cusp contact of the maxillary
molar in the central fossa of the mandibular antagonist.
MANDIBULAR FIRST MOLAR
MAXILLARY FIRST MOLAR
Same procedure is
used for setting the
remaining maxillary
teeth.
The teeth on the
opposite side of the
dental arches are
arranged in a similar
manner.
26. Arranging Non anatomical Mandibular
Posterior Teeth to Balanced Articulation
The arrangement of nonanatomical posterior teeth with both anteroposterior
and mediolateral compensating curves permits the establishment of a
balanced articulation.
mandibular teeth usually are arranged first followed by the maxillary teeth.
The contours established in the wax occlusal rim and the use of the several
reference lines and guides developed for the anatomical arrangement also are
used with the nonanatomical teeth.
The major difference is in the positioning of the mandibular posterior teeth
to develop the compensating curves.
27. Number of posterior teeth
number of posterior teeth used in balanced articulation with nonanatomical
teeth will be limited to three.
It is more convenient to drop the first premolar and place the second premolar
and the first and second molars into the available space.
With the elimination of the first premolar and with the use of only three
posterior teeth, it often is necessary to position the two molars slightly to the
facial.
28. Anteroposterior compensating curves
The amount of curvature developed is
dependent on the steepness of the condylar
guidance,
but it rarely requires more than a combined
20-degree elevation of the occlusal surfaces
of the posterior teeth from the horizontal
plane of orientation
established by the anterior and posterior
reference points.
The anteroposterior curve is developed to
provide the needed tooth structure for
balancing contacts in the protrusive
movement.
29. Mediolateral compensating curves
A mediolateral compensating curve also is needed
to provide the needed tooth structure to achieve
balanced articulation during lateral movements.
This curve also is initiated with the first
replacement tooth and continues through the
second molar.
The degree to which the facial cusps are elevated in
relation to the lingual cusps to establish this curve
will vary with the condylar and incisal guidances.
The curve usually does not exceed 5 to 10 degrees
from the horizontal plane of orientation when
viewed in the frontal plane
30. First premolar
The position of the first mandibular replacement tooth (second premolar) will
be dictated by the position of the lower anterior teeth.
The second premolar should be positioned immediately next to the canine,
with no space allowed to detract from pleasing esthetics.
The central fossa of the mandibular premolar tooth is aligned with the
reference line from the tip of the canine to the middle of the retromolar pad.
The long axis of the tooth is perpendicular to the occlusal plane, and the
facial cusp is slightly elevated above the lingual cusp.
31. First molar
Position the mandibular first molar next to the premolar with the mesial
marginal ridge at the same level as the distal marginal ridge of the premolar
and its distal marginal ridge slightly elevated.
Distal of the first molar should be elevated approximately 1 mm above the
occlusal plane (established by the anterior and posterior reference points.)
The amount of elevation may need to be increased or decreased, depending
on the mechanical equivalent recorded for the horizontal condylar guidance
central fossa of the first molar should be slightly to the facial in relation to
the reference line from the canine to the retromolar pad.
frontal plane -mediolateral compensating curve- initiated with the setting of
the premolar, should be maintained by a slight elevation of the facial cusp
above the lingual cusp.
High condylar
guidance greater
compensating
curve
long axis
directed
anteriorly.
anteroposterior
compensating
curve begins
with this tooth.
avoid possible crowding of
the tongue.
32. Second molar
positioned with the mesial marginal ridge at the same level as the distal marginal ridge of the
first molar.
The anteroposterior compensating curve is continued posteriorly by elevating the distal of this
second molar tooth approximately 2 mm above the occlusal plane established by the reference
points.
long axis of this tooth also will be anteriorly directed.
central fossa of the second molar also will be positioned slightly to the facial of the reference
line.
facial cusps of both the first and second molars should be in a straight line when viewed from the
occlusal surface.
The teeth should not be positioned “around” the remaining residual ridge.
The mediolateral compensating curve should be continued as viewed in the frontal plane.
33. Remaining Mandibular Posterior Teeth
The mandibular posterior teeth are arranged for the other side of the arch
with the same criteria and procedures as just outlined.
As the remaining teeth are positioned, they should be evaluated in relation to
the teeth on the opposite side of the arch.
This is extremely important, especially in trying to maintain
(1) the appropriate level of the occlusal plane
(2) the same degree of anteroposterior and mediolateral compensating curves for
both sides of the mandibular arch.
34. Arranging Non anatomical Maxillary Posterior
Teeth to Balanced Articulation
1st premolar
For most patients, only three
maxillary posterior teeth will be
used.
maxillary first premolar – longer
occlusal cervical height (more
esthetic
Carefully close the articulator and
establish contact between the
occlusal surface of the maxillary
tooth and the central fossa or
marginal ridges of the mandibular
antagonist.
1 to 2 mm of horizontal overlap of
the maxillary facial cusp in relation
to the mandibular facial cusp.
prevent cheek biting
will contribute to the attainment
of a balanced articulation.
35. 1st molar 2nd molar
Position the maxillary first molar tooth alongside
the premolar, aligning their marginal ridges and
facial surfaces.
Carefully close the articulator and establish contact
between the maxillary occlusal surface and the
central fossa or marginal ridges of the mandibular
antagonist.
Maintain maximum contact between the maxillary
occlusal surface with the central fossa of the lower
tooth and the 1 to 2 mm of horizontal overlap of the
maxillary facial cusp in relation to the mandibular
facial cusps.
View the tooth-to-tooth relationships from the
lingual by turning the instrument around and looking
through the tongue space.
Position the maxillary second
molar tooth with a small cone of
pink wax. Again,
carefully close the articulator and
establish the tooth contacts as you
did with the first molar.
Seal the tooth to the record base.
36. Remaining maxillary posterior teeth
The maxillary posterior teeth are arranged for the other side of the arch with
the same criteria and procedures as previously outlined for maxillary
posterior teeth.
As the remaining teeth are positioned, they should be evaluated for the
required contacts between the maxillary occlusal surfaces and the central
fossae and marginal ridges of the mandibular antagonists.
When all teeth have been properly positioned, they are sealed to the record
base with pink wax and evaluated.
Bilateral balanced articulation between the maxillary and mandibular teeth
will be developed and refined after the dentures are processed with the
selective occlusal reshaping procedures
37. WHICH IS FIRST?
MAXILLARY OR
MANDIBULAR
most clinicians -
mandibular teeth
(provides better
control of the
orientation of the
plane of
occlusion both
mediolaterally
and
superoinferiorly.)
DECISION ON
NUMBER OF TEETH
available space for
posterior teeth from
the distal of the
canine to the
retromolar pad.
If only three teeth are to
be arranged, it is more
convenient to drop the
first premolar
(less occlusal surface for
the mastication of food.)
REQUIREMENTS OF OCCLUSAL UNITS
WORKING SIDE BALANCING SIDE
efficient in cutting and
grinding.
They should contact on the
second molars
when the incising units contact
in function.decreased buccal-lingual
width
should function as a group They should contact at the end
of the
chewing cycle when the
working units contact.
over the ridge crest in thf
masticating area for lever
balance
surface to receive and
transmit the force of occlusion
essentially vertically.
They should have smooth
gliding contacts
for lateral and protrusive
excursions.
center the work load near the
anteroposterior center of the
denture.
plane of occlusion as parallel as possible to the mean foundation plane.
38. FACTORS OF TOOTH
ARRANGEMENT VERTICAL
DIMENSION
CUSP HEIGHT
COMPANSATING
CURVES
INCISAL
GUIDANCE
PLANE OF
ORIENTATION
CONDYLAR
GUIDANCE
39. ARRANGEMENT OF ANTERIOR TEETH
The six upper and six lower teeth are set
up in the arrangement dictated by the
patient’s esthetic and phonetic
requirements.
Lock the Articulator into centric.
The occlusal rims are then seated onto
their casts at the established vertical and
centric relation.
Lower the Incisal Pin into contact with the
“zero” horizontal Incisal Guide, the chisel
end of the Pin resting crosswise on the
center table and lock in position by the
Thumbscrew.
Verify or correct at this time, the
alignment of the Incisal Pin chisel end with
the “zero” indicating line on the Lateral
Wings.
40. ANTERIOR GUIDE ON ARTICULATOR
It is a mechanical device which, together with
the anterior pin, may be utilized to maintain the
established occluding'vertical dimension and as a
substitute for dental arch guidances which are to
be established or which are already present.
The guide itself should permit both
anteroposterior and lateral adjustments.
Very seldom is it a true copy of the actual incisal
guidance represented by the occlusions of the
anterior teeth, either present or to be arranged.
41. Incisal guidance
Incisal guidance is the guiding influence which results from the positional
relationships of the upper and lower anterior teeth when the mandible is
moved into eccentric relations to the maxillae while the anterior teeth
remain in contact.
It is the guidance which results from the occlusions of the anterior teeth
themselves and should not be confused with the inclines of the anterior guide
of the articulator.
Incisal guidance may or may not be one of the factors to be considered when
arranging artificial teeth into balanced occlusion
It depends upon which of two generally accepted methods of tooth
arrangement is being used:
42. Method 1
By this method the upper and lower anterior teeth are
arranged and tried in the patient's mouth.
They are arranged to produce the best possible esthetic
values for the individual patient.
The resulting ineisal guidance is accepted as being a
fixed factor and is used for adjusting the anterior guide
on the articulator.
geometric problem to be solved with posterior occlusal
surface form and arrangement has been established for
the individual patient.
43. Method 2
Six upper anterior teeth and the
upper posterior teeth are
arranged on one side only.
The lower first molar on the same
side is positioned and, with its
upper opponents, is arranged into
the best possible centric, lateral,
and protrusive occlusions,
without grinding.
The occlusions of this lower first
molar with its opponents are then
used for adjusting the anterior
guide of the articulator.
incisal guidance is the resultant
of posterior tooth arrangement
and is not a factor fixed in
advance of posterior tooth
arrangement
All remaining posterior teeth are then arranged
into balanced occlusion, and then the lower
anterior teeth are arranged
The amount of horizontal overjet (horizontal
overlap) is established in the anterior tooth
arrangement.
44. The maxillary and mandibular anterior teeth should not make contact when
the jaws are closed in centric relation.
There should be not less than 2 mm of horizontal overjet in dentures for
patients with normal ridge relations.
Upper anterior teeth – esthetics
Lower anterior teeth - over the crest of the remaining ridge, or at least
within the labial border of the lower denture.
45. This completes
adjustment of the
anteroposterior portion
of the anterior guide.
ADJUSTMENT OF INCISAL GUIDE
Gently guide the upper cast into a straight
protrusion.
The lingual edges of the upper central
incisors are brought into contact with the
incisal edges of the lower incisors
The Incisal Guide is then rotated antero
posteriorly to make contact with the
Incisal Pin, tightening the small Locknut to
maintain the angulation.
46. Lateral adjustment of the anterior guide
RIGHT LATERAL
The upper cast is then guided into a right lateral cuspid to cuspid
guidance relation by thumb pressure at the right side of the upper
cast to assure the Bennett Shift
The Lateral Wing is then elevated to contact the corner of the
Incisal Pin and the Locknut is tightened to maintain this adjustment.
47. LEFT LATERAL
Apply thumb pressure at the left side of the
upper cast and guide it into a left lateral cuspid
to cuspid excursion
Adjust the remaining Lateral Wing to contact
the Incisal Pin and secure the adjustment by
tightening the Locknut.
48. The properly adjusted
anterior guide now
furnishes a hard
metallic surface on
which the anterior pin
may glide without
displacing the anterior
teeth.
The dotted lines
illustrate the anterior
guide adjustments.
49. ARRANGEMENT OF POSTERIOR TEETH
The remaining teeth are set into centric occlusion and checked in working,
balancing and protrusive excursions.
The Incisal Pin acts as the vertical stop and must remain in contact with the
Incisal Guide surfaces from centric throughout all excursive movements.
For minimal occlusal balance, there should be at least three points of contact
on the occlusal plane. More the number of contacts, better the balance.
Bilateral balanced occlusion can be protrusive or lateral balance.
50. Steep cusps and prominent compensating curves are
usually detrimental to complete denture stability
because they result in unnecessary horizontal forces
being directed onto the denture bases.
Condylar guidances must be accepted as recorded
Incisal guidance inclinations may and should be kept as
fiat as practicable.
51. Factors of lateral balance
1. The inclination of the condylar path on the balancing side
2. The inclination of the incisal guidance and cuspid lift.
3. The inclination of the plane of occlusion on the balancing
side and working side.
4. The compensating curve on the balancing side and working
side.
5. The buccal cusp heights or inclination of the teeth on the
balancing side.
6. The lingual cusp heights or inclination on the working side.
7. The Bennett side shift on the working side.
52.
53. PROBLEMS OF OCCLUSION WHICH MAY
OCCUR DURING POSTERIOR TOOTH
ARRANGEMENT IN THE ARTICULATOR
AND THEIR SOLUTION
Premature occlusal contacts are accompanied by a lifting of the anterior pin
from the surface of the anterior guide.
The anterior pin should remain in contact with the platform of a properly
adjusted anterior guide in all cast relations.
An absence of desired occlusal contacts while the anterior pin is in contact
with the anterior guide should be interpreted as an absence of occlusal
contact.
54. Absence of contact in the
posterior region with
the casts in a protrusive
relation
To correct:
1. Increase the prominence of the
anteroposterior compensating
curve
2. Increase the cusp height
progressively toward the posterior
3. Raise the plane of orientation in
the posterior region.
Premature contact in the
posterior region with the
casts in protrusive relation
1. Decrease the prominence of the
anteroposterior compensating
curve
2. Decrease the cusp height
progressively toward the posterior
3. Lower the plane of orientation in
the posterior region.
55. Absence of contact on the
balancing side with the casts
in a lateral relation
1. Increase the lateral cusp height on
the balancing side,
2. Increase the prominence of the
lateral compensating curve on that
side
3. Raise the plane of orientation in
the posterior region on that side.
1. Decrease the lateral cusp height on
the balancing side,
2. Decrease the prominence of the
lateral compensating curve on that
side
3. If extreme, lower the plane of
orientation in the posterior region on
that side.
Note. Do not decrease the lateral cusp height on the working side, because that
would also require decreasing lateral incisal guidance on the working side and this
would affect esthetics.
Premature contacts on the
balancing side with the casts
in a lateral relation
56. Absence of contact on the
working side with the casts
in a lateral relation
1. If all other contacts are correct,
increase lateral cusp height on the
working side
2. If the error is very slight, spot-
grind on the balancing side
3. Decrease the prominence of the
lateral compensating curve on the
working side (except when such
procedure would result in this side
being out of contact when it
becomes the balancing side).
Premature contact on the
working side with the casts
in a lateral relation
1. Increase the prominence of the
lateral compensating curve on
that side or
2. Grind the teeth on the working
side, but first decide whether to
do it by decreasing lateral cusp
height or by increasing
anteroposterior cusp height.
First move the casts into protrusive
relation to determine the needs of
protrusive occlusion.
57. If the adjustment of the anterior guide has not been altered, and if the
anterior pin remains in contact with it, this is not a premature contact but
rather an absence of contact on the balancing side and should be treated as
such.
If reduction of the buccal cusps of the upper and lingual areas of the lower
teeth would destroy the necessary protrusive occlusion contacts, then grind
only those surfaces of both the upper and lower teeth which are
complementary to the opposing cusps.
In other words, deepen the lateral escapement grooves which oppose all
cusps and rearrange these teeth.
This procedure will relieve the premature contact in working occlusion and
accentuate contact in protrusive occlusion and should always be given serious
consideration before spot-grinding the occlusion of processed dentures or of
natural teeth.
58. Premature contact of the anterior teeth
with the casts in a protrusive relation
To correct:
I. Rearrange the lower anterior teeth closer to the lower ridge
II. Use shorter lower anterior teeth
III. Shorten them by grinding.
This is a very unlikely error, because the anterior teeth were arranged first and the anterior guide was
adjusted to harmonize with the arrangement.
Unless the original anterior guide adjustment has been altered, the anterior pin adjustment hasbeen
changed, or the anterior tooth arrangement has been altered, this problem is one of absence of contact
in the posterior region and not one of premature contact in the anterior region.
Editor's Notes
The posterior plane of occlusion is an extension of this anterior plane level with the junction between the middle and upper third of the retromolar pads bilaterally.
These posterior references (retromolar pads) will place the overall plane at a level that is familiar to the tongue. If the plane is too low in the anterior region or too high in the posterior region, the maxillary denture will tend to slide forward.
plane of occlusion should parallel the mean mandibular residual ridge.
The height of the occlusal plane is not simply a matter of dividing the maxillomandibular denture space equally ( governed by the relative amount of bone lost from the two ridges)
The most reliable guides are esthetics or anterior tooth placement and the retromolar pads.
The labial surfaces of the central incisors are usually 8 to 10 mm in front of the papillae
vary with the
size of the teeth and the labiolingual thickness of
the alveolar process carrying the natural teeth, so it
is not an absolute relationship. Furthermore, as
severe resorption of the residual ridge in a vertical
direction occurs, the incisive papilla may be
located more posteriorly to the position of the
replacement teeth. Thus the distance from the
papilla to the labial surface of the teeth may
become greater for those patients with excessive
bone loss in the maxillary anterior region
This
fact must be kept in mind when placing an artificial
incisor in the wax occlusion rim. The root of the
natural tooth extends into the alveolar process, with
a relatively thin layer of bone over it labially. This
means that in some situations the residual ridge can
be used as a guide to determine the proper inclination
of anterior teeth. However, the accuracy of this
guide decreases as resorption of the residual ridge
progresses. Clinical judgment is essential in the
evaluation and application of these guides.
For the maxillary anterior teeth
to be set with the appropriate labial orientation, it
may be necessary to grind the acrylic resin to reduce
the thickness of the record base. This is a common
occurrence in clinical practice and should always be
performed before grinding on the neck of the tooth.
Seal the tooth
into position with pink wax, using the no. 7 spatula.
Try to use only the amount of wax needed for
securely attaching the teeth to the record base.
Excess wax should be removed from the teeth.Place a small portion of soft, pink wax on the neck of the maxillary central incisor and attach the tooth to the record base over the anterior region of the residual ridge
After this tooth is
arranged in the normal position for a lateral incisor,
it may be repositioned with spacing, lapping, or
rotation to meet the individual esthetic requirements
for the patient.
Again, after initially setting the tooth to these
guidelines, any individual changes necessary for
the creation of naturalness for the patient should be
performed.
Reducing the horizontal and vertical overlaps of the anterior teeth is necessary to reduce the incisal guide angle.
It should be recognized that this reduction may have an impact on esthetics.
dangers from a high incisal guidance far exceed the possible impact on esthetics that might be produced when the teeth are set with less horizontal and vertical overlaps. It is not necessary for the anterior teeth to contact in maximum intercuspation.
In fact, it is better that they be set just out of contact
0.5-mm vertical overlap with the maxillary central and canine teeth.
1- to 2-mm horizontal overlap must exist between the lingual surface of the maxillary anterior teeth and the labial surface of the mandibular anterior teeth.
After
these teeth are adjusted to this ideal arrangement,
they may be altered by rotation, spacing, and
tilting the teeth to achieve the naturalness requirement
of the patient.
This is the space resulting
from the removal of the posterior teeth and the loss
of bone from the residual ridgesposition the teeth along a line extending from the tip of the canine to the middle of the retromolar pad.
This arbitrary line should pass through the central fossa of the mandibular premolars and molars
It frequently needs to be ground because of the minimal space remaining between the second premolar and the canine after these teeth have been arranged in maximum intercuspation.
For this reason, the tooth must be ground and shaped to fit the space available. The teeth on both sides of the dental arches are arranged in a similar manner.
Then the two mandibular premolars are repositioned to achieve maximum intercuspation with the maxillary premolars
In the ideal situation, the mandibular first and second premolars, with their central grooves, are positioned on a line from the canine tip to 1 to 2 mm below the top of the retromolar pad
Before the first premolar is positioned, a small
section of the mandibular wax occlusal rim is
removed to accommodate the first and second premolars.
When these lower teeth have been arranged, a segment of the maxillary occlusal rim is removed to accommodate the first maxillary premolar, which is The mandibular first premolar may need to be adjusted mesiodistally to fit into the available space.
Reshaping of the tooth by grinding usually will satisfy the space requirements. Maintenance of the occlusal plane by positioning the mandibular teeth at the appropriate height is of paramount importance as is the placement of their central grooves on the reference line from the tip of the canine to the retromolar pad.
The first three premolars set (two mandibular and one maxillary) are the key to the relative anteroposterior intercuspation of all the remaining posterior teeth.
Once the premolars are set and properly related to each other, positioning of the remaining mandibular posterior teeth is easily accomplished
The index
finger is used to hold the cervical neck of the maxillary
tooth in place while the articulator is closed.
Eliminating the first premolar is a logical choice
because this tooth has less occlusal surface for the
mastication of food.
When
the arrangement is completed, the tooth is sealed to
the record base with the hot no. 7 spatula
When all teeth have been
properly positioned, they are sealed to the record
base with pink baseplate wax.
In such instances,
arrangement)After some of the wax
occlusal rim distal to the canine is removed, the
first premolar is set. Place a small portion of soft,
pink wax on the neck of the maxillary premolar and
only one premolar and two molars are the customary
teeth selected. T
Seal the tooth
with pink wax.
and place the second premolar and the first and second molars into the available space.
to minimize the work force directed to the
denture foundation. simultaneous harmonious contacts at the end of
the chewing cycle and during eccentric excursions. Placing teeth on the residual ridge incline as it ascends to the pad should be avoided.
when properly adjusted its inclines will be concentric with (occasionally parallel with) the condylar guidances
Steepest incline furnished by single or multiple inclines anywhere on the occluding dental arches at the occluding vertical dimension.
With natural teeth this guidance might be furnished by two or more of the posterior teeth or by the anterior teeth. we should not
think of the anterior guide of the articulator as
pertaining only to the guidance furnished by the
occlusion of the anterior teeth, but rather as the
anterior, or third leg guide of the entire "mechanical"
dental tripod which we call the articulator. The
influence exerted by the inclinations of the incisal
guidance upon posterior tooth form and arrangement
is much greater than one might expect.
Although this method usually calls for more
reshaping of posterior tooth forms than does the
second method, it does offer the opportunity to
produce dentures which best harmonize with the
facial characteristics of the individual patient and is
the method which I prefer.
While
this method is a somewhat arbitrary one, it does
require less skill than does the first method. It can be
used to advantage by those who are forced to use awho desire to do a minimum of occlusal grinding
during tooth arrangement. With this method the
preselected posterior tooth form, and also by those
For
some.patients this will result in a very extensive
horizontal overjut, but their appearance is improved,
and stability of the lower denture is increased over
that which results when the upper anterior teeth are
set too far lingually and when the lower anterior
teeth are set too fa r labially. For several patients a
horizontal overjut of at least 0.5 inch has produced
most satisfactory results.
when moving the casts into protrusive relation, it may be noted that the lower end of the anterior pin has been raised from the fiat surface of the anterior guide.
Tilt the anterior guide to make contact with the
lower end of the anterior pin
The waxed occlusal rims may then be tried in the patient for esthetics, occlusal function and perhaps correction.
The articulation is completed and the gingival and palatal is waxed.
Reseat the completed occlusal rims onto their master casts. Seal the rims to the casts to preserve the tissue surface from plaster or stone seepage during the flasking procedure.
Steep Condylar guidances, steep incisal guidances, and combinations of them suggest prominent compensating curves with steep anteroposterior and lateral cusp height (steep slopes of the cusps).
Before making any of-the changes which will be suggested, the casts should be moved into all normal relations to each other to ascertain whether or not the suggested change or changes would destroy occlusions which have been satisfactorily established.
Also, it should be determined whether the occlusal error is due to a premature (interceptive or deflective) occlusal contact or an absence of contact