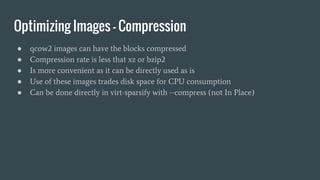
Download as PDF, PPTX


![virt-customize
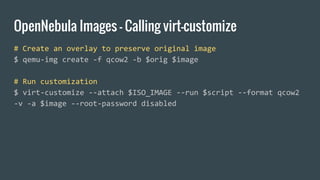
● Starts custom VM and attach disks and connects to network
● Change passwords, create users
● Move files
● Install packages
● Execute scripts
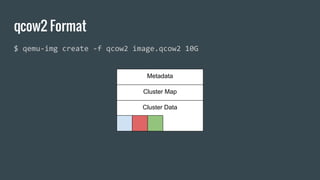
virt-customize [--options]
[ -d domname | -a disk.img [-a disk.img ...] ] [--chmod PERMISSIONS:FILE] [--commands-from-file FILENAME]
[--copy SOURCE:DEST] [--copy-in LOCALPATH:REMOTEDIR] [--delete PATH] [--edit FILE:EXPR] [--firstboot SCRIPT]
[--firstboot-command 'CMD+ARGS'] [--firstboot-install PKG,PKG..] [--hostname HOSTNAME] [--install PKG,PKG..]
[--link TARGET:LINK[:LINK..]] [--mkdir DIR] [--move SOURCE:DEST] [--password USER:SELECTOR] [--root-password SELECTOR]
[--run SCRIPT] [--run-command 'CMD+ARGS'] [--scrub FILE] [--sm-attach SELECTOR] [--sm-register] [--sm-remove]
[--sm-unregister] [--ssh-inject USER[:SELECTOR]] [--truncate FILE] [--truncate-recursive PATH] [--timezone TIMEZONE] [--touch FILE]
[--update] [--upload FILE:DEST] [--write FILE:CONTENT] [--no-logfile] [--password-crypto md5|sha256|sha512]
[--selinux-relabel] [--sm-credentials SELECTOR]](https://image.slidesharecdn.com/customizingvmimages-160426091114/85/TechDay-April-Customizing-VM-Images-8-320.jpg)
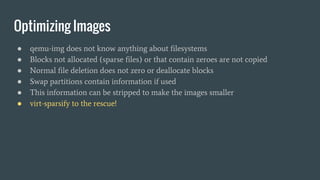
![OpenNebula Images - Create CDROM
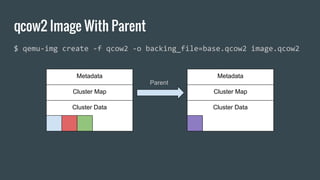
# Download context packages from github
curl -s https://api.github.com/repos/OpenNebula/addon-context-
linux/releases | jq -r '.[0].assets[].browser_download_url' |
xargs -L1 wget -P repo
# Create ISO image with label “EXTRA”
genisoimage -o extra-packages.iso -R -J -V EXTRA repo/](https://image.slidesharecdn.com/customizingvmimages-160426091114/85/TechDay-April-Customizing-VM-Images-10-320.jpg)

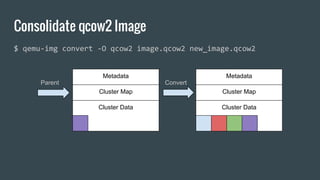


This document discusses various tools and techniques for customizing and optimizing virtual machine images in qcow2 format. It covers mounting qcow2 images, using libguestfs and virt-customize to modify files and install packages, creating CDROMs to package customization scripts, optimizing images with virt-sparsify using normal and in-place sparsification as well as compression, and tips for using qemu-img.


