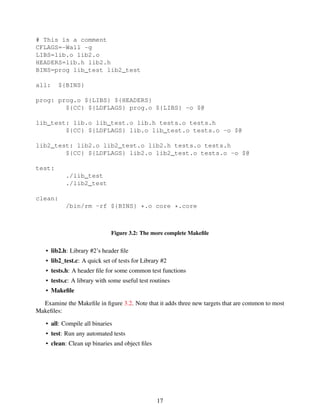
The document introduces revision control systems (RCS) as essential tools for software development that allow developers to save different versions of source code over time. Key benefits of RCS mentioned include the ability to revert code, safeguard against loss through backups, track changes made, support concurrent editing, save notable versions as snapshots, and create isolated experimental branches. The document advocates for using Subversion as an RCS and provides examples of how RCS can also be useful for storing documents beyond just code.


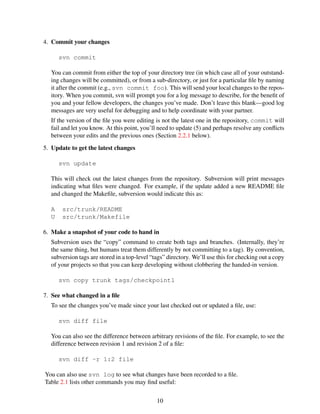
![branch. You can make changes in this branch (and save your work and get all of the benefits
of source control) without affecting your main branch. Of course, if you create a branch and
like the ideas from it, you’ll have to merge those changes back later. You can either use svn
merge, or you can svn diff and then patch the files manually. The nice thing about using
svn merge is that it records which change you’re propagating.
• Use meaningful log messages. Even for yourself, it’s great to be able to go back and say,
“Ah-ha! That’s why I made that change.” Reading a diff is harder than reading a good log
message that briefly describes the changes and the reason for them.
• Avoid conflicts by good decomposition and out-of-band coordination. Revision control is
great, but conflicts can be a bit of a pain. To keep them to a minimum:
– Make your program modular. If one person can work independently on, say, the user
IRC message parsing code while the other works on the routing code, it will reduce
the chances of conflicts—and it’s good programming practice that will reduce your
headaches in lots of other ways. Have this modularity reflected in the way you put
what code in what file.
– Coordinate out of band with your partner. Don’t just sit down and start working on
"whatever"—let your partner know what you’re working on.
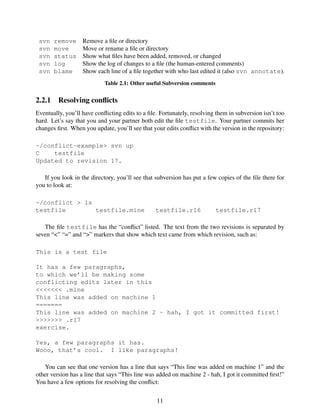
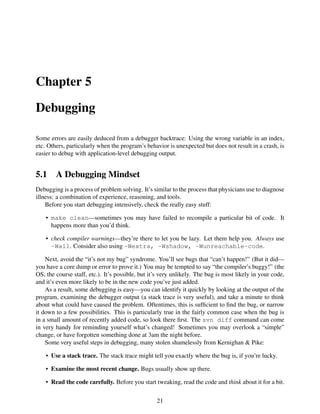
2.4 Other source control systems
Table 2.2 lists a number of other popular source control systems that you might encounter after this
class.
2.5 Trying it out on your own
Subversion is installed on the Andrew linux machines. To create a repository, try:
mkdir svn
svnadmin create svn/test
svn checkout file:///afs/andrew.cmu.edu/YOUR/PATH/svn/test
(Of course, replace “YOUR/PATH” with that to your repository!)
You’ll be able to access this repository from any machine with AFS access. You can also access
it via SSH by specifying the URL as:
svn checkout
svn+ssh://you@linux.andrew.cmu.edu/afs/andrew....../svn/test
2.6 Recommended Reading
The best subversion book is “Version Control with Subversion.” It’s available in book form and for
free online [1].
13](https://image.slidesharecdn.com/krjijysrtjoyp3bdp4fm-signature-5da9e99d15f12367439aabde98c61a3ac6bf795461403aadbc524e8ce63fff91-poli-160111213646/85/Systems-se-13-320.jpg)
![RCS An early source control system. Allows files to be locked and un-
locked; does not address concurrent use and conflict resolution.
Sometimes used for web pages and configuration files where
changes occur slowly but revision control is useful.
CVS The Concurrent Version System. CVS is built atop RCS and uses
its underlying mechanisms to version single files. Very popular.
Major users include the FreeBSD project and many other open
source systems.
Subversion Subversion is designed to fix many of the flaws in CVS while
retaining a familiar interface. Adds a number of capabilities
to CVS (e.g., the ability to rename files and directories) with-
out breaking the basics. Quickly gaining popularity among open
source projects.
Bitkeeper A commercial distributed source control system. BitKeeper used
to be used for the Linux kernel.
Git A distributed source control system used for the Linux kernel.
Does not have one central repository; each participant merges
changes into their own tree.
Visual SourceSafe Microsoft’s source control system.
Perforce A popular, heavy-weight commercial revision control system.
Table 2.2: Popular revision control systems.
Bibliography
[1] Ben Collins-Sussman, Brian W. Fitzpatrick, and C. Michael Pilato. Version Control with
Subversion. O’Reilly and Associates. ISBN 0-596-00448-6. Available online at http:
//svnbook.red-bean.com/.
14](https://image.slidesharecdn.com/krjijysrtjoyp3bdp4fm-signature-5da9e99d15f12367439aabde98c61a3ac6bf795461403aadbc524e8ce63fff91-poli-160111213646/85/Systems-se-14-320.jpg)


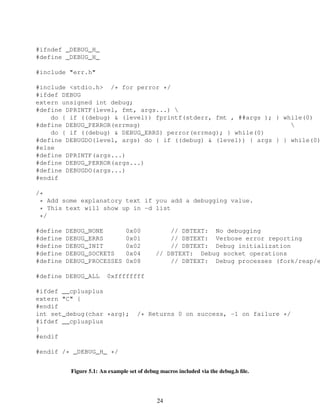

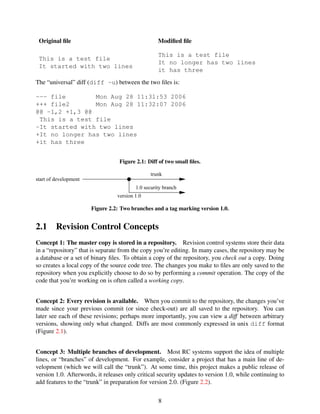
![Many systems prevent core dumps from processes that are setuid or setgid. If you want to get a
core from such executables, you’ll need to execute them as their owner.
2. GDB doesn’t work. When I run it, I get a shell prompt! The most likely cause of this is that
you’re exec’ing a different shell as part of your .cshrc or .bashrc file. The best way to change
your shell is to use the chsh command to change it globally. Barring that, you should restrict the
exec to only change the shell for interactive logins. The easiest way to do so is to do the exec only
in your .login file.
5.3.2 Using GDB to track down common problems
XXX-TODO
Examples: fewer compile/run cycles by figuring out if a program got to a particular spot w/breakpoints;
understanding the path of execution by examining predicates; etc.
5.3.3 System call tracing: ktrace, strace, and friends
Another good way to debug processes (even if you may not have the source code handy) is to use a
system call tracing facility such as ktrace (BSD) or strace (Linux).
To run a program using strace, run:
strace <executable> [args]
Strace produces output listing each system call, its parameters, and results:
516 unix35:~> strace ./syscalls
execve("./syscalls", ["./syscalls"], [/* 34 vars */]) = 0
brk(0) = 0x601000
...
(other output for linking libraries and program startup)
...
socket(PF_INET, SOCK_STREAM, IPPROTO_TCP) = 3
bind(3, {sa_family=AF_UNSPEC, sa_data="00...000"}, 16) = 0
exit_group(0) = ?
Process 24787 detached
Strace runs quickly and provides a dynamic trace of the program’s execution at the system call
level. From the example above, the socket() and bind() calls are listed, along with their return
codes. Even from the trace, it’s clear that the bind call was being made without properly initialized
variables.
Strace output can be very useful to observe the last few system calls made before a program
crashed.
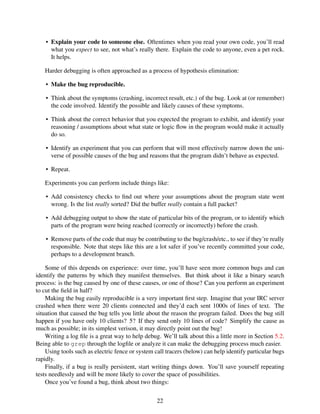
26](https://image.slidesharecdn.com/krjijysrtjoyp3bdp4fm-signature-5da9e99d15f12367439aabde98c61a3ac6bf795461403aadbc524e8ce63fff91-poli-160111213646/85/Systems-se-26-320.jpg)
![#include <stdlib.h>
#include <stdio.h>
#include <unistd.h>
#include <sys/types.h>
#include <sys/socket.h>
#include <string.h>
#include <netinet/in.h>
int
main()
{
int s;
struct sockaddr_in sin;
memset(&sin, 0, sizeof(sin));
s = socket(AF_INET, SOCK_STREAM, IPPROTO_TCP);
/* Deliberately uninitialized sockaddr */
bind(s, (struct sockaddr *)&sin, sizeof(sin));
exit(0);
}
Figure 5.2: A test program that performs two system calls.
5.3.4 Memory Debugging with Valgrind
Valgrind is a powerful dynamic analysis tool (it tests your code while your code is running). It
provides tools that can check for invalid or uninitialized memory use, writing memory after it was
freed, and memory leaks. Because it runs programs in a virtual machine (all code executes inside
valgrind, not on the normal host processor), programs run about 10x more slowly under Valgrind,
but that shouldn’t be a problem for code in this class.
To run your code under valgrind, run it as:
valgrind <executable> [args]
For example, if you were to type in and run the program in Figure 5.3 without valgrind, it would
(typically) appear to run properly:
508 unix35:~> ./uninit
Buf[0] contains 0 (deliberate uninitialized access)
Running it under valgrind produces copious output. Examining some of that shows:
507 unix35:~> valgrind ./uninit
...
==23689== Use of uninitialised value of size 8
==23689== at 0x4E691CB: (within /lib/libc-2.6.1.so)
==23689== by 0x4E6BB3E: vfprintf (in /lib/libc-2.6.1.so)
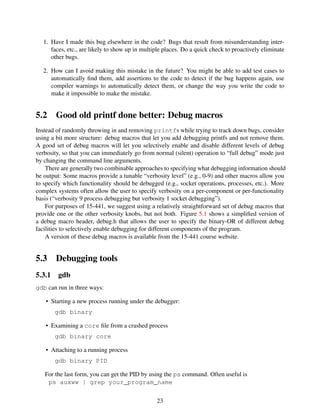
27](https://image.slidesharecdn.com/krjijysrtjoyp3bdp4fm-signature-5da9e99d15f12367439aabde98c61a3ac6bf795461403aadbc524e8ce63fff91-poli-160111213646/85/Systems-se-27-320.jpg)
![#include <stdlib.h>
#include <stdio.h>
int
main()
{
int *buf;
buf = (int *)malloc(10 * sizeof(int));
printf("Buf[0] contains %d (deliberate uninitialized access)n", buf[0])
exit(0);
}
Figure 5.3: A test program that accesses uninitialized memory.
==23689== by 0x4E73319: printf (in /lib/libc-2.6.1.so)
==23689== by 0x400562: main (in /home/dga/uninit)
Like Electric Fence, below, valgrind also detects other memory errors. It’s a great tool to use
when confronted with tricky memory leaks or hard-to-reproduce “heisenbugs.”
For the most part, Valgrind is only available on Linux.
5.3.5 Memory Debugging with Electric Fence
Electric Fence is a utility that helps debug buffer overruns. It monitors access to malloc-generated
buffers to detect if your code writes past the end (or start) of the buffer. Running your code under
electric fence will be slower, but it’s a good way to detect weird, hard to track down errors involving
buffer problems. Electric Fence is faster than Valgrind, but doesn’t detect as many kinds of errors.
To run your code under electric fence, run it as:
ef <executable> [args]
You can also compile your code directly against Electric Fence by linking it with -lefence.
Using electricfence, an attempt to access memory outside of the allocated chunk will cause the
program to seg fault instead of causing strange, unpredictable behavior.
For example, if you were to type in and run the program in Figure 5.4 without electric fence, it
would (typically) run to completion:
546 unix35:~> ./overwrite
accessing start of buf
accessing end of buf
accessing past end of buf
done with overwrite test
However, if you run it under electric fence, it will crash at exactly the instruction that writes
outside the malloc buffer:
28](https://image.slidesharecdn.com/krjijysrtjoyp3bdp4fm-signature-5da9e99d15f12367439aabde98c61a3ac6bf795461403aadbc524e8ce63fff91-poli-160111213646/85/Systems-se-28-320.jpg)
![#include <stdlib.h>
#include <stdio.h>
int
main()
{
char *buf;
buf = malloc(64);
fprintf(stderr, "accessing start of bufn");
buf[0] = ’0’;
fprintf(stderr, "accessing end of bufn");
buf[63] = ’0’;
fprintf(stderr, "accessing past end of bufn");
buf[64] = ’0’;
fprintf(stderr, "done with overwrite testn");
exit(0);
}
Figure 5.4: A test program that overwrites a malloc buffer.
547 unix35:~> ef ./overwrite
Electric Fence 2.2.0 Copyright (C) 1987-1999
Bruce Perens <bruce@perens.com>
accessing start of buf
accessing end of buf
accessing past end of buf
/usr/bin/ef: line 20: 11049 Segmentation fault (core dumped)
( export LD_PRELOAD=libefence.so.0.0; exec $* )
The error message from ElectricFence isn’t particularly useful (though it does tell you the pro-
cess ID that died, which is handy if you’re on a system like the Andrew Linux machines that name
core dump based on PID), but the resulting core dump file is very valuable:
548 unix35:~> gdb ./overwrite ./core.11049
GNU gdb Red Hat Linux (6.1post-1.20040607.43.0.1rh)
...
#0 0x0804847b in main () at overwrite.c:14
14 buf[64] = ’0’;
5.3.6 Tracing packets with tcpdump and Wireshark
For network projects and debugging distributed systems, packet sniffers such as tcpdump and
Wireshark (formerly Ethereal) can be a life-saver. These utilities can record packets as they go in
and out of a machine, and can decode various protocols. tcpdump is a more low-level interface
29](https://image.slidesharecdn.com/krjijysrtjoyp3bdp4fm-signature-5da9e99d15f12367439aabde98c61a3ac6bf795461403aadbc524e8ce63fff91-poli-160111213646/85/Systems-se-29-320.jpg)
![Chapter 6
Documentation and Style
Finding the sweet spot in documenting your code can be difficult. On one hand, a camp of developers
argues that the code is the documentation. Their rationale is that if code can change independently
of documentation, then documentation can and will get out of date. On the other hand, a new user
of the code or libraries developed by people in the first camp may disagree—strongly.
We don’t know the perfect answer to this debate, but we do have a few suggestions:
Don’t document the obvious, and make your code obvious.
for (i = 0; i < a.max; i++) {
printf("%dn", a.contents[i]);
}
Comments in code like the above add unnecessary clutter to the obvious. Why is it obvious? We
have several hints:
• The use of a standard index variable name, i.
• A “typical” for loop for iterating through an array
• The “max” element is clearly named.
Note the example in Figure 6.1. This code snippet from a previous 15-441 project shows two
bugs. First, the project uses a magic consant for LSA announcements (how should we remember
that type “1” is an LSA announcement?) Ironically, the constant INCOMING_ADVERTISEMENT is
defined earlier in the file; the programmers just forgot to use it in this case. Imagine the fun tracking
/* Send an ACK if this is an LSA annoucement */
if (getMsgType(buffer) == 1) {
sendACK(&from, length, getMsgSeqNumber(buffer));
}
/* process the incoming LSA message */
processLSA(buffer, ntohs(from.sin_port));
Figure 6.1: A commenting and style counter-example from 15-441.
31](https://image.slidesharecdn.com/krjijysrtjoyp3bdp4fm-signature-5da9e99d15f12367439aabde98c61a3ac6bf795461403aadbc524e8ce63fff91-poli-160111213646/85/Systems-se-31-320.jpg)
![6.2 Communication
At this point, you may well ask: What in the world is a chapter about writing and graphics doing in
a book about hacking? The answer is that programs do not stand in a vacuum, and the similarities
between good code and good writing are startling.
In the words of E.B. White, “Eliminate Unnecessary Words!” Good technical communication
is concise and precise. Use the right words to describe exactly what you mean, no more and no
less. Strive for clarity in all that you write. You’ll note that this is much like good programming.
A well-written program contains a minumum of unnecessary, repetitive cruft, is easy to understand,
and does exactly what it’s supposed to do and nothing more. So too does a well-written technical
document.
6.3 Further Reading
Srunk & White’s “The Elements of Style” [? ] is one of the best references on English writing.
It’s short, sweet, and effective, and the lessons therein can be translated to numerous other domains
(programming, presenting data graphically, and so on).
The Practice of Programming [1] has a great discussion on programming style with numerous
examples.
Bibliography
[1] Brian W. Kernighan and Rob Pike. The Practice of Programming. Addison-Wesley. ISBN
0-201-61586-X.
33](https://image.slidesharecdn.com/krjijysrtjoyp3bdp4fm-signature-5da9e99d15f12367439aabde98c61a3ac6bf795461403aadbc524e8ce63fff91-poli-160111213646/85/Systems-se-33-320.jpg)


![8.0.3 The Shell
Just because you’ve learned a high level scripting language, don’t neglect the basics of the shell. It’s
a tool you’ll interact with every time you run a command, move files, list directories, etc. As a tool
you use so often, learn some of its time-saving features!
Things anyone should be able to do with the shell:
• Basic wildcards: *, {foo,bar}, [12345].
• For loops
• Redirection
• Create aliases that persist beyond logout for common operations
8.0.4 Other useful tools
The m4 macro language is occasionally useful, and understanding m4 is useful when dealing with
tools like automake and autoconf. I’ve recently found myself leaning more towards embedded script-
ing languages (such as “erb” – embedded ruby), since it’s one less tool to learn, and m4 can be a bit,
er, opaque and painful.
Command line, pipe-oriented tools like “awk” and “sed” are useful for one-liners, but the com-
mon scripting languages can be used there as well. If you find yourself scrounging around in old
shell script programs, you may want to invest a bit of time to learn the very basics of awk and sed.
I wouldn’t become an “awk” expert unless you have a really compelling need. Do understand the
most common idiom of sed usage, which is akin to the earlier example in perl:
sed ’s/search/replace/’
which will take all text input to it (though a pipe, etc.) and replace the first occurrence of “search”
with “replace”. Append ’/g’ if you want it to replace all occurrences.
Learn the basics of grep. I use some handy aliases to rapidly grep through collections of files
recursively from the current directory: These aliases use the ’find’ command to traverse all files of
particular types and pass them to ’grep’. In csh aliases format, the aliases are:
rgrep "find . -type f -print0 | xargs -0 -n 20 grep !*"
rgrep-c "find . -type f -name ’*.c’ -print0 | xargs -0 -n 20 grep -H !*"
rgrep-cc "find . -type f -name ’*.cc’ -print0 | xargs -0 -n 20 grep -H !*"
rgrep-h "find . -type f -name ’*.[hH]’ -print0 | xargs -0 -n 20 grep -H !*"
rgrep-ch "find . -type f ( -name ’*.[cChHly]’ -or -name ’*.cc’ -or
-name ’*.cpp’ -or -name ’*.hpp’ ) -print0 | xargs -0 -n 20
grep -H !*"
cgrep "grep -H !* *.{C,c,cc,cpp,h,H,hh,hpp,l,y,java}"
rgrep-j "find . -type f -name ’*.[Jj]ava’ -print0 | xargs -0 -n 20 grep -H
rgrep-html "find . -type f -name ’*.ht{m,ml}’ -print0 | xargs -0 -n 20 grep
38](https://image.slidesharecdn.com/krjijysrtjoyp3bdp4fm-signature-5da9e99d15f12367439aabde98c61a3ac6bf795461403aadbc524e8ce63fff91-poli-160111213646/85/Systems-se-38-320.jpg)
![8.0.5 “Scripting” languages go well beyond
A nice thing about many of the so-called “scripting” languages is that they go well beyond simple
automation. For many small to medium sized (or sometimes larger) programs, Ruby or Python is
an ideal implementation environment. In our research, we use Ruby for complex data analysis (with
appropriate C-based libraries to do fast math, etc.). Perl, Python, and Ruby all form the basis of
innumerable complex, fully featured and powerful Web sites, and the pain to develop these sites is a
small fraction of what it would be in a lower-level language such as C.
Time invested in learning a high level, interpreted language will pay itself back fast.
• Lots of powerful, high level libraries
• Fast development and prototyping
8.0.6 A Ruby Primer
Programming Ruby [1] is a nice starting reference.
XXX: Add python and perl refs to biblio.
Bibliography
[1] Dave Thomas, Chad Fowler, and Andy Hunt. Programming Ruby: The Pragmatic Program-
mer’s Guide. Pragmatic Bookshelf, second edition, October 2004. ISBN 978-0-9745140-5-5.
39](https://image.slidesharecdn.com/krjijysrtjoyp3bdp4fm-signature-5da9e99d15f12367439aabde98c61a3ac6bf795461403aadbc524e8ce63fff91-poli-160111213646/85/Systems-se-39-320.jpg)


![• Insert an item, delete it, and then try to retrieve it
• Delete a non-existent item
• Insert the same item multiple times
• Delete every item in the hash table and then insert more
• Fill the hash table completely, delete, and insert more
Note the order in which those tests are expressed: simple ones first and complex ones later. It’s
likely that the first time you try a simple test, you’ll find some bugs. Once you’ve fixed those, move
on to more complex tests to turn up harder bugs, etc., etc. Much like you would in debugging, try to
keep the tests as simple as possible while tickling the corner cases you want to explore, so that when
you have to debug the problems they find, you can do so easily.
9.3 Test Automation
As we’ve discussed, you want to automate your tests. By doing so, you’ll run them more often and
they’ll be all the more useful to you. Ideally, you should be able to type make test and have all
of your tests run.
9.4 Recommended Reading
Kernighan and Pike’s “The Practice of Programming” covers these issues well [1].
Bibliography
[1] Brian W. Kernighan and Rob Pike. The Practice of Programming. Addison-Wesley. ISBN
0-201-61586-X.
45](https://image.slidesharecdn.com/krjijysrtjoyp3bdp4fm-signature-5da9e99d15f12367439aabde98c61a3ac6bf795461403aadbc524e8ce63fff91-poli-160111213646/85/Systems-se-45-320.jpg)


![Chapter 11
Human Factors
11.1 Time Management
Students in our class often begin working on their projects late and find themselves scrambling to
complete the assignments as the deadline looms ever-nearer. As much as we’d like to, we don’t think
we’re going to be able to fundamentally change this, but we’d like to help you make the process a
little more smooth. If there’s a single goal of this chapter, it’s to eliminate the (very dreadful and
unfortunately common) experience of having an “almost complete, almost working” assignment at
the time of the deadline that, because of last minute bugs or integration problems, doesn’t pass any
of the tests, and therefore receives a dismal grade that doesn’t fairly reflect the effort that its authors
put into it.
Note how time mgmt and modularity interact
11.1.1 Planning and Estimating
Estimating development time is tough. Real-world, serious programmers get it wrong all the time.
In the following section, we outline a few suggestions that can help make the time that your projects
require a bit more predictable.
11.2 An Attitude for Software Development
11.2.1 Program Deliberately!
Have you ever found yourself pseudo-randomly modifying statements, throwing in additional API
calls, etc., to “see if it works?” (Be honest. I have.) This practice is what Hunt and Thomas refer to
as “Programming by Coincidence” [? ]. Avoid it like the plague!
• Always understand why your code works!
If you don’t, it’s much more likely that your code doesn’t work robustly. It may rely on strange
side-effects; it may fail under unexpected boundary conditions; it may break when you add more
code. Instead, spend the time to understand how to make the code work properly:
49](https://image.slidesharecdn.com/krjijysrtjoyp3bdp4fm-signature-5da9e99d15f12367439aabde98c61a3ac6bf795461403aadbc524e8ce63fff91-poli-160111213646/85/Systems-se-49-320.jpg)

![Cutting and Pasting
Emacs stores all deleted text (other than backspaced characters) in a “kill ring.” If you kill multiple
things in a row without intervening commands, it appends these to the same buffer. Otherwise, it
starts a new buffer in the kill ring.
C-y will “yank” text from the kill ring. If you hit M-y after yanking some text, emacs will
change the yanked text to the next older entry in the kill ring, and so on. Give it a try.
Macros
An amazingly useful feature in emacs is the quick construction of small macros.
Command Effect
C-x ( Start recording a keyboard macro
C-x ) End recording
C-x e Invoke the last created macro
M-x name-last-kbd-macro Assigns a name to the last created macro.
M-x insert-kbd-macro Inserts a definition of the keyboard macro into the current buffer.
You can use this to “capture” your recorded macro and save it in
your .emacs file for later use. Consider binding
12.0.5 Tags
Tags are a handy, powerful feature in good editors that give the editor a rudimentry knowledge of the
symbols, function names, etc., in your programs. Using tags, you can quickly jump to the definition
or prototype for a function or use auto-completion for longer symbol and function names.
Emacs uses a TAGS file created by the program etags. Creaing the file is simple: run etags
*.[ch]. Actually, I suggest either creating a makefile target or an alias for it that’s a little more
complete:
etags *.{c,C,cc,cpp,h,hh,hpp,cpp,java} Makefile
to cover most of the bases. Once the TAGS file exists, using it is a piece of cake:
Command Effect
M-. Visit tags table.
C-u M-. Finds the next tag
M-0 M-. Synonym for find-next tag. Easier to type.
C-u -M-. Find previous tag (negative modifier)
M-tab Tag complete symbol. Type the first few characters of a function
or variable and hit M-tab to autocomplete it.)
M-, Search for next tab. Find tag is a strict match; this finds sub
expressions that contain what you’re looking for. Very handy.
Tab In some prompts from emacs, the tab key will also complete on
tag values.
12.0.6 Integrated Development Environments
Unless you have a compelling reason to learn a particular IDE (existing job, project, etc.) we don’t
suggest a particular IDE. If you do choose one, consider one that works with a variety of underlying
languages and operating systems, such as eclipse. Note, however, that the integration and “do it
55](https://image.slidesharecdn.com/krjijysrtjoyp3bdp4fm-signature-5da9e99d15f12367439aabde98c61a3ac6bf795461403aadbc524e8ce63fff91-poli-160111213646/85/Systems-se-55-320.jpg)