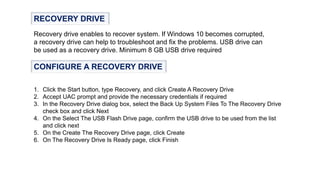
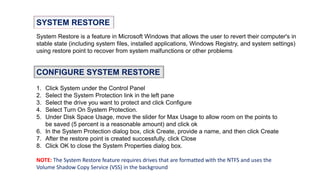
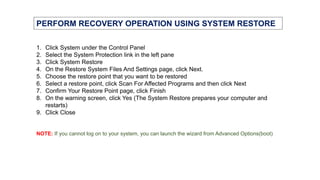
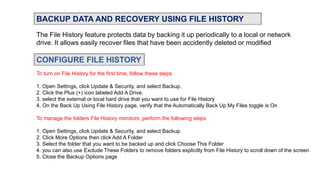
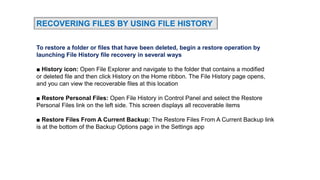
2. RECOVERY DRIVE
Recovery drive enables to recover system. If Windows 10 becomes corrupted,
a recovery drive can help to troubleshoot and fix the problems. USB drive can
be used as a recovery drive. Minimum 8 GB USB drive required
CONFIGURE A RECOVERY DRIVE
1. Click the Start button, type Recovery, and click Create A Recovery Drive
2. Accept UAC prompt and provide the necessary credentials if required
3. In the Recovery Drive dialog box, select the Back Up System Files To The Recovery Drive
check box and click Next
4. On the Select The USB Flash Drive page, confirm the USB drive to be used from the list
and click next
5. On the Create The Recovery Drive page, click Create
6. On The Recovery Drive Is Ready page, click Finish
3. SYSTEM RESTORE
CONFIGURE SYSTEM RESTORE
System Restore is a feature in Microsoft Windows that allows the user to revert their computer's in
stable state (including system files, installed applications, Windows Registry, and system settings)
using restore point to recover from system malfunctions or other problems
1. Click System under the Control Panel
2. Select the System Protection link in the left pane
3. Select the drive you want to protect and click Configure
4. Select Turn On System Protection.
5. Under Disk Space Usage, move the slider for Max Usage to allow room on the points to
be saved (5 percent is a reasonable amount) and click ok
6. In the System Protection dialog box, click Create, provide a name, and then click Create
7. After the restore point is created successfully, click Close
8. Click OK to close the System Properties dialog box.
NOTE: The System Restore feature requires drives that are formatted with the NTFS and uses the
Volume Shadow Copy Service (VSS) in the background
4. PERFORM RECOVERY OPERATION USING SYSTEM RESTORE
1. Click System under the Control Panel
2. Select the System Protection link in the left pane
3. Click System Restore
4. On the Restore System Files And Settings page, click Next.
5. Choose the restore point that you want to be restored
6. Select a restore point, click Scan For Affected Programs and then click Next
7. Confirm Your Restore Point page, click Finish
8. On the warning screen, click Yes (The System Restore prepares your computer and
restarts)
9. Click Close
NOTE: If you cannot log on to your system, you can launch the wizard from Advanced Options(boot)
5. BACKUP AND RESTORE (WINDOWS 7) TOOL
BACKUP AND RESTORE PROCEDURE
For restoring files and folders, backup and restore tool is used to create backups of files contained
in folders, libraries, and whole disk volumes. Backups can’t be saved to the disk on which Windows
10 is installed, so another location such as an external USB drive, network drive, or non-system
local disk must be required
1. Open Settings and click Update And Security
2. Click Backup and then click Go To Backup And Restore (Windows 7)
3. Click Set Up Backup
4. Choose the location where you want to save and click next
5. On the What Do You Want To Back Up page, click Let Windows Choose (Recommended) and click
Next
6. On the Review Your Backup Settings page, click Change Schedule.
7. On the How Often Do You Want To Back Up page, leave the Run Backup On A
Schedule (Recommended) check box selected and, if necessary, modify the backup
schedule.
8. Click OK.
9. On the Review Your Backup Settings page, click Save Settings And Run Backup
10. After completing backup you can restore your data using click Restore My Files option
6. BACKUP AND RESTORE WITH WBAdmin
Backing up using WBAdmin
WBAdmin is a command line tool which is also found in Windows Server and is useful to
automate or create a backup job on several computers. WBAdmin.exe command is used
to create, configure, and restore backup jobs
Follow these steps to back up the entire contents of the C drive to a backup drive located on E
1. Right-click Start and select Command Prompt (Admin); accept UAC
2. Type the following command
WBadmin start backup –BackupTarget:E: -Include:C:
3. Type Y to begin the backup operation
Restoring data using WBAdmin
Follow these steps to recovery a backup of volume E from January 24,2018, at 17.12
1. Boot to a Windows RE and type wbadmin get versions to check version information
2. Type the following command at a command prompt and then press Enter
wbadmin start recovery -version:01/24/2018-17:12 -itemType:Volume -items:? Volume{a6f2e427-0000 0000-0000-
501f00000000} -BackupTarget:D: -RecoveryTarget:E:
7. BACKUP DATA AND RECOVERY USING FILE HISTORY
CONFIGURE FILE HISTORY
The File History feature protects data by backing it up periodically to a local or network
drive. It allows easily recover files that have been accidently deleted or modified
To turn on File History for the first time, follow these steps
1. Open Settings, click Update & Security, and select Backup.
2. Click the Plus (+) icon labeled Add A Drive.
3. select the external or local hard drive that you want to use for File History
4. On the Back Up Using File History page, verify that the Automatically Back Up My Files toggle is On
To manage the folders File History monitors, perform the following steps
1. Open Settings, click Update & Security, and select Backup.
2. Click More Options then click Add A Folder
3. Select the folder that you want to be backed up and click Choose This Folder
4. you can also use Exclude These Folders to remove folders explicitly from File History to scroll down of the screen
5. Close the Backup Options page
8. RECOVERING FILES BY USING FILE HISTORY
To restore a folder or files that have been deleted, begin a restore operation by
launching File History file recovery in several ways
■ History icon: Open File Explorer and navigate to the folder that contains a modified
or deleted file and then click History on the Home ribbon. The File History page opens,
and you can view the recoverable files at this location
■ Restore Personal Files: Open File History in Control Panel and select the Restore
Personal Files link on the left side. This screen displays all recoverable items
■ Restore Files From A Current Backup: The Restore Files From A Current Backup link
is at the bottom of the Backup Options page in the Settings app
9. BACKUP USING OneDrive
Microsoft OneDrive allows to store files online, sync files between PC and OneDrive, and
access files directly by a web browser located at OneDrive.com. Microsoft account must
be needed for using OneDrive.
RECOVERING FILES FROM OneDrive
To recover deleted files from OneDrive.com, follow these steps…
1. Browse to your OneDrive.com or right-click the cloud icon in the notification area and
click Go To OneDrive.com.
2. On the left side of the page, select Recycle Bin.
3. If Recycle Bin is not visible, click the three horizontal lines in the top left corner of the
screen and select Recycle Bin.
4. Select the items that you want to recover.
5. Click Restore on the menu.