1. Step by step!
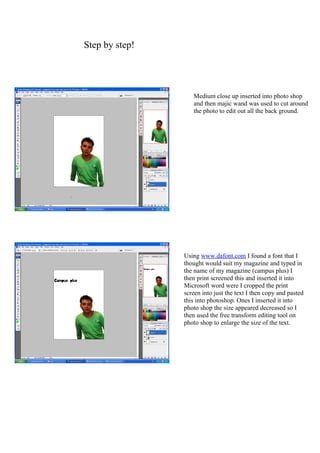
Medium close up inserted into photo shop
and then majic wand was used to cut around
the photo to edit out all the back ground.
Using www.dafont.com I found a font that I
thought would suit my magazine and typed in
the name of my magazine (campus plus) I
then print screened this and inserted it into
Microsoft word were I cropped the print
screen into just the text I then copy and pasted
this into photoshop. Ones I inserted it into
photo shop the size appeared decreased so I
then used the free transform editing tool on
photo shop to enlarge the size of the text.
2. I decided that the image should be in the
left third so I moved it from the right side
of the magazine. I then inserted a sky like
why using the box tool. I then added an
image from google imagers (the itunes gift
voucher) as a give away with the
magazine.
I then again used dafont to insert the text I
then crop it in word and coppy and pasted
the image into photo shop.
I lastly added the bar code by coppy and
pasting the bar code into photo shop.
`
I changed my mind at this stage and free
transformed the dafont text text to back it into
a sky line and then reversed it out to change
the backing to black.
I then free transformed the image of the
person to enlarge it.
I then used out a glow to make the outer edge
of the person glow to make it stand out.
I then free transformed the dafont text to make
it larger I then arranged this text over the
picture of the person and reversed out every
other peace of text.
I then removed the picture from google
imagers of the itunes gift card as I realised we
were not suppose to used imported images.
I then used a special font to create a fake bar
code for the magazine on Microsoft word I
then coppy and pasted this into photoshop and
used the free transform tool to make it bigger
and fit the bottom right corner.
3. I then ones again used www.dafont.com to
create the text about the 20% special offer
with in the magazine I again used the preview
option on www.dafont.com and print screened
it and then pasted it into word. I then cropped
the print screen down to the text only. I then
copied and pasted this is photoshop and used
the free transform option to enlarge the text
and put it at an angle.
I now moved onto my contents page this is explained
step by step below.
To start my contents page I opened photo shop
and selected new from the file drop down
menu. I then selected A4 international paper.
After this I loaded up the www.dafont.com
website and selected the same if not a similar
font to the one used for the sky line on the
front cover and used this but changed it to
contents page I then print screened this,
copied and pasted this into work cropped it
down to text only and cut and pasted into
photo shop I then inverted the inserted text to
create a similar sky line to the one on the front
cover.
4. I then looked threw some imagers from
what me and my group took for our
magazine and found one of one of my
camera team members against a wall I
cropped this picture to remove all back
ground and my team member from it and
the used the image of the wall as my back
ground.
I then used the dafont website to get
the correct font and then print
screened and copy and pasted it
into word were I cropped it and the
copy and pasted it into photo shop I
then free transformed the text to the
right size and then moved the text
into the order in which I wanted it
and the saved as JPEG.