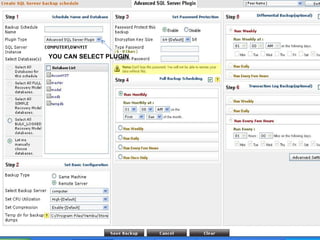
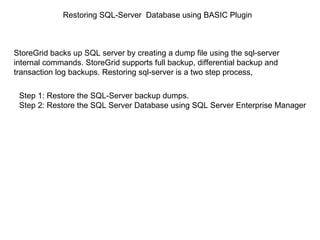
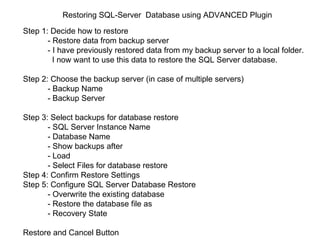
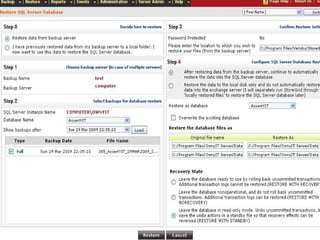
SQL BACKUP WITH STOREGRID
1. In case of SQL enterprise manager, you have to schedule all the backup jobs manually whereas  StoreGrid is an automated backup solution with wide scheduling features taking backups at their exact scheduled times. 2.  The backed up data can be compressed and encrypted efficiently using StoreGrid  while SQL Enterprise Manager doesn't provide such data compression and encryption features as StoreGrid does. 3.  With StoreGrid you can configure multiple database(s) for backup in single schedule and transfer the dumped data to remote backup server  where as with Enterprise Manager, you cannot transfer data to remote machine. Why Storegrid
StoreGrid supports backup of Microsoft SQL servers using two types of plug-ins:  The Basic Plugin  Basic SQL Server Plugin uses OSQL utility to dump the database(s) and then uploads the locally dumped file to the backup server. 2. Advanced Plugin.  Advanced SQL Server plugin uses VDI API to backup database(s) and then uploads the locally dumped file to the backup server. Plugin available with StoreGrid
StoreGrid provides three types of backups for SQL Server database :  Full Full backup type backs up the entire database. 2.  Differential Log Differential backup type backs up only modified extents since the previous full backup. 3.  Transaction  Transaction log backup backs up the active portion and truncates the inactive portion of the transaction log.
How to get here in the StoreGrid Web Console?   How to Enable/Disable Advanced Plugin   In the top menu, select: "Administration->Advanced Options" and click on the "Plugin Settings" icon in the left hand side.  SQL + Exchange Plugin   By default StoreGrid is installed with basic version of the (SQL + Exchange) plugin. On Clicking the "Enable Advanced Plugin" button, the advanced version of the (SQL + Exchange) plugin will be enabled.  Once the advanced version of the (SQL + Exchange) plugin is enabled, "Disable Advanced Plugin" button is provided to revert to the basic version of the (SQL + Exchange) plugin.
Steps to Configure SQL Server Backup   How to get here in the StoreGrid Web Console?     In the top menu, select: "Backup->Create SQL Server Backup"   SQL Server Connection Settings   SQL Server Instance Name  Authentication  Windows Authentication   SQL Server Authentication  User Name  Password  Next Button / Cancel Button
SQL Server Backup Configuration   Step 1: Schedule Name And Database   - Enter Backup Schedule Name    - Plugin Type   - SQL Server Instance Name    - Select Database(s)    - Select All Databases for this schedule  - Select All Full Recovery Model databases  - Select All Simple Recovery Model databases  - Select All Bulk-Logged Recovery Model databases  - Let me manually choose databases  Step 2: Set Basic Configuration  Step 3: Set Password Protection  Step 4: Full Backup Scheduling (Decide When To Do Full Backup)  Step 5: Differential Backup Scheduling (Optional)  Step 6: Transaction Log Backup Scheduling (Optional)  Step 7: Advanced Options  Saving the configured backup
YOU CAN SELECT PLUGIN
Restoring Data
Restoring SQL-Server  Database using BASIC Plugin Step 1: Restore the SQL-Server backup dumps. Step 2: Restore the SQL Server Database using SQL Server Enterprise Manager StoreGrid backs up SQL server by creating a dump file using the sql-server internal commands. StoreGrid supports full backup, differential backup and transaction log backups. Restoring sql-server is a two step process,
Restoring SQL-Server  Database using ADVANCED Plugin Step 1: Decide how to restore - Restore data from backup server   - I have previously restored data from my backup server to a local folder.  I now want to use this data to restore the SQL Server database.  Step 2: Choose the backup server (in case of multiple servers) - Backup Name  - Backup Server  Step 3: Select backups for database restore - SQL Server Instance Name  - Database Name  - Show backups after  - Load  - Select Files for database restore  Step 4: Confirm Restore Settings  Step 5: Configure SQL Server Database Restore - Overwrite the existing database  - Restore the database file as - Recovery State  Restore and Cancel Button 
 

Sql

  • 1.
    SQL BACKUP WITHSTOREGRID
  • 2.
    1. In caseof SQL enterprise manager, you have to schedule all the backup jobs manually whereas StoreGrid is an automated backup solution with wide scheduling features taking backups at their exact scheduled times. 2. The backed up data can be compressed and encrypted efficiently using StoreGrid while SQL Enterprise Manager doesn't provide such data compression and encryption features as StoreGrid does. 3. With StoreGrid you can configure multiple database(s) for backup in single schedule and transfer the dumped data to remote backup server where as with Enterprise Manager, you cannot transfer data to remote machine. Why Storegrid
  • 3.
    StoreGrid supports backupof Microsoft SQL servers using two types of plug-ins: The Basic Plugin Basic SQL Server Plugin uses OSQL utility to dump the database(s) and then uploads the locally dumped file to the backup server. 2. Advanced Plugin. Advanced SQL Server plugin uses VDI API to backup database(s) and then uploads the locally dumped file to the backup server. Plugin available with StoreGrid
  • 4.
    StoreGrid provides threetypes of backups for SQL Server database : Full Full backup type backs up the entire database. 2. Differential Log Differential backup type backs up only modified extents since the previous full backup. 3. Transaction Transaction log backup backs up the active portion and truncates the inactive portion of the transaction log.
  • 5.
    How to gethere in the StoreGrid Web Console? How to Enable/Disable Advanced Plugin   In the top menu, select: "Administration->Advanced Options" and click on the "Plugin Settings" icon in the left hand side. SQL + Exchange Plugin By default StoreGrid is installed with basic version of the (SQL + Exchange) plugin. On Clicking the "Enable Advanced Plugin" button, the advanced version of the (SQL + Exchange) plugin will be enabled. Once the advanced version of the (SQL + Exchange) plugin is enabled, "Disable Advanced Plugin" button is provided to revert to the basic version of the (SQL + Exchange) plugin.
  • 6.
    Steps to ConfigureSQL Server Backup How to get here in the StoreGrid Web Console?   In the top menu, select: "Backup->Create SQL Server Backup" SQL Server Connection Settings SQL Server Instance Name Authentication Windows Authentication  SQL Server Authentication User Name Password Next Button / Cancel Button
  • 7.
    SQL Server BackupConfiguration Step 1: Schedule Name And Database - Enter Backup Schedule Name - Plugin Type - SQL Server Instance Name - Select Database(s) - Select All Databases for this schedule - Select All Full Recovery Model databases - Select All Simple Recovery Model databases - Select All Bulk-Logged Recovery Model databases - Let me manually choose databases Step 2: Set Basic Configuration Step 3: Set Password Protection Step 4: Full Backup Scheduling (Decide When To Do Full Backup) Step 5: Differential Backup Scheduling (Optional) Step 6: Transaction Log Backup Scheduling (Optional) Step 7: Advanced Options Saving the configured backup
  • 8.
  • 9.
  • 10.
    Restoring SQL-Server  Databaseusing BASIC Plugin Step 1: Restore the SQL-Server backup dumps. Step 2: Restore the SQL Server Database using SQL Server Enterprise Manager StoreGrid backs up SQL server by creating a dump file using the sql-server internal commands. StoreGrid supports full backup, differential backup and transaction log backups. Restoring sql-server is a two step process,
  • 11.
    Restoring SQL-Server  Databaseusing ADVANCED Plugin Step 1: Decide how to restore - Restore data from backup server - I have previously restored data from my backup server to a local folder. I now want to use this data to restore the SQL Server database. Step 2: Choose the backup server (in case of multiple servers) - Backup Name - Backup Server Step 3: Select backups for database restore - SQL Server Instance Name - Database Name - Show backups after - Load - Select Files for database restore Step 4: Confirm Restore Settings Step 5: Configure SQL Server Database Restore - Overwrite the existing database - Restore the database file as - Recovery State Restore and Cancel Button 
  • 12.