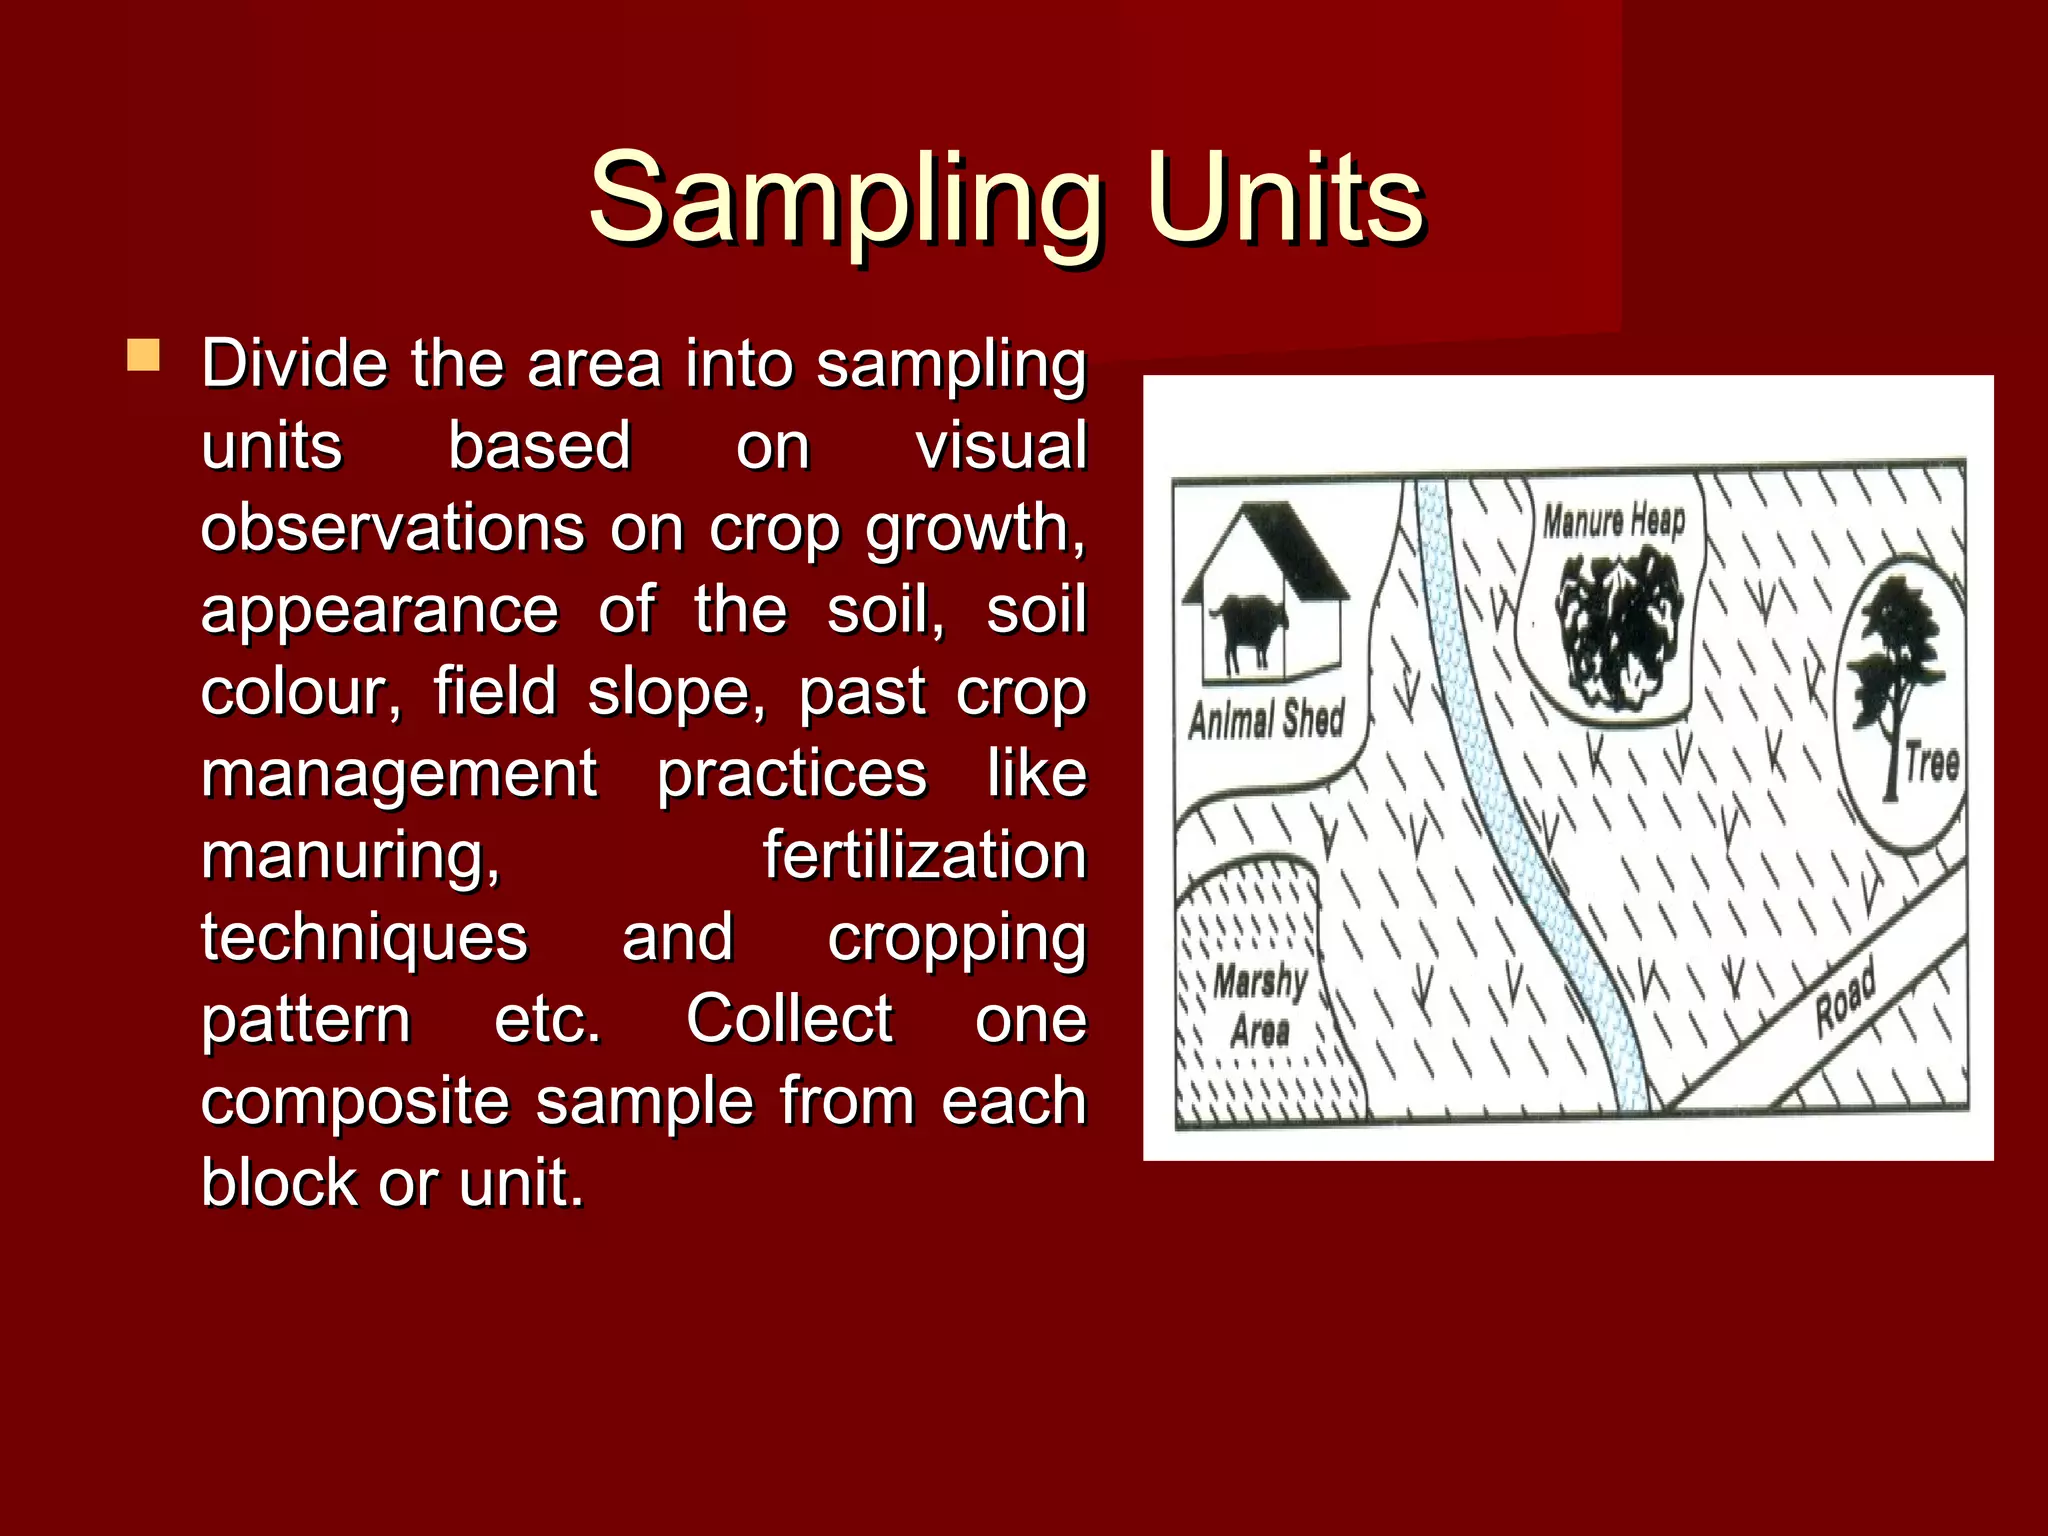
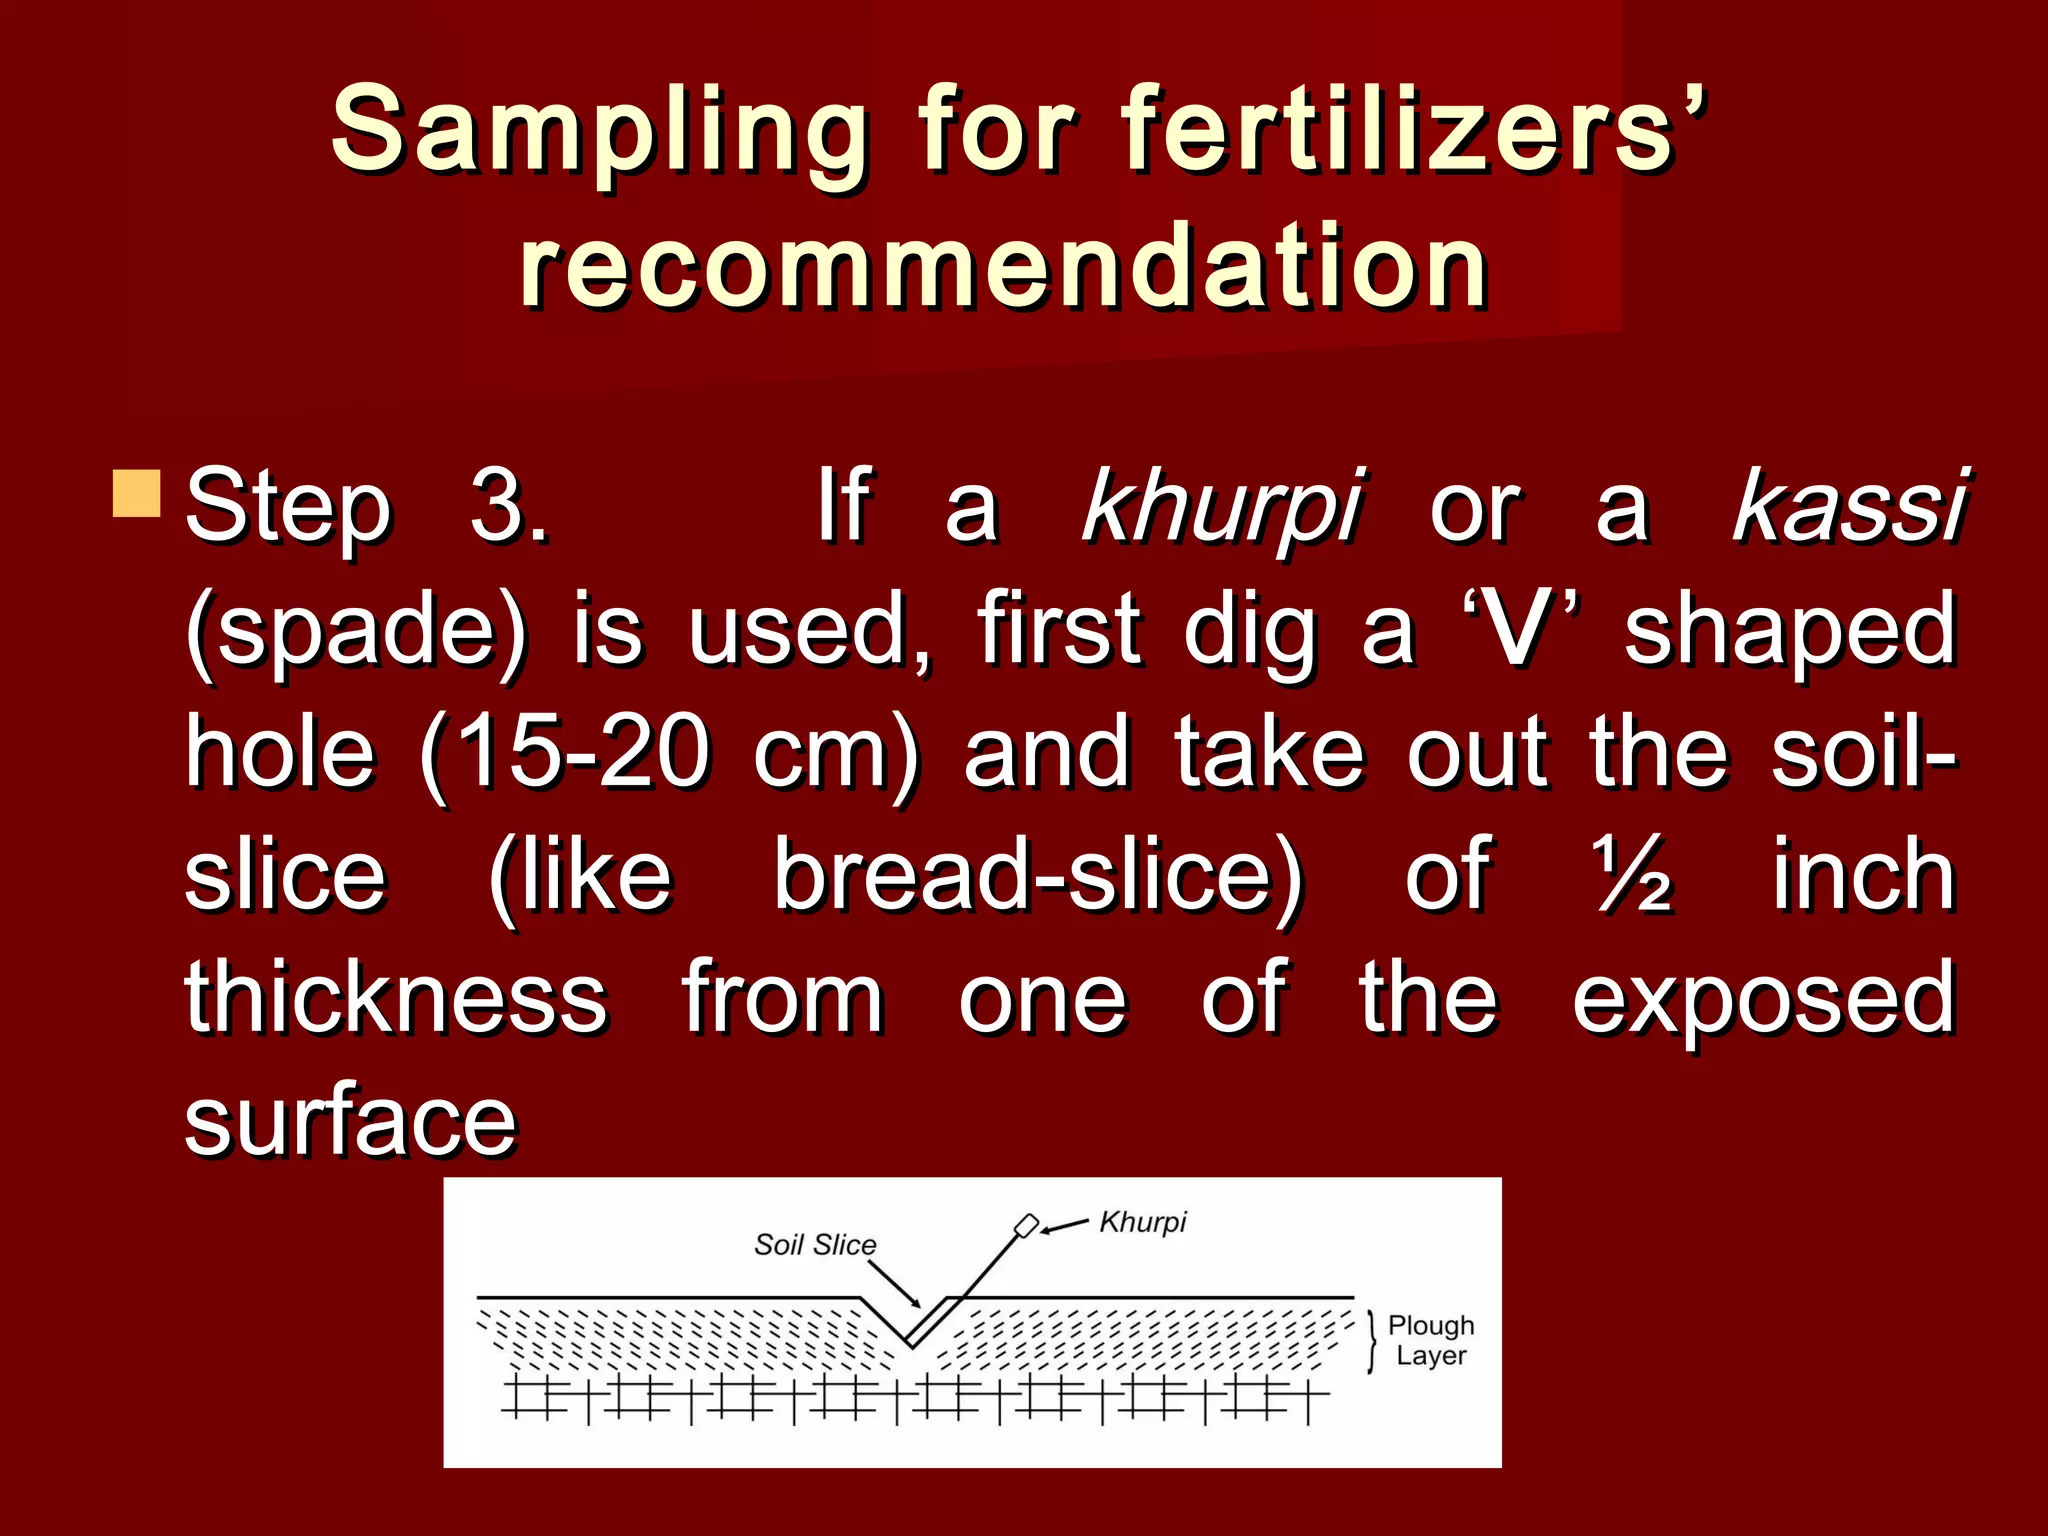
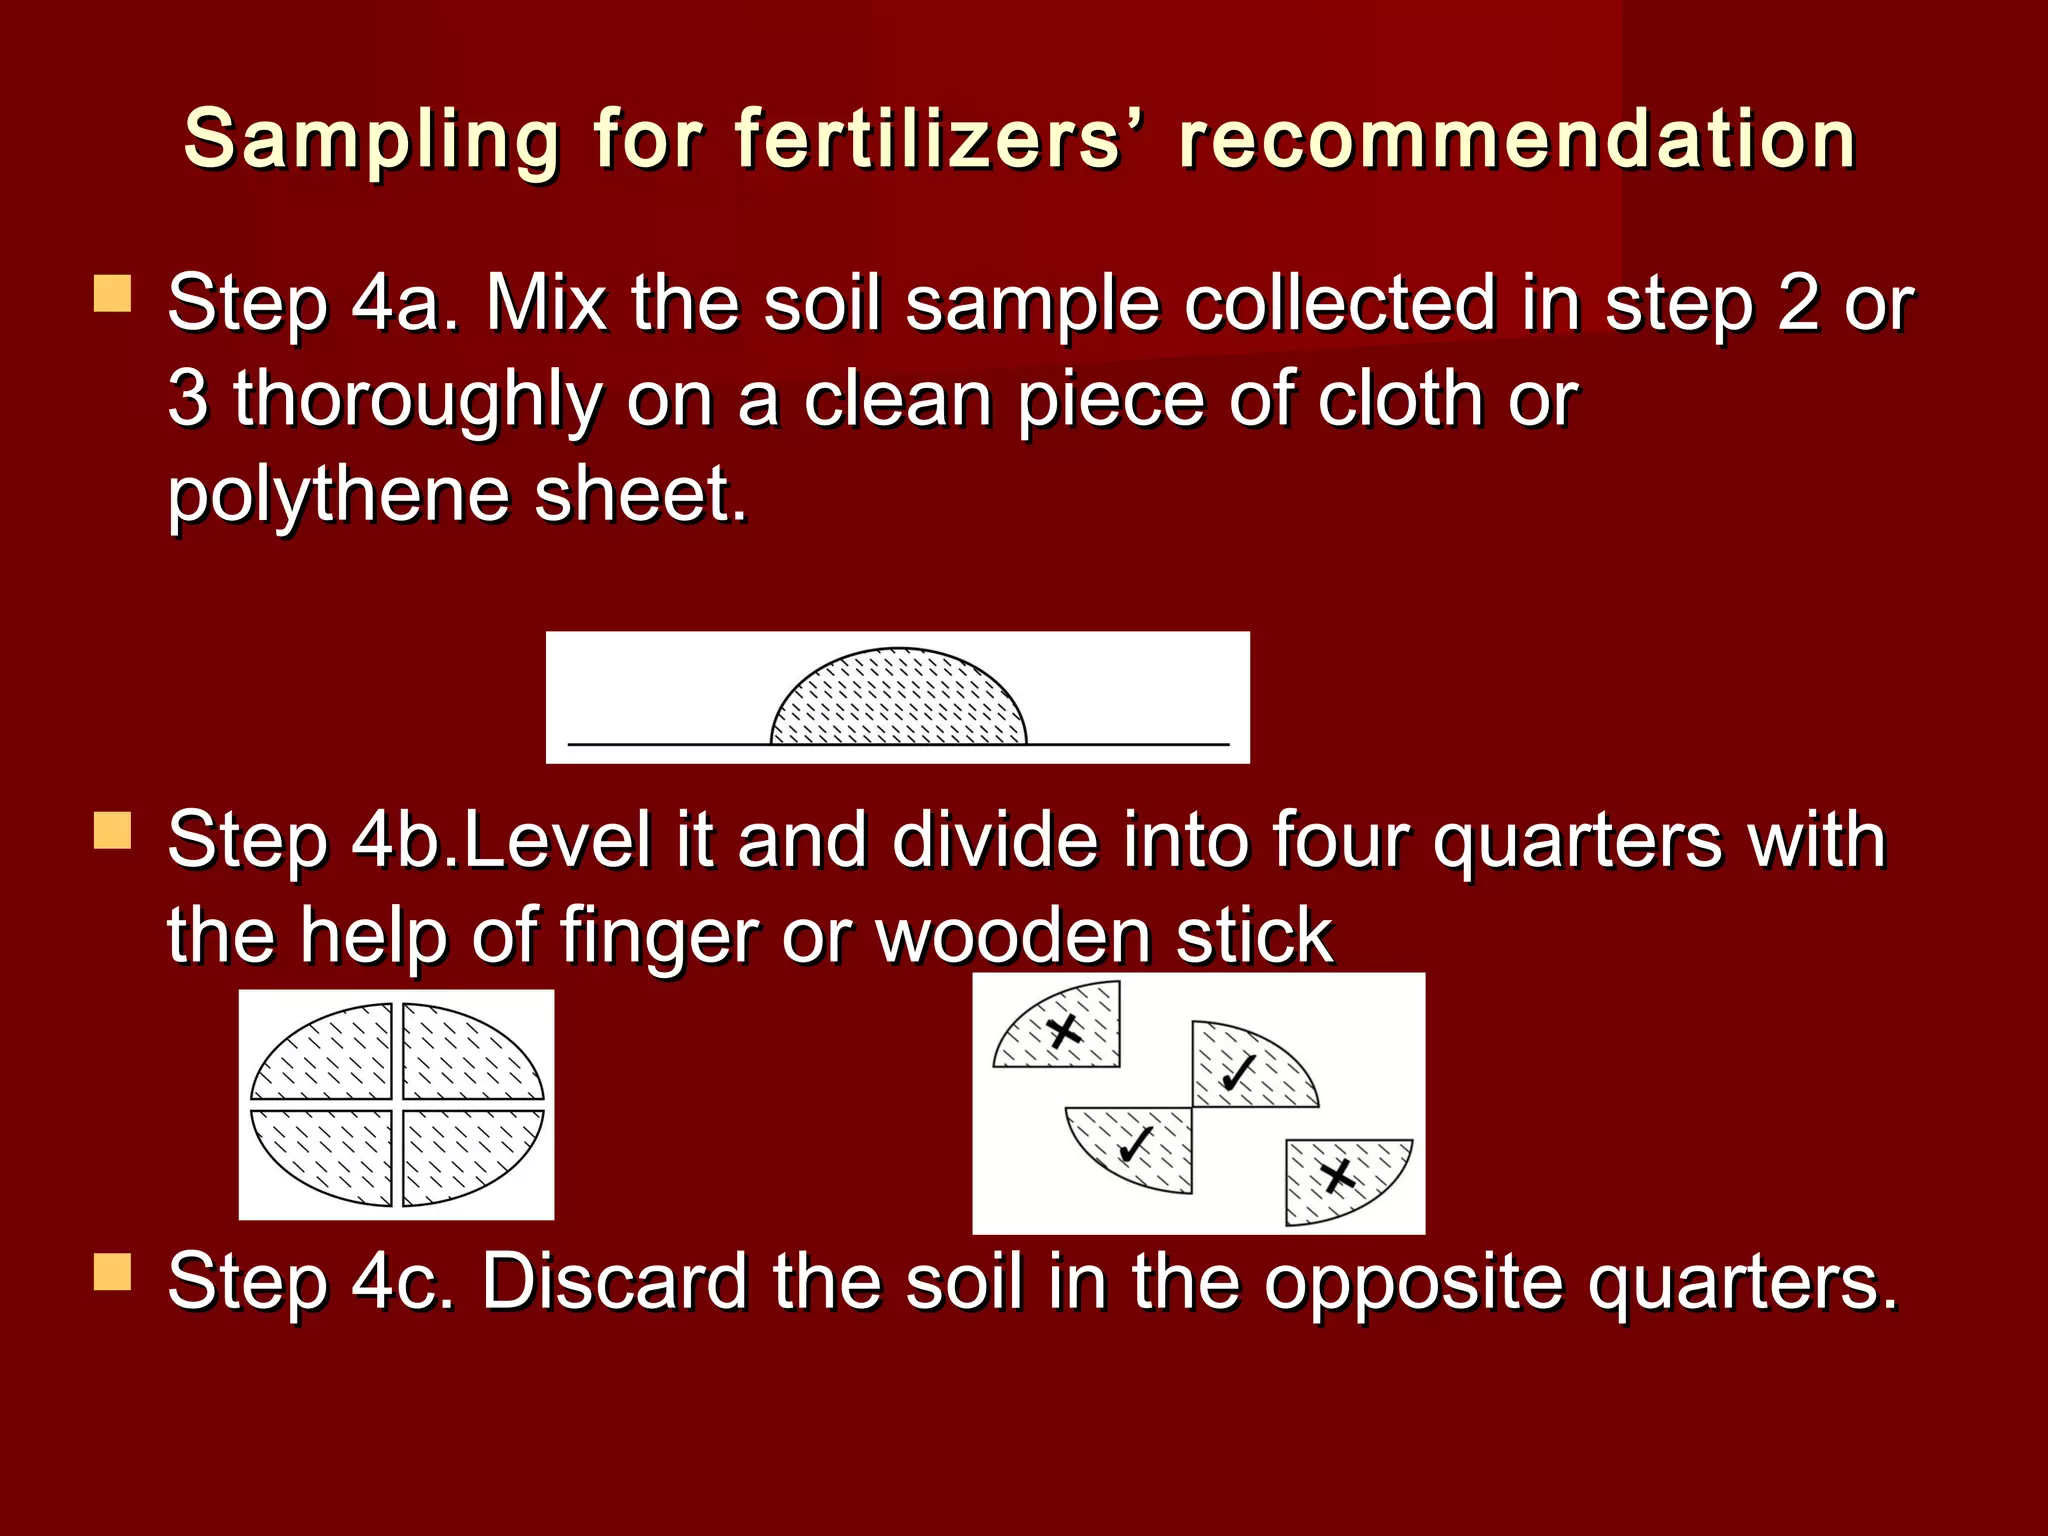
Soil Testing – Its ImportanceSoil Testing – Its Importance
Dr Narender K Sankhyan
Sr. Scientist, Department of Soil
Science,
CSK Himachal Pradesh Krishi
Vishavavidyalaya, Palampur (H.P.)
Dr Narender K Sankhyan
Sr. Scientist, Department of Soil
Science,
CSK Himachal Pradesh Krishi
Vishavavidyalaya, Palampur (H.P.)
ByBy
GENESIS OF THE SOIL HEALTH ISSUE
0
200
400
600
800
1000
1200
Census year
Population(million)
1951 1961 1971 1981 1991 2001
Population growth rate continued
to be more than 2 per cent per
annum
0
50000
100000
150000
200000
250000
Year
Foodgrainproduction(Mt)
1951 1961 1971 1981 1991 2001
Rate of food grain production was
more than population growth rate
till 1991. But, declined to 1.16
percent per annum in 1991 - 2001
Population and food grain production growth rate in India
0
1
2
3
4
5
6
7
Census year
Population(million)
1951 1961 1971 1981 1991 2001
As at the National level, population
growth rate in Himachal also
continued to be more than 2 per cent
0
500
1000
1500
Year
Foodgrainproduction(Mt)
1971 1981 1991 2001
Rate of food grain production
declined from 2.50 in 1981 to -1.73
in 1991-2001
Population and food grain production growth rate in Himachal
Population, food grain production and per capita land
holding scenario
0
200
400
600
800
1000
1200
1400
1950 1975 2000 2025
Year
Population/
FoodGrainProduction
0.00
0.10
0.20
0.30
0.40
0.50
0.60
LandAvailability
Population (million)
Food Grain Production (million tonnes)
Holding/ caputa (ha/ person)
About Green Revolution in India
Production
Seed
Fertilizer
No consideration to soil resource – the producer
0
20
40
60
80
100
1970 1980 1990 2000-01 2002-03
Year
Nutrientsconsumption(kg/ha)
India Himachal
Cut on fertilizer subsidies
NUTRIENTS CONSUMPTION IN INDIA AND HIMACHAL PRADESH
N, P and K Consumption ratio in HP - 4.2:1.3:1
Ideal - 4:2:1 (Cereal based cropping system)
0
2
4
6
8
10
12
14
16
1972 1976 1980 1984 1988 1992 1996 2000 2004
Years
Nutrientsconsumptionratio(N:P:K)
N P K
Nutrients Consumption Ratio in India
SOIL COMPONENTS
Air
(25%)
Water
(25%)
Mineral matter
(45%)
Organic Matter
(5%)
NUTRIENTS MINING IN HIMACHAL PRADESH
Continuous use of N alone (through Urea)
leads to complete degradation of soil resource
100% N
Control
Zero application of chemical fertilizers
can be considered BETTER THAN
THEIR IMBALANCED use
The ABSENCE OF K IN PLANT NUTRITION
CAUSED DRASTIC REDUCTION in maize grain
yield compared to the balanced application of
NPK
100% NPK
The balanced application of NPK sustained
crop Productivity
100% NP
Integrated nutrient supply (NPK+FYM) holds
promise in sustaining high yields besides
improving soil quality
100% NPK + FYM
100% NPK + lime
Lime could be an alternative to FYM in acidic
soils for sustaining high crop yields besides
maintaining soil quality
Emerging Secondary and Micronutrient
Deficiencies
The continued low and imbalanced use of N, P and K over the
years has led to depletion of native reserves of secondary
and micronutrients. This has resulted in DECLINE in SOIL HEALTH
vis-à-vis CROP PRODUCTIVITY
S deficiency in
Cauliflower
Zn deficiency in
Maize
Mg deficiency in
Maize
 Reproducing the words of Hon’ble former President of India :
if second Green Revolution is to come, it must have
five components
 Soil characterization
 Seed
 Fertilizer
 Production
 Value Addition and Marketing
Visualizing Second Green Revolution
Soil Testing : DefinitionSoil Testing : Definition
•Soil testing is a chemical
method of determining
the nutrient supplying
power of a soil.
IntroductionIntroduction
• The basic purpose of the soil-testing programme is to
give farmers a service leading to better and more
economic use of fertilizers and better soil
management practices for increasing agricultural
production.
• The basic purpose of the soil-testing programme is to
give farmers a service leading to better and more
economic use of fertilizers and better soil
management practices for increasing agricultural
production.
• A fertilizer recommendation from a soil testing
laboratory is based on carefully conducted soil
analyses and the results of up-to-date agronomic
research on the crop, and it therefore is the most
scientific information available for fertilizing a
particular crop.
• A fertilizer recommendation from a soil testing
laboratory is based on carefully conducted soil
analyses and the results of up-to-date agronomic
research on the crop, and it therefore is the most
scientific information available for fertilizing a
particular crop.
• Each recommendation based on a soil test takes into account
the soil test data obtained by the accurate analysis, the
research work conducted on the crop in a particular area and
the management practices of the concerned farmer.
IntroductionIntroduction
• The soil test with the resulting fertilizer recommendation
is, therefore, the actual connecting link between
agronomic research and its practical application on the
farmers’ fields.
•Application of nutrients through chemical fertilizers without soil
test, a farmer may be applying too much of a little needed plant
food element or too little of another element which is actually
the principal limiting factor in plant growth.
• The farmer finds it extremely difficult to know
the proper type of fertilizer, which would
match his soil.
IntroductionIntroduction
• In using a fertilizer, he must take into account
the requirement of his crops.
• In using a fertilizer, he must take into account
the requirement of his crops.
• The solution to this problem of
the farmers is “Soil Testing”.
Objectives of Soil TestingObjectives of Soil Testing
• To evaluate the fertility status of a soil for providing an
index of nutrient availability or supply in a given soil.
• To predict the probability of obtaining a profitable
response to lime and fertilizers.
• To provide a basis for recommendations on the
amount of lime and fertilizer.
• To evaluate the fertility status of a soil on area basis by
the use of soil test summaries.
• Such summaries are helpful in developing both farm
level and nutrient management programmes.
The soil testing is comprised of fourThe soil testing is comprised of four
consecutive steps:consecutive steps:
 Collect a representative soil sample fromCollect a representative soil sample from
the field.the field.
 Determine the quantity of plant availableDetermine the quantity of plant available
nutrient in soil sample (soil test).nutrient in soil sample (soil test).
 Interpret the soil test results (soil testInterpret the soil test results (soil test
calibration).calibration).
 Estimate the quantity of nutrient requiredEstimate the quantity of nutrient required
by the crop (nutrient recommendationby the crop (nutrient recommendation
Soil SamplingSoil Sampling
 The most critical aspect of soil testing isThe most critical aspect of soil testing is
obtaining a soil sample that is representative ofobtaining a soil sample that is representative of
the field.the field.
 A useful soil testing service starts with theA useful soil testing service starts with the
collection of representative soil samples. A soilcollection of representative soil samples. A soil
sample must be taken at the right time and in thesample must be taken at the right time and in the
right way. The tools used, the area sampled, theright way. The tools used, the area sampled, the
depth and the correct mix of the sample, thedepth and the correct mix of the sample, the
information provided, and packaging allinformation provided, and packaging all
influence quality of the soil test data. influence quality of the soil test data. 
Sampling timeSampling time
 Take soil samples well before sowing of the crop orTake soil samples well before sowing of the crop or
establishing a new orchard.establishing a new orchard.
 For agricultural crops, the best time of sampling is whenFor agricultural crops, the best time of sampling is when
the field is free of crops.the field is free of crops.
 For horticultural crops, the best time to collect a soilFor horticultural crops, the best time to collect a soil
sample is during autumn.sample is during autumn.
 As a general rule, it is best to go for soil sampling aAs a general rule, it is best to go for soil sampling a
couple of weeks prior to the start of any seedbedcouple of weeks prior to the start of any seedbed
preparation.preparation.
 In case of perennial crops like forage and fruit tress, soilIn case of perennial crops like forage and fruit tress, soil
sampling should be done prior to the beginning of a newsampling should be done prior to the beginning of a new
flush of growth.flush of growth.
Sampling UnitsSampling Units
 Divide the area into samplingDivide the area into sampling
units based on visualunits based on visual
observations on crop growth,observations on crop growth,
appearance of the soil, soilappearance of the soil, soil
colour, field slope, past cropcolour, field slope, past crop
management practices likemanagement practices like
manuring, fertilizationmanuring, fertilization
techniques and croppingtechniques and cropping
pattern etc. Collect onepattern etc. Collect one
composite sample from eachcomposite sample from each
block or unit.block or unit.
Sampling for fertilizers’Sampling for fertilizers’
recommendationrecommendation
 Step 1.Step 1. First remove the litter from the surfaceFirst remove the litter from the surface
by scraping it away at each spot selected for soilby scraping it away at each spot selected for soil
sampling.sampling.
 Step 2.Step 2. If probe auger/specially designed soilIf probe auger/specially designed soil
sampling tubes are available, then take aboutsampling tubes are available, then take about
15-20 surface soil samples (0-15 cm) from each15-20 surface soil samples (0-15 cm) from each
block (sampling unit) of about ½ acre area in ablock (sampling unit) of about ½ acre area in a
random zig-zag manner as shown in figure 2.random zig-zag manner as shown in figure 2.
Avoid sampling near houses, roads, bunds,Avoid sampling near houses, roads, bunds,
channels, marshy spots, trees, recently fertilizedchannels, marshy spots, trees, recently fertilized
area, compost pits, any other abnormal spotsarea, compost pits, any other abnormal spots
and other non representative locations. Collectand other non representative locations. Collect
these in a clean dry container or cloth sheet.these in a clean dry container or cloth sheet.
Sampling for fertilizers’Sampling for fertilizers’
recommendationrecommendation
 Step 3.Step 3. If aIf a khurpikhurpi or aor a kassikassi
(spade) is used, first dig a ‘(spade) is used, first dig a ‘VV’ shaped’ shaped
hole (15-20 cm) and take out the soil-hole (15-20 cm) and take out the soil-
slice (like bread-slice) of ½ inchslice (like bread-slice) of ½ inch
thickness from one of the exposedthickness from one of the exposed
surfacesurface
Sampling for fertilizers’ recommendationSampling for fertilizers’ recommendation
 Step 4a. Mix the soil sample collected in step 2 orStep 4a. Mix the soil sample collected in step 2 or
3 thoroughly on a clean piece of cloth or3 thoroughly on a clean piece of cloth or
polythene sheet.polythene sheet.
 Step 4b.Level it and divide into four quarters withStep 4b.Level it and divide into four quarters with
the help of finger or wooden stickthe help of finger or wooden stick
 Step 4c. Discard the soil in the opposite quarters.Step 4c. Discard the soil in the opposite quarters.
Sampling for fertilizers’Sampling for fertilizers’
recommendationrecommendation
 Step 5. Mix rest of the soil andStep 5. Mix rest of the soil and continuecontinue
quartering till about ½ kg of representativequartering till about ½ kg of representative
soil is obtained. Dry the sample in shadesoil is obtained. Dry the sample in shade
and fill in the cloth or polythene bag. Labeland fill in the cloth or polythene bag. Label
the sample as shown in figure 5. The soilthe sample as shown in figure 5. The soil
sample is now ready forsample is now ready for
submitting/sending to the soil testingsubmitting/sending to the soil testing
laboratory for its analysis.laboratory for its analysis.
Sampling for fertilizers’Sampling for fertilizers’
recommendationrecommendation
 Step 6.Step 6. If the sample is to beIf the sample is to be
analyzed for micronutrient(s), aanalyzed for micronutrient(s), a
stainless steel probe augerstainless steel probe auger must bemust be
used. In case,used. In case, stainless steel probestainless steel probe
augerauger is not available, then stainlessis not available, then stainless
steelsteel khurpikhurpi could be used for drawingcould be used for drawing
the soil sample.the soil sample.
Sampling for HorticulturalSampling for Horticultural
CropsCrops
 Roots of horticultural crops penetrateRoots of horticultural crops penetrate
deep into the soil profile and thedeep into the soil profile and the
success of plantations depends uponsuccess of plantations depends upon
the fertility status of sub-soil layers.the fertility status of sub-soil layers.
So the method of collecting samplesSo the method of collecting samples
for horticultural crops is different fromfor horticultural crops is different from
agricultural crops.agricultural crops.
Sampling for HorticulturalSampling for Horticultural
CropsCrops
 Step 1. Dig a pit to a maximum of 150Step 1. Dig a pit to a maximum of 150
cm depth (as shown in figure 6) or tillcm depth (as shown in figure 6) or till
one gets hard pan/bed rock or waterone gets hard pan/bed rock or water
table. Make one side of this pit verticaltable. Make one side of this pit vertical
for soil sampling.for soil sampling.
 Step 2. Mark the vertical side of the pitStep 2. Mark the vertical side of the pit
at 15, 30, 60, 90, 120 and 150 cm depthat 15, 30, 60, 90, 120 and 150 cm depth
from the surface.from the surface.
Sampling for HorticulturalSampling for Horticultural
CropsCrops
 Step 3. Hold a bucket or container at 150 cmStep 3. Hold a bucket or container at 150 cm
mark and collect about half kg of soil-slice of ½mark and collect about half kg of soil-slice of ½
inch thickness from 120 - 150 cm depth andinch thickness from 120 - 150 cm depth and
transfer the sample to a storage bag marking it:transfer the sample to a storage bag marking it:
Sample 6 (120-150 cm).Sample 6 (120-150 cm).
 Step 4.Step 4. In the same way collect the samplesIn the same way collect the samples
from preceding upper layers i.e. 90 – 120, 60 –from preceding upper layers i.e. 90 – 120, 60 –
90, 30 – 60, 15 – 30 and 0 – 15 cm depths. Mark90, 30 – 60, 15 – 30 and 0 – 15 cm depths. Mark
sample number with corresponding depth onsample number with corresponding depth on
each sample. For example sample collectedeach sample. For example sample collected
from 90 – 120 cm depth would be SAMPLE No.from 90 – 120 cm depth would be SAMPLE No.
5 and the one from 60 – 90 cm depth SAMPLE5 and the one from 60 – 90 cm depth SAMPLE
No. 4.No. 4.
Sampling for HorticulturalSampling for Horticultural
CropsCrops
 Step 5.Step 5. Put onePut one
INFORMATION LABELINFORMATION LABEL insideinside
each bag and tie one to theeach bag and tie one to the
sampling bag.sampling bag.
 Step 6.Step 6. Send the soil sampleSend the soil sample
to the nearest soil testingto the nearest soil testing
laboratory.laboratory.
PrecautionsPrecautions
 (i). While sampling soil at different depths in a soil profile(i). While sampling soil at different depths in a soil profile
or sampling pit, care must be taken to start samplingor sampling pit, care must be taken to start sampling
from the last layer so as to avoid mixing of soil from thefrom the last layer so as to avoid mixing of soil from the
upper layers with the soil of lower layers.upper layers with the soil of lower layers.
 (ii) In case there is hard pan within 150 cm depth from(ii) In case there is hard pan within 150 cm depth from
the soil surface, its depth and thickness must bethe soil surface, its depth and thickness must be
recorded, because the recommendations for orchardrecorded, because the recommendations for orchard
establishment would depend upon effective soil depthestablishment would depend upon effective soil depth
and its nutritional status.and its nutritional status.
 (iii)(iii) Similarly, if water table is shallow, its depth mustSimilarly, if water table is shallow, its depth must
also be recordedalso be recorded
Information to be sent with the soil sampleInformation to be sent with the soil sample
 Name and address of the farmer.Name and address of the farmer.
 KhasraKhasra number or any other identity thatnumber or any other identity that
identifies the field (or Soil sample).identifies the field (or Soil sample).
 Availability of irrigation facilities.Availability of irrigation facilities.
 Upland/Medium land/Lowland.Upland/Medium land/Lowland.
 Depth of soil sample.Depth of soil sample.
 Information of the previous crop before soilInformation of the previous crop before soil
sample collection:sample collection:
 Name and variety of the crop.Name and variety of the crop.
 Dose of organic manure, if applied.Dose of organic manure, if applied.
 Dose of fertilizers, if applied.Dose of fertilizers, if applied.
 Yield.Yield.
 Information of the crop that will be grown.Information of the crop that will be grown.
 Name and variety of the crop.Name and variety of the crop.
 Season (Season (kharifkharif/r/rabiabi).).
 Problem(s), if any in the sampling area (likeProblem(s), if any in the sampling area (like
water logging problem, low yields, lowwater logging problem, low yields, low
response to added inputs, stunted growth ofresponse to added inputs, stunted growth of
plantation crops etc.).plantation crops etc.).
 Date of sample collection.Date of sample collection.
Signature of the farmer/sample collectorSignature of the farmer/sample collector
AddressAddress
Thanks

Soil Testing – its importance

  • 1.
    Soil Testing –Its ImportanceSoil Testing – Its Importance Dr Narender K Sankhyan Sr. Scientist, Department of Soil Science, CSK Himachal Pradesh Krishi Vishavavidyalaya, Palampur (H.P.) Dr Narender K Sankhyan Sr. Scientist, Department of Soil Science, CSK Himachal Pradesh Krishi Vishavavidyalaya, Palampur (H.P.) ByBy
  • 2.
    GENESIS OF THESOIL HEALTH ISSUE 0 200 400 600 800 1000 1200 Census year Population(million) 1951 1961 1971 1981 1991 2001 Population growth rate continued to be more than 2 per cent per annum 0 50000 100000 150000 200000 250000 Year Foodgrainproduction(Mt) 1951 1961 1971 1981 1991 2001 Rate of food grain production was more than population growth rate till 1991. But, declined to 1.16 percent per annum in 1991 - 2001 Population and food grain production growth rate in India
  • 3.
    0 1 2 3 4 5 6 7 Census year Population(million) 1951 19611971 1981 1991 2001 As at the National level, population growth rate in Himachal also continued to be more than 2 per cent 0 500 1000 1500 Year Foodgrainproduction(Mt) 1971 1981 1991 2001 Rate of food grain production declined from 2.50 in 1981 to -1.73 in 1991-2001 Population and food grain production growth rate in Himachal
  • 4.
    Population, food grainproduction and per capita land holding scenario 0 200 400 600 800 1000 1200 1400 1950 1975 2000 2025 Year Population/ FoodGrainProduction 0.00 0.10 0.20 0.30 0.40 0.50 0.60 LandAvailability Population (million) Food Grain Production (million tonnes) Holding/ caputa (ha/ person)
  • 5.
    About Green Revolutionin India Production Seed Fertilizer No consideration to soil resource – the producer
  • 6.
    0 20 40 60 80 100 1970 1980 19902000-01 2002-03 Year Nutrientsconsumption(kg/ha) India Himachal Cut on fertilizer subsidies NUTRIENTS CONSUMPTION IN INDIA AND HIMACHAL PRADESH N, P and K Consumption ratio in HP - 4.2:1.3:1 Ideal - 4:2:1 (Cereal based cropping system)
  • 7.
    0 2 4 6 8 10 12 14 16 1972 1976 19801984 1988 1992 1996 2000 2004 Years Nutrientsconsumptionratio(N:P:K) N P K Nutrients Consumption Ratio in India
  • 8.
  • 9.
    NUTRIENTS MINING INHIMACHAL PRADESH
  • 10.
    Continuous use ofN alone (through Urea) leads to complete degradation of soil resource 100% N Control Zero application of chemical fertilizers can be considered BETTER THAN THEIR IMBALANCED use
  • 11.
    The ABSENCE OFK IN PLANT NUTRITION CAUSED DRASTIC REDUCTION in maize grain yield compared to the balanced application of NPK 100% NPK The balanced application of NPK sustained crop Productivity 100% NP
  • 12.
    Integrated nutrient supply(NPK+FYM) holds promise in sustaining high yields besides improving soil quality 100% NPK + FYM 100% NPK + lime Lime could be an alternative to FYM in acidic soils for sustaining high crop yields besides maintaining soil quality
  • 13.
    Emerging Secondary andMicronutrient Deficiencies The continued low and imbalanced use of N, P and K over the years has led to depletion of native reserves of secondary and micronutrients. This has resulted in DECLINE in SOIL HEALTH vis-à-vis CROP PRODUCTIVITY S deficiency in Cauliflower Zn deficiency in Maize Mg deficiency in Maize
  • 14.
     Reproducing thewords of Hon’ble former President of India : if second Green Revolution is to come, it must have five components  Soil characterization  Seed  Fertilizer  Production  Value Addition and Marketing Visualizing Second Green Revolution
  • 15.
    Soil Testing :DefinitionSoil Testing : Definition •Soil testing is a chemical method of determining the nutrient supplying power of a soil.
  • 16.
    IntroductionIntroduction • The basicpurpose of the soil-testing programme is to give farmers a service leading to better and more economic use of fertilizers and better soil management practices for increasing agricultural production. • The basic purpose of the soil-testing programme is to give farmers a service leading to better and more economic use of fertilizers and better soil management practices for increasing agricultural production. • A fertilizer recommendation from a soil testing laboratory is based on carefully conducted soil analyses and the results of up-to-date agronomic research on the crop, and it therefore is the most scientific information available for fertilizing a particular crop. • A fertilizer recommendation from a soil testing laboratory is based on carefully conducted soil analyses and the results of up-to-date agronomic research on the crop, and it therefore is the most scientific information available for fertilizing a particular crop.
  • 17.
    • Each recommendationbased on a soil test takes into account the soil test data obtained by the accurate analysis, the research work conducted on the crop in a particular area and the management practices of the concerned farmer. IntroductionIntroduction • The soil test with the resulting fertilizer recommendation is, therefore, the actual connecting link between agronomic research and its practical application on the farmers’ fields. •Application of nutrients through chemical fertilizers without soil test, a farmer may be applying too much of a little needed plant food element or too little of another element which is actually the principal limiting factor in plant growth.
  • 18.
    • The farmerfinds it extremely difficult to know the proper type of fertilizer, which would match his soil. IntroductionIntroduction • In using a fertilizer, he must take into account the requirement of his crops. • In using a fertilizer, he must take into account the requirement of his crops. • The solution to this problem of the farmers is “Soil Testing”.
  • 19.
    Objectives of SoilTestingObjectives of Soil Testing • To evaluate the fertility status of a soil for providing an index of nutrient availability or supply in a given soil. • To predict the probability of obtaining a profitable response to lime and fertilizers. • To provide a basis for recommendations on the amount of lime and fertilizer. • To evaluate the fertility status of a soil on area basis by the use of soil test summaries. • Such summaries are helpful in developing both farm level and nutrient management programmes. • To evaluate the fertility status of a soil for providing an index of nutrient availability or supply in a given soil. • To predict the probability of obtaining a profitable response to lime and fertilizers. • To provide a basis for recommendations on the amount of lime and fertilizer. • To evaluate the fertility status of a soil on area basis by the use of soil test summaries. • Such summaries are helpful in developing both farm level and nutrient management programmes.
  • 20.
    The soil testingis comprised of fourThe soil testing is comprised of four consecutive steps:consecutive steps:  Collect a representative soil sample fromCollect a representative soil sample from the field.the field.  Determine the quantity of plant availableDetermine the quantity of plant available nutrient in soil sample (soil test).nutrient in soil sample (soil test).  Interpret the soil test results (soil testInterpret the soil test results (soil test calibration).calibration).  Estimate the quantity of nutrient requiredEstimate the quantity of nutrient required by the crop (nutrient recommendationby the crop (nutrient recommendation
  • 21.
    Soil SamplingSoil Sampling The most critical aspect of soil testing isThe most critical aspect of soil testing is obtaining a soil sample that is representative ofobtaining a soil sample that is representative of the field.the field.  A useful soil testing service starts with theA useful soil testing service starts with the collection of representative soil samples. A soilcollection of representative soil samples. A soil sample must be taken at the right time and in thesample must be taken at the right time and in the right way. The tools used, the area sampled, theright way. The tools used, the area sampled, the depth and the correct mix of the sample, thedepth and the correct mix of the sample, the information provided, and packaging allinformation provided, and packaging all influence quality of the soil test data. influence quality of the soil test data. 
  • 22.
    Sampling timeSampling time Take soil samples well before sowing of the crop orTake soil samples well before sowing of the crop or establishing a new orchard.establishing a new orchard.  For agricultural crops, the best time of sampling is whenFor agricultural crops, the best time of sampling is when the field is free of crops.the field is free of crops.  For horticultural crops, the best time to collect a soilFor horticultural crops, the best time to collect a soil sample is during autumn.sample is during autumn.  As a general rule, it is best to go for soil sampling aAs a general rule, it is best to go for soil sampling a couple of weeks prior to the start of any seedbedcouple of weeks prior to the start of any seedbed preparation.preparation.  In case of perennial crops like forage and fruit tress, soilIn case of perennial crops like forage and fruit tress, soil sampling should be done prior to the beginning of a newsampling should be done prior to the beginning of a new flush of growth.flush of growth.
  • 23.
    Sampling UnitsSampling Units Divide the area into samplingDivide the area into sampling units based on visualunits based on visual observations on crop growth,observations on crop growth, appearance of the soil, soilappearance of the soil, soil colour, field slope, past cropcolour, field slope, past crop management practices likemanagement practices like manuring, fertilizationmanuring, fertilization techniques and croppingtechniques and cropping pattern etc. Collect onepattern etc. Collect one composite sample from eachcomposite sample from each block or unit.block or unit.
  • 24.
    Sampling for fertilizers’Samplingfor fertilizers’ recommendationrecommendation  Step 1.Step 1. First remove the litter from the surfaceFirst remove the litter from the surface by scraping it away at each spot selected for soilby scraping it away at each spot selected for soil sampling.sampling.  Step 2.Step 2. If probe auger/specially designed soilIf probe auger/specially designed soil sampling tubes are available, then take aboutsampling tubes are available, then take about 15-20 surface soil samples (0-15 cm) from each15-20 surface soil samples (0-15 cm) from each block (sampling unit) of about ½ acre area in ablock (sampling unit) of about ½ acre area in a random zig-zag manner as shown in figure 2.random zig-zag manner as shown in figure 2. Avoid sampling near houses, roads, bunds,Avoid sampling near houses, roads, bunds, channels, marshy spots, trees, recently fertilizedchannels, marshy spots, trees, recently fertilized area, compost pits, any other abnormal spotsarea, compost pits, any other abnormal spots and other non representative locations. Collectand other non representative locations. Collect these in a clean dry container or cloth sheet.these in a clean dry container or cloth sheet.
  • 25.
    Sampling for fertilizers’Samplingfor fertilizers’ recommendationrecommendation  Step 3.Step 3. If aIf a khurpikhurpi or aor a kassikassi (spade) is used, first dig a ‘(spade) is used, first dig a ‘VV’ shaped’ shaped hole (15-20 cm) and take out the soil-hole (15-20 cm) and take out the soil- slice (like bread-slice) of ½ inchslice (like bread-slice) of ½ inch thickness from one of the exposedthickness from one of the exposed surfacesurface
  • 26.
    Sampling for fertilizers’recommendationSampling for fertilizers’ recommendation  Step 4a. Mix the soil sample collected in step 2 orStep 4a. Mix the soil sample collected in step 2 or 3 thoroughly on a clean piece of cloth or3 thoroughly on a clean piece of cloth or polythene sheet.polythene sheet.  Step 4b.Level it and divide into four quarters withStep 4b.Level it and divide into four quarters with the help of finger or wooden stickthe help of finger or wooden stick  Step 4c. Discard the soil in the opposite quarters.Step 4c. Discard the soil in the opposite quarters.
  • 27.
    Sampling for fertilizers’Samplingfor fertilizers’ recommendationrecommendation  Step 5. Mix rest of the soil andStep 5. Mix rest of the soil and continuecontinue quartering till about ½ kg of representativequartering till about ½ kg of representative soil is obtained. Dry the sample in shadesoil is obtained. Dry the sample in shade and fill in the cloth or polythene bag. Labeland fill in the cloth or polythene bag. Label the sample as shown in figure 5. The soilthe sample as shown in figure 5. The soil sample is now ready forsample is now ready for submitting/sending to the soil testingsubmitting/sending to the soil testing laboratory for its analysis.laboratory for its analysis.
  • 28.
    Sampling for fertilizers’Samplingfor fertilizers’ recommendationrecommendation  Step 6.Step 6. If the sample is to beIf the sample is to be analyzed for micronutrient(s), aanalyzed for micronutrient(s), a stainless steel probe augerstainless steel probe auger must bemust be used. In case,used. In case, stainless steel probestainless steel probe augerauger is not available, then stainlessis not available, then stainless steelsteel khurpikhurpi could be used for drawingcould be used for drawing the soil sample.the soil sample.
  • 29.
    Sampling for HorticulturalSamplingfor Horticultural CropsCrops  Roots of horticultural crops penetrateRoots of horticultural crops penetrate deep into the soil profile and thedeep into the soil profile and the success of plantations depends uponsuccess of plantations depends upon the fertility status of sub-soil layers.the fertility status of sub-soil layers. So the method of collecting samplesSo the method of collecting samples for horticultural crops is different fromfor horticultural crops is different from agricultural crops.agricultural crops.
  • 30.
    Sampling for HorticulturalSamplingfor Horticultural CropsCrops  Step 1. Dig a pit to a maximum of 150Step 1. Dig a pit to a maximum of 150 cm depth (as shown in figure 6) or tillcm depth (as shown in figure 6) or till one gets hard pan/bed rock or waterone gets hard pan/bed rock or water table. Make one side of this pit verticaltable. Make one side of this pit vertical for soil sampling.for soil sampling.  Step 2. Mark the vertical side of the pitStep 2. Mark the vertical side of the pit at 15, 30, 60, 90, 120 and 150 cm depthat 15, 30, 60, 90, 120 and 150 cm depth from the surface.from the surface.
  • 31.
    Sampling for HorticulturalSamplingfor Horticultural CropsCrops  Step 3. Hold a bucket or container at 150 cmStep 3. Hold a bucket or container at 150 cm mark and collect about half kg of soil-slice of ½mark and collect about half kg of soil-slice of ½ inch thickness from 120 - 150 cm depth andinch thickness from 120 - 150 cm depth and transfer the sample to a storage bag marking it:transfer the sample to a storage bag marking it: Sample 6 (120-150 cm).Sample 6 (120-150 cm).  Step 4.Step 4. In the same way collect the samplesIn the same way collect the samples from preceding upper layers i.e. 90 – 120, 60 –from preceding upper layers i.e. 90 – 120, 60 – 90, 30 – 60, 15 – 30 and 0 – 15 cm depths. Mark90, 30 – 60, 15 – 30 and 0 – 15 cm depths. Mark sample number with corresponding depth onsample number with corresponding depth on each sample. For example sample collectedeach sample. For example sample collected from 90 – 120 cm depth would be SAMPLE No.from 90 – 120 cm depth would be SAMPLE No. 5 and the one from 60 – 90 cm depth SAMPLE5 and the one from 60 – 90 cm depth SAMPLE No. 4.No. 4.
  • 32.
    Sampling for HorticulturalSamplingfor Horticultural CropsCrops  Step 5.Step 5. Put onePut one INFORMATION LABELINFORMATION LABEL insideinside each bag and tie one to theeach bag and tie one to the sampling bag.sampling bag.  Step 6.Step 6. Send the soil sampleSend the soil sample to the nearest soil testingto the nearest soil testing laboratory.laboratory.
  • 33.
    PrecautionsPrecautions  (i). Whilesampling soil at different depths in a soil profile(i). While sampling soil at different depths in a soil profile or sampling pit, care must be taken to start samplingor sampling pit, care must be taken to start sampling from the last layer so as to avoid mixing of soil from thefrom the last layer so as to avoid mixing of soil from the upper layers with the soil of lower layers.upper layers with the soil of lower layers.  (ii) In case there is hard pan within 150 cm depth from(ii) In case there is hard pan within 150 cm depth from the soil surface, its depth and thickness must bethe soil surface, its depth and thickness must be recorded, because the recommendations for orchardrecorded, because the recommendations for orchard establishment would depend upon effective soil depthestablishment would depend upon effective soil depth and its nutritional status.and its nutritional status.  (iii)(iii) Similarly, if water table is shallow, its depth mustSimilarly, if water table is shallow, its depth must also be recordedalso be recorded
  • 34.
    Information to besent with the soil sampleInformation to be sent with the soil sample  Name and address of the farmer.Name and address of the farmer.  KhasraKhasra number or any other identity thatnumber or any other identity that identifies the field (or Soil sample).identifies the field (or Soil sample).  Availability of irrigation facilities.Availability of irrigation facilities.  Upland/Medium land/Lowland.Upland/Medium land/Lowland.  Depth of soil sample.Depth of soil sample.  Information of the previous crop before soilInformation of the previous crop before soil sample collection:sample collection:  Name and variety of the crop.Name and variety of the crop.  Dose of organic manure, if applied.Dose of organic manure, if applied.  Dose of fertilizers, if applied.Dose of fertilizers, if applied.  Yield.Yield.  Information of the crop that will be grown.Information of the crop that will be grown.  Name and variety of the crop.Name and variety of the crop.  Season (Season (kharifkharif/r/rabiabi).).  Problem(s), if any in the sampling area (likeProblem(s), if any in the sampling area (like water logging problem, low yields, lowwater logging problem, low yields, low response to added inputs, stunted growth ofresponse to added inputs, stunted growth of plantation crops etc.).plantation crops etc.).  Date of sample collection.Date of sample collection. Signature of the farmer/sample collectorSignature of the farmer/sample collector AddressAddress
  • 35.