SlideShare a Scribd company logo
1 of 178
Download to read offline
Contents
Preface
1
Installation
2
Introduction
3
Effects on WinCC
4
Display in
Runtime Mode
5
Configuration in WinCC
6
Appendix A
Reference
A
Index
I
WinCC
WinCCProAgent
Manual
6AV6392-1DB05-0AB0.
C79000-G8276-C165-01
April 2000 Edition
www.dienhathe.vn
www.dienhathe.com
WinCC, SIMATIC, SINEC, STEP are trademarks of Siemens.
All other names used in this manual may be trademarks, the use of which by third parties for their own purposes may
violate the rights of the respective proprietors.
(The reproduction, transmission or use of this document or its
contents is not permitted without express written authority.
Offenders will be liable for damages. All rights, including rights
created by patent grant or registration of a utility model or
design, are reserved.)
(We have checked that the contents of this document
correspond to the hardware and software described.
Nonetheless, differences might exist and therefore we cannot
guarantee that they are completely identical. The information
contained in this document is however, reviewed regularly and
any necessary changes will be included in the next edition. We
welcome suggestions for improvement.)
 Siemens AG 2000 All rights reserved Subject to change without prior notice.
6AV6392-1DB05-0AB0
Printed in the Federal Republic of Germany Siemens Aktiengesellschaft
www.dienhathe.vn
www.dienhathe.com
ProAgent Manual
C79000-G8276-C165-01 i
Contents
1 Preface ............................................................................................................. 1-1
1.1 Guide to the Manual........................................................................... 1-1
1.2 Position within the Information Environment...................................... 1-3
1.3 History................................................................................................ 1-4
1.4 Notation.............................................................................................. 1-4
1.5 Abbreviations ..................................................................................... 1-5
1.6 Additional Support.............................................................................. 1-6
2 Installation ....................................................................................................... 2-1
2.1 System Requirements ....................................................................... 2-1
2.2 Installing ProAgent............................................................................. 2-2
2.3 Uninstalling ProAgent ........................................................................ 2-4
3 Introduction ..................................................................................................... 3-1
3.1 What Process Diagnosis Can Achieve .............................................. 3-1
3.2 How Process Diagnosis is Carried Out.............................................. 3-3
3.3 How Process Diagnosis is Configured............................................... 3-5
3.4 Before You Start................................................................................. 3-8
3.5 Important Terms................................................................................. 3-9
3.5.1 Units.............................................................................................. 3-9
3.5.2 Actions.......................................................................................... 3-9
3.5.3 Transitions .................................................................................... 3-9
3.5.4 Movements ................................................................................... 3-9
4 Effects on WinCC ............................................................................................ 4-1
4.1 After Installation ................................................................................. 4-2
4.2 After Generation................................................................................. 4-3
4.3 ALARM_S Messaging........................................................................ 4-5
www.dienhathe.vn
www.dienhathe.com
Contents 04.00
ProAgent Manual
ii C79000-G8276-C165-01
5 Display in Runtime Mode ............................................................................... 5-1
5.1 General .............................................................................................. 5-2
5.1.1 How To Activate Diagnosis ........................................................... 5-2
5.1.2 The Purpose of the Individual Diagnosis Screens........................ 5-3
5.1.3 Operating Principles ..................................................................... 5-9
5.1.4 Structure of the Diagnostic Screens ............................................. 5-12
5.1.5 Global Screen Header .................................................................. 5-13
5.1.6 Global Key Set.............................................................................. 5-14
5.2 ProAgent's User Screen .................................................................... 5-17
5.2.1 The Purpose of the ProAgent User Screen.................................. 5-17
5.2.2 What You See on ProAgent's User Screen .................................. 5-17
5.3 Global Message Window................................................................... 5-19
5.3.1 The Purpose of the Message Window ......................................... 5-19
5.3.2 What You See in the Global Message Window............................ 5-20
5.4 Message Screen................................................................................ 5-22
5.4.1 The Purpose of the Message Screen........................................... 5-22
5.4.2 What You See in the Message Screen......................................... 5-23
5.4.3 Message Screen Keys.................................................................. 5-25
5.4.4 How to Work with the Message Screen........................................ 5-26
5.5 Overview Screen................................................................................ 5-31
5.5.1 The Purpose of the Overview Screen........................................... 5-31
5.5.2 What You See in the Overview Screen......................................... 5-32
5.5.3 Overview Screen Keys.................................................................. 5-35
5.5.4 How to Work with the Overview Screen ....................................... 5-36
5.5.5 Changing the Display Mode.......................................................... 5-40
5.5.6 Hierarchical Units on the Overview Screen .................................. 5-41
5.5.7 Sequence Handling ...................................................................... 5-42
5.6 Detail Screen ..................................................................................... 5-44
5.6.1 The Purpose of the Detail Screen................................................. 5-44
5.6.2 What You See in the Detail Screen............................................... 5-45
5.6.3 Representation of the Network in STL.......................................... 5-48
5.6.4 Representation of the Network in LAD ......................................... 5-49
5.6.5 Keys in the Detail Screen.............................................................. 5-50
5.6.6 How to Work with the Detail Screen ............................................. 5-53
5.6.7 Switching Between Partial and Full View...................................... 5-56
5.6.8 Switching Between Initial Values and Current Status ................... 5-56
5.6.9 Switching Action or Transition....................................................... 5-57
5.6.10 Enhanced Options with S7-PDIAG............................................... 5-58
5.7 Movement Screen.............................................................................. 5-63
5.7.1 The Purpose of the Movement Screen......................................... 5-63
5.7.2 What You See in the Movement Screen....................................... 5-64
5.7.3 Keys in the Movement Screen...................................................... 5-67
5.7.4 How to Work with the Movement Screen ..................................... 5-68
5.7.5 Hierarchical Units in the Movement Screen.................................. 5-70
5.7.6 Master List of All Movements........................................................ 5-70
www.dienhathe.vn
www.dienhathe.com
04.00 Contents
ProAgent Manual
C79000-G8276-C165-01 iii
6 Configuring in WinCC..................................................................................... 6-1
6.1 Basic Requirements of the PLC Program.......................................... 6-1
6.2 Shared Database with STEP 7 .......................................................... 6-4
6.3 When You Configure with ProAgent .................................................. 6-7
6.4 How You Configure with ProAgent..................................................... 6-9
6.5 Configuration Steps in Detail.............................................................. 6-12
6.5.1 Defining the target hardware and resolution................................. 6-12
6.5.2 Selecting the Units for Diagnosis.................................................. 6-12
6.5.3 Defining the Replacement Character Strategy ............................. 6-15
6.5.4 Selecting Display Classes ............................................................ 6-16
6.5.5 Defining the Alarm Diagnostic Screen .......................................... 6-18
6.5.6 Defining the Diagnostic Screen for Manual Starting of
Diagnosis...................................................................................... 6-19
6.5.7 Setting Key Labeling..................................................................... 6-21
6.5.8 Archiving the Criteria Analysis ...................................................... 6-22
6.5.9 Process Controlling Messages ..................................................... 6-22
6.5.10 Defining the Report Files .............................................................. 6-23
6.5.11 Settings for Generation................................................................. 6-25
6.5.12 Carrying Out Generation............................................................... 6-27
6.5.13 Checking the Runtime Modules.................................................... 6-28
6.5.14 Configuring Installation Screens for Starting ProAgent................. 6-29
6.5.15 Multi-Lingual Projects ................................................................... 6-31
6.5.16 Other Hardware Platforms............................................................ 6-33
6.6 Changing the Diagnostic Screens ..................................................... 6-37
6.6.1 Changing the Diagnostic Screens ................................................ 6-37
6.6.2 Internal Structure of the Diagnostic Screens ................................ 6-38
6.6.3 Practical Ideas .............................................................................. 6-40
www.dienhathe.vn
www.dienhathe.com
Contents 04.00
ProAgent Manual
iv C79000-G8276-C165-01
A Reference......................................................................................................... A-1
A.1 Functions ........................................................................................... A-2
A.1.1 ProAgent Functions (Overview).................................................... A-2
A.1.2 Function for Calling the Defined Start Screen............................... A-3
A.1.3 Functions for Directly Opening Specific Diagnostic Screens........ A-4
A.1.4 Directly Open Diagnostic Screens for a Specific Unit................... A-5
A.1.5 Directly Open Diagnostic Screens for a Specific Message........... A-7
A.1.6 Display the Name of a Current Step on a System Screen............ A-9
A.1.7 Exiting Diagnostics ....................................................................... A-13
A.1.8 Changing the Runtime Language................................................. A-14
A.1.9 Statistical Evaluation of Cause of Error ........................................ A-15
A.2 ProAgent Editor.................................................................................. A-18
A.2.1 Generation Run Tab...................................................................... A-18
A.2.2 Options Tab................................................................................... A-20
A.2.3 Report Tab .................................................................................... A-22
A.3 VarControl.......................................................................................... A-23
A.3.1 The Purpose of VarControl ........................................................... A-23
A.3.2 What You See in the Tag Table..................................................... A-24
A.3.3 How to Work with VarControl........................................................ A-26
I Index................................................................................................................. I-1
www.dienhathe.vn
www.dienhathe.com
ProAgent Manual
C79000-G8276-C165-01 1-1
Preface
This chapter explains how the manual is organized and where to find what
information.
1.1 Guide to the Manual
This manual provides you with all the information you need to do the following:
• configure an installation-specific process diagnosis
• detect a process error, find the cause of the error and rectify the error
This manual assumes that you already have general experience of configuring with
WinCC. This manual is therefore restricted to describing the functions and
procedures offered by ProAgent but not contained in the standard functional scope of
WinCC.
The Online Help also assumes you have a basic knowledge of STEP 7 and associated
optional packages.
Note
If you want to configure a process diagnosis yourself, all chapters of the Online Help
are important to you. If you want to work with a process diagnosis that has already
been configured, you only need to read the chapters entitled Introduction and
Display in Runtime Mode.
1
Overview
Contents
What You Are
Expected to Know
Already
Target Group
www.dienhathe.vn
www.dienhathe.com
Preface 04.00
ProAgent Manual
1-2 C79000-G8276-C165-01
The chapters of this manual are arranged by topic as follows:
• The chapter entitled Installation informs you how to install the optional package
on your system under STEP 7 and WinCC.
• The chapter entitled Introduction helps you get to know the advantages of
process diagnosis and shows you how simple it is to find and rectify a fault. An
overview shows you what steps are required for configuration and where the
interfaces are between STEP 7, WinCC and ProAgent.
At the end of the chapter, a number of important terms that are frequently
encountered in the context of process diagnosis are explained.
• By installing the ProAgent options package, a few script functions have been
added to the Global Script Editor that are required for process diagnostics. In
addition, external tags of different data types have been added to tag
management.
The chapter entitled Effects on WinCC shows you which components have been
added.
• The Display in Runtime Mode section describes in detail how the different
diagnostic screens appear in WinCC Runtime mode, what they show and which
functions you can trigger as a user.
It also explains what the sequence of process diagnosis and fault rectification
looks like in practice. You require this knowledge before you begin to create your
own configuration.
• The chapter entitled Configuring in WinCC then informs you how you can
integrate a process diagnosis into a new configuration or how you can 'retrofit' an
existing configuration with process diagnosis.
In addition, this chapter also provides a number of tips on how you can adapt the
diagnostic screens to the design of your plant screens.
• In the Appendix, you will find detailed information on the dialog boxes of
ProAgent's editor and on the functions which have been added to the basic
WinCC package for process diagnostics. At the end of the appendix is a summary
of the main functions of the WinCC Runtime module known as VarControl.
Note
Please note that the various manuals that make up the complement of WinCC
documentation and the WinCC Online Help texts provide excellent descriptions of the
general WinCC functions.
Answers to queries relating to STEP 7 and its options packages will be found in the
manuals for these programs. These programs too have extensive online Help systems.
Where to Find What
Other Sources of
Information
www.dienhathe.vn
www.dienhathe.com
04.00 Preface
ProAgent Manual
C79000-G8276-C165-01 1-3
1.2 Position within the Information Environment
WinCC and the various OSs are supplied with several different manuals and Online
Help systems.
The diagram below illustrates the position of the ProAgent documentation within the
overall documentation structure.
Online
Help
Pro Agent
option package
WinCC basic documentation
Online
Help texts
ProAgent
User’s
Guide
CD-ROM
Examples
Control Center
Channels
User Administration
Graphics Designer
Global Scripts
Tag Logging
Alarm Logging
Text Library
Report Designer
Software protection
Configuration Manual
Position within the Information Environment
The content of the ProAgent User's Guide essentially corresponds to the information
contained in the associated Online Help.
However, detailed descriptions of the dialog boxes in the ProAgent editor are only
contained in the Online Help.
Note
The tools used for programming the PLCs have their own documentation which is
not listed in the above graphic.
www.dienhathe.vn
www.dienhathe.com
Preface 04.00
ProAgent Manual
1-4 C79000-G8276-C165-01
1.3 History
The different issues of the User's Guide describe the following software versions:
Issue 02/98 WinCC Version 4.01
ProAgent Version 4.0
Issue 11/98 WinCC Version 4.01
ProAgent Version 4.0
Issue 06/99 WinCC Version 4.02
ProAgent Version 4.5
Issue 04/00 WinCC Version 5.0
ProAgent Version 5.0
1.4 Notation
Different character formats are used to help you find your way through the text, as
follows:
Output Words in typewriter type (Courier) indicate inputs
and outputs as they appear on the screen.
Change
transitions
Names of keys are printed in bold type face.
Editors → ProAgent Menu options are shown in italics. Different levels
are linked by an arrow. The complete route to the
menu option in question is always shown.
Generation Run tab Names of buttons, windows and tabs are printed in
italic type face.
www.dienhathe.vn
www.dienhathe.com
04.00 Preface
ProAgent Manual
C79000-G8276-C165-01 1-5
1.5 Abbreviations
The abbreviations used in this documentation have the following meanings:
ALARM_S Event-driven signaling path from the PLC to the OS
AM Alarm message
CPU Central processing unit
DB Data block
DEO Initial diagnostic address
DP Distributed I/O
EM Event message
FB Function block with instance data
FC Function block without instance data
FI Flat screen system
HMI Human-machine interface
LAD Ladder diagram
MPI Multipoint interface
OB Organization block
OP Operator panel
OS Operator station
PC Personal computer
PLC Programmable logic controller
PLC Programmable logic control
RLO Result of logical operation
S7 SIMATIC S7
STL Statement list
UDT User-defined data type
WinCC Windows Control Center
www.dienhathe.vn
www.dienhathe.com
Preface 04.00
ProAgent Manual
1-6 C79000-G8276-C165-01
1.6 Additional Support
Can be contacted at any time of the day throughout the world:
Johnson City
Nurember
Singapore
SIMATIC BASIC Hotline
Nuremberg
SIMATIC BASIC Hotline
Johnson City
SIMATIC BASIC Hotline
Singapore
SIMATIC BASIC Hotline
Local time:
Mo-Fr
7 a.m. through 5 p.m.
Telephone:
+49 911 895-7000
Fax:
+49 911 895-7002
e-mail:
simatic.support@
nbgm.siemens.de
Local time:
Mo-Fr
8 a.m. through 7 p.m.
Telephone:
+1 423 461-2522
Fax:
+1 423 461-2231
e-mail:
simatic.hotline@
sea.siemens.com
Local time:
Mo-Fr
8.30 a.m. through 5.30 p.m.
Telephone:
+65 740-7000
Fax:
+65 740-7001
e-mail:
simatic.hotline@
sae.siemens.com
SIMATIC Premium Hotline
(with charges, with SIMATIC Card only)
Time:
Mo-Fr 24 hours
Telephone:
+49 911 895-7777
Fax:
+49 911 895-7001
SIMATIC Customer
Support Hotline
www.dienhathe.vn
www.dienhathe.com
04.00 Preface
ProAgent Manual
C79000-G8276-C165-01 1-7
SIMATIC Customer Support offers you wide-ranging additional information on
SIMATIC products by way of its online services:
• You can obtain general up-to-date information
− on the Internet at http://www.ad.siemens.de/simatic
− by polling fax number 08765–93 02 77 95 00
• Up-to-date product information and downloads which may be of assistance
during operation:
− on the Internet at http://www.ad.siemens.de/support/html-00/
− from the Bulletin Board System (BBS) in Nuremberg (SIMATIC Customer
Support Mailbox)
by dialing +49 (911) 895–7100.
To dial the mailbox, use a modem up to V.34 (28.8 kbauds), and set its
parameters as follows: 8, N, 1, ANSI, or dial up via ISDN (x.75, 64 kB).
SIMATIC Customer
Support Online
Services
www.dienhathe.vn
www.dienhathe.com
Preface 04.00
ProAgent Manual
1-8 C79000-G8276-C165-01
www.dienhathe.vn
www.dienhathe.com
ProAgent Manual
C79000-G8276-C165-01 2-1
Installation
This chapter explains how you install ProAgent under STEP 7 and under WinCC.
2.1 System Requirements
The following hardware configuration is recommended for ProAgent CS:
Processor 300 MHz Pentium or faster
RAM 128 MB
The hardware requirements for ProAgent runtime systems are the same as for the
WinCC basic program.
In addition, you will also need the following:
Free hard disk space ProAgent CS: 80 MB on the drive on which
WinCC is installed
ProAgent RT: 15 MB on the drive on which
WinCC is installed
Screen resolution 1024 x 768, 800 x 600
Programmable logic control SIMATIC S7 with ALARM_S-compatible CPU
2
Overview
Hardware
Requirements
www.dienhathe.vn
www.dienhathe.com
Installation 04.00
ProAgent Manual
2-2 C79000-G8276-C165-01
The software requirements depend on the planned operating mode:
• You require the following for configuring:
Microsoft Windows NT Version 4.0 / Service Pack 4
WinCC Version 5.0 / Service Pack 1 including options
packages "Basis Process Control" and "Object
Manager"
STEP 7 Version 5.0 or higher, Service Pack 3
S7-PDIAG
and/or
S7-GRAPH
Version 4.01 or higher
Version 4.0 or higher
AS-OS Mapper SIMATIC AS/OS Engineering V 5.1
• You require the following for runtime mode:
Microsoft Windows NT Version 4.0 / Service Pack 4
WinCC Version 5.0 / Service Pack 1
2.2 Installing ProAgent
WinCC and STEP 7 must have been installed for ProAgent to be able to run. At least
one of the optional STEP 7 packages, S7-PDIAG or S7-GRAPH, is also required.
Beware
Before you install ProAgent, please read the file contained on the CD-ROM -
InstallNotesEng.doc. This will provide you with additional installation
information that only became available after this manual went to print.
Note
To be able to install ProAgent under Windows NT, you must have write access rights
to the registry. This means you have to have administrator access authority.
Details about installation of WinCC can be found in the WinCC documentation. The
following description starts from the assumption that WinCC has already been
installed.
To install ProAgent proceed as follows:
1. Insert the ProAgent CD-ROM in the CD-ROM drive.
The Setup Program starts automatically after a few seconds.
Software
Requirements
Installation
Requirements
Installing ProAgent
www.dienhathe.vn
www.dienhathe.com
04.00 Installation
ProAgent Manual
C79000-G8276-C165-01 2-3
If the CD-ROM is already in your drive or you are installing the program from a
network drive, you can also start Setup manually. To do this, choose Settings →
Control Panel → Add/Remove Programs and click the Install button on the
Install/Uninstall tab.
2. You will then be prompted through the entire installation procedure for
WinCC/ProAgent. Please follow all the instructions on the screen.
When you have completed installation and if you have Windows, you can now
configure process diagnostics with ProAgent.
Note
The ProAgent Runtime software is protected. You must have valid authorization to be
able to use the full scope of the program's functions. The easiest and best way to
install authorization is to do so at the same time as installing ProAgent. You can,
however, install it later by means of the AuthorsW.exe program on your
authorization disk. In this case, ProAgent will initially only run in demo mode.
Further information about the topic of software protection can be found in the
manual entitled WinCC Software Protection.
The Installation Program copies the necessary files to the WinCC system folder.
Further, a ProAgent folder is created.
ProAgent is added to the standard editors, with its own icon in the Project Navigation
Window of the Control Center:
ProAgent
The ProAgent Editor
ProAgent does not have a separate program icon. All ProAgent functions can only be
accessed via WinCC.
Installed Files
New Editor in the
Project Navigation
Window
Buttons on the
Toolbar
www.dienhathe.vn
www.dienhathe.com
Installation 04.00
ProAgent Manual
2-4 C79000-G8276-C165-01
Nevertheless, two new links have been added to the Windows Start menu:
WinCC/ProAgent
With this button you call the online documentation for
ProAgent. It also contains all the information incorporated
in the User's Guide.
ProAgent Sample File
Description
Click this button to open an electronic document containing
an illustrated introductory example. This example helps to
get you started with S7-PDIAG and ProAgent and thus
makes it easier for you.
To view this example, you will require Acrobat Reader. If
the program is not installed on your system, you can install
it by running ProAgent's Setup.
The ReleaseNote.doc file on the CD-ROM contains up-to-date information
relating to ProAgent, that only became available after this manual went to print.
Please note all the tips mentioned in that file.
2.3 Uninstalling ProAgent
You can uninstall ProAgent under Windows NT:
1. From the Windows Start menu choose Settings → Control Panel → Add/Remove
Programs
2. Select the Install/Uninstall tab in the Add/Remove Programs Properties window.
3. In the list, select the SIMATIC WinCC ProAgent entry.
4. Click the Add/Remove... button and follow the instructions on the screen.
ProAgent has now been removed from your system.
Note
If you deinstall ProAgent from a computer, you should also deinstall the relevant
authorization for the program using AuthorsW.exe. You can then reactivate this
authorization on a different computer.
Further information about the topic of authorization can be found in the manual
entitled WinCC Software Protection.
Up-to-date
Information
www.dienhathe.vn
www.dienhathe.com
ProAgent Manual
C79000-G8276-C165-01 3-1
Introduction
This chapter helps you get to know the advantages of process diagnosis and shows
you how simple it is to find and rectify an operating fault. An overview shows you
what steps are required for configuration and where the interfaces are between
STEP 7, WinCC and ProAgent.
At the end of the chapter, a number of important terms that are frequently
encountered in the context of process diagnosis are explained.
3.1 What Process Diagnosis Can Achieve
SIMATIC S7 PLCs enable you to configure powerful process diagnosis functions.
These diagnostics functions help you detect and rectify potential faults very quickly.
In that way, you will be able to increase the availability of your installation, reduce
down times and bring down costs.
Triggering of movements
to rectify faults with the OS
System availability
Down times
Costs
Alarm message in
runtime mode
Automatic analysis
Display of cause of fault
on OS
Option package
ProAgent
Process diagnosis
Sequence and Benefits of Process Diagnosis
3
Overview
www.dienhathe.vn
www.dienhathe.com
Introduction 04.00
ProAgent Manual
3-2 C79000-G8276-C165-01
Many problems can be avoided from the outset
The flexibility of the process diagnosis system enables potential problems in the
process sequence to be identified before they actually occur. For example, wear on a
tool is indicated by an increase in forces. The process diagnosis system can monitor
these forces and initiate replacement of the tool at the appropriate time.
Problems can still be identified without process diagnosis
WinCC enables you to visualize installations and control them by means of an easy-
to-use interface. A powerful message system draws your attention to process faults.
An alarm message is then displayed on the OS.
Situation-relevant information assists you in locating the fault
If problems arise in the process sequence, you can use the OS to trace quite simply
which units have caused the fault. To this end, you can examine the results of logical
operation directly on the OS either in the statement list or in the ladder diagram and
thus find the fault quickly.
You can quickly remedy the problem
To rectify the fault, you can trigger targeted movements on the OS.
If several parts of the installation have been damaged, you can see this on the OS and
can take the necessary steps to have the individual parts repaired at the same time.
And that means that your installation will be ready for operation again as quickly as
possible.
Do not shift
x-axis
Process diagnosis
Fault rectification in prompted manual mode
I 1.0 I 1.1 O1.0
Message display
Message, Diagnosis, Assistance with Fault Rectification
Avoiding Problems
Identifying Problems
Rectifying Problems
www.dienhathe.vn
www.dienhathe.com
04.00 Introduction
ProAgent Manual
C79000-G8276-C165-01 3-3
3.2 How Process Diagnosis is Carried Out
When you configure process diagnosis, a number of additional diagnostic screens are
integrated into the configuration. The contents of the screens can be adapted
dynamically to the technological units of the installation.
You can select your start screen for the process diagnosis system yourself. In
addition, you can set which ProAgent screen is opened with an ALARM_S message
in WinCC Runtime mode.
Performing process diagnosis is extremely easy. You can switch between the various
diagnostic screens simply by pressing a key:
• The ProAgent user screen is intended as the start screen and as a distribution list
for the other screens.
• In the Global Message Window, all diagnosis-capable messages are marked.
This marking means you can see that you can trace the causes of faults in the
process control system. If you apply the default setting, this diagnostic screen is
opened automatically in WinCC Runtime mode and placed on top as soon as an
ALARM_S error message arrives.
• The Message Screen displays a series of additional functions for selecting and
processing the individual alarm messages.
• The Overview Screen displays all the units and their subunits. This enables you
to see at a glance which operating mode the individual units are in.
• The Movement Screen is used for quick rectification of an error. You can see at a
glance which movements are blocked and those which can still be executed.
Movements by individual units can be triggered by keys.
• The Detail screen shows the result of the error analysis which is performed
automatically by the operating unit. To this end, the display shows a Statement
List (STL) or a ladder diagram (LAD) with the corresponding excerpt from the
STEP 7 program code. The status bits of the operands and all the results of logic
operations can be displayed at the same time. Signals that caused an error are
highlighted. The cause of an error can therefore quickly be traced.
Diagnostic screens
www.dienhathe.vn
www.dienhathe.com
Introduction 04.00
ProAgent Manual
3-4 C79000-G8276-C165-01
Global
Message window
Alarm message
Process error
Overview picture
Units
Status of the units
Operating modes
Detail picture
Result of the
Fault analysis
Status and result
Of logical operation
Movement picture
Possible movements
Trigger movements
by means of keys
Message picture
Selection
Acknowledgment
The Different Diagnostic Screens
The entire user interface has been standardized, so that all installations and sections
of installations are controlled along uniform lines.
A detailed description of the individual diagnostic screens can be found in the
chapter entitled Display in Runtime Mode (Chapter 5).
Standardization
www.dienhathe.vn
www.dienhathe.com
04.00 Introduction
ProAgent Manual
C79000-G8276-C165-01 3-5
3.3 How Process Diagnosis is Configured
ProAgent is a universal system solution and designed for optimum interaction
between STEP 7, optional STEP 7 packages and the WinCC visualization system.
WinCC offers you a standardized and ergonomical user interface for configuring
process diagnosis. It makes no difference whether you integrate process diagnosis
into a new project to be created or into an existing project.
Just as when configuring an installation, there are two main subtasks involved in
implementing process diagnosis:
1. programming the PLC
2. configuring the OS
Just like WinCC, you use ProAgent for the second step only, that of configuring the
OS.
Shared
database
S7-GRAPH
S7-PDIAG
ProAgent
PLC
Operator Station
Steps Involved in Configuring the Process Diagnosis
System Concept
Subtasks
www.dienhathe.vn
www.dienhathe.com
Introduction 04.00
ProAgent Manual
3-6 C79000-G8276-C165-01
Preparations for process diagnosis differ depending on which language you use for
programming a PLC:
• If you are using S7-GRAPH and its compiler is set to ALARM_S, your programs
will automatically become diagnosis-capable. You will find further information
on this subject in the S7-GRAPH manual.
• If you are programming in LAD/CSF/STL, you need the S7-PDIAG option
package. S7-PDIAG creates additional modules for monitoring your process for
the purposes of fault detection. This is done for the most part automatically.
Thanks to the global approach of S7 process diagnosis, you can work within an
installation using different programming languages to suit your particular needs. You
can also detect and locate process faults in "mixed" sequential and logic control
systems.
Programming the PLC and defining the settings in S7-PDIAG are the first steps in
creating the process diagnosis. They are followed by configuration of the OS using
WinCC and ProAgent.
When translating the PLC program, the STEP 7 option packages store all the data
required for the process diagnosis in a shared database.
WinCC will then access this database during the next step, so that it can configure the
OS.
Once the STEP 7 program has been created, the process diagnosis function for the
OS can be configured. This is the point at which the optional WinCC package,
ProAgent, is first put to use.
It goes without saying that you do not need to repeat any of the entries already made
in STEP 7. All relevant information was stored in the shared database now accesed
by ProAgent.
The diagnostic screens are supplied ready-configured. If in a particular case you
would like to customize the design of one of the screens to suit your own special
requirements, you can take advantage of the extensive possibilities offered by the
Graphics Designer.
More information about possible design alterations can be found in the chapter
entitled Changing the Diagnostic Screens (Chapter 6.6.1).
Programming
the PLC
Common Database
as Interface
Configuring the OS
www.dienhathe.vn
www.dienhathe.com
04.00 Introduction
ProAgent Manual
C79000-G8276-C165-01 3-7
Configuration in WinCC is simple and quick. All you still have to do is:
Defining
start picture
Defining
target hardware
Selecting
units
Carrying out
generation
Defining
options
Configuring the OS for Process Diagnosis
In the first step you set the system hardware for which you want to configure process
diagnostics.
As a second step, select the diagnostic screen you want to open when you activate
diagnostics in WinCC Runtime mode.
In the third step, you select the units of your S7 PLC for which you would like to set
up process diagnosis. This selection is quite simple: ProAgent prepares a list in
which you need only click the units concerned.
The final step you perform is to generate the new database for diagnosis, a task
which requires you simply to press a button.
You will find detailed instructions on configuration with ProAgent in the section on
how to configure in ProAgent (Chapter 6.4).
www.dienhathe.vn
www.dienhathe.com
Introduction 04.00
ProAgent Manual
3-8 C79000-G8276-C165-01
3.4 Before You Start
ProAgent is only part of the world of S7 and therefore also just one part of creating a
process diagnosis. Like WinCC, ProAgent is only used for configuring the OS and
not the PLC.
In order to be able to configure a process diagnosis, certain basic requirements must
be met. They can be summarized as follows:
You have to install the following software or have already installed it:
• STEP 7
• WinCC with Object Manager
• AS/OS Engineering
• ProAgent
In addition, the following requirements must be met:
• The PLC must have been programmed already - either with LAD/CSF/STL and
S7-PDIAG or S7-GRAPH.
• If the PLC was programmed in STEP 7, additional blocks for error detection have
to be created with the S7-PDIAG options package. Error detection must have
been activated.
www.dienhathe.vn
www.dienhathe.com
04.00 Introduction
ProAgent Manual
C79000-G8276-C165-01 3-9
3.5 Important Terms
3.5.1 Units
In S7-PDIAG, a unit is a module, in S7-GRAPH it is a sequence of steps.
Units are objects of the process diagnosis that are monitored with the aid of error
definitions. There can be several error definitions for each unit. Units can be physical
objects in the process (e.g. a press, die), which in turn can encompass movements
(see Movements) (e.g. forward/backward, up/down).
Units are logical hierarchical criteria and structure the view of the process They may
store data that is shared by all hierarchically subordinate objects. Hierarchically
subordinate objects can in turn be other units or movements, for example.
There can be one or more actions for each unit (see Actions).
3.5.2 Actions
Actions are part of a unit (see Units). An action is used in a process to drive an
individual actuator.
In program terms, an action is
• a network or expression in an LAD/CSF/STL program
• a step in an S7-GRAPH program
3.5.3 Transitions
A transition describes a condition for progressing from one step to the next within a
sequence of steps.
Transitions exist only in S7-GRAPH.
3.5.4 Movements
Movements relate to sequences in the process that can be monitored with the aid of
error definitions in the process diagnosis. There can be several error definitions for
each movement. A movement can be contained within a unit (see Units) and
represents an actual movement of a physical object in the process (e.g. a die moves
up and down).
Movements are defined in S7-PDIAG by using the UDT "Movement" within a
module.
www.dienhathe.vn
www.dienhathe.com
Introduction 04.00
ProAgent Manual
3-10 C79000-G8276-C165-01
www.dienhathe.vn
www.dienhathe.com
ProAgent Manual
C79000-G8276-C165-01 4-1
Effects on WinCC
By installing the ProAgent options package, a few script functions have been added
to the Global Script Editor that are required for process diagnostics. In addition,
external tags of different data types have been added to tag management.
This chapter shows you which components have been added.
4
Overview
www.dienhathe.vn
www.dienhathe.com
Effects on WinCC 04.00
ProAgent Manual
4-2 C79000-G8276-C165-01
4.1 After Installation
While ProAgent is being installed, a folder called ProAgent is created at the
WinCC system folder. It contains diagnostic screens that are fully ready for use for
the different OS.
Note
The names of the screens required for process diagnosis all begin with the prefix
@Diag. In this way, these diagnostic screens are always listed together.
Since ProAgent is used around the world, all the names used are English.
ProAgent is added to the standard editors, with its own icon in the Project Navigation
Window of the Control Center:
ProAgent
The ProAgent editor
When ProAgent is installed, if you choose Editors from the menu, you will now find
an additional option called ProAgent.
By opening the shortcut menu with the right mouse button or by choosing Editors →
ProAgent → Open from the menu, you can call the configuration dialog box for
process diagnostics.
Diagnostic Screens
The ProAgent Editor
www.dienhathe.vn
www.dienhathe.com
04.00 Effects on WinCC
ProAgent Manual
C79000-G8276-C165-01 4-3
4.2 After Generation
By generating ProAgent, stored pieces of message text and all data required for
diagnostics are imported from database shared with STEP 7 and saved together with
the configuration in WinCC.
The effects of generating ProAgent with respect to WinCC are described below.
In Tag Management, the entry SIMATIC S7 PROTOCOL SUITE is stored with
further subitems under the item Internal Tags. This provides you with the
connections, channels and tags necessary for selecting the Units that can be
diagnosed:
SIMATIC S7 PROTOCOL SUITE
The ready-made diagnostic screens are copied from the respective template to the
GraCS folder in your current WinCC project. These screens with the prefix @Diag
are therefore also listed in the table window of the Graphics Designer.
In alarm logging, all the ALARM_S messages relevant to process diagnostics and
any process control system messages are added.
The message line format for the ProAgent Message Screens is stored under the name
@DiagLine. Similarly, the message window template for process diagnosis has the
name @DiagWindow.
Tag Management
The Graphics
Designer Editor
The Alarm Logging
Editor
www.dienhathe.vn
www.dienhathe.com
Effects on WinCC 04.00
ProAgent Manual
4-4 C79000-G8276-C165-01
This means the ProAgent Message Screens have been enhanced by two additional
functions:
• All ALARM_S messages for which you can perform a criteria analysis are
identified in the Diag message block by an asterisk, "*".
• All other ALARM_S messages are identified in the Diag message block by a
letter "A".
Diagnosable Alarm Message
Further, new message classes are created at Message Class with which you can
precisely select from the Message Screen the messages that you want to display in
WinCC Runtime mode of process diagnostics.
Note
Use of message classes for process diagnostics presupposes that a WinCC display
unit has been configured in STEP 7. Only then can the respective message classes be
selected.
If no WinCC display device has been configured, ProAgent will always generate
messages of the message class Error.
You will find further information on configuring message classes in the manuals and
in the Online Helps for STEP 7 and its options packages.
If you want to adapt your configuration perfectly to the respective operations being
run, you may also change the preassigned names of the individual message classes.
You change the name of a message class as follows:
1. Select the Properties command from the context menu of the message class in
question.
2. Enter the new name on the Configure Message Classes tab.
In the Global Script editor, a folder called ProAgent is created at the entry called
Standard Functions and contains the functions required for diagnostics.
You will find a description of all ProAgent functions in the section entitled Functions
(Chapter A.1) in the Appendix.
The Global Script
Editor
www.dienhathe.vn
www.dienhathe.com
04.00 Effects on WinCC
ProAgent Manual
C79000-G8276-C165-01 4-5
4.3 ALARM_S Messaging
STEP 7 options packages S7-PDIAG and S7-GRAPH send ALARM_S messages.
This is the reason why the ALARM_S message number procedure has to be
introduced in WinCC, too.
You can use ALARM_S alongside the message bit procedure used to date. You can
also continue to use existing projects.
ALARM_S is a message number procedure. The message numbers are assigned by
the system when you configure in STEP 7. Message text is uniquely assigned by the
numbers.
The different messages are assigned to various display classes. When you configure,
you have the choice of selecting a specific subset of display classes for an OS. You
can therefore distribute messages to specific display devices.
When an error occurs, the CPU sends the time in addition to the state of the message
(active, cleared or acknowledged).
This makes an exact diagnosis of the cause of the error possible.
Due to the use of the ALARM_S message number procedure, there are certain minor
changes relating to configuration and in the Message Screen on the OS.
• Messages are no longer configured in WinCC, but while programming the PLC in
STEP 7 instead. This is also where you assign a message class to every message.
• Due to the use of ALARM_S, there are also several minor extensions in the
display of the Message Screen. You will find a detailed description in section
called What You See on the Message Screen (Chapter 5.4.2).
Why ALARM_S?
What is ALARM_S?
Changes due to
ALARM_S
www.dienhathe.vn
www.dienhathe.com
Effects on WinCC 04.00
ProAgent Manual
4-6 C79000-G8276-C165-01
www.dienhathe.vn
www.dienhathe.com
ProAgent Manual
C79000-G8276-C165-01 5-1
Display in Runtime Mode
This section describes in detail how the different diagnostic screens appear in WinCC
Runtime mode, what they show and which functions you can trigger as a user.
5
Overview
www.dienhathe.vn
www.dienhathe.com
Display in Runtime Mode 04.00
ProAgent Manual
5-2 C79000-G8276-C165-01
5.1 General
5.1.1 How To Activate Diagnosis
Thanks to the Alarm Logging editor of WinCC, you are no longer a stranger to
working with message windows and alarm messages.
There is still such a thing as a message window – even if ProAgent has been used to
configure a process diagnosis function. ALARM_S messages for which you can
perform a criteria analysis are now identified by an asterisk, "*". You can call up
further information about these messages from the Detail Screen and Movement
Screen. All other ALARM_S messages are identified by a letter "A".
Alarm Message Structure
Depending on the configuration, there is normally at least one key which, for
example, calls the ProAgent Overview Screen, in addition to starting diagnostics by
means of an ALARM_S message. From there, you can go to other diagnostic
screens.
You can also configure how you want to select one of the other diagnostic screens
(Message Screen, Detail Screen, Movement Screen) from your system screens.
After completing diagnosis and rectifying the fault, you have to acknowledge the
message as normal. If the alarm message belongs to an acknowledgment group, all
the other alarm messages of this group are also acknowledged at the same time.
Diagnosable
Messages
Diagnosis Start
Screen
Other Routes
Message
Acknowledgement
www.dienhathe.vn
www.dienhathe.com
04.00 Display in Runtime Mode
ProAgent Manual
C79000-G8276-C165-01 5-3
5.1.2 The Purpose of the Individual Diagnosis Screens
When you configure process diagnosis, a number of diagnostic screens are integrated
into your project. Process diagnostics runs in WinCC Runtime mode with the help of
these screens.
The diagnostic screens are for the most part standardized and differ only minimally
between the various OSs. The following figures show examples of diagnostic screens
on a PC.
global key set message line
ProAgent User Screen (Example on PC)
You can activate the ProAgent user screen to start diagnostics from the system
screens of your project. You can then switch from here directly to the other
diagnostic screens.
It depends on the configuration concerned whether the ProAgent user screen is
actually used.
You will find a detailed description of the ProAgent user screen in the section called
ProAgent User Screen(Chapter 5.2).
Note
If you want to use this screen together with your default configuration, you have to
adjust the Back key.
Diagnosis Screens
ProAgent User
Screen
www.dienhathe.vn
www.dienhathe.com
Display in Runtime Mode 04.00
ProAgent Manual
5-4 C79000-G8276-C165-01
diagnosable alarm message
global key set
Global Message Window (example on PC)
In the Global Message Window, diagnosable messages are marked by the letter "A".
Diagnosable messages, for which you can also carry out an analysis of criteria, are
marked by an asterisk "*". You can call up further information about these messages
from the Detail Screen and Movement Screen.
Whether or not you actually use the Global Message Window depends on the
respective configuration. You can set whether this screen opens automatically in
WinCC Runtime mode with an ALARM_S message.
A detailed description of the global message window will be found in the section
called Global Message Window (Chapter 5.3).
Global Message
Window
www.dienhathe.vn
www.dienhathe.com
04.00 Display in Runtime Mode
ProAgent Manual
C79000-G8276-C165-01 5-5
diagnosable alarm message
picture-specific key set global key set
global picture header
Message Screen (example on PC)
The structure of the Message Screen is matched to that of the Global Message
Window, but it does offer you a number of screen-specific keys. This means you can
call, among other things, a dialog box for selecting messages and acknowledging
ALARM_S messages.
A detailed description of the Message Screen can be found in the chapter entitled
Message Screen (Chapter 5.4).
Message Screen
www.dienhathe.vn
www.dienhathe.com
Display in Runtime Mode 04.00
ProAgent Manual
5-6 C79000-G8276-C165-01
global picture header
global key set
picture-specific
key set
blocked unit
message line
Overview Screen (example on PC)
The Overview Screen shows an overview of all the units in the system.
This enables you to see at a glance which operating mode a particular unit is in.
Blocked units are identified as such. When a fault is rectified, this marking is
removed.
A detailed description of the Overview Screen can be found in the chapter entitled
Overview Screen (Chapter 5.5).
Overview Screen
www.dienhathe.vn
www.dienhathe.com
04.00 Display in Runtime Mode
ProAgent Manual
C79000-G8276-C165-01 5-7
global picture
header
global
key set
picture-specific
key set
these signals caused
a process error
result of logical
operation
message line
Detail Screen (example on PC)
The process diagnosis analyzes which signals in the PLC program have led to an
error message. The detail screen shows the result of this criteria analysis. This means
you recognize not only that a fault has occurred, but also the cause of this fault.
The Detail Screen shows the relevant section of the STEP 7 program code in STL or
LAD format. Parallel to this, the status bits of the operands, all results of logical
operation, symbols and comments are displayed. Signals that have caused a fault are
highlighted.
A detailed description of the Detail Screen can be found in the chapter entitled Detail
Screen (Chapter 5.6).
Detail Screen
www.dienhathe.vn
www.dienhathe.com
Display in Runtime Mode 04.00
ProAgent Manual
5-8 C79000-G8276-C165-01
global
picture header
global key set
movement possible
movement blocked
picture-specific
key set
message line
Movement Screen (example on PC)
The Movement Screen provides assistance with rectifying faults. It enables you to
trigger targeted movements of individual units very simply.
The symbols displayed help you to see at a glance whether a movement is blocked.
A detailed description of the Movement Screen will be found in the section called
Movement Screen (Chapter 5.7).
Movement Screen
www.dienhathe.vn
www.dienhathe.com
04.00 Display in Runtime Mode
ProAgent Manual
C79000-G8276-C165-01 5-9
5.1.3 Operating Principles
Operation of the individual diagnostic screens is standardized and is based on the
design options familiar to you from WinCC.
Standardized graphics are used in all diagnostic screens.
Once you have got to know the basic structure of the diagnostic screens and the
various symbols used, you will quickly find your way round all screens.
The ProAgent user screen can be used as the start screen for diagnostics. For precise
error localization and elimination, you can then change directly to the Overview
Screen, Message Screen, Detail Screen or Movement Screen.
The information displayed following a change of screens will always depend on
which message or unit is highlighted. When an initial message is issued, the
corresponding unit is selected. If no message or unit is marked and the Detail Screen
or Movement Screen is called, the first action of the first unit of the first CPU of your
configuration is opened for these two screens.
You can return from the diagnostic screens at any time to the system screen from
which you activated diagnostics.
User screen
Overview screenMessage screen
Movement screen Detail screen
S7-KFA-Editor
S7-PDIAG
S7-GRAPH
S7 Manager
Linking Diagnostic Screens
Standardization
Links
www.dienhathe.vn
www.dienhathe.com
Display in Runtime Mode 04.00
ProAgent Manual
5-10 C79000-G8276-C165-01
Depending on the type of your OS, you can continue to work in the way to which
you are accustomed. Basically, you can run all diagnostic screens at the click of a
mouse or by using function and arrow keys.
Note
For reasons of clarity, all keys are reproduced in this documentation with the symbols
or text name which can be seen on the diagnostic screens. The key numbers and
associated letters (F or K) are not used, since they vary depending on the type of OS
configured.
The cursor functions possible are depicted by the following symbols:
Symbol Key Function
Cursor Up
Cursor Down
Indicates that the display
can be scrolled vertically by
one element.
Indicates that the display
can be scrolled vertically by
one page.
Cursor Left
Cursor Right
Indicates that the display
can be scrolled horizontally
by one element.
Indicates that the display
can be scrolled horizontally
by one page.
Cursor Symbols
Controlling via
Keyboard and
Mouse
Symbols
www.dienhathe.vn
www.dienhathe.com
04.00 Display in Runtime Mode
ProAgent Manual
C79000-G8276-C165-01 5-11
Other symbols are used to denote errors and errored results of logic operations:
Symbol Name Function
Warning triangle Identifies a faulty unit or
blocked movement.
That unit whose fault
occurred first is marked by a
flashing border around this
symbol.
Lightning Identifies a faulty signal.
Connection disturbed Indicates an errored
connection or an addressing
error.
Fault symbols
www.dienhathe.vn
www.dienhathe.com
Display in Runtime Mode 04.00
ProAgent Manual
5-12 C79000-G8276-C165-01
5.1.4 Structure of the Diagnostic Screens
All diagnostic screens – except the user screen and the global message window –
consist of three segments: a specific section for each diagnostic screen is embedded
between a global screen header (Chapter 5.1.5) and a set of global keys
(Chapter 5.1.6). Above the keys is a message line for displaying the earliest message.
global key set
global picture header
picture-specific section
Sections of the Diagnostic Screens
Clear partitioning of diagnostic screens into one screen-specific and two global
sections make sure you can quickly find your bearings when running the different
screens.
www.dienhathe.vn
www.dienhathe.com
04.00 Display in Runtime Mode
ProAgent Manual
C79000-G8276-C165-01 5-13
5.1.5 Global Screen Header
clockdisplay of dateuser
Global Screen Header
The date and time are always displayed in all diagnostic screens.
In addition, displayed to the right of the User symbol is the name under which you or
your group logged on in WinCC.
ProAgent is integrated in the central access protection function of WinCC. This
enables you, for example, to protect particular operating objects against being used
by unauthorized persons. You should use this in particular for the VarControl global
key and on the Overview Screen for the Operating Mode, Seq. Handling and S7
Manager keys. Further information can be found in the manual or in the Online Help
for the WinCC editor User Administrator.
www.dienhathe.vn
www.dienhathe.com
Display in Runtime Mode 04.00
ProAgent Manual
5-14 C79000-G8276-C165-01
5.1.6 Global Key Set
In addition to a number of screen-specific keys, you can also use various cross-
screen keys in all diagnostic screens.
Symbol Name Function
Overview You use this key to open the Overview
Screen.
Detail View You use this key to open the Detail Screen.
Movements You use this key to open the Movement
Screen.
Messages You use this key to open the Message
Screen.
VarControl Use this key to call the VarControl runtime
module. This enables you to monitor and
control the operands of the respective PLC
program.
S7 Manager With this key you can change directly to
SIMATIC Manager to work with other
SIMATIC applications.
Language With this key you can select, with multi-
lingual projects, German, English or
French.
Information You can use this key to open the window
entitled Screen Information. This window
allows you to enter or read information or
comments for each diagnostic screen.
Back You can use this key to exit diagnosis mode
and return to the installation screen from
which ProAgent was activated.
Global keys
www.dienhathe.vn
www.dienhathe.com
04.00 Display in Runtime Mode
ProAgent Manual
C79000-G8276-C165-01 5-15
With the Overview, Detail View, Movements and Messages keys you can change
directly between these four diagnostic screens for every selected message or unit.
The key of the diagnostic screen being displayed is deactivated.
Use this VarControl key to call the VarControl runtime module. This enables you to
monitor in a tag table the operands of the diagnosed PLC program in certain cycles
and to control them.
A summary of the main functions of this module can be found in the appendix under
the chapter entitled VarControl (Chapter A.3).
If you require SIMATIC Manager - for example, to work with other SIMATIC
applications, press the S7 Manager key. If SIMATIC Manager is already open, its
window is placed on top. If it is not open, SIMATIC Manager will be opened with
the last project to be called.
Note
If the S7 Manager key is not active, you may not be authorized to call SIMATIC
Manager.
Using the Language key, you can reset the language of the diagnostic screen
concerned to German, English or French at runtime. The screen will then be rebuilt
in the corresponding language.
Switching
Diagnostic Screen
Calling VarControl
Calling SIMATIC
Manager
Changing
Languages
www.dienhathe.vn
www.dienhathe.com
Display in Runtime Mode 04.00
ProAgent Manual
5-16 C79000-G8276-C165-01
Use the Information key to call the information window.
Information
In this window you can enter an explanatory text or comment for each diagnostic
screen and save it using the Save Text button. In this way, you can give users special
information, instructions and tips. With multi-lingual projects, information is
displayed only in the languages in which it was entered.
You can exit diagnostic mode whenever you like by pressing Back.
Calling Screen
Information
Exit Diagnosis
www.dienhathe.vn
www.dienhathe.com
04.00 Display in Runtime Mode
ProAgent Manual
C79000-G8276-C165-01 5-17
5.2 ProAgent's User Screen
5.2.1 The Purpose of the ProAgent User Screen
The ProAgent user screen is designed as an example configuration for starting
process diagnostics from the system screens of the current WinCC project.
You can branch from here to the Message Screen and to the Overview Screen, where
you can gain an overview of pending faults.
Note
If you want to use this screen together with your default configuration, you have to
adjust the Back key.
5.2.2 What You See on ProAgent's User Screen
The structure of ProAgent's user screen is similar to that of other diagnostic screens.
1
2 3
ProAgent User Screen (Example on PC)
Entry route
Standardized
Structure
www.dienhathe.vn
www.dienhathe.com
Display in Runtime Mode 04.00
ProAgent Manual
5-18 C79000-G8276-C165-01
(1) Here you can see the precise product designation of ProAgent and the
copyright notices. You can modify this center area of the user screen in a very
simple manner to reflect your corporate design and, for example, to insert
your company logo at this point (refer to Changing the Diagnostic Screens
(Chapter 6.6.1)).
(2) The keys in this section enable you, among other things, to switch to the other
diagnostic screens (see Global Key Set (Chapter 5.1.6)).
(3) The earliest message is displayed on the message line. You can scroll to other
messages.
www.dienhathe.vn
www.dienhathe.com
04.00 Display in Runtime Mode
ProAgent Manual
C79000-G8276-C165-01 5-19
5.3 Global Message Window
5.3.1 The Purpose of the Message Window
When you configure, you can set this screen so that it is opened automatically in
WinCC Runtime mode by an ALARM_S message and placed on top (refer to
Defining the Alarm Diagnostic Screen (Chapter 6.5.5)).
The Global Message Window often serves as an entry route into diagnostics. The
window allows you to monitor what faults have occurred and which messages are
diagnosable. Using this information, you can then branch to the other diagnostic
screens for the purpose of process diagnosis.
You are already familiar with the structure of a message window in table format from
your experience with the Alarm Logging editor. However, ProAgent's Global
Message Window provides a number of additional pieces of information and
functions.
In the Global Message Window, diagnosable messages are marked by the letter "A".
Diagnosable messages, for which you can also carry out an analysis of criteria, are
marked by an asterisk "*". You can call up further information about these messages
from the Detail Screen and Movement Screen. The messages are displayed in
chronological order: the oldest message is on the top line, the latest on the bottom
line.
If it is not possible to arrive at a guaranteed statement about the cause of the fault on
the basis of the error message alone, you can select the message for which you would
like to carry out process fault diagnosis first and then switch to one of the diagnostic
screens by means of the keys of the Global Key Set.
Remark
Detecting the fault and editing the diagnostic data is carried out by the STEP 7
package S7-PDIAG or S7-GRAPH. The faults detected are reported to WinCC and
ProAgent by means of the message number procedure ALARM_S.
Automatic Opening
of the Screen
Entry Route into
Diagnostics
Similarity to the
Message Window
Additional Functions
www.dienhathe.vn
www.dienhathe.com
Display in Runtime Mode 04.00
ProAgent Manual
5-20 C79000-G8276-C165-01
5.3.2 What You See in the Global Message Window
1 64
2
53
Global Message Window (example on PC)
(1) The Diag column shows you whether an ALARM_S message has been issued
and whether you can carry out an analysis of the criteria for this message:
*: identifies an ALARM_S message for which you can also perform a criteria
analysis. You can call the Detail Screen for messages of this kind.
A: identifies all other ALARM_S messages.
This column remains blank if messages issued are not diagnosable.
(2) The Status column displays the message status:
C: message arrived
G: message departed
CG: message arrived and departed
(3) In the Acknowledged column you can see whether this message has been
acknowledged.
Operating Elements
www.dienhathe.vn
www.dienhathe.com
04.00 Display in Runtime Mode
ProAgent Manual
C79000-G8276-C165-01 5-21
(4) The Date column displays the date of the arrival event.
(5) The Time column displays the time of the arrival event.
(6) The Message text column displays the user texts that have been configured in
the configuration system of Alarm Logging or with the optional STEP 7
packages.
If you have taken over the presettings when configuring, the colors used for the
individual messages have the following meanings:
• White on a red background: ALARM_S messages
• White on a blue background: the message currently selected
• Yellow against a black background: process control system messages (further
information is contained in the manuals and Online Help tools for STEP 7).
Colors
www.dienhathe.vn
www.dienhathe.com
Display in Runtime Mode 04.00
ProAgent Manual
5-22 C79000-G8276-C165-01
5.4 Message Screen
5.4.1 The Purpose of the Message Screen
The Message Screen displays all pending process messages. The messages are
displayed in chronological order: the oldest message is on the top line, the latest on
the bottom line.
The Message Screen frequently serves as the entry point to diagnosis. It enables you
to observe whether and which faults occur. You can then branch selectively to further
diagnostic screens.
The structure of the Message Screen corresponds to that of the Global Message
Window. The screen likewise allows you to recognize at a glance which messages are
diagnosable. You can then carry out a process diagnosis for those messages.
You can select a specific message and then open other diagnostic screens along
context-sensitive lines:
• The Detail Screen: This screen shows the program code that caused the selected
alarm message.
• The Movement Screen: This screen shows all movements of the blocked unit.
And, of course, you can also execute those movements directly from that point as
well.
If you would like to see an overview of the various units that make up your
installation, you can open the Overview Screen.
In contrast to the Global Message Window, the Message Screen offers you a number
of additional pieces of information and functions. Thus you can call, among other
things, a dialog box for selecting messages, acknowledge ALARM_S messages and
view archived messages.
Similarity to the
Global Message
Window
Additional Functions
www.dienhathe.vn
www.dienhathe.com
04.00 Display in Runtime Mode
ProAgent Manual
C79000-G8276-C165-01 5-23
5.4.2 What You See in the Message Screen
The structure of the Message Screen corresponds to that of the Global Message
Window.
1 642 53
Message Screen (example on PC)
The Message Screen contains the following entries:
(1) The Diag column shows you whether an ALARM_S message has been issued
and whether you can carry out an analysis of the criteria for this message:
A: identifies a diagnosable message, i.e. an ALARM_S message.
*: identifies a diagnosable message for which you also carry out an analysis of
the criteria. For messages of this type, you can call the Detail Screen or the
Movement Screen.
This column remains blank if messages issued are not diagnosable.
(2) The Status column displays the message status:
C: message arrived
G: message departed
CG: message arrived and departed
(3) When the message list is selected, you can see in the Acknowledged column
whether the message has been acknowledged.
Familiar Layout
www.dienhathe.vn
www.dienhathe.com
Display in Runtime Mode 04.00
ProAgent Manual
5-24 C79000-G8276-C165-01
(4) In the Date column, you can see the date of the event.
(5) In the Time column, you can see the time of the event.
(6) The Message text column displays the user texts that have been configured in
the configuration system of Alarm Logging or with the optional STEP 7
packages.
If you accept the presettings, the colors of the individual messages have the following
meanings:
• White on a red background: ALARM_S messages
• White on a blue background: the message currently selected
• Yellow against a black background: process control system messages (for further
information refer to the manuals and Online Help tools for STEP 7).
You can, however, change these color settings. (See Changing the Diagnostic Screens
(Chapter 6.6.1)).
In comparison with the Global Message Window, a number of new keys have been
added with which you can further edit the selected messages.
Additional Functions
www.dienhathe.vn
www.dienhathe.com
04.00 Display in Runtime Mode
ProAgent Manual
C79000-G8276-C165-01 5-25
5.4.3 Message Screen Keys
You can use the following keys in the Message Screen:
Symbol Name Function
Up
Down
Use the vertical arrow keys or the mouse
to move the selection bar for selecting
messages.
Message list You use this key to call the current
message sequence.
Short-term
Archive
You can use this key to check messages
stored in the continuous archive (or
short-term archive) in WinCC Runtime
mode.
Long-term
Archive
You can use this key to check messages
archived in the sequence archive (or
long-term archive) in WinCC Runtime
mode.
Selection You can use this key to open the
selection dialog box for defining the
selection criteria. All messages that do
not satisfy these criteria are then no
longer displayed.
Info text You can use this key to open a dialog
box for displaying longer information
texts. All text has to be configured in S7.
Comment You can use this key to open a text
editor for editing short comments.
Single ack You can use this key to acknowledge a
single message.
Group ack You can use this key to acknowledge all
pending, instantaneously visible
messages that require acknowledgement,
as long as they do not have to be
acknowledged singly (single
acknowledgement only).
...
The keys of the global key set (see
Global Key Set (Chapter 5.1.6)).
Message Screen Keys
www.dienhathe.vn
www.dienhathe.com
Display in Runtime Mode 04.00
ProAgent Manual
5-26 C79000-G8276-C165-01
5.4.4 How to Work with the Message Screen
This chapter gives a general outline of how to use the Message Screen in practice.
You have opened the Message Screen in order to obtain an overview of the pending
alarm messages. You wish to carry out a process diagnosis for specific messages.
Message Screen (example on PC)
First of all, you gain an overview of all the diagnosable messages. Use the Selection
key to call the Set Selection dialog box and thus harmonize the Message Screen with
your specific requirements in WinCC Runtime mode.
Further information about the various filter criteria can be found in the manual or
Online Help texts for Alarm Logging.
Before performing process diagnostics for a specific alarm message, select the
message concerned. To do this, click the message concerned with the mouse or move
the selection bar with the arrow keys to the corresponding point.
Aims
Filtering Out
Messages
Selecting a Message
www.dienhathe.vn
www.dienhathe.com
04.00 Display in Runtime Mode
ProAgent Manual
C79000-G8276-C165-01 5-27
To obtain an overview of the units affected on your system by the errors, press the
Overview key to change to the Overview Screen. The unit relating to the message is
selected on the screen. From here, you can switch to the Movement Screen in order
to manually trigger individual movements for a specific unit or return to the Message
Screen.
When you have selected the message you want, press the Detail View key to change
to the detail screen. This shows you the section of the STEP 7 program code
responsible for triggering the alarm message.
If you have selected a message, press the Movements key to go directly to the
Movement Screen (in other words, without going indirectly via the Overview
Screen). The Movement Screen shows all movements for the units where there are
faults and allows you to execute those movements directly as well.
In WinCC Runtime mode, you can check all archived messages at any time. For this,
all the archiving options with which you will be familiar from alarm logging are
available to you.
Note
Should you wish to use the archive functions, you must configure them first in alarm
logging using the Archive Configuration dialog box.
The short-term archive can store up to 10,000 messages: in the long-term archive, the
complete hard disk capacity of your computer is available. Further information can
be found in the WinCC manual or Online Help texts for Alarm Logging.
Switching to the
Overview Screen
Switching to the
Detail Screen
Switching to the
Movement Screen
Displaying Archive
Messages
www.dienhathe.vn
www.dienhathe.com
Display in Runtime Mode 04.00
ProAgent Manual
5-28 C79000-G8276-C165-01
If you want to enter a brief explanation on a message for other users (for example
"This message arose today because ..."), press the Comment key.
Message comment input presupposes an activated long-term archive.
Message Comment Dialog Box
The Number field contains the number of the single message in question (as it is
stored in the table window of Alarm Logging).
You can see when the message occurred from the Date and Time boxes. The User
and Computer boxes indicate who entered the comment.
Note
You can enter your explanations in the Comment box. When configured to do so, the
box also displays the operands triggering the message and the diagnostics entry
operand (refer to Archiving the Criteria Analysis (Chapter 6.5.8)).
Message Comments
www.dienhathe.vn
www.dienhathe.com
04.00 Display in Runtime Mode
ProAgent Manual
C79000-G8276-C165-01 5-29
In Step 7, Help information for the project runtime can be stored for every message.
If you wish to view this information at runtime, press the Info text key to open the
Info Text For A Message dialog box.
Info Text Dialog Box
The Number field contains the number of the single message in question (as it is
stored in the table window of Alarm Logging).
Further information can be found in the manual or Online Help texts for Alarm
Logging.
After completing diagnosis and rectifying the fault, the final step you have to take is
to acknowledge the messages:
• Acknowledge a single message with the Single ack key.
• With the Group ack key, you acknowledge not only the selected message but all
pending, currently visible messages requiring acknowledgement, provided they
do not require single acknowledgement.
You can check and/or alter the precise acknowledgement criteria in Alarm Logging
in the Configuring Message Classes dialog box on the Acknowledgement tab. Further
information can be found in the manual or Online Help texts for Alarm Logging.
Info Text
Acknowledging
Messages
www.dienhathe.vn
www.dienhathe.com
Display in Runtime Mode 04.00
ProAgent Manual
5-30 C79000-G8276-C165-01
You can switch directly from the Message Screen to the other diagnostic screens or
also exit diagnostics:
switches to the Overview Screen
switches to the Detail Screen
switches to the Movement Screen
exits diagnostics
Exiting the Message
Screen
www.dienhathe.vn
www.dienhathe.com
04.00 Display in Runtime Mode
ProAgent Manual
C79000-G8276-C165-01 5-31
5.5 Overview Screen
5.5.1 The Purpose of the Overview Screen
The Overview Screen shows you all the units on your system.
It gives you the following information about each unit:
• whether it has a fault
• in which operating mode it is (Manual, Automatic etc.)
• in the case of S7-Graph sequences, which step of the sequence is currently active.
If there are faults on more than one unit, you can see on which one the fault first
occurred. In this way, you immediately see where the actual cause is located and
which faults are secondary in nature.
You can select a unit from the list and set its operating mode. For example, you can
switch from Automatic to Manual mode in order to be able to rectify a fault
manually.
Once you have selected a unit, you can analyze it more closely in the Detail Screen
and move individual units by hand in the Movement Screen in order to rectify the
fault.
A description of the Detail Screen can be found in the chapter entitled Detail Screen
(Chapter 5.6). A description of the Movement Screen can be found in the chapter
entitled Movement Screen (Chapter 5.7).
Display
Functions
www.dienhathe.vn
www.dienhathe.com
Display in Runtime Mode 04.00
ProAgent Manual
5-32 C79000-G8276-C165-01
5.5.2 What You See in the Overview Screen
Like all the diagnostic pictures, the Overview Screen has a standardized layout.
There are only slight variations between the display on the various OSs.
The following illustration shows an example of the Overview Screen on a PC.
2
8
1
11
6
109
3 5 4 7
12 13 14
Overview Screen (example on PC)
(1) Information is provided on the display mode in the top left box:
The Warning Triangle symbol is displayed here if only the blocked
units are displayed. If this symbol does not appear, all units are
displayed (see Switching the Display Mode (Chapter 5.5.5)).
Arrow symbols appear in this field if there are more units than can
be displayed in the list at one time. You can then scroll up or down
through the list of units by clicking the buttons to the right of the
table or using the cursor keys of your OS.
General Layout
Display mode
www.dienhathe.vn
www.dienhathe.com
04.00 Display in Runtime Mode
ProAgent Manual
C79000-G8276-C165-01 5-33
In the top segment of the display, you are provided with detailed information on the
hierarchy of the units (refer to Hierarchical Units on the Overview Screen
(Chapter 5.5.6)) and on the unit highlighted by the selection bar.
(2) The name of the next higher unit in the hierarchy appears in the Unit Layer
box.
(3) In the Unit No. box you can see the block type (FC or DB) and the block
number of the unit you selected.
(4) The complete name of the unit appears in the Unit box. This name depends on
the programming of the PLC:
• If the unit was programmed in S7-PDIAG, this is the symbol of the block
or an absolute name.
• If the unit has been programmed in S7-GRAPH, this is a sequence name.
(5) The current mode of the unit is displayed in the Operating Mode box. If the
STEP 7 program does not define an operating mode, the field remains blank.
You can change modes with the Operating Mode key.
Boxes (6) and (7) appear only if the selected unit was programmed in S7-GRAPH.
(6) In the Step box you can see the step name of the first active step.
(7) The numbers of the active steps appear in these boxes. The numbers of the
errored actions are always displayed first from left to right. They are identified
by a highlight. If there are more steps active than can be displayed, the
following symbol appears:
The center segment of the display shows you a table containing all the diagnosable
units of your installation. The order in which they are displayed depends on the
attributes which you assigned to the units in S7-PDIAG in the Properties - Units
dialog box. The Overview Screen ProAgent is built in accordance with the attributes
"Belongs to Screen“ and "Position on Screen“. Units for which these attributes are
not set are attached to the bottom of the list.
(8) Displayed in the left of the table is the instantaneous status of a unit:
The Warning Triangle symbol indicates that a unit is blocked. A red
border flashes round the Warning Triangle symbol in front of the unit
that became blocked first.This indicates to you that this fault is not a
secondary fault.
The Connection Errored symbol indicates that connection to the AS
is errored or an addressing error has occurred.
Information on
Selected Unit
Overview of Units
www.dienhathe.vn
www.dienhathe.com
Display in Runtime Mode 04.00
ProAgent Manual
5-34 C79000-G8276-C165-01
(9) The Unit Name column displays the name of a unit stored in the PLC
program. This is:
− the symbol of a module or an absolute designator if the unit has been
programmed in S7-PDIAG
− a sequence name if the unit has been programmed in S7-GRAPH
(10) The contents of the Step Name and Action columns depend on the
programming of the unit:
− nothing is displayed if the unit has been programmed in S7-PDIAG
− the step name and the number of the active step are displayed when
S7-GRAPH is used.
(11) In the Mode column you can see which operating mode is currently set for
that unit. If the STEP 7 program does not define an operating mode, the field
remains blank. You can change modes with the Operating Mode key.
(12) To the right of the Mode column you can see whether there is a higher-level or
lower-level unit available for the unit concerned:
This symbol indicates a lower-level unit. You can change to that unit
either by left-clicking the symbol or with the Layer Down key..
You can change to that unit either by right-clicking the symbol or
with the Layer Up key.
This symbol indicates that there are a lower-level unit and a higher-
level unit. You can change the unit layer either by left-clicking or
right-clicking the symbol or by using either the Layer Down or
Layer Up key.
(13) On the far right you can see whether there is a movement for the unit
concerned:
If there is a movement for the unit or a lower-level unit, the
Movement symbol is displayed. You can then change to the
Movement Screen either by left-clicking the symbol or with the
Movements key.
The Movements symbol to the right of a sequence indicates that this
sequence has been assigned a movement unit in S7-GRAPH (see
Basic Requirements of the PLC Program (Chapter 6.1)). The
assigned movement unit will be handled in the overview as a part of
a sequence and will not be shown as a separate unit.
(14) Here you can scroll up and down in the list of units by clicking the mouse if
more units are present than can all be displayed in the list at the same time.
www.dienhathe.vn
www.dienhathe.com
04.00 Display in Runtime Mode
ProAgent Manual
C79000-G8276-C165-01 5-35
5.5.3 Overview Screen Keys
You can use the following keys in the Overview Screen:
Symbol Name Function
Up (cursor)
Down
(cursor)
You use the Up and Down cursor keys to move the
highlight between the individual units.
Page Up
Page Down
With these keys you can move the selection bar one
whole page up or down.
If there are more units than can be displayed on the
screen at the same time, the display is scrolled as
soon as you move the highlight past the top or
bottom end of the message list.
Layer
Down
You use this key to switch to a subordinate
hierarchical unit.
The Subordinate Unit symbol to the right of the
unit indicates that there is a subordinate unit. In
this case the Layer Down key is enabled. If there
isn't a subordinate unit, the key is deactivated.
Layer Up You use this key to switch to a higher-order
hierarchical unit.
You can see whether a higher-level unit is present
by this key being enabled. If there isn't a higher-
order unit, the key is deactivated.
Operating
Mode
You can use this key to change the Operating
Modes of the unit selected. The operating modes
that are possible depend on how the unit has been
programmed. If no mode is defined, the key is
disabled.
Seq.
handling
With this key you can open the Sequence Handling
dialog box in which you can execute specific single
steps of the sequence you selected.
All /
Errored
You use this key to toggle the Display Mode
between display of all units or display of only the
blocked units.
...
The keys of the global key set (see Global Key Set
(Chapter 5.1.6)).
Keys in the Overview Screen
www.dienhathe.vn
www.dienhathe.com
Display in Runtime Mode 04.00
ProAgent Manual
5-36 C79000-G8276-C165-01
Note
ProAgent is integrated in the central access protection function of WinCC. This
enables you, for example, to protect particular operating objects against being used
by unauthorized persons. You should use this in particular for the Operating Mode,
Seq. Handling and S7 Manager keys. Further information can be found in the
manual or in the Online Help for the WinCC editor User Administrator.
5.5.4 How to Work with the Overview Screen
This chapter gives a general outline of how to use the Overview Screen most
effectively in practice.
You have opened the Overview Screen in order to see which units of your installation
are blocked. You would like to see which unit caused the error and what triggered the
error. Finally, you would like specifically to move individual system components to
clear the error.
Overview Screen (example on PC)
Aims
www.dienhathe.vn
www.dienhathe.com
04.00 Display in Runtime Mode
ProAgent Manual
C79000-G8276-C165-01 5-37
First of all, you would like to gain an overview of the units blocked. You
use the cursor keys to move the highlight through the list. All blocked
units are marked by the Warning Triangle symbol.
To see just the errored units, press the All / Errored key to change the Display
Mode. Those units that are not blocked are then no longer displayed, and you can
move directly between the blocked units with the highlight.
This setting is retained until you restart WinCC Runtime mode or change the display
mode back to the display of all units by pressing the key.
A red border round the Warning Triangle flashes next to the unit in which an error
occurred first.
You move the highlight onto the unit with the flashing border. That unit is now
selected. In the top segment of the display, you can see more extensive information
on that unit: the next higher hierarchical layer of the selected unit, the block type,
unit-assigned text, the current operating mode and the step numbers of the active
actions.
If the cause of the fault is not clear, you can investigate the fault more closely to see
which logical operation results in the program code have led to the error message. To
do this, press the Details key to open the Detail Screen.
If you know what has caused the fault, you will naturally want to rectify it as quickly
as possible so that the system can be started up again. To this end, you can e.g.
trigger deliberate movements of certain units in manual mode.
Note
It depends on your PLC program whether or not it is necessary to switch to manual
mode or to another mode before triggering manual movements.
To change the operating mode, move the highlight to a unit on which you wish to
carry out a movement.
If this unit has subordinate units, the Subordinate Unit symbol will be
displayed on the right (see Hierarchical Units in the Overview Screen
(Chapter 5.5.6)). You can change to a lower layer in the hierarchy with the
Layer Down key and make a more accurate selection.
Finally, press the Operating Mode key to open the dialog box for
selecting the modes.
On Which Units Are
There Faults?
On Which Unit Did a
Fault Occur First?
Information on the
Unit
Criteria Analysis
Changing the
Operating Mode
www.dienhathe.vn
www.dienhathe.com
Display in Runtime Mode 04.00
ProAgent Manual
5-38 C79000-G8276-C165-01
The Operating mode window
Here you can select the mode concerned with the mouse or the arrow keys and press
the OK button or confirm with Enter.
Note
If the ›Operating Mode key is not active, you may not be authorized to change
modes.
If you have selected the unit or subunit you what to move and set the correct mode,
press the Movements key to change to the Movement Screen.
Opening the
Movement Screen
www.dienhathe.vn
www.dienhathe.com
04.00 Display in Runtime Mode
ProAgent Manual
C79000-G8276-C165-01 5-39
If a unit was programmed in S7-GRAPH, you can use the Seq. Handling key to
open the Sequence Handling dialog box and set or reset individual steps in a
sequence.
Note
If the Seq. Handling key is not active,you might not be authorized to use the
Sequence Handling dialog box.
The Movements symbol to the right of a sequence indicates that this
sequence has been assigned a movement unit in S7-GRAPH (see Basic
Requirements of the PLC Program (Chapter 6.1)). The assigned movement
unit will be handled in the overview as a part of a sequence and will not be
shown as a separate unit.
You can then change to the Movement Screen either by left-clicking the
symbol or with the Movements key.
You can switch directly from the Overview Screen to the other diagnostic pictures or
also exit diagnostics:
switches to the Detail Screen
switches to the Movement Screen
switches to the Message Screen
exits diagnostics
Calling Sequence
Handling
Exiting the
Overview Screen
www.dienhathe.vn
www.dienhathe.com
Display in Runtime Mode 04.00
ProAgent Manual
5-40 C79000-G8276-C165-01
5.5.5 Changing the Display Mode
You can specify whether all or only the blocked units are displayed in the Overview
Screen.
To change back to the other display mode, press the All / Errored
key.
Restricting the units displayed to those blocked is especially useful if your
installation consists of a very large number of units. However, if you then want to
select a healthy unit (for example, to trigger a movement), you must reset the display
mode back to display all units.
You can tell which display mode is active thanks to a graphic symbol at the top left
of the display field:
• The Warning Triangle symbol is displayed if only the blocked units are displayed.
• The symbol is not displayed if you are able to see and select all the units
irrespective of whether they are blocked or not.
Display Modes
When to Use Which
Mode
How to Tell Which
Mode is Active
www.dienhathe.vn
www.dienhathe.com
04.00 Display in Runtime Mode
ProAgent Manual
C79000-G8276-C165-01 5-41
5.5.6 Hierarchical Units on the Overview Screen
When programming a PLC, a hierarchy of the units can – depending on the
programming language used – be defined. Thus in the case of S7-PDIAG a unit can
be equated with a module which as a rule also represents a process unit. By virtue of
the multi-instance concept of STEP 7 a unit can also contain other units.
As soon as at least one subunit has a fault, the immediately higher-order unit is also
marked as having a fault. The marker is thus passed on from one level to the next
right up to the highest hierarchical level.
Note
When the PLC is programmed in S7-GRAPH, there are no hierarchical units.
In this way you can tell whether tehre are any more hierarchical layers associated
with a unit.
If there are only lower-level units for a specific unit, this symbol
appears to the right of the unit concerned. In this case the Layer
Down key is highlighted in color, whereas the Layer Up key is
grayed.
If there are only higher-level units for a specific unit, this symbol
appears to the right of the unit concerned. In this case the Layer Up
key is highlighted in color, grayed.
This symbol indicates that there are a lower-level unit and a higher-
level unit for a given unit. In this case the Layer Up and the Layer
Down keys are highlighted in color.
To change the hierarchical level proceed as follows:
1. Move the highlight to the unit whose subordinate or higher-order units you wish
to display.
2. Press the Layer Down key if you would like to see the lower-level units, or press
the Layer Up key to see the higher-level unit.
When you move down a hierarchical level, only the subunits of the selected unit are
shown.
When you move up a hierarchical level, all units on that level are once again
displayed.
Hierarchical Units
Identifying
Hierarchical Units
Changing
Hierarchical Level
www.dienhathe.vn
www.dienhathe.com
Display in Runtime Mode 04.00
ProAgent Manual
5-42 C79000-G8276-C165-01
5.5.7 Sequence Handling
If you have selected a unit on the Overview Screen that was programmed in S7-
GRAPH, you can open the Sequence Handling dialog box.
In this dialog box
• you are given information on the unit you selected and on the step you selected
• you can set or reset the individual steps of a sequence.
The Movements symbol to the right of a sequence indicates that this
sequence has been assigned a movement unit in S7-GRAPH (see Basic
Requirements of the PLC Program (Chapter 6.1)). The assigned
movement unit will be handled in the overview as a part of a sequence and
will not be shown as a separate unit.
Warning
When using the Sequence Handling dialog box, you must ensure that the sequence
remains in a consistent state.
The following illustration shows an example of the Sequence Handling dialog box on
a PC.
81 5 643 72
Sequence Handling Dialog Box (Example on a PC)
Purpose
www.dienhathe.vn
www.dienhathe.com
04.00 Display in Runtime Mode
ProAgent Manual
C79000-G8276-C165-01 5-43
In the top segment of the display you are provided with information on the unit that
was selected on the Overview Screen from which the step screen was opened.
(1) In the Unit No. box you can see the block type (FC or DB) and the block
number of the unit you selected.
(2) The sequence name appears in the Unit box.
(3) You can see the step name of the first active step in the Step box.
(4) The number of the active step is displayed in the Step No. box. If several
actions are active simultaneously, the step number of the action which is the
first to be displayed in the list at (6) is shown.
(5) The current mode of the unit is displayed in the Operating mode box.
(6) The numbers of the active steps appear in these boxes. If there are more steps
active than can be displayed, the following symbol appears:
The step number and the step name of the active step are displayed in the center
segment of the display:
(7) Here you can enter the step number for the current unit that you want to set or
delete.
(8) Here the name of the step you entered at (7) appears following its
confirmation by pressing ENTER.
Note
Always deactivate all active steps before activating new steps.
In the bottom half of the display, you can activate or deactivate steps or sequences.
To do this, perform the following steps:
1. Enter the number of the step which you want to activate or deactivate in the Step
No. box and confirm it by pressing ENTER.
The name of the step you specified now appears in the Step Name box (8).
2. Press one of four keys:
• With Activate Step, you set the displayed step.
• With Deactivate Step, you reset the displayed step.
• With Initialize Sequence, you initialize the displayed sequence.
• With Deactivate Sequence, you deactivate the entire sequence.
With the Exit key, you return to the Overview Screen.
Information on Unit
and Step
Displaying the
Active Step
Activating and
Deactivating Steps
Back to the
Overview Screen
www.dienhathe.vn
www.dienhathe.com
Display in Runtime Mode 04.00
ProAgent Manual
5-44 C79000-G8276-C165-01
5.6 Detail Screen
5.6.1 The Purpose of the Detail Screen
Retracing an error/fault to the relevant points in the program code is referred to as
analysis of criteria. The Detail Screen shows the result of the analysis of criteria in
the form of an STL or LAD.
When you call the Detail Screen for the first time, the criteria are shown initially in
STL. Each time you open the display after this time, the type of display used is the
one you used the last time. You can switch easily between the two types of display by
pressing the STL / LAD key (see Keys in the Detail Screen (Chapter 5.6.5)).
Note
In principle, the two variants of the Detail Screen are equivalent. They differ only
with respect to the way they look and are used.
The LAD variant, however, is not able to display all commands. The following are
permissible:
U op, UN op, U(, O op, ON op, O(, O, ), NOT, = op, S op, R op, X, X(,
XN, XN(, Label
(op = operand; Label only at the beginning of the network, U is equivalent to A in IEC
notation)
Should an instruction be shown that cannot be displayed in LAD, a message is
issued. You can then change to the STL display with the STL / LAD key.
The display of the STEP 7 program code in the STL or LAD lists those positions of
the PLC program that have triggered a process fault. This should not be confused
with a programming error. When the process fault occurs, a quite specific status
comes into being for which the program is monitored. This status is characteristic of
a fault in the installation and therefore leads to an alarm message being displayed.
Since the process diagnosis system can monitor a whole range of conditions and
mutual interdependencies can also be defined, it is of course of interest to see which
signals have led to the issue of an alarm message.
From this information you can derive what is causing the alarm and how it may be
rectified in the shortest possible time.
Symbols and comments are displayed in addition to the program code. At the same
time, you are shown the status of the operands and all results of logical operations.
All signals whose status has contributed to the error message are marked. This
enables you to immediately recognize what conditions have led to the alarm message
being triggered.
Analysis of Criteria
STL or LAD
Program Excerpt
Additional
Information
www.dienhathe.vn
www.dienhathe.com
04.00 Display in Runtime Mode
ProAgent Manual
C79000-G8276-C165-01 5-45
5.6.2 What You See in the Detail Screen
Which faults are displayed when you open the Detail Screen depends on from where
you have opened it:
• If you have opened the Detail Screen from the Message Screen or the Global
Message Window, you have selected a message there. The Detail Screen now
shows you the fault that has triggered this message.
• If you have opened the Detail Screen from the Overview Screen, you have
selected a unit there. The Detail Screen now shows you the fault of the first
blocked action of this unit.
Like all the diagnostic screens, the Detail Screen has a standardized layout.
Switching the display between the STL and LAD changes only the center section of
the Detail Screen. The information about the unit (in the top section) and the
assignment of the keys remain unchanged.
The following illustration depicts an example of the STL variant of a Detail Screen
on a PC.
9 141 5 6 43 8 12 152 10 11713
Detail Screen (example of the STL variant on PC)
Faults Displayed
General Layout
www.dienhathe.vn
www.dienhathe.com
Display in Runtime Mode 04.00
ProAgent Manual
5-46 C79000-G8276-C165-01
The top section of the Detail Screen contains detailed information about the unit in
which the process fault has occurred.
(1) At the top left, you obtain information on the display mode:
• The lightning symbol appears in this field when the partial view of the
display is activated, in which only the non-performed statements or
switches are listed (see Switching Between Partial and Full View
(Chapter 5.6.7)).
• The spectacles symbol appears in this field if current status bits are
displayed instead of the status bits that were valid at the moment the fault
arose (initial values) (see Switching Between Initial Values and Current
Status (Chapter 5.6.8)).
• Arrow symbols appear in this field if there are more statements or
switches than can be displayed at one time. You can then scroll through
these statements/switches using either the keyboard or the mouse.
(2) The Unit Level box displays the unit level to which the blocked unit belongs.
(3) In the Unit no.: box you can see the block type (FC or DB) and the block
number of the unit you selected.
(4) The Unit box displays the name of the unit you selected.
The displays and contents of the following fields depend on the programming of the
unit:
Programming in S7-GRAPH
If the unit was programmed in S7-GRAPH, you are provided with two lines of
information on the blocked step or blocked transition.
(5) The lightning symbol appears here if the currently displayed step has blocked.
(6) You can see the step name in the Step box.
(7) The number of this step is displayed in the No. box.
(8) The Parallel Steps box lists the numbers of the currently active steps. The step
selected is marked here. If more parallel steps are possible than can be
displayed at one time, the symbol also appears in this field.
With transitions, the subsequent steps for selected transitions are displayed
here.
(9) The lightning symbol appears here if the currently displayed transition has
blocked.
(10) You can see the transition name in the Transition box.
(11) The No. box displays the number of this transition.
Information About
the Unit
www.dienhathe.vn
www.dienhathe.com
Siemens win cc manual wincc-proagent

More Related Content

What's hot

Aplplication server instalacion
Aplplication server instalacionAplplication server instalacion
Aplplication server instalacionhkaczuba
 
IEC programing manual
IEC programing manualIEC programing manual
IEC programing manualquanglocbp
 
Case ih wd1204 tier 3 self propelled windrower service repair manual instant ...
Case ih wd1204 tier 3 self propelled windrower service repair manual instant ...Case ih wd1204 tier 3 self propelled windrower service repair manual instant ...
Case ih wd1204 tier 3 self propelled windrower service repair manual instant ...yhfhjjsenned
 
Case ih wd1204 tier 3 self propelled windrower service repair manual (pin ygg...
Case ih wd1204 tier 3 self propelled windrower service repair manual (pin ygg...Case ih wd1204 tier 3 self propelled windrower service repair manual (pin ygg...
Case ih wd1204 tier 3 self propelled windrower service repair manual (pin ygg...ufjjsjekdkemme
 
Dell poweredge-rc-s140 users-guide-en-us-nhat-thien-minh
Dell poweredge-rc-s140 users-guide-en-us-nhat-thien-minhDell poweredge-rc-s140 users-guide-en-us-nhat-thien-minh
Dell poweredge-rc-s140 users-guide-en-us-nhat-thien-minhMr Cuong
 
Innova 3140g User Manual
Innova 3140g User ManualInnova 3140g User Manual
Innova 3140g User ManualTim Miller
 
Steyr cvt 6215 tractor service repair manual
Steyr cvt 6215 tractor service repair manualSteyr cvt 6215 tractor service repair manual
Steyr cvt 6215 tractor service repair manualfujdfjjsjekkmem
 

What's hot (8)

Aplplication server instalacion
Aplplication server instalacionAplplication server instalacion
Aplplication server instalacion
 
IEC programing manual
IEC programing manualIEC programing manual
IEC programing manual
 
Case ih wd1204 tier 3 self propelled windrower service repair manual instant ...
Case ih wd1204 tier 3 self propelled windrower service repair manual instant ...Case ih wd1204 tier 3 self propelled windrower service repair manual instant ...
Case ih wd1204 tier 3 self propelled windrower service repair manual instant ...
 
Case ih wd1204 tier 3 self propelled windrower service repair manual (pin ygg...
Case ih wd1204 tier 3 self propelled windrower service repair manual (pin ygg...Case ih wd1204 tier 3 self propelled windrower service repair manual (pin ygg...
Case ih wd1204 tier 3 self propelled windrower service repair manual (pin ygg...
 
Dell poweredge-rc-s140 users-guide-en-us-nhat-thien-minh
Dell poweredge-rc-s140 users-guide-en-us-nhat-thien-minhDell poweredge-rc-s140 users-guide-en-us-nhat-thien-minh
Dell poweredge-rc-s140 users-guide-en-us-nhat-thien-minh
 
Innova 3140g User Manual
Innova 3140g User ManualInnova 3140g User Manual
Innova 3140g User Manual
 
Steyr cvt 6215 tractor service repair manual
Steyr cvt 6215 tractor service repair manualSteyr cvt 6215 tractor service repair manual
Steyr cvt 6215 tractor service repair manual
 
manual service Oki C310dn
manual service Oki C310dnmanual service Oki C310dn
manual service Oki C310dn
 

Similar to Siemens win cc manual wincc-proagent

Siemens s7 300-400-simatic couter module cm35
Siemens s7 300-400-simatic couter module cm35Siemens s7 300-400-simatic couter module cm35
Siemens s7 300-400-simatic couter module cm35Dien Ha The
 
Siemens catalog hmi-protool manual
Siemens catalog hmi-protool manualSiemens catalog hmi-protool manual
Siemens catalog hmi-protool manualDien Ha The
 
Siemens catalog hmi-protool configuring graphics displays manual
Siemens catalog hmi-protool configuring graphics displays manualSiemens catalog hmi-protool configuring graphics displays manual
Siemens catalog hmi-protool configuring graphics displays manualDien Ha The
 
Program Directory For CBPDO Installation and ServerPac Reference z/OS
Program Directory For CBPDO Installation and ServerPac Reference z/OSProgram Directory For CBPDO Installation and ServerPac Reference z/OS
Program Directory For CBPDO Installation and ServerPac Reference z/OSIBM India Smarter Computing
 
Simocode dp = manual de parametrização e operação
Simocode dp = manual de parametrização e operaçãoSimocode dp = manual de parametrização e operação
Simocode dp = manual de parametrização e operaçãoconfidencial
 
Motherboard manual ga-ma790x-ds4_e
Motherboard manual ga-ma790x-ds4_eMotherboard manual ga-ma790x-ds4_e
Motherboard manual ga-ma790x-ds4_eCord_Dj
 
Centro de maquinado pro light 2000
Centro de maquinado pro light 2000Centro de maquinado pro light 2000
Centro de maquinado pro light 2000Lenin Serrano
 
Modifying infor erp_syte_line_5140
Modifying infor erp_syte_line_5140Modifying infor erp_syte_line_5140
Modifying infor erp_syte_line_5140rajesh_rolta
 
Siemens pg 702 programming device
Siemens pg 702 programming deviceSiemens pg 702 programming device
Siemens pg 702 programming deviceDien Ha The
 
Siemens pg 702 programming device
Siemens pg 702 programming deviceSiemens pg 702 programming device
Siemens pg 702 programming deviceDien Ha The
 
Siemens catalog hmi-tp070 touch panel
Siemens catalog hmi-tp070 touch panelSiemens catalog hmi-tp070 touch panel
Siemens catalog hmi-tp070 touch panelDien Ha The
 
Siemens catalog hmi-tp070_e
Siemens catalog hmi-tp070_eSiemens catalog hmi-tp070_e
Siemens catalog hmi-tp070_eDien Ha The
 
350209_NGU-2000 BB (799020).pdf
350209_NGU-2000 BB (799020).pdf350209_NGU-2000 BB (799020).pdf
350209_NGU-2000 BB (799020).pdfGerson37561
 
Hướng dẫn sử dụng máy chấm công vân tay
Hướng dẫn sử dụng máy chấm công vân tayHướng dẫn sử dụng máy chấm công vân tay
Hướng dẫn sử dụng máy chấm công vân tayCông Ty SHG Vietnam
 

Similar to Siemens win cc manual wincc-proagent (20)

Simatic protool manual
Simatic protool manualSimatic protool manual
Simatic protool manual
 
Siemens s7 300-400-simatic couter module cm35
Siemens s7 300-400-simatic couter module cm35Siemens s7 300-400-simatic couter module cm35
Siemens s7 300-400-simatic couter module cm35
 
Siemens catalog hmi-protool manual
Siemens catalog hmi-protool manualSiemens catalog hmi-protool manual
Siemens catalog hmi-protool manual
 
Siemens catalog hmi-protool configuring graphics displays manual
Siemens catalog hmi-protool configuring graphics displays manualSiemens catalog hmi-protool configuring graphics displays manual
Siemens catalog hmi-protool configuring graphics displays manual
 
Program Directory For CBPDO Installation and ServerPac Reference z/OS
Program Directory For CBPDO Installation and ServerPac Reference z/OSProgram Directory For CBPDO Installation and ServerPac Reference z/OS
Program Directory For CBPDO Installation and ServerPac Reference z/OS
 
Simocode dp = manual de parametrização e operação
Simocode dp = manual de parametrização e operaçãoSimocode dp = manual de parametrização e operação
Simocode dp = manual de parametrização e operação
 
Motherboard manual ga-ma790x-ds4_e
Motherboard manual ga-ma790x-ds4_eMotherboard manual ga-ma790x-ds4_e
Motherboard manual ga-ma790x-ds4_e
 
Centro de maquinado pro light 2000
Centro de maquinado pro light 2000Centro de maquinado pro light 2000
Centro de maquinado pro light 2000
 
430ug slau049f
430ug slau049f430ug slau049f
430ug slau049f
 
Modifying infor erp_syte_line_5140
Modifying infor erp_syte_line_5140Modifying infor erp_syte_line_5140
Modifying infor erp_syte_line_5140
 
Siemens pg 702 programming device
Siemens pg 702 programming deviceSiemens pg 702 programming device
Siemens pg 702 programming device
 
Siemens pg 702 programming device
Siemens pg 702 programming deviceSiemens pg 702 programming device
Siemens pg 702 programming device
 
Siemens catalog hmi-tp070 touch panel
Siemens catalog hmi-tp070 touch panelSiemens catalog hmi-tp070 touch panel
Siemens catalog hmi-tp070 touch panel
 
Siemens catalog hmi-tp070_e
Siemens catalog hmi-tp070_eSiemens catalog hmi-tp070_e
Siemens catalog hmi-tp070_e
 
Service Manual.pdf
Service Manual.pdfService Manual.pdf
Service Manual.pdf
 
350209_NGU-2000 BB (799020).pdf
350209_NGU-2000 BB (799020).pdf350209_NGU-2000 BB (799020).pdf
350209_NGU-2000 BB (799020).pdf
 
Hướng dẫn sử dụng máy chấm công vân tay
Hướng dẫn sử dụng máy chấm công vân tayHướng dẫn sử dụng máy chấm công vân tay
Hướng dẫn sử dụng máy chấm công vân tay
 
Program Directory for IBM Ported Tools for z/OS
Program Directory for IBM Ported Tools for z/OSProgram Directory for IBM Ported Tools for z/OS
Program Directory for IBM Ported Tools for z/OS
 
Ax50 enus wn_app
Ax50 enus wn_appAx50 enus wn_app
Ax50 enus wn_app
 
Datastage
DatastageDatastage
Datastage
 

More from Dien Ha The

Vnd feb 2020 price list schneider (1)
Vnd feb 2020 price list schneider (1)Vnd feb 2020 price list schneider (1)
Vnd feb 2020 price list schneider (1)Dien Ha The
 
Resize bientanfuji-dienhathe.com
Resize bientanfuji-dienhathe.comResize bientanfuji-dienhathe.com
Resize bientanfuji-dienhathe.comDien Ha The
 
Fed e-quick-start-up-guide-bientanfuji-dienhathe.com
Fed e-quick-start-up-guide-bientanfuji-dienhathe.comFed e-quick-start-up-guide-bientanfuji-dienhathe.com
Fed e-quick-start-up-guide-bientanfuji-dienhathe.comDien Ha The
 
Fed e-quick-start-manual-bientanfuji-dienhathe.com
Fed e-quick-start-manual-bientanfuji-dienhathe.comFed e-quick-start-manual-bientanfuji-dienhathe.com
Fed e-quick-start-manual-bientanfuji-dienhathe.comDien Ha The
 
Ls bang gia ls ap dung 20 04-2019
Ls bang gia ls ap dung 20 04-2019Ls bang gia ls ap dung 20 04-2019
Ls bang gia ls ap dung 20 04-2019Dien Ha The
 
Mitsubishi graphic operation terminal got2000 series parts library book
Mitsubishi graphic operation terminal got2000 series parts library bookMitsubishi graphic operation terminal got2000 series parts library book
Mitsubishi graphic operation terminal got2000 series parts library bookDien Ha The
 
Mitsubishi inverter fr-a700-instruction-manualbasic-160425031653
Mitsubishi inverter fr-a700-instruction-manualbasic-160425031653Mitsubishi inverter fr-a700-instruction-manualbasic-160425031653
Mitsubishi inverter fr-a700-instruction-manualbasic-160425031653Dien Ha The
 
Mitsubishi graphic operation terminal got2000 series gt2103 new product release
Mitsubishi graphic operation terminal got2000 series gt2103 new product releaseMitsubishi graphic operation terminal got2000 series gt2103 new product release
Mitsubishi graphic operation terminal got2000 series gt2103 new product releaseDien Ha The
 
Mitsubishi graphic operation terminal got2000 series got mobile function quic...
Mitsubishi graphic operation terminal got2000 series got mobile function quic...Mitsubishi graphic operation terminal got2000 series got mobile function quic...
Mitsubishi graphic operation terminal got2000 series got mobile function quic...Dien Ha The
 
Mitsubishi graphic operation terminal got2000 series drive control interactiv...
Mitsubishi graphic operation terminal got2000 series drive control interactiv...Mitsubishi graphic operation terminal got2000 series drive control interactiv...
Mitsubishi graphic operation terminal got2000 series drive control interactiv...Dien Ha The
 
Mitsubishi inverter option catalog
Mitsubishi inverter option catalogMitsubishi inverter option catalog
Mitsubishi inverter option catalogDien Ha The
 
Mitsubishi low voltage ws-v series mccb and elcb
Mitsubishi low voltage ws-v series mccb and elcbMitsubishi low voltage ws-v series mccb and elcb
Mitsubishi low voltage ws-v series mccb and elcbDien Ha The
 
Mitsubishi graphic operation terminal got2000 series (concise)
Mitsubishi graphic operation terminal got2000 series (concise)Mitsubishi graphic operation terminal got2000 series (concise)
Mitsubishi graphic operation terminal got2000 series (concise)Dien Ha The
 
Mitsubishi low voltage ws-v series comparison of previous and new models
Mitsubishi low voltage ws-v series comparison of previous and new modelsMitsubishi low voltage ws-v series comparison of previous and new models
Mitsubishi low voltage ws-v series comparison of previous and new modelsDien Ha The
 
Mitsubishi inverter inverter family
Mitsubishi inverter inverter familyMitsubishi inverter inverter family
Mitsubishi inverter inverter familyDien Ha The
 
Mitsubishi low voltage miniature circuit breakers din series
Mitsubishi low voltage miniature circuit breakers din seriesMitsubishi low voltage miniature circuit breakers din series
Mitsubishi low voltage miniature circuit breakers din seriesDien Ha The
 
Mitsubishi inverter freqrol-hc2 series
Mitsubishi inverter freqrol-hc2 seriesMitsubishi inverter freqrol-hc2 series
Mitsubishi inverter freqrol-hc2 seriesDien Ha The
 
Mitsubishi low voltage mccb and elcb(ws-v series) y0720-version 1-mitsu
Mitsubishi low voltage mccb and elcb(ws-v series) y0720-version 1-mitsuMitsubishi low voltage mccb and elcb(ws-v series) y0720-version 1-mitsu
Mitsubishi low voltage mccb and elcb(ws-v series) y0720-version 1-mitsuDien Ha The
 
Mitsubishi inverter freqrol-f700 pj series
Mitsubishi inverter freqrol-f700 pj seriesMitsubishi inverter freqrol-f700 pj series
Mitsubishi inverter freqrol-f700 pj seriesDien Ha The
 
Mitsubishi inverter catalog-mitsubishi-inverter-option-160426021125
Mitsubishi inverter catalog-mitsubishi-inverter-option-160426021125Mitsubishi inverter catalog-mitsubishi-inverter-option-160426021125
Mitsubishi inverter catalog-mitsubishi-inverter-option-160426021125Dien Ha The
 

More from Dien Ha The (20)

Vnd feb 2020 price list schneider (1)
Vnd feb 2020 price list schneider (1)Vnd feb 2020 price list schneider (1)
Vnd feb 2020 price list schneider (1)
 
Resize bientanfuji-dienhathe.com
Resize bientanfuji-dienhathe.comResize bientanfuji-dienhathe.com
Resize bientanfuji-dienhathe.com
 
Fed e-quick-start-up-guide-bientanfuji-dienhathe.com
Fed e-quick-start-up-guide-bientanfuji-dienhathe.comFed e-quick-start-up-guide-bientanfuji-dienhathe.com
Fed e-quick-start-up-guide-bientanfuji-dienhathe.com
 
Fed e-quick-start-manual-bientanfuji-dienhathe.com
Fed e-quick-start-manual-bientanfuji-dienhathe.comFed e-quick-start-manual-bientanfuji-dienhathe.com
Fed e-quick-start-manual-bientanfuji-dienhathe.com
 
Ls bang gia ls ap dung 20 04-2019
Ls bang gia ls ap dung 20 04-2019Ls bang gia ls ap dung 20 04-2019
Ls bang gia ls ap dung 20 04-2019
 
Mitsubishi graphic operation terminal got2000 series parts library book
Mitsubishi graphic operation terminal got2000 series parts library bookMitsubishi graphic operation terminal got2000 series parts library book
Mitsubishi graphic operation terminal got2000 series parts library book
 
Mitsubishi inverter fr-a700-instruction-manualbasic-160425031653
Mitsubishi inverter fr-a700-instruction-manualbasic-160425031653Mitsubishi inverter fr-a700-instruction-manualbasic-160425031653
Mitsubishi inverter fr-a700-instruction-manualbasic-160425031653
 
Mitsubishi graphic operation terminal got2000 series gt2103 new product release
Mitsubishi graphic operation terminal got2000 series gt2103 new product releaseMitsubishi graphic operation terminal got2000 series gt2103 new product release
Mitsubishi graphic operation terminal got2000 series gt2103 new product release
 
Mitsubishi graphic operation terminal got2000 series got mobile function quic...
Mitsubishi graphic operation terminal got2000 series got mobile function quic...Mitsubishi graphic operation terminal got2000 series got mobile function quic...
Mitsubishi graphic operation terminal got2000 series got mobile function quic...
 
Mitsubishi graphic operation terminal got2000 series drive control interactiv...
Mitsubishi graphic operation terminal got2000 series drive control interactiv...Mitsubishi graphic operation terminal got2000 series drive control interactiv...
Mitsubishi graphic operation terminal got2000 series drive control interactiv...
 
Mitsubishi inverter option catalog
Mitsubishi inverter option catalogMitsubishi inverter option catalog
Mitsubishi inverter option catalog
 
Mitsubishi low voltage ws-v series mccb and elcb
Mitsubishi low voltage ws-v series mccb and elcbMitsubishi low voltage ws-v series mccb and elcb
Mitsubishi low voltage ws-v series mccb and elcb
 
Mitsubishi graphic operation terminal got2000 series (concise)
Mitsubishi graphic operation terminal got2000 series (concise)Mitsubishi graphic operation terminal got2000 series (concise)
Mitsubishi graphic operation terminal got2000 series (concise)
 
Mitsubishi low voltage ws-v series comparison of previous and new models
Mitsubishi low voltage ws-v series comparison of previous and new modelsMitsubishi low voltage ws-v series comparison of previous and new models
Mitsubishi low voltage ws-v series comparison of previous and new models
 
Mitsubishi inverter inverter family
Mitsubishi inverter inverter familyMitsubishi inverter inverter family
Mitsubishi inverter inverter family
 
Mitsubishi low voltage miniature circuit breakers din series
Mitsubishi low voltage miniature circuit breakers din seriesMitsubishi low voltage miniature circuit breakers din series
Mitsubishi low voltage miniature circuit breakers din series
 
Mitsubishi inverter freqrol-hc2 series
Mitsubishi inverter freqrol-hc2 seriesMitsubishi inverter freqrol-hc2 series
Mitsubishi inverter freqrol-hc2 series
 
Mitsubishi low voltage mccb and elcb(ws-v series) y0720-version 1-mitsu
Mitsubishi low voltage mccb and elcb(ws-v series) y0720-version 1-mitsuMitsubishi low voltage mccb and elcb(ws-v series) y0720-version 1-mitsu
Mitsubishi low voltage mccb and elcb(ws-v series) y0720-version 1-mitsu
 
Mitsubishi inverter freqrol-f700 pj series
Mitsubishi inverter freqrol-f700 pj seriesMitsubishi inverter freqrol-f700 pj series
Mitsubishi inverter freqrol-f700 pj series
 
Mitsubishi inverter catalog-mitsubishi-inverter-option-160426021125
Mitsubishi inverter catalog-mitsubishi-inverter-option-160426021125Mitsubishi inverter catalog-mitsubishi-inverter-option-160426021125
Mitsubishi inverter catalog-mitsubishi-inverter-option-160426021125
 

Recently uploaded

Linux Systems Programming: Inter Process Communication (IPC) using Pipes
Linux Systems Programming: Inter Process Communication (IPC) using PipesLinux Systems Programming: Inter Process Communication (IPC) using Pipes
Linux Systems Programming: Inter Process Communication (IPC) using PipesRashidFaridChishti
 
Memory Interfacing of 8086 with DMA 8257
Memory Interfacing of 8086 with DMA 8257Memory Interfacing of 8086 with DMA 8257
Memory Interfacing of 8086 with DMA 8257subhasishdas79
 
"Lesotho Leaps Forward: A Chronicle of Transformative Developments"
"Lesotho Leaps Forward: A Chronicle of Transformative Developments""Lesotho Leaps Forward: A Chronicle of Transformative Developments"
"Lesotho Leaps Forward: A Chronicle of Transformative Developments"mphochane1998
 
PE 459 LECTURE 2- natural gas basic concepts and properties
PE 459 LECTURE 2- natural gas basic concepts and propertiesPE 459 LECTURE 2- natural gas basic concepts and properties
PE 459 LECTURE 2- natural gas basic concepts and propertiessarkmank1
 
COST-EFFETIVE and Energy Efficient BUILDINGS ptx
COST-EFFETIVE  and Energy Efficient BUILDINGS ptxCOST-EFFETIVE  and Energy Efficient BUILDINGS ptx
COST-EFFETIVE and Energy Efficient BUILDINGS ptxJIT KUMAR GUPTA
 
8086 Microprocessor Architecture: 16-bit microprocessor
8086 Microprocessor Architecture: 16-bit microprocessor8086 Microprocessor Architecture: 16-bit microprocessor
8086 Microprocessor Architecture: 16-bit microprocessorAshwiniTodkar4
 
HOA1&2 - Module 3 - PREHISTORCI ARCHITECTURE OF KERALA.pptx
HOA1&2 - Module 3 - PREHISTORCI ARCHITECTURE OF KERALA.pptxHOA1&2 - Module 3 - PREHISTORCI ARCHITECTURE OF KERALA.pptx
HOA1&2 - Module 3 - PREHISTORCI ARCHITECTURE OF KERALA.pptxSCMS School of Architecture
 
Unit 4_Part 1 CSE2001 Exception Handling and Function Template and Class Temp...
Unit 4_Part 1 CSE2001 Exception Handling and Function Template and Class Temp...Unit 4_Part 1 CSE2001 Exception Handling and Function Template and Class Temp...
Unit 4_Part 1 CSE2001 Exception Handling and Function Template and Class Temp...drmkjayanthikannan
 
scipt v1.pptxcxxxxxxxxxxxxxxxxxxxxxxxxxxxxxxxxxxxxxxxxxxxxxxxxxxxxxxxxxxxxxxx...
scipt v1.pptxcxxxxxxxxxxxxxxxxxxxxxxxxxxxxxxxxxxxxxxxxxxxxxxxxxxxxxxxxxxxxxxx...scipt v1.pptxcxxxxxxxxxxxxxxxxxxxxxxxxxxxxxxxxxxxxxxxxxxxxxxxxxxxxxxxxxxxxxxx...
scipt v1.pptxcxxxxxxxxxxxxxxxxxxxxxxxxxxxxxxxxxxxxxxxxxxxxxxxxxxxxxxxxxxxxxxx...HenryBriggs2
 
Convergence of Robotics and Gen AI offers excellent opportunities for Entrepr...
Convergence of Robotics and Gen AI offers excellent opportunities for Entrepr...Convergence of Robotics and Gen AI offers excellent opportunities for Entrepr...
Convergence of Robotics and Gen AI offers excellent opportunities for Entrepr...ssuserdfc773
 
Ground Improvement Technique: Earth Reinforcement
Ground Improvement Technique: Earth ReinforcementGround Improvement Technique: Earth Reinforcement
Ground Improvement Technique: Earth ReinforcementDr. Deepak Mudgal
 
fitting shop and tools used in fitting shop .ppt
fitting shop and tools used in fitting shop .pptfitting shop and tools used in fitting shop .ppt
fitting shop and tools used in fitting shop .pptAfnanAhmad53
 
HAND TOOLS USED AT ELECTRONICS WORK PRESENTED BY KOUSTAV SARKAR
HAND TOOLS USED AT ELECTRONICS WORK PRESENTED BY KOUSTAV SARKARHAND TOOLS USED AT ELECTRONICS WORK PRESENTED BY KOUSTAV SARKAR
HAND TOOLS USED AT ELECTRONICS WORK PRESENTED BY KOUSTAV SARKARKOUSTAV SARKAR
 
Introduction to Serverless with AWS Lambda
Introduction to Serverless with AWS LambdaIntroduction to Serverless with AWS Lambda
Introduction to Serverless with AWS LambdaOmar Fathy
 
Introduction to Data Visualization,Matplotlib.pdf
Introduction to Data Visualization,Matplotlib.pdfIntroduction to Data Visualization,Matplotlib.pdf
Introduction to Data Visualization,Matplotlib.pdfsumitt6_25730773
 
XXXXXXXXXXXXXXXXXXXXXXXXXXXXXXXXXXXXXXXXXXXXXXXXXXXX
XXXXXXXXXXXXXXXXXXXXXXXXXXXXXXXXXXXXXXXXXXXXXXXXXXXXXXXXXXXXXXXXXXXXXXXXXXXXXXXXXXXXXXXXXXXXXXXXXXXXXXXX
XXXXXXXXXXXXXXXXXXXXXXXXXXXXXXXXXXXXXXXXXXXXXXXXXXXXssuser89054b
 
Introduction to Robotics in Mechanical Engineering.pptx
Introduction to Robotics in Mechanical Engineering.pptxIntroduction to Robotics in Mechanical Engineering.pptx
Introduction to Robotics in Mechanical Engineering.pptxhublikarsn
 
Worksharing and 3D Modeling with Revit.pptx
Worksharing and 3D Modeling with Revit.pptxWorksharing and 3D Modeling with Revit.pptx
Worksharing and 3D Modeling with Revit.pptxMustafa Ahmed
 
Electromagnetic relays used for power system .pptx
Electromagnetic relays used for power system .pptxElectromagnetic relays used for power system .pptx
Electromagnetic relays used for power system .pptxNANDHAKUMARA10
 
8th International Conference on Soft Computing, Mathematics and Control (SMC ...
8th International Conference on Soft Computing, Mathematics and Control (SMC ...8th International Conference on Soft Computing, Mathematics and Control (SMC ...
8th International Conference on Soft Computing, Mathematics and Control (SMC ...josephjonse
 

Recently uploaded (20)

Linux Systems Programming: Inter Process Communication (IPC) using Pipes
Linux Systems Programming: Inter Process Communication (IPC) using PipesLinux Systems Programming: Inter Process Communication (IPC) using Pipes
Linux Systems Programming: Inter Process Communication (IPC) using Pipes
 
Memory Interfacing of 8086 with DMA 8257
Memory Interfacing of 8086 with DMA 8257Memory Interfacing of 8086 with DMA 8257
Memory Interfacing of 8086 with DMA 8257
 
"Lesotho Leaps Forward: A Chronicle of Transformative Developments"
"Lesotho Leaps Forward: A Chronicle of Transformative Developments""Lesotho Leaps Forward: A Chronicle of Transformative Developments"
"Lesotho Leaps Forward: A Chronicle of Transformative Developments"
 
PE 459 LECTURE 2- natural gas basic concepts and properties
PE 459 LECTURE 2- natural gas basic concepts and propertiesPE 459 LECTURE 2- natural gas basic concepts and properties
PE 459 LECTURE 2- natural gas basic concepts and properties
 
COST-EFFETIVE and Energy Efficient BUILDINGS ptx
COST-EFFETIVE  and Energy Efficient BUILDINGS ptxCOST-EFFETIVE  and Energy Efficient BUILDINGS ptx
COST-EFFETIVE and Energy Efficient BUILDINGS ptx
 
8086 Microprocessor Architecture: 16-bit microprocessor
8086 Microprocessor Architecture: 16-bit microprocessor8086 Microprocessor Architecture: 16-bit microprocessor
8086 Microprocessor Architecture: 16-bit microprocessor
 
HOA1&2 - Module 3 - PREHISTORCI ARCHITECTURE OF KERALA.pptx
HOA1&2 - Module 3 - PREHISTORCI ARCHITECTURE OF KERALA.pptxHOA1&2 - Module 3 - PREHISTORCI ARCHITECTURE OF KERALA.pptx
HOA1&2 - Module 3 - PREHISTORCI ARCHITECTURE OF KERALA.pptx
 
Unit 4_Part 1 CSE2001 Exception Handling and Function Template and Class Temp...
Unit 4_Part 1 CSE2001 Exception Handling and Function Template and Class Temp...Unit 4_Part 1 CSE2001 Exception Handling and Function Template and Class Temp...
Unit 4_Part 1 CSE2001 Exception Handling and Function Template and Class Temp...
 
scipt v1.pptxcxxxxxxxxxxxxxxxxxxxxxxxxxxxxxxxxxxxxxxxxxxxxxxxxxxxxxxxxxxxxxxx...
scipt v1.pptxcxxxxxxxxxxxxxxxxxxxxxxxxxxxxxxxxxxxxxxxxxxxxxxxxxxxxxxxxxxxxxxx...scipt v1.pptxcxxxxxxxxxxxxxxxxxxxxxxxxxxxxxxxxxxxxxxxxxxxxxxxxxxxxxxxxxxxxxxx...
scipt v1.pptxcxxxxxxxxxxxxxxxxxxxxxxxxxxxxxxxxxxxxxxxxxxxxxxxxxxxxxxxxxxxxxxx...
 
Convergence of Robotics and Gen AI offers excellent opportunities for Entrepr...
Convergence of Robotics and Gen AI offers excellent opportunities for Entrepr...Convergence of Robotics and Gen AI offers excellent opportunities for Entrepr...
Convergence of Robotics and Gen AI offers excellent opportunities for Entrepr...
 
Ground Improvement Technique: Earth Reinforcement
Ground Improvement Technique: Earth ReinforcementGround Improvement Technique: Earth Reinforcement
Ground Improvement Technique: Earth Reinforcement
 
fitting shop and tools used in fitting shop .ppt
fitting shop and tools used in fitting shop .pptfitting shop and tools used in fitting shop .ppt
fitting shop and tools used in fitting shop .ppt
 
HAND TOOLS USED AT ELECTRONICS WORK PRESENTED BY KOUSTAV SARKAR
HAND TOOLS USED AT ELECTRONICS WORK PRESENTED BY KOUSTAV SARKARHAND TOOLS USED AT ELECTRONICS WORK PRESENTED BY KOUSTAV SARKAR
HAND TOOLS USED AT ELECTRONICS WORK PRESENTED BY KOUSTAV SARKAR
 
Introduction to Serverless with AWS Lambda
Introduction to Serverless with AWS LambdaIntroduction to Serverless with AWS Lambda
Introduction to Serverless with AWS Lambda
 
Introduction to Data Visualization,Matplotlib.pdf
Introduction to Data Visualization,Matplotlib.pdfIntroduction to Data Visualization,Matplotlib.pdf
Introduction to Data Visualization,Matplotlib.pdf
 
XXXXXXXXXXXXXXXXXXXXXXXXXXXXXXXXXXXXXXXXXXXXXXXXXXXX
XXXXXXXXXXXXXXXXXXXXXXXXXXXXXXXXXXXXXXXXXXXXXXXXXXXXXXXXXXXXXXXXXXXXXXXXXXXXXXXXXXXXXXXXXXXXXXXXXXXXXXXX
XXXXXXXXXXXXXXXXXXXXXXXXXXXXXXXXXXXXXXXXXXXXXXXXXXXX
 
Introduction to Robotics in Mechanical Engineering.pptx
Introduction to Robotics in Mechanical Engineering.pptxIntroduction to Robotics in Mechanical Engineering.pptx
Introduction to Robotics in Mechanical Engineering.pptx
 
Worksharing and 3D Modeling with Revit.pptx
Worksharing and 3D Modeling with Revit.pptxWorksharing and 3D Modeling with Revit.pptx
Worksharing and 3D Modeling with Revit.pptx
 
Electromagnetic relays used for power system .pptx
Electromagnetic relays used for power system .pptxElectromagnetic relays used for power system .pptx
Electromagnetic relays used for power system .pptx
 
8th International Conference on Soft Computing, Mathematics and Control (SMC ...
8th International Conference on Soft Computing, Mathematics and Control (SMC ...8th International Conference on Soft Computing, Mathematics and Control (SMC ...
8th International Conference on Soft Computing, Mathematics and Control (SMC ...
 

Siemens win cc manual wincc-proagent

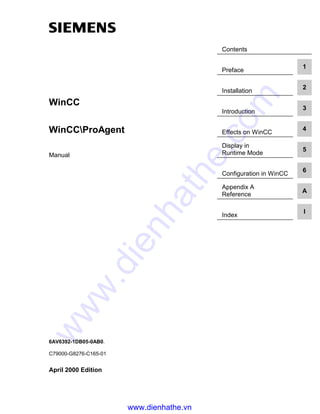
  • 1. Contents Preface 1 Installation 2 Introduction 3 Effects on WinCC 4 Display in Runtime Mode 5 Configuration in WinCC 6 Appendix A Reference A Index I WinCC WinCCProAgent Manual 6AV6392-1DB05-0AB0. C79000-G8276-C165-01 April 2000 Edition www.dienhathe.vn www.dienhathe.com
  • 2. WinCC, SIMATIC, SINEC, STEP are trademarks of Siemens. All other names used in this manual may be trademarks, the use of which by third parties for their own purposes may violate the rights of the respective proprietors. (The reproduction, transmission or use of this document or its contents is not permitted without express written authority. Offenders will be liable for damages. All rights, including rights created by patent grant or registration of a utility model or design, are reserved.) (We have checked that the contents of this document correspond to the hardware and software described. Nonetheless, differences might exist and therefore we cannot guarantee that they are completely identical. The information contained in this document is however, reviewed regularly and any necessary changes will be included in the next edition. We welcome suggestions for improvement.)  Siemens AG 2000 All rights reserved Subject to change without prior notice. 6AV6392-1DB05-0AB0 Printed in the Federal Republic of Germany Siemens Aktiengesellschaft www.dienhathe.vn www.dienhathe.com
  • 3. ProAgent Manual C79000-G8276-C165-01 i Contents 1 Preface ............................................................................................................. 1-1 1.1 Guide to the Manual........................................................................... 1-1 1.2 Position within the Information Environment...................................... 1-3 1.3 History................................................................................................ 1-4 1.4 Notation.............................................................................................. 1-4 1.5 Abbreviations ..................................................................................... 1-5 1.6 Additional Support.............................................................................. 1-6 2 Installation ....................................................................................................... 2-1 2.1 System Requirements ....................................................................... 2-1 2.2 Installing ProAgent............................................................................. 2-2 2.3 Uninstalling ProAgent ........................................................................ 2-4 3 Introduction ..................................................................................................... 3-1 3.1 What Process Diagnosis Can Achieve .............................................. 3-1 3.2 How Process Diagnosis is Carried Out.............................................. 3-3 3.3 How Process Diagnosis is Configured............................................... 3-5 3.4 Before You Start................................................................................. 3-8 3.5 Important Terms................................................................................. 3-9 3.5.1 Units.............................................................................................. 3-9 3.5.2 Actions.......................................................................................... 3-9 3.5.3 Transitions .................................................................................... 3-9 3.5.4 Movements ................................................................................... 3-9 4 Effects on WinCC ............................................................................................ 4-1 4.1 After Installation ................................................................................. 4-2 4.2 After Generation................................................................................. 4-3 4.3 ALARM_S Messaging........................................................................ 4-5 www.dienhathe.vn www.dienhathe.com
  • 4. Contents 04.00 ProAgent Manual ii C79000-G8276-C165-01 5 Display in Runtime Mode ............................................................................... 5-1 5.1 General .............................................................................................. 5-2 5.1.1 How To Activate Diagnosis ........................................................... 5-2 5.1.2 The Purpose of the Individual Diagnosis Screens........................ 5-3 5.1.3 Operating Principles ..................................................................... 5-9 5.1.4 Structure of the Diagnostic Screens ............................................. 5-12 5.1.5 Global Screen Header .................................................................. 5-13 5.1.6 Global Key Set.............................................................................. 5-14 5.2 ProAgent's User Screen .................................................................... 5-17 5.2.1 The Purpose of the ProAgent User Screen.................................. 5-17 5.2.2 What You See on ProAgent's User Screen .................................. 5-17 5.3 Global Message Window................................................................... 5-19 5.3.1 The Purpose of the Message Window ......................................... 5-19 5.3.2 What You See in the Global Message Window............................ 5-20 5.4 Message Screen................................................................................ 5-22 5.4.1 The Purpose of the Message Screen........................................... 5-22 5.4.2 What You See in the Message Screen......................................... 5-23 5.4.3 Message Screen Keys.................................................................. 5-25 5.4.4 How to Work with the Message Screen........................................ 5-26 5.5 Overview Screen................................................................................ 5-31 5.5.1 The Purpose of the Overview Screen........................................... 5-31 5.5.2 What You See in the Overview Screen......................................... 5-32 5.5.3 Overview Screen Keys.................................................................. 5-35 5.5.4 How to Work with the Overview Screen ....................................... 5-36 5.5.5 Changing the Display Mode.......................................................... 5-40 5.5.6 Hierarchical Units on the Overview Screen .................................. 5-41 5.5.7 Sequence Handling ...................................................................... 5-42 5.6 Detail Screen ..................................................................................... 5-44 5.6.1 The Purpose of the Detail Screen................................................. 5-44 5.6.2 What You See in the Detail Screen............................................... 5-45 5.6.3 Representation of the Network in STL.......................................... 5-48 5.6.4 Representation of the Network in LAD ......................................... 5-49 5.6.5 Keys in the Detail Screen.............................................................. 5-50 5.6.6 How to Work with the Detail Screen ............................................. 5-53 5.6.7 Switching Between Partial and Full View...................................... 5-56 5.6.8 Switching Between Initial Values and Current Status ................... 5-56 5.6.9 Switching Action or Transition....................................................... 5-57 5.6.10 Enhanced Options with S7-PDIAG............................................... 5-58 5.7 Movement Screen.............................................................................. 5-63 5.7.1 The Purpose of the Movement Screen......................................... 5-63 5.7.2 What You See in the Movement Screen....................................... 5-64 5.7.3 Keys in the Movement Screen...................................................... 5-67 5.7.4 How to Work with the Movement Screen ..................................... 5-68 5.7.5 Hierarchical Units in the Movement Screen.................................. 5-70 5.7.6 Master List of All Movements........................................................ 5-70 www.dienhathe.vn www.dienhathe.com
  • 5. 04.00 Contents ProAgent Manual C79000-G8276-C165-01 iii 6 Configuring in WinCC..................................................................................... 6-1 6.1 Basic Requirements of the PLC Program.......................................... 6-1 6.2 Shared Database with STEP 7 .......................................................... 6-4 6.3 When You Configure with ProAgent .................................................. 6-7 6.4 How You Configure with ProAgent..................................................... 6-9 6.5 Configuration Steps in Detail.............................................................. 6-12 6.5.1 Defining the target hardware and resolution................................. 6-12 6.5.2 Selecting the Units for Diagnosis.................................................. 6-12 6.5.3 Defining the Replacement Character Strategy ............................. 6-15 6.5.4 Selecting Display Classes ............................................................ 6-16 6.5.5 Defining the Alarm Diagnostic Screen .......................................... 6-18 6.5.6 Defining the Diagnostic Screen for Manual Starting of Diagnosis...................................................................................... 6-19 6.5.7 Setting Key Labeling..................................................................... 6-21 6.5.8 Archiving the Criteria Analysis ...................................................... 6-22 6.5.9 Process Controlling Messages ..................................................... 6-22 6.5.10 Defining the Report Files .............................................................. 6-23 6.5.11 Settings for Generation................................................................. 6-25 6.5.12 Carrying Out Generation............................................................... 6-27 6.5.13 Checking the Runtime Modules.................................................... 6-28 6.5.14 Configuring Installation Screens for Starting ProAgent................. 6-29 6.5.15 Multi-Lingual Projects ................................................................... 6-31 6.5.16 Other Hardware Platforms............................................................ 6-33 6.6 Changing the Diagnostic Screens ..................................................... 6-37 6.6.1 Changing the Diagnostic Screens ................................................ 6-37 6.6.2 Internal Structure of the Diagnostic Screens ................................ 6-38 6.6.3 Practical Ideas .............................................................................. 6-40 www.dienhathe.vn www.dienhathe.com
  • 6. Contents 04.00 ProAgent Manual iv C79000-G8276-C165-01 A Reference......................................................................................................... A-1 A.1 Functions ........................................................................................... A-2 A.1.1 ProAgent Functions (Overview).................................................... A-2 A.1.2 Function for Calling the Defined Start Screen............................... A-3 A.1.3 Functions for Directly Opening Specific Diagnostic Screens........ A-4 A.1.4 Directly Open Diagnostic Screens for a Specific Unit................... A-5 A.1.5 Directly Open Diagnostic Screens for a Specific Message........... A-7 A.1.6 Display the Name of a Current Step on a System Screen............ A-9 A.1.7 Exiting Diagnostics ....................................................................... A-13 A.1.8 Changing the Runtime Language................................................. A-14 A.1.9 Statistical Evaluation of Cause of Error ........................................ A-15 A.2 ProAgent Editor.................................................................................. A-18 A.2.1 Generation Run Tab...................................................................... A-18 A.2.2 Options Tab................................................................................... A-20 A.2.3 Report Tab .................................................................................... A-22 A.3 VarControl.......................................................................................... A-23 A.3.1 The Purpose of VarControl ........................................................... A-23 A.3.2 What You See in the Tag Table..................................................... A-24 A.3.3 How to Work with VarControl........................................................ A-26 I Index................................................................................................................. I-1 www.dienhathe.vn www.dienhathe.com
  • 7. ProAgent Manual C79000-G8276-C165-01 1-1 Preface This chapter explains how the manual is organized and where to find what information. 1.1 Guide to the Manual This manual provides you with all the information you need to do the following: • configure an installation-specific process diagnosis • detect a process error, find the cause of the error and rectify the error This manual assumes that you already have general experience of configuring with WinCC. This manual is therefore restricted to describing the functions and procedures offered by ProAgent but not contained in the standard functional scope of WinCC. The Online Help also assumes you have a basic knowledge of STEP 7 and associated optional packages. Note If you want to configure a process diagnosis yourself, all chapters of the Online Help are important to you. If you want to work with a process diagnosis that has already been configured, you only need to read the chapters entitled Introduction and Display in Runtime Mode. 1 Overview Contents What You Are Expected to Know Already Target Group www.dienhathe.vn www.dienhathe.com
  • 8. Preface 04.00 ProAgent Manual 1-2 C79000-G8276-C165-01 The chapters of this manual are arranged by topic as follows: • The chapter entitled Installation informs you how to install the optional package on your system under STEP 7 and WinCC. • The chapter entitled Introduction helps you get to know the advantages of process diagnosis and shows you how simple it is to find and rectify a fault. An overview shows you what steps are required for configuration and where the interfaces are between STEP 7, WinCC and ProAgent. At the end of the chapter, a number of important terms that are frequently encountered in the context of process diagnosis are explained. • By installing the ProAgent options package, a few script functions have been added to the Global Script Editor that are required for process diagnostics. In addition, external tags of different data types have been added to tag management. The chapter entitled Effects on WinCC shows you which components have been added. • The Display in Runtime Mode section describes in detail how the different diagnostic screens appear in WinCC Runtime mode, what they show and which functions you can trigger as a user. It also explains what the sequence of process diagnosis and fault rectification looks like in practice. You require this knowledge before you begin to create your own configuration. • The chapter entitled Configuring in WinCC then informs you how you can integrate a process diagnosis into a new configuration or how you can 'retrofit' an existing configuration with process diagnosis. In addition, this chapter also provides a number of tips on how you can adapt the diagnostic screens to the design of your plant screens. • In the Appendix, you will find detailed information on the dialog boxes of ProAgent's editor and on the functions which have been added to the basic WinCC package for process diagnostics. At the end of the appendix is a summary of the main functions of the WinCC Runtime module known as VarControl. Note Please note that the various manuals that make up the complement of WinCC documentation and the WinCC Online Help texts provide excellent descriptions of the general WinCC functions. Answers to queries relating to STEP 7 and its options packages will be found in the manuals for these programs. These programs too have extensive online Help systems. Where to Find What Other Sources of Information www.dienhathe.vn www.dienhathe.com
  • 9. 04.00 Preface ProAgent Manual C79000-G8276-C165-01 1-3 1.2 Position within the Information Environment WinCC and the various OSs are supplied with several different manuals and Online Help systems. The diagram below illustrates the position of the ProAgent documentation within the overall documentation structure. Online Help Pro Agent option package WinCC basic documentation Online Help texts ProAgent User’s Guide CD-ROM Examples Control Center Channels User Administration Graphics Designer Global Scripts Tag Logging Alarm Logging Text Library Report Designer Software protection Configuration Manual Position within the Information Environment The content of the ProAgent User's Guide essentially corresponds to the information contained in the associated Online Help. However, detailed descriptions of the dialog boxes in the ProAgent editor are only contained in the Online Help. Note The tools used for programming the PLCs have their own documentation which is not listed in the above graphic. www.dienhathe.vn www.dienhathe.com
  • 10. Preface 04.00 ProAgent Manual 1-4 C79000-G8276-C165-01 1.3 History The different issues of the User's Guide describe the following software versions: Issue 02/98 WinCC Version 4.01 ProAgent Version 4.0 Issue 11/98 WinCC Version 4.01 ProAgent Version 4.0 Issue 06/99 WinCC Version 4.02 ProAgent Version 4.5 Issue 04/00 WinCC Version 5.0 ProAgent Version 5.0 1.4 Notation Different character formats are used to help you find your way through the text, as follows: Output Words in typewriter type (Courier) indicate inputs and outputs as they appear on the screen. Change transitions Names of keys are printed in bold type face. Editors → ProAgent Menu options are shown in italics. Different levels are linked by an arrow. The complete route to the menu option in question is always shown. Generation Run tab Names of buttons, windows and tabs are printed in italic type face. www.dienhathe.vn www.dienhathe.com
  • 11. 04.00 Preface ProAgent Manual C79000-G8276-C165-01 1-5 1.5 Abbreviations The abbreviations used in this documentation have the following meanings: ALARM_S Event-driven signaling path from the PLC to the OS AM Alarm message CPU Central processing unit DB Data block DEO Initial diagnostic address DP Distributed I/O EM Event message FB Function block with instance data FC Function block without instance data FI Flat screen system HMI Human-machine interface LAD Ladder diagram MPI Multipoint interface OB Organization block OP Operator panel OS Operator station PC Personal computer PLC Programmable logic controller PLC Programmable logic control RLO Result of logical operation S7 SIMATIC S7 STL Statement list UDT User-defined data type WinCC Windows Control Center www.dienhathe.vn www.dienhathe.com
  • 12. Preface 04.00 ProAgent Manual 1-6 C79000-G8276-C165-01 1.6 Additional Support Can be contacted at any time of the day throughout the world: Johnson City Nurember Singapore SIMATIC BASIC Hotline Nuremberg SIMATIC BASIC Hotline Johnson City SIMATIC BASIC Hotline Singapore SIMATIC BASIC Hotline Local time: Mo-Fr 7 a.m. through 5 p.m. Telephone: +49 911 895-7000 Fax: +49 911 895-7002 e-mail: simatic.support@ nbgm.siemens.de Local time: Mo-Fr 8 a.m. through 7 p.m. Telephone: +1 423 461-2522 Fax: +1 423 461-2231 e-mail: simatic.hotline@ sea.siemens.com Local time: Mo-Fr 8.30 a.m. through 5.30 p.m. Telephone: +65 740-7000 Fax: +65 740-7001 e-mail: simatic.hotline@ sae.siemens.com SIMATIC Premium Hotline (with charges, with SIMATIC Card only) Time: Mo-Fr 24 hours Telephone: +49 911 895-7777 Fax: +49 911 895-7001 SIMATIC Customer Support Hotline www.dienhathe.vn www.dienhathe.com
  • 13. 04.00 Preface ProAgent Manual C79000-G8276-C165-01 1-7 SIMATIC Customer Support offers you wide-ranging additional information on SIMATIC products by way of its online services: • You can obtain general up-to-date information − on the Internet at http://www.ad.siemens.de/simatic − by polling fax number 08765–93 02 77 95 00 • Up-to-date product information and downloads which may be of assistance during operation: − on the Internet at http://www.ad.siemens.de/support/html-00/ − from the Bulletin Board System (BBS) in Nuremberg (SIMATIC Customer Support Mailbox) by dialing +49 (911) 895–7100. To dial the mailbox, use a modem up to V.34 (28.8 kbauds), and set its parameters as follows: 8, N, 1, ANSI, or dial up via ISDN (x.75, 64 kB). SIMATIC Customer Support Online Services www.dienhathe.vn www.dienhathe.com
  • 14. Preface 04.00 ProAgent Manual 1-8 C79000-G8276-C165-01 www.dienhathe.vn www.dienhathe.com
  • 15. ProAgent Manual C79000-G8276-C165-01 2-1 Installation This chapter explains how you install ProAgent under STEP 7 and under WinCC. 2.1 System Requirements The following hardware configuration is recommended for ProAgent CS: Processor 300 MHz Pentium or faster RAM 128 MB The hardware requirements for ProAgent runtime systems are the same as for the WinCC basic program. In addition, you will also need the following: Free hard disk space ProAgent CS: 80 MB on the drive on which WinCC is installed ProAgent RT: 15 MB on the drive on which WinCC is installed Screen resolution 1024 x 768, 800 x 600 Programmable logic control SIMATIC S7 with ALARM_S-compatible CPU 2 Overview Hardware Requirements www.dienhathe.vn www.dienhathe.com
  • 16. Installation 04.00 ProAgent Manual 2-2 C79000-G8276-C165-01 The software requirements depend on the planned operating mode: • You require the following for configuring: Microsoft Windows NT Version 4.0 / Service Pack 4 WinCC Version 5.0 / Service Pack 1 including options packages "Basis Process Control" and "Object Manager" STEP 7 Version 5.0 or higher, Service Pack 3 S7-PDIAG and/or S7-GRAPH Version 4.01 or higher Version 4.0 or higher AS-OS Mapper SIMATIC AS/OS Engineering V 5.1 • You require the following for runtime mode: Microsoft Windows NT Version 4.0 / Service Pack 4 WinCC Version 5.0 / Service Pack 1 2.2 Installing ProAgent WinCC and STEP 7 must have been installed for ProAgent to be able to run. At least one of the optional STEP 7 packages, S7-PDIAG or S7-GRAPH, is also required. Beware Before you install ProAgent, please read the file contained on the CD-ROM - InstallNotesEng.doc. This will provide you with additional installation information that only became available after this manual went to print. Note To be able to install ProAgent under Windows NT, you must have write access rights to the registry. This means you have to have administrator access authority. Details about installation of WinCC can be found in the WinCC documentation. The following description starts from the assumption that WinCC has already been installed. To install ProAgent proceed as follows: 1. Insert the ProAgent CD-ROM in the CD-ROM drive. The Setup Program starts automatically after a few seconds. Software Requirements Installation Requirements Installing ProAgent www.dienhathe.vn www.dienhathe.com
  • 17. 04.00 Installation ProAgent Manual C79000-G8276-C165-01 2-3 If the CD-ROM is already in your drive or you are installing the program from a network drive, you can also start Setup manually. To do this, choose Settings → Control Panel → Add/Remove Programs and click the Install button on the Install/Uninstall tab. 2. You will then be prompted through the entire installation procedure for WinCC/ProAgent. Please follow all the instructions on the screen. When you have completed installation and if you have Windows, you can now configure process diagnostics with ProAgent. Note The ProAgent Runtime software is protected. You must have valid authorization to be able to use the full scope of the program's functions. The easiest and best way to install authorization is to do so at the same time as installing ProAgent. You can, however, install it later by means of the AuthorsW.exe program on your authorization disk. In this case, ProAgent will initially only run in demo mode. Further information about the topic of software protection can be found in the manual entitled WinCC Software Protection. The Installation Program copies the necessary files to the WinCC system folder. Further, a ProAgent folder is created. ProAgent is added to the standard editors, with its own icon in the Project Navigation Window of the Control Center: ProAgent The ProAgent Editor ProAgent does not have a separate program icon. All ProAgent functions can only be accessed via WinCC. Installed Files New Editor in the Project Navigation Window Buttons on the Toolbar www.dienhathe.vn www.dienhathe.com
  • 18. Installation 04.00 ProAgent Manual 2-4 C79000-G8276-C165-01 Nevertheless, two new links have been added to the Windows Start menu: WinCC/ProAgent With this button you call the online documentation for ProAgent. It also contains all the information incorporated in the User's Guide. ProAgent Sample File Description Click this button to open an electronic document containing an illustrated introductory example. This example helps to get you started with S7-PDIAG and ProAgent and thus makes it easier for you. To view this example, you will require Acrobat Reader. If the program is not installed on your system, you can install it by running ProAgent's Setup. The ReleaseNote.doc file on the CD-ROM contains up-to-date information relating to ProAgent, that only became available after this manual went to print. Please note all the tips mentioned in that file. 2.3 Uninstalling ProAgent You can uninstall ProAgent under Windows NT: 1. From the Windows Start menu choose Settings → Control Panel → Add/Remove Programs 2. Select the Install/Uninstall tab in the Add/Remove Programs Properties window. 3. In the list, select the SIMATIC WinCC ProAgent entry. 4. Click the Add/Remove... button and follow the instructions on the screen. ProAgent has now been removed from your system. Note If you deinstall ProAgent from a computer, you should also deinstall the relevant authorization for the program using AuthorsW.exe. You can then reactivate this authorization on a different computer. Further information about the topic of authorization can be found in the manual entitled WinCC Software Protection. Up-to-date Information www.dienhathe.vn www.dienhathe.com
  • 19. ProAgent Manual C79000-G8276-C165-01 3-1 Introduction This chapter helps you get to know the advantages of process diagnosis and shows you how simple it is to find and rectify an operating fault. An overview shows you what steps are required for configuration and where the interfaces are between STEP 7, WinCC and ProAgent. At the end of the chapter, a number of important terms that are frequently encountered in the context of process diagnosis are explained. 3.1 What Process Diagnosis Can Achieve SIMATIC S7 PLCs enable you to configure powerful process diagnosis functions. These diagnostics functions help you detect and rectify potential faults very quickly. In that way, you will be able to increase the availability of your installation, reduce down times and bring down costs. Triggering of movements to rectify faults with the OS System availability Down times Costs Alarm message in runtime mode Automatic analysis Display of cause of fault on OS Option package ProAgent Process diagnosis Sequence and Benefits of Process Diagnosis 3 Overview www.dienhathe.vn www.dienhathe.com
  • 20. Introduction 04.00 ProAgent Manual 3-2 C79000-G8276-C165-01 Many problems can be avoided from the outset The flexibility of the process diagnosis system enables potential problems in the process sequence to be identified before they actually occur. For example, wear on a tool is indicated by an increase in forces. The process diagnosis system can monitor these forces and initiate replacement of the tool at the appropriate time. Problems can still be identified without process diagnosis WinCC enables you to visualize installations and control them by means of an easy- to-use interface. A powerful message system draws your attention to process faults. An alarm message is then displayed on the OS. Situation-relevant information assists you in locating the fault If problems arise in the process sequence, you can use the OS to trace quite simply which units have caused the fault. To this end, you can examine the results of logical operation directly on the OS either in the statement list or in the ladder diagram and thus find the fault quickly. You can quickly remedy the problem To rectify the fault, you can trigger targeted movements on the OS. If several parts of the installation have been damaged, you can see this on the OS and can take the necessary steps to have the individual parts repaired at the same time. And that means that your installation will be ready for operation again as quickly as possible. Do not shift x-axis Process diagnosis Fault rectification in prompted manual mode I 1.0 I 1.1 O1.0 Message display Message, Diagnosis, Assistance with Fault Rectification Avoiding Problems Identifying Problems Rectifying Problems www.dienhathe.vn www.dienhathe.com
  • 21. 04.00 Introduction ProAgent Manual C79000-G8276-C165-01 3-3 3.2 How Process Diagnosis is Carried Out When you configure process diagnosis, a number of additional diagnostic screens are integrated into the configuration. The contents of the screens can be adapted dynamically to the technological units of the installation. You can select your start screen for the process diagnosis system yourself. In addition, you can set which ProAgent screen is opened with an ALARM_S message in WinCC Runtime mode. Performing process diagnosis is extremely easy. You can switch between the various diagnostic screens simply by pressing a key: • The ProAgent user screen is intended as the start screen and as a distribution list for the other screens. • In the Global Message Window, all diagnosis-capable messages are marked. This marking means you can see that you can trace the causes of faults in the process control system. If you apply the default setting, this diagnostic screen is opened automatically in WinCC Runtime mode and placed on top as soon as an ALARM_S error message arrives. • The Message Screen displays a series of additional functions for selecting and processing the individual alarm messages. • The Overview Screen displays all the units and their subunits. This enables you to see at a glance which operating mode the individual units are in. • The Movement Screen is used for quick rectification of an error. You can see at a glance which movements are blocked and those which can still be executed. Movements by individual units can be triggered by keys. • The Detail screen shows the result of the error analysis which is performed automatically by the operating unit. To this end, the display shows a Statement List (STL) or a ladder diagram (LAD) with the corresponding excerpt from the STEP 7 program code. The status bits of the operands and all the results of logic operations can be displayed at the same time. Signals that caused an error are highlighted. The cause of an error can therefore quickly be traced. Diagnostic screens www.dienhathe.vn www.dienhathe.com
  • 22. Introduction 04.00 ProAgent Manual 3-4 C79000-G8276-C165-01 Global Message window Alarm message Process error Overview picture Units Status of the units Operating modes Detail picture Result of the Fault analysis Status and result Of logical operation Movement picture Possible movements Trigger movements by means of keys Message picture Selection Acknowledgment The Different Diagnostic Screens The entire user interface has been standardized, so that all installations and sections of installations are controlled along uniform lines. A detailed description of the individual diagnostic screens can be found in the chapter entitled Display in Runtime Mode (Chapter 5). Standardization www.dienhathe.vn www.dienhathe.com
  • 23. 04.00 Introduction ProAgent Manual C79000-G8276-C165-01 3-5 3.3 How Process Diagnosis is Configured ProAgent is a universal system solution and designed for optimum interaction between STEP 7, optional STEP 7 packages and the WinCC visualization system. WinCC offers you a standardized and ergonomical user interface for configuring process diagnosis. It makes no difference whether you integrate process diagnosis into a new project to be created or into an existing project. Just as when configuring an installation, there are two main subtasks involved in implementing process diagnosis: 1. programming the PLC 2. configuring the OS Just like WinCC, you use ProAgent for the second step only, that of configuring the OS. Shared database S7-GRAPH S7-PDIAG ProAgent PLC Operator Station Steps Involved in Configuring the Process Diagnosis System Concept Subtasks www.dienhathe.vn www.dienhathe.com
  • 24. Introduction 04.00 ProAgent Manual 3-6 C79000-G8276-C165-01 Preparations for process diagnosis differ depending on which language you use for programming a PLC: • If you are using S7-GRAPH and its compiler is set to ALARM_S, your programs will automatically become diagnosis-capable. You will find further information on this subject in the S7-GRAPH manual. • If you are programming in LAD/CSF/STL, you need the S7-PDIAG option package. S7-PDIAG creates additional modules for monitoring your process for the purposes of fault detection. This is done for the most part automatically. Thanks to the global approach of S7 process diagnosis, you can work within an installation using different programming languages to suit your particular needs. You can also detect and locate process faults in "mixed" sequential and logic control systems. Programming the PLC and defining the settings in S7-PDIAG are the first steps in creating the process diagnosis. They are followed by configuration of the OS using WinCC and ProAgent. When translating the PLC program, the STEP 7 option packages store all the data required for the process diagnosis in a shared database. WinCC will then access this database during the next step, so that it can configure the OS. Once the STEP 7 program has been created, the process diagnosis function for the OS can be configured. This is the point at which the optional WinCC package, ProAgent, is first put to use. It goes without saying that you do not need to repeat any of the entries already made in STEP 7. All relevant information was stored in the shared database now accesed by ProAgent. The diagnostic screens are supplied ready-configured. If in a particular case you would like to customize the design of one of the screens to suit your own special requirements, you can take advantage of the extensive possibilities offered by the Graphics Designer. More information about possible design alterations can be found in the chapter entitled Changing the Diagnostic Screens (Chapter 6.6.1). Programming the PLC Common Database as Interface Configuring the OS www.dienhathe.vn www.dienhathe.com
  • 25. 04.00 Introduction ProAgent Manual C79000-G8276-C165-01 3-7 Configuration in WinCC is simple and quick. All you still have to do is: Defining start picture Defining target hardware Selecting units Carrying out generation Defining options Configuring the OS for Process Diagnosis In the first step you set the system hardware for which you want to configure process diagnostics. As a second step, select the diagnostic screen you want to open when you activate diagnostics in WinCC Runtime mode. In the third step, you select the units of your S7 PLC for which you would like to set up process diagnosis. This selection is quite simple: ProAgent prepares a list in which you need only click the units concerned. The final step you perform is to generate the new database for diagnosis, a task which requires you simply to press a button. You will find detailed instructions on configuration with ProAgent in the section on how to configure in ProAgent (Chapter 6.4). www.dienhathe.vn www.dienhathe.com
  • 26. Introduction 04.00 ProAgent Manual 3-8 C79000-G8276-C165-01 3.4 Before You Start ProAgent is only part of the world of S7 and therefore also just one part of creating a process diagnosis. Like WinCC, ProAgent is only used for configuring the OS and not the PLC. In order to be able to configure a process diagnosis, certain basic requirements must be met. They can be summarized as follows: You have to install the following software or have already installed it: • STEP 7 • WinCC with Object Manager • AS/OS Engineering • ProAgent In addition, the following requirements must be met: • The PLC must have been programmed already - either with LAD/CSF/STL and S7-PDIAG or S7-GRAPH. • If the PLC was programmed in STEP 7, additional blocks for error detection have to be created with the S7-PDIAG options package. Error detection must have been activated. www.dienhathe.vn www.dienhathe.com
  • 27. 04.00 Introduction ProAgent Manual C79000-G8276-C165-01 3-9 3.5 Important Terms 3.5.1 Units In S7-PDIAG, a unit is a module, in S7-GRAPH it is a sequence of steps. Units are objects of the process diagnosis that are monitored with the aid of error definitions. There can be several error definitions for each unit. Units can be physical objects in the process (e.g. a press, die), which in turn can encompass movements (see Movements) (e.g. forward/backward, up/down). Units are logical hierarchical criteria and structure the view of the process They may store data that is shared by all hierarchically subordinate objects. Hierarchically subordinate objects can in turn be other units or movements, for example. There can be one or more actions for each unit (see Actions). 3.5.2 Actions Actions are part of a unit (see Units). An action is used in a process to drive an individual actuator. In program terms, an action is • a network or expression in an LAD/CSF/STL program • a step in an S7-GRAPH program 3.5.3 Transitions A transition describes a condition for progressing from one step to the next within a sequence of steps. Transitions exist only in S7-GRAPH. 3.5.4 Movements Movements relate to sequences in the process that can be monitored with the aid of error definitions in the process diagnosis. There can be several error definitions for each movement. A movement can be contained within a unit (see Units) and represents an actual movement of a physical object in the process (e.g. a die moves up and down). Movements are defined in S7-PDIAG by using the UDT "Movement" within a module. www.dienhathe.vn www.dienhathe.com
  • 28. Introduction 04.00 ProAgent Manual 3-10 C79000-G8276-C165-01 www.dienhathe.vn www.dienhathe.com
  • 29. ProAgent Manual C79000-G8276-C165-01 4-1 Effects on WinCC By installing the ProAgent options package, a few script functions have been added to the Global Script Editor that are required for process diagnostics. In addition, external tags of different data types have been added to tag management. This chapter shows you which components have been added. 4 Overview www.dienhathe.vn www.dienhathe.com
  • 30. Effects on WinCC 04.00 ProAgent Manual 4-2 C79000-G8276-C165-01 4.1 After Installation While ProAgent is being installed, a folder called ProAgent is created at the WinCC system folder. It contains diagnostic screens that are fully ready for use for the different OS. Note The names of the screens required for process diagnosis all begin with the prefix @Diag. In this way, these diagnostic screens are always listed together. Since ProAgent is used around the world, all the names used are English. ProAgent is added to the standard editors, with its own icon in the Project Navigation Window of the Control Center: ProAgent The ProAgent editor When ProAgent is installed, if you choose Editors from the menu, you will now find an additional option called ProAgent. By opening the shortcut menu with the right mouse button or by choosing Editors → ProAgent → Open from the menu, you can call the configuration dialog box for process diagnostics. Diagnostic Screens The ProAgent Editor www.dienhathe.vn www.dienhathe.com
  • 31. 04.00 Effects on WinCC ProAgent Manual C79000-G8276-C165-01 4-3 4.2 After Generation By generating ProAgent, stored pieces of message text and all data required for diagnostics are imported from database shared with STEP 7 and saved together with the configuration in WinCC. The effects of generating ProAgent with respect to WinCC are described below. In Tag Management, the entry SIMATIC S7 PROTOCOL SUITE is stored with further subitems under the item Internal Tags. This provides you with the connections, channels and tags necessary for selecting the Units that can be diagnosed: SIMATIC S7 PROTOCOL SUITE The ready-made diagnostic screens are copied from the respective template to the GraCS folder in your current WinCC project. These screens with the prefix @Diag are therefore also listed in the table window of the Graphics Designer. In alarm logging, all the ALARM_S messages relevant to process diagnostics and any process control system messages are added. The message line format for the ProAgent Message Screens is stored under the name @DiagLine. Similarly, the message window template for process diagnosis has the name @DiagWindow. Tag Management The Graphics Designer Editor The Alarm Logging Editor www.dienhathe.vn www.dienhathe.com
  • 32. Effects on WinCC 04.00 ProAgent Manual 4-4 C79000-G8276-C165-01 This means the ProAgent Message Screens have been enhanced by two additional functions: • All ALARM_S messages for which you can perform a criteria analysis are identified in the Diag message block by an asterisk, "*". • All other ALARM_S messages are identified in the Diag message block by a letter "A". Diagnosable Alarm Message Further, new message classes are created at Message Class with which you can precisely select from the Message Screen the messages that you want to display in WinCC Runtime mode of process diagnostics. Note Use of message classes for process diagnostics presupposes that a WinCC display unit has been configured in STEP 7. Only then can the respective message classes be selected. If no WinCC display device has been configured, ProAgent will always generate messages of the message class Error. You will find further information on configuring message classes in the manuals and in the Online Helps for STEP 7 and its options packages. If you want to adapt your configuration perfectly to the respective operations being run, you may also change the preassigned names of the individual message classes. You change the name of a message class as follows: 1. Select the Properties command from the context menu of the message class in question. 2. Enter the new name on the Configure Message Classes tab. In the Global Script editor, a folder called ProAgent is created at the entry called Standard Functions and contains the functions required for diagnostics. You will find a description of all ProAgent functions in the section entitled Functions (Chapter A.1) in the Appendix. The Global Script Editor www.dienhathe.vn www.dienhathe.com
  • 33. 04.00 Effects on WinCC ProAgent Manual C79000-G8276-C165-01 4-5 4.3 ALARM_S Messaging STEP 7 options packages S7-PDIAG and S7-GRAPH send ALARM_S messages. This is the reason why the ALARM_S message number procedure has to be introduced in WinCC, too. You can use ALARM_S alongside the message bit procedure used to date. You can also continue to use existing projects. ALARM_S is a message number procedure. The message numbers are assigned by the system when you configure in STEP 7. Message text is uniquely assigned by the numbers. The different messages are assigned to various display classes. When you configure, you have the choice of selecting a specific subset of display classes for an OS. You can therefore distribute messages to specific display devices. When an error occurs, the CPU sends the time in addition to the state of the message (active, cleared or acknowledged). This makes an exact diagnosis of the cause of the error possible. Due to the use of the ALARM_S message number procedure, there are certain minor changes relating to configuration and in the Message Screen on the OS. • Messages are no longer configured in WinCC, but while programming the PLC in STEP 7 instead. This is also where you assign a message class to every message. • Due to the use of ALARM_S, there are also several minor extensions in the display of the Message Screen. You will find a detailed description in section called What You See on the Message Screen (Chapter 5.4.2). Why ALARM_S? What is ALARM_S? Changes due to ALARM_S www.dienhathe.vn www.dienhathe.com
  • 34. Effects on WinCC 04.00 ProAgent Manual 4-6 C79000-G8276-C165-01 www.dienhathe.vn www.dienhathe.com
  • 35. ProAgent Manual C79000-G8276-C165-01 5-1 Display in Runtime Mode This section describes in detail how the different diagnostic screens appear in WinCC Runtime mode, what they show and which functions you can trigger as a user. 5 Overview www.dienhathe.vn www.dienhathe.com
  • 36. Display in Runtime Mode 04.00 ProAgent Manual 5-2 C79000-G8276-C165-01 5.1 General 5.1.1 How To Activate Diagnosis Thanks to the Alarm Logging editor of WinCC, you are no longer a stranger to working with message windows and alarm messages. There is still such a thing as a message window – even if ProAgent has been used to configure a process diagnosis function. ALARM_S messages for which you can perform a criteria analysis are now identified by an asterisk, "*". You can call up further information about these messages from the Detail Screen and Movement Screen. All other ALARM_S messages are identified by a letter "A". Alarm Message Structure Depending on the configuration, there is normally at least one key which, for example, calls the ProAgent Overview Screen, in addition to starting diagnostics by means of an ALARM_S message. From there, you can go to other diagnostic screens. You can also configure how you want to select one of the other diagnostic screens (Message Screen, Detail Screen, Movement Screen) from your system screens. After completing diagnosis and rectifying the fault, you have to acknowledge the message as normal. If the alarm message belongs to an acknowledgment group, all the other alarm messages of this group are also acknowledged at the same time. Diagnosable Messages Diagnosis Start Screen Other Routes Message Acknowledgement www.dienhathe.vn www.dienhathe.com
  • 37. 04.00 Display in Runtime Mode ProAgent Manual C79000-G8276-C165-01 5-3 5.1.2 The Purpose of the Individual Diagnosis Screens When you configure process diagnosis, a number of diagnostic screens are integrated into your project. Process diagnostics runs in WinCC Runtime mode with the help of these screens. The diagnostic screens are for the most part standardized and differ only minimally between the various OSs. The following figures show examples of diagnostic screens on a PC. global key set message line ProAgent User Screen (Example on PC) You can activate the ProAgent user screen to start diagnostics from the system screens of your project. You can then switch from here directly to the other diagnostic screens. It depends on the configuration concerned whether the ProAgent user screen is actually used. You will find a detailed description of the ProAgent user screen in the section called ProAgent User Screen(Chapter 5.2). Note If you want to use this screen together with your default configuration, you have to adjust the Back key. Diagnosis Screens ProAgent User Screen www.dienhathe.vn www.dienhathe.com
  • 38. Display in Runtime Mode 04.00 ProAgent Manual 5-4 C79000-G8276-C165-01 diagnosable alarm message global key set Global Message Window (example on PC) In the Global Message Window, diagnosable messages are marked by the letter "A". Diagnosable messages, for which you can also carry out an analysis of criteria, are marked by an asterisk "*". You can call up further information about these messages from the Detail Screen and Movement Screen. Whether or not you actually use the Global Message Window depends on the respective configuration. You can set whether this screen opens automatically in WinCC Runtime mode with an ALARM_S message. A detailed description of the global message window will be found in the section called Global Message Window (Chapter 5.3). Global Message Window www.dienhathe.vn www.dienhathe.com
  • 39. 04.00 Display in Runtime Mode ProAgent Manual C79000-G8276-C165-01 5-5 diagnosable alarm message picture-specific key set global key set global picture header Message Screen (example on PC) The structure of the Message Screen is matched to that of the Global Message Window, but it does offer you a number of screen-specific keys. This means you can call, among other things, a dialog box for selecting messages and acknowledging ALARM_S messages. A detailed description of the Message Screen can be found in the chapter entitled Message Screen (Chapter 5.4). Message Screen www.dienhathe.vn www.dienhathe.com
  • 40. Display in Runtime Mode 04.00 ProAgent Manual 5-6 C79000-G8276-C165-01 global picture header global key set picture-specific key set blocked unit message line Overview Screen (example on PC) The Overview Screen shows an overview of all the units in the system. This enables you to see at a glance which operating mode a particular unit is in. Blocked units are identified as such. When a fault is rectified, this marking is removed. A detailed description of the Overview Screen can be found in the chapter entitled Overview Screen (Chapter 5.5). Overview Screen www.dienhathe.vn www.dienhathe.com
  • 41. 04.00 Display in Runtime Mode ProAgent Manual C79000-G8276-C165-01 5-7 global picture header global key set picture-specific key set these signals caused a process error result of logical operation message line Detail Screen (example on PC) The process diagnosis analyzes which signals in the PLC program have led to an error message. The detail screen shows the result of this criteria analysis. This means you recognize not only that a fault has occurred, but also the cause of this fault. The Detail Screen shows the relevant section of the STEP 7 program code in STL or LAD format. Parallel to this, the status bits of the operands, all results of logical operation, symbols and comments are displayed. Signals that have caused a fault are highlighted. A detailed description of the Detail Screen can be found in the chapter entitled Detail Screen (Chapter 5.6). Detail Screen www.dienhathe.vn www.dienhathe.com
  • 42. Display in Runtime Mode 04.00 ProAgent Manual 5-8 C79000-G8276-C165-01 global picture header global key set movement possible movement blocked picture-specific key set message line Movement Screen (example on PC) The Movement Screen provides assistance with rectifying faults. It enables you to trigger targeted movements of individual units very simply. The symbols displayed help you to see at a glance whether a movement is blocked. A detailed description of the Movement Screen will be found in the section called Movement Screen (Chapter 5.7). Movement Screen www.dienhathe.vn www.dienhathe.com
  • 43. 04.00 Display in Runtime Mode ProAgent Manual C79000-G8276-C165-01 5-9 5.1.3 Operating Principles Operation of the individual diagnostic screens is standardized and is based on the design options familiar to you from WinCC. Standardized graphics are used in all diagnostic screens. Once you have got to know the basic structure of the diagnostic screens and the various symbols used, you will quickly find your way round all screens. The ProAgent user screen can be used as the start screen for diagnostics. For precise error localization and elimination, you can then change directly to the Overview Screen, Message Screen, Detail Screen or Movement Screen. The information displayed following a change of screens will always depend on which message or unit is highlighted. When an initial message is issued, the corresponding unit is selected. If no message or unit is marked and the Detail Screen or Movement Screen is called, the first action of the first unit of the first CPU of your configuration is opened for these two screens. You can return from the diagnostic screens at any time to the system screen from which you activated diagnostics. User screen Overview screenMessage screen Movement screen Detail screen S7-KFA-Editor S7-PDIAG S7-GRAPH S7 Manager Linking Diagnostic Screens Standardization Links www.dienhathe.vn www.dienhathe.com
  • 44. Display in Runtime Mode 04.00 ProAgent Manual 5-10 C79000-G8276-C165-01 Depending on the type of your OS, you can continue to work in the way to which you are accustomed. Basically, you can run all diagnostic screens at the click of a mouse or by using function and arrow keys. Note For reasons of clarity, all keys are reproduced in this documentation with the symbols or text name which can be seen on the diagnostic screens. The key numbers and associated letters (F or K) are not used, since they vary depending on the type of OS configured. The cursor functions possible are depicted by the following symbols: Symbol Key Function Cursor Up Cursor Down Indicates that the display can be scrolled vertically by one element. Indicates that the display can be scrolled vertically by one page. Cursor Left Cursor Right Indicates that the display can be scrolled horizontally by one element. Indicates that the display can be scrolled horizontally by one page. Cursor Symbols Controlling via Keyboard and Mouse Symbols www.dienhathe.vn www.dienhathe.com
  • 45. 04.00 Display in Runtime Mode ProAgent Manual C79000-G8276-C165-01 5-11 Other symbols are used to denote errors and errored results of logic operations: Symbol Name Function Warning triangle Identifies a faulty unit or blocked movement. That unit whose fault occurred first is marked by a flashing border around this symbol. Lightning Identifies a faulty signal. Connection disturbed Indicates an errored connection or an addressing error. Fault symbols www.dienhathe.vn www.dienhathe.com
  • 46. Display in Runtime Mode 04.00 ProAgent Manual 5-12 C79000-G8276-C165-01 5.1.4 Structure of the Diagnostic Screens All diagnostic screens – except the user screen and the global message window – consist of three segments: a specific section for each diagnostic screen is embedded between a global screen header (Chapter 5.1.5) and a set of global keys (Chapter 5.1.6). Above the keys is a message line for displaying the earliest message. global key set global picture header picture-specific section Sections of the Diagnostic Screens Clear partitioning of diagnostic screens into one screen-specific and two global sections make sure you can quickly find your bearings when running the different screens. www.dienhathe.vn www.dienhathe.com
  • 47. 04.00 Display in Runtime Mode ProAgent Manual C79000-G8276-C165-01 5-13 5.1.5 Global Screen Header clockdisplay of dateuser Global Screen Header The date and time are always displayed in all diagnostic screens. In addition, displayed to the right of the User symbol is the name under which you or your group logged on in WinCC. ProAgent is integrated in the central access protection function of WinCC. This enables you, for example, to protect particular operating objects against being used by unauthorized persons. You should use this in particular for the VarControl global key and on the Overview Screen for the Operating Mode, Seq. Handling and S7 Manager keys. Further information can be found in the manual or in the Online Help for the WinCC editor User Administrator. www.dienhathe.vn www.dienhathe.com
  • 48. Display in Runtime Mode 04.00 ProAgent Manual 5-14 C79000-G8276-C165-01 5.1.6 Global Key Set In addition to a number of screen-specific keys, you can also use various cross- screen keys in all diagnostic screens. Symbol Name Function Overview You use this key to open the Overview Screen. Detail View You use this key to open the Detail Screen. Movements You use this key to open the Movement Screen. Messages You use this key to open the Message Screen. VarControl Use this key to call the VarControl runtime module. This enables you to monitor and control the operands of the respective PLC program. S7 Manager With this key you can change directly to SIMATIC Manager to work with other SIMATIC applications. Language With this key you can select, with multi- lingual projects, German, English or French. Information You can use this key to open the window entitled Screen Information. This window allows you to enter or read information or comments for each diagnostic screen. Back You can use this key to exit diagnosis mode and return to the installation screen from which ProAgent was activated. Global keys www.dienhathe.vn www.dienhathe.com
  • 49. 04.00 Display in Runtime Mode ProAgent Manual C79000-G8276-C165-01 5-15 With the Overview, Detail View, Movements and Messages keys you can change directly between these four diagnostic screens for every selected message or unit. The key of the diagnostic screen being displayed is deactivated. Use this VarControl key to call the VarControl runtime module. This enables you to monitor in a tag table the operands of the diagnosed PLC program in certain cycles and to control them. A summary of the main functions of this module can be found in the appendix under the chapter entitled VarControl (Chapter A.3). If you require SIMATIC Manager - for example, to work with other SIMATIC applications, press the S7 Manager key. If SIMATIC Manager is already open, its window is placed on top. If it is not open, SIMATIC Manager will be opened with the last project to be called. Note If the S7 Manager key is not active, you may not be authorized to call SIMATIC Manager. Using the Language key, you can reset the language of the diagnostic screen concerned to German, English or French at runtime. The screen will then be rebuilt in the corresponding language. Switching Diagnostic Screen Calling VarControl Calling SIMATIC Manager Changing Languages www.dienhathe.vn www.dienhathe.com
  • 50. Display in Runtime Mode 04.00 ProAgent Manual 5-16 C79000-G8276-C165-01 Use the Information key to call the information window. Information In this window you can enter an explanatory text or comment for each diagnostic screen and save it using the Save Text button. In this way, you can give users special information, instructions and tips. With multi-lingual projects, information is displayed only in the languages in which it was entered. You can exit diagnostic mode whenever you like by pressing Back. Calling Screen Information Exit Diagnosis www.dienhathe.vn www.dienhathe.com
  • 51. 04.00 Display in Runtime Mode ProAgent Manual C79000-G8276-C165-01 5-17 5.2 ProAgent's User Screen 5.2.1 The Purpose of the ProAgent User Screen The ProAgent user screen is designed as an example configuration for starting process diagnostics from the system screens of the current WinCC project. You can branch from here to the Message Screen and to the Overview Screen, where you can gain an overview of pending faults. Note If you want to use this screen together with your default configuration, you have to adjust the Back key. 5.2.2 What You See on ProAgent's User Screen The structure of ProAgent's user screen is similar to that of other diagnostic screens. 1 2 3 ProAgent User Screen (Example on PC) Entry route Standardized Structure www.dienhathe.vn www.dienhathe.com
  • 52. Display in Runtime Mode 04.00 ProAgent Manual 5-18 C79000-G8276-C165-01 (1) Here you can see the precise product designation of ProAgent and the copyright notices. You can modify this center area of the user screen in a very simple manner to reflect your corporate design and, for example, to insert your company logo at this point (refer to Changing the Diagnostic Screens (Chapter 6.6.1)). (2) The keys in this section enable you, among other things, to switch to the other diagnostic screens (see Global Key Set (Chapter 5.1.6)). (3) The earliest message is displayed on the message line. You can scroll to other messages. www.dienhathe.vn www.dienhathe.com
  • 53. 04.00 Display in Runtime Mode ProAgent Manual C79000-G8276-C165-01 5-19 5.3 Global Message Window 5.3.1 The Purpose of the Message Window When you configure, you can set this screen so that it is opened automatically in WinCC Runtime mode by an ALARM_S message and placed on top (refer to Defining the Alarm Diagnostic Screen (Chapter 6.5.5)). The Global Message Window often serves as an entry route into diagnostics. The window allows you to monitor what faults have occurred and which messages are diagnosable. Using this information, you can then branch to the other diagnostic screens for the purpose of process diagnosis. You are already familiar with the structure of a message window in table format from your experience with the Alarm Logging editor. However, ProAgent's Global Message Window provides a number of additional pieces of information and functions. In the Global Message Window, diagnosable messages are marked by the letter "A". Diagnosable messages, for which you can also carry out an analysis of criteria, are marked by an asterisk "*". You can call up further information about these messages from the Detail Screen and Movement Screen. The messages are displayed in chronological order: the oldest message is on the top line, the latest on the bottom line. If it is not possible to arrive at a guaranteed statement about the cause of the fault on the basis of the error message alone, you can select the message for which you would like to carry out process fault diagnosis first and then switch to one of the diagnostic screens by means of the keys of the Global Key Set. Remark Detecting the fault and editing the diagnostic data is carried out by the STEP 7 package S7-PDIAG or S7-GRAPH. The faults detected are reported to WinCC and ProAgent by means of the message number procedure ALARM_S. Automatic Opening of the Screen Entry Route into Diagnostics Similarity to the Message Window Additional Functions www.dienhathe.vn www.dienhathe.com
  • 54. Display in Runtime Mode 04.00 ProAgent Manual 5-20 C79000-G8276-C165-01 5.3.2 What You See in the Global Message Window 1 64 2 53 Global Message Window (example on PC) (1) The Diag column shows you whether an ALARM_S message has been issued and whether you can carry out an analysis of the criteria for this message: *: identifies an ALARM_S message for which you can also perform a criteria analysis. You can call the Detail Screen for messages of this kind. A: identifies all other ALARM_S messages. This column remains blank if messages issued are not diagnosable. (2) The Status column displays the message status: C: message arrived G: message departed CG: message arrived and departed (3) In the Acknowledged column you can see whether this message has been acknowledged. Operating Elements www.dienhathe.vn www.dienhathe.com
  • 55. 04.00 Display in Runtime Mode ProAgent Manual C79000-G8276-C165-01 5-21 (4) The Date column displays the date of the arrival event. (5) The Time column displays the time of the arrival event. (6) The Message text column displays the user texts that have been configured in the configuration system of Alarm Logging or with the optional STEP 7 packages. If you have taken over the presettings when configuring, the colors used for the individual messages have the following meanings: • White on a red background: ALARM_S messages • White on a blue background: the message currently selected • Yellow against a black background: process control system messages (further information is contained in the manuals and Online Help tools for STEP 7). Colors www.dienhathe.vn www.dienhathe.com
  • 56. Display in Runtime Mode 04.00 ProAgent Manual 5-22 C79000-G8276-C165-01 5.4 Message Screen 5.4.1 The Purpose of the Message Screen The Message Screen displays all pending process messages. The messages are displayed in chronological order: the oldest message is on the top line, the latest on the bottom line. The Message Screen frequently serves as the entry point to diagnosis. It enables you to observe whether and which faults occur. You can then branch selectively to further diagnostic screens. The structure of the Message Screen corresponds to that of the Global Message Window. The screen likewise allows you to recognize at a glance which messages are diagnosable. You can then carry out a process diagnosis for those messages. You can select a specific message and then open other diagnostic screens along context-sensitive lines: • The Detail Screen: This screen shows the program code that caused the selected alarm message. • The Movement Screen: This screen shows all movements of the blocked unit. And, of course, you can also execute those movements directly from that point as well. If you would like to see an overview of the various units that make up your installation, you can open the Overview Screen. In contrast to the Global Message Window, the Message Screen offers you a number of additional pieces of information and functions. Thus you can call, among other things, a dialog box for selecting messages, acknowledge ALARM_S messages and view archived messages. Similarity to the Global Message Window Additional Functions www.dienhathe.vn www.dienhathe.com
  • 57. 04.00 Display in Runtime Mode ProAgent Manual C79000-G8276-C165-01 5-23 5.4.2 What You See in the Message Screen The structure of the Message Screen corresponds to that of the Global Message Window. 1 642 53 Message Screen (example on PC) The Message Screen contains the following entries: (1) The Diag column shows you whether an ALARM_S message has been issued and whether you can carry out an analysis of the criteria for this message: A: identifies a diagnosable message, i.e. an ALARM_S message. *: identifies a diagnosable message for which you also carry out an analysis of the criteria. For messages of this type, you can call the Detail Screen or the Movement Screen. This column remains blank if messages issued are not diagnosable. (2) The Status column displays the message status: C: message arrived G: message departed CG: message arrived and departed (3) When the message list is selected, you can see in the Acknowledged column whether the message has been acknowledged. Familiar Layout www.dienhathe.vn www.dienhathe.com
  • 58. Display in Runtime Mode 04.00 ProAgent Manual 5-24 C79000-G8276-C165-01 (4) In the Date column, you can see the date of the event. (5) In the Time column, you can see the time of the event. (6) The Message text column displays the user texts that have been configured in the configuration system of Alarm Logging or with the optional STEP 7 packages. If you accept the presettings, the colors of the individual messages have the following meanings: • White on a red background: ALARM_S messages • White on a blue background: the message currently selected • Yellow against a black background: process control system messages (for further information refer to the manuals and Online Help tools for STEP 7). You can, however, change these color settings. (See Changing the Diagnostic Screens (Chapter 6.6.1)). In comparison with the Global Message Window, a number of new keys have been added with which you can further edit the selected messages. Additional Functions www.dienhathe.vn www.dienhathe.com
  • 59. 04.00 Display in Runtime Mode ProAgent Manual C79000-G8276-C165-01 5-25 5.4.3 Message Screen Keys You can use the following keys in the Message Screen: Symbol Name Function Up Down Use the vertical arrow keys or the mouse to move the selection bar for selecting messages. Message list You use this key to call the current message sequence. Short-term Archive You can use this key to check messages stored in the continuous archive (or short-term archive) in WinCC Runtime mode. Long-term Archive You can use this key to check messages archived in the sequence archive (or long-term archive) in WinCC Runtime mode. Selection You can use this key to open the selection dialog box for defining the selection criteria. All messages that do not satisfy these criteria are then no longer displayed. Info text You can use this key to open a dialog box for displaying longer information texts. All text has to be configured in S7. Comment You can use this key to open a text editor for editing short comments. Single ack You can use this key to acknowledge a single message. Group ack You can use this key to acknowledge all pending, instantaneously visible messages that require acknowledgement, as long as they do not have to be acknowledged singly (single acknowledgement only). ... The keys of the global key set (see Global Key Set (Chapter 5.1.6)). Message Screen Keys www.dienhathe.vn www.dienhathe.com
  • 60. Display in Runtime Mode 04.00 ProAgent Manual 5-26 C79000-G8276-C165-01 5.4.4 How to Work with the Message Screen This chapter gives a general outline of how to use the Message Screen in practice. You have opened the Message Screen in order to obtain an overview of the pending alarm messages. You wish to carry out a process diagnosis for specific messages. Message Screen (example on PC) First of all, you gain an overview of all the diagnosable messages. Use the Selection key to call the Set Selection dialog box and thus harmonize the Message Screen with your specific requirements in WinCC Runtime mode. Further information about the various filter criteria can be found in the manual or Online Help texts for Alarm Logging. Before performing process diagnostics for a specific alarm message, select the message concerned. To do this, click the message concerned with the mouse or move the selection bar with the arrow keys to the corresponding point. Aims Filtering Out Messages Selecting a Message www.dienhathe.vn www.dienhathe.com
  • 61. 04.00 Display in Runtime Mode ProAgent Manual C79000-G8276-C165-01 5-27 To obtain an overview of the units affected on your system by the errors, press the Overview key to change to the Overview Screen. The unit relating to the message is selected on the screen. From here, you can switch to the Movement Screen in order to manually trigger individual movements for a specific unit or return to the Message Screen. When you have selected the message you want, press the Detail View key to change to the detail screen. This shows you the section of the STEP 7 program code responsible for triggering the alarm message. If you have selected a message, press the Movements key to go directly to the Movement Screen (in other words, without going indirectly via the Overview Screen). The Movement Screen shows all movements for the units where there are faults and allows you to execute those movements directly as well. In WinCC Runtime mode, you can check all archived messages at any time. For this, all the archiving options with which you will be familiar from alarm logging are available to you. Note Should you wish to use the archive functions, you must configure them first in alarm logging using the Archive Configuration dialog box. The short-term archive can store up to 10,000 messages: in the long-term archive, the complete hard disk capacity of your computer is available. Further information can be found in the WinCC manual or Online Help texts for Alarm Logging. Switching to the Overview Screen Switching to the Detail Screen Switching to the Movement Screen Displaying Archive Messages www.dienhathe.vn www.dienhathe.com
  • 62. Display in Runtime Mode 04.00 ProAgent Manual 5-28 C79000-G8276-C165-01 If you want to enter a brief explanation on a message for other users (for example "This message arose today because ..."), press the Comment key. Message comment input presupposes an activated long-term archive. Message Comment Dialog Box The Number field contains the number of the single message in question (as it is stored in the table window of Alarm Logging). You can see when the message occurred from the Date and Time boxes. The User and Computer boxes indicate who entered the comment. Note You can enter your explanations in the Comment box. When configured to do so, the box also displays the operands triggering the message and the diagnostics entry operand (refer to Archiving the Criteria Analysis (Chapter 6.5.8)). Message Comments www.dienhathe.vn www.dienhathe.com
  • 63. 04.00 Display in Runtime Mode ProAgent Manual C79000-G8276-C165-01 5-29 In Step 7, Help information for the project runtime can be stored for every message. If you wish to view this information at runtime, press the Info text key to open the Info Text For A Message dialog box. Info Text Dialog Box The Number field contains the number of the single message in question (as it is stored in the table window of Alarm Logging). Further information can be found in the manual or Online Help texts for Alarm Logging. After completing diagnosis and rectifying the fault, the final step you have to take is to acknowledge the messages: • Acknowledge a single message with the Single ack key. • With the Group ack key, you acknowledge not only the selected message but all pending, currently visible messages requiring acknowledgement, provided they do not require single acknowledgement. You can check and/or alter the precise acknowledgement criteria in Alarm Logging in the Configuring Message Classes dialog box on the Acknowledgement tab. Further information can be found in the manual or Online Help texts for Alarm Logging. Info Text Acknowledging Messages www.dienhathe.vn www.dienhathe.com
  • 64. Display in Runtime Mode 04.00 ProAgent Manual 5-30 C79000-G8276-C165-01 You can switch directly from the Message Screen to the other diagnostic screens or also exit diagnostics: switches to the Overview Screen switches to the Detail Screen switches to the Movement Screen exits diagnostics Exiting the Message Screen www.dienhathe.vn www.dienhathe.com
  • 65. 04.00 Display in Runtime Mode ProAgent Manual C79000-G8276-C165-01 5-31 5.5 Overview Screen 5.5.1 The Purpose of the Overview Screen The Overview Screen shows you all the units on your system. It gives you the following information about each unit: • whether it has a fault • in which operating mode it is (Manual, Automatic etc.) • in the case of S7-Graph sequences, which step of the sequence is currently active. If there are faults on more than one unit, you can see on which one the fault first occurred. In this way, you immediately see where the actual cause is located and which faults are secondary in nature. You can select a unit from the list and set its operating mode. For example, you can switch from Automatic to Manual mode in order to be able to rectify a fault manually. Once you have selected a unit, you can analyze it more closely in the Detail Screen and move individual units by hand in the Movement Screen in order to rectify the fault. A description of the Detail Screen can be found in the chapter entitled Detail Screen (Chapter 5.6). A description of the Movement Screen can be found in the chapter entitled Movement Screen (Chapter 5.7). Display Functions www.dienhathe.vn www.dienhathe.com
  • 66. Display in Runtime Mode 04.00 ProAgent Manual 5-32 C79000-G8276-C165-01 5.5.2 What You See in the Overview Screen Like all the diagnostic pictures, the Overview Screen has a standardized layout. There are only slight variations between the display on the various OSs. The following illustration shows an example of the Overview Screen on a PC. 2 8 1 11 6 109 3 5 4 7 12 13 14 Overview Screen (example on PC) (1) Information is provided on the display mode in the top left box: The Warning Triangle symbol is displayed here if only the blocked units are displayed. If this symbol does not appear, all units are displayed (see Switching the Display Mode (Chapter 5.5.5)). Arrow symbols appear in this field if there are more units than can be displayed in the list at one time. You can then scroll up or down through the list of units by clicking the buttons to the right of the table or using the cursor keys of your OS. General Layout Display mode www.dienhathe.vn www.dienhathe.com
  • 67. 04.00 Display in Runtime Mode ProAgent Manual C79000-G8276-C165-01 5-33 In the top segment of the display, you are provided with detailed information on the hierarchy of the units (refer to Hierarchical Units on the Overview Screen (Chapter 5.5.6)) and on the unit highlighted by the selection bar. (2) The name of the next higher unit in the hierarchy appears in the Unit Layer box. (3) In the Unit No. box you can see the block type (FC or DB) and the block number of the unit you selected. (4) The complete name of the unit appears in the Unit box. This name depends on the programming of the PLC: • If the unit was programmed in S7-PDIAG, this is the symbol of the block or an absolute name. • If the unit has been programmed in S7-GRAPH, this is a sequence name. (5) The current mode of the unit is displayed in the Operating Mode box. If the STEP 7 program does not define an operating mode, the field remains blank. You can change modes with the Operating Mode key. Boxes (6) and (7) appear only if the selected unit was programmed in S7-GRAPH. (6) In the Step box you can see the step name of the first active step. (7) The numbers of the active steps appear in these boxes. The numbers of the errored actions are always displayed first from left to right. They are identified by a highlight. If there are more steps active than can be displayed, the following symbol appears: The center segment of the display shows you a table containing all the diagnosable units of your installation. The order in which they are displayed depends on the attributes which you assigned to the units in S7-PDIAG in the Properties - Units dialog box. The Overview Screen ProAgent is built in accordance with the attributes "Belongs to Screen“ and "Position on Screen“. Units for which these attributes are not set are attached to the bottom of the list. (8) Displayed in the left of the table is the instantaneous status of a unit: The Warning Triangle symbol indicates that a unit is blocked. A red border flashes round the Warning Triangle symbol in front of the unit that became blocked first.This indicates to you that this fault is not a secondary fault. The Connection Errored symbol indicates that connection to the AS is errored or an addressing error has occurred. Information on Selected Unit Overview of Units www.dienhathe.vn www.dienhathe.com
  • 68. Display in Runtime Mode 04.00 ProAgent Manual 5-34 C79000-G8276-C165-01 (9) The Unit Name column displays the name of a unit stored in the PLC program. This is: − the symbol of a module or an absolute designator if the unit has been programmed in S7-PDIAG − a sequence name if the unit has been programmed in S7-GRAPH (10) The contents of the Step Name and Action columns depend on the programming of the unit: − nothing is displayed if the unit has been programmed in S7-PDIAG − the step name and the number of the active step are displayed when S7-GRAPH is used. (11) In the Mode column you can see which operating mode is currently set for that unit. If the STEP 7 program does not define an operating mode, the field remains blank. You can change modes with the Operating Mode key. (12) To the right of the Mode column you can see whether there is a higher-level or lower-level unit available for the unit concerned: This symbol indicates a lower-level unit. You can change to that unit either by left-clicking the symbol or with the Layer Down key.. You can change to that unit either by right-clicking the symbol or with the Layer Up key. This symbol indicates that there are a lower-level unit and a higher- level unit. You can change the unit layer either by left-clicking or right-clicking the symbol or by using either the Layer Down or Layer Up key. (13) On the far right you can see whether there is a movement for the unit concerned: If there is a movement for the unit or a lower-level unit, the Movement symbol is displayed. You can then change to the Movement Screen either by left-clicking the symbol or with the Movements key. The Movements symbol to the right of a sequence indicates that this sequence has been assigned a movement unit in S7-GRAPH (see Basic Requirements of the PLC Program (Chapter 6.1)). The assigned movement unit will be handled in the overview as a part of a sequence and will not be shown as a separate unit. (14) Here you can scroll up and down in the list of units by clicking the mouse if more units are present than can all be displayed in the list at the same time. www.dienhathe.vn www.dienhathe.com
  • 69. 04.00 Display in Runtime Mode ProAgent Manual C79000-G8276-C165-01 5-35 5.5.3 Overview Screen Keys You can use the following keys in the Overview Screen: Symbol Name Function Up (cursor) Down (cursor) You use the Up and Down cursor keys to move the highlight between the individual units. Page Up Page Down With these keys you can move the selection bar one whole page up or down. If there are more units than can be displayed on the screen at the same time, the display is scrolled as soon as you move the highlight past the top or bottom end of the message list. Layer Down You use this key to switch to a subordinate hierarchical unit. The Subordinate Unit symbol to the right of the unit indicates that there is a subordinate unit. In this case the Layer Down key is enabled. If there isn't a subordinate unit, the key is deactivated. Layer Up You use this key to switch to a higher-order hierarchical unit. You can see whether a higher-level unit is present by this key being enabled. If there isn't a higher- order unit, the key is deactivated. Operating Mode You can use this key to change the Operating Modes of the unit selected. The operating modes that are possible depend on how the unit has been programmed. If no mode is defined, the key is disabled. Seq. handling With this key you can open the Sequence Handling dialog box in which you can execute specific single steps of the sequence you selected. All / Errored You use this key to toggle the Display Mode between display of all units or display of only the blocked units. ... The keys of the global key set (see Global Key Set (Chapter 5.1.6)). Keys in the Overview Screen www.dienhathe.vn www.dienhathe.com
  • 70. Display in Runtime Mode 04.00 ProAgent Manual 5-36 C79000-G8276-C165-01 Note ProAgent is integrated in the central access protection function of WinCC. This enables you, for example, to protect particular operating objects against being used by unauthorized persons. You should use this in particular for the Operating Mode, Seq. Handling and S7 Manager keys. Further information can be found in the manual or in the Online Help for the WinCC editor User Administrator. 5.5.4 How to Work with the Overview Screen This chapter gives a general outline of how to use the Overview Screen most effectively in practice. You have opened the Overview Screen in order to see which units of your installation are blocked. You would like to see which unit caused the error and what triggered the error. Finally, you would like specifically to move individual system components to clear the error. Overview Screen (example on PC) Aims www.dienhathe.vn www.dienhathe.com
  • 71. 04.00 Display in Runtime Mode ProAgent Manual C79000-G8276-C165-01 5-37 First of all, you would like to gain an overview of the units blocked. You use the cursor keys to move the highlight through the list. All blocked units are marked by the Warning Triangle symbol. To see just the errored units, press the All / Errored key to change the Display Mode. Those units that are not blocked are then no longer displayed, and you can move directly between the blocked units with the highlight. This setting is retained until you restart WinCC Runtime mode or change the display mode back to the display of all units by pressing the key. A red border round the Warning Triangle flashes next to the unit in which an error occurred first. You move the highlight onto the unit with the flashing border. That unit is now selected. In the top segment of the display, you can see more extensive information on that unit: the next higher hierarchical layer of the selected unit, the block type, unit-assigned text, the current operating mode and the step numbers of the active actions. If the cause of the fault is not clear, you can investigate the fault more closely to see which logical operation results in the program code have led to the error message. To do this, press the Details key to open the Detail Screen. If you know what has caused the fault, you will naturally want to rectify it as quickly as possible so that the system can be started up again. To this end, you can e.g. trigger deliberate movements of certain units in manual mode. Note It depends on your PLC program whether or not it is necessary to switch to manual mode or to another mode before triggering manual movements. To change the operating mode, move the highlight to a unit on which you wish to carry out a movement. If this unit has subordinate units, the Subordinate Unit symbol will be displayed on the right (see Hierarchical Units in the Overview Screen (Chapter 5.5.6)). You can change to a lower layer in the hierarchy with the Layer Down key and make a more accurate selection. Finally, press the Operating Mode key to open the dialog box for selecting the modes. On Which Units Are There Faults? On Which Unit Did a Fault Occur First? Information on the Unit Criteria Analysis Changing the Operating Mode www.dienhathe.vn www.dienhathe.com
  • 72. Display in Runtime Mode 04.00 ProAgent Manual 5-38 C79000-G8276-C165-01 The Operating mode window Here you can select the mode concerned with the mouse or the arrow keys and press the OK button or confirm with Enter. Note If the ›Operating Mode key is not active, you may not be authorized to change modes. If you have selected the unit or subunit you what to move and set the correct mode, press the Movements key to change to the Movement Screen. Opening the Movement Screen www.dienhathe.vn www.dienhathe.com
  • 73. 04.00 Display in Runtime Mode ProAgent Manual C79000-G8276-C165-01 5-39 If a unit was programmed in S7-GRAPH, you can use the Seq. Handling key to open the Sequence Handling dialog box and set or reset individual steps in a sequence. Note If the Seq. Handling key is not active,you might not be authorized to use the Sequence Handling dialog box. The Movements symbol to the right of a sequence indicates that this sequence has been assigned a movement unit in S7-GRAPH (see Basic Requirements of the PLC Program (Chapter 6.1)). The assigned movement unit will be handled in the overview as a part of a sequence and will not be shown as a separate unit. You can then change to the Movement Screen either by left-clicking the symbol or with the Movements key. You can switch directly from the Overview Screen to the other diagnostic pictures or also exit diagnostics: switches to the Detail Screen switches to the Movement Screen switches to the Message Screen exits diagnostics Calling Sequence Handling Exiting the Overview Screen www.dienhathe.vn www.dienhathe.com
  • 74. Display in Runtime Mode 04.00 ProAgent Manual 5-40 C79000-G8276-C165-01 5.5.5 Changing the Display Mode You can specify whether all or only the blocked units are displayed in the Overview Screen. To change back to the other display mode, press the All / Errored key. Restricting the units displayed to those blocked is especially useful if your installation consists of a very large number of units. However, if you then want to select a healthy unit (for example, to trigger a movement), you must reset the display mode back to display all units. You can tell which display mode is active thanks to a graphic symbol at the top left of the display field: • The Warning Triangle symbol is displayed if only the blocked units are displayed. • The symbol is not displayed if you are able to see and select all the units irrespective of whether they are blocked or not. Display Modes When to Use Which Mode How to Tell Which Mode is Active www.dienhathe.vn www.dienhathe.com
  • 75. 04.00 Display in Runtime Mode ProAgent Manual C79000-G8276-C165-01 5-41 5.5.6 Hierarchical Units on the Overview Screen When programming a PLC, a hierarchy of the units can – depending on the programming language used – be defined. Thus in the case of S7-PDIAG a unit can be equated with a module which as a rule also represents a process unit. By virtue of the multi-instance concept of STEP 7 a unit can also contain other units. As soon as at least one subunit has a fault, the immediately higher-order unit is also marked as having a fault. The marker is thus passed on from one level to the next right up to the highest hierarchical level. Note When the PLC is programmed in S7-GRAPH, there are no hierarchical units. In this way you can tell whether tehre are any more hierarchical layers associated with a unit. If there are only lower-level units for a specific unit, this symbol appears to the right of the unit concerned. In this case the Layer Down key is highlighted in color, whereas the Layer Up key is grayed. If there are only higher-level units for a specific unit, this symbol appears to the right of the unit concerned. In this case the Layer Up key is highlighted in color, grayed. This symbol indicates that there are a lower-level unit and a higher- level unit for a given unit. In this case the Layer Up and the Layer Down keys are highlighted in color. To change the hierarchical level proceed as follows: 1. Move the highlight to the unit whose subordinate or higher-order units you wish to display. 2. Press the Layer Down key if you would like to see the lower-level units, or press the Layer Up key to see the higher-level unit. When you move down a hierarchical level, only the subunits of the selected unit are shown. When you move up a hierarchical level, all units on that level are once again displayed. Hierarchical Units Identifying Hierarchical Units Changing Hierarchical Level www.dienhathe.vn www.dienhathe.com
  • 76. Display in Runtime Mode 04.00 ProAgent Manual 5-42 C79000-G8276-C165-01 5.5.7 Sequence Handling If you have selected a unit on the Overview Screen that was programmed in S7- GRAPH, you can open the Sequence Handling dialog box. In this dialog box • you are given information on the unit you selected and on the step you selected • you can set or reset the individual steps of a sequence. The Movements symbol to the right of a sequence indicates that this sequence has been assigned a movement unit in S7-GRAPH (see Basic Requirements of the PLC Program (Chapter 6.1)). The assigned movement unit will be handled in the overview as a part of a sequence and will not be shown as a separate unit. Warning When using the Sequence Handling dialog box, you must ensure that the sequence remains in a consistent state. The following illustration shows an example of the Sequence Handling dialog box on a PC. 81 5 643 72 Sequence Handling Dialog Box (Example on a PC) Purpose www.dienhathe.vn www.dienhathe.com
  • 77. 04.00 Display in Runtime Mode ProAgent Manual C79000-G8276-C165-01 5-43 In the top segment of the display you are provided with information on the unit that was selected on the Overview Screen from which the step screen was opened. (1) In the Unit No. box you can see the block type (FC or DB) and the block number of the unit you selected. (2) The sequence name appears in the Unit box. (3) You can see the step name of the first active step in the Step box. (4) The number of the active step is displayed in the Step No. box. If several actions are active simultaneously, the step number of the action which is the first to be displayed in the list at (6) is shown. (5) The current mode of the unit is displayed in the Operating mode box. (6) The numbers of the active steps appear in these boxes. If there are more steps active than can be displayed, the following symbol appears: The step number and the step name of the active step are displayed in the center segment of the display: (7) Here you can enter the step number for the current unit that you want to set or delete. (8) Here the name of the step you entered at (7) appears following its confirmation by pressing ENTER. Note Always deactivate all active steps before activating new steps. In the bottom half of the display, you can activate or deactivate steps or sequences. To do this, perform the following steps: 1. Enter the number of the step which you want to activate or deactivate in the Step No. box and confirm it by pressing ENTER. The name of the step you specified now appears in the Step Name box (8). 2. Press one of four keys: • With Activate Step, you set the displayed step. • With Deactivate Step, you reset the displayed step. • With Initialize Sequence, you initialize the displayed sequence. • With Deactivate Sequence, you deactivate the entire sequence. With the Exit key, you return to the Overview Screen. Information on Unit and Step Displaying the Active Step Activating and Deactivating Steps Back to the Overview Screen www.dienhathe.vn www.dienhathe.com
  • 78. Display in Runtime Mode 04.00 ProAgent Manual 5-44 C79000-G8276-C165-01 5.6 Detail Screen 5.6.1 The Purpose of the Detail Screen Retracing an error/fault to the relevant points in the program code is referred to as analysis of criteria. The Detail Screen shows the result of the analysis of criteria in the form of an STL or LAD. When you call the Detail Screen for the first time, the criteria are shown initially in STL. Each time you open the display after this time, the type of display used is the one you used the last time. You can switch easily between the two types of display by pressing the STL / LAD key (see Keys in the Detail Screen (Chapter 5.6.5)). Note In principle, the two variants of the Detail Screen are equivalent. They differ only with respect to the way they look and are used. The LAD variant, however, is not able to display all commands. The following are permissible: U op, UN op, U(, O op, ON op, O(, O, ), NOT, = op, S op, R op, X, X(, XN, XN(, Label (op = operand; Label only at the beginning of the network, U is equivalent to A in IEC notation) Should an instruction be shown that cannot be displayed in LAD, a message is issued. You can then change to the STL display with the STL / LAD key. The display of the STEP 7 program code in the STL or LAD lists those positions of the PLC program that have triggered a process fault. This should not be confused with a programming error. When the process fault occurs, a quite specific status comes into being for which the program is monitored. This status is characteristic of a fault in the installation and therefore leads to an alarm message being displayed. Since the process diagnosis system can monitor a whole range of conditions and mutual interdependencies can also be defined, it is of course of interest to see which signals have led to the issue of an alarm message. From this information you can derive what is causing the alarm and how it may be rectified in the shortest possible time. Symbols and comments are displayed in addition to the program code. At the same time, you are shown the status of the operands and all results of logical operations. All signals whose status has contributed to the error message are marked. This enables you to immediately recognize what conditions have led to the alarm message being triggered. Analysis of Criteria STL or LAD Program Excerpt Additional Information www.dienhathe.vn www.dienhathe.com
  • 79. 04.00 Display in Runtime Mode ProAgent Manual C79000-G8276-C165-01 5-45 5.6.2 What You See in the Detail Screen Which faults are displayed when you open the Detail Screen depends on from where you have opened it: • If you have opened the Detail Screen from the Message Screen or the Global Message Window, you have selected a message there. The Detail Screen now shows you the fault that has triggered this message. • If you have opened the Detail Screen from the Overview Screen, you have selected a unit there. The Detail Screen now shows you the fault of the first blocked action of this unit. Like all the diagnostic screens, the Detail Screen has a standardized layout. Switching the display between the STL and LAD changes only the center section of the Detail Screen. The information about the unit (in the top section) and the assignment of the keys remain unchanged. The following illustration depicts an example of the STL variant of a Detail Screen on a PC. 9 141 5 6 43 8 12 152 10 11713 Detail Screen (example of the STL variant on PC) Faults Displayed General Layout www.dienhathe.vn www.dienhathe.com
  • 80. Display in Runtime Mode 04.00 ProAgent Manual 5-46 C79000-G8276-C165-01 The top section of the Detail Screen contains detailed information about the unit in which the process fault has occurred. (1) At the top left, you obtain information on the display mode: • The lightning symbol appears in this field when the partial view of the display is activated, in which only the non-performed statements or switches are listed (see Switching Between Partial and Full View (Chapter 5.6.7)). • The spectacles symbol appears in this field if current status bits are displayed instead of the status bits that were valid at the moment the fault arose (initial values) (see Switching Between Initial Values and Current Status (Chapter 5.6.8)). • Arrow symbols appear in this field if there are more statements or switches than can be displayed at one time. You can then scroll through these statements/switches using either the keyboard or the mouse. (2) The Unit Level box displays the unit level to which the blocked unit belongs. (3) In the Unit no.: box you can see the block type (FC or DB) and the block number of the unit you selected. (4) The Unit box displays the name of the unit you selected. The displays and contents of the following fields depend on the programming of the unit: Programming in S7-GRAPH If the unit was programmed in S7-GRAPH, you are provided with two lines of information on the blocked step or blocked transition. (5) The lightning symbol appears here if the currently displayed step has blocked. (6) You can see the step name in the Step box. (7) The number of this step is displayed in the No. box. (8) The Parallel Steps box lists the numbers of the currently active steps. The step selected is marked here. If more parallel steps are possible than can be displayed at one time, the symbol also appears in this field. With transitions, the subsequent steps for selected transitions are displayed here. (9) The lightning symbol appears here if the currently displayed transition has blocked. (10) You can see the transition name in the Transition box. (11) The No. box displays the number of this transition. Information About the Unit www.dienhathe.vn www.dienhathe.com