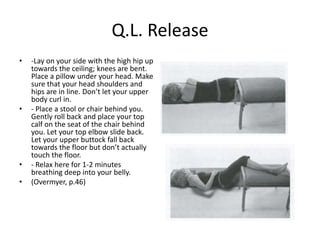
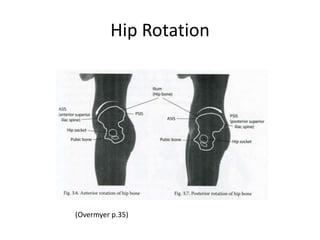
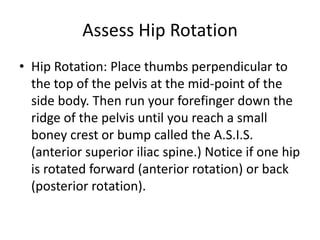
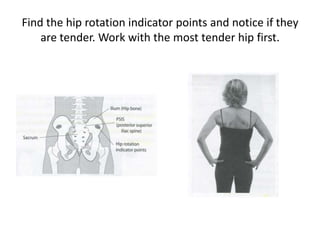
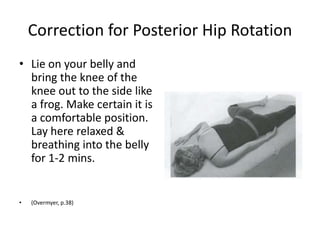
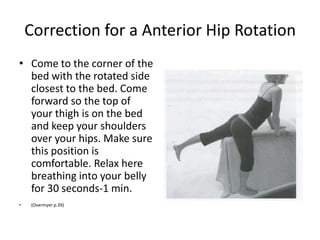
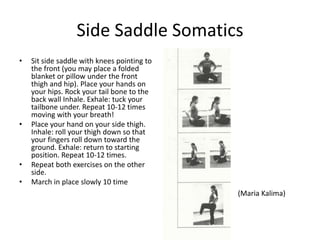
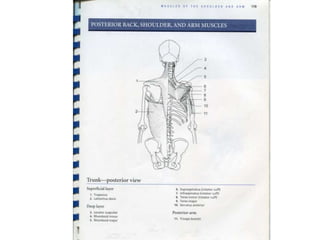
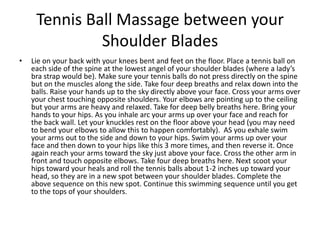
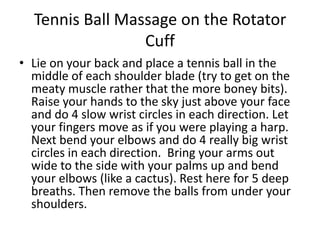
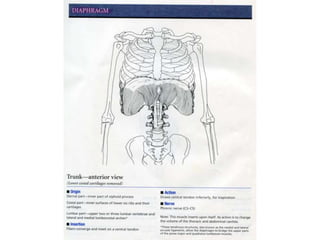
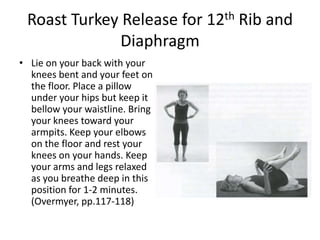
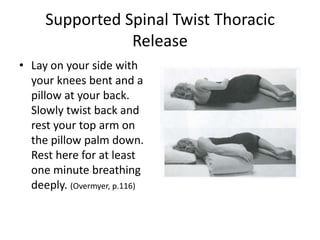
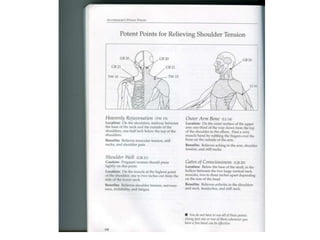
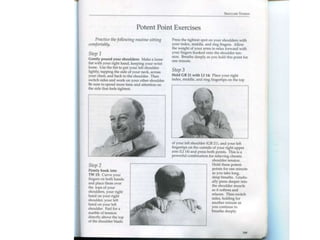
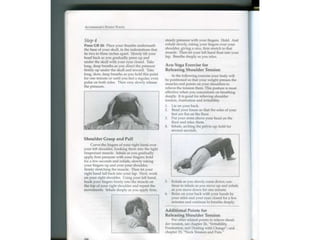
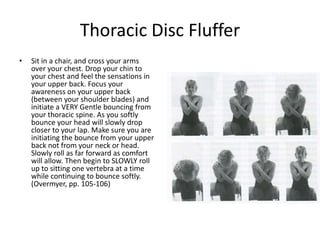
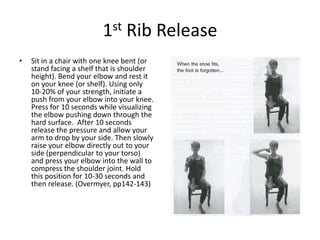
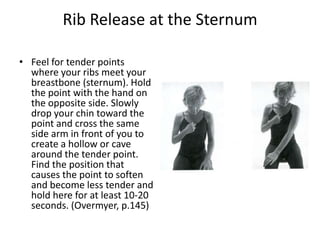
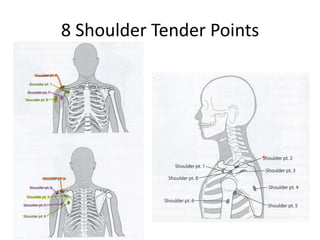
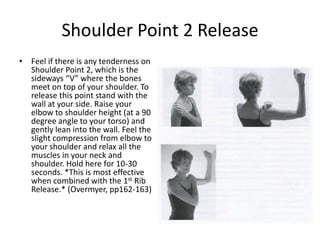
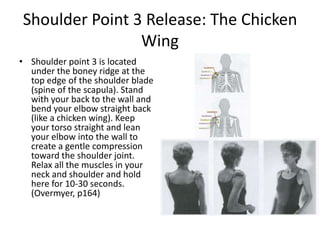
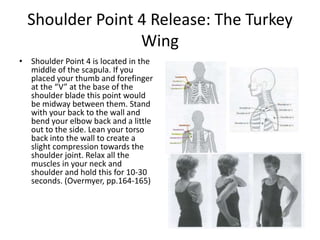
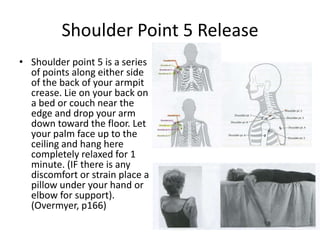
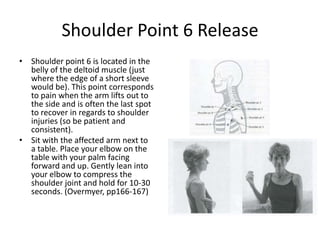
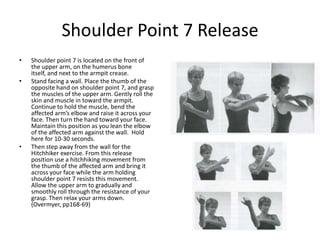
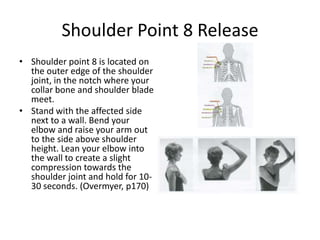
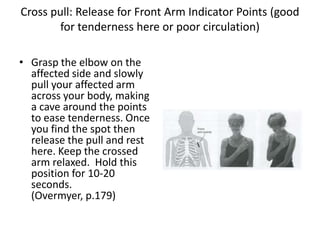
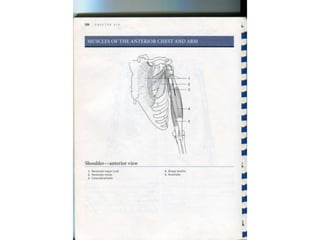
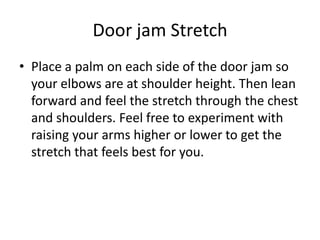
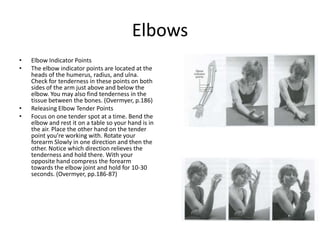
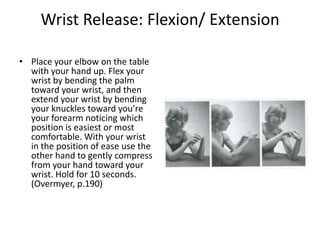
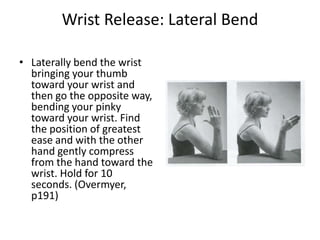
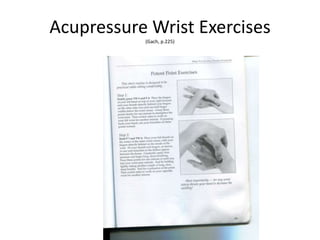
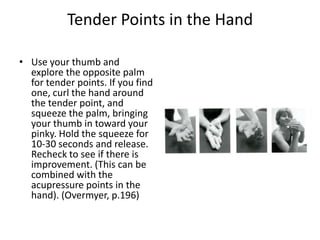
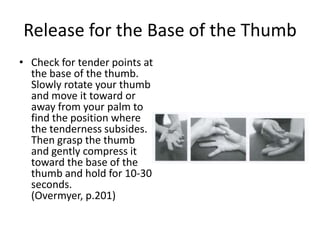
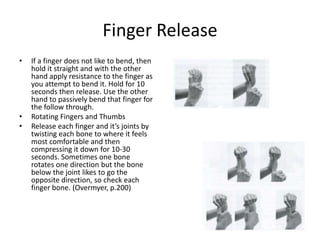
CALL ON ➥9907093804 🔝 Call Girls Hadapsar ( Pune) Girls Service
Shoulder burden meltdown presentation
1. Shoulder Burden Meltdown
References:
Acupressure’s Potent Points. By Michael Reed Gach
Atlas of Skeletal Muscles. By Judith & Robert Stone
Maria Kalima
Ortho-Bionomy; A path to Self-Care. By Luann Overmyer
2. High Hip Assessment
• Find the lateral most top of pelvis. Find the
midline of the side body. Place your thumbs in
at a right angle and notice which hip is higher.
It helps to use your belly button as a guide
and imagine a straight line from one thumb to
the other. Is the line level?
3. Q.L. Release
• -Lay on your side with the high hip up
towards the ceiling; knees are bent.
Place a pillow under your head. Make
sure that your head shoulders and
hips are in line. Don’t let your upper
body curl in.
• - Place a stool or chair behind you.
Gently roll back and place your top
calf on the seat of the chair behind
you. Let your top elbow slide back.
Let your upper buttock fall back
towards the floor but don’t actually
touch the floor.
• - Relax here for 1-2 minutes
breathing deep into your belly.
• (Overmyer, p.46)
5. Assess Hip Rotation
• Hip Rotation: Place thumbs perpendicular to
the top of the pelvis at the mid-point of the
side body. Then run your forefinger down the
ridge of the pelvis until you reach a small
boney crest or bump called the A.S.I.S.
(anterior superior iliac spine.) Notice if one hip
is rotated forward (anterior rotation) or back
(posterior rotation).
6. Find the hip rotation indicator points and notice if they
are tender. Work with the most tender hip first.
7. Correction for Posterior Hip Rotation
• Lie on your belly and
bring the knee of the
knee out to the side like
a frog. Make certain it is
a comfortable position.
Lay here relaxed &
breathing into the belly
for 1-2 mins.
• (Overmyer, p.38)
8. Correction for a Anterior Hip Rotation
• Come to the corner of the
bed with the rotated side
closest to the bed. Come
forward so the top of
your thigh is on the bed
and keep your shoulders
over your hips. Make sure
this position is
comfortable. Relax here
breathing into your belly
for 30 seconds-1 min.
• (Overmyer p.39)
9. Side Saddle Somatics
• Sit side saddle with knees pointing to
the front (you may place a folded
blanket or pillow under the front
thigh and hip). Place your hands on
your hips. Rock your tail bone to the
back wall Inhale. Exhale: tuck your
tailbone under. Repeat 10-12 times
moving with your breath!
• Place your hand on your side thigh.
Inhale: roll your thigh down so that
your fingers roll down toward the
ground. Exhale: return to starting
position. Repeat 10-12 times.
• Repeat both exercises on the other
side.
• March in place slowly 10 time
(Maria Kalima)
10.
11. Tennis Ball Massage between your
Shoulder Blades
• Lie on your back with your knees bent and feet on the floor. Place a tennis ball on
each side of the spine at the lowest angel of your shoulder blades (where a lady’s
bra strap would be). Make sure your tennis balls do not press directly on the spine
but on the muscles along the side. Take four deep breaths and relax down into the
balls. Raise your hands up to the sky directly above your face. Cross your arms over
your chest touching opposite shoulders. Your elbows are pointing up to the ceiling
but your arms are heavy and relaxed. Take for deep belly breaths here. Bring your
hands to your hips. As you inhale arc your arms up over your face and reach for
the back wall. Let your knuckles rest on the floor above your head (you may need
to bend your elbows to allow this to happen comfortably). AS you exhale swim
your arms out to the side and down to your hips. Swim your arms up over your
face and then down to your hips like this 3 more times, and then reverse it. Once
again reach your arms toward the sky just above your face. Cross the other arm in
front and touch opposite elbows. Take four deep breaths here. Next scoot your
hips toward your heals and roll the tennis balls about 1-2 inches up toward your
head, so they are in a new spot between your shoulder blades. Complete the
above sequence on this new spot. Continue this swimming sequence until you get
to the tops of your shoulders.
12. Tennis Ball Massage on the Rotator
Cuff
• Lie on your back and place a tennis ball in the
middle of each shoulder blade (try to get on the
meaty muscle rather that the more boney bits).
Raise your hands to the sky just above your face
and do 4 slow wrist circles in each direction. Let
your fingers move as if you were playing a harp.
Next bend your elbows and do 4 really big wrist
circles in each direction. Bring your arms out
wide to the side with your palms up and bend
your elbows (like a cactus). Rest here for 5 deep
breaths. Then remove the balls from under your
shoulders.
13.
14. Roast Turkey Release for 12th Rib and
Diaphragm
• Lie on your back with your
knees bent and your feet on
the floor. Place a pillow
under your hips but keep it
bellow your waistline. Bring
your knees toward your
armpits. Keep your elbows
on the floor and rest your
knees on your hands. Keep
your arms and legs relaxed
as you breathe deep in this
position for 1-2 minutes.
(Overmyer, pp.117-118)
15. Supported Spinal Twist Thoracic
Release
• Lay on your side with
your knees bent and a
pillow at your back.
Slowly twist back and
rest your top arm on
the pillow palm down.
Rest here for at least
one minute breathing
deeply. (Overmyer, p.116)
16.
17.
18.
19. Thoracic Disc Fluffer
• Sit in a chair, and cross your arms
over your chest. Drop your chin to
your chest and feel the sensations in
your upper back. Focus your
awareness on your upper back
(between your shoulder blades) and
initiate a VERY Gentle bouncing from
your thoracic spine. As you softly
bounce your head will slowly drop
closer to your lap. Make sure you are
initiating the bounce from your upper
back not from your neck or head.
Slowly roll as far forward as comfort
will allow. Then begin to SLOWLY roll
up to sitting one vertebra at a time
while continuing to bounce softly.
(Overmyer, pp. 105-106)
20. 1st Rib Release
• Sit in a chair with one knee bent (or
stand facing a shelf that is shoulder
height). Bend your elbow and rest it
on your knee (or shelf). Using only
10-20% of your strength, initiate a
push from your elbow into your knee.
Press for 10 seconds while visualizing
the elbow pushing down through the
hard surface. After 10 seconds
release the pressure and allow your
arm to drop by your side. Then slowly
raise your elbow directly out to your
side (perpendicular to your torso)
and press your elbow into the wall to
compress the shoulder joint. Hold
this position for 10-30 seconds and
then release. (Overmyer, pp142-143)
21. Alternative 1st Rib Release
• Place a soft pillow or thick blanket
over the back of a chair. Sit sideways
on the chair and hang the affected
arm over the back of the chair so
your arm pit rests on the pillow.
Reach the affected hand down
toward the floor using the rib
muscles to assist. The pillow will
provide resistance. Continue reaching
down for 10 seconds and then
release. Stand up and allow the arm
to passively drop toward the ground.
Next bend your elbow and raise your
arm out to the side, level with your
shoulder, and gently lean in to the
wall. Relax the muscles in your neck
and shoulder, and hold this
compression for 10-30 seconds.
(Overmyer, p.144)
22. Rib Release at the Sternum
• Feel for tender points
where your ribs meet your
breastbone (sternum). Hold
the point with the hand on
the opposite side. Slowly
drop your chin toward the
point and cross the same
side arm in front of you to
create a hollow or cave
around the tender point.
Find the position that
causes the point to soften
and become less tender and
hold here for at least 10-20
seconds. (Overmyer, p.145)
24. Release for Shoulder Point 1 (the memory point)
• Find Shoulder Point 1 and if
it is tender do the following
release. Stand facing the
wall. Bring the affected
forearm in front of your
face with your elbow on the
wall. Gently lean into it
creating compression from
the elbow to the shoulder.
Hold for 10-20 seconds and
then release.
(Overmyer, p.161)
25. Shoulder Point 2 Release
• Feel if there is any tenderness on
Shoulder Point 2, which is the
sideways “V” where the bones
meet on top of your shoulder. To
release this point stand with the
wall at your side. Raise your
elbow to shoulder height (at a 90
degree angle to your torso) and
gently lean into the wall. Feel the
slight compression from elbow to
your shoulder and relax all the
muscles in your neck and
shoulder. Hold here for 10-30
seconds. *This is most effective
when combined with the 1st Rib
Release.* (Overmyer, pp162-163)
26. Shoulder Point 3 Release: The Chicken
Wing
• Shoulder point 3 is located
under the boney ridge at the
top edge of the shoulder blade
(spine of the scapula). Stand
with your back to the wall and
bend your elbow straight back
(like a chicken wing). Keep
your torso straight and lean
your elbow into the wall to
create a gentle compression
toward the shoulder joint.
Relax all the muscles in your
neck and shoulder and hold
here for 10-30 seconds.
(Overmyer, p164)
27. Shoulder Point 4 Release: The Turkey
Wing
• Shoulder Point 4 is located in the
middle of the scapula. If you
placed your thumb and forefinger
at the “V” at the base of the
shoulder blade this point would
be midway between them. Stand
with your back to the wall and
bend your elbow back and a little
out to the side. Lean your torso
back into the wall to create a
slight compression towards the
shoulder joint. Relax all the
muscles in your neck and
shoulder and hold this for 10-30
seconds. (Overmyer, pp.164-165)
28. Shoulder Point 5 Release
• Shoulder point 5 is a series
of points along either side
of the back of your armpit
crease. Lie on your back on
a bed or couch near the
edge and drop your arm
down toward the floor. Let
your palm face up to the
ceiling and hang here
completely relaxed for 1
minute. (IF there is any
discomfort or strain place a
pillow under your hand or
elbow for support).
(Overmyer, p166)
29. Shoulder Point 6 Release
• Shoulder point 6 is located in the
belly of the deltoid muscle (just
where the edge of a short sleeve
would be). This point corresponds
to pain when the arm lifts out to
the side and is often the last spot
to recover in regards to shoulder
injuries (so be patient and
consistent).
• Sit with the affected arm next to
a table. Place your elbow on the
table with your palm facing
forward and up. Gently lean into
your elbow to compress the
shoulder joint and hold for 10-30
seconds. (Overmyer, pp166-167)
30. Shoulder Point 7 Release
• Shoulder point 7 is located on the front of
the upper arm, on the humerus bone
itself, and next to the armpit crease.
• Stand facing a wall. Place the thumb of the
opposite hand on shoulder point 7, and grasp
the muscles of the upper arm. Gently roll the
skin and muscle in toward the armpit.
Continue to hold the muscle, bend the
affected arm’s elbow and raise it across your
face. Then turn the hand toward your face.
Maintain this position as you lean the elbow
of the affected arm against the wall. Hold
here for 10-30 seconds.
• Then step away from the wall for the
Hitchhiker exercise. From this release
position use a hitchhiking movement from
the thumb of the affected arm and bring it
across your face while the arm holding
shoulder point 7 resists this movement.
Allow the upper arm to gradually and
smoothly roll through the resistance of your
grasp. Then relax your arms down.
(Overmyer, pp168-69)
31. Shoulder Point 8 Release
• Shoulder point 8 is located on
the outer edge of the shoulder
joint, in the notch where your
collar bone and shoulder blade
meet.
• Stand with the affected side
next to a wall. Bend your
elbow and raise your arm out
to the side above shoulder
height. Lean your elbow into
the wall to create a slight
compression towards the
shoulder joint and hold for 10-
30 seconds. (Overmyer, p170)
32. Cross pull: Release for Front Arm Indicator Points (good
for tenderness here or poor circulation)
• Grasp the elbow on the
affected side and slowly
pull your affected arm
across your body, making
a cave around the points
to ease tenderness. Once
you find the spot then
release the pull and rest
here. Keep the crossed
arm relaxed. Hold this
position for 10-20
seconds.
(Overmyer, p.179)
33.
34. Door jam Stretch
• Place a palm on each side of the door jam so
your elbows are at shoulder height. Then lean
forward and feel the stretch through the chest
and shoulders. Feel free to experiment with
raising your arms higher or lower to get the
stretch that feels best for you.
35. Wall Stretches for the Shoulder and
Pectoralis Minor
• Stand with a corner or doorjam at your side.
Bend your elbow to a 90 degree angle but keep it
touching your side. Without bending your wrist,
place your palm flat against the corner. Slowly
turn your torso away from the wall and feel the
stretch deep in your shoulder.
• Stand with the wall to your side. Place your palm
on the wall with your arm straight out at shoulder
height. Gently turn your body away from the wall
and feel this stretch in the front of your shoulder
and down your arm.
36.
37. Elbows
• Elbow Indicator Points
• The elbow indicator points are located at the
heads of the humerus, radius, and ulna.
Check for tenderness in these points on both
sides of the arm just above and below the
elbow. You may also find tenderness in the
tissue between the bones. (Overmyer, p.186)
• Releasing Elbow Tender Points
• Focus on one tender spot at a time. Bend the
elbow and rest it on a table so your hand is in
the air. Place the other hand on the tender
point you’re working with. Rotate your
forearm Slowly in one direction and then the
other. Notice which direction relieves the
tenderness and hold there. With your
opposite hand compress the forearm
towards the elbow joint and hold for 10-30
seconds. (Overmyer, pp.186-87)
38. Wrist Release: Flexion/ Extension
• Place your elbow on the table
with your hand up. Flex your
wrist by bending the palm
toward your wrist, and then
extend your wrist by bending
your knuckles toward you’re
your forearm noticing which
position is easiest or most
comfortable. With your wrist
in the position of ease use the
other hand to gently compress
from your hand toward your
wrist. Hold for 10 seconds.
(Overmyer, p.190)
39. Wrist Release: Lateral Bend
• Laterally bend the wrist
bringing your thumb
toward your wrist and
then go the opposite way,
bending your pinky
toward your wrist. Find
the position of greatest
ease and with the other
hand gently compress
from the hand toward the
wrist. Hold for 10
seconds. (Overmyer,
p191)
42. Tender Points in the Hand
• Use your thumb and
explore the opposite palm
for tender points. If you find
one, curl the hand around
the tender point, and
squeeze the palm, bringing
your thumb in toward your
pinky. Hold the squeeze for
10-30 seconds and release.
Recheck to see if there is
improvement. (This can be
combined with the
acupressure points in the
hand). (Overmyer, p.196)
43. Release for the Base of the Thumb
• Check for tender points at
the base of the thumb.
Slowly rotate your thumb
and move it toward or
away from your palm to
find the position where
the tenderness subsides.
Then grasp the thumb
and gently compress it
toward the base of the
thumb and hold for 10-30
seconds.
(Overmyer, p.201)
44. Finger Release
• If a finger does not like to bend, then
hold it straight and with the other
hand apply resistance to the finger as
you attempt to bend it. Hold for 10
seconds then release. Use the other
hand to passively bend that finger for
the follow through.
• Rotating Fingers and Thumbs
• Release each finger and it’s joints by
twisting each bone to where it feels
most comfortable and then
compressing it down for 10-30
seconds. Sometimes one bone
rotates one direction but the bone
below the joint likes to go the
opposite direction, so check each
finger bone. (Overmyer, p.200)