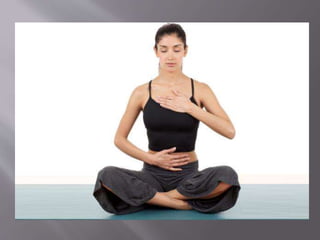
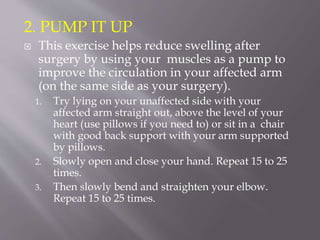
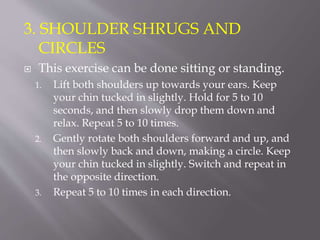
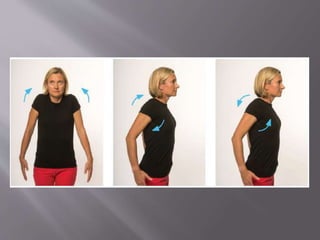
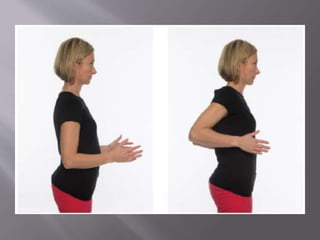
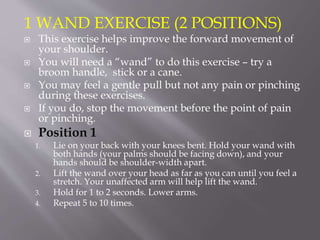
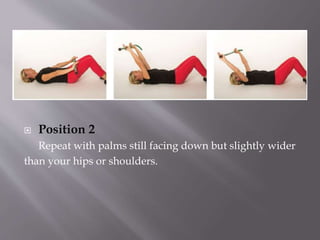
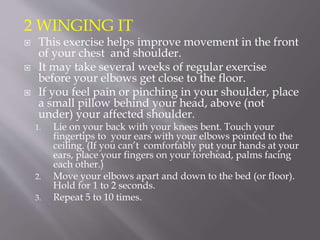
 Exercises are any bodily activity that enhances
or maintain our physical fitness, overall health
and wellness
 Its performed for various reasons like :-
 To aid growth and improve strength
 Prevent aging
 Developing muscles
 Maintain cardiovascular system and other body
functions
Post mastectomy exercises are
exercises that are done after
mastectomy surgeries i.e removal off
breast
Indications for post mastectomy
exercise include Mastectomy surgeries like
 Surgical breast biopsy
 Lymph node removal
 Breast conservation surgery
 Mastectomy
 Breast reconstruction
 Help to reduce after surgery limitation in
shoulder range of motion
 Help to regain and maintain normal movement
of your arm and shoulder
 Help to reduce pain in chest wall, shoulder,
neck and back
 Help to return to the daily activities faster such
as dressing, bathing, and driving
 Help to keep your muscle strong
 Help to improve overall wellbeing
 Wear comfortable loose clothing when during
exercise
 Do exercise slowly, until you feel gentle stretch
not pain
 May feel tightness in chest and armpit after
surgery, but its normal and decrease on doing
exercise
 Many women may feel burning, tingling,
numbness on back of arm or on chest wall. This
may increase after surgery, but keep doing
exercises
 Exercise after a warm shower, when our
muscles are warm and relaxed
 Breath deeply and often as you do exercise
 Do not bounce, or make any quick, jerky
movements while stretching
 Contact doctor if unusual pain or swelling is
seen
 Don’t exercise too much in early weeks
 Do each exercise 5-7 times
 Do exercise twice a day
 Begin exercise the day after surgery
 Plan to take your pain medication 20-30 min
before surgery
 Do exercise2 times a day
 Try to do daily and do not forget
 Exercises are divided into 3 stages based on the
post mastectomy period
 Right after surgery (First 1 to 7 days)
 First stage of healing (First 6 weeks after surgery)
 Second stage of healing (From about 6 weeks after
surgery)
 These are gentle exercises done after first week
of surgery or while drain still in place
 It’s normal to feel your skin and tissue stretch
a bit with these exercises but be careful not to
make sudden movements until incision are
healed and drain is removed.
1. DEEP BREATHING
 Deep breathing is an important part of your
recovery and helps to expand your chest wall.
 It helps with relaxation and can remind you to
fill your lungs completely.
1. Try lying on your back or sitting and then take a
slow, deep breath through your nose. Breathe in as
much air as you can while trying to expand your
chest and stomach like a balloon.
2. Do not tense your shoulders or neck.
3. Relax and breathe out slowly and completely.
4. Repeat 4 or 5 times.
2. PUMP IT UP
 This exercise helps reduce swelling after
surgery by using your muscles as a pump to
improve the circulation in your affected arm
(on the same side as your surgery).
1. Try lying on your unaffected side with your
affected arm straight out, above the level of your
heart (use pillows if you need to) or sit in a chair
with good back support with your arm supported
by pillows.
2. Slowly open and close your hand. Repeat 15 to 25
times.
3. Then slowly bend and straighten your elbow.
Repeat 15 to 25 times.
3. SHOULDER SHRUGS AND
CIRCLES
 This exercise can be done sitting or standing.
1. Lift both shoulders up towards your ears. Keep
your chin tucked in slightly. Hold for 5 to 10
seconds, and then slowly drop them down and
relax. Repeat 5 to 10 times.
2. Gently rotate both shoulders forward and up, and
then slowly back and down, making a circle. Keep
your chin tucked in slightly. Switch and repeat in
the opposite direction.
3. Repeat 5 to 10 times in each direction.
3 ARM LIFTS
 This exercise can be done sitting or standing.
1. Clasp your hands together in front of your chest.
Point your elbows out.
2. Slowly lift your arms upwards until you feel a
gentle stretch.
3. Hold for 1 to 2 seconds, and then slowly return to
the start position.
4. Repeat 5 to 10 times.
4 SHOULDER BLADE SQUEEZE
 This exercise helps improve movement in your
shoulder and your posture.
1. Sit in a chair facing straight ahead without resting
your back on the chair, or stand up. Your arms
should be at your side with your elbows straight
and your palms facing your sides.
2. Open your chest, gently squeeze your shoulder
blades together and down and rotate your thumbs
so your palms face forward.
3. Hold for 5 to 10 seconds and practice your deep
breathing while holding this posture. Relax and
return to the start position.
4. Repeat 5 to 10 times.
 Once the drain has been removed, you should
try to get back full control of your shoulder.
 Begin with these easy exercises, and then move
on to the more advanced exercises once you
feel stronger.
 By the end of this stage, you should have full
movement of your affected arm and shoulder.
 But listen to your body. You shouldn’t feel
worse after the exercises.
1 WAND EXERCISE (2 POSITIONS)
 This exercise helps improve the forward movement of
your shoulder.
 You will need a “wand” to do this exercise – try a
broom handle, stick or a cane.
 You may feel a gentle pull but not any pain or pinching
during these exercises.
 If you do, stop the movement before the point of pain
or pinching.
 Position 1
1. Lie on your back with your knees bent. Hold your wand with
both hands (your palms should be facing down), and your
hands should be shoulder-width apart.
2. Lift the wand over your head as far as you can until you feel a
stretch. Your unaffected arm will help lift the wand.
3. Hold for 1 to 2 seconds. Lower arms.
4. Repeat 5 to 10 times.
 Position 2
Repeat with palms still facing down but slightly wider
than your hips or shoulders.
2 WINGING IT
 This exercise helps improve movement in the front
of your chest and shoulder.
 It may take several weeks of regular exercise
before your elbows get close to the floor.
 If you feel pain or pinching in your shoulder, place
a small pillow behind your head, above (not
under) your affected shoulder.
1. Lie on your back with your knees bent. Touch your
fingertips to your ears with your elbows pointed to the
ceiling. (If you can’t comfortably put your hands at your
ears, place your fingers on your forehead, palms facing
each other.)
2. Move your elbows apart and down to the bed (or floor).
Hold for 1 to 2 seconds.
3. Repeat 5 to 10 times.
3 WALL CLIMBING (2 POSITIONS)
 This exercise helps increase movement in your
shoulder.
 Try to reach a little higher on the wall each day.
 This exercise can be done in 2 directions –
facing the wall or your affected side to the wall.
 Facing the wall
1. Stand facing the wall, about 5 cm (2 inches) away.
Place both your hands on the wall at shoulder level.
2. Use your fingers to climb up or slide as high as you
can go until you feel a stretch.
3. Return to start position.
4. Repeat 5 to 10 times.
 Side wall stretch
1. Stand with your affected side to the wall, about 2
feet from the wall so you can touch the wall with
your fingertips.
2. Walk your fingers up the wall as you do in facing
the wall. Do not rotate your body towards the wall.
Keep your torso facing forward even if it means you
can’t go up as high.
3. Lower and repeat 5 to 10 times.
4 SNOW ANGELS
 This exercise can be done lying down on the
floor or on a bed.
1. Lie on your back and extend your arms out at your
sides.
2. Move them up over your head, eventually touching
your fingers, and then back down to your thighs (as
if you’re making an angel in the snow).
3. Repeat 3 to 5 times.
More advanced exercises
 Once you’re getting better movement in your shoulder,
try these more advanced stretches.
1 SIDE BENDS
 This exercise helps improve movement on both sides of
your body.
1. Sit in a chair and clasp your hands together in your lap.
2. Slowly lift your arms over your head. Bend your elbows
slightly.
3. When your arms are above your head, bend at your waist and
move your body to the right. Hold 1 to 2 seconds. Use your
right hand to gently pull your left arm a little further to the
right. Keep yourself firmly planted on the chair. Take a deep
breath in and out.
4. Return to the centre and then bend to the left, using your left
hand to pull your right arm further.
5. Repeat 5 to 10 times on each side.
 From about 6 weeks after surgery, as you feel stronger,
you can gradually start doing strengthening and
general conditioning exercises.
 For some women, this means getting back to their old
exercise routine, but for others it may mean trying out
some new activities.
 Talk to your doctor or another member of your
healthcare team about starting a specific strengthening
program or aerobic exercise, and ask if there are any
special precautions you should take.
 If you have pain, your shoulder is tight or if your hand
or arm begins to swell, talk to your doctor or another
member of your healthcare team.
1 STRENGTHENING
 Slowly getting back to household chores, gardening or
yardwork are some ways you can keep building your
strength.
 Within 4 to 6 weeks after surgery, you can start doing
your strengthening exercises with light weights (500 g
to 1 kg or 1 to 2 lbs).
 If you don’t have any light weights, you can use an
unopened juice bottle or a plastic bottle filled with
water.
 Check with your doctor or physiotherapist to decide
what weight is best for you.
 They can also suggest strengthening exercises for the
upper body that are suitable for you.
 But it is important to build up slowly. If you don’t
exercise for long days, you can reduce slight weight
and start again.
2 REGULAR AEROBIC EXERCISE
 It is any exercise that gets your heart and lungs
working hard, improves your general physical
condition.
 It can help with your recovery and has many benefits.
 It can:
• help improve your cardiovascular fitness – how well
your heart, lungs and blood vessels bring oxygen to
your muscles, so that you can do physical work for
longer periods of time
• help you maintain a healthy body weight
• help you feel better, which may reduce stress and
anxiety
• help you as you face the challenges of life after cancer
 Brisk walking, swimming, running, cycling, and
dancing are all examples of aerobic exercises.

Post mastectomy exercises

  • 2.
     Exercises areany bodily activity that enhances or maintain our physical fitness, overall health and wellness  Its performed for various reasons like :-  To aid growth and improve strength  Prevent aging  Developing muscles  Maintain cardiovascular system and other body functions
  • 3.
    Post mastectomy exercisesare exercises that are done after mastectomy surgeries i.e removal off breast
  • 4.
    Indications for postmastectomy exercise include Mastectomy surgeries like  Surgical breast biopsy  Lymph node removal  Breast conservation surgery  Mastectomy  Breast reconstruction
  • 5.
     Help toreduce after surgery limitation in shoulder range of motion  Help to regain and maintain normal movement of your arm and shoulder  Help to reduce pain in chest wall, shoulder, neck and back  Help to return to the daily activities faster such as dressing, bathing, and driving  Help to keep your muscle strong  Help to improve overall wellbeing
  • 6.
     Wear comfortableloose clothing when during exercise  Do exercise slowly, until you feel gentle stretch not pain  May feel tightness in chest and armpit after surgery, but its normal and decrease on doing exercise  Many women may feel burning, tingling, numbness on back of arm or on chest wall. This may increase after surgery, but keep doing exercises
  • 7.
     Exercise aftera warm shower, when our muscles are warm and relaxed  Breath deeply and often as you do exercise  Do not bounce, or make any quick, jerky movements while stretching  Contact doctor if unusual pain or swelling is seen  Don’t exercise too much in early weeks  Do each exercise 5-7 times  Do exercise twice a day
  • 8.
     Begin exercisethe day after surgery  Plan to take your pain medication 20-30 min before surgery  Do exercise2 times a day  Try to do daily and do not forget
  • 9.
     Exercises aredivided into 3 stages based on the post mastectomy period  Right after surgery (First 1 to 7 days)  First stage of healing (First 6 weeks after surgery)  Second stage of healing (From about 6 weeks after surgery)
  • 10.
     These aregentle exercises done after first week of surgery or while drain still in place  It’s normal to feel your skin and tissue stretch a bit with these exercises but be careful not to make sudden movements until incision are healed and drain is removed.
  • 11.
    1. DEEP BREATHING Deep breathing is an important part of your recovery and helps to expand your chest wall.  It helps with relaxation and can remind you to fill your lungs completely. 1. Try lying on your back or sitting and then take a slow, deep breath through your nose. Breathe in as much air as you can while trying to expand your chest and stomach like a balloon. 2. Do not tense your shoulders or neck. 3. Relax and breathe out slowly and completely. 4. Repeat 4 or 5 times.
  • 13.
    2. PUMP ITUP  This exercise helps reduce swelling after surgery by using your muscles as a pump to improve the circulation in your affected arm (on the same side as your surgery). 1. Try lying on your unaffected side with your affected arm straight out, above the level of your heart (use pillows if you need to) or sit in a chair with good back support with your arm supported by pillows. 2. Slowly open and close your hand. Repeat 15 to 25 times. 3. Then slowly bend and straighten your elbow. Repeat 15 to 25 times.
  • 15.
    3. SHOULDER SHRUGSAND CIRCLES  This exercise can be done sitting or standing. 1. Lift both shoulders up towards your ears. Keep your chin tucked in slightly. Hold for 5 to 10 seconds, and then slowly drop them down and relax. Repeat 5 to 10 times. 2. Gently rotate both shoulders forward and up, and then slowly back and down, making a circle. Keep your chin tucked in slightly. Switch and repeat in the opposite direction. 3. Repeat 5 to 10 times in each direction.
  • 17.
    3 ARM LIFTS This exercise can be done sitting or standing. 1. Clasp your hands together in front of your chest. Point your elbows out. 2. Slowly lift your arms upwards until you feel a gentle stretch. 3. Hold for 1 to 2 seconds, and then slowly return to the start position. 4. Repeat 5 to 10 times.
  • 19.
    4 SHOULDER BLADESQUEEZE  This exercise helps improve movement in your shoulder and your posture. 1. Sit in a chair facing straight ahead without resting your back on the chair, or stand up. Your arms should be at your side with your elbows straight and your palms facing your sides. 2. Open your chest, gently squeeze your shoulder blades together and down and rotate your thumbs so your palms face forward. 3. Hold for 5 to 10 seconds and practice your deep breathing while holding this posture. Relax and return to the start position. 4. Repeat 5 to 10 times.
  • 21.
     Once thedrain has been removed, you should try to get back full control of your shoulder.  Begin with these easy exercises, and then move on to the more advanced exercises once you feel stronger.  By the end of this stage, you should have full movement of your affected arm and shoulder.  But listen to your body. You shouldn’t feel worse after the exercises.
  • 22.
    1 WAND EXERCISE(2 POSITIONS)  This exercise helps improve the forward movement of your shoulder.  You will need a “wand” to do this exercise – try a broom handle, stick or a cane.  You may feel a gentle pull but not any pain or pinching during these exercises.  If you do, stop the movement before the point of pain or pinching.  Position 1 1. Lie on your back with your knees bent. Hold your wand with both hands (your palms should be facing down), and your hands should be shoulder-width apart. 2. Lift the wand over your head as far as you can until you feel a stretch. Your unaffected arm will help lift the wand. 3. Hold for 1 to 2 seconds. Lower arms. 4. Repeat 5 to 10 times.
  • 23.
     Position 2 Repeatwith palms still facing down but slightly wider than your hips or shoulders.
  • 24.
    2 WINGING IT This exercise helps improve movement in the front of your chest and shoulder.  It may take several weeks of regular exercise before your elbows get close to the floor.  If you feel pain or pinching in your shoulder, place a small pillow behind your head, above (not under) your affected shoulder. 1. Lie on your back with your knees bent. Touch your fingertips to your ears with your elbows pointed to the ceiling. (If you can’t comfortably put your hands at your ears, place your fingers on your forehead, palms facing each other.) 2. Move your elbows apart and down to the bed (or floor). Hold for 1 to 2 seconds. 3. Repeat 5 to 10 times.
  • 26.
    3 WALL CLIMBING(2 POSITIONS)  This exercise helps increase movement in your shoulder.  Try to reach a little higher on the wall each day.  This exercise can be done in 2 directions – facing the wall or your affected side to the wall.  Facing the wall 1. Stand facing the wall, about 5 cm (2 inches) away. Place both your hands on the wall at shoulder level. 2. Use your fingers to climb up or slide as high as you can go until you feel a stretch. 3. Return to start position. 4. Repeat 5 to 10 times.
  • 28.
     Side wallstretch 1. Stand with your affected side to the wall, about 2 feet from the wall so you can touch the wall with your fingertips. 2. Walk your fingers up the wall as you do in facing the wall. Do not rotate your body towards the wall. Keep your torso facing forward even if it means you can’t go up as high. 3. Lower and repeat 5 to 10 times.
  • 30.
    4 SNOW ANGELS This exercise can be done lying down on the floor or on a bed. 1. Lie on your back and extend your arms out at your sides. 2. Move them up over your head, eventually touching your fingers, and then back down to your thighs (as if you’re making an angel in the snow). 3. Repeat 3 to 5 times.
  • 32.
    More advanced exercises Once you’re getting better movement in your shoulder, try these more advanced stretches. 1 SIDE BENDS  This exercise helps improve movement on both sides of your body. 1. Sit in a chair and clasp your hands together in your lap. 2. Slowly lift your arms over your head. Bend your elbows slightly. 3. When your arms are above your head, bend at your waist and move your body to the right. Hold 1 to 2 seconds. Use your right hand to gently pull your left arm a little further to the right. Keep yourself firmly planted on the chair. Take a deep breath in and out. 4. Return to the centre and then bend to the left, using your left hand to pull your right arm further. 5. Repeat 5 to 10 times on each side.
  • 34.
     From about6 weeks after surgery, as you feel stronger, you can gradually start doing strengthening and general conditioning exercises.  For some women, this means getting back to their old exercise routine, but for others it may mean trying out some new activities.  Talk to your doctor or another member of your healthcare team about starting a specific strengthening program or aerobic exercise, and ask if there are any special precautions you should take.  If you have pain, your shoulder is tight or if your hand or arm begins to swell, talk to your doctor or another member of your healthcare team.
  • 35.
    1 STRENGTHENING  Slowlygetting back to household chores, gardening or yardwork are some ways you can keep building your strength.  Within 4 to 6 weeks after surgery, you can start doing your strengthening exercises with light weights (500 g to 1 kg or 1 to 2 lbs).  If you don’t have any light weights, you can use an unopened juice bottle or a plastic bottle filled with water.  Check with your doctor or physiotherapist to decide what weight is best for you.  They can also suggest strengthening exercises for the upper body that are suitable for you.  But it is important to build up slowly. If you don’t exercise for long days, you can reduce slight weight and start again.
  • 36.
    2 REGULAR AEROBICEXERCISE  It is any exercise that gets your heart and lungs working hard, improves your general physical condition.  It can help with your recovery and has many benefits.  It can: • help improve your cardiovascular fitness – how well your heart, lungs and blood vessels bring oxygen to your muscles, so that you can do physical work for longer periods of time • help you maintain a healthy body weight • help you feel better, which may reduce stress and anxiety • help you as you face the challenges of life after cancer  Brisk walking, swimming, running, cycling, and dancing are all examples of aerobic exercises.