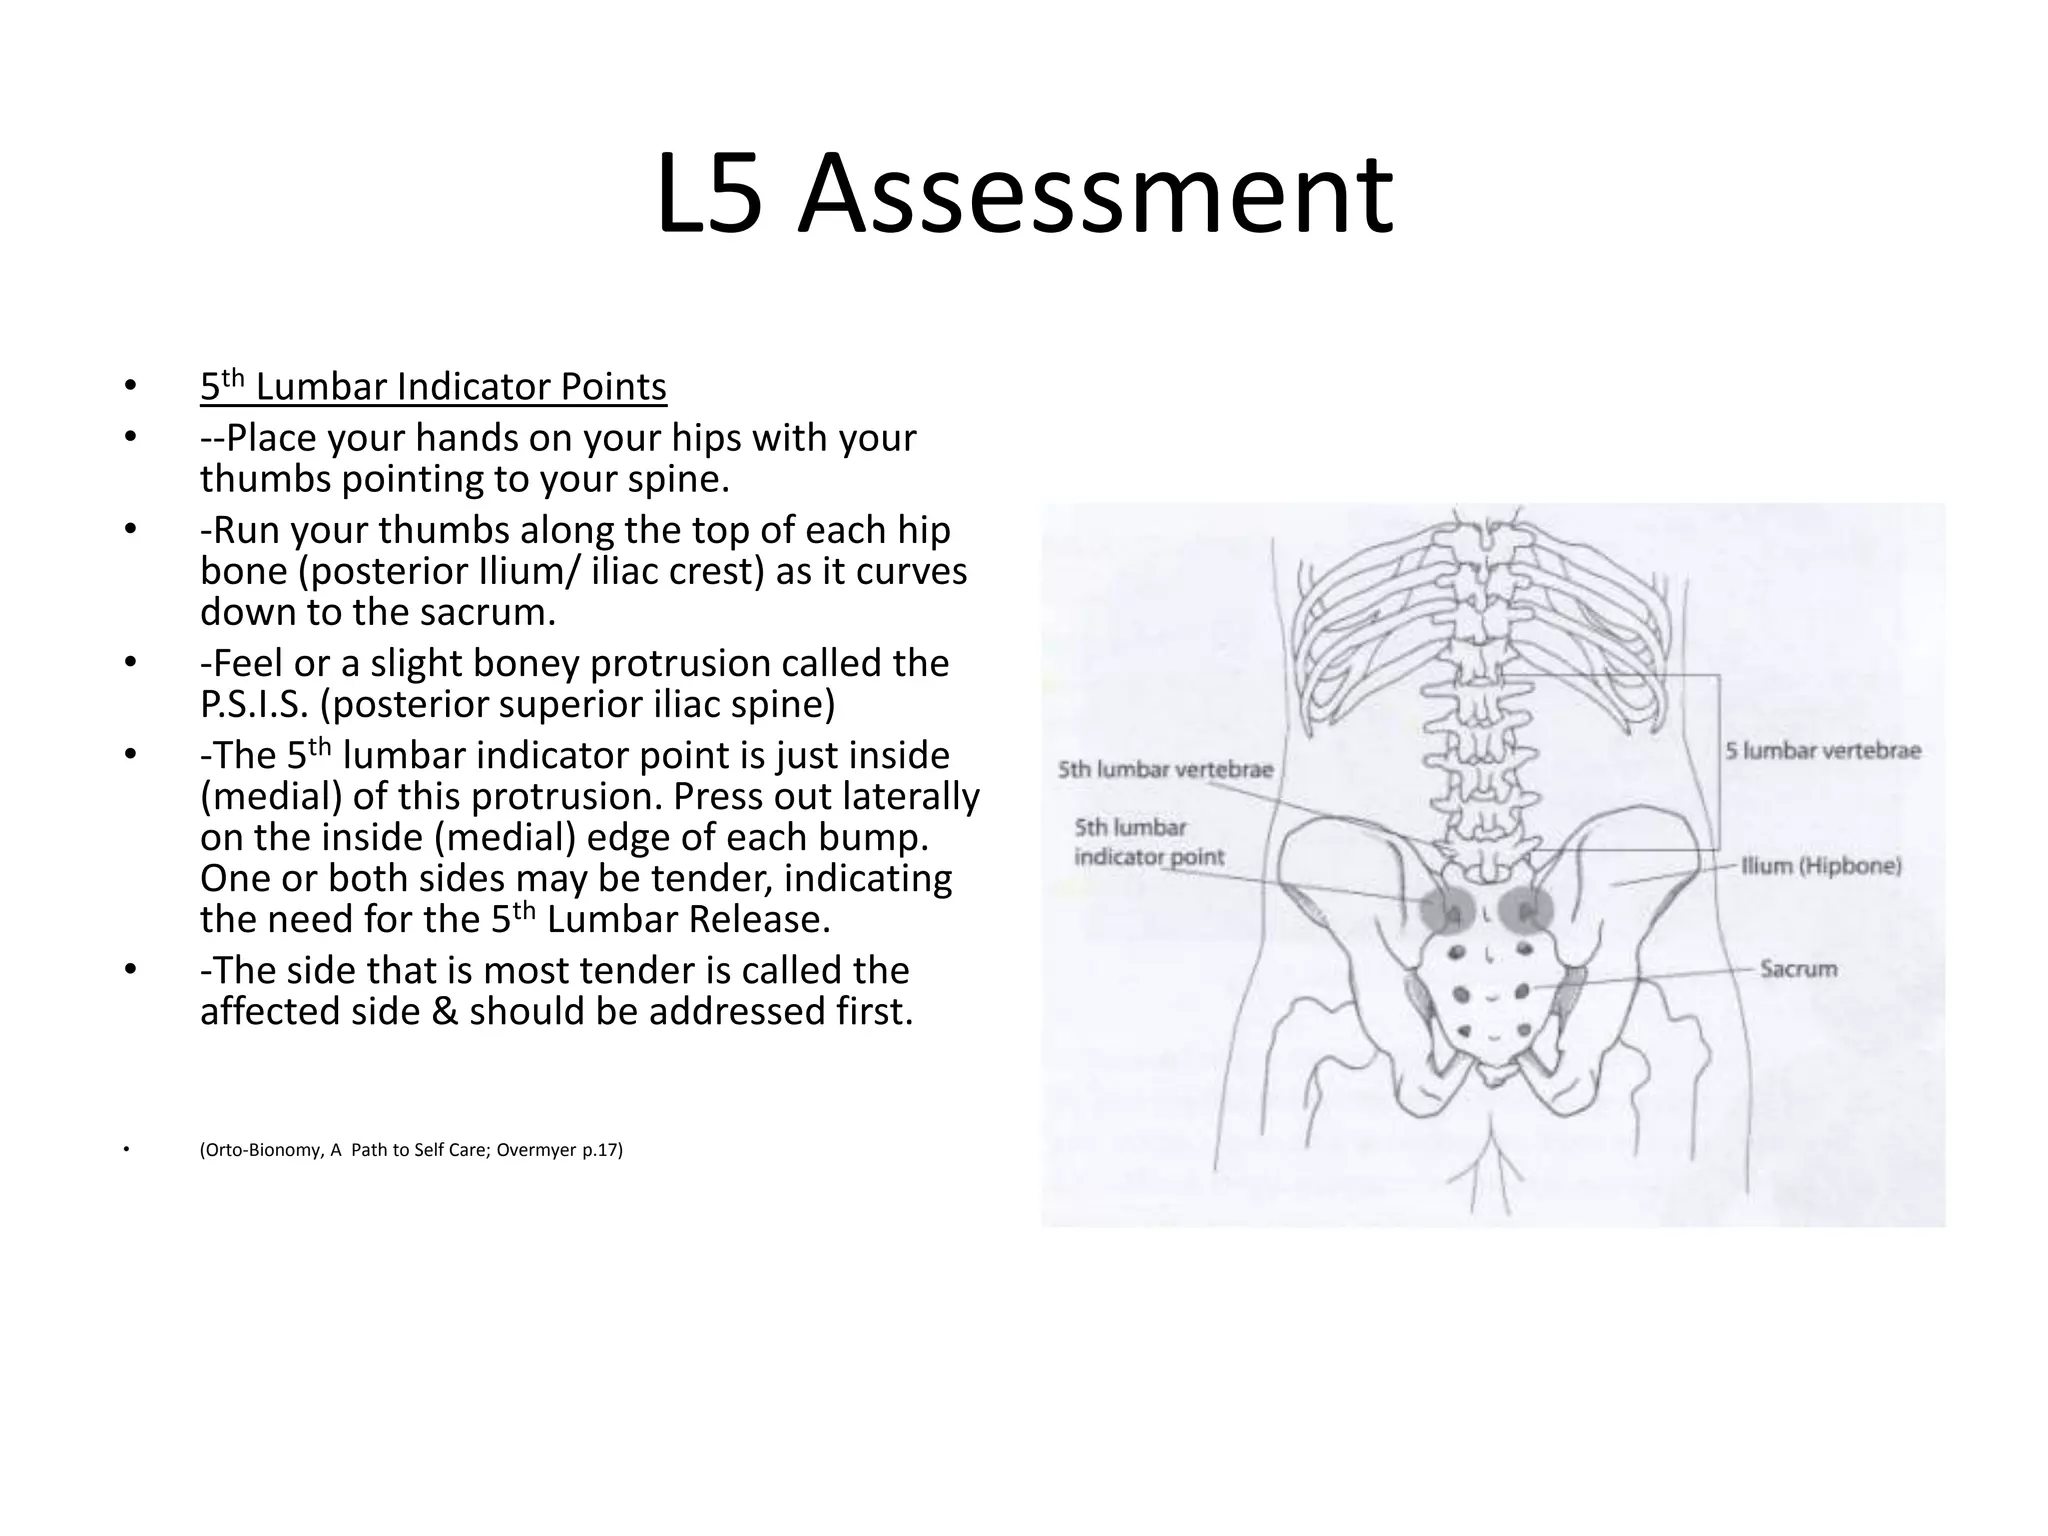
4. Release the Diaphragm
Find the bottom edge
of your rib cage.
Gently hook your
fingers in and under
your rib cage to
massage the where
the diaphragm
attaches. Begin at the
far right and move to
the left.
5. Abdominal Breathing with Lumbar
Release Position.
• Do this exercise every day for 3-20 minutes to relieve chronic pain and tension in
the low back. The keys are optimum comfort, focus, breath & visualizing the
exhales releasing through the low back.
• -Lie on your back and place your feet and calves on a chair with your knees bent at
90 degrees.
• -One at a time, gently move your knees back & forth, and side to side until you find
the position that feels really comfortable on your low back. Take your time and
focus on the subtle changes that take place in your back.
• -Place your palms on your belly inhale slowly and deeply. Feel your belly rise.
Imagine the air gently flowing out of your low back as you exhale. Notice how your
body softens on the out breath and expands on every in breath.
• -Maintain a slow even pace. Allow your exhales to be twice as long as your inhales.
• -Keep your face and jaw relaxed.
• If you experience discomfort in your low back at any time then gently reposition
your legs to find optimum comfort.
6. • “When we engage in non-weight bearing
movement exercises, we remind the nervous
system of the capacity for a relaxed range of
movement.” (Overmyer, p.13)
7. Pelvic Rock with Abdominal Breathing.
• -Lie on your back with your knees bent and feet on the floor hip distance apart.
• - Slightly arch your back then release it. Gently press your low back down into the
floor & feel your pubic bone curl up to the ceiling. Then release it.
• -Again press your low back into the floor and push into your feet (feel the pubic
curling motion supported by the foot pressure). Now see if you can keep the belly
relaxed and allow that pelvic rock to come only from pressing into your feet.
• -Begin Abdominal Breathing with long slow exhales releasing out of your low back.
Maintain a relaxed rhythm of deep inhales & exhales.
• -As you exhale press through your feet so the weight is more on the soles. As the
pubic bone curls up the lumbar spine flattens to the floor.
• -As you inhale release the pressure from your feet and allow the pelvis to rock
back to neutral.
• -Continue rocking with your breath for 1-2 minutes. There is no need for forceful
pressure. Everything flows gently and easily.
8. L5 Assessment
• 5th Lumbar Indicator Points
• --Place your hands on your hips with your
thumbs pointing to your spine.
• -Run your thumbs along the top of each hip
bone (posterior Ilium/ iliac crest) as it curves
down to the sacrum.
• -Feel or a slight boney protrusion called the
P.S.I.S. (posterior superior iliac spine)
• -The 5th lumbar indicator point is just inside
(medial) of this protrusion. Press out laterally
on the inside (medial) edge of each bump.
One or both sides may be tender, indicating
the need for the 5th Lumbar Release.
• -The side that is most tender is called the
affected side & should be addressed first.
9. L5 Correction
5th Lumbar Release Position
-Lay diagonally on the bed face down
with the affected side close to the
edge. Hang the affected leg off the bed
so that your knee points to the floor
and your foot rests lightly on the
ground.
-Give in to gravity. Do not try to
support yourself from your low back or
groin. If you have difficulty relaxing,
then place a chair or a pillow under
the knee.
-Relax deeply in this position for 2-3
minutes.
10. -*Come out of this position by sliding your other leg off the bed. Slowly put
weight on BOTH feet to stand up. (If you try to lift the hanging leg then you
might reestablish the painful tension pattern).
11.
12. High Hip assessment
• Find the lateral most top of pelvis. Find the
midline of the side body. Place your thumbs in
at a right angle and notice which hip is higher.
It helps to use your belly button as a guide
and imagine a straight line from one thumb to
the other. Is the line level?
13. Q.L. Release
• -Lay on your side with the high
hip up towards the ceiling; knees
are bent. Place a pillow under
your head. Make sure that your
head shoulders and hips are in
line. Don’t let your upper body
curl in.
• - Place a stool or chair behind
you. Gently roll back and place
your top calf on the seat of the
chair behind you. Let your top
elbow slide back. Let your upper
buttock fall back towards the
floor but don’t actually touch the
floor.
• - Relax here for 1-2 minutes
breathing deep into your belly.
14. General Low Back Release
• These are side lying exercises so place a pillow under your
head for comfort. Lay on a firm surface. Stay within a
comfortable range of motion. There should be no
discomfort during these exercises.
• Isometric
• -Lay on your side with your knees bent like you are sitting in
a chair. Grasp your knees & as you exhale slowly press your
knees into your hands. The movement extends through the
hips, curling the pubic bone forward and presses the low
back away from your knees.
• -Gently release your hands and straighten your
legs, allowing them to complete the movement they were
trying to make.
15. Q.L. exercise to increase ease of
motion.
-Lay on your side with knees
bent at 90 degrees.
-Keeping your knees in
place, slowly lift your ankles up
towards the sky and then slowly
lower. Repeat 4 times.
-Place a cushion under your
feet. Gently push your feet
down into the cushion while
breathing deep for 20 seconds.
-Remove the cushion & repeat
the ankle lifts checking for
comfort & ease.
-Repeat on the other side.
Notice if 1 side is easier than
the other & always exercise the
easy side first.
17. Assess Hip Rotation
• Hip Rotation: Place thumbs perpendicular to
the top of the pelvis at the mid-point of the
side body. Then run your forefinger down the
ridge of the pelvis until you reach a small
boney crest or bump called the A.S.I.S.
(anterior superior iliac spine.) Notice if one hip
is rotated forward (anterior rotation) or back
(posterior rotation).
18. -Find the hip rotation indicator points and notice if they
are tender. Work with the most tender hip first.
19. Correct Hip Rotations
• - If both hips are twisted; Exagerate the
imbalance. Lay on your belly placing a rolled
towel under the thigh of the hip rotating
forward (anterior). Place another rolled towel
under the hip crease of the posteriorly rotated
hip. Turn your head to the side that feels most
relaxed & breath deep into your belly for 1-2
minutes.
20. Correction for
Posterior hip rotation
Lie on your belly and
bring the knee of the
affected side out to
the side like a frog.
Make certain it is a
comfortable position.
Lay here relaxed &
breathing into the
belly for 1-2 mins.
21. Correction for Anterior hip rotation
• Come to the corner of the
bed with the rotated side
closest to the bed. Come
forward so the top of
your thigh is on the bed
and keep your shoulders
over your hips. Make sure
this position is
comfortable. Relax here
breathing into your belly
for 30 seconds-1 min.
22. Side Saddle Somatics
• Sit side saddle with knees pointing to
the front (you may place a folded
blanket or pillow under the front
thigh and hip). Place your hands on
your hips. Rock your tail bone to the
back wall Inhale. Exhale: tuck your
tailbone under. Repeat 10-12 times
moving with your breath!
• Place your hand on your side thigh.
Inhale: roll your thigh down so that
your fingers roll down toward the
ground. Exhale: return to starting
position. Repeat 10-12 times.
• Repeat both exercises on the other
side.
• March in place slowly 10 times.
23. Sacroiliac Joint Exercises:
Painting Circles
Lay on your belly.
Bend one knee with
your foot pointing to
the sky. Slowly paint
big circles in the air
with your toes and be
aware of the positions
with the most comfort
and ease and pause
and rest for a few
breathes in them.
Repeat on the other
side.
24. Sacroiliac Joint Exercises:
Crisscross
Lay face down with
your knees bent.
Remember to move
slowly. Let your feet
fall out to the sides
and then come back in
crossing your ankles
like an “X.” Repeat for
1-2 minutes.
25. Foot Rub
Lay on your belly with
your knees bent and
feet in the air. Rub
your feet together. Be
sure to get all sides
and angles of your
feet, top s and soles.
Then use one foot to
rub down the inside
calf of the opposite
leg.
26.
27. Tennis Ball Gluteal Release
• Lay on your back with your feet on the floor and place a tennis ball
in the middle of each buttock even with (but not on) your tailbone.
Breathe and relax here for 1 min.
• Slowly bring your knees into your chest and draw 5 large circles
with your knee caps. Circle in the opposite direction too.
• Slowly take the knees in opposite circles like an old fashion egg
beater 5 times. Then switch directions.
• Place the feet on the floor & bring the soles of your feet together
and let your knees fall open. Breath here for 1 min.
• Then take your legs out straight on breath here for 1 min.
• Then bend your knees keeping your feet on the floor and scoot your
hips toward the top of your matt rolling those tennis balls up ½ and
inch toward the top of the pelvis.
• Repeat the entire sequence in this position.
29. Iliopsoas Stretch
-Crescent lunge
with back knee on
the floor. (If you
had an Anterior hip
rotation then
stretch the affected
leg back 2 times.
Example; right leg
back, then left,
then right again)
34. Tension in calves and hamstrings can lead to and/or
exacerbate low back pain.
35. Release the hamstrings:
• Lay on your back with one leg up. Place a strap
behind your calf. Keep your leg straight and
pull your strap into your face as you lower
your leg. Let the resistance of the strap be just
enough to prevent movement without causing
strain. Hold of 6-10 seconds then release you
leg down to the ground. Repeat 3 times and
then switch to the other leg