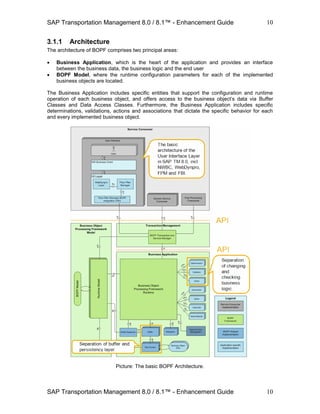
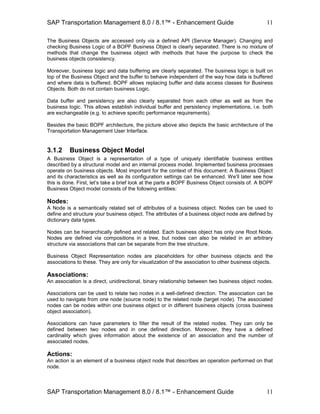
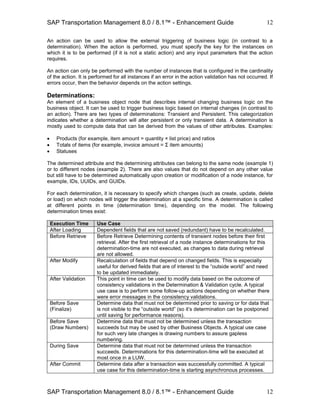
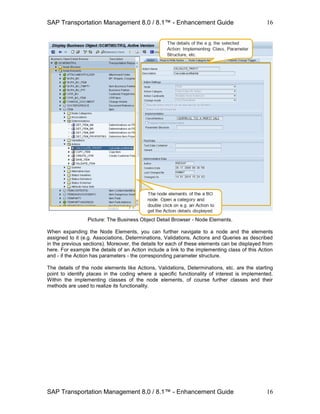
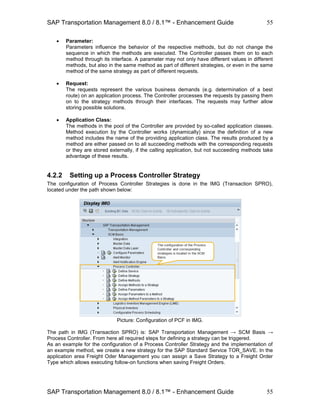
This document provides an overview of enhancement techniques for SAP Transportation Management 8.0/8.1. It describes the Business Object Processing Framework (BOPF) which models and implements business objects. The Floor Plan Manager (FPM) is used to model and implement the user interface, while the Floor Plan Manager BOPF Integration (FBI) connects the backend to the user interface. The document provides examples of enhancing fields, actions, queries, the user interface, and other objects using techniques like BAdIs, process controllers, conditions, and the BOPF enhancement workbench.


![SAP Transportation Management 8.0 / 8.1™ - Enhancement Guide
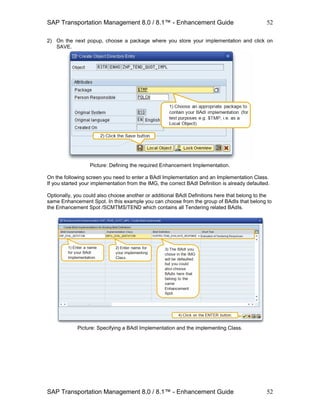
SAP Transportation Management 8.0 / 8.1™ - Enhancement Guide
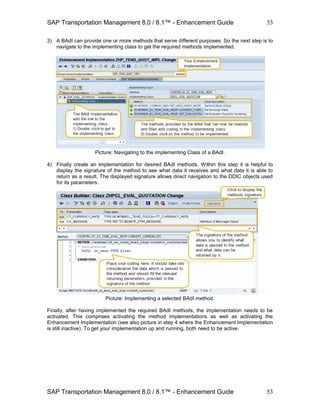
61
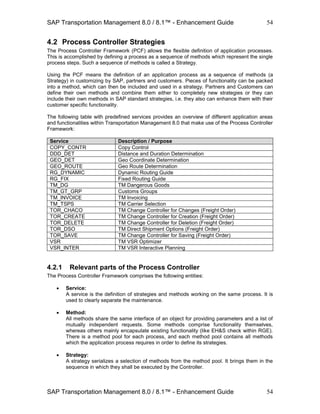
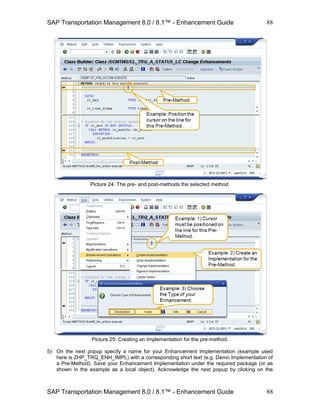
61
.INCLUDE Types ZENH_S_DEMO_RESULT
RETURN_CODE Types /SCMTMS/STRING
Structure Description
ZENH_S_DEMO_REQUEST Demo Request: External View
Component Typing
Method
Component Type
STRATEGY Types /SCTM/DE_STRATEGY
REQUESTS Types ZENH_T_DEMO_REQUEST_INT
Also define the corresponding table types:
Table Type Description
ZENH_T_DEMO_REQUEST_INT Demo Request: Internal View Table
Line Type
ZENH_S_DEMO_REQUEST_INT
Table Type Description
ZENH_T_DEMO_REQUEST Demo Requests: External View Table
Line Type
ZENH_S_DEMO_REQUEST
3) Create a Request Object Class: The request object represents the container for request and
result data as well as process specific options. It will be filled by the controller and passed
through the Process Controller Framework from method to method (i.e. it is the generic
interface between the methods of a strategy).
Create a class [namespace]CL_[process]_REQUEST which inherits from the super class
/SCTM/CL_REQUEST. Example: ZENH_CL_DEMO_REQUEST.
Add public attributes for request and result data as well as (if required) process specific
options. In example class ZENH_CL_DEMO_REQUEST add the following attributes:
Attribute Level Visibility Typing Associated Type
MV_STRATEGY Instance
Attribute
Public Type /SCTM/DE_STRATEGY
MT_REQUESTS Instance
Attribute
Public Type ZENH_T_DEMO_REQUEST_INT
MT_RESULTS Instance
Attribute
Public Type ZENH_T_DEMO_RESULT
MO_MESSAGE_
HANDLER
Instance
Attribute
Public Type
Ref To
/BOBF/IF_FRW_MESSAGE
Implement a constructor for the class with the following parameters (the method
CONSTRUCTOR is a public instance method):
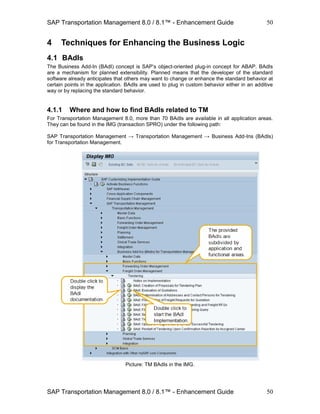
Parameter Pass
Value
Optional Typing
Method
Associated Type
IV_REQUEST_ID Type /SCTM/DE_REQUEST_ID
IV_STRATEGY Type /SCTM/DE_STRATEGY
IT_REQUESTS Type ZENH_T_DEMO_REQUEST_INT
The example coding for the constructor looks as follows:](https://image.slidesharecdn.com/saptmenhancementguide1-130909225733-/85/Sap-tm-enhancement-guide-61-320.jpg)
![SAP Transportation Management 8.0 / 8.1™ - Enhancement Guide
SAP Transportation Management 8.0 / 8.1™ - Enhancement Guide
62
62
METHOD constructor.
* call constructor of super class
super->constructor( iv_request_id ).
* assign constructor parameters to member varialbles
mv_strategy = iv_strategy.
mt_requests = it_requests.
ENDMETHOD.
4) Create a Controller Class: The controller object is responsible for mapping input data to
internal structures, creating requests, starting the Process Controller Framework and finally
mapping the results to the external structures.
Create a class [namespace]CL_[process]_CONTROLLER which inherits from the super
class /SCTM/CL_CONTROLLER. Example: ZENH_CL_DEMO_CONTROLLER.
Create a private instance method CREATE_REQUEST_OBJECTS with the following
parameters:
Parameter Type Pass
Value
Typing
Method
Associated Type
IT_REQUEST_DATA Importing Type ZENH_T_DEMO_REQUEST
ET_STRATEGY_RE
QUESTS
Exporting Yes Type /SCTM/TT_CON_REQUEST
_STRATEGY
MR_MESSAGE Changing Type
Ref To
/BOBF/IF_FRW_MESSAGE
The method is responsible for mapping the input data to internal structures, creating
requests and sorting them into the Process Controller Framework.
The example coding for method CREATE_REQUEST_OBJECTS looks as follows and
can be used as a “template”:
METHOD create_request_objects.
DATA: lv_message TYPE string, "#EC NEEDED
lo_request TYPE REF TO zenh_cl_demo_request,
lt_strategy_ids TYPE /sctm/tt_strategy_id,
lv_exists TYPE boole_d,
lv_request_id TYPE /sctm/de_request_id.
FIELD-SYMBOLS: <fs_request> TYPE zenh_s_demo_request.
CLEAR et_strategy_requests.
* Fill complete strategy, method sequence, parameter and detail
* buffer
CLEAR lt_strategy_ids.
LOOP AT it_request_data ASSIGNING <fs_request>.
INSERT <fs_request>-strategy INTO TABLE lt_strategy_ids.
ENDLOOP.
fill_strategy_buffer( lt_strategy_ids ).
* Create the requests according to their strategy
lv_request_id = 0.](https://image.slidesharecdn.com/saptmenhancementguide1-130909225733-/85/Sap-tm-enhancement-guide-62-320.jpg)
![SAP Transportation Management 8.0 / 8.1™ - Enhancement Guide
SAP Transportation Management 8.0 / 8.1™ - Enhancement Guide
64
64
lo_demo_request TYPE REF TO zenh_cl_demo_request,
lt_bapiret2 TYPE bapirettab.
FIELD-SYMBOLS:
<fs_strategy_request> TYPE /sctm/s_con_request_strategy,
<fs_result> TYPE zenh_s_demo_result.
CLEAR et_result.
* Transform the supplied request data into request objects
CLEAR lt_strategy_requests.
create_request_objects(
EXPORTING it_request_data = it_request_data
IMPORTING et_strategy_requests = lt_strategy_requests
CHANGING mr_message = co_message_handler ).
* Fill created request objects into controller
clear_refill_attributes( it_input_methpar = it_input_methpar
it_strategy_requests = lt_strategy_requests ).
CLEAR lt_bapiret2.
start_perform_requests( IMPORTING et_bapiret2 = lt_bapiret2 ).
* Get results / messages from every single request
LOOP AT mt_strategy_requests ASSIGNING <fs_strategy_request>.
LOOP AT <fs_strategy_request>-t_request INTO lo_request.
lo_demo_request = zenh_cl_demo_methods=>
cast_request( lo_request ).
CHECK lo_demo_request IS BOUND.
* Take over results
LOOP AT lo_demo_request->mt_results ASSIGNING <fs_result>.
INSERT <fs_result> INTO TABLE et_result.
ENDLOOP.
* Take over request specific messages
ENDLOOP.
ENDLOOP.
ENDMETHOD.
5) Create a Method Pool Class: This class contains all the required functionality for the new
process, i.e. it contains the implementation of the methods that can be combined to strategies
Create a class [namespace]CL_[process]_METHODS.
Example: ZENH_CL_DEMO_METHODS.
Create a static public method CAST_REQUEST with the following parameters:
Parameter Type Pass
Value
Typing
Method
Associated Type
IO_REQUEST Importing Type
Ref To
/SCTM/CL_REQUEST
RO_REQUEST Returning Yes Type
Ref To
ZENH_CL_DEMO_REQUEST](https://image.slidesharecdn.com/saptmenhancementguide1-130909225733-/85/Sap-tm-enhancement-guide-64-320.jpg)
![SAP Transportation Management 8.0 / 8.1™ - Enhancement Guide
SAP Transportation Management 8.0 / 8.1™ - Enhancement Guide
65
65
The method is responsible for casting the generic request into the process specific
request. The example coding for method CAST_REQUEST looks as follows and can be
used as a “template”:
METHOD cast_request.
TRY.
ro_request ?= io_request.
CATCH cx_sy_move_cast_error.
CLEAR ro_request.
ENDTRY.
ENDMETHOD.
For each of the required steps for the new process create a public instance method with
the following parameters:
Parameter Type Typing
Method
Associated Type
IO_METHPAR Importing Type
Ref To
/SCTM/CL_METH_PARAMETER
IT_REQUEST Importing Type /SCTM/TT_REQUEST
A general template for an implementation of the methods looks as follows:
METHOD your_functionality.
DATA: lo_request TYPE REF TO /sctm/cl_request,
lo_[PROCESS]_request TYPE REF TO [YOUR REQUEST
OBJECT].
LOOP AT it_request INTO lo_request.
lo_[PROCESS]_request = cast_request( lo_request ).
CHECK lo_[PROCESS]_request IS NOT INITIAL.
*#################################################
*Execute your process here; take request data out
*of lo_[PROCESS]_request and put in result
*#################################################
ENDLOOP.
ENDMETHOD.
The process controller strategies can also include methods from other method pool
classes. This possibility can be used to combine standard method with customer specific
methods in a strategy where the customer specific methods are implemented in a
separate, customer method pool class.
Add the following two example methods to class ZENH_CL_DEMO_METHODS with the
following example code and the parameters as shown above.
METHOD first_enh_method.
DATA: lo_request TYPE REF TO /sctm/cl_request,
lo_demo_request TYPE REF TO zenh_cl_demo_request,
ls_result TYPE zenh_s_demo_result.](https://image.slidesharecdn.com/saptmenhancementguide1-130909225733-/85/Sap-tm-enhancement-guide-65-320.jpg)


![SAP Transportation Management 8.0 / 8.1™ - Enhancement Guide
SAP Transportation Management 8.0 / 8.1™ - Enhancement Guide
78
78
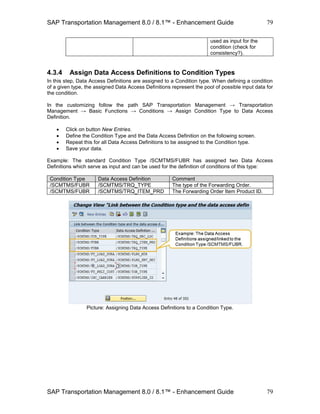
4.3.3 Creating Condition Types
Just like Data Access definitions, customers and partners can define new Condition types. In the
customizing follow the path SAP Transportation Management → Transportation Management →
Basic Functions → Conditions → Define Condition Types.
Click on button New Entries.
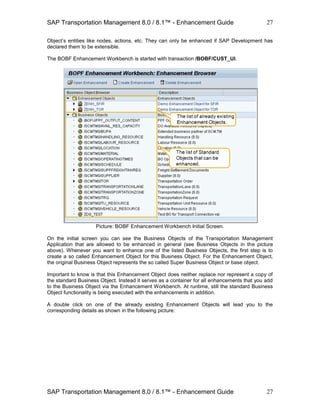
Define a name and a description for the new Condition Type and provide the required
details in section Maintenance View for Condition Types. Example: The standard
Condition Type /SCMTMS/FUBR that returns a Freight Unit Building Rule ID. Conditions
of this type use the Forwarding Order Type and Forwarding Order Item Product (see
assignment of Data Access Definitions to this type in customizing).
Picture: A (standard) Condition Type.
Field Content Comment
Condition Type /SCMTMS/FUBR The name of the new
Data Access Definition.
Description FUB Rule Determination
Cond.
A description of the new
Data Access Definition.
Only one condition
allowed for this condition
type
[space] If this flag is set, only one
single condition can be
defined with this type.
Result is a structure [space] If this flag is set, the
condition is intended to
return a result structure
instead of a single
attribute. In this case
enter the structure name
in field Result DDIC
Type.
Result DDIC Type /SCMTMS/FUBR_ID The DDIC type for the
result of a condition of
this type.
Business Object /SCMTMS/TRQ The Business Object
node whose keys areBO Node Name ITEM](https://image.slidesharecdn.com/saptmenhancementguide1-130909225733-/85/Sap-tm-enhancement-guide-78-320.jpg)


![SAP Transportation Management 8.0 / 8.1™ - Enhancement Guide
SAP Transportation Management 8.0 / 8.1™ - Enhancement Guide
103
103
enhancements e.g. in a client of the development system, the client must be configured
correspondingly to allow transports of enhancement configurations / customizing records.
Transporting as well as deleting created customizing records is possible via a corresponding
Web Dynpro application that can be started with the following general link which has to be
enhanced with information on server and port, depending on where you want to start the tool.
http://[server]:[port]/sap/bc/webdynpro/sap/wd_analyze_config_comp
Example:
http://ukwtr9x.wdf.sap.corp:80089/sap/bc/webdynpro/sap/wd_analyze_config_comp
Here you can select the enhancement configuration/customizing record to either transport it
through the system landscape or if required to delete it. Details on this tool and its usage are
provided in section 4.3.
In the following sections the Freight Order UI will be the example UI to be enhanced. As
mentioned, the principles and techniques used in the following examples are can also be applied
for any other TM UI too. The next section describes how to do field extensions on the UI. This
section also describes some basic aspects of the configuration editor which will be used in
general, i.e. the descriptions provided here also hold for other UI configuration enhancements.](https://image.slidesharecdn.com/saptmenhancementguide1-130909225733-/85/Sap-tm-enhancement-guide-103-320.jpg)


![SAP Transportation Management 8.0 / 8.1™ - Enhancement Guide
SAP Transportation Management 8.0 / 8.1™ - Enhancement Guide
115
115
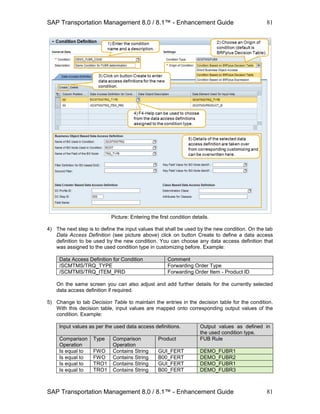
5.4.3 Adding a new tab with data from a new BO subnode
The third example will show a more complex configuration enhancement. A new subnode for the
Freight Order will be created. The data of this subnode shall be displayed as a list on a tab,
including a toolbar with actions that can be executed on the available data.
1) Create a new subnode for the Freight Order as a subnode of its Root Node with a cardinality
of 1:N. We will use the example subnode ZENH_SUBNODE as described in section 3.4.4 for
the next steps.
2) Start the editor for the Web Dynpro ABAP Component Configuration to create a new
configuration. The editor can be started via the following general link which has to be
enhanced with information on server and port, depending on where you want to start the tool.
https://[server]:[port]/sap/bc/webdynpro/sap/configure_component
Example:
https://uscia9x.wdf.sap.corp:44352/sap/bc/webdynpro/sap/configure_component
Here you can enter a component name and a new Configuration ID.
Component Name FPM_LIST_UIBB The new configuration shall
represent a list which will contain
data from a new sub node
Configuration ID ZENH_DEMO_LIST This will be the new configuration to
be integrated in the Freight Order UI.
Click on button Create to create the new configuration.
Picture: The initial screen of the Component Configuration Editor
3) On the first popup, specify a description for the new configuration as well as a package where
to store it (e.g. as a local object in case of just testing).
On the second popup specify the feeder class that shall be used for the new configuration
and the UIBB represented by it. For this example, we use a predefined feeder class for our
new configuration: Class /BOFU/CL_FBI_GUIBB_LIST.](https://image.slidesharecdn.com/saptmenhancementguide1-130909225733-/85/Sap-tm-enhancement-guide-115-320.jpg)


![SAP Transportation Management 8.0 / 8.1™ - Enhancement Guide
SAP Transportation Management 8.0 / 8.1™ - Enhancement Guide
123
123
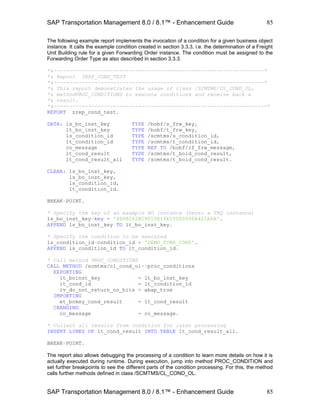
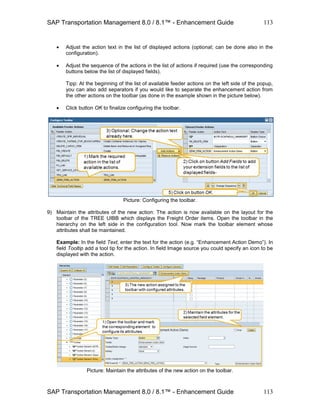
3) On the following popup click on Button to add a new button to the main tool bar. Then click on
button OK to continue.
Picture: Add a new button.
4) A new button will appear in the list of tool bar elements. The attributes of this button can now
be maintained as follows:
Attribute Value
Text Enh. Main Toolbar Action
Tool Tip An Enhancement Action on the main toolbar
FPM Event ID ZENH_MAINTOOLBAR_ACTION
Action Type Standard
Moreover maintain the following Event Parameter:
Parameter Name Parameter Value
FBI_RAISED_BY_TOOLBAR X
5) Save your configuration. The new button is now ready to be used on the Freight Order UI via
its main tool bar.
Picture: The new button on the main tool bar.
With this first example the enhancement action will be triggered by the additional button on the
main tool bar. As we have chosen the FPM Event ID to be identical with the action name, the
execution of the action will be handled generically without any further coding required.
In case you don’t want to relate the button to a BO action as shown in the first example, you can
follow the second approach which allows you to implement arbitrary coding to be executed when
clicking the related button on the UI. This works as follows:
For each application configuration (e.g. /SCMTMS/FRE_ORDER) there is a FBI View available
that follows the naming convention [application configuration name]_HTLB. For the example this
is FBI View /SCMTMS/FRE_ORDER_HTLB. It is defined to handle the tool bar of the application
and the Exit Class defined there is called automatically.
Instead of providing an action name as the FPM Event ID (see step 4 above) you can provide an
arbitrary FPM Event ID (e.g. MyEventID) that will be handled by the Exit Class of the HTLB FBI
View. In the Exit Class you can add coding to method ADAPT_EVENT to react on and handle the
event. You can identify the corresponding Exit Class as follows:](https://image.slidesharecdn.com/saptmenhancementguide1-130909225733-/85/Sap-tm-enhancement-guide-123-320.jpg)


![SAP Transportation Management 8.0 / 8.1™ - Enhancement Guide
SAP Transportation Management 8.0 / 8.1™ - Enhancement Guide
126
126
* take over action parameters
ASSIGN is_parameters->* TO <fs_parameters>.
* prepare message text parameter
CLEAR ls_msg.
ls_msg-msgv1 = <fs_parameters>-zzenh_comment.
* use parameter Z_FLAG
IF <fs_parameters>-z_works_ind = abap_true.
MESSAGE s001(zenh_mess) WITH ls_msg-msgv1 INTO lv_temp.
ELSE.
MESSAGE e002(zenh_mess) WITH ls_msg-msgv1 INTO lv_temp.
ENDIF.
CALL METHOD /scmtms/cl_common_helper=>msg_helper_add_symsg(
EXPORTING
iv_key = /scmtms/if_tor_c=>sc_bo_key
iv_node_key = /scmtms/if_tor_c=>sc_node-root
CHANGING
co_message = eo_message ).
ENDMETHOD.
2) Start the editor for the Web Dynpro ABAP Component Configuration to create a new
configuration. As mentioned already in section 5.4.3, the editor can be started via the
following general link which has to be enhanced with information on server and port,
depending on where you want to start the tool.
https://[server]:[port]/sap/bc/webdynpro/sap/configure_component
Example:
https://uscia9x.wdf.sap.corp:44352/sap/bc/webdynpro/sap/configure_component
Here you can enter a component name and a new Configuration ID. This new configuration
will define a From UIBB that will contain the action parameters as available input fields.
Field Value Comment
Component Name FPM_FORM_UIBB The new configuration shall
represent a form which will
contain data of the action
parameter structure.
Configuration ID ZENH_WDCC_POPUP_ACTION This will be the new
configuration to be integrated in
the Freight Order UI.
Click on button Create to create the new configuration.
3) On the following popup provide a description and a package where to store the new
configuration. Then click on button OK to continue.
Field Value
Description FPM_FORM_UIBB
Package $TMP (or your own customer/partner specific package)](https://image.slidesharecdn.com/saptmenhancementguide1-130909225733-/85/Sap-tm-enhancement-guide-126-320.jpg)

![SAP Transportation Management 8.0 / 8.1™ - Enhancement Guide
SAP Transportation Management 8.0 / 8.1™ - Enhancement Guide
128
128
enhanced with information on server and port, depending on where you want to start the tool.
In this case we customize an already existing standard component configuration, i.e. we use
the following link to start the component customizing for /SCMTMS/WDCC_FRE_ORDER.
https://[server]:[port]/sap/bc/webdynpro/sap/customize_component
Example:
https://uscia9x.wdf.sap.corp:44352/sap/bc/webdynpro/sap/customize_component
Here you can enter a component name and a new Configuration ID. This new configuration
will define a From UIBB that will contain the action parameters as available input fields.
Field Value Comment
Component Name FPM_OVP_COMPONENT
Configuration ID /SCMTMS/WDCC_FRE_ORDER The standard Web Dynpro
Component Configuration of the
Freight Order UI.
Click on button Change to enhance the existing standard component configuration.
11) A new page is now added to component configuration /SCMTMS/WDCC_FREE_ORDER.
Click on button Add Page on the upper right side of the editor and specify the page attributes
as follows:
Attribute Value
Page ID ENH_POPUP_ACTION
Page Type Dialog
Title Enhancement Popup
Dialog buttons OK and CANCEL (OK is default button)
In the element hierarchy on the left side of the editor further drill down by following the path
Page: ENH_POPUP_ACTION → Section: SECTION_1 → UIBB_XXX and specify the
attributes of the UIBB listed there as follows:
Attribute Value
Component FPM_FORM_UIBB
Configuration Name ZENH_WDCC_POPUP_ACTION
View FORM_WINDOW
Title Enhancement Popup
With these settings we have assigned our configuration of the Form UIBB to represent the
popup to the newly created page. This new page represents now the complete definition of
the popup that shall come up when executing the action from the UI.
12) Click on button Save in the Editor Tool Bar to save the component customizing.
13) In the next step, start the editor for the Web Dynpro ABAP Component Configuration
/SCMTMS/WDCC_APPCC which represents the application controller configuration. Here,
the Action is finally assigned to the popup that was configured in the previous steps.
14) Click on button Change and on the next screen navigate to tab strip Component-Defined. In
section Configuration Context click on button Add and add a new Action Parameter
Configuration. Specify the following attributes:](https://image.slidesharecdn.com/saptmenhancementguide1-130909225733-/85/Sap-tm-enhancement-guide-128-320.jpg)


![SAP Transportation Management 8.0 / 8.1™ - Enhancement Guide
SAP Transportation Management 8.0 / 8.1™ - Enhancement Guide
144
144
5.5 Transporting or removing UI enhancements.
Transporting as well as deleting created customizing records is possible via a corresponding Web
Dynpro application that can be started with the following general link which has to be enhanced
with information on server and port, depending on where you want to start the tool.
http://[server]:[port]/sap/bc/webdynpro/sap/wd_analyze_config_comp
Example: http://ukwtr9x.wdf.sap.corp:80089/sap/bc/webdynpro/sap/wd_analyze_config_comp
Here you can select the enhancement configuration/customizing record to either transport it
through the system landscape or if required to delete it.
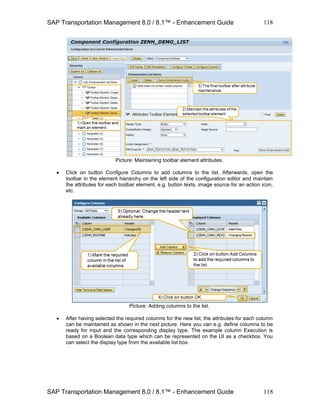
1) Start the tool as mentioned above. In field Find by select Configuration and in the next field
enter the name of a configuration that you want to take a look at.
Example: /SCMTMS/WDCC_FRE_ORDER_GEN_GNINF
Picture: The initial screen of the tool.
2) On the next screen mark the found configuration and click on button Goto Personalization.
Picture: Navigating to the Personalization of the configuration.
Moreover, the buttons Copy or Enhance allow creating a copy of a selected configuration that
can be reused when building a new user interface, e.g. for an existing BO. Or such a copy is
created, adjusted and replaces corresponding standard configurations in an existing user
interface.
3) The following screen shows the list of Component Personalizations. Here you can find
buttons to either transport an enhanced configuration (i.e. the corresponding customizing
records) or delete the enhancements again.
Picture: Transporting or deleting a Component Personalization (customizing record).
In the above mentioned example, you can see a customizing record for the standard
configuration /SCMTMS/WDCC_FRE_ORDER_GEN_GNINF which is valid for all users (*).](https://image.slidesharecdn.com/saptmenhancementguide1-130909225733-/85/Sap-tm-enhancement-guide-144-320.jpg)


![SAP Transportation Management 8.0 / 8.1™ - Enhancement Guide
SAP Transportation Management 8.0 / 8.1™ - Enhancement Guide
153
153
6.2 Creating a new POWL
This section describes how to create a new TM specific Personal Object Work List (POWL) and
how to enhance existing standard POWLs provided with the standard TM application. As a first
step to learn about the basic technical concepts we will take a look at how to create a new
POWL.
The provided example will use generic result query QDB_PLANNING_ATTRIBUTES that was
already enhanced by an additional field ZENH_ENTRY_DATE in section 6.1.5. Generic Result
Queries are the basic data source for any POWL. With this example enhancement all POWLs
that make use of the mentioned query can make use of the additional field as a selection criteria
as well as an attribute in the result list.
6.2.1 The POWL Feeder Class
The main access point for a POWL is the POWL Feeder Class. It contains the definition of the
POWL’s field catalog, the selection criteria and the actions that can be executed for a selected
set of object instances from the POWL.
In TM, a POWL Feeder Class is based on a query of a Business Object. The relationship
between a Business Object query (a generic result query) and a POWL Feeder class is always
one to one. So whenever there is no POWL Feeder Class for an existing generic result query of a
BO, you need a new POWL Feeder Class.
You should also keep this in mind when you create BO Queries for POWL usage. If you have
two completely different requirements which lead to different BO Queries, of course two different
POWL Feeder Classes are required.
If you have different business categories/usages for POWL which share a lot of common parts
form a technical perspective, it makes sense to design one (technical) BO Query which has one
technical POWL Feeder class in the end. Based on this feeder class, you can separate your
different usages or categories with POWL types. An example is the TOR Feeder class, with
separated POWL types for each BO Category.
In the following example a new POWL for Freight Orders is created to describe how POWLs are
developed in general. The example POWL will make use of the enhanced Generic Result Query
from chapter 6.1.5.
1) Create a new POWL Feeder Class with e.g. transaction SE24: The general naming
convention followed in TM is /SCMTMS/CL_UI_POW_FD_[object name or abbreviation]. Our
example class will be: ZCL_ENH_UI_POW_FD_TOR.
Make sure that the new Feeder class inherits from class /SCMTMS/CL_UI_POW_FD_BASE.
Save and activate the new class.
2) As you will see in the coding of the POWL Feeder Class Constructor, constants are used to
specify the names or keys for all general attributes of a POWL. In the standard TM
implementation, the constants interface /SCMTMS/IF_UI_POW_CONST contains all the
definitions of these constants for all TM standard POWLs.
In the example a separate new constants interface is created to represent the constants used
for this customer/partner specific POWL (with this it will not be necessary to use implicit
enhancements to adjust the standard constants interface with your own customer/partner
specific constants). Create the example constants interface as follows:
Start transaction SE24, enter the interface name ZIF_ENH_UI_POW_CONST in field
Object Type and click on button Create.](https://image.slidesharecdn.com/saptmenhancementguide1-130909225733-/85/Sap-tm-enhancement-guide-153-320.jpg)


![SAP Transportation Management 8.0 / 8.1™ - Enhancement Guide
SAP Transportation Management 8.0 / 8.1™ - Enhancement Guide
188
188
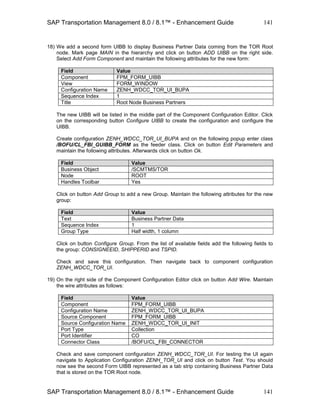
Picture: Maintaining PPF Settings - Initial screen.
3) On the next screen switch to change mode (Crtl+F1), mark entry Action Profile in the
Dialog Structure tree and click on button New Entry to create a new Action Profile with
the following data:
Field Value
Action Profile ZENH_TRQ_FWO_PRINT
Description Enhancement Action Profile for TRQ
Category of Object Type Persistent Class
Object Type Name /BOFU/CL_PPF_CONTAINER
Context Class /BOFU/CL_PPF_CONTEXT
4) Mark entry Action Definition in the Dialog Structure tree and click on button New Entry to
create the new Action Definition ZENH_TRQ_FWO_PRINT_MAN with the following data:
Tab strip Field Value
Action Definition ZENH_TRQ_FWO_PRINT_MAN
Description Enhancement TRQ Manual Print Action
Action
Definition
Action Settings
Processing Time Processing using selection report
Processing Times Not
Permitted
No Restrictions
Schedule Automatically X
Changeable in Dialog X
Delete After Processing [blank]
Executable in Dialog X
Action Determination and Action Merging
Determination Technology Determination Using Conditions that Can Be Transported
Rule Type Conditions Using Business Add In (BAdI)
Action Merging Set Highest Number of Processed Actions
Action
Description
Description Enhancement TRQ Manual Print Action](https://image.slidesharecdn.com/saptmenhancementguide1-130909225733-/85/Sap-tm-enhancement-guide-188-320.jpg)
![SAP Transportation Management 8.0 / 8.1™ - Enhancement Guide
SAP Transportation Management 8.0 / 8.1™ - Enhancement Guide
189
189
Action
Merging
Number of Unprocessed Actions
One Unprocessed Action for
each Action Definition
X
Number of Processed Actions
Allow Any Number of Actions X
To create Action Definition ZENH_TRQ_FWO_PRINT again click on button New Entry
and enter the following data:
Tab strip Field Value
Action Definition ZENH_TRQ_FWO_PRINT
Description Enhancement TRQ Print Action
Action
Definition
Action Settings
Processing Time Processing when saving document
Processing Times Not
Permitted
No Restrictions
Schedule Automatically X
Changeable in Dialog X
Delete After Processing [blank]
Executable in Dialog X
Action Determination and Action Merging
Determination Technology Determination Using Conditions that Can Be Transported
Rule Type Conditions Using Business Add In (BAdI)
Action Merging Set Highest Number of Processed Actions
Action
Description
Description Enhancement TRQ Print Action.
Action
Merging
Number of Unprocessed Actions
One Unprocessed Action for
each Action Definition
X
Number of Processed Actions
Allow Any Number of Actions X
5) Double click on entry Action Definition in the Dialog Structure tree. You should now see
the two action definitions displayed in a list. For both action definitions execute the
following steps.
6) Mark an action definition in the list and double click on entry Processing Type in the
Dialog Structure tree. Then click on button New Entry to create the new Processing Type
for the selected action definition with the following data:
In the list Permitted Processing Types of Action use the F4-Help in column Assignment /
Change Using Value Help in List and select value External Communication.
7) You can now see three tab strips which allow specifying further details for the processing
type. On tab strip Document enter the following data:
Field Value
Form Name ZENH_FP_TRQ
Form Type PDF-Based Forms
Format /BOFU/PPF_STANDARD
Personalization Type Recipient-Specific Variable Replacement
8) Double click on entry Action Definition in the Dialog Structure tree again to return to the
list of action definitions and repeat steps 6 and 7 for the second action definition.](https://image.slidesharecdn.com/saptmenhancementguide1-130909225733-/85/Sap-tm-enhancement-guide-189-320.jpg)
![SAP Transportation Management 8.0 / 8.1™ - Enhancement Guide
SAP Transportation Management 8.0 / 8.1™ - Enhancement Guide
191
191
The start condition is checked before the action is executed. The action is only executed
when the start condition has been fulfilled. As for the schedule condition, we use a
standard default start condition for the example. You could also create your own start
condition here with your own logic.
6) Save your settings. The condition configuration is now complete and ready to be used in
the next steps.
7.4.2 Maintaining Output Management Adapter Settings
In this step the output management adapter settings are done. These settings determine output
for a given Business Object (BO) node. To finalize the example configuration execute the
following steps.
1) Start customizing transaction SPRO and follow the path Cross-Application Components
→ Reusable Objects and Functions for BOPF Environment → PPF Adapter for Output
Management → Maintain Output Management Adapter Settings.
2) On the first screen double click on entry PPF Output Agents for BO Nodes in the Dialog
Structure tree and then click on button New Entries. Enter the following data:
Field Value
Business Object /SCMTMS/TRQ
Node ROOT
Output Agent ZENH_TRQ_STANDARD
Agent Class for Node ZCL_ENH_TRQ_PPF_SERVICE
Enable X
3) In the Dialog Structure tree double click on entry Assign PPF Profiles and enter the
following data:
Field Value
Action Profile
Application for Action
Profile
[blank]
Enable X
Output Type Has Uncritical o/p: Process after Commit (background)
Create DB Image X
4) Save your settings.
7.4.3 Maintaining an output device/printer for your user
Open the menu path System → User Profile → Own Data and navigate to the tab strip Defaults.
In section Spool Control enter the output device name (e.g. T818_BW) in field Output Device or
select an existing one via the F4-Help. Also set the flag Output Immediately.
7.4.4 Preparing an example print document
The new form is based on the BO /SCMTMS/TRQ that provides its Root node and Item node
data as the content for form. For testing the new form proceed as follows:](https://image.slidesharecdn.com/saptmenhancementguide1-130909225733-/85/Sap-tm-enhancement-guide-191-320.jpg)
![SAP Transportation Management 8.0 / 8.1™ - Enhancement Guide
SAP Transportation Management 8.0 / 8.1™ - Enhancement Guide
192
192
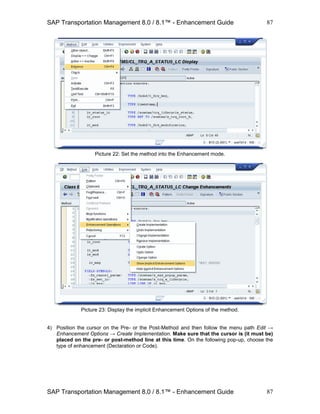
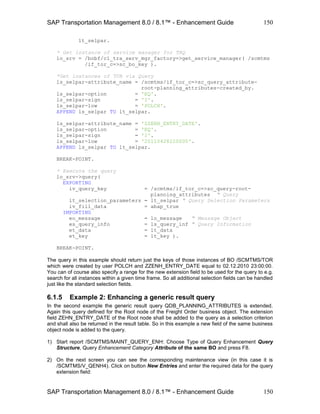
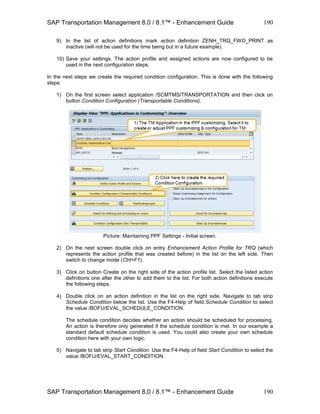
1) Start customizing transaction SPRO and follow the path SAP Transportation
Management → Forwarding Order Management → Forwarding Order → Define
Forwarding Order Types.
Switch into change mode (Ctrl+F4) Create a new Forwarding Order Type (click on button
New Entries) or choose an existing one from the list.
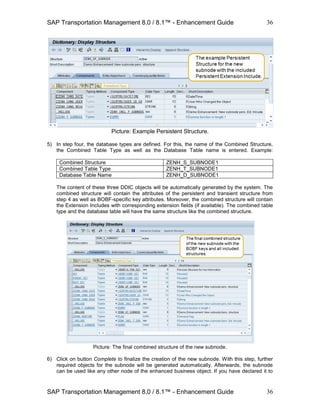
2) In section Process Control / Business Object Mode on the main screen enter the output
profile / action profile ZENH_TRQ_FWO_PRINT that was created in section 7.4.1, step 3.
Any Forwarding Order that you create now with this type will now make use of this output
profile with its settings and the example form.
Picture: Specifying the Output Profile in the Forwarding Order Type.
3) Maintain all other mandatory or required settings and save the Forwarding Order Type
settings.
4) Create a new Forwarding Order with the corresponding Forwarding Order Type.
You can do this via the TM UI in the Netweaver Business Client (NWBC) or the
standalone UI triggered via the user menu path User Menu for [user] → Forwarding
Order Management → Forwarding Order → Create Forwarding Order.
Provide all mandatory fields on tab strip General Data. Define the required business
partners on tab strip Business Partner and maintain the required location information on
tab strip Location and Dates / Times. Moreover, maintain item data in the item list of your
example document (e.g. an item hierarchy of Container, Package and Product).
5) Save the new document (Ctrl+S) and switch into Edit mode again (button Edit or Ctrl+E).
6) On the Forwarding Order UI go to tab strip Output Management and here navigate further
to tab strip Outputs. In the tool bar click on button Generate Actions.
In the list of generated actions you should now see an entry with the action definition
Enhancement TRQ Manual Print Action that was created in the example action profile.](https://image.slidesharecdn.com/saptmenhancementguide1-130909225733-/85/Sap-tm-enhancement-guide-192-320.jpg)