This document is the Apex Developer Guide, which provides guidance and reference information for developing applications on the Salesforce Platform using the Apex programming language. It introduces Apex and outlines the Apex development process, including writing Apex code, running and testing code, and deploying code to production. The guide also references additional documentation on Apex classes, interfaces, and exceptions.


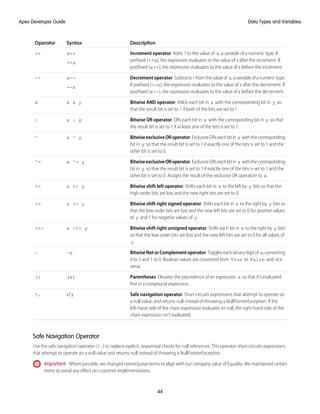
![Naming Variables, Methods and Classes
You cannot use any of the Apex reserved keywords when naming variables, methods or classes. These include words that are part of
Apex and the Lightning platform, such as list, test, or account, as well as reserved keywords.
Using Variables and Expressions
Apex is a strongly-typed language, that is, you must declare the data type of a variable when you first refer to it. Apex data types include
basic types such as Integer, Date, and Boolean, as well as more advanced types such as lists, maps, objects and sObjects.
Variables are declared with a name and a data type. You can assign a value to a variable when you declare it. You can also assign values
later. Use the following syntax when declaring variables:
datatype variable_name [ = value];
Tip: Note that the semi-colon at the end of the above is not optional. You must end all statements with a semi-colon.
The following are examples of variable declarations:
// The following variable has the data type of Integer with the name Count,
// and has the value of 0.
Integer Count = 0;
// The following variable has the data type of Decimal with the name Total. Note
// that no value has been assigned to it.
Decimal Total;
// The following variable is an account, which is also referred to as an sObject.
Account MyAcct = new Account();
In Apex, all primitive data type arguments, such as Integer or String, are passed into methods by value. This fact means that any changes
to the arguments exist only within the scope of the method. When the method returns, the changes to the arguments are lost.
Non-primitive data type arguments, such as sObjects, are passed into methods by reference. Therefore, when the method returns, the
passed-in argument still references the same object as before the method call. Within the method, the reference can't be changed to
point to another object, but the values of the object's fields can be changed.
Using Statements
A statement is any coded instruction that performs an action.
In Apex, statements must end with a semicolon and can be one of the following types:
• Assignment, such as assigning a value to a variable
• Conditional (if-else)
• Loops:
– Do-while
– While
– For
• Locking
• Data Manipulation Language (DML)
• Transaction Control
• Method Invoking
• Exception Handling
6
Introducing Apex
Apex Developer Guide](https://image.slidesharecdn.com/salesforceapexdeveloperguide-230916115800-b7c953cd/85/salesforce_apex_developer_guide-10-320.jpg)
![A block is a series of statements that are grouped together with curly braces and can be used in any place where a single statement
would be allowed. For example:
if (true) {
System.debug(1);
System.debug(2);
} else {
System.debug(3);
System.debug(4);
}
In cases where a block consists of only one statement, the curly braces can be left off. For example:
if (true)
System.debug(1);
else
System.debug(2);
Using Collections
Apex has the following types of collections:
• Lists (arrays)
• Maps
• Sets
A list is a collection of elements, such as Integers, Strings, objects, or other collections. Use a list when the sequence of elements is
important. You can have duplicate elements in a list.
The first index position in a list is always 0.
To create a list:
• Use the new keyword
• Use the List keyword followed by the element type contained within <> characters.
Use the following syntax for creating a list:
List <datatype> list_name
[= new List<datatype>();] |
[=new List<datatype>{value [, value2. . .]};] |
;
The following example creates a list of Integer, and assigns it to the variable My_List. Remember, because Apex is strongly typed,
you must declare the data type of My_List as a list of Integer.
List<Integer> My_List = new List<Integer>();
For more information, see Lists on page 28.
A set is a collection of unique, unordered elements. It can contain primitive data types, such as String, Integer, Date, and so on. It can
also contain more complex data types, such as sObjects.
To create a set:
• Use the new keyword
• Use the Set keyword followed by the primitive data type contained within <> characters
7
Introducing Apex
Apex Developer Guide](https://image.slidesharecdn.com/salesforceapexdeveloperguide-230916115800-b7c953cd/85/salesforce_apex_developer_guide-11-320.jpg)
![Use the following syntax for creating a set:
Set<datatype> set_name
[= new Set<datatype>();] |
[= new Set<datatype>{value [, value2. . .] };] |
;
The following example creates a set of String. The values for the set are passed in using the curly braces {}.
Set<String> My_String = new Set<String>{'a', 'b', 'c'};
For more information, see Sets on page 31.
A map is a collection of key-value pairs. Keys can be any primitive data type. Values can include primitive data types, as well as objects
and other collections. Use a map when finding something by key matters. You can have duplicate values in a map, but each key must
be unique.
To create a map:
• Use the new keyword
• Use the Map keyword followed by a key-value pair, delimited by a comma and enclosed in <> characters.
Use the following syntax for creating a map:
Map<key_datatype, value_datatype> map_name
[=new map<key_datatype, value_datatype>();] |
[=new map<key_datatype, value_datatype>
{key1_value => value1_value
[, key2_value => value2_value. . .]};] |
;
The following example creates a map that has a data type of Integer for the key and String for the value. In this example, the values for
the map are being passed in between the curly braces {} as the map is being created.
Map<Integer, String> My_Map = new Map<Integer, String>{1 => 'a', 2 => 'b', 3 => 'c'};
For more information, see Maps on page 32.
Using Branching
An if statement is a true-false test that enables your application to do different things based on a condition. The basic syntax is as
follows:
if (Condition){
// Do this if the condition is true
} else {
// Do this if the condition is not true
}
For more information, see Conditional (If-Else) Statements on page 51.
Using Loops
While the if statement enables your application to do things based on a condition, loops tell your application to do the same thing
again and again based on a condition. Apex supports the following types of loops:
• Do-while
8
Introducing Apex
Apex Developer Guide](https://image.slidesharecdn.com/salesforceapexdeveloperguide-230916115800-b7c953cd/85/salesforce_apex_developer_guide-12-320.jpg)

![7. Select Number for the data type and click Next.
8. Enter Price for the field label.
9. Enter 16 in the length text box.
10. Enter 2 in the decimal places text box, and click Next.
11. Click Next to accept the default values for field-level security.
12. Click Save.
You’ve just created a custom object called Book, and added a custom field to that custom object. Custom objects already have some
standard fields, like Name and CreatedBy, and allow you to add other fields that are more specific to your implementation. For this
tutorial, the Price field is part of our Book object and it is accessed by the Apex class you will write in the next step.
SEE ALSO:
Salesforce Help: Find Object Management Settings
Adding an Apex Class
In this step, you add an Apex class that contains a method for updating the book price. This method is called by the trigger that you will
be adding in the next step.
Prerequisites:
• A Salesforce account in a sandbox Professional, Enterprise, Performance, or Unlimited Edition org, or an account in a Developer org.
• The Book custom object.
1. From Setup, enter “Apex Classes” in the Quick Find box, then select Apex Classes and click New.
2. In the class editor, enter this class definition:
public class MyHelloWorld {
}
The previous code is the class definition to which you will be adding one method in the next step. Apex code is generally contained
inclasses.Thisclassisdefinedas public,whichmeanstheclassisavailabletootherApexclassesandtriggers.Formoreinformation,
see Classes, Objects, and Interfaces on page 58.
3. Add this method definition between the class opening and closing brackets.
public static void applyDiscount(Book__c[] books) {
for (Book__c b :books){
b.Price__c *= 0.9;
}
}
This method is called applyDiscount, and it is both public and static. Because it is a static method, you don't need to create
an instance of the class to access the method—you can just use the name of the class followed by a dot (.) and the name of the
method. For more information, see Static and Instance Methods, Variables, and Initialization Code on page 67.
This method takes one parameter, a list of Book records, which is assigned to the variable books. Notice the __c in the object
name Book__c. This indicates that it is a custom object that you created. Standard objects that are provided in the Salesforce
application, such as Account, don't end with this postfix.
18
Apex Quick Start
Apex Developer Guide](https://image.slidesharecdn.com/salesforceapexdeveloperguide-230916115800-b7c953cd/85/salesforce_apex_developer_guide-22-320.jpg)
![The next section of code contains the rest of the method definition:
for (Book__c b :books){
b.Price__c *= 0.9;
}
Notice the __c after the field name Price__c. This indicates it is a customfield that you created. Standard fields that are provided
by default in Salesforce are accessed using the same type of dot notation but without the __c, for example, Name doesn't end
with __c in Book__c.Name. The statement b.Price__c *= 0.9; takes the old value of b.Price__c, multiplies it
by 0.9, which means its value will be discounted by 10%, and then stores the new value into the b.Price__c field. The *=
operatorisashortcut.Anotherwaytowritethisstatementis b.Price__c = b.Price__c * 0.9;.SeeExpressionOperators
on page 38.
4. Click Save to save the new class. You should now have this full class definition.
public class MyHelloWorld {
public static void applyDiscount(Book__c[] books) {
for (Book__c b :books){
b.Price__c *= 0.9;
}
}
}
You now have a class that contains some code that iterates over a list of books and updates the Price field for each book. This code is
part of the applyDiscount static method called by the trigger that you will create in the next step.
Add an Apex Trigger
In this step, you create a trigger for the Book__c custom object that calls the applyDiscount method of the MyHelloWorld
class that you created in the previous step.
Prerequisites:
• A Salesforce account in a sandbox Professional, Enterprise, Performance, or Unlimited Edition org, or an account in a Developer org.
• The MyHelloWorld Apex class.
A trigger is a piece of code that executes before or after records of a particular type are inserted, updated, or deleted from the Lightning
platform database. Every trigger runs with a set of context variables that provide access to the records that caused the trigger to fire. All
triggers run in bulk; that is, they process several records at once.
1. From the object management settings for books, go to Triggers, and then click New.
2. In the trigger editor, delete the default template code and enter this trigger definition:
trigger HelloWorldTrigger on Book__c (before insert) {
Book__c[] books = Trigger.new;
MyHelloWorld.applyDiscount(books);
}
The first line of code defines the trigger:
trigger HelloWorldTrigger on Book__c (before insert) {
It gives the trigger a name, specifies the object on which it operates, and defines the events that cause it to fire. For example, this
trigger is called HelloWorldTrigger, it operates on the Book__c object, and runs before new books are inserted into the database.
19
Apex Quick Start
Apex Developer Guide](https://image.slidesharecdn.com/salesforceapexdeveloperguide-230916115800-b7c953cd/85/salesforce_apex_developer_guide-23-320.jpg)
![The next line in the trigger creates a list of book records named books and assigns it the contents of a trigger context variable
called Trigger.new. Trigger context variables such as Trigger.new are implicitly defined in all triggers and provide access
to the records that caused the trigger to fire. In this case, Trigger.new contains all the new books that are about to be inserted.
Book__c[] books = Trigger.new;
The next line in the code calls the method applyDiscount in the MyHelloWorld class. It passes in the array of new books.
MyHelloWorld.applyDiscount(books);
You now have all the code that is needed to update the price of all books that get inserted. However, there is still one piece of the puzzle
missing. Unit tests are an important part of writing code and are required. In the next step, you will see why this is so and you will be
able to add a test class.
SEE ALSO:
Salesforce Help: Find Object Management Settings
Add a Test Class
In this step, you add a test class with one test method. You also run the test and verify code coverage. The test method exercises and
validates the code in the trigger and class. Also, it enables you to reach 100% code coverage for the trigger and class.
Prerequisites:
• A Salesforce account in a sandbox Professional, Enterprise, Performance, or Unlimited Edition org, or an account in a Developer org.
• The HelloWorldTrigger Apex trigger.
Note: Testing is an important part of the development process. Before you can deploy Apex or package it for AppExchange, the
following must be true.
• Unit tests must cover at least 75% of your Apex code, and all of those tests must complete successfully.
Note the following.
– When deploying Apex to a production organization, each unit test in your organization namespace is executed by default.
– Calls to System.debug aren’t counted as part of Apex code coverage.
– Test methods and test classes aren’t counted as part of Apex code coverage.
– Whileonly75%ofyourApexcodemustbecoveredbytests,don’tfocusonthepercentageofcodethatiscovered.Instead,
make sure that every use case of your application is covered, including positive and negative cases, as well as bulk and
single records. This approach ensures that 75% or more of your code is covered by unit tests.
• Every trigger must have some test coverage.
• All classes and triggers must compile successfully.
1. From Setup, enter Apex Classes in the Quick Find box, then select Apex Classes and click New.
2. In the class editor, add this test class definition, and then click Save.
@IsTest
private class HelloWorldTestClass {
@IsTest
static void validateHelloWorld() {
Book__c b = new Book__c(Name='Behind the Cloud', Price__c=100);
System.debug('Price before inserting new book: ' + b.Price__c);
20
Apex Quick Start
Apex Developer Guide](https://image.slidesharecdn.com/salesforceapexdeveloperguide-230916115800-b7c953cd/85/salesforce_apex_developer_guide-24-320.jpg)
![// Insert book
insert b;
// Retrieve the new book
b = [SELECT Price__c FROM Book__c WHERE Id =:b.Id];
System.debug('Price after trigger fired: ' + b.Price__c);
// Test that the trigger correctly updated the price
System.assertEquals(90, b.Price__c);
}
}
This class is defined using the @IsTest annotation. Classes defined this way should only contain test methods and any methods
requiredtosupportthosetestmethods.Oneadvantagetocreatingaseparateclassfortestingisthatclassesdefinedwith @IsTest
don’t count against your org’s limit of 6 MB of Apex code. You can also add the @IsTest annotation to individual methods. For
more information, see @IsTest Annotation on page 98 and Execution Governors and Limits.
The method validateHelloWorld is defined using the @IsTest annotation. This annotation means that if changes are
made to the database, they’re rolled back when execution completes. You don’t have to delete any test data created in the test
method.
Note: The @IsTest annotation on methods is equivalent to the testMethod keyword. As best practice, Salesforce
recommends that you use @IsTest rather than testMethod. The testMethod keyword may be versioned out in a
future release.
First, the test method creates a book and inserts it into the database temporarily. The System.debug statement writes the value
of the price in the debug log.
Book__c b = new Book__c(Name='Behind the Cloud', Price__c=100);
System.debug('Price before inserting new book: ' + b.Price__c);
// Insert book
insert b;
After the book is inserted, the code retrieves the newly inserted book, using the ID that was initially assigned to the book when it
was inserted. The System.debug statement then logs the new price that the trigger modified.
// Retrieve the new book
b = [SELECT Price__c FROM Book__c WHERE Id =:b.Id];
System.debug('Price after trigger fired: ' + b.Price__c);
When the MyHelloWorld class runs, it updates the Price__c field and reduces its value by 10%. The following test verifies
that the method applyDiscount ran and produced the expected result.
// Test that the trigger correctly updated the price
System.assertEquals(90, b.Price__c);
3. To run this test and view code coverage information, switch to the Developer Console.
4. In the Developer Console, click Test > New Run.
5. To select your test class, click HelloWorldTestClass.
6. To add all methods in the HelloWorldTestClass class to the test run, click Add Selected.
7. Click Run.
The test result displays in the Tests tab. Optionally, you can expand the test class in the Tests tab to view which methods were run.
In this case, the class contains only one test method.
21
Apex Quick Start
Apex Developer Guide](https://image.slidesharecdn.com/salesforceapexdeveloperguide-230916115800-b7c953cd/85/salesforce_apex_developer_guide-25-320.jpg)
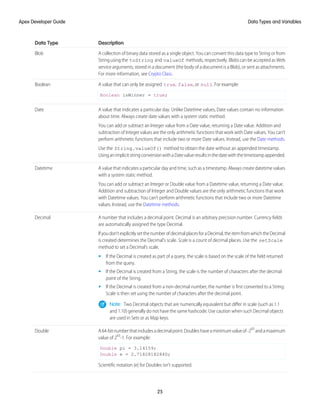
![Description
Data Type
TheSolutionsObjectfieldSolutionNoteoperatesasaspecialtypeofString.IfyouhaveHTMLSolutions
enabled, any HTML tags used in this field are verified before the object is created or updated. If invalid
HTML is entered, an error is thrown. Any JavaScript used in this field is removed before the object is
created or updated. In the following example, when the Solution displays on a detail page, the
SolutionNote field has H1 HTML formatting applied to it:
trigger t on Solution (before insert) {
Trigger.new[0].SolutionNote ='<h1>hello</h1>';
}
In the following example, when the Solution displays on a detail page, the SolutionNote field only
contains HelloGoodbye:
trigger t2 on Solution (before insert) {
Trigger.new[0].SolutionNote =
'<javascript>Hello</javascript>Goodbye';
}
For more information, see “HTML Solutions Overview” in Salesforce Help.
EscapeSequences: All Strings in Apex use the same escape sequences as SOQL strings: b
(backspace), t (tab), n (line feed), f (form feed), r (carriage return), " (double quote),
' (single quote), and (backslash).
Comparison Operators: Unlike Java, Apex Strings support using the comparison operators ==,
!=, <, <=, >,and >=.BecauseApexusesSOQLcomparisonsemantics,resultsforStringsarecollated
accordingtothecontextuser’slocaleandaren’tcase-sensitive.Formoreinformation,seeExpression
Operators.
String Methods: As in Java, Strings can be manipulated with several standard methods. For more
information, see String Class.
Apex classes and triggers saved (compiled) using API version 15.0 and higher produce a runtime
error if you assign a String value that is too long for the field.
A value that indicates a particular time. Always create time values with a system static method. See
Time Class.
Time
In addition, two non-standard primitive data types can’t be used as variable or method types, but do appear in system static methods:
• AnyType. The valueOf static method converts an sObject field of type AnyType to a standard primitive. AnyType is used within
the Lightning Platform database exclusively for sObject fields in field history tracking tables.
• Currency. The Currency.newInstance static method creates a literal of type Currency. This method is for use solely within
SOQL and SOSL WHERE clauses to filter against sObject currency fields. You can’t instantiate Currency in any other type of Apex.
For more information on the AnyType data type, see Field Types in the Object Reference for Salesforce.
27
Data Types and Variables
Apex Developer Guide](https://image.slidesharecdn.com/salesforceapexdeveloperguide-230916115800-b7c953cd/85/salesforce_apex_developer_guide-31-320.jpg)
![To declare a list, use the List keyword followed by the primitive data, sObject, nested list, map, or set type within <> characters. For
example:
// Create an empty list of String
List<String> my_list = new List<String>();
// Create a nested list
List<List<Set<Integer>>> my_list_2 = new List<List<Set<Integer>>>();
To access elements in a list, use the List methods provided by Apex. For example:
List<Integer> myList = new List<Integer>(); // Define a new list
myList.add(47); // Adds a second element of value 47 to the end
// of the list
Integer i = myList.get(0); // Retrieves the element at index 0
myList.set(0, 1); // Adds the integer 1 to the list at index 0
myList.clear(); // Removes all elements from the list
For more information, including a complete list of all supported methods, see List Class.
Using Array Notation for One-Dimensional Lists
When using one-dimensional lists of primitives or objects, you can also use more traditional array notation to declare and reference list
elements. For example, you can declare a one-dimensional list of primitives or objects by following the data type name with the []
characters:
String[] colors = new List<String>();
These two statements are equivalent to the previous:
List<String> colors = new String[1];
String[] colors = new String[1];
To reference an element of a one-dimensional list, you can also follow the name of the list with the element's index position in square
brackets. For example:
colors[0] = 'Green';
Eventhoughthesizeoftheprevious String arrayisdefinedasoneelement(thenumberbetweenthebracketsin new String[1]),
lists are elastic and can grow as needed provided that you use the List add method to add new elements. For example, you can
add two or more elements to the colors list. But if you’re using square brackets to add an element to a list, the list behaves like an
array and isn’t elastic, that is, you won’t be allowed to add more elements than the declared array size.
All lists are initialized to null. Lists can be assigned values and allocated memory using literal notation. For example:
Description
Example
Defines an Integer list of size zero with no elements
List<Integer> ints = new Integer[0];
Defines an Integer list with memory allocated for six Integers
List<Integer> ints = new Integer[6];
29
Data Types and Variables
Apex Developer Guide](https://image.slidesharecdn.com/salesforceapexdeveloperguide-230916115800-b7c953cd/85/salesforce_apex_developer_guide-33-320.jpg)
![IN THIS SECTION:
List Sorting
You can sort list elements and the sort order depends on the data type of the elements.
List Sorting
You can sort list elements and the sort order depends on the data type of the elements.
Using the List.sort method, you can sort elements in a list. Sorting is in ascending order for elements of primitive data types, such
as strings. The sort order of other more complex data types is described in the chapters covering those data types.
This example shows how to sort a list of strings and verifies that the colors are in ascending order in the list.
List<String> colors = new List<String>{
'Yellow',
'Red',
'Green'};
colors.sort();
System.assertEquals('Green', colors.get(0));
System.assertEquals('Red', colors.get(1));
System.assertEquals('Yellow', colors.get(2));
For the Visualforce SelectOption control, sorting is in ascending order based on the value and label fields. See this next section for the
sequence of comparison steps used for SelectOption.
Default Sort Order for SelectOption
The List.sort method sorts SelectOption elements in ascending order using the value and label fields, and is based on this
comparison sequence.
1. The value field is used for sorting first.
2. If two value fields have the same value or are both empty, the label field is used.
Note that the disabled field is not used for sorting.
For text fields, the sort algorithm uses the Unicode sort order. Also, empty fields precede non-empty fields in the sort order.
In this example, a list contains three SelectOption elements. Two elements, United States and Mexico, have the same value field (‘A’).
The List.sort method sorts these two elements based on the label field, and places Mexico before United States, as shown in the
output. The last element in the sorted list is Canada and is sorted on its value field ‘C’, which comes after ‘A’.
List<SelectOption> options = new List<SelectOption>();
options.add(new SelectOption('A','United States'));
options.add(new SelectOption('C','Canada'));
options.add(new SelectOption('A','Mexico'));
System.debug('Before sorting: ' + options);
options.sort();
System.debug('After sorting: ' + options);
This is the output of the debug statements. It shows the list contents before and after the sort.
DEBUG|Before sorting: (System.SelectOption[value="A", label="United States",
disabled="false"],
System.SelectOption[value="C", label="Canada", disabled="false"],
System.SelectOption[value="A", label="Mexico", disabled="false"])
DEBUG|After sorting: (System.SelectOption[value="A", label="Mexico", disabled="false"],
30
Data Types and Variables
Apex Developer Guide](https://image.slidesharecdn.com/salesforceapexdeveloperguide-230916115800-b7c953cd/85/salesforce_apex_developer_guide-34-320.jpg)
![System.SelectOption[value="A", label="United States", disabled="false"],
System.SelectOption[value="C", label="Canada", disabled="false"])
Sets
A set is an unordered collection of elements that do not contain any duplicates. Set elements can be of any data type—primitive types,
collections, sObjects, user-defined types, and built-in Apex types.
This table represents a set of strings that uses city names:
'Tokyo'
'Paris'
'New York'
'San Francisco'
Sets can contain collections that can be nested within one another. For example, you can have a set of lists of sets of Integers. A set can
contain up to seven levels of nested collections inside it, that is, up to eight levels overall.
To declare a set, use the Set keyword followed by the primitive data type name within <> characters. For example:
Set<String> myStringSet = new Set<String>();
The following example shows how to create a set with two hardcoded string values.
// Defines a new set with two elements
Set<String> set1 = new Set<String>{'New York', 'Paris'};
To access elements in a set, use the system methods provided by Apex. For example:
// Define a new set
Set<Integer> mySet = new Set<Integer>();
// Add two elements to the set
mySet.add(1);
mySet.add(3);
// Assert that the set contains the integer value we added
System.assert(mySet.contains(1));
// Remove the integer value from the set
mySet.remove(1);
The following example shows how to create a set from elements of another set.
// Define a new set that contains the
// elements of the set created in the previous example
Set<Integer> mySet2 = new Set<Integer>(mySet);
// Assert that the set size equals 1
// Note: The set from the previous example contains only one value
System.assert(mySet2.size() == 1);
For more information, including a complete list of all supported set system methods, see Set Class.
Note the following limitations on sets:
• UnlikeJava,Apexdevelopersdonotneedtoreferencethealgorithmthatisusedtoimplementasetintheirdeclarations(forexample,
HashSet or TreeSet). Apex uses a hash structure for all sets.
• A set is an unordered collection—you can’t access a set element at a specific index. You can only iterate over set elements.
• The iteration order of set elements is deterministic, so you can rely on the order being the same in each subsequent execution of
the same code.
31
Data Types and Variables
Apex Developer Guide](https://image.slidesharecdn.com/salesforceapexdeveloperguide-230916115800-b7c953cd/85/salesforce_apex_developer_guide-35-320.jpg)
![All variables are initialized to null if they aren’t assigned a value. For instance, in the following example, i, and k are assigned values,
while the integer variable j and the boolean variable b are set to null because they aren’t explicitly initialized.
Integer i = 0, j, k = 1;
Boolean b;
Note: A common pitfall is to assume that an uninitialized boolean variable is initialized to false by the system. This isn’t the
case. Like all other variables, boolean variables are null if not assigned a value explicitly.
Variable Scope
Variables can be defined at any point in a block, and take on scope from that point forward. Sub-blocks can’t redefine a variable name
that has already been used in a parent block, but parallel blocks can reuse a variable name. For example:
Integer i;
{
// Integer i; This declaration is not allowed
}
for (Integer j = 0; j < 10; j++);
for (Integer j = 0; j < 10; j++);
Case Sensitivity
To avoid confusion with case-insensitive SOQL and SOSL queries, Apex is also case-insensitive. This means:
• Variable and method names are case-insensitive. For example:
Integer I;
//Integer i; This would be an error.
• References to object and field names are case-insensitive. For example:
Account a1;
ACCOUNT a2;
• SOQL and SOSL statements are case- insensitive. For example:
Account[] accts = [sELect ID From ACCouNT where nAme = 'fred'];
Note: You’ll learn more about sObjects, SOQL and SOSL later in this guide.
Also note that Apex uses the same filtering semantics as SOQL, which is the basis for comparisons in the SOAP API and the Salesforce
user interface. The use of these semantics can lead to some interesting behavior. For example, if an end-user generates a report based
on a filter for values that come before 'm' in the alphabet (that is, values < 'm'), null fields are returned in the result. The rationale for this
behavior is that users typically think of a field without a value as just a space character, rather than its actual null value. Consequently,
in Apex, the following expressions all evaluate to true:
String s;
System.assert('a' == 'A');
System.assert(s < 'b');
System.assert(!(s > 'b'));
Note: Although s < 'b' evaluates to true in the example above, 'b.'compareTo(s) generates an error because
you’re trying to compare a letter to a null value.
36
Data Types and Variables
Apex Developer Guide](https://image.slidesharecdn.com/salesforceapexdeveloperguide-230916115800-b7c953cd/85/salesforce_apex_developer_guide-40-320.jpg)
![• A literal expression. For example:
1 + 1
• A new sObject, Apex object, list, set, or map. For example:
new Account(<field_initializers>)
new Integer[<n>]
new Account[]{<elements>}
new List<Account>()
new Set<String>{}
new Map<String, Integer>()
new myRenamingClass(string oldName, string newName)
• Any value that can act as the left-hand of an assignment operator (L-values), including variables, one-dimensional list positions, and
most sObject or Apex object field references. For example:
Integer i
myList[3]
myContact.name
myRenamingClass.oldName
• Any sObject field reference that is not an L-value, including:
– The ID of an sObject in a list (see Lists)
– A set of child records associated with an sObject (for example, the set of contacts associated with a particular account). This type
of expression yields a query result, much like SOQL and SOSL queries.
• A SOQL or SOSL query surrounded by square brackets, allowing for on-the-fly evaluation in Apex. For example:
Account[] aa = [SELECT Id, Name FROM Account WHERE Name ='Acme'];
Integer i = [SELECT COUNT() FROM Contact WHERE LastName ='Weissman'];
List<List<SObject>> searchList = [FIND 'map*' IN ALL FIELDS RETURNING Account (Id, Name),
Contact, Opportunity, Lead];
For information, see SOQL and SOSL Queries on page 158.
• A static or instance method invocation. For example:
System.assert(true)
myRenamingClass.replaceNames()
changePoint(new Point(x, y));
Expression Operators
Expressions can be joined to one another with operators to create compound expressions.
Apex supports the following operators:
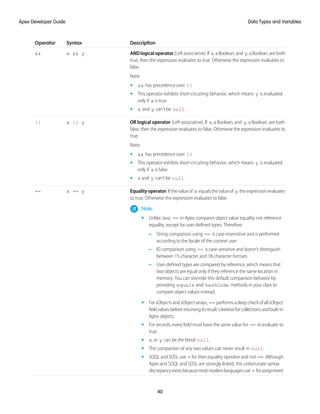
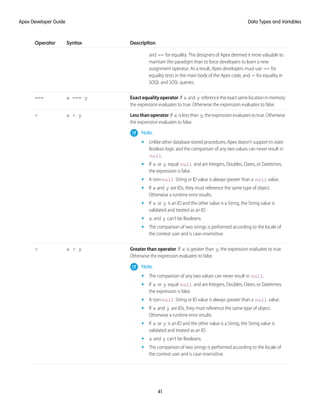
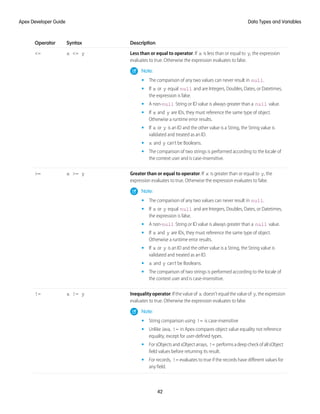
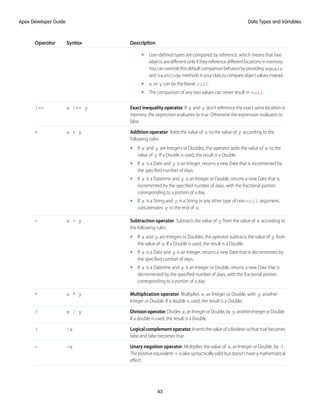
Description
Syntax
Operator
Assignment operator (Right associative). Assigns the value of y to the L-value
x. The data type of x must match the data type of y and can’t be null.
x = y
=
38
Data Types and Variables
Apex Developer Guide](https://image.slidesharecdn.com/salesforceapexdeveloperguide-230916115800-b7c953cd/85/salesforce_apex_developer_guide-42-320.jpg)

![If the left-hand-side of the chain expression evaluates to null, the right-hand-side isn’t evaluated. Use the safe navigation operator (?.)
in method, variable, and property chaining. The part of the expression that isn’t evaluated can include variable references, method
references, or array expressions.
Note: All Apex types are implicitly nullable and can hold a null value returned from the operator.
Examples
• This example first evaluates a, and returns null if a is null. Otherwise the return value is a.b.
a?.b // Evaluates to: a == null ? null : a.b
• This example returns null if a[x] evaluates to null. If a[x] doesn’t evaluate to null and aMethod() returns null, then this
expression throws a NullPointerException.
a[x]?.aMethod().aField // Evaluates to null if a[x] == null
• This example returns null if a[x].aMethod() evaluates to null.
a[x].aMethod()?.aField
• This example indicates that the type of the expression is the same whether the safe navigation operator is used in the expression or
not.
Integer x = anObject?.anIntegerField; // The expression is of type Integer because the
field is of type Integer
• This example shows a single statement replacing a block of code that checks for nulls.
// Previous code checking for nulls
String profileUrl = null;
if (user.getProfileUrl() != null) {
profileUrl = user.getProfileUrl().toExternalForm();
}
// New code using the safe navigation operator
String profileUrl = user.getProfileUrl()?.toExternalForm();
• This example shows a single-row SOQL query using the safe navigation operator.
// Previous code checking for nulls
results = [SELECT Name FROM Account WHERE Id = :accId];
if (results.size() == 0) { // Account was deleted
return null;
}
return results[0].Name;
// New code using the safe navigation operator
return [SELECT Name FROM Account WHERE Id = :accId]?.Name;
Table 1: Safe Navigation Operator Use-Cases
More information
Example
Allowed use-case
Can be used as a top-level statement.
aObject?.aMethod();
Method or variable or parameter chains
45
Data Types and Variables
Apex Developer Guide](https://image.slidesharecdn.com/salesforceapexdeveloperguide-230916115800-b7c953cd/85/salesforce_apex_developer_guide-49-320.jpg)
![More information
Example
Allowed use-case
The operator skips the method chain up to
the first closing parenthesis. By adding the
((T)a1?.b1)?.c1()
Using parentheses, for example in a cast.
operator after the parenthesis, the code
safeguards the whole expression. If the
operator is used elsewhere, and not after
the parenthesis, the whole cast expression
isn’t be safeguarded. For example, the
behavior of
//Incorrect use of safe
navigation operator
((T)a1?.b1).c1()
is equivalent to:
T ref = null;
if (a1 != null) {
ref = (T)a1.b1;
}
result = ref.c1();
An SObject expression evaluates to null
when the relationship is null. The behavior
String s =
contact.Account?.BillingCity;
SObject chaining
is equivalent to String s =
contact.Account.BillingCity.
If the SOQL query returns no objects, then
the expression evaluates to null. The
behavior is equivalent to:
List<Contact> contacts =
[SELECT LastName FROM
String s = [SELECT LastName
FROM Contact]?.LastName;
SOQL Queries
Contact];
String s;
if (contacts.size() == 0) {
s = null; // New behavior
when using Safe Navigation.
Earlier, this would throw
an exception. }
else if (contacts.size() ==
1) {
s =
contacts.get(0).LastName; }
else { // contacts.size() >
1 throw new
QueryException(...); }
46
Data Types and Variables
Apex Developer Guide](https://image.slidesharecdn.com/salesforceapexdeveloperguide-230916115800-b7c953cd/85/salesforce_apex_developer_guide-50-320.jpg)
![You can’t use the Safe Navigation Operator in certain cases. Attempting to use the operator in these ways causes an error during
compilation:
• Types and static expressions with dots. For example:
– Namespaces
– {Namespace}.{Class}
– Trigger.new
– Flow.interview.{flowName}
– {Type}.class
• Static variable access, method calls, and expressions. For example:
– AClass.AStaticMethodCall()
– AClass.AStaticVariable
– String.format('{0}', 'hello world')
– Page.{pageName}
• Assignable expressions. For example:
– foo?.bar = 42;
– ++foo?.bar;
• SOQL bind expressions. For example:
class X { public String query = 'xyz';}
X x = new X();
List<Account> accounts = [SELECT Name FROM Account WHERE Name = :X?.query]
List<List<SObject>> moreAccounts = [FIND :X?.query IN ALL FIELDS
RETURNING Account(Name)];
• With addError() on SObject scalar fields. For example:
Contact c;
c.LastName?.addError('The field must have a value');
Note: You can use the operator with addError() on SObjects, including lookup and master-detail fields.
Operator Precedence
Operators are interpreted in order, according to rules.
Apex uses the following operator precedence rules:
Description
Operators
Precedence
Grouping and prefix increments and decrements
{} () ++ --
1
Unaryoperators,additiveoperators,typecastandobject
creation
~ ! -x +x (type) new
2
Multiplication and division
* /
3
Addition and subtraction
+ -
4
47
Data Types and Variables
Apex Developer Guide](https://image.slidesharecdn.com/salesforceapexdeveloperguide-230916115800-b7c953cd/85/salesforce_apex_developer_guide-51-320.jpg)
![Description
Operators
Precedence
Shift Operators
<< >> >>>
5
Greater-than and less-than comparisons, reference tests
< <= > >= instanceof
6
Comparisons: equal and not-equal
== !=
7
Bitwise AND
&
8
Bitwise XOR
^
9
Bitwise OR
|
10
Logical AND
&&
11
Logical OR
||
12
Assignment operators
= += -= *= /= &= <<= >>= >>>=
13
Comments
Both single and multiline comments are supported in Apex code.
• Tocreateasinglelinecomment,use //.Allcharactersonthesamelinetotherightofthe // areignoredbytheparser.Forexample:
Integer i = 1; // This comment is ignored by the parser
• To create a multiline comment, use /* and */ to demarcate the beginning and end of the comment block. For example:
Integer i = 1; /* This comment can wrap over multiple
lines without getting interpreted by the
parser. */
Assignment Statements
An assignment statement is any statement that places a value into a variable.
An assignment statement generally takes one of two forms:
[LValue] = [new_value_expression];
[LValue] = [[inline_soql_query]];
In the forms above, [LValue] stands for any expression that can be placed on the left side of an assignment operator. These include:
• A simple variable. For example:
Integer i = 1;
Account a = new Account();
Account[] accts = [SELECT Id FROM Account];
• A de-referenced list element. For example:
ints[0] = 1;
accts[0].Name = 'Acme';
48
Data Types and Variables
Apex Developer Guide](https://image.slidesharecdn.com/salesforceapexdeveloperguide-230916115800-b7c953cd/85/salesforce_apex_developer_guide-52-320.jpg)
![• An sObject field reference that the context user has permission to edit. For example:
Account a = new Account(Name = 'Acme', BillingCity = 'San Francisco');
// IDs cannot be set prior to an insert call
// a.Id = '00300000003T2PGAA0';
// Instead, insert the record. The system automatically assigns it an ID.
insert a;
// Fields also must be writable for the context user
// a.CreatedDate = System.today(); This code is invalid because
// createdDate is read-only!
// Since the account a has been inserted, it is now possible to
// create a new contact that is related to it
Contact c = new Contact(LastName = 'Roth', Account = a);
// Notice that you can write to the account name directly through the contact
c.Account.Name = 'salesforce.com';
Assignment is always done by reference. For example:
Account a = new Account();
Account b;
Account[] c = new Account[]{};
a.Name = 'Acme';
b = a;
c.add(a);
// These asserts should now be true. You can reference the data
// originally allocated to account a through account b and account list c.
System.assertEquals(b.Name, 'Acme');
System.assertEquals(c[0].Name, 'Acme');
Similarly, two lists can point at the same value in memory. For example:
Account[] a = new Account[]{new Account()};
Account[] b = a;
a[0].Name = 'Acme';
System.assert(b[0].Name == 'Acme');
In addition to =, other valid assignment operators include +=, *=, /=, |=, &=, ++, and --. See Expression Operators on page 38.
Rules of Conversion
In general, Apex requires you to explicitly convert one data type to another. For example, a variable of the Integer data type cannot be
implicitly converted to a String. You must use the string.format method. However, a few data types can be implicitly converted,
without using a method.
Numbers form a hierarchy of types. Variables of lower numeric types can always be assigned to higher types without explicit conversion.
The following is the hierarchy for numbers, from lowest to highest:
1. Integer
2. Long
49
Data Types and Variables
Apex Developer Guide](https://image.slidesharecdn.com/salesforceapexdeveloperguide-230916115800-b7c953cd/85/salesforce_apex_developer_guide-53-320.jpg)
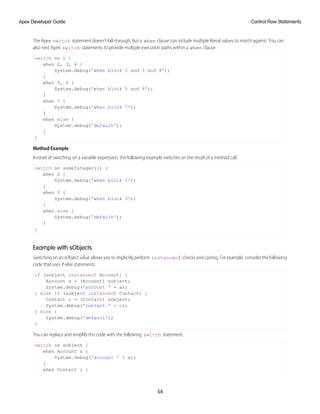
![Control Flow Statements
Apex provides if-else statements, switch statements, and loops to control the flow of code execution. Statements are generally executed
line by line, in the order they appear. With control flow statements, you can make Apex code execute based on a certain condition, or
have a block of code execute repeatedly.
IN THIS SECTION:
Conditional (If-Else) Statements
The conditional statement in Apex works similarly to Java.
Switch Statements
Apex provides a switch statement that tests whether an expression matches one of several values and branches accordingly.
Loops
Apex supports five types of procedural loops.
Conditional (If-Else) Statements
The conditional statement in Apex works similarly to Java.
if ([Boolean_condition])
// Statement 1
else
// Statement 2
The else portion is always optional, and always groups with the closest if. For example:
Integer x, sign;
// Your code
if (x <= 0) if (x == 0) sign = 0; else sign = -1;
is equivalent to:
Integer x, sign;
// Your code
if (x <= 0) {
if (x == 0) {
sign = 0;
} else {
sign = -1;
}
}
Repeated else if statements are also allowed. For example:
if (place == 1) {
medal_color = 'gold';
} else if (place == 2) {
medal_color = 'silver';
} else if (place == 3) {
medal_color = 'bronze';
} else {
medal_color = null;
}
51
Control Flow Statements
Apex Developer Guide](https://image.slidesharecdn.com/salesforceapexdeveloperguide-230916115800-b7c953cd/85/salesforce_apex_developer_guide-55-320.jpg)
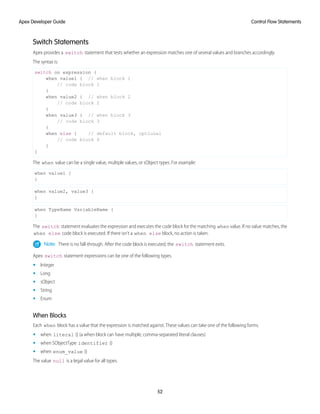
![System.debug('contact ' + c);
}
when null {
System.debug('null');
}
when else {
System.debug('default');
}
}
Note: You can use only one sObject type per when block.
Example with Enums
A switch statementthatusesenum when valuesdoesn’trequirea when else block,butitisrecommended.Youcanusemultiple
enum values per when block clause.
switch on season {
when WINTER {
System.debug('boots');
}
when SPRING, SUMMER {
System.debug('sandals');
}
when else {
System.debug('none of the above');
}
}
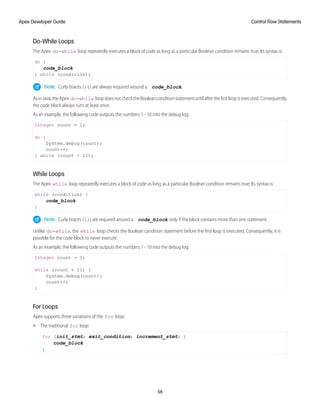
Loops
Apex supports five types of procedural loops.
These types of procedural loops are supported:
• do {statement} while (Boolean_condition);
• while (Boolean_condition) statement;
• for (initialization; Boolean_exit_condition; increment) statement;
• for (variable : array_or_set) statement;
• for (variable : [inline_soql_query]) statement;
All loops allow for loop control structures:
• break; exits the entire loop
• continue; skips to the next iteration of the loop
IN THIS SECTION:
1. Do-While Loops
2. While Loops
3. For Loops
55
Control Flow Statements
Apex Developer Guide](https://image.slidesharecdn.com/salesforceapexdeveloperguide-230916115800-b7c953cd/85/salesforce_apex_developer_guide-59-320.jpg)
![• The list or set iteration for loop:
for (variable : list_or_set) {
code_block
}
where variable must be of the same primitive or sObject type as list_or_set.
• The SOQL for loop:
for (variable : [soql_query]) {
code_block
}
or
for (variable_list : [soql_query]) {
code_block
}
Both variable and variable_list must be of the same sObject type as is returned by the soql_query.
Note: Curly braces ({}) are required around a code_block only if the block contains more than one statement.
Each is discussed further in the sections that follow.
IN THIS SECTION:
Traditional For Loops
List or Set Iteration for Loops
Iterating Collections
Traditional For Loops
The traditional for loop in Apex corresponds to the traditional syntax used in Java and other languages. Its syntax is:
for (init_stmt; exit_condition; increment_stmt) {
code_block
}
When executing this type of for loop, the Apex runtime engine performs the following steps, in order:
1. Executethe init_stmt componentoftheloop.Notethatmultiplevariablescanbedeclaredand/orinitializedinthisstatement.
2. Perform the exit_condition check. If true, the loop continues. If false, the loop exits.
3. Execute the code_block.
4. Execute the increment_stmt statement.
5. Return to Step 2.
As an example, the following code outputs the numbers 1 - 10 into the debug log. Note that an additional initialization variable, j, is
included to demonstrate the syntax:
for (Integer i = 0, j = 0; i < 10; i++) {
System.debug(i+1);
}
57
Control Flow Statements
Apex Developer Guide](https://image.slidesharecdn.com/salesforceapexdeveloperguide-230916115800-b7c953cd/85/salesforce_apex_developer_guide-61-320.jpg)
![List or Set Iteration for Loops
The list or set iteration for loop iterates over all the elements in a list or set. Its syntax is:
for (variable : list_or_set) {
code_block
}
where variable must be of the same primitive or sObject type as list_or_set.
When executing this type of for loop, the Apex runtime engine assigns variable to each element in list_or_set, and
runs the code_block for each value.
For example, the following code outputs the numbers 1 - 10 to the debug log:
Integer[] myInts = new Integer[]{1, 2, 3, 4, 5, 6, 7, 8, 9, 10};
for (Integer i : myInts) {
System.debug(i);
}
Iterating Collections
Collections can consist of lists, sets, or maps. Modifying a collection's elements while iterating through that collection is not supported
and causes an error. Do not directly add or remove elements while iterating through the collection that includes them.
Adding Elements During Iteration
To add elements while iterating a list, set or map, keep the new elements in a temporary list, set, or map and add them to the original
after you finish iterating the collection.
Removing Elements During Iteration
To remove elements while iterating a list, create a new list, then copy the elements you wish to keep. Alternatively, add the elements
you wish to remove to a temporary list and remove them after you finish iterating the collection.
Note: The List.remove method performs linearly. Using it to remove elements has time and resource implications.
To remove elements while iterating a map or set, keep the keys you wish to remove in a temporary list, then remove them after you
finish iterating the collection.
Classes, Objects, and Interfaces
Apex classes are modeled on their counterparts in Java. You’ll define, instantiate, and extend classes, and you’ll work with interfaces,
Apex class versions, properties, and other related class concepts.
IN THIS SECTION:
1. Classes
As in Java, you can create classes in Apex. A class is a template or blueprint from which objects are created. An object is an instance
of a class.
58
Classes, Objects, and Interfaces
Apex Developer Guide](https://image.slidesharecdn.com/salesforceapexdeveloperguide-230916115800-b7c953cd/85/salesforce_apex_developer_guide-62-320.jpg)
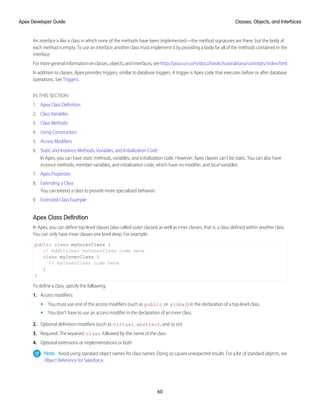
![Use the following syntax for defining classes:
private | public | global
[virtual | abstract | with sharing | without sharing]
class ClassName [implements InterfaceNameList] [extends ClassName]
{
// The body of the class
}
• The private access modifier declares that this class is only known locally, that is, only by this section of code. This is the default
access for inner classes—that is, if you don't specify an access modifier for an inner class, it’s considered private. This keyword
can only be used with inner classes (or with top-level test classes marked with the @IsTest annotation).
• The public access modifier declares that this class is visible in your application or namespace.
• The global access modifier declares that this class is known by all Apex code everywhere. All classes containing methods defined
with the webservice keyword must be declared as global. If a method or inner class is declared as global, the outer,
top-level class must also be defined as global.
• The with sharing and without sharing keywords specify the sharing mode for this class. For more information, see
Using the with sharing, without sharing, and inherited sharing Keywords on page 86.
• The virtual definition modifier declares that this class allows extension and overrides. You can’t override a method with the
override keyword unless the class has been defined as virtual.
• The abstract definitionmodifierdeclaresthatthisclasscontainsabstractmethods,thatis,methodsthatonlyhavetheirsignature
declared and no body defined.
Note:
• You can’t add an abstract method to a global class after the class has been uploaded in a Managed - Released package version.
• If the class in the Managed - Released package is virtual, the method that you can add to it must also be virtual and must have
an implementation.
• You can’t override a public or protected virtual method of a global class of an installed managed package.
For more information about managed packages, see What is a Package? on page 679.
A class can implement multiple interfaces, but only extend one existing class. This restriction means that Apex doesn’t support multiple
inheritance. The interface names in the list are separated by commas. For more information about interfaces, see Interfaces on page 78.
For more information about method and variable access modifiers, see Access Modifiers on page 66.
SEE ALSO:
Documentation Typographical Conventions
Salesforce Help: Manage Apex Classes
Salesforce Help: Developer Console Functionality
Class Variables
To declare a variable, specify the following:
• Optional: Modifiers, such as public or final, as well as static.
• Required: The data type of the variable, such as String or Boolean.
• Required: The name of the variable.
• Optional: The value of the variable.
61
Classes, Objects, and Interfaces
Apex Developer Guide](https://image.slidesharecdn.com/salesforceapexdeveloperguide-230916115800-b7c953cd/85/salesforce_apex_developer_guide-65-320.jpg)
![Use the following syntax when defining a variable:
[public | private | protected | global] [final] [static] data_type variable_name
[= value]
For example:
private static final Integer MY_INT;
private final Integer i = 1;
Versioned Behavior Changes
In API version 50.0 and later, scope and accessibility rules are enforced on Apex variables, methods, inner classes, and interfaces that are
annotated with @namespaceAccessible. For accessibility considerations, see NamespaceAccessible Annotation. For more
information on namespace-based visibility, see Namespace-Based Visibility for Apex Classes in Second-Generation Packages.
Class Methods
To define a method, specify the following:
• Optional: Modifiers, such as public or protected.
• Required: The data type of the value returned by the method, such as String or Integer. Use void if the method doesn’t return a
value.
• Required:Alistofinputparametersforthemethod,separatedbycommas,eachprecededbyitsdatatype,andenclosedinparentheses
(). If there are no parameters, use a set of empty parentheses. A method can only have 32 input parameters.
• Required: The body of the method, enclosed in braces {}. All the code for the method, including any local variable declarations, is
contained here.
Use the following syntax when defining a method:
[public | private | protected | global] [override] [static] data_type method_name
(input parameters)
{
// The body of the method
}
Note: You can use override to override methods only in classes that have been defined as virtual or abstract.
For example:
public static Integer getInt() {
return MY_INT;
}
As in Java, methods that return values can also be run as a statement if their results aren’t assigned to another variable.
User-defined methods:
• Can be used anywhere that system methods are used.
• Can be recursive.
• Can have side effects, such as DML insert statements that initialize sObject record IDs. See Apex DML Statements.
• Can refer to themselves or to methods defined later in the same class or anonymous block. Apex parses methods in two phases, so
forward declarations aren’t needed.
62
Classes, Objects, and Interfaces
Apex Developer Guide](https://image.slidesharecdn.com/salesforceapexdeveloperguide-230916115800-b7c953cd/85/salesforce_apex_developer_guide-66-320.jpg)

![To use the private, protected, public, or global access modifiers, use the following syntax:
[(none)|private|protected|public|global] declaration
For example:
// private variable s1
private string s1 = '1';
// public method getsz()
public string getsz() {
...
}
Static and Instance Methods, Variables, and Initialization Code
In Apex, you can have static methods, variables, and initialization code. However, Apex classes can't be static. You can also have instance
methods, member variables, and initialization code, which have no modifier, and local variables.
Characteristics
Static methods, variables, and initialization code have these characteristics.
• They’re associated with a class.
• They’re allowed only in outer classes.
• They’re initialized only when a class is loaded.
• They aren’t transmitted as part of the view state for a Visualforce page.
Instance methods, member variables, and initialization code have these characteristics.
• They’re associated with a particular object.
• They have no definition modifier.
• They’re created with every object instantiated from the class in which they’re declared.
Local variables have these characteristics.
• They’re associated with the block of code in which they’re declared.
• They must be initialized before they’re used.
The following example shows a local variable whose scope is the duration of the if code block.
Boolean myCondition = true;
if (myCondition) {
integer localVariable = 10;
}
Using Static Methods and Variables
You can use static methods and variables only with outer classes. Inner classes have no static methods or variables. A static method or
variable doesn’t require an instance of the class in order to run.
Before an object of a class is created, all static member variables in a class are initialized, and all static initialization code blocks are
executed. These items are handled in the order in which they appear in the class.
A static method is used as a utility method, and it never depends on the value of an instance member variable. Because a static method
is only associated with a class, it can’t access the instance member variable values of its class.
67
Classes, Objects, and Interfaces
Apex Developer Guide](https://image.slidesharecdn.com/salesforceapexdeveloperguide-230916115800-b7c953cd/85/salesforce_apex_developer_guide-71-320.jpg)
![A static variable is static only within the scope of the Apex transaction. It’s not static across the server or the entire organization. The
value of a static variable persists within the context of a single transaction and is reset across transaction boundaries. For example, if an
Apex DML request causes a trigger to fire multiple times, the static variables persist across these trigger invocations.
To store information that is shared across instances of a class, use a static variable. All instances of the same class share a single copy of
the static variable. For example, all triggers that a single transaction spawns can communicate with each other by viewing and updating
static variables in a related class. A recursive trigger can use the value of a class variable to determine when to exit the recursion.
Suppose that you had the following class.
public class P {
public static boolean firstRun = true;
}
A trigger that uses this class could then selectively fail the first run of the trigger.
trigger T1 on Account (before delete, after delete, after undelete) {
if(Trigger.isBefore){
if(Trigger.isDelete){
if(p.firstRun){
Trigger.old[0].addError('Before Account Delete Error');
p.firstRun=false;
}
}
}
}
A static variable defined in a trigger doesn't retain its value between different trigger contexts within the same transaction, such as
between before insert and after insert invocations. Instead, define the static variables in a class so that the trigger can access these class
member variables and check their static values.
Aclassstaticvariablecan’tbeaccessedthroughaninstanceofthatclass.Ifclass MyClass hasastaticvariable myStaticVariable,
and myClassInstance is an instance of MyClass, myClassInstance.myStaticVariable isn’t a legal expression.
Thesameistrueforinstancemethods.If myStaticMethod() isastaticmethod, myClassInstance.myStaticMethod()
isn’t legal. Instead, refer to those static identifiers using the class: MyClass.myStaticVariable and
MyClass.myStaticMethod().
Local variable names are evaluated before class names. If a local variable has the same name as a class, the local variable hides methods
and variables on the class of the same name. For example, this method works if you comment out the String line. But if the String
line is included the method doesn’t compile, because Salesforce reports that the method doesn’t exist or has an incorrect signature.
public static void method() {
String Database = '';
Database.insert(new Account());
}
An inner class behaves like a static Java inner class, but doesn’t require the static keyword. An inner class can have instance member
variables like an outer class, but there’s no implicit pointer to an instance of the outer class (using the this keyword).
Note: In API version 20.0 and earlier, if a Bulk API request causes a trigger to fire, each chunk of 200 records for the trigger to
process is split into chunks of 100 records. In Salesforce API version 21.0 and later, no further splits of API chunks occur. If a Bulk
API request causes a trigger to fire multiple times for chunks of 200 records, governor limits are reset between these trigger
invocations for the same HTTP request.
68
Classes, Objects, and Interfaces
Apex Developer Guide](https://image.slidesharecdn.com/salesforceapexdeveloperguide-230916115800-b7c953cd/85/salesforce_apex_developer_guide-72-320.jpg)

![In the following example a custom iterator iterates through a collection:
public class CustomIterator
implements Iterator<Account>{
private List<Account> accounts;
private Integer currentIndex;
public CustomIterator(List<Account> accounts){
this.accounts = accounts;
this.currentIndex = 0;
}
public Boolean hasNext(){
return currentIndex < accounts.size();
}
public Account next(){
if(hasNext()) {
return accounts[currentIndex++];
} else {
throw new NoSuchElementException('Iterator has no more elements.');
}
}
}
public class CustomIterable implements Iterable<Account> {
public Iterator<Account> iterator(){
List<Account> accounts =
[SELECT Id, Name,
NumberOfEmployees
FROM Account
LIMIT 10];
return new CustomIterator(accounts);
}
}
The following is a batch job that uses an iterator:
public class BatchClass implements Database.Batchable<Account>{
public Iterable<Account> start(Database.BatchableContext info){
return new CustomIterable();
}
public void execute(Database.BatchableContext info, List<Account> scope){
List<Account> accsToUpdate = new List<Account>();
for(Account acc : scope){
acc.Name = 'changed';
acc.NumberOfEmployees = 69;
accsToUpdate.add(acc);
}
update accsToUpdate;
}
public void finish(Database.BatchableContext info){
}
}
81
Classes, Objects, and Interfaces
Apex Developer Guide](https://image.slidesharecdn.com/salesforceapexdeveloperguide-230916115800-b7c953cd/85/salesforce_apex_developer_guide-85-320.jpg)
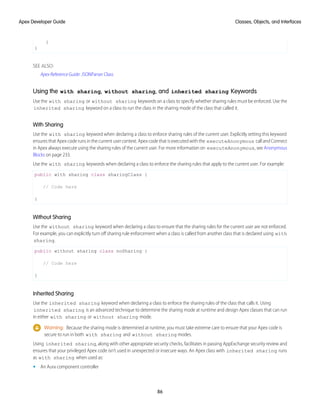
![• A Visualforce controller
• An Apex REST service
• Any other entry point to an Apex transaction
There’s a distinct difference between an Apex class that is marked with inherited sharing and one with an omitted sharing
declaration. If the class is used as the entry point to an Apex transaction, an omitted sharing declaration runs as without sharing.
However, inherited sharing ensures that the default is to run as with sharing. A class declared as inherited
sharing runs as without sharing only when explicitly called from an already established without sharing context.
Example: This example declares an Apex class with inherited sharing and a Visualforce invocation of that Apex code.
Because of the inherited sharing declaration, only contacts for which the running user has sharing access are displayed.
If the declaration is omitted, contacts that the user has no rights to view are displayed due to the insecure default behavior.
public inherited sharing class InheritedSharingClass {
public List<Contact> getAllTheSecrets() {
return [SELECT Name FROM Contact];
}
}
<apex:page controller="InheritedSharingClass">
<apex:repeat value="{!allTheSecrets}" var="record">
{!record.Name}
</apex:repeat>
</apex:page>
Implementation Details
• The sharing setting of the class where a method is defined is applied, not of the class where the method is called from. For example,
if a method is defined in a class declared as with sharing is called by a class declared as without sharing, the method
executes with sharing rules enforced.
• If a class isn’t explicitly declared as either with sharing or without sharing, the current sharing rules remain in effect.
Therefore, the class doesn’t enforce sharing rules except when it acquires sharing rules from another class. For example, if the class
is called by another class that has sharing enforced, then sharing is enforced for the called class.
• Both inner classes and outer classes can be declared as with sharing. Inner classes do not inherit the sharing setting from their
container class. Otherwise, the sharing setting applies to all code contained in the class, including initialization code, constructors,
and methods.
• Classes inherit sharing setting from a parent class when one class extends or implements another.
• Apex triggers can’t have an explicit sharing declaration and run as without sharing.
Best Practices
Apexwithoutanexplicitsharingdeclarationisinsecurebydefault.Westronglyrecommendthatyoualwaysspecifyasharingdeclaration
for a class.
Regardless of the sharing mode, object-level access and field-level security are not enforced by Apex. You must enforce object-level
access and field-level security in your SOQL queries or code. For example, with sharing mechanism doesn’t enforce user’s access
to view reports and dashboards. You must explicitly enforce running user’s CRUD (Create, Read, Update, Delete) and field-level security
in your code. See Enforcing Object and Field Permissions.
87
Classes, Objects, and Interfaces
Apex Developer Guide](https://image.slidesharecdn.com/salesforceapexdeveloperguide-230916115800-b7c953cd/85/salesforce_apex_developer_guide-91-320.jpg)

![System.debug('Method called with: ' + a + ' and ' + i);
// Perform long-running code
}
}
Toallowcalloutsina Future method,specify (callout=true).Thedefaultis (callout=false),whichpreventsamethod
from making callouts.
The following snippet shows how to specify that a method executes a callout:
@Future (callout=true)
public static void doCalloutFromFuture() {
//Add code to perform callout
}
Future Method Considerations
• Remember that any method using the Future annotation requires special consideration because the method doesn’t necessarily
execute in the same order it’s called.
• Methodswiththe Future annotationcan’tbeusedinVisualforcecontrollersineither getMethodName or setMethodName
methods, nor in the constructor.
• You can’t call a method annotated with Future from a method that also has the Future annotation. Nor can you call a trigger
from an annotated method that calls another annotated method.
InvocableMethod Annotation
Use the InvocableMethod annotation to identify methods that can be run as invocable actions.
Note: IfaflowinvokesApex,therunningusermusthavethecorrespondingApexclasssecuritysetintheiruserprofileorpermission
set.
InvocablemethodsarecallednativelyfromRest,Apex,Flow,orEinsteinbotthatinteractswiththeexternalAPIsource.Invocablemethods
have dynamic input and output values and support describe calls.
This code sample shows an invocable method with primitive data types.
public class AccountQueryAction {
@InvocableMethod(label='Get Account Names' description='Returns the list of account names
corresponding to the specified account IDs.' category='Account')
public static List<String> getAccountNames(List<ID> ids) {
List<Account> accounts = [SELECT Name FROM Account WHERE Id in :ids];
Map<ID, String> idToName = new Map<ID, String>();
for (Account account : accounts) {
idToName.put(account.Id, account.Name);
}
// put each name in the output at the same position as the id in the input
List<String> accountNames = new List<String>();
for (String id : ids) {
accountNames.add(idToName.get(id));
}
return accountNames;
}
}
91
Classes, Objects, and Interfaces
Apex Developer Guide](https://image.slidesharecdn.com/salesforceapexdeveloperguide-230916115800-b7c953cd/85/salesforce_apex_developer_guide-95-320.jpg)
![This code sample shows an invocable method with a specific sObject data type.
public class AccountInsertAction {
@InvocableMethod(label='Insert Accounts' description='Inserts the accounts specified and
returns the IDs of the new accounts.' category= 'Account')
public static List<ID> insertAccounts(List<Account> accounts) {
Database.SaveResult[] results = Database.insert(accounts);
List<ID> accountIds = new List<ID>();
for (Database.SaveResult result : results) {
accountIds.add(result.getId());
}
return accountIds;
}
}
This code sample shows an invocable method with the generic sObject data type.
public with sharing class GetFirstFromCollection {
@InvocableMethod
public static List<Results> execute (List<Requests> requestList) {
List<Results> results = new List<Results>();
for (Requests request : requestList) {
List<SObject> inputCollection = request.inputCollection;
SObject outputMember = inputCollection[0];
//Create a Results object to hold the return values
Results result = new Results();
//Add the return values to the Results object
result.outputMember = outputMember;
//Add Result to the results List at the same position as the request is in the
requests List
results.add(result);
}
return results;
}
public class Requests {
@InvocableVariable(label='Records for Input' description='yourDescription' required=true)
public List<SObject> inputCollection;
}
public class Results {
@InvocableVariable(label='Records for Output' description='yourDescription'
required=true)
public SObject outputMember;
}
}
This code sample shows an invocable method with a custom icon from an SVG file.
global class CustomSvgIcon {
@InvocableMethod(label='myIcon' iconName='resource:myPackageNamespace__google:top')
global static List<Integer> myMethod(List<Integer> request) {
92
Classes, Objects, and Interfaces
Apex Developer Guide](https://image.slidesharecdn.com/salesforceapexdeveloperguide-230916115800-b7c953cd/85/salesforce_apex_developer_guide-96-320.jpg)
![The following code sample shows an invocable method with invocable variables.
global class ConvertLeadAction {
@InvocableMethod(label='Convert Leads')
global static List<ConvertLeadActionResult> convertLeads(List<ConvertLeadActionRequest>
requests) {
List<ConvertLeadActionResult> results = new List<ConvertLeadActionResult>();
for (ConvertLeadActionRequest request : requests) {
results.add(convertLead(request));
}
return results;
}
public static ConvertLeadActionResult convertLead(ConvertLeadActionRequest request) {
Database.LeadConvert lc = new Database.LeadConvert();
lc.setLeadId(request.leadId);
lc.setConvertedStatus(request.convertedStatus);
if (request.accountId != null) {
lc.setAccountId(request.accountId);
}
if (request.contactId != null) {
lc.setContactId(request.contactId);
}
if (request.overWriteLeadSource != null && request.overWriteLeadSource) {
lc.setOverwriteLeadSource(request.overWriteLeadSource);
}
if (request.createOpportunity != null && !request.createOpportunity) {
lc.setDoNotCreateOpportunity(!request.createOpportunity);
}
if (request.opportunityName != null) {
lc.setOpportunityName(request.opportunityName);
}
if (request.ownerId != null) {
lc.setOwnerId(request.ownerId);
}
if (request.sendEmailToOwner != null && request.sendEmailToOwner) {
lc.setSendNotificationEmail(request.sendEmailToOwner);
}
Database.LeadConvertResult lcr = Database.convertLead(lc, true);
if (lcr.isSuccess()) {
ConvertLeadActionResult result = new ConvertLeadActionResult();
result.accountId = lcr.getAccountId();
result.contactId = lcr.getContactId();
result.opportunityId = lcr.getOpportunityId();
return result;
} else {
throw new ConvertLeadActionException(lcr.getErrors()[0].getMessage());
95
Classes, Objects, and Interfaces
Apex Developer Guide](https://image.slidesharecdn.com/salesforceapexdeveloperguide-230916115800-b7c953cd/85/salesforce_apex_developer_guide-99-320.jpg)
![}
}
global class ConvertLeadActionRequest {
@InvocableVariable(required=true)
global ID leadId;
@InvocableVariable(required=true)
global String convertedStatus;
@InvocableVariable
global ID accountId;
@InvocableVariable
global ID contactId;
@InvocableVariable
global Boolean overWriteLeadSource;
@InvocableVariable
global Boolean createOpportunity;
@InvocableVariable
global String opportunityName;
@InvocableVariable
global ID ownerId;
@InvocableVariable
global Boolean sendEmailToOwner;
}
global class ConvertLeadActionResult {
@InvocableVariable
global ID accountId;
@InvocableVariable
global ID contactId;
@InvocableVariable
global ID opportunityId;
}
class ConvertLeadActionException extends Exception {}
}
The following code sample shows an invocable method with invocable variables that have the generic sObject data type.
public with sharing class GetFirstFromCollection {
@InvocableMethod
public static List <Results> execute (List<Requests> requestList) {
List<SObject> inputCollection = requestList[0].inputCollection;
SObject outputMember = inputCollection[0];
//Create a Results object to hold the return values
96
Classes, Objects, and Interfaces
Apex Developer Guide](https://image.slidesharecdn.com/salesforceapexdeveloperguide-230916115800-b7c953cd/85/salesforce_apex_developer_guide-100-320.jpg)
![Here’s an example of a public test class that contains utility methods for test data creation:
@IsTest
public class TestUtil {
public static void createTestAccounts() {
// Create some test accounts
}
public static void createTestContacts() {
// Create some test contacts
}
}
Classes defined as @IsTest can't be interfaces or enums.
Methods of a public test class can only be called from a running test, that is, a test method or code invoked by a test method. Non-test
requests can’t call public methods.. To learn about the various ways you can run test methods, see Run Unit Test Methods.
@IsTest(SeeAllData=true) Annotation
For Apex code saved using Salesforce API version 24.0 and later, use the @IsTest(SeeAllData=true) annotation to grant test
classes and individual test methods access to all data in the organization. The access includes pre-existing data that the test didn’t create.
Starting with Apex code saved using Salesforce API version 24.0, test methods don’t have access to pre-existing data in the organization.
However, test code saved against Salesforce API version 23.0 and earlier continues to have access to all data in the organization. See
Isolation of Test Data from Organization Data in Unit Tests on page 645.
Considerations for the @IsTest(SeeAllData=true) Annotation
• If a test class is defined with the @IsTest(SeeAllData=true) annotation, the SeeAllData=true applies to all
test methods that don’t explicitly set the SeeAllData keyword.
• The @IsTest(SeeAllData=true) annotation is used to open up data access when applied at the class or method level.
However, if the containing class has been annotated with @IsTest(SeeAllData=true), annotating a method with
@IsTest(SeeAllData=false) is ignored for that method. In this case, that method still has access to all the data in
the organization. Annotating a method with @IsTest(SeeAllData=true) overrides, for that method, an
@IsTest(SeeAllData=false) annotation on the class.
• @IsTest(SeeAllData=true) and @IsTest(IsParallel=true) annotations can’t be used together on the
same Apex method.
This example shows how to define a test class with the @IsTest(SeeAllData=true) annotation. All the test methods in this
class have access to all data in the organization.
// All test methods in this class can access all data.
@IsTest(SeeAllData=true)
public class TestDataAccessClass {
// This test accesses an existing account.
// It also creates and accesses a new test account.
@IsTest
static void myTestMethod1() {
// Query an existing account in the organization.
Account a = [SELECT Id, Name FROM Account WHERE Name='Acme' LIMIT 1];
System.assert(a != null);
99
Classes, Objects, and Interfaces
Apex Developer Guide](https://image.slidesharecdn.com/salesforceapexdeveloperguide-230916115800-b7c953cd/85/salesforce_apex_developer_guide-103-320.jpg)
![// Create a test account based on the queried account.
Account testAccount = a.clone();
testAccount.Name = 'Acme Test';
insert testAccount;
// Query the test account that was inserted.
Account testAccount2 = [SELECT Id, Name FROM Account
WHERE Name='Acme Test' LIMIT 1];
System.assert(testAccount2 != null);
}
// Like the previous method, this test method can also access all data
// because the containing class is annotated with @IsTest(SeeAllData=true).
@IsTest
static void myTestMethod2() {
// Can access all data in the organization.
}
}
This second example shows how to apply the @IsTest(SeeAllData=true) annotation on a test method. Because the test
method’s class isn’t annotated, you have to annotate the method to enable access to all data for the method. The second test method
doesn’t have this annotation, so it can access only the data it creates. In addition, it can access objects that are used to manage your
organization, such as users.
// This class contains test methods with different data access levels.
@IsTest
private class ClassWithDifferentDataAccess {
// Test method that has access to all data.
@IsTest(SeeAllData=true)
static void testWithAllDataAccess() {
// Can query all data in the organization.
}
// Test method that has access to only the data it creates
// and organization setup and metadata objects.
@IsTest
static void testWithOwnDataAccess() {
// This method can still access the User object.
// This query returns the first user object.
User u = [SELECT UserName,Email FROM User LIMIT 1];
System.debug('UserName: ' + u.UserName);
System.debug('Email: ' + u.Email);
// Can access the test account that is created here.
Account a = new Account(Name='Test Account');
insert a;
// Access the account that was just created.
Account insertedAcct = [SELECT Id,Name FROM Account
WHERE Name='Test Account'];
System.assert(insertedAcct != null);
100
Classes, Objects, and Interfaces
Apex Developer Guide](https://image.slidesharecdn.com/salesforceapexdeveloperguide-230916115800-b7c953cd/85/salesforce_apex_developer_guide-104-320.jpg)
![Versioned Behavior Changes
In API version 47.0 and later, @NamespaceAccessible isn’t allowed on an entity marked with @AuraEnabled. Therefore, an Aura or
Lightning web component installed from a package can’t call an Apex method from another package, even if both packages are in the
same namespace.
In API version 50.0 and later, scope and accessibility rules are enforced on Apex variables, methods, inner classes, and interfaces that are
annotatedwith @NamespaceAccessible.Foraccessibilityconsiderations,seeConsiderationsforApexAcessibilityAcrossPackages.
For more information on namespace-based visibility, see Namespace-Based Visibility for Apex Classes in Second-Generation Packages.
ReadOnly Annotation
The @ReadOnly annotation allows you to perform less restrictive queries against the Lightning Platform database by increasing the
limit of the number of returned rows for a request to 1,000,000. All other limits still apply. The annotation blocks the following operations
within the request: DML operations, calls to System.schedule, and enqueued asynchronous Apex jobs.
The @ReadOnly annotationisavailableforRESTandSOAPWebservicesandthe Schedulable interface.Tousethe @ReadOnly
annotation, the top-level request must be in the schedule execution or the Web service invocation. For example, if a Visualforce page
calls a Web service that contains the @ReadOnly annotation, the request fails because Visualforce is the top-level request, not the
Web service.
Visualforce pages can call controller methods with the @ReadOnly annotation, and those methods run with the same relaxed
restrictions. To increase other Visualforce-specific limits, such as the size of a collection that can be used by an iteration component like
<apex:pageBlockTable>, you can set the readonly attribute on the <apex:page> tag to true. For more information,
see Working with Large Sets of Data in the Visualforce Developer's Guide.
Versioned Behavior Changes
Prior to API version 49.0, using @ReadOnly on Apex REST methods (@HttpDelete, @HttpGet, @HttpPatch, @HttpPost, or @HttpPut)
also required annotating the method with @RemoteAction. In API version 49.0 and later, you can annotate Apex REST methods
with just @ReadOnly.
RemoteAction Annotation
The RemoteAction annotation provides support for Apex methods used in Visualforce to be called via JavaScript. This process is
often referred to as JavaScript remoting.
Note: Methods with the RemoteAction annotation must be static and either global or public.
Add the Apex class as a custom controller or a controller extension to your page.
<apex:page controller="MyController" extension="MyExtension">
Warning: Adding a controller or controller extension grants access to all @RemoteAction methods in that Apex class, even
if those methods aren’t used in the page. Anyone who can view the page can execute all @RemoteAction methods and
provide fake or malicious data to the controller.
Then, add the request as a JavaScript function call. A simple JavaScript remoting invocation takes the following form.
[namespace.]MyController.method(
[parameters...,]
callbackFunction,
[configuration]
);
104
Classes, Objects, and Interfaces
Apex Developer Guide](https://image.slidesharecdn.com/salesforceapexdeveloperguide-230916115800-b7c953cd/85/salesforce_apex_developer_guide-108-320.jpg)

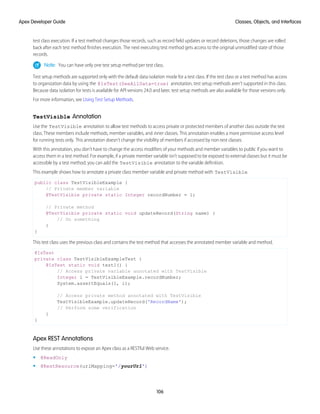
![• Methods annotated with @HttpGet are also called if the HTTP request uses the HEAD request method.
HttpPatch Annotation
The @HttpPatch annotation is used at the method level and enables you to expose an Apex method as a REST resource. This method
is called when an HTTP PATCH request is sent, and updates the specified resource.
To use this annotation, your Apex method must be defined as global static.
HttpPost Annotation
The @HttpPost annotation is used at the method level and enables you to expose an Apex method as a REST resource. This method
is called when an HTTP POST request is sent, and creates a new resource.
To use this annotation, your Apex method must be defined as global static.
HttpPut Annotation
The @HttpPut annotation is used at the method level and enables you to expose an Apex method as a REST resource. This method
is called when an HTTP PUT request is sent, and creates or updates the specified resource.
To use this annotation, your Apex method must be defined as global static.
Classes and Casting
In general, all type information is available at run time. This means that Apex enables casting, that is, a data type of one class can be
assigned to a data type of another class, but only if one class is a subclass of the other class. Use casting when you want to convert an
object from one data type to another.
In the following example, CustomReport extends the class Report. Therefore, it is a subclass of that class. This means that you
can use casting to assign objects with the parent data type (Report) to the objects of the subclass data type (CustomReport).
public virtual class Report {
}
public class CustomReport extends Report {
}
In the following code segment, a custom report object is first added to a list of report objects. Then the custom report object is returned
as a report object, which is then cast back into a custom report object.
...
// Create a list of report objects
Report[] Reports = new Report[5];
// Create a custom report object
CustomReport a = new CustomReport();
// Because the custom report is a sub class of the Report class,
// you can add the custom report object a to the list of report objects
Reports.add(a);
// The following is not legal:
// CustomReport c = Reports.get(0);
// because the compiler does not know that what you are
108
Classes, Objects, and Interfaces
Apex Developer Guide](https://image.slidesharecdn.com/salesforceapexdeveloperguide-230916115800-b7c953cd/85/salesforce_apex_developer_guide-112-320.jpg)
![Classes and Collections
Lists and maps can be used with classes and interfaces, in the same ways that lists and maps can be used with sObjects. This means, for
example, that you can use a user-defined data type for the value or the key of a map. Likewise, you can create a set of user-defined
objects.
If you create a map or list of interfaces, any child type of the interface can be put into that collection. For instance, if the List contains an
interface i1, and MyC implements i1, then MyC can be placed in the list.
SEE ALSO:
Using Custom Types in Map Keys and Sets
Collection Casting
Because collections in Apex have a declared type at runtime, Apex allows collection casting.
Collections can be cast in a similar manner that arrays can be cast in Java. For example, a list of CustomerPurchaseOrder objects can be
assigned to a list of PurchaseOrder objects if class CustomerPurchaseOrder is a child of class PurchaseOrder.
public virtual class PurchaseOrder {
Public class CustomerPurchaseOrder extends PurchaseOrder {
}
{
List<PurchaseOrder> POs = new PurchaseOrder[] {};
List<CustomerPurchaseOrder> CPOs = new CustomerPurchaseOrder[]{};
POs = CPOs;
}
}
Once the CustomerPurchaseOrder list is assigned to the PurchaseOrder list variable, it can be cast back to a list of
CustomerPurchaseOrder objects, but only because that instance was originally instantiated as a list of CustomerPurchaseOrder objects.
A list of PurchaseOrder objects that is instantiated as such cannot be cast to a list of CustomerPurchaseOrder objects, even if the list of
PurchaseOrder objects contains only CustomerPurchaseOrder objects.
If the user of a PurchaseOrder list that only includes CustomerPurchaseOrders objects tries to insert a non-CustomerPurchaseOrder
subclassof PurchaseOrder (suchas InternalPurchaseOrder),aruntimeexceptionresults.ThisisbecauseApexcollections
have a declared type at runtime.
Note: Maps behave in the same way as lists with regards to the value side of the Map. If the value side of map A can be cast to
the value side of map B, and they have the same key type, then map A can be cast to map B. A runtime error results if the casting
is not valid with the particular map at runtime.
Differences Between Apex Classes and Java Classes
Apex classes and Java classes work in similar ways, but there are some significant differences.
These are the major differences between Apex classes and Java classes:
• Inner classes and interfaces can only be declared one level deep inside an outer class.
• Static methods and variables can only be declared in a top-level class definition, not in an inner class.
• An inner class behaves like a static Java inner class, but doesn’t require the static keyword. An inner class can have instance
member variables like an outer class, but there is no implicit pointer to an instance of the outer class (using the this keyword).
110
Classes, Objects, and Interfaces
Apex Developer Guide](https://image.slidesharecdn.com/salesforceapexdeveloperguide-230916115800-b7c953cd/85/salesforce_apex_developer_guide-114-320.jpg)

![organization contains Apex classes that you’ve defined with the same name as a built-in class, the Apex runtime defaults to your custom
class and calls the methods in your class. Let’s take a look at the following example.
Create this custom Apex class:
public class Database {
public static String query() {
return 'wherefore art thou namespace?';
}
}
Execute this statement in the Developer Console:
sObject[] acct = Database.query('SELECT Name FROM Account LIMIT 1');
System.debug(acct[0].get('Name'));
When the Database.query statement executes, Apex looks up the query method on the custom Database class first. However,
the query method in this class doesn’t take any parameters and no match is found, hence you get an error. The custom Database
class overrides the built-in Database class in the System namespace. To solve this problem, add the System namespace prefix
to the class name to explicitly instruct the Apex runtime to call the query method on the built-in Database class in the System
namespace:
sObject[] acct = System.Database.query('SELECT Name FROM Account LIMIT 1');
System.debug(acct[0].get('Name'));
SEE ALSO:
Using the Schema Namespace
Using the Schema Namespace
The Schema namespaceprovidesclassesandmethodsforworkingwithschemametadatainformation.Weimplicitlyimport Schema.*,
but you must fully qualify your uses of Schema namespace elements when they have naming conflicts with items in your unmanaged
code. If your org contains an Apex class that has the same name as an sObject, add the Schema namespace prefix to the sObject name
in your code.
You can omit the namespace when creating an instance of a schema class or when calling a schema method. For example, because the
DescribeSObjectResult and FieldSet classes are in the Schema namespace, these code segments are equivalent.
Schema.DescribeSObjectResult d = Account.sObjectType.getDescribe();
Map<String, Schema.FieldSet> FSMap = d.fieldSets.getMap();
And:
DescribeSObjectResult d = Account.sObjectType.getDescribe();
Map<String, FieldSet> FSMap = d.fieldSets.getMap();
Using the Schema Namespace for Disambiguation
Use Schema.object_name to refer to an sObject that has the same name as a custom class. This disambiguation instructs the
Apex runtime to use the sObject.
public class Account {
public Integer myInteger;
}
115
Classes, Objects, and Interfaces
Apex Developer Guide](https://image.slidesharecdn.com/salesforceapexdeveloperguide-230916115800-b7c953cd/85/salesforce_apex_developer_guide-119-320.jpg)
![// ...
// Create a standard Account object myAccountSObject
Schema.Account myAccountSObject = new Schema.Account();
// Create accountClassInstance, a custom class in your org
Account accountClassInstance = new Account();
myAccountSObject.Name = 'Snazzy Account';
accountClassInstance.myInteger = 1;
SEE ALSO:
Using the System Namespace
Namespace, Class, and Variable Name Precedence
Becauselocalvariables,classnames,andnamespacescanallhypotheticallyusethesameidentifiers,theApexparserevaluatesexpressions
in the form of name1.name2.[...].nameN as follows:
1. The parser first assumes that name1 is a local variable with name2 - nameN as field references.
2. If the first assumption does not hold true, the parser then assumes that name1 is a class name and name2 is a static variable name
with name3 - nameN as field references.
3. If the second assumption does not hold true, the parser then assumes that name1 is a namespace name, name2 is a class name,
name3 is a static variable name, and name4 - nameN are field references.
4. If the third assumption does not hold true, the parser reports an error.
Iftheexpressionendswithasetofparentheses(forexample, name1.name2.[...].nameM.nameN()),theApexparserevaluates
the expression as follows:
1. The parser first assumes that name1 is a local variable with name2 - nameM as field references, and nameN as a method
invocation.
2. If the first assumption does not hold true:
• If the expression contains only two identifiers (name1.name2()), the parser then assumes that name1 is a class name and
name2 is a method invocation.
• If the expression contains more than two identifiers, the parser then assumes that name1 is a class name, name2 is a static
variable name with name3 - nameM as field references, and nameN is a method invocation.
3. If the second assumption does not hold true, the parser then assumes that name1 is a namespace name, name2 is a class name,
name3 is a static variable name, name4 - nameM are field references, and nameN is a method invocation.
4. If the third assumption does not hold true, the parser reports an error.
However, with class variables Apex also uses dot notation to reference member variables. Those member variables might refer to other
class instances, or they might refer to an sObject which has its own dot notation rules to refer to field names (possibly navigating foreign
keys).
Once you enter an sObject field in the expression, the remainder of the expression stays within the sObject domain, that is, sObject fields
cannot refer back to Apex expressions.
For instance, if you have the following class:
public class c {
c1 c1 = new c1();
class c1 { c2 c2; }
116
Classes, Objects, and Interfaces
Apex Developer Guide](https://image.slidesharecdn.com/salesforceapexdeveloperguide-230916115800-b7c953cd/85/salesforce_apex_developer_guide-120-320.jpg)
![Setting the Salesforce API Version for Classes and Triggers
To set the Salesforce API and Apex version for a class or trigger:
1. Edit either a class or trigger, and click Version Settings.
2. Select the Version of the Salesforce API. This version is also the version of Apex associated with the class or trigger.
3. Click Save.
If you pass an object as a parameter in a method call from one Apex class, C1, to another class, C2, and C2 has different fields exposed
due to the Salesforce API version setting, the fields in the objects are controlled by the version settings of C2.
In this example, the Categories field is set to null after calling the insertIdea method in class C2 from a method in the test
class C1, because the Categories field isn’t available in version 13.0 of the API.
The first class is saved using Salesforce API version 13.0:
// This class is saved using Salesforce API version 13.0
// Version 13.0 does not include the Idea.categories field
global class C2
{
global Idea insertIdea(Idea a) {
insert a; // category field set to null on insert
// retrieve the new idea
Idea insertedIdea = [SELECT title FROM Idea WHERE Id =:a.Id];
return insertedIdea;
}
}
The following class is saved using Salesforce API version 16.0:
@IsTest
// This class is bound to API version 16.0 by Version Settings
private class C1
{
static testMethod void testC2Method() {
Idea i = new Idea();
i.CommunityId = '09aD000000004YCIAY';
i.Title = 'Testing Version Settings';
i.Body = 'Categories field is included in API version 16.0';
i.Categories = 'test';
C2 c2 = new C2();
Idea returnedIdea = c2.insertIdea(i);
// retrieve the new idea
Idea ideaMoreFields = [SELECT title, categories FROM Idea
WHERE Id = :returnedIdea.Id];
// assert that the categories field from the object created
// in this class is not null
System.assert(i.Categories != null);
// assert that the categories field created in C2 is null
System.assert(ideaMoreFields.Categories == null);
}
}
118
Classes, Objects, and Interfaces
Apex Developer Guide](https://image.slidesharecdn.com/salesforceapexdeveloperguide-230916115800-b7c953cd/85/salesforce_apex_developer_guide-122-320.jpg)
![Custom Labels
Custom labels aren’t standard sObjects. You can’t create a new instance of a custom label. You can only access the value of a custom
label using system.label.label_name. For example:
String errorMsg = System.Label.generic_error;
For more information on custom labels, see “Custom Labels” in Salesforce Help.
Accessing SObject Fields
As in Java, SObject fields can be accessed or changed with simple dot notation. For example:
Account a = new Account();
a.Name = 'Acme'; // Access the account name field and assign it 'Acme'
System-generated fields, such as Created By or Last Modified Date, cannot be modified. If you try, the Apex runtime
engine generates an error. Additionally, formula field values and values for other fields that are read-only for the context user cannot be
changed.
If you use the generic SObject type instead of a specific object, such as Account, you can retrieve only the Id field using dot notation.
You can set the Id field for Apex code saved using Salesforce API version 27.0 and later). Alternatively, you can use the generic SObject
put and get methods. See SObject Class.
This example shows how you can access the Id field and operations that aren’t allowed on generic SObjects.
Account a = new Account(Name = 'Acme', BillingCity = 'San Francisco');
insert a;
sObject s = [SELECT Id, Name FROM Account WHERE Name = 'Acme' LIMIT 1];
// This is allowed
ID id = s.Id;
// The following line results in an error when you try to save
String x = s.Name;
// This line results in an error when you try to save using API version 26.0 or earlier
s.Id = [SELECT Id FROM Account WHERE Name = 'Acme' LIMIT 1].Id;
Note: If your organization has enabled person accounts, you have two different kinds of accounts: business accounts and person
accounts. If your code creates a new account using name, a business account is created. If your code uses LastName, a person
account is created.
If you want to perform operations on an SObject, it is recommended that you first convert it into a specific object. For example:
Account a = new Account(Name = 'Acme', BillingCity = 'San Francisco');
insert a;
sObject s = [SELECT Id, Name FROM Account WHERE Name = 'Acme' LIMIT 1];
ID id = s.ID;
Account convertedAccount = (Account)s;
convertedAccount.name = 'Acme2';
update convertedAccount;
Contact sal = new Contact(FirstName = 'Sal', Account = convertedAccount);
The following example shows how you can use SOSL over a set of records to determine their object types. Once you have converted
the generic SObject record into a Contact, Lead, or Account, you can modify its fields accordingly:
public class convertToCLA {
List<Contact> contacts = new List<Contact>();
List<Lead> leads = new List<Lead>();
124
Working with Data in Apex
Apex Developer Guide](https://image.slidesharecdn.com/salesforceapexdeveloperguide-230916115800-b7c953cd/85/salesforce_apex_developer_guide-128-320.jpg)
![List<Account> accounts = new List<Account>();
public void convertType(String phoneNumber) {
List<List<SObject>> results = [FIND :phoneNumber
IN Phone FIELDS
RETURNING Contact(Id, Phone, FirstName, LastName),
Lead(Id, Phone, FirstName, LastName),
Account(Id, Phone, Name)];
List<SObject> records = new List<SObject>();
records.addAll(results[0]); //add Contact results to our results super-set
records.addAll(results[1]); //add Lead results
records.addAll(results[2]); //add Account results
if (!records.isEmpty()) {
for (Integer i = 0; i < records.size(); i++) {
SObject record = records[i];
if (record.getSObjectType() == Contact.sObjectType) {
contacts.add((Contact) record);
} else if (record.getSObjectType() == Lead.sObjectType){
leads.add((Lead) record);
} else if (record.getSObjectType() == Account.sObjectType) {
accounts.add((Account) record);
}
}
}
}
}
Using SObject Fields
SObject fields can be initially set or not set (unset); unset fields are not the same as null or blank fields. When you perform a DML operation
on an SObject, you can change a field that is set; you can’t change unset fields.
Note: To erase the current value of a field, set the field to null.
If an Apex method takes an SObject parameter, you can use the System.isSet() method to identify the set fields. If you want to unset any
fields to retain their values, first create an SObject instance. Then apply only the fields you want to be part of the DML operation.
This example code shows how SObject fields are identified as set or unset.
Contact nullFirst = new Contact(LastName='Codey', FirstName=null);
System.assertEquals(true, nullFirst.isSet('FirstName'), 'FirstName is set to a literal
value, so it counts as set');
Contact unsetFirst = new Contact(LastName='Astro');
System.assertEquals(false, unsetFirst.isSet('FirstName'), ‘FirstName is not set’);
AnexpressionwithSObjectfieldsoftypeBooleanevaluatestotrueonlyiftheSObjectfieldistrue.Ifthefieldisfalseornull,theexpression
evaluates to false. This example code shows an expression that checks if the IsActive field of a Campaign object is null. Because
this expression always evaluates to false, the code in the if statement is never executed.
Campaign cObj= new Campaign();
...
if (cObj.IsActive == null) {
... // IsActive is evaluated to false and this code block is not executed.
}
125
Working with Data in Apex
Apex Developer Guide](https://image.slidesharecdn.com/salesforceapexdeveloperguide-230916115800-b7c953cd/85/salesforce_apex_developer_guide-129-320.jpg)
![How DML Works
Single vs. Bulk DML Operations
You can perform DML operations either on a single sObject, or in bulk on a list of sObjects. Performing bulk DML operations is the
recommended way because it helps avoid hitting governor limits, such as the DML limit of 150 statements per Apex transaction. This
limit is in place to ensure fair access to shared resources in the Lightning Platform. Performing a DML operation on a list of sObjects
counts as one DML statement, not as one statement for each sObject.
This example performs DML calls on single sObjects, which isn’t efficient.
The for loop iterates over contacts. For each contact, if the department field matches a certain value, it sets a new value for the
Description__c field. If the list contains more than items, the 151st update returns an exception that can't be caught.
List<Contact> conList = [Select Department , Description from Contact];
for(Contact badCon : conList) {
if (badCon.Department == 'Finance') {
badCon.Description__c = 'New description';
}
// Not a good practice since governor limits might be hit.
update badCon;
}
This example is a modified version of the previous example that doesn't hit the governor limit. The DML operation is performed in bulk
by calling update on a list of contacts. This code counts as one DML statement, which is far below the limit of 150.
// List to hold the new contacts to update.
List<Contact> updatedList = new List<Contact>();
List<Contact> conList = [Select Department , Description from Contact];
for(Contact con : conList) {
if (con.Department == 'Finance') {
con.Description = 'New description';
// Add updated contact sObject to the list.
updatedList.add(con);
}
}
// Call update on the list of contacts.
// This results in one DML call for the entire list.
update updatedList;
AnotherDMLgovernorlimitisthetotalnumberofrowsthatcanbeprocessedbyDMLoperationsinasingletransaction,whichis10,000.
All rows processed by all DML calls in the same transaction count incrementally toward this limit. For example, if you insert 100 contacts
and update 50 contacts in the same transaction, your total DML processed rows are 150. You still have 9,850 rows left (10,000 - 150).
System Context and Sharing Rules
Most DML operations execute in system context, ignoring the current user's permissions, field-level security, organization-wide defaults,
position in the role hierarchy, and sharing rules. For more information, see Enforcing Sharing Rules.
Note: If you execute DML operations within an anonymous block, they execute using the current user’s object and field-level
permissions.
127
Working with Data in Apex
Apex Developer Guide](https://image.slidesharecdn.com/salesforceapexdeveloperguide-230916115800-b7c953cd/85/salesforce_apex_developer_guide-131-320.jpg)
![Best Practices
With DML on SObjects, it’s best to construct new instances and only update the fields you wish to modify without querying other fields.
If you query fields other than the fields you wish to update, you may revert queried field values that could have changed between the
query and the DML.
Adding and Retrieving Data With DML
Apex is tightly integrated with the Lightning Platform persistence layer. Records in the database can be inserted and manipulated
through Apex directly using simple statements. The language in Apex that allows you to add and manage records in the database is the
Data Manipulation Language (DML). In contrast to the SOQL language, which is used for read operations (querying records), DML is used
for write operations.
Before inserting or manipulating records, record data is created in memory as sObjects. The sObject data type is a generic data type and
corresponds to the data type of the variable that will hold the record data. There are specific data types, subtyped from the sObject data
type, which correspond to data types of standard object records, such as Account or Contact, and custom objects, such as
Invoice_Statement__c. Typically, you will work with these specific sObject data types. But sometimes, when you don’t know the type
of the sObject in advance, you can work with the generic sObject data type. This is an example of how you can create a new specific
Account sObject and assign it to a variable.
Account a = new Account(Name='Account Example');
In the previous example, the account referenced by the variable a exists in memory with the required Name field. However, it is not
persisted yet to the Lightning Platform persistence layer. You need to call DML statements to persist sObjects to the database. Here is
an example of creating and persisting this account using the insert statement.
Account a = new Account(Name='Account Example');
insert a;
Also, you can use DML to modify records that have already been inserted. Among the operations you can perform are record updates,
deletions, restoring records from the Recycle Bin, merging records, or converting leads. After querying for records, you get sObject
instances that you can modify and then persist the changes of. This is an example of querying for an existing record that has been
previously persisted, updating a couple of fields on the sObject representation of this record in memory, and then persisting this change
to the database.
// Query existing account.
Account a = [SELECT Name,Industry
FROM Account
WHERE Name='Account Example' LIMIT 1];
// Write the old values the debug log before updating them.
System.debug('Account Name before update: ' + a.Name); // Name is Account Example
System.debug('Account Industry before update: ' + a.Industry);// Industry is not set
// Modify the two fields on the sObject.
a.Name = 'Account of the Day';
a.Industry = 'Technology';
// Persist the changes.
update a;
// Get a new copy of the account from the database with the two fields.
Account a = [SELECT Name,Industry
FROM Account
WHERE Name='Account of the Day' LIMIT 1];
128
Working with Data in Apex
Apex Developer Guide](https://image.slidesharecdn.com/salesforceapexdeveloperguide-230916115800-b7c953cd/85/salesforce_apex_developer_guide-132-320.jpg)
![// Verify that updated field values were persisted.
System.assertEquals('Account of the Day', a.Name);
System.assertEquals('Technology', a.Industry);
DML Statements vs. Database Class Methods
Apex offers two ways to perform DML operations: using DML statements or Database class methods. This provides flexibility in how you
perform data operations. DML statements are more straightforward to use and result in exceptions that you can handle in your code.
This is an example of a DML statement to insert a new record.
// Create the list of sObjects to insert
List<Account> acctList = new List<Account>();
acctList.add(new Account(Name='Acme1'));
acctList.add(new Account(Name='Acme2'));
// DML statement
insert acctList;
This is an equivalent example to the previous one but it uses a method of the Database class instead of the DML verb.
// Create the list of sObjects to insert
List<Account> acctList = new List<Account>();
acctList.add(new Account(Name='Acme1'));
acctList.add(new Account(Name='Acme2'));
// DML statement
Database.SaveResult[] srList = Database.insert(acctList, false);
// Iterate through each returned result
for (Database.SaveResult sr : srList) {
if (sr.isSuccess()) {
// Operation was successful, so get the ID of the record that was processed
System.debug('Successfully inserted account. Account ID: ' + sr.getId());
}
else {
// Operation failed, so get all errors
for(Database.Error err : sr.getErrors()) {
System.debug('The following error has occurred.');
System.debug(err.getStatusCode() + ': ' + err.getMessage());
System.debug('Account fields that affected this error: ' + err.getFields());
}
}
}
One difference between the two options is that by using the Database class method, you can specify whether or not to allow for partial
record processing if errors are encountered. You can do so by passing an additional second Boolean parameter. If you specify false
for this parameter and if a record fails, the remainder of DML operations can still succeed. Also, instead of exceptions, a result object
array(oroneresultobjectifonlyonesObjectwaspassedin)isreturnedcontainingthestatusofeachoperationandanyerrorsencountered.
By default, this optional parameter is true, which means that if at least one sObject can’t be processed, all remaining sObjects won’t
and an exception will be thrown for the record that causes a failure.
The following helps you decide when you want to use DML statements or Database class methods.
129
Working with Data in Apex
Apex Developer Guide](https://image.slidesharecdn.com/salesforceapexdeveloperguide-230916115800-b7c953cd/85/salesforce_apex_developer_guide-133-320.jpg)
![This example inserts three account records and updates an existing account record. First, three Account sObjects are created and added
to a list. An insert statement bulk inserts the list of accounts as an argument. Then, the second account record is updated, the billing city
is updated, and the update statement is called to persist the change in the database.
Account[] accts = new List<Account>();
for(Integer i=0;i<3;i++) {
Account a = new Account(Name='Acme' + i,
BillingCity='San Francisco');
accts.add(a);
}
Account accountToUpdate;
try {
insert accts;
// Update account Acme2.
accountToUpdate =
[SELECT BillingCity FROM Account
WHERE Name='Acme2' AND BillingCity='San Francisco'
LIMIT 1];
// Update the billing city.
accountToUpdate.BillingCity = 'New York';
// Make the update call.
update accountToUpdate;
} catch(DmlException e) {
System.debug('An unexpected error has occurred: ' + e.getMessage());
}
// Verify that the billing city was updated to New York.
Account afterUpdate =
[SELECT BillingCity FROM Account WHERE Id=:accountToUpdate.Id];
System.assertEquals('New York', afterUpdate.BillingCity);
Inserting Related Records
You can insert records related to existing records if a relationship has already been defined between the two objects, such as a lookup
or master-detail relationship. A record is associated with a related record through a foreign key ID. For example, when inserting a new
contact, you can specify the contact’s related account record by setting the value of the AccountId field.
This example adds a contact to an account (the related record) by setting the AccountId field on the contact. Contact and Account
are linked through a lookup relationship.
try {
Account acct = new Account(Name='SFDC Account');
insert acct;
// Once the account is inserted, the sObject will be
// populated with an ID.
// Get this ID.
ID acctID = acct.ID;
// Add a contact to this account.
Contact con = new Contact(
FirstName='Joe',
LastName='Smith',
131
Working with Data in Apex
Apex Developer Guide](https://image.slidesharecdn.com/salesforceapexdeveloperguide-230916115800-b7c953cd/85/salesforce_apex_developer_guide-135-320.jpg)
![Phone='415.555.1212',
AccountId=acctID);
insert con;
} catch(DmlException e) {
System.debug('An unexpected error has occurred: ' + e.getMessage());
}
Updating Related Records
Fields on related records can't be updated with the same call to the DML operation and require a separate DML call. For example, if
inserting a new contact, you can specify the contact's related account record by setting the value of the AccountId field. However,
you can't change the account's name without updating the account itself with a separate DML call. Similarly, when updating a contact,
if you also want to update the contact’s related account, you must make two DML calls. The following example updates a contact and
its related account using two update statements.
try {
// Query for the contact, which has been associated with an account.
Contact queriedContact = [SELECT Account.Name
FROM Contact
WHERE FirstName = 'Joe' AND LastName='Smith'
LIMIT 1];
// Update the contact's phone number
queriedContact.Phone = '415.555.1213';
// Update the related account industry
queriedContact.Account.Industry = 'Technology';
// Make two separate calls
// 1. This call is to update the contact's phone.
update queriedContact;
// 2. This call is to update the related account's Industry field.
update queriedContact.Account;
} catch(Exception e) {
System.debug('An unexpected error has occurred: ' + e.getMessage());
}
IN THIS SECTION:
Relating Records by Using an External ID
Add related records by using a custom external ID field on the parent record. Associating records through the external ID field is an
alternative to using the record ID. You can add a related record to another record only if a relationship (such as master-detail or
lookup) has been defined for the objects involved.
Creating Parent and Child Records in a Single Statement Using Foreign Keys
Relating Records by Using an External ID
Add related records by using a custom external ID field on the parent record. Associating records through the external ID field is an
alternative to using the record ID. You can add a related record to another record only if a relationship (such as master-detail or lookup)
has been defined for the objects involved.
132
Working with Data in Apex
Apex Developer Guide](https://image.slidesharecdn.com/salesforceapexdeveloperguide-230916115800-b7c953cd/85/salesforce_apex_developer_guide-136-320.jpg)
![MyExtID__c, set. Next, the sample calls Database.insert by passing it an array of sObjects. The first element in the array is
the parent sObject and the second is the opportunity sObject. The Database.insert statement creates the opportunity with its
parent account in a single step. Finally, the sample checks the results and writes the IDs of the created records to the debug log, or the
first error if record creation fails. This sample requires an external ID text field on Account called MyExtID.
public class ParentChildSample {
public static void InsertParentChild() {
Date dt = Date.today();
dt = dt.addDays(7);
Opportunity newOpportunity = new Opportunity(
Name='OpportunityWithAccountInsert',
StageName='Prospecting',
CloseDate=dt);
// Create the parent reference.
// Used only for foreign key reference
// and doesn't contain any other fields.
Account accountReference = new Account(
MyExtID__c='SAP111111');
newOpportunity.Account = accountReference;
// Create the Account object to insert.
// Same as above but has Name field.
// Used for the insert.
Account parentAccount = new Account(
Name='Hallie',
MyExtID__c='SAP111111');
// Create the account and the opportunity.
Database.SaveResult[] results = Database.insert(new SObject[] {
parentAccount, newOpportunity });
// Check results.
for (Integer i = 0; i < results.size(); i++) {
if (results[i].isSuccess()) {
System.debug('Successfully created ID: '
+ results[i].getId());
} else {
System.debug('Error: could not create sobject '
+ 'for array element ' + i + '.');
System.debug(' The error reported was: '
+ results[i].getErrors()[0].getMessage() + 'n');
}
}
}
}
Upserting Records
Using the upsert operation, you can either insert or update an existing record in one call. To determine whether a record already
exists, the upsert statement or Database method uses the record’s ID as the key to match records, a custom external ID field, or a
standard field with the idLookup attribute set to true.
• If the key is not matched, then a new object record is created.
134
Working with Data in Apex
Apex Developer Guide](https://image.slidesharecdn.com/salesforceapexdeveloperguide-230916115800-b7c953cd/85/salesforce_apex_developer_guide-138-320.jpg)
![• If the key is matched once, then the existing object record is updated.
• If the key is matched multiple times, then an error is generated and the object record is neither inserted or updated.
Note: Customfieldmatchingiscase-insensitiveonlyifthecustomfieldhastheUniqueandTreat"ABC"and"abc"asduplicate
values (case insensitive) attributes selected as part of the field definition. If this is the case, “ABC123” is matched with “abc123.”
For more information, see Create Custom Fields.
Examples
The following example updates the city name for all existing accounts located in the city formerly known as Bombay, and also inserts a
new account located in San Francisco:
Account[] acctsList = [SELECT Id, Name, BillingCity
FROM Account WHERE BillingCity = 'Bombay'];
for (Account a : acctsList) {
a.BillingCity = 'Mumbai';
}
Account newAcct = new Account(Name = 'Acme', BillingCity = 'San Francisco');
acctsList.add(newAcct);
try {
upsert acctsList;
} catch (DmlException e) {
// Process exception here
}
Note: For more information on processing DmlExceptions, see Bulk DML Exception Handling.
This next example uses the Database.upsert method to upsert a collection of leads that are passed in. This example allows for
partial processing of records, that is, in case some records fail processing, the remaining records are still inserted or updated. It iterates
through the results and adds a new task to each record that was processed successfully. The task sObjects are saved in a list, which is
then bulk inserted. This example is followed by a test class that contains a test method for testing the example.
/* This class demonstrates and tests the use of the
* partial processing DML operations */
public class DmlSamples {
/* This method accepts a collection of lead records and
creates a task for the owner(s) of any leads that were
created as new, that is, not updated as a result of the upsert
operation */
public static List<Database.upsertResult> upsertLeads(List<Lead> leads) {
/* Perform the upsert. In this case the unique identifier for the
insert or update decision is the Salesforce record ID. If the
record ID is null the row will be inserted, otherwise an update
will be attempted. */
List<Database.upsertResult> uResults = Database.upsert(leads,false);
/* This is the list for new tasks that will be inserted when new
leads are created. */
List<Task> tasks = new List<Task>();
for(Database.upsertResult result:uResults) {
if (result.isSuccess() && result.isCreated())
135
Working with Data in Apex
Apex Developer Guide](https://image.slidesharecdn.com/salesforceapexdeveloperguide-230916115800-b7c953cd/85/salesforce_apex_developer_guide-139-320.jpg)
![tasks.add(new Task(Subject = 'Follow-up', WhoId = result.getId()));
}
/* If there are tasks to be inserted, insert them */
Database.insert(tasks);
return uResults;
}
}
@isTest
private class DmlSamplesTest {
public static testMethod void testUpsertLeads() {
/* We only need to test the insert side of upsert */
List<Lead> leads = new List<Lead>();
/* Create a set of leads for testing */
for(Integer i = 0;i < 100; i++) {
leads.add(new Lead(LastName = 'testLead', Company = 'testCompany'));
}
/* Switch to the runtime limit context */
Test.startTest();
/* Exercise the method */
List<Database.upsertResult> results = DmlSamples.upsertLeads(leads);
/* Switch back to the test context for limits */
Test.stopTest();
/* ID set for asserting the tasks were created as expected */
Set<Id> ids = new Set<Id>();
/* Iterate over the results, asserting success and adding the new ID
to the set for use in the comprehensive assertion phase below. */
for(Database.upsertResult result:results) {
System.assert(result.isSuccess());
ids.add(result.getId());
}
/* Assert that exactly one task exists for each lead that was inserted. */
for(Lead l:[SELECT Id, (SELECT Subject FROM Tasks) FROM Lead WHERE Id IN :ids]) {
System.assertEquals(1,l.tasks.size());
}
}
}
Use of upsert with an external ID can reduce the number of DML statements in your code, and help you to avoid hitting governor
limits (see Execution Governors and Limits). This next example uses upsert and an external ID field Line_Item_Id__c on the
Asset object to maintain a one-to-one relationship between an asset and an opportunity line item.
136
Working with Data in Apex
Apex Developer Guide](https://image.slidesharecdn.com/salesforceapexdeveloperguide-230916115800-b7c953cd/85/salesforce_apex_developer_guide-140-320.jpg)
![Note: Before running this sample, create a custom text field on the Asset object named Line_Item_Id__c and mark it as
an external ID. For information on custom fields, see the Salesforce online help.
public void upsertExample() {
Opportunity opp = [SELECT Id, Name, AccountId,
(SELECT Id, PricebookEntry.Product2Id, PricebookEntry.Name
FROM OpportunityLineItems)
FROM Opportunity
WHERE HasOpportunityLineItem = true
LIMIT 1];
Asset[] assets = new Asset[]{};
// Create an asset for each line item on the opportunity
for (OpportunityLineItem lineItem:opp.OpportunityLineItems) {
//This code populates the line item Id, AccountId, and Product2Id for each asset
Asset asset = new Asset(Name = lineItem.PricebookEntry.Name,
Line_Item_ID__c = lineItem.Id,
AccountId = opp.AccountId,
Product2Id = lineItem.PricebookEntry.Product2Id);
assets.add(asset);
}
try {
upsert assets Line_Item_ID__c; // This line upserts the assets list with
// the Line_Item_Id__c field specified as the
// Asset field that should be used for matching
// the record that should be upserted.
} catch (DmlException e) {
System.debug(e.getMessage());
}
}
Merging Records
When you have duplicate lead, contact, case, or account records in the database, cleaning up your data and consolidating the records
might be a good idea. You can merge up to three records of the same sObject type. The merge operation merges up to three records
into one of the records, deletes the others, and reparents any related records.
Example
The following shows how to merge an existing Account record into a master account. The account to merge has a related contact, which
is moved to the master account record after the merge operation. Also, after merging, the merge record is deleted and only one record
remains in the database. This examples starts by creating a list of two accounts and inserts the list. Then it executes queries to get the
new account records from the database, and adds a contact to the account to be merged. Next, it merges the two accounts. Finally, it
verifies that the contact has been moved to the master account and the second account has been deleted.
// Insert new accounts
List<Account> ls = new List<Account>{
new Account(name='Acme Inc.'),
137
Working with Data in Apex
Apex Developer Guide](https://image.slidesharecdn.com/salesforceapexdeveloperguide-230916115800-b7c953cd/85/salesforce_apex_developer_guide-141-320.jpg)
![new Account(name='Acme')
};
insert ls;
// Queries to get the inserted accounts
Account masterAcct = [SELECT Id, Name FROM Account WHERE Name = 'Acme Inc.' LIMIT 1];
Account mergeAcct = [SELECT Id, Name FROM Account WHERE Name = 'Acme' LIMIT 1];
// Add a contact to the account to be merged
Contact c = new Contact(FirstName='Joe',LastName='Merged');
c.AccountId = mergeAcct.Id;
insert c;
try {
merge masterAcct mergeAcct;
} catch (DmlException e) {
// Process exception
System.debug('An unexpected error has occurred: ' + e.getMessage());
}
// Once the account is merged with the master account,
// the related contact should be moved to the master record.
masterAcct = [SELECT Id, Name, (SELECT FirstName,LastName From Contacts)
FROM Account WHERE Name = 'Acme Inc.' LIMIT 1];
System.assert(masterAcct.getSObjects('Contacts').size() > 0);
System.assertEquals('Joe', masterAcct.getSObjects('Contacts')[0].get('FirstName'));
System.assertEquals('Merged', masterAcct.getSObjects('Contacts')[0].get('LastName'));
// Verify that the merge record got deleted
Account[] result = [SELECT Id, Name FROM Account WHERE Id=:mergeAcct.Id];
System.assertEquals(0, result.size());
This second example is similar to the previous except that it uses the Database.merge method (instead of the merge statement).
The last argument of Database.merge is set to false to have any errors encountered in this operation returned in the merge
result instead of getting exceptions. The example merges two accounts into the master account and retrieves the returned results. The
example creates a master account and two duplicates, one of which has a child contact. It verifies that after the merge the contact is
moved to the master account.
// Create master account
Account master = new Account(Name='Account1');
insert master;
// Create duplicate accounts
Account[] duplicates = new Account[]{
// Duplicate account
new Account(Name='Account1, Inc.'),
// Second duplicate account
new Account(Name='Account 1')
};
insert duplicates;
// Create child contact and associate it with first account
Contact c = new Contact(firstname='Joe',lastname='Smith', accountId=duplicates[0].Id);
insert c;
138
Working with Data in Apex
Apex Developer Guide](https://image.slidesharecdn.com/salesforceapexdeveloperguide-230916115800-b7c953cd/85/salesforce_apex_developer_guide-142-320.jpg)
![// Get the account contact relation ID, which is created when a contact is created on
"Account1, Inc."
AccountContactRelation resultAcrel = [SELECT Id FROM AccountContactRelation WHERE
ContactId=:c.Id LIMIT 1];
// Merge accounts into master
Database.MergeResult[] results = Database.merge(master, duplicates, false);
for(Database.MergeResult res : results) {
if (res.isSuccess()) {
// Get the master ID from the result and validate it
System.debug('Master record ID: ' + res.getId());
System.assertEquals(master.Id, res.getId());
// Get the IDs of the merged records and display them
List<Id> mergedIds = res.getMergedRecordIds();
System.debug('IDs of merged records: ' + mergedIds);
// Get the ID of the reparented record and
// validate that this the contact ID.
System.debug('Reparented record ID: ' + res.getUpdatedRelatedIds());
// Make sure there are two IDs (contact ID and account contact relation ID); the order
isn't defined
System.assertEquals(2, res.getUpdatedRelatedIds().size() );
boolean flag1 = false;
boolean flag2 = false;
// Because the order of the IDs isn't defined, the ID can be at index 0 or 1 of the
array
if (resultAcrel.id == res.getUpdatedRelatedIds()[0] || resultAcrel.id ==
res.getUpdatedRelatedIds()[1] )
flag1 = true;
if (c.id == res.getUpdatedRelatedIds()[0] || c.id == res.getUpdatedRelatedIds()[1]
)
flag2 = true;
System.assertEquals(flag1, true);
System.assertEquals(flag2, true);
}
else {
for(Database.Error err : res.getErrors()) {
// Write each error to the debug output
System.debug(err.getMessage());
}
}
}
139
Working with Data in Apex
Apex Developer Guide](https://image.slidesharecdn.com/salesforceapexdeveloperguide-230916115800-b7c953cd/85/salesforce_apex_developer_guide-143-320.jpg)
![Merge Considerations
When merging sObject records, consider the following rules and guidelines:
• Only leads, contacts, cases, and accounts can be merged. See sObjects That Don’t Support DML Operations on page 152.
• You can pass a master record and up to two additional sObject records to a single merge method.
• Using the Apex merge operation, field values on the master record always supersede the corresponding field values on the records
tobemerged.Topreserveamergedrecordfieldvalue,simplysetthisfieldvalueonthemastersObjectbeforeperformingthemerge.
• External ID fields can’t be used with merge.
For more information on merging leads, contacts and accounts, see the Salesforce online help.
Deleting Records
After you persist records in the database, you can delete those records using the delete operation. Deleted records aren’t deleted
permanently from Salesforce, but they are placed in the Recycle Bin for 15 days from where they can be restored. Restoring deleted
records is covered in a later section.
Example
The following example deletes all accounts that are named 'DotCom':
Account[] doomedAccts = [SELECT Id, Name FROM Account
WHERE Name = 'DotCom'];
try {
delete doomedAccts;
} catch (DmlException e) {
// Process exception here
}
Note: For more information on processing DmlExceptions, see Bulk DML Exception Handling.
Referential Integrity When Deleting and Restoring Records
The delete operation supports cascading deletions. If you delete a parent object, you delete its children automatically, as long as
each child record can be deleted.
Forexample,ifyoudeleteacaserecord,ApexautomaticallydeletesanyCaseComment,CaseHistory,andCaseSolutionrecordsassociated
with that case. However, if a particular child record is not deletable or is currently being used, then the delete operation on the parent
case record fails.
The undelete operation restores the record associations for the following types of relationships:
• Parent accounts (as specified in the Parent Account field on an account)
• Indirect account-contact relationships (as specified on the Related Accounts related list on a contact or the Related Contacts related
list on an account)
• Parent cases (as specified in the Parent Case field on a case)
• Master solutions for translated solutions (as specified in the Master Solution field on a solution)
• Managers of contacts (as specified in the Reports To field on a contact)
• Products related to assets (as specified in the Product field on an asset)
• Opportunities related to quotes (as specified in the Opportunity field on a quote)
• All custom lookup relationships
140
Working with Data in Apex
Apex Developer Guide](https://image.slidesharecdn.com/salesforceapexdeveloperguide-230916115800-b7c953cd/85/salesforce_apex_developer_guide-144-320.jpg)
![• Relationship group members on accounts and relationship groups, with some exceptions
• Tags
• An article's categories, publication state, and assignments
Note: Salesforce only restores lookup relationships that have not been replaced. For example, if an asset is related to a different
product prior to the original product record being undeleted, that asset-product relationship is not restored.
Restoring Deleted Records
After you have deleted records, the records are placed in the Recycle Bin for 15 days, after which they are permanently deleted. While
the records are still in the Recycle Bin, you can restore them using the undelete operation. If you accidentally deleted some records
that you want to keep, restore them from the Recycle Bin.
Example
The following example undeletes an account named 'Universal Containers'. The ALL ROWS keyword queries all rows for both top
level and aggregate relationships, including deleted records and archived activities.
Account a = new Account(Name='Universal Containers');
insert(a);
insert(new Contact(LastName='Carter',AccountId=a.Id));
delete a;
Account[] savedAccts = [SELECT Id, Name FROM Account WHERE Name = 'Universal Containers'
ALL ROWS];
try {
undelete savedAccts;
} catch (DmlException e) {
// Process exception here
}
Note: For more information on processing DmlExceptions, see Bulk DML Exception Handling.
Undelete Considerations
Note the following when using the undelete statement.
• You can undelete records that were deleted as the result of a merge. However, the merge reparents the child objects, and that
reparenting can’t be undone.
• To identify deleted records, including records deleted as a result of a merge, use the ALL ROWS parameters with a SOQL query.
• See Referential Integrity When Deleting and Restoring Records.
SEE ALSO:
Querying All Records with a SOQL Statement
Converting Leads
The convertLead DMLoperationconvertsaleadintoanaccountandcontact,aswellas(optionally)anopportunity. convertLead
is available only as a method on the Database class; it is not available as a DML statement.
Converting leads involves the following basic steps:
141
Working with Data in Apex
Apex Developer Guide](https://image.slidesharecdn.com/salesforceapexdeveloperguide-230916115800-b7c953cd/85/salesforce_apex_developer_guide-145-320.jpg)
![1. Your application determines the IDs of any lead(s) to be converted.
2. Optionally, your application determines the IDs of any account(s) into which to merge the lead. Your application can use SOQL to
search for accounts that match the lead name, as in the following example:
SELECT Id, Name FROM Account WHERE Name='CompanyNameOfLeadBeingMerged'
3. Optionally, your application determines the IDs of the contact or contacts into which to merge the lead. The application can use
SOQL to search for contacts that match the lead contact name, as in the following example:
SELECT Id, Name FROM Contact WHERE FirstName='FirstName' AND LastName='LastName' AND
AccountId = '001...'
4. Optionally, the application determines whether opportunities should be created from the leads.
5. The application uses the query (SELECT ... FROM LeadStatus WHERE IsConverted=true) to obtain the leads
with converted status.
6. The application calls convertLead.
7. The application iterates through the returned result or results and examines each LeadConvertResult object to determine whether
conversion succeeded for each lead.
8. Optionally, when converting leads owned by a queue, the owner must be specified. This is because accounts and contacts can’t be
owned by a queue. Even if you are specifying an existing account or contact, you must still specify an owner.
Example
This example shows how to use the Database.convertLead method to convert a lead. It inserts a new lead, creates a
LeadConvert object,setsitsstatustoconverted,andthenpassesittothe Database.convertLead method.Finally,itverifies
that the conversion was successful.
Lead myLead = new Lead(LastName = 'Fry', Company='Fry And Sons');
insert myLead;
Database.LeadConvert lc = new database.LeadConvert();
lc.setLeadId(myLead.id);
LeadStatus convertStatus = [SELECT Id, MasterLabel FROM LeadStatus WHERE IsConverted=true
LIMIT 1];
lc.setConvertedStatus(convertStatus.MasterLabel);
Database.LeadConvertResult lcr = Database.convertLead(lc);
System.assert(lcr.isSuccess());
Convert Leads Considerations
• Fieldmappings:Thesystemautomaticallymapsstandardleadfieldstostandardaccount,contact,andopportunityfields.Forcustom
lead fields, your Salesforce administrator can specify how they map to custom account, contact, and opportunity fields. For more
information about field mappings, see Salesforce Help.
• Merged fields: If data is merged into existing account and contact objects, only empty fields in the target object are
overwritten—existingdata(includingIDs)arenotoverwritten.Theonlyexceptionisifyouspecify setOverwriteLeadSource
on the LeadConvert object to true, in which case the LeadSource field in the target contact object is overwritten with the
contents of the LeadSource field in the source LeadConvert object.
142
Working with Data in Apex
Apex Developer Guide](https://image.slidesharecdn.com/salesforceapexdeveloperguide-230916115800-b7c953cd/85/salesforce_apex_developer_guide-146-320.jpg)

![Result Class
Operation
EmptyRecycleBinResult Class
emptyRecycleBin
Returned Database Errors
While DML statements always return exceptions when an operation fails for one of the records being processed and the operation is
rolled back for all records, Database class methods can either do so or allow partial success for record processing. In the latter case of
partial processing, Database class methods don’t throw exceptions. Instead, they return a list of errors for any errors that occurred on
failed records.
TheerrorsprovidedetailsaboutthefailuresandarecontainedintheresultoftheDatabaseclassmethod.Forexample,a SaveResult
object is returned for insert and update operations. Like all returned results, SaveResult contains a method called getErrors
that returns a list of Database.Error objects, representing the errors encountered, if any.
Example
This example shows how to get the errors returned by a Database.insert operation. It inserts two accounts, one of which doesn’t
have the required Name field, and sets the second parameter to false: Database.insert(accts, false);. This sets the
partial processing option. Next, the example checks if the call had any failures through if (!sr.isSuccess()) and then iterates
through the errors, writing error information to the debug log.
// Create two accounts, one of which is missing a required field
Account[] accts = new List<Account>{
new Account(Name='Account1'),
new Account()};
Database.SaveResult[] srList = Database.insert(accts, false);
// Iterate through each returned result
for (Database.SaveResult sr : srList) {
if (!sr.isSuccess()) {
// Operation failed, so get all errors
for(Database.Error err : sr.getErrors()) {
System.debug('The following error has occurred.');
System.debug(err.getStatusCode() + ': ' + err.getMessage());
System.debug('Fields that affected this error: ' + err.getFields());
}
}
}
More About DML
Here are some things you may want to know about using Data Manipulation Language.
IN THIS SECTION:
Setting DML Options
Transaction Control
144
Working with Data in Apex
Apex Developer Guide](https://image.slidesharecdn.com/salesforceapexdeveloperguide-230916115800-b7c953cd/85/salesforce_apex_developer_guide-148-320.jpg)
![• Sending a group event invitation to a lead or contact respects the triggerOtherEmail option
• Email sent when updating or deleting a group event also respects the triggerUserEmail and triggerOtherEmail
options, as appropriate
localeOptions Property
The localeOptions property specifies the language of any labels that are returned by Apex. The value must be a valid user locale
(language and country), such as de_DE or en_GB. The value is a String, 2-5 characters long. The first two characters are always an ISO
language code, for example 'fr' or 'en.' If the value is further qualified by a country, then the string also has an underscore (_) and another
ISO country code, for example 'US' or 'UK.' For example, the string for the United States is 'en_US', and the string for French Canadian is
'fr_CA'.
optAllOrNone Property
The optAllOrNone property specifies whether the operation allows for partial success. If optAllOrNone is set to true, all
changes are rolled back if any record causes errors. The default for this property is false and successfully processed records are
committed while records with errors aren't. This property is available in Apex saved against Salesforce API version 20.0 and later.
Transaction Control
All requests are delimited by the trigger, class method, Web Service, Visualforce page or anonymous block that executes the Apex code.
If the entire request completes successfully, all changes are committed to the database. For example, suppose a Visualforce page called
an Apex controller, which in turn called an additional Apex class. Only when all the Apex code has finished running and the Visualforce
page has finished running, are the changes committed to the database. If the request does not complete successfully, all database
changes are rolled back.
Sometimes during the processing of records, your business rules require that partial work (already executed DML statements) be “rolled
back” so that the processing can continue in another direction. Apex gives you the ability to generate a savepoint, that is, a point in the
request that specifies the state of the database at that time. Any DML statement that occurs after the savepoint can be discarded, and
the database can be restored to the same condition it was in at the time you generated the savepoint.
The following limitations apply to generating savepoint variables and rolling back the database:
• If you set more than one savepoint, then roll back to a savepoint that is not the last savepoint you generated, the later savepoint
variables become invalid. For example, if you generated savepoint SP1 first, savepoint SP2 after that, and then you rolled back
to SP1, the variable SP2 would no longer be valid. You will receive a runtime error if you try to use it.
• References to savepoints cannot cross trigger invocations because each trigger invocation is a new trigger context. If you declare a
savepoint as a static variable then try to use it across trigger contexts, you will receive a run-time error.
• Each savepoint you set counts against the governor limit for DML statements.
• Static variables are not reverted during a rollback. If you try to run the trigger again, the static variables retain the values from the
first run.
• EachrollbackcountsagainstthegovernorlimitforDMLstatements.Youwillreceivearuntimeerrorifyoutrytorollbackthedatabase
additional times.
• The ID on an sObject inserted after setting a savepoint is not cleared after a rollback. Create an sObject to insert after a rollback.
Attempting to insert the sObject using the variable created before the rollback fails because the sObject variable has an ID. Updating
or upserting the sObject using the same variable also fails because the sObject is not in the database and, thus, cannot be updated.
The following is an example using the setSavepoint and rollback Database methods.
Account a = new Account(Name = 'xxx'); insert a;
System.assertEquals(null, [SELECT AccountNumber FROM Account WHERE Id = :a.Id].
148
Working with Data in Apex
Apex Developer Guide](https://image.slidesharecdn.com/salesforceapexdeveloperguide-230916115800-b7c953cd/85/salesforce_apex_developer_guide-152-320.jpg)
![AccountNumber);
// Create a savepoint while AccountNumber is null
Savepoint sp = Database.setSavepoint();
// Change the account number
a.AccountNumber = '123';
update a;
System.assertEquals('123', [SELECT AccountNumber FROM Account WHERE Id = :a.Id].
AccountNumber);
// Rollback to the previous null value
Database.rollback(sp);
System.assertEquals(null, [SELECT AccountNumber FROM Account WHERE Id = :a.Id].
AccountNumber);
sObjects That Cannot Be Used Together in DML Operations
DML operations on certain sObjects, sometimes referred to as setup objects, can’t be mixed with DML on other sObjects in the same
transaction. This restriction exists because some sObjects affect the user’s access to records in the org. You must insert or update these
types of sObjects in a different transaction to prevent operations from happening with incorrect access-level permissions. For example,
you can’t update an account and a user role in a single transaction.
You can’t use the following sObjects with other sObjects when performing DML operations in the same transaction.
• AuthSession
• FieldPermissions
• ForecastingShare
• Group
You can only insert and update a group in a transaction with other sObjects. Other DML operations aren’t allowed.
• GroupMember
Note: With legacy Apex code saved using Salesforce API version 14.0 and earlier, you can insert and update a group member
with other sObjects in the same transaction.
• ObjectPermissions
• ObjectTerritory2AssignmentRule
• ObjectTerritory2AssignmentRuleItem
• PermissionSet
• PermissionSetAssignment
• QueueSObject
• RuleTerritory2Association
• SetupEntityAccess
• Territory
• Territory2
• Territory2Model
• User
You can insert a user in a transaction with other sObjects in Apex code saved using Salesforce API version 14.0 and earlier.
149
Working with Data in Apex
Apex Developer Guide](https://image.slidesharecdn.com/salesforceapexdeveloperguide-230916115800-b7c953cd/85/salesforce_apex_developer_guide-153-320.jpg)
![Profile p = [SELECT Id FROM Profile WHERE Name='Standard User'];
UserRole r = [SELECT Id FROM UserRole WHERE Name='COO'];
// Create new user with a non-null user role ID
User u = new User(alias = al, email=em,
emailencodingkey='UTF-8', lastname=lname,
languagelocalekey='en_US',
localesidkey='en_US', profileid = p.Id, userroleid = r.Id,
timezonesidkey='America/Los_Angeles',
username=uname);
insert u;
}
}
IN THIS SECTION:
Mixed DML Operations in Test Methods
Test methods allow for performing mixed Data Manipulation Language (DML) operations that include both setup sObjects and
other sObjects if the code that performs the DML operations is enclosed within System.runAs method blocks. You can also
perform DML in an asynchronous job that your test method calls. These techniques enable you, for example, to create a user with
a role and other sObjects in the same test.
Mixed DML Operations in Test Methods
Test methods allow for performing mixed Data Manipulation Language (DML) operations that include both setup sObjects and other
sObjects if the code that performs the DML operations is enclosed within System.runAs method blocks. You can also perform DML
in an asynchronous job that your test method calls. These techniques enable you, for example, to create a user with a role and other
sObjects in the same test.
The setup sObjects are listed in sObjects That Cannot Be Used Together in DML Operations.
Note: Because validation for mixed DML operations is skipped during deployment, there can be a difference in the number of
test failures when tests are deployed versus when run in the user interface.
Example: Mixed DML Operations in System.runAs Blocks
This example shows how to enclose mixed DML operations within System.runAs blocks to avoid the mixed DML error. The
System.runAs block runs in the current user’s context. It creates a test user with a role and a test account, which is a mixed DML
operation.
@isTest
private class MixedDML {
static testMethod void mixedDMLExample() {
User u;
Account a;
User thisUser = [SELECT Id FROM User WHERE Id = :UserInfo.getUserId()];
// Insert account as current user
System.runAs (thisUser) {
Profile p = [SELECT Id FROM Profile WHERE Name='Standard User'];
UserRole r = [SELECT Id FROM UserRole WHERE Name='COO'];
u = new User(alias = 'jsmith', email='jsmith@acme.com',
emailencodingkey='UTF-8', lastname='Smith',
languagelocalekey='en_US',
localesidkey='en_US', profileid = p.Id, userroleid = r.Id,
151
Working with Data in Apex
Apex Developer Guide](https://image.slidesharecdn.com/salesforceapexdeveloperguide-230916115800-b7c953cd/85/salesforce_apex_developer_guide-155-320.jpg)
![timezonesidkey='America/Los_Angeles',
username='jsmith@acme.com');
insert u;
a = new Account(name='Acme');
insert a;
}
}
}
Use @future to Bypass the Mixed DML Error in a Test Method
Mixed DML operations within a single transaction aren’t allowed. You can’t perform DML on a setup sObject and another sObject in the
same transaction. However, you can perform one type of DML as part of an asynchronous job and the others in other asynchronous jobs
or in the original transaction. This class contains an @future method to be called by the class in the subsequent example.
public class InsertFutureUser {
@future
public static void insertUser() {
Profile p = [SELECT Id FROM Profile WHERE Name='Standard User'];
UserRole r = [SELECT Id FROM UserRole WHERE Name='COO'];
User futureUser = new User(firstname = 'Future', lastname = 'User',
alias = 'future', defaultgroupnotificationfrequency = 'N',
digestfrequency = 'N', email = 'test@test.org',
emailencodingkey = 'UTF-8', languagelocalekey='en_US',
localesidkey='en_US', profileid = p.Id,
timezonesidkey = 'America/Los_Angeles',
username = 'futureuser@test.org',
userpermissionsmarketinguser = false,
userpermissionsofflineuser = false, userroleid = r.Id);
insert(futureUser);
}
}
This class calls the method in the previous class.
@isTest
public class UserAndContactTest {
public testmethod static void testUserAndContact() {
InsertFutureUser.insertUser();
Contact currentContact = new Contact(
firstName = String.valueOf(System.currentTimeMillis()),
lastName = 'Contact');
insert(currentContact);
}
}
sObjects That Don’t Support DML Operations
Your organization contains standard objects provided by Salesforce and custom objects that you created. These objects can be accessed
in Apex as instances of the sObject data type. You can query these objects and perform DML operations on them. However, some
standard objects don’t support DML operations although you can still obtain them in queries. They include the following:
• AccountTerritoryAssignmentRule
• AccountTerritoryAssignmentRuleItem
152
Working with Data in Apex
Apex Developer Guide](https://image.slidesharecdn.com/salesforceapexdeveloperguide-230916115800-b7c953cd/85/salesforce_apex_developer_guide-156-320.jpg)
![article.Anon-administratornon-knowledgeuserwhocallsthe doNothing methodwillgetthefollowingerror: DML operation
UPDATE not allowed on FAQ__kav
public class KnowledgeAccess {
public void doNothing() {
}
public void DMLOperation() {
FAQ__kav[] articles = [SELECT Id FROM FAQ__kav WHERE PublishStatus = 'Draft' and
Language = 'en_US'];
update articles;
}
}
As a workaround, cast the input array to the DML statement from an array of FAQ__kav articles to an array of the generic sObject
type as follows:
public void DMLOperation() {
FAQ__kav[] articles = [SELECT id FROM FAQ__kav WHERE PublishStatus = 'Draft' and
Language = 'en_US'];
update (sObject[]) articles;
}
Locking Records
When an sObject record is locked, no other client or user is allowed to make updates either through code or the Salesforce user interface.
The client locking the records can perform logic on the records and make updates with the guarantee that the locked records won’t be
changed by another client during the lock period.
IN THIS SECTION:
Locking Statements
In Apex, you can use FOR UPDATE to lock sObject records while they’re being updated in order to prevent race conditions and
other thread safety problems.
Locking in a SOQL For Loop
Avoiding Deadlocks
Locking Statements
In Apex, you can use FOR UPDATE to lock sObject records while they’re being updated in order to prevent race conditions and other
thread safety problems.
While an sObject record is locked, no other client or user is allowed to make updates either through code or the Salesforce user interface.
The client locking the records can perform logic on the records and make updates with the guarantee that the locked records won’t be
changed by another client during the lock period. The lock gets released when the transaction completes.
TolockasetofsObjectrecordsinApex,embedthekeywords FOR UPDATE afteranyinlineSOQLstatement.Forexample,thefollowing
statement, in addition to querying for two accounts, also locks the accounts that are returned:
Account [] accts = [SELECT Id FROM Account LIMIT 2 FOR UPDATE];
156
Working with Data in Apex
Apex Developer Guide](https://image.slidesharecdn.com/salesforceapexdeveloperguide-230916115800-b7c953cd/85/salesforce_apex_developer_guide-160-320.jpg)
![Note: You can’t use the ORDER BY keywords in any SOQL query that uses locking.
Locking Considerations
• While the records are locked by a client, the locking client can modify their field values in the database in the same transaction. Other
clients have to wait until the transaction completes and the records are no longer locked before being able to update the same
records. Other clients can still query the same records while they’re locked.
• If you attempt to lock a record currently locked by another client, your process waits a maximum of 10 seconds for the lock to be
releasedbeforeacquiringanewlock.Ifthewaittimeexceeds10seconds,a QueryException isthrown.Similarly,ifyouattempt
toupdatearecordcurrentlylockedbyanotherclientandthelockisn’treleasedwithinamaximumof10seconds,a DmlException
is thrown.
• If a client attempts to modify a locked record, the update operation can succeed if the lock gets released within a short amount of
time after the update call was made. In this case, it’s possible that the updates overwrite those made by the locking client if the
second client obtained an old copy of the record. To prevent the overwrite from happening, the second client must lock the record
first. The locking process returns a fresh copy of the record from the database through the SELECT statement. The second client
can use this copy to make new updates.
• The record locks that are obtained in Apex via FOR UPDATE clause are automatically released when making callouts. Use caution
while making callouts in contexts where FOR UPDATE queries could have been previously executed.
• When you perform a DML operation on one record, related records are locked in addition to the record in question.
Warning: Use care when setting locks in your Apex code. See Avoiding Deadlocks.
Locking in a SOQL For Loop
The FOR UPDATE keywords can also be used within SOQL for loops. For example:
for (Account[] accts : [SELECT Id FROM Account
FOR UPDATE]) {
// Your code
}
As discussed in SOQL For Loops, the example above corresponds internally to calls to the query() and queryMore() methods
in the SOAP API.
Notethatthereisno commit statement.IfyourApextriggercompletessuccessfully,anydatabasechangesareautomaticallycommitted.
If your Apex trigger does not complete successfully, any changes made to the database are rolled back.
Avoiding Deadlocks
Apex has the possibility of deadlocks, as does any other procedural logic language involving updates to multiple database tables or
rows. To avoid such deadlocks, the Apex runtime engine:
1. First locks sObject parent records, then children.
2. Locks sObject records in order of ID when multiple records of the same type are being edited.
Asadeveloper,usecarewhenlockingrowstoensurethatyouarenotintroducingdeadlocks.Verifythatyouareusingstandarddeadlock
avoidance techniques by accessing tables and rows in the same order from all locations in an application.
157
Working with Data in Apex
Apex Developer Guide](https://image.slidesharecdn.com/salesforceapexdeveloperguide-230916115800-b7c953cd/85/salesforce_apex_developer_guide-161-320.jpg)
![SOQL and SOSL Queries
You can evaluate Salesforce Object Query Language (SOQL) or Salesforce Object Search Language (SOSL) statements on-the-fly in Apex
by surrounding the statement in square brackets.
SOQL Statements
SOQL statements evaluate to a list of sObjects, a single sObject, or an Integer for count method queries.
For example, you could retrieve a list of accounts that are named Acme:
List<Account> aa = [SELECT Id, Name FROM Account WHERE Name = 'Acme'];
From this list, you can access individual elements:
if (!aa.isEmpty()) {
// Execute commands
}
You can also create new objects from SOQL queries on existing ones. This example creates a new contact for the first account with the
number of employees greater than 10.
Contact c = new Contact(Account = [SELECT Name FROM Account
WHERE NumberOfEmployees > 10 LIMIT 1]);
c.FirstName = 'James';
c.LastName = 'Yoyce';
The newly created object contains null values for its fields, which must be set.
The count method can be used to return the number of rows returned by a query. The following example returns the total number
of contacts with the last name of Weissman:
Integer i = [SELECT COUNT() FROM Contact WHERE LastName = 'Weissman'];
You can also operate on the results using standard arithmetic:
Integer j = 5 * [SELECT COUNT() FROM Account];
SOQL limits apply when executing SOQL queries. See Execution Governors and Limits.
For a full description of SOQL query syntax, see the Salesforce SOQL and SOSL Reference Guide.
SOSL Statements
SOSL statements evaluate to a list of lists of sObjects, where each list contains the search results for a particular sObject type. The result
lists are always returned in the same order as they were specified in the SOSL query. If a SOSL query doesn’t return any records for a
specified sObject type, the search results include an empty list for that sObject.
For example, you can return a list of accounts, contacts, opportunities, and leads that begin with the phrase map:
List<List<SObject>> searchList = [FIND 'map*' IN ALL FIELDS RETURNING Account (Id, Name),
Contact, Opportunity, Lead];
Note: The syntax of the FIND clause in Apex differs from the syntax of the FIND clause in SOAP API and REST API:
• In Apex, the value of the FIND clause is demarcated with single quotes. For example:
FIND 'map*' IN ALL FIELDS RETURNING Account (Id, Name), Contact, Opportunity, Lead
158
Working with Data in Apex
Apex Developer Guide](https://image.slidesharecdn.com/salesforceapexdeveloperguide-230916115800-b7c953cd/85/salesforce_apex_developer_guide-162-320.jpg)
![Note: Apex that is running in system mode ignores field-level security while scanning for a match using IN ALL
FIELDS.
• In the API, the value of the FIND clause is demarcated with braces. For example:
FIND {map*} IN ALL FIELDS RETURNING Account (Id, Name), Contact, Opportunity, Lead
From searchList, you can create arrays for each object returned:
Account [] accounts = ((List<Account>)searchList[0]);
Contact [] contacts = ((List<Contact>)searchList[1]);
Opportunity [] opportunities = ((List<Opportunity>)searchList[2]);
Lead [] leads = ((List<Lead>)searchList[3]);
SOSL limits apply when executing SOSL queries. See Execution Governors and Limits.
For a full description of SOSL query syntax, see the Salesforce SOQL and SOSL Reference Guide.
IN THIS SECTION:
1. Working with SOQL and SOSL Query Results
2. Accessing sObject Fields Through Relationships
3. Understanding Foreign Key and Parent-Child Relationship SOQL Queries
4. Working with SOQL Aggregate Functions
5. Working with Very Large SOQL Queries
6. Using SOQL Queries That Return One Record
7. Improve Performance by Avoiding Null Values
8. Working with Polymorphic Relationships in SOQL Queries
A polymorphic relationship is a relationship between objects where a referenced object can be one of several different types. For
example, the Who relationship field of a Task can be a Contact or a Lead.
9. Using Apex Variables in SOQL and SOSL Queries
10. Querying All Records with a SOQL Statement
Working with SOQL and SOSL Query Results
SOQL and SOSL queries only return data for sObject fields that are selected in the original query. If you try to access a field that was not
selected in the SOQL or SOSL query (other than ID), you receive a runtime error, even if the field contains a value in the database. The
following code example causes a runtime error:
insert new Account(Name = 'Singha');
Account acc = [SELECT Id FROM Account WHERE Name = 'Singha' LIMIT 1];
// Note that name is not selected
String name = [SELECT Id FROM Account WHERE Name = 'Singha' LIMIT 1].Name;
The following is the same code example rewritten so it does not produce a runtime error. Note that Name has been added as part of
the select statement, after Id.
insert new Account(Name = 'Singha');
Account acc = [SELECT Id FROM Account WHERE Name = 'Singha' LIMIT 1];
159
Working with Data in Apex
Apex Developer Guide](https://image.slidesharecdn.com/salesforceapexdeveloperguide-230916115800-b7c953cd/85/salesforce_apex_developer_guide-163-320.jpg)
![// Note that name is now selected
String name = [SELECT Id, Name FROM Account WHERE Name = 'Singha' LIMIT 1].Name;
Even if only one sObject field is selected, a SOQL or SOSL query always returns data as complete records. Consequently, you must
dereference the field in order to access it. For example, this code retrieves an sObject list from the database with a SOQL query, accesses
the first account record in the list, and then dereferences the record's AnnualRevenue field:
Double rev = [SELECT AnnualRevenue FROM Account
WHERE Name = 'Acme'][0].AnnualRevenue;
// When only one result is returned in a SOQL query, it is not necessary
// to include the list's index.
Double rev2 = [SELECT AnnualRevenue FROM Account
WHERE Name = 'Acme' LIMIT 1].AnnualRevenue;
The only situation in which it is not necessary to dereference an sObject field in the result of an SOQL query, is when the query returns
an Integer as the result of a COUNT operation:
Integer i = [SELECT COUNT() FROM Account];
Fields in records returned by SOSL queries must always be dereferenced.
Also note that sObject fields that contain formulas return the value of the field at the time the SOQL or SOSL query was issued. Any
changes to other fields that are used within the formula are not reflected in the formula field value until the record has been saved and
re-queried in Apex. Like other read-only sObject fields, the values of the formula fields themselves cannot be changed in Apex.
Accessing sObject Fields Through Relationships
sObject records represent relationships to other records with two fields: an ID and an address that points to a representation of the
associatedsObject.Forexample,theContactsObjecthasbothan AccountId fieldoftypeID,andan Account fieldoftypeAccount
that points to the associated sObject record itself.
The ID field can be used to change the account with which the contact is associated, while the sObject reference field can be used to
access data from the account. The reference field is only populated as the result of a SOQL or SOSL query (see note).
For example, the following Apex code shows how an account and a contact can be associated with one another, and then how the
contact can be used to modify a field on the account:
Note: To provide the most complete example, this code uses some elements that are described later in this guide:
• For information on insert and update, see Insert Statement and Update Statement.
Account a = new Account(Name = 'Acme');
insert a; // Inserting the record automatically assigns a
// value to its ID field
Contact c = new Contact(LastName = 'Weissman');
c.AccountId = a.Id;
// The new contact now points at the new account
insert c;
// A SOQL query accesses data for the inserted contact,
// including a populated c.account field
c = [SELECT Account.Name FROM Contact WHERE Id = :c.Id];
// Now fields in both records can be changed through the contact
c.Account.Name = 'salesforce.com';
160
Working with Data in Apex
Apex Developer Guide](https://image.slidesharecdn.com/salesforceapexdeveloperguide-230916115800-b7c953cd/85/salesforce_apex_developer_guide-164-320.jpg)
![c.LastName = 'Roth';
// To update the database, the two types of records must be
// updated separately
update c; // This only changes the contact's last name
update c.Account; // This updates the account name
Note: The expression c.Account.Name, and any other expression that traverses a relationship, displays slightly different
characteristics when it is read as a value than when it is modified:
• When being read as a value, if c.Account is null, then c.Account.Name evaluates to null, but does not yield a
NullPointerException.Thisdesignallowsdeveloperstonavigatemultiplerelationshipswithoutthetediumofhaving
to check for null values.
• When being modified, if c.Account is null, then c.Account.Name does yield a NullPointerException.
In SOSL, you would access data for the inserted contact in a similar way to the SELECT statement used in the previous SOQL example.
List<List<SObject>> searchList = [FIND 'Acme' IN ALL FIELDS RETURNING
Contact(id,Account.Name)]
In addition, the sObject field key can be used with insert, update, or upsert to resolve foreign keys by external ID. For example:
Account refAcct = new Account(externalId__c = '12345');
Contact c = new Contact(Account = refAcct, LastName = 'Kay');
insert c;
This inserts a new contact with the AccountId equal to the account with the external_id equal to ‘12345’. If there is no such
account, the insert fails.
Tip: The following code is equivalent to the code above. However, because it uses a SOQL query, it is not as efficient. If this code
was called multiple times, it could reach the execution limit for the maximum number of SOQL queries. For more information on
execution limits, see Execution Governors and Limits on page 315.
Account refAcct = [SELECT Id FROM Account WHERE externalId__c='12345'];
Contact c = new Contact(Account = refAcct.Id);
insert c;
Understanding Foreign Key and Parent-Child Relationship SOQL Queries
The SELECT statementofaSOQLquerycanbeanyvalidSOQLstatement,includingforeignkeyandparent-childrecordjoins.Ifforeign
key joins are included, the resulting sObjects can be referenced using normal field notation. For example:
System.debug([SELECT Account.Name FROM Contact
WHERE FirstName = 'Caroline'].Account.Name);
Additionally, parent-child relationships in sObjects act as SOQL queries as well. For example:
for (Account a : [SELECT Id, Name, (SELECT LastName FROM Contacts)
FROM Account
WHERE Name = 'Acme']) {
Contact[] cons = a.Contacts;
161
Working with Data in Apex
Apex Developer Guide](https://image.slidesharecdn.com/salesforceapexdeveloperguide-230916115800-b7c953cd/85/salesforce_apex_developer_guide-165-320.jpg)
![}
//The following example also works because we limit to only 1 contact
for (Account a : [SELECT Id, Name, (SELECT LastName FROM Contacts LIMIT 1)
FROM Account
WHERE Name = 'testAgg']) {
Contact c = a.Contacts;
}
Working with SOQL Aggregate Functions
AggregatefunctionsinSOQL,suchas SUM() and MAX(),allowyoutorollupandsummarizeyourdatainaquery.Formoreinformation
on aggregate functions, see Aggregate Functions in the Salesforce SOQL and SOSL Reference Guide.
You can use aggregate functions without using a GROUP BY clause. For example, you could use the AVG() aggregate function to
find the average Amount for all your opportunities.
AggregateResult[] groupedResults
= [SELECT AVG(Amount)aver FROM Opportunity];
Object avgAmount = groupedResults[0].get('aver');
Note that any query that includes an aggregate function returns its results in an array of AggregateResult objects. AggregateResult is a
read-only sObject and is only used for query results.
Aggregate functions become a more powerful tool to generate reports when you use them with a GROUP BY clause. For example,
you could find the average Amount for all your opportunities by campaign.
AggregateResult[] groupedResults
= [SELECT CampaignId, AVG(Amount)
FROM Opportunity
GROUP BY CampaignId];
for (AggregateResult ar : groupedResults) {
System.debug('Campaign ID' + ar.get('CampaignId'));
System.debug('Average amount' + ar.get('expr0'));
}
Any aggregated field in a SELECT list that does not have an alias automatically gets an implied alias with a format expri, where i
denotes the order of the aggregated fields with no explicit aliases. The value of i starts at 0 and increments for every aggregated field
with no explicit alias. For more information, see Using Aliases with GROUP BY in the Salesforce SOQL and SOSL Reference Guide.
Note: Queries that include aggregate functions are still subject to the limit on total number of query rows. All aggregate functions
other than COUNT() or COUNT(fieldname) include each row used by the aggregation as a query row for the purposes
of limit tracking.
For COUNT() or COUNT(fieldname) queries, limits are counted as one query row, unless the query contains a GROUP BY
clause, in which case one query row per grouping is consumed.
Working with Very Large SOQL Queries
Important: Where possible, we changed noninclusive terms to align with our company value of Equality. We maintained certain
terms to avoid any effect on customer implementations.
Your SOQL query sometimes returns so many sObjects that the limit on heap size is exceeded and an error occurs. To resolve, use a SOQL
query for loop instead, since it can process multiple batches of records by using internal calls to query and queryMore.
162
Working with Data in Apex
Apex Developer Guide](https://image.slidesharecdn.com/salesforceapexdeveloperguide-230916115800-b7c953cd/85/salesforce_apex_developer_guide-166-320.jpg)
![For example, if the results are too large, this syntax causes a runtime exception:
Account[] accts = [SELECT Id FROM Account];
Instead, use a SOQL query for loop as in one of the following examples:
// Use this format if you are not executing DML statements
// within the for loop
for (Account a : [SELECT Id, Name FROM Account
WHERE Name LIKE 'Acme%']) {
// Your code without DML statements here
}
// Use this format for efficiency if you are executing DML statements
// within the for loop
for (List<Account> accts : [SELECT Id, Name FROM Account
WHERE Name LIKE 'Acme%']) {
for (Account a : accts) {
// Your code here
}
update accts;
}
Note: UsingtheSOQLquerywithinthe for loopreducesthepossibilityofreachingthelimitonheapsize.However,thisapproach
can result in more CPU cycles being used with increased DML calls. For more information, see SOQL For Loops Versus Standard
SOQL Queries.
The following example demonstrates a SOQL query for loop that’s used to mass update records. Suppose that you want to change
the last name of a contact in records for contacts whose first and last names match specified criteria:
public void massUpdate() {
for (List<Contact> contacts:
[SELECT FirstName, LastName FROM Contact]) {
for(Contact c : contacts) {
if (c.FirstName == 'Barbara' &&
c.LastName == 'Gordon') {
c.LastName = 'Wayne';
}
}
update contacts;
}
}
Instead of using a SOQL query in a for loop, the preferred method of mass updating records is to use batch Apex, which minimizes
the risk of hitting governor limits.
For more information, see SOQL For Loops on page 169.
More Efficient SOQL Queries
For best performance, SOQL queries must be selective, particularly for queries inside triggers. To avoid long execution times, the system
can terminate nonselective SOQL queries. Developers receive an error message when a non-selective query in a trigger executes against
an object that contains more than 1 million records. To avoid this error, ensure that the query is selective.
163
Working with Data in Apex
Apex Developer Guide](https://image.slidesharecdn.com/salesforceapexdeveloperguide-230916115800-b7c953cd/85/salesforce_apex_developer_guide-167-320.jpg)

![Query 2:
SELECT Id FROM Account WHERE Name != ''
Since Account is a large object even though Name is indexed (primary key), this filter returns most of the records, making the query
non-selective.
Query 3:
SELECT Id FROM Account WHERE Name != '' AND CustomField__c = 'ValueA'
Here we have to see if any filter, when considered individually, is selective. As we saw in the previous example, the first filter isn't
selective. So let's focus on the second one. If the count of records returned by SELECT COUNT() FROM Account WHERE
CustomField__c = 'ValueA' islowerthantheselectivitythreshold,andCustomField__cisindexed,thequeryisselective.
Using SOQL Queries That Return One Record
SOQL queries can be used to assign a single sObject value when the result list contains only one element. When the L-value of an
expression is a single sObject type, Apex automatically assigns the single sObject record in the query result list to the L-value. A runtime
exception results if zero sObjects or more than one sObject is found in the list. For example:
List<Account> accts = [SELECT Id FROM Account];
// These lines of code are only valid if one row is returned from
// the query. Notice that the second line dereferences the field from the
// query without assigning it to an intermediary sObject variable.
Account acct = [SELECT Id FROM Account];
String name = [SELECT Name FROM Account].Name;
Improve Performance by Avoiding Null Values
In your SOQL and SOSL queries, explicitly filtering out null values in the WHERE clause allows Salesforce to improve query performance.
In the following example, any records where the Thread__c value is null are eliminated from the search.
Public class TagWS {
/* getThreadTags
*
* a quick method to pull tags not in the existing list
*
*/
public static webservice List<String>
getThreadTags(String threadId, List<String> tags) {
system.debug(LoggingLevel.Debug,tags);
List<String> retVals = new List<String>();
Set<String> tagSet = new Set<String>();
Set<String> origTagSet = new Set<String>();
origTagSet.addAll(tags);
// Note WHERE clause optimizes search where Thread__c is not null
for(CSO_CaseThread_Tag__c t :
[SELECT Name FROM CSO_CaseThread_Tag__c
165
Working with Data in Apex
Apex Developer Guide](https://image.slidesharecdn.com/salesforceapexdeveloperguide-230916115800-b7c953cd/85/salesforce_apex_developer_guide-169-320.jpg)
![WHERE Thread__c = :threadId AND
Thread__c != null])
{
tagSet.add(t.Name);
}
for(String x : origTagSet) {
// return a minus version of it so the UI knows to clear it
if(!tagSet.contains(x)) retVals.add('-' + x);
}
for(String x : tagSet) {
// return a plus version so the UI knows it's new
if(!origTagSet.contains(x)) retvals.add('+' + x);
}
return retVals;
}
}
Working with Polymorphic Relationships in SOQL Queries
Apolymorphicrelationshipisarelationshipbetweenobjectswhereareferencedobjectcanbeoneofseveraldifferenttypes.Forexample,
the Who relationship field of a Task can be a Contact or a Lead.
The following describes how to use SOQL queries with polymorphic relationships in Apex. If you want more general information on
polymorphic relationships, see Understanding Relationship Fields and Polymorphic Fields in the SOQL and SOSL Reference.
You can use SOQL queries that reference polymorphic fields in Apex to get results that depend on the object type referenced by the
polymorphic field. One approach is to filter your results using the Type qualifier. This example queries Events that are related to an
Account or Opportunity via the What field.
List<Event> events = [SELECT Description FROM Event WHERE What.Type IN ('Account',
'Opportunity')];
Another approach would be to use the TYPEOF clause in the SOQL SELECT statement. This example also queries Events that are
related to an Account or Opportunity via the What field.
List<Event> events = [SELECT TYPEOF What WHEN Account THEN Phone WHEN Opportunity THEN
Amount END FROM Event];
These queries return a list of sObjects where the relationship field references the desired object types.
If you need to access the referenced object in a polymorphic relationship, you can use the instanceof keyword to determine the object
type. The following example uses instanceof to determine whether an Account or Opportunity is related to an Event.
Event myEvent = eventFromQuery;
if (myEvent.What instanceof Account) {
// myEvent.What references an Account, so process accordingly
} else if (myEvent.What instanceof Opportunity) {
// myEvent.What references an Opportunity, so process accordingly
}
Note that you must assign the referenced sObject that the query returns to a variable of the appropriate type before you can pass it to
another method. The following example
1. Queries for User or Group owners of Merchandise__c custom objects using a SOQL query with a TYPEOF clause
166
Working with Data in Apex
Apex Developer Guide](https://image.slidesharecdn.com/salesforceapexdeveloperguide-230916115800-b7c953cd/85/salesforce_apex_developer_guide-170-320.jpg)
![2. Uses instanceof to determine the owner type
3. Assigns the owner objects to User or Group type variables before passing them to utility methods
public class PolymorphismExampleClass {
// Utility method for a User
public static void processUser(User theUser) {
System.debug('Processed User');
}
// Utility method for a Group
public static void processGroup(Group theGroup) {
System.debug('Processed Group');
}
public static void processOwnersOfMerchandise() {
// Select records based on the Owner polymorphic relationship field
List<Merchandise__c> merchandiseList = [SELECT TYPEOF Owner WHEN User THEN LastName
WHEN Group THEN Email END FROM Merchandise__c];
// We now have a list of Merchandise__c records owned by either a User or Group
for (Merchandise__c merch: merchandiseList) {
// We can use instanceof to check the polymorphic relationship type
// Note that we have to assign the polymorphic reference to the appropriate
// sObject type before passing to a method
if (merch.Owner instanceof User) {
User userOwner = merch.Owner;
processUser(userOwner);
} else if (merch.Owner instanceof Group) {
Group groupOwner = merch.Owner;
processGroup(groupOwner);
}
}
}
}
Using Apex Variables in SOQL and SOSL Queries
SOQL and SOSL statements in Apex can reference Apex code variables and expressions if they’re preceded by a colon (:). This use of a
local code variable within a SOQL or SOSL statement is called a bind. The Apex parser first evaluates the local variable in code context
before executing the SOQL or SOSL statement. Bind expressions can be used as:
• The search string in FIND clauses.
• The filter literals in WHERE clauses.
• The value of the IN or NOT IN operator in WHERE clauses, allowing filtering on a dynamic set of values. Note that this is of
particular use with a list of IDs or Strings, though it works with lists of any type.
• The division names in WITH DIVISION clauses.
• The numeric value in LIMIT clauses.
• The numeric value in OFFSET clauses.
For example:
Account A = new Account(Name='xxx');
insert A;
167
Working with Data in Apex
Apex Developer Guide](https://image.slidesharecdn.com/salesforceapexdeveloperguide-230916115800-b7c953cd/85/salesforce_apex_developer_guide-171-320.jpg)
![Account B;
// A simple bind
B = [SELECT Id FROM Account WHERE Id = :A.Id];
// A bind with arithmetic
B = [SELECT Id FROM Account
WHERE Name = :('x' + 'xx')];
String s = 'XXX';
// A bind with expressions
B = [SELECT Id FROM Account
WHERE Name = :'XXXX'.substring(0,3)];
// A bind with INCLUDES clause
B = [SELECT Id FROM Account WHERE :A.TYPE INCLUDES (‘Customer – Direct; Customer –
Channel’)];
// A bind with an expression that is itself a query result
B = [SELECT Id FROM Account
WHERE Name = :[SELECT Name FROM Account
WHERE Id = :A.Id].Name];
Contact C = new Contact(LastName='xxx', AccountId=A.Id);
insert new Contact[]{C, new Contact(LastName='yyy',
accountId=A.id)};
// Binds in both the parent and aggregate queries
B = [SELECT Id, (SELECT Id FROM Contacts
WHERE Id = :C.Id)
FROM Account
WHERE Id = :A.Id];
// One contact returned
Contact D = B.Contacts;
// A limit bind
Integer i = 1;
B = [SELECT Id FROM Account LIMIT :i];
// An OFFSET bind
Integer offsetVal = 10;
List<Account> offsetList = [SELECT Id FROM Account OFFSET :offsetVal];
// An IN-bind with an Id list. Note that a list of sObjects
// can also be used--the Ids of the objects are used for
// the bind
Contact[] cc = [SELECT Id FROM Contact LIMIT 2];
Task[] tt = [SELECT Id FROM Task WHERE WhoId IN :cc];
// An IN-bind with a String list
String[] ss = new String[]{'a', 'b'};
Account[] aa = [SELECT Id FROM Account
168
Working with Data in Apex
Apex Developer Guide](https://image.slidesharecdn.com/salesforceapexdeveloperguide-230916115800-b7c953cd/85/salesforce_apex_developer_guide-172-320.jpg)
![WHERE AccountNumber IN :ss];
// A SOSL query with binds in all possible clauses
String myString1 = 'aaa';
String myString2 = 'bbb';
Integer myInt3 = 11;
String myString4 = 'ccc';
Integer myInt5 = 22;
List<List<SObject>> searchList = [FIND :myString1 IN ALL FIELDS
RETURNING
Account (Id, Name WHERE Name LIKE :myString2
LIMIT :myInt3),
Contact,
Opportunity,
Lead
WITH DIVISION =:myString4
LIMIT :myInt5];
Note: Apex bind variables aren’t supported for the units parameter in the DISTANCE function. This query doesn’t work.
String units = 'mi';
List<Account> accountList =
[SELECT ID, Name, BillingLatitude, BillingLongitude
FROM Account
WHERE DISTANCE(My_Location_Field__c, GEOLOCATION(10,10), :units) < 10];
Querying All Records with a SOQL Statement
SOQL statements can use the ALL ROWS keywords to query all records in an organization, including deleted records and archived
activities. For example:
System.assertEquals(2, [SELECT COUNT() FROM Contact WHERE AccountId = a.Id ALL ROWS]);
You can use ALL ROWS to query records in your organization's Recycle Bin. You cannot use the ALL ROWS keywords with the FOR
UPDATE keywords.
SOQL For Loops
SOQL for loops iterate over all of the sObject records returned by a SOQL query.
The syntax of a SOQL for loop is either:
for (variable : [soql_query]) {
code_block
}
or
for (variable_list : [soql_query]) {
code_block
}
169
Working with Data in Apex
Apex Developer Guide](https://image.slidesharecdn.com/salesforceapexdeveloperguide-230916115800-b7c953cd/85/salesforce_apex_developer_guide-173-320.jpg)
![Both variable and variable_list must be of the same type as the sObjects that are returned by the soql_query.
As in standard SOQL queries, the [soql_query] statement can refer to code expressions in their WHERE clauses using the :
syntax. For example:
String s = 'Acme';
for (Account a : [SELECT Id, Name from Account
where Name LIKE :(s+'%')]) {
// Your code
}
The following example combines creating a list from a SOQL query, with the DML update method.
// Create a list of account records from a SOQL query
List<Account> accs = [SELECT Id, Name FROM Account WHERE Name = 'Siebel'];
// Loop through the list and update the Name field
for(Account a : accs){
a.Name = 'Oracle';
}
// Update the database
update accs;
SOQL For Loops Versus Standard SOQL Queries
SOQL for loops differ from standard SOQL statements because of the method they use to retrieve sObjects. While the standard queries
discussed in SOQL and SOSL Queries can retrieve either the count of a query or a number of object records, SOQL for loops retrieve
all sObjects, using efficient chunking with calls to the query and queryMore methods of SOAP API. Developers can avoid the limit
on heap size by using a SOQL for loop to process query results that return multiple records. However, this approach can result in more
CPU cycles being used. See Total heap size.
Queries including an aggregate function don't support queryMore. A run-time exception occurs if you use a query containing an
aggregate function that returns more than 2,000 rows in a for loop.
SOQL For Loop Formats
SOQL for loops can process records one at a time using a single sObject variable, or in batches of 200 sObjects at a time using an
sObject list:
• The single sObject format executes the for loop's <code_block> one time per sObject record. Consequently, it’s easy to
understand and use, but is grossly inefficient if you want to use data manipulation language (DML) statements within the for loop
body. Each DML statement ends up processing only one sObject at a time.
• The sObject list format executes the for loop's <code_block> one time per list of 200 sObjects. Consequently, it’s a little more
difficult to understand and use, but is the optimal choice if you must use DML statements within the for loop body. Each DML
statement can bulk process a list of sObjects at a time.
For example, the following code illustrates the difference between the two types of SOQL query for loops:
// Create a savepoint because the data should not be committed to the database
Savepoint sp = Database.setSavepoint();
insert new Account[]{new Account(Name = 'yyy'),
new Account(Name = 'yyy'),
new Account(Name = 'yyy')};
170
Working with Data in Apex
Apex Developer Guide](https://image.slidesharecdn.com/salesforceapexdeveloperguide-230916115800-b7c953cd/85/salesforce_apex_developer_guide-174-320.jpg)
![// The single sObject format executes the for loop once per returned record
Integer i = 0;
for (Account tmp : [SELECT Id FROM Account WHERE Name = 'yyy']) {
i++;
}
System.assert(i == 3); // Since there were three accounts named 'yyy' in the
// database, the loop executed three times
// The sObject list format executes the for loop once per returned batch
// of records
i = 0;
Integer j;
for (Account[] tmp : [SELECT Id FROM Account WHERE Name = 'yyy']) {
j = tmp.size();
i++;
}
System.assert(j == 3); // The lt should have contained the three accounts
// named 'yyy'
System.assert(i == 1); // Since a single batch can hold up to 200 records and,
// only three records should have been returned, the
// loop should have executed only once
// Revert the database to the original state
Database.rollback(sp);
Note:
• The break and continue keywords can be used in both types of inline query for loop formats. When using the sObject
list format, continue skips to the next list of sObjects.
• DML statements can only process up to 10,000 records at a time, and sObject list for loops process records in batches of
200. Consequently, if you’re inserting, updating, or deleting more than one record per returned record in an sObject list for
loop, it’s possible to encounter runtime limit’s errors. See Execution Governors and Limits.
• You may get a QueryException in a SOQL for loop with the message Aggregate query has too many
rows for direct assignment, use FOR loop. This exception is sometimes thrown when accessing a large
set of child records (200 or more) of a retrieved sObject inside the loop, or when getting the size of such a record set. For
example, the query in the following SOQL for loop retrieves child contacts for a particular account. If this account contains
more than 200 child contacts, the statements in the for loop cause an exception.
for (Account acct : [SELECT Id, Name, (SELECT Id, Name FROM Contacts)
FROM Account WHERE Id IN ('<ID value>')]) {
List<Contact> contactList = acct.Contacts; // Causes an error
Integer count = acct.Contacts.size(); // Causes an error
}
To avoid getting this exception, use a for loop to iterate over the child records, as follows.
for (Account acct : [SELECT Id, Name, (SELECT Id, Name FROM Contacts)
FROM Account WHERE Id IN ('<ID value>')]) {
Integer count=0;
for (Contact c : acct.Contacts) {
count++;
}
}
171
Working with Data in Apex
Apex Developer Guide](https://image.slidesharecdn.com/salesforceapexdeveloperguide-230916115800-b7c953cd/85/salesforce_apex_developer_guide-175-320.jpg)
![sObject Collections
You can manage sObjects in lists, sets, and maps.
IN THIS SECTION:
Lists of sObjects
Lists can contain sObjects among other types of elements. Lists of sObjects can be used for bulk processing of data.
Sorting Lists of sObjects
Using the List.sort method, you can sort lists of sObjects.
Expanding sObject and List Expressions
Sets of Objects
Sets can contain sObjects among other types of elements.
Maps of sObjects
Map keys and values can be of any data type, including sObject types, such as Account.
Lists of sObjects
Lists can contain sObjects among other types of elements. Lists of sObjects can be used for bulk processing of data.
You can use a list to store sObjects. Lists are useful when working with SOQL queries. SOQL queries return sObject data and this data
can be stored in a list of sObjects. Also, you can use lists to perform bulk operations, such as inserting a list of sObjects with one call.
To declare a list of sObjects, use the List keyword followed by the sObject type within <> characters. For example:
// Create an empty list of Accounts
List<Account> myList = new List<Account>();
Auto-populating a List from a SOQL Query
You can assign a List variable directly to the results of a SOQL query. The SOQL query returns a new list populated with the records
returned. Make sure that the declared List variable contains the same sObject that is being queried. Or you can use the generic sObject
data type.
This example shows how to declare and assign a list of accounts to the return value of a SOQL query. The query returns up to 1,000
returns account records containing the Id and Name fields.
// Create a list of account records from a SOQL query
List<Account> accts = [SELECT Id, Name FROM Account LIMIT 1000];
Adding and Retrieving List Elements
As with lists of primitive data types, you can access and set elements of sObject lists using the List methods provided by Apex. For
example:
List<Account> myList = new List<Account>(); // Define a new list
Account a = new Account(Name='Acme'); // Create the account first
myList.add(a); // Add the account sObject
Account a2 = myList.get(0); // Retrieve the element at index 0
172
Working with Data in Apex
Apex Developer Guide](https://image.slidesharecdn.com/salesforceapexdeveloperguide-230916115800-b7c953cd/85/salesforce_apex_developer_guide-176-320.jpg)
![Bulk Processing
You can bulk-process a list of sObjects by passing a list to the DML operation. This example shows how you can insert a list of accounts.
// Define the list
List<Account> acctList = new List<Account>();
// Create account sObjects
Account a1 = new Account(Name='Account1');
Account a2 = new Account(Name='Account2');
// Add accounts to the list
acctList.add(a1);
acctList.add(a2);
// Bulk insert the list
insert acctList;
Note: If you perform a bulk insert of Knowledge article versions, make the ownerId of all records the same.
Record ID Generation
Apex automatically generates IDs for each object in an sObject list that was inserted or upserted using DML. Therefore, a list that contains
more than one instance of an sObject cannot be inserted or upserted even if it has a null ID. This situation would imply that two IDs
would need to be written to the same structure in memory, which is illegal.
For example, the insert statement in the following block of code generates a ListException because it tries to insert a list
with two references to the same sObject (a):
try {
// Create a list with two references to the same sObject element
Account a = new Account();
List<Account> accs = new List<Account>{a, a};
// Attempt to insert it...
insert accs;
// Will not get here
System.assert(false);
} catch (ListException e) {
// But will get here
}
Using Array Notation for One-Dimensional Lists of sObjects
Alternatively, you can use the array notation (square brackets) to declare and reference lists of sObjects.
This example declares a list of accounts using the array notation.
Account[] accts = new Account[1];
This example adds an element to the list using square brackets.
accts[0] = new Account(Name='Acme2');
These examples also use the array notation with sObject lists.
173
Working with Data in Apex
Apex Developer Guide](https://image.slidesharecdn.com/salesforceapexdeveloperguide-230916115800-b7c953cd/85/salesforce_apex_developer_guide-177-320.jpg)
![Description
Example
Defines an Account list with no elements.
List<Account> accts = new Account[]{};
Defines an Account list with memory allocated for three Accounts:
a new Account object in the first position, null in the second,
and another new Account object in the third.
List<Account> accts = new Account[]
{new Account(), null, new
Account()};
Defines the Contact list with a new list.
List<Contact> contacts = new List<Contact>
(otherList);
Sorting Lists of sObjects
Using the List.sort method, you can sort lists of sObjects.
ForsObjects,sortingisinascendingorderandusesasequenceofcomparisonstepsoutlinedinthenextsection.Youcancreateacustom
sort order for sObjects by wrapping your sObject in an Apex class that implements the Comparable interface. You can also create a
custom sort order by passing a class that implements Comparator as a parameter to the sort method. See Custom Sort Order of
sObjects.
Default Sort Order of sObjects
The List.sort method sorts sObjects in ascending order and compares sObjects using an ordered sequence of steps that specify
the labels or fields used. The comparison starts with the first step in the sequence and ends when two sObjects are sorted using specified
labels or fields. The following is the comparison sequence used:
1. The label of the sObject type.
For example, an Account sObject appears before a Contact.
2. The Name field, if applicable.
For example, if the list contains two accounts named Alpha and Beta, account Alpha comes before account Beta.
3. Standard fields, starting with the fields that come first in alphabetical order, except for the Id and Name fields.
For example, if two accounts have the same name, the first standard field used for sorting is AccountNumber.
4. Custom fields, starting with the fields that come first in alphabetical order.
For example, suppose two accounts have the same name and identical standard fields, and there are two custom fields, FieldA and
FieldB, the value of FieldA is used first for sorting.
Not all steps in this sequence are necessarily carried out. For example, a list containing two sObjects of the same type and with unique
Name values is sorted based on the Name field and sorting stops at step 2. Otherwise, if the names are identical or the sObject doesn’t
have a Name field, sorting proceeds to step 3 to sort by standard fields.
For text fields, the sort algorithm uses the Unicode sort order. Also, empty fields precede non-empty fields in the sort order.
174
Working with Data in Apex
Apex Developer Guide](https://image.slidesharecdn.com/salesforceapexdeveloperguide-230916115800-b7c953cd/85/salesforce_apex_developer_guide-178-320.jpg)
![Here’s an example of sorting a list of Account sObjects. This example shows how the Name field is used to place the Acme account
ahead of the two sForce accounts in the list. Since there are two accounts named sForce, the Industry field is used to sort these remaining
accounts because the Industry field comes before the Site field in alphabetical order.
Account[] acctList = new List<Account>();
acctList.add( new Account(
Name='sForce',
Industry='Biotechnology',
Site='Austin'));
acctList.add(new Account(
Name='sForce',
Industry='Agriculture',
Site='New York'));
acctList.add(new Account(
Name='Acme'));
System.debug(acctList);
acctList.sort();
Assert.areEqual('Acme', acctList[0].Name);
Assert.areEqual('sForce', acctList[1].Name);
Assert.areEqual('Agriculture', acctList[1].Industry);
Assert.areEqual('sForce', acctList[2].Name);
Assert.areEqual('Biotechnology', acctList[2].Industry);
System.debug(acctList);
This example is similar to the previous one, except that it uses the Merchandise__c custom object. This example shows how the Name
field is used to place the Notebooks merchandise ahead of Pens in the list. Because there are two merchandise sObjects with the Name
field value of Pens, the Description field is used to sort these remaining merchandise items. The Description field is used for sorting
because it comes before the Price and Total_Inventory fields in alphabetical order.
Merchandise__c[] merchList = new List<Merchandise__c>();
merchList.add( new Merchandise__c(
Name='Pens',
Description__c='Red pens',
Price__c=2,
Total_Inventory__c=1000));
merchList.add( new Merchandise__c(
Name='Notebooks',
Description__c='Cool notebooks',
Price__c=3.50,
Total_Inventory__c=2000));
merchList.add( new Merchandise__c(
Name='Pens',
Description__c='Blue pens',
Price__c=1.75,
Total_Inventory__c=800));
System.debug(merchList);
merchList.sort();
Assert.areEqual('Notebooks', merchList[0].Name);
Assert.areEqual('Pens', merchList[1].Name);
Assert.areEqual('Blue pens', merchList[1].Description__c);
Assert.areEqual('Pens', merchList[2].Name);
Assert.areEqual('Red pens', merchList[2].Description__c);
System.debug(merchList);
175
Working with Data in Apex
Apex Developer Guide](https://image.slidesharecdn.com/salesforceapexdeveloperguide-230916115800-b7c953cd/85/salesforce_apex_developer_guide-179-320.jpg)
![StageName='Prospecting',
Amount=50000));
oppyList.add( new Opportunity(
Name='United Oil Installations',
CloseDate=closeDate,
StageName='Needs Analysis',
Amount=100000));
oppyList.add( new Opportunity(
Name='Grand Hotels SLA',
CloseDate=closeDate,
StageName='Prospecting',
Amount=25000));
oppyList.add(null);
// Sort the objects using the Comparator implementation
oppyList.sort(new OpportunityComparator());
// Verify the sort order
Assert.isNull(oppyList[0]);
Assert.areEqual('Grand Hotels SLA', oppyList[1].Name);
Assert.areEqual(25000, oppyList[1].Amount);
Assert.areEqual('Edge Installation', oppyList[2].Name);
Assert.areEqual(50000, oppyList[2].Amount);
Assert.areEqual('United Oil Installations', oppyList[3].Name);
Assert.areEqual(100000, oppyList[3].Amount);
// Write the sorted list contents to the debug log.
System.debug(oppyList);
}
}
Example: This example shows how to create a wrapper Comparable class for Opportunity. The implementation of the
compareTo methodinthisclasscomparestwoopportunitiesbasedontheAmountfield—theclassmembervariablecontained
in this instance, and the opportunity object passed into the method.
public class OpportunityWrapper implements Comparable {
public Opportunity oppy;
// Constructor
public OpportunityWrapper(Opportunity op) {
// Guard against wrapping a null
if(op == null) {
Exception ex = new NullPointerException();
ex.setMessage('Opportunity argument cannot be null');
throw ex;
}
oppy = op;
}
// Compare opportunities based on the opportunity amount.
public Integer compareTo(Object compareTo) {
// Cast argument to OpportunityWrapper
OpportunityWrapper compareToOppy = (OpportunityWrapper)compareTo;
// The return value of 0 indicates that both elements are equal.
177
Working with Data in Apex
Apex Developer Guide](https://image.slidesharecdn.com/salesforceapexdeveloperguide-230916115800-b7c953cd/85/salesforce_apex_developer_guide-181-320.jpg)
![Integer returnValue = 0;
if ((oppy.Amount == null) && (compareToOppy.oppy.Amount == null)) {
// both wrappers have null Amounts
returnValue = 0;
} else if ((oppy.Amount == null) && (compareToOppy.oppy.Amount != null)){
// nulls-first implementation
returnValue = -1;
} else if ((oppy.Amount != null) && (compareToOppy.oppy.Amount == null)){
// nulls-first implementation
returnValue = 1;
} else if (oppy.Amount > compareToOppy.oppy.Amount) {
// Set return value to a positive value.
returnValue = 1;
} else if (oppy.Amount < compareToOppy.oppy.Amount) {
// Set return value to a negative value.
returnValue = -1;
}
return returnValue;
}
}
Thistestsortsalistof OpportunityWrapper objectsandverifiesthatthelistelementsaresortedbytheopportunityamount.
@isTest
private class OpportunityWrapperTest {
static testmethod void test1() {
// Add the opportunity wrapper objects to a list.
OpportunityWrapper[] oppyList = new List<OpportunityWrapper>();
Date closeDate = Date.today().addDays(10);
oppyList.add( new OpportunityWrapper(new Opportunity(
Name='Edge Installation',
CloseDate=closeDate,
StageName='Prospecting',
Amount=50000)));
oppyList.add( new OpportunityWrapper(new Opportunity(
Name='United Oil Installations',
CloseDate=closeDate,
StageName='Needs Analysis',
Amount=100000)));
oppyList.add( new OpportunityWrapper(new Opportunity(
Name='Grand Hotels SLA',
CloseDate=closeDate,
StageName='Prospecting',
Amount=25000)));
// Sort the wrapper objects using the implementation of the
// compareTo method.
oppyList.sort();
// Verify the sort order
Assert.areEqual('Grand Hotels SLA', oppyList[0].oppy.Name);
Assert.areEqual(25000, oppyList[0].oppy.Amount);
Assert.areEqual('Edge Installation', oppyList[1].oppy.Name);
Assert.areEqual(50000, oppyList[1].oppy.Amount);
Assert.areEqual('United Oil Installations', oppyList[2].oppy.Name);
178
Working with Data in Apex
Apex Developer Guide](https://image.slidesharecdn.com/salesforceapexdeveloperguide-230916115800-b7c953cd/85/salesforce_apex_developer_guide-182-320.jpg)
![Assert.areEqual(100000, oppyList[2].oppy.Amount);
// Write the sorted list contents to the debug log.
System.debug(oppyList);
}
}
SEE ALSO:
Apex Reference Guide: Collator Class
Apex Reference Guide: Comparable Interface
Apex Reference Guide: Comparator Interface
Expanding sObject and List Expressions
AsinJava,sObjectandlistexpressionscanbeexpandedwithmethodreferencesandlistexpressions,respectively,toformnewexpressions.
In the following example, a new variable containing the length of the new account name is assigned to acctNameLength.
Integer acctNameLength = new Account[]{new Account(Name='Acme')}[0].Name.length();
In the above, new Account[] generates a list.
The list is populated with one element by the new statement {new Account(name='Acme')}.
Item 0, the first item in the list, is then accessed by the next part of the string [0].
The name of the sObject in the list is accessed, followed by the method returning the length name.length().
In the following example, a name that has been shifted to lower case is returned. The SOQL statement returns a list of which the first
element (at index 0) is accessed through [0]. Next, the Name field is accessed and converted to lowercase with this expression
.Name.toLowerCase().
String nameChange = [SELECT Name FROM Account][0].Name.toLowerCase();
Sets of Objects
Sets can contain sObjects among other types of elements.
Sets contain unique elements. Uniqueness of sObjects is determined by comparing the objects’ fields. For example, if you try to add two
accounts with the same name to a set, with no other fields set, only one sObject is added to the set.
// Create two accounts, a1 and a2
Account a1 = new account(name='MyAccount');
Account a2 = new account(name='MyAccount');
// Add both accounts to the new set
Set<Account> accountSet = new Set<Account>{a1, a2};
// Verify that the set only contains one item
System.assertEquals(accountSet.size(), 1);
If you add a description to one of the accounts, it is considered unique and both accounts are added to the set.
// Create two accounts, a1 and a2, and add a description to a2
Account a1 = new account(name='MyAccount');
179
Working with Data in Apex
Apex Developer Guide](https://image.slidesharecdn.com/salesforceapexdeveloperguide-230916115800-b7c953cd/85/salesforce_apex_developer_guide-183-320.jpg)
![Account a2 = new account(name='MyAccount', description='My test account');
// Add both accounts to the new set
Set<Account> accountSet = new Set<Account>{a1, a2};
// Verify that the set contains two items
System.assertEquals(accountSet.size(), 2);
Warning: If set elements are objects, and these objects change after being added to the collection, they won’t be found anymore
when using, for example, the contains or containsAll methods, because of changed field values.
Maps of sObjects
Map keys and values can be of any data type, including sObject types, such as Account.
Maps can hold sObjects both in their keys and values. A map key represents a unique value that maps to a map value. For example, a
common key would be an ID that maps to an account (a specific sObject type). This example shows how to define a map whose keys
are of type ID and whose values are of type Account.
Map<ID, Account> m = new Map<ID, Account>();
As with primitive types, you can populate map key-value pairs when the map is declared by using curly brace ({}) syntax. Within the
curly braces, specify the key first, then specify the value for that key using =>. This example creates a map of integers to accounts lists
and adds one entry using the account list created earlier.
Account[] accs = new Account[5]; // Account[] is synonymous with List<Account>
Map<Integer, List<Account>> m4 = new Map<Integer, List<Account>>{1 => accs};
Maps allow sObjects in their keys. You must use sObjects in the keys only when the sObject field values won’t change.
Auto-Populating Map Entries from a SOQL Query
When working with SOQL queries, maps can be populated from the results returned by the SOQL query. The map key must be declared
with an ID or String data type, and the map value must be declared as an sObject data type.
This example shows how to populate a new map from a query. In the example, the SOQL query returns a list of accounts with their Id
and Name fields. The new operator uses the returned list of accounts to create a map.
// Populate map from SOQL query
Map<ID, Account> m = new Map<ID, Account>([SELECT Id, Name FROM Account LIMIT 10]);
// After populating the map, iterate through the map entries
for (ID idKey : m.keyset()) {
Account a = m.get(idKey);
System.debug(a);
}
One common usage of this map type is for in-memory “joins” between two tables.
Note: RecentlyViewed records for users who are members of several communities can’t be retrieved automatically into a map
via Apex. This is because records of a user with different networks can result in duplicate IDs that maps don’t support. For more
information, see RecentlyViewed.
180
Working with Data in Apex
Apex Developer Guide](https://image.slidesharecdn.com/salesforceapexdeveloperguide-230916115800-b7c953cd/85/salesforce_apex_developer_guide-184-320.jpg)

![Schema.SObjectType is the data type for an sObject token.
In the following example, the token for the Account sObject is returned:
Schema.sObjectType t = Account.sObjectType;
The following also returns a token for the Account sObject:
Account a = new Account();
Schema.sObjectType t = a.getSObjectType();
This example can be used to determine whether an sObject or a list of sObjects is of a particular type:
// Create a generic sObject variable s
SObject s = Database.query('SELECT Id FROM Account LIMIT 1');
// Verify if that sObject variable is an Account token
System.assertEquals(s.getSObjectType(), Account.sObjectType);
// Create a list of generic sObjects
List<sObject> sobjList = new Account[]{};
// Verify if the list of sObjects contains Account tokens
System.assertEquals(sobjList.getSObjectType(), Account.sObjectType);
Some standard sObjects have a field called sObjectType, for example, AssignmentRule, QueueSObject, and RecordType. For these
types of sObjects, always use the getSObjectType method for retrieving the token. If you use the property, for example,
RecordType.sObjectType, the field is returned.
Obtaining sObject Describe Results Using Tokens
To access the describe result for an sObject, use one of the following methods:
• Call the getDescribe method on an sObject token.
• Use the Schema sObjectType static variable with the name of the sObject. For example, Schema.sObjectType.Lead.
Schema.DescribeSObjectResult is the data type for an sObject describe result.
The following example uses the getDescribe method on an sObject token:
Schema.DescribeSObjectResult dsr = Account.sObjectType.getDescribe();
The following example uses the Schema sObjectType static member variable:
Schema.DescribeSObjectResult dsr = Schema.SObjectType.Account;
For more information about the methods available with the sObject describe result, see DescribeSObjectResultClass/>.
SEE ALSO:
DescribeSObjectResult.fields()
DescribeSObjectResult.fieldsets()
Using Field Tokens
To access the token for a field, use one of the following methods:
• Access the static member variable name of an sObject static type, for example, Account.Name.
184
Working with Data in Apex
Apex Developer Guide](https://image.slidesharecdn.com/salesforceapexdeveloperguide-230916115800-b7c953cd/85/salesforce_apex_developer_guide-188-320.jpg)
![Describing sObjects Using Schema Method
As an alternative to using tokens, you can describe sObjects by calling the describeSObjects Schema method and passing one
or more sObject type names for the sObjects you want to describe.
ThisexamplegetsdescribemetadatainformationfortwosObjecttypes—TheAccountstandardobjectandtheMerchandise__ccustom
object. After obtaining the describe result for each sObject, this example writes the returned information to the debug output, such as
the sObject label, number of fields, whether it is a custom object or not, and the number of child relationships.
// sObject types to describe
String[] types = new String[]{'Account','Merchandise__c'};
// Make the describe call
Schema.DescribeSobjectResult[] results = Schema.describeSObjects(types);
System.debug('Got describe information for ' + results.size() + ' sObjects.');
// For each returned result, get some info
for(Schema.DescribeSobjectResult res : results) {
System.debug('sObject Label: ' + res.getLabel());
System.debug('Number of fields: ' + res.fields.getMap().size());
System.debug(res.isCustom() ? 'This is a custom object.' : 'This is a standard object.');
// Get child relationships
Schema.ChildRelationship[] rels = res.getChildRelationships();
if (rels.size() > 0) {
System.debug(res.getName() + ' has ' + rels.size() + ' child relationships.');
}
}
SEE ALSO:
DescribeSObjectResult.fields()
DescribeSObjectResult.fieldsets()
Describing Tabs Using Schema Methods
You can get metadata information about the apps and their tabs available in the Salesforce user interface by executing a describe call
in Apex. Also, you can get more detailed information about each tab. Use the describeTabs Schema method and the getTabs
method in Schema.DescribeTabResult, respectively.
This example shows how to get the tab sets for each app. The example then obtains tab describe metadata information for the Sales
app. For each tab, metadata information includes the icon URL, whether the tab is custom or not, and colors among others. The tab
describe information is written to the debug output.
// Get tab set describes for each app
List<Schema.DescribeTabSetResult> tabSetDesc = Schema.describeTabs();
// Iterate through each tab set describe for each app and display the info
for(DescribeTabSetResult tsr : tabSetDesc) {
String appLabel = tsr.getLabel();
System.debug('Label: ' + appLabel);
System.debug('Logo URL: ' + tsr.getLogoUrl());
System.debug('isSelected: ' + tsr.isSelected());
String ns = tsr.getNamespace();
187
Working with Data in Apex
Apex Developer Guide](https://image.slidesharecdn.com/salesforceapexdeveloperguide-230916115800-b7c953cd/85/salesforce_apex_developer_guide-191-320.jpg)
![if (ns == '') {
System.debug('The ' + appLabel + ' app has no namespace defined.');
}
else {
System.debug('Namespace: ' + ns);
}
// Display tab info for the Sales app
if (appLabel == 'Sales') {
List<Schema.DescribeTabResult> tabDesc = tsr.getTabs();
System.debug('-- Tab information for the Sales app --');
for(Schema.DescribeTabResult tr : tabDesc) {
System.debug('getLabel: ' + tr.getLabel());
System.debug('getColors: ' + tr.getColors());
System.debug('getIconUrl: ' + tr.getIconUrl());
System.debug('getIcons: ' + tr.getIcons());
System.debug('getMiniIconUrl: ' + tr.getMiniIconUrl());
System.debug('getSobjectName: ' + tr.getSobjectName());
System.debug('getUrl: ' + tr.getUrl());
System.debug('isCustom: ' + tr.isCustom());
}
}
}
// Example debug statement output
// DEBUG|Label: Sales
// DEBUG|Logo URL:
https://MyDomainName.my.salesforce.com/img/seasonLogos/2014_winter_aloha.png
// DEBUG|isSelected: true
// DEBUG|The Sales app has no namespace defined.// DEBUG|-- Tab information for the Sales
app --
// (This is an example debug output for the Accounts tab.)
// DEBUG|getLabel: Accounts
// DEBUG|getColors:
(Schema.DescribeColorResult[getColor=236FBD;getContext=primary;getTheme=theme4;],
// Schema.DescribeColorResult[getColor=236FBD;getContext=primary;getTheme=theme3;],
// Schema.DescribeColorResult[getColor=236FBD;getContext=primary;getTheme=theme2;])
// DEBUG|getIconUrl: https://MyDomainName.my.salesforce.com/img/icon/accounts32.png
// DEBUG|getIcons:
(Schema.DescribeIconResult[getContentType=image/png;getHeight=32;getTheme=theme3;
//
getUrl=https://MyDomainName.my.salesforce.com/img/icon/accounts32.png;getWidth=32;],
// Schema.DescribeIconResult[getContentType=image/png;getHeight=16;getTheme=theme3;
//
getUrl=https://MyDomainName.my.salesforce.com/img/icon/accounts16.png;getWidth=16;])
// DEBUG|getMiniIconUrl: https://MyDomainName.my.salesforce.com/img/icon/accounts16.png
// DEBUG|getSobjectName: Account
// DEBUG|getUrl: https://MyDomainName.my.salesforce.com/001/o
// DEBUG|isCustom: false
188
Working with Data in Apex
Apex Developer Guide](https://image.slidesharecdn.com/salesforceapexdeveloperguide-230916115800-b7c953cd/85/salesforce_apex_developer_guide-192-320.jpg)
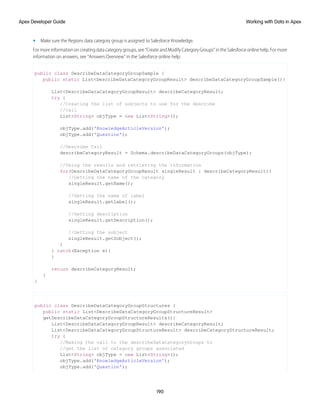
![describeCategoryResult = Schema.describeDataCategoryGroups(objType);
//Creating a list of pair objects to use as a parameter
//for the describe call
List<DataCategoryGroupSobjectTypePair> pairs =
new List<DataCategoryGroupSobjectTypePair>();
//Looping throught the first describe result to create
//the list of pairs for the second describe call
for(DescribeDataCategoryGroupResult singleResult :
describeCategoryResult){
DataCategoryGroupSobjectTypePair p =
new DataCategoryGroupSobjectTypePair();
p.setSobject(singleResult.getSobject());
p.setDataCategoryGroupName(singleResult.getName());
pairs.add(p);
}
//describeDataCategoryGroupStructures()
describeCategoryStructureResult =
Schema.describeDataCategoryGroupStructures(pairs, false);
//Getting data from the result
for(DescribeDataCategoryGroupStructureResult singleResult :
describeCategoryStructureResult){
//Get name of the associated Sobject
singleResult.getSobject();
//Get the name of the data category group
singleResult.getName();
//Get the name of the data category group
singleResult.getLabel();
//Get the description of the data category group
singleResult.getDescription();
//Get the top level categories
DataCategory [] toplevelCategories =
singleResult.getTopCategories();
//Recursively get all the categories
List<DataCategory> allCategories =
getAllCategories(toplevelCategories);
for(DataCategory category : allCategories) {
//Get the name of the category
category.getName();
//Get the label of the category
category.getLabel();
//Get the list of sub categories in the category
DataCategory [] childCategories =
191
Working with Data in Apex
Apex Developer Guide](https://image.slidesharecdn.com/salesforceapexdeveloperguide-230916115800-b7c953cd/85/salesforce_apex_developer_guide-195-320.jpg)
![category.getChildCategories();
}
}
} catch (Exception e){
}
return describeCategoryStructureResult;
}
private static DataCategory[] getAllCategories(DataCategory [] categories){
if(categories.isEmpty()){
return new DataCategory[]{};
} else {
DataCategory [] categoriesClone = categories.clone();
DataCategory category = categoriesClone[0];
DataCategory[] allCategories = new DataCategory[]{category};
categoriesClone.remove(0);
categoriesClone.addAll(category.getChildCategories());
allCategories.addAll(getAllCategories(categoriesClone));
return allCategories;
}
}
}
Testing Access to All Data Categories Associated with an sObject
The following example tests the describeDataCategoryGroupSample method shown earlier. It ensures that the returned
category group and associated objects are correct.
@isTest
private class DescribeDataCategoryGroupSampleTest {
public static testMethod void describeDataCategoryGroupSampleTest(){
List<DescribeDataCategoryGroupResult>describeResult =
DescribeDataCategoryGroupSample.describeDataCategoryGroupSample();
//Assuming that you have KnowledgeArticleVersion and Questions
//associated with only one category group 'Regions'.
System.assert(describeResult.size() == 2,
'The results should only contain two results: ' + describeResult.size());
for(DescribeDataCategoryGroupResult result : describeResult) {
//Storing the results
String name = result.getName();
String label = result.getLabel();
String description = result.getDescription();
String objectNames = result.getSobject();
//asserting the values to make sure
System.assert(name == 'Regions',
'Incorrect name was returned: ' + name);
System.assert(label == 'Regions of the World',
'Incorrect label was returned: ' + label);
System.assert(description == 'This is the category group for all the regions',
'Incorrect description was returned: ' + description);
192
Working with Data in Apex
Apex Developer Guide](https://image.slidesharecdn.com/salesforceapexdeveloperguide-230916115800-b7c953cd/85/salesforce_apex_developer_guide-196-320.jpg)
![System.assert(objectNames.contains('KnowledgeArticleVersion')
|| objectNames.contains('Question'),
'Incorrect sObject was returned: ' + objectNames);
}
}
}
This example tests the describeDataCategoryGroupStructures method. It ensures that the returned category group,
categories and associated objects are correct.
@isTest
private class DescribeDataCategoryGroupStructuresTest {
public static testMethod void getDescribeDataCategoryGroupStructureResultsTest(){
List<Schema.DescribeDataCategoryGroupStructureResult> describeResult =
DescribeDataCategoryGroupStructures.getDescribeDataCategoryGroupStructureResults();
System.assert(describeResult.size() == 2,
'The results should only contain 2 results: ' + describeResult.size());
//Creating category info
CategoryInfo world = new CategoryInfo('World', 'World');
CategoryInfo asia = new CategoryInfo('Asia', 'Asia');
CategoryInfo northAmerica = new CategoryInfo('NorthAmerica',
'North America');
CategoryInfo southAmerica = new CategoryInfo('SouthAmerica',
'South America');
CategoryInfo europe = new CategoryInfo('Europe', 'Europe');
List<CategoryInfo> info = new CategoryInfo[] {
asia, northAmerica, southAmerica, europe
};
for (Schema.DescribeDataCategoryGroupStructureResult result : describeResult) {
String name = result.getName();
String label = result.getLabel();
String description = result.getDescription();
String objectNames = result.getSobject();
//asserting the values to make sure
System.assert(name == 'Regions',
'Incorrect name was returned: ' + name);
System.assert(label == 'Regions of the World',
'Incorrect label was returned: ' + label);
System.assert(description == 'This is the category group for all the regions',
'Incorrect description was returned: ' + description);
System.assert(objectNames.contains('KnowledgeArticleVersion')
|| objectNames.contains('Question'),
'Incorrect sObject was returned: ' + objectNames);
DataCategory [] topLevelCategories = result.getTopCategories();
System.assert(topLevelCategories.size() == 1,
'Incorrect number of top level categories returned: ' + topLevelCategories.size());
System.assert(topLevelCategories[0].getLabel() == world.getLabel() &&
193
Working with Data in Apex
Apex Developer Guide](https://image.slidesharecdn.com/salesforceapexdeveloperguide-230916115800-b7c953cd/85/salesforce_apex_developer_guide-197-320.jpg)
![topLevelCategories[0].getName() == world.getName());
//checking if the correct children are returned
DataCategory [] children = topLevelCategories[0].getChildCategories();
System.assert(children.size() == 4,
'Incorrect number of children returned: ' + children.size());
for(Integer i=0; i < children.size(); i++){
System.assert(children[i].getLabel() == info[i].getLabel() &&
children[i].getName() == info[i].getName());
}
}
}
private class CategoryInfo {
private final String name;
private final String label;
private CategoryInfo(String n, String l){
this.name = n;
this.label = l;
}
public String getName(){
return this.name;
}
public String getLabel(){
return this.label;
}
}
}
Dynamic SOQL
Dynamic SOQL refers to the creation of a SOQL string at run time with Apex code. Dynamic SOQL enables you to create more flexible
applications. For example, you can create a search based on input from an end user or update records with varying field names.
To create a dynamic SOQL query at run time, use the Database.query or Database.queryWithBinds methods, in one
of the following ways.
• Return a single sObject when the query returns a single record:
sObject s = Database.query(string);
• Return a list of sObjects when the query returns more than a single record:
List<sObject> sobjList = Database.query(string);
• Return a list of sObjects using a map of bind variables:
List<sObject> sobjList = Database.queryWithBinds(string, bindVariablesMap, accessLevel);
194
Working with Data in Apex
Apex Developer Guide](https://image.slidesharecdn.com/salesforceapexdeveloperguide-230916115800-b7c953cd/85/salesforce_apex_developer_guide-198-320.jpg)
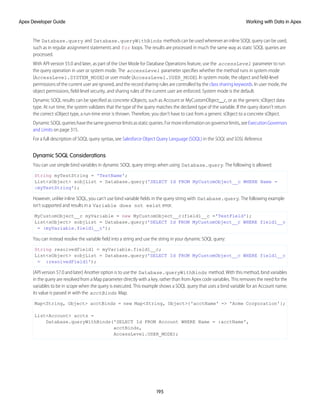
![To use the SOSL WITH SNIPPET clause in a dynamic SOSL query at run time, use the Search.find method.
Search.SearchResults searchResults = Search.find(SOSL_search_string);
This example exercises a simple SOSL query string that includes a WITH SNIPPET clause. The example calls System.debug()
to print the returned titles and snippets. Your code would display the titles and snippets in a Web page.
Search.SearchResults searchResults = Search.find('FIND 'test' IN ALL FIELDS RETURNING
KnowledgeArticleVersion(id, title WHERE PublishStatus = 'Online' AND Language = 'en_US')
WITH SNIPPET (target_length=120)');
List<Search.SearchResult> articlelist = searchResults.get('KnowledgeArticleVersion');
for (Search.SearchResult searchResult : articleList) {
KnowledgeArticleVersion article = (KnowledgeArticleVersion) searchResult.getSObject();
System.debug(article.Title);
System.debug(searchResult.getSnippet());
}
SOSL Injection
SOSL injection is a technique by which a user causes your application to execute database methods you did not intend by passing SOSL
statements into your code. A SOSL injection can occur in Apex code whenever your application relies on end-user input to construct a
dynamic SOSL statement and you do not handle the input properly.
TopreventSOSLinjection,usethe escapeSingleQuotes method.Thismethodaddstheescapecharacter()toallsinglequotation
marks in a string that is passed in from a user. The method ensures that all single quotation marks are treated as enclosing strings, instead
of database commands.
Dynamic DML
In addition to querying describe information and building SOQL queries at runtime, you can also create sObjects dynamically, and insert
them into the database using DML.
To create a new sObject of a given type, use the newSObject method on an sObject token. Note that the token must be cast into a
concrete sObject type (such as Account). For example:
// Get a new account
Account a = new Account();
// Get the token for the account
Schema.sObjectType tokenA = a.getSObjectType();
// The following produces an error because the token is a generic sObject, not an Account
// Account b = tokenA.newSObject();
// The following works because the token is cast back into an Account
Account b = (Account)tokenA.newSObject();
Though the sObject token tokenA is a token of Account, it is considered an sObject because it is accessed separately. It must be cast
back into the concrete sObject type Account to use the newSObject method. For more information on casting, see Classes and
Casting on page 108.
You can also specify an ID with newSObject to create an sObject that references an existing record that you can update later. For
example:
SObject s = Database.query('SELECT Id FROM account LIMIT 1')[0].getSObjectType().
newSObject([SELECT Id FROM Account LIMIT 1][0].Id);
197
Working with Data in Apex
Apex Developer Guide](https://image.slidesharecdn.com/salesforceapexdeveloperguide-230916115800-b7c953cd/85/salesforce_apex_developer_guide-201-320.jpg)
![See SObjectType Class.
Dynamic sObject Creation Example
This example shows how to obtain the sObject token through the Schema.getGlobalDescribe method and then creates a
newsObjectusingthe newSObject methodonthetoken.Thisexamplealsocontainsatestmethodthatverifiesthedynamiccreation
of an account.
public class DynamicSObjectCreation {
public static sObject createObject(String typeName) {
Schema.SObjectType targetType = Schema.getGlobalDescribe().get(typeName);
if (targetType == null) {
// throw an exception
}
// Instantiate an sObject with the type passed in as an argument
// at run time.
return targetType.newSObject();
}
}
@isTest
private class DynamicSObjectCreationTest {
static testmethod void testObjectCreation() {
String typeName = 'Account';
String acctName = 'Acme';
// Create a new sObject by passing the sObject type as an argument.
Account a = (Account)DynamicSObjectCreation.createObject(typeName);
System.assertEquals(typeName, String.valueOf(a.getSobjectType()));
// Set the account name and insert the account.
a.Name = acctName;
insert a;
// Verify the new sObject got inserted.
Account[] b = [SELECT Name from Account WHERE Name = :acctName];
system.assert(b.size() > 0);
}
}
Setting and Retrieving Field Values
Use the get and put methods on an object to set or retrieve values for fields using either the API name of the field expressed as a
String, or the field's token. In the following example, the API name of the field AccountNumber is used:
SObject s = [SELECT AccountNumber FROM Account LIMIT 1];
Object o = s.get('AccountNumber');
s.put('AccountNumber', 'abc');
The following example uses the AccountNumber field's token instead:
Schema.DescribeFieldResult dfr = Schema.sObjectType.Account.fields.AccountNumber;
Sobject s = Database.query('SELECT AccountNumber FROM Account LIMIT 1');
s.put(dfr.getsObjectField(), '12345');
198
Working with Data in Apex
Apex Developer Guide](https://image.slidesharecdn.com/salesforceapexdeveloperguide-230916115800-b7c953cd/85/salesforce_apex_developer_guide-202-320.jpg)
![The Object scalar data type can be used as a generic data type to set or retrieve field values on an sObject. This is equivalent to the
anyType field type. Note that the Object data type is different from the sObject data type, which can be used as a generic type for any
sObject.
Note: Apex classes and triggers saved (compiled) using API version 15.0 and higher produce a runtime error if you assign a String
value that is too long for the field.
Setting and Retrieving Foreign Keys
Apex supports populating foreign keys by name (or external ID) in the same way as the API. To set or retrieve the scalar ID value of a
foreign key, use the get or put methods.
To set or retrieve the record associated with a foreign key, use the getSObject and putSObject methods. Note that these
methods must be used with the sObject data type, not Object. For example:
SObject c =
Database.query('SELECT Id, FirstName, AccountId, Account.Name FROM Contact LIMIT 1');
SObject a = c.getSObject('Account');
There is no need to specify the external ID for a parent sObject value while working with child sObjects. If you provide an ID in the parent
sObject, it is ignored by the DML operation. Apex assumes the foreign key is populated through a relationship SOQL query, which always
returns a parent object with a populated ID. If you have an ID, use it with the child object.
For example, suppose that custom object C1 has a foreign key C2__c that links to a parent custom object C2. You want to create a C1
object and have it associated with a C2 record named 'AW Computing' (assigned to the value C2__r). You do not need the ID of the
'AW Computing' record, as it is populated through the relationship of parent to child. For example:
insert new C1__c(Name = 'x', C2__r = new C2__c(Name = 'AW Computing'));
If you had assigned a value to the ID for C2__r, it would be ignored. If you do have the ID, assign it to the object (C2__c), not the
record.
You can also access foreign keys using dynamic Apex. The following example shows how to get the values from a subquery in a
parent-to-child relationship using dynamic Apex:
String queryString = 'SELECT Id, Name, ' +
'(SELECT FirstName, LastName FROM Contacts LIMIT 1) FROM Account';
SObject[] queryParentObject = Database.query(queryString);
for (SObject parentRecord : queryParentObject){
Object ParentFieldValue = parentRecord.get('Name');
// Prevent a null relationship from being accessed
SObject[] childRecordsFromParent = parentRecord.getSObjects('Contacts');
if (childRecordsFromParent != null) {
for (SObject childRecord : childRecordsFromParent){
Object ChildFieldValue1 = childRecord.get('FirstName');
Object ChildFieldValue2 = childRecord.get('LastName');
System.debug('Account Name: ' + ParentFieldValue +
'. Contact Name: '+ ChildFieldValue1 + ' ' + ChildFieldValue2);
}
}
}
199
Working with Data in Apex
Apex Developer Guide](https://image.slidesharecdn.com/salesforceapexdeveloperguide-230916115800-b7c953cd/85/salesforce_apex_developer_guide-203-320.jpg)
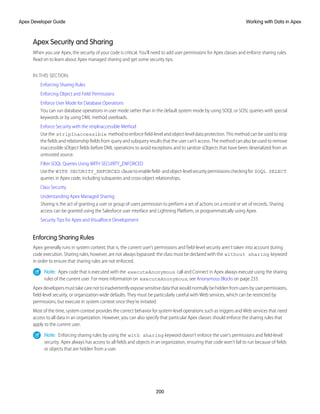
![Thisexamplehastwoclasses,thefirstclass(CWith)enforcessharingruleswhilethesecondclass(CWithout)doesn’t.The CWithout
class calls a method from the first, which runs with sharing rules enforced. The CWithout class contains an inner class, in which code
executes under the same sharing context as the caller. It also contains a class that extends it, which inherits its without sharing setting.
public with sharing class CWith {
// All code in this class operates with enforced sharing rules.
Account a = [SELECT . . . ];
public static void m() { . . . }
static {
. . .
}
{
. . .
}
public void c() {
. . .
}
}
public without sharing class CWithout {
// All code in this class ignores sharing rules and operates
// as if the context user has the Modify All Data permission.
Account a = [SELECT . . . ];
. . .
public static void m() {
. . .
// This call into CWith operates with enforced sharing rules
// for the context user. When the call finishes, the code execution
// returns to without sharing mode.
CWith.m();
}
public class CInner {
// All code in this class executes with the same sharing context
// as the code that calls it.
// Inner classes are separate from outer classes.
. . .
// Again, this call into CWith operates with enforced sharing rules
// for the context user, regardless of the class that initially called this inner
class.
// When the call finishes, the code execution returns to the sharing mode that was
used to call this inner class.
CWith.m();
}
public class CInnerWithOut extends CWithout {
201
Working with Data in Apex
Apex Developer Guide](https://image.slidesharecdn.com/salesforceapexdeveloperguide-230916115800-b7c953cd/85/salesforce_apex_developer_guide-205-320.jpg)
![To check the field-level read permission of the contact's email field before querying for this field:
if (Schema.sObjectType.Contact.fields.Email.isAccessible()) {
Contact c = [SELECT Email FROM Contact WHERE Id= :Id];
}
To check the object-level permission for the contact before deleting the contact:
if (Schema.sObjectType.Contact.isDeletable()) {
// Delete contact
}
Sharing rules are distinct from object-level and field-level permissions. They can coexist. If sharing rules are defined in Salesforce, you
can enforce them at the class level by declaring the class with the with sharing keyword. For more information, see Using the
with sharing, without sharing, and inherited sharing Keywords. If you call the sObject describe result and field describe result access
control methods, the verification of object and field-level permissions is performed in addition to the sharing rules that are in effect.
Sometimes, the access level granted by a sharing rule could conflict with an object-level or field-level permission.
Considerations
• Orgs with Experience Cloud sites enabled provide various settings to hide a user's personal information from other users (see Hide
Personal Information from External Users and Share Personal Contact Information Within Experience Cloud Sites). These settings
aren’t enforced in Apex, even with security features such as the WITH SECURITY_ENFORCED clause or the
stripInaccessible method. To hide specific fields on the User object in Apex, follow the example code outlined in Comply
with a User’s Personal Information Visibility Settings.
• Automated Process users can’t perform Object and FLS checks in custom code unless appropriate permission sets are explicitly
applied to those users.
Enforce User Mode for Database Operations
You can run database operations in user mode rather than in the default system mode by using SOQL or SOSL queries with special
keywords or by using DML method overloads.
Apex code runs in system mode by default, which means that it runs with substantially elevated permissions over the user running the
code. To enhance the security context of Apex, you can specify user-mode access for database operations. Field-level security (FLS) and
object permissions of the running user are respected in user mode, unlike in system mode. User mode always applies sharing rules, but
in system mode they’re controlled by sharing keywords on the class. See Using the with sharing, without sharing, and inherited sharing
Keywords.
You can indicate the mode of the operation by using WITH USER_MODE or WITH SYSTEM_MODE in your SOQL or SOSL query.
This example specifies user mode in SOQL.
List<Account> acc = [SELECT Id FROM Account WITH USER_MODE];
Note: This feature is available in scratch orgs where the ApexUserModeWithPermset feature is enabled. If the feature
isn’t enabled, Apex code with this feature can be compiled but not executed.
Salesforce recommends that you enforce Field Level Security (FLS) by using WITH USER_MODE rather than WITH
SECURITY-ENFORCED because of these additional advantages.
• WITH USER_MODE accounts for polymorphic fields like Owner and Task.whatId.
• WITH USER_MODE processes all clauses in the SOQL SELECT statement including the WHERE clause.
203
Working with Data in Apex
Apex Developer Guide](https://image.slidesharecdn.com/salesforceapexdeveloperguide-230916115800-b7c953cd/85/salesforce_apex_developer_guide-207-320.jpg)
![• WITH USER_MODE finds all FLS errors in your SOQL query, while WITH SECURITY ENFORCED finds only the first error.
Further, in user mode, you can use the getInaccessibleFields() method on QueryException to examine the full set of
access errors.
Database operations can specify either user or system mode. This example inserts a new account in user mode.
Account acc = new Account(Name='test');
insert as user acc;
The AccessLevel class represents the two modes in which Apex runs database operations. Use this class to define the execution
mode as user mode or system mode. An optional accessLevel parameter in Database and Search methods specifies whether the
methodrunsinsystemmode(AccessLevel.SYSTEM_MODE)orusermode(AccessLevel.USER_MODE).Usetheseoverloaded
methods to perform DML and query operations.
• Database.query method. See Dynamic SOQL.
• Database.getQueryLocator methods
• Database.countQuery method
• Search.query method
• Database DML methods (insert, update, upsert, merge, delete, undelete, and convertLead)
– Includes the *Immediate and *Async methods, such as insertImmediate and deleteAsync.
Note: When Database DML methods are run with AccessLevel.USER_MODE, you can access errors via
SaveResult.getErrors().getFields(). With insert as user, you can use the DMLException method
getFieldNames() to obtain the fields with FLS errors.
These methods require the accessLevel parameter.
• Database.queryWithBinds
• Database.getQueryLocatorWithBinds
• Database.countQueryWithBinds
Using Permission Sets to Enforce Security in DML and Search Operations (Developer Preview)
In Developer Preview, you can specify a permission set that is used to augment the field-level and object-level security for database and
search operations. Run the AccessLevel.withPermissionSetId() method with a specified permission set ID. Specific user
modeDMLoperationsthatareperformedwiththat AccessLevel,respectthepermissionsinthespecifiedpermissionset,inaddition
to the running user’s permissions.
This example runs the AccessLevel.withPermissionSetId() method with the specified permission set and inserts a
custom object.
@isTest
public with sharing class ElevateUserModeOperations_Test {
@isTest
static void objectCreatePermViaPermissionSet() {
Profile p = [SELECT Id FROM Profile WHERE Name='Minimum Access - Salesforce'];
User u = new User(Alias = 'standt', Email='standarduser@testorg.com',
EmailEncodingKey='UTF-8', LastName='Testing', LanguageLocaleKey='en_US',
LocaleSidKey='en_US', ProfileId = p.Id,
TimeZoneSidKey='America/Los_Angeles',
UserName='standarduser' + DateTime.now().getTime() + '@testorg.com');
System.runAs(u) {
204
Working with Data in Apex
Apex Developer Guide](https://image.slidesharecdn.com/salesforceapexdeveloperguide-230916115800-b7c953cd/85/salesforce_apex_developer_guide-208-320.jpg)
![try {
Database.insert(new Account(name='foo'), AccessLevel.User_mode);
Assert.fail();
} catch (SecurityException ex) {
Assert.isTrue(ex.getMessage().contains('Account'));
}
//Get ID of previously created permission set named 'AllowCreateToAccount'
Id permissionSetId = [Select Id from PermissionSet
where Name = 'AllowCreateToAccount' limit 1].Id;
Database.insert(new Account(name='foo'),
AccessLevel.User_mode.withPermissionSetId(permissionSetId));
// The elevated access level is not persisted to subsequent operations
try {
Database.insert(new Account(name='foo2'), AccessLevel.User_mode);
Assert.fail();
} catch (SecurityException ex) {
Assert.isTrue(ex.getMessage().contains('Account'));
}
}
}
}
Note: Checkmarx, the AppExchange Security Review source code scanner, hasn’t been updated with this new Apex feature. Until
it’supdated,Checkmarxcangeneratefalsepositivesforfieldorobjectlevelsecurityviolationsthatrequireexceptiondocumentation.
Enforce Security with the stripInaccessible Method
Use the stripInaccessible method to enforce field-level and object-level data protection. This method can be used to strip
the fields and relationship fields from query and subquery results that the user can’t access. The method can also be used to remove
inaccessible sObject fields before DML operations to avoid exceptions and to sanitize sObjects that have been deserialized from an
untrusted source.
Important: Where possible, we changed noninclusive terms to align with our company value of Equality. We maintained certain
terms to avoid any effect on customer implementations.
The field- and object-level data protection is accessed through the Security and SObjectAccessDecision classes. The access check is
based on the field-level permission of the current user in the context of the specified operation—create, read, update, or upsert. The
Security.stripInaccessible() method checks the source records for fields that don’t meet the field-level security check for the current user.
The method also checks the source records for lookup or master-detail relationship fields to which the current user doesn’t have access.
The method creates a return list of sObjects that is identical to the source records, except that the fields that are inaccessible to the
current user are removed. The sObjects returned by the getRecords method contain records in the same order as the sObjects in
the sourceRecords parameter of the stripInaccessible method.
As a Developer Preview feature, Security.stripInaccessible() takes a permission set ID as a parameter and enforces
field-level and object-level access as per the specified permission set, in addition to the running user’s permissions.
Note: The ID field is never stripped by the stripInaccessible method to avoid issues when performing DML on the
result.
205
Working with Data in Apex
Apex Developer Guide](https://image.slidesharecdn.com/salesforceapexdeveloperguide-230916115800-b7c953cd/85/salesforce_apex_developer_guide-209-320.jpg)
![To identify inaccessible fields that were removed, you can use the SObject.isSet() method. For example, the return list contains the
Contact object and the custom field social_security_number__c is inaccessible to the user. Because this custom field fails the field-level
access check, the field isn’t set and isSet returns false.
SObjectAccessDecision securityDecision = Security.stripInaccessible(AccessType.READABLE,
sourceRecords);
Contact c = securityDecision.getRecords()[0];
System.debug(c.isSet('social_security_number__c')); // prints "false"
Note: The stripInaccessible methoddoesn’tsupportAggregateResultSObject.IfthesourcerecordsareofAggregateResult
SObject type, an exception is thrown.
ToenforceobjectandfieldpermissionsontheUserobjectandhideauser’spersonalinformationfromotherusersinorgswithExperience
Cloud sites, see Enforcing Object and Field Permissions.
The following are some examples where the stripInaccessible method can be used.
Example: This example code removes inaccessible fields from the query result. A display table for campaign data must always
show the BudgetedCost. The ActualCost must be shown only to users who have permission to read that field.
SObjectAccessDecision securityDecision =
Security.stripInaccessible(AccessType.READABLE,
[SELECT Name, BudgetedCost, ActualCost FROM Campaign]
);
// Construct the output table
if (securityDecision.getRemovedFields().get('Campaign').contains('ActualCost')) {
for (Campaign c : securityDecision.getRecords()) {
//System.debug Output: Name, BudgetedCost
}
} else {
for (Campaign c : securityDecision.getRecords()) {
//System.debug Output: Name, BudgetedCost, ActualCost
}
}
Example: This example code removes inaccessible fields from the subquery result. The user doesn’t have permission to read the
Phone field of a Contacts object.
List<Account> accountsWithContacts =
[SELECT Id, Name, Phone,
(SELECT Id, LastName, Phone FROM Account.Contacts)
FROM Account];
// Strip fields that are not readable
SObjectAccessDecision decision = Security.stripInaccessible(
AccessType.READABLE,
accountsWithContacts);
// Print stripped records
for (Integer i = 0; i < accountsWithContacts.size(); i++)
{
System.debug('Insecure record access: '+accountsWithContacts[i]);
System.debug('Secure record access: '+decision.getRecords()[i]);
206
Working with Data in Apex
Apex Developer Guide](https://image.slidesharecdn.com/salesforceapexdeveloperguide-230916115800-b7c953cd/85/salesforce_apex_developer_guide-210-320.jpg)
![}
// Print modified indexes
System.debug('Records modified by stripInaccessible: '+decision.getModifiedIndexes());
// Print removed fields
System.debug('Fields removed by stripInaccessible: '+decision.getRemovedFields());
Example: This example code removes inaccessible fields from sObjects before DML operations. The user who doesn’t have
permission to create Rating for an Account can still create an Account. The method ensures that no Rating is set and doesn’t throw
an exception.
List<Account> newAccounts = new List<Account>();
Account a = new Account(Name='Acme Corporation');
Account b = new Account(Name='Blaze Comics', Rating=’Warm’);
newAccounts.add(a);
newAccounts.add(b);
SObjectAccessDecision securityDecision = Security.stripInaccessible(
AccessType.CREATABLE, newAccounts);
// No exceptions are thrown and no rating is set
insert securityDecision.getRecords();
System.debug(securityDecision.getRemovedFields().get('Account')); // Prints "Rating"
System.debug(securityDecision.getModifiedIndexes()); // Prints "1"
Example: This example code sanitizes sObjects that have been deserialized from an untrusted source. The user doesn’t have
permission to update the AnnualRevenue of an Account.
String jsonInput =
'[' +
'{' +
'"Name": "InGen",' +
'"AnnualRevenue": "100"' +
'},' +
'{' +
'"Name": "Octan"' +
'}' +
']';
List<Account> accounts = (List<Account>)JSON.deserializeStrict(jsonInput,
List<Account>.class);
SObjectAccessDecision securityDecision = Security.stripInaccessible(
AccessType.UPDATABLE, accounts);
// Secure update
update securityDecision.getRecords(); // Doesn’t update AnnualRevenue field
System.debug(String.join(securityDecision.getRemovedFields().get('Account'), ', '));
// Prints "AnnualRevenue"
207
Working with Data in Apex
Apex Developer Guide](https://image.slidesharecdn.com/salesforceapexdeveloperguide-230916115800-b7c953cd/85/salesforce_apex_developer_guide-211-320.jpg)
![System.debug(String.join(securityDecision.getModifiedIndexes(), ', ')); // Prints "0”
Example: This example code removes inaccessible relationship fields from the query result. The user doesn’t have permission to
insert the Account__c field, which is a lookup from MyCustomObject__c to Account.
// Account__c is a lookup from MyCustomObject__c to Account
@IsTest
public class TestCustomObjectLookupStripped {
@IsTest static void caseCustomObjectStripped() {
Account a = new Account(Name='foo');
insert a;
List<MyCustomObject__c> records = new List<MyCustomObject__c>{
new MyCustomObject__c(Name='Custom0', Account__c=a.id)
};
insert records;
records = [SELECT Id, Account__c FROM MyCustomObject__c];
SObjectAccessDecision securityDecision = Security.stripInaccessible
(AccessType.READABLE, records);
// Verify stripped records
System.assertEquals(1, securityDecision.getRecords().size());
for (SObject strippedRecord : securityDecision.getRecords()) {
System.debug('Id should be set as Id fields are ignored: ' +
strippedRecord.isSet('Id')); // prints true
System.debug('Lookup field FLS is not READABLE to running user,
should not be set: ' +
strippedRecord.isSet('Account__c')); // prints false
}
}
}
SEE ALSO:
Apex Reference Guide: AccessType Enum
Apex Reference Guide: Security Class
Apex Reference Guide: SObjectAccessDecision Class
Filter SOQL Queries Using WITH SECURITY_ENFORCED
Use the WITH SECURITY_ENFORCED clause to enable field- and object-level security permissions checking for SOQL SELECT
queries in Apex code, including subqueries and cross-object relationships.
Apex generally runs in system context; that is, the current user's permissions and field-level security aren’t taken into account during
code execution. Sharing rules, however, are not always bypassed: the class must be declared with the without sharing keyword
in order to ensure that sharing rules are not enforced. Although performing field- and object-level security checks was possible in earlier
releases, this clause substantially reduces the verbosity and technical complexity in query operations. This feature is tailored to Apex
developers who have minimal development experience with security and to applications where graceful degradation on permissions
errors isn’t required.
Note: The WITH SECURITY_ENFORCED clause is only available in Apex. We don’t recommend using WITH
SECURITY_ENFORCED in Apex classes or triggers with an API version earlier than 45.0.
208
Working with Data in Apex
Apex Developer Guide](https://image.slidesharecdn.com/salesforceapexdeveloperguide-230916115800-b7c953cd/85/salesforce_apex_developer_guide-212-320.jpg)
![WITH SECURITY_ENFORCED applies field- and object-level security checks only to fields and objects referenced in SELECT or
FROM SOQL clauses and not clauses like WHERE or ORDER BY. In other words, security is enforced on what the SOQL SELECT
query returns, not on all the elements that go into running the query.
Insert the WITH SECURITY_ENFORCED clause:
• After the WHERE clause if one exists, else after the FROM clause.
• Before any ORDER BY, LIMIT, OFFSET, or aggregate function clauses.
For more information on SOQL SELECT queries, see SOQL SELECT Syntax in the SOQL and SOSL Reference.
For example, if the user has field access for LastName, this query returns Id and LastName for the Acme account entry.
List<Account> act1 = [SELECT Id, (SELECT LastName FROM Contacts)
FROM Account WHERE Name like 'Acme' WITH SECURITY_ENFORCED]
There are some restrictions while querying polymorphic lookup fields using WITH SECURITY_ENFORCED. Polymorphic fields are
relationship fields that can point to more than one entity.
• Traversing a polymorphic field’s relationship is not supported in queries using WITH SECURITY_ENFORCED. For example, you
cannot use WITH SECURITY_ENFORCED in this query, which returns the Id and Owner names for User and Calendar entities:
SELECT Id, What.Name FROM Event WHERE What.Type IN (’User’,’Calendar’).
• Using TYPEOF expressions with an ELSE clause is not supported in queries using WITH SECURITY_ENFORCED. TYPEOF
is used in a SELECT query to specify the fields to be returned for a given type of a polymorphic relationship. For example, you cannot
use WITH SECURITY_ENFORCED in this query. The query specifies certain fields to be returned for Account and Opportunity
objects, and Name and Email fields to be returned for all other objects.
SELECT
TYPE OF What
WHEN Account THEN Phone
WHEN Opportunity THEN Amount
ELSE Name,Email
END
FROM Event
• The Owner, CreatedBy, and LastModifiedBy polymorphic lookup fields are exempt from this restriction, and do allow
polymorphic relationship traversal.
• ForAppExchangeSecurityReview,youmustuseAPIversion48.0orlaterwhenusing WITH SECURITY_ENFORCED.Youcannot
use API versions where the feature was in beta or pilot.
If any fields or objects referenced in the SOQL SELECT query using WITH SECURITY_ENFORCED are inaccessible to the user,
a System.QueryException is thrown, and no data is returned.
ToenforceobjectandfieldpermissionsontheUserobjectandhideauser’spersonalinformationfromotherusersinorgswithExperience
Cloud sites, see Enforcing Object and Field Permissions.
Example: If field access for either LastName or Description is hidden, this query throws an exception indicating insufficient
permissions.
List<Account> act1 = [SELECT Id, (SELECT LastName FROM Contacts),
(SELECT Description FROM Opportunities)
FROM Account WITH SECURITY_ENFORCED]
209
Working with Data in Apex
Apex Developer Guide](https://image.slidesharecdn.com/salesforceapexdeveloperguide-230916115800-b7c953cd/85/salesforce_apex_developer_guide-213-320.jpg)
![Example: If field access for Website is hidden, this query throws an exception indicating insufficient permissions.
List<Account> act2 = [SELECT Id, parent.Name, parent.Website
FROM Account WITH SECURITY_ENFORCED]
Example: If field access for Type is hidden, this aggregate function query throws an exception indicating insufficient permissions.
List<AggregateResult> agr1 = [SELECT GROUPING(Type)
FROM Opportunity WITH SECURITY_ENFORCED
GROUP BY Type]
Class Security
You can specify which users can execute methods in a particular top-level class based on their user profile or permission sets. You can
only set security on Apex classes, not on triggers.
To set Apex class security from the class list page, seeSet Apex Class Access from the Class List Page
To set Apex class security from the class detail page, see Set Apex Class Access from the Class List Page
To set Apex class security from a permission set:
1. From Setup, enter Permission Sets in the Quick Find box, then select Permission Sets.
2. Select a permission set.
3. Click Apex Class Access.
4. Click Edit.
5. Select the Apex classes that you want to enable from the Available Apex Classes list and click Add, or select the Apex classes that
you want to disable from the Enabled Apex Classes list and click Remove.
6. Click Save.
To set Apex class security from a profile:
1. From Setup, enter Profiles in the Quick Find box, then select Profiles.
2. Select a profile.
3. In the Apex Class Access page or related list, click Edit.
4. Select the Apex classes that you want to enable from the Available Apex Classes list and click Add, or select the Apex classes that
you want to disable from the Enabled Apex Classes list and click Remove.
5. Click Save.
Understanding Apex Managed Sharing
Sharing is the act of granting a user or group of users permission to perform a set of actions on a record or set of records. Sharing access
can be granted using the Salesforce user interface and Lightning Platform, or programmatically using Apex.
For more information on sharing, see Set Your Internal Organization-Wide Sharing Defaults in the Salesforce online help.
210
Working with Data in Apex
Apex Developer Guide](https://image.slidesharecdn.com/salesforceapexdeveloperguide-230916115800-b7c953cd/85/salesforce_apex_developer_guide-214-320.jpg)
![public static boolean manualShareRead(Id recordId, Id userOrGroupId){
// Create new sharing object for the custom object Job.
Job__Share jobShr = new Job__Share();
// Set the ID of record being shared.
jobShr.ParentId = recordId;
// Set the ID of user or group being granted access.
jobShr.UserOrGroupId = userOrGroupId;
// Set the access level.
jobShr.AccessLevel = 'Read';
// Set rowCause to 'manual' for manual sharing.
// This line can be omitted as 'manual' is the default value for sharing objects.
jobShr.RowCause = Schema.Job__Share.RowCause.Manual;
// Insert the sharing record and capture the save result.
// The false parameter allows for partial processing if multiple records passed
// into the operation.
Database.SaveResult sr = Database.insert(jobShr,false);
// Process the save results.
if(sr.isSuccess()){
// Indicates success
return true;
}
else {
// Get first save result error.
Database.Error err = sr.getErrors()[0];
// Check if the error is related to trival access level.
// Access level must be more permissive than the object's default.
// These sharing records are not required and thus an insert exception is
acceptable.
if(err.getStatusCode() == StatusCode.FIELD_FILTER_VALIDATION_EXCEPTION &&
err.getMessage().contains('AccessLevel')){
// Indicates success.
return true;
}
else{
// Indicates failure.
return false;
}
}
}
}
@isTest
private class JobSharingTest {
// Test for the manualShareRead method
static testMethod void testManualShareRead(){
// Select users for the test.
215
Working with Data in Apex
Apex Developer Guide](https://image.slidesharecdn.com/salesforceapexdeveloperguide-230916115800-b7c953cd/85/salesforce_apex_developer_guide-219-320.jpg)
![List<User> users = [SELECT Id FROM User WHERE IsActive = true LIMIT 2];
Id User1Id = users[0].Id;
Id User2Id = users[1].Id;
// Create new job.
Job__c j = new Job__c();
j.Name = 'Test Job';
j.OwnerId = user1Id;
insert j;
// Insert manual share for user who is not record owner.
System.assertEquals(JobSharing.manualShareRead(j.Id, user2Id), true);
// Query job sharing records.
List<Job__Share> jShrs = [SELECT Id, UserOrGroupId, AccessLevel,
RowCause FROM job__share WHERE ParentId = :j.Id AND UserOrGroupId= :user2Id];
// Test for only one manual share on job.
System.assertEquals(jShrs.size(), 1, 'Set the object's sharing model to Private.');
// Test attributes of manual share.
System.assertEquals(jShrs[0].AccessLevel, 'Read');
System.assertEquals(jShrs[0].RowCause, 'Manual');
System.assertEquals(jShrs[0].UserOrGroupId, user2Id);
// Test invalid job Id.
delete j;
// Insert manual share for deleted job id.
System.assertEquals(JobSharing.manualShareRead(j.Id, user2Id), false);
}
}
Important: The object’s organization-wide default access level must not be set to the most permissive access level. For custom
objects, this level is Public Read/Write. For more information, see Understanding Sharing on page 211.
Creating Apex Managed Sharing
Apex managed sharing enables developers to programmatically manipulate sharing to support their application’s behavior through
Apex or the SOAP API. This type of sharing is similar to managed sharing. Only users with “Modify All Data” permission can add or change
Apex managed sharing on a record. Apex managed sharing is maintained across record owner changes.
Apex managed sharing must use an Apexsharingreason. Apex sharing reasons are a way for developers to track why they shared a record
with a user or group of users. Using multiple Apex sharing reasons simplifies the coding required to make updates and deletions of
sharing records. They also enable developers to share with the same user or group multiple times using different reasons.
Apex sharing reasons are defined on an object's detail page. Each Apex sharing reason has a label and a name:
• The label displays in the Reason column when viewing the sharing for a record in the user interface. This label allows users and
administrators to understand the source of the sharing. The label is also enabled for translation through the Translation Workbench.
• The name is used when referencing the reason in the API and Apex.
216
Working with Data in Apex
Apex Developer Guide](https://image.slidesharecdn.com/salesforceapexdeveloperguide-230916115800-b7c953cd/85/salesforce_apex_developer_guide-220-320.jpg)
![hmShr.UserOrGroupId = job.Hiring_Manager__c;
// Set the access level
recruiterShr.AccessLevel = 'edit';
hmShr.AccessLevel = 'read';
// Set the Apex sharing reason for hiring manager and recruiter
recruiterShr.RowCause = Schema.Job__Share.RowCause.Recruiter__c;
hmShr.RowCause = Schema.Job__Share.RowCause.Hiring_Manager__c;
// Add objects to list for insert
jobShrs.add(recruiterShr);
jobShrs.add(hmShr);
}
// Insert sharing records and capture save result
// The false parameter allows for partial processing if multiple records are passed
// into the operation
Database.SaveResult[] lsr = Database.insert(jobShrs,false);
// Create counter
Integer i=0;
// Process the save results
for(Database.SaveResult sr : lsr){
if(!sr.isSuccess()){
// Get the first save result error
Database.Error err = sr.getErrors()[0];
// Check if the error is related to a trivial access level
// Access levels equal or more permissive than the object's default
// access level are not allowed.
// These sharing records are not required and thus an insert exception is
// acceptable.
if(!(err.getStatusCode() == StatusCode.FIELD_FILTER_VALIDATION_EXCEPTION
&&
err.getMessage().contains('AccessLevel'))){
// Throw an error when the error is not related to trivial access
level.
trigger.newMap.get(jobShrs[i].ParentId).
addError(
'Unable to grant sharing access due to following exception: '
+ err.getMessage());
}
}
i++;
}
}
}
Under certain circumstances, inserting a share row results in an update of an existing share row. Consider these examples:
218
Working with Data in Apex
Apex Developer Guide](https://image.slidesharecdn.com/salesforceapexdeveloperguide-230916115800-b7c953cd/85/salesforce_apex_developer_guide-222-320.jpg)
![The Database.Batchable interface is used for all batch Apex processes, including recalculating Apex managed sharing. You can
implement this interface more than once in your organization. For more information on the methods that must be implemented, see
Using Batch Apex on page 273.
Before creating an Apex managed sharing recalculation class, also consider the best practices.
Important: The object’s organization-wide default access level must not be set to the most permissive access level. For custom
objects, this level is Public Read/Write. For more information, see Understanding Sharing on page 211.
Apex Managed Sharing Recalculation Example
For this example, suppose that you are building a recruiting application and have an object called Job. You want to validate that the
recruiter and hiring manager listed on the job have access to the record. The following Apex class performs this validation. This example
requires a custom object called Job, with two lookup fields associated with User records called Hiring_Manager and Recruiter. Also, the
Job custom object should have two sharing reasons added called Hiring_Manager and Recruiter. Before you run this sample, replace
the email address with a valid email address to which you want to send error notifications and job completion notifications.
global class JobSharingRecalc implements Database.Batchable<sObject> {
// String to hold email address that emails will be sent to.
// Replace its value with a valid email address.
static String emailAddress = 'admin@yourcompany.com';
// The start method is called at the beginning of a sharing recalculation.
// This method returns a SOQL query locator containing the records
// to be recalculated.
global Database.QueryLocator start(Database.BatchableContext BC){
return Database.getQueryLocator([SELECT Id, Hiring_Manager__c, Recruiter__c
FROM Job__c]);
}
// The executeBatch method is called for each chunk of records returned from start.
global void execute(Database.BatchableContext BC, List<sObject> scope){
// Create a map for the chunk of records passed into method.
Map<ID, Job__c> jobMap = new Map<ID, Job__c>((List<Job__c>)scope);
// Create a list of Job__Share objects to be inserted.
List<Job__Share> newJobShrs = new List<Job__Share>();
// Locate all existing sharing records for the Job records in the batch.
// Only records using an Apex sharing reason for this app should be returned.
List<Job__Share> oldJobShrs = [SELECT Id FROM Job__Share WHERE ParentId IN
:jobMap.keySet() AND
(RowCause = :Schema.Job__Share.rowCause.Recruiter__c OR
RowCause = :Schema.Job__Share.rowCause.Hiring_Manager__c)];
// Construct new sharing records for the hiring manager and recruiter
// on each Job record.
for(Job__c job : jobMap.values()){
Job__Share jobHMShr = new Job__Share();
Job__Share jobRecShr = new Job__Share();
// Set the ID of user (hiring manager) on the Job record being granted access.
220
Working with Data in Apex
Apex Developer Guide](https://image.slidesharecdn.com/salesforceapexdeveloperguide-230916115800-b7c953cd/85/salesforce_apex_developer_guide-224-320.jpg)
![jobHMShr.UserOrGroupId = job.Hiring_Manager__c;
// The hiring manager on the job should always have 'Read Only' access.
jobHMShr.AccessLevel = 'Read';
// The ID of the record being shared
jobHMShr.ParentId = job.Id;
// Set the rowCause to the Apex sharing reason for hiring manager.
// This establishes the sharing record as Apex managed sharing.
jobHMShr.RowCause = Schema.Job__Share.RowCause.Hiring_Manager__c;
// Add sharing record to list for insertion.
newJobShrs.add(jobHMShr);
// Set the ID of user (recruiter) on the Job record being granted access.
jobRecShr.UserOrGroupId = job.Recruiter__c;
// The recruiter on the job should always have 'Read/Write' access.
jobRecShr.AccessLevel = 'Edit';
// The ID of the record being shared
jobRecShr.ParentId = job.Id;
// Set the rowCause to the Apex sharing reason for recruiter.
// This establishes the sharing record as Apex managed sharing.
jobRecShr.RowCause = Schema.Job__Share.RowCause.Recruiter__c;
// Add the sharing record to the list for insertion.
newJobShrs.add(jobRecShr);
}
try {
// Delete the existing sharing records.
// This allows new sharing records to be written from scratch.
Delete oldJobShrs;
// Insert the new sharing records and capture the save result.
// The false parameter allows for partial processing if multiple records are
// passed into operation.
Database.SaveResult[] lsr = Database.insert(newJobShrs,false);
// Process the save results for insert.
for(Database.SaveResult sr : lsr){
if(!sr.isSuccess()){
// Get the first save result error.
Database.Error err = sr.getErrors()[0];
// Check if the error is related to trivial access level.
// Access levels equal or more permissive than the object's default
// access level are not allowed.
// These sharing records are not required and thus an insert exception
221
Working with Data in Apex
Apex Developer Guide](https://image.slidesharecdn.com/salesforceapexdeveloperguide-230916115800-b7c953cd/85/salesforce_apex_developer_guide-225-320.jpg)
![// is acceptable.
if(!(err.getStatusCode() == StatusCode.FIELD_FILTER_VALIDATION_EXCEPTION
&& err.getMessage().contains('AccessLevel'))){
// Error is not related to trivial access level.
// Send an email to the Apex job's submitter.
Messaging.SingleEmailMessage mail = new Messaging.SingleEmailMessage();
String[] toAddresses = new String[] {emailAddress};
mail.setToAddresses(toAddresses);
mail.setSubject('Apex Sharing Recalculation Exception');
mail.setPlainTextBody(
'The Apex sharing recalculation threw the following exception: ' +
err.getMessage());
Messaging.sendEmail(new Messaging.SingleEmailMessage[] { mail });
}
}
}
} catch(DmlException e) {
// Send an email to the Apex job's submitter on failure.
Messaging.SingleEmailMessage mail = new Messaging.SingleEmailMessage();
String[] toAddresses = new String[] {emailAddress};
mail.setToAddresses(toAddresses);
mail.setSubject('Apex Sharing Recalculation Exception');
mail.setPlainTextBody(
'The Apex sharing recalculation threw the following exception: ' +
e.getMessage());
Messaging.sendEmail(new Messaging.SingleEmailMessage[] { mail });
}
}
// The finish method is called at the end of a sharing recalculation.
global void finish(Database.BatchableContext BC){
// Send an email to the Apex job's submitter notifying of job completion.
Messaging.SingleEmailMessage mail = new Messaging.SingleEmailMessage();
String[] toAddresses = new String[] {emailAddress};
mail.setToAddresses(toAddresses);
mail.setSubject('Apex Sharing Recalculation Completed.');
mail.setPlainTextBody
('The Apex sharing recalculation finished processing');
Messaging.sendEmail(new Messaging.SingleEmailMessage[] { mail });
}
}
Testing Apex Managed Sharing Recalculations
This example inserts five Job records and invokes the batch job that is implemented in the batch class of the previous example. This
example requires a custom object called Job, with two lookup fields associated with User records called Hiring_Manager and Recruiter.
Also, the Job custom object should have two sharing reasons added called Hiring_Manager and Recruiter. Before you run this test, set
222
Working with Data in Apex
Apex Developer Guide](https://image.slidesharecdn.com/salesforceapexdeveloperguide-230916115800-b7c953cd/85/salesforce_apex_developer_guide-226-320.jpg)
![the organization-wide default sharing for Job to Private. Note that since email messages aren’t sent from tests, and because the batch
class is invoked by a test method, the email notifications won’t be sent in this case.
@isTest
private class JobSharingTester {
// Test for the JobSharingRecalc class
static testMethod void testApexSharing(){
// Instantiate the class implementing the Database.Batchable interface.
JobSharingRecalc recalc = new JobSharingRecalc();
// Select users for the test.
List<User> users = [SELECT Id FROM User WHERE IsActive = true LIMIT 2];
ID User1Id = users[0].Id;
ID User2Id = users[1].Id;
// Insert some test job records.
List<Job__c> testJobs = new List<Job__c>();
for (Integer i=0;i<5;i++) {
Job__c j = new Job__c();
j.Name = 'Test Job ' + i;
j.Recruiter__c = User1Id;
j.Hiring_Manager__c = User2Id;
testJobs.add(j);
}
insert testJobs;
Test.startTest();
// Invoke the Batch class.
String jobId = Database.executeBatch(recalc);
Test.stopTest();
// Get the Apex job and verify there are no errors.
AsyncApexJob aaj = [Select JobType, TotalJobItems, JobItemsProcessed, Status,
CompletedDate, CreatedDate, NumberOfErrors
from AsyncApexJob where Id = :jobId];
System.assertEquals(0, aaj.NumberOfErrors);
// This query returns jobs and related sharing records that were inserted
// by the batch job's execute method.
List<Job__c> jobs = [SELECT Id, Hiring_Manager__c, Recruiter__c,
(SELECT Id, ParentId, UserOrGroupId, AccessLevel, RowCause FROM Shares
WHERE (RowCause = :Schema.Job__Share.rowCause.Recruiter__c OR
RowCause = :Schema.Job__Share.rowCause.Hiring_Manager__c))
FROM Job__c];
// Validate that Apex managed sharing exists on jobs.
for(Job__c job : jobs){
// Two Apex managed sharing records should exist for each job
// when using the Private org-wide default.
System.assert(job.Shares.size() == 2);
for(Job__Share jobShr : job.Shares){
223
Working with Data in Apex
Apex Developer Guide](https://image.slidesharecdn.com/salesforceapexdeveloperguide-230916115800-b7c953cd/85/salesforce_apex_developer_guide-227-320.jpg)

![In other words, the attacker's page contains a URL that performs an action on your website. If the user is still logged into your Web page
when they visit the attacker's Web page, the URL is retrieved and the actions performed. This attack succeeds because the user is still
authenticated to your Web page. This is a simple example, and the attacker can get more creative by using scripts to generate the
callback request or even use CSRF attacks against your AJAX methods.
For more information and traditional defenses:
• http://www.owasp.org/index.php/Cross-Site_Request_Forgery
• http://www.cgisecurity.com/csrf-faq.html
• http://shiflett.org/articles/cross-site-request-forgeries
Within the Lightning Platform, Salesforce implemented an anti-CSRF token to prevent such an attack. Every page includes a random
string of characters as a hidden form field. Upon the next page load, the application checks the validity of this string of characters and
doesn’t execute the command unless the value matches the expected value. This feature protects you when using all of the standard
controllers and methods.
Here again, the developer can bypass the built-in defenses without realizing the risk. For example, a custom controller takes the object
ID as an input parameter and then uses that input parameter in a SOQL call.
<apex:page controller="myClass" action="{!init}"</apex:page>
public class myClass {
public void init() {
Id id = ApexPages.currentPage().getParameters().get('id');
Account obj = [select id, Name FROM Account WHERE id = :id];
delete obj;
return ;
}
}
The developer unknowingly bypassed the anti-CSRF controls by developing their own action method. The id parameter is read and
used in the code. The anti-CSRF token is never read or validated. An attacker Web page can send the user to this page by using a CSRF
attack and providing any value for the id parameter.
There are no built-in defenses for such situations, and developers must be cautious about writing pages that take action based on a
user-supplied parameter like the id variable in the previous example. A possible work-around is to insert an intermediate confirmation
page before taking the action to make sure that the user intended to call the page. Other suggestions include shortening the idle session
timeout and educating users to log out of their active session and not use their browser to visit other sites while authenticated.
Because of the Salesforce built-in defense against CSRF, your users can encounter an error when multiple Salesforce login pages are
open. If the user logs in to Salesforce in one tab and then attempts to log in on another, they see this error: The page you submitted was
invalid for your session. Users can successfully log in by refreshing the login page or by attempting to log in a second time.
SOQL Injection
In other programming languages, the previous flaw is known as SQL injection. Apex doesn’t use SQL, but uses its own database query
language, SOQL. SOQL is much simpler and more limited in functionality than SQL. The risks are much lower for SOQL injection than for
SQL injection, but the attacks are nearly identical to traditional SQL injection. SQL/SOQL injection takes user-supplied input and uses
those values in a dynamic SOQL query. If the input isn’t validated, it can include SOQL commands that effectively modify the SOQL
statement and trick the application into performing unintended commands.
228
Working with Data in Apex
Apex Developer Guide](https://image.slidesharecdn.com/salesforceapexdeveloperguide-230916115800-b7c953cd/85/salesforce_apex_developer_guide-232-320.jpg)
![(IsDeleted = false and Name like :queryName)];
System.debug('query result is ' + queryResult);
return null;
}
}
If you must use dynamic SOQL, use the escapeSingleQuotes method to sanitize user-supplied input. This method adds the
escape character () to all single quotation marks in a string that is passed in from a user. The method ensures that all single quotation
marks are treated as enclosing strings, instead of database commands.
Data Access Control
The Lightning Platform makes extensive use of data sharing rules. Each object has permissions and can have sharing settingsthat users
can read, create, edit, and delete. These settings are enforced when using all standard controllers.
WhenusinganApexclass,thebuilt-inuserpermissionsandfield-levelsecurityrestrictionsaren’trespectedduringexecution.Thedefault
behavior is that an Apex class has the ability to read and update all data. Because these rules are not enforced, developers who use Apex
mustavoidinadvertentlyexposingsensitivedatathat’snormallybehiddenfromusersbyuserpermissions,field-levelsecurity,ordefaults,
particularly for Visualforce pages. For example, consider this Apex pseudo-code.
public class customController {
public void read() {
Contact contact = [SELECT id FROM Contact WHERE Name = :value];
}
}
In this case, all contact records are searched, even if the user currently logged in would not normally have permission to view these
records. The solution is to use the qualifying keywords with sharing when declaring the class:
public with sharing class customController {
. . .
}
The with sharing keyword directs the platform to use the security sharing permissions of the user currently logged in, rather than
granting full access to all records.
Custom Settings
Custom settings are similar to custom objects. Application developers can create custom sets of data and associate custom data for an
organization, profile, or specific user. All custom settings data is exposed in the application cache, which enables efficient access without
the cost of repeated queries to the database. Formula fields, validation rules, flows, Apex, and SOAP API can then use this data.
Warning: Protection only applies to custom settings that are marked protected and installed to a subscriber organization as part
of a managed package. Otherwise, they are treated as public custom settings and are readable for all profiles, including the guest
user. Do not store secrets, personally identifying information, or any private data in these settings. Use protected custom settings
only in managed packages. Outside of a managed package, use named credentials or encrypted custom fields to store secrets like
OAuth tokens, passwords, and other confidential material.
Note: While custom settings data is included in sandbox copies, it is treated as data for the purposes of Apex test isolation. Apex
tests must use SeeAllData=true to see existing custom settings data in the organization. As a best practice, create the
required custom settings data in your test setup.
There are two types of custom settings.
230
Working with Data in Apex
Apex Developer Guide](https://image.slidesharecdn.com/salesforceapexdeveloperguide-230916115800-b7c953cd/85/salesforce_apex_developer_guide-234-320.jpg)
![Usage
Variable
The total number of records in a trigger invocation, both old and new.
size
Note: The record firing a trigger can include an invalid field value, such as a formula that divides by zero. In this case, the field
value is set to null in these variables:
• new
• newMap
• old
• oldMap
For example, in this simple trigger, Trigger.new is a list of sObjects and can be iterated over in a for loop. It can also be used as
a bind variable in the IN clause of a SOQL query.
Trigger simpleTrigger on Account (after insert) {
for (Account a : Trigger.new) {
// Iterate over each sObject
}
// This single query finds every contact that is associated with any of the
// triggering accounts. Note that although Trigger.new is a collection of
// records, when used as a bind variable in a SOQL query, Apex automatically
// transforms the list of records into a list of corresponding Ids.
Contact[] cons = [SELECT LastName FROM Contact
WHERE AccountId IN :Trigger.new];
}
ThistriggerusesBooleancontextvariableslike Trigger.isBefore and Trigger.isDelete todefinecodethatonlyexecutes
for specific trigger conditions:
trigger myAccountTrigger on Account(before delete, before insert, before update,
after delete, after insert, after update) {
if (Trigger.isBefore) {
if (Trigger.isDelete) {
// In a before delete trigger, the trigger accesses the records that will be
// deleted with the Trigger.old list.
for (Account a : Trigger.old) {
if (a.name != 'okToDelete') {
a.addError('You can't delete this record!');
}
}
} else {
// In before insert or before update triggers, the trigger accesses the new records
// with the Trigger.new list.
for (Account a : Trigger.new) {
if (a.name == 'bad') {
a.name.addError('Bad name');
}
}
if (Trigger.isInsert) {
239
Invoking Apex
Apex Developer Guide](https://image.slidesharecdn.com/salesforceapexdeveloperguide-230916115800-b7c953cd/85/salesforce_apex_developer_guide-243-320.jpg)
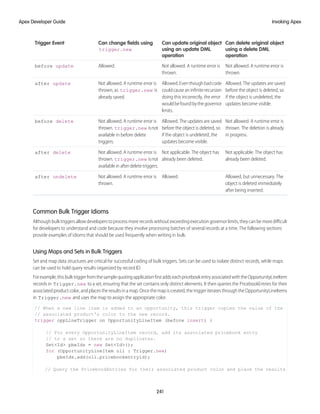
![// in a map.
Map<Id, PricebookEntry> entries = new Map<Id, PricebookEntry>(
[select product2.color__c from pricebookentry
where id in :pbeIds]);
// Now use the map to set the appropriate color on every OpportunityLineItem processed
// by the trigger.
for (OpportunityLineItem oli : Trigger.new)
oli.color__c = entries.get(oli.pricebookEntryId).product2.color__c;
}
Correlating Records with Query Results in Bulk Triggers
Use the Trigger.newMap and Trigger.oldMap ID-to-sObject maps to correlate records with query results. For example, this
trigger from the sample quoting app uses Trigger.oldMap to create a set of unique IDs (Trigger.oldMap.keySet()).
The set is then used as part of a query to create a list of quotes associated with the opportunities being processed by the trigger. For
every quote returned by the query, the related opportunity is retrieved from Trigger.oldMap and prevented from being deleted:
trigger oppTrigger on Opportunity (before delete) {
for (Quote__c q : [SELECT opportunity__c FROM quote__c
WHERE opportunity__c IN :Trigger.oldMap.keySet()]) {
Trigger.oldMap.get(q.opportunity__c).addError('Cannot delete
opportunity with a quote');
}
}
Using Triggers to Insert or Update Records with Unique Fields
When an insert or upsert event causes a record to duplicate the value of a unique field in another new record in that batch, the
errormessagefortheduplicaterecordincludestheIDofthefirstrecord.However,itispossiblethattheerrormessagemaynotbecorrect
by the time the request is finished.
When there are triggers present, the retry logic in bulk operations causes a rollback/retry cycle to occur. That retry cycle assigns new
keys to the new records. For example, if two records are inserted with the same value for a unique field, and you also have an insert
event defined for a trigger, the second duplicate record fails, reporting the ID of the first record. However, once the system rolls back the
changes and re-inserts the first record by itself, the record receives a new ID. That means the error message reported by the second
record is no longer valid.
Defining Triggers
Trigger code is stored as metadata under the object with which they are associated. To define a trigger in Salesforce:
1. From the object management settings for the object whose triggers you want to access, go to Triggers.
Tip: For the Attachment, ContentDocument, and Note standard objects, you can’t create a trigger in the Salesforce user
interface.Fortheseobjects,createatriggerusingdevelopmenttools,suchastheDeveloperConsoleortheSalesforceextensions
for Visual Studio Code. Alternatively, you can also use the Metadata API.
2. In the Triggers list, click New.
3. To specify the version of Apex and the API used with this trigger, click Version Settings. If your organization has installed managed
packages from the AppExchange, you can also specify which version of each managed package to use with this trigger. Associate
242
Invoking Apex
Apex Developer Guide](https://image.slidesharecdn.com/salesforceapexdeveloperguide-230916115800-b7c953cd/85/salesforce_apex_developer_guide-246-320.jpg)

![QuestionDataCategorySelection Entity Not Available in After Insert Triggers
The after insert trigger that fires after inserting one or more Question records doesn’t have access to the
QuestionDataCategorySelection records that are associated with the inserted Questions. For example, the following
query doesn’t return any results in an after insert trigger:
QuestionDataCategorySelection[] dcList =
[select Id,DataCategoryName from QuestionDataCategorySelection where ParentId IN :questions];
Fields Not Updateable in Before Triggers
Some field values are set during the system save operation, which occurs after before triggers have fired. As a result, these fields
cannot be modified or accurately detected in before insert or before update triggers. Some examples include:
• Task.isClosed
• Opportunity.amount*
• Opportunity.ForecastCategory
• Opportunity.isWon
• Opportunity.isClosed
• Contract.activatedDate
• Contract.activatedById
• Case.isClosed
• Solution.isReviewed
• Id (for all records)**
• createdDate (for all records)**
• lastUpdated (for all records)
• Event.WhoId (when Shared Activities is enabled)
• Task.WhoId (when Shared Activities is enabled)
* When Opportunity has no lineitems, Amount can be modified by a before trigger.
** Id and createdDate can be detected in before update triggers, but cannot be modified.
Fields Not Updateable in After Triggers
The following fields can’t be updated by after insert or after update triggers.
• Event.WhoId
• Task.WhoId
Considerations for Event DateTime Fields in Insert and Update Triggers
We recommend using the following date and time fields to create or update events.
• When creating or updating a timed Event, use ActivityDateTime to avoid issues with inconsistent date and time values.
• When creating or updating an all-day Event, use ActivityDate to avoid issues with inconsistent date and time values.
• We recommend that you use DurationInMinutes because it works with all updates and creates for Events.
249
Invoking Apex
Apex Developer Guide](https://image.slidesharecdn.com/salesforceapexdeveloperguide-230916115800-b7c953cd/85/salesforce_apex_developer_guide-253-320.jpg)
![• Triggers on FeedItem objects run before their attachment and capabilities information is saved, which means that
ConnectApi.FeedItem.attachmentinformationand ConnectApi.FeedElement.capabilities information
may not be available in the trigger.
The attachment and capabilities information may not be available from these methods:
ConnectApi.ChatterFeeds.getFeedItem, ConnectApi.ChatterFeeds.getFeedElement,
ConnectApi.ChatterFeeds.getFeedPoll, ConnectApi.ChatterFeeds.getFeedElementPoll,
ConnectApi.ChatterFeeds.postFeedItem, ConnectApi.ChatterFeeds.postFeedElement,
ConnectApi.ChatterFeeds.shareFeedItem, ConnectApi.ChatterFeeds.shareFeedElement,
ConnectApi.ChatterFeeds.voteOnFeedPoll,and ConnectApi.ChatterFeeds.voteOnFeedElementPoll
• FeedAttachment isn’t a triggerable object. You can access feed attachments in FeedItem update triggers through a SOQL query. For
example:
trigger FeedItemTrigger on FeedItem (after update) {
List<FeedAttachment> attachments = [SELECT Id, Title, Type, FeedEntityId
FROM FeedAttachment
WHERE FeedEntityId IN :Trigger.new ];
for (FeedAttachment attachment : attachments) {
System.debug(attachment.Type);
}
}
• When you insert a feed item with associated attachments, the FeedItem is inserted first, then the FeedAttachment records are
created. On update of a feed item with associated attachments, the FeedAttachment records are inserted first, then the FeedItem
is updated. As a result of this sequence of operations, in Salesforce Classic FeedAttachment is available in Update and
AfterInsert triggers. When the attachment is done through Lightning Experience, it’s available in both the Update and
AfterInsert triggers; but in the AfterInsert trigger, use the future method to access FeedAttachments.
• The following feed attachment operations cause the FeedItem update triggers to fire.
– A FeedAttachment is added to a FeedItem and causes the FeedItem type to change.
– A FeedAttachment is removed from a FeedItem and causes the FeedItem type to change.
• FeedItemtriggersaren’tfiredwheninsertingorupdatingaFeedAttachmentthatdoesn’tcauseachangeontheassociatedFeedItem.
• You can’t insert, update, or delete FeedAttachments in before update and after update FeedItem triggers.
• For FeedComment before insert and after insert triggers, the fields of a ContentVersion associated with the FeedComment (obtained
through FeedComment.RelatedRecordId) aren’t available.
Other Chatter Trigger Considerations
• Apex code uses extra security when executing in a Chatter context. To post to a private group, the user running the code must be
a member of that group. If the running user isn't a member, you can set the CreatedById field to be a member of the group in
the FeedItem record.
251
Invoking Apex
Apex Developer Guide](https://image.slidesharecdn.com/salesforceapexdeveloperguide-230916115800-b7c953cd/85/salesforce_apex_developer_guide-255-320.jpg)
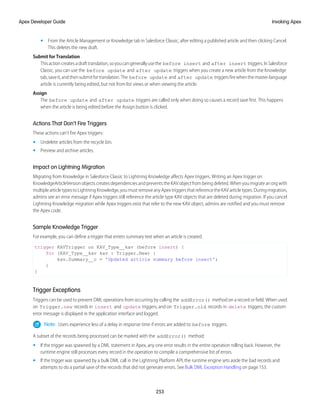
![If a trigger ever throws an unhandled exception, all records are marked with an error and no further processing takes place.
SEE ALSO:
Apex Reference Guide: SObject.addError()
Trigger and Bulk Request Best Practices
Acommondevelopmentpitfallistheassumptionthattriggerinvocationsneverincludemorethanonerecord.Apextriggersareoptimized
to operate in bulk, which, by definition, requires developers to write logic that supports bulk operations.
This is an example of a flawed programming pattern. It assumes that only one record is pulled in during a trigger invocation. While this
might support most user interface events, it does not support bulk operations invoked through SOAP API or Visualforce.
trigger MileageTrigger on Mileage__c (before insert, before update) {
User c = [SELECT Id FROM User WHERE mileageid__c = Trigger.new[0].id];
}
Thisisanotherexampleofaflawedprogrammingpattern.Itassumesthatfewerthan100recordsareinscopeduringatriggerinvocation.
If more than 100 queries are issued, the trigger would exceed the SOQL query limit.
trigger MileageTrigger on Mileage__c (before insert, before update) {
for(mileage__c m : Trigger.new){
User c = [SELECT Id FROM user WHERE mileageid__c = m.Id];
}
}
For more information on governor limits, see Execution Governors and Limits.
This example demonstrates the correct pattern to support the bulk nature of triggers while respecting the governor limits:
Trigger MileageTrigger on Mileage__c (before insert, before update) {
Set<ID> ids = Trigger.newMap.keySet();
List<User> c = [SELECT Id FROM user WHERE mileageid__c in :ids];
}
This pattern respects the bulk nature of the trigger by passing the Trigger.new collection to a set, then using the set in a single
SOQL query. This pattern captures all incoming records within the request while limiting the number of SOQL queries.
Best Practices for Designing Bulk Programs
The following are the best practices for this design pattern:
• Minimize the number of data manipulation language (DML) operations by adding records to collections and performing DML
operations against these collections.
• Minimize the number of SOQL statements by preprocessing records and generating sets, which can be placed in single SOQL
statement used with the IN clause.
SEE ALSO:
Developing Code in the Cloud
Asynchronous Apex
ApexoffersmultiplewaysforrunningyourApexcodeasynchronously.ChoosetheasynchronousApexfeaturethatbestsuitsyourneeds.
254
Invoking Apex
Apex Developer Guide](https://image.slidesharecdn.com/salesforceapexdeveloperguide-230916115800-b7c953cd/85/salesforce_apex_developer_guide-258-320.jpg)
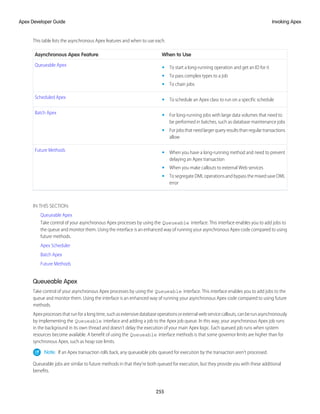
![• Getting an ID for your job: When you submit your job by invoking the System.enqueueJob method, the method returns the
ID of the new job. This ID corresponds to the ID of the AsyncApexJob record. Use this ID to identify and monitor your job, either
through the Salesforce UI (Apex Jobs page), or programmatically by querying your record from AsyncApexJob.
• Using non-primitive types: Your queueable class can contain member variables of non-primitive data types, such as sObjects or
custom Apex types. Those objects can be accessed when the job executes.
• Chaining jobs: You can chain one job to another job by starting a second job from a running job. Chaining jobs is useful if your
process depends on another process to have run first.
You can set a maximum stack depth of chained Queueable jobs, overriding the default limit of five in Developer and Trial Edition
organizations.
Note: Variables that are declared transient are ignored by serialization and deserialization and the value is set to null in
Queueable Apex.
Adding a Queueable Job to the Asynchronous Execution Queue
This example implements the Queueable interface. The execute method in this example inserts a new account. The
System.enqueueJob(queueable) method is used to add the job to the queue.
public class AsyncExecutionExample implements Queueable {
public void execute(QueueableContext context) {
Account a = new Account(Name='Acme',Phone='(415) 555-1212');
insert a;
}
}
To add this class as a job on the queue, call this method:
ID jobID = System.enqueueJob(new AsyncExecutionExample());
Afteryousubmityourqueueableclassforexecution,thejobisaddedtothequeueandwillbeprocessedwhensystemresourcesbecome
available. You can monitor the status of your job programmatically by querying AsyncApexJob or through the user interface in Setup
by entering Apex Jobs in the Quick Find box, then selecting Apex Jobs.
To query information about your submitted job, perform a SOQL query on AsyncApexJob by filtering on the job ID that the
System.enqueueJob method returns. This example uses the jobID variable that was obtained in the previous example.
AsyncApexJob jobInfo = [SELECT Status,NumberOfErrors FROM AsyncApexJob WHERE Id=:jobID];
Similar to future jobs, queueable jobs don’t process batches, and so the number of processed batches and the number of total batches
are always zero.
Adding a Queueable Job with a Specified Minimum Delay
Use the System.enqueueJob(queueable, delay) method to add queueable jobs to the asynchronous execution queue
with a specified minimum delay (0–10 minutes). The delay is ignored during Apex testing.
See System.enqueueJob(queueable, delay) in the Apex Reference Guide.
Warning: When you set the delay to 0 (zero), the queueable job is run as quickly as possible. With chained queueable jobs,
implement a mechanism to slow down or halt the job if necessary. Without such a fail-safe mechanism in place, you can rapidly
reach the daily async Apex limit.
In the following cases, it would be beneficial to adjust the timing before the queueable job is run.
• If the external system is rate-limited and can be overloaded by chained queueable jobs that are making rapid callouts.
256
Invoking Apex
Apex Developer Guide](https://image.slidesharecdn.com/salesforceapexdeveloperguide-230916115800-b7c953cd/85/salesforce_apex_developer_guide-260-320.jpg)
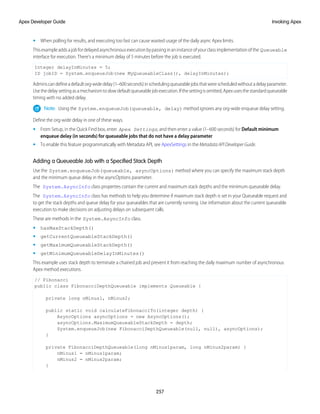
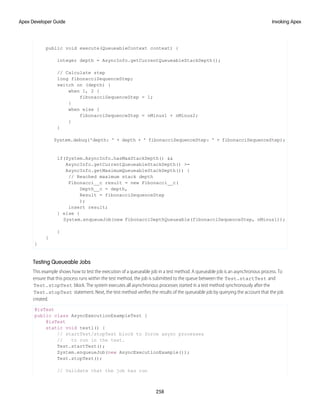
![// by verifying that the record was created.
// This query returns only the account created in test context by the
// Queueable class method.
Account acct = [SELECT Name,Phone FROM Account WHERE Name='Acme' LIMIT 1];
System.assertNotEquals(null, acct);
System.assertEquals('(415) 555-1212', acct.Phone);
}
}
Chaining Jobs
To run a job after some other processing is done first by another job, you can chain queueable jobs. To chain a job to another job, submit
the second job from the execute() method of your queueable class. You can add only one job from an executing job, which means
that only one child job can exist for each parent job. For example, if you have a second class called SecondJob that implements the
Queueable interface, you can add this class to the queue in the execute() method as follows:
public class AsyncExecutionExample implements Queueable {
public void execute(QueueableContext context) {
// Your processing logic here
// Chain this job to next job by submitting the next job
System.enqueueJob(new SecondJob());
}
}
Note: ApexallowsHTTPandwebservicecalloutsfromqueueablejobs,iftheyimplementthe Database.AllowsCallouts
marker interface. In queueable jobs that implement this interface, callouts are also allowed in chained queueable jobs.
You can test chained queueable jobs using appropriate stack depths, but be aware of applicable Apex governor limits. See Adding a
Queueable Job with a Specified Stack Depth.
Queueable Apex Limits
• The execution of a queued job counts one time against the shared limit for asynchronous Apex method executions. See Lightning
Platform Apex Limits.
• You can add up to 50 jobs to the queue with System.enqueueJob in a single transaction. In asynchronous transactions (for
example, from a batch Apex job), you can add only one job to the queue with System.enqueueJob. To check how many
queueable jobs have been added in one transaction, call Limits.getQueueableJobs().
• Because no limit is enforced on the depth of chained jobs, you can chain one job to another. You can repeat this process with each
new child job to link it to a new child job. For Developer Edition and Trial organizations, the maximum stack depth for chained jobs
is 5, which means that you can chain jobs four times. The maximum number of jobs in the chain is 5, including the initial parent
queueable job.
• When chaining jobs with System.enqueueJob, you can add only one job from an executing job. Only one child job can exist
for each parent queueable job. Starting multiple child jobs from the same queueable job isn’t supported.
IN THIS SECTION:
Detecting Duplicate Queueable Jobs
Reduce resource contention and race conditions by enqueuing only a single instance of your async Queueable job based on the
signature. Attempting to add more than one Queueable job to the processing queue with the same signature results in a
DuplicateMessageException when you try to enqueue subsequent jobs.
259
Invoking Apex
Apex Developer Guide](https://image.slidesharecdn.com/salesforceapexdeveloperguide-230916115800-b7c953cd/85/salesforce_apex_developer_guide-263-320.jpg)
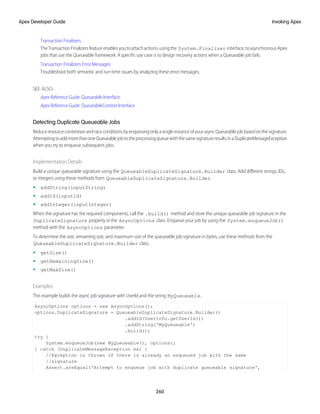
![ex.getMessage());
}
This example builds the async job signature using ApexClass Id and the hash value of an sObject.
AsyncOptions options = new AsyncOptions();
options.DuplicateSignature = QueueableDuplicateSignature.Builder()
.addInteger(System.hashCode(someAccount))
.addId([SELECT Id FROM ApexClass
WHERE Name='MyQueueable'].Id)
.build();
System.enqueueJob(new MyQueueable(), options);
Transaction Finalizers
The Transaction Finalizers feature enables you to attach actions, using the System.Finalizer interface, to asynchronous Apex
jobs that use the Queueable framework. A specific use case is to design recovery actions when a Queueable job fails.
The Transaction Finalizers feature provides a direct way for you to specify actions to be taken when asynchronous jobs succeed or fail.
Before Transaction Finalizers, you could only take these two actions for asynchronous job failures:
• Poll the status of AsyncApexJob using a SOQL query and re-enqueue the job if it fails
• Fire BatchApexErrorEvents when a batch Apex method encounters an unhandled exception
Withtransactionfinalizers,youcanattachapost-actionsequencetoaQueueablejobandtakerelevantactionsbasedonthejobexecution
result.
A Queueable job that failed due to an unhandled exception can be successively re-enqueued five times by a transaction finalizer. This
limit applies to a series of consecutive Queueable job failures. The counter is reset when the Queueable job completes without an
unhandled exception.
Finalizers can be implemented as an inner class. Also, you can implement both Queueable and Finalizer interfaces with the same class.
The Queueable job and the Finalizer run in separate Apex and Database transactions. For example, the Queueable can include DML, and
the Finalizer can include REST callouts. Using a Finalizer doesn’t count as an extra execution against your daily Async Apex limit.
Synchronous governor limits apply for the Finalizer transaction, except in these cases where asynchronous limits apply:
• Total heap size
• Maximum number of Apex jobs added to the queue with System.enqueueJob
• Maximum number of methods with the future annotation allowed per Apex invocation
For more information on governor limits, see Execution Governors and Limits.
System.Finalizer Interface
The System.Finalizer interface includes the execute method:
global void execute(System.FinalizerContext ctx) {}
This method is called on the provided FinalizerContext instance for every enqueued job with a finalizer attached. Within the execute
method, you can define the actions to be taken at the end of the Queueable job. An instance of System.FinalizerContext is
injected by the Apex runtime engine as an argument to the execute method.
System.FinalizerContext Interface
The System.FinalizerContext interface contains four methods.
261
Invoking Apex
Apex Developer Guide](https://image.slidesharecdn.com/salesforceapexdeveloperguide-230916115800-b7c953cd/85/salesforce_apex_developer_guide-265-320.jpg)
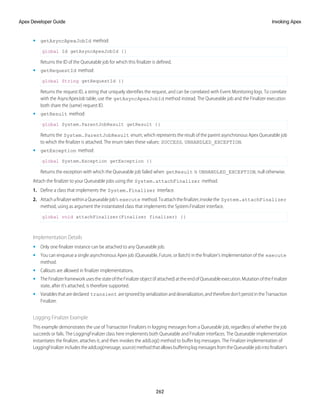
![state. When the Queueable job completes, the finalizer instance commits the buffered log. The finalizer state is preserved even if the
Queueable job fails, and can be accessed for use in DML in finalizer implementation or execution.
public class LoggingFinalizer implements Finalizer, Queueable {
// Queueable implementation
// A queueable job that uses LoggingFinalizer to buffer the log
// and commit upon exit, even if the queueable execution fails
public void execute(QueueableContext ctx) {
String jobId = '' + ctx.getJobId();
System.debug('Begin: executing queueable job: ' + jobId);
try {
// Create an instance of LoggingFinalizer and attach it
LoggingFinalizer f = new LoggingFinalizer();
System.attachFinalizer(f);
// While executing the job, log using LoggingFinalizer.addLog()
// Note that addlog() modifies the Finalizer's state after it is attached
DateTime start = DateTime.now();
f.addLog('About to do some work...', jobId);
while (true) {
// Results in limit error
}
} catch (Exception e) {
System.debug('Error executing the job [' + jobId + ']: ' + e.getMessage());
} finally {
System.debug('Completed: execution of queueable job: ' + jobId);
}
}
// Finalizer implementation
// Logging finalizer provides a public method addLog(message,source) that allows buffering
log lines from the Queueable job.
// When the Queueable job completes, regardless of success or failure, the LoggingFinalizer
instance commits this buffered log.
// Custom object LogMessage__c has four custom fields-see addLog() method.
// internal log buffer
private List<LogMessage__c> logRecords = new List<LogMessage__c>();
public void execute(FinalizerContext ctx) {
String parentJobId = '' + ctx.getAsyncApexJobId();
System.debug('Begin: executing finalizer attached to queueable job: ' + parentJobId);
// Update the log records with the parent queueable job id
System.Debug('Updating job id on ' + logRecords.size() + ' log records');
for (LogMessage__c log : logRecords) {
log.Request__c = parentJobId; // or could be ctx.getRequestId()
}
// Commit the buffer
System.Debug('committing log records to database');
263
Invoking Apex
Apex Developer Guide](https://image.slidesharecdn.com/salesforceapexdeveloperguide-230916115800-b7c953cd/85/salesforce_apex_developer_guide-267-320.jpg)
![Database.insert(logRecords, false);
if (ctx.getResult() == ParentJobResult.SUCCESS) {
System.debug('Parent queueable job [' + parentJobId + '] completed
successfully.');
} else {
System.debug('Parent queueable job [' + parentJobId + '] failed due to unhandled
exception: ' + ctx.getException().getMessage());
System.debug('Enqueueing another instance of the queueable...');
}
System.debug('Completed: execution of finalizer attached to queueable job: ' +
parentJobId);
}
public void addLog(String message, String source) {
// append the log message to the buffer
logRecords.add(new LogMessage__c(
DateTime__c = DateTime.now(),
Message__c = message,
Request__c = 'setbeforecommit',
Source__c = source
));
}
}
Retry Queueable Example
This example demonstrates how to re-enqueue a failed Queueable job in its finalizer. It also shows that jobs can be re-enqueued up to
a queueable chaining limit of 5 retries.
public class RetryLimitDemo implements Finalizer, Queueable {
// Queueable implementation
public void execute(QueueableContext ctx) {
String jobId = '' + ctx.getJobId();
System.debug('Begin: executing queueable job: ' + jobId);
try {
Finalizer finalizer = new RetryLimitDemo();
System.attachFinalizer(finalizer);
System.debug('Attached finalizer');
Integer accountNumber = 1;
while (true) { // results in limit error
Account a = new Account();
a.Name = 'Account-Number-' + accountNumber;
insert a;
accountNumber++;
}
} catch (Exception e) {
System.debug('Error executing the job [' + jobId + ']: ' + e.getMessage());
} finally {
System.debug('Completed: execution of queueable job: ' + jobId);
}
264
Invoking Apex
Apex Developer Guide](https://image.slidesharecdn.com/salesforceapexdeveloperguide-230916115800-b7c953cd/85/salesforce_apex_developer_guide-268-320.jpg)
![}
// Finalizer implementation
public void execute(FinalizerContext ctx) {
String parentJobId = '' + ctx.getAsyncApexJobId();
System.debug('Begin: executing finalizer attached to queueable job: ' + parentJobId);
if (ctx.getResult() == ParentJobResult.SUCCESS) {
System.debug('Parent queueable job [' + parentJobId + '] completed successfully.');
} else {
System.debug('Parent queueable job [' + parentJobId + '] failed due to unhandled
exception: ' + ctx.getException().getMessage());
System.debug('Enqueueing another instance of the queueable...');
String newJobId = '' + System.enqueueJob(new RetryLimitDemo()); // This call fails
after 5 times when it hits the chaining limit
System.debug('Enqueued new job: ' + newJobId);
}
System.debug('Completed: execution of finalizer attached to queueable job: ' +
parentJobId);
}
}
Best Practices
WeurgeISVstoexercisecautioninusingglobalFinalizerswithstate-mutatingmethodsinpackages.Ifasubscriberorg’simplementation
invokes such methods in the global Finalizer, it can result in unexpected behavior. Examine all state-mutating methods to see how they
affect the finalizer state and overall behavior.
Transaction Finalizers Error Messages
Troubleshoot both semantic and run-time issues by analyzing these error messages.
This table provides information about error messages in your Apex debug log.
Table 3: Troubleshooting Errors in Apex Debug Log
Reason for Failure
Failed Context
Error Message
System.attachFinalizer() is
invoked more than once in the same
Queueable instance.
Queueable Execution
MorethanoneFinalizercannotbeattached
to same Async Apex Job
The instantiated class parameter to
System.attachFinalizer()
Queueable Execution
Class {0} must implement the Finalizer
interface
doesn’t implement the
System.Finalizer interface.
System.attachFinalizer() is
invoked in an Apex context that's not
executing a Queueable instance.
Non-Queueable Execution
System.attachFinalizer(Finalizer) is not
allowed in this context
Invalid number of parameters to
System.attachFinalizer()
Queueable Execution
Invalid number of parameters
265
Invoking Apex
Apex Developer Guide](https://image.slidesharecdn.com/salesforceapexdeveloperguide-230916115800-b7c953cd/85/salesforce_apex_developer_guide-269-320.jpg)
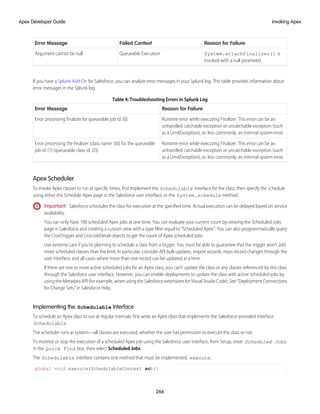
![The implemented method must be declared as global or public.
Use this method to instantiate the class you want to schedule.
Tip: Though it's possible to do additional processing in the execute method, we recommend that all processing must take
place in a separate class.
The following example implements the Schedulable interface for a class called MergeNumbers:
global class ScheduledMerge implements Schedulable {
global void execute(SchedulableContext SC) {
MergeNumbers M = new MergeNumbers();
}
}
To implement the class, execute this example in the Developer Console.
ScheduledMerge m = new ScheduledMerge();
String sch = '20 30 8 10 2 ?';
String jobID = System.schedule('Merge Job', sch, m);
You can also use the Schedulable interface with batch Apex classes. The following example implements the Schedulable
interface for a batch Apex class called Batchable:
global class ScheduledBatchable implements Schedulable {
global void execute(SchedulableContext sc) {
Batchable b = new Batchable();
Database.executeBatch(b);
}
}
An easier way to schedule a batch job is to call the System.scheduleBatch method without having to implement the
Schedulable interface.
UsetheSchedulableContextobjecttotrackthescheduledjobwhenit'sscheduled.TheSchedulableContext getTriggerID method
returns the ID of the CronTrigger object associated with this scheduled job as a string. You can query CronTrigger to track the
progress of the scheduled job.
To stop execution of a job that was scheduled, use the System.abortJob method with the ID returned by the getTriggerID
method.
Tracking the Progress of a Scheduled Job Using Queries
After the Apex job has been scheduled, you can obtain more information about it by running a SOQL query on CronTrigger. You can
retrieve the number of times the job has run, and the date and time when the job is scheduled to run again, as shown in this example.
CronTrigger ct =
[SELECT TimesTriggered, NextFireTime
FROM CronTrigger WHERE Id = :jobID];
The previous example assumes you have a jobID variable holding the ID of the job. The System.schedule method returns the
job ID. If you’re performing this query inside the execute method of your schedulable class, you can obtain the ID of the current job
by calling getTriggerId on the SchedulableContext argument variable. Assuming this variable name is sc, the modified example
becomes:
CronTrigger ct =
[SELECT TimesTriggered, NextFireTime
FROM CronTrigger WHERE Id = :sc.getTriggerId()];
267
Invoking Apex
Apex Developer Guide](https://image.slidesharecdn.com/salesforceapexdeveloperguide-230916115800-b7c953cd/85/salesforce_apex_developer_guide-271-320.jpg)
![You can also get the job’s name and the job’s type from the CronJobDetail record associated with the CronTrigger record. To do so, use
the CronJobDetail relationship when performing a query on CronTrigger. This example retrieves the most recent CronTrigger
record with the job name and type from CronJobDetail.
CronTrigger job =
[SELECT Id, CronJobDetail.Id, CronJobDetail.Name, CronJobDetail.JobType
FROM CronTrigger ORDER BY CreatedDate DESC LIMIT 1];
Alternatively, you can query CronJobDetail directly to get the job’s name and type. This next example gets the job’s name and type for
the CronTrigger record queried in the previous example. The corresponding CronJobDetail record ID is obtained by the
CronJobDetail.Id expression on the CronTrigger record.
CronJobDetail ctd =
[SELECT Id, Name, JobType
FROM CronJobDetail WHERE Id = :job.CronJobDetail.Id];
To obtain the total count of all Apex scheduled jobs, excluding all other scheduled job types, perform the following query. Note the
value '7' is specified for the job type, which corresponds to the scheduled Apex job type.
SELECT COUNT() FROM CronTrigger WHERE CronJobDetail.JobType = '7'
Testing the Apex Scheduler
The following is an example of how to test using the Apex scheduler.
The System.schedule methodstartsanasynchronousprocess.WhenyoutestscheduledApex,youmustensurethatthescheduled
jobisfinishedbeforetestingagainsttheresults.UsetheTestmethods startTest and stopTest aroundthe System.schedule
method to ensure it finishes before continuing your test. All asynchronous calls made after the startTest method are collected by
the system. When stopTest is executed, all asynchronous processes are run synchronously. If you don’t include the
System.schedule method within the startTest and stopTest methods, the scheduled job executes at the end of your
test method for Apex saved using Salesforce API version 25.0 and later, but not in earlier versions.
This example defines a class to be tested.
global class TestScheduledApexFromTestMethod implements Schedulable {
// This test runs a scheduled job at midnight Sept. 3rd. 2042
public static String CRON_EXP = '0 0 0 3 9 ? 2042';
global void execute(SchedulableContext ctx) {
CronTrigger ct = [SELECT Id, CronExpression, TimesTriggered, NextFireTime
FROM CronTrigger WHERE Id = :ctx.getTriggerId()];
System.assertEquals(CRON_EXP, ct.CronExpression);
System.assertEquals(0, ct.TimesTriggered);
System.assertEquals('2042-09-03 00:00:00', String.valueOf(ct.NextFireTime));
Account a = [SELECT Id, Name FROM Account WHERE Name =
'testScheduledApexFromTestMethod'];
a.name = 'testScheduledApexFromTestMethodUpdated';
update a;
}
}
268
Invoking Apex
Apex Developer Guide](https://image.slidesharecdn.com/salesforceapexdeveloperguide-230916115800-b7c953cd/85/salesforce_apex_developer_guide-272-320.jpg)
![The following tests the class:
@istest
class TestClass {
static testmethod void test() {
Test.startTest();
Account a = new Account();
a.Name = 'testScheduledApexFromTestMethod';
insert a;
// Schedule the test job
String jobId = System.schedule('testBasicScheduledApex',
TestScheduledApexFromTestMethod.CRON_EXP,
new TestScheduledApexFromTestMethod());
// Get the information from the CronTrigger API object
CronTrigger ct = [SELECT Id, CronExpression, TimesTriggered,
NextFireTime
FROM CronTrigger WHERE id = :jobId];
// Verify the expressions are the same
System.assertEquals(TestScheduledApexFromTestMethod.CRON_EXP,
ct.CronExpression);
// Verify the job has not run
System.assertEquals(0, ct.TimesTriggered);
// Verify the next time the job will run
System.assertEquals('2042-09-03 00:00:00',
String.valueOf(ct.NextFireTime));
System.assertNotEquals('testScheduledApexFromTestMethodUpdated',
[SELECT id, name FROM account WHERE id = :a.id].name);
Test.stopTest();
System.assertEquals('testScheduledApexFromTestMethodUpdated',
[SELECT Id, Name FROM Account WHERE Id = :a.Id].Name);
}
}
Using the System.schedule Method
After you implement a class with the Schedulable interface, use the System.schedule method to execute it. The scheduler
runs as system—all classes are executed, whether the user has permission to execute the class, or not.
Note: Use extreme care if you’re planning to schedule a class from a trigger. You must be able to guarantee that the trigger won’t
add more scheduled classes than the limit. In particular, consider API bulk updates, import wizards, mass record changes through
the user interface, and all cases where more than one record can be updated at a time.
269
Invoking Apex
Apex Developer Guide](https://image.slidesharecdn.com/salesforceapexdeveloperguide-230916115800-b7c953cd/85/salesforce_apex_developer_guide-273-320.jpg)
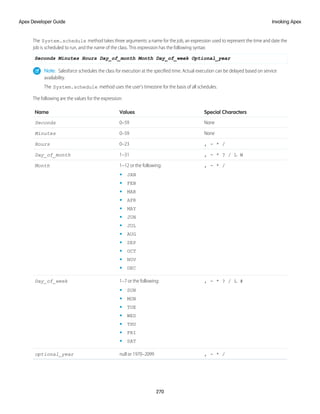
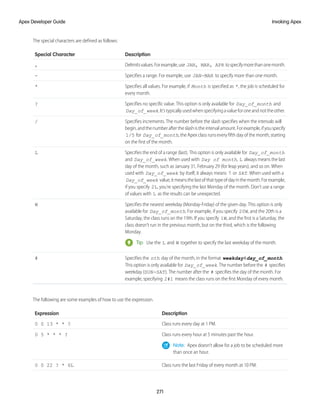
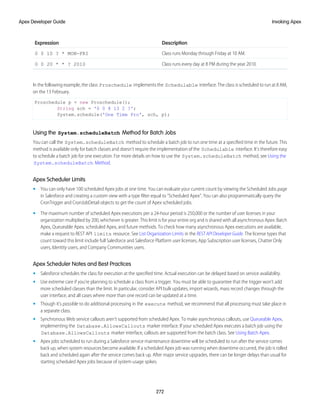
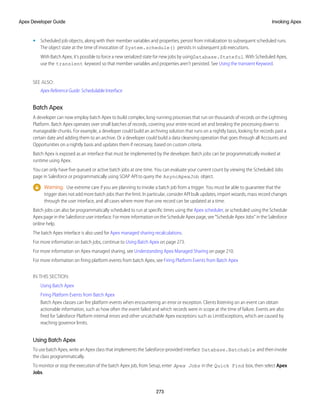
![The following is the instance method with the Database.BatchableContext object:
Description
Returns
Arguments
Name
Returns the ID of the AsyncApexJob object associated with
this batch job as a string. Use this method to track the
ID
getJobID
progress of records in the batch job. You can also use this
ID with the System.abortJob method.
The following example uses the Database.BatchableContext to query the AsyncApexJob associated with the batch job.
public void finish(Database.BatchableContext BC){
// Get the ID of the AsyncApexJob representing this batch job
// from Database.BatchableContext.
// Query the AsyncApexJob object to retrieve the current job's information.
AsyncApexJob a = [SELECT Id, Status, NumberOfErrors, JobItemsProcessed,
TotalJobItems, CreatedBy.Email
FROM AsyncApexJob WHERE Id =
:BC.getJobId()];
// Send an email to the Apex job's submitter notifying of job completion.
Messaging.SingleEmailMessage mail = new Messaging.SingleEmailMessage();
String[] toAddresses = new String[] {a.CreatedBy.Email};
mail.setToAddresses(toAddresses);
mail.setSubject('Apex Sharing Recalculation ' + a.Status);
mail.setPlainTextBody
('The batch Apex job processed ' + a.TotalJobItems +
' batches with '+ a.NumberOfErrors + ' failures.');
Messaging.sendEmail(new Messaging.SingleEmailMessage[] { mail });
}
Using Database.QueryLocator to Define Scope
The start method can return either a Database.QueryLocator object that contains the records to use in the batch job or
an iterable.
The following example uses a Database.QueryLocator:
public class SearchAndReplace implements Database.Batchable<sObject>{
public final String Query;
public final String Entity;
public final String Field;
public final String Value;
public SearchAndReplace(String q, String e, String f, String v){
Query=q; Entity=e; Field=f;Value=v;
}
public Database.QueryLocator start(Database.BatchableContext BC){
return Database.getQueryLocator(query);
}
275
Invoking Apex
Apex Developer Guide](https://image.slidesharecdn.com/salesforceapexdeveloperguide-230916115800-b7c953cd/85/salesforce_apex_developer_guide-279-320.jpg)
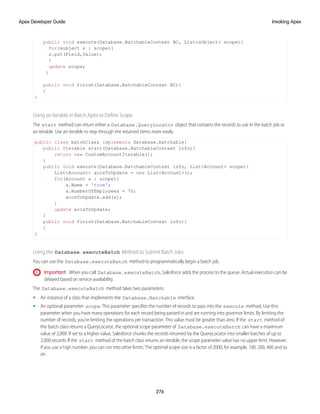
![The Database.executeBatch method returns the ID of the AsyncApexJob object, which you can use to track the progress of
the job. For example:
ID batchprocessid = Database.executeBatch(reassign);
AsyncApexJob aaj = [SELECT Id, Status, JobItemsProcessed, TotalJobItems, NumberOfErrors
FROM AsyncApexJob WHERE ID =: batchprocessid ];
You can also use this ID with the System.abortJob method.
For more information, see AsyncApexJob in the Object Reference for Salesforce.
Holding Batch Jobs in the Apex Flex Queue
With the Apex flex queue, you can submit up to 100 batch jobs.
The outcome of Database.executeBatch is as follows.
• The batch job is placed in the Apex flex queue, and its status is set to Holding.
• If the Apex flex queue has the maximum number of 100 jobs, Database.executeBatch throws a LimitException
and doesn't add the job to the queue.
Note: If your org doesn’t have Apex flex queue enabled, Database.executeBatch adds the batch job to the batch job
queue with the Queued status. If the concurrent limit of queued or active batch job has been reached, a LimitException
is thrown, and the job isn’t queued.
Reordering Jobs in the Apex Flex Queue
While submitted jobs have a status of Holding, you can reorder them in the Salesforce user interface to control which batch jobs are
processed first. To do so, from Setup, enter Apex Flex Queue in the Quick Find box, then select Apex Flex Queue.
Alternatively, you can use Apex methods to reorder batch jobs in the flex queue. To move a job to a new position, call one of the
System.FlexQueue methods. Pass the method the job ID and, if applicable, the ID of the job next to the moved job’s new position.
For example:
Boolean isSuccess = System.FlexQueue.moveBeforeJob(jobToMoveId, jobInQueueId);
You can reorder jobs in the Apex flex queue to prioritize jobs. For example, you can move a batch job up to the first position in the
holding queue to be processed first when resources become available. Otherwise, jobs are processed “first-in, first-out”—in the order
in which they’re submitted.
When system resources become available, the system picks up the next job from the top of the Apex flex queue and moves it to the
batch job queue. The system can process up to five queued or active jobs simultaneously for each organization. The status of these
moved jobs changes from Holding to Queued. Queued jobs get executed when the system is ready to process new jobs. You can
monitor queued jobs on the Apex Jobs page.
Batch Job Statuses
The following table lists all possible statuses for a batch job along with a description of each.
Description
Status
Job has been submitted and is held in the Apex flex queue until
systemresourcesbecomeavailabletoqueuethejobforprocessing.
Holding
Job is awaiting execution.
Queued
277
Invoking Apex
Apex Developer Guide](https://image.slidesharecdn.com/salesforceapexdeveloperguide-230916115800-b7c953cd/85/salesforce_apex_developer_guide-281-320.jpg)
![Description
Status
The start method of the job has been invoked. This status can
last a few minutes depending on the size of the batch of records.
Preparing
Job is being processed.
Processing
Job aborted by a user.
Aborted
Job completed with or without failures.
Completed
Job experienced a system failure.
Failed
Using the System.scheduleBatch Method
You can use the System.scheduleBatch method to schedule a batch job to run once at a future time.
The System.scheduleBatch method takes the following parameters.
• An instance of a class that implements the Database.Batchable interface.
• The job name.
• The time interval, in minutes, after which the job starts executing.
• An optional scope value. This parameter specifies the number of records to pass into the execute method. Use this parameter
when you have many operations for each record being passed in and are running into governor limits. By limiting the number of
records, you’re limiting the operations per transaction. This value must be greater than zero.If the start method of the batch class
returns a QueryLocator, the optional scope parameter of Database.executeBatch can have a maximum value of 2,000. If
set to a higher value, Salesforce chunks the records returned by the QueryLocator into smaller batches of up to 2,000 records. If the
start method of the batch class returns an iterable, the scope parameter value has no upper limit. However, if you use a high
number, you can run into other limits. The optimal scope size is a factor of 2000, for example, 100, 200, 400 and so on.
The System.scheduleBatch method returns the scheduled job ID (CronTrigger ID).
This example schedules a batch job to run 60 minutes from now by calling System.scheduleBatch. The example passes this
method an instance of a batch class (the reassign variable), a job name, and a time interval of 60 minutes. The optional scope
parameter has been omitted. The method returns the scheduled job ID, which is used to query CronTrigger to get the status of the
corresponding scheduled job.
String cronID = System.scheduleBatch(reassign, 'job example', 60);
CronTrigger ct = [SELECT Id, TimesTriggered, NextFireTime
FROM CronTrigger WHERE Id = :cronID];
// TimesTriggered should be 0 because the job hasn't started yet.
System.assertEquals(0, ct.TimesTriggered);
System.debug('Next fire time: ' + ct.NextFireTime);
// For example:
// Next fire time: 2013-06-03 13:31:23
For more information, see CronTrigger in the Object Reference for Salesforce.
Note: Some things to note about System.scheduleBatch:
• Whenyoucall System.scheduleBatch,Salesforceschedulesthejobforexecutionatthespecifiedtime.Actualexecution
occurs at or after that time, depending on service availability.
278
Invoking Apex
Apex Developer Guide](https://image.slidesharecdn.com/salesforceapexdeveloperguide-230916115800-b7c953cd/85/salesforce_apex_developer_guide-282-320.jpg)
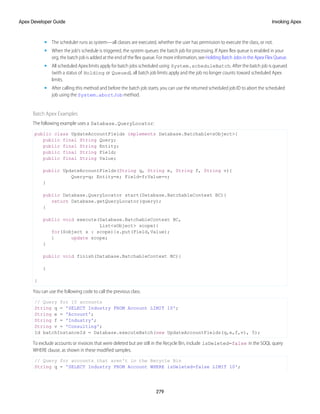
![String e = 'Account';
String f = 'Industry';
String v = 'Consulting';
Id batchInstanceId = Database.executeBatch(new UpdateAccountFields(q,e,f,v), 5);
// Query for invoices that aren't in the Recycle Bin
String q =
'SELECT Description__c FROM Invoice_Statement__c WHERE isDeleted=false LIMIT 10';
String e = 'Invoice_Statement__c';
String f = 'Description__c';
String v = 'Updated description';
Id batchInstanceId = Database.executeBatch(new UpdateInvoiceFields(q,e,f,v), 5);
The following class uses batch Apex to reassign all accounts owned by a specific user to a different user.
public class OwnerReassignment implements Database.Batchable<sObject>{
String query;
String email;
Id toUserId;
Id fromUserId;
public Database.querylocator start(Database.BatchableContext BC){
return Database.getQueryLocator(query);}
public void execute(Database.BatchableContext BC, List<sObject> scope){
List<Account> accns = new List<Account>();
for(sObject s : scope){Account a = (Account)s;
if(a.OwnerId==fromUserId){
a.OwnerId=toUserId;
accns.add(a);
}
}
update accns;
}
public void finish(Database.BatchableContext BC){
Messaging.SingleEmailMessage mail = new Messaging.SingleEmailMessage();
mail.setToAddresses(new String[] {email});
mail.setReplyTo('batch@acme.com');
mail.setSenderDisplayName('Batch Processing');
mail.setSubject('Batch Process Completed');
mail.setPlainTextBody('Batch Process has completed');
Messaging.sendEmail(new Messaging.SingleEmailMessage[] { mail });
}
}
Use the following to execute the OwnerReassignment class in the previous example.
OwnerReassignment reassign = new OwnerReassignment();
reassign.query = 'SELECT Id, Name, Ownerid FROM Account ' +
280
Invoking Apex
Apex Developer Guide](https://image.slidesharecdn.com/salesforceapexdeveloperguide-230916115800-b7c953cd/85/salesforce_apex_developer_guide-284-320.jpg)
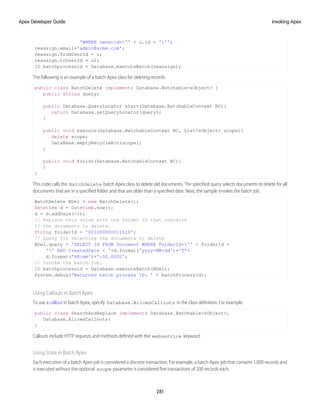
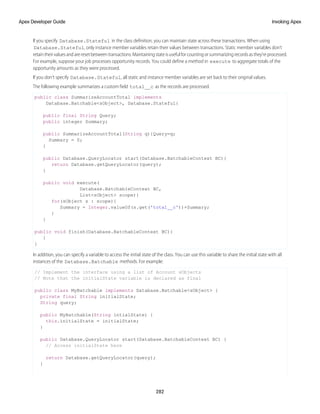
![public void execute(Database.BatchableContext BC,
List<sObject> batch) {
// Access initialState here
}
public void finish(Database.BatchableContext BC) {
// Access initialState here
}
}
The initialState stores only the initial state of the class. You can’t use it to pass information between instances of the class during
execution of the batch job. For example, if you change the value of initialState in execute, the second chunk of processed
records can’t access the new value. Only the initial value is accessible.
Testing Batch Apex
When testing your batch Apex, you can test only one execution of the execute method. Use the scope parameter of the
executeBatch method to limit the number of records passed into the execute method to ensure that you aren’t running into
governor limits.
The executeBatch method starts an asynchronous process. When you test batch Apex, make certain that the asynchronously
processed batch job is finished before testing against the results. Use the Test methods startTest and stopTest around the
executeBatch method to ensure that it finishes before continuing your test. All asynchronous calls made after the startTest
method are collected by the system. When stopTest is executed, all asynchronous processes are run synchronously. If you don’t
include the executeBatch method within the startTest and stopTest methods, the batch job executes at the end of your
test method. This execution order applies for Apex saved using API version 25.0 and later, but not for earlier versions.
ForApexsavedusingAPIversion22.0andlater,exceptionsthatoccurduringtheexecutionofabatchApexjobinvokedbyatestmethod
are passed to the calling test method. As a result, these exceptions cause the test method to fail. If you want to handle exceptions in the
test method, enclose the code in try and catch statements. Place the catch block after the stopTest method. However, with
Apex saved using Apex version 21.0 and earlier, such exceptions don’t get passed to the test method and don’t cause test methods to
fail.
Note: Asynchronous calls, such as @future or executeBatch, called in a startTest, stopTest block, don’t count
against your limits for the number of queued jobs.
The following example tests the OwnerReassignment class.
public static testMethod void testBatch() {
user u = [SELECT ID, UserName FROM User
WHERE username='testuser1@acme.com'];
user u2 = [SELECT ID, UserName FROM User
WHERE username='testuser2@acme.com'];
String u2id = u2.id;
// Create 200 test accounts - this simulates one execute.
// Important - the Salesforce test framework only allows you to
// test one execute.
List <Account> accns = new List<Account>();
for(integer i = 0; i<200; i++){
Account a = new Account(Name='testAccount'+ i,
Ownerid = u.ID);
accns.add(a);
283
Invoking Apex
Apex Developer Guide](https://image.slidesharecdn.com/salesforceapexdeveloperguide-230916115800-b7c953cd/85/salesforce_apex_developer_guide-287-320.jpg)
![method in the running batch class calls a method in a helper class to start the batch job, the API version of the helper class doesn’t
matter.
SEE ALSO:
Apex Reference Guide: Batchable Interface
Apex Reference Guide:FlexQueue Class
Apex Reference Guide: Test.enqueueBatchJobs()
Apex Reference Guide: Test.getFlexQueueOrder()
Salesforce Help: Client-driven and Server-driven Paging for Salesforce Connect—OData 2.0 and 4.0 Adapters
Salesforce Help: Define an External Data Source for Salesforce Connect—OData 2.0 or 4.0 Adapter
Firing Platform Events from Batch Apex
Batch Apex classes can fire platform events when encountering an error or exception. Clients listening on an event can obtain actionable
information, such as how often the event failed and which records were in scope at the time of failure. Events are also fired for Salesforce
Platform internal errors and other uncatchable Apex exceptions such as LimitExceptions, which are caused by reaching governor limits.
An event message provides more granular error tracking than the Apex Jobs UI. It includes the record IDs being processed, exception
type, exception message, and stack trace. You can also incorporate custom handling and retry logic for failures. You can invoke custom
Apex logic from any trigger on this type of event, so Apex developers can build functionality like custom logging or automated retry
handling.
For information on subscribing to platform events, see Subscribing to Platform Events.
The BatchApexErrorEvent object represents a platform event associated with a batch Apex class. This object is available in API version
44.0 and later. If the start, execute, or finish method of a batch Apex job encounters an unhandled exception, a
BatchApexErrorEvent platform event is fired. For more details, see BatchApexErrorEvent in the Platform Events Developer Guide.
To fire a platform event, a batch Apex class declaration must implement the Database.RaisesPlatformEvents interface.
public with sharing class YourSampleBatchJob implements Database.Batchable<SObject>,
Database.RaisesPlatformEvents{
// class implementation
}
Example: This example creates a trigger to determine which accounts failed in the batch transaction. Custom field Dirty__c
indicates that the account was one of a failing batch and ExceptionType__c indicates the exception that was encountered.
JobScope and ExceptionType are fields in the BatchApexErrorEvent object.
trigger MarkDirtyIfFail on BatchApexErrorEvent (after insert) {
Set<Id> asyncApexJobIds = new Set<Id>();
for(BatchApexErrorEvent evt:Trigger.new){
asyncApexJobIds.add(evt.AsyncApexJobId);
}
Map<Id,AsyncApexJob> jobs = new Map<Id,AsyncApexJob>(
[SELECT id, ApexClass.Name FROM AsyncApexJob WHERE Id IN :asyncApexJobIds]
);
List<Account> records = new List<Account>();
for(BatchApexErrorEvent evt:Trigger.new){
//only handle events for the job(s) we care about
if(jobs.get(evt.AsyncApexJobId).ApexClass.Name == 'AccountUpdaterJob'){
287
Invoking Apex
Apex Developer Guide](https://image.slidesharecdn.com/salesforceapexdeveloperguide-230916115800-b7c953cd/85/salesforce_apex_developer_guide-291-320.jpg)
![To define a future method, simply annotate it with the future annotation, as follows.
global class FutureClass
{
@future
public static void myFutureMethod()
{
// Perform some operations
}
}
Methods with the future annotation must be static methods, and can only return a void type. The specified parameters must be
primitive data types, arrays of primitive data types, or collections of primitive data types. Methods with the future annotation can’t
take sObjects or objects as arguments.
The reason why sObjects can’t be passed as arguments to future methods is because the sObject can change between the time you call
the method and the time it executes. In this case, the future method gets the old sObject values and can overwrite them. To work with
sObjects that already exist in the database, pass the sObject ID instead (or collection of IDs) and use the ID to perform a query for the
most up-to-date record. The following example shows how to do so with a list of IDs.
global class FutureMethodRecordProcessing
{
@future
public static void processRecords(List<ID> recordIds)
{
// Get those records based on the IDs
List<Account> accts = [SELECT Name FROM Account WHERE Id IN :recordIds];
// Process records
}
}
The following is a skeletal example of a future method that makes a callout to an external service. Notice that the annotation takes an
extra parameter (callout=true) to indicate that callouts are allowed. To learn more about callouts, see Invoking Callouts Using
Apex.
global class FutureMethodExample
{
@future(callout=true)
public static void getStockQuotes(String acctName)
{
// Perform a callout to an external service
}
}
Inserting a user with a non-null role must be done in a separate thread from DML operations on other sObjects. In this example, the
future method, insertUserWithRole, which is defined in the Util class, performs the insertion of a user with the COO role.
ThisfuturemethodrequirestheCOOroletobedefinedintheorganization.The useFutureMethod methodin MixedDMLFuture
inserts an account and calls the future method, insertUserWithRole.
This Util class contains the future method for inserting a user with a non-null role.
public class Util {
@future
public static void insertUserWithRole(
String uname, String al, String em, String lname) {
289
Invoking Apex
Apex Developer Guide](https://image.slidesharecdn.com/salesforceapexdeveloperguide-230916115800-b7c953cd/85/salesforce_apex_developer_guide-293-320.jpg)
![Profile p = [SELECT Id FROM Profile WHERE Name='Standard User'];
UserRole r = [SELECT Id FROM UserRole WHERE Name='COO'];
// Create new user with a non-null user role ID
User u = new User(alias = al, email=em,
emailencodingkey='UTF-8', lastname=lname,
languagelocalekey='en_US',
localesidkey='en_US', profileid = p.Id, userroleid = r.Id,
timezonesidkey='America/Los_Angeles',
username=uname);
insert u;
}
}
This class contains the main method that calls the future method that was defined previously.
public class MixedDMLFuture {
public static void useFutureMethod() {
// First DML operation
Account a = new Account(Name='Acme');
insert a;
// This next operation (insert a user with a role)
// can't be mixed with the previous insert unless
// it is within a future method.
// Call future method to insert a user with a role.
Util.insertUserWithRole(
'mruiz@awcomputing.com', 'mruiz',
'mruiz@awcomputing.com', 'Ruiz');
}
}
You can invoke future methods the same way you invoke any other method. However, a future method can’t invoke another future
method.
Methods with the future annotation have the following limits:
• No more than 0 in batch and future contexts; 50 in queueable context method calls per Apex invocation. Asynchronous calls, such
as @future or executeBatch, called in a startTest, stopTest block, don’t count against your limits for the number
of queued jobs.
Note: Having multiple future methods fan out from a queueable job isn’t recommended practice as it can rapidly add a large
number of future methods to the asynchronous queue. Request processing can be delayed and you can quickly hit the daily
maximum limit for asynchronous Apex method executions. See Future Method Performance Best Practices and Lightning
Platform Apex Limits.
• The maximum number of future method invocations per a 24-hour period is 250,000 or the number of user licenses in your
organization multiplied by 200, whichever is greater. This limit is for your entire org and is shared with all asynchronous Apex: Batch
Apex, Queueable Apex, scheduled Apex, and future methods. To check how many asynchronous Apex executions are available,
make a request to REST API limits resource. See List Organization Limits in the REST API Developer Guide. The license types that
count toward this limit include full Salesforce and Salesforce Platform user licenses, App Subscription user licenses, Chatter Only
users, Identity users, and Company Communities users.
Note:
• Future jobs queued by a transaction aren’t processed if the transaction rolls back.
290
Invoking Apex
Apex Developer Guide](https://image.slidesharecdn.com/salesforceapexdeveloperguide-230916115800-b7c953cd/85/salesforce_apex_developer_guide-294-320.jpg)
![• Future method jobs queued before a Salesforce service maintenance downtime remain in the queue. After service downtime
ends and when system resources become available, the queued future method jobs are executed. If a future method was
running when downtime occurred, the future method execution is rolled back and restarted after the service comes back up.
Testing Future Methods
To test methods defined with the future annotation, call the class containing the method in a startTest(), stopTest() code block. All
asynchronouscallsmadeafterthe startTest methodarecollectedbythesystem.When stopTest isexecuted,allasynchronous
processes are run synchronously.
For our example, here’s the test class.
@isTest
private class MixedDMLFutureTest {
@isTest static void test1() {
User thisUser = [SELECT Id FROM User WHERE Id = :UserInfo.getUserId()];
// System.runAs() allows mixed DML operations in test context
System.runAs(thisUser) {
// startTest/stopTest block to run future method synchronously
Test.startTest();
MixedDMLFuture.useFutureMethod();
Test.stopTest();
}
// The future method will run after Test.stopTest();
// Verify account is inserted
Account[] accts = [SELECT Id from Account WHERE Name='Acme'];
System.assertEquals(1, accts.size());
// Verify user is inserted
User[] users = [SELECT Id from User where username='mruiz@awcomputing.com'];
System.assertEquals(1, users.size());
}
}
Future Method Performance Best Practices
Salesforce uses a queue-based framework to handle asynchronous processes from such sources as future methods and batch Apex. This
queue is used to balance request workload across organizations. Use the following best practices to ensure your organization is efficiently
using the queue for your asynchronous processes.
• Avoid adding large numbers of future methods to the asynchronous queue, if possible. If more than 2,000 unprocessed requests
from a single organization are in the queue, any additional requests from the same organization will be delayed while the queue
handles requests from other organizations.
• Ensure that future methods execute as fast as possible. To ensure fast execution of batch jobs, minimize Web service callout times
and tune queries used in your future methods. The longer the future method executes, the more likely other queued requests are
delayed when there are a large number of requests in the queue.
• Test your future methods at scale. To help determine if delays can occur, test using an environment that generates the maximum
number of future methods you’d expect to handle.
• Consider using batch Apex instead of future methods to process large numbers of records.
291
Invoking Apex
Apex Developer Guide](https://image.slidesharecdn.com/salesforceapexdeveloperguide-230916115800-b7c953cd/85/salesforce_apex_developer_guide-295-320.jpg)
![}
webservice static Account createAccount(AccountInfo info) {
Account acct = new Account();
acct.Name = info.AcctName;
acct.AccountNumber = String.valueOf(info.AcctNumber);
insert acct;
return acct;
}
webservice static Id [] createAccounts(Account parent,
Account child, Account grandChild) {
insert parent;
child.parentId = parent.Id;
insert child;
grandChild.parentId = child.Id;
insert grandChild;
Id [] results = new Id[3];
results[0] = parent.Id;
results[1] = child.Id;
results[2] = grandChild.Id;
return results;
}
}
// Test class for the previous class.
@isTest
private class SpecialAccountsTest {
testMethod static void testAccountCreate() {
SpecialAccounts.AccountInfo info = new SpecialAccounts.AccountInfo();
info.AcctName = 'Manoj Cheenath';
info.AcctNumber = 12345;
Account acct = SpecialAccounts.createAccount(info);
System.assert(acct != null);
}
}
You can invoke this Web service using AJAX. For more information, see Apex in AJAX on page 312.
Overloading Web Service Methods
SOAP and WSDL do not provide good support for overloading methods. Consequently, Apex does not allow two methods marked with
the webservice keyword to have the same name. Web service methods that have the same name in the same class generate a
compile-time error.
Exposing Apex Classes as REST Web Services
You can expose your Apex classes and methods so that external applications can access your code and your application through the
REST architecture.
This is an overview of how to expose your Apex classes as REST web services. You'll learn about the class and method annotations and
see code samples that show you how to implement this functionality.
294
Invoking Apex
Apex Developer Guide](https://image.slidesharecdn.com/salesforceapexdeveloperguide-230916115800-b7c953cd/85/salesforce_apex_developer_guide-298-320.jpg)
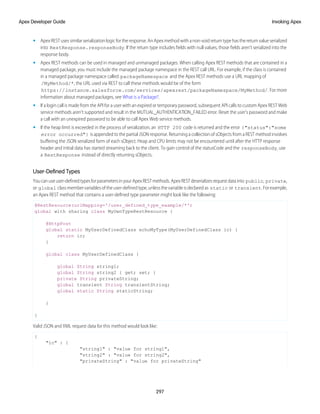
![Apex REST Code Samples
These code samples show you how to expose Apex classes and methods through the REST architecture and how to call those resources
from a client.
IN THIS SECTION:
Apex REST Basic Code Sample
This sample shows how to implement a simple REST API in Apex with three HTTP request methods to delete, retrieve, and update
a record.
Apex REST Code Sample Using RestRequest
This sample shows you how to add an attachment to a record by using the RestRequest object.
Apex REST Basic Code Sample
This sample shows how to implement a simple REST API in Apex with three HTTP request methods to delete, retrieve, and update a
record.
For more information about authenticating with cURL, see the Quick Start section of the REST API Developer Guide.
1. Create an Apex class in your instance from Setup. Enter Apex Classes in the Quick Find box, select Apex Classes, and
then click New. Add this code to the new Apex class:
@RestResource(urlMapping='/Account/*')
global with sharing class MyRestResource {
@HttpDelete
global static void doDelete() {
RestRequest req = RestContext.request;
RestResponse res = RestContext.response;
String accountId = req.requestURI.substring(req.requestURI.lastIndexOf('/')+1);
Account account = [SELECT Id FROM Account WHERE Id = :accountId];
delete account;
}
@HttpGet
global static Account doGet() {
RestRequest req = RestContext.request;
RestResponse res = RestContext.response;
String accountId = req.requestURI.substring(req.requestURI.lastIndexOf('/')+1);
Account result = [SELECT Id, Name, Phone, Website FROM Account WHERE Id =
:accountId];
return result;
}
@HttpPost
global static String doPost(String name,
String phone, String website) {
Account account = new Account();
account.Name = name;
account.phone = phone;
account.website = website;
302
Invoking Apex
Apex Developer Guide](https://image.slidesharecdn.com/salesforceapexdeveloperguide-230916115800-b7c953cd/85/salesforce_apex_developer_guide-306-320.jpg)
![Example 1: Create Tasks for Contacts
The following is an example of how you can look up a contact based on the inbound email address and create a new task.
global class CreateTaskEmailExample implements Messaging.InboundEmailHandler {
global Messaging.InboundEmailResult handleInboundEmail(Messaging.inboundEmail email,
Messaging.InboundEnvelope env){
// Create an InboundEmailResult object for returning the result of the
// Apex Email Service
Messaging.InboundEmailResult result = new Messaging.InboundEmailResult();
String myPlainText= '';
// Add the email plain text into the local variable
myPlainText = email.plainTextBody;
// New Task object to be created
Task[] newTask = new Task[0];
// Try to look up any contacts based on the email from address
// If there is more than one contact with the same email address,
// an exception will be thrown and the catch statement will be called.
try {
Contact vCon = [SELECT Id, Name, Email
FROM Contact
WHERE Email = :email.fromAddress
LIMIT 1];
// Add a new Task to the contact record we just found above.
newTask.add(new Task(Description = myPlainText,
Priority = 'Normal',
Status = 'Inbound Email',
Subject = email.subject,
IsReminderSet = true,
ReminderDateTime = System.now()+1,
WhoId = vCon.Id));
// Insert the new Task
insert newTask;
System.debug('New Task Object: ' + newTask );
}
// If an exception occurs when the query accesses
// the contact record, a QueryException is called.
// The exception is written to the Apex debug log.
catch (QueryException e) {
System.debug('Query Issue: ' + e);
}
// Set the result to true. No need to send an email back to the user
// with an error message
result.success = true;
306
Invoking Apex
Apex Developer Guide](https://image.slidesharecdn.com/salesforceapexdeveloperguide-230916115800-b7c953cd/85/salesforce_apex_developer_guide-310-320.jpg)
![// Return the result for the Apex Email Service
return result;
}
}
Example 2: Handle Unsubscribe Email
Companies that send marketing email to their customers and prospects need to provide a way to let the recipients unsubscribe. The
following is an example of how an email service can process unsubscribe requests. The code searches the subject line of inbound email
for the word “unsubscribe.” If the word is found, the code finds all contacts and leads that match the From email address and sets the
Email Opt Out field (HasOptedOutOfEmail) to True.
Global class unsubscribe implements Messaging.inboundEmailHandler{
Global Messaging.InboundEmailResult handleInboundEmail(Messaging.InboundEmail email,
Messaging.InboundEnvelope env ) {
// Create an inboundEmailResult object for returning
// the result of the email service.
Messaging.InboundEmailResult result = new Messaging.InboundEmailResult();
// Create contact and lead lists to hold all the updated records.
List<Contact> lc = new List <contact>();
List<Lead> ll = new List <lead>();
// Convert the subject line to lower case so the program can match on lower case.
String mySubject = email.subject.toLowerCase();
// The search string used in the subject line.
String s = 'unsubscribe';
// Check the variable to see if the word "unsubscribe" was found in the subject
line.
Boolean unsubMe;
// Look for the word "unsubcribe" in the subject line.
// If it is found, return true; otherwise, return false.
unsubMe = mySubject.contains(s);
// If unsubscribe is found in the subject line, enter the IF statement.
if (unsubMe == true) {
try {
// Look up all contacts with a matching email address.
for (Contact c : [SELECT Id, Name, Email, HasOptedOutOfEmail
FROM Contact
WHERE Email = :env.fromAddress
AND hasOptedOutOfEmail = false
LIMIT 100]) {
// Add all the matching contacts into the list.
307
Invoking Apex
Apex Developer Guide](https://image.slidesharecdn.com/salesforceapexdeveloperguide-230916115800-b7c953cd/85/salesforce_apex_developer_guide-311-320.jpg)
![c.hasOptedOutOfEmail = true;
lc.add(c);
}
// Update all of the contact records.
update lc;
}
catch (System.QueryException e) {
System.debug('Contact Query Issue: ' + e);
}
try {
// Look up all leads matching the email address.
for (Lead l : [SELECT Id, Name, Email, HasOptedOutOfEmail
FROM Lead
WHERE Email = :env.fromAddress
AND isConverted = false
AND hasOptedOutOfEmail = false
LIMIT 100]) {
// Add all the leads to the list.
l.hasOptedOutOfEmail = true;
ll.add(l);
System.debug('Lead Object: ' + l);
}
// Update all lead records in the query.
update ll;
}
catch (System.QueryException e) {
System.debug('Lead Query Issue: ' + e);
}
System.debug('Found the unsubscribe word in the subject line.');
}
else {
System.debug('No Unsuscribe word found in the subject line.' );
}
// Return True and exit.
// True confirms program is complete and no emails
// should be sent to the sender of the unsubscribe request.
result.success = true;
return result;
}
}
@isTest
private class unsubscribeTest {
// The following test methods provide adequate code coverage
// for the unsubscribe email class.
// There are two methods, one that does the testing
// with a valid "unsubcribe" in the subject line
// and one the does not contain "unsubscribe" in the
// subject line.
static testMethod void testUnsubscribe() {
308
Invoking Apex
Apex Developer Guide](https://image.slidesharecdn.com/salesforceapexdeveloperguide-230916115800-b7c953cd/85/salesforce_apex_developer_guide-312-320.jpg)
![JavaScript Remoting
UseJavaScriptremotinginVisualforcetocallmethodsinApexcontrollersfromJavaScript.Createpageswithcomplex,dynamicbehavior
that isn’t possible with the standard Visualforce AJAX components.
Features implemented using JavaScript remoting require three elements:
• The remote method invocation you add to the Visualforce page, written in JavaScript.
• The remote method definition in your Apex controller class. This method definition is written in Apex, but there are some important
differences from normal action methods.
• The response handler callback function you add to or include in your Visualforce page, written in JavaScript.
In your controller, your Apex method declaration is preceded with the @RemoteAction annotation like this:
@RemoteAction
global static String getItemId(String objectName) { ... }
Apex @RemoteAction methods must be static and either global or public.
Add the Apex class as a custom controller or a controller extension to your page.
<apex:page controller="MyController" extension="MyExtension">
Warning: Adding a controller or controller extension grants access to all @RemoteAction methods in that Apex class, even
if those methods aren’t used in the page. Anyone who can view the page can execute all @RemoteAction methods and
provide fake or malicious data to the controller.
Then, add the request as a JavaScript function call. A simple JavaScript remoting invocation takes the following form.
[namespace.]MyController.method(
[parameters...,]
callbackFunction,
[configuration]
);
Table 5: Remote Request Elements
Description
Element
The namespace of the controller class. The namespace element is required if your organization has
a namespace defined, or if the class comes from an installed package.
namespace
The name of your Apex controller or extension.
MyController,
MyExtension
The name of the Apex method you’re calling.
method
A comma-separated list of parameters that your method takes.
parameters
The name of the JavaScript function that handles the response from the controller. You can also
declare an anonymous function inline. callbackFunction receives the status of the method
call and the result as parameters.
callbackFunction
Configures the handling of the remote call and response. Use this element to change the behavior
of a remoting call, such as whether or not to escape the Apex method’s response.
configuration
For more information, see JavaScript Remoting for Apex Controllers in the Visualforce Developer's Guide.
311
Invoking Apex
Apex Developer Guide](https://image.slidesharecdn.com/salesforceapexdeveloperguide-230916115800-b7c953cd/85/salesforce_apex_developer_guide-315-320.jpg)
![How are Transactions Useful?
Transactions are useful when several operations are related, and either all or none of the operations are committed. The goal is to keep
the database in a consistent state. There are many business scenarios that benefit from transaction processing. For example, transferring
funds from one bank account to another is a common scenario. It involves debiting the first account and crediting the second account
with the amount to transfer. These two operations must be committed together to the database. If the debit operation succeeds and
the credit operation fails, the account balances become inconsistent.
Example
This example shows how all DML insert operations in a method are rolled back when the last operation causes a validation rule
failure. In this example, the invoice method is the transaction boundary—all code that runs within this method either commits all
changes to the platform database or rolls back all changes. In this case, we add an invoice statement with a line item for the pencils
merchandise. The Line Item is for a purchase of 5,000 pencils specified in the Units_Sold__c field, which is more than the entire pencils
inventory of 1,000. This example assumes a validation rule has been set up to check that the total inventory of the merchandise item is
enough to cover new purchases.
Sincethisexampleattemptstopurchasemorepencils(5,000)thanitemsinstock(1,000),thevalidationrulefailsandthrowsanexception.
Code execution halts at this point and all DML operations processed before this exception are rolled back. The invoice statement and
the line item aren’t added to the database, and their insert DML operations are rolled back.
In the Developer Console, execute the static invoice method.
// Only 1,000 pencils are in stock.
// Purchasing 5,000 pencils cause the validation rule to fail,
// which results in an exception in the invoice method.
Id invoice = MerchandiseOperations.invoice('Pencils', 5000, 'test 1');
This definition is the invoice method. The update of total inventory causes an exception due to the validation rule failure. As a result,
the invoice statements and line items are rolled back and aren’t inserted into the database.
public class MerchandiseOperations {
public static Id invoice( String pName, Integer pSold, String pDesc) {
// Retrieve the pencils sample merchandise
Merchandise__c m = [SELECT Price__c,Total_Inventory__c
FROM Merchandise__c WHERE Name = :pName LIMIT 1];
// break if no merchandise is found
System.assertNotEquals(null, m);
// Add a new invoice
Invoice_Statement__c i = new Invoice_Statement__c(
Description__c = pDesc);
insert i;
// Add a new line item to the invoice
Line_Item__c li = new Line_Item__c(
Name = '1',
Invoice_Statement__c = i.Id,
Merchandise__c = m.Id,
Unit_Price__c = m.Price__c,
Units_Sold__c = pSold);
insert li;
// Update the inventory of the merchandise item
m.Total_Inventory__c -= pSold;
// This causes an exception due to the validation rule
314
Apex Transactions and Governor Limits
Apex Developer Guide](https://image.slidesharecdn.com/salesforceapexdeveloperguide-230916115800-b7c953cd/85/salesforce_apex_developer_guide-318-320.jpg)
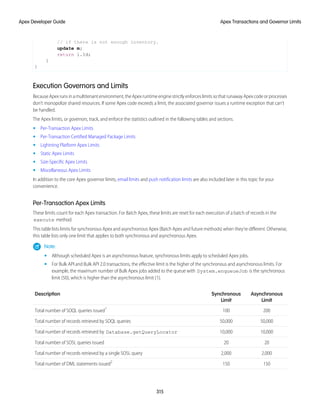
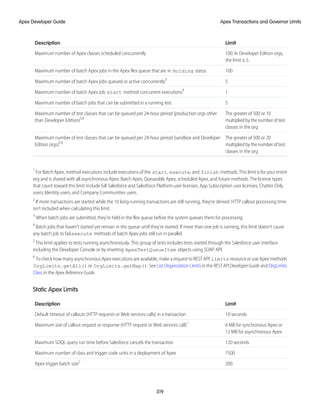
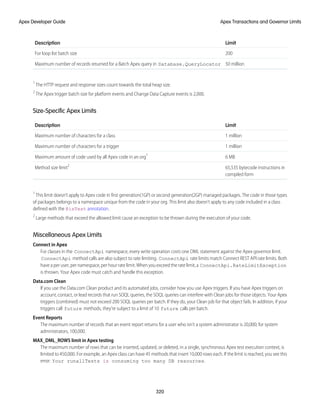
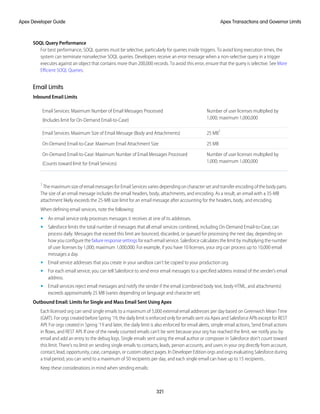
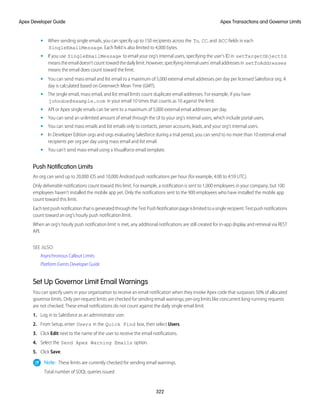
![This enhanced version of the DML call performs the update on an entire list that contains the updated line items. It starts by creating a
new list and then, inside the loop, adds every update line item to the new list. It then performs a bulk update on the new list.
List<Line_Item__c> updatedList = new List<Line_Item__c>();
for(Line_Item__c li : liList) {
if (li.Units_Sold__c > 10) {
li.Description__c = 'New description';
updatedList.add(li);
}
}
// Once DML call for the entire list of line items
update updatedList;
More Efficient SOQL Queries
Placing SOQL queries inside for loop blocks isn’t a good practice because the SOQL query executes once for each iteration and may
surpassthe100SOQLquerieslimitpertransaction.ThefollowingisanexamplethatrunsaSOQLqueryforeveryitemin Trigger.new,
which isn’t efficient. An alternative example is given with a modified query that retrieves child items using only one SOQL query.
Example: Inefficient querying of child items
The for loop in this example iterates over all invoice statements that are in Trigger.new. The SOQL query performed inside the
loop retrieves the child line items of each invoice statement. If more than 100 invoice statements were inserted or updated, and thus
contained in Trigger.new, this results in a run-time exception because of reaching the SOQL limit. The second example solves this
problem by creating another SOQL query that can be called only once.
trigger LimitExample on Invoice_Statement__c (before insert, before update) {
for(Invoice_Statement__c inv : Trigger.new) {
// This SOQL query executes once for each item in Trigger.new.
// It gets the line items for each invoice statement.
List<Line_Item__c> liList = [SELECT Id,Units_Sold__c,Merchandise__c
FROM Line_Item__c
WHERE Invoice_Statement__c = :inv.Id];
for(Line_Item__c li : liList) {
// Do something
}
}
}
Recommended Alternative: Querying of child items with one SOQL query
This example bypasses the problem of having the SOQL query called for each item. It has a modified SOQL query that retrieves all invoice
statements that are part of Trigger.new and also gets their line items through the nested query. In this way, only one SOQL query
is performed and we’re still within our limits.
trigger EnhancedLimitExample on Invoice_Statement__c (before insert, before update) {
// Perform SOQL query outside of the for loop.
// This SOQL query runs once for all items in Trigger.new.
List<Invoice_Statement__c> invoicesWithLineItems =
[SELECT Id,Description__c,(SELECT Id,Units_Sold__c,Merchandise__c from Line_Items__r)
FROM Invoice_Statement__c WHERE Id IN :Trigger.newMap.KeySet()];
324
Apex Transactions and Governor Limits
Apex Developer Guide](https://image.slidesharecdn.com/salesforceapexdeveloperguide-230916115800-b7c953cd/85/salesforce_apex_developer_guide-328-320.jpg)
![for(Invoice_Statement__c inv : invoicesWithLineItems) {
for(Line_Item__c li : inv.Line_Items__r) {
// Do something
}
}
}
SOQL For Loops
Use SOQL for loops to operate on records in batches of 200. This helps avoid the heap size limit of 6 MB. Note that this limit is for code
running synchronously and it is higher for asynchronous code execution.
Example: Query without a for loop
The following is an example of a SOQL query that retrieves all merchandise items and stores them in a List variable. If the returned
merchandise items are large in size and a large number of them was returned, the heap size limit might be hit.
List<Merchandise__c> ml = [SELECT Id,Name FROM Merchandise__c];
Recommended Alternative: Query within a for loop
To prevent this from happening, this second version uses a SOQL for loop, which iterates over the returned results in batches of 200
records.Thisreducesthesizeofthe ml listvariablewhichnowholds200itemsinsteadofallitemsinthe query results,andgetsrecreated
for every batch.
for (List<Merchandise__c> ml : [SELECT Id,Name FROM Merchandise__c]){
// Do something.
}
Using Salesforce Features with Apex
ManyfeaturesoftheSalesforceuserinterfaceareexposedinApexsothatyoucanaccessthemprogramaticallyintheLightningPlatform.
For example, you can write Apex code to post to a Chatter feed, or use the approval methods to submit and approve process requests.
IN THIS SECTION:
Actions
Create quick actions, and add them to your Salesforce Classic home page, to the Chatter tab, to Chatter groups, and to record detail
pages. Choose from standard quick actions, such as create and update actions, or create custom actions based on your company’s
needs.
Approval Processing
AnapprovalprocessautomateshowrecordsareapprovedinSalesforce.Anapprovalprocessspecifieseachstepofapproval,including
from whom to request approval and what to do at each point of the process.
Authentication
Salesforce provides various ways to authenticate users. Build a combination of authentication methods to fit the needs of your org
and your users’ use patterns.
Chatter Answers and Ideas
In Chatter Answers and Ideas, use zones to organize ideas and answers into groups. Each zone can have its own focus, with unique
ideas and answers topics to match that focus.
Use Cases for the CommercePayments Namespace
Review walkthroughs, use cases, and reference material for the CommercePayments platform.
325
Using Salesforce Features with Apex
Apex Developer Guide](https://image.slidesharecdn.com/salesforceapexdeveloperguide-230916115800-b7c953cd/85/salesforce_apex_developer_guide-329-320.jpg)
![Approval Processing
An approval process automates how records are approved in Salesforce. An approval process specifies each step of approval, including
from whom to request approval and what to do at each point of the process.
• Use the Apex process classes to create approval requests and process the results of those requests:
– ProcessRequest Class
– ProcessResult Class
– ProcessSubmitRequest Class
– ProcessWorkItemRequest Class
• Use the Approval.process method to submit an approval request and approve or reject existing approval requests. For more
information, see Approval Class.
Note: The process method counts against the DML limits for your organization. See Execution Governors and Limits.
For more information about approval processes, see “Set Up an Approval Process” in the Salesforce online help.
IN THIS SECTION:
Apex Approval Processing Example
Apex Approval Processing Example
The following sample code initially submits a record for approval, then approves the request. This example assumes that a pre-existing
approval process on Account exists and is valid for the Account record created.
public class TestApproval {
void submitAndProcessApprovalRequest() {
// Insert an account
Account a = new Account(Name='Test',annualRevenue=100.0);
insert a;
User user1 = [SELECT Id FROM User WHERE Alias='SomeStandardUser'];
// Create an approval request for the account
Approval.ProcessSubmitRequest req1 =
new Approval.ProcessSubmitRequest();
req1.setComments('Submitting request for approval.');
req1.setObjectId(a.id);
// Submit on behalf of a specific submitter
req1.setSubmitterId(user1.Id);
// Submit the record to specific process and skip the criteria evaluation
req1.setProcessDefinitionNameOrId('PTO_Request_Process');
req1.setSkipEntryCriteria(true);
// Submit the approval request for the account
Approval.ProcessResult result = Approval.process(req1);
// Verify the result
System.assert(result.isSuccess());
328
Using Salesforce Features with Apex
Apex Developer Guide](https://image.slidesharecdn.com/salesforceapexdeveloperguide-230916115800-b7c953cd/85/salesforce_apex_developer_guide-332-320.jpg)
![System.assertEquals(
'Pending', result.getInstanceStatus(),
'Instance Status'+result.getInstanceStatus());
// Approve the submitted request
// First, get the ID of the newly created item
List<Id> newWorkItemIds = result.getNewWorkitemIds();
// Instantiate the new ProcessWorkitemRequest object and populate it
Approval.ProcessWorkitemRequest req2 =
new Approval.ProcessWorkitemRequest();
req2.setComments('Approving request.');
req2.setAction('Approve');
req2.setNextApproverIds(new Id[] {UserInfo.getUserId()});
// Use the ID from the newly created item to specify the item to be worked
req2.setWorkitemId(newWorkItemIds.get(0));
// Submit the request for approval
Approval.ProcessResult result2 = Approval.process(req2);
// Verify the results
System.assert(result2.isSuccess(), 'Result Status:'+result2.isSuccess());
System.assertEquals(
'Approved', result2.getInstanceStatus(),
'Instance Status'+result2.getInstanceStatus());
}
}
Authentication
Salesforce provides various ways to authenticate users. Build a combination of authentication methods to fit the needs of your org and
your users’ use patterns.
IN THIS SECTION:
Create a Custom Authentication Provider Plug-in
You can use Apex to create a custom OAuth-based authentication provider plug-in for single sign-on (SSO) to Salesforce.
Create a Custom Authentication Provider Plug-in
You can use Apex to create a custom OAuth-based authentication provider plug-in for single sign-on (SSO) to Salesforce.
Out of the box, Salesforce supports several external authentication providers for single sign-on, including Facebook, Google, LinkedIn,
andserviceprovidersthatimplementtheOpenIDConnectprotocol.Bycreatingaplug-inwithApex,youcanaddyourownOAuth-based
authenticationprovider.YouruserscanthenusetheSSOcredentialstheyalreadyusefornon-SalesforceapplicationswithyourSalesforce
orgs.
Before you create your Apex class, you create a custom metadata type record for your authentication provider. For details, see Create a
Custom External Authentication Provider.
329
Using Salesforce Features with Apex
Apex Developer Guide](https://image.slidesharecdn.com/salesforceapexdeveloperguide-230916115800-b7c953cd/85/salesforce_apex_developer_guide-333-320.jpg)
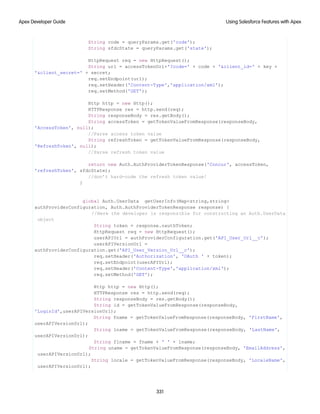
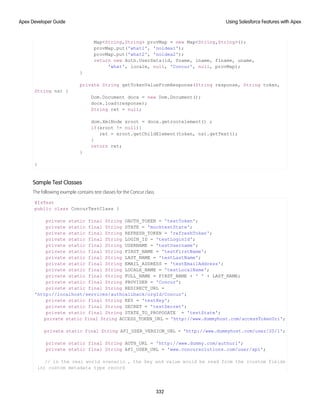
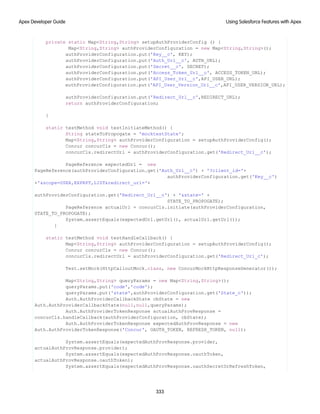

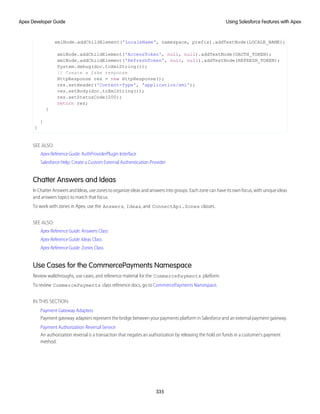

![commercepayments.GatewayErrorResponse('500', ce.getMessage());
return error;
}
Finally, the adapter creates a response object to store data from the gateway’s response. The type of response object will vary based on
whether you originally made a payment capture request or a refund request.
if ( requestType == commercepayments.RequestType.Capture) {
// Refer to the end of this doc for sample createCaptureResponse implementation
response = createCaptureResponse(res);
} else if ( requestType == commercepayments.RequestType.ReferencedRefund) {
response = createRefundResponse(res);
}
return response;
Set Up a Synchronous Payment Gateway Adapter
EDITIONS
Available in: Salesforce
Summer ’20 and later
Available in: API 49.0 and
later
Configure Salesforce to interface with a synchronous payment gateway adapter.
To access the commercepayments API, you need the PaymentPlatform org permission.
1. Create your payment gateway adapter Apex classes. For more information on building
synchronous gateway adapters in Apex, review Building a Synchronous Gateway Adapter.
2. Create a Named Credential in Salesforce UI.
a. From Setup, in the Quick Find box, enter NamedCredential, and then select New
Named Credential.
b. Enter the username, password, and URL for your payment gateway, and then save your changes.
3. Create a payment gateway provider. The payment gateway provider is an object that stores details about the payment gateway that
Salesforce communicates with when processing a transaction. As of Salesforce Summer ’20, you can create a payment gateway
provider record only through Workbench.
a. Log in to Workbench, and then select REST Explorer.
b. Set the method to Post, and then enter the following URL, replacing [version] with your desired API version. The payment
gateway provider entity is available in Salesforce API v48.0 and later.
/services/data/version/tooling/sobjects/PaymentGatewayProvider
c. Enter your payload, replacing VALUE with your desired value.
{
"FullName": "Salesforce",
"Metadata": {
"apexAdapter": "SalesforceAdapter",
"masterLabel": "Salesforce",
"idempotencySupported": "No",
"comments": "Comments"
}
}
4. Create a payment gateway record. This object stores information that Salesforce uses to communicate with the payment gateway.
The record requires these field values.
• Name: We recommend using the same name as the external payment gateway that communicates with Salesforce.
338
Using Salesforce Features with Apex
Apex Developer Guide](https://image.slidesharecdn.com/salesforceapexdeveloperguide-230916115800-b7c953cd/85/salesforce_apex_developer_guide-342-320.jpg)
![First, it builds a payment request object that the gateway can understand.
commercepayments.RequestType requestType = gatewayContext.getPaymentRequestType();
if (requestType == commercepayments.RequestType.Capture) {
req.setEndpoint('/pal/servlet/Payment/v52/capture');
body =
buildCaptureRequest((commercepayments.CaptureRequest)gatewayContext.getPaymentRequest());
} else if (requestType == commercepayments.RequestType.ReferencedRefund) {
req.setEndpoint('/pal/servlet/Payment/v52/refund');
body =
buildRefundRequest((commercepayments.ReferencedRefundRequest)gatewayContext.getPaymentRequest());
}
Then, the adapter sends the request to the payment gateway.
req.setBody(body);
req.setMethod('POST');
commercepayments.PaymentsHttp http = new commercepayments.PaymentsHttp();
HttpResponse res = null;
try {
res = http.send(req);
} catch(CalloutException ce) {
commercepayments.GatewayErrorResponse error = new
commercepayments.GatewayErrorResponse('500', ce.getMessage());
return error;
}
Finally, the adapter creates a response object to store data from the gateway’s response. The type of response object will vary based on
whether you originally made a payment capture request or a refund request.
if ( requestType == commercepayments.RequestType.Capture) {
// Refer to the end of this doc for sample createCaptureResponse implementation
response = createCaptureResponse(res);
} else if ( requestType == commercepayments.RequestType.ReferencedRefund) {
response = createRefundResponse(res);
}
return response;
Processing a Notification from the Payment Gateway
After the customer bank processes the transaction and sends the results to the gateway, the gateway sends the adapter a notification
indicating that it’s ready to provide the final transaction status. For this part of an asynchronous transaction flow, the adapter needs to
call the processNotification class. We can split the processNotification implementation into four parts.
First, the adapter verifies the signature in the notification request. For more information on verifying signatures, review [TOPIC].
private Boolean verifySignature(NotificationRequest requestItem) {
String payload = requestItem.pspReference + ':'
+ (requestItem.originalReference == null ? '' : requestItem.originalReference) +
':'
+ requestItem.merchantAccountCode + ':'
+ requestItem.merchantReference + ':'
+ requestItem.amount.value.intValue() + ':'
+ requestItem.amount.currencyCode + ':'
+ requestItem.eventCode + ':'
+ requestItem.success;
340
Using Salesforce Features with Apex
Apex Developer Guide](https://image.slidesharecdn.com/salesforceapexdeveloperguide-230916115800-b7c953cd/85/salesforce_apex_developer_guide-344-320.jpg)
![String myHMacKey = getHMacKey();
String generatedSign = EncodingUtil.base64Encode(Crypto.generateMac('hmacSHA256',
Blob.valueOf(payload),
EncodingUtil.convertFromHex(myHMacKey)));
return generatedSign.equals(requestItem.additionalData.hmacSignature);
}
Next, the adapter parses the gateway’s notification request and builds a notification object. The
getPaymentGatewayNotificationRequest method evaluates data from the gateway’s notification request items, which
include status, referenceNumber, event, and amount. The notificationStatus object is set to Success or Failed based on
whether the platform successfully received the notification. If the notification’s event code indicates that the gateway processed a
payment capture transaction, the adapter builds a notification object using the CaptureNotification class. If the event code
indicates that the gateway processed a refund transaction, the adapter builds a notification object using the
ReferencedRefundNotification class.
commercepayments.PaymentGatewayNotificationRequest gatewayNotificationRequest =
gatewayNotificationContext.getPaymentGatewayNotificationRequest();
Blob request = gatewayNotificationRequest.getRequestBody();
SampleNotificationRequest notificationRequest =
SampleNotificationRequest.parse(request.toString().replace('currency', 'currencyCode'));
List<SampleNotificationRequest.NotificationItems> notificationItems =
notificationRequest.notificationItems;
SampleNotificationRequest.NotificationRequestItem notificationRequestItem =
notificationItems[0].NotificationRequestItem;
Boolean success = Boolean.valueOf(notificationRequestItem.success);
String pspReference = notificationRequestItem.pspReference;
String eventCode = notificationRequestItem.eventCode;
Double amount = notificationRequestItem.amount.value;
commercepayments.NotificationStatus notificationStatus = null;
if (success) {
notificationStatus = commercepayments.NotificationStatus.Success;
} else {
notificationStatus = commercepayments.NotificationStatus.Failed;
}
commercepayments.BaseNotification notification = null;
if ('CAPTURE'.equals(eventCode)) {
notification = new commercepayments.CaptureNotification();
} else if ('REFUND'.equals(eventCode)) {
notification = new commercepayments.ReferencedRefundNotification();
}
notification.setStatus(notificationStatus);
notification.setGatewayReferenceNumber(pspReference);
notification.setAmount(amount);
The adapter then requests that the payments platform records the results of the notification.
commercepayments.NotificationSaveResult saveResult =
commercepayments.NotificationClient.record(notification);
341
Using Salesforce Features with Apex
Apex Developer Guide](https://image.slidesharecdn.com/salesforceapexdeveloperguide-230916115800-b7c953cd/85/salesforce_apex_developer_guide-345-320.jpg)
![All asynchronous gateways require that the platform acknowledges that it received the notification, regardless of whether the platform
successfully saved the notification’s data. The platform calls the GatewayNotificationResponse class to send the
acknowledgment.
commercepayments.GatewayNotificationResponse gnr = new
commercepayments.GatewayNotificationResponse();
if (saveResult.isSuccess()) {
system.debug('Notification accepted by platform');
} else {
system.debug('Errors in the result '+ Blob.valueOf(saveResult.getErrorMessage()));
}
gnr.setStatusCode(200);
gnr.setResponseBody(Blob.valueOf('[accepted]'));
return gnr;
Debugging
Usually, Apex debug logs are available in the developer console. However, Salesforce doesn’t store debug logs from the
processNotification method in the developer console. To view this part of the method flow using system.debug, review the
Collect Debug Logs for Guest Users section of Set Up Debug Logging.
Set Up an Asynchronous Payment Gateway Adapter in Salesforce
EDITIONS
Available in: Salesforce
Summer ’20 and later
Available in: API 49.0 and
later
Configure Salesforce to interface with an asynchronous payment gateway adapter.
To access the commercepayments API, you need the PaymentPlatform org permission.
1. Create a Site.
a. Register a site and set the site domain.
b. From Setup, in the Quick Find box, enter Sites, and then select Sites. Go to the Sites list
and click New.
c. Enter a label and select Active.
d. Enter a unique value for the default web address.
e. Select Guest Access to the Payments API, and then save your changes.
2. Create your payment gateway adapter Apex classes. Asynchronous payment gateways require Salesforce to implement both an
asynchronous adapter and a synchronous adapter. For more information on building gateway adapters in Apex, review Building an
Asynchronous Gateway Adapter and Building a Synchronous Gateway Adapter.
3. Create a Named Credential in Salesforce UI.
a. From Setup, in the Quick Find box, enter NamedCredential, and then select New Named Credential.
b. Enter the username, password, and URL for your payment gateway, and then save your changes.
4. Create a payment gateway provider. The payment gateway provider is an object that stores details about the payment gateway that
Salesforce communicates with when processing a transaction. As of Salesforce Summer ’20, you can create a payment gateway
provider record only through Workbench.
a. Log in to Workbench, and then select REST Explorer.
b. Set the method to Post, and then enter the following URL, replacing [version] with your desired API version. The payment
gateway provider entity is available in Salesforce API v48.0 and later.
services/data/[version]/tooling/sobjects/PaymentGatewayProvider
342
Using Salesforce Features with Apex
Apex Developer Guide](https://image.slidesharecdn.com/salesforceapexdeveloperguide-230916115800-b7c953cd/85/salesforce_apex_developer_guide-346-320.jpg)
![c. Enter your payload, replacing VALUE with your desired value.
{
"ApexAdapterId": "{{VALUE}}",
"DeveloperName": "{{VALUE}}",
"MasterLabel": "VALUE",
"IdempotencySupported": "VALUE",
"Comments": "VALUE",
5. Create a payment gateway record. This object stores information that Salesforce uses to communicate with the payment gateway.
The record requires the following field values.
• Name: We recommend using the same name as the external payment gateway that will be communicating with Salesforce.
• Merchant Credential ID: Enter the ID of the named credential that you created in Step 2.
• Payment Gateway Provider: Enter the ID of the payment gateway provider that you created in Step 3.
• Status: Active
6. ExternalpaymentgatewaysusewebhookstosendnotificationinformationasHTTPPOSTmessagestoyourSalesforceasynchronous
payment gateway adapter. You can create a webhook by providing a URL in the standard notification transport settings of your
external payment gateway. Create your URL by combining your Salesforce site endpoint from Step 1 with the ID of the payment
gateway provider that you created in step 4.
a. Your endpoint will be the following address, replacing domain with your domain from Step 1A, and replacing subdomain
with the default web address that you provided in Step 1D.
https://MyDomainName.my.salesforce-sites.com/subdomain/services/data/v49.0/commerce/payments/notify
Note: If you’re not using enhanced domains, your org’s Salesforce Sites URL is different. For details, see My Domain URL
Formats in Salesforce Help.
b. FindtheIDofthepaymentgatewayproviderthatyoucreatedinStep4,andadd ?provider=ID totheendofyourendpoint.
For example,
h
t
t
p
s
:
/
/
M
y
D
o
m
a
i
n
N
a
m
e
.
m
y
.
s
a
l
e
s
f
o
r
c
e
-
s
i
t
e
s
.
c
o
m
/
s
o
l
u
t
i
o
n
s
u
s
e
r
s
/
s
e
r
v
i
c
e
s
/
d
a
t
a
/
v
4
9
.
0
/
c
o
m
m
e
r
c
e
/
p
a
y
m
e
n
t
s
/
n
o
t
i
f
y
?
p
r
o
v
i
d
e
r
=
0
c
J
R
0
0
0
0
0
0
0
4
C
E
h
M
A
M
c. Enter the webhook in your external payment gateway’s standard notification settings.
Builder Examples for Payment Gateway Adapters
The final sections of a payment gateway adapter should define how the adapter creates requests and responses. The implementation
oftheseclassescanvarywidelybasedonyourgatewayandplatformrequirements.We’veprovidedseveralgenericsexamplesforreview.
Example:
buildCaptureRequest
private String buildCaptureRequest(commercepayments.CaptureRequest captureRequest)
{
Boolean IS_MULTICURRENCY_ORG = UserInfo.isMultiCurrencyOrganization();
QueryUtils qBuilderForAuth = new QueryUtils(PaymentAuthorization.SObjectType);
qBuilderForAuth.getSelectClause().addField('GatewayRefNumber', false);
qBuilderForAuth.setWhereClause(' WHERE Id =' + ''' +
captureRequest.paymentAuthorizationId + ''');
PaymentAuthorization authObject =
(PaymentAuthorization)Database.query(qBuilderForAuth.buildSOQL())[0];
343
Using Salesforce Features with Apex
Apex Developer Guide](https://image.slidesharecdn.com/salesforceapexdeveloperguide-230916115800-b7c953cd/85/salesforce_apex_developer_guide-347-320.jpg)
!["currencyIsoCode" : "USD",
"effectiveDate" : "2020-10-18T11:32:27.000Z",
"id" : "9tvR00000004Cf1MAE",
"paymentAuthAdjustmentNumber" : "PAA-00XXXXXXX",
"requestDate" : "2020-10-23T15:21:58.000Z",
"status" : "Processed"
},
"paymentGatewayLogs" : [ {
"createdDate" : "2020-10-23T15:21:58.000Z",
"gatewayResultCode" : "00",
"id" : "0XtXXXXXXXXXXXXXXX",
"interactionStatus" : "Success"
} ]
}
The resulting payment authorization adjustment in Salesforce would look like this.
If an error is returned, the response contains the gateway's error code and error message.
Sample Response - Error
{
"errorCode":"",
"errorMessage":""
}
Tokenization Service
The credit card tokenization process replaces sensitive customer information with a one-time algorithmically generated number, called
a token, used during the payment transaction. Salesforce stores the token and then uses that token as a representation of the credit card
used for transactions. The token lets you store information about the credit card without storing sensitive customer data, such as credit
card numbers, in Salesforce.
IN THIS SECTION:
Tokenization Service Apex Class Implementation
Use the tokenization service to hide sensitive customer payment method data. The Tokenization service uses
PaymentMethodTokenizationRequest, PaymentMethodTokenizationResponse, and
CardPaymentMethodRequest. Implement these classes in your payment gateway adapter.
Tokenization Service API
The credit card tokenization process replaces sensitive customer information with a one-time algorithmically generated number,
called a token, to use during the payment transaction. Salesforce stores the token and then uses that token as a representation of
the credit card used for transactions. The token lets you store information about the credit card without actually storing sensitive
customer data such as credit card numbers in Salesforce. Implement our Tokenization API to add tokenization capabilities to your
payment services.
Tokenization Service Apex Class Implementation
EDITIONS
Available in: Salesforce
Spring '21 and later
Use the tokenization service to hide sensitive customer payment method data. The Tokenization
service uses PaymentMethodTokenizationRequest,
PaymentMethodTokenizationResponse, and CardPaymentMethodRequest.
Implement these classes in your payment gateway adapter.
349
Using Salesforce Features with Apex
Apex Developer Guide](https://image.slidesharecdn.com/salesforceapexdeveloperguide-230916115800-b7c953cd/85/salesforce_apex_developer_guide-353-320.jpg)

![A successful tokenization response updates the payment method and provides information about the gateway response and any
payment gateway logs.
{
"paymentMethod": {
"id": "03OR0000000xxxxxxx",
"accountId" : "001xx000000xxxxxxx",
"status" : "Active"
},
"gatewayResponse" : {
"gatewayResultCode": "00",
"gatewayResultCodeDescription": "Transaction Normal",
"gatewayDate": "2020-12-08T04:03:20.000Z",
"gatewayAvsCode" : "7638788018713617",
"gatewayMessage" : "8313990738208498",
"salesforceResultCode": "Success",
"gatewayTokenEncrypted" : "SF701252"
}
"paymentGatewayLogs" : [ {
"createdDate" : "2020-12-08T04:03:20.000Z",
"gatewayResultCode" : "00",
"id" : "0XtR0000000xxxxxxx",
"interactionStatus" : "NoOp"
} ],
}
Alternative Payment Methods
EDITIONS
Available in: Salesforce
Spring '21 and later
An alternative payment method allows customers to store and represent payment method
information not represented by another pre-defined payment method such as
CardPaymentMethod or DigitalWallet. Common examples of alternative payment
methodsincludeCashOnDeliver,Klarna,andDirectDebit.Alternativepaymentmethodsareavailable
in API v51.0 and later.
Create a unique record type for each type of alternative payment method in your org. This way,
each of your alternative payment methods can show different picklist values and page layouts based on the method provider and
gateway provider’s requirements. For example, you could have one alternative payment method record type for direct debit and a
different record type for cash on deliver.
We also recommend creating a GtwyProviderPaymentMethodType for each of your unique alternative payment method
record types.
AlternativePaymentMethod has the private sharing model enabled as default for both internal and external users. Only the record owner
and users with higher ownership have Read, Edit, and Delete access.
Example: Let's say you wanted to make an alternative payment method for GiroPay. First, create an
AlternativePaymentMethod record type.
New RecordType
/services/data/v51.0/sobjects/RecordType
{
"Name" : "Giro Pay",
"DeveloperName" : "GiroPay",
354
Using Salesforce Features with Apex
Apex Developer Guide](https://image.slidesharecdn.com/salesforceapexdeveloperguide-230916115800-b7c953cd/85/salesforce_apex_developer_guide-358-320.jpg)
![This trigger calls postFeedElementBatch(communityId, feedElements) to bulk post to the feeds of newly inserted
accounts.
trigger postFeedItemToAccount on Account (after insert) {
Account[] accounts = Trigger.new;
// Bulk post to the account feeds.
List<ConnectApi.BatchInput> batchInputs = new List<ConnectApi.BatchInput>();
for (Account a : accounts) {
ConnectApi.FeedItemInput input = new ConnectApi.FeedItemInput();
input.subjectId = a.id;
ConnectApi.MessageBodyInput body = new ConnectApi.MessageBodyInput();
body.messageSegments = new List<ConnectApi.MessageSegmentInput>();
ConnectApi.TextSegmentInput textSegment = new ConnectApi.TextSegmentInput();
textSegment.text = 'Let's win the ' + a.name + ' account.';
body.messageSegments.add(textSegment);
input.body = body;
ConnectApi.BatchInput batchInput = new ConnectApi.BatchInput(input);
batchInputs.add(batchInput);
}
ConnectApi.ChatterFeeds.postFeedElementBatch(Network.getNetworkId(), batchInputs);
}
Post a Batch of Feed Elements with a New (Binary) File
Use a trigger to call a method to bulk post a new file to the feeds of accounts.
Important: This example is valid in version 32.0–35.0. In version 36.0 and later, you can’t post a batch of feed elements with a
newfileinthesamecall.UploadthefiletoSalesforcefirst,andthenspecifytheuploadedfilewhenpostingabatchoffeedelements.
This trigger calls postFeedElementBatch(communityId, feedElements) to bulk post to the feeds of newly inserted
accounts. Each post has a new file (binary) attachment.
trigger postFeedItemToAccountWithBinary on Account (after insert) {
Account[] accounts = Trigger.new;
// Bulk post to the account feeds.
List<ConnectApi.BatchInput> batchInputs = new List<ConnectApi.BatchInput>();
for (Account a : accounts) {
ConnectApi.FeedItemInput input = new ConnectApi.FeedItemInput();
input.subjectId = a.id;
ConnectApi.MessageBodyInput body = new ConnectApi.MessageBodyInput();
body.messageSegments = new List<ConnectApi.MessageSegmentInput>();
366
Using Salesforce Features with Apex
Apex Developer Guide](https://image.slidesharecdn.com/salesforceapexdeveloperguide-230916115800-b7c953cd/85/salesforce_apex_developer_guide-370-320.jpg)
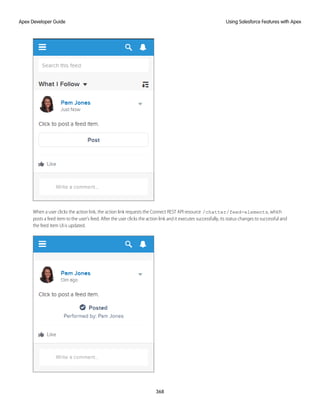
![ConnectApi.RequestHeaderInput requestHeaderInput2 = new ConnectApi.RequestHeaderInput();
// Create the action link group definition.
actionLinkGroupDefinitionInput.actionLinks = New
List<ConnectApi.ActionLinkDefinitionInput>();
actionLinkGroupDefinitionInput.executionsAllowed =
ConnectApi.ActionLinkExecutionsAllowed.OncePerUser;
actionLinkGroupDefinitionInput.category = ConnectApi.PlatformActionGroupCategory.Primary;
// To Do: Verify that the date is in the future.
// Action link groups are removed from feed elements on the expiration date.
datetime myDate = datetime.newInstance(2016, 3, 1);
actionLinkGroupDefinitionInput.expirationDate = myDate;
// Create the action link definition.
actionLinkDefinitionInput.actionType = ConnectApi.ActionLinkType.Api;
actionLinkDefinitionInput.actionUrl = '/services/data/v33.0/chatter/feed-elements';
actionLinkDefinitionInput.headers = new List<ConnectApi.RequestHeaderInput>();
actionLinkDefinitionInput.labelKey = 'Post';
actionLinkDefinitionInput.method = ConnectApi.HttpRequestMethod.HttpPost;
actionLinkDefinitionInput.requestBody = '{"subjectId": "me","feedElementType":
"FeedItem","body": {"messageSegments": [{"type": "Text","text": "This is a
test post created via an API action link."}]}}';
actionLinkDefinitionInput.requiresConfirmation = true;
// To Do: Substitute an OAuth value for your Salesforce org.
requestHeaderInput1.name = 'Authorization';
requestHeaderInput1.value = 'OAuth
00DD00000007WNP!ARsAQCwoeV0zzAV847FTl4zF.85w.EwsPbUgXR4SAjsp';
actionLinkDefinitionInput.headers.add(requestHeaderInput1);
requestHeaderInput2.name = 'Content-Type';
requestHeaderInput2.value = 'application/json';
actionLinkDefinitionInput.headers.add(requestHeaderInput2);
// Add the action link definition to the action link group definition.
actionLinkGroupDefinitionInput.actionLinks.add(actionLinkDefinitionInput);
// Instantiate the action link group definition.
ConnectApi.ActionLinkGroupDefinition actionLinkGroupDefinition =
ConnectApi.ActionLinks.createActionLinkGroupDefinition(Network.getNetworkId(),
actionLinkGroupDefinitionInput);
ConnectApi.FeedItemInput feedItemInput = new ConnectApi.FeedItemInput();
ConnectApi.FeedElementCapabilitiesInput feedElementCapabilitiesInput = new
ConnectApi.FeedElementCapabilitiesInput();
ConnectApi.AssociatedActionsCapabilityInput associatedActionsCapabilityInput = new
ConnectApi.AssociatedActionsCapabilityInput();
ConnectApi.MessageBodyInput messageBodyInput = new ConnectApi.MessageBodyInput();
ConnectApi.TextSegmentInput textSegmentInput = new ConnectApi.TextSegmentInput();
// Set the properties of the feedItemInput object.
feedItemInput.body = messageBodyInput;
feedItemInput.capabilities = feedElementCapabilitiesInput;
feedItemInput.subjectId = 'me';
370
Using Salesforce Features with Apex
Apex Developer Guide](https://image.slidesharecdn.com/salesforceapexdeveloperguide-230916115800-b7c953cd/85/salesforce_apex_developer_guide-374-320.jpg)
![Value
Field
Everyone can see
User Visibility
{ "subjectId":"{!Bindings.SubjectId}",
"feedElementType":"FeedItem", "body":{ "messageSegments":[
{ "type":"Text", "text":"{!Bindings.Text}" } ] } }
HTTP Request Body
Content-Type: application/json
HTTP Headers
0
Position
Post
Label Key
POST
HTTP Method
4. Go back to the Action Link Group Template and select Published. Click Save.
Step 2: Instantiate the Action Link Group, Associate it with a Feed Item, and Post it
This example calls ConnectApi.ActionLinks.createActionLinkGroupDefinition(communityId,
actionLinkGroup) to create an action link group definition.
It calls ConnectApi.ChatterFeeds.postFeedElement(communityId, feedElement) to associate the action
link group with a feed item and post it.
// Get the action link group template Id.
ActionLinkGroupTemplate template = [SELECT Id FROM ActionLinkGroupTemplate WHERE
DeveloperName='Doc_Example'];
// Add binding name-value pairs to a map.
// The names are defined in the action link template(s) associated with the action link
group template.
// Get them from Setup UI or SOQL.
Map<String, String> bindingMap = new Map<String, String>();
bindingMap.put('ApiVersion', 'v33.0');
bindingMap.put('Text', 'This post was created by an API action link.');
bindingMap.put('SubjectId', 'me');
// Create ActionLinkTemplateBindingInput objects from the map elements.
List<ConnectApi.ActionLinkTemplateBindingInput> bindingInputs = new
List<ConnectApi.ActionLinkTemplateBindingInput>();
for (String key : bindingMap.keySet()) {
ConnectApi.ActionLinkTemplateBindingInput bindingInput = new
ConnectApi.ActionLinkTemplateBindingInput();
bindingInput.key = key;
bindingInput.value = bindingMap.get(key);
bindingInputs.add(bindingInput);
}
// Set the template Id and template binding values in the action link group definition.
ConnectApi.ActionLinkGroupDefinitionInput actionLinkGroupDefinitionInput = new
ConnectApi.ActionLinkGroupDefinitionInput();
372
Using Salesforce Features with Apex
Apex Developer Guide](https://image.slidesharecdn.com/salesforceapexdeveloperguide-230916115800-b7c953cd/85/salesforce_apex_developer_guide-376-320.jpg)
![actionLinkGroupDefinitionInput.templateId = template.id;
actionLinkGroupDefinitionInput.templateBindings = bindingInputs;
// Instantiate the action link group definition.
ConnectApi.ActionLinkGroupDefinition actionLinkGroupDefinition =
ConnectApi.ActionLinks.createActionLinkGroupDefinition(Network.getNetworkId(),
actionLinkGroupDefinitionInput);
ConnectApi.FeedItemInput feedItemInput = new ConnectApi.FeedItemInput();
ConnectApi.FeedElementCapabilitiesInput feedElementCapabilitiesInput = new
ConnectApi.FeedElementCapabilitiesInput();
ConnectApi.AssociatedActionsCapabilityInput associatedActionsCapabilityInput = new
ConnectApi.AssociatedActionsCapabilityInput();
ConnectApi.MessageBodyInput messageBodyInput = new ConnectApi.MessageBodyInput();
ConnectApi.TextSegmentInput textSegmentInput = new ConnectApi.TextSegmentInput();
// Define the FeedItemInput object to pass to postFeedElement
feedItemInput.body = messageBodyInput;
feedItemInput.capabilities = feedElementCapabilitiesInput;
feedItemInput.subjectId = 'me';
// The MessageBodyInput object holds the text in the post
messageBodyInput.messageSegments = new List<ConnectApi.MessageSegmentInput>();
textSegmentInput.text = 'Click to post a feed item.';
messageBodyInput.messageSegments.add(textSegmentInput);
// The FeedElementCapabilitiesInput object holds the capabilities of the feed item.
// For this feed item, we define an associated actions capability to hold the action link
group.
// The action link group ID is returned from the call to create the action link group
definition.
feedElementCapabilitiesInput.associatedActions = associatedActionsCapabilityInput;
associatedActionsCapabilityInput.actionLinkGroupIds = new List<String>();
associatedActionsCapabilityInput.actionLinkGroupIds.add(actionLinkGroupDefinition.id);
// Post the feed item.
ConnectApi.FeedElement feedElement =
ConnectApi.ChatterFeeds.postFeedElement(Network.getNetworkId(), feedItemInput);
Edit a Feed Element
Call a method to edit a feed element.
Call updateFeedElement(communityId, feedElementId, feedElement) to edit a feed element. Feed items are
the only type of feed element that can be edited.
String communityId = Network.getNetworkId();
// Get the last feed item created by the context user.
List<FeedItem> feedItems = [SELECT Id FROM FeedItem WHERE CreatedById = :UserInfo.getUserId()
ORDER BY CreatedDate DESC];
if (feedItems.isEmpty()) {
373
Using Salesforce Features with Apex
Apex Developer Guide](https://image.slidesharecdn.com/salesforceapexdeveloperguide-230916115800-b7c953cd/85/salesforce_apex_developer_guide-377-320.jpg)
![// Return null within anonymous apex.
return null;
}
String feedElementId = feedItems[0].id;
ConnectApi.FeedEntityIsEditable isEditable =
ConnectApi.ChatterFeeds.isFeedElementEditableByMe(communityId, feedElementId);
if (isEditable.isEditableByMe == true){
ConnectApi.FeedItemInput feedItemInput = new ConnectApi.FeedItemInput();
ConnectApi.MessageBodyInput messageBodyInput = new ConnectApi.MessageBodyInput();
ConnectApi.TextSegmentInput textSegmentInput = new ConnectApi.TextSegmentInput();
messageBodyInput.messageSegments = new List<ConnectApi.MessageSegmentInput>();
textSegmentInput.text = 'This is my edited post.';
messageBodyInput.messageSegments.add(textSegmentInput);
feedItemInput.body = messageBodyInput;
ConnectApi.FeedElement editedFeedElement =
ConnectApi.ChatterFeeds.updateFeedElement(communityId, feedElementId, feedItemInput);
}
Edit a Question Title and Post
Call a method to edit a question title and post.
Call updateFeedElement(communityId, feedElementId, feedElement) to edit a question title and post.
String communityId = Network.getNetworkId();
// Get the last feed item created by the context user.
List<FeedItem> feedItems = [SELECT Id FROM FeedItem WHERE CreatedById = :UserInfo.getUserId()
ORDER BY CreatedDate DESC];
if (feedItems.isEmpty()) {
// Return null within anonymous apex.
return null;
}
String feedElementId = feedItems[0].id;
ConnectApi.FeedEntityIsEditable isEditable =
ConnectApi.ChatterFeeds.isFeedElementEditableByMe(communityId, feedElementId);
if (isEditable.isEditableByMe == true){
ConnectApi.FeedItemInput feedItemInput = new ConnectApi.FeedItemInput();
ConnectApi.FeedElementCapabilitiesInput feedElementCapabilitiesInput = new
ConnectApi.FeedElementCapabilitiesInput();
ConnectApi.QuestionAndAnswersCapabilityInput questionAndAnswersCapabilityInput = new
ConnectApi.QuestionAndAnswersCapabilityInput();
ConnectApi.MessageBodyInput messageBodyInput = new ConnectApi.MessageBodyInput();
ConnectApi.TextSegmentInput textSegmentInput = new ConnectApi.TextSegmentInput();
messageBodyInput.messageSegments = new List<ConnectApi.MessageSegmentInput>();
374
Using Salesforce Features with Apex
Apex Developer Guide](https://image.slidesharecdn.com/salesforceapexdeveloperguide-230916115800-b7c953cd/85/salesforce_apex_developer_guide-378-320.jpg)

![Edit a Comment
Call a method to edit a comment.
Call updateComment(communityId, commentId, comment) to edit a comment.
String commentId;
String communityId = Network.getNetworkId();
// Get the last feed item created by the context user.
List<FeedItem> feedItems = [SELECT Id FROM FeedItem WHERE CreatedById = :UserInfo.getUserId()
ORDER BY CreatedDate DESC];
if (feedItems.isEmpty()) {
// Return null within anonymous apex.
return null;
}
String feedElementId = feedItems[0].id;
ConnectApi.CommentPage commentPage =
ConnectApi.ChatterFeeds.getCommentsForFeedElement(communityId, feedElementId);
if (commentPage.items.isEmpty()) {
// Return null within anonymous apex.
return null;
}
commentId = commentPage.items[0].id;
ConnectApi.FeedEntityIsEditable isEditable =
ConnectApi.ChatterFeeds.isCommentEditableByMe(communityId, commentId);
if (isEditable.isEditableByMe == true){
ConnectApi.CommentInput commentInput = new ConnectApi.CommentInput();
ConnectApi.MessageBodyInput messageBodyInput = new ConnectApi.MessageBodyInput();
ConnectApi.TextSegmentInput textSegmentInput = new ConnectApi.TextSegmentInput();
messageBodyInput.messageSegments = new List<ConnectApi.MessageSegmentInput>();
textSegmentInput.text = 'This is my edited comment.';
messageBodyInput.messageSegments.add(textSegmentInput);
commentInput.body = messageBodyInput;
ConnectApi.Comment editedComment = ConnectApi.ChatterFeeds.updateComment(communityId,
commentId, commentInput);
}
Follow a Record
Call a method to follow a record.
381
Using Salesforce Features with Apex
Apex Developer Guide](https://image.slidesharecdn.com/salesforceapexdeveloperguide-230916115800-b7c953cd/85/salesforce_apex_developer_guide-385-320.jpg)
![CallgetAllowedItemTypes(repositoryId, repositoryFolderId, filter)witha filter of FilesOnly
to get the first ConnectApi.ContentHubItemTypeSummary.id of a file. The context user can create allowed files in a
repository folder in the external system.
final ConnectApi.ContentHubAllowedItemTypeCollection allowedItemTypesColl =
ConnectApi.ContentHub.getAllowedItemTypes(repositoryId, repositoryFolderId,
ConnectApi.ContentHubItemType.FilesOnly);
final List<ConnectApi.ContentHubItemTypeSummary> allowedItemTypes =
allowedItemTypesColl.allowedItemTypes;
string allowedFileItemTypeId = null;
if(allowedItemTypes.size() > 0){
ConnectApi.ContentHubItemTypeSummary allowedItemTypeSummary = allowedItemTypes.get(0);
allowedFileItemTypeId = allowedItemTypeSummary.id;
}
Get Previews
Call a method to get all supported preview formats and their respective URLs.
Call getPreviews(repositoryId, repositoryFileId) to get all supported preview formats and their respective URLs
and number of renditions. For each supported preview format, we show every rendition URL available.
final String gDriveRepositoryId = '0XCxx00000000ODGAY', gDriveFileId =
'document:1-zcA1BaeoQbo2_yNFiHCcK6QJTPmOke-kHFC4TYg3rk';
final ConnectApi.FilePreviewCollection previewsCollection =
ConnectApi.ContentHub.getPreviews(gDriveRepositoryId, gDriveFileId);
for(ConnectApi.FilePreview filePreview : previewsCollection.previews){
System.debug(String.format('Preview - URL: ''{0}'', format: ''{1}'', nbr of
renditions for this format: {2}', new String[]{ filePreview.url,
filePreview.format.name(),String.valueOf(filePreview.previewUrls.size())}));
for(ConnectApi.FilePreviewUrl filePreviewUrl : filePreview.previewUrls){
System.debug('-----> Rendition URL: ' + filePreviewUrl.previewUrl);
}
}
Get a File Preview
Call a method to get a file preview.
CallgetFilePreview(repositoryId, repositoryFileId, formatType)witha formatType of Thumbnail
to get the thumbnail format preview along with its respective URL and number of thumbnail renditions. For each thumbnail format, we
show every rendition URL available.
final String gDriveRepositoryId = '0XCxx00000000ODGAY', gDriveFileId =
'document:1-zcA1BaeoQbo2_yNFiHCcK6QJTPmOke-kHFC4TYg3rk';
final ConnectApi.FilePreviewCollection previewsCollection =
ConnectApi.ContentHub.getPreviews(gDriveRepositoryId, gDriveFileId);
for(ConnectApi.FilePreview filePreview : previewsCollection.previews){
System.debug(String.format('Preview - URL: ''{0}'', format: ''{1}'', nbr of
renditions for this format: {2}', new String[]{ filePreview.url,
filePreview.format.name(),String.valueOf(filePreview.previewUrls.size())}));
for(ConnectApi.FilePreviewUrl filePreviewUrl : filePreview.previewUrls){
System.debug('-----> Rendition URL: ' + filePreviewUrl.previewUrl);
383
Using Salesforce Features with Apex
Apex Developer Guide](https://image.slidesharecdn.com/salesforceapexdeveloperguide-230916115800-b7c953cd/85/salesforce_apex_developer_guide-387-320.jpg)
![}
}
Get Repository Folder Items
Call a method to get a collection of repository folder items.
Call getRepositoryFolderItems(repositoryId, repositoryFolderId) to get the collection of items in a
repository folder. For files, we show the file’s name, size, external URL, and download URL. For folders, we show the folder’s name,
description, and external URL.
final String gDriveRepositoryId = '0XCxx00000000ODGAY', gDriveFolderId =
'folder:0B0lTys1KmM3sSVJ2bjIzTGFqSWs';
final ConnectApi.RepositoryFolderItemsCollection folderItemsColl =
ConnectApi.ContentHub.getRepositoryFolderItems(gDriveRepositoryId,gDriveFolderId);
final List<ConnectApi.RepositoryFolderItem> folderItems = folderItemsColl.items;
System.debug('Number of items in repository folder: ' + folderItems.size());
for(ConnectApi.RepositoryFolderItem item : folderItems){
ConnectApi.RepositoryFileSummary fileSummary = item.file;
if(fileSummary != null){
System.debug(String.format('File item - name: ''{0}'', size: {1}, external URL:
''{2}'', download URL: ''{3}''', new String[]{ fileSummary.name,
String.valueOf(fileSummary.contentSize), fileSummary.externalDocumentUrl,
fileSummary.downloadUrl}));
}else{
ConnectApi.RepositoryFolderSummary folderSummary = item.folder;
System.debug(String.format('Folder item - name: ''{0}'', description:
''{1}''', new String[]{ folderSummary.name, folderSummary.description}));
}
}
Get a Repository Folder
Call a method to get a repository folder.
Call getRepositoryFolder(repositoryId, repositoryFolderId) to get a repository folder.
final String gDriveRepositoryId = '0XCxx00000000ODGAY', gDriveFolderId =
'folder:0B0lTys1KmM3sSVJ2bjIzTGFqSWs';
final ConnectApi.RepositoryFolderDetail folder =
ConnectApi.ContentHub.getRepositoryFolder(gDriveRepositoryId, gDriveFolderId);
System.debug(String.format('Folder - name: ''{0}'', description: ''{1}'', external
URL: ''{2}'', folder items URL: ''{3}''',
new String[]{ folder.name, folder.description, folder.externalFolderUrl,
folder.folderItemsUrl}));
Get a Repository File Without Permissions Information
Call a method to get a repository file without permission information.
CallgetRepositoryFile(repositoryId, repositoryFileId)togetarepositoryfilewithoutpermissionsinformation.
final String gDriveRepositoryId = '0XCxx00000000ODGAY', gDriveFileId =
'file:0B0lTys1KmM3sTmxKNjVJbWZja00';
final ConnectApi.RepositoryFileDetail file =
384
Using Salesforce Features with Apex
Apex Developer Guide](https://image.slidesharecdn.com/salesforceapexdeveloperguide-230916115800-b7c953cd/85/salesforce_apex_developer_guide-388-320.jpg)
![ConnectApi.ContentHub.getRepositoryFile(gDriveRepositoryId, gDriveFileId);
System.debug(String.format('File - name: ''{0}'', size: {1}, external URL: ''{2}'',
download URL: ''{3}''',
new String[]{ file.name, String.valueOf(file.contentSize), file.externalDocumentUrl,
file.downloadUrl}));
Get a Repository File with Permissions Information
Call a method to get a repository file with permission information.
CallgetRepositoryFile(repositoryId, repositoryFileId, includeExternalFilePermissionsInfo)
to get a repository file with permissions information.
final String gDriveRepositoryId = '0XCxx00000000ODGAY', gDriveFileId =
'file:0B0lTys1KmM3sTmxKNjVJbWZja00';
final ConnectApi.RepositoryFileDetail file =
ConnectApi.ContentHub.getRepositoryFile(gDriveRepositoryId, gDriveFileId, true);
System.debug(String.format('File - name: ''{0}'', size: {1}, external URL: ''{2}'',
download URL: ''{3}''', new String[]{ file.name, String.valueOf(file.contentSize),
file.externalDocumentUrl, file.downloadUrl}));
final ConnectApi.ExternalFilePermissionInformation externalFilePermInfo =
file.externalFilePermissionInformation;
//permission types
final List<ConnectApi.ContentHubPermissionType> permissionTypes =
externalFilePermInfo.externalFilePermissionTypes;
for(ConnectApi.ContentHubPermissionType permissionType : permissionTypes){
System.debug(String.format('Permission type - id: ''{0}'', label: ''{1}''', new
String[]{ permissionType.id, permissionType.label}));
}
//permission groups
final List<ConnectApi.RepositoryGroupSummary> groups =
externalFilePermInfo.repositoryPublicGroups;
for(ConnectApi.RepositoryGroupSummary ggroup : groups){
System.debug(String.format('Group - id: ''{0}'', name: ''{1}'', type:
''{2}''', new String[]{ ggroup.id, ggroup.name, ggroup.type.name()}));
}
Create a Repository File Without Content (Metadata Only)
Call a method to create a file without binary content (metadata only) in a Google Drive repository folder.
Call addRepositoryItem(repositoryId, repositoryFolderId, file) to create a file without binary content
(metadata only) in a Google Drive repository folder. After the file is created, we show the file’s ID, name, description, external URL, and
download URL.
final String gDriveRepositoryId = '0XCxx00000000ODGAY', gDriveFolderId =
'folder:0B0lTys1KmM3sSVJ2bjIzTGFqSWs';
final ConnectApi.ContentHubItemInput newItem = new ConnectApi.ContentHubItemInput();
newItem.itemTypeId = 'document'; //see getAllowedTypes for any file item types available
for creation/update
385
Using Salesforce Features with Apex
Apex Developer Guide](https://image.slidesharecdn.com/salesforceapexdeveloperguide-230916115800-b7c953cd/85/salesforce_apex_developer_guide-389-320.jpg)
![newItem.fields = new List<ConnectApi.ContentHubFieldValueInput>();
//Metadata: name field
final ConnectApi.ContentHubFieldValueInput fieldValueInput = new
ConnectApi.ContentHubFieldValueInput();
fieldValueInput.name = 'name';
fieldValueInput.value = 'new folder item name.txt';
newItem.fields.add(fieldValueInput);
//Metadata: description field
final ConnectApi.ContentHubFieldValueInput fieldValueInputDesc = new
ConnectApi.ContentHubFieldValueInput();
fieldValueInputDesc.name = 'description';
fieldValueInputDesc.value = 'It does describe it';
newItem.fields.add(fieldValueInputDesc);
final ConnectApi.RepositoryFolderItem newFolderItem =
ConnectApi.ContentHub.addRepositoryItem(gDriveRepositoryId, gDriveFolderId, newItem);
final ConnectApi.RepositoryFileSummary newFile = newFolderItem.file;
System.debug(String.format('New file - id: ''{0}'', name: ''{1}'', description:
''{2}'' n external URL: ''{3}'', download URL: ''{4}''', new String[]{
newFile.id, newFile.name, newFile.description, newFile.externalDocumentUrl,
newFile.downloadUrl}));
SEE ALSO:
Apex Reference Guide: ConnectApi.ContentHubItemInput
Apex Reference Guide: ConnectApi.ContentHubFieldValueInput
Create a Repository File with Content
Call a method to create a file with binary content in a Google Drive repository folder.
CalladdRepositoryItem(repositoryId, repositoryFolderId, file, filedata)tocreateafilewithbinary
content in a Google Drive repository folder. After the file is created, we show the file’s ID, name, description, external URL, and download
URL.
final String gDriveRepositoryId = '0XCxx00000000ODGAY', gDriveFolderId =
'folder:0B0lTys1KmM3sSVJ2bjIzTGFqSWs';
final ConnectApi.ContentHubItemInput newItem = new ConnectApi.ContentHubItemInput();
newItem.itemTypeId = 'document'; //see getAllowedTypes for any file item types available
for creation/update
newItem.fields = new List<ConnectApi.ContentHubFieldValueInput>();
//Metadata: name field
Final String newFileName = 'new folder item name.txt';
final ConnectApi.ContentHubFieldValueInput fieldValueInput = new
ConnectApi.ContentHubFieldValueInput();
fieldValueInput.name = 'name';
fieldValueInput.value = newFileName;
newItem.fields.add(fieldValueInput);
//Metadata: description field
386
Using Salesforce Features with Apex
Apex Developer Guide](https://image.slidesharecdn.com/salesforceapexdeveloperguide-230916115800-b7c953cd/85/salesforce_apex_developer_guide-390-320.jpg)
![final ConnectApi.ContentHubFieldValueInput fieldValueInputDesc = new
ConnectApi.ContentHubFieldValueInput();
fieldValueInputDesc.name = 'description';
fieldValueInputDesc.value = 'It does describe it';
newItem.fields.add(fieldValueInputDesc);
//Binary content
final Blob newFileBlob = Blob.valueOf('awesome content for brand new file');
final String newFileMimeType = 'text/plain';
final ConnectApi.BinaryInput fileBinaryInput = new ConnectApi.BinaryInput(newFileBlob,
newFileMimeType, newFileName);
final ConnectApi.RepositoryFolderItem newFolderItem =
ConnectApi.ContentHub.addRepositoryItem(gDriveRepositoryId, gDriveFolderId, newItem,
fileBinaryInput);
final ConnectApi.RepositoryFileSummary newFile = newFolderItem.file;
System.debug(String.format('New file - id: ''{0}'', name: ''{1}'', description:
''{2}'' n external URL: ''{3}'', download URL: ''{4}''', new String[]{
newFile.id, newFile.name, newFile.description, newFile.externalDocumentUrl,
newFile.downloadUrl}));
SEE ALSO:
Apex Reference Guide: ConnectApi.ContentHubItemInput
Apex Reference Guide: ConnectApi.ContentHubFieldValueInput
Apex Reference Guide: ConnectApi.BinaryInput
Update a Repository File Without Content (Metadata Only)
Call a method to update the metadata of a repository file.
Call updateRepositoryFile(repositoryId, repositoryFileId, file) to update the metadata of a file in a
repository folder. After the file is updated, we show the file’s ID, name, description, external URL, download URL.
final String gDriveRepositoryId = '0XCxx00000000ODGAY', gDriveFolderId =
'folder:0B0lTys1KmM3sSVJ2bjIzTGFqSWs', gDriveFileId =
'document:1q9OatVpcyYBK-JWzp_PhR75ulQghwFP15zhkamKrRcQ';
final ConnectApi.ContentHubItemInput updatedItem = new ConnectApi.ContentHubItemInput();
updatedItem.itemTypeId = 'document'; //see getAllowedTypes for any file item types available
for creation/update
updatedItem.fields = new List<ConnectApi.ContentHubFieldValueInput>();
//Metadata: name field
final ConnectApi.ContentHubFieldValueInput fieldValueInputName = new
ConnectApi.ContentHubFieldValueInput();
fieldValueInputName.name = 'name';
fieldValueInputName.value = 'updated file name.txt';
updatedItem.fields.add(fieldValueInputName);
final ConnectApi.RepositoryFileDetail updatedFile =
ConnectApi.ContentHub.updateRepositoryFile(gDriveRepositoryId, gDriveFileId, updatedItem);
System.debug(String.format('Updated file - id: ''{0}'', name: ''{1}'', description:
''{2}'',n external URL: ''{3}'', download URL: ''{4}''', new String[]{
387
Using Salesforce Features with Apex
Apex Developer Guide](https://image.slidesharecdn.com/salesforceapexdeveloperguide-230916115800-b7c953cd/85/salesforce_apex_developer_guide-391-320.jpg)
![updatedFile.id, updatedFile.name, updatedFile.description, updatedFile.externalDocumentUrl,
updatedFile.downloadUrl}));
SEE ALSO:
Apex Reference Guide: ConnectApi.ContentHubItemInput
Apex Reference Guide: ConnectApi.ContentHubFieldValueInput
Update a Repository File with Content
Call a method to update a repository file with content.
Call updateRepositoryFile(repositoryId, repositoryFileId, file, fileData) to update the content
and metadata of a file in a repository. After the file is updated, we show the file’s ID, name, description, external URL, and download URL.
final String gDriveRepositoryId = '0XCxx00000000ODGAY', gDriveFolderId =
'folder:0B0lTys1KmM3sSVJ2bjIzTGFqSWs', gDriveFileId =
'document:1q9OatVpcyYBK-JWzp_PhR75ulQghwFP15zhkamKrRcQ';
final ConnectApi.ContentHubItemInput updatedItem = new ConnectApi.ContentHubItemInput();
updatedItem.itemTypeId = 'document'; //see getAllowedTypes for any file item types available
for creation/update
updatedItem.fields = new List<ConnectApi.ContentHubFieldValueInput>();
//Metadata: name field
final ConnectApi.ContentHubFieldValueInput fieldValueInputName = new
ConnectApi.ContentHubFieldValueInput();
fieldValueInputName.name = 'name';
fieldValueInputName.value = 'updated file name.txt';
updatedItem.fields.add(fieldValueInputName);
//Binary content
final Blob updatedFileBlob = Blob.valueOf('even more awesome content for updated file');
final String updatedFileMimeType = 'text/plain';
final ConnectApi.BinaryInput fileBinaryInput = new ConnectApi.BinaryInput(updatedFileBlob,
updatedFileMimeType, updatedFileName);
final ConnectApi.RepositoryFileDetail updatedFile =
ConnectApi.ContentHub.updateRepositoryFile(gDriveRepositoryId, gDriveFileId, updatedItem);
System.debug(String.format('Updated file - id: ''{0}'', name: ''{1}'', description:
''{2}'',n external URL: ''{3}'', download URL: ''{4}''', new String[]{
updatedFile.id, updatedFile.name, updatedFile.description, updatedFile.externalDocumentUrl,
updatedFile.downloadUrl}));
SEE ALSO:
Apex Reference Guide: ConnectApi.ContentHubItemInput
Apex Reference Guide: ConnectApi.ContentHubFieldValueInput
Apex Reference Guide: ConnectApi.BinaryInput
Get an Authentication URL
Call a method to get an authentication URL.
388
Using Salesforce Features with Apex
Apex Developer Guide](https://image.slidesharecdn.com/salesforceapexdeveloperguide-230916115800-b7c953cd/85/salesforce_apex_developer_guide-392-320.jpg)
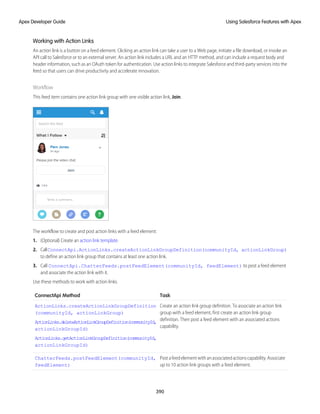
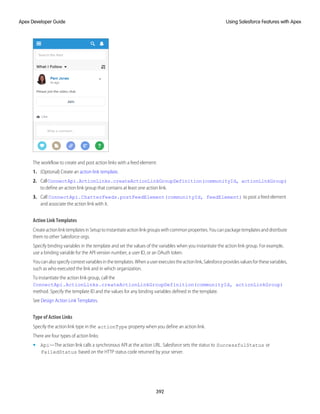

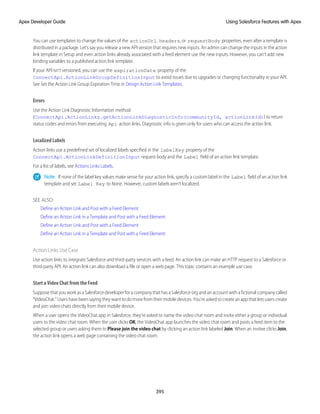

![Moderate Chatter Private Messages with Triggers
EDITIONS
Available in: Salesforce
Classic
Available in: Enterprise,
Performance, Unlimited,
and Developer Editions
USER PERMISSIONS
To save Apex triggers for
ChatterMessage:
• Author Apex
AND
Manage Chatter
Messages and Direct
Messages
Write a trigger for ChatterMessage to automate the moderation of private messages in an org or
Experience Cloud site. Use triggers to ensure that messages conform to your company’s messaging
policies and don’t contain blocklisted words.
Write an Apex before insert trigger to review the private message body and information about the
sender. You can add validation messages to the record or the Body field, which causes the message
to fail and an error to be returned to the user.
Although you can create an afterinsert trigger, ChatterMessage is not updatable, and consequently
any after insert trigger that modifies ChatterMessage will fail at run time with an appropriate error
message.
To create a trigger for private messages from Setup, enter ChatterMessage Triggers in
the Quick Find box, then select ChatterMessage Triggers. Alternatively, you can create a
trigger from the Developer Console by clicking File > New > Apex Trigger and selecting
ChatterMessage from the sObject drop-down list.
This table lists the fields that are exposed on ChatterMessage.
Table 8: Available Fields in ChatterMessage
Description
Apex Data Type
Field
Unique identifier for the Chatter message
ID
Id
Body of the Chatter message as posted by the
sender
String
Body
User ID of the sender
ID
SenderId
Date and time that the message was sent
DateTime
SentDate
Network (site) in which the message was sent.
This field is visible only if digital experiences is
enabled and Private Messages is enabled in at
least one site.
ID
SendingNetworkId
This example shows a beforeinsert trigger on ChatterMessage that is used to review each new message. This trigger calls a class method,
moderator.review(), to review each new message before it is inserted.
trigger PrivateMessageModerationTrigger on ChatterMessage (before insert) {
ChatterMessage[] messages = Trigger.new;
// Instantiate the Message Moderator using the factory method
MessageModerator moderator = MessageModerator.getInstance();
for (ChatterMessage currentMessage : messages) {
moderator.review(currentMessage);
}
}
If a message violates your policy, for example when the message body contains blocklisted words, you can prevent the message from
being sent by calling the Apex addError method. You can call addError to add a custom error message on a field or on the
416
Using Salesforce Features with Apex
Apex Developer Guide](https://image.slidesharecdn.com/salesforceapexdeveloperguide-230916115800-b7c953cd/85/salesforce_apex_developer_guide-420-320.jpg)
![}
/**
Is the sender allowed to send messages in this context?
-- Moderators -- always allowed to send
-- Internal Members -- always allowed to send
-- Site Members -- in general only allowed to send if they have
a sufficient Reputation
-- Site Members -- with insufficient reputation may message the
moderator(s)
**/
public void reviewSender(ChatterMessage theMessage) {
// Are we in a Site Context?
boolean isSiteContext = (theMessage.SendingNetworkId != null);
// Get the User
User sendingUser = [SELECT Id, Name, UserType, IsPortalEnabled
FROM User where Id = :theMessage.SenderId ];
// ...
}
/**
Enforce a singleton pattern to improve performance
**/
public static MessageModerator getInstance() {
if (instance==null) {
instance = new MessageModerator();
}
return instance;
}
/**
Default contructor is private to prevent others from instantiating this class
without using the factory.
Initializes the static members.
**/
private MessageModerator() {
initializeBlockList();
}
/**
Helper method that does the "heavy lifting" to load up the dictionaries
from the database.
Should only run once to initialize the static member which is used for
subsequent validations.
**/
private void initializeBlockList() {
if (blocklistedWords==null) {
// Fill list of blocklisted words
// ...
}
}
}
418
Using Salesforce Features with Apex
Apex Developer Guide](https://image.slidesharecdn.com/salesforceapexdeveloperguide-230916115800-b7c953cd/85/salesforce_apex_developer_guide-422-320.jpg)
![<isGlobal>false</isGlobal>
</DataWeaveResource>
• Push the source to the scratch org using Salesforce CLI version v7.151.9 or higher. See Salesforce CLI Release Notes.
• Invoke the DataWeave script from Apex and check the results from anonymous Apex.
This example invokes the csvToContacts.dwl script.
// CSV data for Contacts
String inputCsv = 'first_name,last_name,emailnCodey,"The Bear",codey@salesforce.com';
DataWeave.Script dwscript = new DataWeaveScriptResource.csvToContacts();
DataWeave.Result dwresult = dwscript.execute(new Map<String, Object>{'records' =>
inputCsv});
List<Contact> results = (List<Contact>)dwresult.getValue();
Assert.areEqual(1, results.size());
Contact codeyContact = results[0];
Assert.areEqual('Codey',codeyContact.FirstName);
Assert.areEqual('The Bear',codeyContact.LastName);
Note: Extensive code samples that demonstrate the DataWeave in Apex feature are available on Developerforce.
Limitations of DataWeave in Apex
DataWeave in Apex has these limitations.
• The DataWeave Java bridge, that is, the ability to bind to static Java methods is disabled. See Introduction to Mule 4. Features that
interact with the environment such as the readURL and envVar functions are also disabled. These checks are done at script
creation time instead of at runtime.
• You must specify an encoding for binary input (Apex Blobs) to be coerced to strings: binaryVariable as String
{encoding: 'utf8' }".
• DataWeave is constrained to disallow the loading of additional libraries. Therefore, scripts must be self-contained.
• DataWeave modules and importing other scripts aren’t supported. For example, import modules::MyMapping as per
Using a Mapping File in a DataWeave Script isn’t supported.
Note: The feature supports built-in modules. See DataWeave Reference.
• DataWeave in Apex doesn’t support these content types.
– Flat File Format (application/flatfile)
– Excel (application/xlsx)
– Arvo (application/avro)
• Apex classes must be at API version 53.0 or later to access DataWeave integration methods.
• There’s a maximum of 50 DataWeave scripts per org.
• The maximum body size of one DataWeave script is 100,000 (one hundred thousand) characters.
Note: XML Entity Expansion isn’t supported, either currently or in the future, as a guard against denial of service attacks.
421
Using Salesforce Features with Apex
Apex Developer Guide](https://image.slidesharecdn.com/salesforceapexdeveloperguide-230916115800-b7c953cd/85/salesforce_apex_developer_guide-425-320.jpg)
![Moderate Feed Items with Triggers
EDITIONS
Available in: Enterprise,
Performance, Unlimited,
and Developer Editions
USER PERMISSIONS
To save Apex triggers for
FeedItem:
• Author Apex
Write a trigger for FeedItem to automate the moderation of posts in an org or Experience Cloud
site. Use triggers to ensure that posts conform to your company’s communication policies and
don’t contain unwanted words or phrases.
Write an Apex before insert trigger to review the feed item body and change the status of the feed
item if it contains a blocklisted phrase. To create a trigger for feed items from Setup, enter
FeedItem Triggers inthe Quick Find box,thenselectFeedItemTriggers.Alternatively,
you can create a trigger from the Developer Console by clicking File > New > Apex Trigger and
selecting FeedItem from the sObject drop-down list.
This example shows a before insert trigger on FeedItem that is used to review each new post. If the
post contains the unwanted phrase, the trigger also sets the status of the post to
PendingReview.
trigger ReviewFeedItem on FeedItem (before insert) {
for (Integer i = 0; i<trigger.new.size(); i++) {
// We don't want to leak "test phrase" information.
if (trigger.new[i].body.containsIgnoreCase('test phrase')) {
trigger.new[i].status = 'PendingReview';
System.debug('caught one for pendingReview');
}
}
}
Experience Cloud Sites
Experience Cloud sites are branded spaces for your employees, customers, and partners to connect. You can customize and create sites
to meet your business needs, then transition seamlessly between them.
Interact with Experience Cloud sites in Apex using the Network class and using Connect in Apex classes in the ConnectApi
namespace.
Connect in Apex has a ConnectApi.Communities class with methods that return information about sites. Many Connect in
Apex methods take a communityId argument, and some Connect in Apex methods take a siteId argument
SEE ALSO:
Apex Reference Guide: Network Class
Apex Reference Guide: Connect in Apex
Email
You can use Apex to work with inbound and outbound email.
Use Apex with these email features:
422
Using Salesforce Features with Apex
Apex Developer Guide](https://image.slidesharecdn.com/salesforceapexdeveloperguide-230916115800-b7c953cd/85/salesforce_apex_developer_guide-426-320.jpg)
![IN THIS SECTION:
Inbound Email
Use Apex to work with email sent to Salesforce.
Outbound Email
Use Apex to work with email sent from Salesforce.
Inbound Email
Use Apex to work with email sent to Salesforce.
You can use Apex to receive and process email and attachments. The email is received by the Apex email service, and processed by
Apex classes that utilize the InboundEmail object.
Note: The Apex email service is only available in Developer, Enterprise, Unlimited, and Performance Edition organizations.
See Apex Email Service.
Outbound Email
Use Apex to work with email sent from Salesforce.
You can use Apex to send individual and mass email. The email can include all standard email attributes (such as subject line and blind
carbon copy address), use Salesforce email templates, and be in plain text or HTML format, or those generated by Visualforce.
Note: Visualforce email templates cannot be used for mass email.
You can use Salesforce to track the status of email in HTML format, including the date the email was sent, first opened and last opened,
and the total number of times it was opened.
To send individual and mass email with Apex, use the following classes:
SingleEmailMessage
Instantiates an email object used for sending a single email message. The syntax is:
Messaging.SingleEmailMessage mail = new Messaging.SingleEmailMessage();
MassEmailMessage
Instantiates an email object used for sending a mass email message. The syntax is:
Messaging.MassEmailMessage mail = new Messaging.MassEmailMessage();
Messaging
Includesthestatic sendEmail method,whichsendstheemailobjectsyouinstantiatewitheitherthe SingleEmailMessage
or MassEmailMessage classes, and returns a SendEmailResult object.
The syntax for sending an email is:
Messaging.sendEmail(new Messaging.Email[] { mail } , opt_allOrNone);
where Email is either Messaging.SingleEmailMessage or Messaging.MassEmailMessage.
The optional opt_allOrNone parameter specifies whether sendEmail prevents delivery of all other messages when any of
the messages fail due to an error (true), or whether it allows delivery of the messages that don't have errors (false). The default
is true.
423
Using Salesforce Features with Apex
Apex Developer Guide](https://image.slidesharecdn.com/salesforceapexdeveloperguide-230916115800-b7c953cd/85/salesforce_apex_developer_guide-427-320.jpg)
![Includes the static reserveMassEmailCapacity and reserveSingleEmailCapacity methods, which can be
called before sending any emails to ensure that the sending organization doesn’t exceed its daily email limit when the transaction
is committed and emails are sent. The syntax is:
Messaging.reserveMassEmailCapacity(count);
and
Messaging.reserveSingleEmailCapacity(count);
where count indicates the total number of addresses that emails will be sent to.
Note the following:
• The email is not sent until the Apex transaction is committed.
• The email address of the user calling the sendEmail method is inserted in the From Address field of the email header. All
email that is returned, bounced, or received out-of-office replies goes to the user calling the method.
• Maximum of 10 sendEmail methods per transaction. Use the Limits methods to verify the number of sendEmail methods
in a transaction.
• Single email messages sent with the sendEmail method count against the sending organization's daily single email limit. When
this limit is reached, calls to the sendEmail method using SingleEmailMessage are rejected, and the user receives a
SINGLE_EMAIL_LIMIT_EXCEEDED error code. However, single emails sent through the application are allowed.
• Mass email messages sent with the sendEmail method count against the sending organization's daily mass email limit. When
this limit is reached, calls to the sendEmail method using MassEmailMessage are rejected, and the user receives a
MASS_MAIL_LIMIT_EXCEEDED error code.
• Any error returned in the SendEmailResult object indicates that no email was sent.
Messaging.SingleEmailMessage has a method called setOrgWideEmailAddressId. It accepts an object ID to an
OrgWideEmailAddress object. If setOrgWideEmailAddressId is passed a valid ID, the
OrgWideEmailAddress.DisplayName field is used in the email header, instead of the logged-in user's Display Name.
The sending email address in the header is also set to the field defined in OrgWideEmailAddress.Address.
Note: Ifboth OrgWideEmailAddress.DisplayName and setSenderDisplayName aredefined,theuserreceives
a DUPLICATE_SENDER_DISPLAY_NAME error.
For more information, see Organization-Wide Email Addresses in the Salesforce Help .
Example
// First, reserve email capacity for the current Apex transaction to ensure
// that we won't exceed our daily email limits when sending email after
// the current transaction is committed.
Messaging.reserveSingleEmailCapacity(2);
// Processes and actions involved in the Apex transaction occur next,
// which conclude with sending a single email.
// Now create a new single email message object
// that will send out a single email to the addresses in the To, CC & BCC list.
Messaging.SingleEmailMessage mail = new Messaging.SingleEmailMessage();
// Strings to hold the email addresses to which you are sending the email.
String[] toAddresses = new String[] {'user@acme.com'};
String[] ccAddresses = new String[] {'smith@gmail.com'};
424
Using Salesforce Features with Apex
Apex Developer Guide](https://image.slidesharecdn.com/salesforceapexdeveloperguide-230916115800-b7c953cd/85/salesforce_apex_developer_guide-428-320.jpg)
![// Assign the addresses for the To and CC lists to the mail object.
mail.setToAddresses(toAddresses);
mail.setCcAddresses(ccAddresses);
// Specify the address used when the recipients reply to the email.
mail.setReplyTo('support@acme.com');
// Specify the name used as the display name.
mail.setSenderDisplayName('Salesforce Support');
// Specify the subject line for your email address.
mail.setSubject('New Case Created : ' + case.Id);
// Set to True if you want to BCC yourself on the email.
mail.setBccSender(false);
// Optionally append the Salesforce email signature to the email.
// The email address of the user executing the Apex Code will be used.
mail.setUseSignature(false);
// Specify the text content of the email.
mail.setPlainTextBody('Your Case: ' + case.Id +' has been created.');
mail.setHtmlBody('Your case:<b> ' + case.Id +' </b>has been created.<p>'+
'To view your case <a href=https://MyDomainName.my.salesforce.com/'+case.Id+'>click
here.</a>');
// Send the email you have created.
Messaging.sendEmail(new Messaging.SingleEmailMessage[] { mail });
External Services
External Services connect your Salesforce org to a service outside of Salesforce, such as an employee banking service. After you register
the external service, you can call it natively in your Apex code. Objects and operations defined in the external service's registered API
specification become Apex classes and methods in the ExternalService namespace. The registered service's schema types map
to Apex types, and are strongly typed, making the Apex compiler do the heavy lifting for you. For example, you can make a type safe
callout to an external service from Apex without needing to use the Http class or perform transforms on JSON strings.
SEE ALSO:
Salesforce Help: Invoke External Service Callouts Using Apex
Flows
Flow Builder lets admins build applications, known as flows, that automate a business process by collecting data and doing something
in your Salesforce org or an external system.
For example, you can create a flow to script calls for a customer support center or to generate real-time quotes for a sales team. You can
embed a flow in a Visualforce page or Aura component and access it in an Apex controller.
425
Using Salesforce Features with Apex
Apex Developer Guide](https://image.slidesharecdn.com/salesforceapexdeveloperguide-230916115800-b7c953cd/85/salesforce_apex_developer_guide-429-320.jpg)
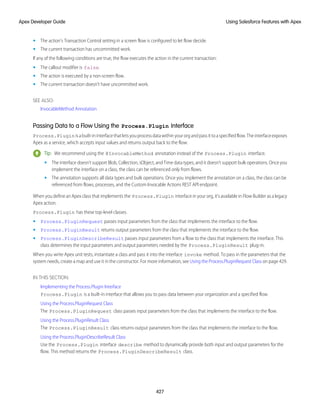
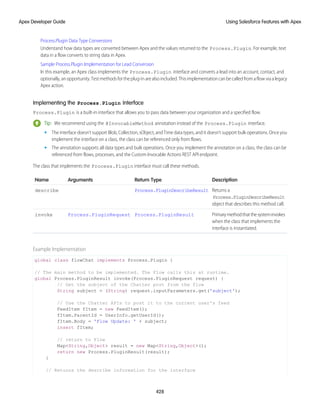
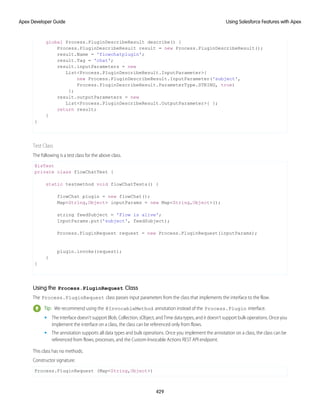
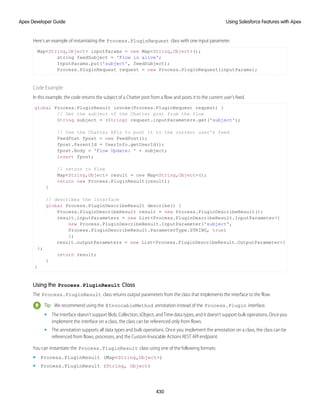

![new Process.PluginDescribeResult.OutputParameter(
'OpportunityID',
Process.PluginDescribeResult.ParameterType.STRING)
};
return result;
}
/**
* Implementation of the LeadConvert plug-in.
* Converts a given lead with several options:
* leadID - ID of the lead to convert
* contactID -
* accountID - ID of the Account to attach the converted
* Lead/Contact/Opportunity to.
* convertedStatus -
* overWriteLeadSource -
* createOpportunity - true if you want to create a new
* Opportunity upon conversion
* opportunityName - Name of the new Opportunity.
* sendEmailtoOwner - true if you are changing owners upon
* conversion and want to notify the new Opportunity owner.
*
* returns: a Map with the following output:
* AccountID - ID of the Account created or attached
* to upon conversion.
* ContactID - ID of the Contact created or attached
* to upon conversion.
* OpportunityID - ID of the Opportunity created
* upon conversion.
*/
public Map<String,String> convertLead (
String leadID,
String contactID,
String accountID,
String convertedStatus,
Boolean overWriteLeadSource,
Boolean createOpportunity,
String opportunityName,
Boolean sendEmailToOwner
) {
Map<String,String> result = new Map<String,String>();
if (leadId == null) throw new ConvertLeadPluginException(
'Lead Id cannot be null');
// check for multiple leads with the same ID
Lead[] leads = [Select Id, FirstName, LastName, Company
From Lead where Id = :leadID];
if (leads.size() > 0) {
Lead l = leads[0];
// CheckAccount = true, checkContact = false
if (accountID == null && l.Company != null) {
Account[] accounts = [Select Id, Name FROM Account
436
Using Salesforce Features with Apex
Apex Developer Guide](https://image.slidesharecdn.com/salesforceapexdeveloperguide-230916115800-b7c953cd/85/salesforce_apex_developer_guide-440-320.jpg)
![where Name = :l.Company LIMIT 1];
if (accounts.size() > 0) {
accountId = accounts[0].id;
}
}
// Perform the lead conversion.
Database.LeadConvert lc = new Database.LeadConvert();
lc.setLeadId(leadID);
lc.setOverwriteLeadSource(overWriteLeadSource);
lc.setDoNotCreateOpportunity(!createOpportunity);
lc.setConvertedStatus(convertedStatus);
if (sendEmailToOwner != null) lc.setSendNotificationEmail(
sendEmailToOwner);
if (accountId != null && accountId.length() > 0)
lc.setAccountId(accountId);
if (contactId != null && contactId.length() > 0)
lc.setContactId(contactId);
if (createOpportunity) {
lc.setOpportunityName(opportunityName);
}
Database.LeadConvertResult lcr = Database.convertLead(
lc, true);
if (lcr.isSuccess()) {
result.put('AccountID', lcr.getAccountId());
result.put('ContactID', lcr.getContactId());
if (createOpportunity) {
result.put('OpportunityID',
lcr.getOpportunityId());
}
} else {
String error = lcr.getErrors()[0].getMessage();
throw new ConvertLeadPluginException(error);
}
} else {
throw new ConvertLeadPluginException(
'No leads found with Id : "' + leadId + '"');
}
return result;
}
// Utility exception class
class ConvertLeadPluginException extends Exception {}
}
// Test class for the lead convert Apex plug-in.
@isTest
private class VWFConvertLeadTest {
static testMethod void basicTest() {
// Create test lead
Lead testLead = new Lead(
Company='Test Lead',FirstName='John',LastName='Doe');
insert testLead;
437
Using Salesforce Features with Apex
Apex Developer Guide](https://image.slidesharecdn.com/salesforceapexdeveloperguide-230916115800-b7c953cd/85/salesforce_apex_developer_guide-441-320.jpg)
![LeadStatus convertStatus =
[Select Id, MasterLabel from LeadStatus
where IsConverted=true limit 1];
// Create test conversion
VWFConvertLead aLeadPlugin = new VWFConvertLead();
Map<String,Object> inputParams = new Map<String,Object>();
Map<String,Object> outputParams = new Map<String,Object>();
inputParams.put('LeadID',testLead.ID);
inputParams.put('ConvertedStatus',
convertStatus.MasterLabel);
Process.PluginRequest request = new
Process.PluginRequest(inputParams);
Process.PluginResult result;
result = aLeadPlugin.invoke(request);
Lead aLead = [select name, id, isConverted
from Lead where id = :testLead.ID];
System.Assert(aLead.isConverted);
}
/*
* This tests lead conversion with
* the Account ID specified.
*/
static testMethod void basicTestwithAccount() {
// Create test lead
Lead testLead = new Lead(
Company='Test Lead',FirstName='John',LastName='Doe');
insert testLead;
Account testAccount = new Account(name='Test Account');
insert testAccount;
// System.debug('ACCOUNT BEFORE' + testAccount.ID);
LeadStatus convertStatus = [Select Id, MasterLabel
from LeadStatus where IsConverted=true limit 1];
// Create test conversion
VWFConvertLead aLeadPlugin = new VWFConvertLead();
Map<String,Object> inputParams = new Map<String,Object>();
Map<String,Object> outputParams = new Map<String,Object>();
inputParams.put('LeadID',testLead.ID);
inputParams.put('AccountID',testAccount.ID);
inputParams.put('ConvertedStatus',
convertStatus.MasterLabel);
438
Using Salesforce Features with Apex
Apex Developer Guide](https://image.slidesharecdn.com/salesforceapexdeveloperguide-230916115800-b7c953cd/85/salesforce_apex_developer_guide-442-320.jpg)
![Process.PluginRequest request = new
Process.PluginRequest(inputParams);
Process.PluginResult result;
result = aLeadPlugin.invoke(request);
Lead aLead =
[select name, id, isConverted, convertedAccountID
from Lead where id = :testLead.ID];
System.Assert(aLead.isConverted);
//System.debug('ACCOUNT AFTER' + aLead.convertedAccountID);
System.AssertEquals(testAccount.ID, aLead.convertedAccountID);
}
/*
* This tests lead conversion with the Account ID specified.
*/
static testMethod void basicTestwithAccounts() {
// Create test lead
Lead testLead = new Lead(
Company='Test Lead',FirstName='John',LastName='Doe');
insert testLead;
Account testAccount1 = new Account(name='Test Lead');
insert testAccount1;
Account testAccount2 = new Account(name='Test Lead');
insert testAccount2;
// System.debug('ACCOUNT BEFORE' + testAccount.ID);
LeadStatus convertStatus = [Select Id, MasterLabel
from LeadStatus where IsConverted=true limit 1];
// Create test conversion
VWFConvertLead aLeadPlugin = new VWFConvertLead();
Map<String,Object> inputParams = new Map<String,Object>();
Map<String,Object> outputParams = new Map<String,Object>();
inputParams.put('LeadID',testLead.ID);
inputParams.put('ConvertedStatus',
convertStatus.MasterLabel);
Process.PluginRequest request = new
Process.PluginRequest(inputParams);
Process.PluginResult result;
result = aLeadPlugin.invoke(request);
Lead aLead =
[select name, id, isConverted, convertedAccountID
from Lead where id = :testLead.ID];
System.Assert(aLead.isConverted);
}
439
Using Salesforce Features with Apex
Apex Developer Guide](https://image.slidesharecdn.com/salesforceapexdeveloperguide-230916115800-b7c953cd/85/salesforce_apex_developer_guide-443-320.jpg)
![/*
* -ve Test
*/
static testMethod void errorTest() {
// Create test lead
// Lead testLead = new Lead(Company='Test Lead',
// FirstName='John',LastName='Doe');
LeadStatus convertStatus = [Select Id, MasterLabel
from LeadStatus where IsConverted=true limit 1];
// Create test conversion
VWFConvertLead aLeadPlugin = new VWFConvertLead();
Map<String,Object> inputParams = new Map<String,Object>();
Map<String,Object> outputParams = new Map<String,Object>();
inputParams.put('LeadID','00Q7XXXXxxxxxxx');
inputParams.put('ConvertedStatus',convertStatus.MasterLabel);
Process.PluginRequest request = new
Process.PluginRequest(inputParams);
Process.PluginResult result;
try {
result = aLeadPlugin.invoke(request);
}
catch (Exception e) {
System.debug('EXCEPTION' + e);
System.AssertEquals(1,1);
}
}
/*
* This tests the describe() method
*/
static testMethod void describeTest() {
VWFConvertLead aLeadPlugin =
new VWFConvertLead();
Process.PluginDescribeResult result =
aLeadPlugin.describe();
System.AssertEquals(
result.inputParameters.size(), 8);
System.AssertEquals(
result.OutputParameters.size(), 3);
}
}
440
Using Salesforce Features with Apex
Apex Developer Guide](https://image.slidesharecdn.com/salesforceapexdeveloperguide-230916115800-b7c953cd/85/salesforce_apex_developer_guide-444-320.jpg)
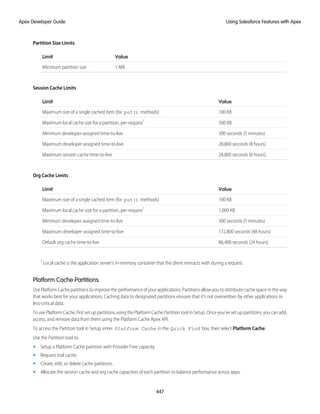
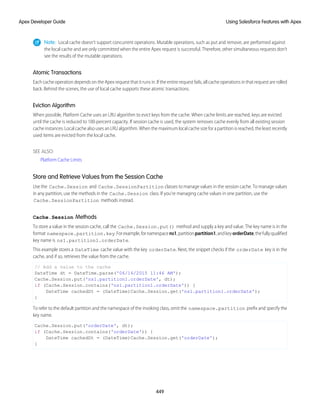
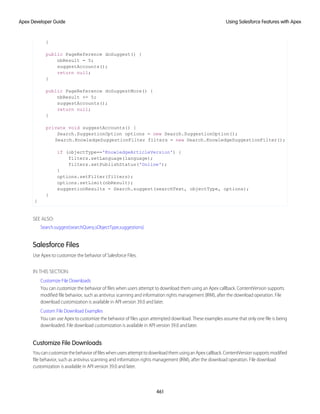

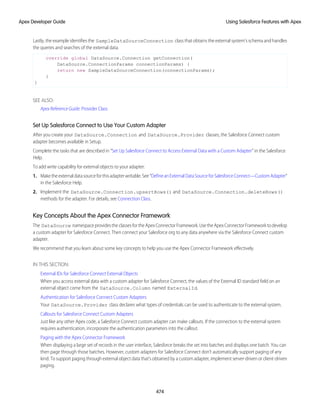
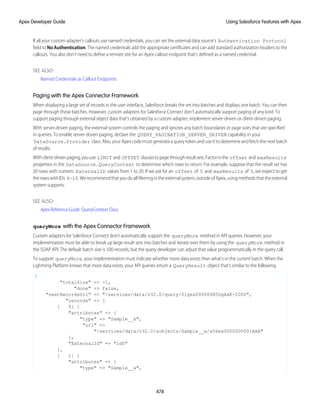
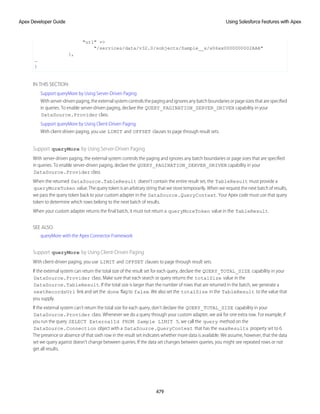
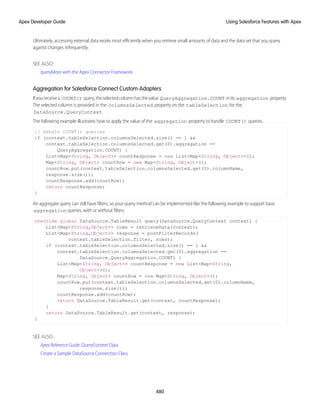
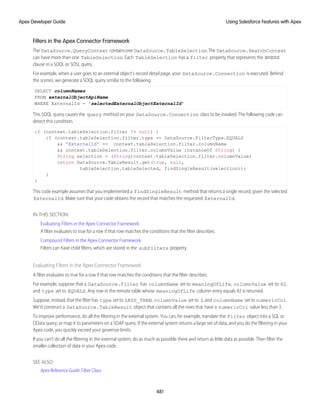
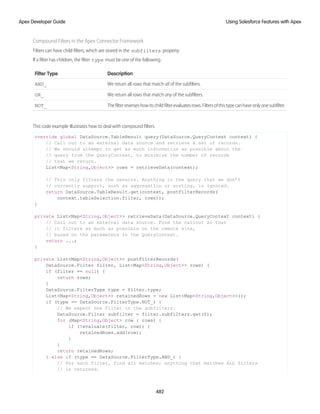
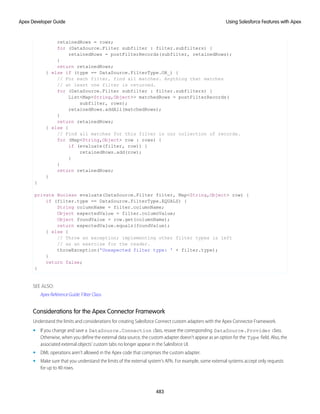
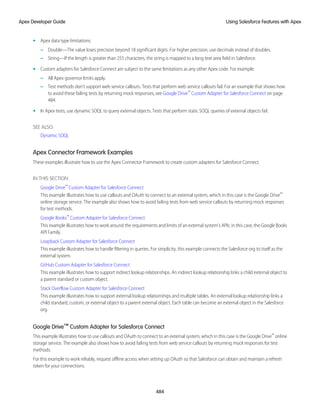
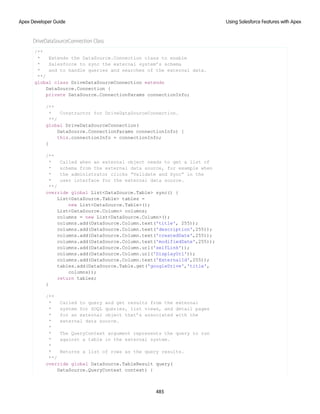
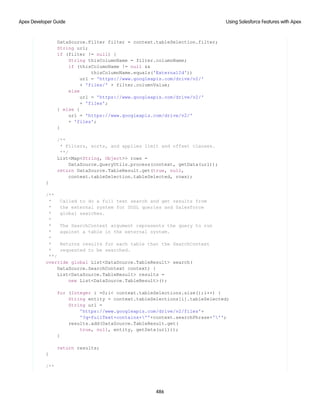
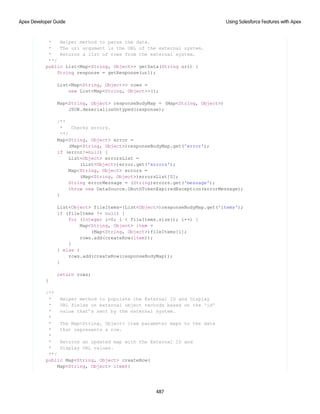
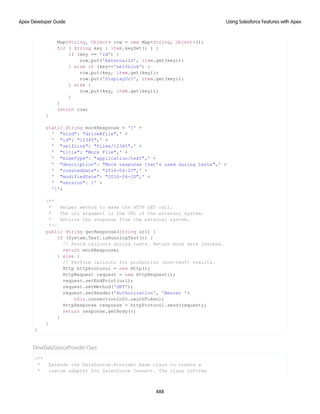
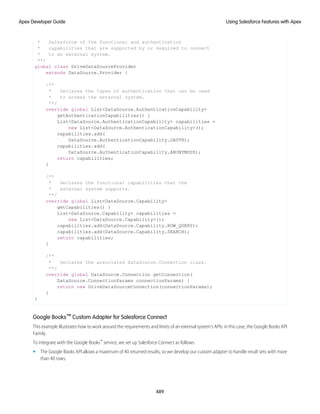
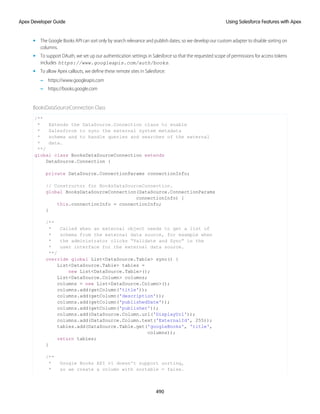
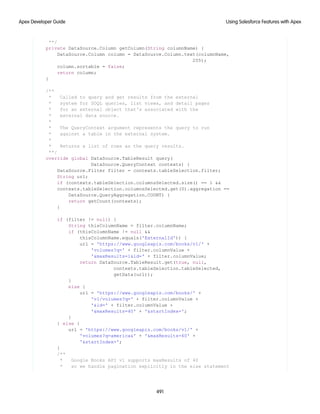
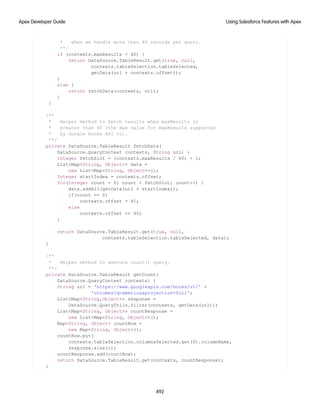

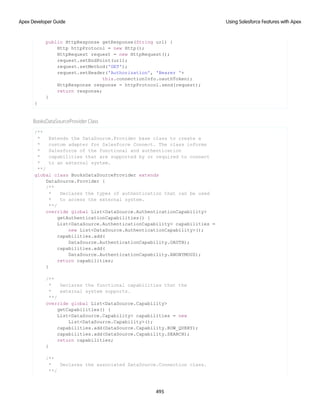
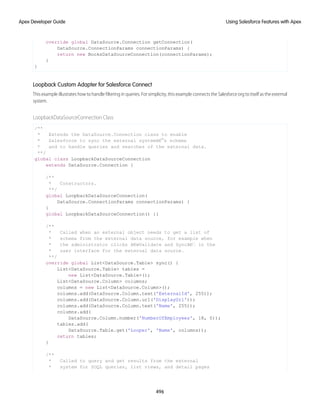
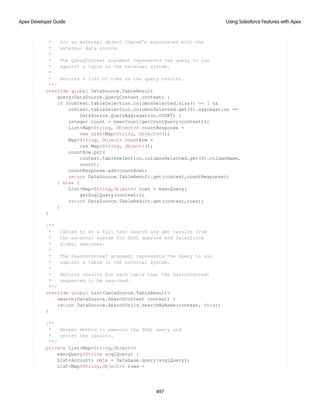
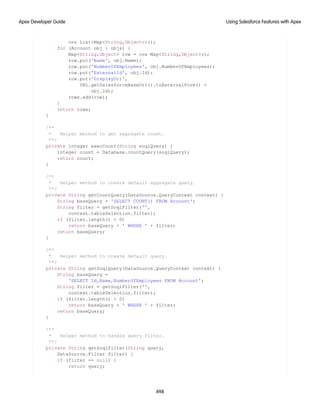

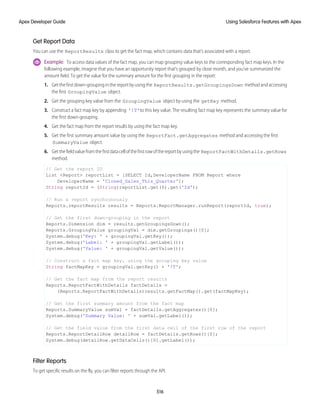
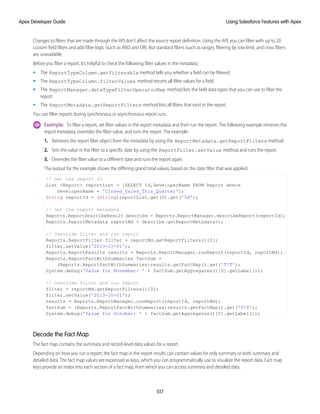
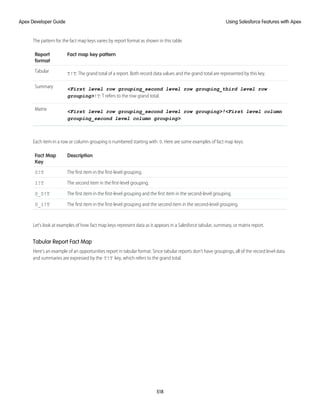
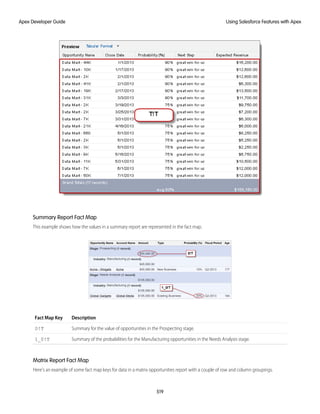

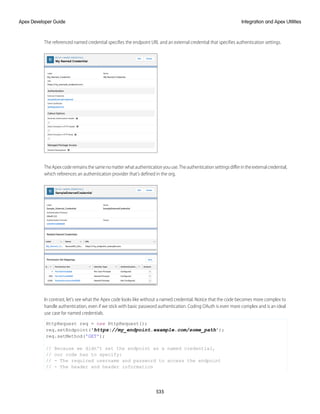
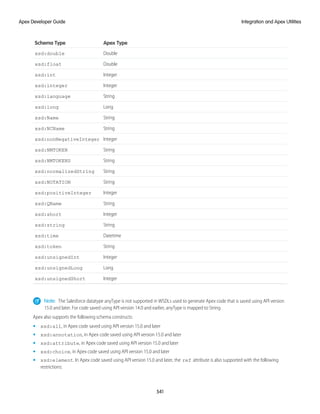
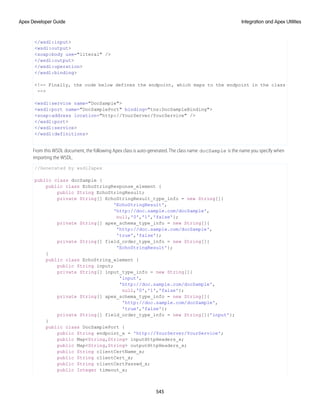
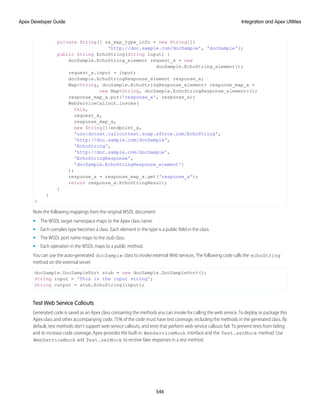
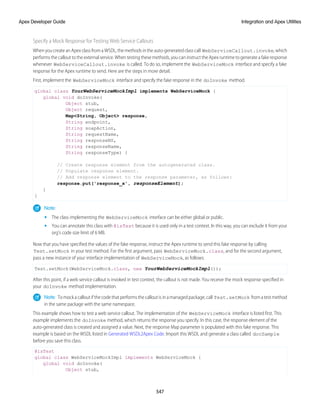
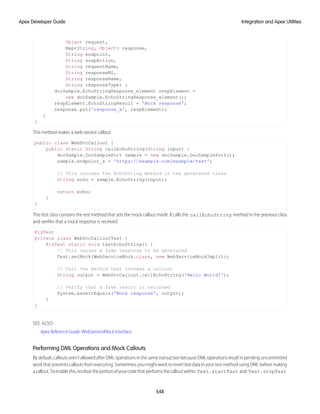

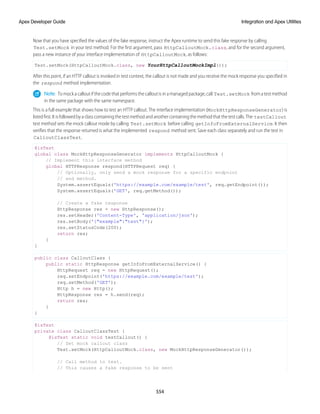

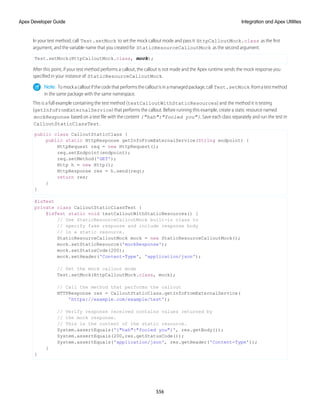
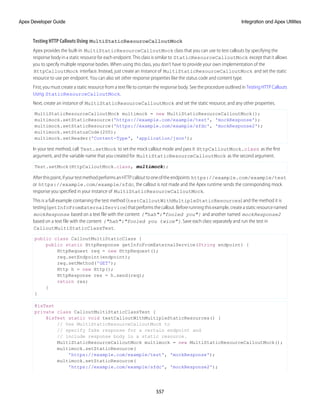
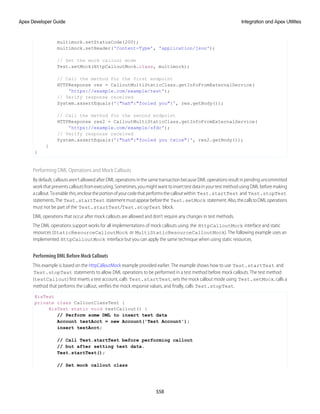
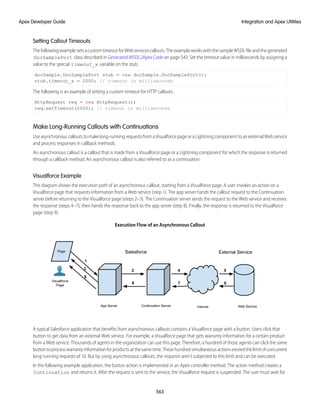


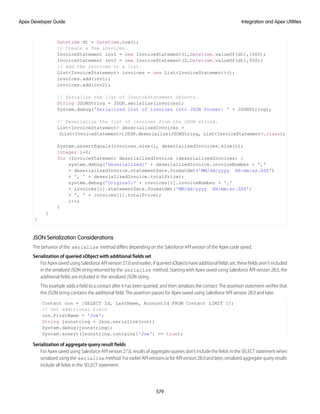
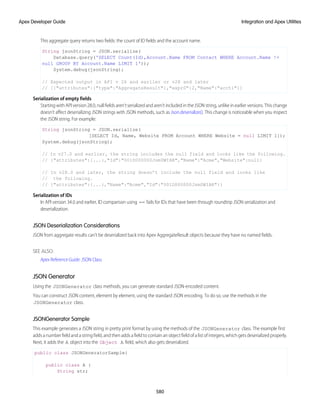
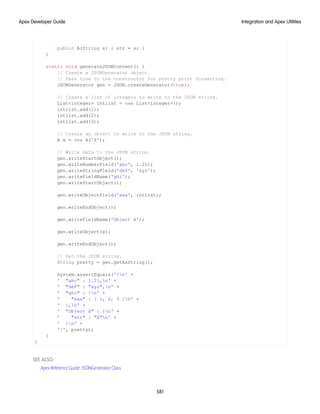
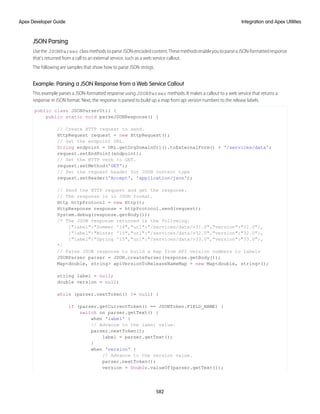

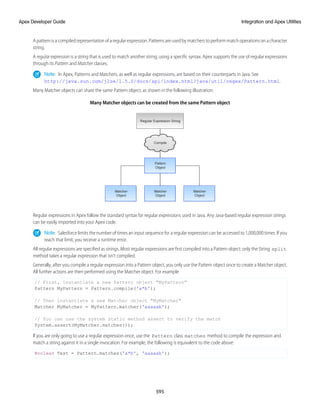

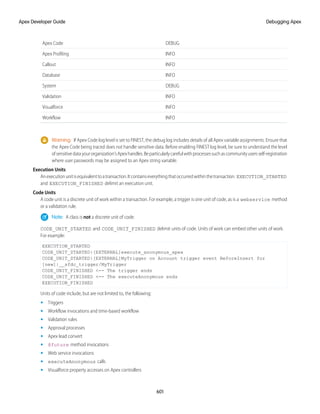
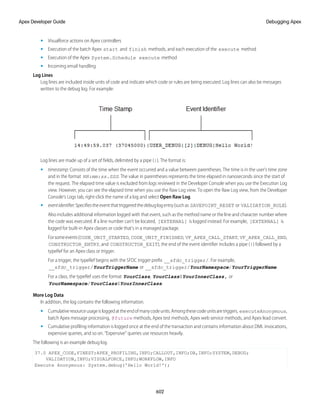
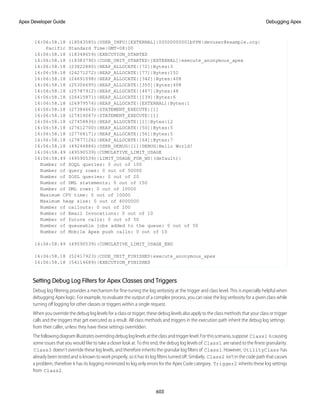
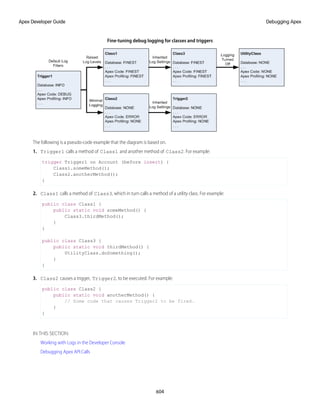
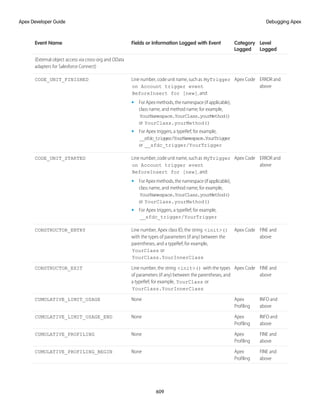
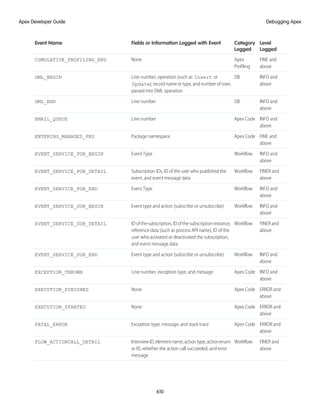
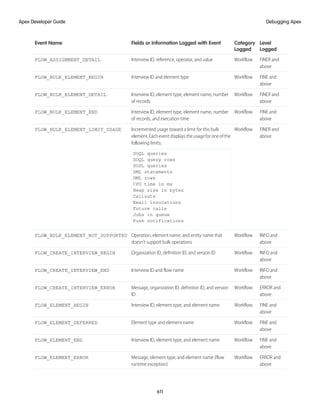
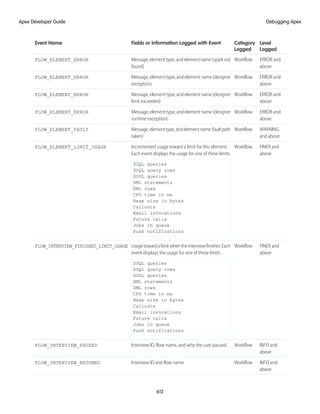
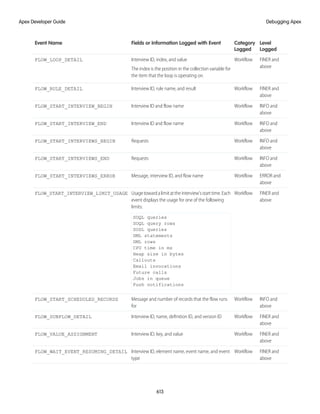
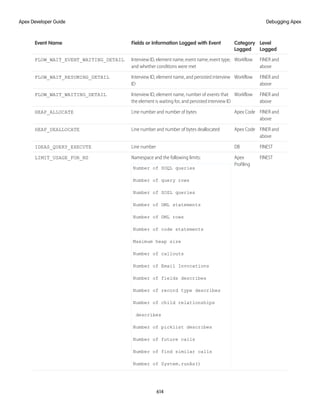
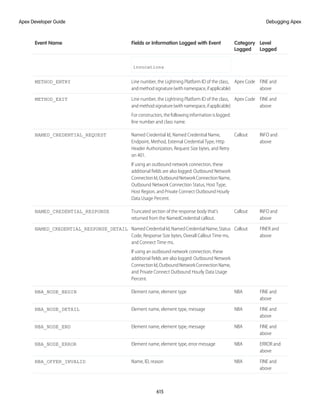
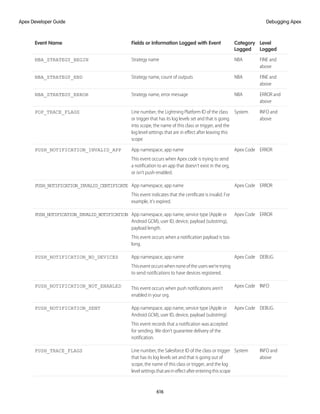
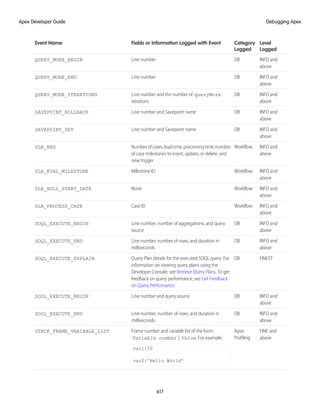
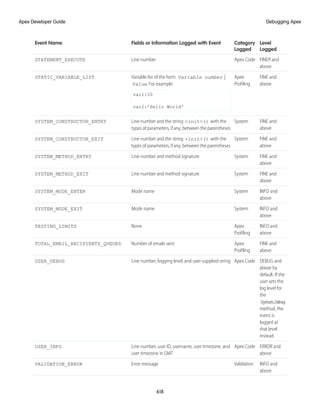

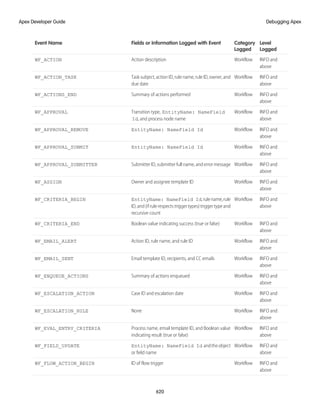
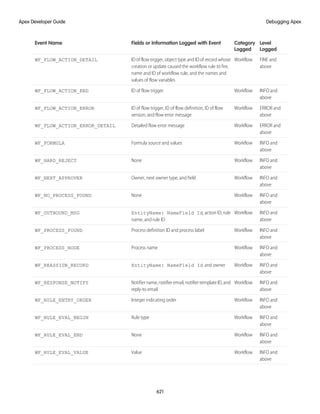
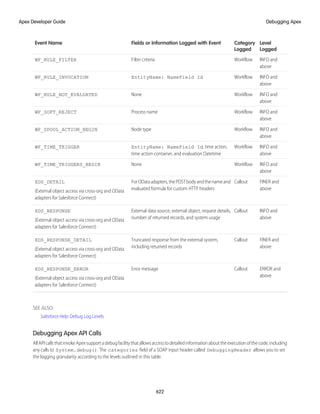
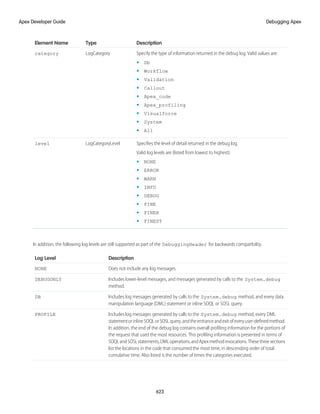
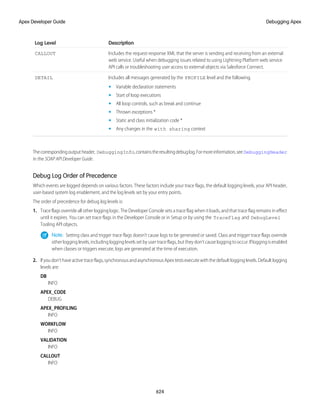
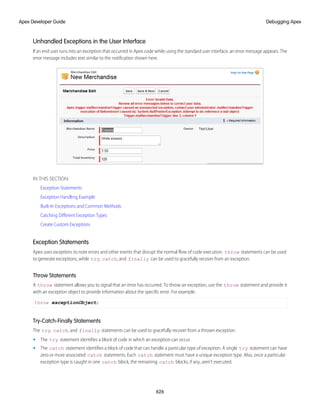

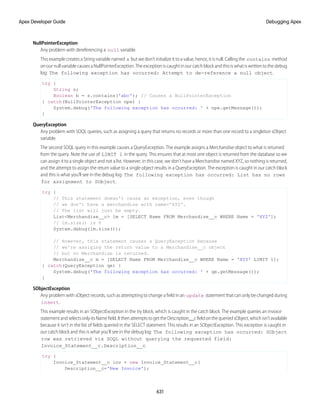

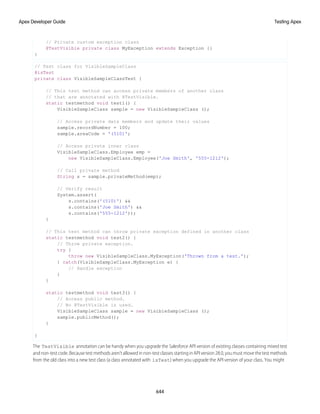
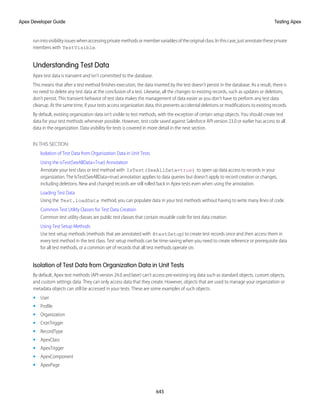
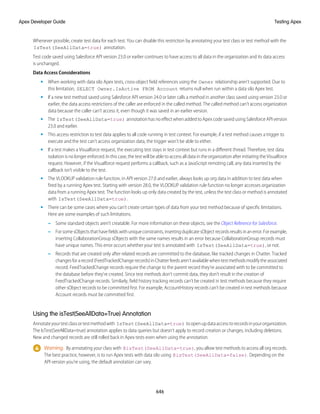
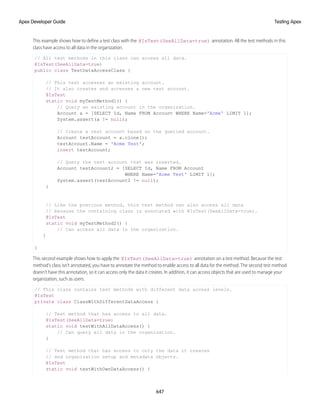
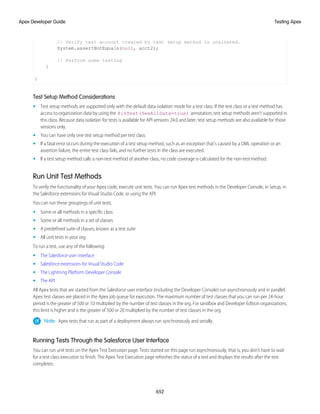
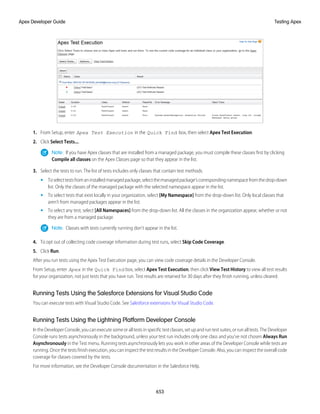
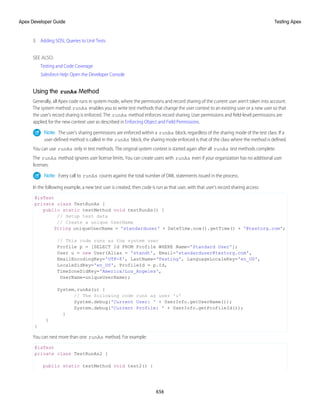
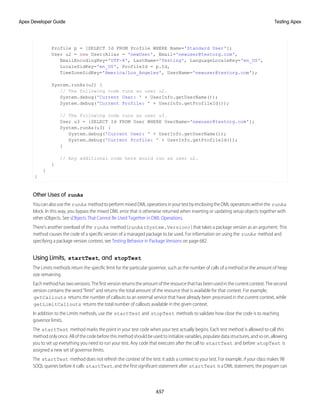
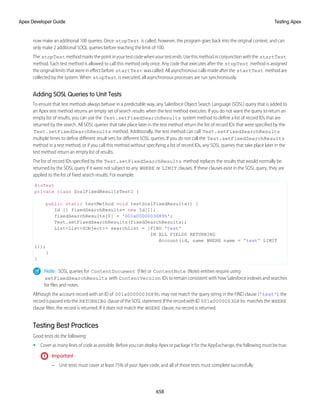

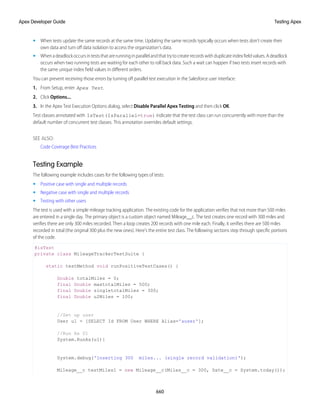
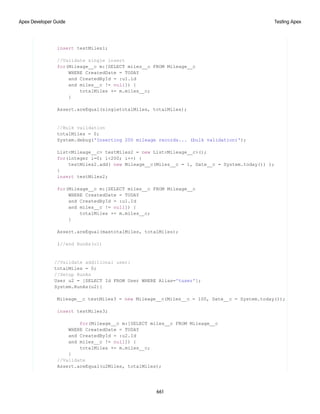
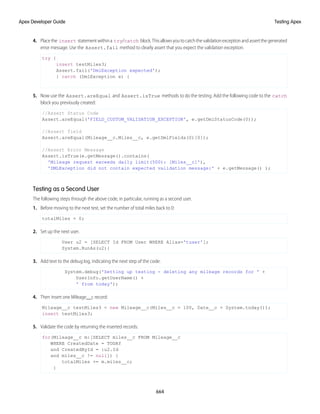
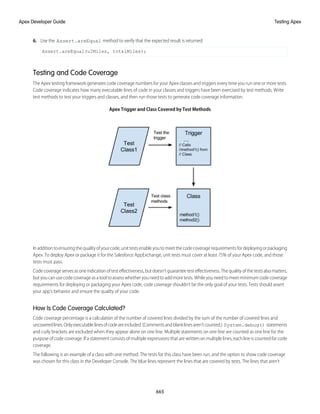
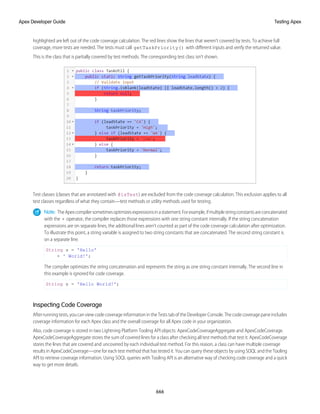
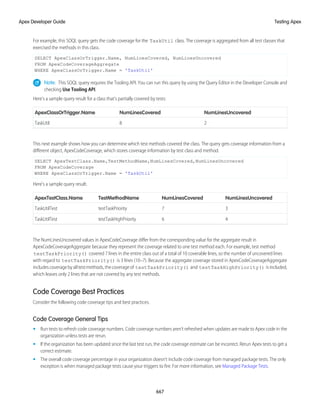
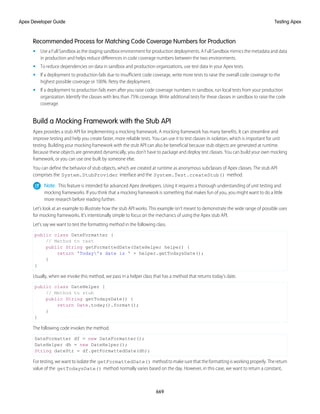


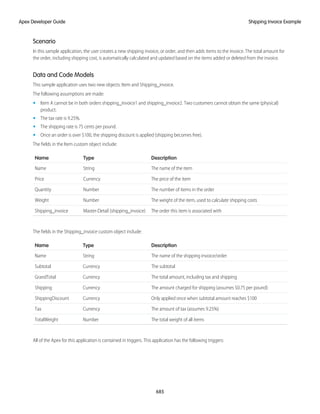
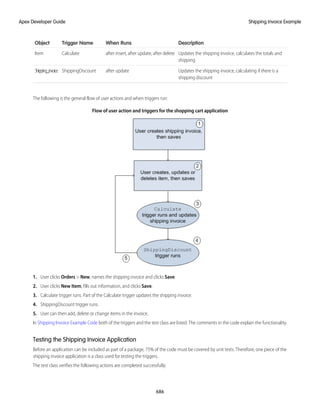

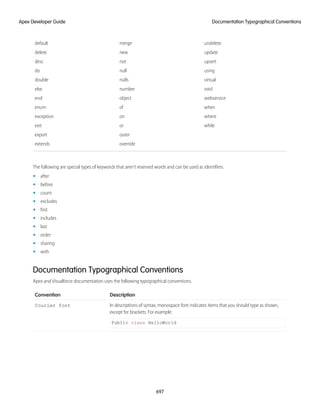
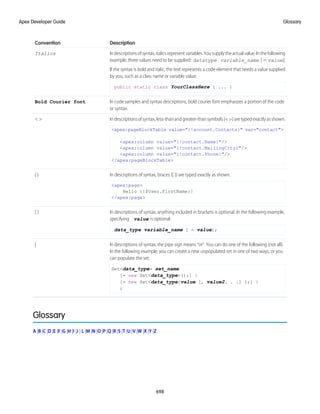


![Polymer [ बहुलक ] Chemistry Notes PDF - Irfanullah Mehar - JJ Sir Chemistry.pdf](https://cdn.slidesharecdn.com/ss_thumbnails/polymerchemistrynotespdf-irfanullahmehar-jjsirchemistry-260210172118-3f9b37f7-thumbnail.jpg?width=640&height=640&fit=bounds)
